

Haier Mwm12001scgss Owner's Manual

1.2 CU. FT. / 1000 WATT
MICROWAVE OVEN
CONVECTION, GRILL, AND SENSOR COOKING
HORNO MICROONDAS
DE 1,2 PIES CÚBICOS/1000 VATIOS
COCCIÓN CON CONVECCIÓN, GRILL Y SENSOR
FOUR A MICRO-ONDES
1,2 PI (34 L) 1000 WATTS
CONVECTION, GRILL ET CUISSON AVEC SENSEUR
User Manual
Model # MWM12001SCGSS
Manual del Usuario
Para Modelo de # MWM12001SCGSS
Guide de l’Utilisateur
Modéle# MWM12001SCGSS
Quality ■ Innovation ■ Style

English
UNPACKING YOUR MICROWAVE
1. Inspect and remove all packing materials. This includes the foam and any
adhesive tape both inside and outside of the unit.
2. Inspect and remove any remains of packing, tape, or printed materials before
powering on your Haier appliance.
DANGER
Risk of child entrapment.
Before you throw away your old appliances,
take off the door so that children may not
easily get trapped inside.
PRODUCT REGISTRATION
Keep for your records to obtain
Warranty Service
Thank you for using our Haier product. This
easy-to-use manual will guide you in getting
the best use out of your appliance.
Remember to record the model and serial
number. They are on a label in
back of the appliance.
Staple your receipt to your manual.
You will need it to obtain warranty service.
Please register online at www.prodregister.com/Haier
Please read this manual carefully before using.
Retain it for your future reference.
1
__________________________
Model Number
__________________________
Microwave Serial number
__________________________
Date of purchase

English
PRECAUTIONS TO AVOID POSSIBLE EXPOSURE
TO EXCESSIVE MICROWAVE ENERGY
(a) Do not attempt to operate this oven with the door open since open-door
operation can result in harmful exposure to microwave energy. It is important
not to defeat or tamper with the safety interlocks.
(b) Do not place any object between the oven front face and the door or allow
soil or cleaner residue to accumulate on sealing surfaces.
(c) Do not operate the oven if it is damaged. It is particularly important that the
oven door closes properly and that there is no damage to the:
1. Door (bent)
2. Hinges and latches (broken or loosened)
3. Door seals and sealing surfaces
(d) The oven should not be adjusted or repaired by anyone except properly
qualified service personnel.
Addendum
• If the apparatus is not maintained in a good state of cleanliness, its surface
could be degraded and affect the lifespan of the apparatus, leading to a
dangerous situation.
Before you call for service
If the oven fails to operate:
a) Ensure that the oven is plugged in securely. If it is not, remove the plug from
the outlet, wait 10 seconds and plug it in again securely.
b) Check for a blown circuit fuse or a tripped main circuit breaker. If these seem
to be operating properly, test the outlet with another appliance.
c) Ensure that the control panel is programmed correctly and the timer is set.
d) Ensure that the door is securely closed, engaging the door safety lock system.
Otherwise, the microwave energy will not flow into the oven.
IF NONE OF THE ABOVE RECTIFIES THE SITUATION, THEN CONTACT
A QUALIFIED TECHNICIAN. DO NOT TRY TO ADJUST OR REPAIR THE
MICROWAVE OVEN YOURSELF.
2

English
MICROWAVE TABLE OF CONTENTS
PAGE
PRECAUTIONS TO AVOID POSSIBLE EXPOSURE .............................
SPECIFICATIONS ...........................................................................3
2
IMPORTANT SAFETY INSTRUCTIONS ..............................................
GROUNDING INSTRUCTION ..........................................................
UTENSILS ......................................................................................7
COOKING TECHNIQUES ................................................................
PARTS & ACCESSORIES .................................................................
INSTALLATION ............................................................................10
CONTROL PANEL ........................................................................
OPERATION...........................................................................11-24
CLEANING AND CARE .................................................................
TROUBLESHOOTING ...................................................................26
LIMITED WARRANTY ...................................................................
11
25
27
SPECIFICATIONS
Model: MWM12001SCGSS
Voltage: 120V ~ 60Hz
Power Imput: 1500W
Output Power (Microwave): 1000W
Input Power (Grill): 1100W
Output Power (Convection): 1500W
Oven Capacity: 1.2 Cubic Feet
Turntable Diameter: 12.4 Inches
External Dimensions (WxHxD): 20.5 x 20.1 x 12.4 Inches
Net Weight: 41.4 lbs.
Warning: Handling the cord on this microwave, or cords
associated with accessories sold with this product, will
expose you to lead. Lead is a substance known to the
state of California to cause cancer and birth defects or
other reproductive harm. Wash hands after handling.
4
6
8
9
3

English
IMPORTANT SAFETY
INSTRUCTIONS
When using electrical appliances, basic safety precautions should be followed,
including the following:
WARNING: To reduce the risk of burns,
electric shock, fire, injury to
persons or exposure to
excessive microwave
energy:
1. Read all instructions before using the appliance.
2. Read and follow the specific "PRECAUTIONS TO AVOID POSSIBLE EXPOSURE TO
EXCESSIVE MICROWAVE ENERGY" on page 2.
3. This appliance must be grounded. Connect only to properly grounded outlet. See
"GROUNDING INSTRUCTIONS" on page 6.
4. Install or locate this appliance only in accordance with the provided installation
instructions on page 10.
5. Some products such as whole eggs and sealed containers -for example, closed
glass jars- are able to explode and should not be heated in this oven.
6. Use this appliance only for its intended use as described in this manual. Do not
use corrosive chemicals or vapors in this appliance. This type of oven is specifically
designed to heat, cook, or dry food. It is not designed for industrial or
laboratory use.
7. As with any appliance, close supervision is necessary when used by children.
8. To reduce the risk of fire in the oven cavity:
• Do not overcook food. Carefully attend appliance when paper, plastic, or
other combustible materials are placed inside the oven to facilitate cooking.
• Remove wire twist-ties from paper or plastic bags before placing bag
in oven.
• If materials inside the oven should ignite, keep oven door closed, turn oven
off, and disconnect the power cord or shut off power at the fuse or circuit
breaker panel.
• Do not use the cavity for storage purposes. Do not leave paper
products, cooking utensils or food in the cavity when not in use.
9. Liquids, such as water, coffee, or tea can be overheated beyond the boiling
point without appearing to be boiling due to surface tension of the liquid. Visible
bubbling or boiling when the container is removed from the microwave oven is not
always present. THIS COULD RESULT IN VERY HOT LIQUIDS SUDDENLY BOILING
OVER WHEN A SPOON OR OTHER UTENSIL IS INSERTED INTO THE LIQUID.
4

English
10. Do not deep fry food in the microwave. It is difficult to control the fat which could
cause a fire hazard.
11. Pierce foods with heavy skins such as potatoes, whole squash, apples and
chestnuts before cooking.
12. The contents of feeding bottles and baby jars should be stirred or shaken and the
temperature should be checked before serving in order to avoid burns.
13. Cooking utensils may become hot because of heat transferred from the heated
food. Potholders may be needed to handle the utensil.
14. Do not cover or block any openings on the appliance.
15. Do not store or use this appliance outdoors. Do not use this product near water,
for example, near a kitchen sink, in a wet basement, near a swimming pool, or
similar locations.
16. Do not operate this appliance if it has a damaged cord or a plug, if it is not
working properly or if it has been damaged or dropped.
17. Do not immerse cord or plug in water. Keep cord away from heated
surface. Do not let cord hang over edge of table or counter.
18. Use only thermometers that are specifically designed for use in
microwave ovens.
19. Be certain the glass tray and roller rings are in place when you operate the oven.
20. This appliance should be serviced only by qualified service personnel. Contact
nearest authorized service facility for examination, repair, or adjustment.
21. Oversized foods or oversized metal utensils should not be inserted in a
microwave/convection oven as they may create a fire or risk of electrical shock.
22. Do not clean with metal scouring pads. Pieces can burn off the pad and touch
electrical parts involving a risk of electric shock.
23. Do not use paper products when appliance is operated in the grill mode.
24. Do not cover racks or any other part of the oven with metal foil. This will cause
overheating of the oven.
25. When cleaning surfaces where the door and the base come together when the
door is closed, use only mild, nonabrasive soaps, or detergents applied with a
sponge or soft cloth.
SAVE THESE INSTRUCTIONS
HOUSEHOLD USE ONLY
5

SAFETY INSTRUCTIONS
WARNING
Do not, under any
circumstances,
cut, remove,
or bypass the
grounding prong.
WARNING:
WARNING:
Electrical Requirements
WIRING AND GROUNDING INSTRUCTIONS
This appliance must be plugged into at least a 15 AMP 110-115 VOLT
60 Hz GROUNDED OUTLET. This appliance must be grounded. It is
equipped with a 3-wire cord having a
grounding plug. The plug must be plugged
into an outlet that is properly installed and
grounded.
WARNING! Improper use of grounded
wire can result in the risk
of electric shock. Consult
a physician if necessary.
Do not attempt to defeat
this safety feature by
modifying the plug.
THE POWER CORD
1. A short power-supply cord is provided with this unit
to reduce the risks associated with a longer cord; for
example, tripping
or entanglement.
2. Avoid the use of an extension cord because it may
overheat and cause a risk of fire. If it is necessary to
use an extension cord, care must be exercised and these
guide lines should be followed:
a. The marked electrical voltage rating of the extension
cord must be be equal to or greater than the electrical
voltage rating of the appliance.
b. Use only 3-wire extension cords with a 3-blade
grounding plug.
c. Longer cords should be arranged so that they do not
drape over countertops or tabletops where they can be
a hazard, or where they can be pulled on by
children intentionally.
ATTEMPTING ANY MAINTENANCE OR CLEANING:
To minimize the possibility of electric shock, unplug this appliance from
the power supply or disconnect at the household distribution panel by
removing the fuse or switching off the circuit breaker before attempting
any maintenance or cleaning.
English
Avoid fire hazard or electric
shock. Do not use an extension cord or
an adapter plug. Do not remove any
prong from the power cord.
Grounding type
wall receptacle
Power supply
cord with 3-prong
grounding plug
6

WARNING
Note
English
UTENSILS
This section lists which utensils can be used in the microwave, which ones have
limited use for short periods, and which ones should not be used in the
microwave.
Recommended
• Microwave browning dish – Use to brown the exterior of small items such as
steaks, chops, or pancakes. Follow the directions provided with your
browning dish.
• Microwaveable plastic wrap – Use to retain steam. Leave a small opening for
some steam to escape and avoid placing it directly on the food.
• Paper towels and napkins – Use for short-term heating and covering; These
absorb excess moisture and prevent spattering. Do not use recycled paper
towels, which may contain metal and could ignite.
• Glass and glass-ceramic bowls and dishes – Use for heating or cooking.
• Paper plates and cups – Use for short-term heating at low temperatures. Do not
use recycled paper, which may contain metal and could ignite.
• Wax paper – Use as a cover to prevent spattering.
• Thermometers – Use only those labeled “Microwave Safe” and follow all
directions. Check the food in several places. Conventional thermometers may
be used on microwave food once the food has been removed from the oven.
Limited Use
• Aluminum foil – Use narrow strips of foil to prevent overcooking of exposed
areas. Using too much foil can damage your oven, so be careful.
• Ceramic, porcelain, and stoneware – Use these if they are labeled “Microwave
Safe.” If they are not labeled, test them to make sure they can be used safely.
• Plastic – Use only if labeled “Microwave Safe.” Other plastics can melt.
• Straw, wicker, and wood – Use only for short-term heating, such as warming
dinner rolls for a few seconds; baskets and bowls may be flammable.
7
Not Recommended
• Glass jars and bottles – Regular glass is too thin to be used in a microwave.
It can shatter and cause damage and injury.
• Paper bags – These are a fire hazard, except for popcorn bags that are
designed for microwave use.
• Styrofoam plates and cups – These can melt and leave an unhealthy
residue on food.
• Plastic storage and food containers – Containers such as margarine tubs
can melt in the microwave.
• Metal utensils – These can damage your oven. Remove all metal
before cooking.
Should you wish to check if a dish is safe for microwaving, place the
empty dish in the oven and microwave on HIGH for 30 seconds.
A dish which becomes very hot should not be used.

English
COOKING TECHNIQUES
Your microwave makes cooking easier than conventional cooking, provided you
keep these considerations in mind:
Stirring
Stir foods such as casseroles and vegetables while cooking to distribute heat
evenly. Food at the outside of the dish absorbs more energy and heats more
quickly, so stir from the outside to the center. The oven will turn off when you
open the door to stir your food.
Arrangement
Arrange unevenly shaped foods, such as chicken pieces or chops, with the
thicker, meatier parts toward the outside of the turntable where they receive more
microwave energy. To prevent overcooking, place delicate areas, such as
asparagus tips, toward the center of the turntable.
Shielding
Shield food with narrow strips of aluminum foil to prevent overcooking. Areas
that need shielding include poultry wing-tips, the ends of poultry legs, and
corners of square baking dishes. Use only small amounts of aluminum foil.
Larger amounts can damage your oven.
Turning
Turn foods over midway through cooking to expose all parts to microwave
energy. This is especially important with large foods such as roasts.
Standing
Foods cooked in the microwave build up internal heat and continue to cook for a
few minutes after heating stops. Let foods stand to complete cooking, especially
foods such as cakes and whole vegetables. Roasts need this time to complete
cooking in the center without overcooking the outer areas. All liquids, such as
soup or hot chocolate, should be shaken or stirred when cooking is complete.
Let liquids stand a moment before serving. When heating baby food, stir well at
removal and test the temperature before serving.
Adding moisture
Microwave energy is attracted to water molecules. Food that is uneven in
moisture content should be covered or allowed to stand so that the heat disperses
evenly. Add a small amount of water to dry food to help it cook.
8
English
SETTING UP YOUR OVEN
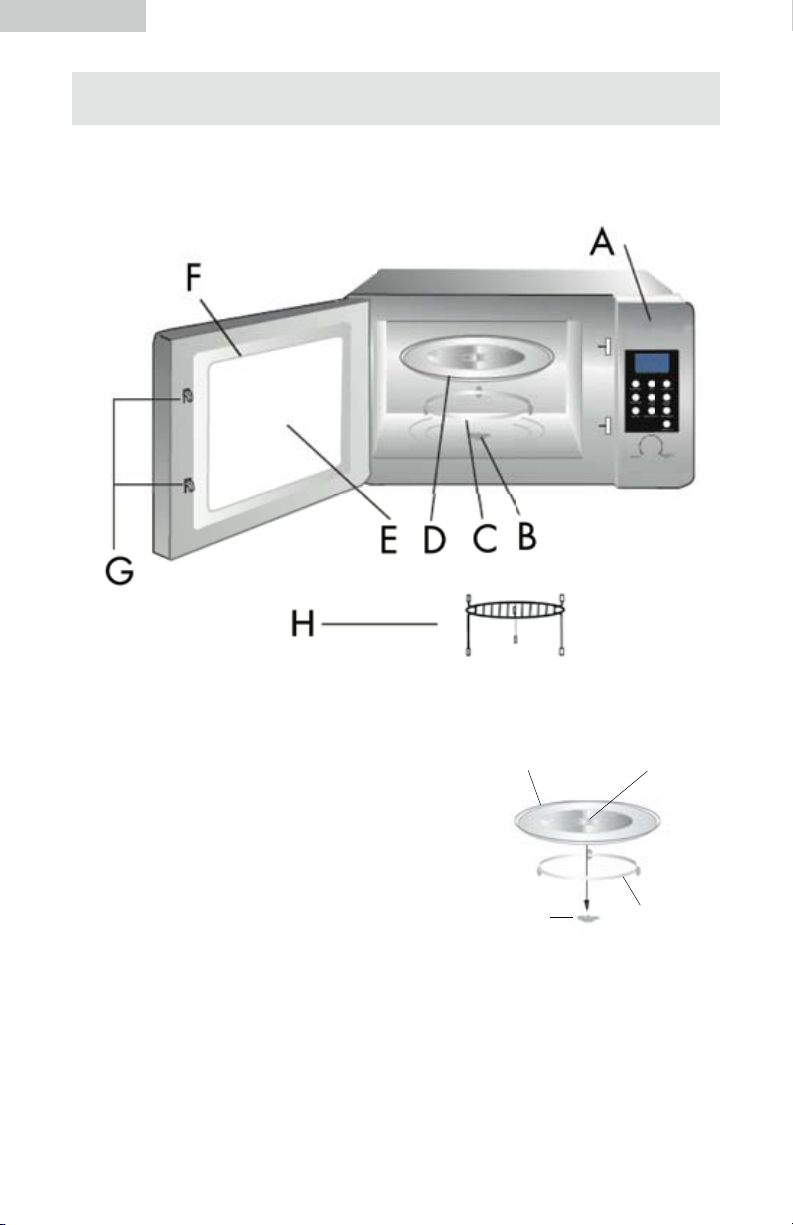
Parts and Accessories
Remove the oven and all materials from the carton and oven cavity.
Your oven comes with the following accessories:
Glass tray ............................1
Turntable ring assembly .........1
A. Control panel
B. Turntable shaft
C. Turntable ring assembly
D. Glass tray
E. Observation window
F. Door assembly
G. Safety interlock system
H. Grill Rack
Glass Tray
Hub (underside)
Turntable Installation
a. Never place the glass tray upside down.
The glass tray should never be restricted.
b. Both glass tray and turntable ring assembly
must always be used during cooking.
c. All food and containers of food are always
Turntable Shaft
Turntable
Ring
Assembly
placed on the glass tray for cooking.
d. If glass tray or turntable ring assembly cracks or breaks, contact your nearest
authorized service center.
9

English
WARNING
COUNTERTOP INSTALLATION
Remove all packing material and accessories. Examine the oven for any
damage, such as dents or broken door. Do not install if oven is damaged.
Cabinet: Remove any protective film found on the microwave oven cabinet
surface. Do not remove the light brown Mica cover that is attached to the oven
cavity to protect the magnetron.
Installation
1. Select a level surface that provides enough open space for the intake and/or
outlet vents. A minimum clearance of 3.0 inches (7.5cm) is required between
the oven and any adjacent walls. One side must be open.
(1) Leave a minimum clearance of 12 inches (30cm) above the oven.
(2) Do not remove the legs from the bottom of the oven.
(3) Blocking the intake and/or outlet openings can damage the oven.
(4) Place the oven as far away from radios/TV as possible. Operation of
microwave oven may cause interference to your radio/TV reception.
2. Plug your oven into a standard household outlet. Be sure the voltage and the
frequency is the same as the voltage and the frequency on the rating label.
WARNING: Do not install oven over a range cooktop or other heat-
producing appliance. If installed near or over a heat source, the
oven could be damaged and the warranty would be void.
10
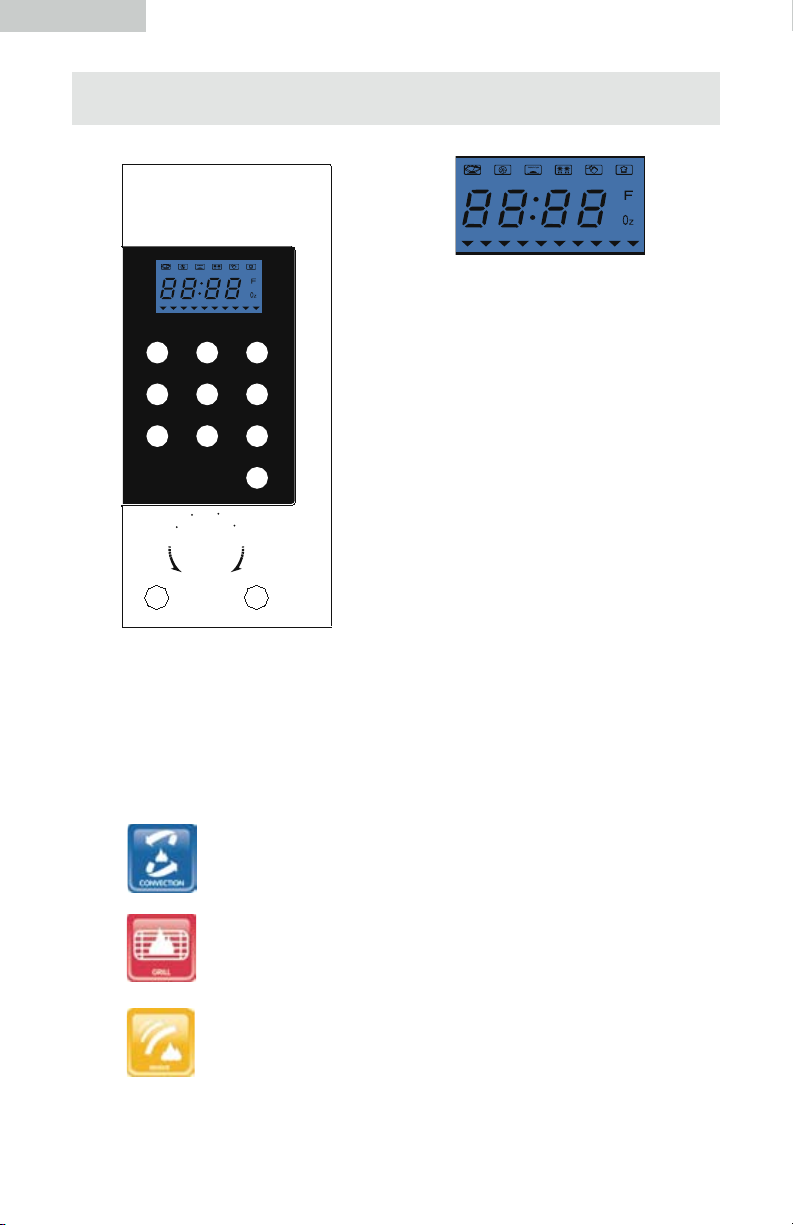
English
Stop/Clear
Start/+30Sec./
Select
M
e
n
u
T
i
m
e
W
e
i
g
h
t
T
e
m
p
P
o
w
e
r
SENSOR
COOK
POPCORN
POWER LEVEL GRILL CONVECTION
WEIGHT DEFROST
SENSOR
REHEAT
TIMER/CLOCK
COMBINATION
100F150F 250F275F 300F325F 350F375F 400F425F
TIME DEFROST
CONTROL PANEL
Control Panel
LCD Screen
1. Power Level LCD Display
2. Grill
3. Convection
4. Combination
5. Sensor Cook
6. Sensor Reheat
7. Popcorn
8. Weight Defrost
9. Time Defrost
10. Timer/Clock
11. Dial
12. Stop/Clear
13. Start/+30sec/Select
This microwave oven uses modern electronic controls to adjust
cooking parameters to meet your needs for better cooking results.
11
The Convection Cooking Feature cooks foods more
effi ciently by circulating heat throughout the unit with a fan,
resulting in a faster cooking time and moist, tender food.
The Grilling Feature uses direct heat from the upper heating
elements to cook and brown your food from above.
The temperature of the Grilling Feature is preset to 329°F.
The Sensor Cooking Feature uses a humidity sensor to
calculate and adjust the remaining cooking time needed for
your food, providing easier programming and
optimum results.

Note
Note
OPERATION
1. Clock Setting
When you first plug in your microwave, you must first set the time.
1. Plug in the microwave
Dial Start/+30 sec/Select Dial Start/+30 sec/Select
English
2. Turn the Dial to select
hours.
3. Press the Start/+30
sec/Select button.
4. Turn the Dial to select
minutes.
5. Press start/+30 sec/
select button
to finish.
To reset the clock:
Timer/Clock Dial Start/+30 sec/Select Dial Start/+30 sec/Select
1.Press the Timer/
Clock button twice.
2. Turn the Dial to
select hours.
3. Press the
Start/+30 sec/
Select button.
4. Turn the Dial to
select minutes.
1. You can use the oven without setting the clock
5. Press start/+30
sec/select button
to finish.
2. The oven uses a 12-Hour clock.
3. The clock will keep the time of day as long as the oven is plugged
in and electricity it provided.
2. Quick 30 Seconds
The Start/+30sec/Select button can be used to set the time for cooking or for
adding extra cooking time while food is already cooking.
Start/+30 sec/Select
The microwave’s power level is automatically set to 100%
1. To set the time for cooking, press start/+30sec/Select button and the oven
will begin cooking for 30 seconds.
2. To add extra cooking time during cooking, press the start/+30sec/Select
button during cooking this will increase cooking time by 30 seconds. The
maximum amount of time that can be added is 95 minutes.
3. Stop/Clear
Stop/Clear
1. To stop the microwave at any point during cooking, press the stop/
clear button.
12
Note
English
4. Variable Power Level
Variable power levels add flexibility to microwave cooking. Each power level
gives you microwave energy a certain percent of the time, for example, Power
Level 3 is microwave energy 30% of the time. Power Level 10 will cook faster but
food may need more frequent stirring, rotating or turning over. A lower setting
will cook more evenly and need less stirring or rotating of the food. Some foods
may have better flavor, texture or appearance if one of the lower settings is used.
Use a lower power level when cooking foods that have a tendency to boil over,
such as scalloped potatoes. Rest periods (when the microwave energy cycles off)
give time for the food to transfer heat to the inside of the food. An example of this
is with the defrost cycle (Power Level 3). If the microwave energy did not cycle
off, the outside of the food would cook before the inside was defrosted.
Power Level Dial Start/+30 sec/Select Dial Start/+30 sec/Select
1. Press the Power
Level button.
2. Turn the dial to
select the
power level.
3. Press the Start/
+30 sec/Select
button to enter.
4. Turn the Dial to
select the time.
Level 10 9 8 7 6 5 4 3 2 1
Power 100% 90% 80% 70% 60% 50% 40% 30% 20% 10%
Display PL10 PL9 PL8 PL7 PL6 PL5 PL4 PL3 PL2 PL1
5. Multi-stage Cooking
Two or three cooking stages can be set. If defrosting is one of the stages, it
should be programmed as the first stage. It will beep once when one stage
finishes and the next stage will begin.
Tw o Stages Cooking Example
Sensor menu and weight defrost cannot be set as one of the
multi-stages.
If you want to defrost the food for 5 minutes, then cook with 80% Microwave
power for 7 minutes. Follow these steps:
Stage 1: Defrost
Time Defrost Dial
1. Press Time Defrost,
“d-2” will display.
2. Turn the dial to select the
cooking time of 5 minutes.
5. Press start/+30
sec/select button
to start cooking.
Stage 2: Microwave
Power Level Dial Start/+30 sec/Select Dial Start/+30 sec/Select
3. Press the Power
level button.
“PL10” displays.
13
4. Turn the dial to
choose 80%
microwave
power, “PL8” will
display.
5. Press Start/+30
sec/Select
to input your
selected
power level.
6. Turn the dial
to adjust the
cooking time of
7 minutes.
7. Press Start/
+30Sec/Select to
start cooking.

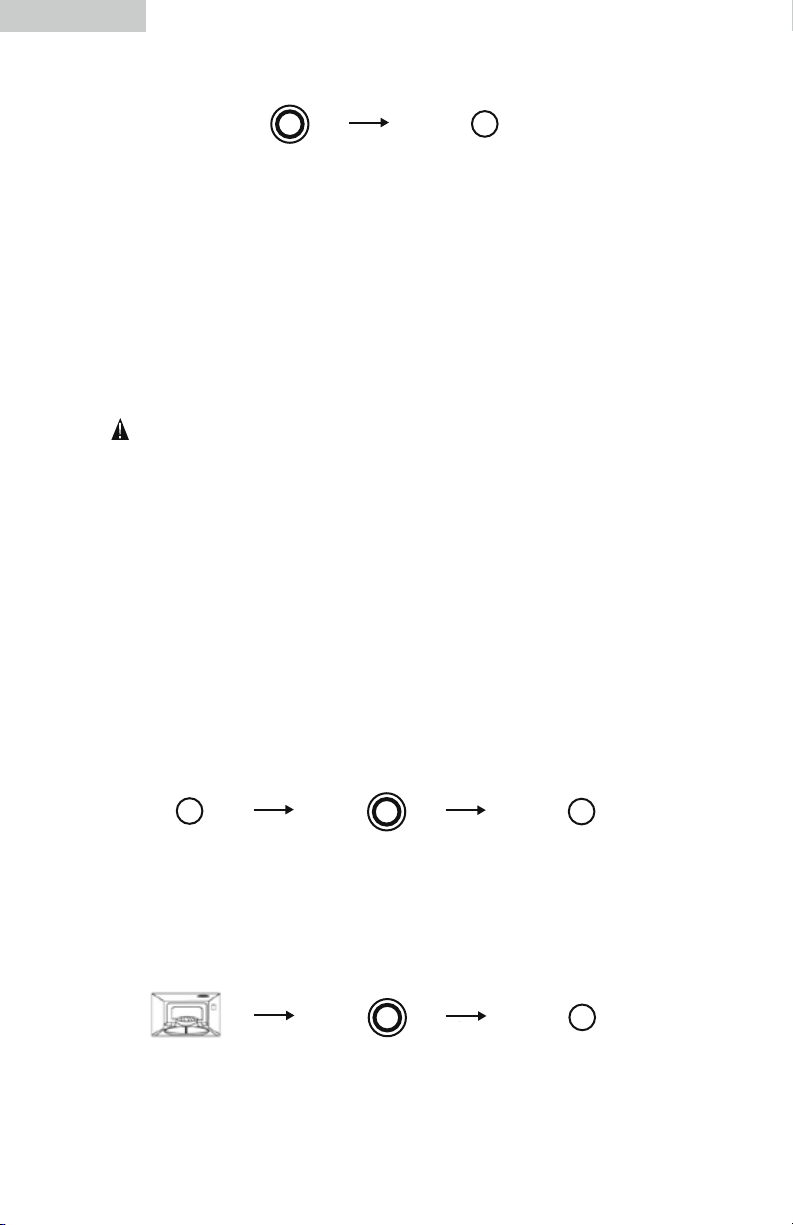
Th ree Stages Cooking Example
WARNING
If you want to defrost the food for 5 minutes, and cook with 100%
microwave power for 7 minutes, then cook with grill 3 minutes. Follow
these steps:
Stage 1: Defrost
Time Defrost Dial
English
1. Press Time Defrost,
“d-2” will display.
2. Turn the dial to select the
cooking time of 5 minutes.
Stage 2: Microwave
Power Level Start/+30sec/Select Dial
3. Press the Power Level
button, “PL10” will
display.
4. Press select/+30sec/
select to input your
selected power level.
5. Turn the dial to adjust the
cooking time to 7 minutes.
Stage 3: Grill
Grill Dial Start/+30sec/Select
6. Press Grill. 7. Turn the dial to adjust the
cooking time to 3 minutes.
8. Press start/+30sec/select
to start cooking.
6. Grill
The Grilling Feature uses direct heat from the upper heating elements to cook
and brown your food from above. The temperature of the Grilling Feature is
preset to 311°F.
Caution: When using the grilling features, remember that the oven, door
and dishes will be very hot.
• Cookware will become very hot, use oven mitts to handle
the cookware.
• In addition to the cookware provided, you can use non-metal
casserole dishes, pie plates and other heat-safe cookware. Place
them directly onto the metal rack.
• Be sure to select a cookware size that will rotate easily.
• Place the metal tray directly on the turntable support.
• Do not use cookware or coverings made of paper, plastic or foil
when using the grilling features.
• When grilling is fi nished, the turntable is very hot, do not rinse
the turntable when hot as this may cause breakage.
14

English
Note
WARNING
Grill Dial Start/+30sec/Select
1. Press the Grill button. 2. Turn the dial to adjust
When half the grill time passes, the oven should sound two
the cooking time, to a
maximum of 95 minutes.
3. Press the Start/+30sec/
Select button to
begin grilling.
beeps. This is normal, to alert you to turn the food. Remove
cookware from oven before turning food. To continue, close
the door and press Start/+30sec/Select. If the oven door is not
opened oven will continue grilling normally.
When grilling is finished use oven mitts to handle the food as it
is extremely hot. During and after use, do not let clothing, pot
holders, or other flammable materials come into contact with the
heating elements; these surfaces are hot enough to burn. Allow
sufficient cooling time.
7. Popcorn
Popcorn Start/+30Sec/Select
1. Press popcorn until the
weight of your popcorn
bag appears in the screen.
• Prepackaged microwave popcorn comes in 3.5 oz (99g) ,3.0oz (85g) and
1.75oz (50 g) bags.
• Place the bag in the oven according to the manufacturer's direction.
• Pop only one bag at a time.
• When popping multiple bags consecutively, the cooking times may vary
slightly. This does not affect the cooking results.
• After popping, open the bag carefully. Popcorn and steam are extremely hot.
• Do not reheat unpopped kernels or reuse bag.
• Use only the package weight, or results will be unsatisfactory and popcorn
may scorch.
• If popcorn is undercooked after the countdown, use Start/+30Sec/Select to
add additional cooking time.
2. Press start/+30sec/select
to begin cooking.
15

Note
English
8. Weight Defrost
Weight Defrost will automatically set the defrosting time and power level to give
even defrosting results.
Weight Defrost Dial Start/+30sec/Select
1. Press the Weight Defrost
button, the oven will display
“d-1.”
2. Turn the dial to select the
weight of the food (Between
4-100OZ), and the “OZ”
light will turn on.
3. Press the Start/+30sec/Select
button to begin defrosting.
Conversion Guide
Weight of food in Lbs Enter Weight in OZ
0.1 1-2
0.2 3
0.3 4-5
0.4 6-7
0.5 8
0.6 9-10
0.7 11
0.8 12-13
0.9 14-15
9. Time Defrost
Time Defrost Dial Start/+30sec/Select
1. Press the Time Defrost button,
the oven will display “d-2.”
Power level for Time Defrost is preset at 30%.
2. Turn the dial to select the
time, to a maxium of
95 minutes.
3. Press the Start/+30sec/Select
button to begin defrosting.
16

English
Defrosting Tips and Techniques
Food
Fish and Seafood
(up to 1.4 kg [3lbs])
Crabmeat
Fish Steaks 4-6
Fish Fillets 4-6 Turn Over /Rearrange/ Shield Ends
Sea Scallops 4-6 Break Apart/ Remove Defrosted Pieces
Whole Fish 4-6 Turn Over
Meat
Ground Meat
Roasts (1.1-1.8 kg
[2½-4lbs.])
Chops/Steak 6-8 Turn over/ Rearrange/ Shield Ends and
Ribs/T-bone 6-8 Turn over/ Rearrange/ Shield Ends and
Stew Meat 4-8 Break Apart/ Rearrange/ Remove
Liver (Thinly Sliced) 4-6 Drain Liquid/ Turn Over/
Bacon (Sliced) 4 Turn Over ----
Poultry
Chicken, whole (up to
1.4 kg [3 lbs])
Cutlets 4-6 Break Apart/ Turn Over/ Remove
Cornish hens 6-8 Turn over/ Shield 10 min.
Turkey Breast (2.3-2.7
kg [5-6 lbs])
Manual Defrost
Time at P3
(min/lb)
6 Break Apart/ Rearrange
4-5 Turn over/ Remove Defroster
4-8 Turn over/ Shield Ends and
4-6 Turn over/ Shield 20 min./
6 Turn over/ Shield 20 min.
During Defrost After Defrosting
Turn Over
Portion/ Shield Edges
Defrosted Surface
Defrosted Surface
Defrosted Surface
Defrosted Pieces
Separate Pieces
Defrosted Pieces
Stand Rinse
Time (Cold Water)
5 min. YES
10 min.
30 min.
in fridge
NO
5 min.
in fridge
YES
5 min.
in fridge
17

10. Sensor Cook
Note
Sensor Cooking is a technology designed to detect the increasing humidity
released by food during the cooking process. As food cooks in a microwave
oven, steam is produced. Once steam is detected by the sensor, the
microwave will automatically calculate and adjust the remaining cooking
time for the type and amount of food. Sensor Cooking simplifi es microwave
programming with excellent cooking results.
Sensor Cook Dial Start/+30sec/Select
English
1. Press the Sensor
Cook button.
2. Turn the dial to select the
desired food type.
3. Press the Start/+30sec/
Select button to
start cooking.
For best results, do not use one of the sensor cook food categories
twice in succession on the same food portion -- this may result in
severely overcooked or burnt food. If there is a need to continue
cooking, it is suggested to use the manual controls, instead of Pre-set
Sensor Cooking
• The oven door should not be opened while the sensor cook is on.
Opening the door may cause inaccurate cooking results. Once the
two beep signal is heard, the remaining cooking time immediately
appears in the screen and begins to count-down. At this time, the
oven door may be opened to stir, turn, or add food.
• Cover foods loosely, but completely, with plastic wrap or place
foods in a casserole dish with a proper fi tting lid.
• Foods less than 4oz. (110g) should be cooked by power and time,
not by sensor cook.
• All foods for sensor cooking should be at their normal
storage temperature.
• Before using sensor cooking, make sure the inside cavity of the oven
is dry.
• The oven will not cook food properly when the oven is still hot.Allow
time for the oven to cool down before proceeding to cook.
• Cover food with lid, or with vented plastic wrap. Never use tightly
sealed plastic containers, as they may prevent steam from escaping
and this will cause food to overcook.
After cooking/reheating: All food should have a specifi c Sensor Cooking
setting. See the “sensor cook chart” on the next page for specifi c food
cooking instructions.
18

English
Menu Weight Display Additional Instructions
Frozen Entrée
Fish
Fillets
Potato
Frozen Vegetables 6~16 Oz
Pasta 2~8 Oz
Fresh Vegetables
Frozen
Pizza
Ground
Meat
Sensor Cook Chart
8~32Oz
(225~900g) SC-1
4~16Oz
110~450g)
1~4 Unit
(6~8Oz
each)
(170~450g)
(56~225g)
4~16Oz
110~450g) SC-7
6~12 Oz
(225g each)
8~24 Oz
(225~680g) SC-8
SC-5. Arange in a single layer. Cover with lid or
SC-2
SC-6
SC-3 Place pasta with hot tap water in a microwave
SC-4 Follow manufacturer's directions
Follow manufacturer's instructions on
preparation. Be careful when removing the film
cover after cooking. Remove facing away from
you to avoid steam burns. If additional time is
needed, continue to cook manually.
vented plastic wrap.
Pierce each potato with a fork 6 times around
its surface. Place potatos around the edge of a
paper-towel-lined turntable, at least 1" (2.5cm)
apart. Do not cover.
Wash thoroughly, add 1 tbsp. of water per
1/2 cup of vegetables, and cover with a lid
or vented plastic wrap. Do not salt/butter
vegetables until after cooking.
casserole dish. Cover with lid or vented
plastic wrap..
All pieces should be the same size.Wash
thoroughly, add 1 tbsp. of water per 1/2 cup
of vegetables, and cover with a lid or vented
plastic wrap. Do not salt/butter vegetables until
after cooking.
for preparation.
Break apart in glass bowl or colander. Cover
with lid or vented plastic wrap. Juices should be
clean when done. Drain.
11. Sensor Reheat Feature
The sensor reheat feature allows you to reheat food without setting the
oven manually.
Sensor Reheat Start/+30sec/Select
1. Press the Sensor
Reheat button. Then
place your food in the
microwave. SA-1 will
be displayed.
Two beeps will signal when the sensor detects the steam. The time will count
down, and display the remaining cooking time in the display window. When
the cooking has finished, 5 beeps will signal and the oven will turn back to
the waiting state.
19
2. Press the Start/+30sec/
Select button to
begin reheating.

Note
English
Avoid the following foods while sensor heating:
1. Bread and other dry foods, such as biscuit or cake.
2. Beverages and frozen foods.
• The oven cannot cook automatically when the temperature of the
oven is too high.
• The reheated food can be covered with a lid. But ensure the lid has
ventilation in order to release steam. Sealed containers and utensils
should never be used.
12. Convection
Convection Cooking is a technology used to cook foods more efficiently.
Convection cooking uses a special heating element and fan to raise the
temperature of the air inside the microwave oven, circulating the uniform
heated air throughout the oven. The air moves over and around the food,
producing golden brown exteriors with rich, moist interiors. Most foods will
cook faster and better with Convection Cooking than conventional
cooking methods.
Convection time cook with preheat
Convection Dial Start/+30sec/Select
1. Press the Convection
button, “100F” will
flash.
2. Turn the dial to enter
the desired temperature
between 100ºF (38ºC)
to 425ºF(218ºC).
3. Press the Start/+30sec/
Select button twice to
begin preheating.
4. When preheating is complete, two beeps will signal. If you do not open the oven within 5
minutes, the oven will turn off automatically.
5. Open the oven door,
and carefully place the
food inside. Close the
oven door.
6. Turn the dial to enter the
Dial Start/+30sec/Select
desired cooking time,
up to a maximum of 95
minutes.
7. Press the Start/+30sec/
Select button to
begin cooking.
Convection without preheat
Convection Dial Start/+30sec/Select
1. Press the Convection
button, “100F” will
flash.
2. Turn the dial to enter
the desired temperature
between 100ºF (38ºC)
to 425ºF(218ºC).
3. Press the Start/+30sec/
Select button to
enter temperature.
20
English
WARNING
Dial Start/+30sec/Select
4. Turn the dial to enter the
desiredcooking time,
up to a maximum of 95
minutes.
5. Press the Start/+30sec/
Select button to
begin cooking.
13. Combination Cooking
Combination cooking offers the best features of microwave energy and
convection cooking. Microwaves cook food fast and convection circulation
of heated air browns foods beautifully. Any oven temperature from 100°F
(38°C) to 375°F (190°C) may be set. The microwave oven power level is
preset at 30% power.
When using the combination feature, remember that the oven, door and
dishes will be very hot.
• Cookware will become hot. Oven mitts will be needed to handle
the cookware.
• Place food or oven-safe cookware directly on the black metal tray
when cooking.
• Make sure food is cooked all the way through before browning.
• In addition to the cookware provided you can use non-metal casserole
dishes, pie plates and other heat-safe cookware. Place them directly on
the black metal tray.
• Be sure to select a size that will rotate easily.
• Place the metal rack directly on the turntable support.
• Do not use cookware or coverings made of paper, plastic or foil when
using the combination feature.
Combination cook with preheat
Combination Dial Start/+30sec/Select
1. Press the Combination
button, “100F” will
flash.
4. When oven is preheated, two beeps will signal.
5. Open the oven door,
and carefully place the
food inside. Close the
oven door.
2. Turn the dial to enter
6. Turn the dial to enter the
21
the desired temperature
between 100ºF (38ºC)
to 375ºF(190ºC). Don't
enter cooking time yet.
Dial Start/+30sec/Select
desired cooking time,
up to a maximum of 95
minutes.
3. Press the Start/+30sec/
Select button twice to
begin preheating.
7. Press the Start/+30sec/
Select button to
begin cooking.
Note
Combinaion cook with without preheat
Convection Dial Start/+30sec/Select
English
1. Press the Combination
button, “100F”
will flash.
Dial Start/+30sec/Select
4. Turn the dial to enter the
desiredcooking time,
up to a maximum of 95
minutes.
Combination Instructions
2. Turn the dial to enter
the desired temperature
between 100ºF (38ºC)
to 375ºF(190ºC).Don't
enter cooking time yet.
5. Press the Start/+30sec/
Select button to
begin cooking.
3. Press the Start/+30sec/
Select button to
enter temperature.
Combination Temperature Microwave Power
100°F (38°C)
150°F (65°C)
250°F (121°C)
275°F (135°C)
300°F (148°C)
325°F (162°C)
350°F (176°C)
375°F (190°C)
30%
22

English
23
Cooking Guide Chart
1 = Best Method 2 = Alternate Method N/R = Not Recommended
Foods Microwave Combination-1
(Microwave + Convection
Appetizers
Dips and Spreads 1 N/R N/R
Pastry Snacks 2 1 2
Meat
Defrosting
Roasting 2 1 2
Defrosting 1 N/R N/R
Roasting 2 1 2
Defrosting 1 N/R N/R
Cooking 1 2 N/R
Casseroles 2 1 2
Scrambled, Omelettes 1 N/R 2
Quiche, Souffle 2 2 1
Quick 2 1 2
Yeast N/R 2 1
Muffins, Coffee Cake 2 1 2
Cakes, (layer and bundt) 2 1 2
Angel Food and Chiffon N/R N/R 1
Custard and Pudding 1 N/R N/R
Bar Cookies 2 1 2
Pies and Pastry N/R 2 1
Candy 1 N/R N/R
Beverages 1 N/R N/R
Sauces and Toppings 1 N/R N/R
Soups and Stews 1 2 N/R
Fruit 1 N/R N/R
Vegetables (fresh) 1 N/R N/R
Blanching vegetables 1 N/R N/R
Frozen Meals 1 2 2
1
Poultry
Fish and Seafood
Eggs and Cheese
Breads
Desserts
Other
N/R N/R
Convection

14. Timer
English
Timer Dial Start/+30sec/Select
1. PressTimer/ Clock
button once. The screen
will read 0:00.
2. Turn the dial to enter
the desired temperature
between 100ºF (38ºC)
to 375ºF(190ºC). Don't
enter cooking time yet.
3. Press the Start/+30sec/
Select button to start the
timer.
The microwave will beep five times when the timer is finished.
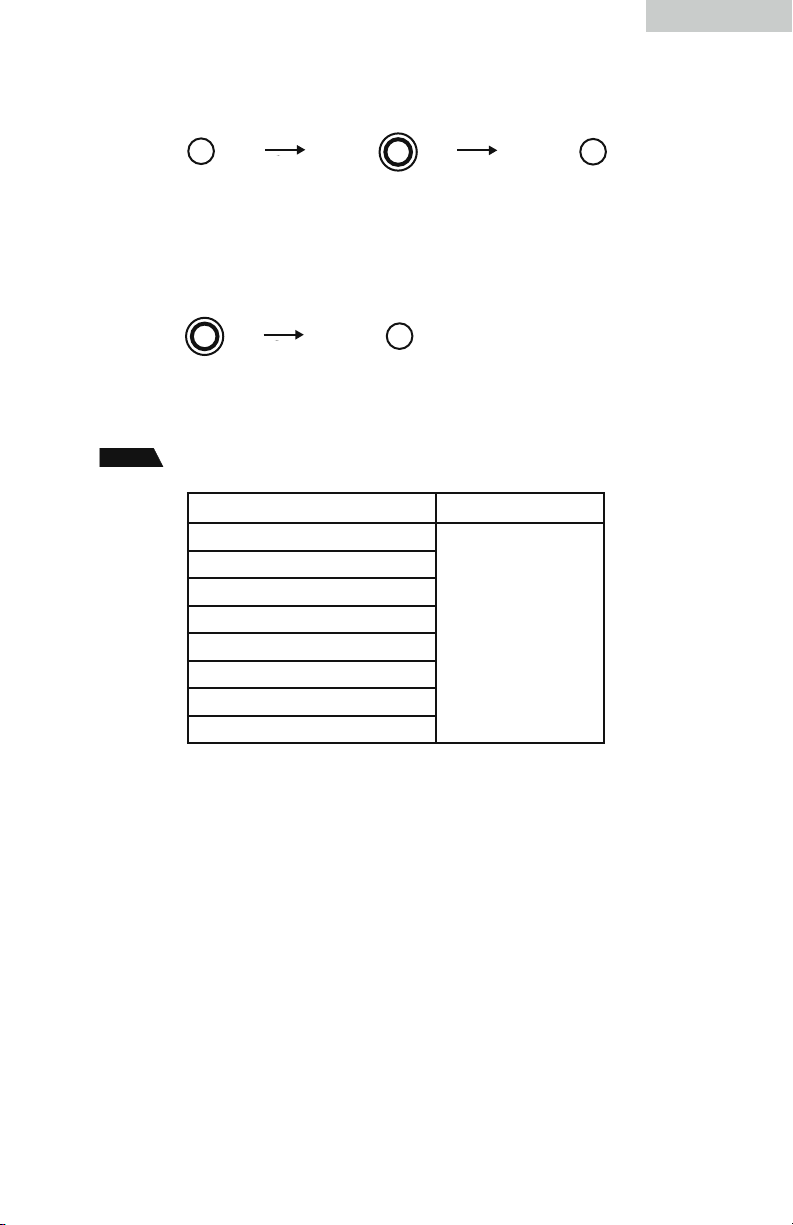
15. Child Lock
Stop/ Clear Stop/ Clear
1. Press Stop/ Clear and
hold for 3 seconds. A
long beep will sound
to signal that the lock
is now on. You will
see the locked icon
on the LCD screen.
2. To unlock, press and hold
the Stop/ Clear button for
3 seconds. A long beep
will sound. The microwave
is now unlocked.
24
 Loading...