

Page 1
0.7 CU. FT. / 700 WATT MICROWAVE OVEN
EXPRESS COOK
HORNO MICROONDAS DE 0.7 PIES CUBICOS
Y 700 VATIOS
FOUR MICRO-ONDES DE 0.7 PIED CUBE ET
700 WATTS
User Manual
Model # MWM0701TW
Manual del Usuario
Para Modelo de # MWM0701TW
Guide de l’Utilisateur
Modéle# MWM0701TW
Quality n Innovation n Style
Page 2

English
UNPACKING YOUR MICROWAVE
1. Inspect and remove all packing materials. This includes the foam and any
adhesive tape both inside and outside of the unit.
2. Inspect and remove any remains of packing, tape, or printed materials before
powering on your Haier appliance.
DANGER
Risk of child entrapment.
Before you throw away your old appliances,
take off the door so that children may not
easily get trapped inside.
PRODUCT REGISTRATION
Keep for your records to obtain
Warranty Service
Thank you for using our Haier product. This
easy-to-use manual will guide you in getting
the best use out of your appliance.
Remember to record the model and serial
number. They are on a label in
back of the appliance.
Staple your receipt to your manual.
You will need it to obtain warranty service.
Please register online at www.prodregister.com/Haier.
Please read this manual carefully before using.
Retain it for your future reference.
1
__________________________
Model number
__________________________
Microwave serial number
__________________________
Date of purchase
Page 3

English
ADVERTENCIA
ADVERTISSMENT
PRECAUTIONS TO AVOID POSSIBLE EXPOSURE
TO EXCESSIVE MICROWAVE ENERGY
(a) Do not attempt to operate this oven with the door open since open-door
operation can result in harmful exposure to microwave energy. It is important
not to defeat or tamper with the safety interlocks.
(b) Do not place any object between the oven front face and the door or allow
soil or cleaner residue to accumulate on sealing surfaces.
(c) Do not operate the oven if it is damaged. It is particularly important that the
oven door closes properly and that there is no damage to the:
1. Door (bent)
2. Hinges and latches (broken or loosened)
3. Door seals and sealing surfaces
(d) The oven should not be adjusted or repaired by anyone except properly
qualified service personnel.
Addendum
• If the apparatus is not maintained in a good state of cleanliness, its surface
could be degraded and affect the lifespan of the apparatus, leading to a
dangerous situation.
Before you call for service
If the oven fails to operate:
a) Ensure that the oven is plugged in securely. If it is not, remove the plug from
the outlet, wait 10 seconds and plug it in again securely.
b) Check for a blown circuit fuse or a tripped main circuit breaker. If these seem
to be operating properly, test the outlet with another appliance.
c) Ensure that the control panel is programmed correctly and the timer is set.
d) Ensure that the door is securely closed, engaging the door safety lock system.
Otherwise, the microwave energy will not flow into the oven.
IF NONE OF THE ABOVE RECTIFIES THE SITUATION, THEN CONTACT
A QUALIFIED TECHNICIAN. DO NOT TRY TO ADJUST OR REPAIR THE
MICROWAVE OVEN YOURSELF.
2
Page 4

English
MICROWAVE TABLE OF CONTENTS
PAGE
PRECAUTIONS TO AVOID POSSIBLE EXPOSURE TO EXCESSIVE MICROWAVE
ENERGY .......................................................................................2
SPECIFICATIONS ...........................................................................3
IMPORTANT SAFETY INSTRUCTIONS ..............................................4
GROUNDING INSTRUCTIONS ........................................................ 6
UTENSILS GUIDE ........................................................................... 7
COOKING TECHNIQUES.......... ...................................................... 8
SETTING UP YOUR OVEN ..............................................................9
COUNTERTOP INSTALLATION ...................................................... 10
CONTROL PANEL ........................................................................ 11
OPERATION INSTRUCTIONS ........................................................ 12
QUICK COOK SETTINGS .............................................................. 14
CLEANING AND CARE .................................................................19
TROUBLESHOOTING ...................................................................20
WARRANTY ................................................................................21
SPECIFICATIONS
Model: MWM0701TW
Voltage: 120V ~ 60Hz
Power Input: 1050W
Microwave Power: 700W
Oven Capacity: 0.7 Cu. Ft.
Turntable Diameter: ø9.6 Inches
External Dimensions (WxHxD): 17 × 13.2 x 10.2 inches
Net Weight: 22 lbs.
Warning: Handling the cord on this microwave, or cords
associated with accessories sold with this
product, will expose you to lead. Lead is a
substance known to the state of California to
cause cancer and birth defects or other
reproductive harm. Wash hands after handling.
3
Page 5

English
IMPORTANT SAFETY INSTRUCTIONS
When using electrical appliances, basic safety precautions should be followed,
including the following:
WARNING: To reduce the risk of burns,
electric shock, fire, injury to
persons or exposure to
excessive microwave
energy:
1. Read all instructions before using the appliance.
2. Read and follow the specific “PRECAUTIONS TO AVOID POSSIBLE EXPOSURE TO
EXCESSIVE MICROWAVE ENERGY” on page 2.
3. This appliance must be grounded. Connect only to properly grounded outlet. See
“GROUNDING INSTRUCTIONS” on page 6.
4. Install or locate this appliance only in accordance with the provided installation
instructions on page 10.
5. Some products such as whole eggs and sealed containers (for example, closed
glass jars) are able to explode and should not be heated in this oven.
6. Use this appliance only for its intended use as described in this manual. Do not
use corrosive chemicals or vapors in this appliance. This type of oven is specifically
designed to heat, cook, or dry food. It is not designed for industrial or laboratory
use.
7. As with any appliance, close supervision is necessary when used by children.
8. To reduce the risk of fire in the oven cavity:
• Do not overcook food. Carefully attend to appliance when paper, plastic, or
other combustible materials are placed inside the oven to facilitate cooking.
• Remove wire twist-ties from paper or plastic bags before placing bag in
oven.
• If materials inside the oven should ignite, keep oven door closed, turn oven
off, and disconnect the power cord or shut off power at the fuse or circuit
breaker panel.
• Do not use the cavity for storage purposes. Do not leave paper
products, cooking utensils or food in the cavity when not in use.
9. Liquids, such as water, coffee, or tea can be overheated beyond the boiling
point without appearing to be boiling due to surface tension of the liquid. Visible
bubbling or boiling when the container is removed from the microwave oven is not
always present. THIS COULD RESULT IN VERY HOT LIQUIDS SUDDENLY BOILING
OVER WHEN A SPOON OR OTHER UTENSIL IS INSERTED INTO THE LIQUID.
4
Page 6

English
10. Do not heat oil or fat for deep-frying. It is difficult to control the temperature of oil
in microwave oven.
11. Pierce foods with heavy skins such as potatoes, whole squash, apples and
chestnuts before cooking.
12. The contents of feeding bottles and baby jars should be stirred or shaken and the
temperature should be checked before serving in order to avoid burns.
13. Cooking utensils may become hot because of heat transferred from the heated
food. Potholders may be needed to handle the utensil.
14. Do not cover or block any openings on the appliance.
15. Do not store or use this appliance outdoors. Do not use this product near water,
for example, near a kitchen sink, in a wet basement, near a swimming pool, or
similar locations.
16. Do not operate this appliance if it has a damaged cord or a plug, if it is not
working properly or if it has been damaged or dropped.
17. Do not immerse cord or plug in water. Keep cord away from heated surface. Do
not let cord hang over edge of table or counter.
18. Use only thermometers that are specifically designed for use in microwave ovens.
19. When cleaning surfaces or door and oven that comes together on closing the
door, use only mild, nonabrasive soaps, or detergents applied with a sponge or
soft cloth.
20. Be certain the glass tray and roller rings are in place when you operate the oven.
21. This appliance should be serviced only by qualified service personnel. Contact
nearest authorized service facility for examination, repair, or adjustment.
SAVE THESE INSTRUCTIONS
HOUSEHOLD USE ONLY
5
Page 7
SAFETY INSTRUCTIONS
ADVERTENCIA
ADVERTISSMENT
Do not under any
circumstances, cut,
remove, or bypass the
grounding prong.
WARNING:
ADVERTENCIA:
AVERTISSEMENT:
WARNING:
ADVERTENCIA:
AVERTISSEMENT:
WARNING:
ADVERTENCIA:
AVERTISSEMENT:
Electrical Requirements
WIRING AND GROUNDING INSTRUCTIONS
This appliance must be plugged into at least a 15 AMP 120 VOLT 60 Hz
GROUNDED OUTLET. This appliance must be grounded. In the event of
an electrical short circuit, grounding reduces the risk of electric shock by
providing an escape wire for the electric current. This appliance is equipped
with a 3 wire cord having a grounding
wire with a grounding plug. The plug must
be plugged into an outlet that is properly
installed and grounded.
W ARNING! Improper use of grounded
wire can result in the risk of electric
shock. Consult a qualified electrician
or serviceman if the grounding
instructions are not completely
understood, or if doubt exists as to
whether the appliance is properly
grounded. Do not attempt to defeat
this safety feature by modifying
the plug.
THE POWER CORD
1. A short power-supply cord is provided with this unit to
reduce the risks associated with a longer cord; for example,
tripping or entanglement.
2. Avoid the use of an extension cord because it may overheat
and cause a risk of fire. If it is necessary to use an extension
cord, care must be exercised and these guide lines should
be followed:
a. The marked electrical voltage rating of the extension cord
must be equal to or greater than the electrical voltage
rating of the appliance.
b. Use only 3-wire extension cords with a 3-blade grounding
plug and a 3-slot receptacle that will accept the plug on the
appliance.
c. Longer cords should be arranged so that they do not drape
over countertops or tabletops where they can be a hazard,
or where they can be pulled on by
children intentionally.
ATTEMPTING ANY MAINTENANCE OR CLEANING:
To minimize the possibility of electric shock, unplug this appliance from
the power supply or disconnect at the household distribution panel by
removing the fuse or switching off the circuit breaker before attempting any
maintenance or cleaning.
English
Avoid fire hazard or electric
shock. Do not use an extension cord or
an adapter plug. Do not remove any
prong from the power cord.
Grounding type
wall receptacle
Power supply
cord with 3-prong
grounding plug
6
Page 8

ADVERTENCIA
ADVERTISSMENT
Note
English
UTENSILS
This section lists which utensils can be used in the microwave, which ones have
limited use for short periods, and which ones should not be used in the
microwave.
Recommended
• Microwave browning dish – Use to brown the exterior of small items such as
steaks, chops, or pancakes. Follow the directions provided with your
browning dish.
• Microwaveable plastic wrap – Use to retain steam. Leave a small opening for
some steam to escape and avoid placing it directly on the food.
• Paper towels and napkins – Use for short-term heating and covering. They
absorb excess moisture and prevent spattering. Do not use recycled paper
towels, which may contain metal and could ignite.
• Glass and glass-ceramic bowls and dishes – Use for heating or cooking.
• Paper plates and cups – Use for short-term heating at low temperatures. Do not
use recycled paper, which may contain metal and could ignite.
• Wax paper – Use as a cover to prevent spattering.
• Thermometers – Use only those labeled “Microwave Safe” and follow all
directions. Check the food in several places. Conventional thermometers may
be used on microwave food once the food has been removed from the oven.
Limited Use
• Aluminum foil – Use narrow strips of foil to prevent overcooking of exposed
areas. Using too much foil can damage your oven, so be careful.
• Ceramic, porcelain, and stoneware – Use these if they are labeled “Microwave
Safe.” If they are not labeled, test them to make sure they can be used safely.
• Plastic – Use only if labeled “Microwave Safe.” Other plastics can melt.
• Straw, wicker, and wood – Use only for short-term heating, such as warming
dinner rolls for a few seconds; baskets and bowls may be flammable.
Not Recommended
• Glass jars and bottles – Regular glass is too thin to be used in a microwave.
It can shatter and cause damage and injury.
• Paper bags – These are a fire hazard, except for popcorn bags that are
designed for microwave use.
• Styrofoam plates and cups – These can melt and leave an unhealthy
residue on food.
• Plastic storage and food containers – Containers such as margarine tubs
can melt in the microwave.
• Metal utensils – These can damage your oven. Remove all metal
before cooking.
Should you wish to check if a dish is safe for microwaving, place the
empty dish in the oven and microwave on HIGH for 30 seconds.
7
A dish that becomes very hot should not be used.
Page 9

English
COOKING TECHNIQUES
Your microwave makes cooking easier than conventional cooking, provided you
keep these considerations in mind:
Stirring
Stir foods such as casseroles and vegetables while cooking to distribute heat
evenly. Food at the outside of the dish absorbs more energy and heats more
quickly, so stir from the outside to the center. The oven will turn off when you
open the door to stir your food.
Arrangement
Arrange unevenly shaped foods, such as chicken pieces or chops, with the
thicker, meatier parts toward the outside of the turntable where they receive more
microwave energy. To prevent overcooking, place delicate areas, such as
asparagus tips, toward the center of the turntable.
Shielding
Shield food with narrow strips of aluminum foil to prevent overcooking. Areas
that need shielding include poultry wing-tips, the ends of poultry legs, and
corners of square baking dishes. Use only small amounts of aluminum foil.
Larger amounts can damage your oven.
Turning
Turn foods over midway through cooking to expose all parts to microwave
energy. This is especially important with large foods such as roasts.
Standing
Foods cooked in the microwave build up internal heat and continue to cook for a
few minutes after heating stops. Let foods stand to complete cooking, especially
foods such as cakes and whole vegetables. Roasts need this time to complete
cooking in the center without overcooking the outer areas. All liquids, such as
soup or hot chocolate, should be shaken or stirred when cooking is complete.
Let liquids stand a moment before serving. When heating baby food, stir well at
removal and test the temperature before serving.
Adding moisture
Microwave energy is attracted to water molecules. Food that is uneven in
moisture content should be covered or allowed to stand so that the heat disperses
evenly. Add a small amount of water to dry food to help it cook.
8
Page 10
Note
English
SETTING UP YOUR OVEN
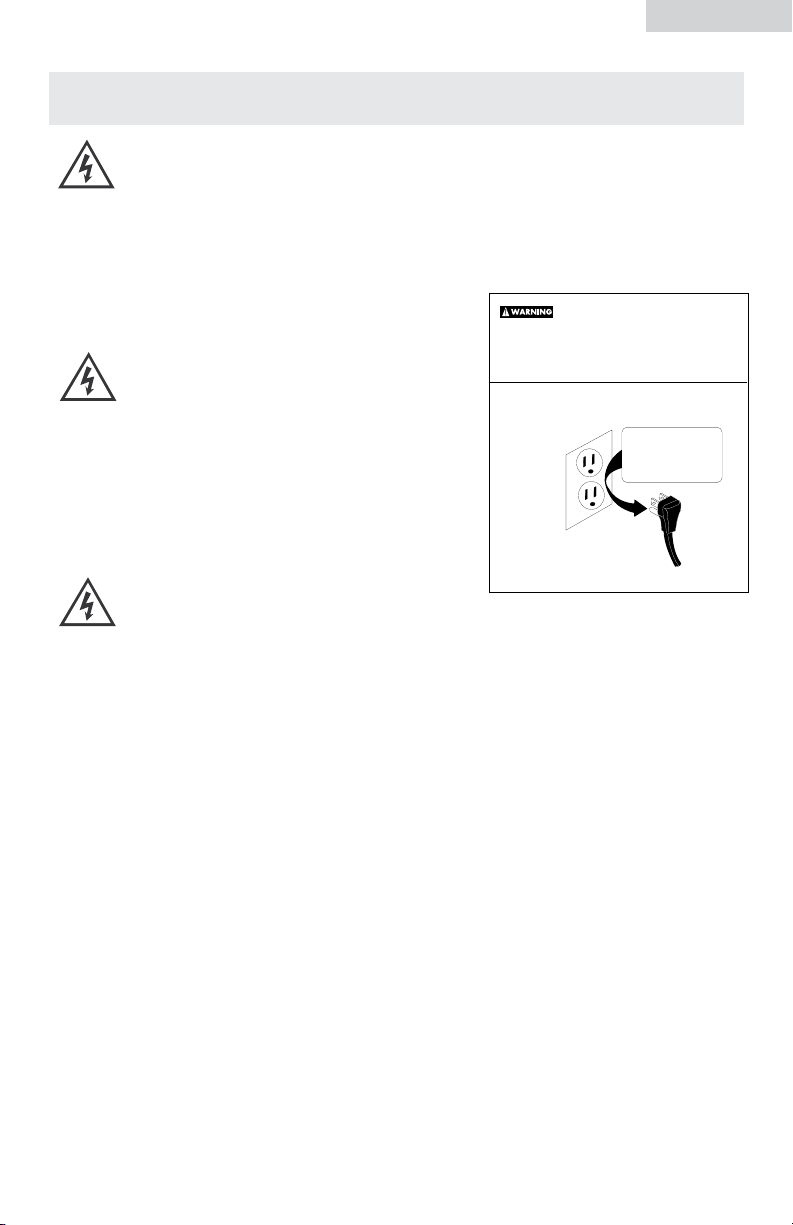
Parts and Accessories
Remove the oven and all materials from the carton and oven cavity.
Your oven comes with the following accessories:
Glass tray ............................1
Turntable ring assembly .........1
A. Control panel
B. Turntable shaft
C. Turntable ring assembly
D. Glass tray
E. Observation window
F. Door assembly
G. Safety interlock system
Turntable Installation
a. Never place the glass tray upside down.
The glass tray should never be restricted.
b. Both glass tray and turntable ring assembly
must always be used during cooking.
c. All food and containers of food are
always placed on the glass tray for cooking.
d. If glass tray or turntable ring assembly cracks
or breaks, contact your nearest authorized
service center.
Cabinet: Remove any protective film found on the microwave oven cabinet
surface. Do not remove the light brown Mica cover that is attached to the oven
cavity to protect the magnetron.
9
Remove all packing matertial and accessories. Examine the oven
for any damage, such as dents or broken door. Do not install if
oven is damaged.
Page 11
ADVERTENCIA
ADVERTISSMENT
English
COUNTERTOP INSTALLATION
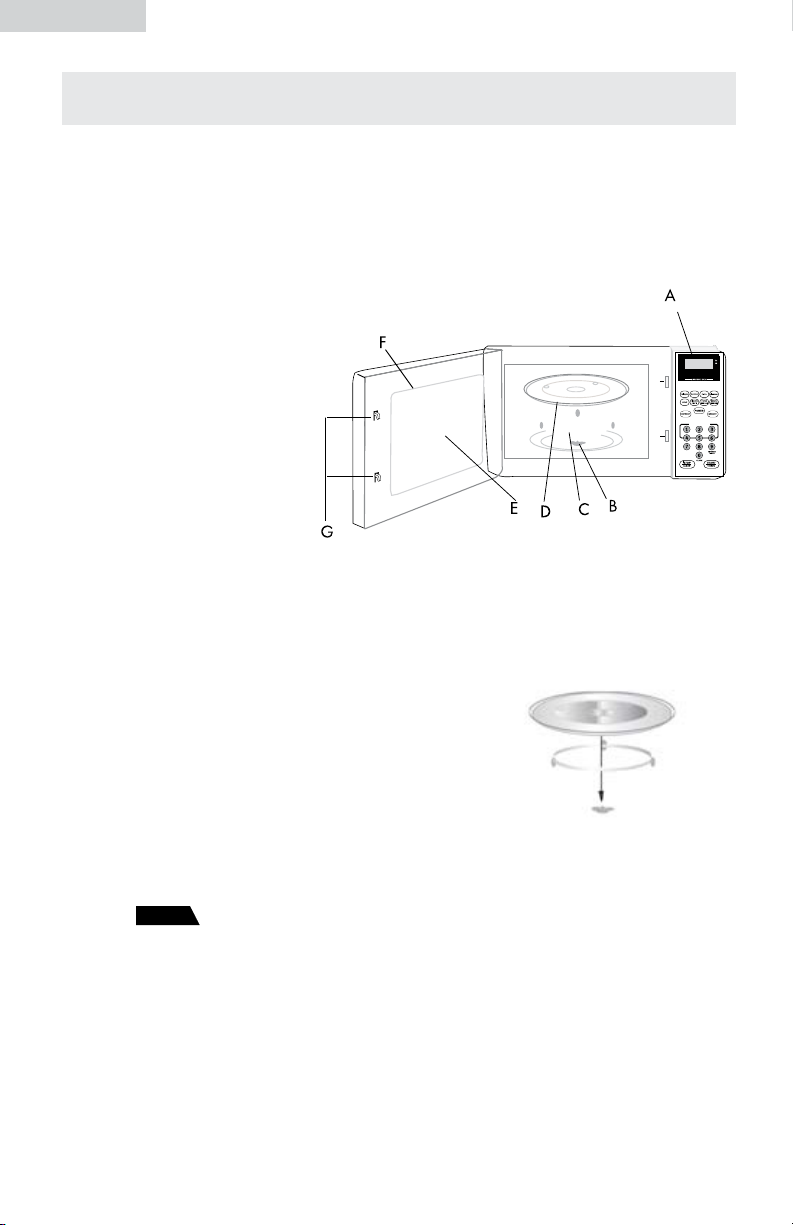
Installation
1. Select a level surface that provides enough open space for the intake and/or
outlet vents. A minimum clearance of 3.0 inches (7.5cm) is required between
the oven and any adjacent walls. One side must be open.
(1) Leave a minimum clearance of 12 inches (30cm) above the oven.
(2) Do not remove the legs from the bottom of the oven.
(3) Blocking the intake and/or outlet openings can damage the oven.
(4) Place the oven as far away from radios/TV as possible. Operation of
microwave oven may cause interference to your radio/TV reception.
2. Plug your oven into a standard household outlet. Be sure the voltage and the
frequency is the same as the voltage and the frequency on the rating label.
WARNING: Do not install oven over a range cooktop or other heat-
producing appliance. If installed near or over a heat source, the
oven could be damaged and the warranty would be void.
10
Page 12
English
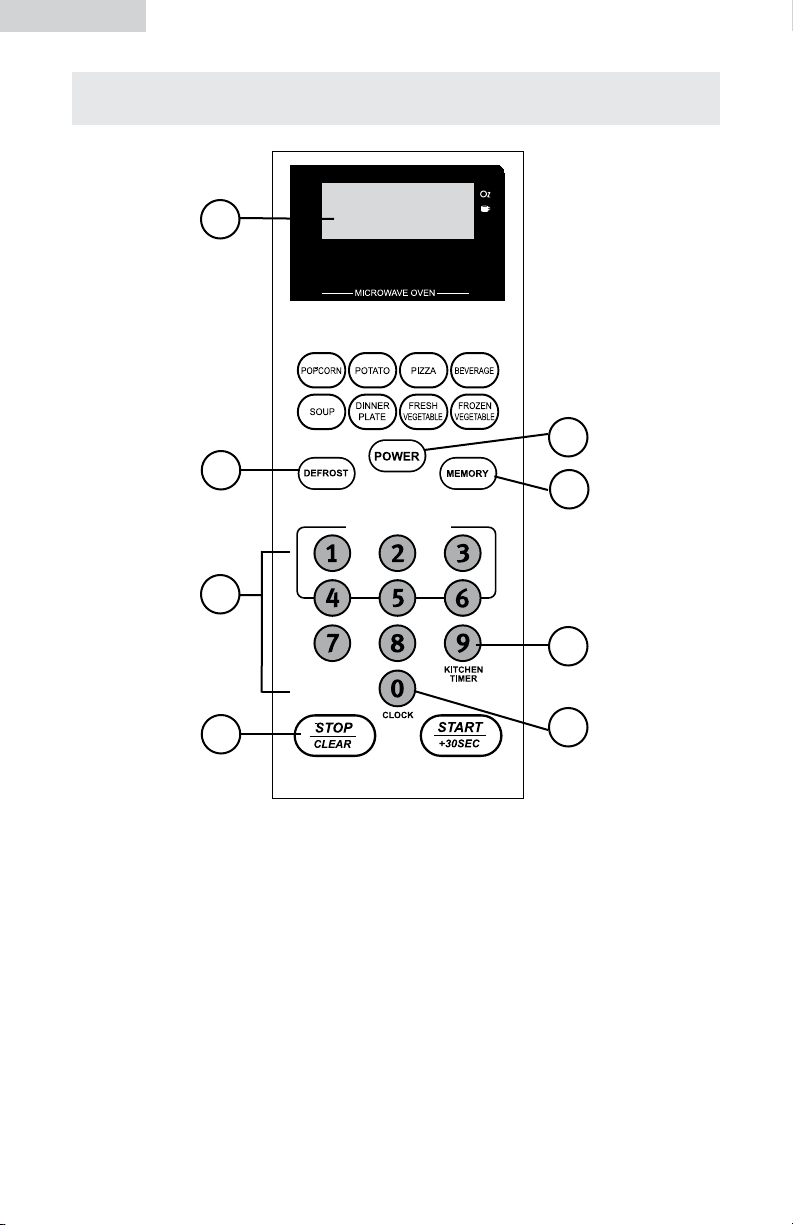
EXPRESS COOK
CONTROL PANEL
1
2
4
3
5
8
1. DISPLAY
Cooking time, power, indicators and
present time are displayed.
2. DEFROST BY WEIGHT OR TIME
Programmed defrosting based on
the weight or time of the foods to be
defrosted
3. POWER
Use to set power level. To check
power level during time cooking,
touch POWER pad.
4. NUMBER PADS (0-9)
Touch to set times or weights
11
6
7
5. MEMORY
Saves cooking procedure for next use.
6. TIMER
Timer functions independently,
even while a cooking program is in
process.
7. CLOCK
Use to set the time of day or recall the
time of day.
8. START/CLEAR
Clear all previous settings selected
before starting to cook. During
cooking: press once to stop oven,
twice to stop and clear all entities.
Page 13
English
Note
OPERATION INSTRUCTIONS
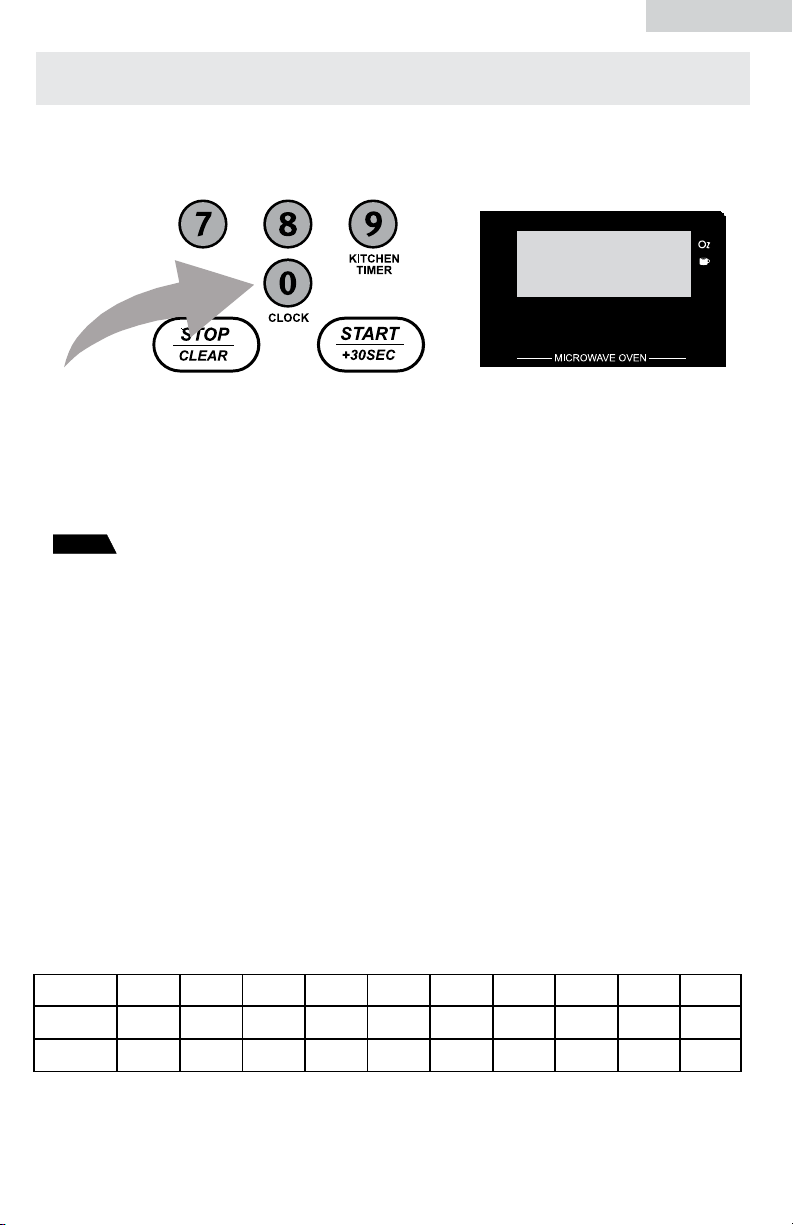
SIGNALS DURING OVEN SETTINGS
ONE SIGNAL: Oven accepts the entry.
TWO SIGNALS: Oven does not accept the entry, check and try again.
When the microwave oven is plugged into an outlet, the oven will display "0:00."
(1) Press "0/CLOCK" and the LED will display 00:00. The hour number will blink.
(2) Press the number keys to enter the correct time. Time input should be 1:00-12:59. For
example, if the time is 10:12, press "1,0,1,2."
(3) Press "START/+30SEC." to confirm the time and finish setting the clock. The time will
be on the display.
(1) If time input is beyond 1:00-12:59, the setting is invalid. You cannot confirm
and finish setting by pressing "START/+30SEC.."
(2) If you want to reset the clock, repeat steps 1 through 3. If you don't press
"START/+30SEC." after setting, the previously set time will be display after
one minute.
2. KITCHEN TIMER
(1) Press "9/KITCHEN TIMER." The LED will display 00:00. The first "0" will flash, and
":" and the other "0" will be lit.
(2) Press the number keys to enter the correct time. (The maximum cooking time is 99
minutes and 99 seconds.)
(3) Press "START/+30SEC." to confirm setting.
(4) When the set time is reached, the buzzer will ring 5 times and the oven will return to
the resting state. If the clock is set (12-hour system), the LED will display the
current time.
3. MICROWAVE COOK
Ten power levels are available.
Level
Power
Display
(1) Press "POWER" repeatedly to choose the microwave power you need. "PL10",
10
100%
PL10
"PL9","PL8"...."PL1" will be displayed in order.
9
90%
PL9
8
80%
PL8
7
70%
PL7
6
60%
PL6
5
50%
PL5
4
40%
PL4
3
30%
PL3
2
20%
PL2
1
10%
PL1
12
Page 14

English
Note
Note
Note
(2) Press the number keys to input the cooking time. The maximum cooking time is
99 minutes and 99 seconds.
(3) Press "START/+30SEC." to start cooking. The remained cooking time will
be displayed.
In the process of cooking, if the "STOP/CLEAR" button is pressed or if
there is no operation within 1 minute, the oven will go back to the former
setting automatically.
Example: To cook food with 50% microwave power for 15 minutes:
(1) Press "POWER" six times until "PL5" displays.
(2) Input the cooking time. Press "1, 5, 0, 0" to set the time.
(3) Press "START/+30SEC." to start cooking.
4. FAST STARTING
(1) In the waiting state, automatic cooking at the 100% power level can be started
easily. Select a cooking time from 1 to 6 minutes by pressing the number pad
1 to 6. Press "START/+30SEC." to increase the cooking time. The maximum
cooking time is 99 minutes and 99 seconds.
(2) In the waiting state, instant cooking at 100% power level with 30 seconds'
cooking time can be started by pressing "START/+30SEC.." Each time you
press that button, it will increase the cooking time by 30 seconds. The maximum
cooking time is 99 minutes and 99 seconds.
Each time you press "START/+30SEC.," the cooking time increases
by 30 seconds for microwave and Auto menu cooking. However, this
operation will not work with the "Weight Defrost" operation.
5. DEFROSTING BY WEIGHT FUNCTION
(1) Press "DEFROST" once to choose the defrost by weight function. "dEF1"
is displayed.
(2) Press the number pad to input weight to be defrosted. Weight range can be
between 4 and 100oz.
(3) If the weight input is not between 4 and 100oz, the input will be invalid. The
microwave will not work until valid numbers are input.
(4) Press "START/+30SEC." to start defrosting. The remained cooking time will
be displayed.
6. TIME DEFROST FUNCTION
(1) Press "DEFROST" twice to choose the defrost by time function. The screen will
display "dEF2."
(2) Press the number pad to input defrosting time. The allowable time range is
00:01~99:99.
(a) If the time input is not within 00:01 and 99:99, no "beep" will be
sound and the microwave will not work until valid numbers
are input.
(b) The default microwave power is power level 3. This cannot be
changed.
(3) Press "START/+30SEC." to start defrosting. The remaining cooking time will
be displayed.
13
Page 15
English
QUICK COOK SETTINGS
The QUICK COOK settings allow you to cook or reheat food automatically without
entering a power level or time
7. POPCORN
a) Press "POPCORN" repeatedly until the number you want appear in the display.
"1.75", " 3.0" and "3.5" will be displayed in order.
For example, if you press "POPCORN" once, "1.75" displays.
b) Press "START/+30 SEC." to begin cooking popcorn. The remaining time will
count down.
c) When cooking is finished, the buzzer will sound five times. The unit will then
return to waiting state. "0:00" will display. If the clock has been set, the current
time will be displayed.
Times (Press "Popcorn")
One
Two
Three
Weight (Oz)
1.75
3.0
3.5
Display
1.75
3.0
3.5
8. POTATO
a) Press "POTATO" repeatedly until the number you want appears in the display,
"1", "2" or "3" will be displayed in order.
"1" setting: 1 potato (approximately 3.0oz)
"2" setting: 2 potatoes (approximately 6.0oz)
"3" setting: 3 potatoes (approximately 9.0oz)
For example, press "POTATO" once: "1" displays.
b) Press "START/+30 SEC." to begin cooking. The remaining time will
count down.
c) When cooking is finished, the buzzer will sound five times. The unit will then
return to waiting state.
Times (Press "Potato")
One
Two
Three
Weight
1set
2sets
3sets
Display
1
2
3
14
Page 16
English
9. PIZZA
a) Press "PIZZA" repeatedly until the number you want appears in the display.
"1","2" or "3" will be displayed.
For example, press "PIZZA" twice. "2" appears in the LED.
b) Press "START/+30 SEC." to begin cooking. The remaining time will
count down.
c) When cooking is finished, the buzzer will sound five times. The unit will then
turn to the waiting state.
Times( Press "Pizza")
One
Two
Three
Weight
1 (about 3.0 oz)
2 (about 6.0 oz)
3 (about 9.0 oz)
Display
1
2
3
10. BEVERAGE
a) Press "BEVERAGE" repeatedly until the number you want appears
in the display. "1", "2", and "3" will be displayed in order. You can
reheat 1 to 3 cups of beverage each time (approximate 250 ML).
For example, press "BEVERAGE" twice. "2" appears in the display.
b) Press "START/+30 SEC." to cook.
c) The buzzer will sound five times when cooking is finished. Then the unit
will return to the waiting state.
Times( Press "BEVERAGE")
One
Two
Three
Weight
1 mug
2 mugs
3 mugs
Display
1
2
3
11. SOUP
a) Press "SOUP" repeatedly until the number you want appears in the display.
"4.0", "8.0", "12.0", "16.0" will be displayed in order. For example, press
"SOUP" twice. "8.0" appears in the display.
b) Press "START/+30 SEC." to cook.
c) The buzzer will sound five times when cooking is finished. Then the unit will
return to the waiting state.
15
Times( Press "SOUP ")
One
Two
Three
Four
Weight
4.0 oz
8.0 oz
12.0 oz
16.0 oz
Display
4.0
8.0
12.0
16.0
Page 17

12. DINNER PLATE
a) Press "DINNER PLATE" repeatedly until the number you want appears in
the display. "9.0"," 12.0 " and "18.0" will be displayed.
For example, press "DINNER PLATE" twice. "12.0" appears in the display.
b) Press "START/+30 SEC." to cook. The remaining time will begin
counting down.
c) The buzzer will sound five times when cooking is finished. The unit will then
return to the waiting state.
English
Times (Press "DINNER PLATE")
One
Two
Three
Weight
9.0 oz
12.0 oz
18.0 oz
Display
9.0
12.0
18.0
13. FRESH VEGETABLE
a) Press "FRESH VEGETABLE" repeatedly until the number you want appears in
the display. "4.0","8.0" and "16.0" will be displayed in order.
For example, press "FRESH VEGETABLE" twice. "8.0" appears in the display.
b) Press "START/+30 SEC." to begin cooking. The remaining time will begin to
count down.
c) The buzzer will sound five times when cooking is finished.
Times (Press "FRESH VEGETABLE")
One
Two
Three
Weight
4.0 oz
8.0 oz
16.0 oz
Display
4.0
8.0
16.0
14. FROZEN VEGETABLE
a) Press "FROZEN VEGETABLE" repeatedly until the number you want appears
in the display. "4.0", "8.0" and "16.0" will be displayed in order.
For example, press "FROZEN VEGETABLE" twice. "8.0" appears in
the display.
b) Press "START/+30 SEC." to begin cooking. The remaining time will begin to
count down.
c) The buzzer will sound five times when cooking is finished.
Times (Press "FROZEN VEGETABLE")
One
Two
Three
Weight
4.0 oz
8.0 oz
16.0 oz
Display
4.0
8.0
16.0
16
Page 18

Note
Note
English
15. MEMORY FUNCTION
(1) Press "MEMORY" to use the memory function. The LED will display 1,2,3.
(2) If the memorized procedure has been set, press "START/ +30 SEC." to use it.
If not, continue to set the procedure. Only one or two stages can be set.
(3) After finishing the setting, press "MEMORY" to save the procedure and
return to the waiting state. If you press "START/ +30 SEC.", it will save the
operation and then begin operating the setting.
Auto menu cooking cannot be set as memory procedure.
Example: To set the following procedure as "Memory 2," if you want to
cook the food with 80% microwave power for 3 minutes and
20 seconds, follow these steps:
1) In the waiting state, press "MEMORY" twice, until the
screen displays "2".
2) Press "POWER" three times until "PL8" displays.
3) Press number keys "3, 2, 0" in order to input the
cooking time.
4) Press "MEMORY" to save the setting. The buzzer sounds
once, then returns to the waiting state. If you press
"START/+30SEC." after the above step, the procedure
will be saved as the memory 2 and operated.
5) As long as the electricity is not cut off, the procedure
will be saved all the time. If electricity is interrupted, the
procedure needs to be reset.
6) If you want to run the saved procedure, in the waiting
state, press "MEMORY" twice. The screen displays "2".
Then press "START/+30SEC." to run.
16. MULTI-STAGE COOKING
This microwave oven can be set with 2 stages cooking at most. If one stage is
defrost by weight, it will placed as the first stage automatically. Only one of the 2
stages can be defrost.
Example: To defrost 20oz of beef first, and then cook with 80% microwave
power for 7 minutes:
1) Press "DEFROST" once to choose defrost by weight function.
"dEF1" displays.
2) Press "2, 0" in sequence to set the weight.
3) Press "POWER" three times to set 80% microwave power.
4) Press "7, 0, 0" in sequence to set the cooking time.
5) Press "START/ +30 SEC." to start cooking.
When the defrost procedure is finished, the buzzer will sound once, and the
second stage will begin.
17
(1) The auto menu can't be set as one of the 2 stages.
(2) Defrost by time can be set as the one of stages.
Page 19

English
17. INQUIRY FUNCTION
(1) In the cooking state, press "0/CLOCK". The LED will display the clock for three
seconds if the clock has been set.
(2) In the cooking state, press "POWER" to display microwave power level. After
three seconds, the oven will return to the previous state. In the multi-stage state,
this Inquiry way can be done In the same way as above.
18. COOKING END REMINDING FUNCTION
When the cooking is over, the buzzer will sound 5 beeps to alert user that the
cooking is finished.
19. OTHER SPECIFICATIONS
(1) In the standby state, if the clock has been set, the screen displays current time.
The " : " will flash; otherwise, when the clock Is not set, it shows " 0:00 ".
(2) In setting the function state, the LED displays the related setting.
(3) In the working or pause state, the LED displays remaining cooking time.
(4) During operation, if cooking is paused or the door is opened, "START/
+30SEC." must be pressed to continue cooking.
20. LOCK FUNCTION FOR CHILDREN
The safety lock prevents unsupervised operation by children.
To set lock: In the waiting state, press "STOP/CLEAR" for 3
seconds. There will be a long "beep" denoting that
the children-lock Is now on. The LED will display "
".
Turning off Child Lock: In the locked state, press "STOP/CLEAR" for 3
seconds. There will be a long "beep" denoting that
lock is turned off.
18
Page 20

English
CLEANING AND CARE
1. When cleaning surfaces of door and oven that come together on closing the
door, use only mild, nonabrasive soups, or detergents applied with a sponge
or soft cloth.
2. Turn off the oven and remove the power plug from the wall socket
before cleaning.
3. Keep the inside of the oven clean. When food splatters or spilled liquids
adhere to oven walls, wipe with a damp cloth. Mild detergent may be used
if the oven gets very dirty. Avoid the use of spray and other harsh cleaners
as they may stain, streak or dull the door surface.
4. The outside surfaces should be cleaned with a damp cloth. To prevent
damage to the operating parts inside the oven, water should not be allowed
to seep into the ventilation openings.
5. Wipe the window on both sides with a damp cloth to remove any spills or
spatters.
6. Do not allow the control panel to become wet. Clean with a soft, damp
cloth. When cleaning the control panel, leave oven door open to prevent
oven from accidentally turning on.
7. If steam accumulates inside or around the outside of the oven door, wipe
with a soft cloth. This may occur when the microwave oven is operated
under high humidity conditions, and this is normal.
8. It is occasionally necessary to remove the glass tray for cleaning. Wash the
tray in warm sudsy water or in a dishwasher.
9. The roller ring and oven floor should be cleaned regularly to avoid excessive
noise. Simply wipe the bottom surface of the oven with mild detergent. The
roller ring may be washed in mild sudsy water or dishwasher. When
removing the roller ring from cavity floor for cleaning, be sure to replace in
the proper position.
10. Remove odors from your oven by combining a cup of water with the juice
and skin of one lemon in a deep bowl, microwave for 5 minutes. Wipe
thoroughly and dry with a soft cloth.
11. When it becomes necessary to replace the oven light, please consult a
dealer to have it replaced.
19
Page 21

TROUBLESHOOTING
Check your problem by using the chart below and try the solutions for each
problem. If the microwave oven still does not work properly, contact Haier
customer service center or the nearest authorized service center.
English
TROUBLE POSSIBLE CAUSE
Oven will not start a. Electrical cord for oven is not
Arcing or
sparkling
Unevenly cooked
foods
Overcooked foods Cooking time, power level is not
Undercooked foods a. Materials to be avoided in
Improper
defrosting
plugged in.
b. Door is open.
c. Wrong operation is set.
a. Materials to be avoided in
microwave oven were used.
b. The oven is operated when empty.
c. Spilled food remains in the cavity.
a. Materials to be avoided in
microwave oven were used.
b. Food is not defrosted
completely.
c. Cooking time, power level is not
suitable.
d. Food is not turned or stirred.
suitable.
microwave oven were used.
b. Food is not defrosted completely.
c. Oven ventilation ports are restricted.
d. Cooking time, power level is not
suitable.
a. Materials to be avoided in
microwave oven were used.
b. Cooking time, power level is not
suitable.
c. Food is not turned or stirred.
POSSIBLE REMEDY
a. Plug into the outlet.
b. Close the door and try
again.
c. Check instructions.
a. Use microwave-safe
cookware only.
b. Do not operate with oven
empty.
c. Clean cavity with wet towel.
a. Use microwave-safe
cookware only.
b. Completely defrost food.
c. Use correct cooking time,
power level.
d. Turn or stir food.
Use correct cooking time and
power level.
a. Use microwave-safe
cookware only.
b. Completely defrost food.
c. Check to see that oven
ventilation ports are not
restricted.
d. Use correct cooking time
and power level.
a. Use microwave-safe
cookware only.
b. Use correct cooking time
and power level.
c. Turn or stir food.
20
Page 22

English
LIMITED WARRANTY
What is covered and for how long?
This warranty covers all defects in workmanship or
materials for a period of:
12 months for labor
12 months for parts
(Functional Parts Only)
10 years Magnetron Tube for Microwave
(part only)
The warranty commences on the date of item
purchase. Customer shall provide Haier with proof
of the date of purchase and the original receipt
along with; brand, model and serial number for
verification prior to any warranty service being
provided.
Carry-In Service is available for selected products
at the discretion of Haier America.
EXCEPTIONS: Commercial or Rental Use
warranty
90 days for labor 90 days for parts
No other warranty applies.
What is covered.
1. The mechanical and electrical parts of the
appliance which serve the functional purpose
of this appliance are covered for a period of
12 months or as stated above. This includes all
parts except finish, trim and glass.
2. The limited warranty does not cover any credit
or refund for any loss or injury caused by the
product or defects to the product including
but not limited to incidental or consequential
damages.
3. If the magnetron tube fails (for Microwave) due
to poor workmanship or material, the part will
be replaced.
What will be done?
1. Any mechanical or electrical part that proves
to be defective in normal usage during the
specified warranty period will be repaired or
replaced at Haier’s discretion.
ALL WARRANTY SERVICE MUST BE PROVIDED
BY ONLY OUR FACTORY SERVICE CENTERS,
OR BY AN AUTHORIZED HAIER CUSTOMER
TECHNICIAN.
If it is determined that repair is not
appropriate or replacement parts are unavailable
for repair, Haier will exchange the product with a
refurbished or new product the same or similar to
the original at its discretion.
2. There will be no charge to the purchaser for
functional replacement parts and labor on any
covered items during the initial12-month period
or as stated above.
3. THIS WARRANTY COVERS APPLIANCES
WITHIN THE CONTINENTAL UNITED STATES,
PUERTO RICO AND CANADA. IT DOES NOT
COVER THE FOLLOWING:
Damages from improper installation. Damages
incurred during shipping. Defects other than
manufacturing. Damage from misuse, abuse,
accident, alteration, lack of proper care and
maintenance or incorrect current or voltage or acts
of God. Damage from other than household use.
Damage from service by other than an authorized
dealer or service center. Decorative trims, glass
or replaceable light bulbs. Transportation and
shipping costs. Labor (after the initial 12 months).
Credit or Refund for products over 30 days past
date of purchase Food loss for food spoiled as a
direct result of mechanical failure of the product
or of any delay in providing service, repair,
replacement. This limited warranty doesn’t apply
to refurbished product or unit purchased as/like
new or second-hand. THIS LIMITED WARRANTY
IS GIVEN IN LIEU OF ALL OTHER WARRANTIES,
EXPRESSED OR INCLUDING THE WARRANTIES
OF MERCHANTABILITY AND FITNESS FOR A
PARTICULAR PURPOSE. The remedy provided in
this warranty is exclusive and is granted in lieu
of all other remedies. This warranty does not
cover incidental or consequential damages, so
the above limitations may not apply to you. Some
states do not allow limitations on how long an
implied warranty lasts, so the above limitations
may not apply to you. This warranty gives you
specific legal rights, and you may have other
rights, which vary from state to state.
Haier America,
New York, NY 10018
To have your product serviced, please contact Haier America Customer
Service Hotline 24 hours a day, 7 days a week. In the U.S.A.,
call 1-877-337-3639.
21
Page 23

Français
DÉBALLAGE DE VOTRE MICRO-ONDES
1. Retirez tous les matériaux d’emballage dont la mousse et les adhésifs à
l’intérieur et à l’extérieur de l’appareil.
2. Vérifiez et retirez tous les restes d’emballage, adhésif ou documentation
avant de mettre en marche votre appareil Haier.
DANGER
Risque de suffocation et de connement des enfants.
Avant de jeter vos vieux appareils électroménagers,
retirez la porte pour que les enfants ne puissent pas
grimper à l’intérieur facilement.
ENREGISTREMENT DU PRODUIT
À conserver pour pouvoir obtenir les
services de garantie
Merci d’avoir choisi ce produit Haier. Ce
guide facile à utiliser vous permettra d’utiliser
votre appareil au maximum de ses capacités.
N’oubliez pas de noter le modèle et le
numéro de série. Ils sont au dos de votre
appareil.
Agrafez votre reçu à votre mode d’emploi.
Vous en aurez besoin pour faire valoir votre garantie.
Merci d’effectuer l’enregistrement en ligne : www.prodregister.com/Haier
S’il vous plaît lire ce manuel soigneusement avant
utilisation. Maintenez-le pour votre future référence.
22
____________________________
Numéro du modèle
____________________________
Numéro de série du micro-ondes
____________________________
Date d’achat
Page 24

Français
ADVERTISSMENT
PRECAUTIONS A RESPECTER AFIN D’EVITER
UNE EXPOSITION EVENTUELLE A UNE ENERGIE
MICRO-ONDES EXCESSIVE
(a) N’utilisez pas ce four lorsque la porte est ouverte. Le faire fonctionner avec la
porte ouverte pourrait provoquer une exposition excessive à l’énergie microondes. Il est important de ne pas trifouiller ou jouer avec les verrouillages de
sécurité.
(b) Ne placez pas d’objet entre la face avant du four et la porte et ne laissez pas
de résidus s’accumuler et obstruer les orifices de sécurité.
(c) N’utilisez pas le four s’il est endommagé. Il est particulièrement important que
la porte du four se ferme bien et qu’il n’y ait pas de problème avec :
1. la porte (cabossée)
2. les charnières de porte et joints d’étanchéité (cassés ou lâches)
3. les joints de porte et orifices de sécurité
(d) Le four doit être réglé ou réparé uniquement par un technicien qualifié.
Addendum
• Si cet appareil n’est pas maintenu propre, ses surfaces peuvent se dégrader et
affecter la durée de vie de l’appareil et entraîner une situation dangereuse.
Avant d’appeler pour maintenance
Si le four ne fonctionne pas :
a) Assurez-vous que le four est correctement branché. Si ce n’est pas le cas,
retirez la fiche de la prise murale, attendez 10 secondes et réinsérez la fiche
dans la prise murale.
b) Vérifiez si un fusible a disjoncté ou s’il y a un problème avec le disjoncteur
principal. S’ils semblent fonctionner correctement, testez la prise murale avec
un autre appareil.
c) Assurez-vous que le tableau de commande est correctement programmé et la
minuterie réglée.
d) Assurez-vous que la porte est correctement fermée, engageant le système de
sécurité de la porte. Sinon, l’énergie micro-ondes ne circulera pas dans le
four.
SI AUCUNE DES OPTIONS CI-DESSUS NE RECTIFIE LA SITUATION,
CONTACTEZ ALORS UN TECHNICIEN AGRÉÉ. N’ESSAYEZ PAS D’AJUSTER OU
DE RÉPARER LE MICRO-ONDES VOUS-MÊME.
23
Page 25

Français
TABLE DES MATIÈRES DU MICRO-ONDES
PAGE
PRECAUTIONS A RESPECTER AFIN D’EVITER UNE EXPOSITION EVENTUELLE A
UNE ENERGIE MICRO-ONDES EXCESSIVE ..................................... 23
CARACTÉRISTIQUES TECHNIQUES ................................................24
CONSIGNES DE SÉCURITÉ IMPORTANTES ..................................... 25
INSTRUCTIONS DE MISE À LA TERRE ............................................27
GUIDE D’USTENSILES ..................................................................28
TECHNIQUES DES CUISSON.......... ...............................................29
INSTALLATION DE VOTRE FOUR À MICRO-ONDES .......................30
INSTALLATION COMPTOIR ..........................................................31
TABLEAU DE COMMANDE ...........................................................32
INSTRUCTIONS D’UTILISATION ....................................................33
RÉGLAGES CUISSON RAPIDE ....................................................... 35
NETTOYAGE ET ENTRETIEN .......................................................... 40
PROBLÈMES ET SOLUTIONS ......................................................... 41
GARANTIE ..................................................................................42
CARACTÉRISTIQUES
Modéle: MWM0701TW
Tension: 120V ~ 60Hz
Puissance Fournie: 1050W
Micro-ondes Puissance: 700W
Capacité de Four: 0.7 pieds cubes
Diamètre De Plateau Tourne-disques: ø9.6 pouces
Dimensionne Externe (WxDxH): 17 × 13.2 x 10.2 inches
Poids Net: 22 livres
Advertissement: Manipulant la corde sur cette micro-onde, ou des
cordes s’est associé aux accessoires vendus avec
ce produit, vous exposera au fil. Le fil est une
substance connue de l’état de la Californie pour
causer des défauts de cancer et de naissance ou
tout autre mal reproducteur. Mains de lavage après
manipulation.
24
Page 26

Français
CONSIGNES DE SÉCURITÉ
IMPORTANTES
Lors de l’utilisation d’appareils électriques certaines précautions d’utilisation doivent être
respectées, dont les suivantes :
AVERTISSEMENT : Afin de réduire tout risque
d’incendie, décharge électrique,
blessure ou exposition excessive
à une énergie micro-ondes :
1. Lisez toutes les instructions avant d’utiliser l’appareil.
2. Lisez et respectez attentivement la section : « PRECAUTIONS A RESPECTER AFIN D’EVITER
UNE EXPOSITION EVENTUELLE A UNE ENERGIE MICRO-ONDES EXCESSIVE. » page 23.
3. Ce four doit être mis à la terre. Ne le reliez qu’à une prise électrique correctement mise à la
terre. Voir « INSTRUCTIONS DE MISE À LA TERRE » page 27.
4. N’installez et ne placez ce four que conformément aux instructions d’installation fournies
page 31.
5. Certains produits comme les oeufs durs et les conteneurs scellés (par exemple les bocaux en
verre fermes) peuvent exploser et ne devraient donc pas être réchauffés dans ce four.
6. N’utilisez ce four que comme indiqué et décrit dans ce guide. N’utilisez pas de produits
chimiques ou vapeurs corrosives dans cet appareil. Ce type de four est spécialement conçu
pour chauffer, cuire ou sécher la nourriture. Il n’est pas conçu pour un usage industriel ou en
laboratoire.
7. Comme avec la plupart des appareils électroménagers, ne laissez pas l’appareil sans
surveillance lorsqu’il est utilisé par des enfants.
8. Afin de réduire les risques d’incendie à l’intérieur du four :
• Ne surcuisez pas les aliments. Restez près du four si du papier, plastique ou autre
matériel combustible est placé dans le four pour faciliter la cuisson.
• Retirez les attaches métalliques des sacs en papier ou plastique ou autres matériaux
combustibles avant de les placer dans le four.
• Si les matériaux à l’intérieur du four s’enflamment maintenez la porte fermée, éteignez
et débranchez le four ou coupez le courant au disjoncteur.
• N’utilisez pas la cavité du four à des fins d’entreposage. N’entreposez pas de
produits en papier, des ustensiles de cuisine ou de la nourriture à l’intérieur du four.
9. Les liquides, tels que l’eau, le café ou le thé peuvent bouillir et déborder sans que cela soit
visible. Lorsque le récipient est sorti du four il se peut qu’il n’y ait ni bulles ni bouillonnement
visible. CELA PEUT ENTRAINER DES DEBORDEMENTS DE BOISSON TRES CHAUDE VOIRE
BOUILLANTE LORSQUE L’ON INSERE UNE CUILLERE OU AUTRE USTENSILE A L’INTERIEUR
DU RECIPIENT.
25
Page 27

Français
10. Ne faites pas frire d’aliments dans le four à micro-ondes. Il est difficile de
contrôler la graisse qui peut causer un risque d’incendie.
11. Percez les aliments à peau épaisse comme les pommes de terre, les courges, les
pommes et les châtaignes avant cuisson.
12. Le contenu des biberons et des petits pots doit être remué ou secoué et la
température doit être vérifiée avant de servir afin d’éviter les brûlures.
13. Les ustensiles de cuisson peuvent devenir chauds à cause du transfert de chaleur
provenant de la nourriture chauffée. Vous pouvez avoir besoin d’utiliser des gants
de cuisine.
14. Ne couvrez pas et ne bloquez pas les orifices du four.
15. N’utilisez pas et n’entreposez pas cet appareil à l’extérieur. N’utilisez pas ce four
près de l’eau, par exemple près d’un évier, dans un sous-sol humide, près d’une
piscine ou dans tout autre lieu similaire.
16. N’utilisez pas ce four si le cordon d’alimentation ou la fiche est endommagé, s’il
ne fonctionne pas correctement ou s’il a été endommagé ou est tombé.
17. Ne plongez pas le cordon d’alimentation ou la fiche dans l’eau. Gardez le
cordon d’alimentation loin des surfaces chaudes. Ne laissez pas le cordon
pendre à travers la table ou le plan de travail.
18. Utilisez uniquement des thermomètres spécialement conçus pour être utilisés dans
les fours à micro-ondes.
19. Lorsque vous nettoyez les surfaces de contact avec la porte utilisez uniquement
des savons ou détergents doux, non-abrasifs, avec une éponge ou un chiffon
doux.
20. Assurez-vous que le plateau en verre et l’anneau de guidage sont bien en place
lorsque vous utilisez le four.
21. Cet appareil ne doit être réparé que par un électricien qualifié. Contactez le
centre de réparation agréé le plus proche pour inspection, réparation ou réglage.
CONSERVEZ CES INSTRUCTIONS
À USAGE DOMESTIQUE UNIQUEMENT
26
Page 28

INSTRUCTIONS DE SÉCURITÉ
ADVERTISSMENT
Sous aucun prétexte
faut-il couper, enlever ou
court-circuiter la branche
de mise à la terre.
AVERTISSEMENT:
AVERTISSEMENT:
AVERTISSEMENT:
Installations Électriques Prérequises
INSTRUCTIONS DE MISE À LA TERRE ET DE FILAGE
Cet appareil doit être relié à au moins 15 AMP 120 VOLTS 60Hz ET
MIS À LA TERRE. Cet appareil doit être mis à la terre. Dans le cas d’un
court-circuit électrique, la mise à la terre prévient les chocs électriques en
permettant au courant électrique de s’échapper. Cet appareil est muni
d’un câble à trois fils, dont un pour la
mise à la terre, et d’un branchement mis
à la terre. La fiche doit être branché à
une prise électrique bien installée et mise
à la terre.
A VERTISSEMENT! Une mauvaise
utilisation du fil de mise à la terre
peut engendrer des risques de
chocs électriques. Consultez un
électricien ou un réparateur si
les instructions ne sont pas bien
comprises ou si vous avez un
doute à savoir si l’appareil est bien
mis à la terre. N’essayez pas de
contournez cette mesure de sécurité
en modifiant la fiche.
BRANCHES DE LA FICHE
1. Cet appareil est muni d’un fil d’alimentation court pour
prévenir les risques associés aux fils plus longs.
2. Évitez l’usage d’une rallonge puisqu’elle pourrait
surchauffer et déclencher un incendie. Si une rallonge est
nécessaire, il est important de bien suivre ces précautions :
a. Le voltage électrique indiqué sur la rallonge doit être
égale ou supérieure au voltage électrique de l’appareil.
b. Utiliser seulement une rallonge à 3 fils avec une fiche
à 3 branches et une prise pouvant recevoir la fiche à 3
branches de l’appareil.
c. Les rallonges plus longues devraient être disposés de
façon à ne pas tomber sur les comptoirs ou la table où
ils peuvent constituer un danger, ou être à la portée des
enfants.
ENTRETIEN ET NETTOYAGE
Pour prévenir les chocs électriques, débranchez l’appareil de sa prise de
courant ou déconnectez sur le panneau électrique en enlevant le fusible
ou en éteignant le disjoncteur avant de tenter tout entretien ou nettoyage.
Français
les chocs électriques. N’utilisez pas
de rallonge ou d’adaptateur de fiche.
N’enlevez aucune des branches de
la fiche.
Prise de courant avec
mise à la terre
Fil d’alimentation
avec fiche à trois
branches.
Évitez les incendies et
27
Page 29

ADVERTENCIA
ADVERTISSMENT
Français
USTENSILES
Cette section liste les ustensiles qui peuvent être utilisés dans le four à microondes, ceux qui ont une utilisation limitée pour une courte période et ceux qui ne
doivent pas être utilisés dans le micro-ondes.
Recommandé
• Plat à brunir micro-ondes – Utiliser pour brunir l’extérieur des petits aliments
comme les steaks, les côtes ou les crêpes. Suivez les instructions fournies avec
votre plat à brunir.
• Emballage plastique adaptés à la cuisson au micro-ondes – Utiliser pour retenir
la vapeur. Faites une petite ouverture pour laisser la vapeur s’échapper et
évitez de le placer directement sur la nourriture.
• Serviettes en papier – Utiliser pour un réchauffement de courte durée et pour
couvrir. Elles absorbent l’excès d’humidité et empêchent les éclaboussures.
N’utilisez pas des serviettes en papier recyclé qui peuvent contenir du métal et
pourraient s’enflammer.
• Plats et bols en verre – Utiliser pour chauffer et cuisiner.
• Papier paraffiné – Utilisez pour couvrir la nourriture et éviter les éclaboussures.
• Thermomètres – Utiliser uniquement ceux portant une étiquette indiquant qu’ils
sont adaptés à la cuisson au four à micro-ondes. Vérifiez la nourriture. Les
thermomètres conventionnels peuvent être utilisés sur la nourriture de microondes une fois que la nourriture a été retirée du micro-ondes.
Utilisation limitée
• Papier aluminium – Utilisez de fins morceaux pour éviter la surcuisson des
parties exposées.
• Céramique, porcelaine et poterie – Uniquement ceux adaptés à la cuisson au
micro-ondes. S’ils ne portent pas la mention, testez-les au micro-ondes.
• Plastique – Uniquement s’ils portent le label « Adapté à la cuisson au micro-
ondes ». Les autres plastiques peuvent fondre.
• Pailles, osier et bois – Uniquement pour des temps de cuisson courts, comme
pour réchauffer quelque chose pour quelques secondes. Les paniers et bols
peuvent s’enflammer.
Non recommandés
• Bocaux et bouteilles en verre – Le verre habituel est trop fin pour être utilisé au
micro-ondes. La plupart des bocaux en verre ne résistent pas à la chaleur et
peuvent être dangereux et causer des dommages et des blessures.
• Sacs en papier – Ils peuvent causer un risque d’incendie sauf les sacs à pop-
corn qui sont conçus pour une utilisation au micro-ondes.
• Assiettes, barquettes et gobelets en polystyrène – Ceux-ci peuvent fondre et
laisser un résidu malsain sur la nourriture.
• Récipients en plastique – Des récipients tes que les barquettes de margarine
peuvent fondre dans le micro-ondes.
• Ustensiles en métal – Ils peuvent endommager votre four. Retirez tout le métal
avant la cuisson.
28
Page 30

Note
Français
Si vous désirez savoir si est ustensile est adapté à l’utilisation au micro-ondes,
placez le vide dans le micro-ondes et chauffez-le pendant 30 secondes A FORTE
PUISSANCE. S’il devient très chaud il n’est pas adapté à la cuisson au microondes.
TECHNIQUES DE CUISSON
Votre micro-ondes rend la cuisson plus facile qu’avec un four traditionnel tant que vous
n’oubliez pas ces considérations :
Remuer
Remuez les aliments comme les ragoûts et les légumes pendant la cuisson pour distribuer
la chaleur de façon homogène. Les aliments vers l’extérieur du plat absorbent plus
d’énergie et chauffent plus rapidement alors remuer de l’extérieur vers le centre. Le four
s’arrêtera lorsque vous ouvrez la porte pour remuer les aliments.
Arranger
Arrangez les aliments de forme inégale comme les morceaux de poulet et les côtes avec
la partie la plus charnue vers l’extérieur du plateau tournant où ils reçoivent plus d’énergie
micro-ondes. Pour empêcher la surcuisson, placez les parties délicates, comme les pointes
d’asperges, vers le centre du plateau tournant.
Protéger
Protégez les aliments avec de petits morceaux de papier aluminium pour empêcher la
surcuisson. Les parties qui ont besoin d’être protégées sont les ailes de volaille, les cuisses
et pieds de volaille et les côtés des plats carrés. Utilisez seulement des petits morceaux de
papier aluminium. Une grande quantité de papier aluminium peut endommager votre four.
Tourner
Tournez les aliments de l’autre côté durant la cuisson pour exposer toutes les parties
à l’énergie micro-ondes. Ceci est particulièrement important avec les morceaux larges
comme les rôtis.
Laisser reposer
Les aliments cuits dans le four à micro-ondes créent une chaleur interne et continuent de
cuire pendant quelques minutes après l’arrêt de la chaleur. Laissez les aliments reposer
pour finir la cuisson, particulièrement les aliments comme les gâteaux et les légumes. Les
rôtis ont besoin de ce laps de temps pour que leur cuisson soit complète au centre sans
que les parties extérieures de l’aliment soient trop cuites. Tous les liquides, comme les
soupes ou le chocolat chaud doivent être remués et secoués quand la cuisson est terminée.
Laissez les liquides reposer un moment avant de les servir. Quand vous chauffez de la
nourriture pour bébé, remuez bien quand vous la retirez du four et testez la température
avant de servir. .
Ajouter de l’humidité
L’énergie micro-ondes est attirée par les molécules de l’eau. Les aliments qui ont un
contenu d’humidité inégal doivent être couverts ou doivent être en position verticale
pour que la chaleur puisse se disperser de façon homogène. Ajoutez un peu d’eau aux
aliments secs pour aider leur cuisson.
29
Page 31

Note
Français
INSTALLATION DE VOTRE FOUR A MICRO-ONDES
Pièces et accessoires
Sortez le four et tous les matériaux du carton et de la cavité du four.
Votre four est accompagné des accessoires suivants :
Plateau en verre ....................1
Anneau de guidage
du plateau tournant .............. 1
A. Tableau de commande
B. Coupleur du plateau tournant
C. Anneau de guidage du
plateau tournant
D. Plateau en verre
E. Fenêtre d’observation
F. Assemblage de la porte
G. Système de sécurité
Installation du plateau tournant
a. Ne placez jamais le plateau en verre à l’envers.
Le plateau en verre ne doit jamais être limité.
b. Le plateau en verre et l’anneau de guidage
doivent toujours être utilisés pendant la cuisson.
c. Placez toujours les aliments et récipients sur le
plateau en verre.
d. Si le plateau en verre se brise ou si l’anneau de guidage se casse contactez le
service après-vente le plus proche de chez vous.
Retirez tous les matériaux d’emballage et les accessoires. Vérifiez que
le four n’est pas endommagé et que la porte n’est pas cassée.
Carrosserie : Retirez tout film protecteur de la surface du four. Ne retirez pas le
Mica marron clair attaché à la cavité du four pour protéger
le magnétron.
30
Page 32

Français
INSTALLATION DU FOUR SUR LE PLAN DE TRAVAIL
Installation
1. Choisissez une surface plane permettant un dégagement suffisant pour faciliter
le branchement et la ventilation. Laissez un minimum de 7.5 cm (3.0 pouces)
entre le four et les murs adjacents.
(1) Laissez un minimum de 30 cm (12 pouces) au-dessus du four.
(2) Ne retirez pas les pieds du four.
(3) Bloquer le branchement et la ventilation peut endommager le four.
(4) Placez le four le plus loin possible des radios et télévisions. L’utilisation
du four à micro-ondes peut causer des interférences à la réception de la
radio ou du téléviseur.
2. Branchez votre four dans une prise standard. Vérifiez que la tension et la
fréquence correspondent à celles indiquées sur l’étiquette de l’appareil.
AVERTISSEMENT : N’installez pas le four au-dessus d’un fourneau ou d’une
source de chaleur. Le four pourrait être endommagé et la
garantie nulle.
3.0 inch (7.5cm)
3.0 inch (7.5cm)
12 inch (30cm)
OPEN
31
Page 33

Français
EXPRESS COOK
TABLEAU DE COMMANDE
1
2
4
3
5
8
1. AFFICHAGE
La durée de cuisson, la puissance, les
voyants lumineux et l’heure sont affichés.
2. DÉCONGÉLATION PAR POIDS OU
DURÉE
Programme la décongélation en fonction
du poids ou de la durée nécessaire pour
décongeler l’aliment.
3. PUISSANCE
Pour régler le niveau de puissance. Pour
vérifier le niveau de puissance durant la
cuisson, appuyez sur la touche POWER.
4. TOUCHES DES NUMÉROS (0-9)
Pour régler les durées ou le poids.
32
6
7
5. MÉMOIRE
Enregistre une procédure de cuisson pour
une utilisation ultérieure.
6. MINUTERIE
La minuterie fonctionne indépendamment,
même quand un programme de cuisson
est en cours.
7. HORLOGE
Pour régler l’heure ou voir l’heure qu’il est.
8. DÉBUT/ANNULATION
Annule tous les réglages appuyés avant
le début de la cuisson. Pendant la cuisson
appuyez une fois pour arrêter le four ;
deux fois pour arrêter et annuler toutes
les entrées.
Page 34

Français
Note
INSTRUCTIONS DE FONCTIONNEMENT
SIGNAUX DURANT LES RÉGLAGES DU FOUR
UN SIGNAL : Le four accepte l’entrée.
DEUX SIGNAUX : Le four n’accepte pas l’entrée, vérifiez et recommencez.
Lorsque le four à micro-ondes est branché dans une prise murale, le four affichera « 0:00 ».
(1) Appuyez sur « 0/CLOCK » et le voyant lumineux affichera 00:00. Le chiffre des
heures clignotera.
(2) Appuyez sur « START/30SEC » pour entrer l’heure correcte. Les numéros entrés doivent
être compris entre 1:00-12:59. Par exemple, s’il est 10:12, appuyez sur « 1, 0, 1, 2 ».
(3) Appuyez sur « START/30SEC » pour confirmer l’heure et terminer le réglage de
l’horloge. L’heure sera maintenant affichée.
(1) Si les numéros entrés ne sont pas compris entre 1:00-12:59, le réglage
sera invalide. Vous ne pouvez pas confirmer et terminer le réglage de
l’horloge en appuyant sur « START/30SEC ».
(2) Si vous voulez régler l’horloge de nouveau, répétez les étapes 1 jusqu’à
3. Si vous n’appuyez pas sur « START/30SEC » après le réglage, l’heure
réglée précédemment sera affichée après une minute.
2. MINUTERIE
(1) Appuyez sur « 9/MINUTERIE », le voyant lumineux affichera 00:00. Le premier « 0 »
clignotera, « . » et l’autre « 0 » s’allumeront.
(2) Appuyez sur les numéros et entrez l’heure correcte. (Le temps de cuisson maximum est
99 minutes et 99 secondes.)
(3) Appuyez sur « START/+30SEC » pour confirmer.
(4) Quand le temps de la minuterie touche à sa fin, la sonnerie retentira 5 fois et le four
retournera en état d’attente. Si l’horloge est réglée (système 12 heures) le voyant
lumineux affichera l’heure actuelle.
3. CUISSON MICRO-ONDES
Il y a dix niveaux de puissance disponibles.
Niveau
Puissance
Affichage
(1) Continuez à appuyer sur « POWER » pour choisir la puissance dont vous avez besoin.
« PL10 », « PL9 », « PL8 »… « PL1 » s’afficheront dans cet ordre.
10
100%
PL10
9
90%
PL9
8
80%
PL8
7
70%
PL7
6
60%
PL6
5
50%
PL5
4
40%
PL4
3
30%
PL3
2
20%
PL2
1
10%
PL1
33
Page 35

Français
Note
Note
Note
(2) Appuyez sur les numéros pour entrer le temps de cuisson. Le temps de cuisson maximum
est 99 minutes et 99 secondes.
(3) Appuyez sur « START/+30 SEC » pour commencer la cuisson et le temps de cuisson
restant s’affichera.
Pendant la cuisson, si vous appuyez sur « STOP/CLEAR » ou s’il n’y a pas
d’opération pendant 1 minute, le four retournera automatiquement au réglage
précédent.
Example: Pour cuire de la nourriture a une puissance micro-ondes de 50%
pendant 15 minutes :
(1) Appuyez sur « POWER » six fois jusqu’à ce que « PL5 » s’affiche.
(2) Entrez le temps de cuisson. Appuyez sur « 1, 5, 0, 0 » pour régler
la durée.
(3) Appuyez sur « START/30SEC » pour commencer la cuisson.
4. CUISSON RAPIDE
(1) Commencez par sélectionner un temps de cuisson entre 1 et 6 minutes en appuyant sur
les numéros pour la cuisson rapide à 100% de puissance. Appuyez sur
« START/+30 SEC » pour augmenter le temps de cuisson. Le temps de cuisson
maximum est 99 minutes et 99 secondes.
(2) En état d’attente, la cuisson instantanée à un niveau de puissance de 100% avec un
temps de cuisson de 30 secondes peut être commencée en appuyant sur
« START/+30 SEC ». À chaque fois que vous appuyez sur « START/+30 SEC » cela
augmente le temps de cuisson de 30 secondes. Le temps de cuisson maximum est de 99
minutes et 99 secondes.
: À chaque fois que vous appuyez sur « START/+30 SEC » cela augmente le
temps de cuisson de 30 secondes pour le menu cuisson automatique et
micro-ondes. Cependant, ce n’est pas le cas en mode « Décongélation poids ».
5. FONCTION DECONGELATION POIDS
(1) Appuyez deux fois sur « DÉCONGÉLATION » pour choisir la fonction décongélation
en fonction du poids. L’écran affichera « dEF1 ».
(2) Appuyez sur les numéros pour régler le poids à décongeler. Il est compris entre 4 et
100 oz.
(3) Si le poids n’est pas compris entre ces valeurs, l’entrée sera invalide. Aucun bip ne
retentira et l’appareil ne se mettra pas en marche tant que des numéros valides ne sont
pas entrés.
(4) Appuyez sur « START/+30 SEC» pour commencer la décongélation. Le temps restant
sera affiché.
6. DECONGELATION EN FONCTION DE LA DUREE
(1) Appuyez deux fois sur « DÉCONGÉLATION » pour choisir la fonction décongélation en
fonction de la durée. L’écran affichera « dEF2 ».
(2) Appuyez sur les numéros pour régler le temps de décongélation. Il est compris entre
00:01 et 99:99.
Si le temps n’est pas compris entre ces valeurs : 00:01 et 99:99 aucun bip
ne retentira et l’appareil ne se mettra pas en marche tant que des numéros
valides ne sont pas entrés.
(3) Appuyez sur « START/+30 SEC » pour commencer la décongélation. Le temps restant
sera affiché.
34
Page 36

RÉGLAGES CUISSON RAPIDE
Les réglages CUISSON RAPIDE vous permettent de cuire ou réchauffer des
aliments automatiquement sans avoir à entrer un niveau de puissance ou une
durée.
7. POP-CORN
a) Appuyez sur « POP-CORN » répétitivement jusqu’à ce que le numéro que vous
désirez s’affiche. « 1.75 », « 3.0 » et « 3.5 » s’afficheront dans cet ordre.
Par exemple, appuyez sur « POP-CORN » une fois. « 1.75 » s’affichera.
b) Appuyez sur « START/+30SEC » pour commencer la cuisson. La
minuterie commencera.
c) La sonnerie retentira cinq fois quand la cuisson est terminée. L’appareil
retournera ensuite en état d’attente. « 0:00 » s’affichera. Si l’horloge a été
réglée, l’heure actuelle s’affichera.
Français
Périodes (Appuyez sur « POP-CORN »)
Un
Deux
Trois
Poids (once)
1.75
3.0
3.5
Affichage
1.75
3.0
3.5
8. POMME DE TERRE
a) Appuyez sur « POMME DE TERRE » répétitivement jusqu’à ce que le numéro
que vous désirez s’affiche. « 1» et « 2 » et « 3 » s’afficheront dans cet ordre.
« 1 » réglage : 1 pomme de terre (environ 3.0 oz)
« 2 » réglage : 2 pommes de terre (environ 6.0 oz)
« 3 » réglage : 3 pommes de terre (environ 9.0 oz)
Par exemple, appuyez sur « POMME DE TERRE » une fois : « 1 » s’affichera.
b) Appuyez sur « START/+30SEC » pour commencer la cuisson.
c) La sonnerie retentira cinq fois quand la cuisson est terminée. L’appareil
retournera ensuite en état d’attente.
Périodes (Appuyez sur
« Pomme de Terre »)
Un
Poids
1
Affichage
1
Deux
Trois
2s
2
3
3
35
Page 37

Français
9. PIZZA
a) Appuyez sur « PIZZA » répétitivement jusqu’à ce que le numéro que vous
désirez s’affiche. « 1» et « 2 » et « 3 » s’afficheront dans cet ordre. Par
exemple, appuyez sur « PIZZA » deux fois. « 2 » s’affichera dans le voyant
lumineux.
b) Appuyez sur « START/+30SEC » pour commencer la cuisson.
c) La sonnerie retentira cinq fois quand la cuisson est terminée. L’appareil
retournera ensuite en état d’attente.
Périodes (Appuyez sur « Pizza »)
Un
Deux
Trois
1 (au sujet du 3.0 once)
2 (au sujet du 6.0 once)
3 (au sujet du 9.0 once)
Poids
Affichage
1
2
3
10. BOISSON
a) Appuyez sur « BOISSON » répétitivement jusqu’à ce que le numéro
que vous désirez s’affiche. « 1» et « 2 » et « 3 » s’afficheront dans cet
ordre. Vous pouvez réchauffer de 1 à 3 tasses de boisson à chaque
fois. (environ 250 ml) Par exemple, appuyez sur « BOISSON » deux
fois. « 2 » s’affichera.
b) Appuyez sur « START/+30SEC » pour commencer la cuisson.
c) La sonnerie retentira cinq fois quand la cuisson est terminée. L’appareil
retournera ensuite en état d’attente.
Périodes (Appuyez sur « Boisson »)
Un
Deux
Trois
Poids
1 tasse
2 tasses
3 tasses
Affichage
1
2
3
11. SOUPE
a) Appuyez sur « SOUPE » répétitivement jusqu’à ce que le numéro que vous
désirez s’affiche. «4.0 », «8.0 » et « 16.0 » s’afficheront dans cet ordre. Par
exemple, appuyez sur « SOUPE » deux fois, « 8.0 » s’affichera.
b) Appuyez sur « START/+30SEC » pour commencer la cuisson.
c) La sonnerie retentira cinq fois quand la cuisson est terminée. L’appareil
retournera ensuite en état d’attente.
Périodes (Appuyez sur « Soupe »)
Un
Deux
Trois
Quatre
36
Poids
4.0 once
8.0 omce
12.0 once
16.0 once
Affichage
4.0
8.0
12.0
16.0
Page 38

12. PLATEAU REPAS
a) Appuyez sur « PLATEAU REPAS » répétitivement jusqu’à ce que le numéro que
vous désirez s’affiche. « 9.0 », « 12.0 » et « 18.0 » s’afficheront dans cet ordre.
Par exemple, appuyez sur « PLATEAU REPAS » deux fois, « 12.0 » s’affichera.
b) Appuyez sur « START/+30SEC » pour commencer la cuisson. La minuterie
commencera.
c) La sonnerie retentira cinq fois quand la cuisson est terminée. L’appareil retournera
ensuite en état d’attente.
Français
Périodes (Appuyez sur « Plateau Repas »)
Un
Deux
Three
Poids
9.0 once
12.0 once
18.0 once
Affichage
9.0
12.0
18.0
13. LÉGUMES FRAIS
a) Appuyez sur « LÉGUMES FRAIS » répétitivement jusqu’à ce que le numéro que
vous désirez s’affiche. «4.0 », «8.0 » et « 16.0 » s’afficheront dans cet ordre. Par
exemple, appuyez sur « LÉGUMES FRAIS » deux fois, « 8.0 » s’affichera.
b) Appuyez sur « START/+30SEC » pour commencer la cuisson. La minuterie
commencera.
c) La sonnerie retentira cinq fois quand la cuisson est terminée.
Périodes (Appuyez sur «Légumes Frais »)
Un
Deux
Trois
Poids
4.0 once
8.0 once
16.0 once
Afficharge
4.0
8.0
16.0
14. LÉGUMES SURGELÉS
a) Appuyez sur « LÉGUMES SURGELÉS » répétitivement jusqu’à ce que le numéro
que vous désirez s’affiche. «4.0 », «8.0 » et « 16.0 » s’afficheront dans cet ordre.
Par exemple, appuyez sur « LÉGUMES SURGELÉS » deux fois,
« 8.0 » s’affichera.
b) Appuyez sur « START/+30SEC » pour commencer la cuisson. La
minuterie commencera.
c) La sonnerie retentira cinq fois quand la cuisson est terminée.
Périodes (Appuyez sur « Légumes Surgelés »)
Poids
Affichage
Un
Deux
Trois
4.0 once
8.0 once
16.0 once
4.0
8.0
16.0
37
Page 39

Note
Note
Français
15. MEMOIRE
(1) Appuyez sur « MEMORY » pour utiliser la fonction mémoire. Le voyant
affichera 1,2,3.
(2) Si la procédure mémorisée a été réglée, appuyez sur « START/+30 SEC »
pour l’utiliser. Sinon, continuez de choisir la procédure voulue. Seules une ou
deux étapes peuvent être réglées.
(3) Après avoir terminé le réglage, appuyez sur « MEMORY » pour enregistrer la
procédure et retourner en attente. Si vous appuyez sur « START/+30 SEC »
cela enregistrera et mettra en marche la procédure choisie.
Menu automatique ne peut être enregistré en mémoire.
Exa mple : Pour régler la procédure suivante comme « Mémoire 2 », si
vous voulez cuisiner avec une puissance micro-ondes de 80% pendant 3
minutes et 20 secondes, suivez les étapes suivantes :
1) En état d’attente, appuyez sur « MEMORY » deux fois, jusqu’à ce
que l’écran affiche « 2 ».
2) Appuyez sur « POWER » trois fois jusqu’à ce que « PL8 » s’affiche.
3) Appuyez sur les numéros « 3, 2, 0 » dans cet ordre pour entrer le
temps de cuisson.
4) Appuyez sur « MEMORY » pour enregistrer ce réglage. La sonnerie
retentira une fois puis retournera en état d’attente. Si vous appuyez
sur « START/30SEC » après l’étape ci-dessus, la procédure sera
enregistrée comme mémoire 2 et utilisée.
5) Tant que le courant n’est pas coupé, la procédure sera enregistrée
tout le temps. Si le courant est coupé, la procédure a besoin d’être
réglée de nouveau.
6) Si vous voulez utiliser la procédure enregistrée, en état d’attente,
appuyez sur « MEMORY » deux fois. L’écran affichera « 2 ».
Appuyez ensuite sur « START/30SEC » pour la mettre en marche.
16. CUISSONS ENCHAINEES
Deux séquences de cuisson enchaînées peuvent être réglées pour ce four à
micro-ondes. Si une étape de cuisson est la décongélation par poids, cela
passera automatiquement en première étape. Une seule des deux étapes peut être
décongélation.
Exemple : Pour d’abord décongeler un morceau de bœuf de 20 oz (1130 g)
puis cuire pendant 7 minutes à une puissance de 80%.
1) Appuyez une fois sur « DÉCONGÉLATION » pour choisir de décongeler
en fonction du poids. « dEf1 » s’affichera.
2) Appuyez sur les numéros 2 puis 0 pour régler le poids.
3) Appuyez sur « POWER » trois fois pour choisir une puissance micro-ondes
de 80%.
4) Appuyez sur les numéros « 7, 0, 0 » pour régler le temps de cuisson.
5) Appuyez sur « START/+30SEC » pour commencer la cuisson.
Lorsque la procédure de décongélation est terminée, la sonnerie retentira une fois
et la seconde étape commencera.
38
(1) Le menu automatique ne peut pas être réglé comme une des 2
étapes de cuisson.
(2) Décongélation durée peut être sélectionnée comme une des étapes
de cuisson.
Page 40

Français
17. VERIFICATION DE L’AVANCEMENT
(1) Pendant la cuisson, appuyez sur « O/CLOCK », l’horloge s’affichera pendant
trois si elle a été réglée.
(2) En mode cuisson du micro-ondes, appuyez sur « POWER » pour connaître le
niveau de puissance micro-ondes et il s’affichera. Après trois secondes le four
retournera à son état initial. En cas de cuissons enchaînées, la vérification peut
se faire de la même façon que ci-dessus.
18. SIGNAL DE FIN DE CUISSON
Lorsque le temps de cuisson est fini, vous entendrez 5 bips pour vous rappeler que
la cuisson est terminée.
19. AUTRES CARACTÉRISTIQUES
(1) Si le voyant lumineux affiche l’heure actuelle, l’icône « : » clignotera, sinon il
affichera « 0:00 ».
(2) Lors du réglage d’une fonction, le voyant lumineux affichera la fonction
correspondante.
(3) Lorsque le four est en marche ou en pause, le voyant lumineux affiche le temps
de cuisson restant.
(4) Lorsqu’il est marche, s’il se met en pause ou la porte du four est ouverte
« START/+30SEC » s’allumera, après que le four soit remis en marche il
clignotera constamment.
20. VERROUILLAGE ENFANT
Le verrouillage enfant empêche une utilisation non supervisée du four par les enfants.
Verrouillage : Appuyez sur « STOP/CLEAR » pendant 3 secondes.
Il y aura un long « bip » indiquant la mise en marche
du verrouillage enfant. Pendant ce temps, le voyant
affichera «
Déverrouillage : En mode verrouillage, appuyez sur « STOP/CLEAR »
pendant 3 secondes. Il y aura un long « bip » indiquant
que le four micro-ondes
est déverrouillé.
» ou l’heure actuelle.
39
Page 41

Français
NETTOYAGE ET ENTRETIEN
1. Lorsque vous nettoyez les surfaces de contact avec la porte utilisez
uniquement des savons ou détergents doux, non-abrasifs, avec une éponge
ou un chiffon doux.
2. Éteignez Le four et retirez la fiche de la prise murale avant de nettoyer.
3. Conservez l’intérieur du four propre. Lorsque de la nourriture ou des liquides
éclaboussent et adhèrent aux parois du four, nettoyez-les avec un chiffon
humide. Évitez d’utiliser des nettoyants trop forts car ils peuvent tacher, rayer
ou ternir la surface de la porte.
4. Les surfaces externes doivent être nettoyées avec un chiffon humide. Afin
d’empêcher les dommages sur les parties fonctionnelles internes du four, il
ne faut pas laisser pénétrer de l’eau dans les ouvertures de ventilation.
5. Nettoyez la fenêtre sur les deux faces avec un chiffon humide pour retirer
toutes les taches ou éclaboussures.
6. Ne laissez pas le tableau de commande recevoir de l’eau. Nettoyez avec
un chiffon doux et humide. Lorsque vous nettoyez le tableau de commande,
laissez la porte du four ouverte pour empêcher que le four ne se mette en
marche accidentellement.
7. Si de la vapeur s’accumule à l’intérieur ou à l’extérieur de la porte du four,
nettoyez avec un chiffon doux. Cela peut arriver quand le four à microondes est utilisé dans des conditions de forte humidité. Cela est normal.
8. Occasionnellement, il est nécessaire de retirer le plateau en verre pour le
nettoyer. Lavez le plateau dans de l’eau savonneuse chaude ou dans un
lave-vaisselle.
9. La couronne de galets et le fond du four doivent être nettoyés régulièrement
pour éviter un bruit excessif. Nettoyez simplement le fond du four avec
un détergent doux. La couronne de galets peut être lavée dans de l’eau
savonneuse ou au lave-vaisselle. Lorsque vous retirez la couronne de
galets de la cavité pour la nettoyer, assurez-vous de la remettre en place
correctement.
10. Pour retirer les odeurs du four, mélangez un verre d’eau avec du jus et du
zeste de citron dans un bol et mettez-le au micro-ondes pendant 5 minutes.
Nettoyez en profondeur et séchez avec un chiffon doux.
11. Lorsqu’il faut remplacer la lumière du four, faites appel à votre revendeur
pour la remplacer.
40
Page 42

Français
MAINTENANCE
Reportez-vous au tableau suivant et essayez les solutions proposées ci-dessous. Si
le four ne fonctionne toujours pas correctement, contactez le service après-vente
le plus proche.
PROBLEME CAUSE POSSIBLE
Le four ne se
met pas en
marche
Étincelles a. Les matériaux à éviter d’utiliser
Aliments cuits
de façon
irrégulière
Aliments trop
cuits
Aliments pas
assez cuits
Mauvaise
décongélation
a. Le cordon d’alimentation n’est
pas branché.
b. La porte est ouverte.
c. Vous avez sélectionné une
mauvaise opération..
ont été utilisés.
b. Le four fonctionne à vide.
c. Des résidus de nourriture restent
dans la cavité.
a. Les matériaux à éviter d’utiliser
ont été utilisés.
b. Les aliments ne sont pas
complètement décongelés.
c. Le temps et la puissance de
cuisson ne sont pas appropriés.
d. Les aliments ne sont pas tournés
ou remués.
Le temps et la puissance de cuisson
ne sont pas appropriés.
a. Les matériaux à éviter d’utiliser
ont été utilisés.
b. Les aliments ne sont pas
complètement décongelés.
c. Les orifices de ventilation sont
bouchés.
d. Le temps et la puissance de
cuisson ne sont pas appropriés.
a. Les matériaux à éviter d’utiliser
ont été utilisés.
b. Le temps et la puissance de
cuisson ne sont pas appropriés.
c. Les aliments ne sont pas tournés
ou remués.
SOLUTION
a. Branchez le cordon dans la prise
électrique.
b. Fermez la porte et essayez de
nouveau.
c. Vérifiez les instructions.
a. Utilisez des matériaux adaptés à la
cuisson au micro-ondes.
b. Ne faites pas fonctionner le four à
vide.
c. Nettoyez la cavité avec un chiffon
humide.
a. Utilisez uniquement des récipients
adaptés à la cuisson au microondes.
b. Décongelez complètement les
aliments.
c. Utilisez le temps et la puissance de
cuisson appropriés.
d. Tournez ou remuez les aliments.
Utilisez le temps et la puissance de
cuisson appropriés.
a. Utilisez uniquement des récipients
adaptés à la cuisson au microondes.
b. Décongelez complètement les
aliments.
c. Vérifiez que les orifices de ventilation
ne sont pas bouchés.
d. Utilisez le temps et la puissance de
cuisson appropriés.
a. Utilisez uniquement des récipients
adaptés à la cuisson au microondes.
b. Utilisez le temps et la puissance de
cuisson appropriés.
c. Tournez ou remuez les aliments.
41
Page 43

GARANTIE LIMITÉE
Français
CETTE GARANTIE COUVRE TOUS DEFAUTS DE PIECES
ET MAIN-D’ŒUVRE POUR UNE PERIODE DE :
12 mois pour la main d’œuvre
12 mois pour les pièces (pièces fonctionnelles
uniquement)
10 ans tube de magnétron (pièce uniquement)
Cette garantie commence à la date d’achat du produit.
Les clients doivent montrer leur preuve d’achat avec
la date de l’achat et le reçu original avec la marque,
le modèle et le numéro de série pour des raisons de
vérification avant que tout service de garanti puisse être
fourni.
Un service de réparation en magasin est disponible
pour certains produits, à la discrétion d’Haier America.
EXCEPTIONS: la garantie de l’appareil pour usage
commercial ou location de l’appareil est de 90 jours à
compter de la date d’achat.
IL N’Y A PAS D’AUTRES GARANTIES.
Ce qui est couvert :
1. Les pièces mécaniques et électriques qui servent au
fonctionnement de cet appareil pour une période de
12 mois. Cela inclut toutes les pièces sauf le verre et
les finitions.
2. La garantie limitée ne couvre pas les avoirs et
remboursements pour perte ou blessure causée
par le produit ou défauts du produit dont mais pas
limitées aux dommages matériels, économiques et
secondaires.
3. Si le tube du magnétron (pour micro-ondes) ne
fonctionne pas du à un problème de main-d’œuvre
ou à une défaillance du matériel, la pièce sera
remplacée.
Ce qui sera fait :
1. Haier réparera ou remplacera, à sa discrétion,
toute pièce mécanique ou électrique qui s’avère
défectueuse en utilisation normale durant la période
de garantie spécifiée.
TOUT SERVICE DE GARANTIE SERA FOURNI
UNIQUEMENT PAR NOS CENTRES DE SERVICE
APRÈS-VENTE OU PAR UN TECHNICIEN AGRÉÉ
HAIER.
S’il est déterminé que la réparation n’est pas
appropriée ou que le remplacement des pièces n’est
pas possible, Haier échangera le produit avec un
produit remis à neuf ou un produit neuf identique ou
similaire à l’original, à sa discrétion.
2. L’acheteur n’aura rien à payer pour la main-d’œuvre
sur toute pièce durant la période initiale de 12
mois et rien également pour les pièces sur toutes les
pièces couvertes pendant la période initiale de 12
mois ou comme mentionné plus haut.
3. CETTE GARANTIE COUVRE LES APPAREILS EN
AMERIQUE CONTINENTALE (DANS LES 48 ETATS
DES ETATS-UNIS), A PORTO RICO ET AU CANADA.
ELLE NE COUVRE PAS CE QUI SUIT :
Les dommages dus à une mauvaise installation.
Les dommages ayant eu lieu durant l’expédition du
produit. Les défauts autres que ceux de fabrication. Les
dommages dus à une mauvaise utilisation, un abus,
un accident, une modification et un mauvais entretien
de l’appareil. Les dommages dus aux catastrophes
naturelles. Les dommages dus à une utilisation autre que
celle spécifiée. Un produit pris en charge et réparé par
quelqu’un d’autre ou ailleurs qu’au centre de réparation
agréé. Les décorations, le verre et les ampoules
remplaçables. Le transport et les frais d’expédition. La
main-d’œuvre (après la période initiale de 12 mois). Les
avoirs ou les remboursements pour des produits achetés
il y a plus de 30 jours. La nourriture avariée comme
conséquence directe d’un problème mécanique de
l’appareil ou un retard dans le service, réparation ou
remplacement de l’appareil.
Cette garantie limitée ne s’applique pas aux produits
remis à neuf ou aux produits achetés d’occasion
ou presque neufs. CETTE GARANTIE LIMITÉE EST
DONNÉE À LA PLACE DE TOUTE AUTRE GARANTIE
EXPRIMÉE, OU IMPLICITE INCLUANT LES GARANTIES
DE QUALITE MARCHANDE ET DE COMPATIBILITE À
UNE FIN PARTICULIÈRE. Le recours offert dans cette
garantie est exclusif et est accordé à la place de tout
autre. Cette garantie ne couvre pas les dommages
secondaires ou conséquents et donc les limitations cidessus peuvent ne pas s’appliquer pas à vous. Certains
États n’autorisent pas les limitations sur la durée
d’une garantie donc les limitations ci-dessus ne vous
concernent peut-être pas. Cette garantie vous donne des
droits légaux et il se peut que vous ayez d’autres droits
qui varient d’un État à l’autre.
Haier America,
New York, NY 10018
Pour la maintenance de votre produit, contactez l’assistance téléphonique 24h/24 du
service clients de Haier America. Aux États-Unis, veuillez appeler le 1-877-337-3639.
42
Page 44

Español
DESEMBALAJE DE SU HORNO MICROONDAS
1. Revise y quite todos los materiales de embalaje. Esto incluye la espuma y la cinta
adhesiva de dentro y fuera de la unidad.
2. Revise y quite los restos de embalaje, cinta o materiales impresos antes de enchufar
su artefacto Haier.
PELIGRO
Riesgo de que los niños queden atrapados.
Antes de deshacerse de su artefacto viejo, saque
la puerta para evitar que los niños puedan quedar
atrapados fácilmente en el interior.
REGISTRO DEL PRODUCTO
Conserve sus registros para obtener
reparaciones con garantía.
Gracias por usar nuestro producto Haier.
Este manual fácil de usar le guiará para que
logre el mejor uso de su producto.
Recuerde anotar los números de modelo y de
serie. Se encuentran en una etiqueta en la
parte posterior del artefacto.
Abroche su recibo al manual.
Lo necesitará para obtener el servicio de garantía.
Regístrese en línea en www.prodregister.com/Haier
Lea por favor este manual cuidadosamente antes de usar.
Consérvelopara su referencia futura.
43
_____________________________
Número de modelo
_____________________________
Número de serie del microondas
_____________________________
Fecha de compra
Page 45

Español
ADVERTENCIA
ADVERTISSMENT
PRECAUCIONES PARA EVITAR LA POSIBLE
EXPOSICIÓN A ENERGÍA EXCESIVA DE
MICROONDAS
(a) No intente poner en funcionamiento el horno con la puerta abierta, ya que
dicho funcionamiento puede ocasionar exposición perjudicial a la energía
de microondas. Es importante que no se anulen ni se manipulen de manera
indebida los cerrojos de seguridad.
(b) No ubique objetos entre el frente del horno y la puerta ni permita que restos
de suciedad o limpiador se acumulen sobre las superficies de sellado.
(c) No ponga en funcionamiento el horno si está dañado. Es especialmente
importante que la puerta del horno cierre correctamente y que no estén
dañados los siguientes elementos:
1. Puerta (doblada)
2. Bisagras y pestillos (rotos o flojos)
3. Sellado de las puertas y superficies de sellado
(d) El horno no debe ser ajustado o reparado por ninguna persona que no
pertenezca al personal de reparaciones debidamente calificado.
Apéndice
• Si el artefacto no se mantiene en buen estado de limpieza, su superficie
podría verse dañada y afectar la vida útil del artefacto y llevar a una situación
peligrosa.
Antes de llamar para obtener servicios de reparación
Si el horno no funciona:
a) Compruebe que el horno esté firmemente enchufado. Si no lo está, saque el
enchufe del tomacorriente, espere 10 segundos y enchúfelo nuevamente con
firmeza.
b) Controle que no haya un circuito de fusibles quemado o que no se haya
saltado un interruptor automático principal. Si parecen estar funcionando
adecuadamente, pruebe el tomacorriente con otro artefacto.
c) Compruebe que el panel de control esté correctamente programado y que el
temporizador esté configurado.
d) Compruebe que la puerta esté bien cerrada activando el sistema de bloqueo
de seguridad de la puerta. De lo contrario, la energía de microondas no fluirá
dentro del horno.
SI NINGUNA DE LAS INDICACIONES ANTERIORES RECTIFICA LA SITUACIÓN,
ENTONCES PÓNGASE EN CONTACTO CON UN
TÉCNICO CALIFICADO. NO INTENTE AJUSTAR O
REPARAR EL HORNO MICROONDAS
USTED MISMO.
44
Page 46

Español
ÍNDICE DE CONTENIDOS DEL MICROONDAS
PÁGINA
PRECAUCIONES PARA EVITAR LA POSIBLE EXPOSICIÓN A ENERGÍA EXCESIVA
DE MICROONDAS ....................................................................... 44
ESPECIFICACIONES ......................................................................45
INSTRUCCIONES DE SEGURIDAD IMPORTANTES ...........................46
INSTRUCCIONES DE PUESTA A TIERRA .........................................48
GUÍA DE UTENSILIOS ..................................................................49
TÉCNICAS DE COCCIÓN.......... .................................................... 50
CÓMO INSTALAR EL HORNO ......................................................51
INSTALACIÓN EN ENCIMERA....................................................... 52
PANEL DE CONTROL ...................................................................53
INSTRUCCIONES OPERATIVAS .....................................................54
CONFIGURACIONES DE COCCIÓN RÁPIDA ..................................56
CUIDADO Y LIMPIEZA ................................................................. 61
DETECCIÓN Y SOLUCIÓN DE PROBLEMAS .................................... 62
GARANTÍA .................................................................................63
SPECIFICATIONS
Modelo: MWM0701TW
Voltaje: 120V ~ 60Hz
Energía de entrada: 1050W
Potencia de microondas: 700W
Capacidad de horno: 0.7 pies cúbicos
Diámetro del plato giratorio: ø9.6 pulgadas
Dimensiones Externas (WxDxH): 17 × 13.2 x 10.2 inches
Peso neto: 22 libras
Advertencia: La manipulación del cable de esta unidad o
los cables de los accesorios que se venden
con este producto implicará la exposición a un
químico que según el estado de California causa
cáncer, defectos de nacimiento y otros daños
reproductivos. Límpiese las manos luego
de manipularlo.
45
Page 47

Español
INSTRUCCIONES DE
SEGURIDAD IMPORTANTES
Cuando se utilizan artefactos eléctricos, se deben tomar precauciones de seguridad básicas,
incluyendo lo siguiente:
ADVERTENCIA: Para reducir el riesgo de quemaduras,
descarga eléctrica, incendio, lesiones a
las personas o exposición a energía de
microondas excesiva:
1. Lea todas las instrucciones antes de usar el artefacto.
2. Lea y cumpla las “PRECAUCIONES PARA EVITAR LA POSIBLE EXPOSICIÓN A ENERGÍA
DE MICROONDAS EXCESIVA” específicas en la página 44.
3. Este artefacto debe tener conexión a tierra. Conéctelo solamente a un tomacorriente con la
correspondiente conexión a tierra. Consulte las “instrucciones de descarga a tierra” en la
página 48.
4. Instale o ubique este horno sólo conforme a las instrucciones de instalación provistas en la
página 51.
5. Algunos productos, tales como por ejemplo huevos enteros y contenedores sellados (por
ejemplo, recipientes de vidrio cerrados) pueden explotar, y por lo tanto no deben calentarse
en este horno.
6. Use este artefacto sólo para los usos para los que fue diseñado, según se describe en este
manual. No use productos químicos o vapores corrosivos en este artefacto. Este horno
fue diseñado específicamente para calentar, deshumedecer o cocinar alimentos. No fue
diseñado para uso industrial o en laboratorios.
7. Como con cualquier artefacto, es necesaria una supervisión estricta cuando los usan los
niños.
8. Para reducir el riesgo de incendio dentro del horno:
• No cocine los alimentos en demasía. Preste atención especial al artefacto cuando
coloque materiales de papel, plástico u otros materiales combustibles en el horno para
facilitar la cocción.
• Quite los cierres de alambre de las bolsas de papel o de plástico antes de ubicarlas en
el horno.
• Si los materiales dentro del horno se prenden fuego, mantenga la puerta del horno
cerrada, apague la unidad y desconecte el cable de energía o corte la energía desde
el panel de fusibles o interruptor automático.
• No use la cavidad del horno para almacenar objetos. No deje productos de papel,
utensilios de cocina o alimentos en la cavidad cuando la unidad no esté en uso.
46
Page 48

Español
9. Los líquidos, tales como el agua, el café o el té pueden recalentarse y pasar el
punto de ebullición sin que parezca que están hirviendo debido a la tensión
superficial del líquido. No siempre es visible el burbujeo o la ebullición cuando
se saca el recipiente del horno microondas. ESTO PUEDE OCASIONAR QUE
LOS LÍQUIDOS MUY CALIENTES ENTREN EN EBULLICIÓN REPENTINAMENTE
CUANDO SE INSERTA UNA CUCHARA U OTRO UTENSILIO EN EL LÍQUIDO.
10. No caliente aceite o grasa para freír. Es difícil controlar la temperatura del aceite
en el horno microondas.
11. Pinche los alimentos con cáscaras gruesas como papas, calabazas enteras,
manzanas y castañas antes de cocinarlos.
12. Los contenidos de los biberones y vasos para bebés deben agitarse o sacudirse,
y debe controlarse la temperatura antes de servirlos para evitar quemaduras.
13. Los utensilios de cocina pueden calentarse a causa del calor que transfieren los
alimentos calientes. Pueden necesitarse agarraderas para manipular los utensilios.
14. No cubra ni obstruya las ventilaciones del horno.
15. No guarde ni use este artefacto en el exterior. No use este producto cerca del
agua, por ejemplo, cerca de un fregadero de cocina, en un sótano húmedo,
cerca de una piscina o en lugares similares.
16. No ponga en funcionamiento este horno si el cable o el enchufe están dañados,
si la unidad no funciona correctamente o si está dañada o se ha caído.
17. No sumerja el cable o el enchufe en agua. Mantenga el cable lejos de las
superficies calientes. No permita que el cable cuelgue sobre el borde de una
mesa o encimera.
18. Utilice solamente termómetros que estén diseñados especialmente para el uso en
hornos microondas.
19. Cuando limpie la puerta y las superficies del horno, use sólo jabones o
detergentes suaves y no abrasivos aplicados con una esponja o paño suave.
20. Asegúrese de que la bandeja de vidrio y el anillo con rodillos estén en su lugar
cuando ponga en funcionamiento el horno.
21. Este aparato sólo debe ser reparado por técnicos de reparaciones calificados.
Póngase en contacto con el lugar de reparaciones autorizado más cercano para
que realicen el examen, la reparación o el ajuste necesarios.
CONSERVE ESTAS INSTRUCCIONES
USO DOMÉSTICO SOLAMENTE
47
Page 49

INSTRUCCIONES DE SEGURIDAD
ADVERTENCIA
ADVERTISSMENT
Bajo ninguna circunstancia
corte, quite, o circunvale la
pinza de hacer tierra.
Suministro eléctrico con
enchufe de hacer tierra con
tres pinzas.
ADVERTENCIA:
AVERTISSEMENT:
ADVERTENCIA:
AVERTISSEMENT:
ADVERTENCIA:
AVERTISSEMENT:
Requisitos Eléctricos
INSTRUCCIONES DE CABLEADO Y DE HACER TIERRA
Este aparato electrodoméstico debe ser enchufado a una TOMA
CONECTADA A TIERRA de por lo menos 15 AMP 120 Voltios 60Hz. Este
aparato debe ser conectado a tierra. En caso de un cortocircuito eléctrico,
la conexión a tierra reduce el riesgo de descargas eléctricas al proveer un
alambre de escape para la corriente eléctrica. Este aparato viene equipado
con un cable de 3 alambres, uno de ellos un
alambre de hacer tierra, con un enchufe de
hacer tierra. En enchufe debe colocarse en
una toma que está correctamente conectada
a tierra.
A DVERTENCIA! Uso indebido de
alambres conectadas a tierra puede
resultar en riesgo de descarga eléctrica.
Consulte a un electricista cualificado o
proveedor de servicios si las instrucciones
de hacer tierra no se comprenden
completamente, o si existen dudas acerca
de si el aparato está correctamente
conectado a tierra. No intente frustrar
esta característica de seguridad haciendo modificaciones al enchufe.
EL CABLE DE ALIMENTACIÓN
1. Este aparato viene equipado con un cable de suministro
eléctrico corto para reducir los riesgos que se asocian con un
cable más largo; por ejemplo, enredos o tropezones.
2. Evite el uso de cables de extensión porque se podrían
sobrecalentar y causar el riesgo de un incendio. Si es
necesario utilizar un cable de extensión, hay que ejercer
cuidado y se deberían seguir los siguientes consejos:
a. La valoración del voltaje eléctrico marcado en el cable de
extensión debe ser igual a o mayor que la valoración de
voltaje eléctrico del aparato.
b. Use sólo cables de extensión con tres alambres mas un
enchufe de hacer tierra de tres pinzas, y un recipiente para
tres pinzas que soportará el enchufe del aparato.
c. Cables mas largos se deben arreglar de tal manera que
no se tiendan sobre mesas o encimeras donde podrían
presentar un peligro, o donde podrían ser jaladas por niños
a propósito.
INTENTAR CUALQUIER FORMA DE MANTENIMIENTO O LIMPIEZA
Para reducir el riesgo de descarga eléctrica, desenchufe este aparato del
suministro eléctrico o desconecte en el panel de distribución casero quitando
el fusible o poniendo el disyuntor en posición apagada antes de intentar
cualquier mantenimiento o limpieza.
Español
descargas eléctricas. No utilice cables
de extensión o enchufes adaptadores.
No quite ninguna pinza del cable de
alimentación. Recipiente de pared de
tipo hacer tierra.
poniendo a tierra
el tipo receptáculo
de pared
Fuente de alimentación
cuerda con el enchufe que
pone a tierra de tres dientes
Evite peligro de incendios o
48
Page 50

ADVERTENCIA
ADVERTISSMENT
Note
Español
UTENSILIOS
En esta sección se enumeran los utensilios que pueden usarse en el microondas, los
que tienen uso limitado durante períodos cortos y los que no deben usarse en este
microondas.
Recomendados
• Bandeja doradora para microondas - Utilícela para dorar el exterior de alimentos
pequeños, tales como bistecs, chuletas o panqueques. Siga las instrucciones provistas
junto con su bandeja doradora.
• Envoltorio plástico apto para microondas - Utilícelo para conservar el vapor. Deje una
pequeña abertura para que escape algo de vapor y evite colocarlo directamente sobre
los alimentos.
• Toallas de papel y servilletas – Utilícelas para calentar alimentos durante períodos
cortos y para cubrir. Absorben el exceso de humedad y previenen las salpicaduras.
No utilice toallas de papel reciclado, que pueden contener metal y pueden prenderse
fuego.
• Tazones y fuentes de vidrio y vidrio cerámico – Utilícelos para calentar o cocinar.
• Platos y tazas de papel – Úselos sólo para calentar a bajas temperaturas durante
un tiempo corto. No utilice papel reciclado, que pueden contener metal y pueden
prenderse fuego.
• Papel encerado – Úselo para cubrir para prevenir salpicaduras.
• Termómetros – Utilice sólo los que tienen el rótulo “Apto para microondas” y siga
todas las instrucciones. Examine los alimentos en varios lugares. Los termómetros
convencionales pueden utilizarse con los alimentos cocidos en microondas una vez que
los haya sacado del horno.
Uso limitado
• Papel aluminio – Utilice tiras angostas de papel aluminio para evitar la cocción
excesiva de las áreas expuestas. El uso de demasiado papel aluminio puede dañar su
horno, de modo que tenga cuidado.
• Cerámica, porcelana y cerámica de gres – Utilícelos si cuentan con el rótulo “Apto
para microondas”. Si no tienen el rótulo, pruébelos para asegurarse de que puedan
usarse con seguridad.
• Plástico – Utilícelo sólo si tiene el rótulo “Apto para microondas”. Los demás plásticos
pueden derretirse.
• Paja, mimbre y madera – Utilícelos sólo para calentar durante períodos cortos, por
ejemplo, para calentar los panecillos de la cena durante unos pocos segundos; las
canastas y los tazones pueden ser inflamables.
No son recomendables
• Jarras y botellas de vidrio – El vidrio común es demasiado delgado para usarlo en el
microondas. Puede romperse y provocar daños y lesiones.
• Bolsas de papel – Constituyen un riesgo de incendio, con la excepción de las bolsas
de palomitas de maíz que están diseñadas para ser usadas en el microondas. Platos
y vasos de espuma de poliestireno – Pueden derretirse y dejar restos insalubres en los
alimentos.
• Recipientes plásticos para almacenamiento de alimentos – Los recipientes tales como
envases de margarina pueden derretirse en el microondas.
• Utensilios de metal – Pueden dañar su horno. Saque todos los elementos de metal antes
de cocinar.
Si desea comprobar si una fuente es apta para microondas, coloque la fuente
vacía en el horno y enciéndalo en la potencia ALTA (HIGH) durante 30
segundos. Las fuentes que se calientan mucho no deben usarse.
49
Page 51

Español
TÉCNICAS DE COCCIÓN
El microondas hace que la cocción sea mucho más fácil que la cocción
tradicional, siempre que tenga estas indicaciones en mente:
Revolver
Revuelva las comidas, tales como las cazuelas y las verduras, mientras cocina
para distribuir el calor de forma pareja. La comida en la parte exterior de la
fuente absorbe más energía y se calienta más rápidamente, de modo que se
debe revolver desde la parte exterior hasta el centro. El horno se apaga cuando
abre la puerta para revolver la comida.
Disposición
Disponga los alimentos con formas desparejas, tales como presas de pollo o
chuletas, con las partes más gruesas y con más carne hacia la parte exterior
del plato giratorio, donde reciben más energía de microondas. Para evitar la
cocción excesiva, coloque las áreas delicadas, tales como puntas de espárragos,
hacia el centro del plato giratorio.
Cubrir
Cubra los alimentos con tiras angostas de papel aluminio para evitar la
cocción excesiva. Las áreas que necesitan ser cubiertas incluyen alas de aves,
los extremos de las patas de aves y las esquinas de las fuentes de hornear
cuadradas. Utilice sólo pequeñas cantidades de papel aluminio. Las cantidades
más grandes pueden dañar su horno.
Dar vuelta
Dé vuelta los alimentos en la mitad del tiempo de cocción para exponer todas
las partes a la energía de microondas. Esto es especialmente importante con
alimentos de gran tamaño, tales como asados.
Dejar reposar
Los alimentos cocidos en el microondas dan lugar a la acumulación de calor
interno y continúan cociéndose durante unos pocos minutos después de que se
detiene el horno. Deje en reposo los alimentos para que se complete la cocción,
en especial los alimentos tales como tortas y verduras enteras. Los asados
precisan este tiempo para completar su cocción en el centro sin cocinar las áreas
externas en demasía. Todos los líquidos, como por ejemplo sopa o chocolate
caliente, deben agitarse o revolverse cuando se termina la cocción. Deje en
reposo los líquidos un momento antes de servirlos. Cuando calienta alimentos
para bebés, revuelva bien al momento de sacar y pruebe la temperatura antes
de servir.
Agregar humedad
Las moléculas de agua atraen la energía de microondas. Los alimentos que no
tienen una humedad pareja deben estar cubiertos o bien se debe dejarlos en
reposo para que el calor se disperse de forma pareja. Agregue una pequeña
cantidad de agua a los alimentos secos para facilitar la cocción.
50
Page 52

Nota
Español
CÓMO INSTALAR EL HORNO
Piezas y Accesorios
Saque el horno y todos los materiales de la caja de cartón y de la cavidad
del horno.
El horno viene con los siguientes accesorios:
Bandeja de vidrio .................1
Conjunto de anillo
y plato giratorio .................1
A. Panel de control
B. Eje del plato giratorio
C. Conjunto de anillo y
plato giratorio
D. Bandeja de vidrio
E.Ventana de observación
F. Conjunto para montaje
de la puerta
G. Sistema de bloqueo de seguridad
Instalación del Plato Giratorio
a. Nunca coloque la bandeja de vidrio con la
parte de arriba hacia abajo. La bandeja de
vidrio nunca debe estar obstruida.
b. Durante la cocción deben usarse siempre tanto
la bandeja de vidrio como el conjunto de anillo
y plato giratorio.
c. Para la cocción siempre deben colocarse todos los alimentos y los recipientes
que los contienen sobre la bandeja de vidrio.
d. Si la bandeja de vidrio o el conjunto de anillo y plato giratorio se parte o
rompe, póngase en contacto con el centro de reparaciones autorizado más
cercano.
Quite todo el material y accesorios de embalaje. Examine el horno
para cualquier daño, tal como abolladuras o puerta quebrada. No
instale si se daña el horno.
Gabinete: Quite las películas protectoras que puedan encontrarse en la superficie
del gabinete del horno microondas. No quite el recubrimiento de mica
color marrón claro que está adherido a la cavidad del horno para
51
proteger el magnetrón.
Page 53

Español
INSTALACIÓN EN ENCIMERA
Instalación
1. Elija una superficie plana que proporcione un espacio abierto suficiente para
las entradas o salidas de aire. Se necesitará un área despejada mínima de
3,0 pulgadas (7,5 cm.) entre el horno y las paredes adyacentes. Un lado
debe estar libre.
(1) Deje un área despejada mínima de 12 pulgadas (30 cm.) por el horno.
(2) No quite las patas de la base del horno.
(3) Tapar las aberturas de entrada o salida puede dañar el horno.
(4) Coloque el horno tan lejos como sea posible de aparatos radio y
televisión. El funcionamiento del horno microondas puede provocar
interferencia en la recepción de las señales de radio o televisión.
2. Enchufe el horno en un tomacorriente normal del hogar. Asegúrese de que el
voltaje y la frecuencia sean los mismos que los que figuran en la etiqueta
de clasificación.
ADVERTENCIA: No instale el horno encima de las hornillas de la cocina u otro
artefacto que produzca calor. Si se instala cerca o encimade
una fuente de calor, el horno dañarse y lagarantía no validez.
3.0 inch (7.5cm)
3.0 inch (7.5cm)
12 inch (30cm)
CERRADO
52
Page 54

Español
EXPRESS COOK
PANEL DE CONTROL
1
2
4
3
5
8
1. VISOR
Se muestra el tiempo de cocción, la
potencia, los indicadores y la hora actual.
2. DESCONGELACIÓN POR PESO O
TIEMPO
Descongelación programada basada
en el peso de los alimentos que van a
descongelarse.
3. POTENCIA
Utilícelo para fijar el nivel de potencia.
Para verificar el nivel de potencia durante
el período de cocción, presione el botón
POTENCIA (POWER).
4. BOTONES NUMÉRICOS (0-9)
Presione para programar tiempos y pesos.
53
6
7
5. MEMORIA
Guarda el procedimiento de cocción para
el próximo uso.
6. TEMPORIZADOR
El temporizador funciona de manera
independiente, incluso cuando está en
proceso un programa de cocción.
7. RELOJ
Utilícelo para configurar la hora del día o
recordar la hora del día.
8. COMENZAR/BORRAR
Borra todas las configuraciones previas
presionadas antes de comenzar a cocinar.
Durante la cocción: presione una vez para
detener el horno; dos veces para detener y
borrar todo lo que haya ingresado.
Page 55

Español
Note
INSTRUCCIONES OPERATIVAS
SEÑALES DURANTE LA CONFIGURACIÓN DEL HORNO
UNA SEÑAL: El horno acepta lo que se introdujo.
DOS SEÑALES: El horno no acepta lo que se introdujo, revise e intente nuevamente.
Cuando el horno microondas esté enchufado en un tomacorriente, el horno
mostrará “0:00”
(1) Presione “0/RELOJ” (“0/CLOCK”), el visor mostrará 00:00. Los números de la hora
destellarán.
(2) Presione las teclas numéricas e ingrese la hora correcta. Para introducir la hora, se
debe ingresar de 1:00 a 12:59. Por ejemplo, si la hora en este momento es 10:12,
presione “1, 0,1, 2”.
(3) Presione “COMENZAR/+30SEG.” (“START/+30SEC.”) para confirmar y terminar
la configuración del reloj. La hora aparecerá en el visor.
(1) Si se ingresa una hora que excede el rango de 1:00 a 12:59, la
configuración no será válida. No puede confirmar y terminar la
configuración presionando “COMENZAR/+30SEG.”
(“START/+30SEC.”).
(2) Si desea reiniciar el reloj, repita los pasos 1 a 3. Si olvida presionar
“COMENZAR/+30SEG.” (“START/+30SEC.”) por último, la
configuración anterior del reloj se mostrará después de un minuto.
2. TEMPORIZADOR DE COCINA
(1) Presione “9/TEMPORIZADOR DE COCINA” (“9/KITCHEN TIMER”) El visor
mostrará 00:00. Destellará el primer “0”, y “:” y el otro “0” se iluminará.
(2) Presione las teclas numéricas e ingrese la hora correcta. (El tiempo máximo de cocción
es de 99 minutos y 99 segundos).
(3) Presione “COMENZAR/+30SEG.” (“START/+30SEC.”) para confirmar la
configuración.
(4) Cuando llega la hora de cocción, el timbre sonará 5 veces y el horno volverá al
estado en espera. Si el reloj se configura con el sistema de 12 horas, el visor mostrará
la hora actual.
3. COCCIÓN CON MICROONDAS
Hay diez niveles de potencia disponibles.
Nivel
Potencia
Visor
(1) (1) Presione “POTENCIA” (“POWER”) para seleccionar la potencia que desee. Se
mostrarán en orden “PL10”, “PL9”, “PL8”, ... “PL1”.
10
100%
PL10
9
90%
PL9
8
80%
PL8
7
70%
PL7
6
60%
PL6
5
50%
PL5
4
40%
PL4
3
30%
PL3
2
20%
PL2
1
10%
PL1
54
Page 56

Español
Nota
Nota
Nota
(2) Presione las teclas numéricas para ingresar la hora de cocción. El tiempo máximo de
cocción es de 99 minutos y 99 segundos.
(3) Presione “COMENZAR/30SEG.” (“START/+30SEC.”) para comenzar a cocinar. Se
mostrará el tiempo de cocción restante.
En el proceso de cocción, si presiona el botón “DETENER / BORRAR”
(“STOP/CLEAR”) o si no se realiza ninguna operación durante 1 minuto, el
horno volverá automáticamente a la configuración anterior.
Eje mplo: Para cocinar la comida con 50% de potencia de microondas por
15 minutos.
(1) Presione POTENCIA (“POWER”) seis veces hasta que aparezca “PL5“.
(2) Seleccione el tiempo de cocción necesario. Presione las teclas numéricas “1,
5, 0, 0” para fijar el tiempo.
(3) Presione “COMENZAR/30SEG.” (“START/+30SEC.”) para comenzar a
cocinar.
4.
COMIENZO RÁPIDO
(1) En estado de espera, se puede comenzar la cocción automática con un nivel de
potencia de 100% fácilmente. Selecciones un tiempo de cocción de 1 a 6 minutos
presionando la tecla numérica 1 al 6. Presione “COMENZAR/30SEG.”
(”START/+30SEC.”) para aumentar el tiempo de cocción. El tiempo máximo de
cocción es de 99 minutos y 99 segundos.
(2) En estado de espera, se puede iniciar la cocción instantánea con un nivel de potencia
de 100% y con un tiempo de cocción de 30 segundos presionando “COMENZAR/
30SEG.” (”START/+30SEC.”) Cada vez que se presiona el mismo botón se
aumentará el tiempo de cocción en 30 segundos. El tiempo máximo de cocción es de
99 minutos y 99 segundos.
Cada vez que presione la tecla “COMENZAR/30SEG.” (”START/+30SEC.”)
aumentará 30 segundos la cocción para los programas de cocción
“Microondas” y “Menú automático”. No obstante, esta operación no podrá
realizarse con la función “Descongelación por peso” (“Weight Defrost”).
5. FUNCIÓN DE DESCONGELACIÓN POR TIEMPO
(1) Presione “DESCONGELAR” (“DEFROST”) para elegir la función descongelar por
peso; se muestra “dEF1”.
(2) Presione las teclas numéricas para ingresar el peso que se debe descongelar. El
peso debe ser de entre 4 y 100 onzas.
(3) Si el peso ingresado no se encuentra entre las 4 y 100 onzas, la entrada no será
válida. La unidad no funcionará hasta que se ingresen los números válidos.
(4) Presione “COMENZAR/30SEG.” (”START/+30SEC.”) para comenzar a
descongelar. Se mostrará el tiempo de cocción restante.
6. FUNCIÓN DE DESCONGELACIÓN POR TIEMPO
(1) Presione “DESCONGELAR” (“DEFROST”) dos veces para elegir la función
descongelar por tiempo. La pantalla mostrará “dEF2.”
(2) Presione las teclas numéricas para ingresar el tiempo de descongelación. El rango de
tiempo efectivo es 00:01~99:99.
(a) Si el tiempo ingresado no está entre los 00:01 y 99:99, no se oirá
un “pitido” y el microondas no funcionará hasta que se ingresen los
números válidos.
(b) La potencia de microondas por defecto es nivel 3. No puede cambiarse.
(3) Presione “COMENZAR/30SEG.” (”START/+30SEC.”) para comenzar a
descongelar. Se mostrará el tiempo de cocción restante.
55
Page 57

CONFIGURACIONES DE COCCIÓN RÁPIDA
Las configuraciones de COCCIÓN RÁPIDA le permiten cocinar o recalentar
alimentos automáticamente sin introducir el nivel de potencia ni el tiempo.
7. PALOMITAS DE MAÍZ
a) P resione “PALOMITAS DE MAÍZ” (“POPCORN”) varias veces hasta que el
número que desea aparezca en el visor. Se mostrarán los indicadores “1.75”,
“ 3.0” y “3.5” en orden. Por ejemplo, si presiona “PALOMITAS DE MAÍZ” (
“POPCORN”) una vez, se muestra “1.75”.
2) Presione “COMENZAR/30SEG.” (”START/+30SEC.”) para comenzar la
cocción. El tiempo de cocción se cuenta en forma regresiva.
c) Cuando la cocción finaliza, suena el timbre cinco veces. La unidad volverá
al estado de espera. se mostrará “0:00”. Si se ha configurado el reloj, se
mostrará la hora actual.
Español
Tiempos (Presione "Popcorn")
Uno
Dos
Tres
Peso (onza)
1.75
3.0
3.5
Exhibición
1.75
3.0
3.5
8. PATATAS
a) Presione “PATATAS” (“POTATO”) varias veces hasta que el número que desea
aparezca en el visor, se mostrará “1”,”2” o “3” en orden.
Configuración “1”: 1 patata (aproximadamente 3,0 onzas)
Configuración “2”: 2 patatas (aproximadamente 6,0 onzas)
Configuración “3”: 3 patatas (aproximadamente 9,0 onzas)
Por ejemplo, presione “PATATAS” (“POTATO”) una vez: se muestra “1”.
2) Presione “COMENZAR/30SEG.” (”START/+30SEC.”) para comenzar la
cocción. El tiempo de cocción se cuenta en forma regresiva.
c) Cuando la cocción finaliza, suena el timbre cinco veces. La unidad volverá al
estado de espera.
Tiempos (Presione "Potato")
Uno
Dos
Tres
Peso
1
2
3
Exhibición
1
2
3
56
Page 58

Español
9. PIZZA
a) Presione “PIZZA” varias veces hasta que el número que desea aparezca en
el visor. Se mostrarán los indicadores “1”, “2” o “3”. Por ejemplo, presione
“PIZZA” dos veces: En el visor aparece “2”.
2) Presione “COMENZAR/30SEG.” (”START/+30SEC.”) para comenzar la
cocción. El tiempo de cocción se cuenta en forma regresiva.
c) Cuando la cocción finaliza, suena el timbre cinco veces. La unidad volverá al
estado de espera.
Tiempos ( Presione "Pizza")
Uno
Dos
Tres
Peso
1 (sobre 3.0 onza)
2 (sobre 6.0 onza)
3 (sobre 9.0 onza)
Exhibición
1
2
3
10. BEBIDAS
a) Presione “BEBIDAS” (“BEVERAGE”) varias veces hasta que el número
que desea aparezca en el visor. Se mostrarán los indicadores “1”,
“2” y “3” en orden. Puede recalentar 1 a 3 tazas de bebidas cada vez
(aprox. 250 ml) Por ejemplo, presione “BEBIDAS” (“BEVERAGE”)
dos veces: en el visor aparecerá “2”.
b) Presione
“COMENZAR/30SEG.” (”START/+30SEC.”)
para la cocción.
c) Cuando la cocción finaliza, suena el timbre cinco veces. La unidad
volverá al estado de espera.
Tiempos ( Presione "BEVERAGE")
Uno
Dos
Tres
Peso
1 taza
2 tazas
3 tazas
Exhibición
1
2
3
11. SOPA
a) Presione SOPA (“SOUP”) varias veces hasta que el número que desea aparezca
en el visor. Se mostrarán los indicadores “4.0”, “8.0”, “12.0”, “16.0” en orden.
Por ejemplo, presione “SOUP” dos veces: en el visor aparecerá “8,0”.
b) Presione “COMENZAR/30SEG.” (”START/+30SEC.”) para la cocción.
c) Cuando la cocción finaliza, suena el timbre cinco veces. La unidad volverá al
estado de espera.
57
Tiempos ( Presione "SOUP ")
Uno
Dos
Tres
Cuatro
Peso
4.0 onza
8.0 onza
12.0 onza
16.0 onza
Exhibición
4.0
8.0
12.0
16.0
Page 59
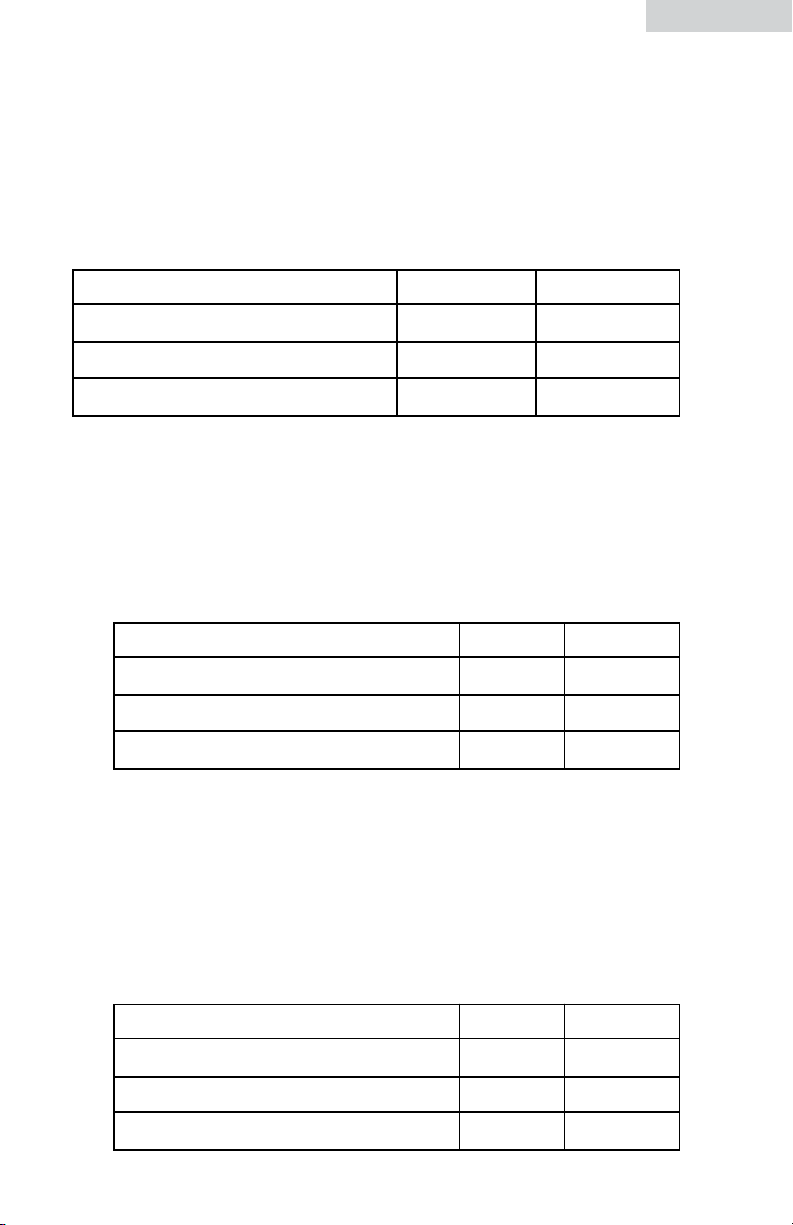
12. PLATO DE COMIDA
a) Presione “PLATO DE COMIDA” (“DINNER PLATE”) varias veces hasta que
el número que desea aparezca en el visor. Aparecerá “9.0”,” 12.0 “ y “18.0”.
Por ejemplo, presione “PLATO DE COMIDA” (“DINNER PLATE”) dos veces.
En el visor aparecerá “12,0”.
b) Presione “COMENZAR/30SEG.” (”START/+30SEC.”) para la cocción. El
tiempo de cocción se cuenta en forma regresiva.
c) Cuando la cocción finaliza, suena el timbre cinco veces. La unidad volverá al
estado de espera.
Español
Tiempos (Presione "DINNER PLATE")
Uno
Dos
Tres
Peso
9.0 onza
12.0 onza
18.0 onza
Exhibición
9.0
12.0
18.0
13. VERDURA FRESCA
a) Presione “VERDURA FRESCA” (“FRESH VEGETABLE”) varias veces hasta
que el número que desea aparezca en el visor. Se mostrarán los indicadores
“4.0”,”8.0” y “16.0” en orden. Por ejemplo, presione “VERDURA FRESCA” (
“FRESH VEGETABLE”) dos veces. En el visor aparecerá “8,0”.
2) Presione “COMENZAR/30SEG.” (”START/+30SEC.”) para comenzar la
cocción. El tiempo de cocción se cuenta en forma regresiva.
c) Cuando la cocción finaliza, suena el timbre cinco veces.
Tiempos (Presione "FRESH VEGETABLE")
Uno
Dos
Tres
Peso
4.0 onza
8.0 onza
16.0 onza
Exhibición
4.0
8.0
16.0
14. VERDURA CONGELADA
a) Presione “VERDURA CONGELADA” (“FROZEN VEGETABLE”) varias
veces hasta que el número que desea aparezca en el visor. Se mostrarán los
indicadores “4.0”,”8.0” y “16.0” en orden. Por ejemplo, presione “VERDURA
CONGELADA” (“FROZEN VEGETABLE”) dos veces. En el visor aparecerá
“8,0”.
2) Presione “COMENZAR/30SEG.” (”START/+30SEC.”) para comenzar la
cocción. El tiempo de cocción se cuenta en forma regresiva.
c) Cuando la cocción finaliza, suena el timbre cinco veces.
Tiempos (Presione "FROZEN VEGETABLE")
Uno
Dos
Tres
Peso
4.0 onza
8.0 onza
16.0 onza
Exhibición
4.0
8.0
16.0
58
Page 60

Nota
Nota
Español
15. FUNCIÓN DE MEMORIA
(1) Presione “MEMORIA” (”MEMORY”) para seleccionar la función de memoria. En el
visor aparecerá 1,2,3.
(2) Si se ha fijado el procedimiento de memoria, presione “COMENZAR/30SEG.”
(”START/+30SEC.”) para utilizarlo. Sino, fije el procedimiento. Sólo puede
configurarse una o dos etapas.
(3) Una vez que se ha finalizado con la configuración, presione “MEMORIA” (”
MEMORY”) para guardar el procedimiento y regresar al estado de espera. Si
presiona “COMENZAR/30SEG.” (”START/+30SEC.”), se guardará y comenzará
a funcionar lo que ha sido configurado.
: No se puede fijar el auto menú como procedimiento de memoria.
Ej emplo: Para configurar el siguiente procedimiento como “Memoria 2”,
si quiere cocinar los alimentos con 80% de potencia de microondas por 3 minutos
y 20 segundos, siga estos pasos:
1) En el estado en espera, presione “MEMORIA” (“MEMORY”) dos veces,
hasta que la pantalla muestre “2”.
2) Presione “POTENCIA” (“POWER”) tres veces hasta que se muestre “PL8”
3) Presione las teclas numéricas “3”, “2”, “0” en orden para ingresar el tiempo
de cocción.
4) Presione “MEMORIA” (“MEMORY”) para guardar la configuración.
Suena el timbre una vez y la unidad vuelve al estado de espera. Si presiona
“Comenzar/+30Seg.” (“START/+30SEC.”) después del paso anterior, el
procedimiento se guardará como memoria 2 y se pondrá en funcionamiento.
5) Si no se corta la energía eléctrica, el procedimiento seguirá guardado todo
el tiempo. Si se corta, debe volver a configurarse el procedimiento.
6) Si desea ejecutar el procedimiento guardado, en el estado en espera
presione “MEMORIA” (“MEMORY”) dos veces. La pantalla muestra “2”.
Luego presione “Comenzar/+30Seg.” (“START/+30SEC.”)
para comenzar.
16. COCCIÓN EN VARIAS ETAPAS
Se pueden configurar un máximo de 2 etapas de cocción. Si una etapa consiste en la
descongelación por peso, esta etapa será automáticamente la primera. Sólo una de las
2 etapas puede ser descongelación.
Ejemplo: : Para descongelar bistecs de 20 onzas primero y luego cocinarlos con la
potencia de 80% durante 7 minutos:
1) Presione “DESCONGELAR” (“DEFROST”) para elegir la función
descongelar por peso; se muestra “dEF1”.
2) Presione “2, 0” para fijar el peso.
3) Presione “POTENCIA” (“POWER”) tres veces para que la potencia
del microondas sea del 80%;
4) Presione “7, 0” para fijar el tiempo de cocción.
5) Presione “COMENZAR/30SEG.” (”START/+30SEC.”) para
comenzar la cocción.
Cuando finalice el procedimiento de descongelación, el timbre sonará una vez,
entonces comienza la segunda etapa..
(2) La descongelación por tiempo puede fijarse como una de las etapas.
59
(1) El menú automático no puede fijarse como una de las 2 etapas.
Page 61

Español
17. FUNCIÓN DE INFORMACIÓN
(1) En el estado de cocción, presione “0/RELOJ” (“0/CLOCK”) El indicador
mostrará el reloj por 3 segundos si éste fue configurado.
(2) En el estado de cocción, presione “POTENCIA” (“POWER”) Después de tres
segundos, el horno volverá al estado anterior. En el estado de etapas múltiples,
se puede requerir información de la misma manera que se
explicó anteriormente.
18. FUNCIÓN DE ADVERTENCIA DEL FINAL DE LA COCCIÓN
Cuando la cocción finaliza, el timbre sonará 5 veces para recordarle al usuario
que la cocción finalizó.
19. OTRAS ESPECIFICACIONES
(1) En el estado en espera, si se ha configurado el reloj, la pantalla muestra la
hora actual. El “: “ destellará; de lo contrario, muestra “0:00”.
(2) En el estado de configuración de función, el visor muestra la
configuración correspondiente.
(3) En el estado funcionamiento o pausa, el visor muestra el tiempo de
cocción restante.
(4) Durante el funcionamiento, si se detiene la cocción o si se abre la puerta, debe
presionarse “COMENZAR/30SEG.” (”START/+30SEC.”) para seguir
el funcionamiento.
20. FUNCIÓN DE DISPOSITIVO DE SEGURIDAD PARA NIÑOS
El bloqueo de seguridad previene que los niños pongan en funcionamiento la
unidad sin supervisión.
Para trabar: Mientras esté activado el modo de seguridad,
presione “DETENER / BORRAR” (”STOP/
CLEAR”) durante 3 segundos. Sonará un “pitido”
largo avisando que el dispositivo de seguridad para
niños está activado. En el visor aparecerá
“
Desactivar la traba
para niños: Mientras esté activado el modo de seguridad,
presione “DETENER / BORRAR” (”STOP/
CLEAR”) durante 3 segundos. Sonará un “pitido”
largo avisando que el dispositivo de seguridad para
niños está desactivado.
”.
60
Page 62

Español
CUIDADO Y LIMPIEZA
1. Cuando limpie la puerta y las superficies del horno, use sólo jabones o
detergentes suaves y no abrasivos aplicados con una esponja o paño suave.
2. Apague el horno y saque el enchufe de energía del tomacorriente de la
pared antes de limpiarlo.
3. Mantenga limpio el interior del horno. Cuando las salpicaduras de comida
o los líquidos derramados se adhieran a las paredes del horno, límpielos
con un paño húmedo. Puede usarse un detergente suave si el horno está
muy sucio. Evite el uso de aerosoles y otros limpiadores fuertes, ya que
pueden manchar, vetear u opacar la superficie de la puerta.
4. Las superficies exteriores deben limpiarse con un paño húmedo. Para evitar
daños a las piezas operativas dentro del horno, no debe permitirse que el
agua penetre en las aberturas para ventilación.
5. Limpie la ventana de ambos lados con un paño húmedo para quitar las
salpicaduras.
6. No permita que se humedezca el panel de control. Límpielo con un paño
suave y húmedo. Cuando limpie el panel de control, deje la puerta abierta
para evitar que el horno se encienda accidentalmente.
7. Si se acumula vapor dentro o alrededor de la parte exterior de la puerta
del horno, límpielo con un paño suave. Esto puede suceder cuando el horno
microondas se pone en funcionamiento en condiciones de alta humedad, y
es normal.
8. Algunas veces es necesario sacar la bandeja de vidrio para limpiarla. Lave
la bandeja en agua tibia y jabonosa o en un lavavajillas.
9. El anillo con rodillos y la puerta del horno deben limpiarse con regularidad
para evitar el ruido excesivo. Simplemente limpie la superficie inferior del
horno con un detergente suave. El anillo con rodillos puede lavarse con
agua con un jabón suave o en el lavavajillas. Cuando saque el anillo
con rodillos del piso de la cavidad para limpiarlo, asegúrese de volver a
colocarlo en la posición adecuada.
10. Para sacar los olores del horno, mezcle una taza de agua con el jugo y la
cáscara de un limón en un tazón profundo, encienda el microondas durante
5 minutos. Limpie minuciosamente y seque con un paño suave.
11. Cuando sea necesario reemplazar la luz del horno, póngase en contacto
con un vendedor para que la reemplace.
61
Page 63

Español
DETECCIÓN Y SOLUCIÓN DE PROBLEMAS
Identifique su problema utilizando el cuadro que aparece a continuación y
pruebe las soluciones para cada problema. Si el horno microondas aún no
funciona correctamente, póngase en contacto con el centro de atención al cliente
de Haier o al centro reparaciones autorizado más cercano.
PROBLEMA
El horno no
enciende.
Se forma un
arco eléctrico
o se producen
chispas.
La comida no
se cocina en
forma pareja.
Comida
recocida.
Comida poco
cocida.
El horno no
descongela
correctamente
CAUSA POSIBLE
a. El cable eléctrico del horno no
está enchufado.
b. La puerta está abierta.
c. Se configuró un funcionamiento
equivocado.
a. Se utilizaron materiales no aptos
para horno microondas.
b. Se puso en funcionamiento el
horno vacío.
c. Hay comida derramada en la
cavidad.
a. Se utilizaron materiales no aptos
para horno microondas.
b. Los alimentos no se han
descongelado por completo.
c. El tiempo de cocción y el nivel de
potencia no son adecuados.
d. No se ha dado vuelta o no se ha
revuelto la comida.
El tiempo de cocción y el nivel de
potencia no son adecuados.
a. Se utilizaron materiales no aptos
para horno microondas.
b. Los alimentos no se han
descongelado por completo.
c. Los orificios de ventilación del
horno están obstruidos.
d. El tiempo de cocción y el nivel de
potencia no son adecuados.
a. Se utilizaron materiales no aptos
para horno microondas.
b. El tiempo de cocción y el nivel de
potencia no son adecuados.
c. No se ha dado vuelta o no se ha
revuelto la comida.
SOLUCIÓN POSIBLE
a. Enchufe el cable en el
tomacorriente.
b. Cierre la puerta e intente
nuevamente.
c. Revise las instrucciones.
a. Utilice solamente utensilios de
cocina aptos para microondas.
b. No ponga en funcionamiento
el horno vacío.
c. Limpie la cavidad con una
toalla
a. Utilice solamente utensilios de
cocina aptos para microondas.
b. Descongele los alimentos por
completo.
c. Utilice el tiempo de cocción y
el nivel de potencia correctos.
d. Dé vuelta o revuelva la
comida.
Utilice el tiempo de cocción y el
nivel de potencia correctos.
a. Utilice solamente utensilios de
cocina aptos para microondas.
b. Descongele los alimentos por
completo.
c. Verifique que los orificios de
ventilación del horno no estén
obstruidos.
d. Utilice el tiempo de cocción y
el nivel de potencia correctos.
a. Utilice solamente utensilios de
cocina aptos para microondas.
b. Utilice el tiempo de cocción y
el nivel de potencia correctos.
c. Dé vuelta o revuelva la
comida.
62
Page 64

Español
GARANTÍA LIMITADA
¿Qué se cubre y por cuánto tiempo?
Esta garantía brinda cobertura por todos los defectos
de mano de obra o en los materiales por un período
de:
12 meses por mano de obra
12 meses por las piezas (únicamente piezas
funcionales)
10 años para el tubo magnetrón del
microondas (la pieza solamente)
La garantía comienza el día de la compra del
producto. Los clientes deben proporcionar a Haier una
prueba de la fecha de compra y el recibo original junto
con la marca, el modelo y el número de serie para
la verificación previa a la provisión de servicios con
garantía.
El servicios de reparaciones en el taller está disponible
para determinados productos, seleccionados a
discreción de Haier America.
EXCEPCIONES: Garantía en uso comercial o
de alquiler
90 días para la mano de obra, 90 días para
las piezas
No se aplica ninguna otra garantía.
Qué cubre.
1. Los repuestos mecánicos y eléctricos, que sirven
para un propósito funcional de este artefacto, están
cubiertos por un período de 12 meses o como
se estableció previamente. Esto incluye todos los
repuestos, excepto las terminaciones, el acabado y
el vidrio.
2. La garantía limitada no cubre créditos o reintegros
por pérdidas o lesiones causados por el producto o
defectos del producto incluyendo, entre otros, daños
consecuentes o fortuitos.
3. Si el tubo magnetrón falla (para el microondas)
debido a mano de obra o materiales deficientes, se
reemplazará la pieza.
¿Qué se hará?
1. Los repuestos mecánicos o eléctricos que se pruebe
que son defectuosos durante el uso normal y durante
el período de garantía especificado, se repararán o
reemplazarán según la discreción de Haier.
TODOS LOS SERVICIOS DE GARANTÍA DEBEN SER
PROPORCIONADOS ÚNICAMENTE POR NUESTROS
CENTROS DE REPARACIÓN DE FÁBRICA, O POR UN
TÉCNICO DE ATENCIÓN A CLIENTES AUTORIZADO
POR HAIER.
Si se determina que la reparación no es adecuada
o que los repuestos para el reemplazo no están
disponibles para la reparación, Haier cambiará
el producto por uno nuevo o reacondicionado en
fábrica que sea el mismo o similar al original según su
discreción.
2. El comprador no incurrirá en ningún gasto por
repuestos funcionales y mano de obra de los ítems
cubiertos durante el período inicial de 12 meses o
como se indicó previamente.
3. ESTA GARANTÍA CUBRE LOS ARTEFACTOS
DENTRO DE LA PORCIÓN CONTINENTAL DE LOS
ESTADOS UNIDOS, CANADÁ Y PUERTO RICO.
NO BRINDA COBERTURA EN LOS SIGUIENTES
CASOS:
Daños por instalación incorrecta. Los daños ocurridos
durante el envío. Los defectos que no sean defectos
de fabricación. Daños causados por el mal uso,
abuso, los accidentes, las alteraciones, la falta de
atención y mantenimiento apropiados, la corriente
o el voltaje incorrectos o los casos de fuerza mayor.
Daños causados por todo aquello que no sea el uso
hogareño. Daños causados por otra reparación que no
sea la brindada por un vendedor autorizado o centro
de reparaciones. Terminaciones decorativas, vidrio o
lámparas de luz. Costos de transporte y envío. Mano
de obra (después de los 12 meses iniciales). Crédito
o reintegro por productos después de los 30 días de
la fecha de compra. Pérdidas por los alimentos que
se echan a perder a causa de una falla mecánica
del producto o por cualquier retraso en la provisión
de servicios, reparación o reemplazo. Esta garantía
limitada no se aplica a productos reacondicionados
en fábrica o a unidades adquiridas como nuevas
o de segunda mano. ESTA GARANTÍA LIMITADA
SE OTORGA EN LUGAR DE CUALQUIER OTRA
GARANTÍA, EXPRESADA O IMPLÍCITA INCLUYENDO
LAS GARANTÍAS DE COMERCIABILIDAD E
IDONEIDAD PARA UN FIN DETERMINADO. El recurso
provisto en esta garantía es exclusivo y otorgado
en lugar de cualquier otro recurso. Esta garantía no
cubre daños fortuitos o consecuentes, de modo que
las limitaciones descritas anteriormente pueden no
aplicarse a su caso. Algunos estados no permiten
limitaciones en cuanto a la duración de una garantía
implícita, de modo que las limitaciones descritas
anteriormente pueden no aplicarse a su caso Esta
garantía le concede derechos legales específicos, y
usted puede tener otros derechos, que varían de un
estado a otro.
Haier America,
New York, NY 10018
Para hacer su producto mantener, entre en contacto con por favor el teléfono directo del servicio de cliente de Haier América 24 horas al día, 7
días a la semana. En los E.E.U.U., llamada 1-877-337-3639.
63
Page 65

IMPORTANT
Do Not Return This Product To The Store
If you have a problem with this product, please contact the "Haier Customer
Satisfaction Center" at 1-877-337-3639.
DATED PROOF OF PURCHASE REQUIRED FOR WARRANTY SERVICE
IMPORTANT
Ne pas Réexpédier ce Produit au Magasin
Pour tout problème concernant ce produit, veuillez contacter le service des
consommateurs ‘Haier Customer Satisfaction Center’ au 1-877-337-3639.
UNE PREUVE D’ACHAT DATEE EST REQUISE POUR BENEFICIER DE LA GARANTIE.
IMPORTANTE
No regrese este producto a la tienda
Si tiene algún problema con este producto, por favor contacte el "Centro de Servicio al
Consumidor de Haier" al 1-877-337-3639 (Válido solo en E.U.A).
NECESITA UNA PRUEBA DE COMPRA FECHADA PARA EL SERVICIO DE LA GARANTIA
115V, 60 Hz
Made in China
Fabriqué en Chine
Hecho en China
Haier America
New York, NY 10018
Printed in China
Issued: March 2008
Part # MW-9999-38
MWM0701TW
©2008 Haier America Trading, LLC. All Rights Reserved. 100522 0308.
 Loading...