

Page 1
Table of Contents
Before using the appliance
Matters Needing Attention......1-3
Installation.............................4-5
Functions .............................6-8
How to operate the wasing machine
Program Setting Guidance Table...9
Preparation ...........................10
Washing Procedure ..........11-12
Maintenance ..........................13
Technical Specifications ........15
Wiring Circuit .........................16
Maintenance
Troubleshooting .....................14
Operation Manual
Automatic Drum Washing Machine
Name of Parts...inside front cover
Meaning of crossedout wheeled dustbin:
Do not dispose of ele ctrical appliances as unsorted
municipal waste, use separate collection facilities.
Contact you local government for information regarding
the collection systems available.
If electrical appliances are disposed of in landfills
or dumps, hazardous substances can leak into the
groundwater and get into the food chain, damaging your
health and well-being.
When replacing old appliances with new ones, the
retailer is legally obligated to take back your old
a
pp
liance for disposals at least free of charge.
MWB146E
MWB126E
MWB106E
MWB86E
Page 2

Top
Handle
Program selector
Detergent dispenser
Name of Parts
Door
Porthole
Function selector
Caution and Warning symbols
Bottom planel
This diagram may be slightly different from the layout of the washing
machine you have just purchased due to techincal improvements
For you safely,any instructions in this manual with this
"Warning"sign must be followed strictly.
For your safety and to prevent damage to the washing
machine,any instructions in this manual with this "Stop"
sign must be followed strictly.
ON/OFF button
3
Page 3

Matters Needing Attention
ƽ Safety
.A separate earthed socket is required for the
power supply. The washing machine must be
positioned so that the plug is accessible.
2. Hold the plug and not the electric cable when
unplugging the washing machine.
3.Fuses in the power circuit should be rated for 15A.
If the supply cord is damaged, it must be replaced
by the manufacturer, its service agent or similarly
qualified persons in order to avoid a hazard.
4. Do not touch or use the washing machine bare-
footed or when the hands or feet are wet.
5.Do not use flammable detergent or dry clean
ing agent; do not use flammable spray in cl ose
vicinity to the washing machine; do not remove
or insert the plug in the presence of flammable
gas.
6. The door of the washing machine will become hot
during the heating process. Avoid contact with the
door during the heating process. For safety, keep
children away from the washing machine.
Keep children away from the packing materials after unpacked.
Wiring Circuit
MWB146E MWB126E MWB106E MWB86E
Page 4
15
2
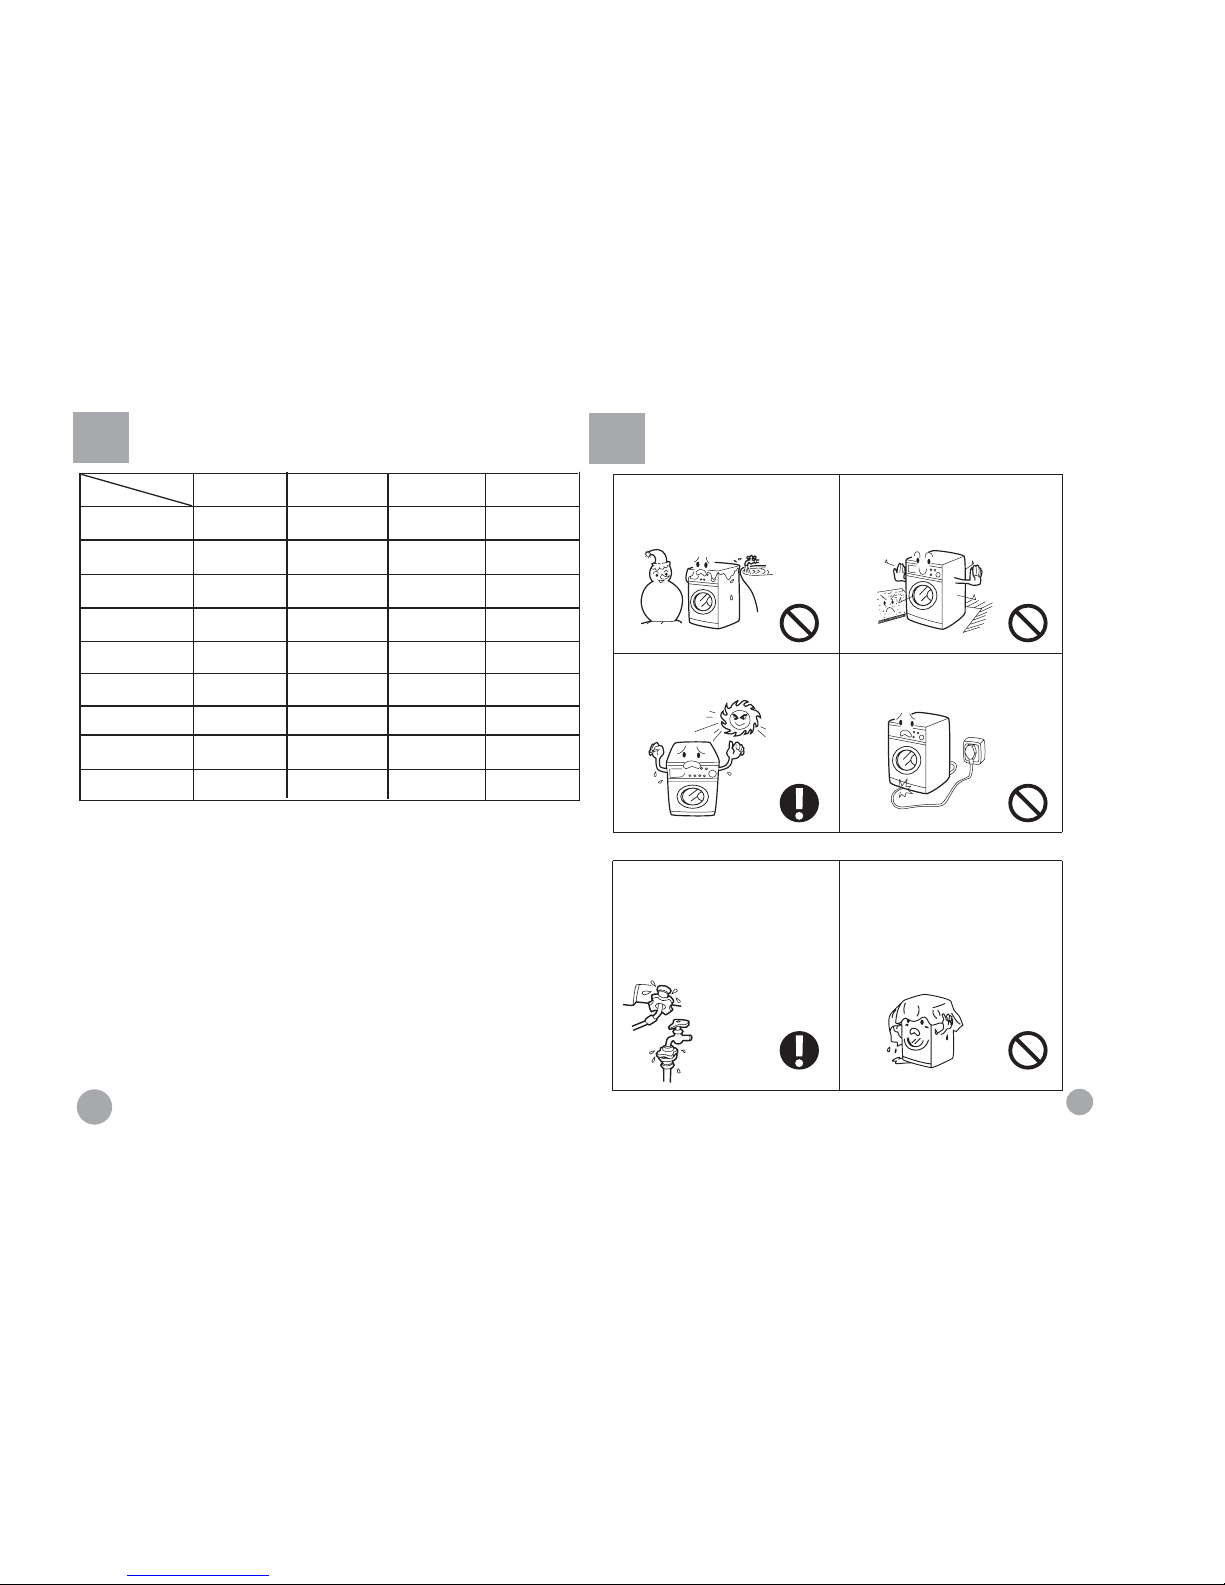
8.The washing machine should not be installed
outdoors or in a damp place. In the event of water
leakage or splashes allow the machine to dry
naturally.
10.Keep away from heat sources and direct sunlight
to prevent plastic and rubber components from
aging.
11.During installation, ensure that the electric
cable is not trapped by the washing machine
and avoid damage to the electric cable.
During Use
1. Before use, check the joints of the filling hose,
the tap and the drainage hose for possible
problems from water pressure fluctuations.
If joints are loose or there is leakage, turn
off the tap and repair. Do not use the washing
machine until the hoses are properly fixed.
The appliance is to be connected to the water
mains using new hose-sets
and that old hose
-sets should not be reused
2.
Keep the door slightly open when the washing
machine is not in use to prevent formation of
odors; do not cover the washing machine with
plastic cover so that inside dampness cannot
be kept in.
Matters Needing Attention
9. The carpet must not obstruct the ventilation
openings in the base of the washing machine.
Technical Specifications
Model
Power supply
Power(Max)
Water pressure (MPa)
Max. wash load (kg)
Spinning speed (Max) (r/min)
Wash program
Weight (kg)
Anti-Electric shock
Anti-Water class
MWB146E
220V-240V~/(50Hz)
1950
6
1400
11
69
I
IPX4
MWB126E
220V-240V~/(50Hz)
1950
6
1200
11
69
I
IPX4
220V-240V~/(50Hz)
1950
6
1000
11
69
MWB106E
I
IPX4
MWB86E
220V-240V~/(50Hz)
1950
6
800
11
69
I
IPX4
0.03p1
0.03p10.03p1 0.03p1
Page 5
Troubleshooting
The following circumstances do not constitute problems. Do not contact the maintenance service
until the
problem has been confirmed.
Problem Possible cause
The washing machine fails to operate
Poor connection to power supply
Power failure
Door is not properly closed (It will show E1)
Machine has not been switched on
Washing machine cannot be filled
with water
Water tap is not turned on (It will show E5)
Water pressure is less than 0.03MPa
The inlet hose is kinked
Water supply failure
The program dial is not properly set
The door is not properly closed
The inlet hose filter is blocked
The machine is draining while is
being filled
The height of the drainage hose is below 80cm (it
should be within 80-100cm)
The drainage hose e nd is in water
Drainage failure
Drainage hose is blocked (It will show E2)
Drainage hose end is exceed 100cm above the floor
level
The filter is blocked
Strong vibration during spin drying
Not all packing bolts have been removed
Washing machine is located on an uneven surface
Machine load is ove r 6kg.
Operation stops be fore complet ion
of a wash cycle
Water or electricity failure
Washing machine is in soak cycle
Operation stops for a period of time
Washing machine is in soak cycle
Washing machine gives an error message.
Excessive foam in the drum, which
is spilled to the distribution drawer
The detergent is not a low-foaming type or for manual
wash
Excessive use of detergent
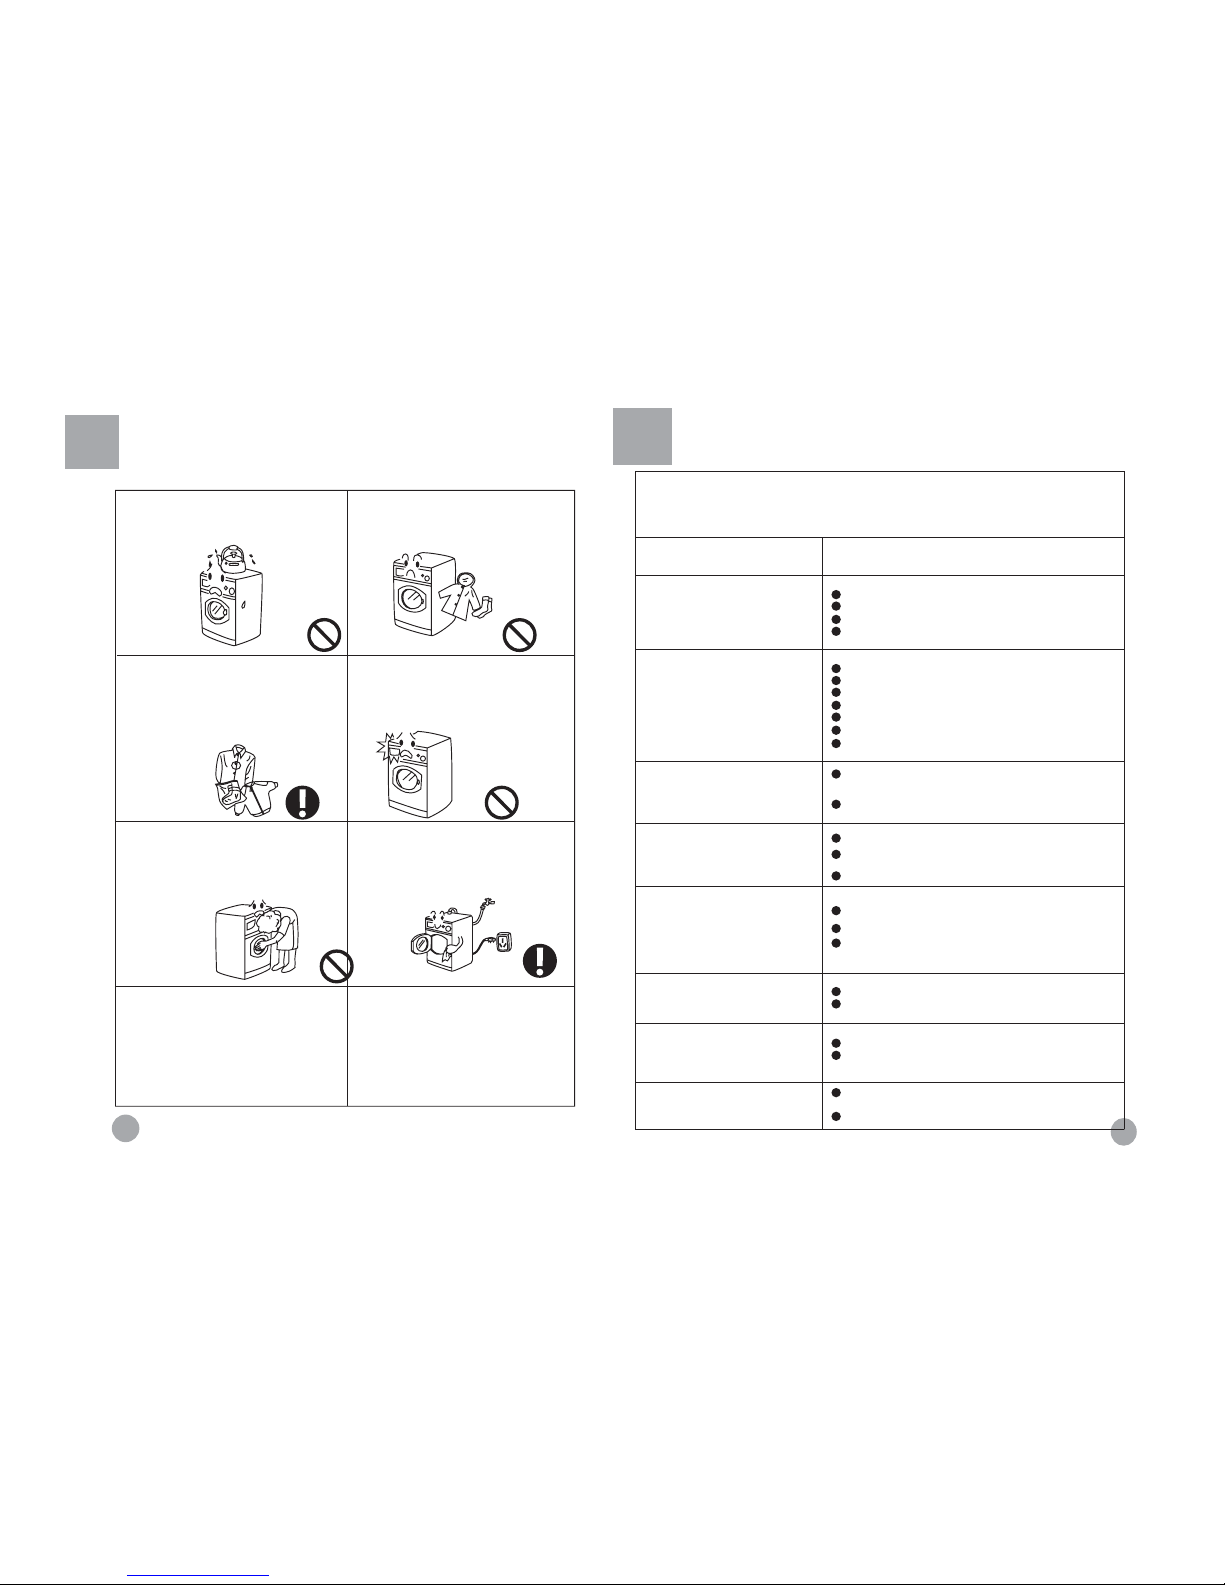
3.Do n ot p lace hea vy o b jects or container
with water on the washing machine,so as to
prevent deformation of the flat surface and
plastic parts.
4. Do not wash articles containing
polystyrene or similar elastic materials.
5. Before washing, do up zippers and ensure
that buttons are securely fastened. Place
small items, such as socks,belts,etc. in a
small washing bag or a pillow-case . To
protect the washing machine, do not wash
garments containing wire parts.
7. The door is fitted with a self-lock device
and can not be opened until 2-3 minutes
after the end of the programme.You are not
recommended not to force the door open
before the programme end. Do not open the
door if the water level is above the lower
part of the door.
8. At the end of the wash cycle, turn off the
water supply to prevent water leakage, unplug the washing machine and thoroughly
clean the trim so as not to dirty the laundry
in the next wash cycle.
6.Do not open the detergent drawing
during the wash cycle.
9.For appliances with type Y attachment,the
intructions shall contain the substance of the
following.
If the supply cord is damaged,it must be
replaced by the manufacturer,its service
agent or similarly qualifled persons in order
to avoid a hazard.
10.The installation instructions shall state
that the appliance is to be connected to the
water mains using new hose-sets and that
the old should not be used.
For washing machines with ventilation
openings in the base,that a carpet must not
obstruct the openings.
Matters Needing Attention
Page 6
13
4
ƽ
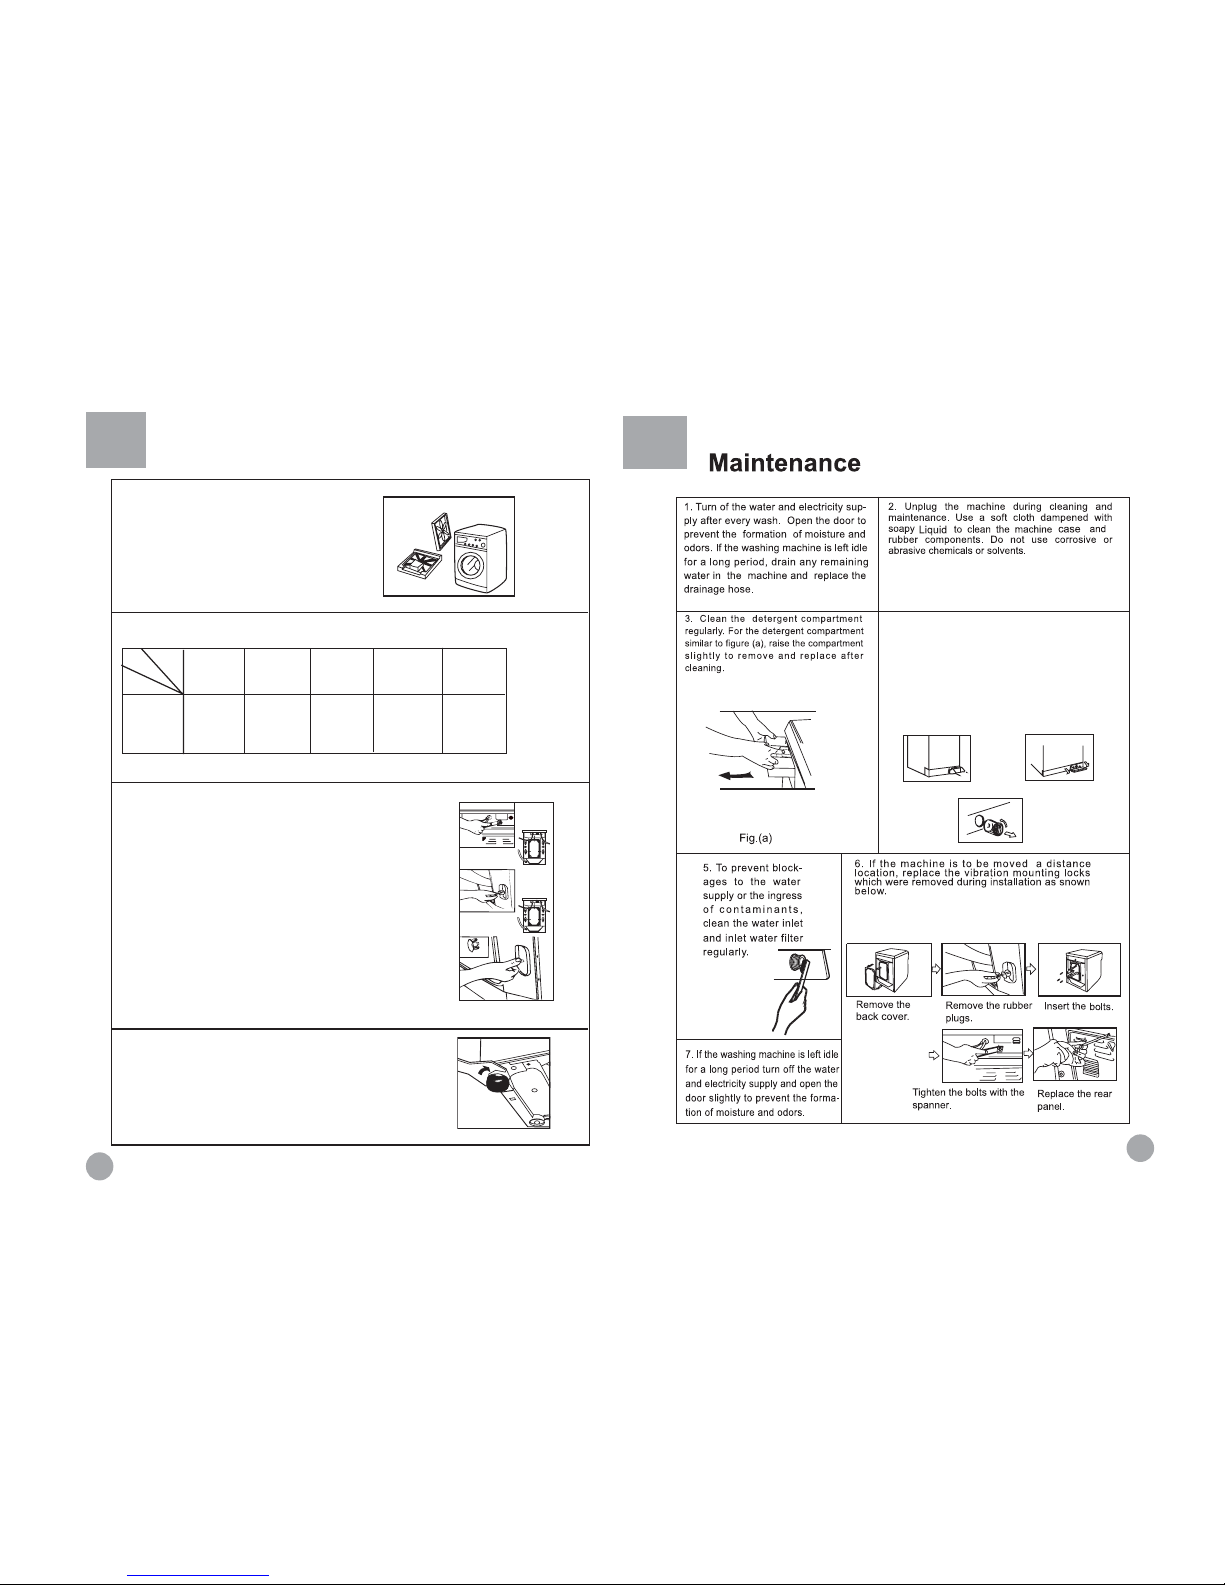
Remove all the packing materials (including the
EPE base)to prevent vibration during use, as
shown in Fig.1.Upon opening of the package,
water drops may be seen on the plastic bag and
the porthole. This is normal phenomenon resulting
from water test in the factory.
Fig
.1
ƽ
Check attachments and materials with reference to the following
ƽ
Dismantle the packing bolts as shown in Fig. 2.
The packing bolts are designed for clamping anti-vibration components
inside of the washing machine during the transportation process.
Before use:
1. Remove the back plate;
2. Remove the three packing bolts on the back plate and take out the
rubber hose;
3. Replace the back plate;
4. Fill the holes left by the packing bolts with plastic plugs.
(Attention: The packing bolts and rubber hose should be kept in a safe
place for later use)
Fig.3
ƽ
Adjusting the washing machine
There are adjustable feet under the bottom of the washing machine. Before
use, the washing machine should be adjusted, as shown in Fig. 3, so that it
is level.
Fig.2
Model
MWB146E
MWB126E
MWB106E
MWB86E
Qty
Name
Operation
manual
Quality
certificate
Water
hose
Drainage
holder
Plastic
plugs
Installation
1
1
1
1
3
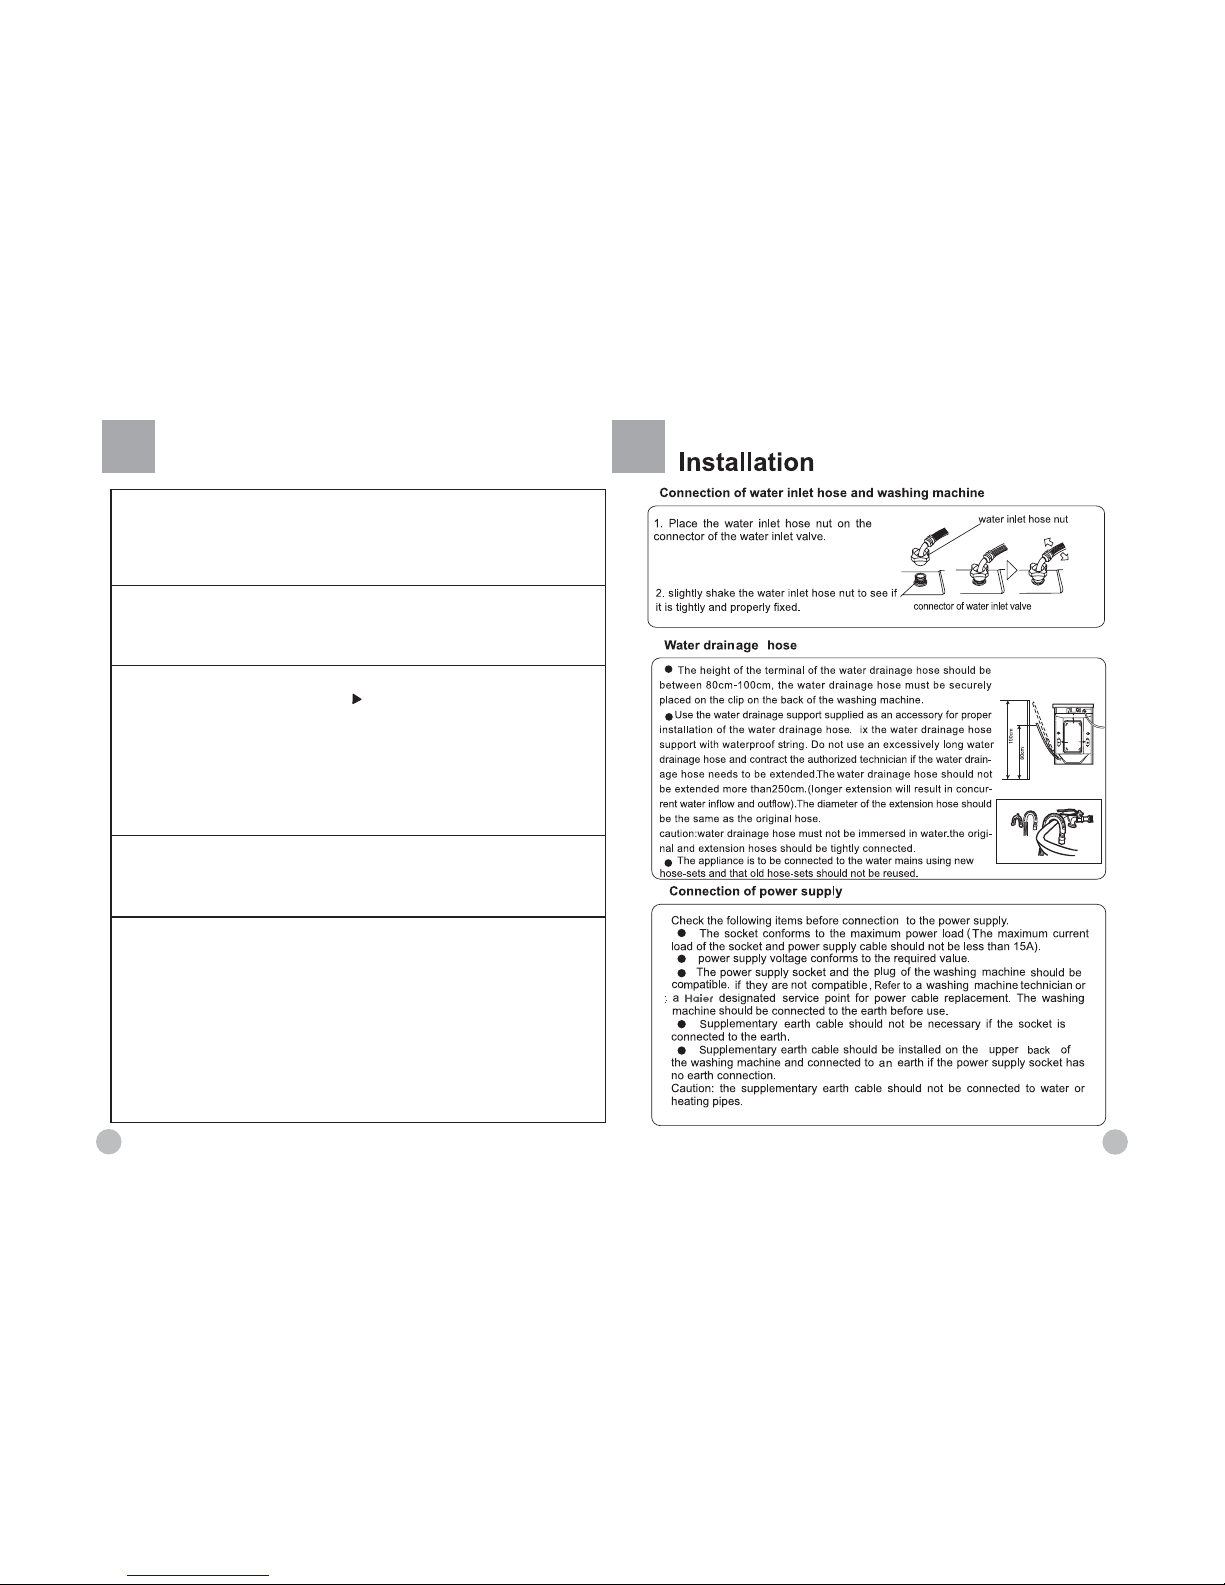
4. Clean the filter Cleaning methods (once a month)
1) Pick up the bottom cover lightly (Fig. 1);
2) Screw out filter by turning counterclockwise (Fig. 2);
3) Flash clean with running water;
4) Replace the filter by turning clockwise and remount the
cover.
Caution: The filter must be in place, or it may lead to
leakage. (
Fig3
)
Fig1
Fig2
Fig3
Page 7
5
12
F
Washing Procedure
5. Function selecting button
Select functions as required (refer to the "Operational Functions" section).
Hints for saving energy
During operation
1. Collect clothes for one full wash load.
2. Do not overload the washing machine.
3. Pre-wash heavily soiled clothes.
4. Reduce the amount of detergent or choose standard or delicate wash
programs for slightly soiled clothes.
5. Choose a proper washing temperature. Only exceed 60
ć
for heavily
soiled clothes.
6. Do not use more detergent than required.
7. Softening agent makes clothes feel softer and easier to iron.
7. Finish
The washing machine will stop operation automatically when a wash cycle ends. The "End" sign will
appear. Open the door and take out the laundry. Then turn off the tap and unplug the power cable.
4. Setting washing temperature
Press the temperature button until " -- C" is displayed if heating is not needed; otherwise, select
an appropriate temperature as required (refer to the "Guide to Operational Program Selection").
6. Washing
Press Start/Pause key and the LCD will display
""
, whic h means the washer ha s s tarted
operation. The LCD will display program remaining time.
T
he following functions ca nnot be re-selected.
1).
2)
3).
.
Temperature Selection Key
Reserve Time Key
All the funct ions alr eady c omplete d.
ƽ
O
Page 8
Washing Procedure
Notes: 1) When first using the washing
machine,let it run unloaded for one program
to prevent the laundry from being tainted by
oil or dirty water from the washing machine.
2) Do not overload the washing
machine.
To get the best washing effect, an appropriate washing program should be selected
according to the laundry type.
Note: The above operations refer to conditions without power-off memory. Or the washing
machine will continue operation from where the program was broken. To clear memory,
press the Start/Pause button. Turn off the power for a few seconds and turn on again, all
the settings will be renewed.
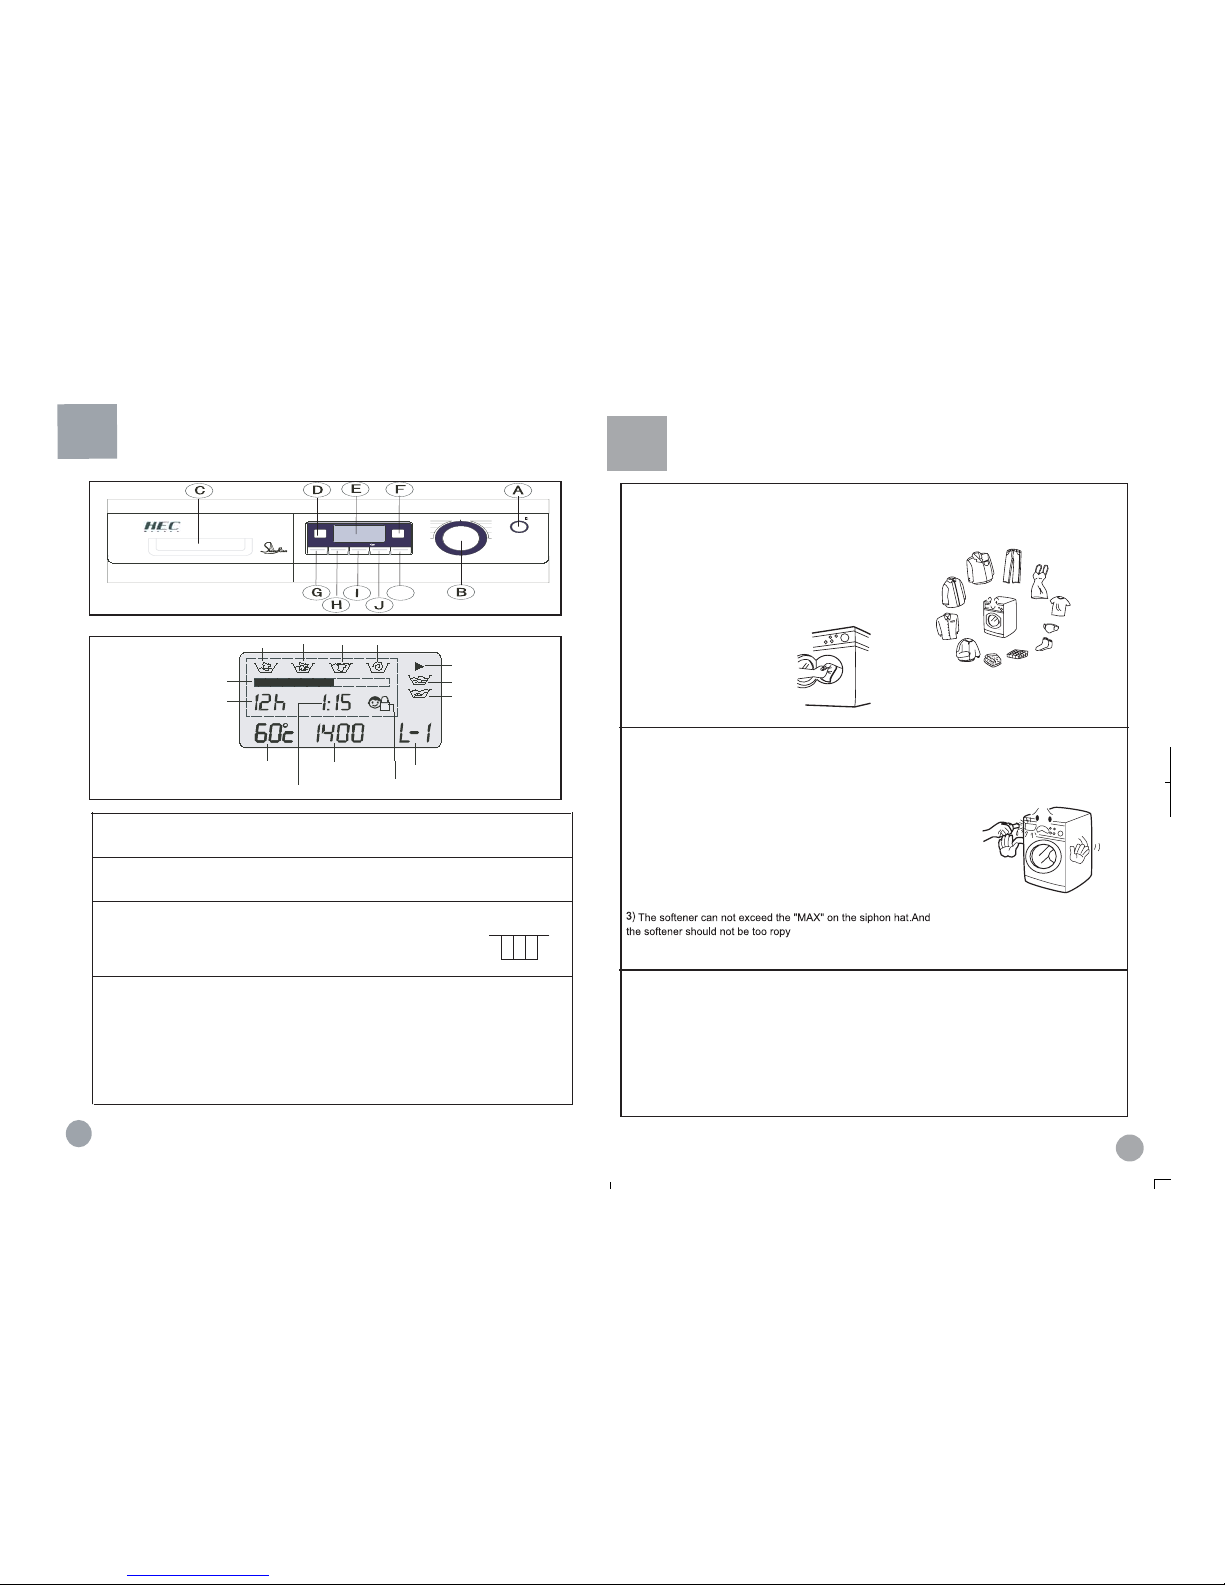
1. Loading
Slide out the detergent drawer and put the required detergent and
softening agent into the corresponding boxes. Push back the drawer gently.
Caution:
1) For pre-washing program, detergent should be added to both
compartments 1 and 2. Compartment 2 allows only solid detergents.
For other programs, do not add detergent to compartment 1.
2) Do not overuse softener; otherwise, it will damage the artificial
fibers. Refer to the instructions during use.
2. Adding detergent
3. Selecting washing program
Load Reference
ƽ
Overalls
(cotton appr 950g)
ƽBlended fabric
clothes
(appr 800g)
ƽ
T-shirt
(cotton
appr 300g)
ƽ Jackets (cotton
appr 800g)
ƽ Woolen
blankets
(appr 3000)
ƽ Single bed sheets
(cotton appr 800g)
ƽ Socks (blended
fabrics appr 50g)
ƽ
Underwear
(blended fabrics appr 70g)
ƽ
-HDQV
J
ƽ Pajamas
(appr 200g)
ƽ Shirts
(appr 300g)
Open the door, put in the laundry piece by piece.
Close the door tightly.
.
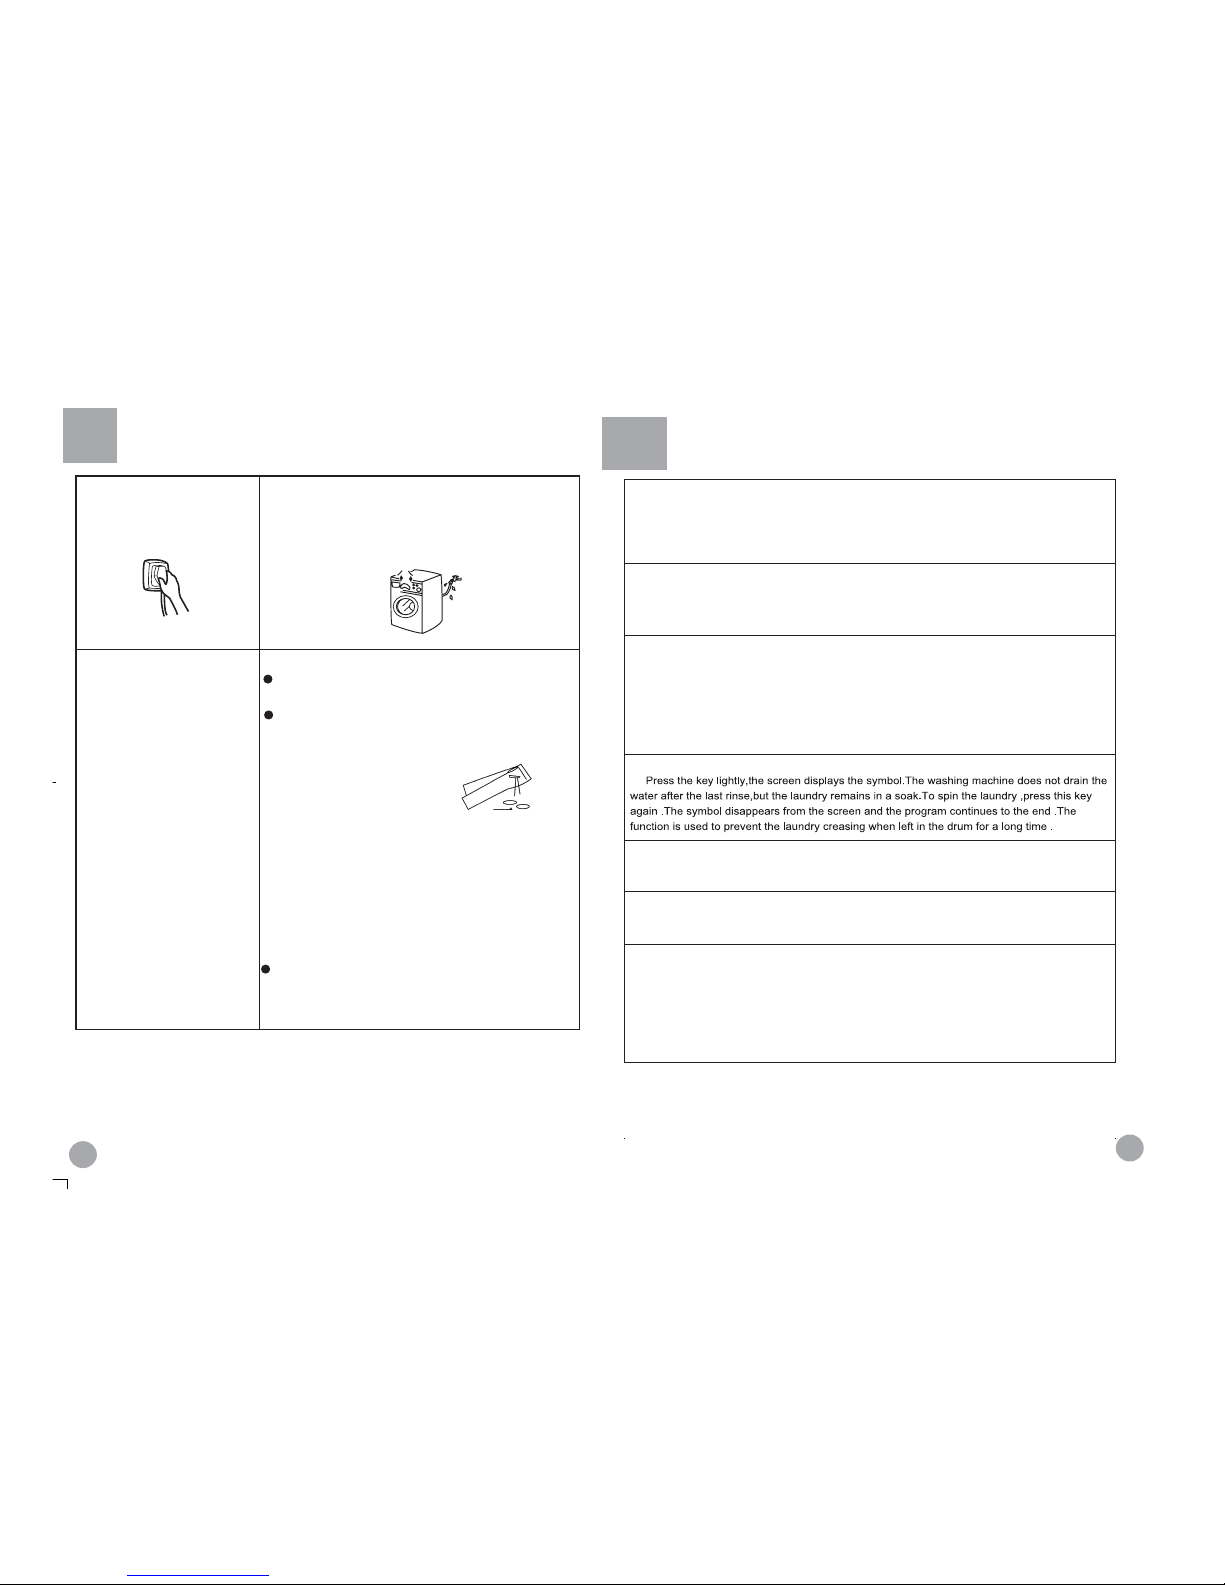
Spin Speed Display
Safety Child Lock Indicator
LoadSelec tionDisplay
Rinse Hold
Start/P ause
Spin
Rinse
Was h
Pre-
wash
Remaining Time Displa
y
Functions
Progress Indication Bar
Servation Time D isplay
Temperature Display
Display Information Introduction
A. Power On/Off Key
Press the key and the washer will be automatically energized, release the key and powe
is disconnected.
B. Program Selection Knob
Turn the knob clockwise/counterclockwise to select the desired program. (please refer to
Program Setting Guidance Table )
C. Det ergent Distribution Box- See Figure a for the drawer- type Detergent Dispenser
Open the dispenser box and you will see four detergent compartment of 1, 2, 3:
Compartment 1: Pre-wash Detergent
Compa rtment 2 : Washi ng De terge nt
Compartment 3:Softener , Conditioner and Perfume
D. Reservation Selection Key
Press the key to select the desired time when the washing progress completes. When
setting t his f eature, the i ndicat or la mp on t he up per left c orner of t he ke y will illumi nate.
Time reservation range is from 1 to 24 hours. The reserved ti me will i ncrease by one
hour at each press of the key. When the feature is set, press Start/Pause key and th
e
reserve time will be displayed and countdown will start. At the same time, reservation
indicator lamp will start blinking and will go off after th e washer enters into normal
washing progress.
Figure a
Delaytime
Rinsehold
Temp.
Speed
Time
Babycare
Start/Pause
Cotton
prewash
Cotton
Synthetic
Wool
Cashmere
Handwash
Quickwash
Sportwash
Duvet
Drain
Spin
Power
MW146E
.
Control Panel Function Description
123
Time
Baby Care
Page 9
Functions
Preparation
1.Power supply
Plug in the power supply 220-240V~/50Hz
2.Water supply
Turn on the tap ensure that the water in clear.
Caution:Before staring the washing machine turn on the water
faucet to ensure the water faucet and the water inlet hose are
connected correctly and do not leak.
4.Detergent selection
Only special low foam detergent should
be used in automatic drum washing
mashine,form blended or wool fabrics
special deter-gent should ne used.dry
clearning solvent should not be used
such as trichhloroethy-lene or alike
(caution :load the required amount of
detergent only).
3.Laundry treatment
Sort out clothes according to type and extent of dirt.There are
three types of clothes:cotton,synthetical and woolen (silk) fabrics.
Separate white clothes from colored.If whites and coloreds
are combimed for one load,make sure the coloreds are colorfast.
-Clothing with frayed edges or yams should be put in a wash
bag or special bag before washing.
-repair damged clothing,lose buttons or damaged zips
and hooks before washing.
-Bed sheets and table ware should be loosely loaded and not
folded.
This washing mashine is for househould use and designed
for mechanically washable clothes.When washing,separate
unwashable clothes with reference to clothes labels.
Note.
If Pr ogram key is t urned aft er reser vation ti me is s et and before
program starts, the
reserva tionwill be automati cally cancell ed.
When reservation feature is activated, t he washing start time is fixed. There will be some
difference between the reserved time and the actual program completion time due to differen
t
water inlet time and load distri bution condition during spin-dry proc ess.
E. LCD
LCD is a window to display information including washing status, washing progress,
reservation time,remaining time, heating temperature, spin
-
dry s peed, loa d selecti on and error etc.
as well as to display additional features such as power clean, super clean rinse and foaming
auto
-
check etc.
F. Start/Pause Key
When the wa sher i s ene rgized, selec t the de sired washin g progr am and press the Star t/Pau
s
key. The indicator lamp on the upper left corner of the key will illuminate to indicate that the
washer has started operation. If i t needs to pause the washing process, simply press the Start/
Pause key and the indicator la mp andremining time display will blink a nd the washer e nters into
condition. Press the Sta rt/Pause key aga in to resume washing process.
(Note: Press the Start/ Pause key only after the desire d program a nd feature are set.
G.
H. Temperature Selection Key
Press the ke y and LCD will display the s elected heating te mperature, w hich is a djustable as
needed. N ote: 20
o
C means cold water washing and no heating is involved.
.
I. Sp in Speed Selection Key
Press the key and LCD will displa y the selected spin-dry r evolution speed, whi ch is a djustable
as needed. ( When No Spin
-
dry fea ture is s elected, the time wil l decrease corres pondingly
.)
J. Load Selection key
Turn the Progr am Kn ob to sel ect t he desir ed pr ogram (s ee Pr ogram S etting G uidance Table)
Press the key and manually select different programs and power-saving and water-seaving fea-
ture based on the volume of load. LCD will display L-1(2,3,4,5,6),indicating the washing loa d is
1(2,3,4,5,6) kg and program time will c hange accordingly. (The feature is not
available in
Wool,Cashmere, Silk, S peedy, Drainage Only a nd Spin Only Progra m. Only L–1, 2, 3 are
available for
Chemical Fiber program. )
Rinse Hold Key
Page 10
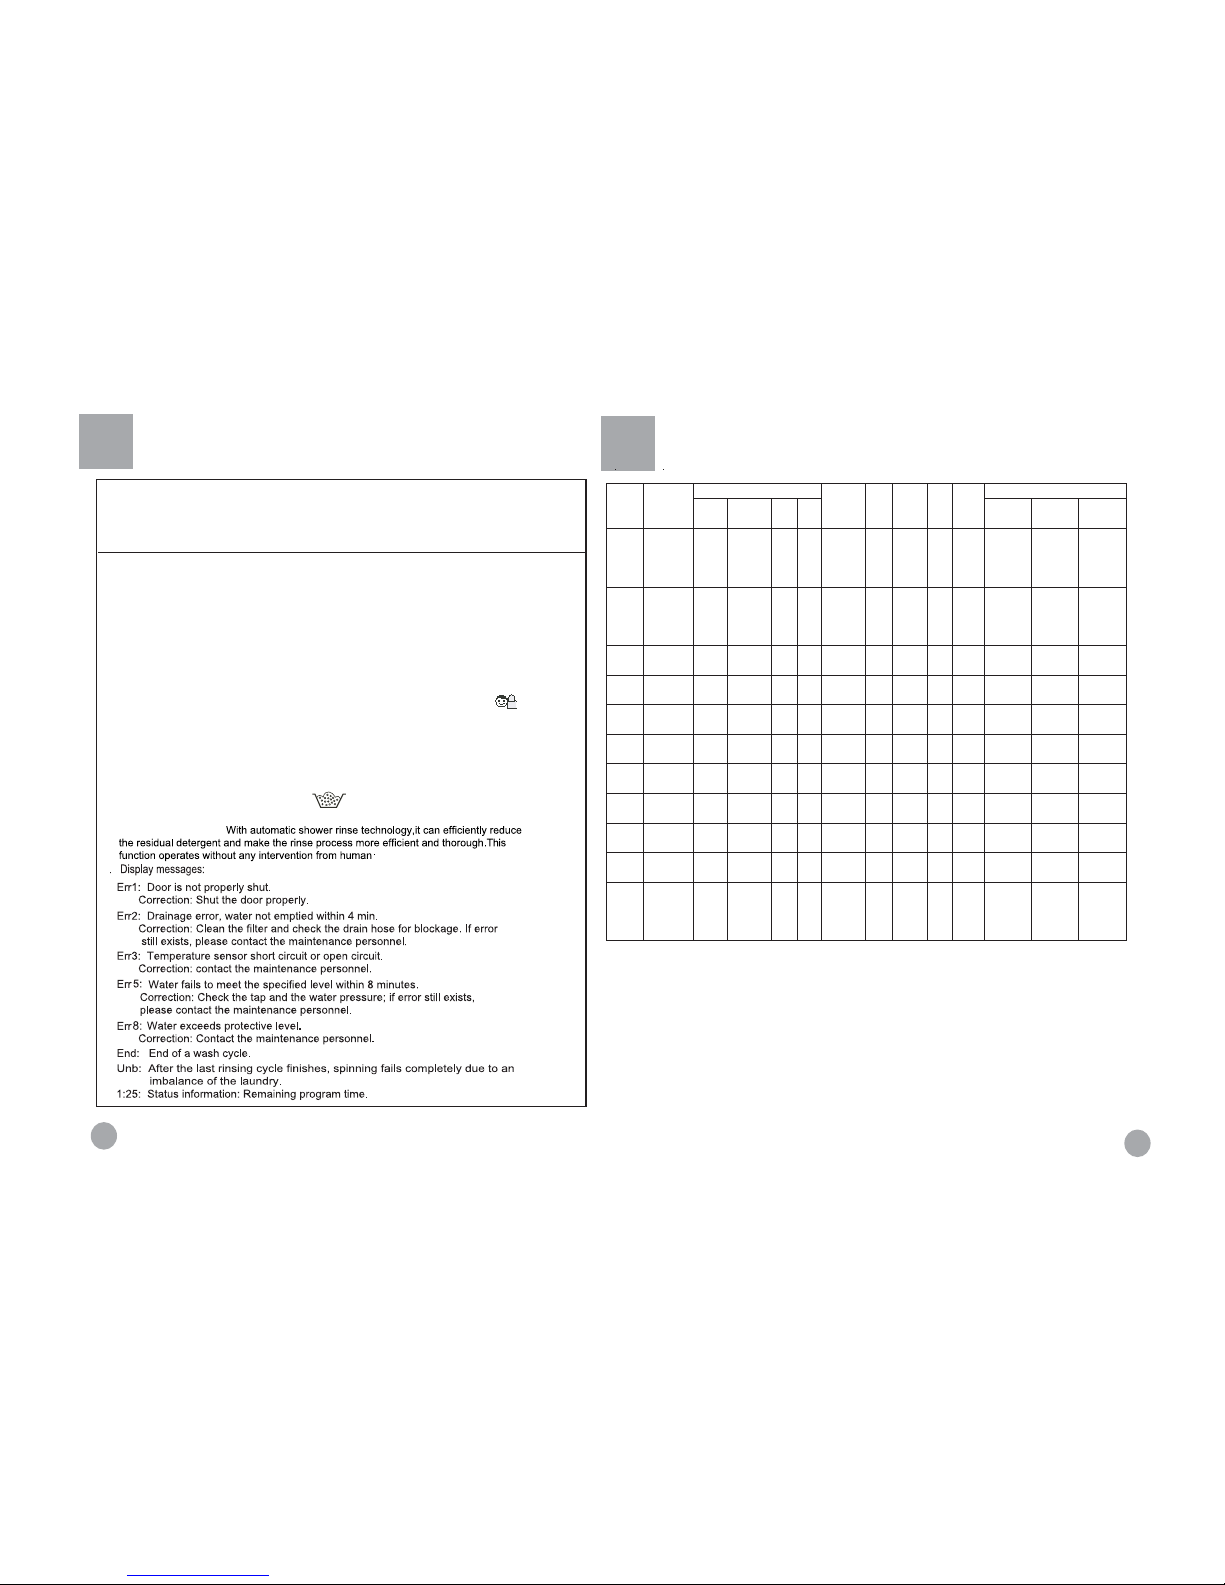
Default Program Detergent Usage MethodProgram
Setting
Mode
Recommended
Laundry
Capacity Temperature Speed
Total
Time
Tempera ture
Adjustment
Range
Rinse
Hold
Load
Selection
Super
Clean
Rinse
Reserve
Compartment1Compartment2Compartment
3
Cotton
Pre-wash
Heavily-soiled
Cotton Fabrics
640
800/
1000/
1200/
1400
2:17
_ _ -30-40-50
-60-70-80-90
_
_ -30-40-50
-60-70-80-90
_ _-30-40
-50-60
_ _-30-40
_ _-30-40
_ _-30-40
_ _-30-40
__-30
_ _-30-40
YES YES YES YES
ƾƾ
嗟
Cotton
Cotton Fabrics 6 40
800/
1000/
1200/
1400
2:03 YES YES YES YES X
ƾ
嗟
Synthetic
Fsat-colour-
Fiber
3 60 800 1:41 YES YES YES YES X
ƾ
嗟
Cashmere
Cashmere
/ 40 600 1:09 YES N O YES YES X
ƾ
嗟
/ 40 400 1:09 YES N O YES YES X
ƾ
嗟
嗟
Hand wash
Slightly-soiled
Textiles
/ 40 600 1:50 YES N O YES YES X
ƾ
/ - - 800 0:28 YES NO NO YES X
ƾ
嗟
嗟
Duvet
/30800 0:44 YES NO NO YES X
ƾ
ƾ
/ 40 1:12 YES NO NO YES X
嗟
Drain
////0:03 / NO NO NO YES XXX
Spin
///
800/
1000/
1200/
1400
0:09 / NO NO NO YES XXX
Note:
嗟
means that it needs to add perfume such as softenerƾmeans that it needs to add
detergent otherwise the
desired washi ng result wi ll not be achi eved. X means it must not add
detergent. The data in Speed column is default spin speed of corresponding model (whe
n
speed is not selected.)
Note: 1.
Washing temperature refers to the highest temperature allowable during the whole
washing process. The washing time var ies accor ding t o the type of clothes, sele cted
temperature and feature. The total operation time provided in the above table is for
reference only (There will be a sli ght difference due to different wat er tempera ture.)
Program SettingGuidance Table
A
.
Power-off Memory Function:Thewasher has power-off memory function.In case of
abrupt power failure or the power must be cut off during a program cycle, the present
settings will be saved and the preset operation will resume when the power is rezumed.If it needs to cancel this feature, pr
ess Start/Pause key so that the washer will
will stop temporarily. Turn off the po wer key and restart the washer after a few
seconds and the feature will be cancelled.
B.
Safety Chi ld Loc k Func tion: During the oper ation o f the progr am, pre ss do wn
Temperature key and Load Selection key concurrently and hold for 3 seconds." "
will be displayed indicating that the program is locked. Repeat the above
procedures to unlock.
C.
Foaming Auto-check Function: The washer offers foaming auto- check function, which is
is a solution to incomplete rinse due to over
-
dispensing of detergent. The washer can
sense the vol ume of foam formed automatically. When foaming is detected, the
Introduction of Other Functions
2. For clothes made of special materials such as woolens, cashmere and wool, please check if the
clothes has a machine
-
washing tag and the requests to the temperature.
K. Super-clean Rinse Key
Press the key and super-clean icon in the LCD will illuminate. When the program comes t o
softening process, the was her will add an extra rinse process. ( This feature is not a vailable in some
programs. Please see Program Setting Guidance Table for details.)
Functions
Foaming ico n
in the LCD will illuminate
and an extra rinse cycle will be
added before the program complete s. Program time duration will increase automatically.
Quick wash
Slightly-soiled
Textiles
Slightly-soiled
Textiles
Duvet
Sport wash
Wool Wool
D
. Auto-shower function:
E
3.The Rinse Hold key and the Delay Time key can not be choosen in one programme.
800/900/
1000/
1000
 Loading...