


LED LCD TV RECEIVER
USER MANUAL
Please read this manual carefully before using
your television and keep this manual in a good
place for future reference.
MODEL:
LET19C600F
LET22C600F
LET24C600F

P.02
P.02
P.03
P.04
P.05
P.07
P.08
P.09
P.09
P.10
P.11
P.12
P.14
P.22
P.23

Thanks for buying this 19"/ 22"/24" LED LCD TV. This guide will help you set up and begin using your TV.
19" HD Ready LED LCD TV.
Remote control
AAA ba x2
ttery
Instruction Manual
Quick start guide
Scart cable x1
Adaptor
22" Full HD 1080P Digital LED LCD TV
Remote control
AAA ba x2
ttery
Instruction Manual
Quick start guide
Scart cable x1
Adaptor
24" Full HD 1080P Digital LED LCD TV
Remote control
AAA ba x2
ttery
Instruction Manual
Quick start guide
Scart cable x1
Adaptor
P.02

P.03

WARNINGS AND CAUTIONS
Warning
High voltages are used in the operation
of this television receiver. Do not remove
the cabinet back from your set. Refer
servicing to qualified service personnel.
Caution
Do not trap the power supply cord under
the television receiver.
Warning
To prevent fire or electrical shock
hazard, do not expose the television
receiver to rain or moisture.
Warning
Do not drop or push objects into the
television cabinet slots or openings.
Never spill any kind of liquid on the
television receiver.
Caution
Do not block the ventilation holes in the
back cover. Adequate ventilation is
essential to prevent failure of electrical
components.
Caution
Never stand on, lean on, or suddenly push
the television or its stand. You should pay
special attention to children. Serious injury
may result if it should fall.
Caution
Do not place your television on an unstable
cart, stand, shelf or table. Serious injury to
an individual , and damage to the
television, may result if it should fall.
Cauti on
When th e telev ision r eceiver is n ot
used fo r an exte nded pe riod of time , it
is advi sable t o disco nnect the AC po wer
cord fr om the AC ou tlet.
Dim:515*320mm(不包 括底座)
Caution
If the television is to be built into a
compartment or similar enclosure, the
minimum distances must be maintained.
Heat build-up can reduce the service life of
your television, and can also be dangerous.
Safet y and warnin gs
01
P.04

02
Introduction
CAUTION
Never tamper with any components inside
the TV, or any other adjustment controls
not mentioned in this manual. All LED-TVs
are high voltage instruments. When you
clean up dust or water drops on the LED
PANEL or CABINET, the power cord should
be pulled out from the receptacle, then
wipe the TV with a dry soft cloth. During
thunder and lighting, unplug the power cord
and antenna cord to prevent damage to
your TV. All repairs to this TV should only
be performed by qualified TV service
personnel.
Main features
1 Used as Television, display terminal,
PC display
2 High luminance, wide viewing
Angle
3 Time-shift
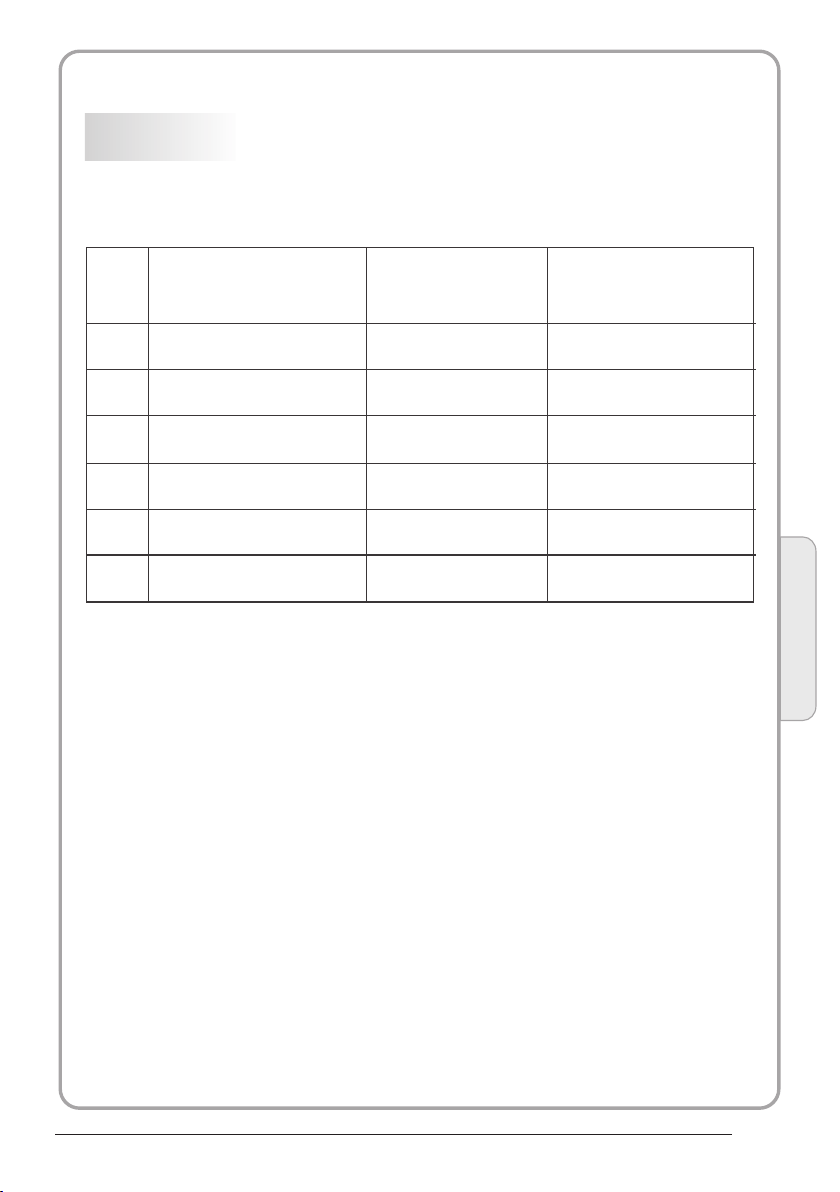
Main parameter
Panel
Power supply
Audio Output Power
Terminals:
(THD 7%)
INSTALLATION
*Locate the TV in the room where light
does not strike the screen directly.
*Total darkness or a reflection on the
picture screen can cause eyestrain. Soft
and indirect lighting is recommended for
comfortable viewing.
*Allow enough space between the TV and
the wall to permit ventilation.
*Avoid excessively warm locations to
prevent possible damage to the cabinet or
premature component failure.
*Do not cover the ventilation openings
when using theTV.
4 HDMI interface and SCART
Interface
5 NICAM
18.5"/21.5"/23.6"
DC 12V, 3A (Power adaptor supplied)
2x3W
Analog RGB(PC)x1; PC audio x 1
High-Definition Multimedia Interface (HDMI) x 2
Vdeoi Input x1
Audio Input x1
USB Input x1
YPbPr x1
Mini SCART x 1
COMMON INTERFACE(CI)
Tuner x 1
Horizontal definition (TV line)
P.05
Composite Videoinput >=350
YPbPr >=400
PC
PRESET MODE
RESOLUTION
V.Freq.(Hz) H.Freq.(KHz)
1
2
3
4
5
6
640x480
800x600
1024x768
1360x768
1280x1024
1920x1080
(Olny for 21.5",23.6")
60
60
60
60
60
60
31.47
37.88
48.36
47.7
63.98
66.64
Introduction
02
P.06

Base Stand Assembly Instr uction
1. Plac e the TV with th e displ ay side d own
on a flat s urfac e.Use a c loth to prot ect.
Locat e the bot tom at th e stand.
2. Fix th e botto m with tu rning the sc rew
tight ly on the s tand.
INSTALLATION NOT ES
Locat e the TV in a room w here li ght doe s not strike t he scre en dire ctly. Total da rknes s
or a refl ectio n on the sc reen can cau se eyes train . Soft and ind irect l ighti ng is
recom mende d for com fortable v iewin g.
Allow e nough s pace be tween the TV a nd the wall to p ermit v entil ation.
Avoid excessive ly warm l ocati ons to preve nt poss ible da mage to the ca binet o r
prema ture co mpone nt failure .
P.07
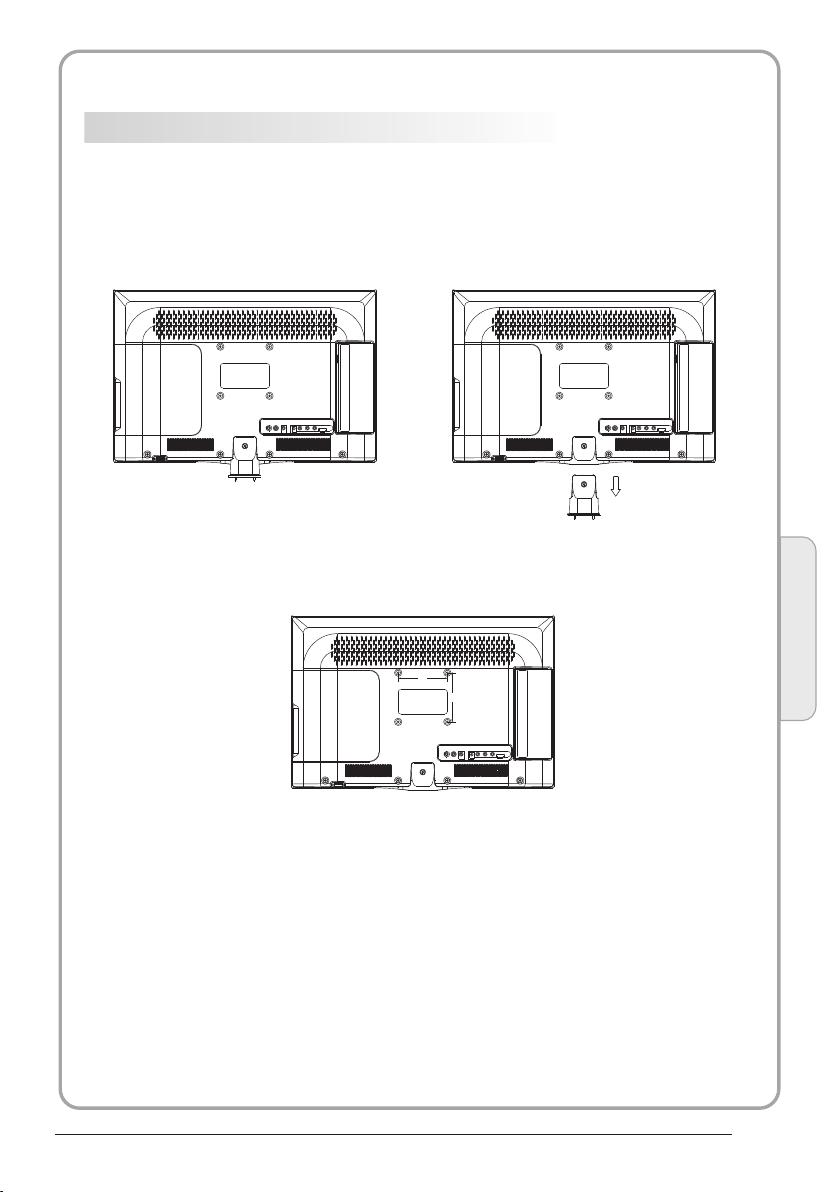
WALL MOUNTING INSTALLATI ON GUIDELIN ES
This te levis ion can b e wall mount ed as fol lows:
1.Pla ce the LE D LCD Tele visio n onto a so lid surfac e. Plea se plac e some soft ma teria l
over th e front o f the scr een to prote ct it fro m any dam age.
2.Rem ove the s crews f rom the lowe r part of t he tele vision, wh ere the b ase joi ns to the
TV, an d take aw ay the stand ( put the s tand so mewhere safe for fu ture us e).
3.Use t he four s crews p rovided to f ix the TV onto a w all mou nting b racket (no t inclu ded)
via the f our VES A standa rd holes on th e back of t he tele vision.
100.00
100.00
Introduction
02
P.08
Remote Control
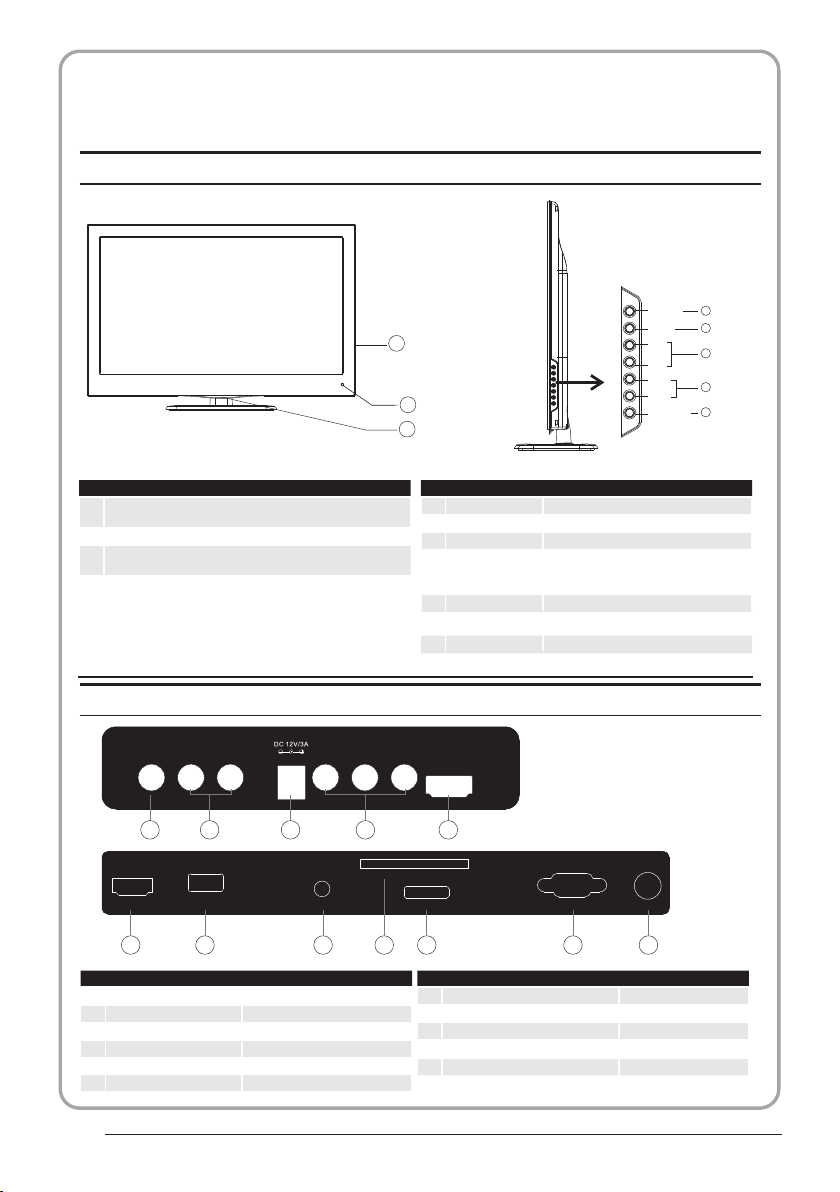
Front control panel
SOUR CE
1
MENU
2
3
1
CH+
CH-
VOL+
VOL-
STANDB Y
3
4
5
2
1
Remote control sensor.
Indicator LED:
2
BLUE: POWER ON. RED: STAND BY.
Key board.
3
Rear/Side S ockets
Rear/Side S ockets
AV L R Y
1 2 3 4 5
HDMI 1
USB
6 7 8
AV
1
L/R AUDIO
2
DC Power Source
3
YPbPr
4
HDMI2
5
HDMI1
6
input
input
input
input
input
input
PC AUDI O
1
2
3
4
5
Pb
Pr
COMM ON INTE RFACE (C I)
SCAR T
10
9
7
8
9
10
11
12
SOURCE
MENU
CH+/CH-
VOL+/VOL-
Display the input source menu.
Display main MENU.
In TV mode,press CH+ or CH- to change
the channel up and down.
In MENU, press CH+ or CH- to select items .
In standby mode, it can Turn on the TV.
Adjust sound level.
In MENU,adjust the item that you Selected.
STANDBY
HDMI 2
VGA ANT
11
USB
PC AUDIO input
COMMON INTERFACE(CI)
SCART
VGAINPUT
ANT
12
input
Intput
Intput
Input
input
P.09

Introduction
02
P.10

COMMON INTERFACE
The common i nte rfa ce (C I) sl ot is d esi gne d to
accept the c ond iti ona l Acce ss (C A) Mo dul e
and Smart ca rd in o rde r to vi ew th e pay T V
programm es an d add iti ona l ser vic es.
Contact yo ur Co mmo n Int erf ace s erv ice
provider t o get m ore i nfo rma tio n abo ut th e
modules an d sub scr ipt ion .
Please not ed th at CA mo dul es an d sma rt
cards are ne ith er su ppl ied n or op tio nal
accessor ies f rom u s.
P.11
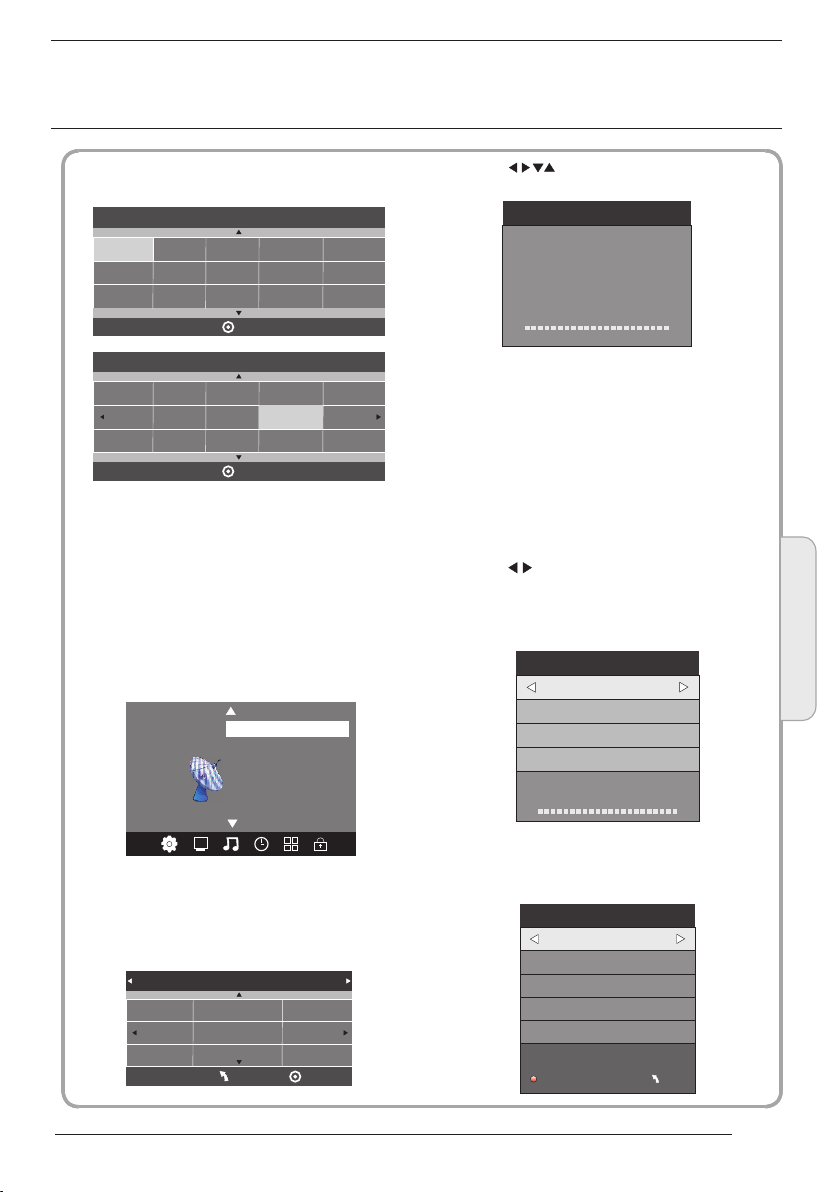
Auto Tuning
DTV M anual Tu ning
ATV Man ual Tun ing
Pro gramm e Edit
CHA NNEL
< >
Sig nal Info rmatio n
CI In forma tion
Softw are U pdate (OAD)O ff
Softw are U pdate (USB)

03
Remote control
1
2
3
4
5
6
7
8
9
10
11
12
30
31
32
33
POWER
1OK2 3
4 5 6
7 8 9 0
TV MENU SOURCE
CH.LI ST
+
VOL
_
SLEEP ASPECT
REVEA L
SUBPAGE SIZE MIX S UBTIT LE
MUTE
AUDIO
RECAL L
EXIT
SOUND
+
CH
PIC
_
TEXTTV/RADIOFREEZE
INFOFAVEPG
INDEX
LIST
HOLD
REC/R EP
1:POWER:To set the TV to standby or power on.
13
14
15
16
17
18
19
20
21
22
23
24
25
26
27
28
29
2:NUMERI C KEY :
3:TV MENU: To display TV menu.
4:CURSOR :To mov e wit hin t he me nu.
5:CH.LIS T:To di spl ay th e cha nne ls li st.
6:VOL+/- :To adjust sou nd le vel .
7:PIC:To swi tch p ict ure m ode .
8:SLEEP: S
9:FREEZE : To freeze the picture.
10:EPG:T
program be ing v iew ed an d wha t's o n nex t in
DTV mode.
11:FAV :T
in TV o r DTV mode.
12:TELET EXT K EYS : Ple ase r efe r to ne xt pa ge.
13:MUTE: To disable or e nab le th e sou nd ou tpu t.
14: AUDIO: To select the a vai lab le au dio
/languag e of TV programs .
15: RECALL : To acc ess the previously viewed
channel.
16: SOURCE : To select input source.
17: OK:To confirm selec tio n.
18: EXIT:T
or exit menu.
19: SOUND: To switch sou nd mo de.
20: CH+/CH -:To ac ces s the n ext o r pre vio us
channels .
21: ASPECT : To change picture aspect ratio.
22:TV/RA DIO :In D VB mo de, i t is u
between di git al TV channels and r adi o
stations.
information .
23: TEXT:To en ter o r exi t TELETEXT.
24: INFO:T
channel be ing v iew ed or f urt her i nfo rma tio n
about the progr am wh en in s mal l EPG
screen in DTV mod e.
25: SUBTIT LE: T
subtitles in DT V mod e.
26. To ski p to th e next file in USB mode.
27. To ski p to th e previous file in USB mode.
28.
are watchi ng in D TV Mo de or p res s to re pea t pla y
in USB Mode.
29. Stop the m edi a pla yer i n USB m ode .
30. To sca n in re verse, during USB, USB playback .
31. To sca n in fo rward, during USB, USB playback .
32. Play the m edi a pla yer i n USB m ode .
33. Pause th e med ia pl aye r in US B mod e,t ime s hif t
in DTV mode.
o access you r fav our ite c han nel s lis t
REC/REP: Pre ss to r eco rd th e TV progr am yo u
For direct a cce ss to c han nel s.
et timer to tu rn off the TV.
o display in for mat ion a bou t the
o return to th e pre vio us me nu
sed to switc h
Display/ rem ove
the progra mme
o display in for mat ion a bou t the
o switch bet wee n different
Remote Control
03
NOTE:
With no operation for 4 hours, t he un it wi ll
swift into the st and by mo de au tom ati cal ly.
(Only in the home m ode l)
P.12

REMOTE CONTROL
TELETEXT
Teletext is an inform ation s ystem b roadcast b y certa in chan nels which c an be
consu lted li ke a news paper. It als o offers acc ess to su btitl es for viewe rs with h earin g
probl ems or wh o are not f amiliar wi th the tr ansmi ssion lang uage( cable n etworks,
satel lite ch annel s, etc.)
Press:
T
EXT
SELECTING A PAGE
You will obtain :
This is u sed t o call or exit t ele tex t modes. The summ ary a ppears with
a list of i tem s that can be ac ces sed . Each item ha s a cor respondi ng
3 digit p age n umber. If the c han nel s elected do es no t broadcas t
telet ext , theindic ati on 10 0 will be disp lay ed and the scr een w ill
remai n bla nk (in this ca se, e xit t eletext an d sel ect anothe r cha nnel).
Enter t he nu mber of the pa ge re qui red using th e 0 to 9 up /down.
Examp le: p age 120, ent er 12 0. Th e num ber is displ aye d top left, the
count er tu rns and then t he pa ge is d isplayed . Rep eat this ope rat ion to
view an oth er page. If th e cou nte r continue s to se arch, this m ean s
that th e pag e is not trans mit ted . Select ano the r number.
E
DIRECT ACCESS
TO THE ITEMS
INDEX
SUB PAGE
HOLD
REVEAL
LIST
Colou red a re as are disp lay ed at the bottom of t he sc reen. The 4
colou red k eys are used t o acc ess t he items or co rre sponding p age s.
The col our ed areas fla sh wh en th e item or the pa ge is n ot yet
avail abl e.
This re tur ns to the cont ent s pag e (usually p age 1 00).
Certa in pa ges contai n sub -pages which ar e aut omatical ly
displ aye d successi vel y. This key i s use d to stop or resume s ubpage ac qui sition. The indica tio n appears to p lef t.
To freeze the page.
To display or hide the concealed information (games solutions).
The use r can s et four favo rit e pag es to be direc tly l inked to the f our
color k eys . While list m ode i s act ivated, it i s not p ossibili ty to u se TOP
or FLOF n avi gation wit h the c olo rkeys. The favo rit e page numbers
shoul d be st ored and res tor ed to /from nonv ola tile memor y for e ach
chann el by t he system so ftw are .
P.13
04
OPERATION
Insta llati on Guid e
Mod e Selec t
Hom e Mode
Sho p Mode
OK
Cou ntry
Nor way
Rum ania
Pola nd
Rus sian
Por tugal
Ser bia
This screen only appea r when the TV first time
turn on or reset to factor y set.You can choose
energy-saving mode a nd count ry, auto turning
programs .And after tu rning th e screen will skip
to the first DTV program.
Swit zerla nd
Slo venia
Spa in
UK
New Zeala nd
Swe den
OK
Mor occo
Tunis
Alg eria
1.CHA NNEL MENU
The first item of the MENU is channe l menu( for
TV or DTV source only).
Auto Tuning
DTV M anual Tu ning
ATV Man ual Tun ing
Pro gramm e Edit
CHA NNEL
< >
You can search channels and edit programs her e.
1).Auto tuning:
Search all the channel s automa tically(you can
select ATV and DTV)
Tune Ty pe DTV+ ATV
Ger many
Gre ece
Hun gary
Sig nal Info rmatio n
CI In forma tion
Softw are U pdate (OAD)O ff
Softw are U pdate (USB)
Ita ly
Lux embou rg
Net herla nds
MEN U
Nor way
Pola nd
Por tugal
OK
Pls press to select country at fir st , then
press OK button to start a uto tuni ng .
Cha nnel Tun ing
TV : 0 Pr ogram me(s)
DTV : 0 P rogra mme(s )
Rad io : 0 Prog ramme (s)
96% U HF CH 68 DT V
NOTE:
All the channels inclu ding ATV, DTV and Radio
can be tuning by one time, if the Tune Type is
DTV+ATV .
All the stor ed ch ann els w ill b e dis app ear a fte r
auto tunin g .
After auto tuning , the channel will skip to
the first DTV channel.
2).DTV Manual tuning:
You can select a DTV channel then find the
program in this channe l.
Pls press to select the channel or i nput,
channel Num. by Num. key t hen pres s OK to
search the programs .
NOTE:
Bad Normal Good means si gnal intensity.
DTV M anual Tu ning
_
VHF C H 5
Pre ss OK to se arch
Bad Nom al
3). ATV Manual tuning :
You can change the sound system to search
the analog TV channels and fine tune the
channels , then storag e the chan nels you
selected.
ATV Man ual Tuni ng
_
Sto rage To 1
Sys tem BG
Cur rent CH 1
Sea rch
Fin e-Tune
Fre quenc y 255.2 5 MHz
Save M ENU
+
Goo d
+
Operation
04
P.14
NOTE:
Press teletext red but ton to sto rage to channels
after manual tuning .
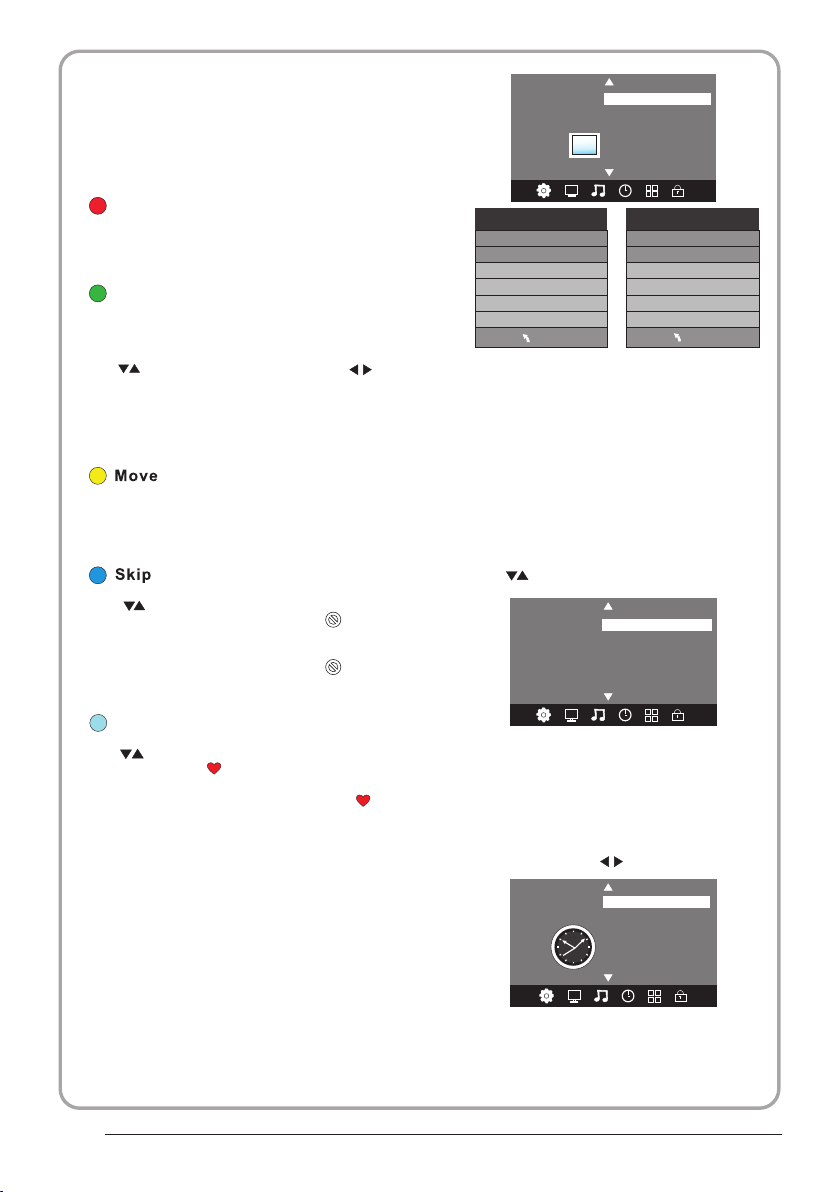
4). Program edit:
You can Delete ,Rename ,Move, Skip , FAV any
programs.
Pic ture Mo de Stan dard
Colo r Temper ature
Asp ect Rat io
PICT URE
< >
Nois e Redu ction
Scr een
Delet e
Press teletext red but ton , the pr ogram in cursor
will delete.
Renam e:
Only can rename ATV progr ams .
Move the cursor to the pro gram, pr ess teletext
green button to rename t he progr am.
Press to choose the character. Pre ss to
move the cursor .
Press MENU button to exi t edit , Pre ss EXIT to
exit the menu.
Note: ATV programs name o nly can be 5 character,
DTV programs name can be 2 5 charac ter.
Use the Arrow B utt ons t o sel ect t he ch ann el yo u
wish to move . Then press the Yellow Button to
select Mov e fun cti on. O nce a cti ve us e the Ar row
Buttons to m ove a nd th en pr ess O K to co nfi rm.
Press to choose the program , pres s teletext
blue button to skip this p rogram , The will
show on the right side of th e progra m .
Choose the skipped pro gram, pr ess blue button
again , you can cancel the s kip ,The w ill
disappear .
Favou rite
Press to choose the program , pres s FAV
button , it will show on the right sid e of the
program.Choose the FAV program , press
FAV button ag ain , you can cancel the FAV,
the will disappear .
Once your favorite gro up is crea ted, you can
press the FAV key to quickly access your favorite
channel.
5). CI in forma tion: ( optional )
This menu can display th e CI card' s i nformation.
2. PICT URE MEN U
The second item of the MEN U is PICTU RE MENU.
You can adjust picture effec t here, su ch as
contrast, brightne ss, etc.
Press OK to move, press OK to adjust .
Pic ture Mo de Stan dard
Con trast 8 2
Brig htne ss 50
Colo r 50
Sha rpnes s 50
Tint 5 0
MEN U
NOTE:
1).Tint is available in NTSC system only.
2).There are four colo rs tempe rature modes
can be selected medium , warm, co ol,user
3).Screen is availab le in PC mod e only which,
can adjust Horizonta l positi on, vertical
position, size and pha se.
Colo r Tempera ture Me dium
Red 4 0
Gre en 31
Blu e 50
MEN U
3.SOUND M ENU
The third item of the MENU i s the SOUN D
MENU.
You can adjust the sound effec t here such as
treble, bass, balanc e etc.
Press to move, press OK to adjust.
Sou nd Mode S tanda rd
Bala nce
SOUN D
< >
Note:
Auto volume: only avai lable wh en the input
signal volume is too lar ge or dist ortion.
Aut o Volume
Sur round o ff
4.TIME ME NU
The forth item of the menu i s the TIME MENU
You can adjust the clock, power on/off t ime,
sleep time etc Press to move, pres s OK to
adjust
Clo ck -- -- -- - -
Off Tim e
On Tim e
TIME
< >
NOTE:
Within 15 minutes ther e is no sign al, the TV
will auto sleep , if Auto Slee p is set ON. The
clock time can get from th e DTV syst em auto.
Sle ep Timer
Aut o Sleep
Time Z one
P.15

5.OPTION MENU
The fifth item of the MENU is the OPTION
MENU. You can adjust the Menu language,
Audio language,Subtitle language etc.
OSD Language English
Audio Languages UK
Subtitle Languages UK
Country UK
OPTION
< >< >
In PVR File system menu you can set up USB
disk for PVR.
NOTE:
Restore factory default will clear all the programs
and password.
PVR File System
Restore Factory Default
Select Disk C:
Check PVR File System Start
USB Disk
Format
Time Shift Size
Speed
Free Record Limit 6 Hr.
OK
MENU
6.LOCK MENU
The sixth item of the menu is the LOCK MENU
You can lock system, set password, block program
and set parental guidance Once you set the lock
system on you can not search the channels or
change any programs.
Lock System
Set Password
Block Program
LOCK
< >< >
NOTE:
The default pass word is 0000, If you forget the
password, you can use the super password: 9443.
Block program: Press to choose the
program ,press teletext green button to block
the program. If you want unblock the program,
pls enter the main menu , input the password,
then press green button again.Parental
guidance: Press to choose rating.
Parental Guidance Off
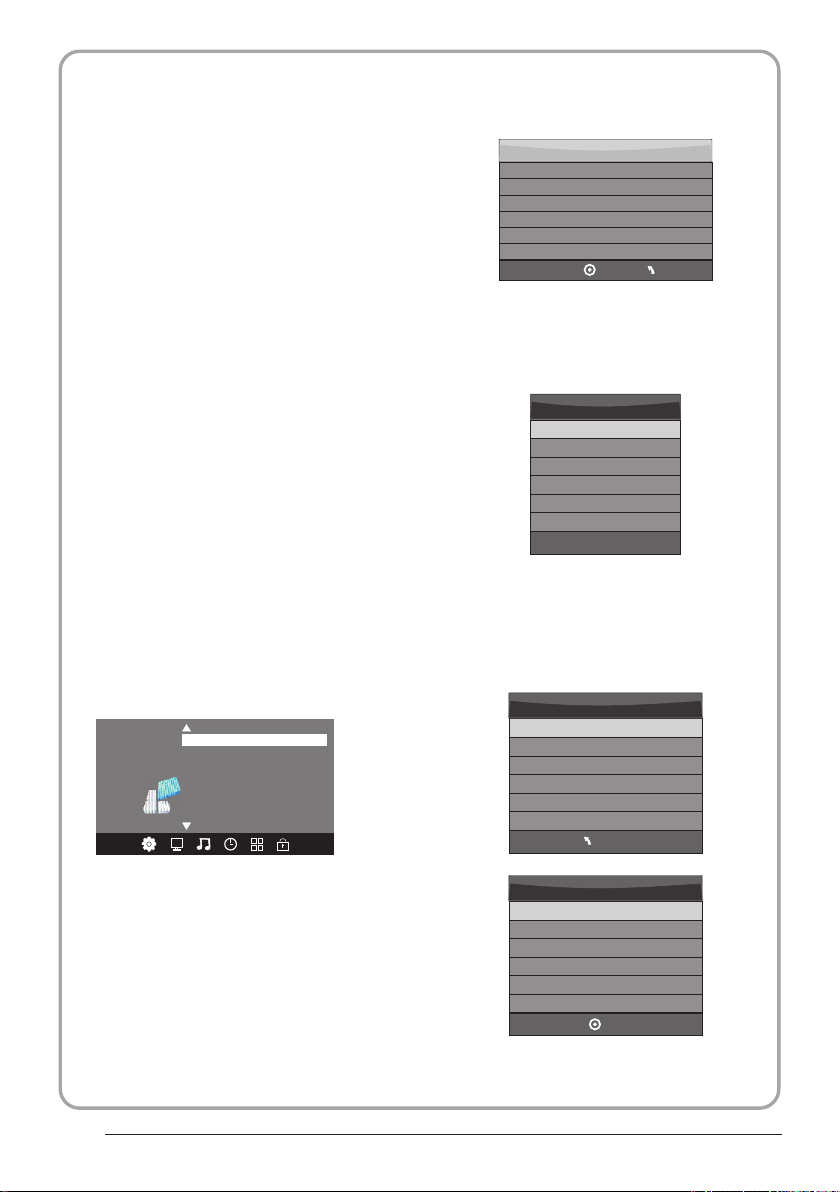
7.EPG Menu(Electronic Program
Guide).
The EPG menu is used to look at what is being
broadcasted on DTV or Radio channel in the day.
To access the EPG menu, press the EPG
botton,the following menu will be displayed:
PROGRAMME GUIDE TIME
28 Apr 04:39
800 SZTVM01 No Information
801 SZTVM02
802 SZTVM03
803 SZTVM04
804 Date
OK
INFO
1.
Use to choose the programs , Press
INFO key, you can display the highlight program's
information.
Schedule
2.
Press the teletext yellow key, It can list
all the reminder schedule, press to choose
the list, press red key to delete the
schedule list, Press EPG to return to EPG menu.
Schedule List 04:55 28th Apr Delete
Time Date
3. Record
Press the red key ,It can set the program
to be recorded.
Remind
4.
Press the blue key to choose one program
and set up one reminder time, the TV screen will
skip to the choosed program in the reminder time
automatically.
Programme Title
Reminder setting
__
OK
No Information
No Information
No Information
No Information
ScheduleRecord INFO
DELETE
802 SZTVM03
08 Minute
05 Hour
Apr Month
28 Date
Once Mode
Remind
INDEX
Channel Name
++
BACK
Operation
04
P.16
8.PVR fun ction
1.Prepar e to re cor d the p rog ram
From OPTION MEN U ent er in to PV R Fil e
System In “OPTIO N MEN U”, ple ase
choose “che ck PV R Fil e Sys tem”. C lic k
“OK”, until “che cki ng”ch ang e int o
“Success”.
Note: plea se ch eck t he te rm “sp eed”. I f it
is “HD suppor t”, tha t mea ns th e spe ed of
USB device i s ava ila ble f or ti me sh ift a nd
record. If n ot, p lea se fo rma t the d evi ce, t o
make sure th e dev ice a vai lab le. T he de fau lt
“Free Recor d Lim it” is 6 h our, i f the s pac e
on the disk is b ig en oug h. If t he sp ace i s not
big enough , the r eco rd ti me sh oul d be
shorter, de pen ds on t he ro om on t he
device. Du rin g the “c hec k PVR F ile
System” che cki ng, p lea se do n ot ta ke an y
other oper ati on un til i t fin ish ed.
The record ing s hav e to be d one w ith T V PVR
system. It can on ly be p lay ed in t he sa me TV,
not in other k ind o f dev ice s (co mpu ter, D VD,
etc...) wh ich d oes n't b e com pat ibl e wit h .TS .
Format.
See that in or der t o car ry ou t any k ind o f
recordin g, th e TV will oblige you t o for mat t he
connecte d dev ice t o sto re th e rec ord ing .
WAR NIN G. WH EN YO U FOR MAT, THE
EXTERNAL DE VIC E WIL L LOSE ALL THE
FILES AND INF ORM ATION YOU ST ORA GE
IN TH E DEVICE.
From OPTION MEN U ent er in to PV R Fil e
System as be low :
OSD L angua ge Engli sh
Aud io Lang uages
Sub title L angua ge
Cou ntry UK
OPTI ON
< >
PVR F ile Sys tem
Res tore Fa ctory D efault
Sele ct Dis k C:
Che ck PVR File Syste m Star t
USB D isk
For mat
Time S hift Siz e
Spe ed
Fre e Recor d Limit 6 H r.
Select Disk:select w hich dis c to save the
record file.
Sele ct Dis k
USB 0
Dis k C:
Check PVR File System: c heck if th e PVR File
System set up in the USB dev ice or not .
MEN U
OK
Format:
File Syste m Size
PVR F ile Sys tem Type H i Speed F S
PVR F ile Sys tem Siz e All
SD 10 4 Mins
HD 29 M ins
P.17
MEN U
File Syste m Size
PVR F ile Sys tem Type FAT3 2
PVR F ile Sys tem Siz e All
SD 10 4 Mins
HD 29 M ins
OK

(Suggest to format the format th e device by
“High Speed Fs...”, which c an speed u p
the record.)
For mat dis k
For mat dis k
Warn ing! All d ata will be lost.
Sta rt Exit
For mat dis k
2.Record t he pr ogr am
As playing t he DT V sou rce , cho ose t he
channel an d cli ck “re cor d”, the r eco rd
frame will p op up . Cli ck “re cor d” aga in,
the record f ram e wil l dis app ear a nd th e
“REC” icon sti ll on t he le ft to p. It w ill
disappea r unt il yo u cli ck “st op”.
3.Play the r eco rd
In “USB”, the rec ord p rog ram w ill b e
saved in the f old er “_M STP VR” on t he
device.
Do no t unplu g USB dev ice.
For mattin g,ple ase wa it
below menu appear afte r Format f inish:
Sele ct Dis k C:
Che ck PVR File Syste m Chec king
USB D isk Pas s
For mat Pas s
Time S hift Siz e All
Spe ed Chec king
Fre e Recor d Limit 6 H r.
Sele ct Dis k C:
Che ck PVR File Syste m SUCC ESS
USB D isk Pas s
For mat Pas s
Time S hift Siz e All
Spe ed HD sup port 20 48 KB/s
Fre e Recor d Limit 6 H r.
If you select the “Hi Speed F S ”format m ode,
then you can change the ti me shift s ize:
Time S hift Dis k Size 5 12 MB
MEN U
MEN U
Time S hift Siz e
SB 14 M ins
HD 4 Min s
1. Th e USB storage size needs to be the
size betwe en 4G B to 50 0GB .
2. Vi deo may become pixelated whe n Video
bit rate is to o low.
3. Not all USB d evi ces a re co mpa tib le.
Below is a lis t of re com men ded U SB
drvies.M ode ls th at ar e not l ist ed ma y be
compatib le, b ut it i s not g uar ant eed t o wor k.
The USB supp ort l ist a re th e sam e as
Tim esh ift f unc tio n ,se e pag e 21
Operation
04
P.18

9.Tim eshif t functio n
SUBPA GE SIZE MIX SUBT ITLE
REC/ REP
33
29
1.Prepar e to re cor d the p rog ram
This TV allows you to pause and recor d the
currentl y wat che d dig ita l pro gra m to a US B
storage de vic e, an d to re sum e to th e poi nt
where it was p aus ed.
NOTE:
Formatti ng a US B 2.0 s tor age d evi ce wi ll
be needed. S ave y our o rig ina l dat a
before for mat tin g. All t he da ta st ore d in
the USB devi ce wi ll be e ras ed af ter
formatti ng.
Sleep time r wil l be su spe nde d if it h ad
been set bef ore a cti vat ing t he Tim e Shi ft
function .
USB Drive S torag e Format
Select to fo rma t the U SB de vic e and
allocate t he am oun t of sp ace f or th e Time
Shift func tio n.
NOTE:
The format p roc ess w ill t ake a t lea st 2
minutes. P lea se do n ot tu rn off the p owe r
or remove th e USB d evi ce du rin g
formatti ng.
During for mat tin g, a sp eed t est w ill b e
done on the US B dev ice . If it f ail s, it
means the US B dev ice m ay no t sup por t
the Time Shif t fun cti on.
Record a pa used DT V program to
USB stora ge devi ce
1. While in th e DTV i npu t sou rce , ins ert
USB storag e dev ice t o the U SB po rt on t he
side of your TV.
2. Press PAUSE 33 to start Time Shift
function . The TV p rog ram p aused. The Tim e
Shift OSD ap pea rs, a nd st art s rec ord ing .
3. Press STOP 29 to st op Tim e Shi ft
function a nd st op re cor din g pro gra m.
Play Stop
FF Prev . Ne xtFB
Pause
NOTE:
Please do no t unp lug t he US B sto rag e
device whe n the Ti me Sh ift f unc tio n is
activate d.
Approxim ate ly 4G B of me mor y buf fer s
about offer 140 minutes.
00: 00:33 /00:0 4:22
P.19

Time Sh ift lim itation s:
1. When the Tim e Shi ft fe atu re is a cti vat ed,
only the PLAY/PAUS E/S TOP /FW D/R EV/
VOL+/VOL -/M UTE k eys a nd so me ba sic
operatio n key s (EN TER /EX IT/ nav iga tio n
keys) are av ail abl e.
2. Vi deo playback may not be smooth a nd
skip if USB re cor din g spe ed do es no t mee t
the minimu m req uir eme nts .
3. Do Not remo ve US B dis k or sw itc h off the
power duri ng Tim e Shi ft op era tio ns. I t wil l
abort once t he si gna l is lo st.
4. Do Not remo ve th e sig nal s our ce du rin g
Tim e Shi ft op era tio ns.
5. Do Not quic kly a nd re pea ted ly ch ang e
operatio ns be twe en
PLAY/PAU SE/ FWD /RE V.
6. Sleep tim er wi ll be t erm ina ted i f it ha d
been set bef ore Ti me Sh ift .
7. Vi deo may become pixelated whe n Video
bit rate is to o low.
8. Not all USB d evi ces a re co mpa tib le, T he
USB hard dis k dri ve el ect ric ty sh oul d be
< 500MA.
Below is a lis t of re com men ded U SB dr vie s.
Models tha t are n ot li ste d may b e
compatib le, b ut it i s not g uar ant eed t o wor k.
Operation
9. Th is feature is not available fo r all d igi tal
TV,s uch a s scr amb led o r aud io only
channels .
04
P.20
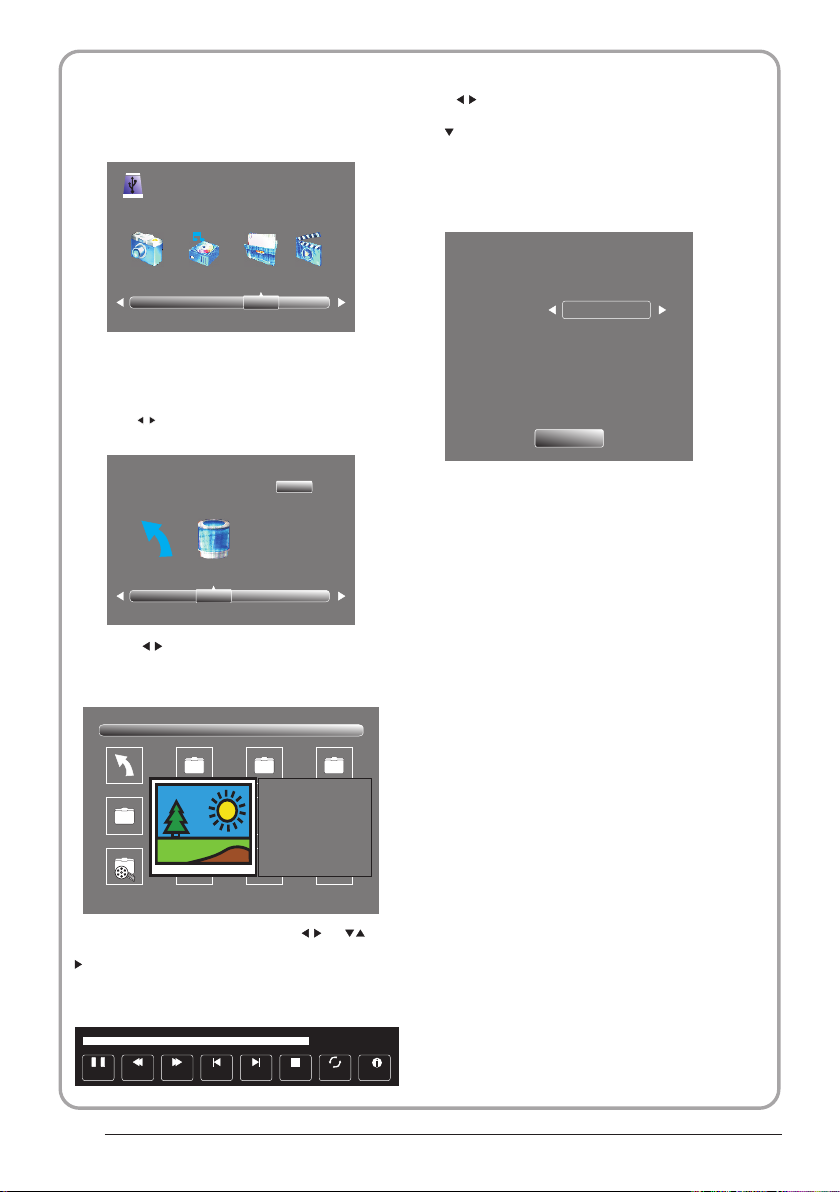
10.USB Pl ayer
Press sour ce ke y, and selsct USB in soure
list, pres s OK bu tto n to en ter t he US B men u.
USB 2 .0
PHOT O MUSIC MO VIE TEXT
Please mak e sur e tha t the U SB de vic e hav e
plugged in t he sl ot. The re ar e fou r typ e med ia
item can be se lec ted , suc h as ph oto , mus ic,
Movie, and t ext . Sel ect t he ty pe me dia i tem b y
pressing , pres s OK bu tto n to en ter
the disk sel ect ion m enu .
Press to select t he fu nct ion i con , pre ss OK
button to co nfi rm th e fun cti on.
Press or EXIT button to exit the control b ar.
NOTE:
You ca n adj ust t he au dio t rac k, or program in the
Info menu wh ile P lay ing t he vi deo f ile .Ch oos e the
Info icon an d pre ss OK c an di spl ay th e Inf o MEN U.
Sample1. ts
Resoluti on: 7 20x 576
Aud io T ra ck : 1 /2
Subtitle : 1/3
Program: 1/6
Size: 30574 KBy tes
Close
1/1
Ret urn C
Press the to sele ct th e rig ht di sk an d pre ss
OK to displa y med ia fi les a nd fo lde r lis t or
choose Ret urn t o bac k to th e med ia ty pe
selectio n men u.
1/1
Ret urn
Movi es
Samp le1.t s
Samp le1. ts S ample 2.ts
Select the m edi a fil e by pr ess ing o r , the n
the previe w fra me wi ll po p up. Pre ss th e but ton
to play the media f ile i n ful l scr een .Wh en th e
media file ( pho to, mus ic, M ovi e, or t ext t ype ) is
playing, p res s the O K or In fo bu tto n can d isp lay
the contro l bar.
Pause FF Prev . Ne xtFB Stop
Res oluti on: 688 x412
Aud ioTrac k: 1/2
Sub title : 1/3
Pro gram: 1 /5
Siz e: 51145 7 KByte s
Sam ple3. ts S ample 4.ts
00: 00:33 /00:0 4:22
Rep eat ALL
Inf o.
USB playba ck is s upp ort ed fo r the f oll owi ng ph oto
file forma ts:
—JPEG(JPE G for mat , fil es wi th th e ext ens ion " .jp g" )
—BMP (files with the extension ".b mp" )
—PNG (files w ith t he ex ten sio n ".p ng" )
USB playba ck is s upp ort ed fo r the f oll owi ng mu sic
file forma ts:
—MP3 (files w ith t he ex ten sio n ".m p3" )
—WAV (files wit h the e xte nsi on ". wav ")
USB playba ck is s upp ort ed fo r the f oll owi ng te xt
file forma ts:
—TXT (files with the extension ".txt" )
USB playba ck is s upp ort ed fo r the f oll owi ng mo vie
file forma ts:
—AVI (f ile with the extension".avi")
—TS (MPEG2 & H.264 )
P.21
05
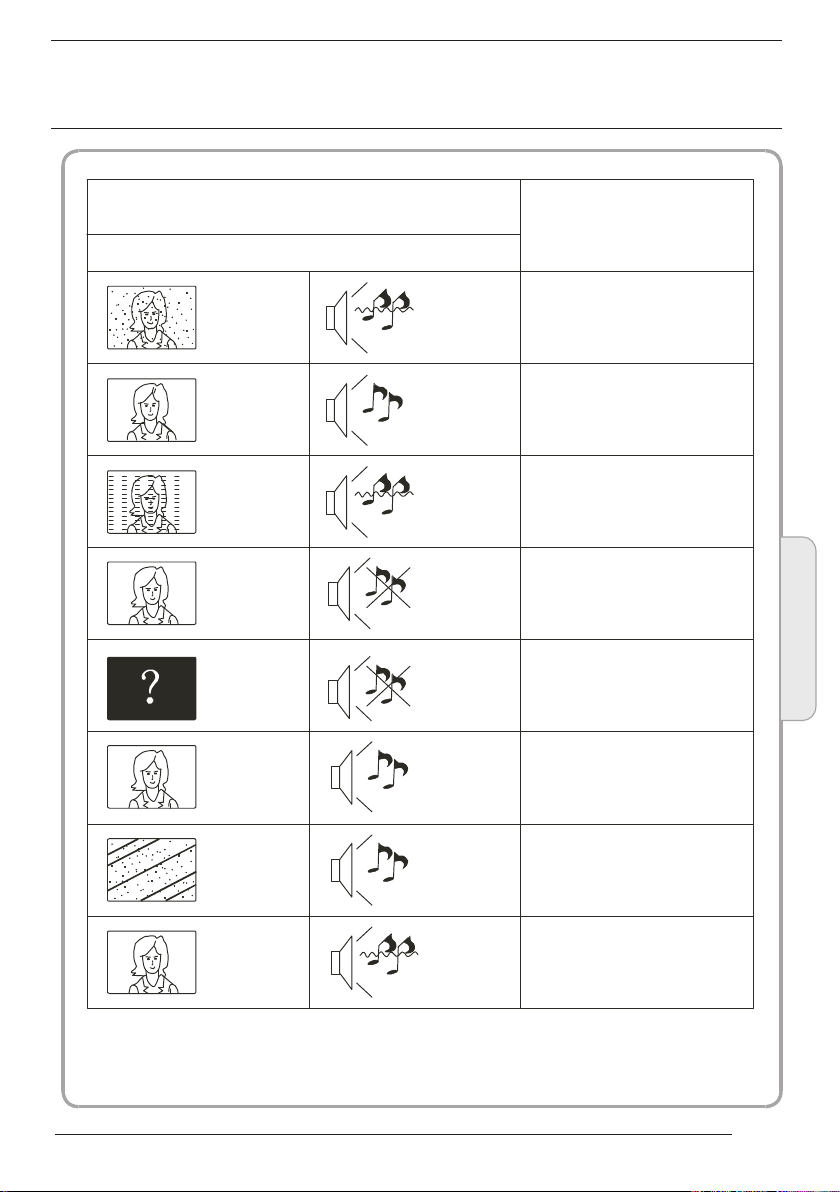
Trouble shooting
Tro uble phenom enon Symptom
Picture Audio
Snow Noise
Ghost
Inter fer ence
Norma l Pic ture
No pict ure M ute
No colo ur Norma l aud io Colour control
Norma l aud io
Noise
Mute
Inspectio n Check
antenna po sit ion , dir ect ion
or connect ion
antenna po sit ion , dir ect ion
or connect ion
electron ic eq uip men t,c ar/
motorcyc le, flu ore sce nt li ght
Volume(ch eck i f mut e is
activate d or if t he au dio s yst em
connecti ons a re no t cor rec t)
Power cord i s not i nse rte d
Power swit ch is n ot op ene d
Contrast a nd br igh tne ss/ vol ume
setup
Press stan dby k ey on t he re mot e
control fo r ins pec tin g
Trouble shooting
05
Pictu re
break ing up
No colo ur
Norma l aud io
or weak
Noise
retune cha nne l
TVs ystem
P.22

Specification
Colour system
Sound system BG, DK, I, L,L'
Video input
b/Pr
Y/P
PAL-B/G、I、D/K
SECAM- B/G、D/K、L、 L
SCART, YP
VGA, HDMI, USB.
480i/p, 576i/p,
720p, 1080i, 1080p
Pr, AV,
b
'
HDMI
Power supply
Audio output 3W+3W
Environment
conditions
Accessory
* The part specifications of this TV set provided here
Difierences may occur as product technology is updated.
Design and specifications are subject to change without notice.
480i/p, 576i/p,
DC 12V, 3A (Power adaptor supplied)
Working temperature:
+5 C - +35 C
Working humidity:
20% - 80%
Storage temperature:
-15 C - +45 C
Storage humidity:
5% - 90%
User manual
Remote control
Battery (x2)
Quick start guide
720p, 1080i, 1080p
are for reference only.
Scart input/output description
TV Source
ATV
SCART Out
ATV
P.23
DTV
Other Source
DTV
ATV

Récepteur TV LCD
MANUEL DE
L'UTILISATEUR
Lisez attentivement ce manuel avant d'utiliser votre téléviseur et conservez ce manuel dans un
bon endroit pour toute référence ultérieure.
Modèle :
LET19C600F
LET22C600F
LET24C600F
1
 Loading...