

Haier LES32T1000HFM User Manual
Welcome
Important Information
01 Safety Warnings
2
2
Safety notice
Warning and cautions
3
4
Main Parameter
Base Stand Assembly Instruction
02 Introduction
5
7
Wall Mounting Installation Guidelines
Control Panel
8
9
Rear/Side Sockets
9
Connecting to your Haier TV
Common Interface
10
12
Remote Control
03 Remote Control
13
Teletext
14
Installation Guide
04 Operation
15
CHANNEL MENU 16
Auto Tuning (DVB-T) 16
Auto Tuning (DVB-C) 17
DTV Manual Tuning (DVB-T)
DTV Manual Tuning (DVB-C)
ATV Manu al Tuning
17
18
18
PICTURE MENU 19
20
SOUND MENU
19
TIME
MENU
19
OPTION MENU
LOCK MENU
EPG Menu(Electronic Program Guide)
20
19
PVR function
24
Prepare to record the program
24
Rec ord the program
25
Play the record
25
Timeshift function
26
Prepare to record the program
26
USB D rive Storage Form at
26
Rec ord a paused DTV pro gram
to USB storage device
26
Timeshift limitations
27
USB Player
28
Trouble shooting
05 Trouble shooting
29
Specification 32
Program edit
CI information
18
19
DVB-S2
21
First Time Installation
21
Satellite Managment
Program Edit
Signal Information
CI Information
EPG(Electronic program guide)
21
22
22
22
22
Thanks for buying this 32" LED LCD TV . This guide will help you set up and
begin using your TV.
IMPOR
TANT INFORMATION
READ ALL INSTRU
CTIONS BEFORE USE AND KEEP FOR FUTURE REFERENCE.
CAUTION
TO REDUCE THE RISK OF ELECTRIC SHOCK, DO NOT REMOVE COVER (OR BACK).NO USER SERVICEABLE PARTS INSIDE.
FOR ANY PROBLEMS, REFER SERVICING TO THE CUSTOMER HELP LINE. THERE IS A LIGHTNING ARROW SYMBOL IN
THE TRIANGLE: THIS SYMBOL INDICATES HIGH VOLTAGE IS PRESENT INSIDE. IT IS DANGEROUS TO MAKE ANY KIND OF
CONTACT WITH ANYINSIDE PART OF THIS PRODUCT.
THERE IS A EXCLAMATION MARK IN THE TRIANGLE: THIS SYMBOL ALERTS YOU THAT IMPORTANT LITERATURE
CONCERNING OPERATION AND MAINTENANCE HAS BEEN INCLUDED WITH THIS PRODUCT.
CAUTION:TO REDUCE THE RISK OF ELECTRIC SHOCK AND FIRE, DO NOT PUT THE TV SET NEAR
SOURCES OF HUMIDITY. DO NOT USE ANY ABRASIVE CLEANERS WHICH MAY SCRATCH OR DAMAGE
THE LCD SCREEN. AVOID CONTACT WITH OBJECTS THAT MAY SCRATCH THE LCD SCREEN.
NOTE: SERVICING THE UNIT YOURSELF IS UNAUTHORISED AND COULD LEAD TO INJURY OR PRODUCT
DAMAGE. REFER ALL SERVICING TO THE CUSTOMER HELPLINE.
Now you can get star
ted!
32" FULL HD 1080P Digital LED LCD TV
Remote control
Instruction Manual
Quick start guide
AAA ba x2ttery
YPbPr Connect Cable
01 Safety warnings
Stand
Safety notice
EN-3
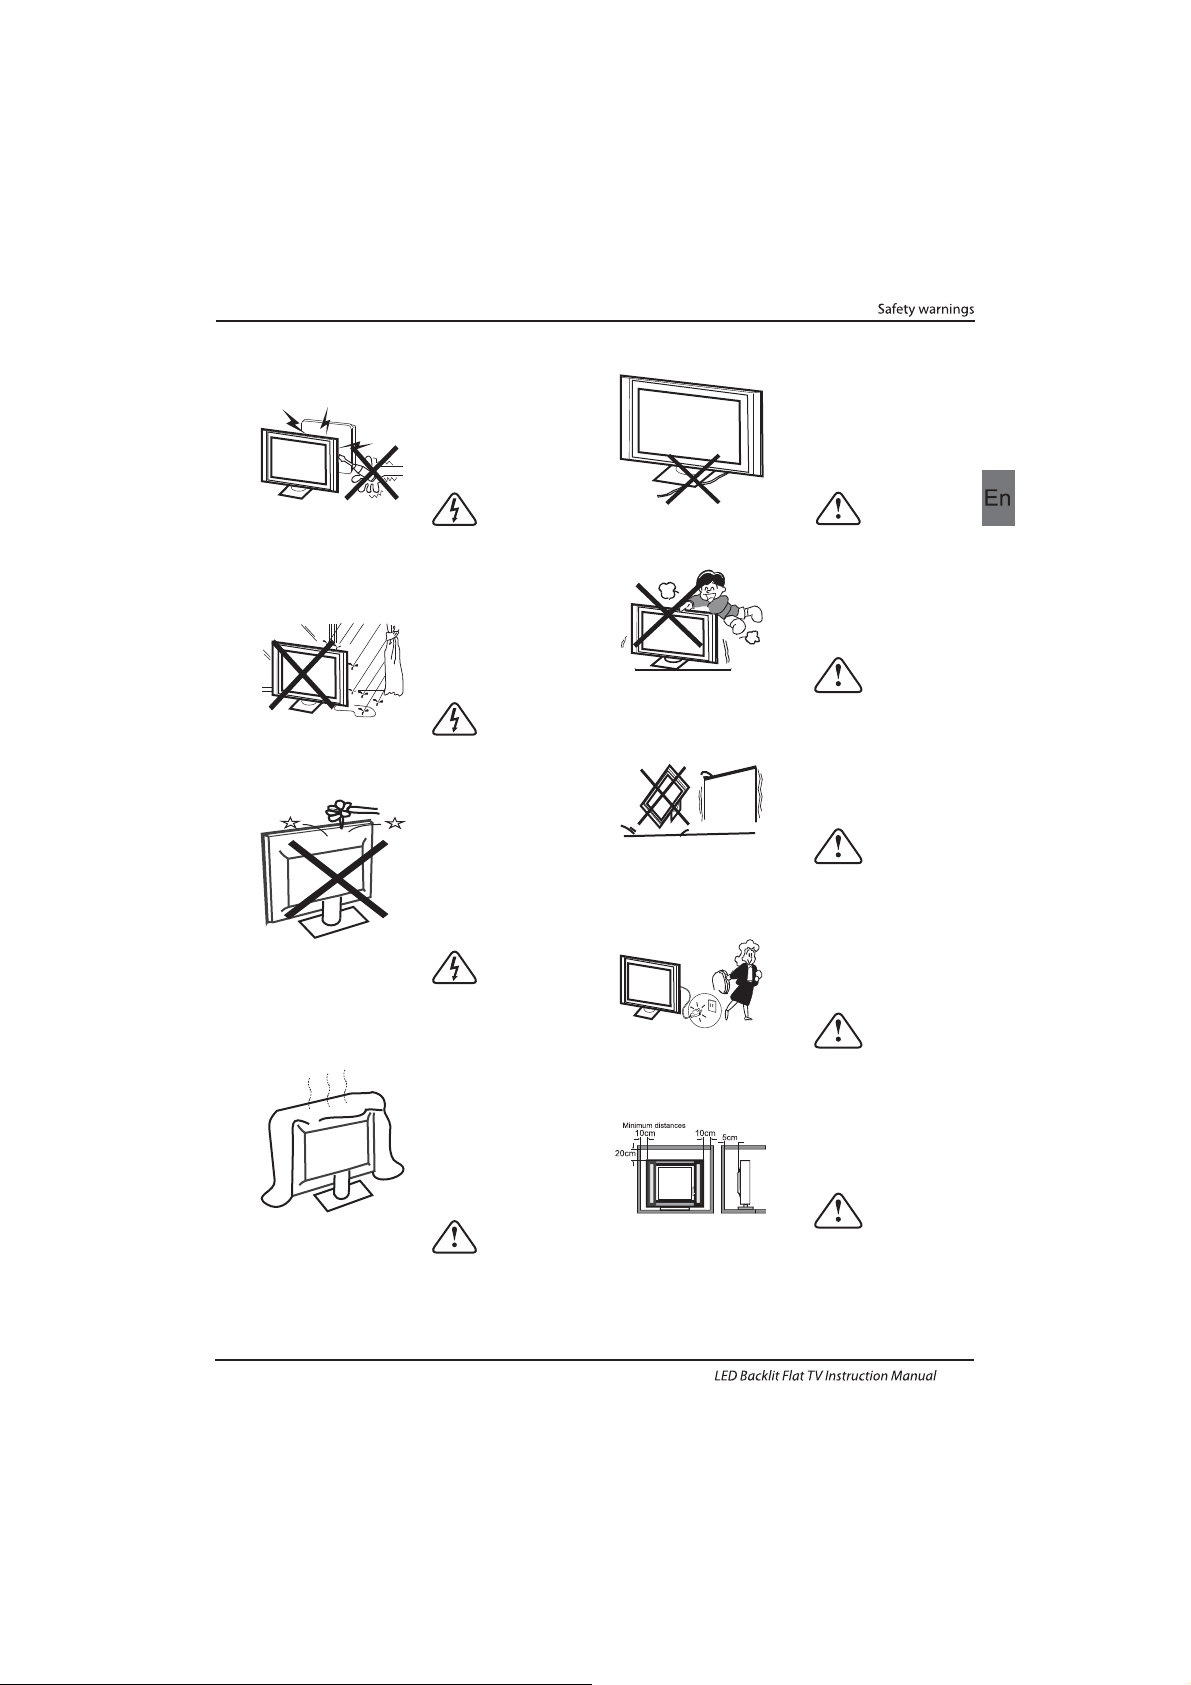
Warning: To avoid any injury caused by lean
of the product, please always ensure the
whole product was placed within the table
surface in horizontal.
Dim:515*320mm(不包括底座)
Warning
High voltages are used in the operation of this
television receiver. Do not remove the cabinet
back from your set. Refer servicing to qualified
service personnel.
Warning
To prevent fire or electrical shock hazard, do
not expose the television receiver to rain or
moisture.
Warning
Do not drop or push objects into the
television cabinet slots or openings. Never
spill any kind of liquid on the television
receiver.
Caution
Do not block the ventilation holes in the back
cover. Adequate ventilation is essential to
prevent failure of electrical components.
Caution
Do not trap the power supply cord under the
television receiver.
Caution
Never stand on, lean on, or suddenly push the
television or its stand. You should pay special
attention to children. Serious injury may result if
it should fall.
Caution
Do not place your television on an unstable cart,
stand, shelf or table. Serious injury to an
individual , and damage to the television, may
result if it should fall.
Caution
When the television receiver is not used for an
extended period of time, it is advisable to
disconnect the AC power cord from the AC
outlet.
Caution
If the television is to be built into a compartment
or similar enclosure, the minimum distances must
be maintained. Heat build-up can reduce the
service life of your television, and can also be
dangerous.
WARNING AND CAUTIONS
EN-4
Panel
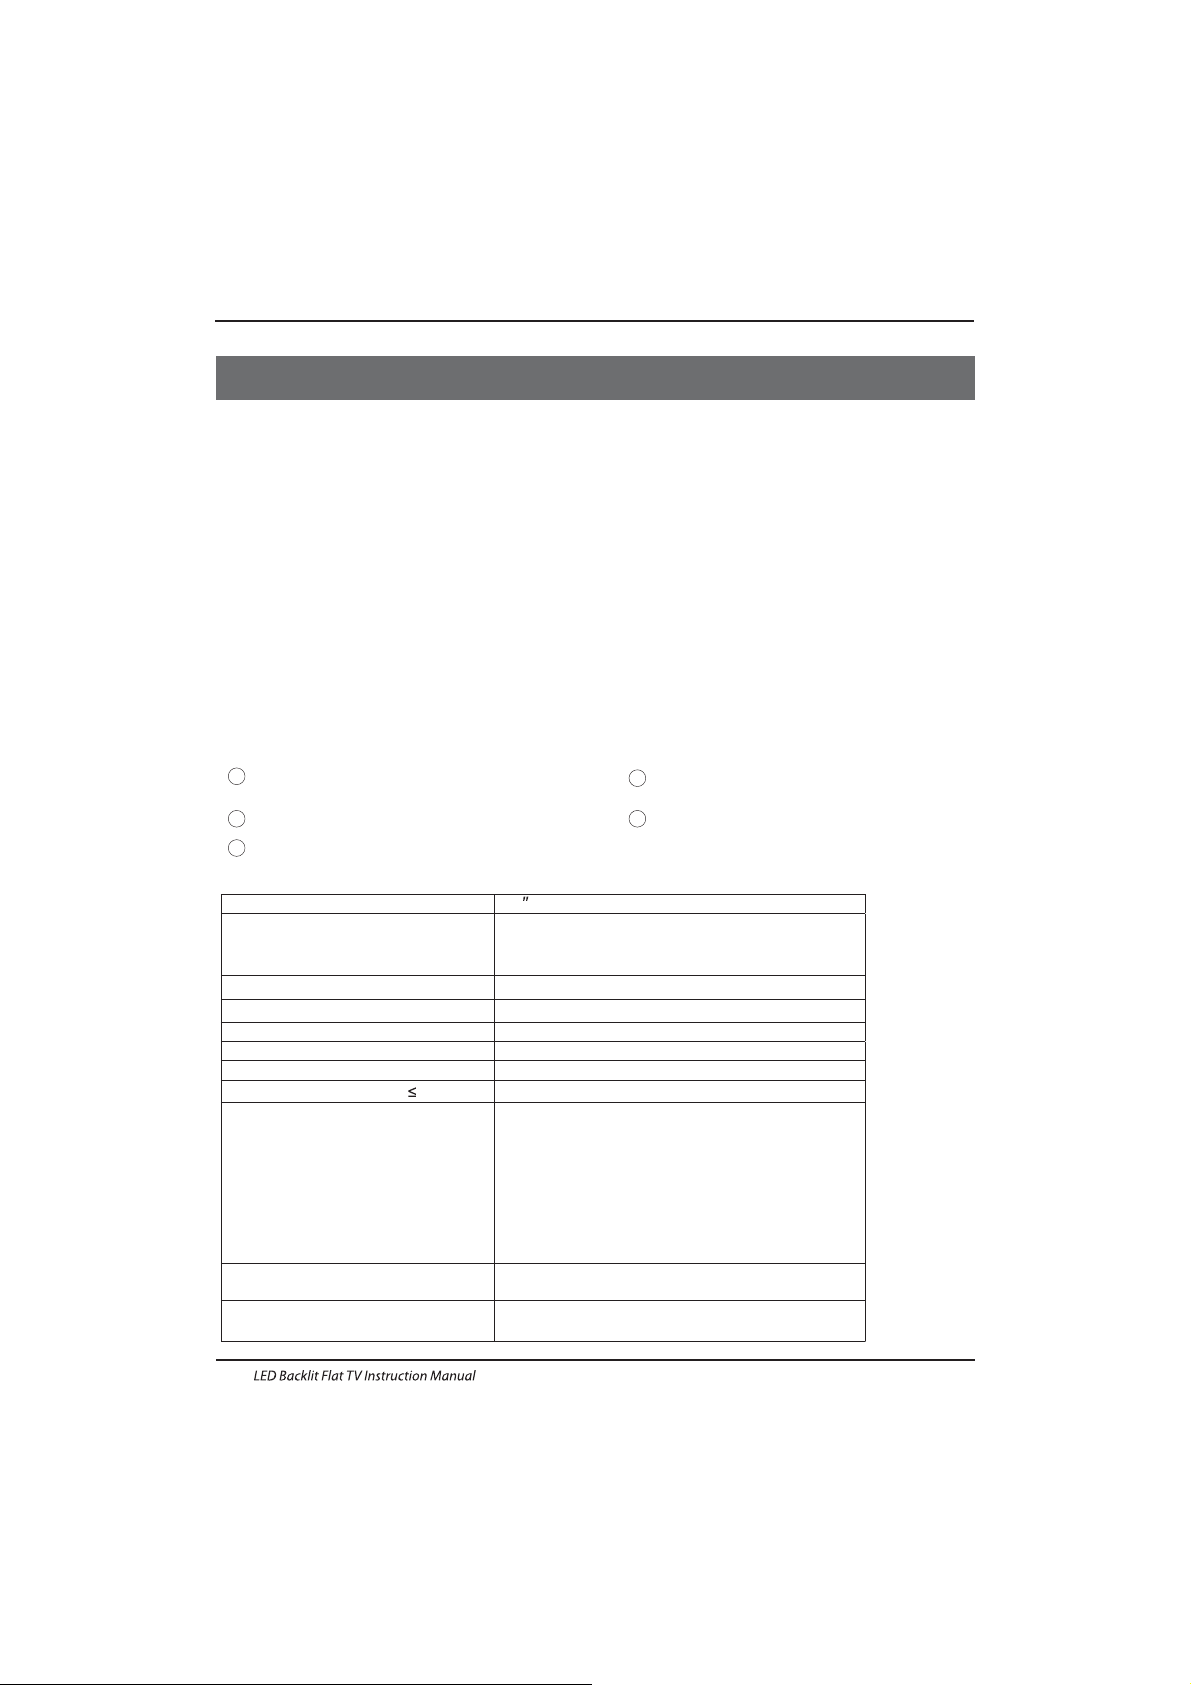
PAL-B/G ,I , D/K
PAL/SECAM/MPEG2/MPEG4/H.264
AC 100-240 V 50/60Hz
2x8W
Analog RGB(PC) x1; PC audio x1
High-Definition Multimedia Interface (HDMI) x 2
Composite Input x 1
YPbPr x 1
SCART Inputx 1
50W
32
CI x 1
USB x 1
x 1
RF Co-Ax x 1
LNB IN
Composite video input >=350
YPbPr >=400
Headphone x 1
TV System
Video Signal System
Input Power Voltage
Power consumption
Standby Power consumption
Audio Output Power (THD 7%)
Signal Input
Signal output
Horizontal definition (TV line)
SECAM-B/G , D/K , L ,
≤0.50W
DVB-T, DVB-C, DVB-S2
INSTALLATIONCAUTION
*Locate the TV in the room where light does
not strike the screen directly.
*Total darkness or a reflection on the picture
screen can cause eyestrain. Soft and indirect
lighting is recommended for comfortable
viewing.
*Allow enough space between the TV and the
wall to permit ventilation.
*Avoid excessively warm locations to prevent
possible damage to the cabinet or premature
component failure.
*Do not cover the ventilation openings when
using theTV.
Main parameter
Main features
4 NICAM;
5 T ;ime-shift
3
HDMI interface and SCART
Inter face;
High luminance, wide viewing
angle;
2
Used as Television, display terminal,
PC display;
1
Never tamper with any components inside the
TV, or any other adjustment controls not
described in this manual. All LED-TV's are high
voltage electrical equipment.
When you clean dust or any water drops off the
SCREEN or CABINET or around any of the
buttons or connectors, the power cabled should
be removed from the power socket. Wipe the TV
with a soft, dry, dust free cloth.
During thunderstorms, unplug the power cable
and aerial / antenna cable to prevent damage to
your TV and any other devices connected to it.
All repairs to this TV should only be performed
by qualified TV service
personnel.
02 Introdution
Introduction
EN-5
5000(DVB-S2);510(DTV);100(ATV)Storage channel number
SCART Output x 1
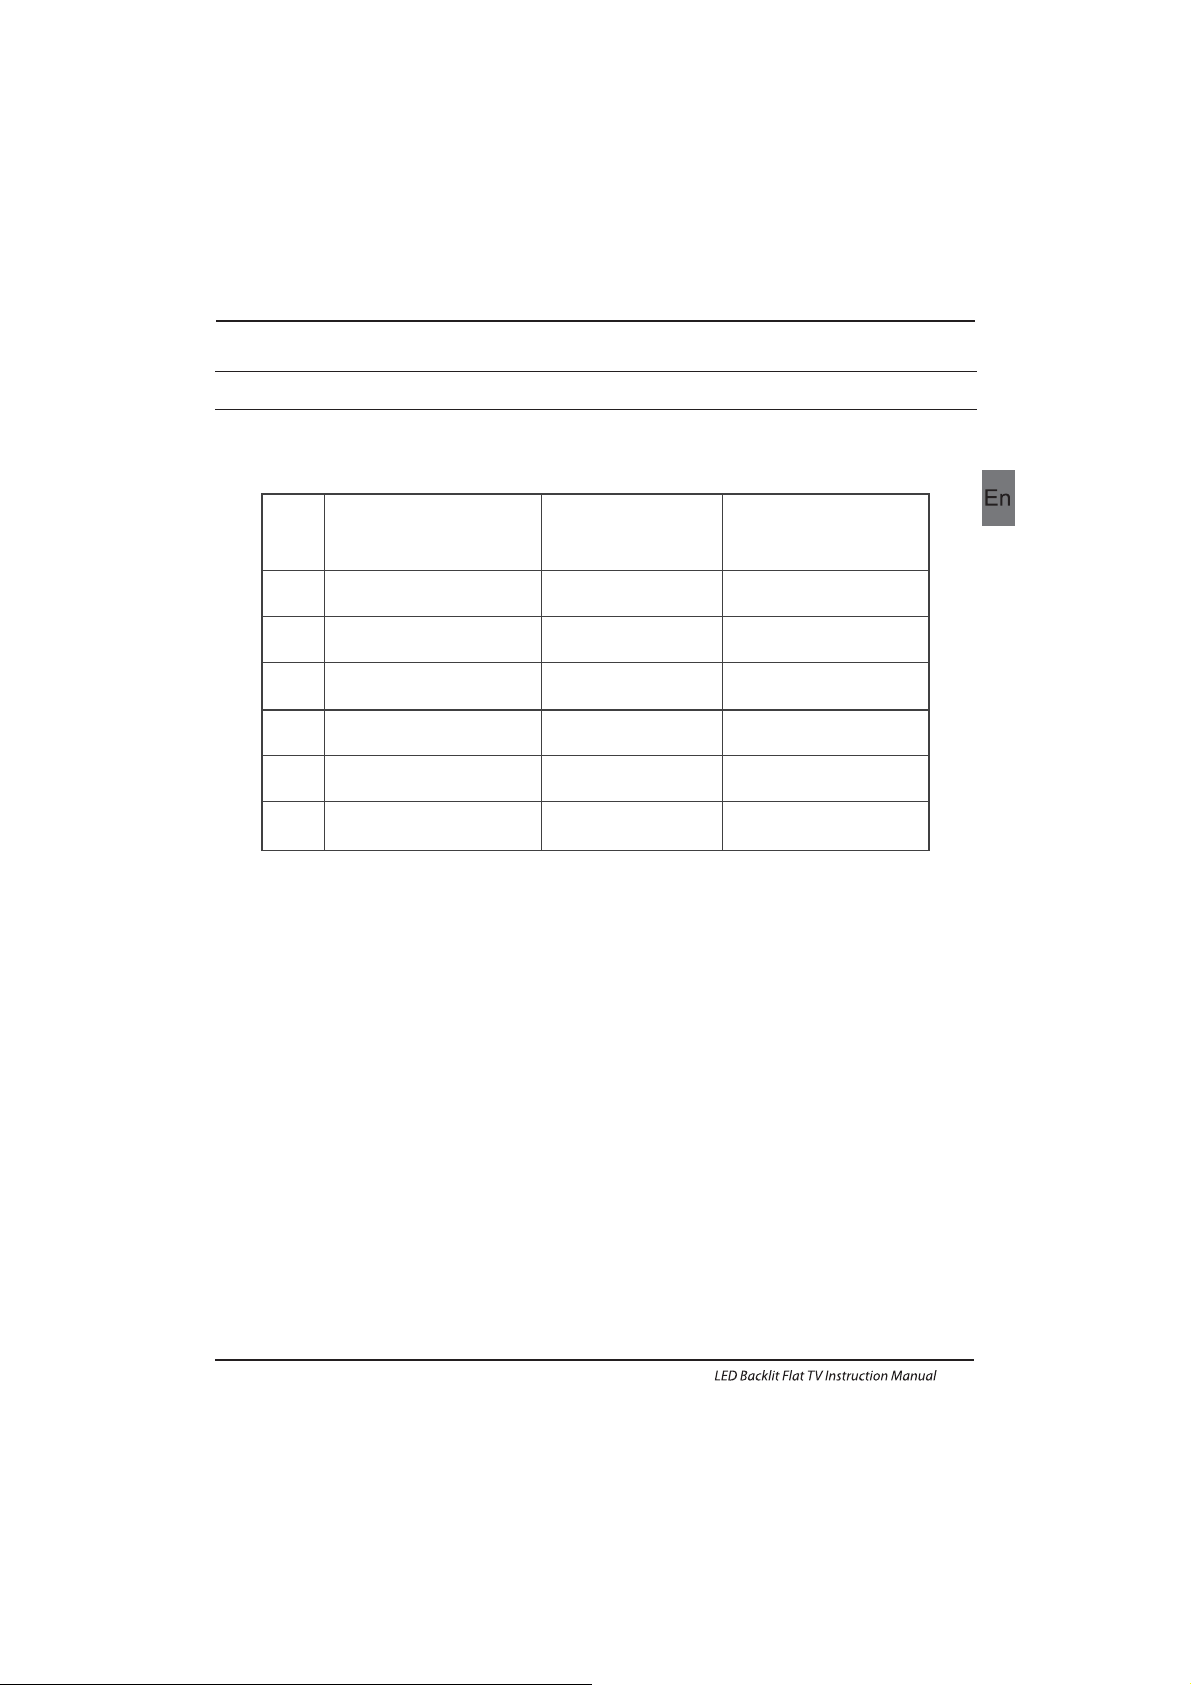
PRESET MODE
PC
3
5
1024x768
1280x1024
60
60
1
640x480
60
31.47
2
800x600
60
37.88
48.36
63.98
RESOLUTION
V.Freq.(KHz) H.Freq.(KHz)
4
1360x768
60
47.7
Introduction
EN-6
6
1920x1080
60
66.64
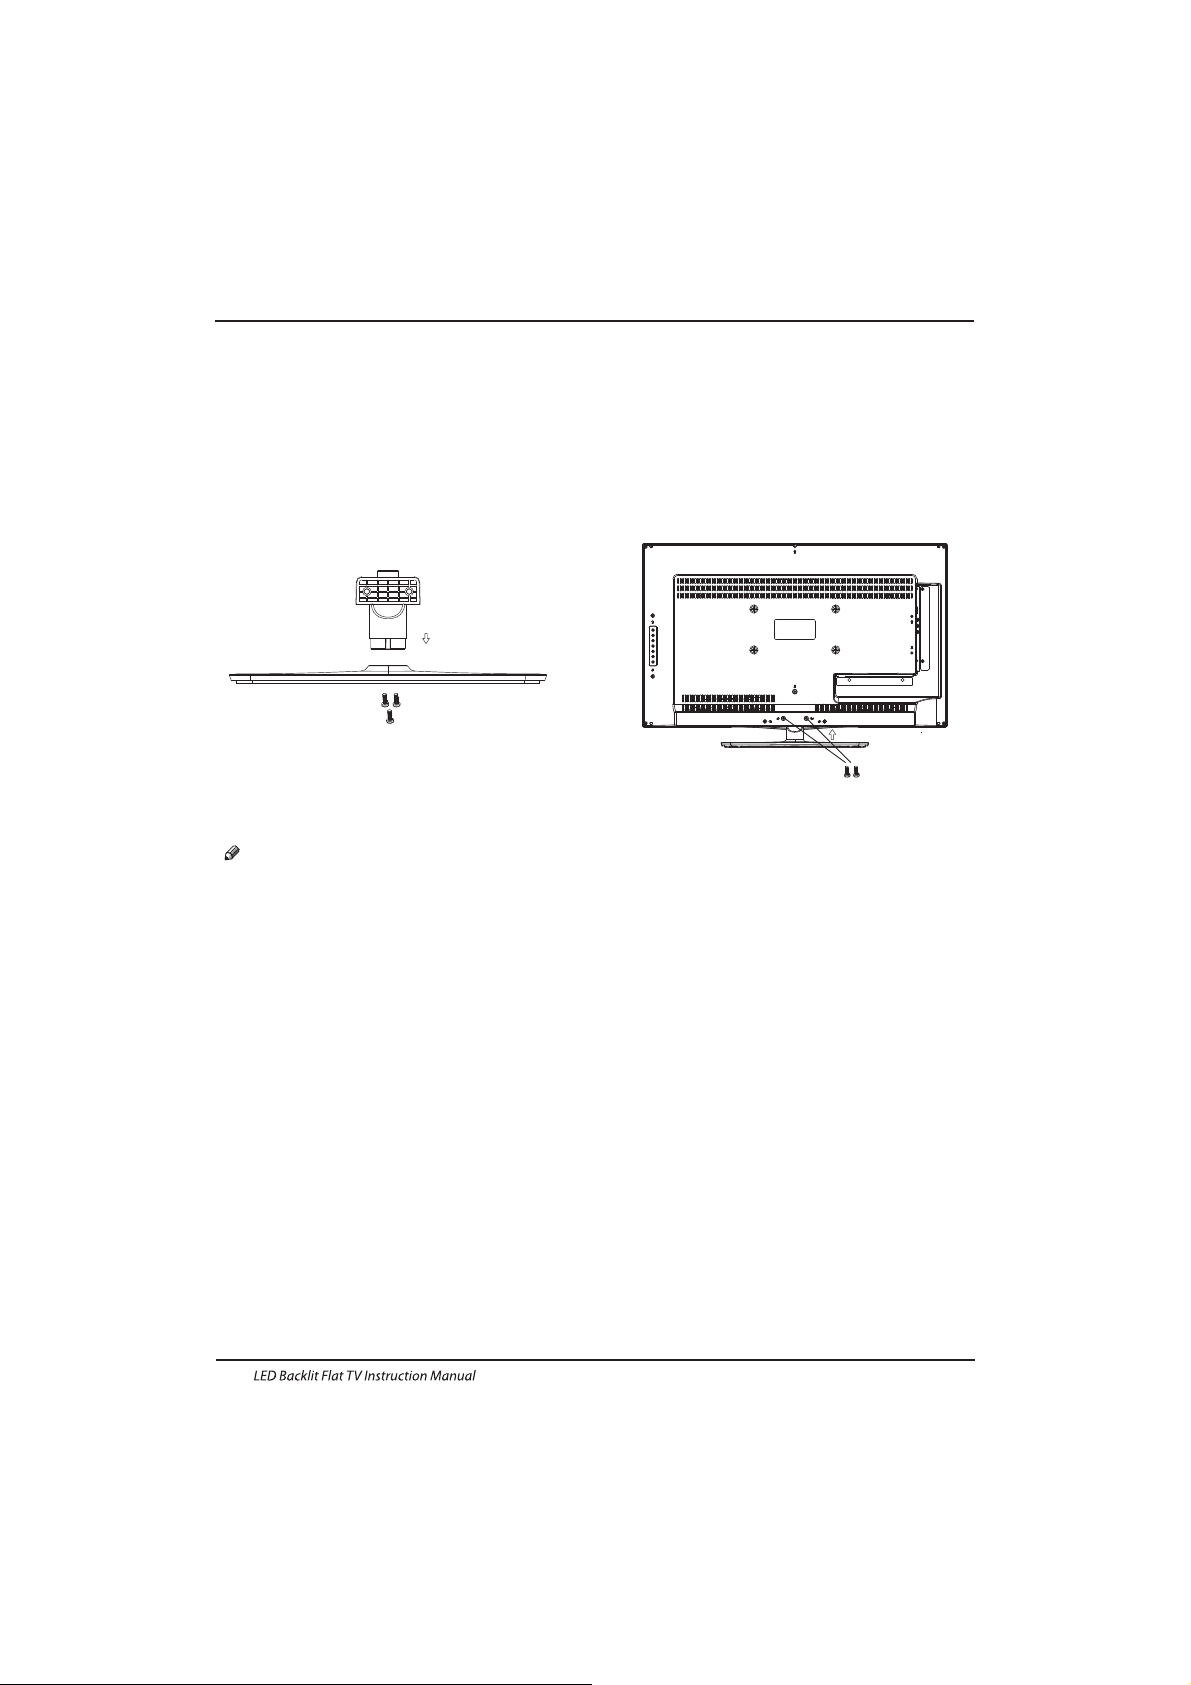
Base Stand Assembly Instruction
1. Insert the stand support pillar into the stand
as the arrow indicated
direction, and then fastened with three screws.
2. Insert the stand Ass'y into back cover as the
arrow indicated direction,and then fastened
with two screws.
INSTALLATION NOTES
Locate the TV in a room where light does not strike the screen directly. Total darkness or a
reflection on the screen can cause eyestrain. Soft and indirect lighting is recommended for
comfortable viewing.
Allow enough space between the TV and the wall to permit ventilation.
Please do not attempt to rotate the TV on the stand.
Avoid excessively warm locations to prevent possible damage to the cabinet or premature
component failure.
Introduction
EN-7
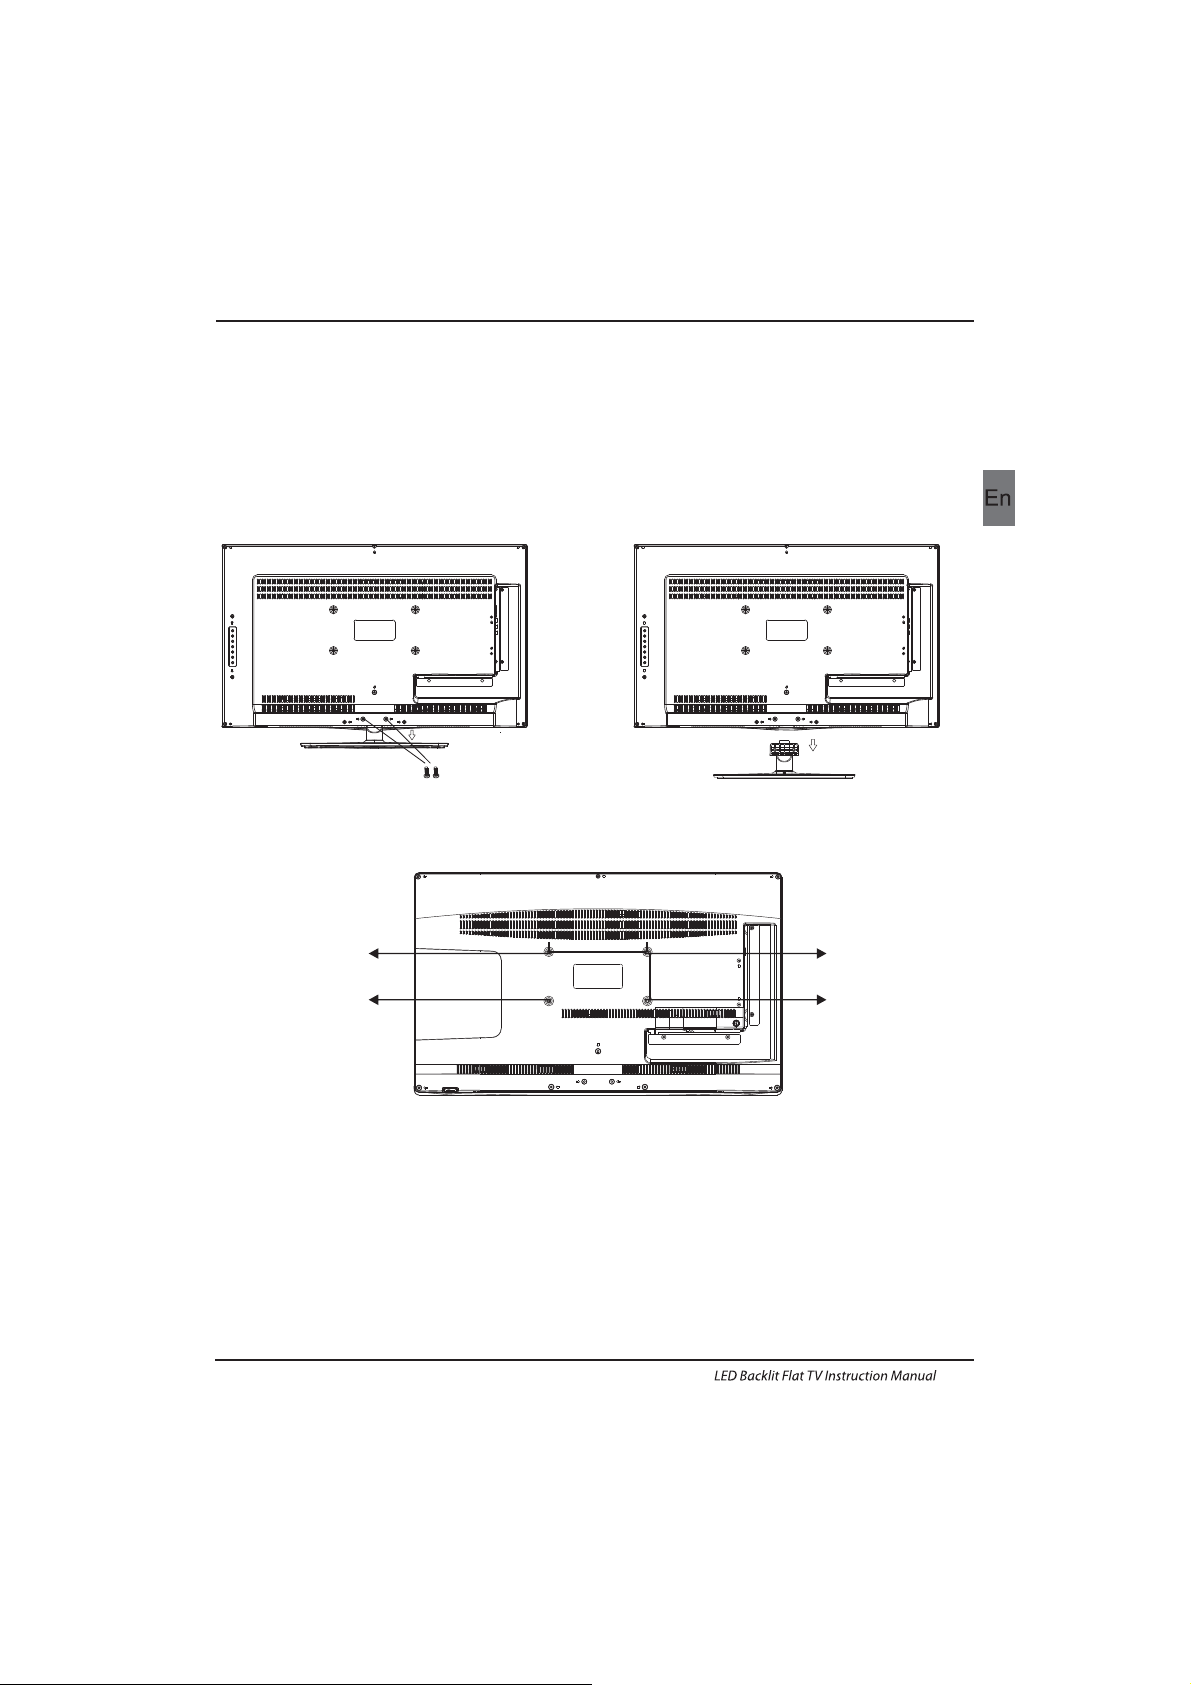
WALL MOUNTING INSTALLATION GUIDELINES
2.Remove the screws from the lower part of the
television, where the base joins to the TV, and take
away the stand (put the stand somewhere safe for
future use).
1.Place the LED LCD Television onto a solid
surface. Please place some soft material
over the front of the screen to protect it
from any damage.
3.Use the four screws provided to fix the TV onto a wall mounting bracket (not included)
via the four VESA standard holes on the back of the television.
Introduction
EN-8
This television can be wall mounted as follows:
M6X13
M6X13
M6X13
M6X13
200mm
100mm
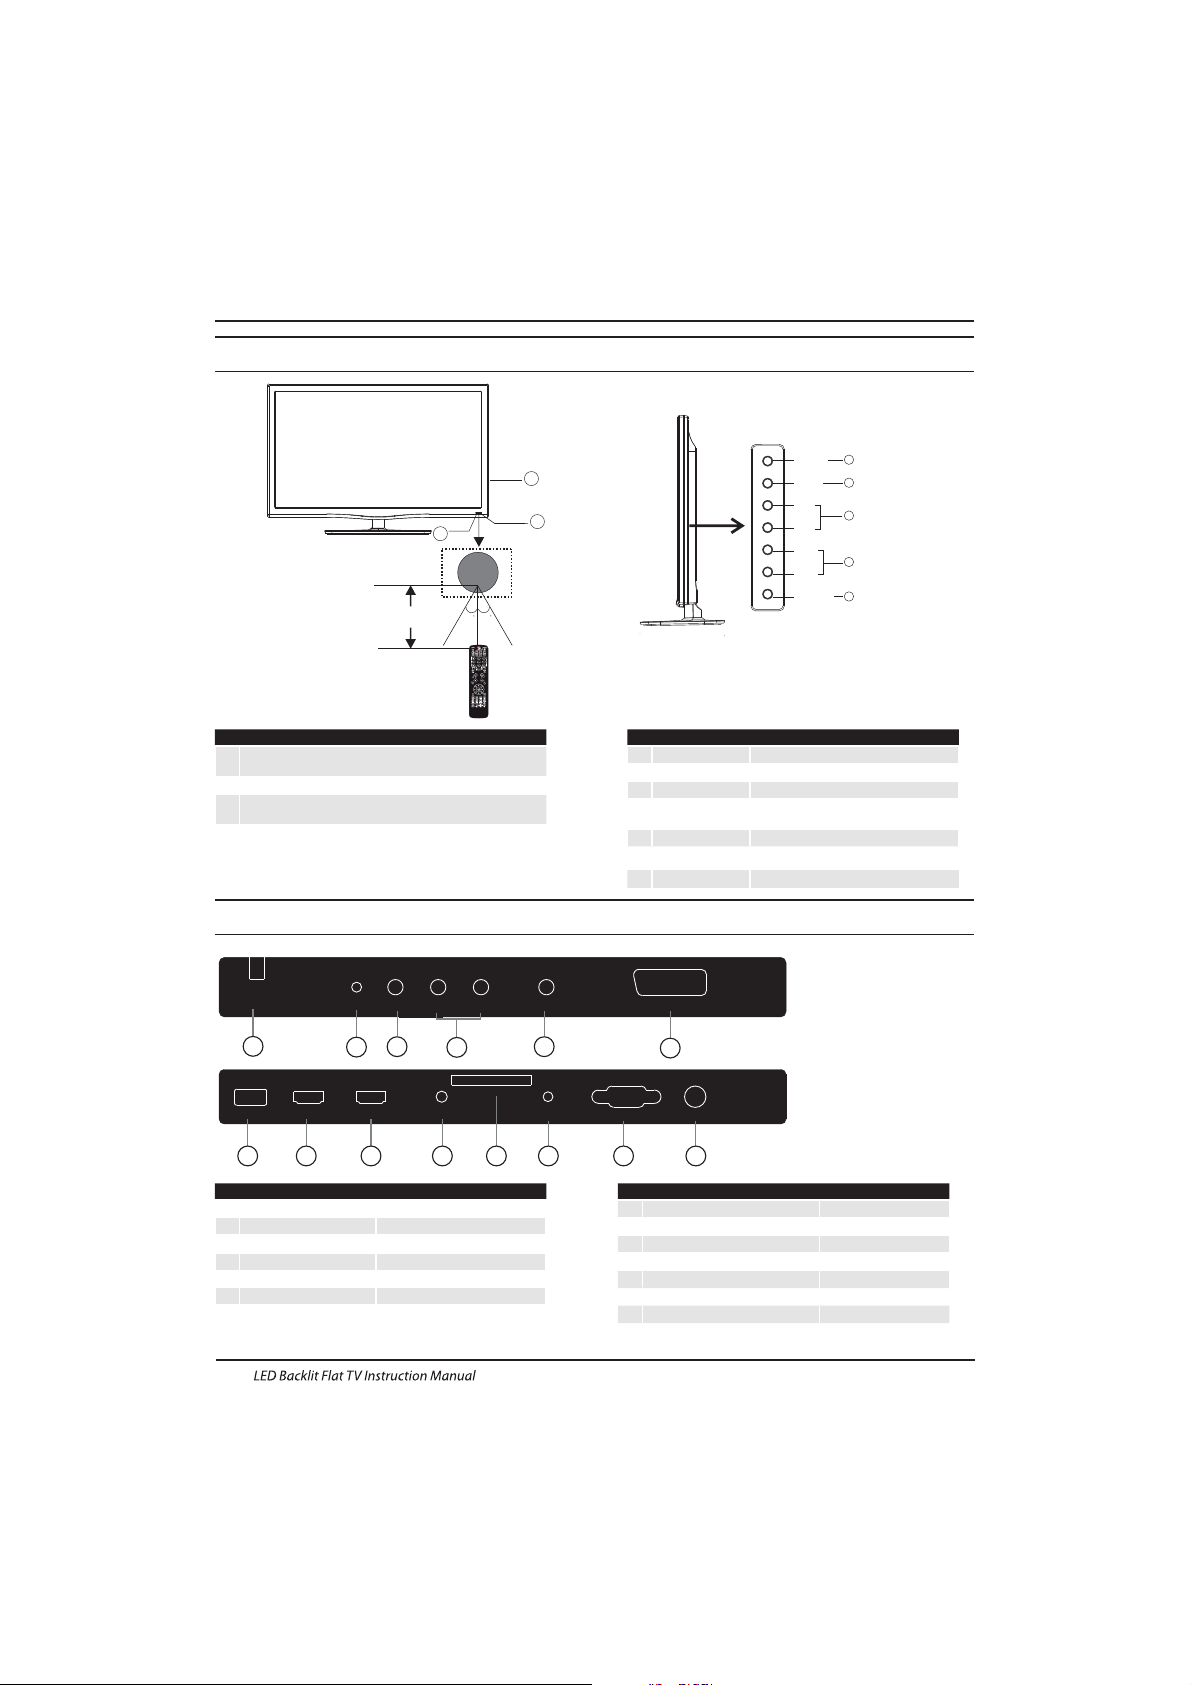
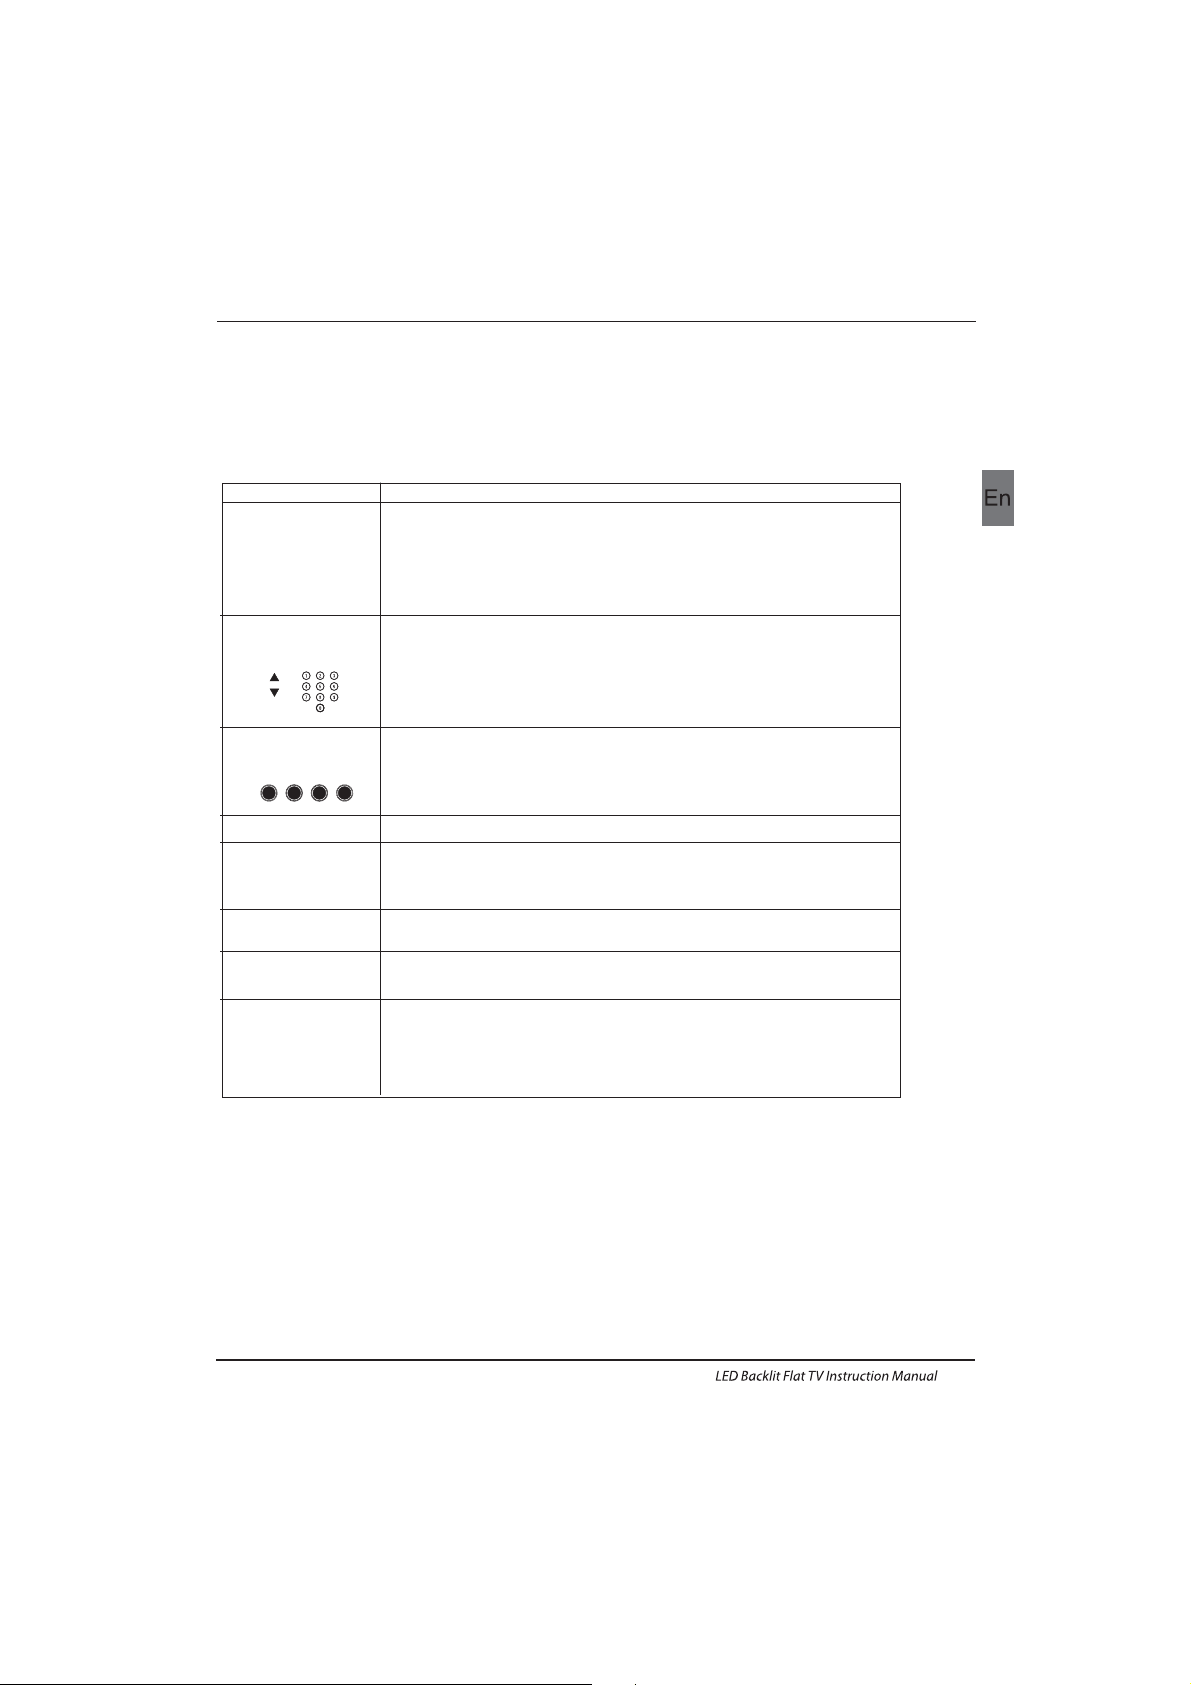
Rear/Side Sockets
1
2
3
Remote control sensor.
Indicator LED:
Blue: Power On ; Red: Stand By.
Key board.
1
SOURCE
Display the input source menu.
MENU
Display main MENU.
3
4
CH+/CH-
In TV mode,press CH+ or CH- to change
the channel up and down.
In MENU, press CH+ or CH- to select items .
STANDBY
2
VOL+/VOL-
Adjust sound level.
In MENU,adjust the item that you selected.
5
1
YPbYr
2
input
3
4
input
5
input
input
AC Power Source
6
input/output
LNB IN
SCART
L/R AUDIO
VIDEO
7
input
USB
input
8
9
HDMI2 input
10
11
12
13
input
HDMI1
COMMON INTERFACE(CI)
PC AUDIO
input
analogue audio output
input
HEADPHONE
input
VGA
14
input
RF
Introduction
Front control panel
EN-9
AC-INPUT
100- 240V~ 5 0/60H z
YPbPr
VIDEO L R
LNB IN
SCART
USB HDMI2 HDMI1 HEADPHONE PC AUDIO VGA RF
COMMO N INTER FACE (CI )
2 3
1
4
6
5
7 8 9
11 12 13 1410
3
1
2
30 30
MENU
CH+
CH-
VOL+
VOL-
2
SOURCE
1
3
4
STANDBY
5
≤8m
RY
W
Audio/Video machine
with HDMI interfaces
CVBS, DVD Player or other
machine with CVBS/S-Video.
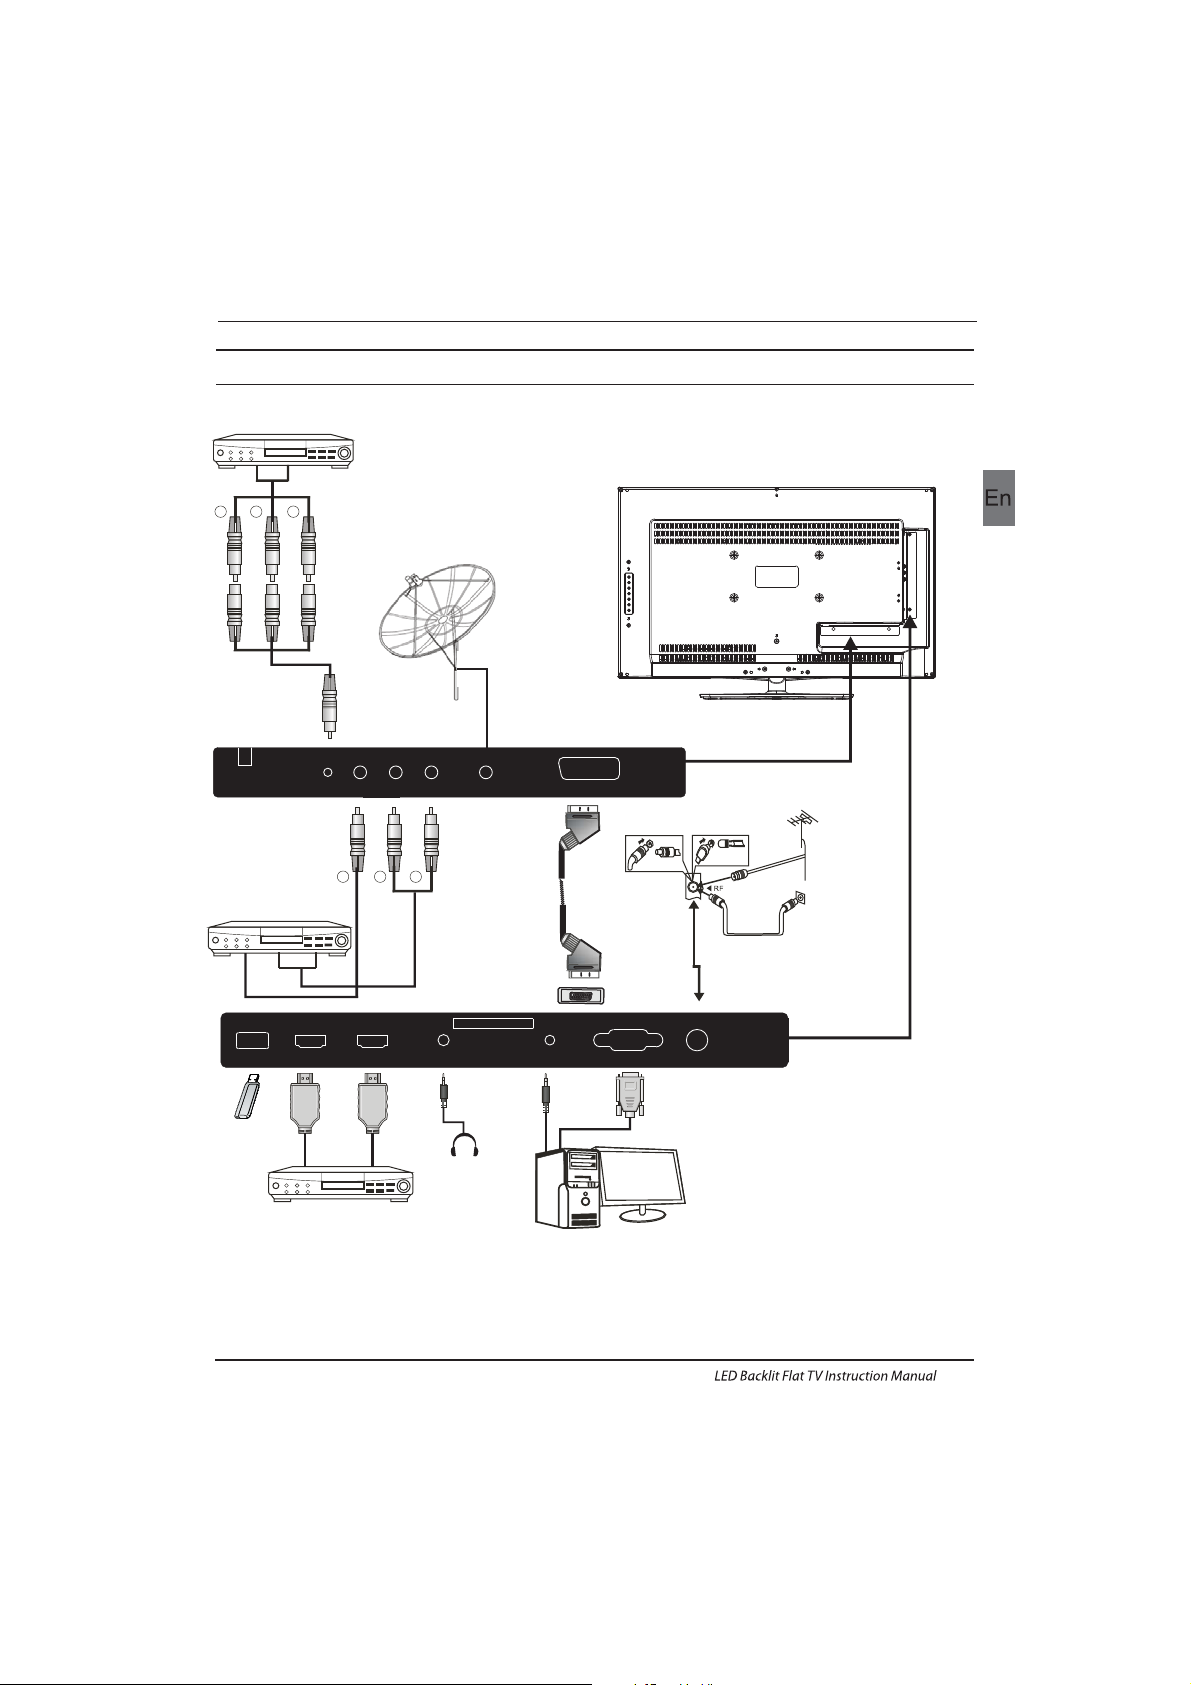
Introduction
Connecting to your Haier TV
G Green (Y)
B Blue (Pb/Cb)
W White(AUDIO-L )
R Red (AUDIO-R, Pr/Cr)
Y Yellow (VIDEO)
EN-10
AC-INPUT
100-2 40V~ 50 /60Hz
YPbPr
VIDEO L R
LNB IN
SCART
GRB
CVBS, DVD P layer o r other
machine with YPbPr/YCbCr .
USB HDMI2 HDMI1 HEADPHONE PC AUDIO VGA RF
COMMO N INTER FACE (CI )
Connecting a DVD p layer / Sa tellite / cabl e
set t op box rec eiver / game s conso le / PC or
Laptop
The re are several op tions t o conne cting a D VD
pla yer / Satellite or Cable set top box receiver /
games console / PC or Lap top to your TV.
Option 1 SCART
Connect a SC ART cable (not supplied)
from the SCART socket on the TV to the DVD
pla yer / Satellite or cable set top box receiver or
games consol.
To select the device connected with the
SCA RT cable press t he SOURCE butto n on the
remote and use the keys to select SCART
and p ress th e OK button.
Note:- The TV will default to the SCART
connection when the TV is switched on.
Option 2
If th e device you want to connect to the
is sw itche d on, swi tch off the devi ce first.
Connect a HD MI cable (not supplied) from
the HDMI socket on the TV to the DVD player /
Satellite or cable receiver or games consol.
Swi tch on the device you have just
con necte d to the TV
To select the device connected with the
HDMI cable press the SOURCE button on the
remote and use the keys to select HDMI and
press the OK button.
Option 3 AV Audio Visual
(Yellow/White/Red)
Mak e sure th at both T V and the d evice are
switched off before connecting.
Connect the AV cables (not supplied) from
the Video (yellow) and Audio (white, red)
sockets on the TV to the DVD player or games
console etc.
To select the device connected with the
AVI cable press the SOURCE button on the
remote and use the keys to select AV and
pre ss the OK b utton.
Option 4 COMPONENT
(Green/Blue/Red)+(White/Red)
Mak e sure th at both T V and the device are
switched off before connecting.
▼▲
▼▲
▼▲
HDMI1/HDMI2
TV
Connect th e cable s (not su pplie d) from t he
COMPONENT IN sockets Y, Pb, Pr (green,
blue, red) and L-Audio-R (white, red) on the TV
to th e DVD player o r games c onsol e etc.
To select th e devic e connected with the
COMPONENT cable press the SOURCE button on the
rem ote and use th e
▼▲ keys to select COMPONENT
and p ress th e OK button.
Opt ion 5 VGA (15pin Sub-D)
Connect a VGA c able (n ot supp lied) f rom the
VGA s ocket o n the TV to t he PC / Lap top.
To select th e PC / Lapt op connected with the
VGA c able pr ess the S OURCE b utton on the
rem ote and use th e
▼▲keys to select PC and
press the OK button.
Not e VGA i s video o nly. For au dio fro m your
PC/Laptop you need to connect a sep arate
cable from the PC Audio (3.5mm jack) to the
headphone socket on you PC/Laptop (3.5mm
jack)
Opt ion 6 USB
Most USB sticks can be connected to your TV
and s ome dig ital ca meras may al so work .
Connect USB stick (not supplied) or a USB
cable (not supplied) to the TV.
To select the USB device connected to the TV,
pre ss the SO URCE bu tton on the re mote an d
use the
▼▲keys to select USB and press the
OK button.
Note1:Only *.jpg and *.mp3 files will work,
oth er file t ypes ar e not gua ranteed an d may not .
Note 2. Apple iPhones and iPods are not
compatible with your TV.
Note 3. When connecting any device to the USB
connection, keep the USB cable length as short
as possible.
Opt ion 7 HEADPHONE OUTPUT
Ins ert th e plug of t he earp hone into the headphone
soc ket on th e TV. The TV sp eaker s are now mute d.
Alternatively you can also plug in external speakers
if re quired.
Opt ion 8 LNB I NPUT
Connect the satallite cable with the LNB Port on the
back.
Aft er that , you can turn o n the eng ine. Pre ss “So urce”
to sw itch into th e DVB-S 2 mode an d start the cha nnel
search.
Connecting to your Haier TV
Introduction
EN-11
EN-12
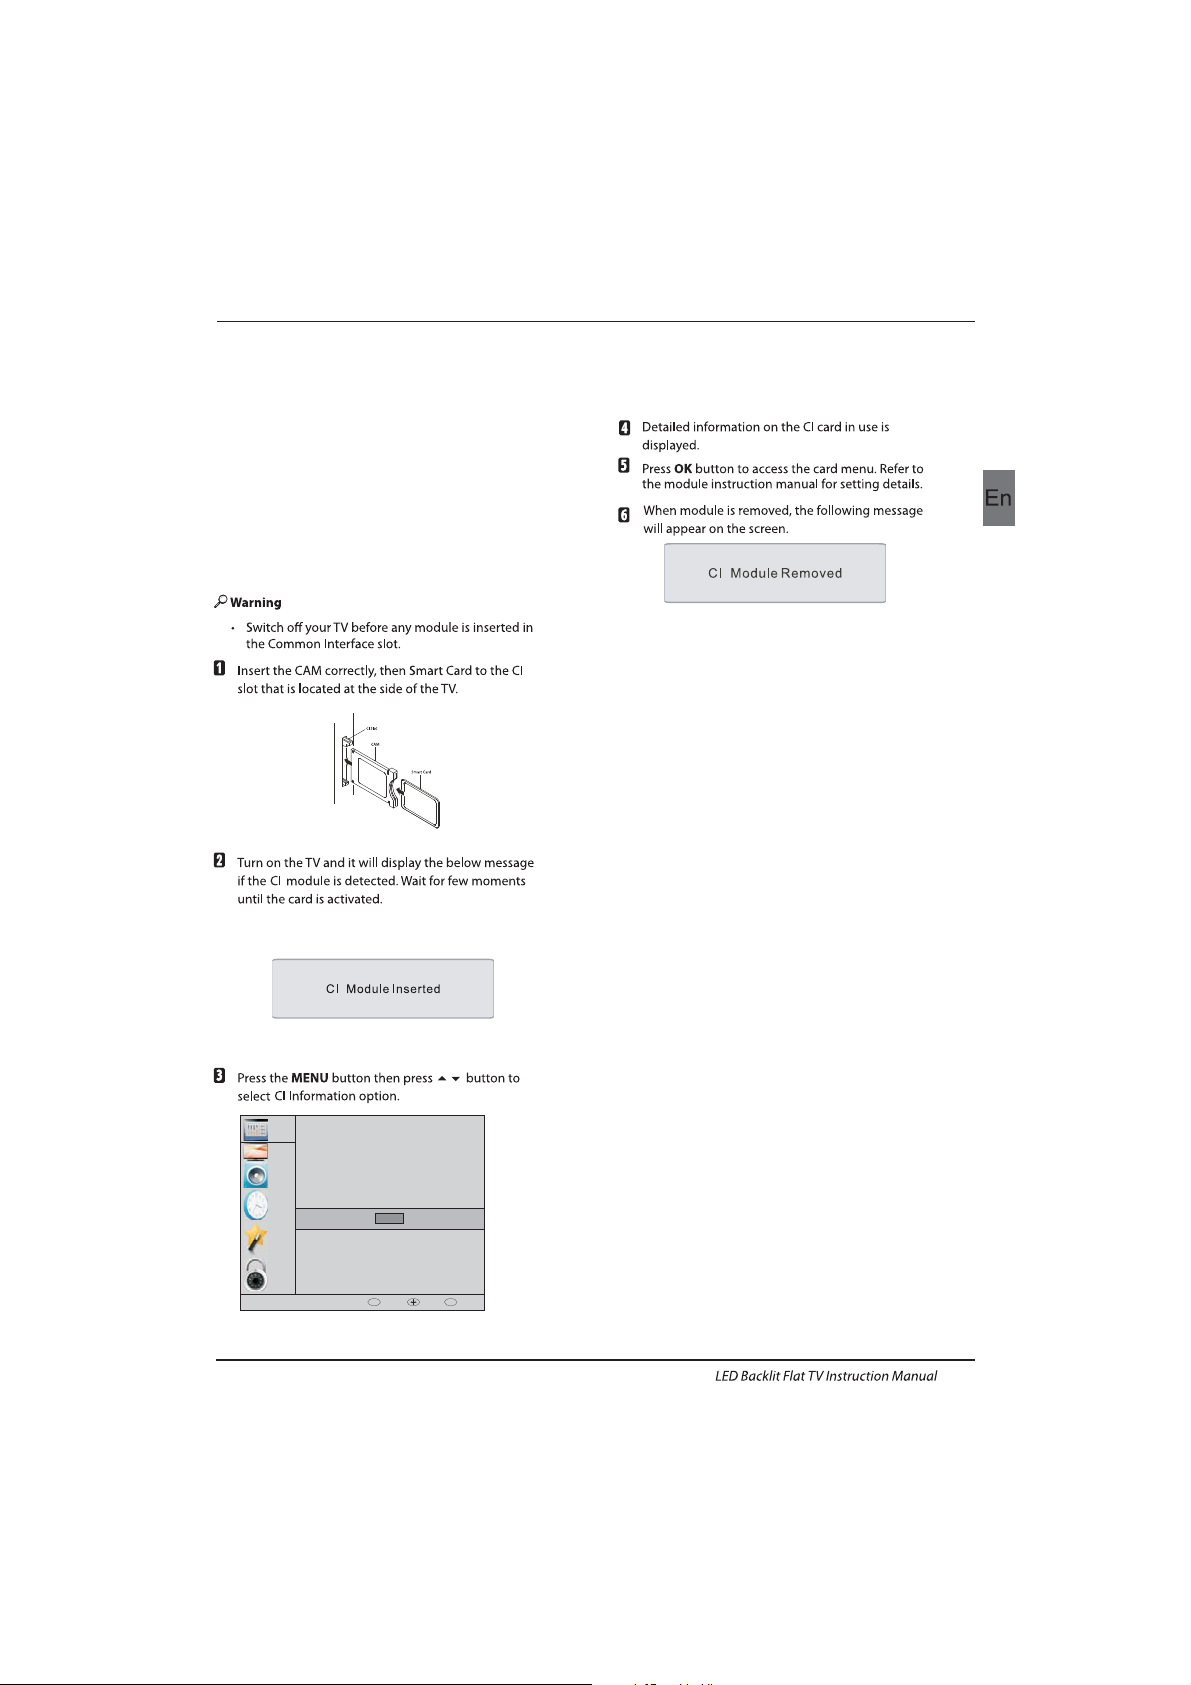
The common i nterface (CI ) slot is d esign ed to
accept the conditional Access (CA) Module and
Smart card in order to view the pay TV
programmes and additional services.
Contact your Common Interface service provider
to ge t more infor matio n about t he modu les and
subscription.
Please noted that CA modules and smart cards
are neither supplied nor optional accessories
from us.
COMMON INTERFACE
Introduction
CHANNEL
PICTURE
SOUND
TIME
OPTION
LOCK
Auto Tuning
ATV Manual Tuning
Programme Edit
Signal Information
DTV Manual Tuning
Software Update(USB)
CI Information
OK
OK
BACK MOVE OK
MENU
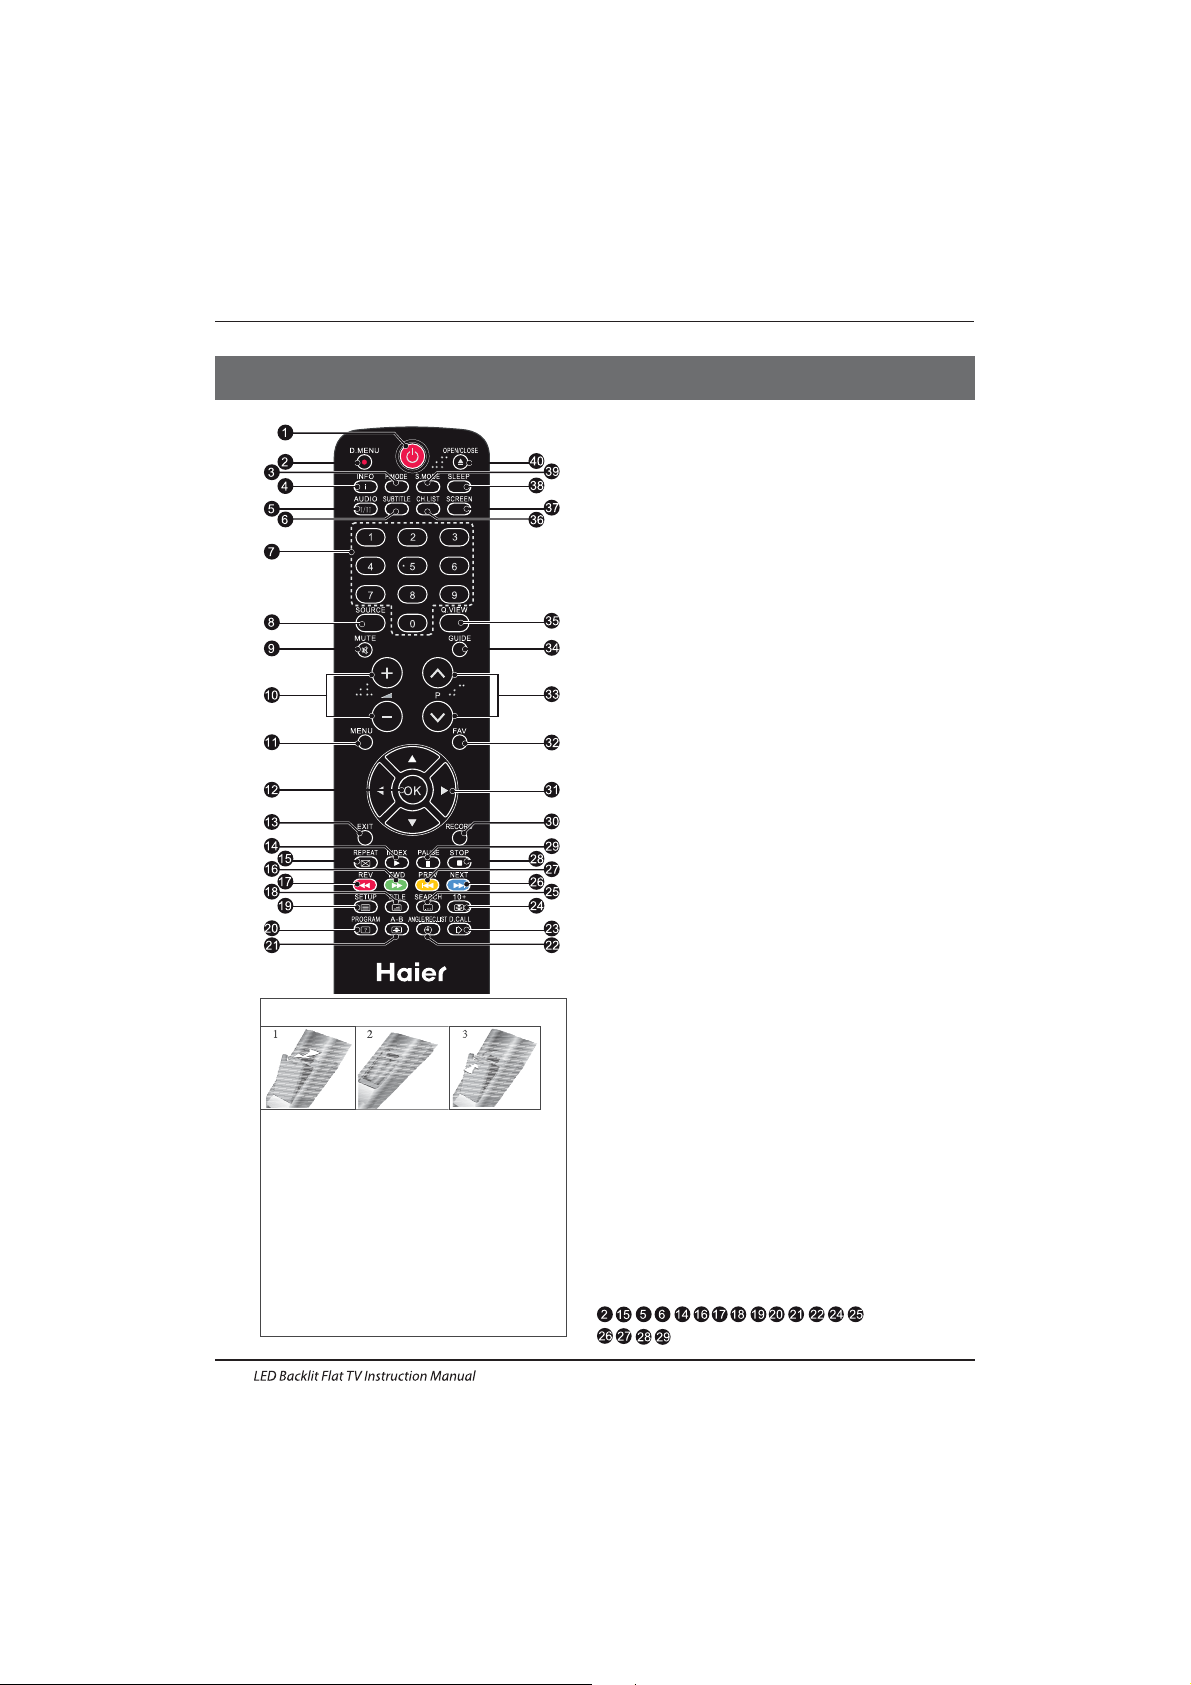
1.POWER:Pres s to turn o n the TV.
2.D.MENU:
3.P.Mode:To switch pi cture m ode.
4.INFO:Press to d isplay the c urren t signa l
sta tus,incl uding i nput so urce an d chann el audi o
mode.
6.SUBTITLE:Pres s to turn t he subt itle On or Off.
7.Number Buttons:For dire ct acce ss to cha nnels .
8.SOURCE:To select i nput so urce.
9.MUTE:To disabl e or enab le the so und out put.
10.Volume Control:To adjust sound level.
11.MENU:To display TV me nu.
12.OK:To confirm selection.
13.EXIT:To retur n to the pr eviou s menu or e xit men u.
14.Teletext Index/USB PLAY
15.REPEAT: .
16.Teletext Green Button / USB Fa st Forw ard
17. Tele text Re d Butto n / USB Fast R ewind
18.Teletext Mix
19.Teletext Text
20.Teletext Reveal
21.Teletext Size
22.Teletext Time/ANGLE/REC.LIST(tele text ti me is no
function)
23.Teletext Mode:No fun ction
24.Teletext Hold
25.Teletext Subcode:Teletext Subpage
26.Teletext Blue Button / USB N ext File
27. Tele text Yellow B utton / U SB Previ ous Fil e
28.USB STOP
29.USB PAUSE
30.START RECORD
31.UP,DOWN,LEFT,RIGHT Cursor:Press to n avigate
your selection.
33.Select Programme:Press
▲▼ Button to select the
nex t or prev ious TV c hanne l.
34.GUIDE:Press to d isplay ele ctron ic prog ramme
gui de in TV mo de.
35.Q.View:To acc ess the p revio usly viewe d chann el.
36.CH.LIST: Press to dis play th e chann el list.
37.Screen:To change picture aspect ratio.
38.Sleep :Set timer to turn of f the TV.
39.S.Mode:To switch sound mo de.
40.OPEN/CLOSE:No Function
START RECORD.
Teletext Exit
5.AU DIO I/I I: Press to se lect MONO,Nicam stereo for
ATV ch annel . Selec t Audio l angua ge for DT V or DVB- S2
channel.
32.Fav:To acces s your favou rite ch annel s list in T V,
DTV or DVB-S2 mode.
:No DVD function
03 Remote Control
Insert Batteries Into the Remote Control
1. Remove the battery cover.
2. Inserting the 2 AAA 1.5V batteries making
sure the polarity(+ or -) of the batteries matches
the polarity marks inside the unit
3. Mount the battery cover. Replace with new
batteries when the TV set begins to show the
following symptoms: Operation is unsteady or
erratic. Sometimes the TV set does not function
with Remote Control Unit.
Remark:
1) Alkaline Battery Recommeded.
2) Remove batteries when they are exhausted
or if the remote control is not to be used for long
time.
Remote Control
EN-13
EN-14
E
TEXT
SELECTING A PAGE
DIRECT ACCESS
TO THE ITEMS
INDEX
SUB PAGE
HOLD
REVEAL
Press:
You will obtain :
LIST
TELETEXT
Enter the number of the page required using the 0 to 9 up/down. Example:
page 120, enter 120. The number is displayed top left, the counter tur ns and
then the page is displayed. Repeat this operation to view another page. If
the counte r continues to s earch, this mean s that the page is not
transmitted. Select another number.
Coloured a re as are displayed a t the bot tom of the scree n. The 4 coloured
keys are used to access the items or corresponding pages. The coloured
areas flash when the item or the page is not yet available.
This returns to the contents page (usually page 100).
Cer tain page s contain sub-page s which a re automatically disp layed
successively. This key is used to stop or resume sub-page acquisi tion.
The indication appears top left.
To freeze the page.
To display or hide the concealed information (games solutions).
The user can set four favorite p ages to be direc tly linke d to the four co lor
keys. While l ist mod e is activated, it is not possi bilit y to use TOP or FLOF
navigation with the colorkeys. The favorite page numbers should be stored
and restored to/f rom nonvol atile memory for eac h chann el by the system
software.
This is used to call or exit teletext modes. The summary appears with a list
of items that can be accessed. Each item has a corresponding 3 d igit page
num ber. If th e chann el sele cted do es not broadcast telete xt, theindication
100 w ill be di splayed and th e screen will remain blan k (in thi s case, exit
teletext and select another channel).
Teletext is an information system broadcast by certain channels which can be consulted like
a newspaper. It also offers access to subtitles for viewers with hearing problems or who are
not familiar with the transmission language(cable networks, satellite channels, etc.)
Remote Control
Operation
04 OPERATION
Password
Please enter old password
Please enter new password
Confirm new password
Home Mode
Mode Select
OK
Shop Mode
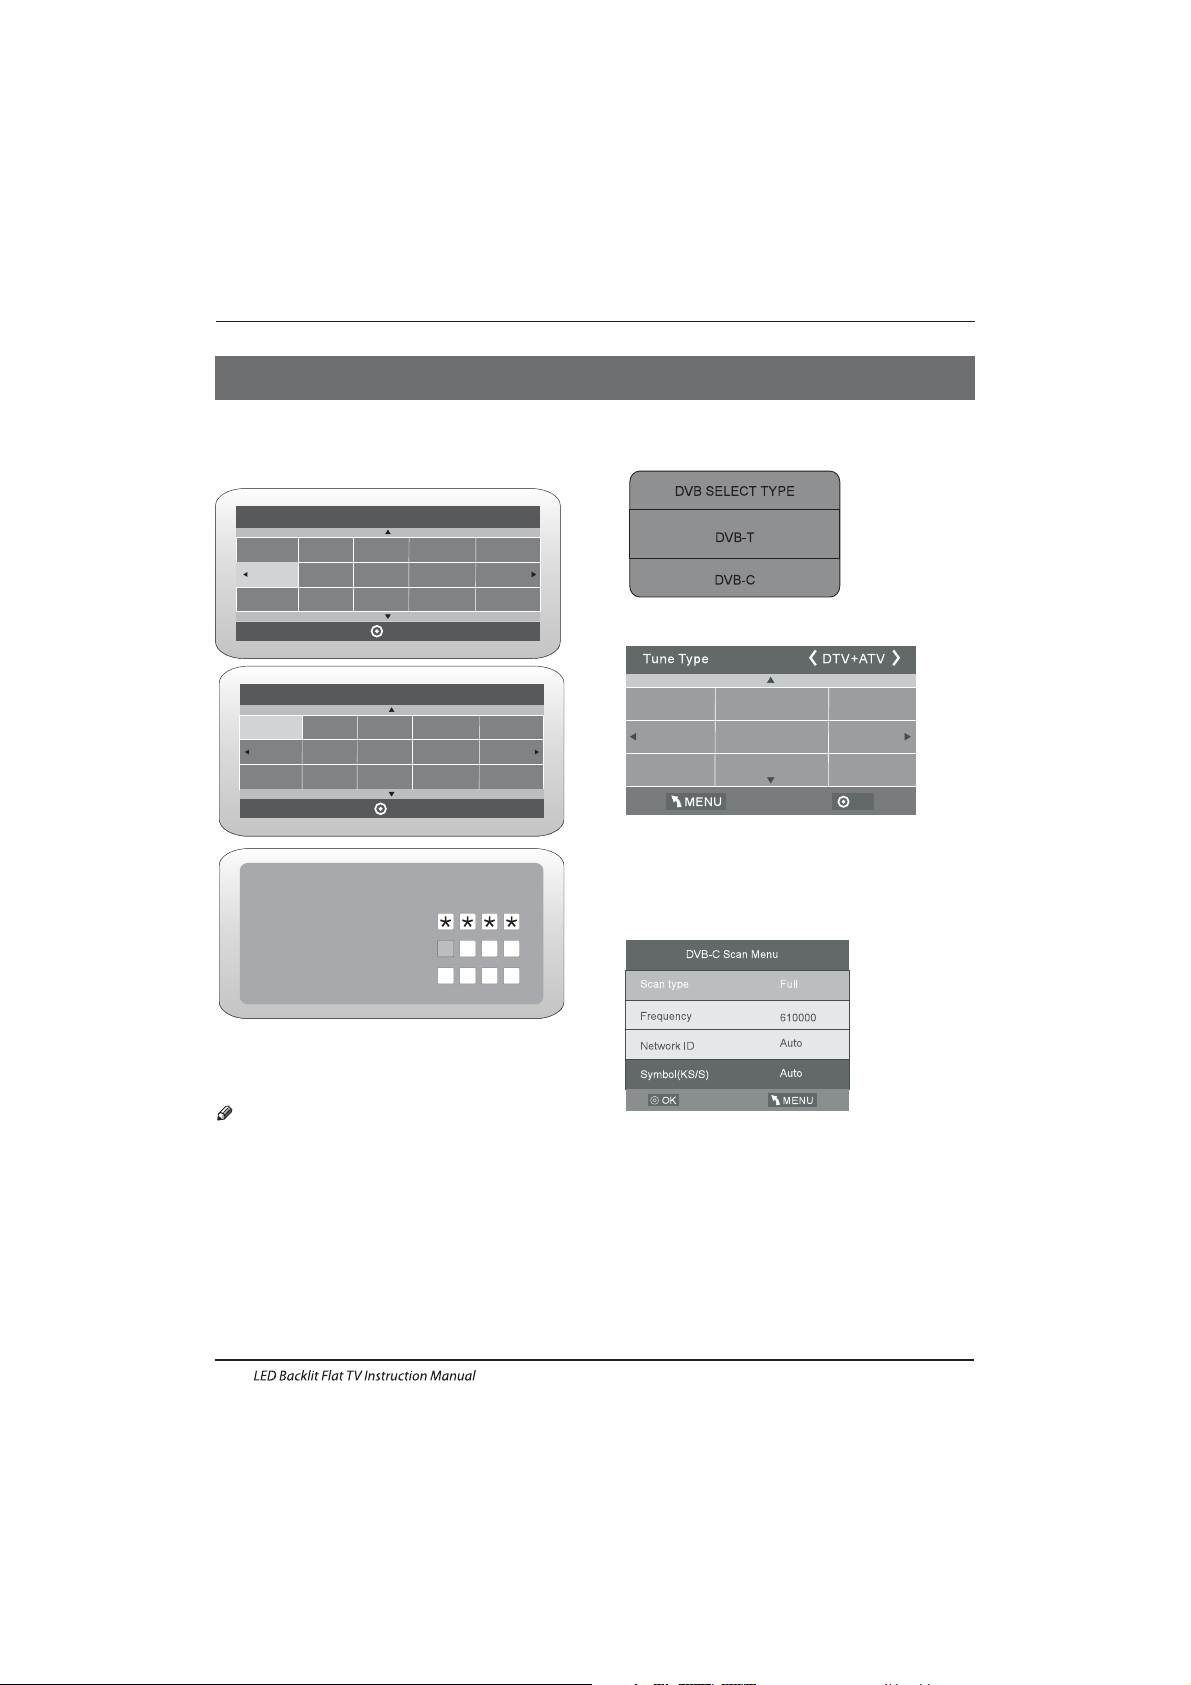
The installation guide only appear when the TV first time
turn on or reset to factory set.
Installation Guide
1).Press the ▲▼ buttons to navigate the menu and
change the settings. Press the OK button to confirm.
Select your desired language ,Home/Shop Mode to be
displayed on the menu.
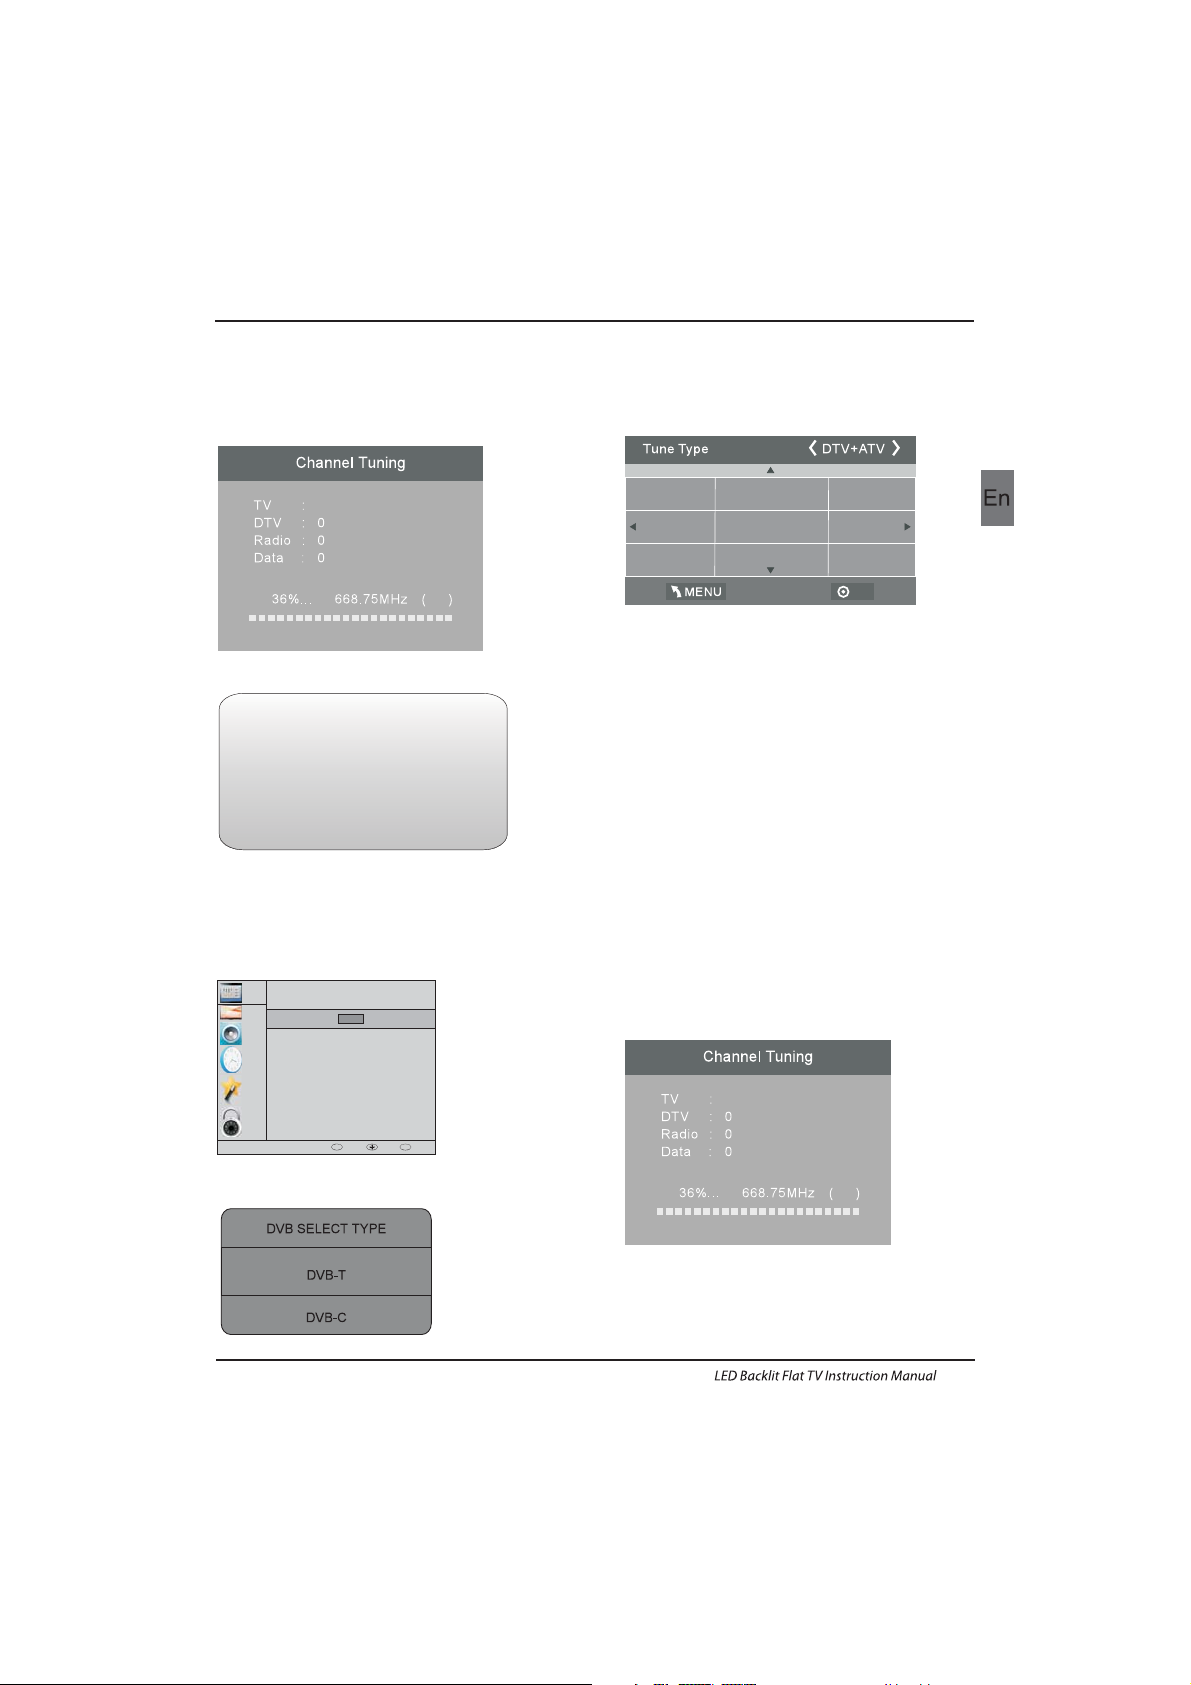
2). Press the buttons to select DVB -T/DVB-C and
then press the OK button to confirm.
▲▼
a. If you select DVB-T, the next step is to selec t the Tune
type and country then press the OK button to start tuning.
b. If you select DVB-C, the next step is to config the
DVB-C system like (scan type / Frequency/ Network
ID/Symbol(KS/S) then press OK button to into the
tune type and country select menu, this step is the
same as DVB-T, select the tune type (DT V/ATV).
Choose the right country, press OK button to start
tuning.
HOME or SHOP modes
1. Ho me Mode i s an ener gy-savin g Mode. H ome
Mode is recommended for normal viewing setting and is
set as default during manufacturer.
2. Shop Mode is an option for retailers for Advertising or
product presentation. Shop Mode has a brigh ter image
than Home Mode.
3. You may switch between Home or Shop Mode
as you choose.If you choose Shop Mode ,it will enter
HDMI1 source automatically,and you wil press Exit key to
exi t POP men u.
Note: The default password is .0000
EN-15
OK
Greece
Nederlands
Germany
Portugal
Poland
Italy
Hungary
Luxembourg
Norway
Please select an OSD language
OK
English
French
Italiano
Deutsch
Nederlands
Spanish
3). Channel tuning will commence. This operation may take
up to 6 minutes. The display will show the progress of the
tuning and the number of channels found.
4). If you want to sk ip the ATV tuning, p ress the MENU
button to interrupt the tuning half way.
A pop-up screen will be displayed, press the button to
selec t YES to confirm. You will then go straight to DT V
tuning. You may repeat the above step if you also want
to skip the DTV tuning. A n installation reminder will appear
the next time you turn on the TV.
◀
1. 1)Auto Tuning (DVB-T)
1. CHANNEL MENU
Programme(s)
Programme(s)
Programme(s)
Programme(s)
1
ATV
CHANNEL
PICTURE
SOUND
TIME
OPTION
LOCK
Auto Tuning
ATV Manual Tuning
Programme Edit
Signal Information
DTV Manual Tuning
Software Update(USB)
CI Information
OK
OK
BACK MOVE OK
MENU
1). Press the MENU button and then press the buttons
to select the CHANNEL menu and then press the OK button.
▼▲
2). Press the buttons to select Auto Tuning and then
press the OK button.
▼▲
6) Congratulations
Congratulations!!!
Completed Initial Quick Setup.
Enjoy your Haier TV
Press OK to Exit
3). Press the buttons to select DVB-T/DVB-C Press
select DVB-T and then press the OK button to confirm.
▼▲
4). In the Tune Type menu, press the buttons to select
ATV / DTV / DT V + ATV. Press the button and then press
the buttons to select the country where you will
operate the TV. Press the OK button to confirm
◀▶
▼
◀▶▼▲
Operation
EN-16
5). After tuning is complete, the channels are arranged in a
preset order. If you wish to skip channels, modify the preset
order or rename channels, select
Programme Edit under the
Channel menu.
OK
Greece
Nederlands
Germany
Portugal
Poland
Italy
Hungary
Luxembourg
Norway
5). Channel tuning will commence. This operation may take
up to 6 minutes. The display will show the progress of the
tuning and the number of channels found.
6). If you want to sk ip the ATV tuning, p ress the MENU
button to interrupt the tuning half way. A pop-up screen
will be displayed, press the◀button to select YES to
confirm. You will then go straight to DTV tuning. You may
repeat the above step if you also want to skip the DTV
tuning. An installation reminder will appear the next time
you turn on the TV.
7). After tuning is complete, the channels are arranged in a
preset order. If you wish to skip channels, modify the preset
order or rename channels, select P
rogramme Edit under the
channel menu.
Programme(s)
Programme(s)
Programme(s)
Programme(s)
1
ATV
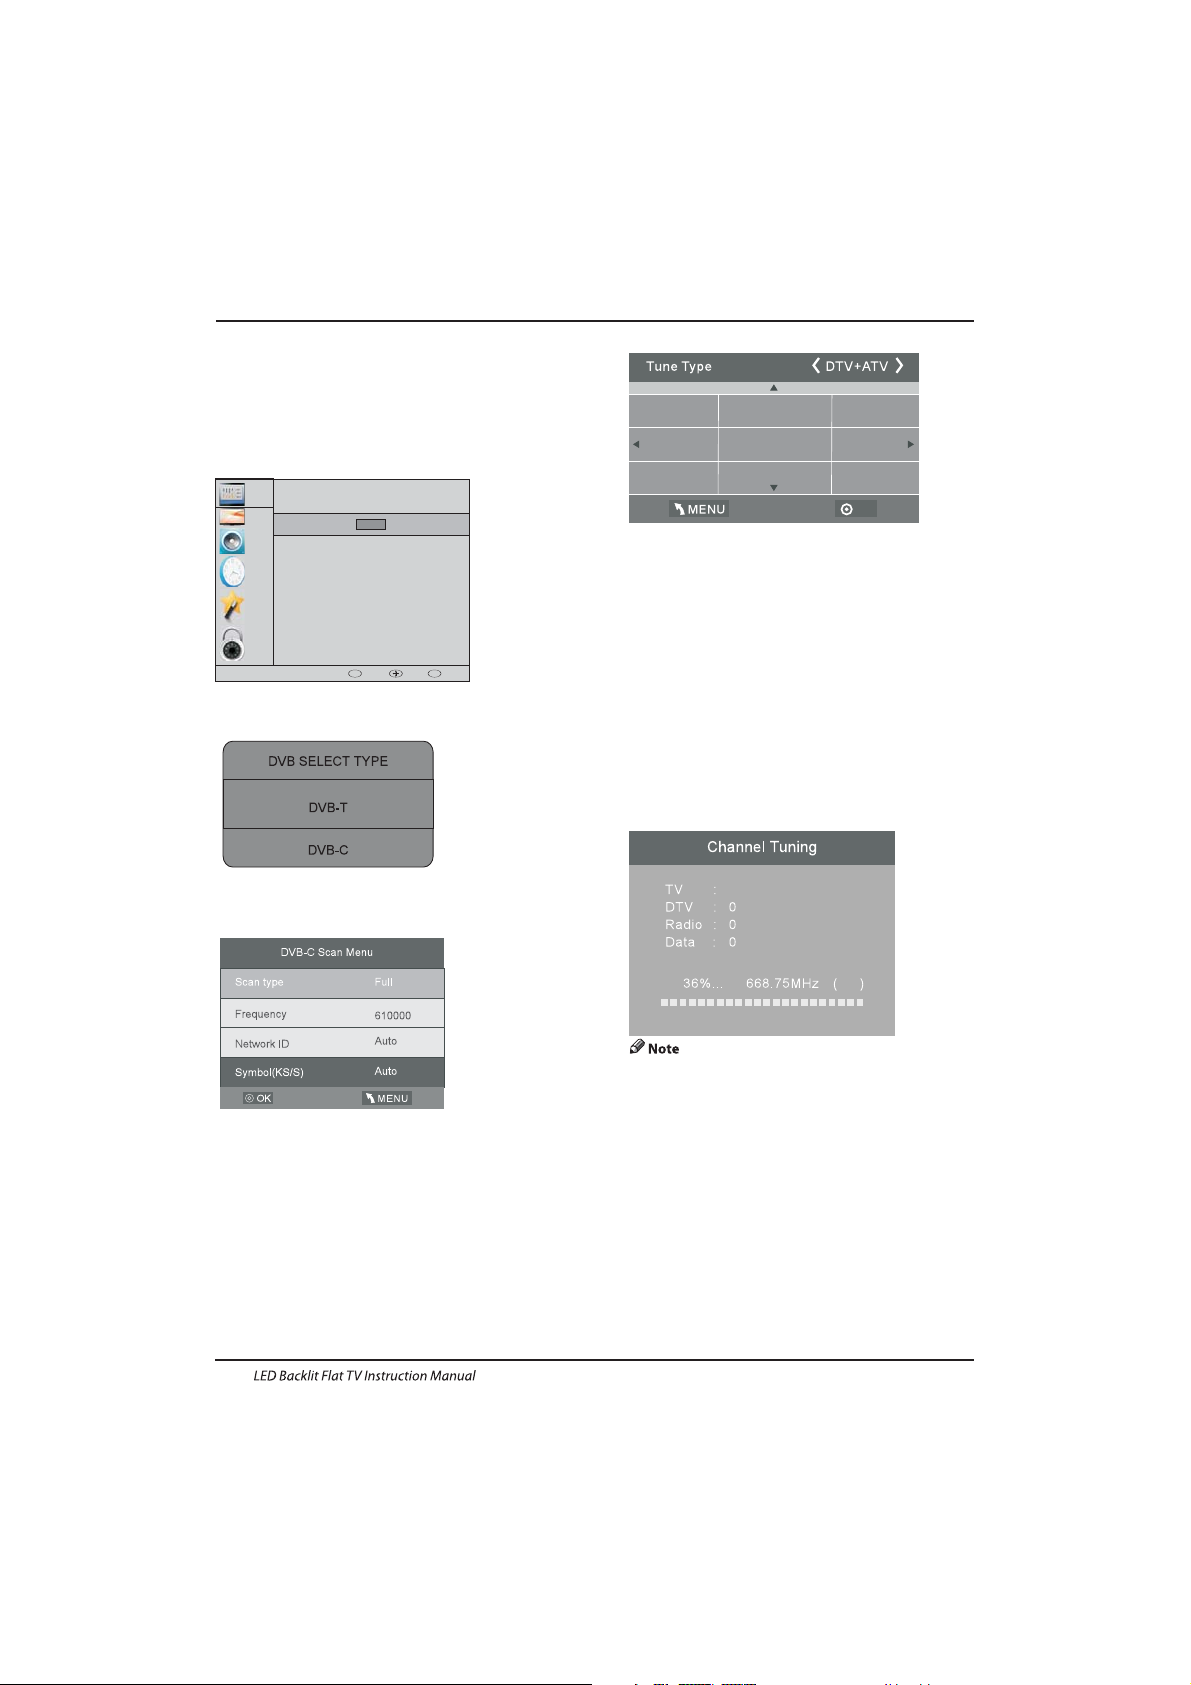
1.2 ) Auto Tuning (DVB-C )
2). Press the▼▲buttons to select Auto Tuning and then
press the OK button.
3). Press the▼▲buttons to select DVB-T/DVB-C .Press
select DVB-C and then press the OK button to confirm.
4). Press buttons to select Scan type/Symbol (Ks/S)
press the OK button to confirm.
5). In the Tune Type menu, press the buttons to
select ATV / DTV / DT V + ATV. Press the button
and then press the buttons to select the
country where you will operate the TV. Press the
OK button to confirm.
▼▲
◀▶
▼
◀▶▼▲
1). Press the MENU button and then press the▼▲ buttons
to select the CHANNEL menu and then press the OK button.
Operation
CHANNEL
PICTURE
SOUND
TIME
OPTION
LOCK
Auto Tuning
ATV Manual Tuning
Programme Edit
Signal Information
CADTV Manual Tuning
Software Update(USB)
CI Information
OK
OK
BACK MOVE OK
MENU
EN-17
OK
Greece
Nederlands
Germany
Portugal
Poland
Italy
Hungary
Luxembourg
Norway
6). Channel tuning will commence. This operation may
take up to 6 minutes. The display will show the
progress of the tuning and the number of channels
found.
7). If you want to sk ip the ATV tuning, p ress the MENU
button to interrupt the tuning half way. A pop-up screen
will be displayed, press the◀button to select YES to
confirm. You will then go straight to DT V tuning. You
may repeat the above step if you also want to sk ip the
DTV tuning. An installation reminder will appear the
next time you turn on the TV.
8). After tuning is complete, the channels are arranged
in a preset order. If you wish to skip channels, modify
the preset order or rename channels, select P
rogramme
Edit under the channel menu.
2. 1 ) DT V Manual Tuning (DVB -T)
All the channels including ATV, DTV and Radio
can be tuning by one time,if the Tune Type is
DTV+ATV .
All t he stored ch annel s will be d isapp ear after
aut o tunin g .
After auto tuning , the channel will skip to
the first DTV channel.
1). Press the MENU button and then press the▼▲
buttons to select the CHANNEL menu and then
press the OK button.
Programme(s)
Programme(s)
Programme(s)
Programme(s)
1
ATV
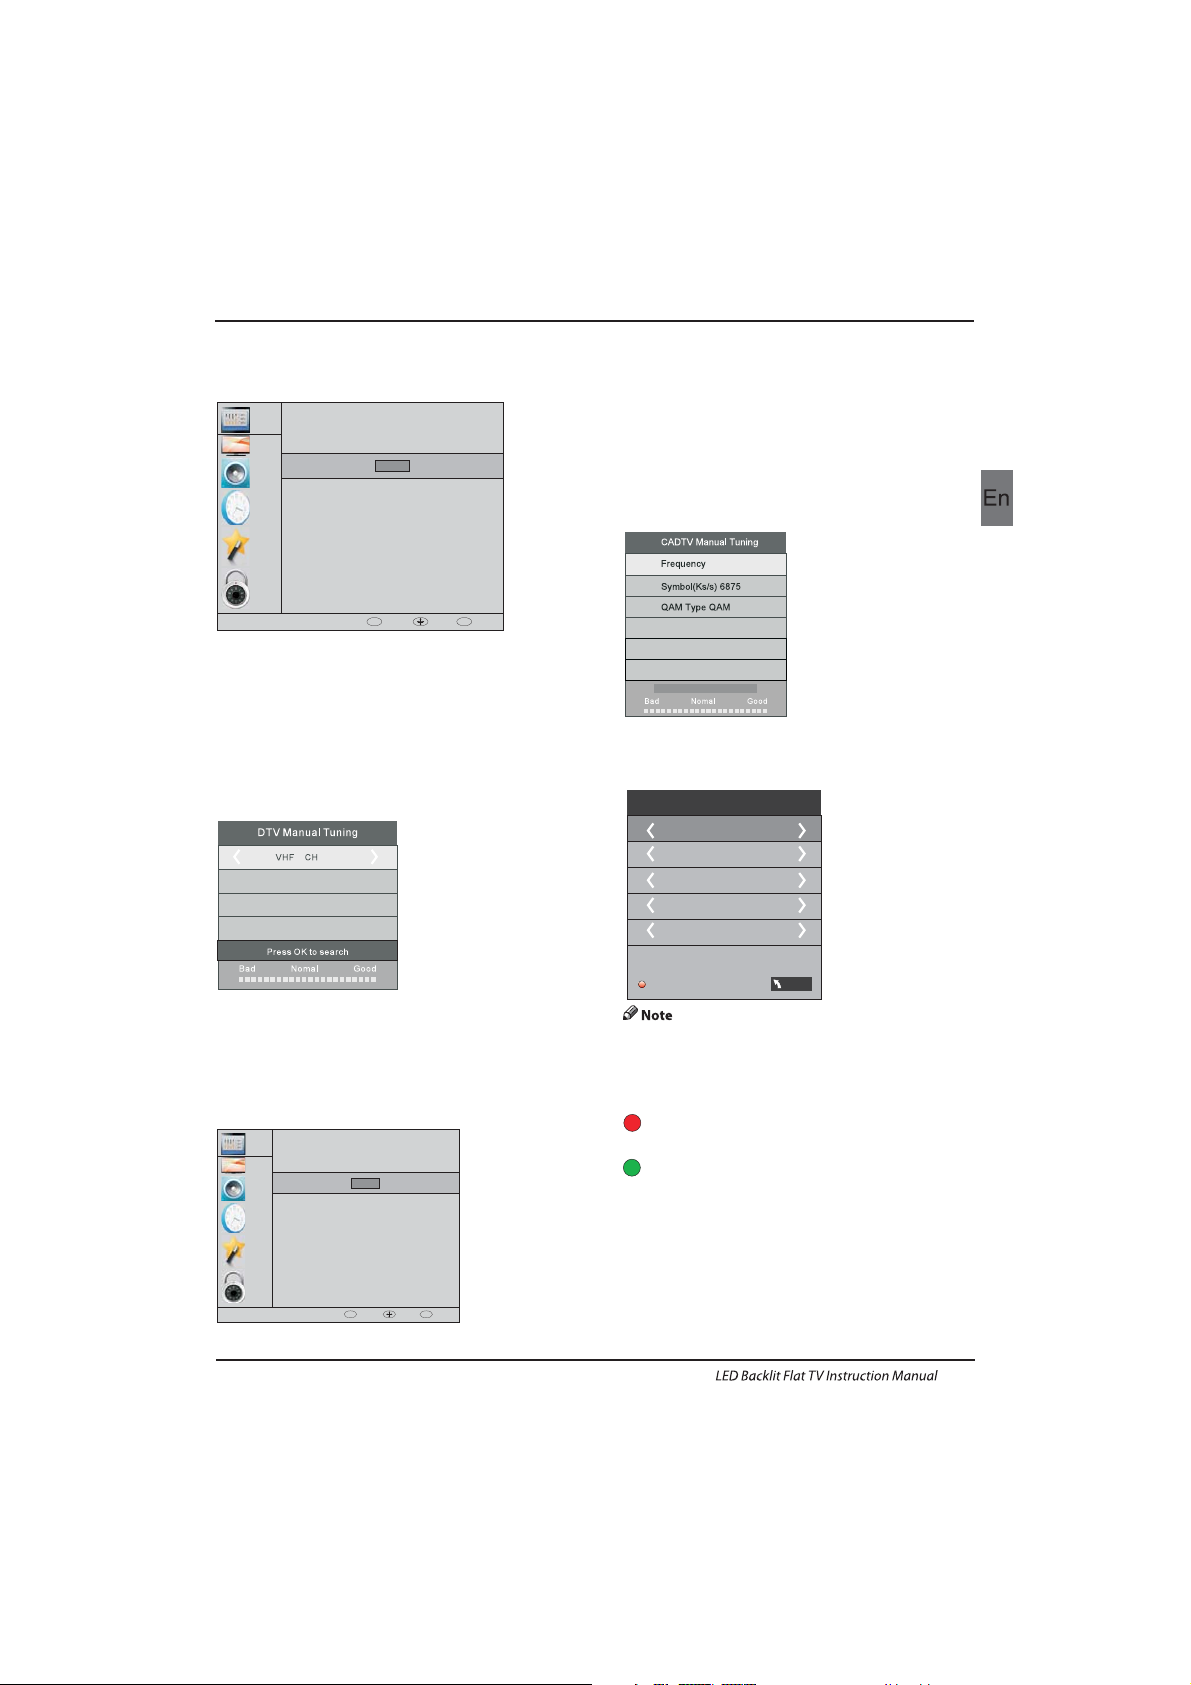
4). Press the MENU button to return back to the
main menu.
5). Press the EXIT button to exit the menu.
2. 2 )DTV Manual Tuning (DVB-C)
3). The DTV M anual Tuning screen will pop up.
Press the◀▶buttons to select the desired UHF
channel and then press the OK button to
commence the search of that channel. When the
signal has been tuned, the picture and signal
strength will be displayed on the screen.
1). Press the MENU button a nd then press th e
buttons to select the CHANNEL menu and then
press the OK button.
2). Press the buttons to select CADTV Manual
Tuning and then press the OK button.
▼▲
▼▲
490000
16
NO SIGNAL
D
Operation
CHANNEL
PICTURE
SOUND
TIME
OPTION
LOCK
Auto Tuning
ATV Manual Tuning
Programme Edit
Signal Information
DTV M anual Tu ning
Software Update(USB)
CI In forma tion
OK
OK
BACK MOVE OK
MENU
CHANNEL
PICTURE
SOUND
TIME
OPTION
LOCK
Auto Tuning
ATV Manual Tuning
Programme Edit
Signal Information
CADTV Manual Tuning
Software Update(USB)
CI Information
OK
OK
BACK MOVE OK
MENU
EN-18
2). Press the▼▲buttons to select DTV Manual Tuning
and then press the OK button.
3). The CADTV Manual Tuning screen will pop up.
Press the▼▲buttons to select(Frequency /Symbol
(ks/s/QAM Type QAM) press the OK button to commence
the search of that channel. When the signal has been
tuned, the picture and signal strength will be displayed
on the screen.
4). Press the MENU button to return back to the main
menu.
5). Press the EXIT button to exit the menu.
Rename:
Only can rename ATV programs .
Move the cursor to the program, press teletext green
button to rename the program.
Press▼▲ to choose the character. Press◀▶to move the
cursor .
Press MENU button to exit edit , Press EXIT to exit the
menu.
Note: ATV programs name only can be 5 character.
Press teletext red button to storage to channels
after manual tuning .
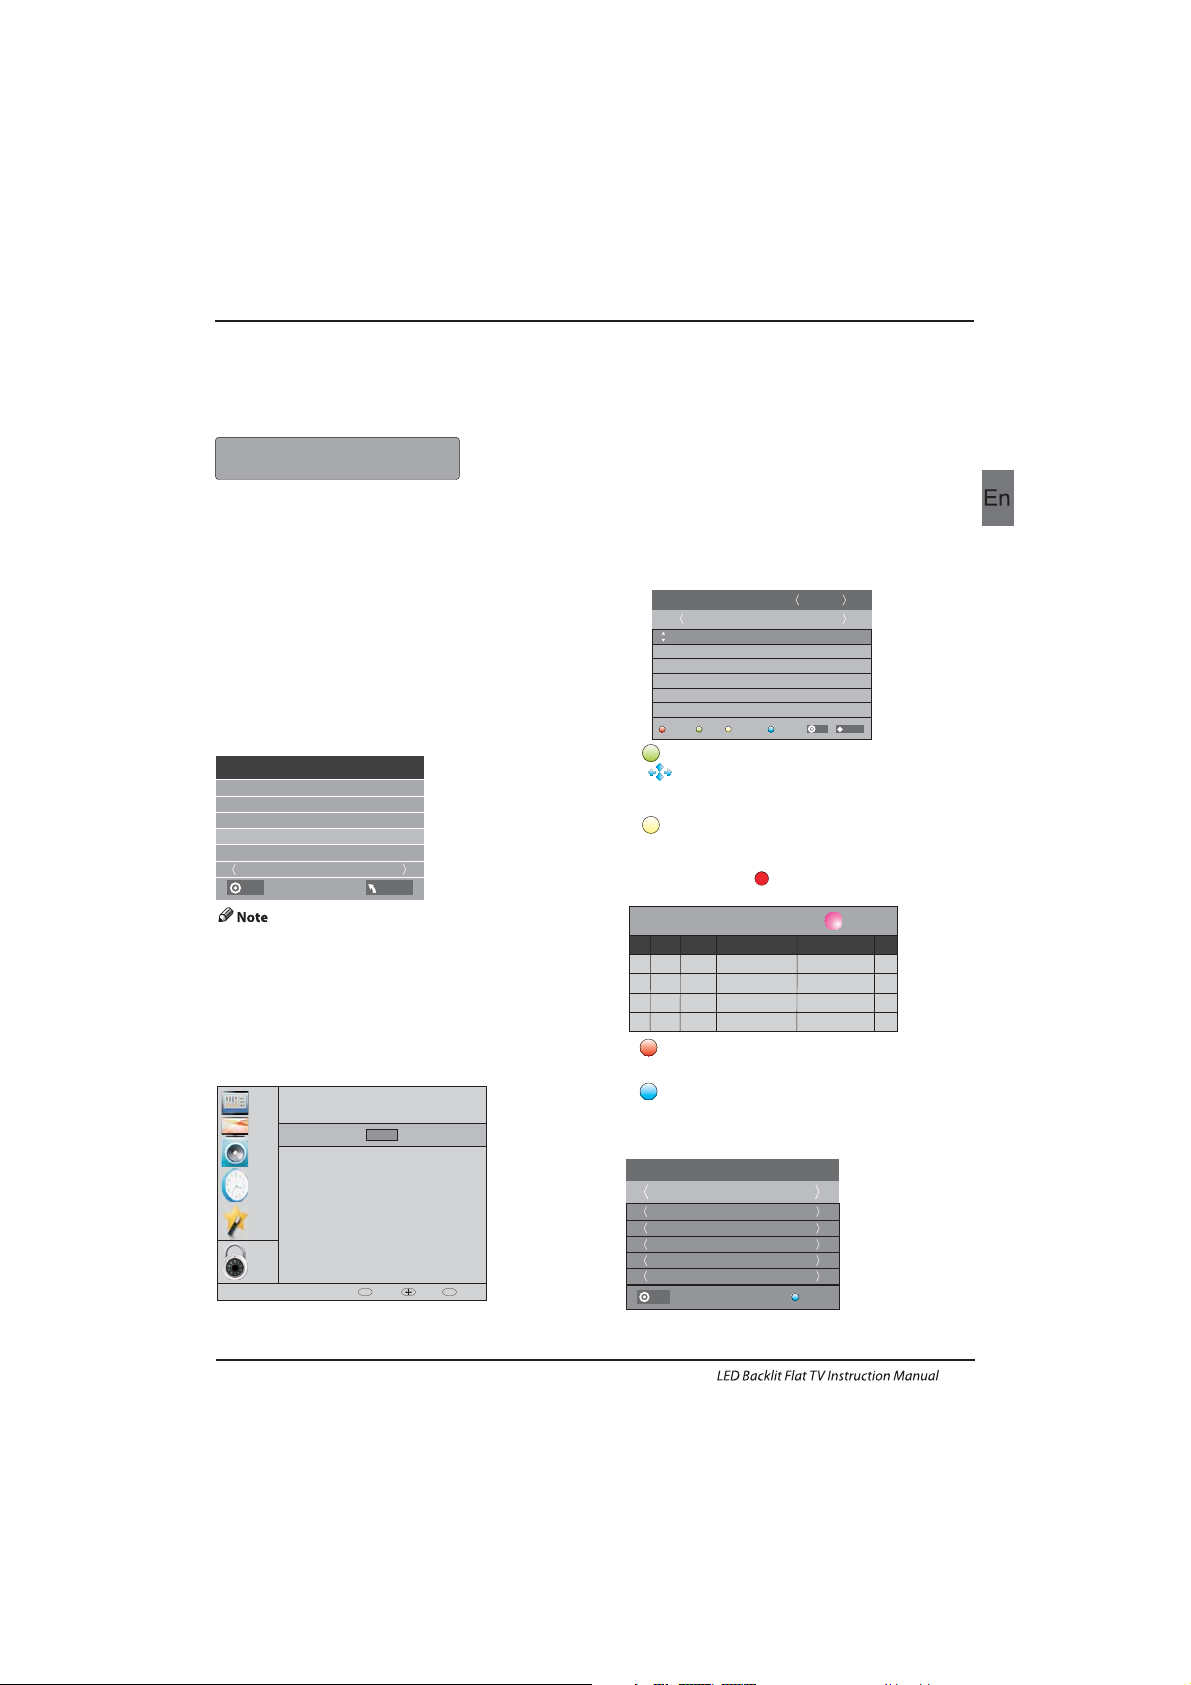
4). Prog ram edit:
You can Delete ,Rename ,Move, Skip , FAV any
programs.
Press teletext red button , the program in cursor will delete.
Delete
3) ATV Manual tuning :
You can change the sound system to search the
analog TV channels and fine tune the channels ,
then storage the channels you selected.
ATV Manual Tuning
Sto rage To 1
System BG
Cur rent CH 1
Search
Fine-Tune
Fre quenc y 424.2 5 MHz
Sav e MENU

5). CI information: (optional)
This menu can display the CI card' s information.
Use the Arrow Buttons to select the channel you wish to
move. Then press the Yellow Button to select Move
fun ction. On ce acti ve use th e Arrow Butt ons to move an d
then press OK to confirm.
Press to choose the program , press teletex t blue
button to skip this program, The will show on the right
side of the program .Choose the skipped program, press
blue button again , you can cancel the skip ,The will
disappear .
▼▲
Favourite:
Press to choose the program , press FAV button , it will
show on the right side of the program.Choose the FAV
program , press FAV button again , you can cancel the FAV,
the will disappear .
▼▲
Once your favorite group is created, you can press the FAV
key to quickly access your favorite channel.
1).Tint is available in NTSC system only.
2).There are four colors temperature modes
can be selected medium, warm, cool,user
3).Screen is available in PC mode only which
can adjust Horizontal position, vertical
position, size and phase.
3.SOUND MENU
The third item of the MENU is the SOUND MENU.
You can adjust the sound effect here such as
treble, bass, balance etc.
Press▼▲ to move, press OK to adjust.
Auto volume: only available when the input signal
volume is too large or distortion.
4.TIME MENU
The four th item of the menu is the TIME MENU.
You can adjust the clock, power on/off time, etc
Press◀▶to move, press OK to adjust.
sleep timer
The second item of the MENU is PIC TURE MENU.
You can adjust picture effect here, such as contrast,
brightness, etc.
Press OK to move, press OK to adjust.
2. PICTUREMENU
Operation
Move:
Skip:
Pic ture Mo de Stan dard
Contrast 50
Brightness 50
Color 50
Sharpness 50
Tint 50
Col or Tempera ture Me dium
Red 5 8
Gre en 50
Blu e 50
MENU
MENU
CHANNEL
PICTURE
SOUND
TIME
OPTION
LOCK
Picture Mode
Aspect Ratio
Noise Reduction
Screen
Color Temperature
Eco
Mild
User
Standard
OK
BACK MOVE OK
MENU
CHANNEL
PICTURE
SOUND
TIME
OPTION
LOCK
Sound Mode
Aut o Volume
Surround Sound
Balance
Standard
Music
Theater
Sports
User
OK
BACK MOVE OK
MENU
EN-19
5.OPTION MENU
The fifth item of the MENU is the OPTION MENU. You can
adjust the ,Audio language,Subtitle
language etc.
OSD language
Within 15 minutes there is no signal, the TV will auto
sleep , if Auto Sleep is set ON. The clock time can get
from the DTV system auto.
CHANNEL
PICTURE
SOUND
TIME
OPTION
LOCK
Clock
Off Time
Sleep Timer
Auto Sleep
Time Z one
On Time
OK
OK
BACK MOVE OK
MENU
CHANNEL
PICTURE
SOUND
TIME
OPTION
LOCK
OSD Language
Subtitle Language
PVR F ile Sys tem
Restore Factory Default
Automatic power-down(4h)
Home/Shop Mode
DCR
HDM I CEC
Audio Languages
OK
OK
BACK MOVE OK
MENU
6.LOCK MENU
The sixth item of the menu is the LOCK MENU.
You can lock system, set password, block program and set
parental guidance Once you set the lock system on you
can not search the channels or change any programs.
The default pass word is 0000, If you forget the
password, you can use the super password:9443.
Block program: Press
▼▲ to choose the
program ,press teletext green button to block
the program. If you want unblock the program,
pls enter the main menu , input the password,
then press green button again.Parental
guidance: Press
◀▶to choose rating.
7.EPG Menu(Electronic Program
Guide).
The EPG menu is used to look at what is being
broadcasted on DTV or Radio channel in the day.
To access the EPG menu, press the EPG
botton,the following menu will be displayed:
1.
Use to choose the programs , Press
INFO key, you can display the highlight program's
information.
INFO
2.
Press the teletext yellow key, It can list
all the reminder schedule, press to choose
the list, press red key to delete the
schedule list.
▼▲
Schedule
DELETE
Sch edule L ist 04: 55 28th Ap r Delete
Time Da te
Programme Title
Channel Name
Restore factory default will clear all the programs
and password.
In PV R File syste m menu you can s et up USB
dis k for PVR.
Automatic Power-down
1.I f after 4 hours from switch on and no changes have
been made to the TV, for example no channel or volume
changes,the TV will start the automatic power down
sequence.
And pop-up window will appear on screen.
After 150 seconds the TV will automatically switch to
standby. To override the automatic shutdown press any
button on the remote control.
2. To cancel the automatic power-down
On the Option Menu select Automatic power-down(4H)
Press OK . A pop-up me ssage will appear
“Are yo u sure you wan t to autom atic powerdown?”
Use t he arro w key to se lect
The TV screen returns to the Option Menu and the
Automatic power-down(4H) option will display.
Automa tic power- down(4H ) OFF
To return to auto shutdown after 4 hour s repeat the
abo ve excep t
use t he arrow key to s elect .
disable
left YES
right NO
Seconds to Automatic power-down
Please press any Key to Cancel
26/Jan
11: 40
1 TV3
Club/Super3-Naturalmen..
No Information
No Information
PROGRAMME GUIDE
Schedule
Record
Info
Remind
TIME
2 3/2 4
3 TVC HD
OK
INDEX
USB Disk
Time Shi ft Size
Speed
Sel ect Dis k C:
Che ck PVR Fi le Syst em Star t
Format
Fre e Recor d Limit 6 H r.
OK
MENU
Operation
CHANNEL
PICTURE
SOUND
TIME
OPTION
LOCK
Loc k Syste m
Block Program
Parental Guidance
Set P asswo rd
OK
OK
BACK MOVE OK
MENU
EN-20
3. Record
Press the red key ,I t can set the program to be recorded.
4.
Press the blue key to choose one program and set up one
reminder time, the TV screen will skip to the choosed
program in the reminder time automatically.
Remind
1 TV3
37 Mi nute
11 Hou r
Jan M onth
26 Da te
Onc e Mode
Reminder
BACK
OK
Operation
EN-21
8.DVB-S2 Operation
8.1First Time Installation
Please press the source button to enter input menu and use/ direction buttons to select DVB-S2 and press
OK key to confirm. The Channel List for ASTRA is already installed. You are now ready to watch TV.
If you are using different satellites please follow the system settings instructions to set up the satellite.
If you are using more than one Satellite you need to assign the satellites the correct DiSEqC-LNB that is
used in your satellite installation.
8.2 Satellite Managment
Configure the settings of satellites.
Satellites' list: Press to select a satellite, whose settings will be shown at right side.
LNB Type: Press
◀ /▶/OK to show the list of LNB Types which is shown as frequencies of local oscillator. You
also can enter frequency by User Single, User Dual at bottom of the list.
LNB Power: Press
◀ /▶to set the LNB power.
22K: Press
◀ /▶to switch on or off the 22K,which is set with auto when LNB Type is dual local oscillator.
▼/▲
Toneburst: Enable or Disable t he toneburst switcher.
DiSEqC1.0:
DiSEqC1.1:
Motor:
DiSEqC1.2:
DiSEqC1.3:
Motor Settings:
Select the right port up to 4 for the right LNB.
Select the right port up to 16 for the right LNB.
Press LEFT/RIGHT to select DiSEqC1.2 or DiSEqC1.3. Then Press OK to
show the menu to set position.
Move the motor to a right position to lock the signal.
Move the motor according to the local and satellite positions.
Select DiSEqC and press OK to open.
Move Auto:
Move Continue:
Move Step[1]:
Store Position:
Goto Position:
Goto Reference:
Press LEFT/RIGHT to start to move West/East. It will be stopped
automatically when the signal is locked.
Press LEFT/RIGHT to start to move West/East. It will keep moving until you stop it.
Press LEFT/RIGHT to move just a step.
Store current position of motor.
Press LEFT/RIGHT to goto the position stored.
Rest all the positions.
Goto X: Goto the position calculated from the local and satellite positions.
8.2.1 Satellite settings
Add satellites:
Press RED to add a new satellite, in which you must inpu t an uniq ue longitude, and edit the satellite's name with
soft keyboard.
Edit satellites:
Press GREEN to edit the focused satellite.
Delete satellite:
Press YELLOW to delete the focused satellite.
Press OK to confirm.

EN-22
Operation
8.2.2 Transponder
Press GUIDE to switch the list to show transp onder s of the focused satellite. Also you can press GUDIE to switc h
back to satellites' list.
Add transponder:
Press RED to add a new transponder. I t can't save an existi ng TP unde r the same satellite.
Edit transponder:
Press GREEN to edit the focused transponder. It can't save an existing TP und er the sa me satellite.
Delete transponder:
Press YELLOW to delete the focused transponder. Press OK to confirm .
Single Transponder Scan:
Press BLUE to pop the men u of scan ning se tting. After configur ing the settings, Press O K to star t scannin g.
Multi-Transponder Scan:
Press OK to select transponders with the mark”√",the n press BLUE to po p the men u of scan ning se tting. After
Configuring the settings, press OK to start multi-transponder scanning.
8.2.3 Channel search
Single Satellite Scan:
Press BLUE to pop the menu of scanning settings.
Scan Mode: Press
◀/▶ to select defaul t, whic h scan th e defau lt transponder s built i n, Blin d Scan and Ne tWork,
which scan with NIT on.
Crytped: Press
◀/▶to select All Chan nels or F TA Channels;
Service Type: Press
◀/▶ to select ALL , DTV or Radio.Press OK to start scanning with the above settings.
Multi-Satellites Scan:
Press OK to select satellites with the mark “√" ,th en press BLUE to pop the menu of scanning setting. After
Configuring like single satellite scan, press OK to start multi-satellites scan.
8.3 Program Edit
To edit your program preferences (skip, favour ite, move or delete), you will need to ente r the Program Edit Menu.
Delete a TV or R adio Program
Selec t the pro gram and then press the RED button to delete the chann el.
Move a TV or R adio Program
Selec t the pre ferred pro gram then pres s the YELLOW button. Press
◀/▶ to move the program. Pre ss YELLOW
again to confirm.
Ski p TV or Radio P rogram
Selec t the pro gram you wou ld like to sk ip and press the BLUE butto n. A skip symbol is displayed. The program is
mar ked as a sk ip.
Set Fa vourite Program
Press▼▲to choose the p rogram , press FAV but ton , it wi ll show o n the rig ht side o f the progra m.Cho ose the FAV
pro gram , press FAV butto n again , y ou can ca ncel th e FAV, the wi ll disappear.Once your favorite group is created, you
can p ress th e FAV key to qui ckly access yo ur favorit e chann el.
8.4 Signal information
It shows the signal quality and s ignal strange by selectet c hannel.
8.5 CI information
It shows informations about the CI card that is connectet to tv.
8.6 EPG (Electronic program guide)
The EPG is an on-screen TV guide that shows scheduled programs seven days in ad vance for ever y tuned cha nnel.
Press the GUIDE button on th e Remote Control to access guide. It will show a li st with t he current runprogramms.
Select “Programm Guide” and press to switch between Time / Channel.
You can use the
▼/▲ key to select the preferred program.
◀/▶

Operation
EN-23
Time: An overview will be shown about the broadcast to the selectet date to current time f rom the programms.
- Select the “Date / Timer” display and press to edit the date.
Channel:An overview will be shown about the broadcast course of the selecte t chann el on day you edit b efor.
- Select the programm display and press
◀/▶ to switch the channel
Remind:Use BLUE botton to open the reminder se tting. Press “Ok” to acknowledge the edit settings.
The made settings will be stored in your schedule list.
Record:Use RED botton to open the record setting. Pres “Ok” to acknowledge the edit settings.
The made settings will be stored in your schedule list.
Info:Use Green botton to open the information about the selectet broadcast.
Schedule:Use YELLOW botton to open th e sched ule lis t from your re cords and re mind settings.
Selec tet items can be del ete wit h “RED” botton.
◀/▶
 Loading...