

Page 1
LED Television
User Manual
MODELS:
LE32D2320
LE39D2380
LE42D2380
LE46D2380
Page 2

Page 3
Energy Star
This product qualifies for ENERGY STAR in the factory default setting and this is the
setting in which power savings will be achieved.Changing the factory default picture
setting or enabling other features will increase power consumption that could exceed
the limits necessary to quality for ENERGY STAR rating.
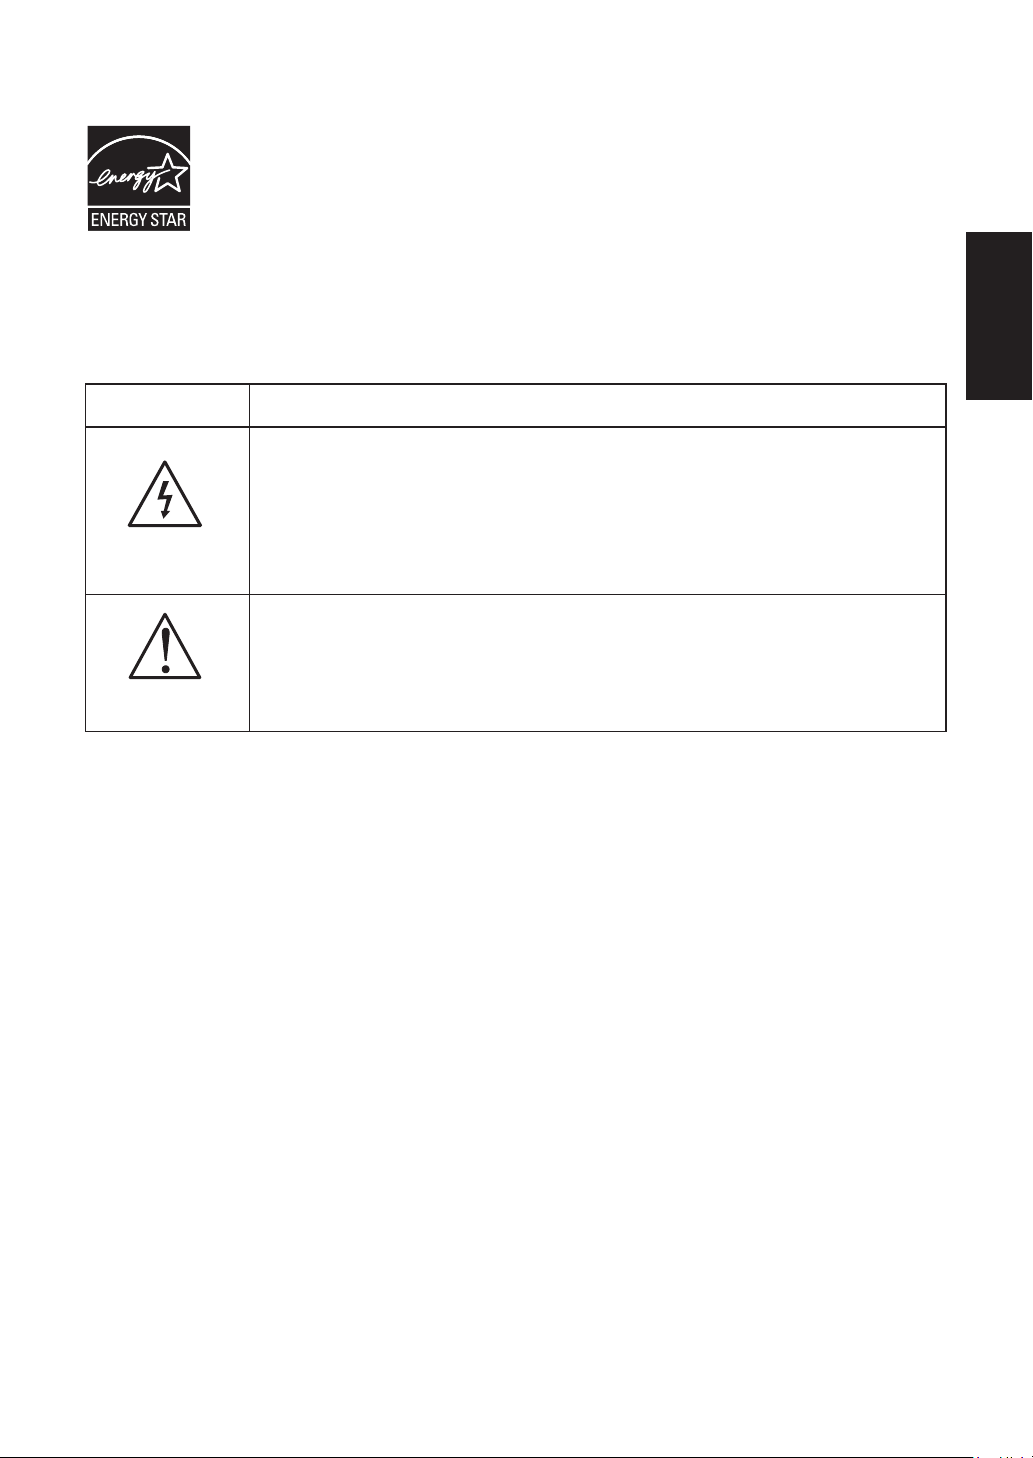
SYMBOL SYMBOL DEFINITION
DANGEROUS VOLTAGE: The lightning flash with arrowhead
symbol, within an equilateral triangle, is intended to alert the
user to the presence of uninsulated “dangerous voltage” within
SA 1965
SA 1966
the product’s enclosure that may be of sufficient magnitude to
constitute a risk of electrical shock to persons.
INSTRUCTIONS: The exclamation point within on equilateral
triangle to alert the user to the presence of important operating
and maintenance (servicing) instruction in the literature
accompanying the appliance.
English
Apparatus shall not be exposed to dripping or splashing and no objects filled with
liquids, such as vases, shall be placed on the apparatus.
Caution - Danger of explosion if battery is incorrectly replaced. Replace only with
the same or equivalent type.
Batteries installed warning
Caution - Danger of explosion if battery is incorrectly replaced. Replace only with
the same or equivalent type.
The batteries (battery pack or batteries installed) shall not be exposed to
excessive heat such as sunshine, fire or the like.
excessive heat such as sunshine, fire or the like.
1
Page 4

FOR YOUR SAFETY
Before operating the TV please read this manual thoroughly. This manual should be
retained for future reference.
FCC Class B Radio Frequency Interference Statement
WARNING:
(FOR FCC CERTIFIED MODELS)
NOTE:
a Class B digital device, pursuant to Part 15 of the FCC Rules. These limits are
designed to provide reasonable protection against harmful interference in a residential
installation. This equipment generates, uses and can radiate radio frequency energy,
and if not installed and used in accordance with the instructions, may cause harmful
interference to radio communications. However, there is no guarantee that interference
will not occur in a particular installation. If this equipment does cause harmful
interference to radio or television reception, which can be determined by turning the
equipment off and on, the user is encouraged to try to correct the interference by one
or more of the following measures:
1. Reorient or relocate the receiving antenna.
2. Increase the separation between the equipment and receiver.
3. Connect the equipment into an outlet on a circuit different from that to which the
4. Consult the dealer or an experienced radio/TV technician for help.
This equipment has been tested and found to comply with the limits for
receiver is connected.
NOTICE
1. The changes or modifications not expressly approved by the party responsible for
compliance could void the user's authority to operate the equipment.
2. Shielded interface cables and AC power cord, if any, must be used in order to
comply with the emission limits.
3. The manufacturer is not responsible for any radio or TV interference caused by
unauthorized modification to this equipment. It is the responsibilities of the user to
correct such interference.
WARNING:
To prevent fire or shock hazard, do not expose the TV to rain or moisture.
Dangerously high voltages are present inside the TV. Do not open the cabinet. Refer
servicing to qualified personnel only.
2
Page 5
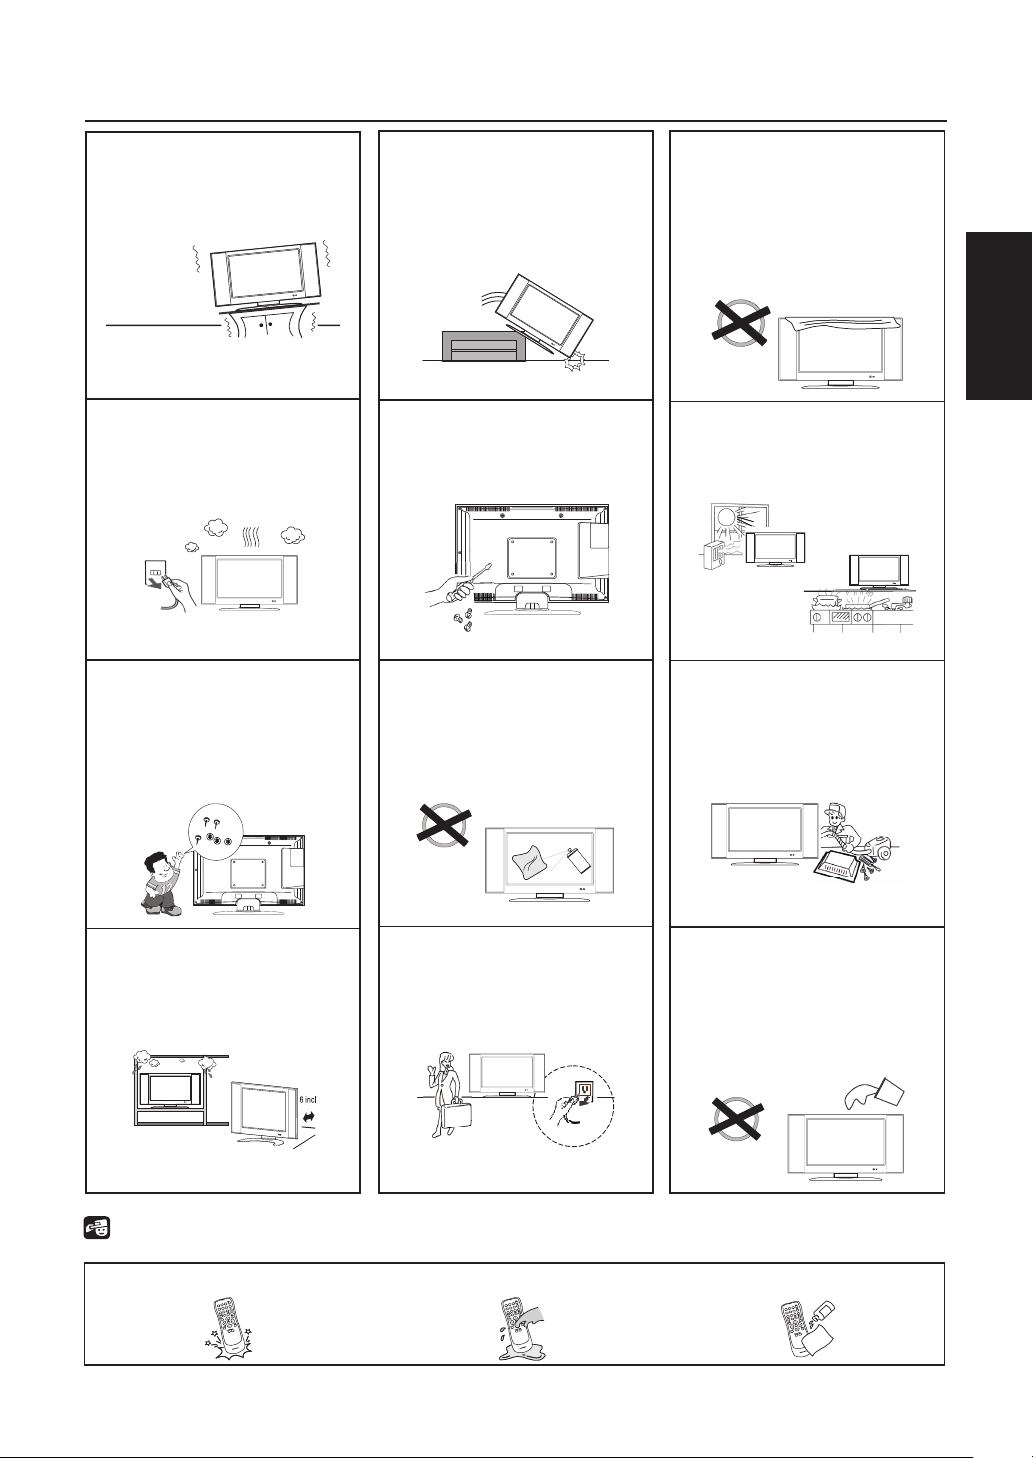
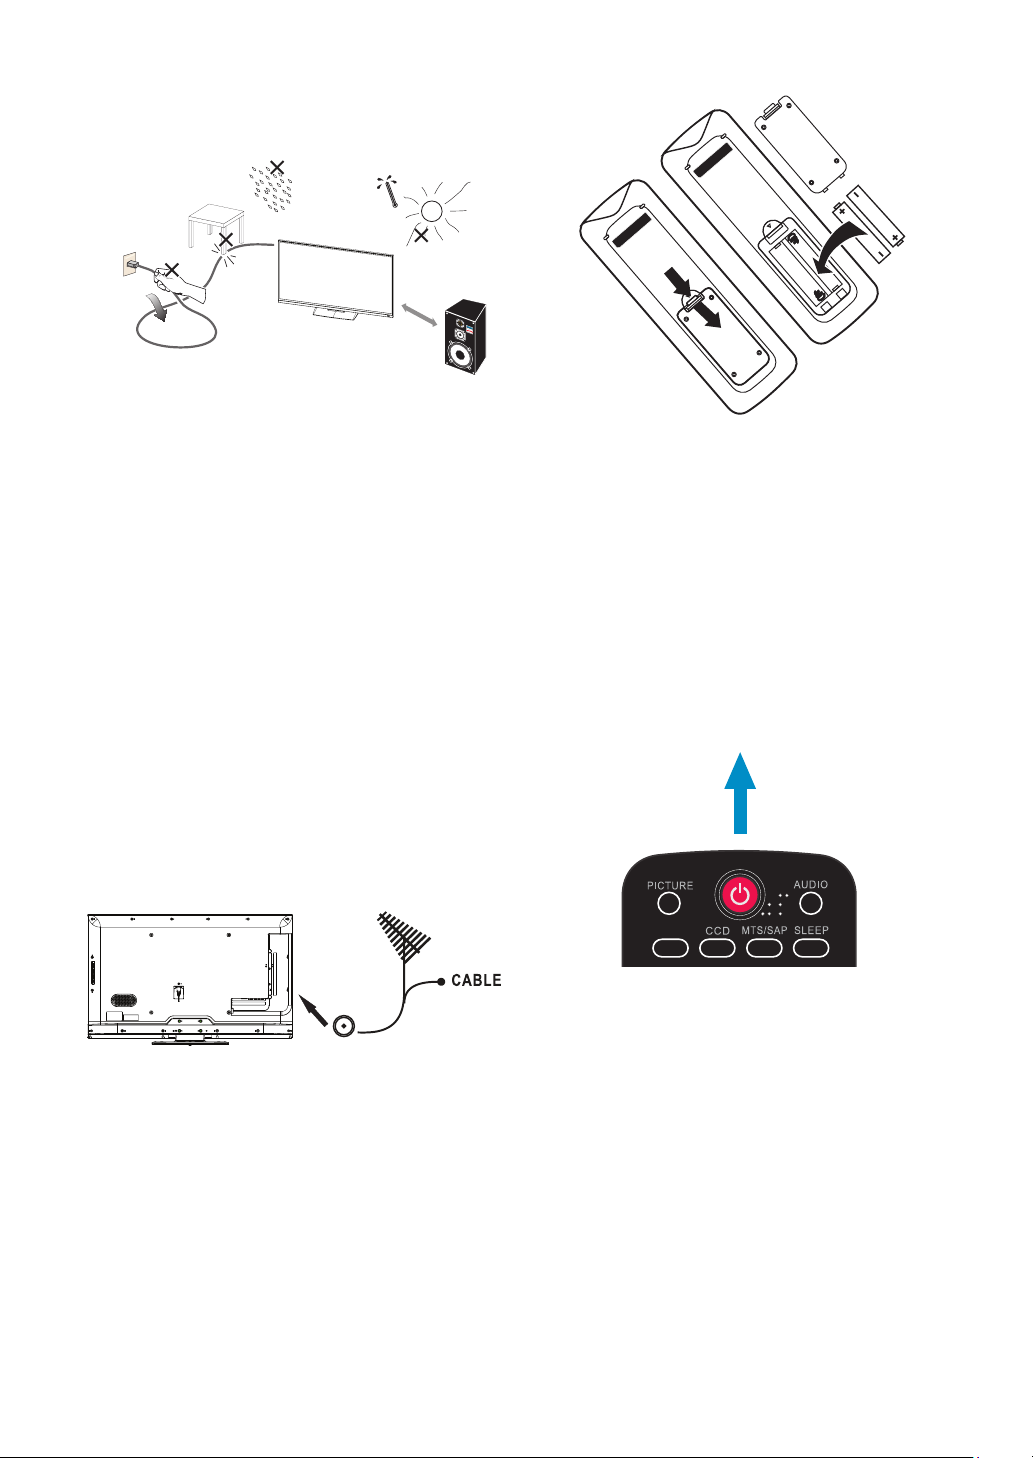
PRECAUTIONS AND REMINDERS
Place unit on even surfaces.
Unplug immediately if is
malfunction like no picture,
no video/audio, smoke and
bad odor from TV.
Don't throw any object
inside the TV box like
metals or other flammable
materials.
Unplug immediately if other
foreign materials are put
inside TV box or if the TV
fell down.
Prohibit/Avoid opening TV
cabinet.
Remember to unplug the
AC cord from the AC outlet
before cleaning. Do not use
liquid cleaners or aerosol
cleaners to clean the display.
Do not cover or block
any vents and openings.
Inadequate ventilation
may shorten the life of
the display unit and cause
overheating.
Avoid direct sunlight, dusty,
high humidity and smoky
areas
.
Call service personnel to
clean the internal part of
the TV once a year.
English
Don't place the TV in
confined spaces or in a box
when using it.
Notice for Remote Control
Avoid Dropping
3
2
1
6
5
4
9
8
7
0
Make sure to unplug the
unit when not in use for a
long period of time (days).
Avoid Liquids
3
2
1
6
5
4
9
8
7
0
3
Do not place the display
near water, such as bathtub,
washbasin, kitchen sink
laundry tub, swimming pool
or in a damp basement.
Avoid Aerosol Cleaners
3
2
1
6
5
4
9
8
7
0
Page 6

IMPORTANT SAFETY INSTRUCTIONS
Read before operating equipment
1. Read these instructions.
2. Keep these instructions.
3. Heed all warnings.
4. Follow all instructions.
5. Do not use this apparatus near water.
6. Clean only with a dry cloth.
7. Do not block any of the ventilation openings. Install in accordance with the
manufacturers instructions.
8. Do not install near any heat sources such as radiators, heat registers, stoves, or
other apparatus (including amplifiers) that produce heat.
9. Do not defeat the safety purpose of the polarized or grounding type plug. A
polarized plug has two blades with one wider than the other. A grounding type plug
has two blades and third grounding prong. The wide blade or third prong is provided
for your safety. When the provided plug does not fit into your outlet, consult an
electrician for replacement of the obsolete outlet.
10. Protect the power cord from being walked on or pinched particularly at plugs,
convenience receptacles, and the point where they exit from the apparatus.
11. Only use attachments/accessories specified by the manufacturer.
12. Use only with a cart, stand, tripod, bracket, or table specified by the manufacturer,
or sold with the apparatus. When a cart is used, use caution when moving the cart/
apparatus combination to avoid injury from tip-over.
13. The TV should be operated only from the type of power source indicated on the
label. If you are not sure of the type of power supplied to your home, consult your
dealer or local power company.
14. Unplug this apparatus during lightning storms or when unused for long periods of
time.
15. Refer all servicing to qualified service personnel. Servicing is required when the
apparatus has been damaged in any way, such as power-supply cord or plug is
damaged, liquid has been spilled or objects have fallen into apparatus, the apparatus
has been exposed to rain or moisture, does not operate normally, or has been
dropped.
16. Class I Protective Earthing Connection – "The Class I apparatus shall be connected
to a mains socket outlet with a protective earthing connection."
17. Disconnect Device - Mains Plug or Appliance Coupler – "The mains plug or appliance
coupler is used as the disconnect device, the disconnect device shall remain readily
operable."
18. Disconnect Device - An all-pole MAINS SWITCH – "An all-pole MAINS SWITCH is
used as the disconnect device, the switch shall remain readily operable."
4
Page 7

19. Service Instructions – "CAUTION – These servicing instructions are for use by
qualified service personnel only. To reduce the risk of electric shock, do not perform
any servicing other than that contained in the operating instructions unless you are
qualified to do so."
20. Wall Mount Bracket – For use only with UL Listed Wall Mount Bracket with
minimum weight/load: Please see page 30.
21. CONSUMER ALERT – This television receiver has only an analog broadcast
tuner and will require a converter box after June 12 2009,to receive over-the-air
broadcasts with an antenna because of the Nation's transition to digital broadcasting.
Analog-only TVs should continue to work as before with cable and satellite TV
services, gaming consoles, VCRs, DVD players, and similar products, For more
information, call the Federal Communications Commission at 1-888-225-5322 (TTY:
1-888-835-5322)or visit the Commission's digital television website at: www.DTV.
gov.
Information about the DTV transition –after June 12 2009, a television receiver
with only an analog broadcast tuner will require a converter box to receive full
power over the- air broadcasts with an antenna because of the Nation's transition
to digital broadcasting. Analog-only TVs should continue to work as before to
receiver low power, Class A or translator television stations an with cable and
satellite TV services, gaming consoles, VCRs, DVD players, and similar products. For
more information about the DTV transition is available from http://www.DTV.gov
or 1-888-CALL-FCC, and from http://www.dtv2009.gov or 1-888-DTV-2009 for
information about subsidized coupons for digital-to-analog converter boxed.
22. Tilt/Stability – All televisions must comply with recommended international global
safety standards for tilt and stability properties of its cabinets design.
●Do not compromise these design standards by applying excessive pull force to
the front, or top, of the cabinet, which could ultimately overturn the product.
●Also, do not endanger yourself, or children, by placing electronic equipment/toys
on the top of the cabinet. Such items could unsuspectingly fall from the top of
the set and cause product damage and/or personal injury.
23. Wall or Ceiling Mounting – The appliance should be mounted to a wall or ceiling
only as recommended by the manufacturer.
24. Power Lines – An outdoor antenna should be located away from power lines.
25. Outdoor Antenna Grounding – If an outside antenna is connected to the receiver,
be sure the antenna system is grounded so as to provide some protection against
voltage surges and built up static charges. Section 810 of the National Electric Code,
ANSI/NFPA No. 70-1984, provides information with respect to proper grounding
of the mats and supporting structure grounding of the lead-in wire to an antennadischarge unit, size of grounding connectors, location of antenna discharge unit,
connection to grounding electrodes and requirements for the grounding electrode.
See Figure below.
English
5
Page 8

ANTENNA
GROUND CLAMP
ELECTRIC SERVICE EQUIPMENT
GROUND CLAMPS
POWER SERVICE GROUNDING ELECTRODE SYSTEM
ANTENNA DISCHARGE UNIT
GROUNDING CONDUCTORS
EXAMPLE OF ANTENNA GROUNDING AS PER
NATIONAL ELECTRICAL CODE
Note to the CATV system installer: This reminder is provided to call the CATV
system installer’s attention to Article 820-40 of the NEC that provides guidelines
for proper grounding and, in particular, specifies that the cable ground shall be
connected to the 6 English grounding system of the building, as close to the point
of cable entry as practical. Please, make sure to connect the power plug to the wall
outlet socket after connecting the TV to the adapter!
26. Apparatus shall not be exposed to dripping or splashing and no objects filled with
liquids, such as vases, shall be placed on the apparatus.
27. Warning statement indicating that Class I apparatus shall be connected to a mains
socket outlet with a protective earthing connection.
28. Apparatus shall not be exposed to dripping or splashing and no objects filled with
liquids, such as vases, shall be placed on the apparatus.
29. Statement indicating that when the mains plug or appliance coupler shall remain
readily operable.
30. Where the MAINS plug or an appliance coupler is used as the disconnect device, the
disconnect device shall remain readily operable.
31. Where an all-pole MAINS SWITCH is used as the disconnect device, the location
on the apparatus and the function of the switch shall be described, and the switch
shall remain readily operable.
6
Page 9

SAVE THESE INSTRUCTIONS
Thank you for purchasing this Haier product. This easy-to-use manual will guide you in getting
the best use of your product. Remember to record the model and serial number. They are on
the label on back of the unit.
English
Model number
Serial number
Date of purchase
Staple your receipt to your manual. You will need it to obtain warranty service.
7
Page 10

TABLE OF CONTENT
FOR YOUR SAFETY ..................................................................................2
PRECAUTIONS AND REMINDERS .....................................................3
IMPORTANT SAFETY INSTRUCTIONS ............................................. 4
PREPARATION ...........................................................................................9
ATTACHING THE BASE ................................................................................9
PREPARING YOUR LCD HDTV FOR WALL MOUNTING .................9
PERIPHERAL CONNECTION GUIDE ..............................................11
OPERATING INSTRUCTIONS ............................................................ 13
USING THE REAR PANEL CONTROL ................................................... 13
USING THE REMOTE CONTROL ........................................................... 14
INITIAL SETUP.............................................................................................. 16
INPUT SOURCE ........................................................................................... 17
VIDEO ............................................................................................................. 18
AUDIO ............................................................................................................ 19
TV ..................................................................................................................... 20
SETUP .............................................................................................................. 21
PARENTAL .................................................................................................... 23
MEDIA ............................................................................................................. 25
TIPS .................................................................................................................. 27
PRODUCT SPECIFICATION ................................................................29
TROUBLESHOOTING ........................................................................... 31
GLOSSARY ................................................................................................ 32
WARRANTY ............................................................................................33
8
Page 11
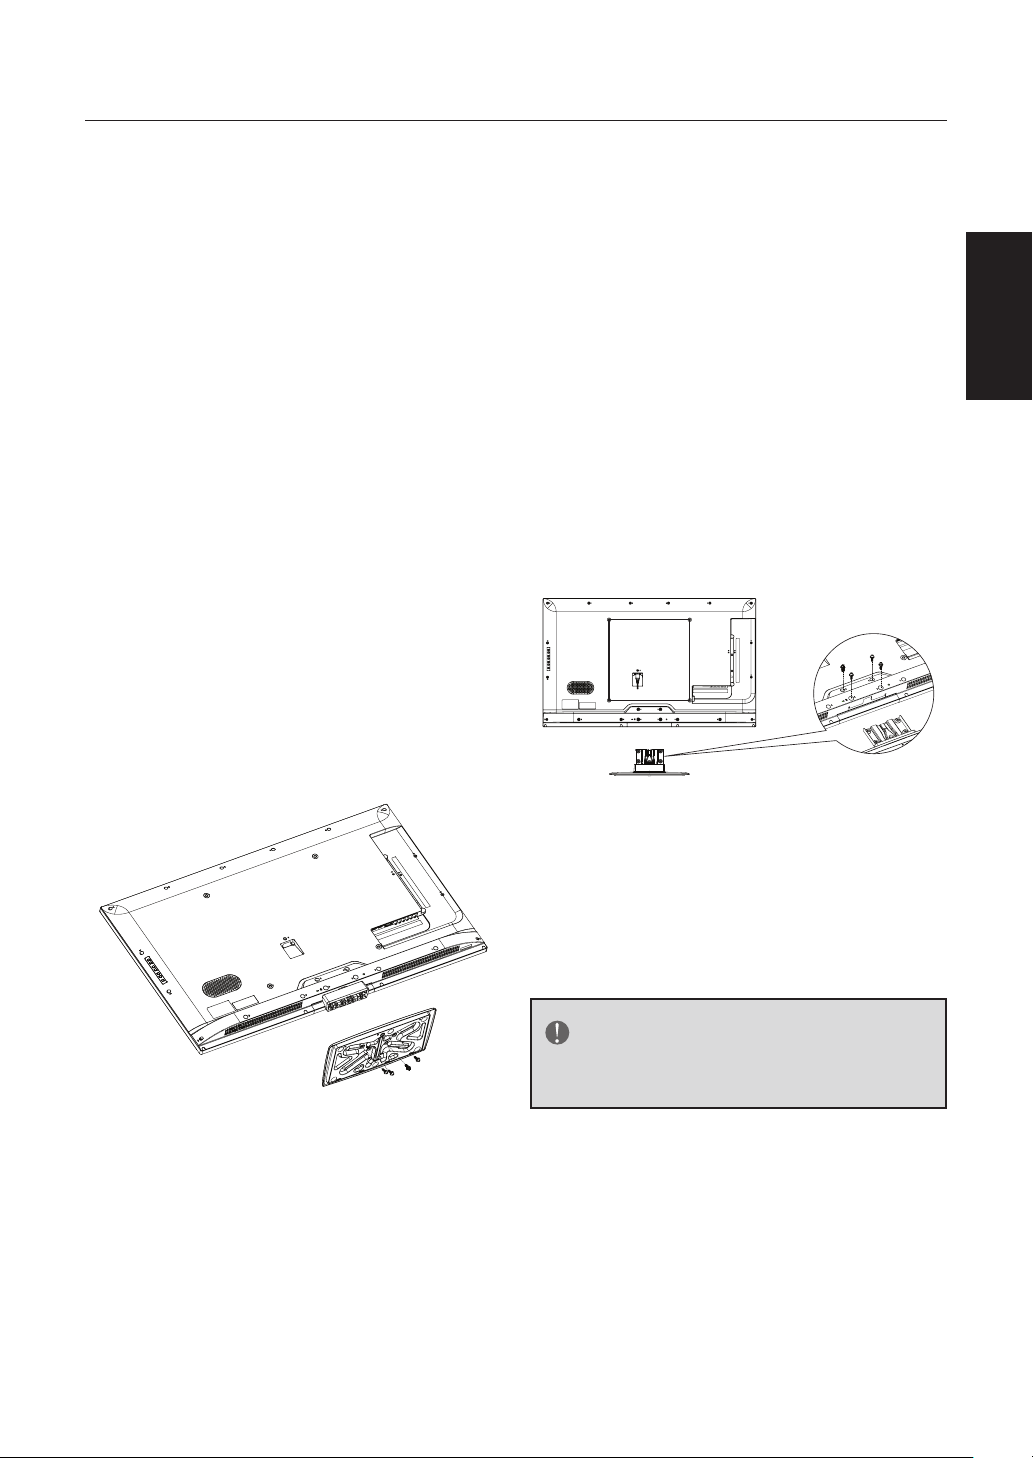
PREPARATION
IMPORTANT: Do not apply pressure
to the screen display area which may
compromise the integrity of the display.
The manufacturer’s warranty does
not cover user abuse or improper
installations.
ATTACHING THE BASE
IMPORTANT:
must be assembled prior to usage.
1. Place TV unit face down on a soft
and flat surface (blanket, foam, cloth,
etc.) to prevent any damage to the
HDTV.
2. Carefully align and insert the base
to the neck.
3. Gently push the Base towards the
HDTV until the locking mechanism
locks into place.
The Base of the HDTV
you need to remove the neck and the
base.
For your safety, please use only with
a UL listed wall mount bracket with
minimum weight of the TV without
stand. (Please see page 30.)
To attach a wall mount bracket to your
TV:
1. Remove the screws holding your
TV to the stand.
2. Remove the neck and the base
from your TV.
3. Secure the wall mount bracket
to the back of your TV using four
screws.
English
4. Fasten the base using the supplied
screws.
PREPARING YOUR LCD HDTV
FOR WALL MOUNTING
We suggest that you keep your TV at
least 2.36 inches (60 mm) from the wall
to prevent cable interference.
Before mounting your TV on the wall,
• LE32D2320: 200x100mm;Metric 4x10
mm
• LE39D2380: 200x200mm; Metric 6x10
mm
• LE42D2380/LE46D2380;400x400mm,
Metric 6x10 mm
NOTE
The wall mount bracket and the
screws are not included.
9
Page 12
1. Install the base stand; place the
TV on a solid surface.
Min
1 m
Ensure that the TV is placed in
a position to allow free flow of
air. Do not cover the ventilation
openings on the back cover.
HTR- D09B
HTR- D09B
4. Power :
Insert the power cord in the wall
socket with AC power supply.
To prevent any unsafe situations, no
naked flame sources, such as lighted
candles, should be placed on or in
the vicinity.
Avoid heat, direct sunlight and
exposure to rain or water. The
equipment shall not be exposed to
dripping or splashing.
2. Connect the antenna cable or cable
TV cable to the aerial socket ANT
IN 75Ω at the back of the TV set.
3. Remote control:
5. Turn the TV on:
Press the Power key on the remote
control or the power button on
the control panel on the side of the
TV.
Power Key
ZOOM
Remove the cover of the battery
compartment. Insert the 2 batteries
supplied (Type AAA 1.5V).
10
Page 13
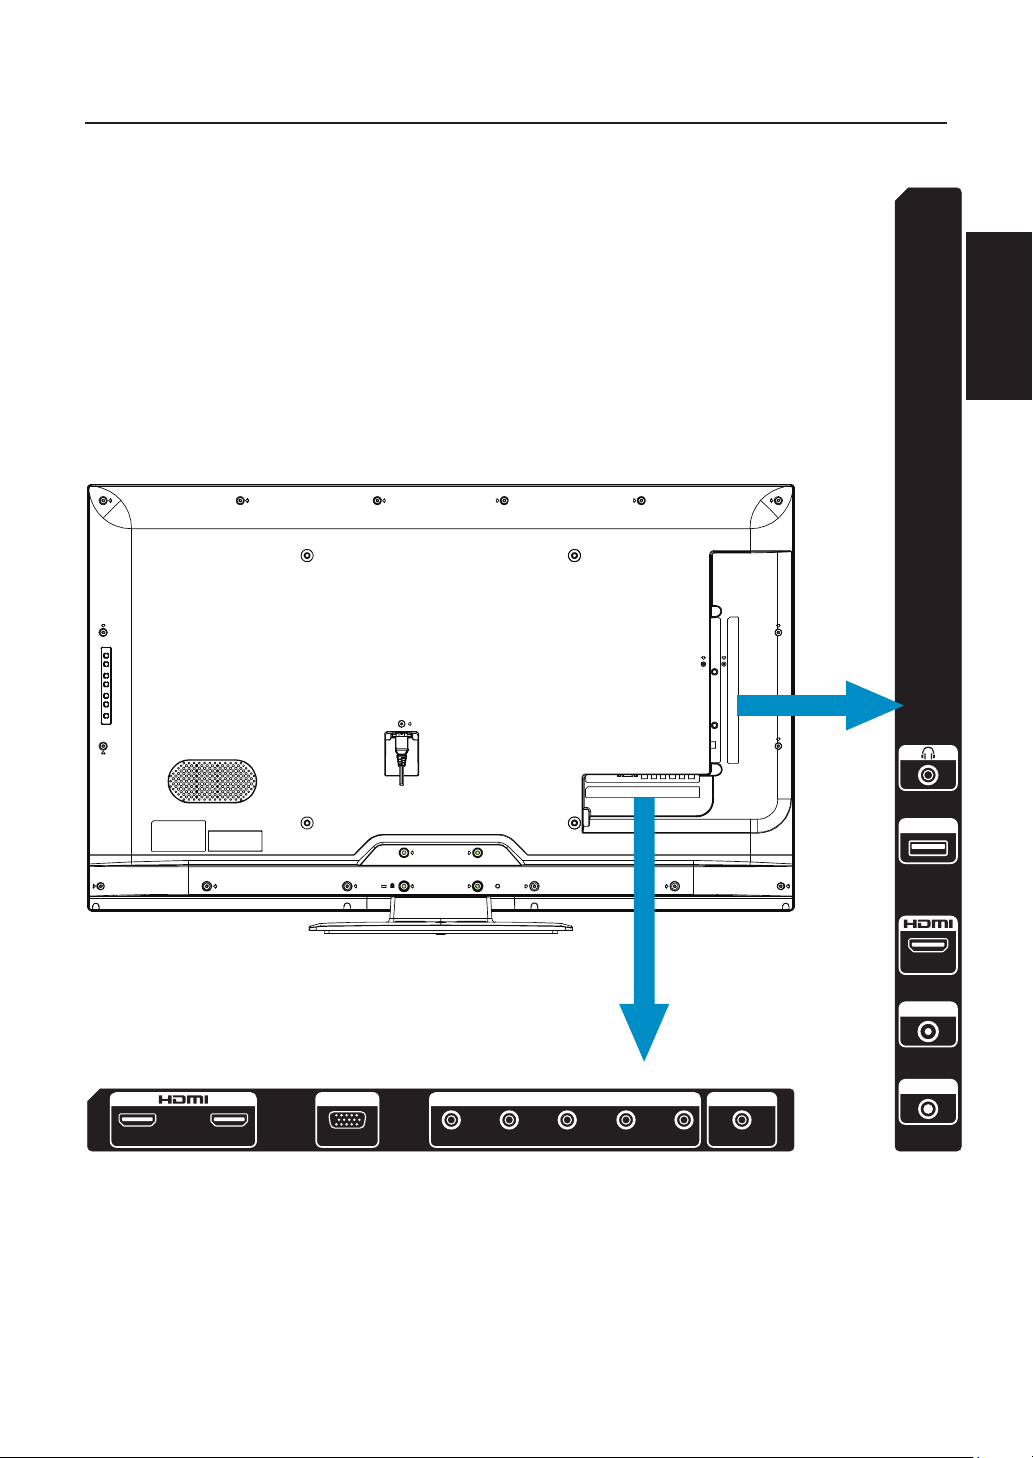
PERIPHERAL CONNECTION GUIDE
English
1 2
PC IN
VGA
AV / Y
COMPONENT / AV IN
Pr L R
Pb
USB
3
ANTENNA
COAX OUT
PC AUDIO
11
Page 14

1. HDMI – Connect the primary source for digital video such as a DVD
multimedia player or set top box through this all digital connector.
2. PC IN/PC AUDIO – Connect the video and audio cables from a computer
here.
3. AV IN (AV) – Connect the input source for composite video devices, such
as a VCR or video game. Use the white and red connectors to connect the
external audio from the same source.
4. COMPONENT (Y/Pb/Pr with Audio L/R) – Connect the primary source
for component video devices such as a DVD Player or set top box here. Use
red for Pr, blue for Pb, green for Y, red for right audio (R) and white for left
audio (L) inputs.
5. ANTENNA(CABLE DIGITAL/ANALOG) – Connect to an antenna or
digital cable (out-of-the-wall, not from Cable Box) for Digital TV.
6. COAX OUT – When a digital audio signal is associated with the input
selected for viewing, the digital audio will be available on this COAX OUT
connection to your home theater system.
7. USB PORT – Insert a USB storage device to the USB port to view JPEG/
BMP photos, listen to MP3 music. (Please refer to pages 25-26 for more
information.)
8. Earphone Output – Connect to headphones. When headphones are
inserted to the plug, the TV speakers will be muted.
Once your equipment is connected, use the following procedure to view the
input signal:
Press the Source button on the remote control to select the relevant source to
view.
(ex: Press the INPUT button to select “Component” if you have connected a
DVD palyer to Component input.)
12
Page 15
OPERATING INSTRUCTIONS
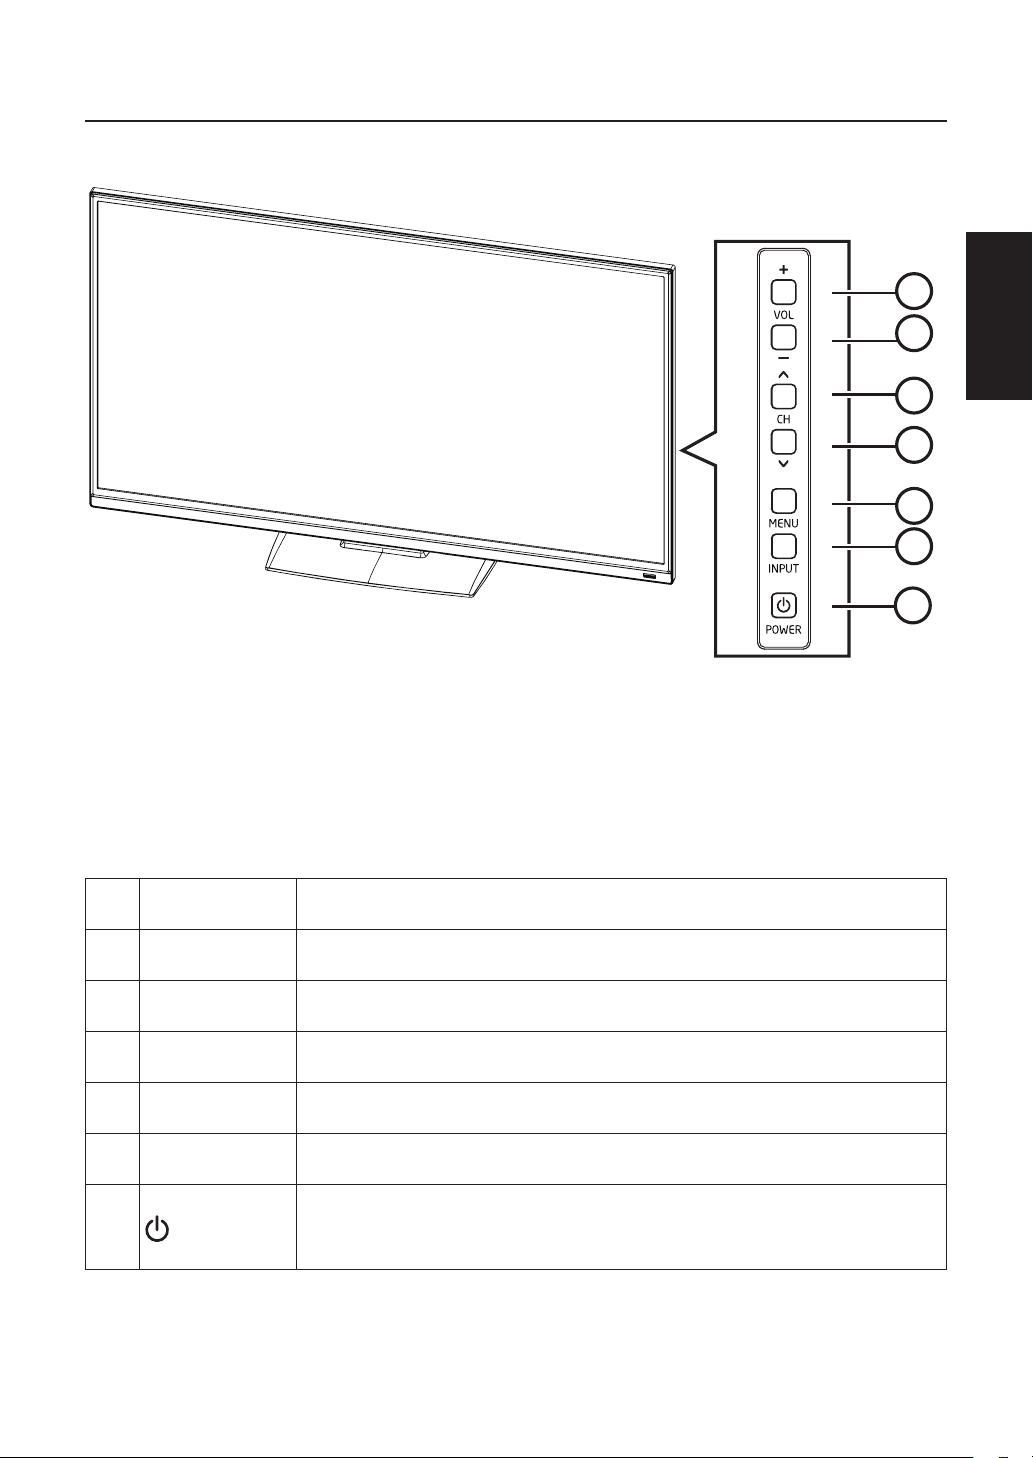
USING THE REAR PANEL CONTROL
1
1. VOL + Press to increase the sound volume.
2
3
4
5
6
7
English
2. VOL - Press to decrease the sound volume.
3. CH
4. CH
5. MENU Press to open or exit the OSD (on-screen display) menu.
6. INPUT Press to select the input source.
7.
▲
▼
POWER
Press to increase the channel number.
Press to decrease the channel number.
Press to turn on / off (standby) the TV set.
13
Page 16
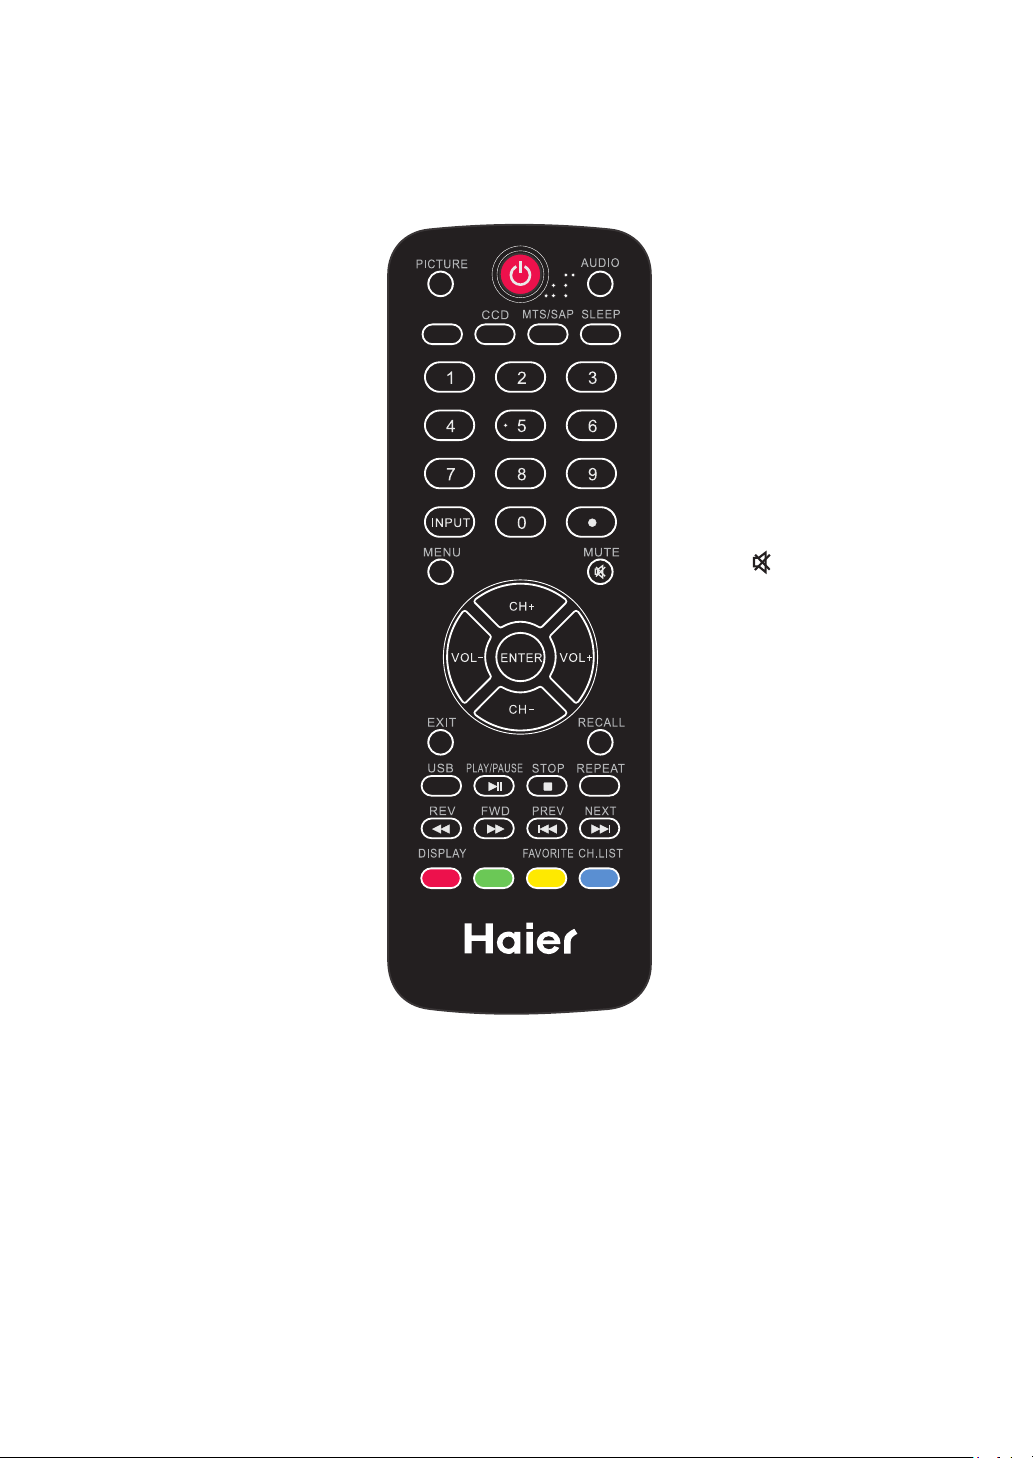
USING THE REMOTE CONTROL
Power
Press to power ON/OFF
(standby) TV.
Note: The TV is never
completely powered
off unless physically
unplugged.
PICTURE
Press to switch the
picture mode.
AUDIO
Press to switch the audio
mode.
ZOOM
Press to switch the display
mode: Normal, Wide,
Cinema, Zoom.
CCD
Press to switch the closed
caption type: CC On/CC
Off/CC On with mute.
MTS/SAP
Press to switch sounds:
SAP, Stereo, Mono for
NTSC TV, or switch audio
language for DTV.
SLEEP
Press to set the sleep
timer (off/10 minutes/20
minutes/30 minutes/40
minutes/50 minutes/60
minutes/90 minutes/120
minutes).
ZOOM
FREEZE
0 ~ 9 / • number
Press to enter a TV
channel number (Press
"." to choose the subchannel).
INPUT
Press "INPUT" to open
the Source List.
MENU
Press to open or exit the
menu.
MUTE
Switch the sound on/off.
CH+ / CH -
• Menu is displayed:
Press CH+ or CH- to
navigate up or down.
• Menu not displayed:
Press CH+ or CH- to
browse through the TV
channels.
• UP/DOWN Multiplex
CH +/- function.
VOL+ / VOL-
• Menu is displayed:
Press VOL+ or VOL- to
navigate right or left.
• Menu not displayed:
Press VOL+ or VOL- to
adjust volume.
ENTER
Press to confirm a
selection.
EXIT
Press to exit menu or on
screen display (OSD).
14
Page 17

RECALL
Press to display the previous channel.
DISPLAY
Press to show the information about
the input source, TV channel, display
resolution and current time.
“Display” under TV source, after OSD
disappear,press UP/DOWN to change
the channel.
FREEZE
Press to freeze picture.
FAVORITE
Press to open the Favorite Channel
List.
CH.LIST
Press to display the Channel List.
For Multimedia use only.
play the previous file in Music mode.
Press to return to the thumbnail mode
when playing the first file in the current
directory.
NEXT
Press to display the next photo during
the photo slideshow. Press to play the
next file in MP3 MusicBox. Press to
return to the thumbnail mode when
playing the last file in the current
directory.
English
USB
Press USB to switch to or exit the USB
multimedia mode.
PLAY/PAUSE
Press to Play/Pause in Multimedia
mode.
STOP
Press to Stop playing in Multimedia
mode.
REPEAT
Press to toggle Repeat On/Off mode in
Music mode.
REV
Press to fast reverse MP3 playback in
Music mode.
FWD
Press to fast forward MP3 playback in
Music mode.
PREV
Press to display the previous photo
during the photo slideshow. Press to
15
Page 18

INITIAL SETUP
Welcome
Welcome to use the wizard for initial
Setup!!
Please press [ENTER] to start the
wizard.
Initial Setup Welcome
Welcome to use the Wizard for Initial Setup!!
Please press [ENTER] to start the wizard.
Language
Initial Setup
Please select your time zone:
NEW
ARIZONA
foundland
CENTRAL
EASTERN
Atlantic
INDIANA
ALASKA
MOUNTAIN
PACIFIC
HAWAII
Back Select Next Exit
Time Zone
Eastern Time
Central Time
Mountain Time
Pacific Time
Alaska
Hawaii
Tuner Type
Please select your tuner type, press
[CH-]/[CH+]to select,
press [ENTER] to confirm:
Initial Setup Tuner
Please select your tuner mode:
Antenna
Please select your language, press [CH-]/
[CH+] to select,
press [ENTER] to confirm:
Initial Setup Language
Please select your language:
English
Español
Français
Back Select Next Exit
Time Zone
Please select your time zone, press
[CH-]/[CH+] to select,
press [ENTER] to confirm:
Cable
Back Select Next Exit
1. Antenna: Set the signal type to
antenna. When set to Air, the TV can
receive analog and digital (ATSC)
broadcasting signals.
2. Cable: Set the signal type to
cable. When set to Cable, the
TV can receive analog and QAM
broadcasting signals.
Scan
Please select scan or skip scan, press
[CH-]/[CH+] to select,
press [ENTER] to confirm:
16
Page 19
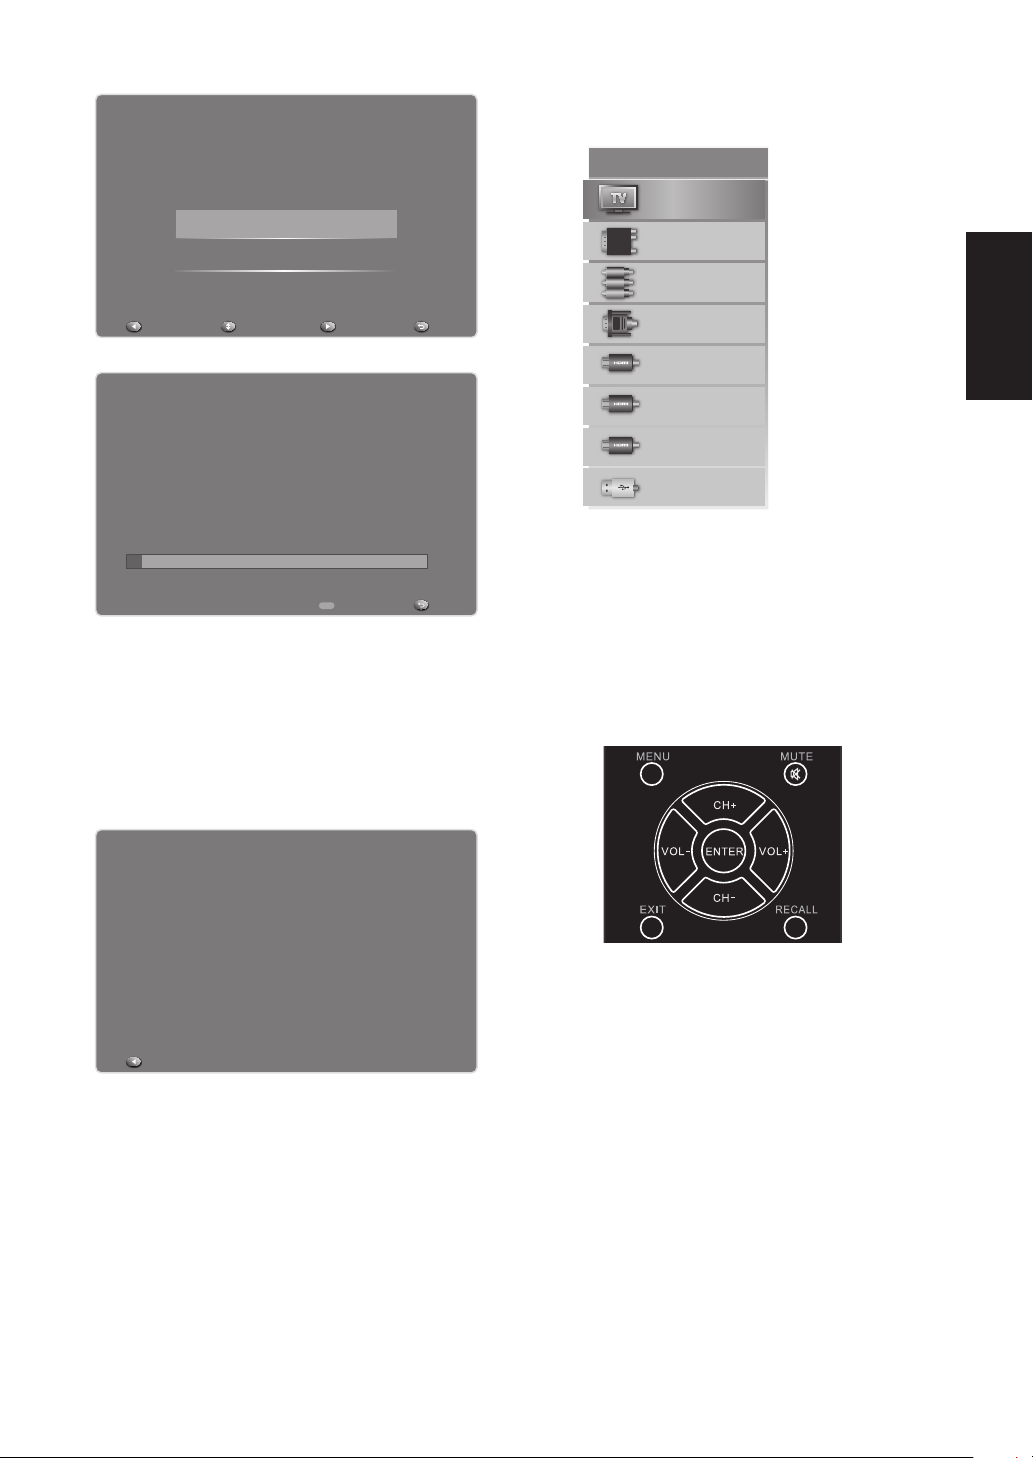
Initial Setup Channel Scan
First, please connect cable and/or antenna.
Start channel scan now ?
If you skip this step,the channel scan could be performed in Menu.
Scan
Skip Scan
INPUT SOURCE
Source Select
TV
Composite
Component
Back Select Next Exit
Initial Setup Channel Scan
The Channel Scan may take a while to complete.
Status:Scanning..
Analog Channels:0
Digital Channels:0
5%
MENU
Cancel
Exit
1. Scan: Automatically search for
channels.
2. Skip Scan: Skip the scan and enter
to the complete interface.
Complete
Initial Setup Complete
Congratulations!!
Completed Initial Setup.
Please press [ENTER] to exit the wizard.
VGA
HDMI 1
HDMI 2
HDMI 3
USB
Press INPUT to display the input
source list, and press [CH-]/[CH+] to
select and ENTER to confirm.
Using the Remote Control to
Display and Navigate the OnScreen Main Menus
English
Back
1. Press [MENU] to display the on-
screen menu or to go back one
level in the menu. At the top level
menu, pressing the MENU button
will exit the menu.
2. Use the [VOL-] or [VOL+] buttons
to highlight the desired menu icon.
Press [ENTER] to select it.
3. Use the [CH+] or [CH-] buttons
to scroll up and down through the
features.
4. Follow the instructions on the
17
Page 20
screen.
5. Press [EXIT] to immediately exit
the menu.
Press once to display the onscreen menu, and press again
to return to normal view. If no
buttons are pressed, the menu
closes automatically after
about 60 seconds.
To exit the menus:Press [EXIT] (or
[MENU])
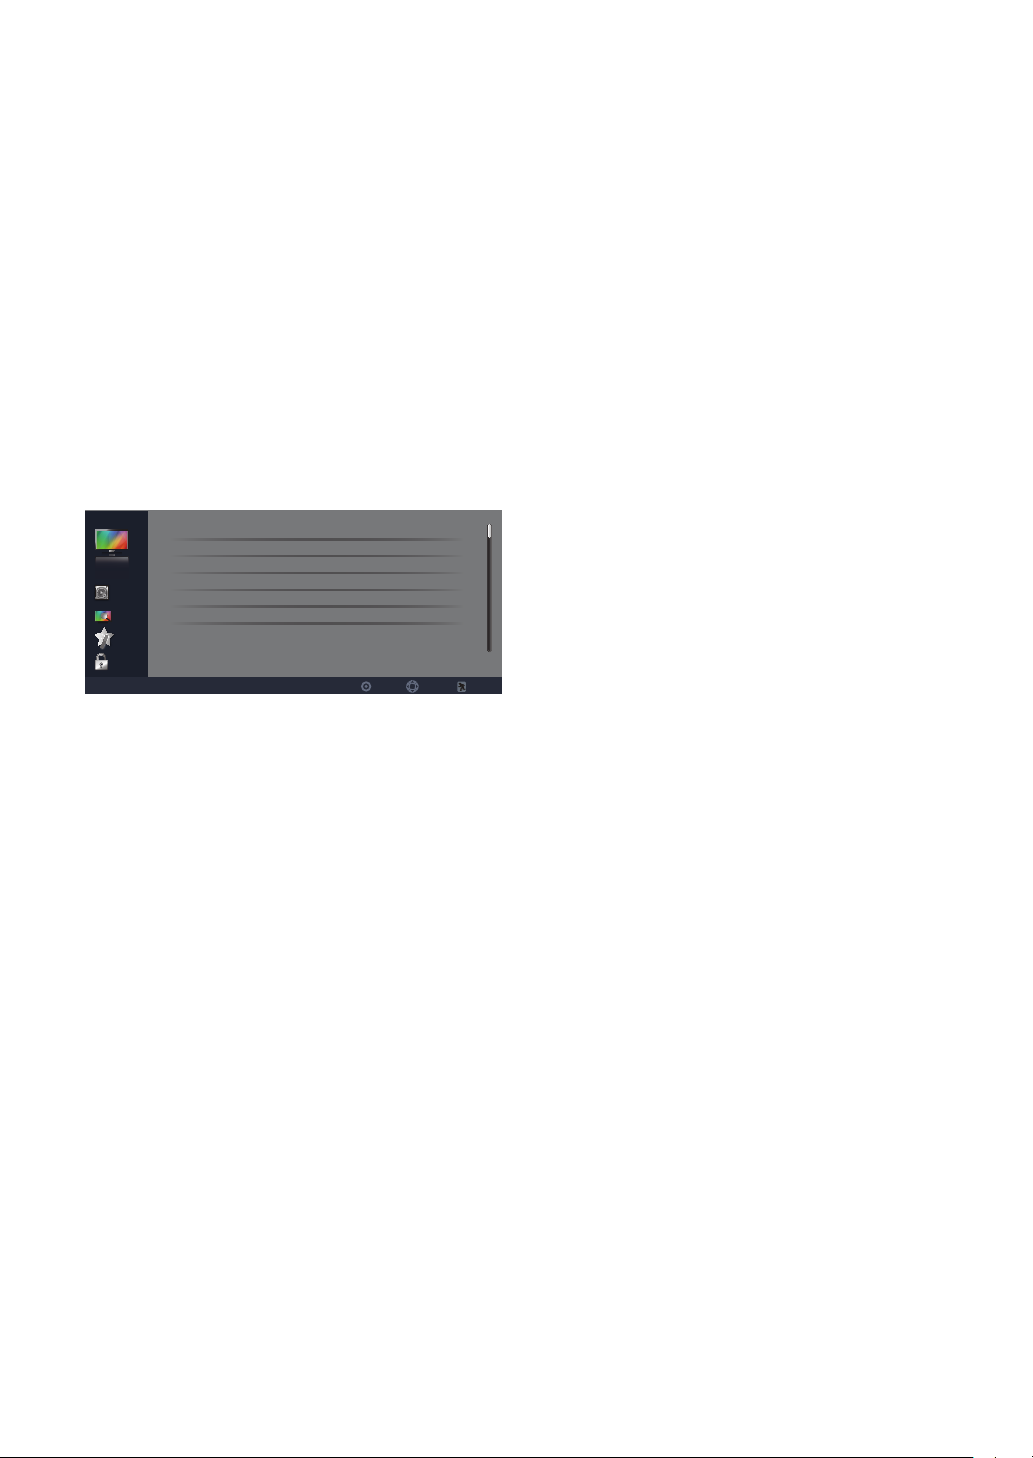
VIDEO
Picture Mode Energy Saving
Brightness
Video
Contrast
Saturation
Audio
Tint
TV
Sharpness
Setup
Parental
1. Picture Mode: Use the [CH-] or
[CH+] buttons to highlight one of
the following options, then press
[ENTER] to enter the sub-menu
and press [VOL-] or [VOL+] to
adjust.
[Energy Saving] – Picture settings
that conserve the most energy.
[Mild] – Adjusts the brightness
and contrast level, and lowers the
sharpness for a soft picture viewing
mode.
[Standard] – Select for standard
picture settings. Recommended for
home entertainment.
[Bright Room] – Select for
enhanced picture brightness.
50
50
50
0
10
SelectEnter Exit
below will automatically
change the Picture Mode to
User.
2. Brightness: Adjust to brighten or
darken the picture. Press
[VOL-]
to
darken the picture. Press [VOL+]
to brighten the picture.
3. Contrast: Adjust the white level
of the picture. Press [VOL-] to
decrease the contrast.Press [VOL+]
to increase the contrast.
4. Saturation: Adjust the color
saturation of the picture. Press
[VOL-] to increase the color
saturation. Press [VOL+] to
increase the color saturation.
5. Tint: Adjust the tint of the picture.
Press [VOL-] to increase the red
tones.Press [VOL+] to increase the
green tones.
6. Sharpness: Adjust to sharpen or
soften the picture. Press [VOL-] to
soften the picture.Press [VOL+] to
sharpen the picture.
7. Color Temperature: Use the
[CH-] or [CH+] buttons to
highlight one of the following
options, then press [ENTER] to
enter the sub-menu and press
[VOL-] or [VOL+] to adjust.
[Cool] – Select to give the white
color a bluish tint.
[Standard] – Select to give the
white color a neutral tint.
[Warm] – Select to give the white
color a reddish tint.
[User] – Allows you to store your
preferred settings.
Note: Changing the settings
18
Page 21
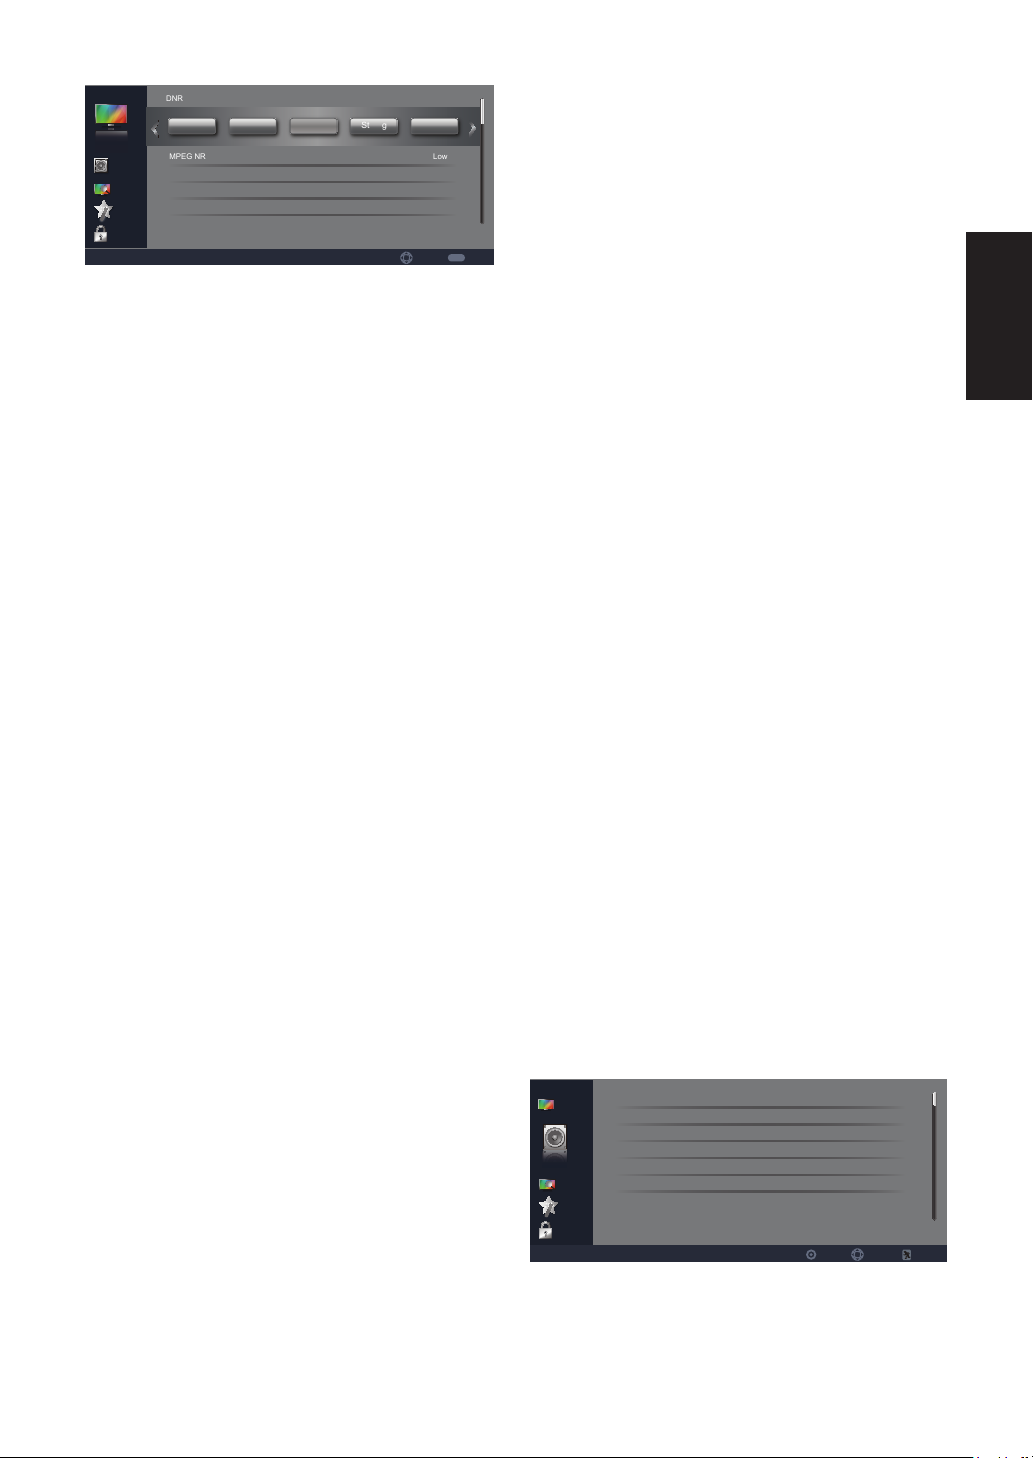
DNR
Video
Audio
TV
Setup
Parental
Off Low Strong Auto
MPEG NR
Adaptive Luma Control
Adaptive Back Light
Film Mode
Medium
Low
Medium
Off
Auto
MENU
Select Back
1. Advanced Video: Use the [CH-]
or [CH+] buttons to highlight one
of the following options, then press
[ENTER] to enter the sub-menu
and press[VOL-] or [VOL+] to
adjust.
[DNR] – Digital Noise Reduction.
You can clear up analog TV signal
by reducing the dot noise. (This
feature is not available at PC or
Media source.)
[MPEG NR] – Similar with DNR,
you can set to reduce the block
noise.
[Adaptive Luma Control] –
Dynamically change the brightness
and contrast according to the
amount of light and dark in the
signal.
[Adaptive Back Light] –
Dynamically change the back light
of the screen according to the
amount of light and dark in the
signal.
[Film Mode] – A frame rate
conversion to film format to avoid
signal flashing.
[VGA Mode] – Graphic/Video
(This feature is only available in
VGA mode).
• Graphic: In this mode, images look
smoother and text appears clearer. This
is the default setting.
• Video: In this mode, images look
sharper. Select this mode for watching
videos from a computer.
[HDMI Mode] – Auto/Graphic/
Video (This feature is only available
in HDMI mode).
• Auto: Choose Video/Graphic
automatically.
• Graphic: In this mode, images look
smoother and text appears clear. Select
this mode when connecting a computer.
• Video: In this mode, images look
sharper. Select this mode when
watching videos from a computer or
connecting video players, such as a DVD
player, Blu-ray player, etc.
2. VGA:
[Auto Adjust] –Auto adjust
H.Position/V.Position/Phase/
Clock,select this option when
the image does not fill the entire
screen.
[H.Position] –Adjust picture's H
Postion.
[V.Position] –Adjust picture's V
Postion.
[Phase] –Adjust Phase.
[Clock] –Adjust Clock.
[Reset Computer settings] –
Reset H.Position/V.Position/Phase/
Clock.
AUDIO
Sound Mode Standard
Video
Balance
Bass
Treble
Audio
Surround Sound
Digtial Audio Output
TV
Setup
Parental
1. Sound Mode : Use the [CH-] or
[CH+] buttons to highlight one of
the following options, then press
0
50
50
Off
RAW
SelectEnter Exit
English
19
Page 22
[ENTER] to enter the sub-menu
and press[VOL-] or [VOL+] to
adjust.
[User] – Allow you to store your
preferred settings.
[Standard] – Select for standard
sound settings. Recommended for
home entertainment.
[Soft] – Select for soft sound
settings.
[Dynamic] – Select for dynamic
sound settings.
Note: Changing the settings
below will automatically
change the Sound Mode to
User.
2. Balance: Adjust the level of sound
coming from the left and right
speakers. Press [VOL-] to shift the
balance and emphasize the left
speaker. Press [VOL+] to shift the
balance and emphasize the right
speaker.
3. Bass:Adjust the low frequency
sounds.Press [VOL-] to decrease
bass. Press [VOL+] to increase the
bass.
format of the audio stream.
[PCM] – PCM can be matched
with most AV amplifiers.
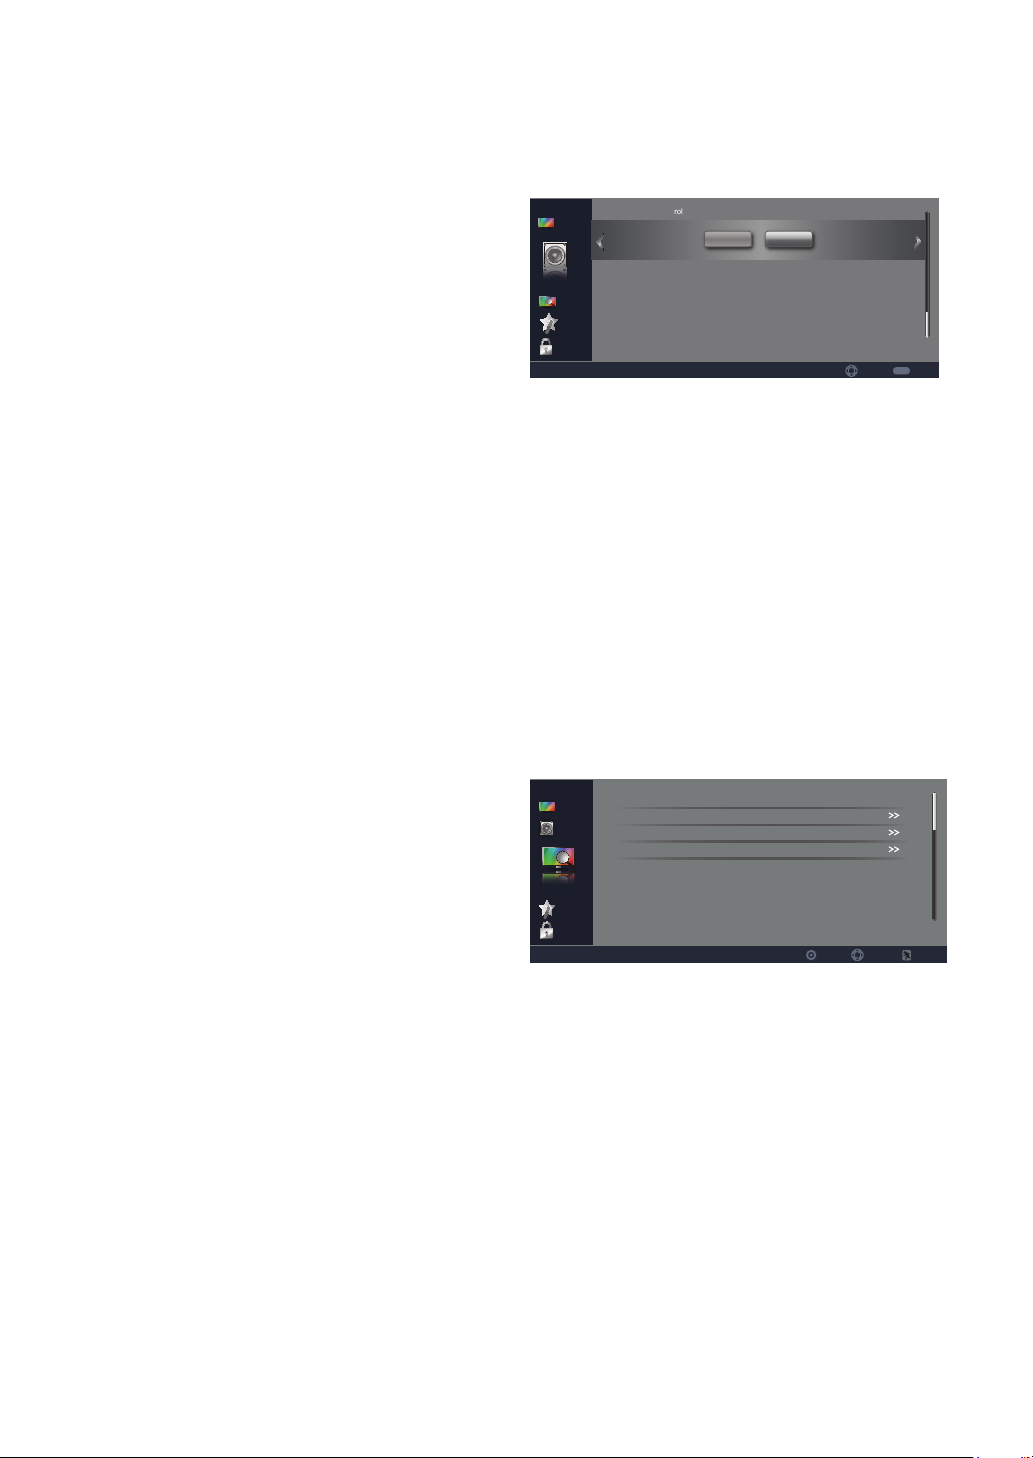
Auto Volume Control
Video
Off
Audio
TV
Setup
Parental
On
Select Back
1. Auto Volume Control : Use
the [CH-] or [CH+] buttons to
highlight one of the following
options, then press [ENTER]
to enter the sub-menu and
press[VOL-] or [VOL+] to adjust.
[Off ] – Set the auto volume
control off.
[On] – Set the auto volume
control on.
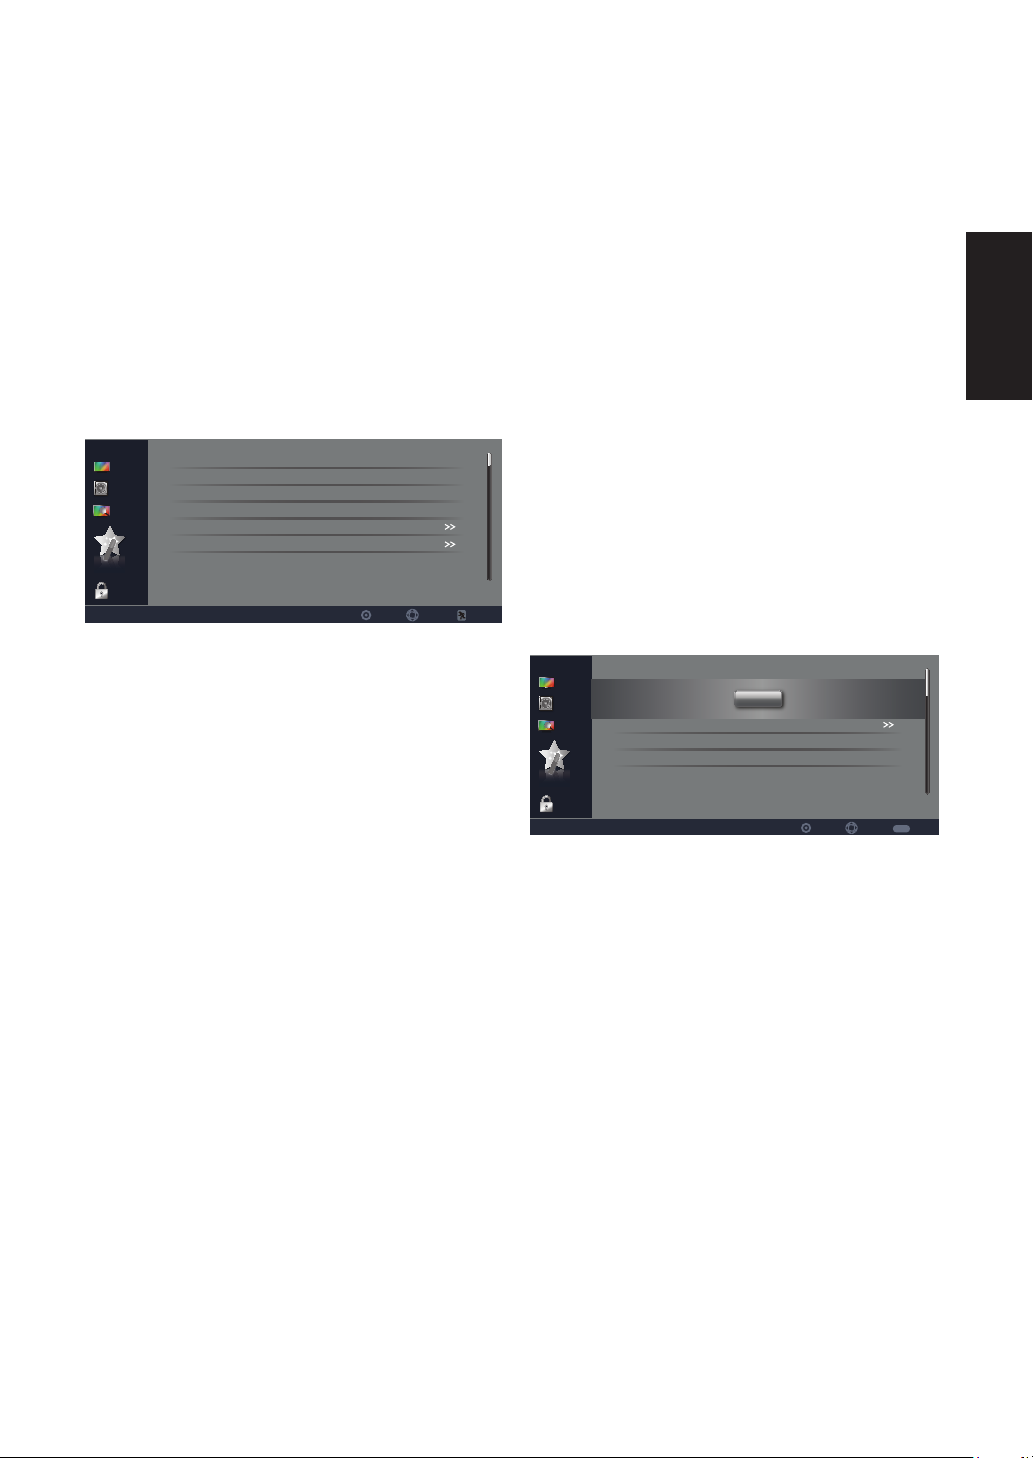
TV
Signal Type Antenna
Video
Auto Channel Search
Audio
Channel Skip
Favorite list
TV
Setup
Parental
SelectEnter Exit
MENU
4. Treble: Adjust the high frequency
sounds.Press [VOL-] to decrease
treble. Press [VOL+] to increase
the treble.
5. Surround Sound:
[Off ] – Set surround sound off.
[On] – Set surround sound on.
6. Digital Audio Output:
[Off ] – Set the audio output type
of coax or optical terminal off.
[RAW] – Output the original
1. Signal Type : Use the [CH-] or
[CH+] buttons to highlight one of
the following options, then press
[ENTER] to enter the sub-menu
and press[VOL-] or [VOL+] to
adjust.
[Antenna] – Set the signal type
to antenna. When set to Air, the
TV can receive analog and digital
(ATSC) broadcasting signal.
[Cable] – Set the signal type
to cable. When set to Cable, the
20
Page 23
TV can receive analog and QAM
broadcasting signal.
2. Auto Channel Search: Highlight
and press ENTER to start the
channel scan.
3. Channel Skip: Manually add and
skip channels in your program list.
4. Favorite List: Manually add and
skip channels in your favorite list.
SETUP
Menu Language English
Video
MTS
Audio
No Signal Power Off
Blue Screen
TV
Audio Only
Time Setup
Setup
Parental
1. Menu Language : Use the [CH-
] or [CH+] buttons to highlight
one of the following options, then
press [ENTER] to enter the submenu and press[VOL-] or [VOL+]
to adjust.
Set the On-Screen-Display language.
English/Espanol/Francais.
2. Aspect Ratio: Press to switch
the display mode: Normal, Wide,
Cinema, Zoom when having signal.
Note: ATSC/HDMI/COMPONENT
Connect with 720P/1080I/1080P
and “Aspect ratio” was set as wide.
3. MTS: Set the preferred sound
track of analog channels. Mono/
Stereo/SAP.
4. No Signal Power Off: When this
option is set to On, the TV will
automatically turn off when there is
no input signal.
Stereo
On
On
SelectEnter Exit
5. Blue Screen: When this option is
set to On, the screen will be blue
instead of black when there is no
input signal.
6. Audio Only: Press [ENTER] to
turn down backlight ,and press any
key to resume.
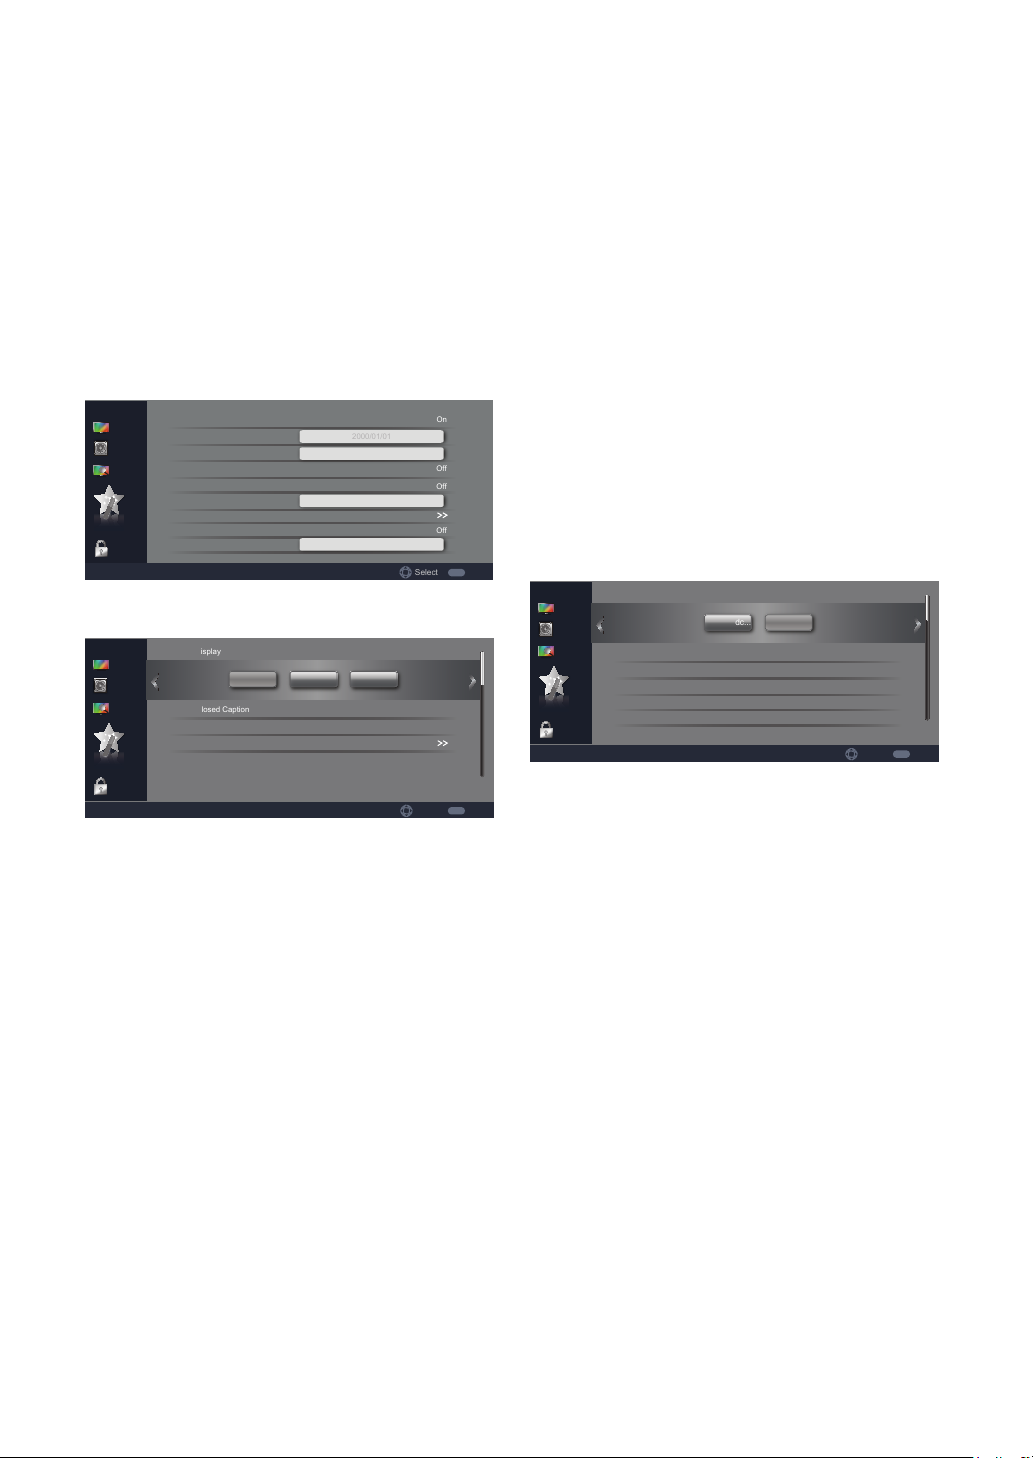
7. Time Setup: Set Time Zone/
Time/Sleep Timer/Auto Sleep.
8. Caption: Set Caption Display/
Analog Closed Caption/Digital
Closed Caption /Digital Caption
Style. For details, please refer to
page 22.
9. All Reset: Reset all the Settings to
default.
Time Setup
Time Zone
Video
Audio
TV
Setup
Parental
Time
Sleep Timer
Auto Sleep
Enter
Off
Off
MENU
SelectEnter
Back
1. Time Zone : Use the [CH-] or
[CH+] buttons to highlight one of
the following options, then press
[ENTER] to enter the sub-menu
and press[VOL-] or [VOL+] to
adjust.
Set the current time zone. Press
[VOL-] or [VOL+] / [ENTER] to
adjust.
2. Time : Set the current date /time.
Press [VOL-] or [VOL+] / [ENTER]
to adjust.
Auto Synchronization/Date/Time
Daylight Saving Time
Power On Timer/Timer/Power On
English
21
Page 24
Channel
Power Off Timer/Timer
3. Sleep Timer: Set the sleep time.
Press [VOL-] or [VOL+] to select
the sleep time.
4. Auto Sleep:Set the Auto Sleep
time .Press [VOL-] or [VOL+] to
select OFF/1Hour/2Hours/5Hours.
Time
Auto Synchronization On
Video
Audio
TV
Setup
Parental
Date
Time
Daylight Saving Time
Power On Timer
Timer
Power On Channel
Power Off Timer
Timer
2000/01/01
11:12:01
00:00:00
00:00:00
Select
Off
Off
Off
MENU
Back
Caption
Caption Display
Video
Audio
TV
Setup
Parental
Off
Analog Closed Caption
Digital Closed Caption
Digital Caption Style
On OnMute
CC1
Service 1
MENU
Select Back
1. Caption Display: Use the [CH-]
or [CH+] buttons to highlight one
of the following options, then press
[ENTER] to enter the sub-menu
and press[VOL-] or [VOL+] to
adjust.
[Off ] – Set the caption display off
to hide the closed captions (CC).
[On] – Set the caption display on
to display the CC.
[OnMute ] – When muted, the
CC will be displayed. If audio line
out is used, the line out will not be
controlled.
2. Analog Closed Caption: Select
the closed-captions mode for
analog programs.CC1/CC2/CC3/
CC4/TEXT1/TEXT2/TEXT3/
TEXT4.
3. Digital Closed Caption: Select
the closed-captions mode for digital
programs. Off/Service1/Service2/
Service3/Service4/Service5/
Service6.
4. Digital Caption Style: Applies
only to digital channels with
closed captions. Set Caption Style/
Font Size/Font Style/Font Color/
Font Opacity /Background color/
Background Opacity.
Digital Caption Style
Caption Style
Video
Audio
TV
Setup
Parental
Font Size
Font Style
Font Color
Font Opacity
Background Color
As Broadc...
Custom
Large
Style 1
White
Solid
Black
MENU
Select Back
1. Caption Style: Use the [CH-] or
[CH+] buttons to highlight one of
the following options, then press
[ENTER] to enter the sub-menu
and press[VOL-] or [VOL+] to
adjust.
Set the style of caption.
As Broadcast/Custom.
Note: Changing the settings
below will automatically
change the Caption Style to
Custom.
2. Font Size: Set the font size. Small/
Medium/Large.
3. Font Style: Set the font style.
Style1~style7.
4. Font Color: Set the font color.
Black/White/Green/Blue/Red/Cyan/
22
Page 25
Yellow/Magenta.
5. Font Opacity: Set the font opacity.
Solid/Translucent/Transparent/
Flashing.
6. Background Color: Set the
background color. Black/White/
Green/Blue/Red/Cyan/Yellow/
Magenta
7. Background Opacity: Set
the background opacity. Solid/
Translucent/Transparent/Flashing.
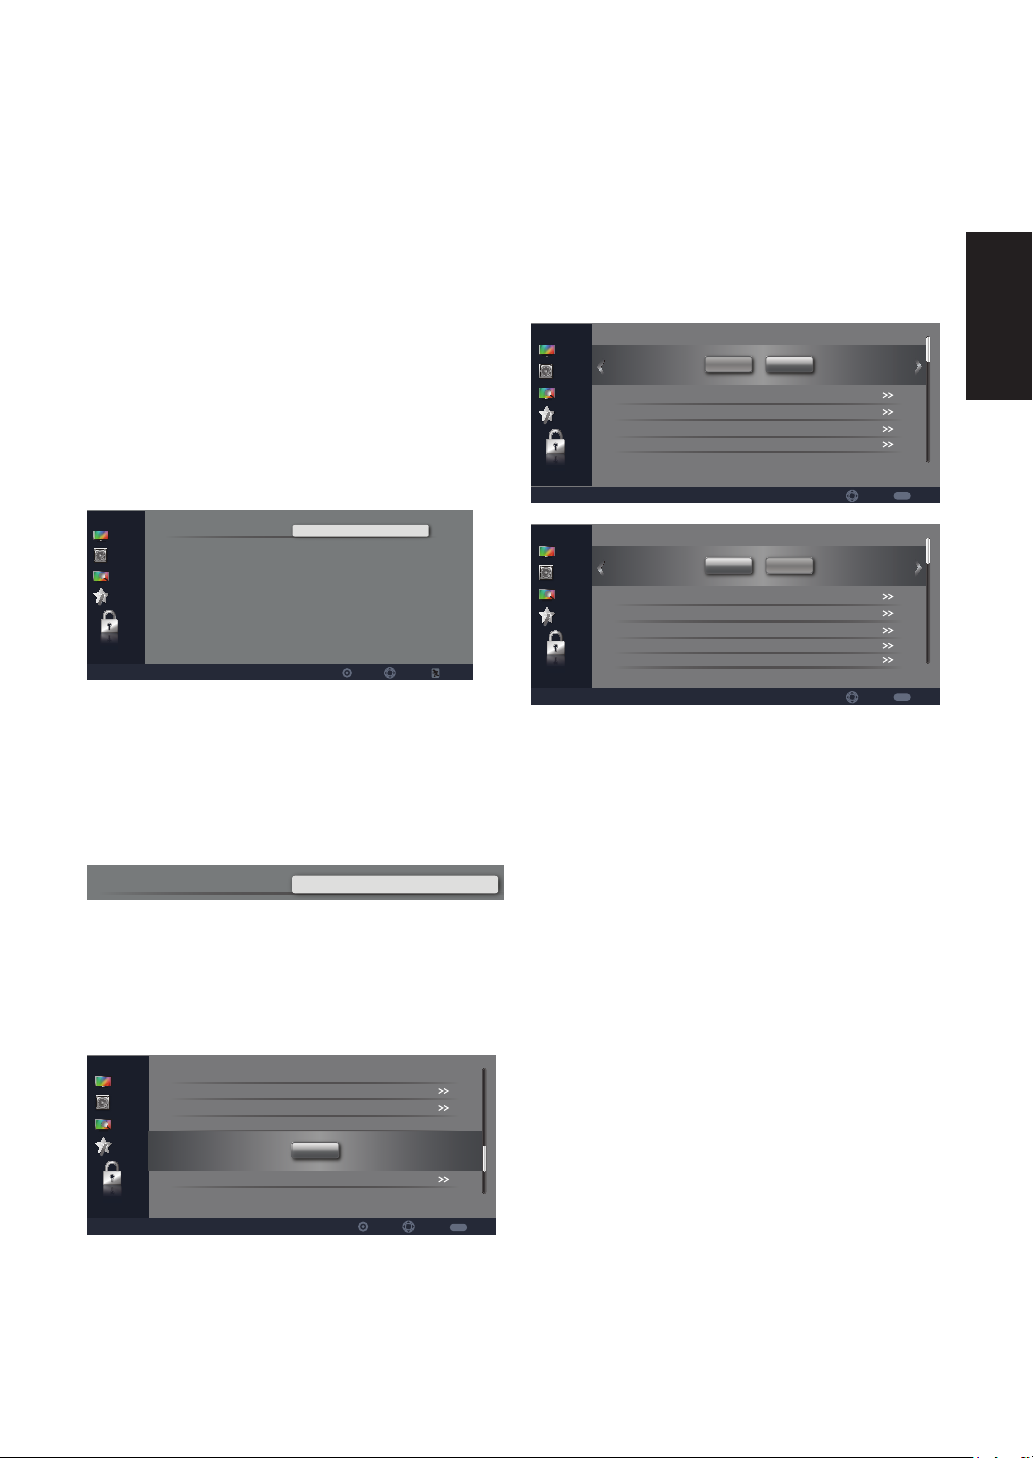
PARENTAL
Password
Video
Audio
TV
Setup
Parental
SelectEnter Exit
1. Password: Use the [CH-] or
[CH+] buttons to highlight one of
the following options, then press
[ENTER] to select it and then you
will enter the password interface.
Password
[ENTER] to enter the sub-menu
and press[VOL-] or [VOL+] to
adjust.
Set the channel / program block on
or off.
2. Channel Block: Set the channels
to be blocked.
System Block
Video
Audio
TV
Setup
Parental
Video
Audio
TV
Setup
Parental
Channel Block
Program Block
Change Password
Clean All
Rating Enable
U.S. TV Ratings
U.S. Movie Rating
Canadian English Ratings
Canadian French Ratings
Open V-chip
Off
Off
On
MENU
Select Back
On
MENU
Select Back
3. Program Block: Use the [CH-]
or [CH+] buttons to highlight one
of the following options, then press
[ENTER] to enter the sub-menu
and press[VOL-] or [VOL+] to
adjust.
English
After entering the correct
password, you will see the submenu
shown below. The default password
is “0000”.
Video
Audio
TV
Setup
Parental
System Block
Channel Block
Program Block
Change Password
Clean All
Enter
On
MENU
SelectEnter
Back
1. System Block: Use the [CH-] or
[CH+] buttons to highlight one of
the following options, then press
Set the program to be locked. For
details please refer to pages 23~25.
[Rating Enable] – Set the ratings
on or off.
[U.S. TV Ratings] – See page 24.
[U.S. Movie Rating]–See page 24.
[Canadian English Ratings] –
See page 25.
[Canadian French Ratings] –
See page 25.
[Open V-chip] – Set the V-chip on.
[Clear Open V-chip Data] – Set
the V-chip data to default values.
23
Page 26
[Block Unrated] – Block the
programs that do not have any valid
rating flag.
4. Change Password: Enter the
4-digital new password and
confirm it. New Password/Confirm
password.
5. Clean All: Set the items in the
lock menu to default values.
U.S. TV Ratings
The TV rating compose of two aspects:
age-based and content-based.
Video
Audio
TV
Setup
Parental
Video
Audio
TV
Setup
Parental
Allowed Rating
Allowed Rating
A
D
L
S
V
FV
TV-Y
TV-Y7
TV-G
TV-PG
TV-14
TV-MA
Blocked Rating
Blocked Rating
MENU
SelectSet
Back
MENU
SelectSet
Back
[A] – All
[D] – Suggestive dialogue
[L] – Strong language
[S] – Sexual situations
[V] – Violence
[FV] – Fantasy violence
Cautioned
[TV-MA] – Mature Audience Only
Note: The content ratings will
increase depending on the
level of the age-based rating.
For example, a program with a
TV-PG V(violence) rating may
contain moderate violence,
while a TV-14 V(violence)
rating may contain intense
violence. So locking a higher
level option will automatically
cause locking the options that
has more sensitive level.
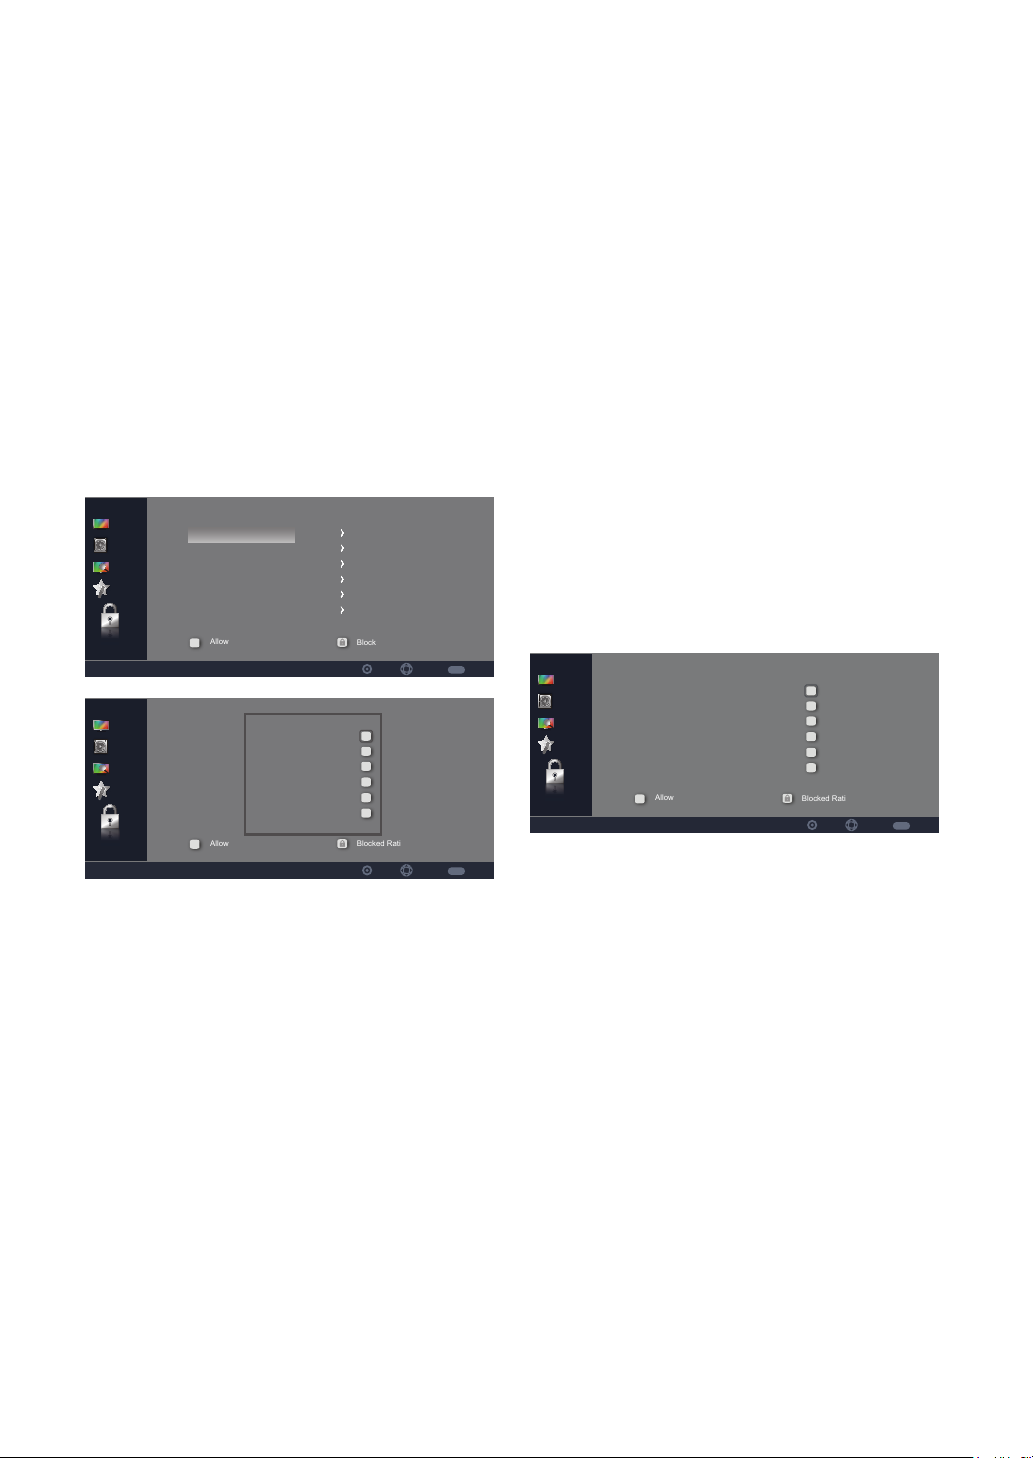
U.S. Movie Ratings
This system defines the rating control
which come from MPAA rules.
Video
Audio
TV
Setup
Parental
Allowed Rating
G
PG
PG-13
R
NC-17
X
Blocked Rating
MENU
SelectSet
Back
[G] – General audience. All ages
admitted.
[PG] – Parental guidance
suggested.Some material may not
be suitable for children.
[PG-13] – Parents strongly
cautioned. Some material may be
inappropriate for children under 13.
[TV-Y] – All Children
[TV-Y7] – Directed to Older
Children
[TV-G] – General Audience
[TV-PG] – Parental Guidance
Suggested
[TV-14] – Parents Strongly
[R] – Restricted. Children under
17 require accompanying parent or
adult guardian.
[NC-17] – No one 17 and under
admitted.
[X] – Adult audience only.
24
Page 27
Canadian English Rating
MEDIA
These ratings are for programs which
are using English rating system.
Video
Audio
TV
Setup
Parental
Allowed Rating
C
C8+
G
PG
14+
18+
Blocked Rating
MENU
SelectSet
Back
[C] – Children
[C8+] – Children 8 years and
older
[G] – General programming
[PG] – Parental guidance
[14+] – Viewers 14 and older
[18+] – Adult programming
Canadian French Rating
The ratings are for programs which
are using French rating system.
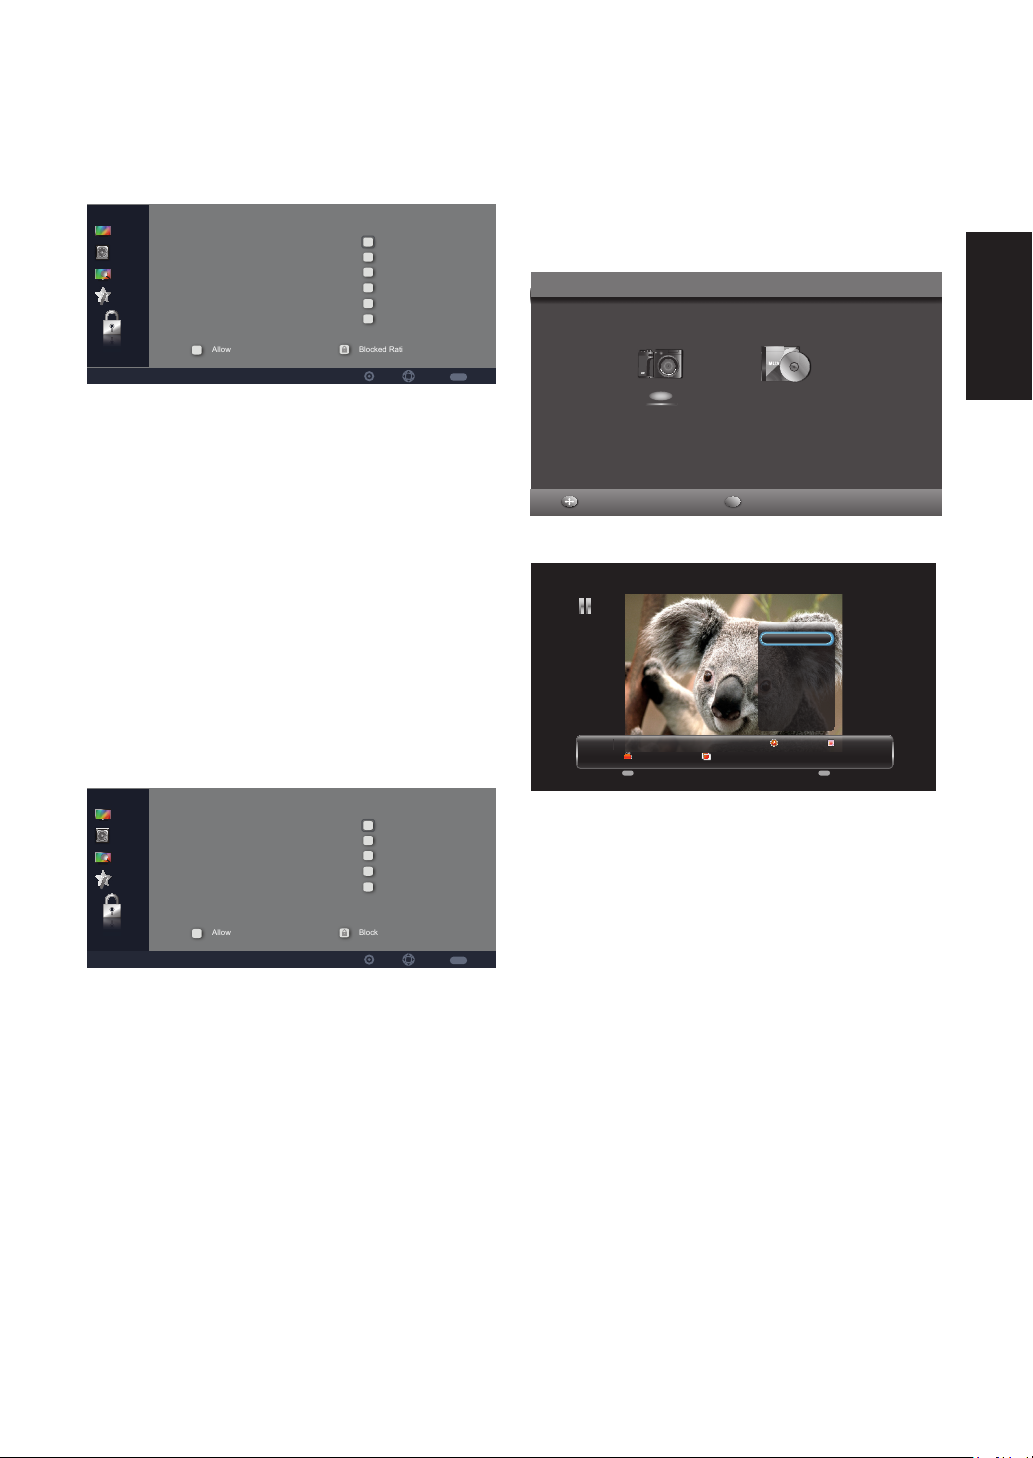
Insert a USB storage device, press
INPUT, and select USB. The screen
below will be shown. You can also press
the USB button on the remote control.
Device Inserted
Photo
Select Enter
Music
Enter
Picture
Play
Repeat
Shuffle
Rotate
Show Info
3/8
Photo
None
MENU Enter
Menu Enter
Koala.jpg
Short
English
Video
Audio
TV
Setup
Parental
Allowed Rating
G
8 ans+
13 ans+
16 ans+
18 ans+
Blocked Rating
MENU
SelectSet
[G] – General
[8 ans+] – Not recommended for
younger children
[13 ans+] – Not recommended
for children under age 13
[16 ans+] – Not recommended
for ages under 16
[18 ans+] – This program is
restricted to adults
Back
Press MENU to display the menu.Use
the [CH+] and [CH-] buttons to select
an option.
[Play] – Press ENTER to pause or
play the music.
[Repeat] – None/Repeat One/
Repeat All. Press ENTER to select
the repeat mode.
[Shuffle ] – Press ENTER to
enable shuffle mode.
[Rotate] – Press ENTER to rotate
the picture.
[Show Info] – Press ENTER to
display the information about the
current picture.
25
Page 28

Play
Repeat
Shuffle
Rotate
Show Info
3/8
Photo
None
MENU Enter
Menu Enter
Photo
None
MENU Enter
Menu Enter
Koala.jpg
Koala.jpg
Short
Album:
Orientation:
Artist:
Name:
Date:
Size:
Next:
EXPOSURE TIME:
F NUMBER:
EXPOSURE PROGRAM:
COLOR SPACE:
Short
Photo
Rotate 90°
Corbis
koala.jpg
2012-04-20 15:21:55
1024 x 768
Light house.jpg
3/8
Music
Pause
Repeat
Shuffle
Show info
Hide Spectrum
Lyric Display Line
Music
MENU Enter
00:00:57 00:04:47
20
Menu Enter
Someone like you.mp3
8/10
Press MENU to display the menu. Use
the [CH+] and [CH-] buttons to select
an option.
[Lyric Display Line] – Press
Enter to adjst Lyric Display line
(OFF, Single line ,Multiple lines).
[Audio Only] – Press [ENTER]
to disable the screen ,and press any
key to resume.
Music
MENU Enter
Music
MENU Enter
00:01:05 00:04:47
20
Menu Enter
Menu Enter
Someone like you.mp3
00:00:42 00:04:47
20
Someone like you.mp3
Pause
Repeat
Shuffle
Show info
Hide Spectrum
Lyric Display Line
Titel:
Artist:
Album:
Genre:
Year:
Duration:
Next:
8/10
Someone Like You
Adete
21
N/A
N/A
00:04:47
take it all .mp3
8/10
None
Repeat One
Repeat All
Note: Please refer to page 15 for
details on how to use the remote
control in the USB Multimedia
mode.
[Pause] – Press ENTER to pause
or play the music.
[Repeat ] – None/Repeat One/
Repeat All. Press ENTER to select
the repeat mode.
[Shuffle ] – Press ENTER to
enable shuffle mode.
[Show info] – Press ENTER to
display the information about the
current music.
[Hide Spectrum] – Press ENTER
to hide or show the spectrum.
26
Page 29

TIPS
Care of the screen
Do not rub or strike the screen with
anything hard as this may scratch, mar, or
damage the screen permanently.
Unplug the power cord before cleaning
the screen. Dust the TV by wiping the
screen and the cabinet with a soft, clean
cloth. If the screen requires additional
cleaning, use a clean, damp cloth. Do
not use liquid cleaners or aerosol
cleaners.
Mobile telephone warning
To avoid disturbances in picture and
sound, malfunctioning of your TV or even
damage to the TV, keep away your mobile
telephone from the TV.
End of life directives
We are paying a lot of attention to
produce environmental friendly in green
focal areas. Your new receiver contains
materials, which can be recycled and
reused.
At the end of its life, specialized companies
can dismantle the discarded receiver to
concentrate the reusable materials and to
minimize the amount of materials to be
disposed of.
Please ensure you dispose of your old
receiver according to local regulations.
Haier is committed to safely recycling
electronic products and product materials.
Please check for a local recycling location
in the United States at: 1800RECYCLING.
COM or call 1.800.RECYCLING.
Dolby License Notice and
Trademark Acknowledgement
Manufactured under license from Dolby
Laboratories.
Dolby and the double-D symbol are
trademarks of Dolby Laboratories.
Regulatory Notices – Federal
Communications Commission
Notice
This equipment has been tested and found
to comply with the limits for a Class B
digital device, pursuant to part 15 of the
FCC Rules. These limits are designed to
provide reasonable protection against
harmful interference in a residential
installation. This equipment generates, uses,
and can radiate radio frequency energy
and, if not installed and used in accordance
with the instructions, may cause harmful
interference to radio communications.
However, there is no guarantee that
interference will not occur in a particular
installation. If this equipment does cause
harmful interference to radio or television
reception, which can be determined by
turning the equipment off and on, the
user is encouraged to try to correct
the interference by one or more of the
following measures:
• Reorient or relocate the receiving
antenna.
• Increase the separation between the
equipment and the TV.
• Connect the equipment into wall
power outlet on a circuit different from
that to which the receiver is connected.
• Consult the dealer or an experienced
radio or television technician for help.
English
27
Page 30

Modifications
The FCC requires the user to
be notified that any changes or
modifications made to this device that
are not expressly approved by our
company may void the user’s authority
to operate the equipment.
Cables
Connections to this device must be
made with shielded cables with metallic
RF/EMI connector hoods to maintain
compliance with FCC Rules and
Regulations.
Canadian notice
This Class B digital apparatus meets
all requirements of the Canadian
Interference-Causing Equipment
Regulations.
Avis Canadian
Cat apparel numerous de la classed
B respected toutes les exigencies du
règlement sur le materiel brouilleur du
Canada.
28
Page 31

PRODUCT SPECIFICATION
NOTE
• This model complies with the specifications listed below.
• Designs and specifications are subject to change without notice.
• This model may not be compatible with features and/or specifications that may be
added in the future.
Model No. LE32D2320 LE39D2380 LE42D2380 LE46D2380
DISPLAY
Viewable
Television
System
Channel
Coverage
Rear
Connectors
31.5" 38.5" 42" 46"
NTSC standard, ATSC standard (8-VSB, Clear-QAM)
NTCS:CH2-CH69 Antenna
CH1-CH135 Cable
ATCS:CH2-CH69 Antenna
CH1-CH135 Cable
CONNECTIONS
Tuner input (75Ω)
AV IN:
PC IN:
Supported scan rate: 640x480@60Hz,720x400@70Hz,
Recommended: For LE32D2320: 1360x768@60Hz
AV/L/R video/audio input
D-SUB and PC Audio (Headphone mini-jack)
800x600@60Hz,1024x768@60Hz,1360x768@60Hz
1440x900@60Hz,1680x1050@60Hz,1920x1080@60Hz
Note:
1360x768@60Hz: For LE32D2320 only.
1440x900@60Hz,1680x1050@60Hz,1920x1080@60Hz:
For LE39D2380/LE42D2380/LE46D2380.
For LE39D2380/LE42D2380/LE46D2380: 1920x1080@60Hz
Component Video and L/R Audio input
Supported resolution: 480i@60Hz, 480p@60Hz,
720p@60Hz,1080i@60Hz,
1080p@60Hz.
English
HDMI input
Supported scan rates: 480i@60Hz,480p@60Hz,
720p@60Hz,1080i@60Hz,
1080p@60Hz.
HDMI 1/2
D-SUB
COMPONENT 1
AV(Share Y)
Audio Input
Coax out
29
Page 32

Model No. LE32D2320 LE39D2380 LE42D2380 LE46D2380
PC Audio In
Side
Connectors
HDMI3
USB
Earphone Out
WEIGHT & DIMENSIOIN
Dimensions
with Stand
28.9"x19.3"x7.1" 34.9"x22.6"x8.5" 38.1"x24.5"x8.5" 41.6"x26.5"x8.5"
(W x H x D)
Dimensions
without Stand
28.9"x17.9"x2.6" 34.9"x21.3"x2.6" 38.1"x23.2"x2.6" 41.6"x25.1"x2.6"
(W x H x D)
Weight with
Stand
17.38(lbs) 25.08(lbs) 29.96(lbs) 34.54(lbs)
Weight
without Stand
16.3(lbs) 22.66(lbs) 27.5(lbs) 32.12(lbs)
and Base
WALL MOUNTING
VESAcompatible
wall bracket
(W x H)
Screw type
200x100mm 200x200mm 400x400mm 400x400mm
Metric 4x10 mm Metric 6x10 mm Metric 6x10mm Metric 6x10mm
Power
Consumption
Standby
Mains Power
Audio Power
Ambient
Temperature
Supplied
Accessories
POWER
65W 120W 130W 130W
<0.5W
120V 60Hz
5W + 5W 8W + 8W 8W + 8W 8W + 8W
41°F - 95°F
PACKAGE CONTENTS
TV unit x1
Base x1
Remote control x1 (with two size AAA alkaline batteries)
Screws x 4
User manual x1
Registration Card x1
30
Page 33

TROUBLESHOOTING
Please make these simple checks before calling service. These tips may save
you time and money since charges for receiver installation and adjustments of
customer controls are not covered under your warranty.
Symptoms Items to Check and Actions to follow
“Ghost” or double image
No power
No picture
Good picture but no
sound
Good sound but poor
color
• This may be caused by obstruction to the antenna due
to high rise buildings or hills. Using a highly directional
antenna may improve the picture.
• Check if the TV’s AC power cord is plugged into the
mains socket.
• Unplug the TV, wait for 60 seconds. Then reinsert plug
into the mains socket and turn on the TV again.
• Check antenna connections at the rear of the TV to see
if it is properly connected to the TV.
• Possible broadcast station trouble.
Try another channel.
• Adjust the contrast and brightness settings.
• Check the Closed Captions control. Some TEXT modes
could block the screen.
• Increase the VOLUME.
• Check if the TV is muted; press the MUTE button on the
remote control.
• Adjust the contrast, color and brightness settings.
English
Poor picture
Snowy picture and noise
Horizontal dotted line
Television not responding
to remote control
• Poor picture quality may occur when an activated S-VHS
camera or camcorder is connected to your TV and the
other peripheral at the same time. Switch off one of the
peripherals.
• Check the antenna connection.
• This may be caused by electrical interference (e.g. hair
dryer, nearby neon lights, etc.)
• Turn off the equipment.
• Check whether the batteries are working. Replace if
necessary.
• Clean the remote control sensor lens on the TV.
• You can still use the buttons at the front of your TV.
• Select the TV mode to ensure your remote control is set
in the TV mode.
31
Page 34

GLOSSARY
HDTV
HDTV displays are technically defined as being capable of displaying a minimum of
720p or 1080i active scan lines.
HDMI Inputs
High-Definition Multimedia Interface.
Audio / Video Inputs
Located on the rear of the receiver, these connectors (RCA phono type plug)
are used for the input of audio and video signals. Designed for use with VCRs (or
other accessories) in order to receive higher picture resolution and offer sound
connection options.
Menu
An on-screen listing of features shown on the TV screen is made available for user
adjustments.
MPAA
Motion Picture Association of America.
Multichannel Television Sound (MTS)
The broadcasting standard, which allows stereo sounds to be transmitted with
the TV picture.
RF
Radio Frequency or modulated signal design used as the carrier for television
broadcasts.
Second Audio Program (SAP)
Another or additional audio channel provided for in the Multichannel Television
Sound (MTS) broadcast standard. A monaural sound track included within the
recorded or video signal (usually containing a second language translation for the
displayed program).
Sleep Timer
You can set a time period for which the TV will be turn off automatically.
32
Page 35

WARRANTY
This Haier brand product, when shipped in its original container, will be free from
defective workmanship and materials, and agrees that it will, at its option, either repair
the defect or replace the defective product with a new or re-manufactured equivalent,
for parts or labor for the periods set forth below:
This warranty does not apply to the appearance of the product or the exterior of
the product, which has been damaged or defaced, altered or modified in design or
construction. It does not apply to the additional excluded items set forth below:
The warranty commences on the date the item was purchased and the original purchase
receipt must be presented to the authorized service center before warranty repairs are
rendered.
The limited warranty described herein is in addition to whatever implied warranties
may be granted to purchasers by law. ALL IMPLIED WARRANTIES INCLUDING THE
WARRANTIES OF MERCHANTABILITY AND FITNESS FOR USE ARE LIMITED TO
THE PERIOD(s) FROM THE DATE OF PURCHASE SET FORTH BELOW. Some states
do not allow limitations on how long an implied warranty lasts, so the above limitation
may not apply to you.
Neither the sales personnel of the seller nor any other person is authorized to make
any warranties other than those described herein, or to extend the duration of any
warranties beyond the time period described herein on behalf of Haier.
English
The warranties described herein shall be the sole and exclusive warranties granted by
Haier and shall be the sole and exclusive remedy available to the purchaser. Correction
of defects in the manner and for the period of time described herein, shall constitute
complete fulfillment of all abilities and Responsibility of Haier to the purchaser with
respect to the product, and shall constitute full satisfaction of all claims, whether based
on contract, negligence, strict duality or otherwise. In no event shall Haier be liable, or
in any way responsible for any damages or defects in the product which were caused
by repairs or attempted repairs performed by anyone other than an authorized service
center or dealer; nor shall Haier be liable, or in any way responsible for incidental or
consequential economic or property damage. Some states do not allow the exclusion of
incidental or consequential damages, so that above exclusion may not apply to you.
THIS WARRANTY GIVES YOU SPECIFIC LEGAL RIGHTS. YOU MAY ALSO HAVE
OTHER RIGHTS WHICH VARY FROM STATE TO STATE.
Warranty period for LE32D2320/LE39D2380/LE42D2380/LE46D2380 1 year parts and
labor.
Additional items excluded from warranty coverage: non-rechargeable batteries. What to
do to obtain service or to obtain product literature, accessories, supplies or customer
assistance: Simply call 1-877-337-3639. Be sure to have proof of purchase.
33
Page 36

www.HaierAmerica.com
Models: LE32D2320/LE39D2380/
LE42D2380/LE46D2380
Issued: May 2012
Made in China
Fabriqué en Chine
Hecho en China
Printed China
La Chine imprimée
China impresa
Haier America
New York, NY 10018
©2012 Haier America Trading, LLC.
Page 37

Télévision à DEL
Manuel de l'utilisateur
MODÈLES:
LE32D2320
LE39D2380
LE42D2380
LE46D2380
UNE VIE PLUS INTELLIGENTE UNE MEILLEURE PLANÈTE
Page 38

Page 39

Energy Star
Le réglage par défaut de ce produit est conforme aux directives du programme
ENERGY STAR et cette configuration permettra d'atteindre des économies d'énergie.
Toute modification du réglage de l'image par défaut et toute activation d'autres
fonctions augmenteront la consommation électrique, qui pourrait alors dépasser la
limite autorisée par les directives de conformité au programme ENERGY STAR.
Symboles DÉFINITION DU SYMBOLE
TENSION DANGEREUSE : Le symbole de l’éclair avec la
flèche dessinée à l’intérieur d’un triangle avertit l’utilisateur de
la présence de « tension dangereuse » non isolée au sein du
SA 1965
SA 1966
logement du produit qui peut avoir une amplitude suffisante
pour constituer un risque de choc électrique aux personnes.
INSTRUCTIONS :Le point d’exclamation dessiné à l’intérieur
d’un triangle avertit l’utilisateur de la présence d’importantes
instructions d’opération et d’entretien (réparation) dans la
documentation accompagnant l’appareil.
Français
L’appareil ne doit pas être exposé à la pluie ou aux éclaboussures et aucun objet
rempli de liquide, tel qu'un vase, ne doit être placé sur le dessus de l’appareil.
Danger d’explosion si la pile n’est pas correctement remplacée. Ne remplacez
qu’avec le même type ou équivalent.
Avertissement d’installation des piles
Danger d’explosion si la pile n’est pas correctement remplacée. Ne remplacez
qu’avec le même type ou équivalent.
Les piles (bloc-pile ou piles installées) ne doivent pas être exposées à une chaleur
excessive, telle que les rayons directs du soleil, du feu ou toute autre source de
chaleur.
1
Page 40

POUR VOTRE SÉCURITÉ
Avant de faire fonctionner le téléviseur veuillez lire soigneusement ce manuel. Ce manuel
doit être conservé pour toute référence ultérieure.
Déclaration concernant les interférences de fréquences radio
FCC de classe B
ATTENTION :
(POUR LES MODÈLES CERTIFIÉS FCC)
REMARQUE :
périphérique numérique de Classe B, conformément à la Section 15 du règlement de
la FCC. Ces limites sont conçues pour fournir une protection raisonnable contre les
interférences néfastes en installation résidentielle. Cet équipement génère, utilise et
peut émettre une énergie en radiofréquence et, s’il n’est pas installé et utilisé selon les
instructions, il peut entraîner des interférences nuisibles aux communications radio.
Cependant, il n’y a aucune garantie que des interférences ne se produiront pas dans
une installation particulière. Si cet appareil occasionne des interférences néfastes sur
la réception radio ou télévisée, ce qui peut se déterminer en éteignant l’appareil et en
le rallumant, l’utilisateur est encouragé à essayer de corriger l’interférence par une ou
plusieurs des mesures suivantes :
1. Réorientez ou déplacez l’antenne réceptrice.
2. Augmentez la distance entre l’appareil et le récepteur.
3. Branchez l’appareil dans une prise de courant sur un circuit différent de celui
auquel le récepteur est branché.
4. Consultez le revendeur ou un technicien radio/télévision expérimenté pour de
l’aide.
Cet équipement a été testé et est conforme aux limitations pour un
AVIS
1. Toute modification non expressément approuvée par la partie responsable de la
conformité peut annuler le droit pour l’utilisateur de faire fonctionner cet appareil.
2. Des câbles d’interface et le cordon d’alimentation CA blindés, s’il y a lieu, doivent
être utilisés afin de se conformer avec les limites sur les émissions.
3. Le fabricant n’est pas responsable pour toutes interférences radio ou TV causées
par une modification non autorisée à cet équipement. C’est la responsabilité de
l’utilisateur que de corriger ladite interférence.
ATTENTION :
Pour éviter des risques d’incendies ou d’électrochocs, n’exposez pas le poste à la pluie
ou l’humidité. Des tensions dangereusement hautes sont présentes à l’intérieur du
moniteur. N’ouvrez pas le boîtier. Les réparations doivent uniquement être confiées au
personnel qualifié.
2
Page 41

PRÉCAUTIONS ET RAPPELS
Placez l’appareil sur des
surfaces planes.
Débranchez immédiatement
s’il y a un mauvais
fonctionnement comme pas
d’images, pas de vidéo/audio,
fumée et mauvaise odeur
du téléviseur.
Ne jetez aucun objet
à l’intérieur du boîtier
du téléviseur, comme
des métaux ou d’autres
matériaux inflammables.
Débranchez immédiatement
si un élément extérieur est
tombé dans le téléviseur ou
si le téléviseur est tombé.
Empêchez/Évitez l'ouverture
du poste de télévision.
Rappelez-vous de
débrancher le cordon
d’alimentation CA de la
prise électrique CA avant
le nettoyage. N’utilisez pas
de nettoyants liquides ou de
nettoyants en aérosols pour
nettoyer l’écran.
Ne couvrez pas ou ne
bloquez pas les orifices ou
les évents. Une ventilation
inadéquate peut raccourcir
la durée de vie de votre
téléviseur et causer de la
surchauffe.
Évitez les radiations solaires
directes, la poussière, et les
zones à humidité élevée et
les espaces enfumées
.
Faites appel à un centre
de service pour nettoyer
l’intérieur de la télévision
une fois par an.
Français
Ne mettez pas votre
téléviseur dans des espaces
confinés ou dans un boîte
quand vous l’utilisez.
Notice pour la télécommande
Évitez de la faire tomber!
3
2
1
6
5
4
9
8
7
0
Assurez-vous de débrancher
l’appareil quand vous ne
l’utilisez pas pendant une
longue période de temps
(jours).
Évitez de renverser des liquides
3
2
1
6
5
4
9
8
7
0
3
Ne placez pas l’écran à
proximité d’eau, telle qu’une
baignoire, un lavabo, un
évier de cuisine, un bac
à laver, une piscine ou un
sous-sol humide.
Évitez des nettoyants en
aérosols
3
2
1
6
5
4
9
8
7
0
Page 42

CONSIGNES DE SÉCURITE IMPORTANTES
Lisez avant de faire fonctionner cet équipement
1. Lisez ces instructions.
2. Conservez ces instructions.
3. Soyez attentif à tous les avertissements.
4. Suivez toutes les instructions.
5. N’utilisez pas cet appareil à proximité d’une source d’eau.
6. Nettoyez qu’avec un chiffon sec.
7. Ne bloquez pas les orifices d’aération. Installez conformément aux instructions du
fabricant.
8. N’installez pas l’appareil à proximité de sources de chaleur comme des radiateurs,
des registres de chaleur, des fours ou d’autres appareils (notamment des
amplificateurs) qui produisent de la chaleur.
9. Ne désactivez pas l’objectif de la prise polarisée ou de type de mise à la terre. Une
prise polarisée comporte deux lames dont l’une plus large que l’autre Une prise
de type mise à la terre comporte deux lames et une troisième broche de mise à
la terre. Une fiche de type mise à la masse possède deux lames et une troisième
de mise à la masse. La lame plus large ou la troisième broche est fournie pour
votre sécurité. Si la fiche fournie ne s'insère pas dans la prise murale, consultez un
électricien pour le remplacement de la prise désuète.
10. Protégez le cordon d’alimentation de sorte qu’on ne risque pas de marcher dessus
ni de le pincer, spécialement au niveau des prises, des prises d’alimentation et au
point de sortie de l’appareil.
11. N’utilisez que les équipements/accessoires spécifiés par le fabricant.
12. N’utilisez cet appareil qu’avec le chariot, le pied, le trépied, le support ou la table
recommandé par le fabricant ou vendu avec l’appareil. Quand un chariot est utilisé,
soyez prudent en déplaçant l’ensemble chariot/appareil pour éviter toute blessure
pouvant résulter de culbutes.
13. Le téléviseur doit être utilisé qu'avec le type de source d'alimentation indiqué sur
l'étiquette. Si vous n’êtes pas sûr(e) du type d’alimentation électrique chez vous,
consultez votre revendeur ou votre fournisseur local.
14. Débranchez cet appareil lors d’orages ou quand vous ne l’utilisez pas durant des
périodes prolongées.
15. Référez tout l’entretien à du personnel d’entretien qualifié. Une réparation est
nécessaire lorsque l’appareil a été endommagé de quelque façon que ce soit,
comme des dommages au cordon d’alimentation, du liquide renversé ou des objets
tombés à l’intérieur de l’appareil, l’appareil a été exposé à la pluie ou l’humidité, il ne
fonctionne pas normalement ou il est tombé.
16. Connexion avec mise à la terre de classe I – « Les appareils de classe I doivent être
branchés à une prise électrique dotée d’une mise à la terre. »
4
Page 43

17. Disjoncteur – prise électrique ou coupleur installé sur l’appareil – « La prise
électrique ou le coupleur installé sur l’appareil sert à déconnecter l’appareil. Ce
dispositif doit être gardé en état de fonctionnement. »
18. Disjoncteur – interrupteur électrique tous pôles – « Un interrupteur électrique
tous pôles sert à déconnecter l’appareil. Cet interrupteur doit être gardé en état de
fonctionnement. »
19. Instructions de maintenance – « AVERTISSEMENT – Ces instructions de
maintenance sont à consulter uniquement par du personnel qualifié. Pour réduire
les risques de choc électrique, n'effectuez aucune opération de maintenance autre
que celles contenues dans le guide de l'utilisateur à moins que vous ne soyez qualifié
pour le faire. »
20. Support de montage mural – À n’utiliser qu’avec un support de montage mural
certifié UL et supportant un poids/une charge minime indiqués en : page 31.
21. ALERTE AU CONSOMMATEUR – Ce téléviseur n’est doté que d’un syntoniseur
analogique et nécessitera un décodeur après le 12 juin 2009 afin de recevoir les
émissions hertziennes à l’aide d’une antenne, car les diffuseurs nationaux passeront à
une transmission numérique à cette date. Les téléviseurs exclusivement analogiques
devraient continuer à fonctionner comme auparavant avec les services du câble
et du satellite, les consoles de jeu, les magnétoscopes, les lecteurs DVD et les
autres produits similaires. Pour plus d’informations, appelez la Commission des
Communications Fédérales au 1-888-225-5322 (ATS : 1-888-835-5322) ou visitez le
site Web de la télévision numérique de la Commission au : www.DTV.gov.
Renseignements concernant la transition à la télévision numérique – depuis le 12
juin 2009, un téléviseur doté exclusivement d’un syntoniseur analogique nécessitera
un convertisseur pour recevoir l’ensemble des émissions hertziennes avec une
antenne, car les diffuseurs nationaux passeront à une transmission numérique à
partir de cette date. Les téléviseurs exclusivement analogiques devraient continuer
à fonctionner comme auparavant avec les récepteurs de faible puissance, de classe
A ou des stations de télévision analogiques et avec les services du câble et de
satellite, les consoles de jeux, les magnétoscopes, les lecteurs DVD et les autres
produits similaires. Pour plus d’informations à propos de la transition à la télévision
numérique, consultez le site Web http://www.DTV.gov ou appelez au 1-888-CALLFCC, ou encore consultez le site http://www.dtv2009.gov ou appelez le 1-888-DTV2009 pour plus d’informations à propos des coupons subventionnés pour l’achat de
convertisseurs numériques-analogiques.
22. Pivotement/Stabilité – Toutes les télévisions doivent se conformer aux normes
de sécurité internationales recommandées pour les propriétés d’inclinaison et de
stabilité de la conception de leurs boîtiers.
●Ne transigez pas avec ces normes de design en appliquant une force de traction
excessive au devant, ou au sommet, du boîtier, ce qui pourrait bel et bien retourner
le produit.
●Aussi, ne vous mettez pas en danger, ou les enfants, en plaçant de l’équipement
électronique /jouets sur le dessus du boîtier. Lesdits éléments pourraient
de manière imprévue tomber du haut du poste de télévision et causer des
dommages au produit et/ou des blessures personnelles.
Français
5
Page 44

23. Montage mural ou au plafond – L’appareil ne doit jamais être monté sur un mur ou
SYSTEME D’ ELECTRODE DE MISE A LA TERRE DU SERVICE D’ALIMENTATION
un plafond sans suivre les conseils du fabriquant.
24. Lignes électriques – Une antenne extérieure devrait être située loin des lignes
électriques.
25. Mise à la terre d'une antenne extérieure – Si une antenne extérieure est branchée
au récepteur, assurez-vous que l’antenne est mise à la terre en guise de protection
contre des surtensions et des charges statiques accumulées. La section 810 du code
national électrique (NEC) fournit des informations relatives à une bonne mise à la
terre de la masse et une bonne structure de soutien, la mise à la terre du fil d’entrée
à une unité de décharge d’antenne, la section des conducteurs de mise à la terre, la
disposition d’une unité de décharge d’antenne, la connexion aux câbles de terre et
les conditions concernant le câble de terre. Consultez la figure ci-dessous.
ANTENNE
PINCE DE MISE A LA TERRE
EQUIPEMENT DE SERVICE
ELECTRIQUE
PINCES DE MISE A LA TERRE
UNITE DE DECHARGE
D’ANTENNE
PRISES DE TERRE
EXEMPLE DE MISE À LA MASSE DE L'ANTENNE SELON LE
CODE NATIONAL ÉLECTRIQUE
Note à l'installateur du système de télédistribution : Ce rappel est donné pour
attirer l’attention des installateurs du système de câblodistribution sur l’Article 82040 du code national électrique (NEC) qui fournit des instructions sur une bonne
mise à la terre et spécifie en particulier que le câble de terre sera correctement
branché au système de mise à la terre du bâtiment ou aussi près que possible de
l’entrée du câble. Veuillez brancher la fiche d’alimentation à la prise murale après
avoir raccordé le téléviseur au cordon d’alimentation!
26. L’appareil ne doit pas être exposé à la pluie ou aux éclaboussures et aucun objet
rempli de liquide, tel qu'un vase, ne doit être placé sur le dessus de l’appareil.
27. Déclaration indiquant que les appareils de Classe I doivent être raccordés à une
prise électrique reliée à la terre.
28. L’appareil ne doit pas être exposé à la pluie ou aux éclaboussures et aucun objet
rempli de liquide, tel qu'un vase, ne doit être placé sur le dessus de l’appareil.
29. Déclaration indiquant que, lorsque le coupleur de l’appareil ou sa prise électrique
sert d’interrupteur pour l’appareil, il doit toujours rester fonctionnel.
30. L’interrupteur de l’appareil ou sa prise électrique sert d’interrupteur pour l’appareil.
Il doit donc toujours rester fonctionnel.
31. Lorsqu’un interrupteur électrique tous pôles sert à déconnecter l’appareil,
l’emplacement de l’appareil et la fonction de l’interrupteur doivent être décrits et
l’interrupteur doit être gardé en état de fonctionnement.
6
Page 45

CONSERVEZ CES
INSTRUCTIONS
Merci d’avoir acheté cet appareil Haier. Ce manuel vous aidera à obtenir le meilleur rendement
de votre téléviseur. N’oubliez pas d'inscrire le numéro de modèle et le numéro de série du
téléviseur. Ils sont indiqués sur l'étiquette collée au dos de l’appareil.
Numéro de modèle
Français
Numéro de série
Date d'achat
Brochez votre reçu au manuel. Vous en aurez besoin pour obtenir une réparation
dans le cadre de la garantie.
7
Page 46

TABLE DES MATIÈRES
POUR VOTRE SÉCURITÉ ........................................................................ 2
PRÉCAUTIONS ET RAPPELS ................................................................. 3
CONSIGNES DE SÉCURITE IMPORTANTES .................................... 4
PREPARATION ...........................................................................................9
FIXATION DE LA BASE ................................................................................9
PRÉPARATION DE VOTRE TVHD LCD POUR UN MONTAGE
MURAL ...............................................................................................................9
GUIDE DE CONNEXION DES PÉRIPHÉRIQUES .......................... 11
INSTRUCTIONS D’UTILISATION......................................................13
À L'AIDE DU PANNEAU DE COMMANDE ARRIÈRE ....................... 13
UTILISATION DE LA TÉLÉCOMMANDE .............................................. 14
INITIAL SETUP (INSTALLATION INITIALE) ........................................ 16
SOURCE D'ENTRÉE .................................................................................... 17
VIDEO (VIDÉO) ............................................................................................ 18
AUDIO ............................................................................................................ 20
TV ..................................................................................................................... 21
PARAMÈTRES ................................................................................................ 21
PARENTAL .................................................................................................... 23
MEDIA (MÉDIA) ........................................................................................... 26
CONSEILS ...................................................................................................... 28
CARACTERISTIQUES DU PRODUIT ................................................30
DÉPANNAGE ...........................................................................................32
GLOSSAIRE ............................................................................................... 33
GARANTIE ................................................................................................34
8
Page 47
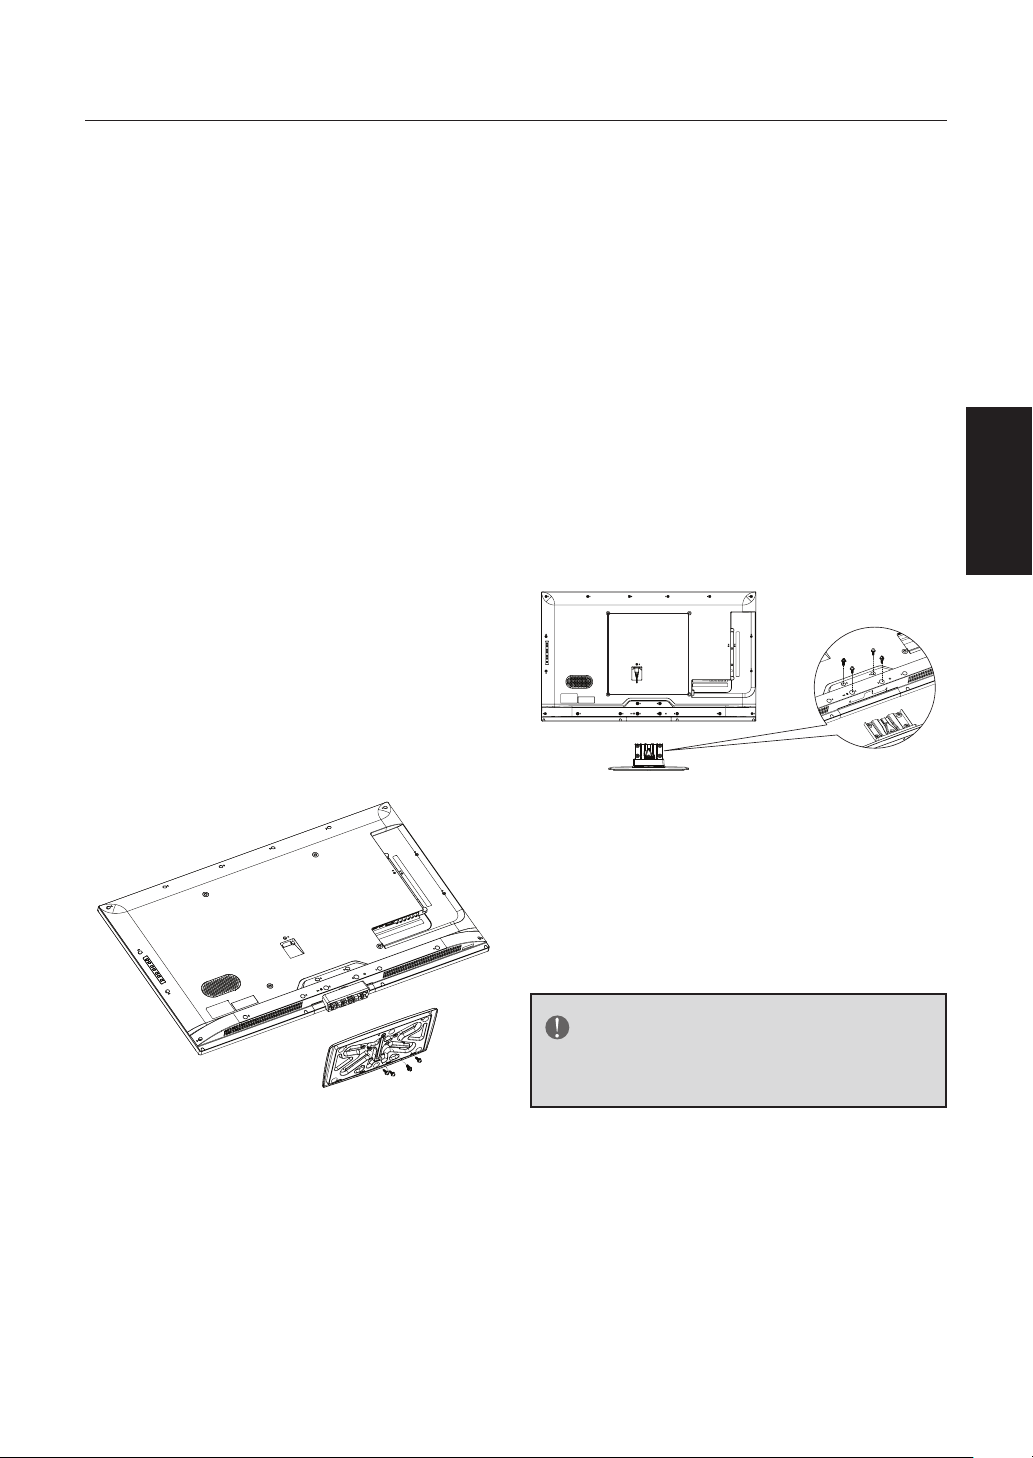
PREPARATION
IMPORTANT : N’appliquez pas de
pression sur la zone de l’écran car
cela peut compromettre l’intégrité
de l’écran. La garantie du fabricant ne
couvre pas les abus de l’utilisateur ou
les installations mal faites.
FIXATION DE LA BASE
IMPORTANT :
être assemblée avant toute utilisation.
1. Placez le téléviseur face vers le
bas sur une surface plane et douce
(couverture, mousse, chiffon, etc.)
afin de prévenir tout dommage au
TVHD.
2. Alignez soigneusement et insérez la
base au pied.
3. Poussez doucement la base vers le
TVHD jusqu’à ce que le mécanisme
de verrouillage s’enclenche.
La base du TVHD doit
Avant de monter votre téléviseur sur le
mur, vous avez besoin de retirer la base.
À n’utiliser qu’avec un support
de montage mural certifié UL et
supportant au minimum le poids du
téléviseur sans sa base. (veuillez vous
référer à la page 31).
Pour fixer un support de montage
mural à votre téléviseur :
1. Retirez les vis retenant le téléviseur
au pied.
2. Retirez la base du téléviseur.
3. Fixez le support mural à l'arrière
de votre téléviseur au moyen de
quatre vis.
Français
4. Fixez la base à l'aide des vis fournies.
PRÉPARATION DE VOTRE
TVHD LCD POUR UN
MONTAGE MURAL
Nous suggérons de garder votre
téléviseur à au moins 2,36 pouces
(60 mm) du mur pour éviter toute
interférence entre les câbles.
• LE32D2320 : 200 x 100 mm; 4 x 10 mm
métrique
• LE39D2380 : 200 x 200 mm; 6 x 10 mm
métrique
• LE42D2380/LE46D2380; 400 x 400 mm,
6 x 10 mm métrique
REMARQUE
Le support de montage mural et les
vis ne sont pas fournis.
9
Page 48

1. Installez le pied; placez le
téléviseur sur une surface
solide.
Min
1 m
HTR- D09B
HTR- D09B
Assurez-vous que le téléviseur
est placé dans une position qui
permette un flux d’air libre.
Ne couvrez pas les ouvertures
d’aération au dos de l’appareil.
Afin de prévenir toutes situations
non sûres, aucune source de
flammes nues, telles que des
bougies allumées, devraient être
placées dessus ou à proximité.
Évitez toute exposition à la chaleur,
à la lumière directe du soleil ainsi
qu’à la pluie ou à l’eau. L’équipement
ne doit pas être exposé à des fuites
d’eau ou à des éclaboussures.
2. Raccordez le câble de l’antenne ou
le câble CATV à la prise d’antenne
ANT IN 75Ω à l’arrière du
téléviseur.
4. Alimentation :
Insérez le cordon d’alimentation
dans une prise électrique murale.
5. Mettez le téléviseur sous
tension :
Appuyez sur le bouton
ALIMENTATION de la
télécommande ou du panneau
de contrôle situé sur le côté du
téléviseur.
Touche alimentation
ZOOM
3. Télécommande :
Retirez le couvercle du
compartiment des piles. Insérez les
2 piles fournies (Type AAA 1,5 V).
10
Page 49

GUIDE DE CONNEXION DES PÉRIPHÉRIQUES
Français
1 2
PC IN
VGA
AV / Y
COMPONENT / AV IN
Pr L R
Pb
USB
3
ANTENNA
COAX OUT
PC AUDIO
11
Page 50

1. HDMI – Raccordez la source principale de vidéo numérique tel qu’un lecteur
multimédia de DVD ou un décodeur à ce connecteur numérique.
2. PC IN/PC AUDIO (ENTRÉE/AUDIO PC) – Raccordez ici les câbles
vidéo et audio d’un ordinateur.
3. AV IN (ENTRÉE AV) – Raccordez ici la source d’entrée pour les dispositifs
vidéo composite tels qu’un magnétoscope ou une console de jeu vidéo.
Utilisez les connecteurs rouge et blanc pour raccorder l’audio externe de la
même source.
4. COMPOSANT (Y/Pb/Pr avec Audio L/R) – Raccordez ici la source
principale pour les dispositifs vidéo composant tels qu’un lecteur de DVD
ou un décodeur. Utilisez le câble rouge pour l’entrée Pr, bleu pour l’entrée
Pb, vert pour l’entrée Y, et le câble audio rouge pour l’entrée droite (R) et le
blanc pour l’entrée gauche (L).
5. ANTENNE (CÂBLE NUMÉRIQUE OU ANALOGIQUE) – Raccordez
à une antenne ou à un câble numérique (du mur, pas du décodeur numérique).
6. SORTIE COAXIALE – Quand un signal audio numérique est associé avec
l’entrée choisie pour le visionnement, l'audio numérique sera disponible sur
cette connexion COAX OUT vers votre cinéma maison.
7. PORT USB – Insérez une clé USB dans le port USB pour afficher vos photos
JPEG/BMP ou écouter de la musique en format MP3. (Veuillez consulter les
pages 26 et 27 pour de plus amples renseignements.)
8. Sortie casque – Raccordez des écouteurs. Une fois les écouteurs raccordés,
les haut-parleurs intégrés du téléviseur sont désactivés.
Une fois que votre équipement est connecté, utilisez la procédure suivante pour
visionner le signal d’entrée :
Appuyez sur le bouton correspondant de la télécommande pour sélectionner la
source désirée.
(ex : appuyez sur le bouton INPUT pour sélectionner l'entrée « Composante » si
vous avez branché un lecteur DVD à l'entrée Composante.)
12
Page 51

INSTRUCTIONS D’UTILISATION
À L'AIDE DU PANNEAU DE COMMANDE ARRIÈRE
1
2
3
4
5
Français
6
7
1. VOL +
2. VOL -
3. CH
4. CH
5. MENU
6. INPUT
7.
▲
▼
POWER
Appuyez sur ce bouton pour augmenter le niveau du
volume du son.
Appuyez sur ce bouton pour diminuer le niveau du volume
du son.
Appuyez sur ce bouton pour passer au canal supérieur.
Appuyez sur ce bouton pour passer au canal inférieur.
Appuyez sur ce bouton pour ouvrir ou quitter le menu de
l’OSD.
Appuyez sur ce bouton pour sélectionner la source
d’entrée.
Appuyez sur ce bouton pour allumer / éteindre (mettre en
veille) le téléviseur.
13
Page 52

UTILISATION DE LA TÉLÉCOMMANDE
Power (Alimentation)
Appuyez sur ce bouton
pour mettre le téléviseur
sous/hors tension (en
veille).
Remarque : Le téléviseur
n'est jamais complètement
hors tension à moins
d'être physiquement
débranché.
PICTURE (IMAGE)
Appuyez sur ce bouton
pour changer le mode
d'image.
AUDIO
Appuyez sur ce bouton
pour changer le mode
audio.
ZOOM
Appuyez sur ce bouton
pour changer le mode
d'affichage : Normal, Large,
Cinéma, Zoom.
CCD (Dispositif de soustitrage)
Appuyez sur ce bouton
pour changer de type
de sous-titrage : Soustitrage activé/ Sous-titrage
désactivé/ Sous-titrage
activé en muet.
MTS/SAP
Appuyez sur ce bouton
pour changer le son :
SAP, Stéréo, Mono pour
un téléviseur NTSC,
ou changer la langue
audio pour en mode de
télévision numérique.
ZOOM
FREEZE
SLEEP (VEILLE)
Appuyez sur ce bouton
pour régler la minuterie
de mise en veille
(désactivé/ 10 minutes/
20 minutes/30 minutes/
40 minutes/50 minutes/
60 minutes/90 minutes/
120 minutes).
0 ~ 9 / • numéro
Appuyez sur ces boutons
pour entrer le numéro du
canal(appuyezsur‘•’pour
choisir le sous-canal).
INPUT (ENTREE)
Appuyez sur le bouton
« ENTRÉE » pour afficher
la liste des sources.
MENU
Appuyez sur ce bouton
pour ouvrir ou quitter le
menu.
MUTE (MUET)
Appuyez sur ce bouton
pour éteindre/activer le
son.
CH+ / CH -
• Lorsque le menu est à
l'écran :
Appuyez sur les boutons
CH+ ou CH- pour
naviguer vers le haut ou
vers le bas.
• Lorsque le menu n'est
pas affiché :
Appuyez sur les boutons
CH+ ou CH- pour faire
défiler les canaux de
télévision.
14
Page 53

• Multiplex HAUT/BAS Fonction CH +/-.
VOL+ / VOL-
• Lorsque le menu est à l'écran :
Appuyez sur les boutons VOL+ ou
VOL- pour naviguer vers la droite ou la
gauche.
• Lorsque le menu n'est pas affiché :
Appuyez sur les boutons VOL+ ou VOLpour régler le volume.
ENTER (ENTRER)
Appuyez sur ce bouton pour confirmer
une sélection.
EXIT (QUITTER)
Appuyez sur ce bouton pour quitter le
menu ou l’OSD.
RECALL (RETOUR)
Appuyez sur ce bouton pour afficher le
canal de télévision précédent.
DISPLAY (AFFICHAGE)
Appuyez sur ce bouton pour afficher
les informations concernant la source
d’entrée, le canal, la résolution
d’affichage et l’heure actuelle.
Appuyez trois fois sur « Display »
(Affichage) sous la source TV; lorsque
le menu OSD disparaît, appuyez sur les
boutons HAUT/BAS pour changer le
canal.
FREEZE (FIGER)
Appuyez sur ce bouton pour figer
l’image affichée.
activer ou quitter le mode multimédia
USB.
PLAY/PAUSE (LECTURE/PAUSE)
Appuyez sur ce bouton pour activer/
mettre en pause la lecture de la source
Multimédia.
STOP
Appuyez sur ce bouton pour arrêter la
lecture de la source Multimédia.
REPEAT (RECOMMENCER)
Appuyez sur ce bouton pour activer/
désactiver le mode de répétition en
mode Musique.
REV (RET. RAP.)
Appuyez sur ce bouton pour revenir
rapidement en arrière dans le fichier
MP3 en mode Musique.
FWD (AV. RAP.)
Appuyez sur ce bouton pour avancer
rapidement en avant dans le fichier
MP3 en mode Musique.
PREV (PRÉC)
Appuyez sur ce bouton pour afficher la
photo précédente dans le diaporama.
Appuyez sur ce bouton pour lire le
morceau précédent en mode Musique.
Appuyez sur ce bouton pour revenir
au mode miniature lors de la lecture
du premier fichier dans le répertoire
courant.
Français
FAVORITE (FAVORIS)
Appuyez sur ce bouton pour afficher la
liste des canaux favoris.
CH.LIST (LISTE DES CANAUX)
Appuyez sur ce bouton pour afficher la
liste des canaux.
Pour une utilisation multimédia
seulement.
USB
Appuyez sur le bouton USB pour
NEXT (SUIVANT)
Appuyez sur ce bouton pour afficher
la photo suivante dans le diaporama.
Appuyez sur ce bouton pour lire le
morceau suivant dans l'application
MP3 MusicBox. Appuyez sur ce bouton
pour revenir au mode miniature lors
de la lecture du dernier fichier dans le
répertoire courant.
15
Page 54

IINITIAL SETUP
(INSTALLATION INITIALE)
Welcome (Bienvenue)
Bienvenue à l'assistant de la
configuration initiale!
Veuillez appuyer sur le bouton [ENTER]
pour démarrer l'assistant.
Initial Setup
Please select your time zone:
NEW
ARIZONA
foundland
CENTRAL
EASTERN
Atlantic
INDIANA
ALASKA
MOUNTAIN
PACIFIC
HAWAII
Back Select Next Exit
Eastern Time
Central Time
Mountain Time
Pacific Time
Time Zone
Alaska
Hawaii
Initial Setup Welcome
Welcome to use the Wizard for Initial Setup!!
Please press [ENTER] to start the wizard.
Language (Langue)
Veuillez sélectionner votre langue avec
les boutons [CH-]/[CH+], puis appuyez
sur [ENTER] pour confirmer :
Initial Setup Language
Please select your language:
English
Español
Français
Tuner Type (Type de syntoniseur)
Veuillez sélectionner votre type de
syntoniseur avec les boutons [CH-]/
[CH+], puis appuyez sur [ENTER] pour
confirmer :
Initial Setup Tuner
Please select your tuner mode:
Antenna
Cable
Back Select Next Exit
1. Antenna (Antenne) : Si vous avez
branché une antenne. Le téléviseur
peut alors recevoir des signaux de
télévision analogiques et numériques
(ATSC).
Back Select Next Exit
Time Zone (Fuseau horaire)
Veuillez sélectionner votre fuseau
horaire avec les boutons [CH-]/[CH+],
puis appuyez sur [ENTER] pour
confirmer :
2. Cable (Câble) : Si vous êtes
branché au câble. Le téléviseur
peut alors recevoir des signaux de
télévision analogiques et QAM.
Scan (Balayage)
Veuillez sélectionner Balayer ou Ignorer
le balayage avec les boutons [CH-]/
[CH+], puis appuyez sur [ENTER] pour
confirmer :
16
Page 55

Initial Setup Channel Scan
First, please connect cable and/or antenna.
Start channel scan now ?
If you skip this step,the channel scan could be performed in Menu.
Scan
Skip Scan
SOURCE D'ENTRÉE
Source Select
TV
Composite
Component
Back Select Next Exit
Initial Setup Channel Scan
The Channel Scan may take a while to complete.
Status:Scanning..
Analog Channels:0
Digital Channels:0
MENU
Cancel
1. Scan (Balayer) : Recherche
automatique des canaux.
2. Skip Scan (Ignorer le
balayage) : Ignorer la recherche
des canaux et passer à l'interface
complète.
Complete (Terminé)
5%
Exit
VGA
HDMI 1
HDMI 2
HDMI 3
USB
Appuyez sur le bouton INPUT pour
afficher la liste des sources d'entrée,
puis appuyez sur les boutons [CH-]/
[CH+] pour sélectionner la source et
sur ENTER pour confirmer.
Utilisation de la télécommande
pour afficher les menus à l'écran
et naviguer dedans
Français
Initial Setup Complete
Congratulations!!
Completed Initial Setup.
Please press [ENTER] to exit the wizard.
Back
1. Appuyez sur le bouton [MENU]
pour afficher le menu à l'écran ou
pour remonter d'un niveau dans
le menu. Dans le menu du niveau
supérieur, appuyez sur le bouton
MENU pour quitter le menu.
2. Appuyez sur les boutons [VOL-]
ou[VOL+] pour mettre en
surbrillance l'icône souhaitée.
Appuyez sur [ENTER] pour
sélectionner ce menu.
3. Utilisez les boutons [CH+] ou [CH-]
pour faire défiler les options vers le
haut ou vers le bas.
17
Page 56

4. Suivez les instructions à l'écran.
5. Appuyez sur le bouton [EXIT] pour
quitter immédiatement le menu.
Appuyez une fois sur ce
bouton pour afficher le menu
à l'écran et appuyez à nouveau
pour revenir à l'affichage
normal. Si vous n'avez appuyé
sur aucun bouton, le menu se
ferme automatiquement après
environ 60 secondes.
Pour quitter les menus : appuyez sur
le bouton [EXIT] (ou sur le bouton
[MENU])
VIDEO (VIDÉO)
Picture Mode Energy Saving
Brightness
Video
Contrast
Saturation
Audio
Tint
TV
Sharpness
Setup
Parental
1. Picture Mode (Mode Image) :
Utilisez les boutons [CH-] ou [CH+]
pour mettre en surbrillance l'une
des options suivantes, puis appuyez
sur le bouton [ENTER] pour entrer
dans le sous-menu et utilisez les
boutons [VOL-] ou [VOL+] pour
effectuer le réglage.
[Energy Saving] (Économie
d'énergie) – Paramètres d'image qui
économisent le plus d'énergie.
[Mild] (Doux) – Ajuste les niveaux
de luminosité et de contraste, et
abaisse la netteté pour obtenir une
image plus douce.
[Standard] – Permet de
sélectionner une image
de configuration standard.
Recommandé pour le
divertissement à domicile.
[Bright Room] (Pièce
lumineuse) – Permet d'augmenter
la luminosité de l'image.
50
50
50
0
10
SelectEnter Exit
[User] (Personnalisé) – Vous
permet de conserver vos propres
paramètres.
Remarque : Toute modification
des paramètres ci-dessous
changera automatiquement la
configuration au Mode d'image
personnalisé.
2. Brightness (Luminosité) :
Réglage de la luminosité de l'image.
Appuyez sur le bouton [
VOL-] pour
assombrir l'image. Appuyez sur
le bouton [VOL+] pour éclaircir
l'image.
3. Contrast (Contraste) : Réglage
du niveau des blancs de l’image.
Appuyez sur le bouton [VOL-] pour
diminuer le contraste. Appuyez sur
le bouton [VOL+] pour augmenter
le contraste.
4. Saturation : Réglage de l’intensité
des couleurs de l’image. Appuyez sur
le bouton [VOL-] pour diminuer la
saturation des couleurs. Appuyez sur
le bouton [VOL+] pour augmenter
la saturation des couleurs.
5. Tint (Teinte) : Réglage de la
position verticale de l’image.
Appuyez sur le bouton [VOL-]
pour augmenter les tons rouges.
Appuyez sur le bouton [VOL+]
pour augmenter les tons verts.
6. Sharpness (Netteté) : Réglage
de la netteté de l'image. Appuyez
sur le bouton [VOL-] pour adoucir
l'image. Appuyez sur le bouton
[VOL+] pour accentuer la netteté
de l'image.
7. Color Temperature
(Température des couleurs) :
Utilisez les boutons [CH-] ou
[CH+] pour mettre en surbrillance
l'une des options suivantes, puis
appuyez sur le bouton [ENTER]
pour entrer dans le sous-menu
et utilisez les boutons [VOL-] ou
[VOL+] pour effectuer le réglage.
18
Page 57

[Cool] (Froid) – Donne à la
couleur blanche une teinte bleutée.
[Standard] – Donne à la couleur
blanche une teinte neutre.
[Warm] (Chaud) – Donne
à la couleur blanche une teinte
rougeâtre.
DNR
Video
Audio
TV
Setup
Parental
Off Low Strong Auto
MPEG NR
Adaptive Luma Control
Adaptive Back Light
Film Mode
Medium
1. Advanced Video (Vidéo
avancée) : Utilisez les boutons
[CH-] ou [CH+] pour mettre
en surbrillance l'une des options
suivantes, puis appuyez sur le
bouton [ENTER] pour entrer dans
le sous-menu et utilisez les boutons
[VOL-] ou [VOL+] pour effectuer
le réglage.
[DNR] – Réduction numérique
du bruit. Nettoyez le signal de
télévision analogique en réduisant
le bruit des points à l'écran. (Cette
fonction n'est pas disponible avec
les sources PC ou multimédia.)
[MPEG NR] – Comme avec la
fonction DNR, vous pouvez réduire
le bruit des blocs.
[Adaptive Luma Control]
(Contrôle adapté de la
luminance) – Changez de façon
dynamique la luminosité et le
contraste en fonction de la quantité
de lumière et d'obscurité du signal.
[Adaptive Back Light]
(Rétroéclairage adapté) –
Changer de façon dynamique
le rétroéclairage de l'écran en
fonction de la quantité de lumière
et d'obscurité du signal.
Low
Medium
Off
Auto
MENU
Select Back
[Film Mode] (Mode film) –
Conversion de la fréquence d'image
au format du film pour éviter le
clignotement du signal.
[VGA Mode] (Mode VGA) –
Graphique/Vidéo (cette fonction
est disponible uniquement en mode
VGA).
• Graphic (Graphique) : Dans ce mode,
les images sont plus douces et le texte
est plus clair. Il s'agit de la valeur par
défaut.
• Video (Vidéo) : Dans ce mode, les
images sont plus nettes. Sélectionnez ce
mode pour regarder des vidéos à partir
d'un ordinateur.
[HDMI Mode] (Mode HDMI)
– Auto/
Video (Vidéo)
Graphic (Graphique)
(cette fonction est
/
disponible uniquement en mode
HDMI).
• Auto : Sélectionne automatiquement le
mode Vidéo/Graphique.
• Graphique : Dans ce mode, les images
sont plus douces et le texte est plus
clair. Sélectionnez ce mode pour
connecter un ordinateur.
• Vidéo : Dans ce mode, les images sont
plus nettes. Sélectionnez ce mode
pour regarder des vidéos à partir d'un
ordinateur ou pour connecter un
lecteur vidéo, tel qu'un lecteur DVD, un
lecteur Blu-ray, etc.
2. VGA :
[Auto Adjust] (Réglage auto) –
Règle automatiquement les réglages
de Position H./Position V./Phase/
Horloge. Sélectionnez cette option
lorsque l'image ne remplit pas tout
l'écran.
[H.Position] (Position H.) –
Réglage de la position horizontale
de l'image.
[V.Position] (Position V.) –
Réglage de la position verticale de
l'image.
Français
19
Page 58

[Phase] –Réglage de la phase.
[Clock] (Horloge) – Réglage de
l'horloge.
[Reset Computer settings]
(Réinitialiser les paramètres
de l'ordinateur) – Réinitialise
les valeurs Position H./Position V./
Phase/Horloge.
AUDIO
Sound Mode Standard
Video
Balance
Bass
Treble
Audio
Surround Sound
Digtial Audio Output
TV
Setup
Parental
1. Sound Mode (Mode audio) :
Utilisez les boutons [CH-] ou
[CH+] pour mettre en surbrillance
l'une des options suivantes, puis
appuyez sur le bouton [ENTER]
pour entrer dans le sous-menu
et utilisez les boutons [VOL-] ou
[VOL+] pour effectuer le réglage.
[User] (Personnalisé) – Vous
permet de conserver vos propres
paramètres.
[Standard] – Permet de
sélectionner les paramètres audio
standards. Recommandé pour le
divertissement à domicile.
[Soft] (Doux) – Permet de
sélectionner les paramètres audio
doux.
[Dynamic] (Dynamique)
– Permet de sélectionner les
paramètres audio dynamiques.
Remarque : Toute modification
des paramètres ci-dessous
changera automatiquement la
configuration au Mode audio
personnalisé.
2. Balance : Réglage du niveau de son
provenant des haut-parleurs gauche
et droit. Appuyez sur le bouton
[VOL-] pour changer l'équilibre et
souligner le haut-parleur gauche.
0
50
50
Off
RAW
SelectEnter Exit
Appuyez sur le bouton [VOL+]
pour changer l'équilibre et souligner
le haut-parleur droit.
3. Bass (Basses) : Réglage des sons
basse fréquence. Appuyez sur le
bouton [VOL-] pour diminuer
les basses. Appuyez sur le bouton
[VOL+] pour augmenter les basses.
4. Treble (Aigu) : Réglage des sons
haute fréquence. Appuyez sur le
bouton [VOL-] pour diminuer
les aigus. Appuyez sur le bouton
[VOL+] pour augmenter les aigus.
5. Surround Sound (Son
Surround) :
[Off] – Désactive le son surround.
[On] – Active le son surround.
6. Digital Audio Output (Sortie
audio numérique) :
[Off] – Désactive le connecteur
coaxial ou optique audio.
[RAW] – Sortie au format
d'origine des flux audio.
[PCM] – Le format PCM est
compatible avec la plupart des
amplificateurs audio-vidéo.
Auto Volume Control
Video
Off
Audio
TV
Setup
Parental
On
MENU
Select Back
1. Auto Volume Control
(Contrôle automatique du
volume) : Utilisez les boutons
[CH-] ou [CH+] pour mettre
en surbrillance l'une des options
suivantes, puis appuyez sur le
bouton [ENTER] pour entrer dans
le sous-menu et utilisez les boutons
[VOL-] ou [VOL+] pour effectuer
le réglage.
[Off] – Désactive le contrôle
automatique du volume.
[On] – Active le contrôle
automatique du volume.
20
Page 59

TV
Signal Type Antenna
Video
Auto Channel Search
Audio
Channel Skip
Favorite list
TV
Setup
Parental
SelectEnter Exit
1. Signal Type (Type de signal) :
Utilisez les boutons [CH-] ou
[CH+] pour mettre en surbrillance
l'une des options suivantes, puis
appuyez sur le bouton [ENTER]
pour entrer dans le sous-menu
et utilisez les boutons [VOL-] ou
[VOL+] pour effectuer le réglage.
[Antenna] (Antenne) – Règle
le type de signal à Antenne. Le
téléviseur peut alors recevoir des
signaux de télévision analogiques et
numériques (ATSC).
[Cable] (Câble) – Règle le type
de signal à Câble. Le téléviseur
peut alors recevoir des signaux de
télévision analogiques et QAM.
2. Auto Channel Search
(Recherche auto des canaux) :
Mettez en surbrillance et appuyez
sur le bouton ENTER pour lancer
la recherche de canaux.
3. Channel Skip (Sauter canal) :
Ajout et saut manuel de canaux de
la liste des canaux.
4. Favorite List (Liste des
favoris) : Ajout et saut manuel de
canaux de la liste des canaux favoris.
SETUP (PARAMÈTRES)
Menu Language English
Video
Audio
TV
Setup
Parental
MTS
No Signal Power Off
Blue Screen
Audio Only
Time Setup
Stereo
On
On
SelectEnter Exit
1. Menu Language (Langue du
Menu) : Utilisez les boutons
[CH-] ou [CH+] pour mettre
en surbrillance l'une des options
suivantes, puis appuyez sur le
bouton [ENTER] pour entrer dans
le sous-menu et utilisez les boutons
[VOL-] ou [VOL+] pour effectuer
le réglage.
Définissez la langue d'affichage à
l'écran :
English/Espanol/Français.
2. Aspect Ratio (Format
d’image) : Appuyez sur ce bouton
pour changer le mode d'affichage :
Normal, Wide (Large), Cinema
(Cinéma), Zoom avec un signal
affiché à l'écran.
Remarque :
Brancher la connexion ATSC/
HDMI/COMPONENT à une
résolution 720P/1080I/1080P; la
fonction « Aspect ratio » (Format
de l'image) est réglée au format
large.
3. MTS (Décodeur de son
multicanaux) : Permet de
régler la piste audio des canaux
analogiques. Mono/Stereo (Stéréo)/
SAP.
4. No Signal Power Off (Auto
extinction si aucun signal n'est
détecté) : Lorsque cette option
est activée, le téléviseur s'éteindra
automatiquement si aucun signal
n'est détecté.
5. Blue Screen (Écran bleu) :
Lorsque cette option est activée,
l'écran sera bleu plutôt que noir si
aucun signal n'est détecté.
6. Audio Only (Audio seulement) :
Appuyez sur le bouton [ENTER]
pour couper l'image,et appuyez sur
n'importe quel bouton pour afficher
à nouveau l'image.
7. Time Setup (Réglage de
l'heure) : Réglez le fuseau horaire/
l'heure/ la minuterie de mise en
Français
21
Page 60

veille/la mise en veille automatique.
8. Caption (sous-titrage) : Réglez
l'affichage du sous-titrage/le soustitrage analogique/le sous-titrage
numérique/le style de sous-titrage.
Pour plus de détails, consultez la
page 22.
9. All Reset (Tout réinitialiser) :
Permet de réinitialiser tous les
paramètres à leur valeur par défaut.
Time Setup (Réglage de l'heure)
Time Zone
Video
Audio
TV
Setup
Parental
Time
Sleep Timer
Auto Sleep
Enter
Off
Off
MENU
SelectEnter
Back
1. Time Zone (Fuseau horaire) :
Utilisez les boutons [CH-] ou
[CH+] pour mettre en surbrillance
l'une des options suivantes, puis
appuyez sur le bouton [ENTER]
pour entrer dans le sous-menu
et utilisez les boutons [VOL-] ou
[VOL+] pour effectuer le réglage.
Réglage du fuseau horaire. Appuyez
sur les boutons
[VOL-] ou [VOL +] et [ENTER]
pour effectuer le réglage.
2. Time (Heure) : Réglage de
la date/l'heure. Appuyez sur les
boutons [VOL-] ou [VOL +] et
[ENTER] pour effectuer le réglage.
Auto Synchronization
(Synchronisation auto) Date/Time
(Heure)
Daylight Saving Time (Réglage de
l'heure d'été)
Power On Timer (Minuterie
d'allumage)/ Timer (Minuterie)/
Power On Channel (Canal par
défaut)
Power Off Timer (Minuterie
d'extinction)/Timer (Minuterie)
3. Sleep Timer (Minuterie de mise
en veille) : Réglage de l'heure
de mise en veille. Appuyez sur les
boutons [VOL-] ou [VOL +] pour
choisir l'heure de mise en veille.
4. Auto Sleep (Mise en veille
auto) :Réglage de l'heure de mise
en veille automatique. Appuyez sur
les boutons [VOL-] ou [VOL+]
pour choisir OFF/1Hour/2Hours/
5Hours (Désactivé/1 heure/
2 heures/ 5 heures).
Time (Heure)
Auto Synchronization On
Video
Audio
TV
Setup
Parental
Date
Time
Daylight Saving Time
Power On Timer
Timer
Power On Channel
Power Off Timer
Timer
2000/01/01
11:12:01
00:00:00
00:00:00
Select
Off
Off
Off
MENU
Back
Caption (sous-titrage)
Caption Display
Video
Audio
TV
Setup
Parental
Off
Analog Closed Caption
Digital Closed Caption
Digital Caption Style
On OnMute
CC1
Service 1
MENU
Select Back
1. Caption Display (Affichage
du sous-titrage) : Utilisez les
boutons [CH-] ou [CH+] pour
mettre en surbrillance l'une des
options suivantes, puis appuyez sur
le bouton [ENTER] pour entrer
dans le sous-menu et utilisez les
boutons [VOL-] ou [VOL+] pour
effectuer le réglage.
[Off ] – Désactive les sous-titrages.
[On] – Active et affiche les sous-
titrages.
[OnMute ] (En mode muet)
– En mode muet, les sous-titrages
s'affichent. Si la sortie audio
est utilisée, celle-ci ne sera pas
22
Page 61

contrôlée.
2. Analog Closed Caption
(Sous-titrages analogiques) :
Choisissez le mode des soustitrages pour les programmes
analogiques : CC1/CC2/ CC3/
CC4/TEXT1/ TEXT2/ TEXT3/
TEXT4.
3. Digital Closed Caption
(Sous-titrages numériques) :
Choisissez le mode des soustitrages pour les programmes
numériques : Off/ Service1/
Service2/ Service3/ Service4/
Service5/ Service6.
4. Digital Caption Style (Style
des sous-titrages numériques) :
Ne s'applique qu'aux canaux
numériques avec sous-titrages.
Réglez le style de sous-titrage/ la
taille de police/ la police/ la couleur
de police/ l'opacité de la police/ la
couleur d'arrière-plan/ l'opacité de
l'arrière-plan.
Digital Caption Style (Style des
sous-titrages numériques)
Caption Style
Video
Audio
TV
Setup
Parental
Font Size
Font Style
Font Color
Font Opacity
Background Color
As Broadc...
Custom
Large
Style 1
White
Solid
Black
MENU
Select Back
1. Caption Style (Style des soustitrages) : Utilisez les boutons
[CH-] ou [CH+] pour mettre
en surbrillance l'une des options
suivantes, puis appuyez sur le
bouton [ENTER] pour entrer dans
le sous-menu et utilisez les boutons
[VOL-] ou [VOL+] pour effectuer
le réglage.
Réglage du style de sous-titrage.
Tel que diffusé/personnalisé.
Remarque : Toute modification
des paramètres ci-dessous
changera automatiquement
la configuration au Mode de
sous-titrage personnalisé.
2. Font Size (Taille de la police) :
Réglage de la taille de police : Small
(Petite)/ Medium (Moyenne)/ Large
(Grande).
3. Font Style (Style de police de
caractère) : Réglage du jeu de
caractères : Style1~Style7.
4. Font Color (Couleur de la
police) : Réglage de la couleur
de la police : Black (Noir)/White
(Blanc)/ Green (Vert)/ Blue (Bleu)/
Red (Rouge)/Cyan/ Yellow (Jaune)/
Magenta.
5. Font Opacity (Opacité de la
police) : Réglage de l'opacité de
la police : Solid (Plein)/ Translucent
(Translucide)/Transparent/ Flashing
(Clignotant).
6. Background Color (Couleur
d'arrière-plan) : Réglage de
la couleur d'arrière-plan : Black
(Noir)/White (Blanc)/ Green (Vert)/
Blue (Bleu)/ Red (Rouge)/Cyan/
Yellow (Jaune)/ Magenta.
7. Background Opacity (Opacité
de l'arrière-plan) : Réglage de
l'opacité de l'arrière-plan : Solid
(Plein)/ Translucent (Translucide)/
Transparent/ Flashing (Clignotant).
PARENTAL
Password
Video
Audio
TV
Setup
Parental
SelectEnter Exit
1. Password (Mot de passe) :
Utilisez les boutons [CH-] ou
[CH+] pour mettre en surbrillance
l'une des options suivantes, puis
appuyez sur le bouton [ENTER]
pour le sélectionner et ouvrir
l'interface de réglage du mot de
passe.
Français
23
Page 62

Password
Après avoir saisi le mot de passe
adéquat, vous verrez le sous-menu
ci-dessous. Le mot de passe par
défaut est 0000.
Video
Audio
TV
Setup
Parental
System Block
Channel Block
Program Block
Change Password
Clean All
Enter
On
MENU
SelectEnter
Back
1. System Block (Blocage du
système) : Utilisez les boutons
[CH-] ou [CH+] pour mettre
en surbrillance l'une des options
suivantes, puis appuyez sur le
bouton [ENTER] pour entrer dans
le sous-menu et utilisez les boutons
[VOL-] ou [VOL+] pour effectuer
le réglage.
Active/Désactive le blocage par
canal/programme.
2. Channel Block (Blocage canal) :
Réglage des canaux à bloquer.
System Block
Video
Audio
TV
Setup
Parental
Video
Audio
TV
Setup
Parental
Channel Block
Program Block
Change Password
Clean All
Rating Enable
U.S. TV Ratings
U.S. Movie Rating
Canadian English Ratings
Canadian French Ratings
Open V-chip
Off
Off
On
MENU
Select Back
On
MENU
Select Back
3. Program Block (Blocage
programme) : Utilisez les
boutons [CH-] ou [CH+] pour
mettre en surbrillance l'une des
options suivantes, puis appuyez sur
le bouton [ENTER] pour entrer
dans le sous-menu et utilisez les
boutons [VOL-] ou [VOL+] pour
effectuer le réglage.
Réglage des programmes à bloquer.
Pour plus de détails, consultez les
pages 24-26.
[Rating Enable] (Réglage
par classification) – Active ou
désactive la classification.
[U.S. TV Ratings]
(Classification américaine) –
Consultez la page 24-25.
[U.S. Movie Rating]
(Classification américaine des
films)– Consultez la page 25.
[Canadian English Ratings]
(Classification canadienne
[anglais]) – Consultez la page 25-
26.
[Canadian French Ratings]
(Classification canadienne
[français]) – Consultez la page 26.
[Open V-chip] (Puce
antiviolence) – Active la puce
antiviolence.
[Clear Open V-chip Data]
(Supprime les données de la
puce antiviolence) – Règle les
données de la puce antiviolence aux
valeurs par défaut.
[Block Unrated] (Blocage des
programmes non classifiés)
– Bloque les programmes non
étiquetés par une classification
reconnue.
4. Change Password (Modifier
mot de passe) : Entrez le nouveau
mot de passe de 4 chiffres puis
confirmez-le. Saisissez le nouveau
mot de passe/Confirmez le mot de
passe.
5. Clean All (Effacer tout) :
Réglage des éléments du menu aux
24
Page 63

valeurs par défaut.
U.S. TV Ratings (Classification de
TV américaine)
La classification de TV américaine
comprend deux aspects : l'âge et le
contenu.
Video
Audio
TV
Setup
Parental
Video
Audio
TV
Setup
Parental
Allowed Rating
Allowed Rating
A
D
L
S
V
FV
TV-Y
TV-Y7
TV-G
TV-PG
TV-14
TV-MA
Blocked Rating
Blocked Rating
MENU
SelectSet
Back
MENU
SelectSet
Back
[A] – Tous
[D] – Dialogues suggestifs
[L] – Langue inadéquat
[S] – Situations sexuelles
[V] – Violence
[FV] – Violence fictive
[TV-Y] – Tous
[TV-Y7] – Enfants plus âgés
[TV-G] – Auditoire général
[TV-PG] – Surveillance parentale
suggérée
[TV-14] – Surveillance parentale
fortement suggérée
[TV-MA] – Auditoire adulte
uniquement
Remarque : Les classifications
de contenu augmentent selon
le niveau de classement par âge.
Par exemple, un programme
avec une classification TV-PG
V (violence) peut contenir des
scènes de violence modérée,
alors qu'un programme
classé TV-14 V (violence)
peut contenir beaucoup de
scènes de violence. Ainsi, le
verrouillage d'une option d'un
niveau supérieur bloquera
automatiquement les options
de niveau plus sensible.
U.S. Movie Ratings (Classification
américaine des films)
Ce système définit le contrôle de
classement conforme aux règles de la
MPAA.
Video
Audio
TV
Setup
Parental
Allowed Rating
G
PG
PG-13
R
NC-17
X
Blocked Rating
MENU
SelectSet
Back
[G] – Auditoire général. Pour tous
les âges.
[PG] – Surveillance parentale
suggérée. Certaines scènes peuvent
ne pas être convenables pour les
enfants.
[PG-13] – Surveillance parentale
fortement suggérée. Certaines
scènes peuvent être inappropriées
pour des enfants de moins de
13 ans.
[R] – Restreint. Les enfants de
moins de 17 ans doivent être
accompagnés d'un parent ou
d'un adulte.
[NC-17] – Les moins de 17 ans ne
sont pas admis.
[X] – Auditoire adulte uniquement.
Canadian English Rating
(Classification canadienne
anglaise)
Ces classifications concernent les
programmes qui utilisent le système de
classement anglais.
Français
25
Page 64

Video
Audio
TV
Setup
Parental
Allowed Rating
Device Inserted
C
C8+
G
PG
14+
18+
Blocked Rating
MENU
SelectSet
Back
Photo
Music
[C] – Enfants
[C8+] – Enfants de 8 ans et plus
[G] – Auditoire général
[PG] – Guide parental
[14+] – Auditeurs de 14 ans et plus
[18+] – Auditoire adulte
Canadian French Rating
(Classification canadienne
française)
Ces classifications concernent les
programmes qui utilisent le système de
classement français.
Video
Audio
TV
Setup
Parental
Allowed Rating
G
8 ans+
13 ans+
16 ans+
18 ans+
Blocked Rating
MENU
SelectSet
Back
[G] – Auditoire général
[8 ans +] – Non recommandé
pour les jeunes enfants
[13 ans +] – Non recommandé
pour les enfants de moins de 13 ans
[16 ans +] – Non recommandé
pour les enfants de moins de 16 ans
[18 ans +] – Programme limité
aux adultes
MEDIA (MÉDIA)
Insérez une clé USB, puis appuyez sur
INPUT et sélectionnez USB. L'écran
ci-dessous apparaîtra. Vous pouvez
également appuyer sur le bouton USB
de la télécommande.
Select Enter
Enter
Picture (Image)
Play
Repeat
Shuffle
Rotate
Show Info
3/8
Photo
None
MENU Enter
Menu Enter
Koala.jpg
Short
Appuyez sur le bouton MENU pour
afficher le menu. Appuyez sur les
boutons [CH+] et [CH-] pour choisir
une option.
[Play] (Lecture) – Appuyez sur
le bouton ENTER pour activer la
lecture de musique ou mettre la
lecture en pause.
[Repeat] (Répéter) – None/
Repeat One/Repeat All (Aucun/
Répéter une fois/Tout répéter).
Appuyez sur le bouton ENTER
pour sélectionner le mode de
répétition.
[Shuffle] (Aléatoire) – Appuyez
sur le bouton ENTER pour activer
le mode aléatoire.
[Rotate] (Tourner) – Appuyez
sur le bouton ENTER pour tourner
l'image.
[Show Info] (Afficher info) –
Appuyez sur le bouton ENTER
pour afficher l'information de
l'image à l'écran.
26
Page 65

Photo
None
MENU Enter
Menu Enter
Photo
None
MENU Enter
Menu Enter
Music (Musique)
Koala.jpg
Koala.jpg
Play
Repeat
Shuffle
Rotate
Show Info
Short
Album:
Orientation:
Artist:
Name:
Date:
Size:
Next:
EXPOSURE TIME:
F NUMBER:
EXPOSURE PROGRAM:
COLOR SPACE:
Short
Photo
Rotate 90°
Corbis
koala.jpg
2012-04-20 15:21:55
1024 x 768
Light house.jpg
Appuyez sur le bouton ENTER
pour afficher l'information de la
musique en cours de lecture.
[Hide Spectrum] (Cacher
spectre) – Appuyez sur le bouton
3/8
ENTER pour cacher ou afficher le
spectre audio.
[Lyric Display Line] (Affichage
des paroles) – Appuyez sur le
bouton ENTER pour régler la ligne
d'affichage des paroles : OFF, Single
line, Multiple lines (Désactivée, une
ligne, plusieurs lignes).
[Audio Only] (Audio seul) –
3/8
Appuyez sur le bouton [ENTER]
pour désactiver l'image,et appuyez
Français
sur n'importe quel bouton pour
afficher à nouveau l'image.
Pause
Repeat
Shuffle
Show info
Hide Spectrum
Lyric Display Line
Music
MENU Enter
00:00:57 00:04:47
20
Menu Enter
Someone like you.mp3
8/10
Appuyez sur le bouton MENU pour
afficher le menu. Appuyez sur les
boutons [CH +] et [CH-] pour choisir
une option.
[Pause] – Appuyez sur le bouton
ENTER pour activer la lecture de
musique ou mettre la lecture en
pause.
[Repeat] (Répéter) – None/
Repeat One/Repeat All (Aucun/
Répéter une fois/Tout répéter).
Appuyez sur le bouton ENTER
pour sélectionner le mode de
répétition.
[Shuffle] (Aléatoire) – Appuyez
sur le bouton ENTER pour activer
le mode aléatoire.
[Show Info] (Afficher info) –
Music
MENU Enter
Music
MENU Enter
00:01:05 00:04:47
20
Menu Enter
Menu Enter
Someone like you.mp3
00:00:42 00:04:47
20
Someone like you.mp3
Pause
Repeat
Shuffle
Show info
Hide Spectrum
Lyric Display Line
Titel:
Artist:
Album:
Genre:
Year:
Duration:
Next:
8/10
Someone Like You
Adete
21
N/A
N/A
00:04:47
take it all .mp3
8/10
None
Repeat One
Repeat All
Remarque : Consultez la page 15
pour plus de détails sur l'utilisation
de la télécommande en mode
Multimédia USB.
27
Page 66

CONSEILS
Entretien de l’écran
Ne pas frotter ou cogner l’écran avec
quelque chose de dur car cela peut
le rayer, le marquer ou l’endommager
définitivement.
Débranchez la fiche d’alimentation
avant de nettoyer l’écran. Dépoussiérez
le téléviseur en essuyant l’écran et
le boîtier à l’aide d’un chiffon doux
et propre. Si l’écran a besoin d’un
nettoyage supplémentaire, utilisez un
chiffon propre humidifié. Ne pas utiliser
de nettoyants liquides ou de nettoyants
en aérosols.
Avertissement relatif aux
téléphones mobiles
Pour éviter des perturbations dans l’image
et le son, des dysfonctionnements de votre
téléviseur, voire des dommages sur le
téléviseur, gardez votre téléphone mobile
éloigné du téléviseur.
Directives relatives à la fin de vie
Nous prenons grand soin de produire de
manière écologique dans les zones focales
vertes. Votre nouveau récepteur contient
des matériaux qui sont recyclables et
réutilisables.
A la fin de sa vie, des sociétés spécialisées
peuvent démonter le récepteur mis au
rebus pour rassembler les matériaux
réutilisables et minimiser la quantité de
matériaux qui sont jetés.
Veuillez vous assurer de mettre au rebus
votre vieux récepteur conformément aux
réglementations locales. Haier s’est engagé
à recycler des produits électroniques et
matériaux de façon sécuritaire. Veuillez
vérifier un endroit local pour le recyclage
aux États-Unis au : 1800RECYCLING.
COM ou appelez au 1 800-RECYCLING.
Avis de licence Dolby et marques
déposées
Produit fabriqué sous licence de Dolby
Laboratories.
Dolby et le symbole double-D sont des
marques de commerce des laboratoires
Dolby.
Notices réglementaires –
Notice de la commission des
communications fédérales
Cet appareil a subi des tests de contrôle
et a été déclaré conforme aux restrictions
imposées aux appareils numériques
de classe B, par la section 15 de la
réglementation FCC. Ces limites sont
conçues pour fournir une protection
raisonnable contre les interférences
néfastes en installation résidentielle.
Cet équipement génère, utilise et peut
émettre une énergie en radiofréquence
et, s’il n’est pas installé et utilisé selon
les instructions, il peut entraîner des
interférences nuisibles aux communications
radio. Cependant, il n’y a aucune garantie
que des interférences ne se produiront
pas dans une installation particulière. Si
cet appareil occasionne des interférences
néfastes sur la réception radio ou télévisée,
ce qui peut se déterminer en éteignant
l’appareil et en le rallumant, l’utilisateur
est encouragé à essayer de corriger
l’interférence par une ou plusieurs des
mesures suivantes :
• Réorientez ou déplacez l’antenne
réceptrice.
• Augmentez la distance entre l’appareil
et le récepteur.
• Branchez l’appareil dans une prise de
courant sur un circuit différent de celui
auquel le récepteur est branché.
28
Page 67

• Consultez le revendeur ou un
technicien radio/télévision expérimenté
pour de l’aide.
Modifications
La FCC demande que l’utilisateur soit
notifié du fait que tout changement
ou toute modification apporté à
cet appareil qui n’est expressément
approuvé par notre société peut
annuler le droit pour l’utilisateur de
faire fonctionner cet appareil.
Câbles
Les connexions à l’appareil doivent être
réalisées au moyen de câbles blindés
dotés de boîtiers de connecteurs RFI/
EMI métalliques afin de garantir la
conformité avec la réglementation de la
FCC.
Français
Notice canadienne
Cet appareil numérique de classe B
satisfait à toutes les exigences de la
réglementation canadienne relative aux
appareils susceptibles de provoquer un
brouillage radioélectrique.
Avis Canadien
Cet appareil numérique de classe B
satisfait à toutes les exigences de la
réglementation canadienne relative aux
appareils susceptibles de provoquer un
brouillage radioélectrique.
29
Page 68

CARACTERISTIQUES DU PRODUIT
REMARQUE
• Ce modèle est conforme aux spécifications énumérées ci-dessous.
• Les caractéristiques et spécifications sont sujettes à modifications sans préavis.
• Ce modèle peut ne pas être compatible avec les fonctions et/ou spécifications
susceptibles d’être ajoutées à l’avenir.
Modèle n° LE32D2320 LE39D2380 LE42D2380 LE46D2380
DISPLAY (AFFICHAGE)
Affichable
Système de
téléviseur
Couverture
des canaux
Connecteurs
sur la façade
arrière
31,5 po 38,5 po 42 po 46 po
NTSC standard, ATSC standard (8-VSB, Clear-QAM)
NTCS :CH2-CH69 (Antenne)
CH1-CH135 (Câble)
ATCS : CH2-CH69 (Antenne)
CH1-CH135 (Câble)
CONNEXIONS
Entrée du syntoniseur (75Ω)
AV IN (ENTRÉE AV):
PC IN (ENTRÉE PC):
Taux de balayage pris en charge : 640 x 480 @ 60 Hz, 720 x 400 @ 70 Hz,
Recommandé: Pour le modèle LE32D2320 : 1360 x 768 @ 60 Hz
Pour les modèles LE39D2380/LE42D2380/LE46D2380 : 1920 x 1080 @
60 Hz
Entrée AV / audio/vidéo G/D
SUB-D et audio PC (prise casque de type mini-jack)
800 x 600 @ 60 Hz, 1024 x 768 @ 60 Hz, 1360 x 768 @
60 Hz
1440 x 900 @ 60 Hz, 1680 x 1050 @ 60 Hz, 1920
x 1080 @ 60 Hz
Remarque :
1360 x 768 @ 60 Hz : pour le modèle LE32D2320
seulement.
1440 x 900 @ 60 Hz, 1680 x 1050 @ 60 Hz, 1920
x 1080 @ 60 Hz :
pour les modèles LE39D2380/LE42D2380/LE46D2380.
Entrée composante vidéo et audio D/G
Résolutions prises en charge : 480i @ 60 Hz, 480p @ 60 Hz,
720p @ 60 Hz, 1080i @ 60 Hz,
1080p @ 60 Hz.
Entrée HDMI
Taux de balayage pris en charge : 480i @ 60 Hz, 480p @ 60 Hz,
720p @ 60 Hz, 1080i @ 60 Hz,
1080p @ 60 Hz.
HDMI 1/2
SUB-D
COMPOSANTE 1
AV (partage la composante Y)
Entrée Audio
Sortie Coaxiale
30
Page 69

Modèle n° LE32D2320 LE39D2380 LE42D2380 LE46D2380
Entrée audio pour PC
Connecteurs
sur le côté
HDMI3
USB
Sortie casque
POIDS & DIMENSIONS
Dimensions
avec pied
(L x H x P)
Dimensions
sans pied
(L x H x P)
Poids avec pied
Poids sans pied
ni base
28,9 po x 19,3 po
x 7,1 po
28,9 po x 17,9 po
x 2,6 po
17,38 (lb) 25,08 (lb) 29,96 (lb) 34,54 (lb)
16,3 (lb) 22,66 (lb) 27,5 (lb) 32,12 (lb)
34,9 po x 22,6 po
x 8,5 po
34,9 po x 21,3 po
x 2,6 po
38,1 po x 24,5 po
x 8,5 po
38,1 po x 23,2 po
x 2,6 po
41,6 po x 26,5 po
x 8,5 po
41,6 po x 25,1 po
x 2,6 po
MONTAGE MURAL
Support mural
compatible
200 x 100 mm 200 x 200 mm 400x 400 mm 400x 400 mm
VESA (L x H )
Type de vis
4 x 10 mm métrique
6 x 10 mm
métrique
6 x 10 mm
métrique
6 x 10 mm métrique
POWER (ALIMENTATION)
Consommation
d’énergie
Veille
Alimentation
électrique
Puissance audio
Température
ambiante
65 W 120 W 130 W 130 W
< 0,5 W
120 V 60 Hz
5 W + 5 W 8 W + 8 W 8 W + 8 W 8 W + 8 W
41°F - 95°F
CONTENU DE L'EMBALLAGE
1 téléviseur
Base x1
Accessoires
fournis
Télécommande x1 (avec deux piles alkaline de taille AAA)
Vis x 4
Manuel de l’utilisateur x1
Bon d'enregistrement x 1
Français
31
Page 70

DÉPANNAGE
Veuillez procéder aux vérifications suivantes avant d’appeler pour une réparation.
Ces conseils peuvent vous faire gagner du temps et de l’argent puisque les prix
pour l’installation du récepteur et les réglages des commandes du client ne sont
pas couverts sous votre garantie.
Symptômes Éléments à vérifier et actions à suivre
«Fantôme» ou
image double
Absence de tension
Pas d’image
Bonne image, mais
pas de son
Bon son, mais
couleurs médiocres
• Ceci peut provenir d’une obstruction de l’antenne due à des
gratte-ciels ou des collines. L’emploi d’une antenne hautement
directionnelle pourrait améliorer l'image.
• Vérifiez que le cordon d’alimentation CA du téléviseur est
branché dans la prise d’alimentation.
• Débranchez le téléviseur et attendez 60 secondes. Réinsérez
ensuite la prise dans la prise d’alimentation et rallumez le
téléviseur.
• Vérifiez les connexions de l’antenne au dos du téléviseur pour
voir si elle est bien branchée sur le téléviseur.
• Possibilité de problème de la station de diffusion.
Essayez un autre canal.
• Réglez les paramètres de luminosité et de contraste.
• Vérifiez la commande des sous-titres. Certains modes de
TEXTE peuvent bloquer l’écran.
• Augmenter le VOLUME.
• Vérifiez que le son du téléviseur n’est pas coupé ; appuyez sur
le bouton MUTE de la télécommande.
• Réglez les paramètres de luminosité, de contraste et des
couleurs.
Image médiocre
Image et son
enneigés
Ligne pointillée
horizontale
La télévision ne
répond pas à la
télécommande
• Parfois la qualité d’image est médiocre quand une caméra ou
un caméscope S-VHS est connecté à votre téléviseur ainsi
qu’un autre périphérique en même temps. Eteindre un des
périphériques.
• Vérifiez les branchements de l’antenne.
• Ceci peut provenir d’interférences électriques (par ex. : sèche-
cheveux, lumières néon à proximité, etc.)
• Éteignez l’appareil.
• Vérifiez si les piles fonctionnent. Remplacez-les si nécessaire.
• Nettoyez la lentille du capteur de la télécommande sur le
téléviseur.
• Vous pouvez toujours utiliser les boutons à l’avant de votre
téléviseur.
• Sélectionnez le mode TV pour être certain que votre
télécommande est en mode TV.
32
Page 71

GLOSSAIRE
TVHD
Les affichages en TVHD sont techniquement définis comme étant capables
d’afficher des lignes de balayage actives à au moins 720p ou 1 080i.
Entrées HDMI
Interface multimédia haute définition.
Entrées Audio/Vidéo
Situés à l’arrière du récepteur, ces connecteurs (prise de type phono RCA)
servent pour l’entrée des signaux audio et vidéo. Conçus pour une utilisation avec
des magnétoscopes (ou autres accessoires) afin de recevoir une résolution d’image
supérieure et d’offrir des options de connexions sonores.
Menu
Une liste de fonctions à l’écran présentée sur l’écran de télévision est mise à la
disposition de l’utilisation pour procéder à des réglages.
MPAA
Motion Picture Association of America.
Multichannel Television sound (MTS – transmission multivoie de
signaux sonores en télévision)
Le standard de diffusion, qui permet de transmettre le son stéréo avec l’image du
téléviseur.
RF
Radiofréquence ou conception de signal modulé qui sert de transporteur pour
les diffusions télévisées.
Second Audio Program (SAP – deuxième programme audio)
Un canal différent ou supplémentaire prévu dans le standard de diffusion du
son de télévision à canaux multiples (MTS). Une piste sonore monaurale incluse
au sein du signal enregistré ou vidéo (contenant généralement une deuxième
traduction de langue pour le programme affiché).
Français
Minuterie de mise en sommeil
Vous pouvez définir une période au bout de laquelle le téléviseur s’éteindra
automatiquement.
33
Page 72

GARANTIE
Ce produit de marque Haier, est garanti, lors de son expédition dans son emballage
d’origine, contre tout défaut de main-d'œuvre ou de fabrication. Le fabricant accepte, à
sa discrétion, de réparer ou de remplacer le produit défectueux par un appareil neuf ou
remis à neuf de type équivalent, pour les pièces, la main-d'œuvre et la période indiquées
ci-dessous :
Cette garantie ne s’applique pas à l’apparence ou à l’extérieur du produit, si celui-ci a
été endommagé, rendu illisible, altéré ou modifié au niveau de sa conception ou de sa
construction. La garantie ne s'applique pas aux accessoires supplémentaires indiqués cidessous :
La garantie commence le jour de l’achat d'origine de l'appareil et le reçu doit être
présenté au centre de service autorisé avant d’effectuer une réparation dans le cadre de
la garantie.
La garantie limitée décrite dans ce document s’ajoute à toute garantie implicite accordée
aux acheteurs par la loi. TOUTE GARANTIE IMPLICITE, INCLUANT LA GARANTIE
DE QUALITÉ MARCHANDE ET D'ADAPTATION À UN USAGE PARTICULIER,
EST LIMITÉE AUX PÉRIODES INDIQUÉES CI-DESSOUS, À COMPTER DE LA DATE
D’ACHAT. Certains États ne permettent pas la limitation sur la durée de la garantie
implicite; dans ces cas, les limites évoquées par la présente peuvent ne pas s’appliquer à
vous.
Ni le personnel de vente ni aucune autre personne ne sont autorisés à donner, pour
le compte de Haier, d'autre garantie que celles décrites dans ce document, ni à en
prolonger la durée au-delà de la période indiquée.
Les garanties décrites dans ce document sont les seules garanties exclusives accordées
par Haier et sont les seuls recours exclusifs mis à disposition de l'acheteur. La correction
des défauts, effectuée tel qu'indiqué et dans la période indiquée dans ce document,
constitue l'unique responsabilité et engagement de Haier envers l'acheteur en ce qui
concerne le produit, et constitue la satisfaction complète de toutes les plaintes, qu'elles
soient basées sur un contrat, une négligence, une responsabilité stricte ou autre. Haier
ne peut être tenue responsable d'aucune manière pour des dommages ou défauts au
produit causés par une réparation ou une tentative de réparation effectuée par une
personne ou un centre de service non autorisés par Haier. Haier ne sera pas non plus
tenue responsable d'accidents directs ou consécutifs ou de dommages à la propriété.
CERTAINS ÉTATS N'AUTORISENT PAS L’EXCLUSION DES DOMMAGES DIRECTS
OU CONSÉCUTIFS. DANS CES ÉTATS, CETTE EXCLUSION PEUT NE PAS
S'APPLIQUER À VOUS.
La période de garantie pour les modèles LE32D2320/LE39D2380/LE42D2380/
LE46D2380 est de 1 an, pièces et main-d'œuvre.
Les accessoires supplémentaires exclus de la garantie : les piles non rechargeables. Pour
obtenir une réparation, ou de la documentation, des accessoires ou des fournitures
reliés au produit, ou pour obtenir un soutien technique : appelez le 1-877-337-3639.
Pensez à préparer votre preuve d’achat.
34
Page 73

Modèles: LE32D2320/LE39D2380/
LE42D2380/LE46D2380
Insert Date: Mai 2012
www.HaierAmerica.com
Made in China
Fabriqué en Chine
Hecho en China
Printed China
La Chine imprimée
China impresa
Haier America
New York, NY 10018
©2012 Haier America Trading, LLC.
Page 74

TV LED
Manual de usuario
MODELOS:
LE32D2320
LE39D2380
LE42D2380
LE46D2380
VIDA MÁS INTELIGENTE UN MEJOR PLANETA
Page 75

Page 76

Energy Star
Este producto posee la clasificación ENERGY STAR en la configuración predeterminada
de fábrica y ésta es la configuración en la que se logrará el ahorro de energía.La
modificación de la configuración de imagen predeterminada o la activación de otras
funciones aumentarán el consumo de energía, que podría exceder los límites necesarios
para calificar para la clasificación ENERGY STAR.
SÍMBOLO DEFINICIÓN DEL SÍMBOLO
VOLTAJE PELIGROSO: el símbolo del relámpago con una
punta de flecha dentro del triángulo equilátero tiene la intención
de alertar al usuario acerca de la presencia de “voltaje peligroso”
SA 1965
sin aislamiento dentro de la carcasa del producto que podría
tener la magnitud suficiente como para constituirse en un riesgo
de descarga eléctrico para las personas.
INSTRUCCIONES:El signo de exclamación dentro
del triángulo equilátero indica al usuario la presencia de
instrucciones de funcionamiento y mantenimiento (reparación)
SA 1966
en la documentación que acompaña al producto.
No se debe exponer el producto a salpicaduras ni se debe colocar sobre éste
ningún recipiente que contenga agua, como por ejemplo, jarrones.
Precaución - Existe un riego de explosión si se coloca las pilas de forma
incorrecta. Sólo reemplace las por unas del mismo tipo o equivalente.
Advertencia sobre las baterías instaladas
Precaución - Existe un riego de explosión si se coloca las pilas de forma
incorrecta. Sólo reemplace las por unas del mismo tipo o equivalente.
No exponga las baterías (batería externa o batería instalada) a un calor excesivo
como los rayos directos del sol, fuego o similares.
Español
1
Page 77

PARA SU SEGURIDAD
Antes de utilizar la TV, lea por completo este manual. Se deberá conservar este manual
para su referencia futura.
Declaración de interferencia de radiofrecuencia de clase B de la
FCC
ADVERTENCIA:
(PARA MODELOS CERTIFICADOS POR LA FCC)
NOTA :
límites de dispositivo digital Clase B, conforme la Parte 15 de las Reglas de la FCC.
Estos límites se crearon con el fin de proporcionar una protección razonable contra
interferencia dañina en una instalación residencial. Este equipo genera, utiliza y puede
irradiar energía de radiofrecuencia y, si no se encuentra instalado o si no es utilizado de
acuerdo con las instrucciones, puede causar interferencia dañina a las comunicaciones
radiales. Sin embargo, no se puede garantizar que la interferencia no ocurrirá en una
instalación en particular. En el caso de que el dispositivo causara interferencia dañina a
las comunicaciones radiales, la cual puede ser determinada encendiendo o apagando el
dispositivo, se sugiere que el usuario tome una o más de las siguientes medidas:
1. Reoriente o coloque en otro lugar la antena receptora.
2. Incremente la separación entre el equipo y el receptor.
3. Enchufe el equipo a un tomacorriente diferente del que se encuentra enchufado el
4. Consulte a un vendedor o técnico experimentado de radio/TV para obtener ayuda.
Este equipo ha sido comprobado y se determinó que cumple con los
receptor.
AVISO
1. Los cambios o las modificaciones no aprobadas de forma explícita por la parte
responsable del cumplimiento podrían anular la autoridad del usuario de utilizar
este dispositivo.
2. Se deben utilizar cables de interfaz y de alimentación CA blindados, si existiese
alguno, con el fin de cumplir con los límites de emisión.
3. El fabricante no es responsable de ninguna interferencia de radio o TV causada
por una modificación no autorizada de este equipo. Es responsabilidad del usuario
corregir dicha interferencia.
ADVERTENCIA:
Para evitar incendios o un peligro de descarga eléctrica, no exponga la TV a la lluvia o
humedad. Existen voltajes peligrosamente altos dentro de la TV. No abra la cubierta de
la TV. Remita el servicio técnico sólo al personal de servicio técnico calificado.
2
Page 78

PRECAUCIONES Y RECORDATORIOS
Coloque la unidad en
superficies niveladas.
Desenchufe de inmediato
si existe un funcionamiento
defectuoso como una
desaparición de imagen, una
desaparición de video/audio,
humo u olores extraños
provenientes de la TV.
No arroje ningún objeto
dentro de la TV como
metales u otros materiales
inflamables.
Desenchufe de inmediato si
se colocan otros materiales
extraños dentro de la TV o
si ésta se cae.
Prohíba/evite abrir la
cubierta de la TV.
Recuerde desenchufar el
cable de alimentación CA
del tomacorriente CA antes
de efectuar la limpieza. No
utilice limpiadores líquidos
o en aerosol para limpiar la
pantalla.
No cubra ni bloquee
cualquier rejilla y abertura.
Una ventilación inadecuada
podría acortar la vida
útil de la TV y causar un
sobrecalentamiento.
Evite exponer la TV a la
luz solar directa y a lugares
polvorientos, de gran
humedad y humosos
.
Póngase en contacto con el
personal de servicio técnico
para limpiar la parte interna
de la TV una vez por año.
Español
No coloque la TV en
lugares cerrados o en una
caja cuando esté siendo
utilizada.
Aviso para el control remoto
Evite que se caiga
3
2
1
6
5
4
9
8
7
0
Asegúrese de desenchufar la
unidad cuando no se utilice
la TV durante un período de
tiempo extenso (días).
Evite que esté expuesto a líquido
3
2
1
6
5
4
9
8
7
0
3
No coloque la TV cerca de
agua, por ejemplo, en lugares
como bañeras, lavabos,
fregaderos, lavaderos,
piscinas o subsuelos
mojados.
Evite utilizar limpiadores en
aerosol
3
2
1
6
5
4
9
8
7
0
Page 79

INSTRUCCIONES IMPORTANTES DE SEGURIDAD
Lea esta sección antes de utilizar la TV
1. Lea estas instrucciones.
2. Conserve estas instrucciones.
3. Preste atención a todas las advertencias.
4. Siga todas las instrucciones.
5. No utilice la TV cerca de agua.
6. Limpie la TV sólo con un paño seco.
7. No bloquee ninguna de las aberturas de ventilación. Instale la TV de acuerdo con las
instrucciones del fabricante.
8. No instale la TV cerca de cualquier fuente de calor como calentadores, registradores
de calor, estufas u otros dispositivos (incluyendo amplificadores) que emanen calor.
9. No intente anular las previsiones de seguridad del enchufe polarizado o del tipo con
conexión a tierra. Un enchufe polarizado posee dos clavijas, una más ancha que la
otra. Un enchufe del tipo con conexión a tierra posee 2 clavijas y una tercera clavija
de conexión a tierra. Se proporciona la clavija más ancha y la tercera clavija para su
seguridad. Si el enchufe proporcionado no puede ser colocado en el tomacorriente,
consulte a un electricista para el reemplazo del tomacorriente obsoleto.
10. Evite que el cable de alimentación sea pisado o estrangulado, especialmente en el
enchufe, receptáculos de conveniencia y en el lugar donde sale de la TV.
11. Sólo utilice los accesorios especificados por el fabricante.
12. Sólo utilice el carro, base, trípode, soporte o mesa especificado por el fabricante o
vendido junto con la TV. Cuando se utiliza un carro, tenga cuidado cuando mueva la
combinación carro/TV con el fin de evitar lesiones causadas por caídas.
13. Se deberá utilizar la TV sólo con el tipo de energía eléctrica que aparece en la
etiqueta. Si no está seguro acerca del tipo de energía eléctrica suministrado a su
hogar, póngase en contacto con el vendedor o con la empresa de energía eléctrica
local.
14. Desenchufe la TV durante tormentas eléctricas o cuando no será utilizada durante
períodos de tiempo extensos.
15. Remita todo servicio técnico al personal de servicio técnico calificado. Se deberá
efectuar el servicio técnico cuando la TV se encuentre dañada de alguna forma,
como por ejemplo, cuando el cable o enchufe de alimentación se encuentre dañado,
cuando se haya derramado líquido o se haya caído un objeto dentro de la TV, cuando
la TV haya sido expuesta a la lluvia o humedad, cuando la TV funcione de forma
anormal o cuando la TV se haya caído.
16. Conductor de conexión a tierra de protección Clase I – "Los aparatos de Clase I
deberán conectarse a una toma de corriente eléctrica que cuente con un conductor
de conexión a tierra de protección".
17. Dispositivo de desconexión - Enchufe de alimentación de corriente o acoplador
del aparato – "El enchufe alimentación de corriente o el acoplador del aparato son
dispositivos de desconexión; el dispositivo de desconexión siempre deberá estar
listo para usar".
4
Page 80

18. Dispositivo de desconexión - INTERRUPTOR PRINCIPAL DE CORRIENTE
omnipolar – "El INTERRUPTOR PRINCIPAL DE CORRIENTE omnipolar es un
dispositivo de desconexión; el interruptor siempre deberá estar listo para usar".
19. Instrucciones de servicio – "PRECAUCIÓN – Sólo el personal de servicio calificado
deberá usar estas instrucciones de servicio. Para reducir el riesgo de que ocurra
una descarga eléctrica, no realice ningún tipo de mantenimiento que no esté en las
instrucciones de funcionamiento, a menos que esté calificado para hacerlo".
20. Soporte de pared – Para usarse sólo con soportes de pared con certificación UL y
con el peso/carga mínima: Ver página 31.
21. ALERTA AL CONSUMIDOR – Este receptor de televisión sólo tiene un sintonizador
de transmisión analógica. A partir del 12 de junio de 2009, para recibir transmisiones
por aire mediante una antena necesitará un decodificador debido a la transición
a la señal digital a nivel nacional. Los televisores únicamente analógicos deberán
seguir funcionando como siempre con los servicios de cable y satélite, consolas de
juego, videograbadoras, reproductores de DVD y productos similares. Para obtener
más información, llame a la Comisión Federal de Comunicaciones al 1-888-2255322 (Teléfono para sordos: 1-888-835-5322) o visite la página web de la Comisión
Federal de Comunicaciones sobre la televisión digital: www.DTV.gov.
Información sobre la transición a la televisión digital –a partir del 12 de junio de
2009, los receptor de televisión únicamente con sintonizadores de transmisión
analógica necesitarán un decodificador para recibir las transmisiones por aire
mediante una antena con la potencia completa; esto se debe a la transición a la
señal digital a nivel nacional. Los televisores únicamente analógicos deberán seguir
funcionando como siempre para recibir señales de baja potencia, de Clase A o de
estaciones reemisoras de televisión, así como con servicios de cable y satélite,
consolas de juego, videograbadoras, reproductores de DVD y productos similares.
En http://www.DTV.gov o 1-888-CALL-FCC encontrará más información sobre la
transición a la televisión digital, y en http://www.dtv2009.gov o 1-888-DTV-2009
encontrará más información sobre cupones de subvención para decodificadores de
señal analógica a digital.
22. Inclinación/estabilidad – Todas las TV deben cumplir con los estándares de seguridad
internacionales recomendados en lo que respecta a la inclinación y estabilidad del
diseño de la cubierta de la TV.
●No afecte estos estándares de diseño aplicando una fuerza excesiva en la parte
frontal o superior de la cubierta de la TV, que podría llegar a volcar el producto.
●Además, no se ponga en peligro ni ponga en peligro a los niños colocando
equipos/juguetes electrónicos sobre la cubierta de la TV. Estos elementos podrían
caerse repentinamente desde la parte superior de la TV y causar daños en el
producto y/o lesiones personales.
23. Montaje en pared o techo – Se deberá montar la TV en la pared o techo sólo
siguiendo las recomendaciones del fabricante.
24. Líneas de tensión – Se deberá instalar la antena exterior alejada de líneas de tensión.
Español
5
Page 81

25. Conexión a tierra de la antena para exteriores – Si se usa una antena para exteriores
CONDUCTORES DE CONEXIÓN A TIERRA
SISTEMA DE ELECTRODOS DE CONEXIÓN A TIERRA DEL SERVICIO ELÉCTRICO
conectada al receptor, asegúrese de que el sistema de la antena esté conectado a
tierra para obtener una cierta protección contra sobrecargas de tensión y descargas
de electricidad estática acumulada. La sección 810 del Código Eléctrico Nacional
(CEN), ANSI/NFPA No. 70-1984, contiene información sobre la forma adecuada de
hacer una conexión a tierra del poste y de la estructura de soporte, la conexión
a tierra del conductor de conexión hacia una unidad de descarga de la antena, el
tamaño de los conectores de conexión a tierra, la ubicación de la unidad de descarga
de la antena, la conexión a los electrodos de conexión a tierra y los requerimientos
del electrodo de conexión a tierra. Consulte la figura que aparece a continuación.
ANTENA
ABRAZADERA DE CONEXIÓN A TIERRA
UNIDAD DE DESCARGA DE
EQUIPO DE SERVICIO ELÉCTRICO
ABRAZADERAS DE
CONEXIÓN A TIERRA
LA ANTENA
EJEMPLO DE LA CONEXIÓN A TIERRA DE LA ANTENA
CONFORME EL CÓDIGO ELÉCTRICO NACIONAL
Nota para instaladores del sistema de CATV: El fin de este aviso es hacer que
la persona que instale el sistema de cable esté al tanto del Artículo 820-40 del
CEN que brinda las pautas para realizar una conexión a tierra adecuada y, en
particular, especifica que el cable de conexión a tierra deberá estar conectado al
sistema de conexión a tierra 6 English del edificio, lo más cerca que sea posible al
punto de entrada del cable. ¡Asegúrese de enchufar el cable de alimentación en el
tomacorriente luego de conectar la TV al adaptador!
26. No se debe exponer el producto a salpicaduras ni se debe colocar sobre éste ningún
recipiente que contenga agua, como por ejemplo, jarrones.
27. La advertencia indica que los aparatos de Clase I deberán conectarse a un
tomacorriente que cuente con un conductor de conexión a tierra de protección.
28. No se debe exponer el producto a salpicaduras ni se debe colocar sobre éste ningún
recipiente que contenga agua, como por ejemplo, jarrones.
29. Declaración que indica que el enchufe de alimentación de corriente o el acoplador
del aparato siempre deberá estar listo para usar.
30. El enchufe de alimentación de corriente o el acoplador del aparato son dispositivos
de desconexión; el dispositivo de desconexión siempre deberá estar listo para usar.
31. Cuando se utilice el INTERRUPTOR PRINCIPAL DE CORRIENTE omnipolar como
el dispositivo de desconexión, se deberá describir la ubicación del aparato y el
funcionamiento del interruptor, y el interruptor siempre deberá estar listo para usar.
6
Page 82

GUARDE ESTAS
INSTRUCCIONES
Gracias por comprar este producto Haier. Este manual fácil de usar lo ayudará a usar su
producto de la mejor manera posible. No se olvide de apuntar el modelo y el número de serie.
Los encontrará en la etiqueta ubicada en la parte posterior del producto.
Número de modelo
Español
Número de serie
Fecha de compra
Engrape el recibo del producto con el manual. Lo necesitará para obtener el
servicio de la garantía.
7
Page 83

CONTENIDOS
PARA SU SEGURIDAD ............................................................................ 2
PRECAUCIONES Y RECORDATORIOS .............................................3
INSTRUCCIONES IMPORTANTES DE SEGURIDAD ......................4
Colocación de la base .....................................................................................9
PREPARACIÓN DE LA HDTV LCD PARA EL MONTAJE
EN PARED .........................................................................................................9
PREPARACIÓN .......................................................................................... 9
GUÍA DE CONEXIÓN DE PERIFÉRICOS ........................................ 11
INSTRUCCIONES DE FUNCIONAMIENTO ..................................13
UTILIZACIÓN DEL PANEL DE CONTROL TRASERO ..................... 13
UTILIZACIÓN DEL CONTROL REMOTO ........................................... 14
INITIAL SETUP (CONFIGURACIÓN INICIAL) ................................... 16
FUENTE DE ENTRADA ............................................................................. 17
VIDEO ............................................................................................................. 18
AUDIO ............................................................................................................ 20
TV ..................................................................................................................... 21
SETUP (CONFIGURACIÓN) .................................................................... 21
PARENTAL (CONTROL PATERNO) ..................................................... 23
MEDIA (MULTIMEDIA) ............................................................................... 26
CONSEJOS ..................................................................................................... 28
ESPECIFICACIONES DEL PRODUCTO............................................30
RESOLUCIÓN DE PROBLEMAS ......................................................... 32
GLOSARIO ...............................................................................................33
GARANTÍA ............................................................................................... 34
8
Page 84

PREPARACIÓN
IMPORTANTE: no aplique presión
en el área de la pantalla debido a que
podría afectar la integridad de la misma.
La garantía del fabricante no cubre
abusos o instalaciones inadecuadas por
parte del usuario.
Colocación de la base
IMPORTANTE:
de la HDTV antes de utilizarla.
1. Coloque la TV hacia abajo sobre
una superficie suave y plana (manta,
goma espuma, paño, etc.) para
evitar cualquier daño a la HDTV.
2. Alinee e inserte cuidadosamente la
base en el soporte.
3. Empuje la base contra la HDTV con
cuidado hasta que el mecanismo de
enganche quede fijo.
se deberá colocar la base
Antes de instalar la TV en la pared,
deberá extraer la base y el soporte.
Para su protección, sólo use un
soporte de pared con certificación UL
con el peso mínimo del televisor sin el
soporte. (Vea la página 31).
Para colocar un soporte de montaje en
pared en la TV:
1. Quite los tornillos que fijan la TV al
pie de apoyo.
2. Extraiga el soporte y la base de la TV.
3. Asegure el soporte de montaje en
pared a la parte posterior de la TV
a través de 4 tornillos.
Español
4. Sujete la base con los tornillos
suministrados.
PREPARACIÓN DE LA HDTV
LCD PARA EL MONTAJE EN
PARED
Sugerimos que mantenga la TV a
como mínimo 2,36 pulgadas (60 mm)
de la pared con el fin de evitar una
interferencia del cable.
• LE32D2320: 200 x 100 mm; métrico 4 x
10 mm
• LE39D2380: 200 x 200 mm; métrico 6 x
10 mm
• LE42D2380/LE46D2380: 400 x 400 mm;
métrico 6 x 10 mm
NOTA
El soporte de pared y los tornillos no
están incluidos.
9
Page 85

1. Instale la base. Coloque la TV
sobre una superficie sólida.
Min
1 m
Asegúrese de que la TV esté
colocada en una ubicación donde
el aire pueda fluir libremente. No
cubra las aberturas de ventilación
ubicadas en la cubierta trasera.
Para evitar cualquier situación
insegura, no se deberá colocar
sobre o cerca de la TV ninguna
fuente de llama expuesta tales
como velas encendidas.
Evite exponer la TV al calor, a la
luz solar directa y a la lluvia o
agua. No se debe exponer la TV a
salpicaduras.
HTR- D09B
HTR- D09B
4. Alimentación:
Inserte el cable de alimentación
en un tomacorriente de pared
que posea un suministro de
alimentación CA.
5. Encendido de la TV:
Presione el botón Encendido/
apagado en el control remoto o
el botón Encendido/apagado en el
panel de control lateral de la TV.
Encendido/Apagado
2. Conecte el cable de la antena o
el cable de CATV al conector de
antena ENTRADA DE ANTENA
75Ω ubicado en la parte trasera de
la TV.
3. Control remoto:
Extraiga la tapa del compartimiento
de las pilas. Inserte las 2 pilas
suministradas (tipo “AAA” de 1,5V).
ZOOM
10
Page 86

GUÍA DE CONEXIÓN DE PERIFÉRICOS
1 2
PC IN
VGA
AV / Y
COMPONENT / AV IN
Pr L R
Pb
Español
USB
3
ANTENNA
COAX OUT
PC AUDIO
11
Page 87

1. HDMI – Conecte la fuente primaria para video digital como un reproductor
multimedia de DVD o decodificador a través de este conector totalmente
digital.
2. ENTRADA DE PC/AUDIO DE PC – Conecte aquí los cables de audio y
video de una computadora.
3. ENTRADA DE A/V – Conecta la fuente de entrada para dispositivos
de video compuesto como videograbadoras o juegos de video. Utilice los
conectores blanco y rojo para conectar el audio externo desde la misma
fuente.
4. VIDEO COMPONENTE (Y/Pb/Pr con audio L/R) – Conecte aquí la
fuente primaria para dispositivos de video componente como un reproductor
de DVD o un decodificador. Use rojo para la entrada Pr, azul para la Pb, verde
para la Y, rojo para la entrada del canal de audio derecho (R) y blanco para la
del canal de audio izquierdo (L).
5. ANTENA (CABLE DIGITAL/ANALÓGICO) – Conecte este puerto
con una antena o cable digital (proveniente desde la pared y no desde el
decodificador) para TV digital.
6. SALIDA COAXIAL - Cuando una señal de audio digital está asociada con
la entrada seleccionada para la visualización, el audio digital estará disponible
en esta conexión SALIDA COAXIAL con el sistema de cine en casa.
7. PUERTO USB – Inserte un dispositivo de almacenamiento USB a este
puerto USB para visualizar fotografías en formato JPEG/BMP o escuchar
música en formato MP3. (Consulte la página 26-27 para obtener más
información).
8. Salida de los audífonos – Se conecta a los auriculares. Cuando el conector
del audífono está conectado a la entrada, los parlantes de la TV estarán en
silencio.
Una vez que los dispositivos estén conectados, utilice el siguiente procedimiento
para visualizar la señal de entrada:
Presione el botón de la Fuente en el mando a distancia para elegir la fuente de
entrada adecuada.
(Por ejemplo: Presione el botón ENTRADA para seleccionar el “Video
componente” si ha conectado un reproductor de DVD a la entrada Video
componente).
12
Page 88

INSTRUCCIONES DE FUNCIONAMIENTO
UTILIZACIÓN DEL PANEL DE CONTROL TRASERO
1
2
3
4
5
6
7
1. VOL + Presione este botón para subir el volumen.
2. VOL - Presione este botón para bajar el volumen.
3. CH
4. CH
5. MENU Presione este botón para ingresar o salir del menú OSD.
6. INPUT Presione este botón para seleccionar la fuente de entrada.
7.
▲
▼
POWER
Presione este botón para subir de canal.
Presione este botón para bajar de canal.
Presione este botón para encender/apagar (modo de
espera) la TV.
Español
13
Page 89

UTILIZACIÓN DEL CONTROL REMOTO
Alimentación
Presione este botón para
ENCENDER/APAGAR
(modo de espera) el
televisor.
Nota: La TV nunca está
totalmente apagada a
menos que se desconecte
físicamente.
PICTURE (IMAGEN)
Presione este botón
para cambiar el modo de
imagen.
AUDIO
Presione este botón para
cambiar el modo de audio.
ZOOM
Presione este botón
para cambiar el modo
de pantalla. Normal,
Panorámico, Cine y Zoom.
CCD
Presione este botón
para cambiar el tipo de
subtítulos: CC activado/CC
desactivado/CC activado al
silenciar.
MTS/SAP
Presione para cambiar
el modo de audio: SAP,
Estéreo, Mono para TV
NTSC o cambio del idioma
del audio para DTV.
SLEEP (Modo suspendido)
Presione este botón para
ajustar el temporizador
(desactivado/ 10 minutos/
20 minutos/ 30 minutos/
40 minutos/ 50 minutos/
60 minutos/ 90 minutos/
120 minutos).
Números 0 ~ 9 / •
ZOOM
FREEZE
Presione estos botones
para ingresar el número
de canal de TV (Presione
"." para seleccionar un
subcanal).
INPUT (ENTRADA)
Presione el botón
"ENTRADA" para abrir la
lista de fuentes.
MENU (MENÚ)
Presione este botón para
ingresar o salir del menú
OSD.
MUTE (SILENCIO)
Activa/desactiva el sonido.
CH+ / CH-
• Menú visualizado:
Presione CH+ o CH- para
navegar hacia arriba o
abajo.
• Menú no visualizado:
Presione CH+ o CHpara navegar a través de
los canales de TV.
• ARRIBA/ABAJO
MúltiplexFunción CH +/-.
VOL+ / VOL-
• Menú visualizado:
Presione VOL+ o VOLpara navegar hacia la
derecha o izquierda.
• Menú no visualizado:
Presione VOL+ o VOL- para
ajustar el volumen.
ENTER (ACEPTAR)
Presione este botón para
confirmar una selección.
EXIT (SALIR)
Presione este botón
para salir del menú OSD
(visualización en pantalla).
RECALL (REGRESAR)
Presione este botón para
14
Page 90

visualizar el canal anterior.
DISPLAY (VISUALIZAR)
Presione este botón para mostrar
información sobre la fuente de entrada,
el canal, la resolución de la pantalla y la
hora actual.
Presione tres veces el botón "Display"
(Visualizar) dentro de la fuente TV y,
después de que desaparezca el menú
OSD, presione ARRIBA/ABAJO para
cambiar de canal.
FREEZE (CONGELAR)
Presione este botón para congelar la
imagen.
FAVORITE (CANALES FAVORITOS)
Presione este botón para abir la lista de
canales favoritos.
CH.LIST (LISTA DE CANALES)
Presione este botón para visualizar la
lista de canales.
Sólo para el uso multimedia.
rápidamente la reproducción de MP3
en el modo Música.
PREV (ANTERIOR)
Presione este botón para visualizar
la fotografía anterior durante la
presentación de las fotografías. Presione
este botón para reproducir el archivo
anterior en el modo Música. Presione
este botón para regresar al modo de
vista en miniatura al reproducir el
primer archivo del directorio actual.
NEXT (SIGUIENTE)
Presione este botón para visualizar
la fotografía siguiente durante la
presentación de las fotografías. Presione
este botón para reproducir el archivo
siguiente en MP3 MusicBox. Presione
este botón para regresar al modo de
vista en miniatura al reproducir el
último archivo del directorio actual.
Español
USB
Presione el botón USB para ingresar o
salir del modo multimedia USB.
PLAY/PAUSE (REPRODUCIR/
PAUSAR)
Presione este botón para iniciar/pausar
la reproducción en el modo Mutimedia.
STOP (DETENER)
Presione este botón para detener la
reproducción en el modo Multimedia.
REPEAT (REPETIR)
Presione este botón para activar/
desactivar el modo de repetición en el
modo Música.
REV (RETROCESO RÁPIDO)
Presione este botón para retroceder
rápidamente la reproducción de MP3
en el modo Música.
FWD (AVANCE RÁPIDO)
Presione este botón para avanzar
15
Page 91

INITIAL SETUP
(CONFIGURACIÓN INICIAL)
Welcome (Bienvenido/a)
¡Bienvenido al asistente de configuración
inicial!
Presione [ENTER] para iniciar el
asistente.
Initial Setup
Please select your time zone:
NEW
ARIZONA
foundland
CENTRAL
EASTERN
Atlantic
INDIANA
ALASKA
MOUNTAIN
PACIFIC
HAWAII
Back Select Next Exit
Eastern Time
Central Time
Mountain Time
Pacific Time
Time Zone
Alaska
Hawaii
Initial Setup Welcome
Welcome to use the Wizard for Initial Setup!!
Please press [ENTER] to start the wizard.
Language (Idioma)
Presione [CH-]/[CH+] para seleccionar
el idioma y
presione [ENTER] para confirmar.
Initial Setup Language
Please select your language:
English
Español
Français
Back Select Next Exit
Time Zone (Zona horaria)
Presione [CH-]/[CH+] para seleccionar
la zona horaria y
presione [ENTER] para confirmar.
Tuner Type (Tipo de sintonizador)
Presione [CH-]/[CH+] para seleccionar
el tipo de sintonizador y
presione [ENTER] para confirmar.
Initial Setup Tuner
Please select your tuner mode:
Antenna
Cable
Back Select Next Exit
1. Antenna (Antena): establece el
tipo de señal en antena. al establecer
en Aire, la TV puede recibir señales
de transmisión analógicas y digitales
(ATSC).
2. Cable: establece el tipo de señal en
cable al establecer en Cable, la TV
puede recibir señales de transmisión
analógicas y QAM.
Scan (Búsqueda)
Presione [CH-]/[CH+] para seleccionar
iniciar la búsqueda u omitirla y
presione [ENTER] para confirmar.
16
Page 92

Initial Setup Channel Scan
First, please connect cable and/or antenna.
Start channel scan now ?
If you skip this step,the channel scan could be performed in Menu.
Scan
Skip Scan
FUENTE DE ENTRADA
Source Select
TV
Composite
Component
Back Select Next Exit
Initial Setup Channel Scan
The Channel Scan may take a while to complete.
Status:Scanning..
Analog Channels:0
Digital Channels:0
5%
MENU
Cancel
Exit
1. Scan (Búsqueda): busca
automáticamente los canales.
2. Skip Scan (Omitir búsqueda):
omite la búsqueda e ingresa en la
interfaz de finalización.
Complete (Configuración
completada)
VGA
HDMI 1
HDMI 2
HDMI 3
USB
Presione INPUT para visualizar la lista
de fuentes de entrada, presione [CH-]/
[CH+] para seleccionar una fuente y
presione ENTER para confirmar.
Utilización del control remoto
para visualizar y navegar por los
menús principales de visualización
en pantalla
Español
Initial Setup Complete
Congratulations!!
Completed Initial Setup.
Please press [ENTER] to exit the wizard.
Back
1. Presione [MENU] para visualizar
el menú en pantalla o regresar al
nivel anterior del menú. En el nivel
superior del menú, si presiona el
botón MENU, se cerrará el menú.
2. Utilice los botones [VOL-] o
[VOL+] para seleccionar el icono
de menú deseado. Presione
[ENTER] para seleccionarlo.
3. Utilice los botones [CH+] o [CH-]
para desplazarse hacia arriba o
abajo a través de las funciones.
17
Page 93

4. Siga las instrucciones que aparecen
en la pantalla.
5. Presione [EXIT] para salir
inmediatamente del menú.
Presione este botón una
vez para visualizar el menú
en pantalla y presiónelo
nuevamente para regresar a la
visualización normal. Si no se
presiona ningún botón, el menú
se cerrará de forma automática
después de aproximadamente
60 segundos.
Para salir de los menús: presione [EXIT]
(o [MENU]).
VIDEO
Picture Mode Energy Saving
Brightness
Video
Contrast
Saturation
Audio
Tint
TV
Sharpness
Setup
Parental
1. Picture Mode (Modo de
imagen): Utilice los botones [CH-]
o [CH+] para seleccionar una de
las siguientes opciones, presione
[ENTER] para ingresar en el
submenú y presione [VOL-] o
[VOL+] para ajustar.
[Energy Saving] (Ahorro de
energía) – Configuración de imagen
que ahorra la mayor cantidad de
energía.
[Mild] (Suave) – Ajusta el nivel de
brillo y contraste y reduce la nitidez
para un modo de visualización de
imagen suave.
[Standard] (Estándar) –
Seleccione para obtener la
configuración de imagen estándar.
Opción recomendada para el
entretenimiento hogareño.
[Bright Room] (Sala luminosa)
50
50
50
0
10
SelectEnter Exit
– Seleccione esta opción para
obtener un brillo mejorado de la
imagen.
[User] (Usuario) –
Permite
almancear la configuración preferida.
Nota: Si cambia la
configuración que se
detalla abajo, se cambiará
automáticamente Modo de
imagen a Usuario.
2. Brightness (Brillo): permite
aclarar o oscurecer la imagen.
Presione [VOL-] para oscurecer
la imagen. Presione [VOL+] para
aclarar la imagen.
3. Contrast (Contraste): permite
ajustar le nivel de blanco de la
imagen. Presione [VOL-] para
reducir el contraste. Presione
[VOL+] para aumentar el contraste.
4. Saturation (Saturación):
permite ajustar la saturación de
color de la imagen. Presione [VOL-]
para reducir la saturación de color.
Presione [VOL+] para aumentar la
saturación de color.
5. Tint (Tinte): permite ajustar el
tinte de la imagen. Presione [VOL-]
para aumentar los tonos rojos.
Presione [VOL+] para aumentar los
tonos verdes.
6. Sharpness (Nitidez): permite
aumentar la nitidez o suavisar
la imagen. Presione [VOL-] para
suavizar la imagen. Presione [VOL+]
para aumentar la nitidez de la
imagen.
7. Color Temperature
(Temperatura de color): Utilice
los botones [CH-] o [CH+] para
seleccionar una de las siguientes
opciones, presione [ENTER] para
ingresar en el submenú y presione
[VOL-] o [VOL+] para ajustar.
[Cool] (Fría) – Seleccione esta
18
Page 94

opción para otorgarle al color
blanco un tinte azulado.
[Standard] (Estándar) –
Seleccione esta opción para
otorgarle al color blanco un tinte
neutro.
[Warm] (Cálida) – Seleccione
esta opción para otorgarle al color
blanco un tinte rojizo.
DNR
Video
Audio
TV
Setup
Parental
Off Low Strong Auto
MPEG NR
Adaptive Luma Control
Adaptive Back Light
Film Mode
Medium
1. Advanced Video (Video
avanzado): Utilice los botones
[CH-] o [CH+] para seleccionar
una de las siguientes opciones,
presione [ENTER] para ingresar en
el submenú y presione [VOL-] o
[VOL+] para ajustar.
[DNR] – Reducción de ruido
digital. Puede ajustar la señal de TV
analógica mediante la reducción del
ruido de punto. (Esta función no
está disponible en la fuente PC o
Multimedia).
[MPEG NR] – Similar a DNR,
puede ajustar esta opción para
reducir el ruido de bloque.
[Adaptive Luma Control]
(Control lumínico adaptable) –
Cambia dinámicamente el contraste
y brillo de acuerdo con el nivel de
luz u oscuridad de la señal.
[Adaptive Back Light]
(Retroiluminación adaptable)
– Cambia dinámicamente la
retroiluminación de la pantalla
de acuerdo con el nivel de luz u
oscuridad de la señal.
[Film Mode] (Modo de
película) – Conversión de tasa de
Low
Medium
Off
Auto
MENU
Select Back
cuadros al formato de película para
evitar un parpadeo de la señal.
[VGA Mode] (Modo VGA) –
Gráficos/Video (esta función se
encuentra sólo disponible en el
modo VGA).
• Gráficos: En este modo, la imagen se ve
más suave y el texto se ve más nítido.
Ésta es la configuración predeterminada.
• Video: En este modo, la imagen se ve
más nítida. Seleccione este modo para
la visualización de videos desde una
computadora.
[HDMI Mode (Modo HDMI)] –
Auto/Gráficos/Video (esta función
se encuentra sólo disponible en el
modo HDMI).
• Auto: selecciona Video/Gráficos de
forma automática.
• Gráficos: En este modo, la imagen se ve
más suave y el texto se ve más nítido.
Seleccione este modo al realizar la
conexión con una computadora.
• Video: En este modo, la imagen se ve
más nítida. Seleccione este modo al
visualizar videos desde una computadora
o al conectar reproductores de
video, como un reproductor de DVD,
reproductor de Blu-ray, etc.
2. VGA:
[Auto Adjust] (Ajuste
automático) – Ajusta
automáticamente las opciones
Posición horizontal/ Posición
vertical/ Fase/ Reloj. Seleccione esta
opción cuando la imagen no cubre
la pantalla completa.
[H.Position] (Posición
horizontal) – Ajusta la posición
horizontal de la imagen.
[V.Position] (Posición vertical)
– Ajusta la posición vertical de la
imagen.
[Phase] (Fase) – Ajusta la fase.
Español
19
Page 95

[Clock] (Reloj) – Ajusta el reloj.
[Reset Computer settings]
(Restablecer configuración
de computadora) – Restablece
las opciones Posición horizontal/
Posición vertical/ Fase/ Reloj.
AUDIO
Sound Mode Standard
Video
Balance
Bass
Treble
Audio
Surround Sound
Digtial Audio Output
TV
Setup
Parental
1. Sound Mode (Modo de sonido):
Utilice los botones [CH-]o
[CH+] para seleccionar una de
las siguientes opciones, presione
[ENTER] para ingresar en el
submenú y presione [VOL-] o
[VOL+] para ajustar.
[User] (Usuario) – Permite
almacenar la configuración preferida.
[Standard] (Estándar) –
Seleccione para obtener la
configuración de sonido estándar.
Opción recomendada para el
entretenimiento hogareño.
[Soft] (Suave) – Seleccione esta
opción para una configuración de
sonido suave.
[Dynamic] (Dinámico) –
Seleccione esta opción para una
configuración de sonido dinámico.
Nota: Si cambia la
configuración que se
detalla abajo, se cambiará
automáticamente Modo de
sonido a Usuario.
2. Balance: ajusta el nivel de sonido
proveniente de los parlantes
izquierdo y derecho. Presione
[VOL-] para cambiar el balance
y acentuar el altavoz izquierdo.
Presione [VOL+] para cambiar
0
50
50
Off
RAW
SelectEnter Exit
el balance y acentuar el altavoz
derecho.
3. Bass (Graves): ajusta los sonidos
de baja frecuencia. Presione [VOL-]
para reducir los graves. Presione
[VOL+] para aumentar los graves.
4. Treble (Agudos): ajusta los
sonidos de alta freciencia. Presione
[VOL-] para reducir los agudos.
Presione [VOL+] para aumentar los
agudos.
5. Surround Sound (Sonido
envolvente):
[Off ] (Deactivado) – Desactiva
el sonido envolvente.
[On] (Activado) – Activa el
sonido envolvente.
6. Digital Audio Output (Salida
de audio digital):
[Off ] (Desactivado) – Desactiva
el tipo de salida de audio coaxial u
óptico.
[RAW] – Emite el formato original
de la transmisión de audio.
[PCM] – PCM puede ajustar en la
mayoría de amplificadores de A/V.
Auto Volume Control
Video
Off
Audio
TV
Setup
Parental
On
MENU
Select Back
1. Auto Volume Control (Control
automático de volumen): Utilice
los botones [CH-] o [CH+] para
seleccionar una de las siguientes
opciones, presione [ENTER] para
ingresar en el submenú y presione
[VOL-] o [VOL+] para ajustar.
[Off ] (Desactivado) – Desactiva
el control automático de volumen.
[On] (Activado) – Activa el
control automático de volumen.
20
Page 96

TV
Signal Type Antenna
Video
Auto Channel Search
Audio
Channel Skip
Favorite list
TV
Setup
Parental
SelectEnter Exit
1. Signal Type (Tipo de señal):
Utilice los botones [CH-] o [CH+]
para seleccionar una de las
siguientes opciones, presione
[ENTER] para ingresar en el
submenú y presione [VOL-] o
[VOL+] para ajustar.
[Antenna] (Antena) – Establece
el tipo de señal en antena. Al
establecer en Aire, la TV puede
recibir señales de transmisión
analógicas y digitales (ATSC).
[Cable] – Establece el tipo de
señal en cable. Al establecer en
Cable, la TV puede recibir señales
de transmisión analógicas y QAM.
2. Auto Channel Search
(Búsqueda automática de
canales): Seleccione y presione
ENTER para iniciar la búsqueda de
canales.
3. Channel Skip (Omisión de
canales): Agregue y omita
manualmnte los canales de la lista
de programas.
4. Favorite List (Lista de
favoritos): Agregue y omita
manualmnte los canales de la lista
de favoritos.
SETUP (CONFIGURACIÓN)
Menu Language English
Video
Audio
TV
Setup
Parental
MTS
No Signal Power Off
Blue Screen
Audio Only
Time Setup
Stereo
On
On
SelectEnter Exit
1. Menu Language (Idioma del
menú): Utilice los botones [CH-]
o [CH+] para seleccionar una de
las siguientes opciones, presione
[ENTER] para ingresar en el
submenú y presione [VOL-] o
[VOL+] para ajustar.
Establezca el idioma de la
visualización en pantalla.
English/Espanol/Francais.
2. Aspect Ratio (Relación de
aspecto): Presione este botón
para cambiar el modo de pantalla.
Normal, Wide (Panorámico),
Cinema (Cine) y Zoom al existir
una señal.
Nota: ATSC/HDMI/VIDEO
COMPONTE Permite la conexión
con 720P/1080I/1080P ,y “Aspect
ratio” (Relación de aspecto) se
estableció en el modo panorámico.
3. MTS: permite establecer el modo
de audio preferido para los canales
analógicos. Mono/ Stereo (Estéreo)/
SAP.
4. No Signal Power Off (Apagado
sin señal): cuando se establezca
esta opción en Activado, la TV se
apagará automáticamente cuando
no exista una señal de entrada.
5. Blue Screen (Pantalla azul):
cuando se establezca esta opción
en Activado, la pantalla aparecerá de
color azul en lugar de negro cuando
no exista una señal de entrada.
6. Audio Only (Sólo audio):
Presione [ENTER] para apagar
la retroiluminación y presione
cualquier botón para activarla.
7. Time Setup (Configuración de
hora): permite ajustar las opciones
Zona horaria/Hora/Temporizador
de apagado/Apagado automático.
8. Caption (Subtítulos): permite
ajustar las opciones Caption Display
Español
21
Page 97

(Visualización de subtítulos)/
Analog Closed Caption (Subtítulos
analógicos)/Digital Closed Caption
(Subtítulos digitales)/Digital Caption
Style (Estilo de subtítulos digitales).
Para obtener más información,
consulte la página 22.
9. All Reset (Restablecer todo):
permite restablecer la configuración
a los valores predeterminados.
Time Setup (Configuración de hora)
temporizador de apagado. Presione
[VOL-] o [VOL+] para seleccionar
el tiempo de apagado.
4. Auto Sleep (Apagado
autmático): permite ajustar el
tiempo de apagado automático.
Presione [VOL-]o [VOL+] para
seleccionar OFF (Desactivado)/
1Hour (1 hora)/ 2Hours (2 horas)/
5Hours (5 horas).
Time (Hora)
Time Zone
Video
Audio
TV
Setup
Parental
Time
Sleep Timer
Auto Sleep
Enter
Off
Off
MENU
SelectEnter
Back
1. Time Zone (Zona horaria):
Utilice los botones [CH-] o
[CH+] para seleccionar una de
las siguientes opciones, presione
[ENTER] para ingresar en el
submenú y presione [VOL-] o
[VOL+] para ajustar.
Permite ajustar la zona horaria
actual. Presione
[VOL-] or [VOL+] / [ENTER] para
ajustar.
2. Time (Hora): permite ajustar la
hora/fecha actuales. Presione
[VOL-] o [VOL+] / [ENTER] para
ajustar.
Auto Synchronization
(Sincronización automática)/Date
(Fecha)/Time (Hora)
Daylight Saving Time (Horario de
verano)
Power On Timer (Temporizador de
encendido)/Timer (Temporizador)/
Power On Channel (Canal de
encendido)
Power Off Timer (Temporizador de
apagado)/Timer (Temporizador)
3. Sleep Timer (Temporizador de
apagado): permite establecer el
Auto Synchronization On
Video
Audio
TV
Setup
Parental
Date
Time
Daylight Saving Time
Power On Timer
Timer
Power On Channel
Power Off Timer
Timer
2000/01/01
11:12:01
00:00:00
00:00:00
Select
Off
Off
Off
MENU
Back
Caption (Subtítulos ocultos)
Caption Display
Video
Audio
TV
Setup
Parental
Off
Analog Closed Caption
Digital Closed Caption
Digital Caption Style
On OnMute
CC1
Service 1
MENU
Select Back
1. Caption Display (Visualización
de subtítulos): Utilice los botones
[CH-] o [CH+] para seleccionar
una de las siguientes opciones,
presione [ENTER] para ingresar en
el submenú y presione [VOL-] o
[VOL+] para ajustar.
[Off ] (Desactivado) – Desactiva
la visualización de subtítulos (CC) y
los oculta.
[On] (Activado) – Activa la
visualización de subtítulos (CC) y
los muestra.
[OnMute] (Al silenciar) – Al
silenciar la TV, se mostrarán los
subtítulos. Si se utiliza la salida de
línea de audio, no se controlará la
salida de línea.
2. Analog Closed Captions
22
Page 98

(Subtítulos analógicos): permite
seleccionar el modo de subtítulos
para los programas analógicos:
CC1/CC2/CC3/CC4/TEXT1/
TEXT2/TEXT3/TEXT4.
3. Digital Closed Caption
(Subtítulos digitales): permite
seleccionar el modo de subtítulos
para los programas digitales. Off
(Desactivado)/Service1 (Servicio
1)/Service2 (Servicio 2)/Service3
(Servicio 3)/Service4 (Servicio 4)/
Service5 (Servicio 5)/Service6
(Servicio 6).
4. Digital Caption Style (Estilo
de subtítulos digitales): válido
sólo para los canales digitales
con subtítulos. Permite ajustar
las opciones Caption Style (Estilo
de subtítulos)/Font Size (Tamaño
de fuente)/Font Style (Estilo de
fuente)/Font Color (Color de
fuente)/Font Opacity (Opacidad de
fuente)/Background color (Color
de fondo)/Background Opacity
(Opacidad de fondo).
Digital Caption Style (Estilo de
subtítulos digitales)
Caption Style
Video
Audio
TV
Setup
Parental
Font Size
Font Style
Font Color
Font Opacity
Background Color
As Broadc...
Custom
Large
Style 1
White
Solid
Black
MENU
Select Back
1. Caption Style (Estilo de
subtítulos): Utilice los botones
[CH-] o [CH+] para seleccionar
una de las siguientes opciones,
presione [ENTER] para ingresar en
el submenú y presione [VOL-] o
[VOL+] para ajustar.
Permite ajustar el estilo de los
subtítulos.
As Broadcast (Según la transmisión)/
Custom (Personalizado)
.
Nota: Si cambia la
configuración que se
detalla abajo, se cambiará
automáticamente Estilo de
subtítulos a Personalizado.
2. Font Size (Tamaño de fuente):
ajusta el tamaño de la fuente: Small
(Pequeña)/Medium (Mediana)/Large
(Grande).
3. Font Style (Estilo de fuente):
ajusta el estilo de la fuente: Estilo 1
a Estilo 7.
4. Font Color (Color de fuente):
ajusta el color de la fuente: Black
(Negro)/White (Blanco)/Green
(Verde)/Blue (Azul)/Red (Rojo)/
Cyan (Cián)/Yellow (Amarillo)/
Magenta.
5. Font Opacity (Opacidad
de fuente): ajusta la opacidad
de la fuente: Solid (Sólida)/
Translucent (Traslúcida)/
Transparent (Transparente)/Flashing
(Parpadeante).
6. Background Color (Color de
fondo): ajusta el color de fondo:
Black (Negro)/White (Blanco)/
Green (Verde)/Blue (Azul)/
Red (Rojo)/Cyan (Cián)/Yellow
(Amarillo)/Magenta.
7. Background Opacity
(Opacidad de fondo): ajusta
la opacidad de fondo: Solid
(Sólida)/Translucent (Traslúcida)/
Transparent (Transparente)/Flashing
(Parpadeante).
PARENTAL (CONTROL
PATERNO)
Password
Video
Audio
TV
Setup
Parental
SelectEnter Exit
1. Password (Contraseña): Utilice
Español
23
Page 99

los botones [CH-] o [CH+] para
seleccionar una de las siguientes
opciones, presione [ENTER] para
seleccionarla e ingresará en la
interfaz de la contraseña.
Password
Video
Audio
TV
Setup
Parental
Rating Enable
U.S. TV Ratings
U.S. Movie Rating
Canadian English Ratings
Canadian French Ratings
Open V-chip
Off
On
MENU
Select Back
Después de ingresar la contraseña
correcta, aparecerá el submenú
que se muestra a continuación.
La contraseña predeterminada es
“0000”.
Video
Audio
TV
Setup
Parental
System Block
Channel Block
Program Block
Change Password
Clean All
Enter
On
SelectEnter
1. System Block (Bloqueo del
sistema): Utilice los botones
[CH-] o [CH+] para seleccionar
una de las siguientes opciones,
presione [ENTER] para ingresar en
el submenú y presione [VOL-] o
[VOL+] para ajustar.
Permite activar o desactivar el
bloqueo de programas/canales.
2. Channel Block (Bloqueo de
canales): permite establecer los
canales que se bloquearán.
System Block
Video
Audio
TV
Setup
Parental
Channel Block
Program Block
Change Password
Clean All
Off
On
Select Back
3. Program Block (Bloqueo de
programas): Utilice los botones
[CH-] o [CH+] para seleccionar
una de las siguientes opciones,
presione [ENTER] para ingresar en
el submenú y presione [VOL-] o
[VOL+] para ajustar.
Permite establecer los programas
que se bloquearán. Para obtener
más información, consulte las
páginas 24~26.
MENU
Back
[Rating Enable] (Activar
clasificación) – Permite activar o
desactivar la clasificación.
[U.S. TV Ratings] (Clasificación
de TV de EE. UU.) – Consulte la
página 25.
[U.S. Movie Rating]
(Clasificación de películas de
EE. UU.) – Consulte la página 25.
[Canadian English Ratings]
(Clasificación de inglés
canadiense) – Consulte la página
25-26.
[Canadian French Ratings]
(Clasificación de francés
canadiense) – Consulte la página 26.
[Open V-chip] (V-chip abierto)
– Activa la función V-chip.
[Clear Open V-chip Data]
MENU
(Borrar datos de V-chip abierto)
– Establece los datos de V-chip en
los valores predeterminados.
[Block Unrated] (Bloquear
sin clasificación) – Se bloquean
los programas que no poseen un
identificación de clasificación válida.
24
Page 100

4. Change Password (Cambiar
contraseña): Ingrese la
nueva contraseña de 4 dígitos
y confírmela. New Password
(Contraseña nueva)/Confirm
password (Confirmar contraseña).
5. Clean All (Borrar todo):
Establece los elementos del
menú de bloqueo en los valores
predeterminados.
U.S. TV Ratings (Clasificación de
TV de EE. UU.)
La clasificación de TV está compuesta
por 2 aspectos: clasificación basada
en edad y clasificación basada en
contenido.
Video
Audio
TV
Setup
Parental
Video
Audio
TV
Setup
Parental
Allowed Rating
Allowed Rating
A
D
L
S
V
FV
TV-Y
TV-Y7
TV-G
TV-PG
TV-14
TV-MA
Blocked Rating
Blocked Rating
MENU
SelectSet
Back
MENU
SelectSet
Back
[A] – Apto para todo público
[D] – Diálogos sugerentes
[L] – Lenguaje fuerte
[S] – Situaciones sexuales
[V] – Violencia
[FV] – Violencia de fantasía
[TV-Y] – Apto para todos los
niños
[TV-Y7] – Apto para niños más
grandes
[TV-G] – Apto para todo público
[TV-PG] – Se sugiere la
orientación paterna
[TV-14] – Contenido con
advertencia para los padres
[TV-MA] – Sólo publico adulto
Nota: La clasificación de
contenido aumentará
en función del nivel de la
clasificación basada en edad.
Por ejemplo, un programa
con una clasificación TVPG V (violencia) podría
contener violencia moderada,
mientras que un programa
con una clasificación TV-14 V
(violencia) podría contener
violencia intensa. Por lo tanto,
el bloqueo de una opción con
un nivel más alto provocará el
bloqueo de las opciones que
poseen un nivel más sensible.
U.S. Movie Ratings (Clasificación
de películas de EE. UU.)
Este sistema define el control de
clasificación incluido de las reglas
de la Asociación Cinematográfica
Estadounidense (MPAA).
Video
Audio
TV
Setup
Parental
Allowed Rating
G
PG
PG-13
R
NC-17
X
Blocked Rating
MENU
SelectSet
Back
[G] – Todo público. Todas las
edades permitidas.
[PG] – Se sugiere la orientación
paterna. Parte del material podría
no ser adecuado para los niños.
[PG-13] – Contenido con
advertencia para los padres Parte
del material podría ser inapropiado
para niños menores de 13 años.
[R] – Contenido restringido.
Los niños menores de 17 años
requieren la compañía de un padre
o adulto responsable.
Español
25
 Loading...