

Haier LE24F33800, LE19B3320, LE19B13200 User Manual
LED
LE24F33800

-1-
Contents
Safety and warnings.......................................................................................
Introduction..................................................................................................
......................................................................................
Installation...................................................................................................
Remote Control.............................................................................................
Operation.....................................................................................................
Troubleshooting...........................................................................................
Warranty.......................................................................................................
Base stand assembly
2-3
4
5
6-9
10
11-13
14
15
-2-
SA FET Y AND WARN ING S
IMPORTANT SAFETY INSTRUCTION
TO REDUCE THE RISK OF ELECTRIC SHOCK, DO
NOT REMOVE COVER (OR BACK).NO USER
SERVICEABLE PARTS INSIDE. REFER SERVICING
TO QUALIFIED SERVICE PERSONNEL.
RISK OF ELECTRIC SHOCK
DO NOT OPEN!
CAU TION
CAUTION
The symbol indicates that dangerous voltages
constituting a risk of electric shock are present
within this unit.
The symbol indicates that there are important
operating and maintenance instructions in the
literaturaccompanying this unit.
To reduce the risk of fire or electric shock, do
not expose this Television to rain or moisture.
WARNING:
1) Read these instructions.
2) Keep these instructions.
3) Heed all warnings.
4) Follow all instructions.
5) Do not use this Television near water.
6) Clean only with dry cloth.
7) Do not block any ventilation openings, install in
accordance with the instructions.
8) Do not install near any heat sources such as radiations,
heat registers, stoves, or other Television (including
amplifiers) that produce heat.
9) Do not defeat the safety purpose of the polarized plug.
If the provided plug does not fit into your outlet, consult
an electrician for replacement of the obsolete outlet.
10) Protected the power cord from being walked on or
pinched particularly at plugs, convenience receptacles,
and the point where they exit from the Television.
11) Only use attachments/accessories specified by the
manufacturer.
12) Unplug this Television during lighting storms or
when unused for long periods of time.
13) Refer all servicing to qualified service personnel.
Servicing is required when the Television has been
damaged in any way, such as; power-supply cord or plug
is damaged, liquid has been spilled or objects have fallen
into the Television, the Television has been exposed to
rain or moisture, does not operate normally, or has been
dropped.
14) Mains plug is used as the disconnect device, the
disconnect device shall remain readily operable.
15) The ventilation should not be impeded by covering
the ventilation openings with items, such as newspapers,
table-cloth, curtains, etc.
16) No naked flame sources, such as lighted candles,
should be placed on the Television.
17) Attention should be drawn to the environmental
aspects of battery disposal.
18) The use of Television in moderate climate.
19) The Television shall not be exposed to dripping or
splashing and that no objects filled with liquids, such as
vases, shall be placed on the Television.
This symbol indicates that this product incorporates
double insulation between hazardous mains voltage and
user accessible parts. When servicing use only
identical replacement parts.
This marking indicates that this product should not be
disposed with other household wastes throughout the
EU. To prevent possible harm to the environment or
human health from uncontrolled waste disposal,
recycle it responsibly to promote the sustainable
reuse of material resources. To return your used
device, please use the return and collection systems or
contact the retailer where the product was purchased.
They can take this product for environmental safe
recycling.
The batteries shall not be exposed to excessive heat
such as sunshine, fire or the like.
WARNING:
The excessive sound pressure from earphones and
headphones can cause hearing loss.
WARNING:
Haier is committed to safely recycling electronic
products and product materials. Please check for a
local recycling location in the United States at:
1800RECYCLING.COM or call 1.800.RECYCLING.
ENERGY STAR is a joint program of the U.S.
Environmetal Protection Agency and the U.S.
Department of Energy helping us all save
money and protect the environmetal through
energy efficient practices.
This product default mode (standard mode) already
pass the Energy star test. If TV set in other mode, may
increase energy consumption beyond the limits
required for ENERGY STAR qualification.
-3-
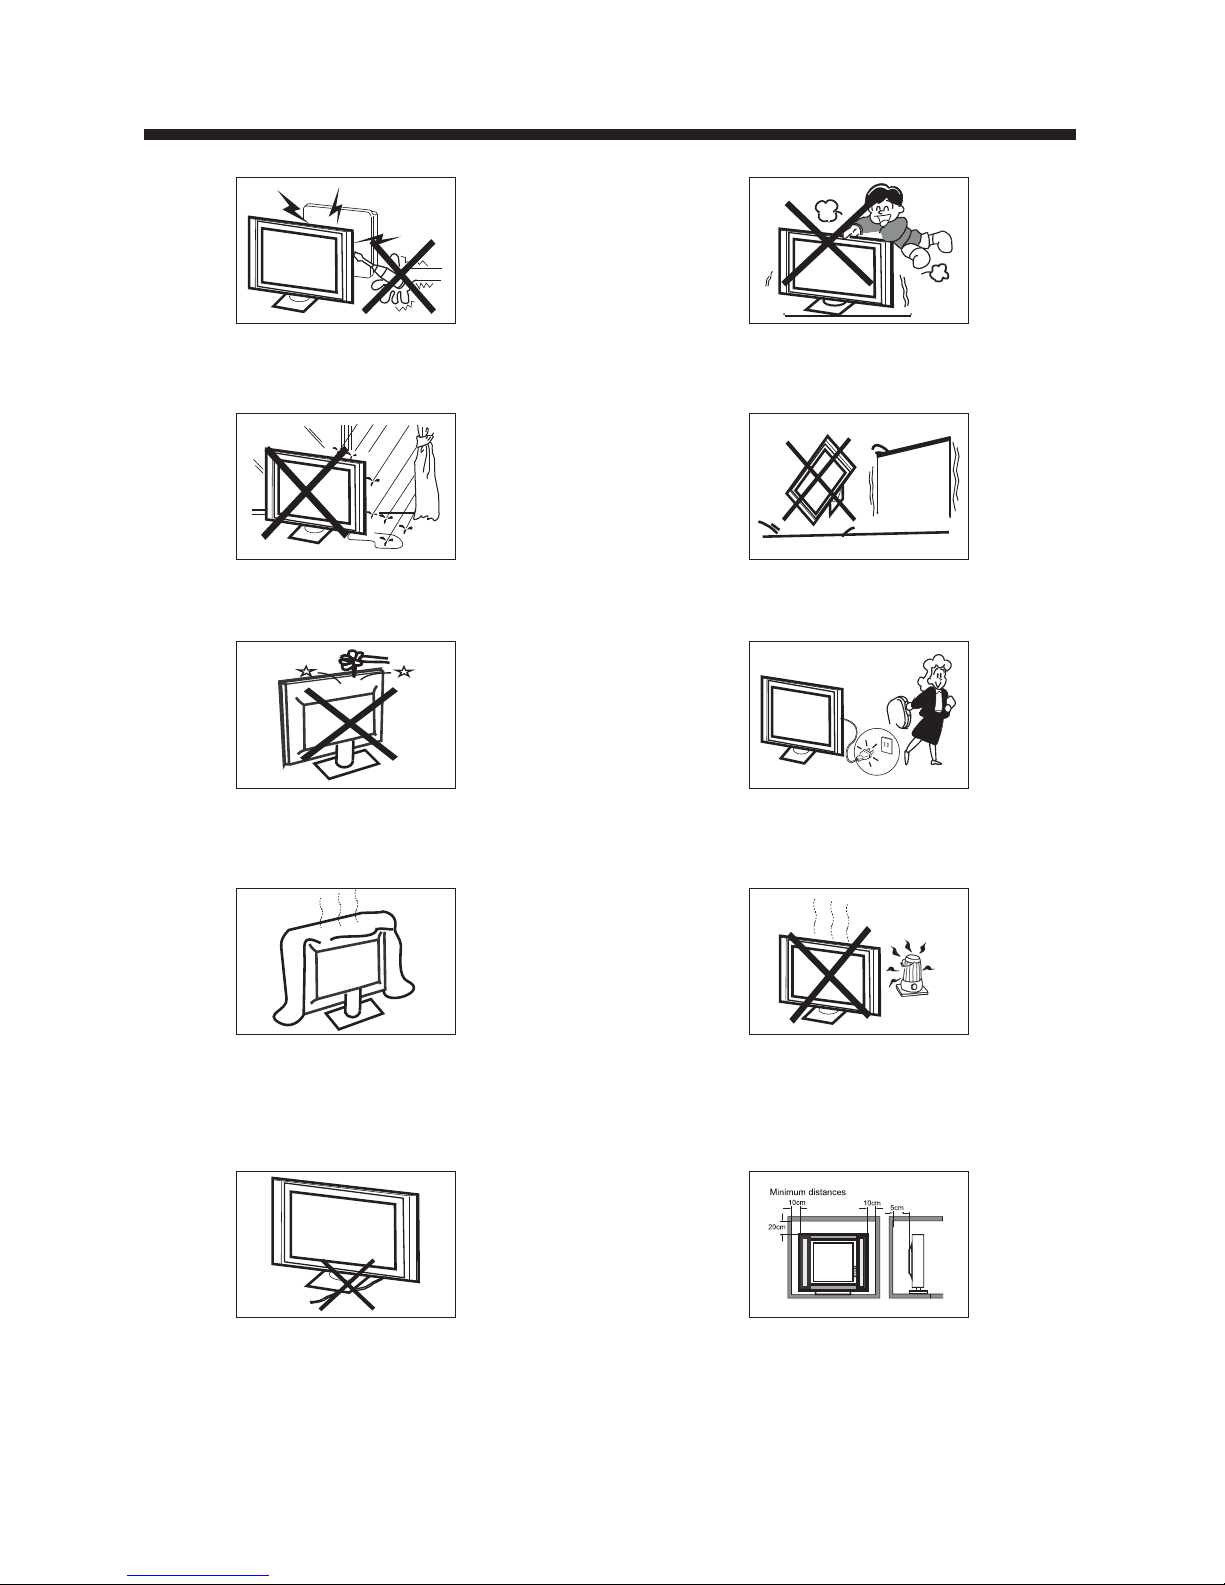
High voltages are used in the operation of this television
receiver. Do not the cabinet.
Refer servicing to qualified service personnel.
open
SA FETY AND WARN ING S
To prevent fire or electrical shock hazard, do not expose
the television receiver to rain or moisture.
Do not drop or push objects into the television cabinet
slots or openings. Never spill any kind of liquid on the
television receiver.
Do not block the ventilation holes on the back cover .
Adequate ventilation is essential to prevent failure of
electrical components.
of the TV
Do not trap the power supply cord under the television
receiver s .' stand
Never stand on, lean on, or suddenly push the television or
its stand. You should pay special attention to children.
Serious injury may result if it falls.
Do not place your television on an unstable cart, stand,
shelf or table. Serious injury to an individual and damage
to the television may result if it falls.
/or
When the television receiver is not used for an
extended period of time, it is advisable to disconnect
the AC power cord from the AC outlet.
Avoid exposing the television receiver to direct sunlight
and other sources of heat. Do not stand the television
receiver directly on other products which give off heat,
e.g. video cassette players and audio amplifiers. Do not
place naked flame sources, such as lighted candles on
the television. or near
Dim:515*320m m(不包括 底座)
If the television is to be built into a compartment or similar
enclosure, the minimum distances must be maintained. Heat
build-up can reduce the life of your television, and can also
be dangerous.
-4-
INTRODUCTION
Main features
Accessories
Infrared Remote Control....................
1
User’s M anual .................................
1
Battery(AAA)................................... 2
Accessories
Power cable...................................
1
■ Integrated ATSC TV tuner for HDTV broadcast reception
■ High brightness provides a vivid and brilliant picture
■ Deeper blacks and brighter whites with high contrast
■ Wide Screen aspect ratio (16:9) for a complete home
theater experience
■ HDMI input for true digital connection
■ VGA port for connection to PC
■ Built-in stereo speaker system
■ Full-function Remote Control
HDMI, the HDMI logo and High-Definition Multimedia Interface are trademarks or registered
trademarks of HDMI Licensing LLC.
Main Specifications
x 2 (1 HDMI input is MHL enabled)
Resolution:
TV System:
Video Signal System:
Receiving Channel:
1920 x 1080
16:9
NTSC
Cable :1-135/ Air: 2-69 (ATV&DTV)
x 1
High-Definition Multimedia Interface (HDMI) Input
Audio Input x 2
x 1
Horizontal definition (TV line) Composite Video Input >=350
Component (YPbPr) >=400
Video Input >=400
x 1
AC 100-240V 50/60Hz
2x3W
ATSC Digital system and NTSC Analog system
Headphone Output
x 1
x 1
Coaxial Output
Aspect Ratio:
Viewing Picture Size (diagonal)
Power supply
Audio Output Power (THD 7%):
Component (YPbPr) Input
Composite Video Input
Analog RGB (VGA) Input
Power consumption
x 1
USB Input
24 inches
40W
-5-
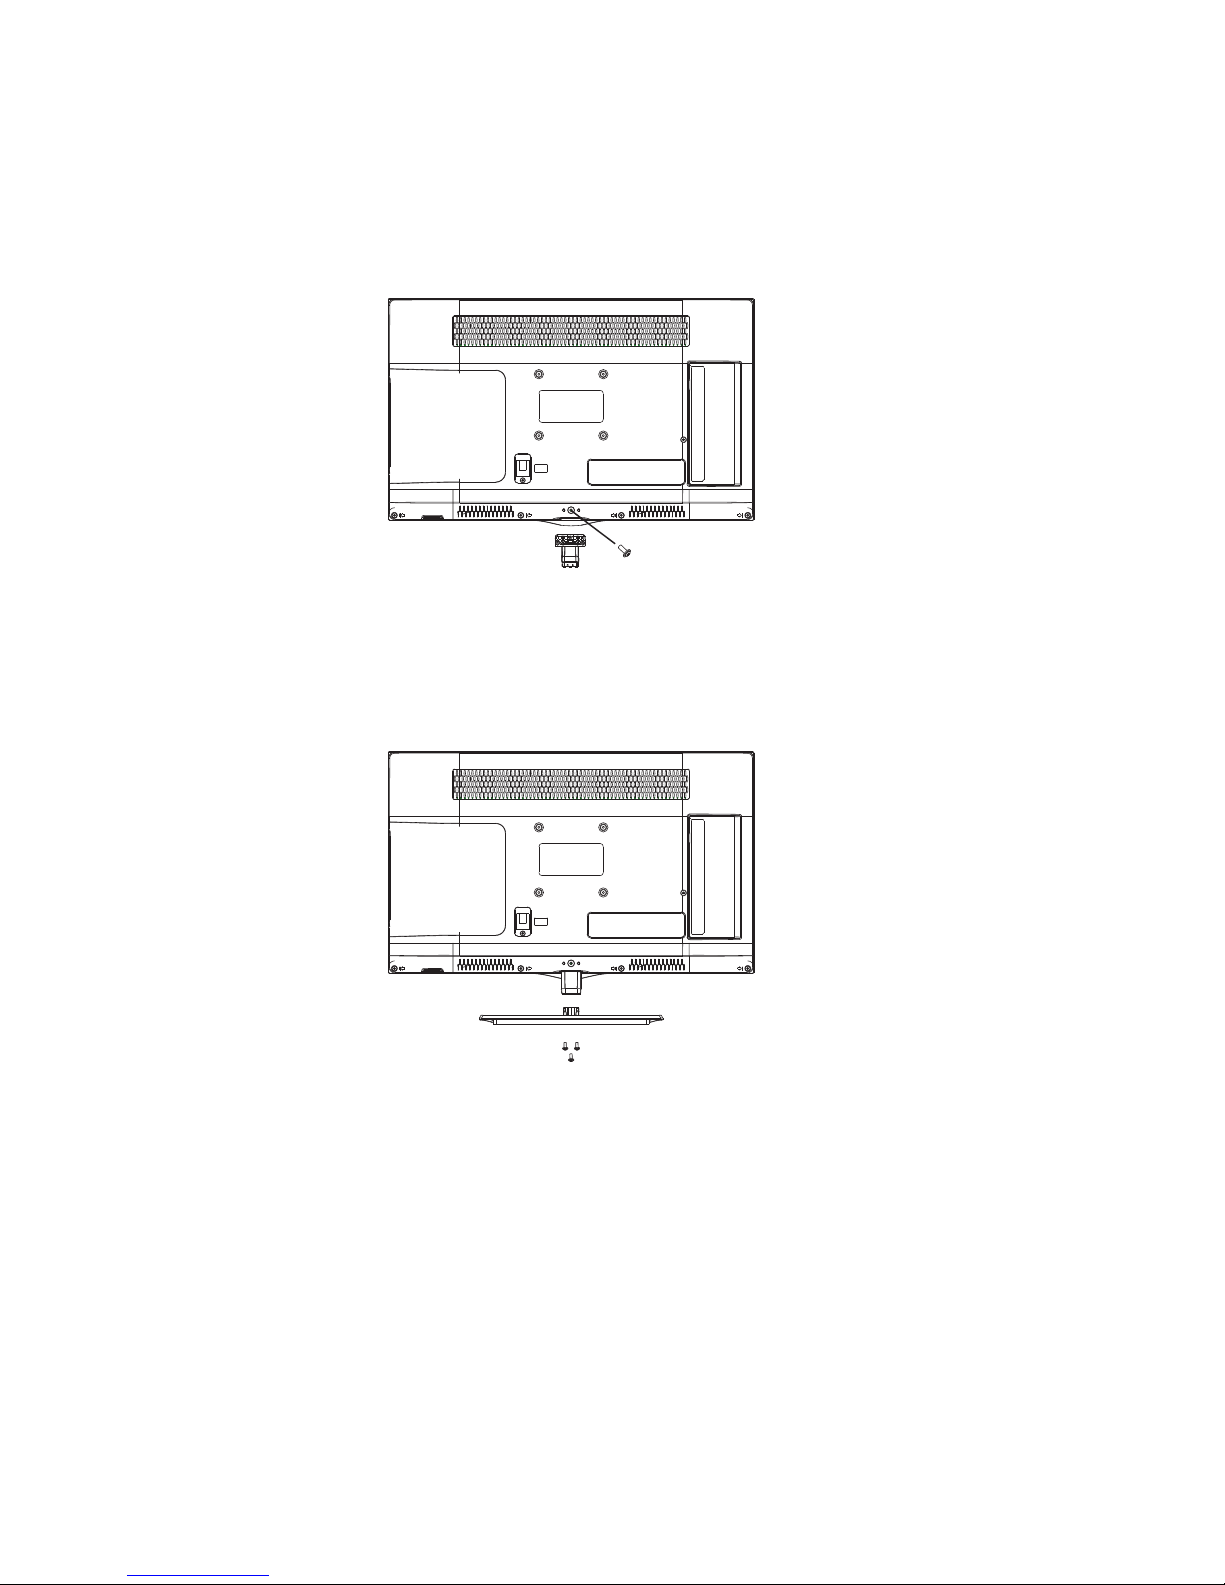
Base Stand Assembly Instruction
1. Locate the bottom bracket into the gap in the bottom of the TV, and check that it is securely held in
place by its screws.
2. Attach the base stand to the stand neck firmly tightening the supplied screws.
Note: This stand is not a swivel stand. Do not attempt to rotate the TV.
-6-
INSTALLATION
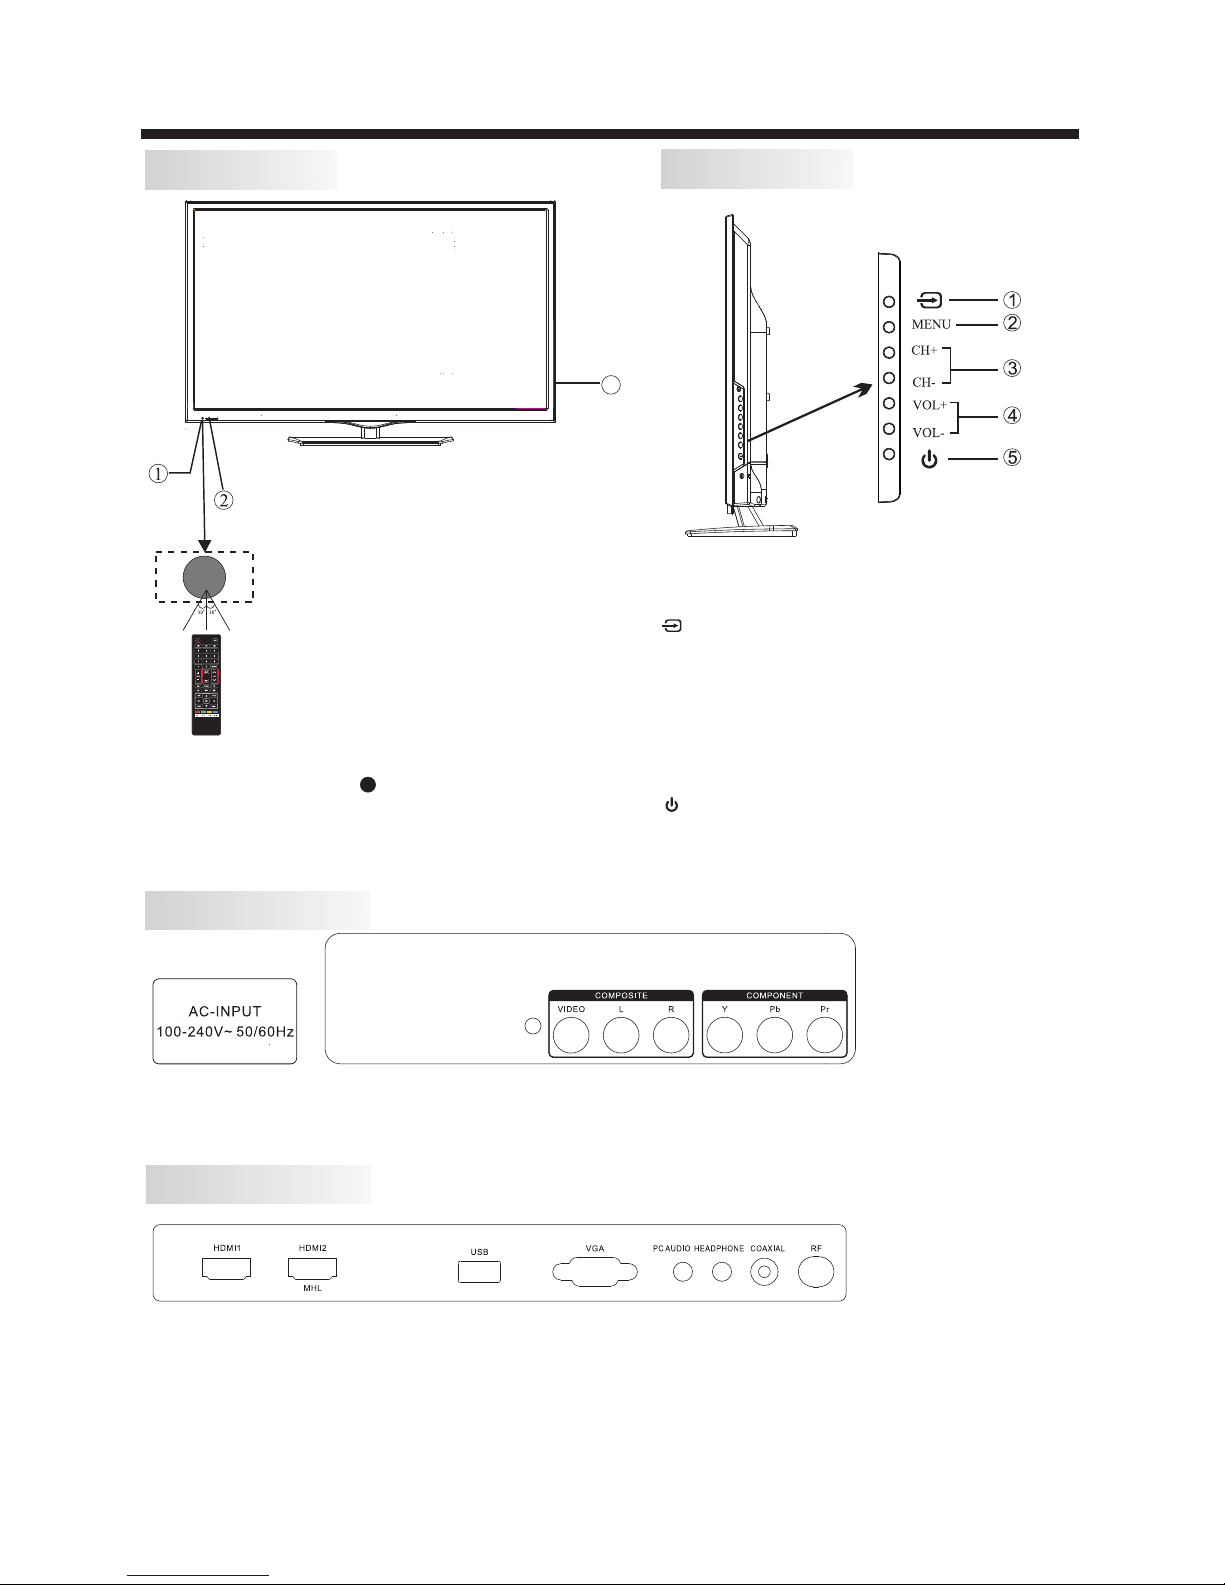
Front panel
Side panel
REAR Connections
1: Remote control sensor.
2
3:
: Indicator LED: RED STANDBY.
Panel keys
1. : Display the input source menu.
2. MENU: Display main MENU.
3. CH+/CH-: In TV mode, press "CH+" or "CH-" to
change the channel up and down. In MENU mode, press
"CH+" or "CH-" to select items; In standby mode, press
"CH+" or "CH-" to turn on the TV.
4. VOL+/VOL-: Adjust sound level. In MENU mode,
press "VOL+ " or "VOL- " to adjust the item that you
selected.
5. : Press this button to turn the unit ON from
STANDBY mode. Press it again to turn the set back to
STANDBY.
SIDE Connections
All the terminals are (from left to right):
, MHL/HDMI2, USB, VGA, PC AUDIO, HEADPHONE, COAXIAL(audio output), RF.
Note: When HDMI has an input signal coming from a DVI source then the audio input signal must be
connected to the PC audio input.
HDMI1
All the terminals are (from left to right):
POWER SOCKET, VIDEO, AUDIO INPUT, .
Note: AV and component (YPbPr) share the R and L audio inputs.
YPbPr INPUT(COMPONENT)
3
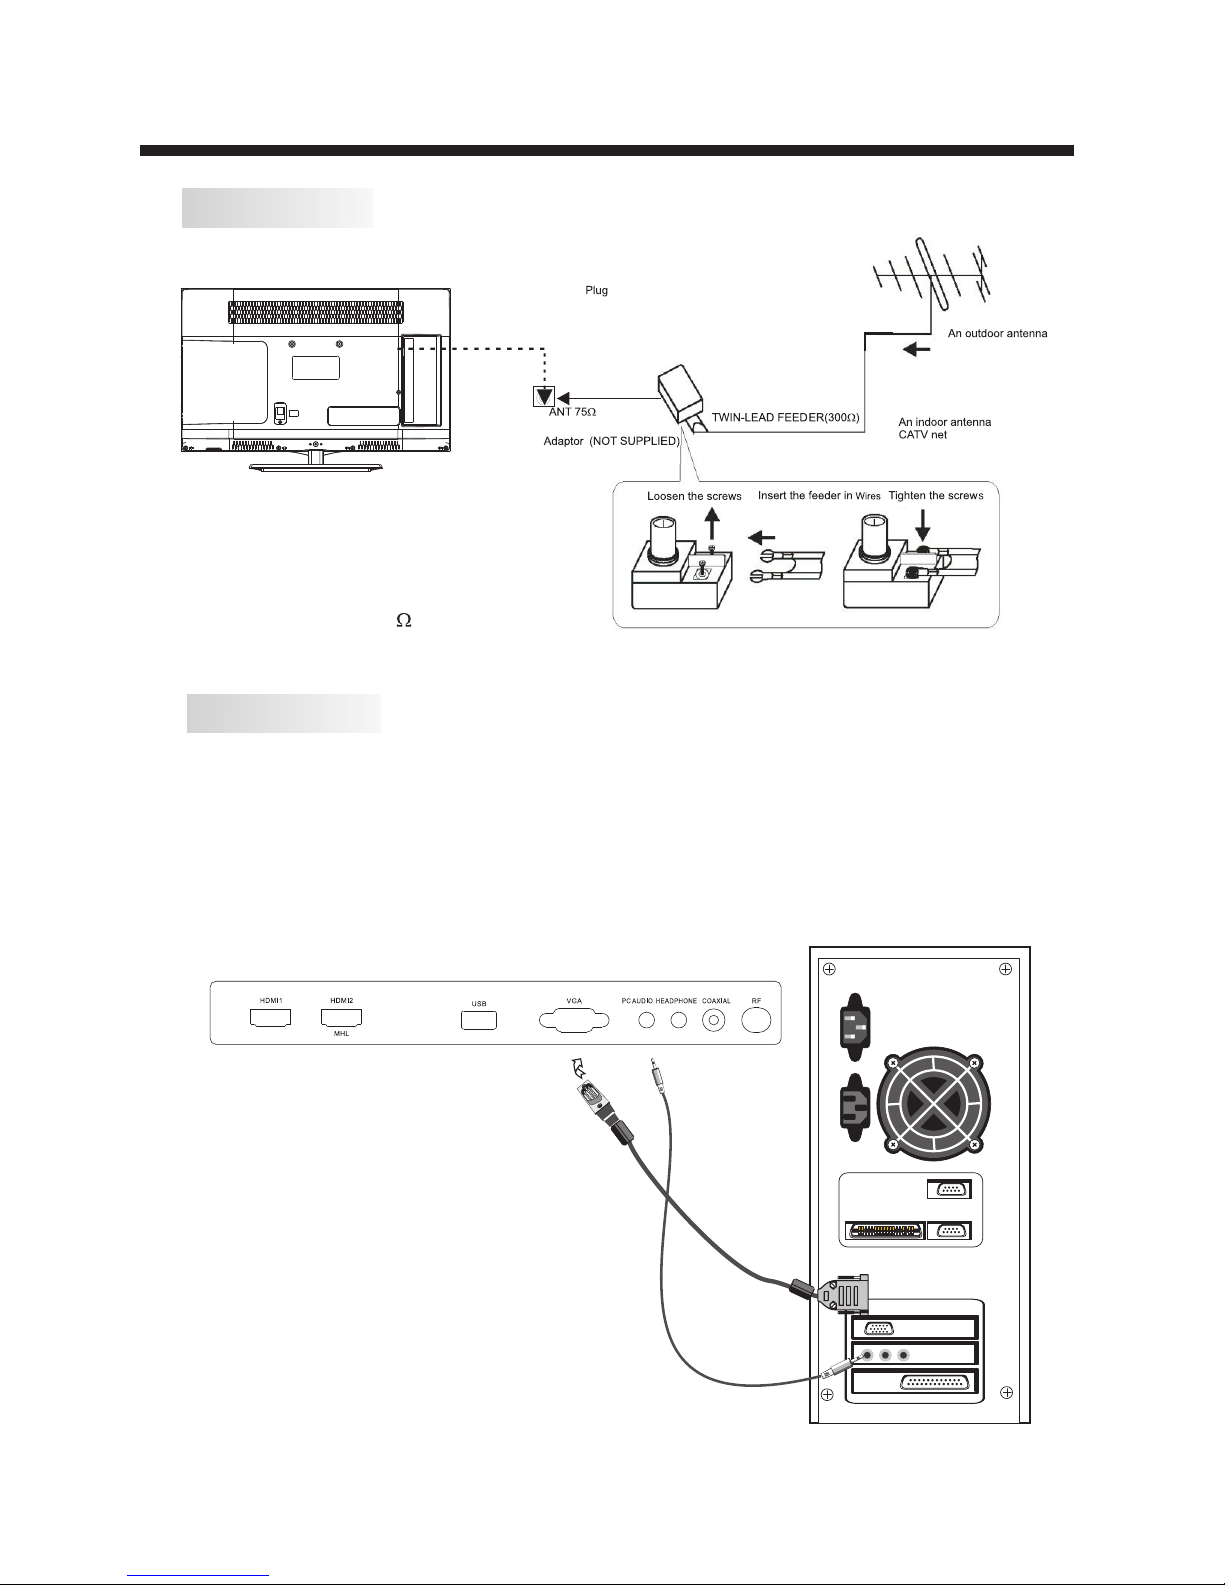
ANTENNA
INSTALLATION
Note:
Aerial connections: IEC (female).
Input impendance: 75 unbalanced.
STEPS:
PC
Be sure both the TV and computer are powered off.
1.Connect a VGA and audio cable.
2.Connect the power cord.
3.Turn on the TV, switch to PC mode.
4.Turn on the PC.
-7-
PC
-8-
INSTALLATION
PRESET MODE
1
2
3
4
5
6
640*480
800*600
1024*768
1280*1024
60
60
60
60
31.47
37.88
48.36
63.98
RESOLUTION
V.Freq.(Hz) H.Freq.(KHz)
1366*768
1920*1080
60
60
47.71
67.50
INSTALLATION
-9-
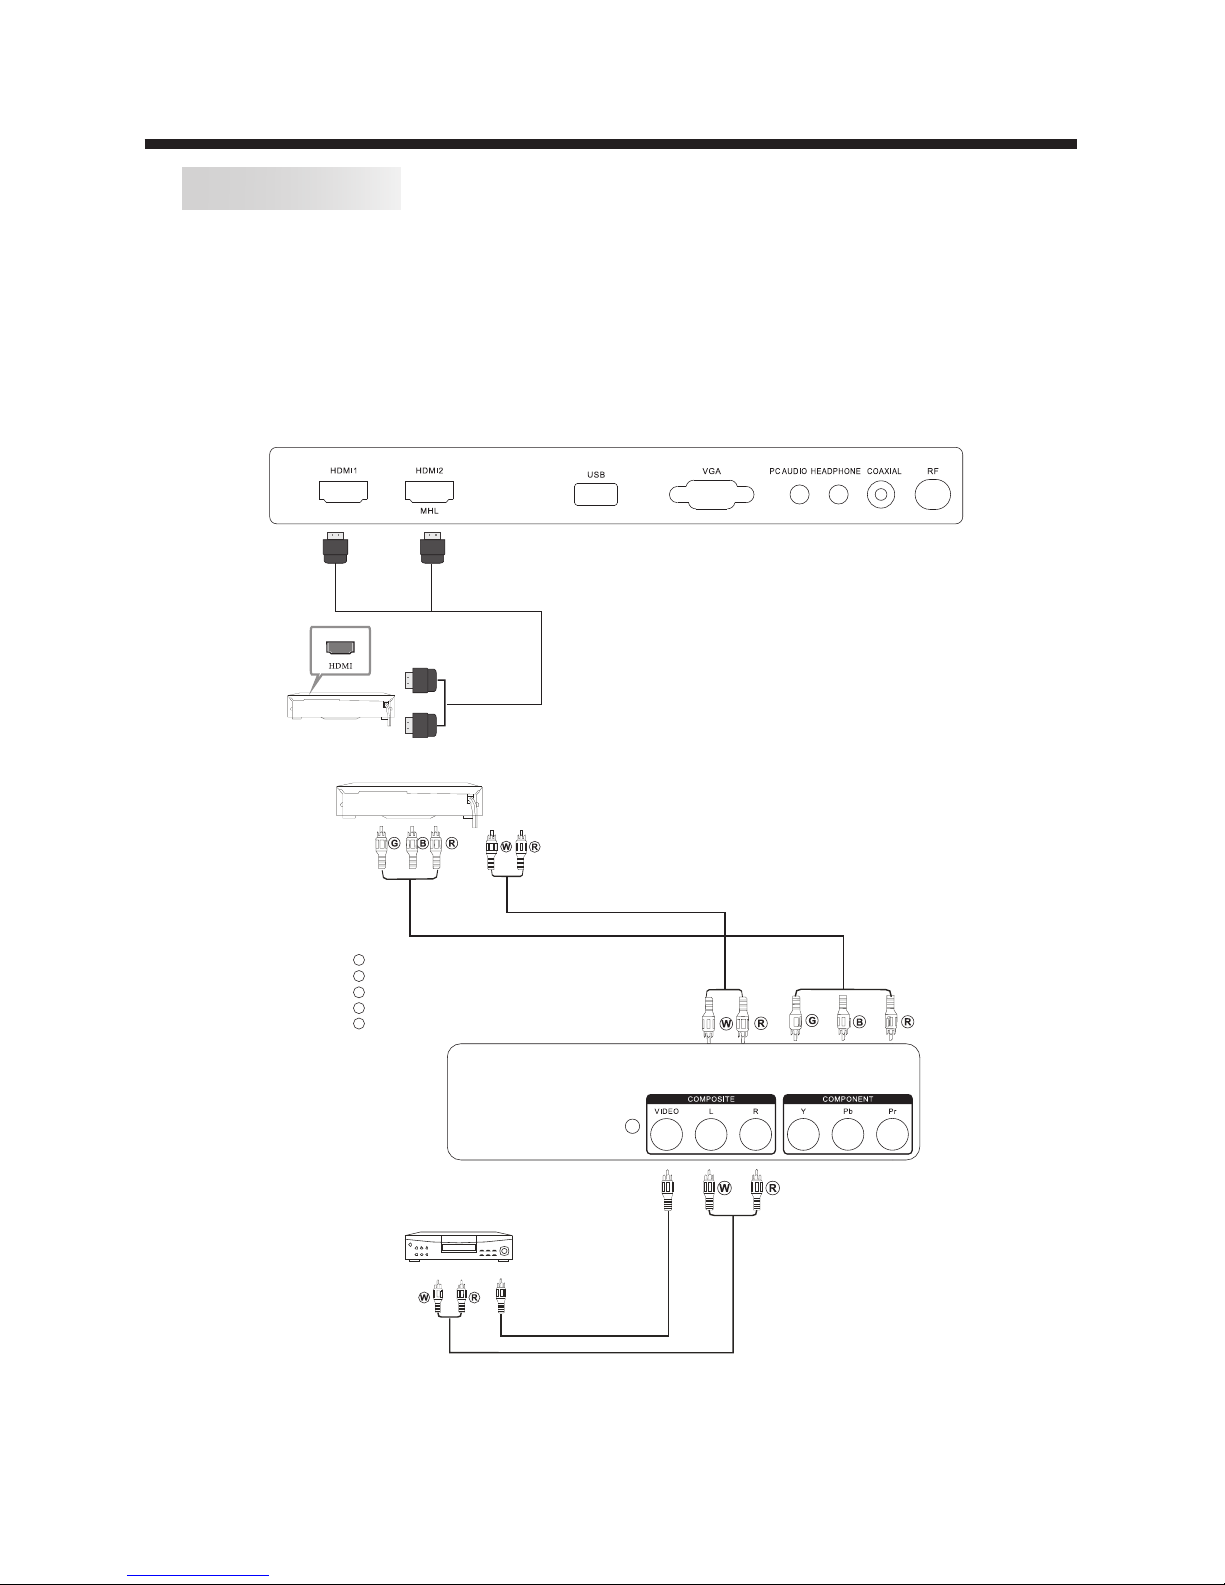
AV EQUIPMENT
There are two HDMI ports located on the back of your TV. You can connect a Blu-ray player,
DVD player, or other video equipment through these ports.
There is one component (Y, Pb, Pr) and one composite (AV) video input located on the back
of your TV. You can connect a VCR, cable box, or other video equipment to these jacks.
Please see the diagram below. You may also need to refer to the owner's manual of the device
that you are trying to connect.
The HDMI2 port is MHL enabled. You can connect MHL devices, such as the compatible
mobile phones and tablets.
NOTE: a USB to HDMI cable is required to connect a mobile phone or tablet to the TV. Please
the documentation of your device.check
The television's inputs can be connected to the following types of equipment: VCR, multi disc player,
DVD, camcorder, video game or stereo system, etc.....
YPbPr can support these video formats:480i,576i,480p,576p,720p,1080i, 1080p.
Yellow (video)
White(audio L)
Red(audio R or Pr)
Y
W
R
Blue(Pb)
Green(Y)
B
G
TO AUD IO OUTP UTS
TO VI DEO
OUT PUTS
VID EO EQUI PMENT
VIDEO EQUIPMENT with YPbPr
-10-
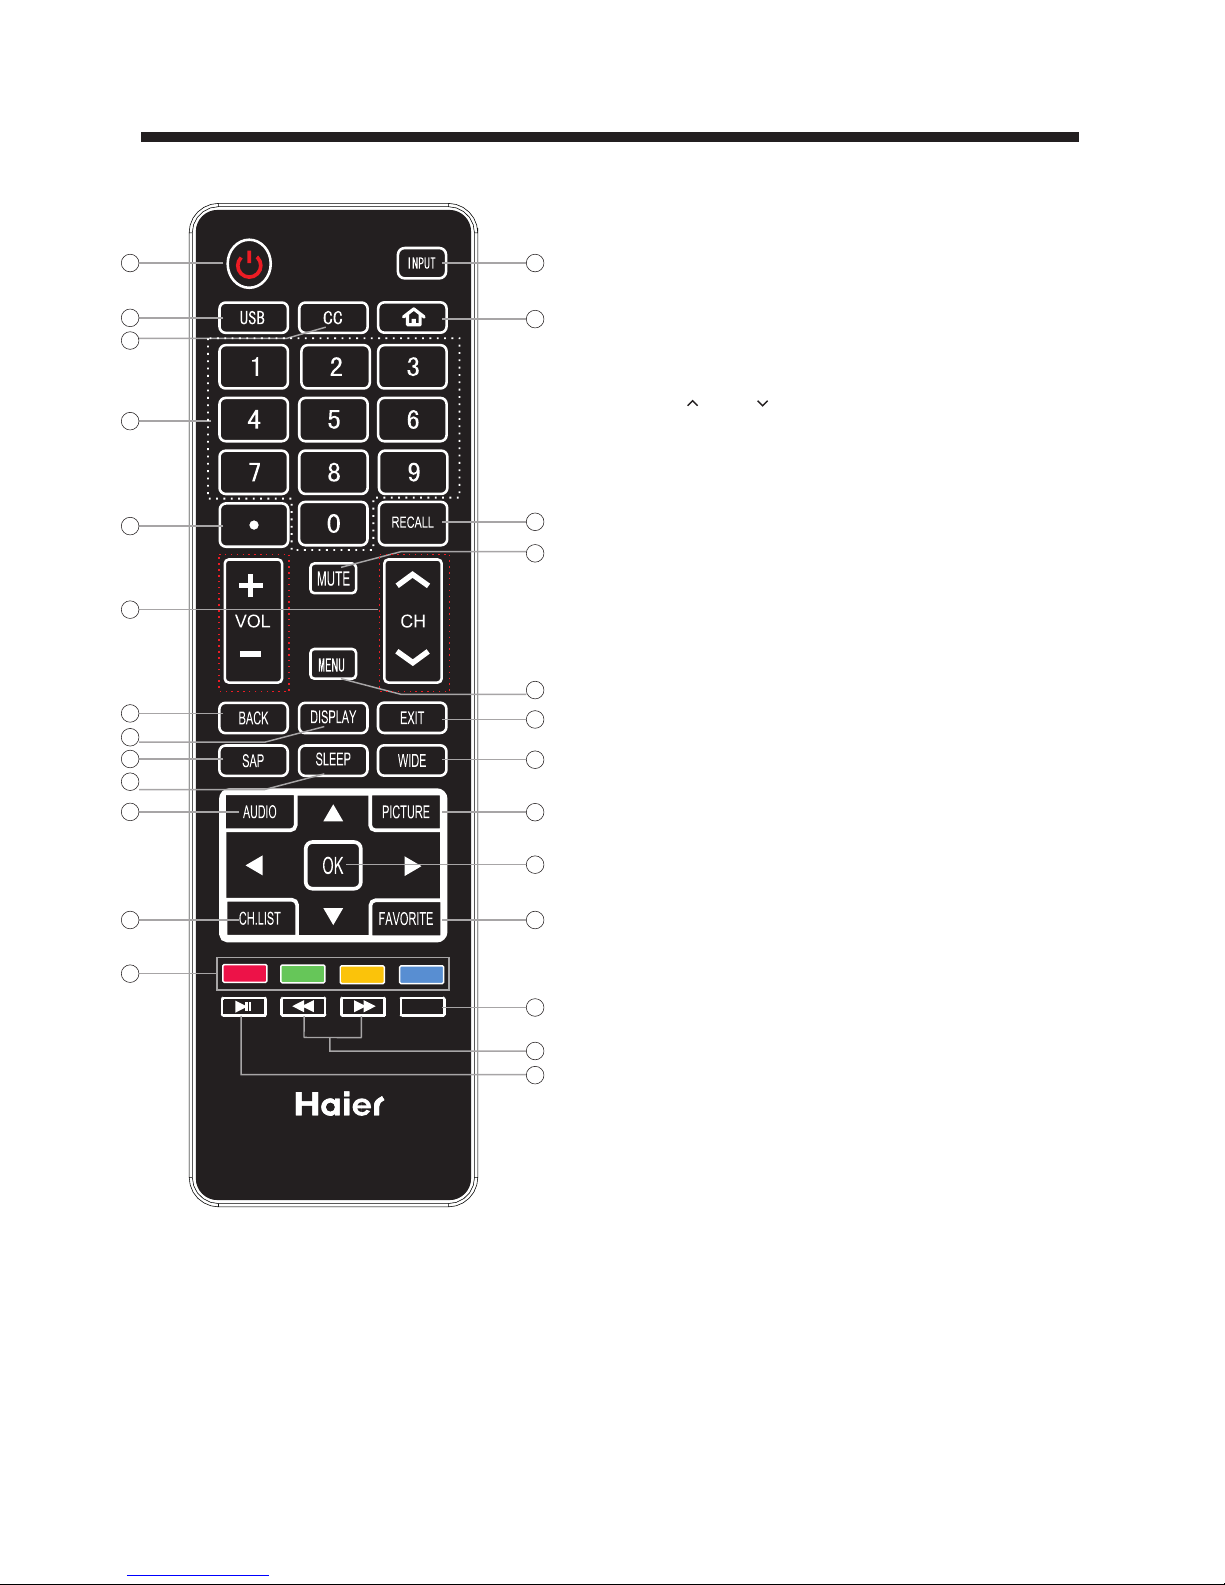
REMOTE CONTROL
1.Pr ess to tu rn on and off the TV.
2.US B: Pres s to launch t he USB multimedi a mode.
3.Se lect a cl osed capt ion option.
4.Pr ess to in put a chann el.
5.Pr ess to se lect the di gital sub-chan nels.For examp le, to
ente r “54-3 ”, press“ 54”,“●”, and then “3 ”.
6.Pr ess CH or C H to go to the ne xt or previous cha nnel
in the c hanne l list. Pre ss VOL+ or VOL- to inc rease or
decr ease th e volume.
7.Re turn to t he menu .
8.Pr ess to di splay the TV st atus info rmati on.
9.Se lect MO NO, STERE O, SAP in NTSC (a nalog TV)
syst em.
10.P ress to the sl eep tim er option s.
11.Pres s to cycle through t he differen t sound s ettings .
12.O pen the c hannel li st in TV mode.
13.S how the i nput sour ce menu.
14.S witch t o
15.P ress to g o to the last v iewed channel.
16.S witch es the TV sound o n or off.
17.P ress to o pen the on- screen menu .
18.E xit
19.P ress to c hange the a spect ratio.
20.P ress to c ycle thro ugh the availabl e picture modes.
21.P ress to c onfirm se lections in an on- screen menu or to
open a s ubmen u.
22.O pen the f avorite c hannel list in TV mode .
prev ious If th e Roku Stre aming
Stic k is conn ected, pr ess this button to g o back to the
prev ious sc reen.
cycl e throu gh
the HD MI2/M HL input . If the Ro ku Stream ing
Stic k is conn ected, pr ess this button to r eturn to th e Roku
home s creen .
disp lay (OS D)
the on -scre en displa y.
23.I f the Rok u Streami ng Stick is connec ted, press this
butt on to vie w more opti ons.
24. Re verse /Fast for ward: Use these bu ttons to co ntrol
musi c/pho to playba ck.
25. PL AY/ PAU SE: Press t o play/ pause mus ic or photo
slid eshow i n USB mode.
26. CO LOR BUT TONS: Short c uts-fol low the c olored li nks
in the t ext.
1
2
3
4
5
6
7
8
9
10
11
12
13
14
15
16
17
18
19
20
21
22
23
*
25
24
26
-11-
OPERATION
CC Mode C C On
Basic S el ect io n CC1
Advan ce d Sel ec tion Se rv ice l
Optio n
OK
VGA Set ti ng
H-Pos
V-Pos
Clock
Phase
Auto
50
38
50
17
MEN U
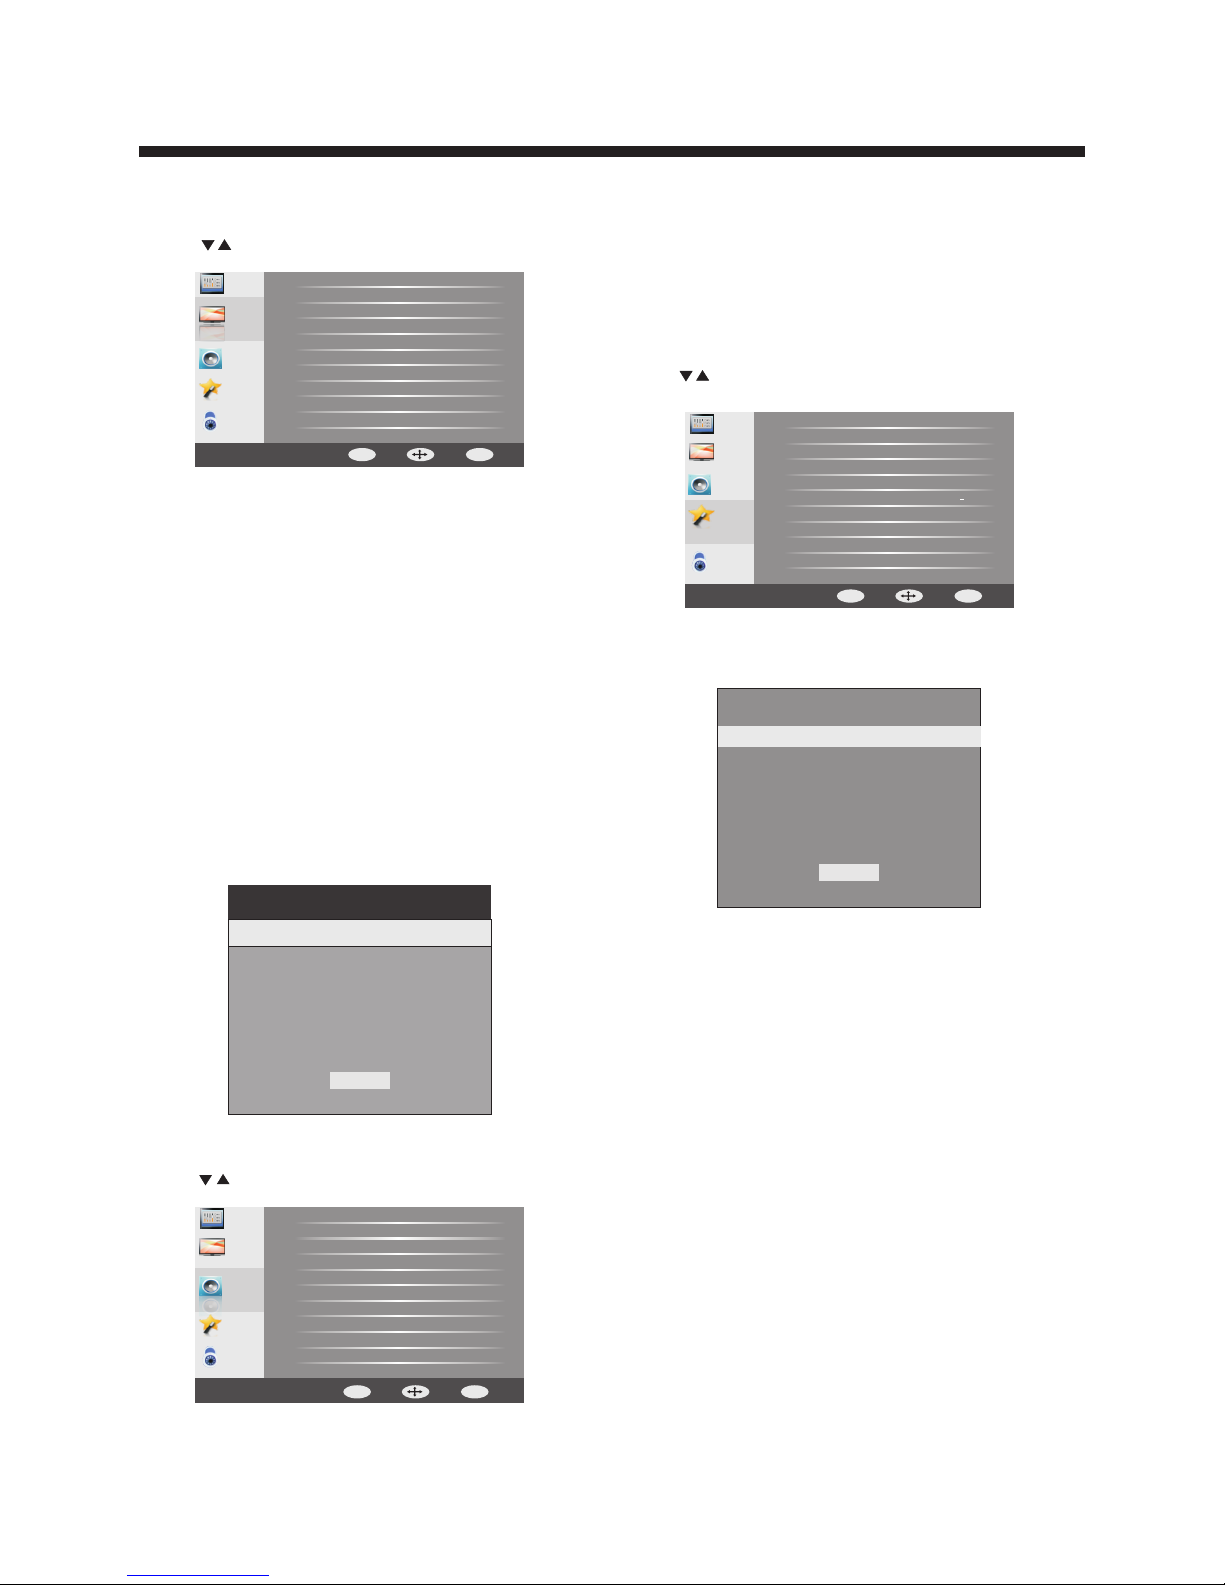
1. PICTURE MENU
In this menu, you can adjust the picture options,
such as contrast, brightness, etc.
Press to select, press OK to adjust.
1.1 VGA Setting
When a PC is connected, you can adjust the VGA settings.
1) H-Pos: Adjust the horizontal position of the screen.
2) V-Pos: Adjust the vertical position of the screen.
3) Clock: Fine tune the screen width.
4) Phase: Fine tune the phase of the screen. Usually you
don't adjust this item.
5) Auto: Auto adjust to fit the screen.
Note:
1) If you want to adjust contrast, brightness, color, and
sharpness, the picture mode be set to .will user
2) Cool to give the white colors
a blue tint, Normal to give the white colors a neutral tint, Warm
to give the white colors a red tint.
picture
Adjust the color tempertaure to
Energy Saving mode is the default setting, if you select
some other options, the power consumption may change.
2.AUDIO menu
In this menu, you can ajust the sound options.
Press to select, press to adjust.OK
3.
In this menu, you can adjust the Menu language,
Closed Caption,
Press to select, press to adjust.
SETUP menu
adjust the sleep timer, time zone,
Restore Default, etc.
OK
3.1 Closed Caption
Note:
1)
2)
Audio language is available in ATSC/TVmode only.
Auto volume is available only when the input signal
volume is too large or there is distortion.
1) CC Mode: Switch the closed caption mode.
2) Advanced selection: only available in ATSC.
3) Option: Used to edit the CC font.
Note:
1) Restore Default: Restore Default will clear all the
and reset all the settings to
default values.
saved channels of the
factory
Audi o
Setu p
TV
Pict ure
Lock
Pic ture Mo de
Con trast
Bri ghtne ss
Sha rpnes s
Tin t
Col or
Col or Temp er atu re
Adv aced Vi deo
Ene rgy Sav ing
50
50
50
50
50
Back
Move
ENTER
MENU
OK
Setu p
TV
Pict ure
Lock
Sou nd Mode
Bas s
Tre ble
Bal ance
MTS
Dig ital Ou tput
Sur round S ound
Aud io
Aut o Volume
Onl y Off
Sta ndard
50
50
50
Ste reo
RAW
Off
Off
Audi o
Back
Move
ENTER
MENU
OK
TV
Pict ure
Lock
Men u Langu age
Clo sed Cap tion
Ste ep Time r
Tim e Zon e
DST
Tim e For mat
Clo ck
Res tor Def ault
Sof tware U pdate
Eng lish
off
Pac ific
off
12- hour
Setu p
Audi o
Back
Move
ENTER
MENU
OK
OPERATION
-12-
And use the key to lock/unlock
.
OK Parental
Controls
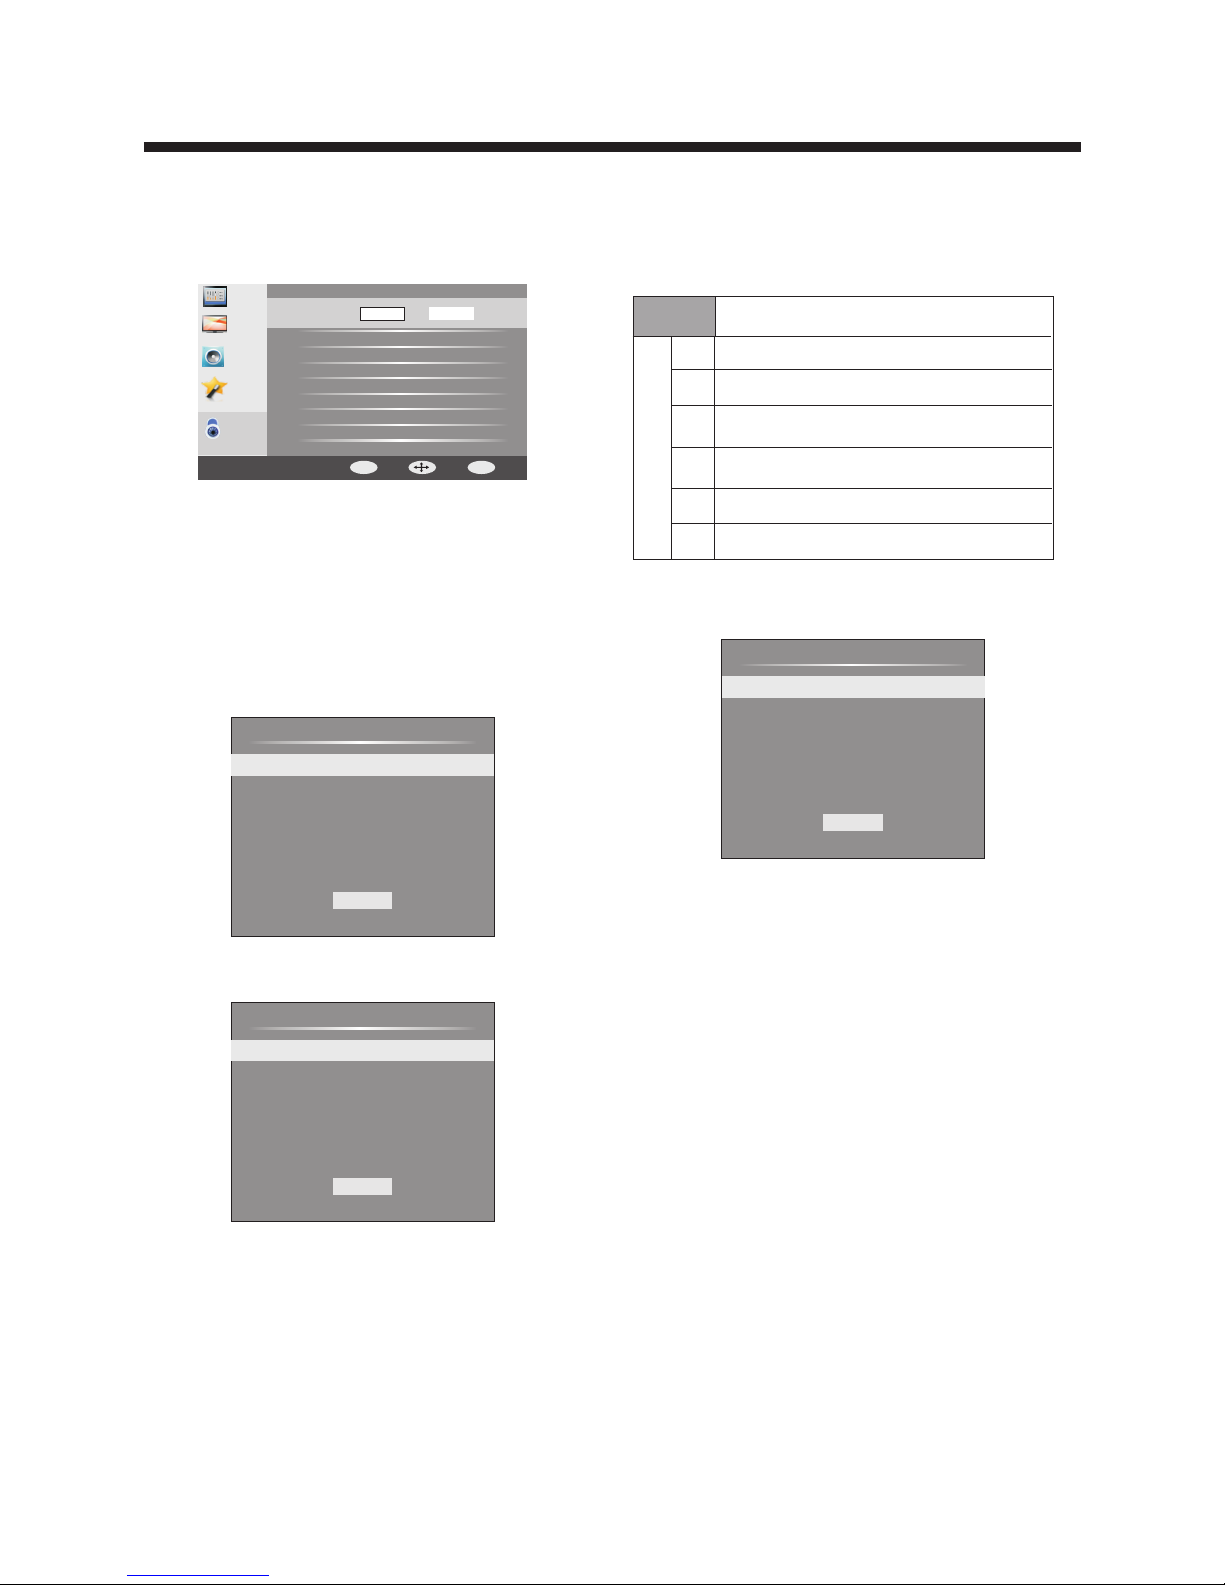
2) MPAA: Switching the movie-rating control level;
N/A, G, PG, PG-13, R, NC-17, X.
Rat ing
Des cript ion
Age
G General a udiences , All Ages admit ted
PG
Par ental G uidan ce sugg ested . Some ma teria l may not b e
Sui table f or chil dren.
PG- 13
Par ents st rongl y cauti oned. S ome mat erial . may be
Ina pprop riate f or chil dren un der 13.
R
NC- 17
X
Res trict . Under 1 7 requi res acc ompan ying pa rent or a dult
gua rdian (age va ries in s ome jur isdic tions )
No o ne 17 and u nder ad mitte d.
X is an o lder ra ting th at is uni fied wi th NC-1 7 but may b e
enc oded in t he data o f older m ovies .
1) Canada English: Switching the English rating control
level: EXEMPT, C, C8+, G, PG, 14+, 18+.
4.LOCK MENU
In this menu, you can change the password and adjust
the vchip settings.
Enter the password, to enter the lock menu. The
factory default password is 0000.
4.1 Change Password
1) old password: Input the old password.
2) new password: Input the new password.
3)Confirm password: Input the new password again.
Enter
Enter
4.2 System Lock
When the System Lock switch is ON, the options
listed below can be adjusted.
4.3 US
Press to display the following screen.OK
1) TV: Press display the following screen.OK
4.4 Canada
Press , to display the following screen.OK
TV
Pict ure
Lock
Ent er Pass word
Sys tem Loc k
US
Can ada
RRT S ett ing
Res et RRT
Cha nge Pas sword
Setu p
Audi o
OK
---- -
Back
Move
ENTER
MENU
OK
MPAA
TV
US
MEN U
FV
V
S
L
D
ALL
TV RATING
MEN U
Canada
Canad a En g
Canad a Fr e
MEN U
-13-
OPERATION
Rat ing
Des cript ion
Age
E Exe mpt: In clude s news, s ports , docum ents an d other i nform ation
pro gramm ing: ta lk show s, musi c video s, and va riety p rogra mming .
C Chi ldren : Inten ded for y ounge r child ren und er the ag e of 8 year s.
Pay s caref ul atte ntion t o theme s that co uld thr eaten t heir sense o f
sec urity and wel l-bei ng.
C8+ C hildr en over 8 y ears ol d: Cont ains no p ortra yal of vi olenc e as the
pre ferre d, acce ptabl e, or onl y way to re solve c onfli ct; nor e ncourage
chi ldren t o imita te dang erous a cts whi ch they m ay see on t he scre en .
G Gen eral: C onsid ered ac cepta ble for a ll age gr oups, Ap propriat e
vie wing fo r the ent ire fam ily, contai ns very l ittle v iolen ce, phy sical ,
ver bal or em otion al.
PG Pa renta l Guida nce: In tende d for a gen eral au dienc e, but ma y not be
sui table f or youn ger chi ldren ( under t he age of 8 ) becau se it cou ld
con tain co ntrov ersia l theme s or issu es.
14+ O ver 14 Years: Could c ontain the mes where vi olence is on e of the
dom inant e lemen ts of the s toryl ine But i t must be i ntegr al to the
dev el opme nt of plo t or char acter. L anguage us age could be p rofane
and n udity , p resen t withi n the con text of t heme.
18+ Ad ults: Inte nded for vie wers 18 year s and older an d might cont ain
dep ictio ns of vio lence , which w hile re lated t o the dev elopm ent of
plo t, char acter o r theme s, are in tende d for adu lt view ing. Co uld
con tain gr aphic l angua ge and po rtray als of se creta ry and nu dity.
2) Canada French: Switching the French-rating control
level: E, G, 8ANS+, 13 ANS+, 16ANS+, 18ANS+.
Rat ing
Des cript ion
Age
E Exe mpt pro gramm ing
G Gen eral: Al l ages and chi ldren, con tains mini mal direct v iol ence,
but m ay be int egrat ed into t he plot i n a humor ous or un reali stic
man ner.
8an s+ Gene ral but i nadvi sable f or youn g child ren :Ma y be view ed by a
wid e publi c audie nce, bu t could c ontai n scene s distu rbing t o
chi ldren u nder 8 wh o canno t disti nguis h betwe en imag inary a nd
rea l situa tions . Recom mende d for vie wing wi th pare n.
13a ns+ Ove r 13 year s: Coul d conta in scen es of fre quent v iolen t scene s
and i n tense v iolen ce.
16a ns+ Ove r 16 year s: Coul d conta in freq uent vi olent s cenes a nd viol ence.
18a ns+ Ove r 18 year s: Only f or adul t viewi ng. Cou ld cont ain fre quent
vio lent sc enes an d extre me viol ence.
4.5 RRT setting
ATSC digital TV mode, it can be adjusted
4.6 Reset RRT:
Press
In
to reset the RRT settings to the factory
default values.
OK
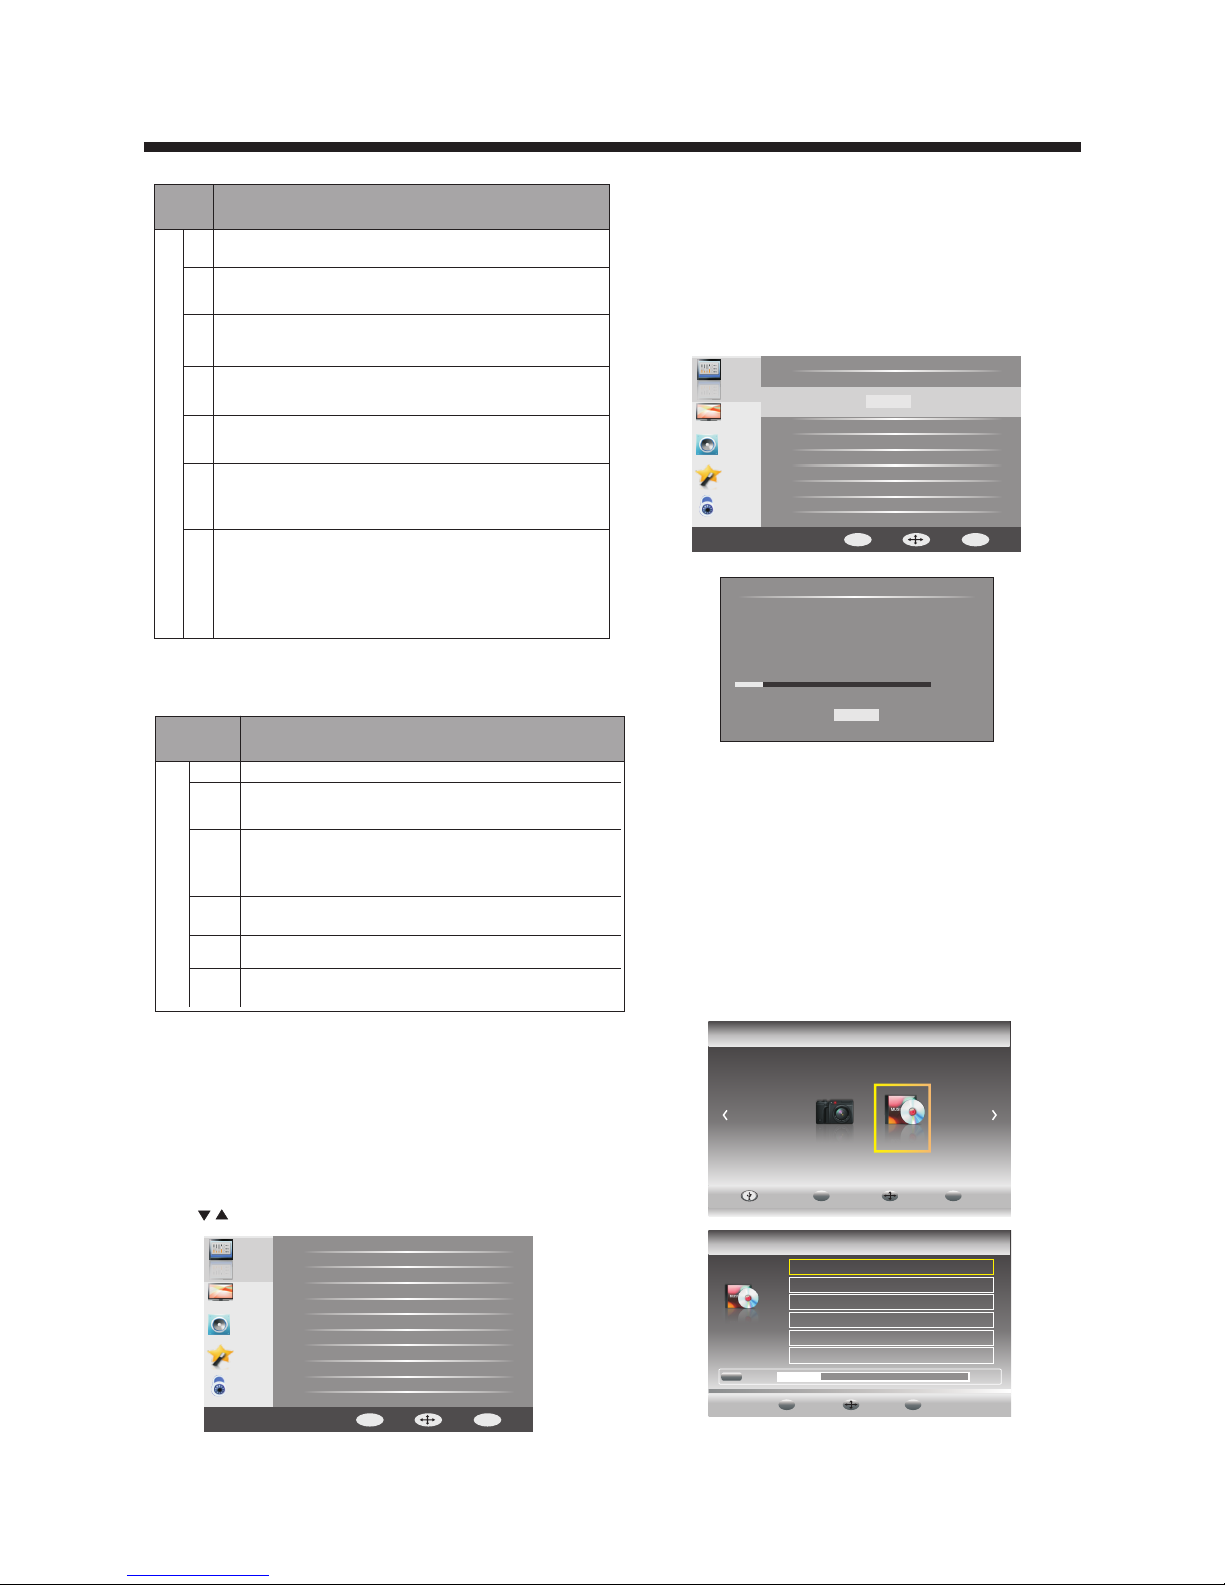
5. MENU
In this menu, you can adjust digital and analog TV
Channels.
Press to select, press to adjust.
TV
OK
5.1 Air/Cable:
Select Air TV signal cable TV signal.
5.2 Scan:
If it's the first time you use the TV, you should scan all
the TV channels first.
Press to confirm to display the following
screen.
or
Channel
andOK
5.3 Favorite:
Press to choose/delete favorite channels.
5.4 Show/Hide
Press to display/ hide the current channel.
5.5 DTV signal
Display DTV signal . It can't be selected or
adjusted.
OK
OK
5.6 e-Manual
Display the user guide.
the strength
MEN U
Statu s Sc an ning
Ana log Cha nnels :
Dig ital Ch annel s:
0
0
5 %.. .
Air /Cabl e
Fav orite
Sho w/Hid e
DTV S ignal
Cha nnelS can
e-M anual
Cab le
Lock
Setu p
Audi o
TV
Pict ure
Back
Move
ENTER
MENU
OK
Lock
Setu p
Audi o
TV
Pict ure
Air /Cabl e
Fav orite
Sho w/Hid e
DTV S ignal
Cha nnel Sc an
e-M anual
OK
Cab le
Back
Move
ENTER
MENU
OK
MUS IC
Back
EXIT
Move Select
OK
Jam es Blun t-you a re beau tiful .mp3
Ret urn
Up Fo lder
A-L in-.m p3
.mp 3
.mp 3
00:04 :22
Play
00:04 :22
6. Multimedia
You can display the Music and Photo fil s by using the
USB port that is located on the rear panel:
e
PHOT O M USIC
Hai er Inno vatio n Life
USB2. 0 Back
EXIT
Move S elect
OK
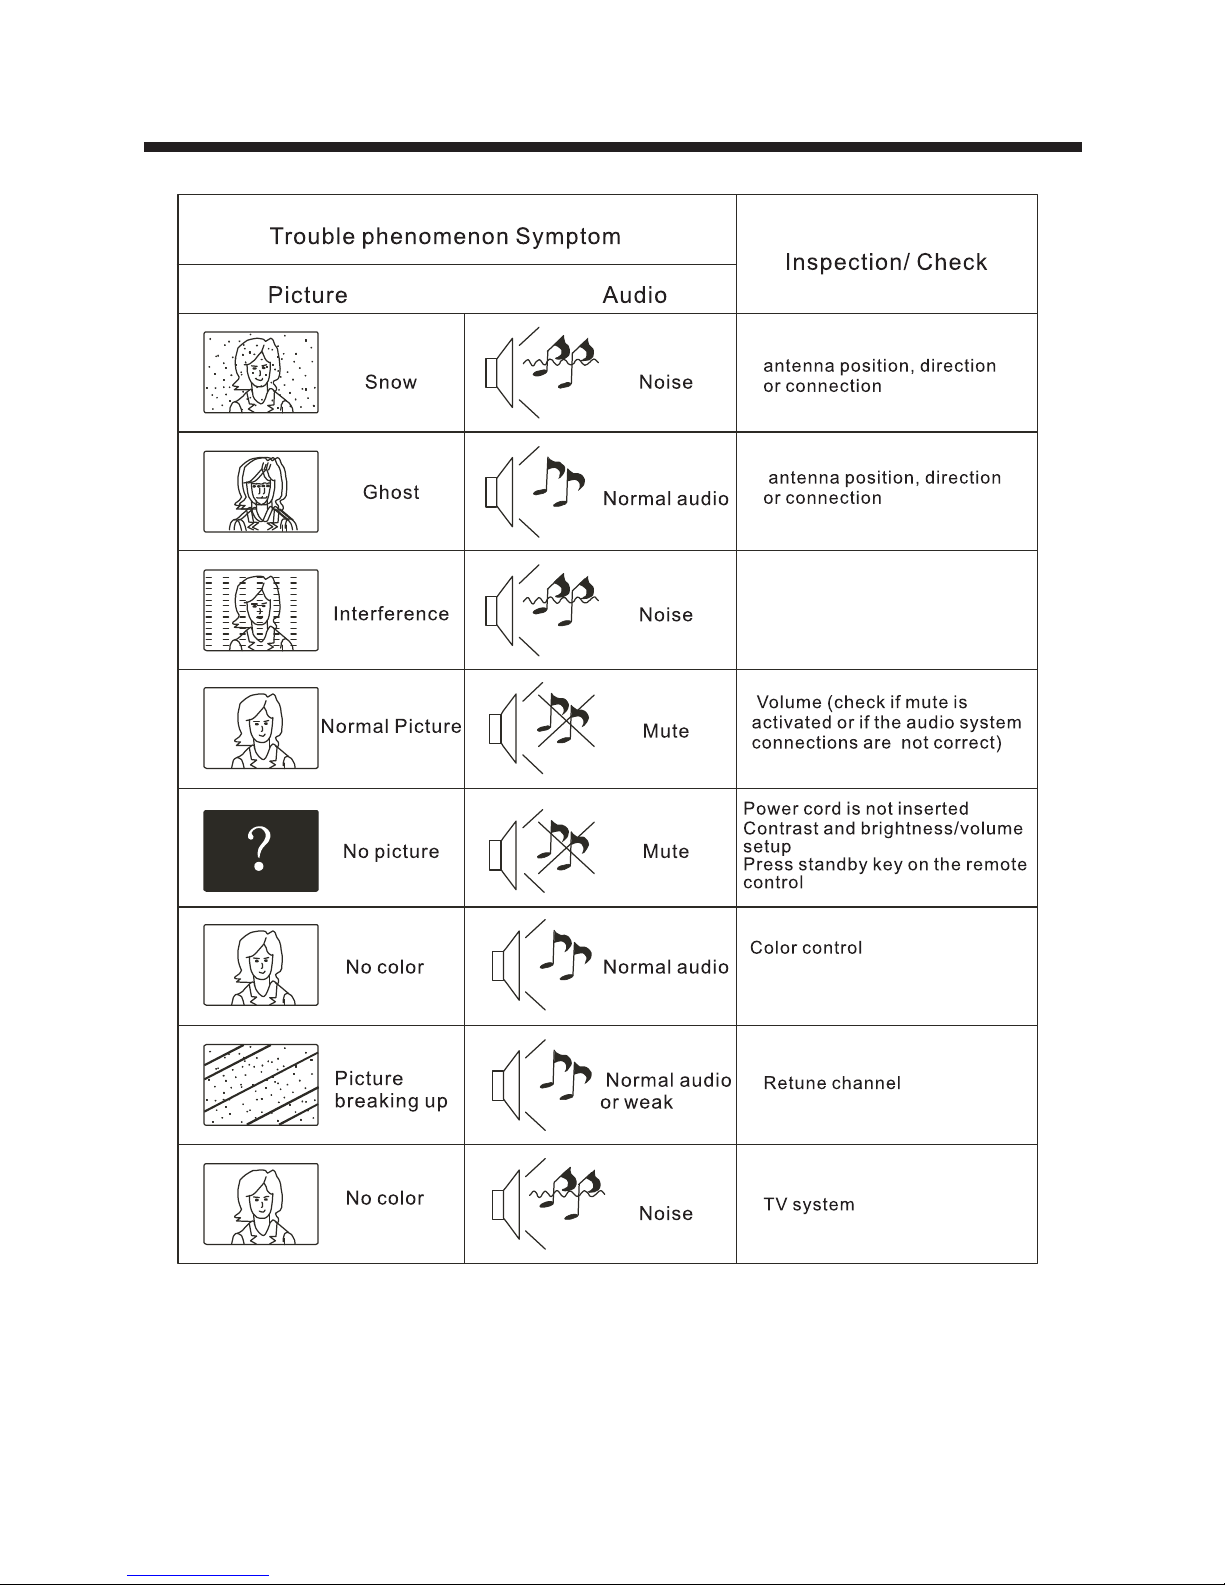
TR OUB LE SH OOT ING
-14-
The LCD TV panel is built with very high precision technology giving you fine picture details
in vibrant color. Occasionally, a few non-active pixels may appear on the screen as a fixed
point of red, green, blue, black or white. Please note this does not affect the performance of
the product.
Component (Y Pb Pr) connections
micr owave , electro nic equipment,
car/ motor cycle, fl uorescent ligh t
 Loading...