

Haier L32R3, L42R3 User Manual

Please READ this manualcarefullybefore
operating your TV, and retain it for future
reference.
OWNER
’S
MANUAL
TFT-LED/LCD TELEVISION
L32R3/L42R3
Warning
EN-1 TV LCD-TFT Owner’s Manual
Warning/Safety
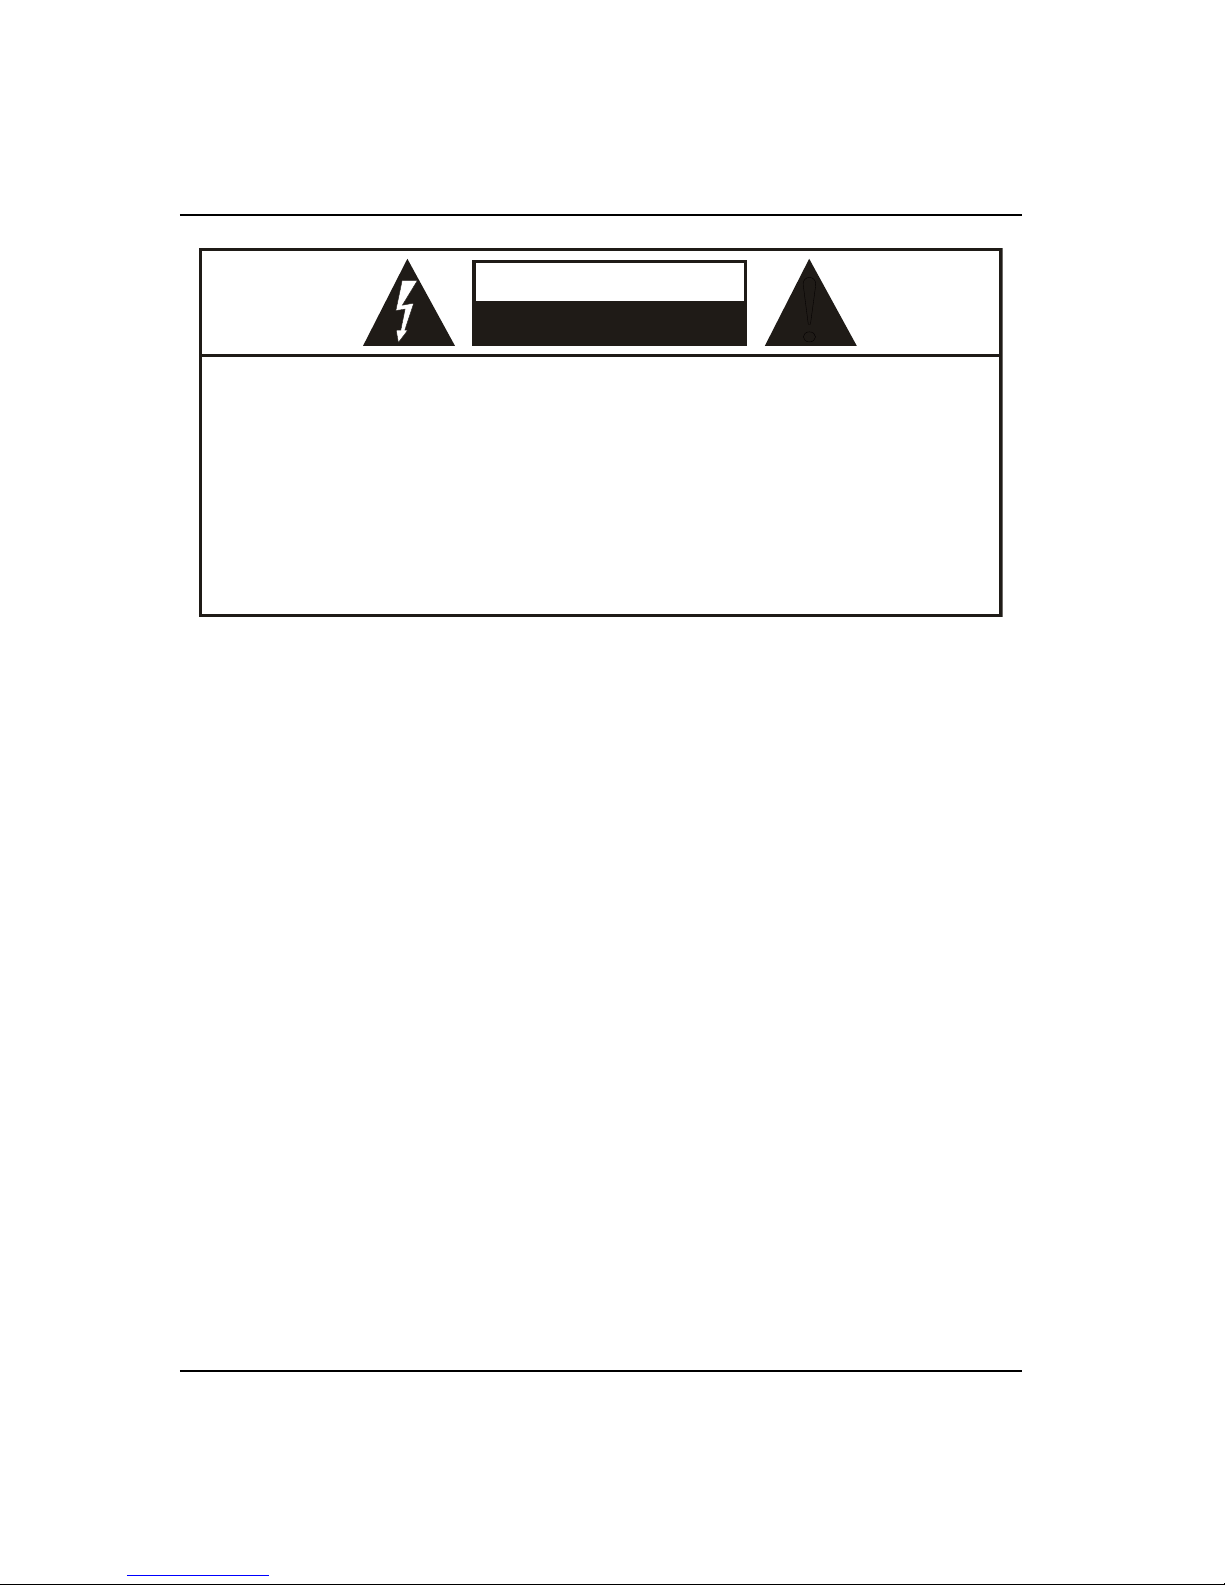
WARNING
!
WARNING:
TO REDUCE THE RISK OF ELECTRIC SHOCK DO NOT REMOVE COVER (OR BACK). NO USER SERVICEABLE PARTS
INSIDE. REFER TO QUALIFIED SERVICE PERSONNEL.
*
To avoid electric hazards, it is strongly suggested that the back cover not be opened, as there is no any
accessory inside the casing.
*
lf necessary, please contact authorized after-sales services.
*
A lighting ash mark in a triangle: A potentially hazardous situation, which, if not avoided, could result in
serious injury by high voltage.
*
An exclamation mark in a triangle: Major part or accessory of which technical specications must be followed if
it is to be replaced.
RISK ELECTRIC SHOCK
DO NOT OPEN
WARNING: To avoid fire or electric hazards, never place your television receiver in an area with heavy moisture.
Attention should be paid to avoid accidental scratches or impacts onto the screen.
CAUTION:
Please read this manual carefully before using your television and keep this manual in a good place for future q
reference.
To achieve the best performance of your television, read this User’s Manual carefully and properly store it for future q
reference.
Information of screen displays and figures in the User’s Manual may vary due to technical innovations.q
Unauthorized disassembly of this product is prohibited.q
Important Safety Instructions
1.The product should be tightly xed to avoid drop damages and even re.
2.To avoid re hazards, do not use this product under direct sunlight or closely to heat sources.
3.Do not locate the product close to water or oil, which may cause re hazards.
4.Unplug the power supply and antenna of the product when there is a rainstorm, especially thunderstorm.
5.Do not use damaged or worn electric plugs, and keep electric cord away from heat sources to avoid electric shocks or
re hazards.
6.Do not connect excessive sockets in parallel or share the same socket by multiple plugs to avoid re hazards.
7.The product must be placed on a solid and stable surface to avoid collapse.
8.Unanthorized disassembly of the television is prohibited to avoid electric shocks or re hazards, contact authorized
aftersales serivce if technical serivce is needed.
9.Keep the product away from a transformer or heat source to avoid re hazards.
10.Disconnect the product from power supply and contact authorized after-sales service if abnormal sound is heard in
the product.
11.Do not use or store inammable materials near the product to avoid explosion or re hazards.
12.Do not place the product in a humid area to avoid re hazards.
13.The antenna of the product should be away from electric cable to avoid electric shocks.
14.Never touch the plug when your hand is wet as this might cause electric shocks.
15.Always make sure that the television is well plugged as poor electric connection might cause re.
16.When antenna is used, measures should be taken to prevent water from owing down along the cable into the
television.
17.Unplug the television, use soft fabric, never chemicals, if you are going to make cleaning of the product, Make sure
that no water drops in the product.
18.The plug and electric cable must be kept clean to avoid electric shocks or re hazards.
19.Disconnect the television from power supply and antenna when there is a rainstorm or thunderstorm to avoid
electric shocks or re hazards.
20.Disconnect the television from power supply to avoid electric shocks or re hazards in a long vocation.
Contents
TV LCD-TFT Owner’s Manual EN-2
Contents
How to customize your own picture status.............. 11
Sound menu.......................................................12
How to select sound mode............................................. 12
How to Customize your own sound status............... 12
Channel menu.................................................... 12
Auto Tuning.......................................................................... 13
DTV Manual Tuning........................................................... 13
ATV Manual Tuning............................................................ 13
Programme Edit.................................................................. 14
Singnal Information .......................................................... 14
Programme Guide.............................................................. 14
Time menu..........................................................14
Option menu......................................................14
Lock menu..........................................................15
Tuning Lock.......................................................................... 15
Set Password........................................................................ 15
Block Program ..................................................................... 15
Parental Guideance........................................................... 15
Clear Lock.............................................................................. 15
PC Set..................................................................15
USB Mode...........................................................16
Maintenance 18
Specification 19
Format 19
Troubleshooting 19
Warning 1
Important Safety Instructions 1
Introduction 3
Controls................................................................3
Connection Options ............................................4
Remote control ....................................................5
Installation 6
External Equipment Connections ...................... 6
Accessories ..............................................................................6
Antenna Connection............................................................6
Choose Your Connection.................................................... 7
Connecting a VCR..................................................................7
External AV Source Setup...................................................7
Connecting a DVD player................................................... 7
Connecting a DTV (digital TV) ..........................................8
Connecting a digital audio output .................................8
Connecting a computer......................................................9
HDMI and DVI input .......................................................... 10
Operation 10
Switching On/O the TV set........................................... 10
Choose the Menu Language.......................................... 10
Choose the Input source .................................................11
Picture menu...................................................... 11
How to select picture mode........................................... 11
Introduction
EN-3 TV LCD-TFT Owner’s Manual
Introduction
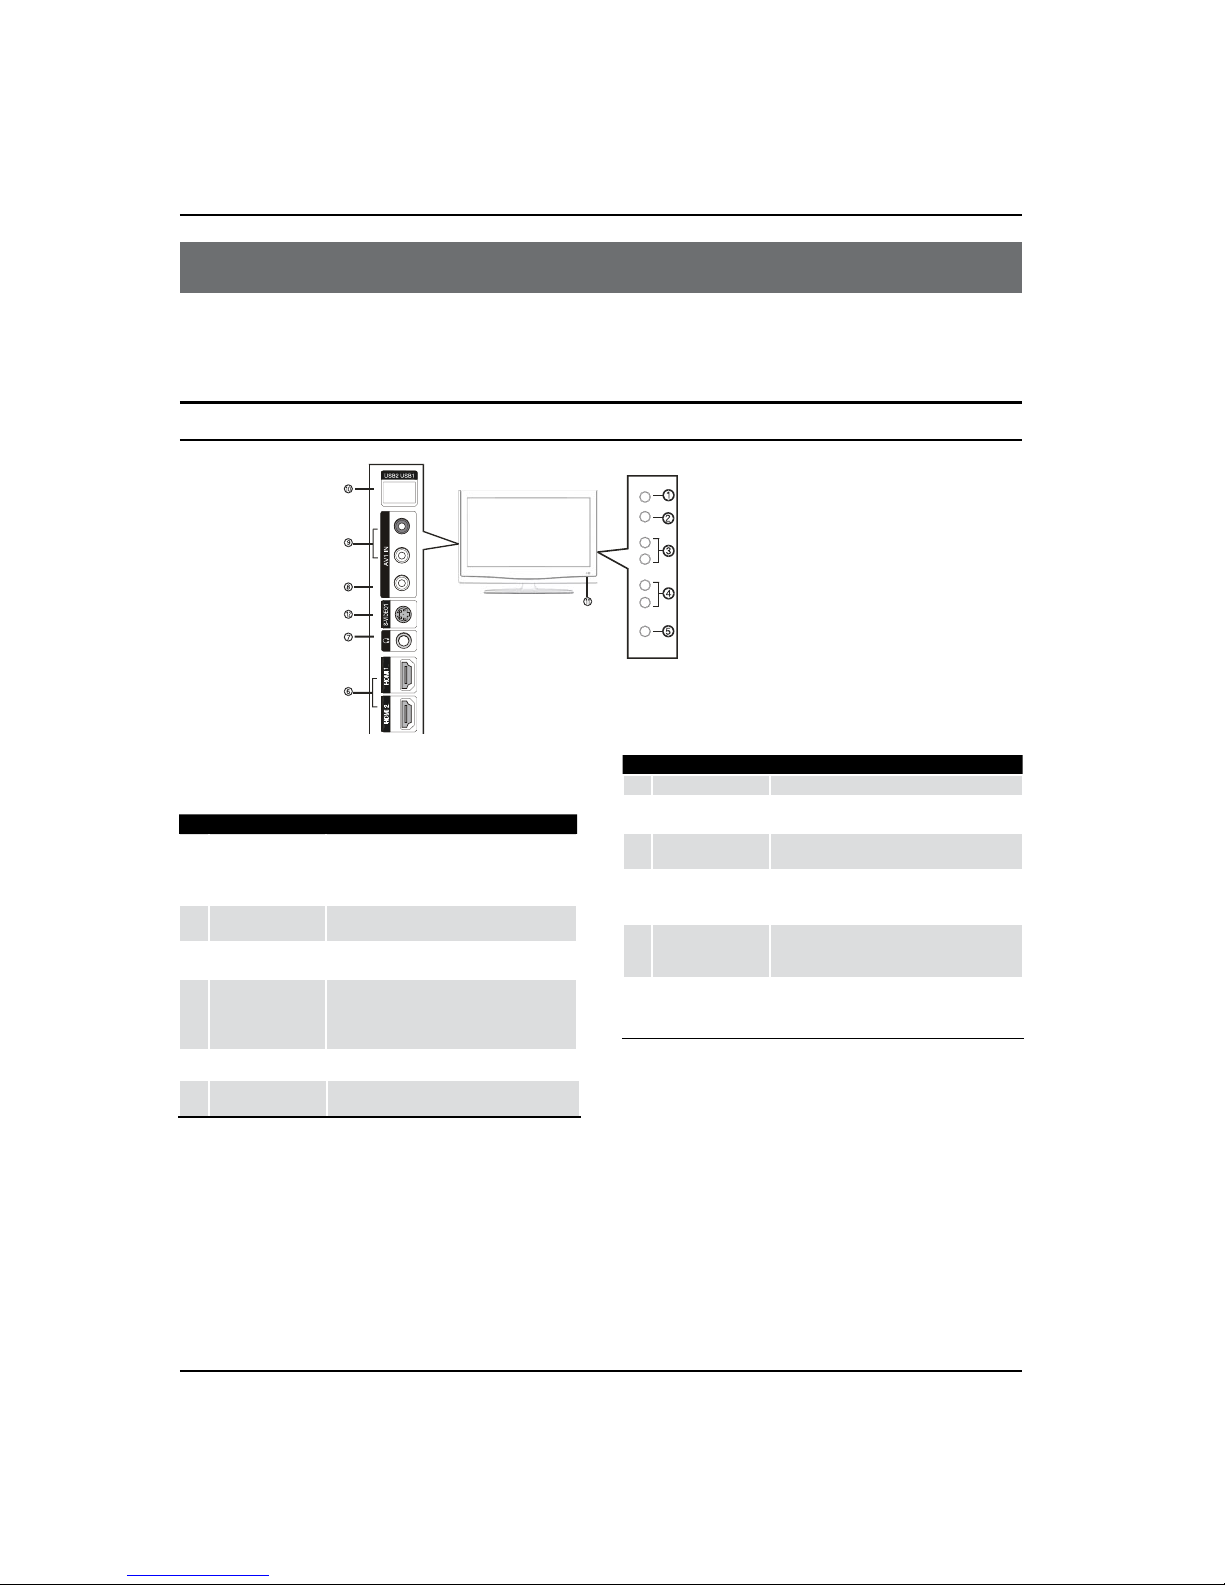
Controls
This is a simplied representation of the TV front panel, side panel control buttons and side inputs.
TV Side panel controls and connections
VIDEO L-AUDIO-R
TV/AV MENU VOL+ VOL- CH+ CH- POWER
1
TV/AV
Press to access the input source mode. Press
repeatedly to change the source to the one you
want to watch. In the MENU screen, the TV/
AV button serves as the OK button.
2
MENU
Menu display. Press to access the on-screen
menu display.
3
VOL +/-
Press to adjust the volume. In the MENU screen,
these buttons serve as right/left buttons.
4
CH +/-
Press to scan through channels. To scan quickly
through channels, press and hold down either
+/- . In the MENU screen, these buttons serve
as up/down buttons.
5
POWER
Press to turn on and o the TV.
6
HDMI IN
Connect a HDMI device to receive digital audio
and uncompressed digital video signals.
7
Headphone jack Headphone audio output terminal.
8
AV1 VIDEO IN
Connect the composite video cable from an
external signal source to this jack.
9
AV1 AUDIO IN
Connect the audio L/R cables from the video
signal source to these jacks.
0
USB
Connect the USB Flash to play the
Movies,Music,Text and Photos, and updata the
software(USB1)
A
Remote Sensor
Receivers IR signals from the remote control.
Do not put anything near the sensor, which
may block the remote control signal.
B
S- VIDEO
Connect the S-Video cable from an external
signal source to this jacks.
Introduction
TV LCD-TFT O wner’s Manual EN-4
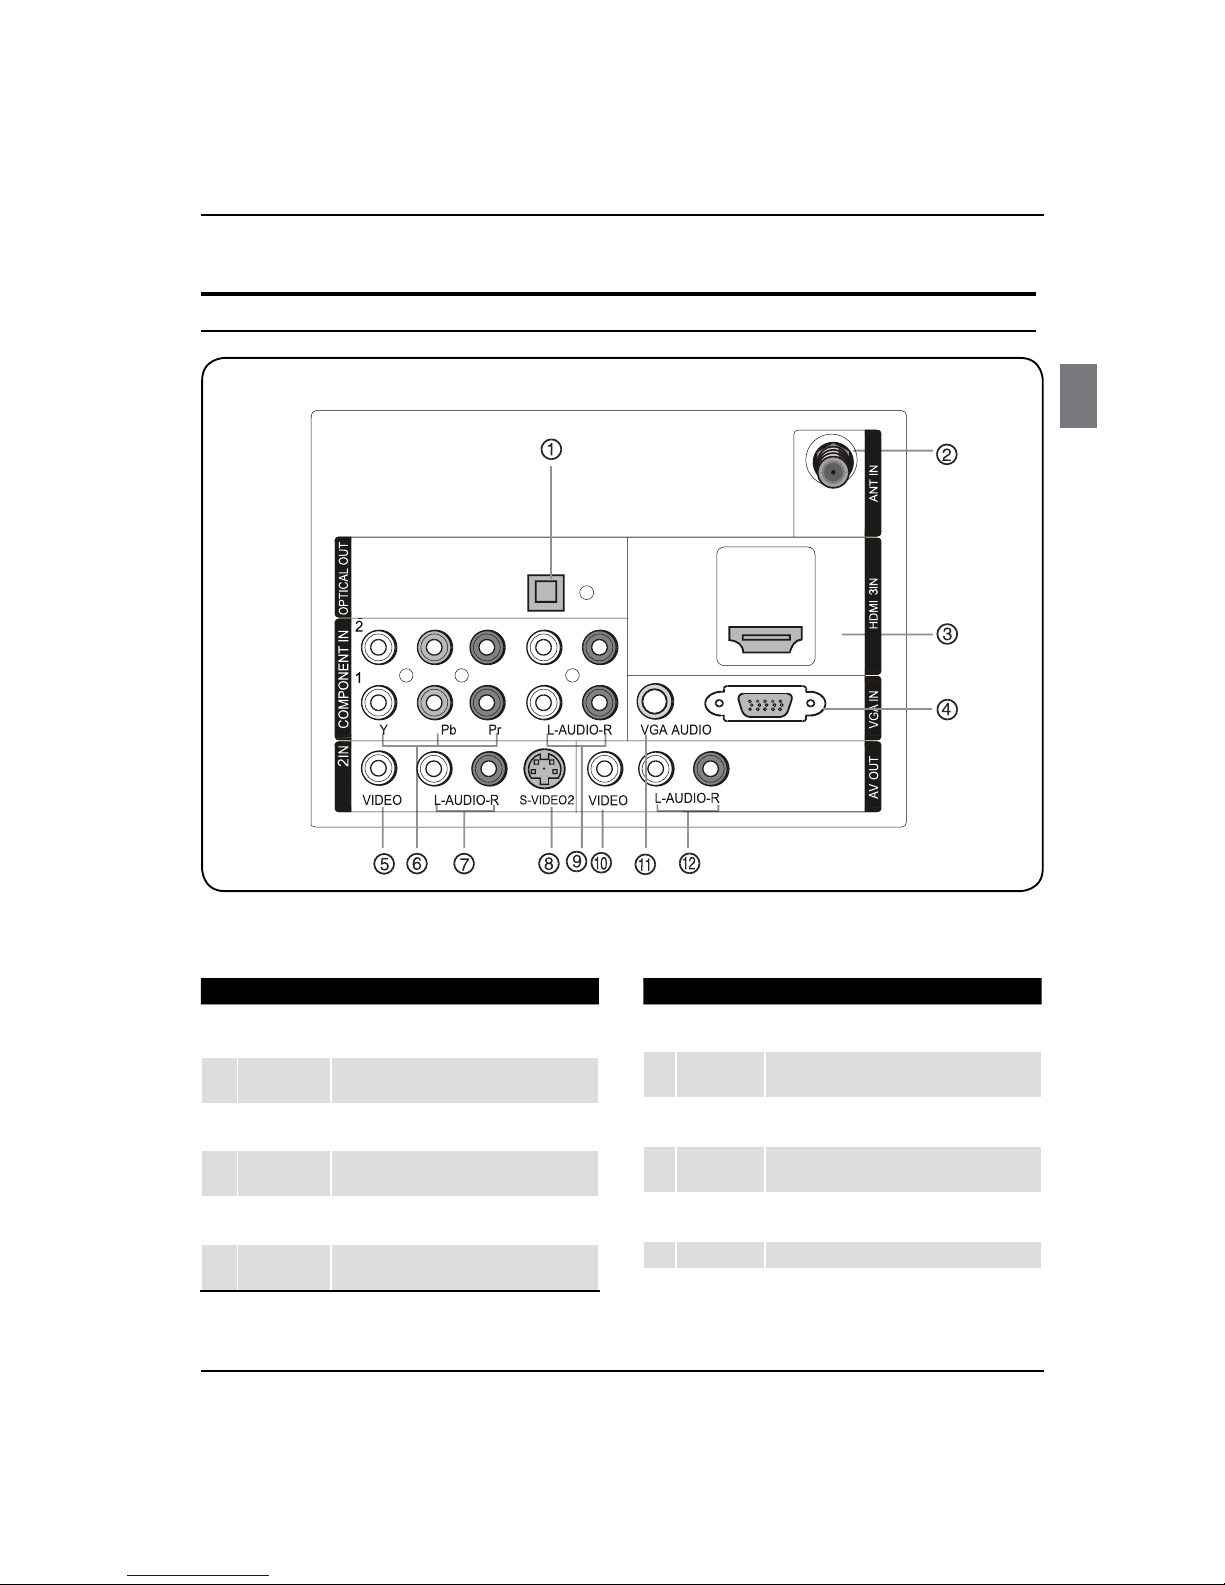
AV
1
Digital Audio
Output
Connect various types of digital audio equipment.
2
Antenna
Input
Connect cable or antenna signals to the TV,
either directly or through your cable box.
3
HDMI In
Connect a HDMI device to receive digital audio
and uncompressed digital video.
4
VGA Video In
Connect a video cable from a computer to this
jack.
5
VIDEO In
Connect the video signal from a video device to
this jack.
6
Component
Video In
Connect a component video device to these
jacks.
7
AUDIO In
Connect the audio L/R cables from the video signal
source to these jacks.
8
S-VIDEO In
Connect the S-Video cable from an external signal
source to this jack.
9
COMPONENT
AUDIO In
Connect the audio L/R cables from the component
video signal source to these jacks.
0
Video Out
Connect the
video
L/R cables
to your other video
equipment
.
A
VGA/DVI
Audio In
Connect the audio L/R cables from a computer to
this jack.
B
AUDIO Out
Connect the audio L/R cables to your audio equipment.
Connection Options
Back panel connections
Introduction
EN-5 TV LCD-TFT O wner’s Manual
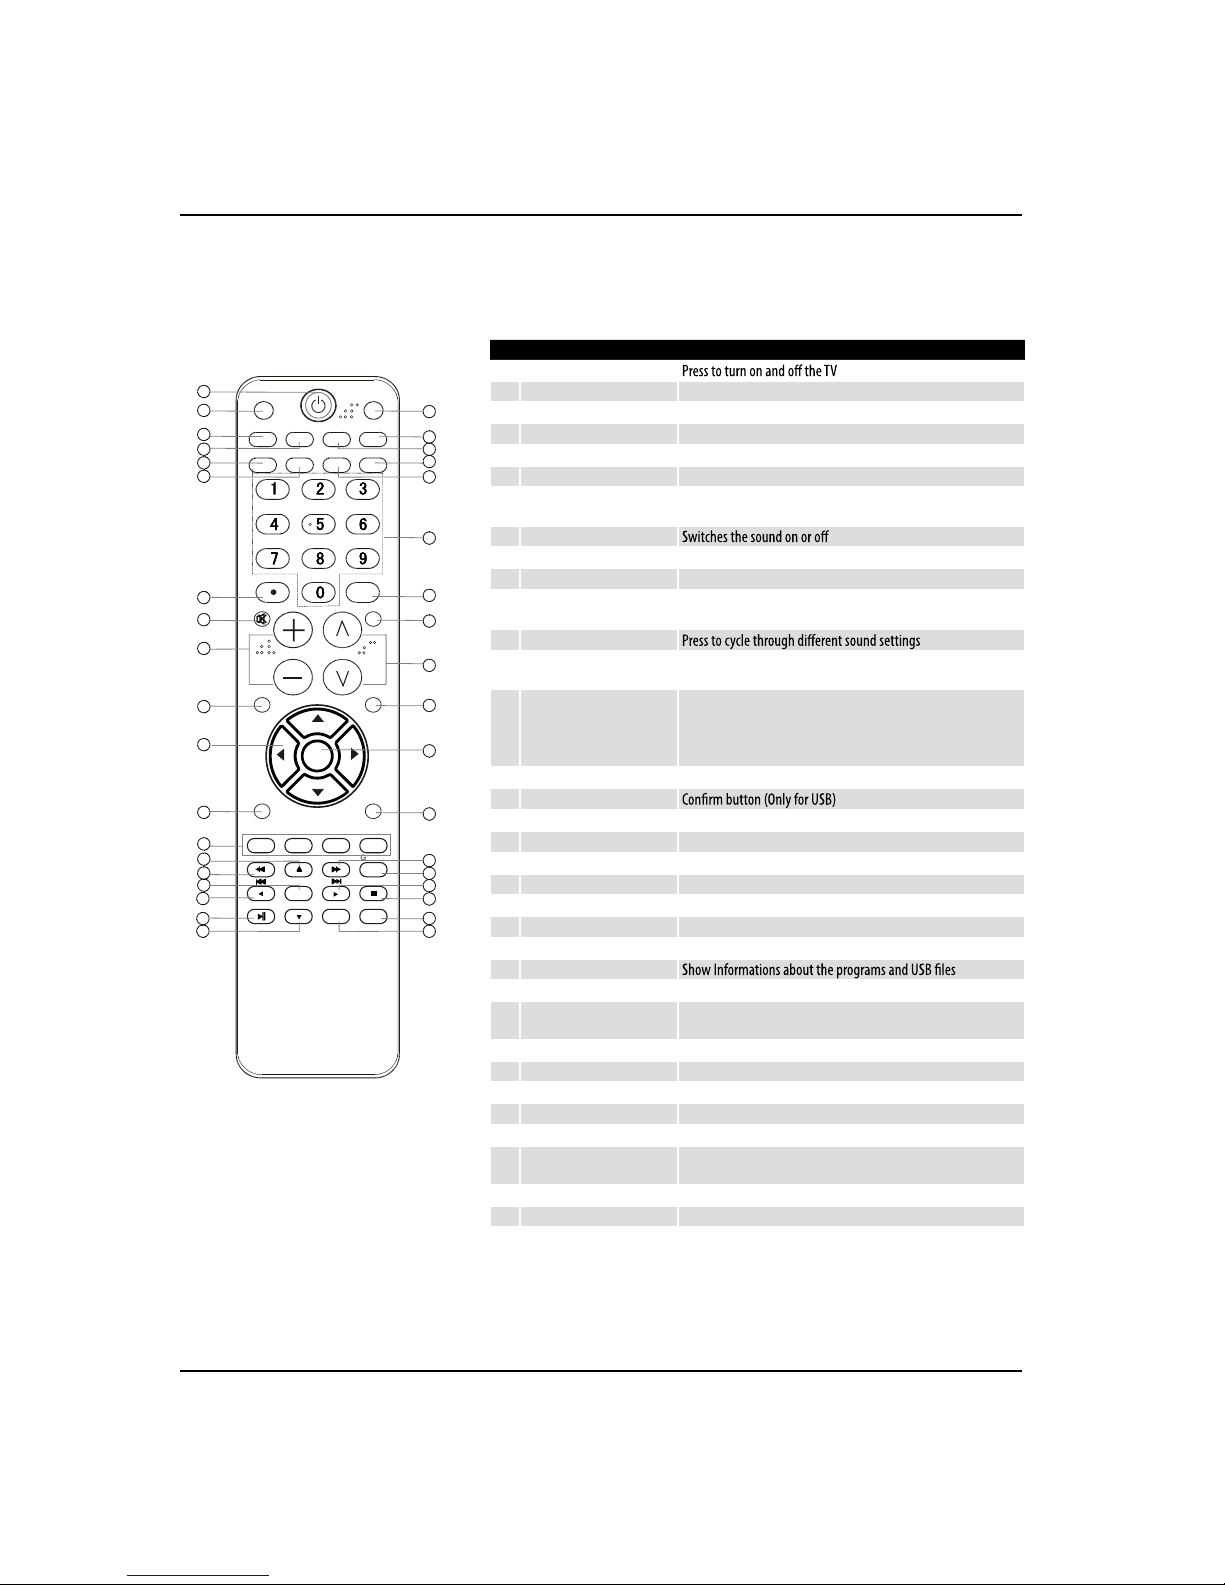
Remote control
The remote control cannot be operated unless the batteries are properly loaded.
When using the remote control, aim it at the remote sensor on the TV.
1
Power
2
INPUT Show the input source
3
MTS/SAP Select MONO, STEREO, SAP
4
CCD (closed caption) Select a closed caption option
5
P.SIZE
Select the aspect ratio
6
H.LOCK Hotel Lock button
7
• button
Press to select digital channels. For example, to enter “54-3”,
press “54”, “• ” and “3”
8
MUTE
9
VOLUME UP/DOWN
Press to adjust the volume
0
MENU
Press to open the on-screen menu
A
Thumbstick (Up/Down/
Left/Right)
Allows you to navigate the on-screen menus and adjust the
system settings to your preference
B
SOUND
C
Color button
Press to operate the Functions in GUIDE/Program Edit/Block
Program/USB
D
G
I
X
Thunbstick(USB)
Allows you to navigate the on-screen menus in USB function,and
17 for Previous, 34 for Next;
E
REV Fast Reverse (Only for USB)
F
ENTER
H
Play/Pause button (Only for USB)
J
USB Press to switch input source to USB in
K
DNR
Digital Noise Reduction
L
SLEEP button
Press to display the sleep timer option
M
CH.LIST
Open the channel list in TV
N
FAVORITE
Open the favourite channel list in TV
O
Number buttons
Press to change a channel
P
INFO
Q
Q.VIEW Press to jump back and forth between two channels
R
CHANNEL UP/DOWN
Channel selection(up/down)
S
Q.MENU Adjust some functions in common use
T
OK
Accesses the highlighted item in the on-screen menu
U
PICTURE
Press repeatedly to cycle through the available picture modes
V
FWD
Fast forward(Only for USB)
W
GUIDE
Display the guide when you are watching analog or digital channels
Y
EXIT
Clears all on-screen displays and returns to TV viewing from any
menu
Z
REPEAT
Replay a music or movie
[
ZOOM
Press to magnify/minify an image
ENTER
ZOOM
OK
GUIDE
EXIT
REPEAT
INPUT
MTS/SAP
INFO
MUTE
VOL CH
MENU
Q.MENU
SOUND
PICTURE
Q.VIEW
P.SIZE H.LO CK
FAVORITE
CH.LIST
CC
DNRSLEEP
USB
17
18
19
20
21
22
23
24
25
26
27
28
29
30
31
32
33
34
35
36
37
1
2
3
4
5
6
7
8
9
10
11
12
13
14
15
16

Installation
TV LCD-TFT Owner’s Manual EN-6
Installation
External Equipment Connections
Accessories
Remote control Owner’s manual Alkaline battery (AAA) x2
Antenna Connection
Over-the-air TV reception quality will depend on your antenna type, antenna location and antenna positioning.
ANT IN
VHF Antenna
UHF Antenna
Turn clockwise to tighten
Bronze Wire
Be careful not to bend thebronze wire
when connecting the antenna.
Bronze Wire
Multi-family Dwellings/Apartments
(Connect to wall antenna socket)
Wall Antenna
Socket
RF Coaxial Wire (75 ohm)
Single-family Dwellings /Houses
(Connect to wall jackfor outdoorantenna)
Outdoor Antenna
To improve the picture quality in a poor signal
area, please purchase a signal amplifier and install
properly.
If the antenna needs to be split for two TV’s, install a
“2-Way Signal Splitter” in the connections.
To install the antenna properly please contact a
professional in your area.
Note
All cables shown are not included with the TV.R
PLAY/PAUSE
REV
REPEAT
GUIDE
MTS/SAP
CCD ARC
FREEZE
ENTER
STOPUSB REC
PREV NEXT
CH.LIST
FAVORITE
TV
STB
INPUT
MUTE
VOL CH
MENU
SLEEP DISPLAY
EXIT
RECALL
PICTURE AUDIO PC HDMI
CABLE VCR AUD
DVD
ANT IN
Installation
EN-7 TV LCD-TFT Owner’s Manual
Choose Your Connection
There are several ways to connect your television,
depending on the components you want to connect
and the quality of the signal you want to achieve. The
following are examples of some dierent ways to
connect your TV with dierent input sources.
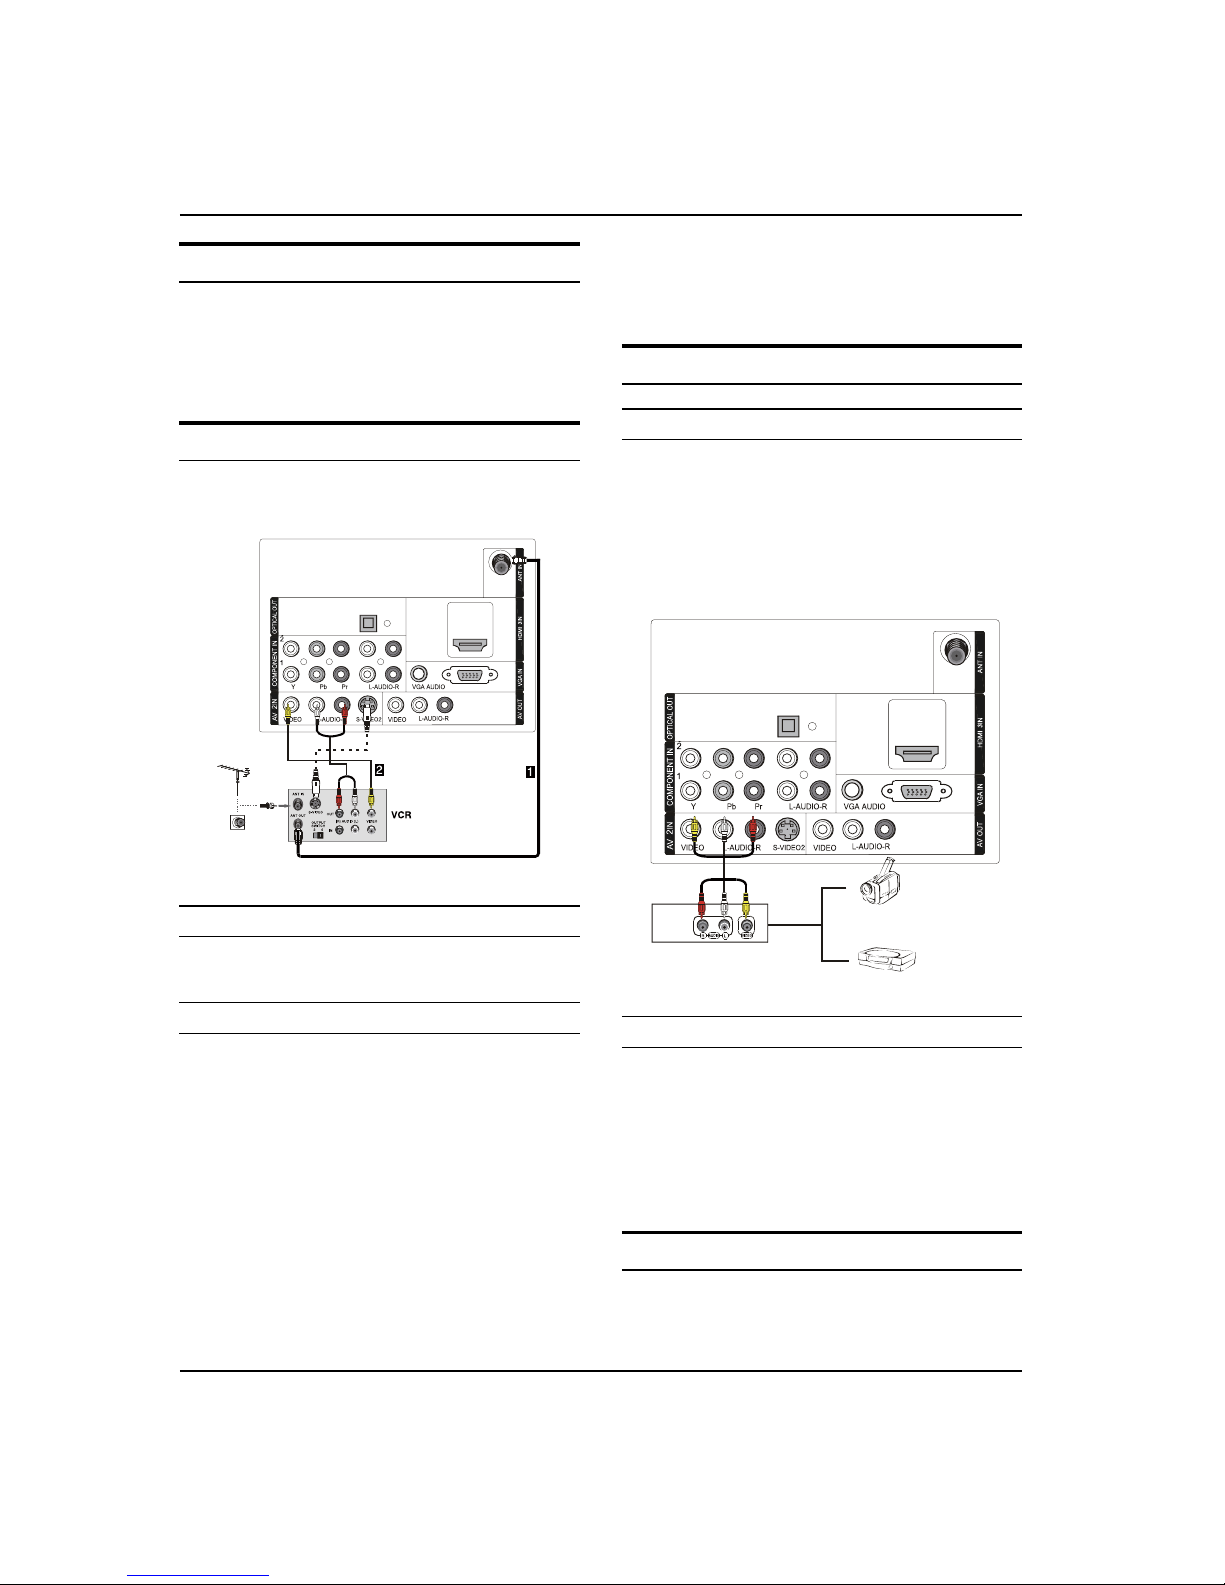
Connecting a VCR
To avoid picture noise (interference), leave an adequate
distance between the VCR and TV.
Connection Option 1
Set VCR output switch to channel 3 or 4 and then tune
the TV to the same channel number.
Connection Option 2
Connect the audio and video cables from the VCR’s A
output jacks to the TV input jacks, as shown in the
figure. When connecting the TV to VCR, match the
jack colors (Video = yellow, Audio Left = white, and
Audio Right = red). If you connect a S-VIDEO output
from VCR to the S-VIDEO input, the picture quality is
improved; compared to connecting a regular VCR to
the Video input.
Insert a video tape into the VCR and press
B PLAY on
the VCR. (Refer to the VCR owner’s manual.)
Select the input source with using theC INPUT button
on the remote control, and then press
/button
to select the source, press OK button to confirm.
External AV Source Setup
How to connect
Connect the audio and video cables from the q
external equipment’s output jacks to the TV input
jacks, as shown in the figure.
When connecting the TV to external equipment, q
match the jack colors (Video = yellow, Audio Left =
white, and Audio Right = red).
Video Game Set
Camcorder
How to use
Select the input source with using the A INPUT button
on the remote control.
Press
B CH+/- button to select the desired source.
Press
C OK button to confirm.
Operate the corresponding external equipment.
D
Connecting a DVD player
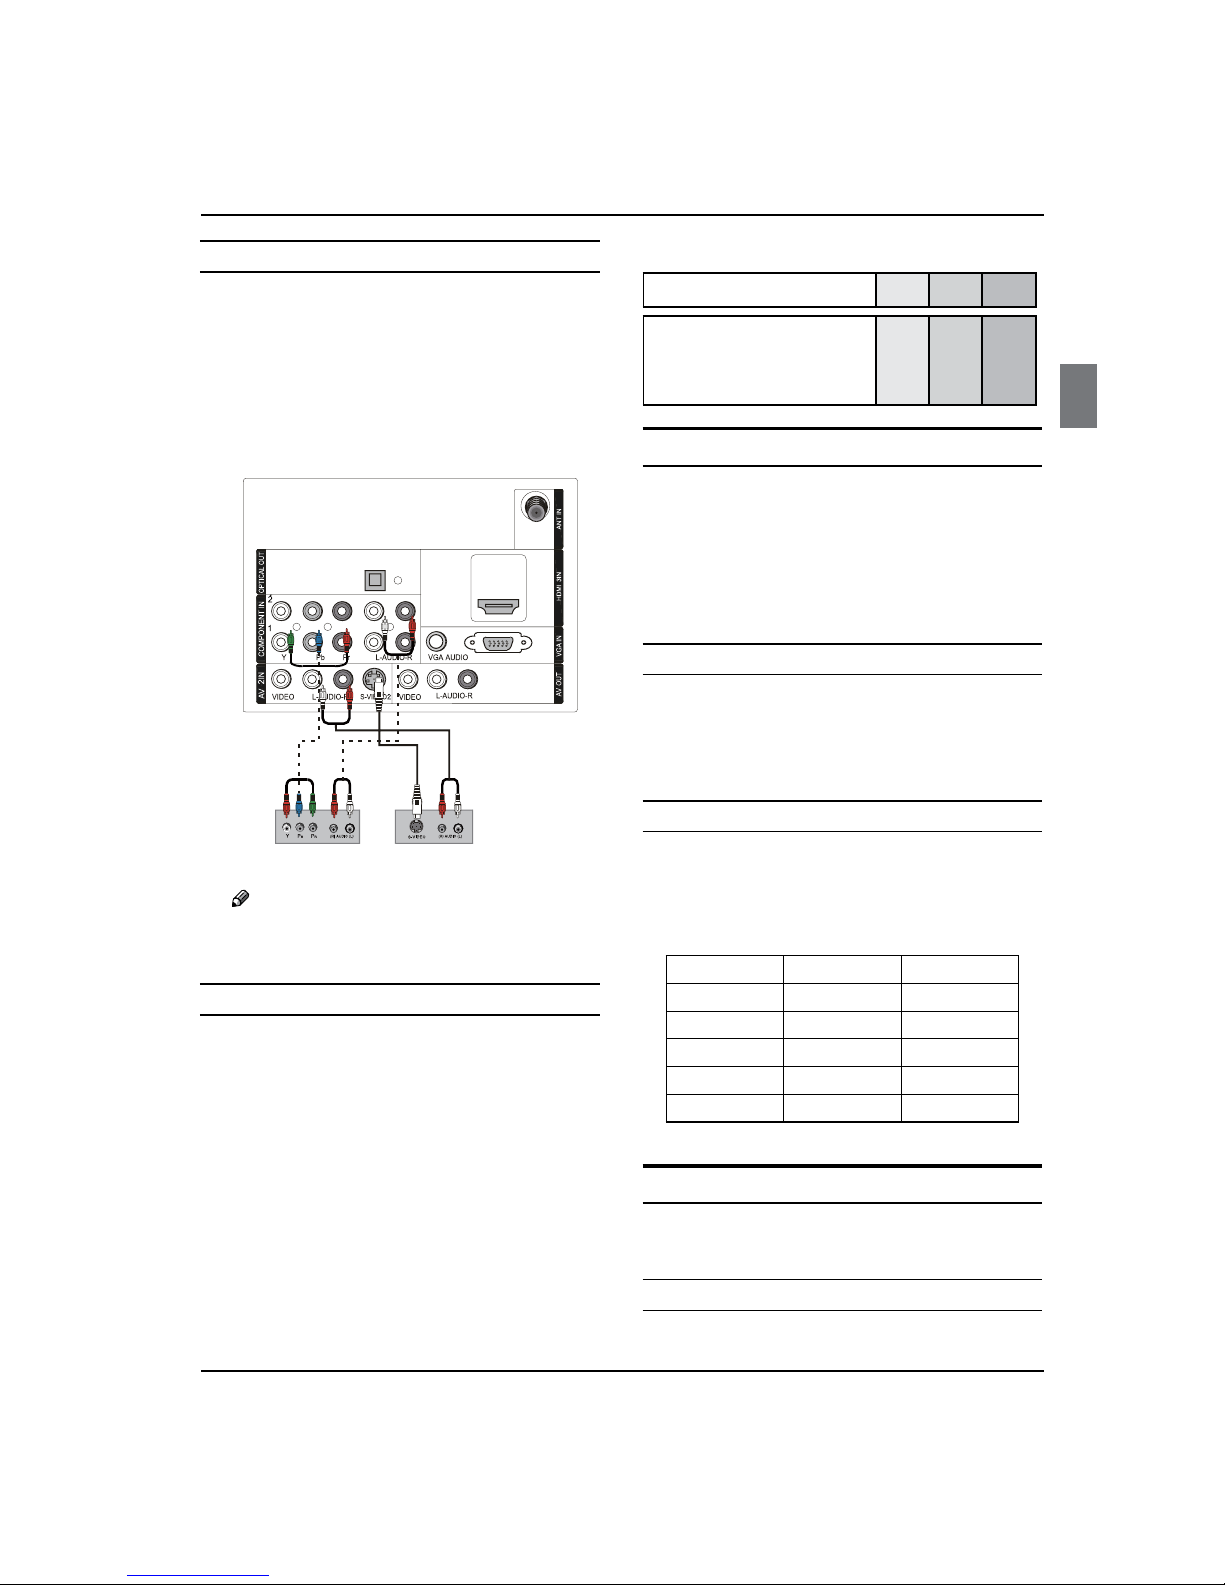
Installation
TV LCD-TFT Owner’s Manual EN-8
How to connect
Connect the DVD video outputs (COMPONENT) to A
the Y Pb Pr jacks on the TV and connect the DVD
audio outputs to the YPbPr Audio IN jacks on the TV,
as shown in the figure.
If your DVD only has an S-VIDEO output jack, connect B
this to the S-VIDEO input on the TV, as shown in the
figure.
DVD
or
Note
If your DVD player does not have component R
video output, use S-Video.
How to use
Turn on the DVD player, insert a DVD disc.A
Use B INPUT button on the remote control to select
component mode.
Press
C PLAY button on external equipment for
program play.
Refer to the DVD player’s manual for operating
D
instructions.
Component Input portsQ
To get better picture quality, connect a DVD player to
the component input ports as shown below.
Component ports on the TV Y Pb Pr
Video output ports on DVD
player
Y
Y
Y
Y
Pb
B-Y
Cb
PB
Pr
R-Y
Cr
PR
Connecting a DTV (digital TV)
This TV can receive Digital Over-the-air/Cable signals
without an external digital set-top box. However, if you do
receive Digital signals from a digital set-top box or other
digital external device, refer to the figure as shown below.
This TV supports HDCP (High-bandwidth Digital
Contents Protection) protocol for Digital Contents
(480p,720p,1080i).
How to connect
Use the TV’s COMPONENT, VGA or HDMI jack for q
video connections, depending on your set-top box
connector. Then, make the corresponding audio
connections.
How to use
Turn on the digital set-top box. (Refer to the owner’s A
manual for the digital set-top box.)
Use INPUT on the remote control to select
B
COMPONENT, VGA or HDMI source.
Signal COMPONENT HDMI
480i Yes Yes
480p Yes Yes
720p Yes Yes
1080i Yes Yes
1080p Yes Yes
Connecting a digital audio output
Send the TV’s audio to external audio equipment (stereo
system) via the Digital Audio Output (Optical) port.
How to connect
Connect one end of an optical cable to the TV Digital A

Installation
EN-9 TV LCD-TFT Owner’s Manual
Audio (Optical) Output port.
Connect the other end of the optical cable to the
B
digital audio (optical) input on the audio equipment.
See the external audio equipment instruction
manual for operation.
Digit al Set-to p Box
+'0,
Note
When connecting with external audio equipments, R
such as amplifers or speakers, please turn the TV
speakers o.
!
Caution:
Do not look into the optical output port. Looking q
at the laser beam may damage your vision.
Connecting a computer
How to connect
To get the best picture quality, adjust the VGA A
graphics card to 1280s1024.
Use the TV’s VGA or DVI (Digital Visual Interface) B
Audio IN port for audio connections, depending on
your computer connector.
If the graphic card on the computer does not q
output analog and digital RGB simultaneously,
connect only one of either VGA IN or HDMI IN to
display the VGA on the TV.
If the graphic card on the computer does output q
analog and digital RGB simultaneously, set the TV
to either VGA or HDMI; (the other mode is set to
Plug and Play automatically by the TV.)
Then, make the corresponding audio connection.
C
If using a sound card, adjust the VGA sound as
required.
How to use
Turn on the computer and the TV.A
Use INPUT on the remote control to select VGA or B
HDMI source.
Check the image on your TV. There may be noise
C
associated with the resolution, vertical pattern,
contrast or brightness in VGA mode. If noise
is present, change the VGA mode to another
resolution, change the refresh rate to another rate
or adjust the brightness and contrast on the menu
until the picture is clear. If the refresh rate of the VGA
graphic card can not be changed, change the VGA
graphic card or consult the manufacturer of the VGA
graphic card.
Note
Use a DVI cable.R

Installation/Operation
TV LCD-TFT Owner’s Manual EN-10
Avoid keeping a fixed image on the TV’s screen R
for a long period of time. The fixed image may
become permanently imprinted on the screen.
The synchronization input form for Horizontal and R
Vertical frequencies is separate.
HDMI and DVI input
When the source device (DVD player or Set Top Box)
supports HDMI
How To Connect
Connect the source device to HDMI port of this TV A
with an HDMI cable (not supplied with this product).
No separated audio connection is necessary.
B
How To Use
If the source device supports Auto HDMI function, q
the output resolution of the source device will be
automatically set to 1280s720p.
If the source device does not support Auto HDMI, q
you need to set the output resolution appropriately.
To get the best picture quality, adjust the output
resolution of the source device to 1280s720p.
Select HDMI input source in input source option of q
Select Main source menu.
When the source device (DVD player or Set Top Box)
supports DVI
How To Connect
Connect the source device to HDMI port of this TV A
with a HDMI-to-DVI cable (not supplied with this
product).
A separated audio connection is necessary.
B
If the source device has an analog audio output C
connector, connect the source device audio output to
DVI Audio In port located on the left side of HDMI port.
How To Use
If the source device supports Auto DVI function, q
the output resolution of the source device will be
automatically set to 1280s720p.
If the source device does not support Auto DVI, you q
need to set the output resolution appropriately.
To get the best picture quality, adjust the output
resolution of the source device to 1280s720p.
Press the q INPUT button to select HDMI input source
in input source option of Select Main source menu.
Operation
In the manual, the OSD (on screen display) may be
dierent from your TV’s, because it is just an example to
help you with the TV operation.
There are several options you might need to set up in
order for your TV to work properly. Read the instructions
that follow.
Switching On/O the TV set
First, connect power cord correctly.A
Select the viewing source by using B INPUT button on
the remote control.
When finished using the TV, press
C POWER button on
the remote control. The TV reverts to standby mode.
If you intend to be away on vacation, disconnect the
D
power plug from the wall power outlet.
Note
If the TV in power on , the screen show information R
according the type of input signal, the information
will disappear. If there is no signal, “No Signal” will
display on the screen.
Choose the Menu Language
When you start using your set for the first time, you must
select the language which will be used for displaying
menus and indications.
Choose
A TV Input and then press MENU button.
Press
B
/
button to select Option menu.
Press C
/OK button and then use/button to
select Language.

Operation
EN-11 TV LCD-TFT Owner’s Manual
PressD
/
button to select language.
( English or Portugues)
Choose the Input source
Change the picture source so you can watch your TV,
VCR, Cable , or any other devices that are connected to
your TV.
Press A INPUT button to enter the Input Source menu
and then use
/button to select the desired
items (Air, Cable, AV1, AV2, S-Video1, S-Video2,
Component1, Component2, PC, HDMI1, HDMI2,
HDMI3, USB).
Press B OK button to confirm .
Picture Menu
The TV menu gives you an overview of the menus you
can select.
Note
Depending on the input signal, one or more menu R
items may not be selectable.
How to select picture mode
The picture mode provides the pre-defined images
settings:
Standard, Mild, Dynamic and User
.
Press
A MENU button and then use
/
button to
select Picture menu.
Press
B
/OK button and then use /button to
select Picture Mode.
Press
C
/
button to select the option
Standard,
Mild, Dynamic and User
.
You can also press PICTURE button on the remote control
to select the option Standard, Mild, Dynamic and User.
How to customize your own picture status
Press A MENU button and then use /button to
select Picture menu.
Press
B
/OK
button and then use/button to
select the desired items.
Press
C
/OK
button and then use/button to
adjust the setting.
Picture ModeY
Select the mode of picture:
Standard, Mild, Dynamic
and User
.
ContrastY
This will adjust the intensity of bright parts in the
picture but keep the dark parts unchanged.
BrightnessY
This will adjust the light output of the complete
picture, which will mainly aect the darker areas of
the picture.
ColorY
This will adjust the saturation level of the colors to suit
your personal preference.
SharpnessY
This will adjust the sharpness of fine details in the
picture.
Note
The picture options can only be adjusted in the R
User mode. The other picture modes are preset.
TintY
Allows you to select the color mix (Tint) of the picture.
Operation
TV LCD-TFT Owner’s Manual EN-12
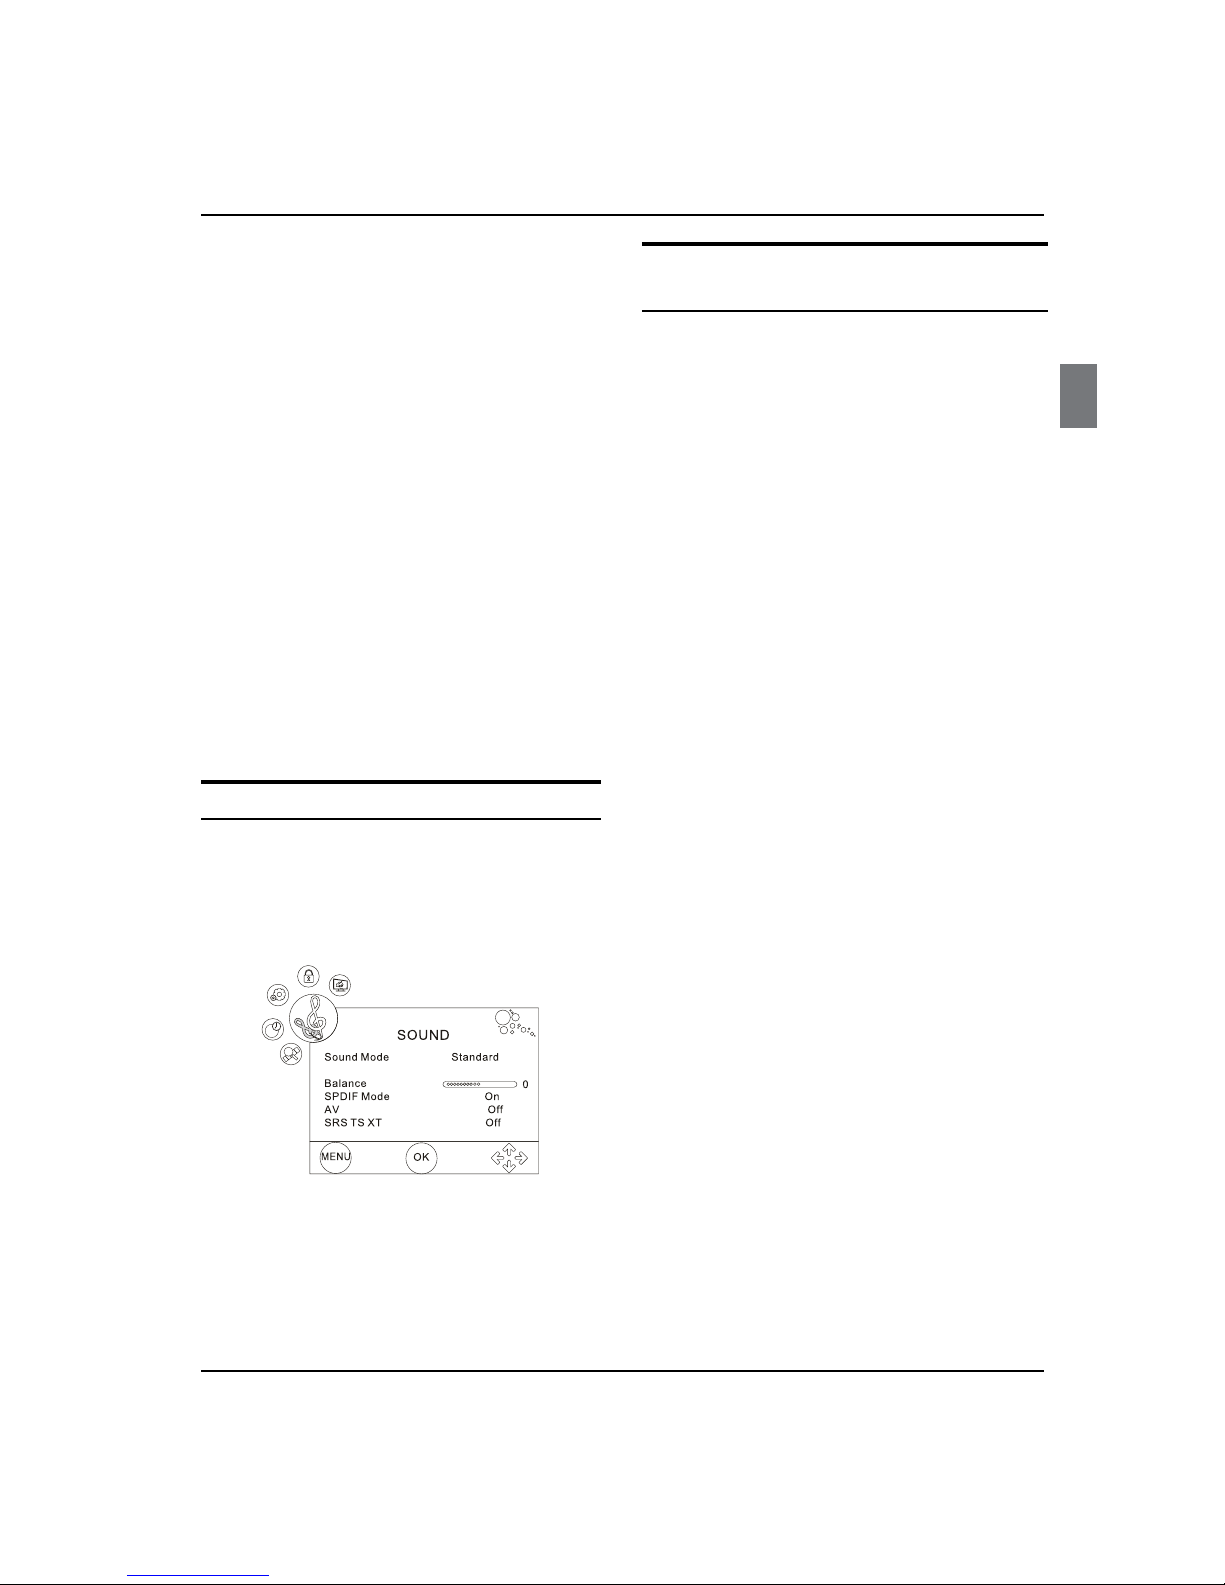
How to Customize your own sound
status
Press A MENU button and then use/button to
select Audio menu.
Press
B
/OK
button and then use/button to
select desired items.
Press
C
/OK
button and then use/button to
adjust the setting.
Sound Mode: Y To adjust the audio mode:
Standard, Music, Movie and User.
Equalizer: Y
To adjust the equalizer.
Balance: Y Adjust to emphasize left or right speaker
balance.
SPDIF Mode: Y
To adjust the SPDIF output: On or O.
AVLY
To adjust the audio volume
On or O.
SRS TS XTY
To turn the simulated surround sound
On or O.
MTS/SAP : This TV can receive MTS stereo programs
and SAP (Secondary Audio Program) that accompanies
the stereo program; if the station transmits an additional
sound signal as well as the original one.
When having selected
MTS/SAP button on the remote
control, this TV can only receive the signal when the TV
station transmits the proper signals.
Mono sound is automatically received if the broadcast is only
in Mono; even though Stereo or SAP has been selected.
Select Mono if you want to listen to mono sound during
stereo/ SAP broadcasting. Stereo or SAP can be received
in a Analog channel.
Use
A MTS/SAP button to select your desired MTS
mode in a analog signal.
Each time you press q
MTS/SAP
button, Mono,
Stereo or SAP appear. If other languages are
available on the digital signal, select them with the
MTS/SAP
button.
Press B EXIT button to save and return to TV viewing.
Channel menu
Display channel menu by pressing INPUT button then
Color temperatureY
This will increase or decrease Warm (red) and Cool
(blue) colors to suit personal preferences.
Select Cool to give the white colors a blue tint,
Standard to give the white colors a neutral tint, Warm
to give the white colors a red tint.
Aspect RatioY
To change the aspect ratio: Full Screen, 4:3, Auto,
Cinema, Zoom and just scan.
You can also press P.SIZE button on the remote control to
select the option.
DNRY
Automatically lters out and reduces the image
noise an
d improves picture quality when receiving
weak video signals: On or O.
BacklightY
To adjust the brightness of Backlight.
Sound menu
How to select sound mode
Press A MENU button and then use/button to
select Sound menu.
Press
B
/OK
button and then use/button to
select Sound Mode.
Equalizer
L
PressC
/
button to select the option Standard,
Music, Movie and User.
You can also press q SOUND button on the remote
control to select the Audio Mode: Standard, Music,
Movie and User.
 Loading...