

Haier L42A9, L42S9 Service Manual
42″LCD TV Haier L42A9
1
Service
Service
Service
Horizontal Frequency
34~68 kHz
TABLE OF CONTENTS
Description Page Description Page
SAFETY NOTICE
ANY PERSON ATTEMPTING TO SERVICE THIS CHASSIS MUST FAMILIARIZE HIMSELF WITH THE CHASSIS
AND BE AWARE OF THE NECESSARY SAFETY PRECAUTIONS TO BE USED WHEN SERVICING
ELECTRONIC EQUIPMENT CONTAINING HIGH VOLTAGES.
CAUTION: USE A SEPARATE ISOLATION TRANSFOMER FOR THIS UNIT WHEN SERVICING
6.4 IO Board……..……………..………….…..…….......31
6.5 Key Board………………………..……..……….......32
6.6 IR Board…………………………..……….…….......32
7. Adjustment..............................................................33
8. Block Diagram.…….................................................34
9. Wiring Diagram.……...............................................36
10. Schematic Diagram………..……..………………...37
10.1 Main Board…………….…………………...….......37
10.2 Power Board……………..…………...……….......47
10.3 Inverter Board……………..……..…...……….......52
10.4 IO Board……….…………..……..…...……….......53
10.5 Key Board……………….………….………….......56
10.6 IR Board……………………………….……….......57
11. Exploded View……………………….………….…...58
12. BOM List……………….…………………………….60
Table of Contents........……...................................…........1
Important Safety Notice.......................................……......2
Revision List…………………………………………………3
1. General Specification.................................………........4
2. Operating Instructions…………………….……...….......5
2.1 The Use of Remote Control…….…………...…….......5
2.2 To Use the Menu…...…………………….…………......6
2.3 How to Connect…….…………………….…..…….....14
2.4 Front Panel Control Knobs……………….………......15
3. Input/Output Specification…………....................…....16
4. Mechanical Instructions…………………….................18
5. Repair Flow Chart ……………………….…….…….....21
6. PCB Layout ………………..………………....…..........25
6.1 Main Board………………..……………...…….….......25
6.2 Power Board……………..…..………….…..…….......27
6.3 Inverter Board……………..………….…..……….......30

2
Important Safety Notice
Proper service and repair is important to the safe, reliable operation of all Haier Company Equipment. The service
procedures recommended by Haier and described in this service manual are effective methods of performing
service operations. Some of these service operations require the use of tools specially designed for the purpose.
The special tools should be used when and as recommended.
It is important to note that this manual contains various CAUTIONS and NOTICES which should be carefully read in
order to minimize the risk of personal injury to service personnel. The possibility exists that improper service
methods may damage the equipment. It is also important to understand that these CAUTIONS and NOTICES ARE
NOT EXHAUSTIVE. Haier could not possibly know, evaluate and advise the service trade of all conceivable ways in
which service might be done or of the possible hazardous consequences of each way. Consequently, Haier has not
undertaken any such broad evaluation. Accordingly, a servicer who uses a service procedure or tool which is not
recommended by Haier must first satisfy himself thoroughly that neither his safety nor the safe operation of the
equipment will be jeopardized by the service method selected.
Hereafter throughout this manual, Haier Company will be referred to as Haier.
WARNING
Use of substitute replacement parts, which do not have the same, specified safety characteristics might create
shock, fire, or other hazards.
Under no circumstances should the original design be modified or altered without written permission from Haier.
Haier assumes no liability, express or implied, arising out of any unauthorized modification of design.
Servicer assumes all liability.
FOR PRODUCTS CONTAINING LASER:
DANGER-Invisible laser radiations when open AVOID DIRECT EXPOSURE TO BEAM.
CAUTION-Use of controls or adjustments or performance of procedures other than those specified herein may
result in hazardous radiation exposure.
CAUTION -The use of optical instruments with this product will increase eye hazard.
TO ENSURE THE CONTINUED RELIABILITY OF THIS PRODUCT, USE ONLY ORIGINAL MANUFACTURER'S
REPLACEMENT PARTS, WHICH ARE LISTED WITH THEIR PART NUMBERS IN THE PARTS LIST SECTION OF
THIS SERVICE MANUAL.
Take care during handling the LCD module with backlight unit
-Must mount the module using mounting holes arranged in four corners.
-Do not press on the panel, edge of the frame strongly or electric shock as this will result in damage to the screen.
-Do not scratch or press on the panel with any sharp objects, such as pencil or pen as this may result in damage to
the panel.
-Protect the module from the ESD as it may damage the electronic circuit (C-MOS).
-Make certain that treatment person’s body is grounded through wristband.
-Do not leave the module in high temperature and in areas of high humidity for a long time.
-Avoid contact with water as it may a short circuit within the module.
-If the surface of panel becomes dirty, please wipe it off with a soft material. (Cleaning with a dirty or rough cloth may
damage the panel.)

3
Revision List
Version Release Date Revision Instructions Model
A00 Jan.7,2010 Initial release
E429MANCJWH6NN
E429MANCJWH3NN
E429MANCJWH7NN
E429MANCJWH8NN
A01 Feb.4,2010 Add new models E429MANMJWH62N
A02 Oct.8,2010 Add new models
E429MANCJW3HNN
E429MANCJW6HNN
E429MANCJW7HNN
E429MANCJW8HNN
E429MANMJWH92N

4
1. General Specification
5
2. Operating Instructions
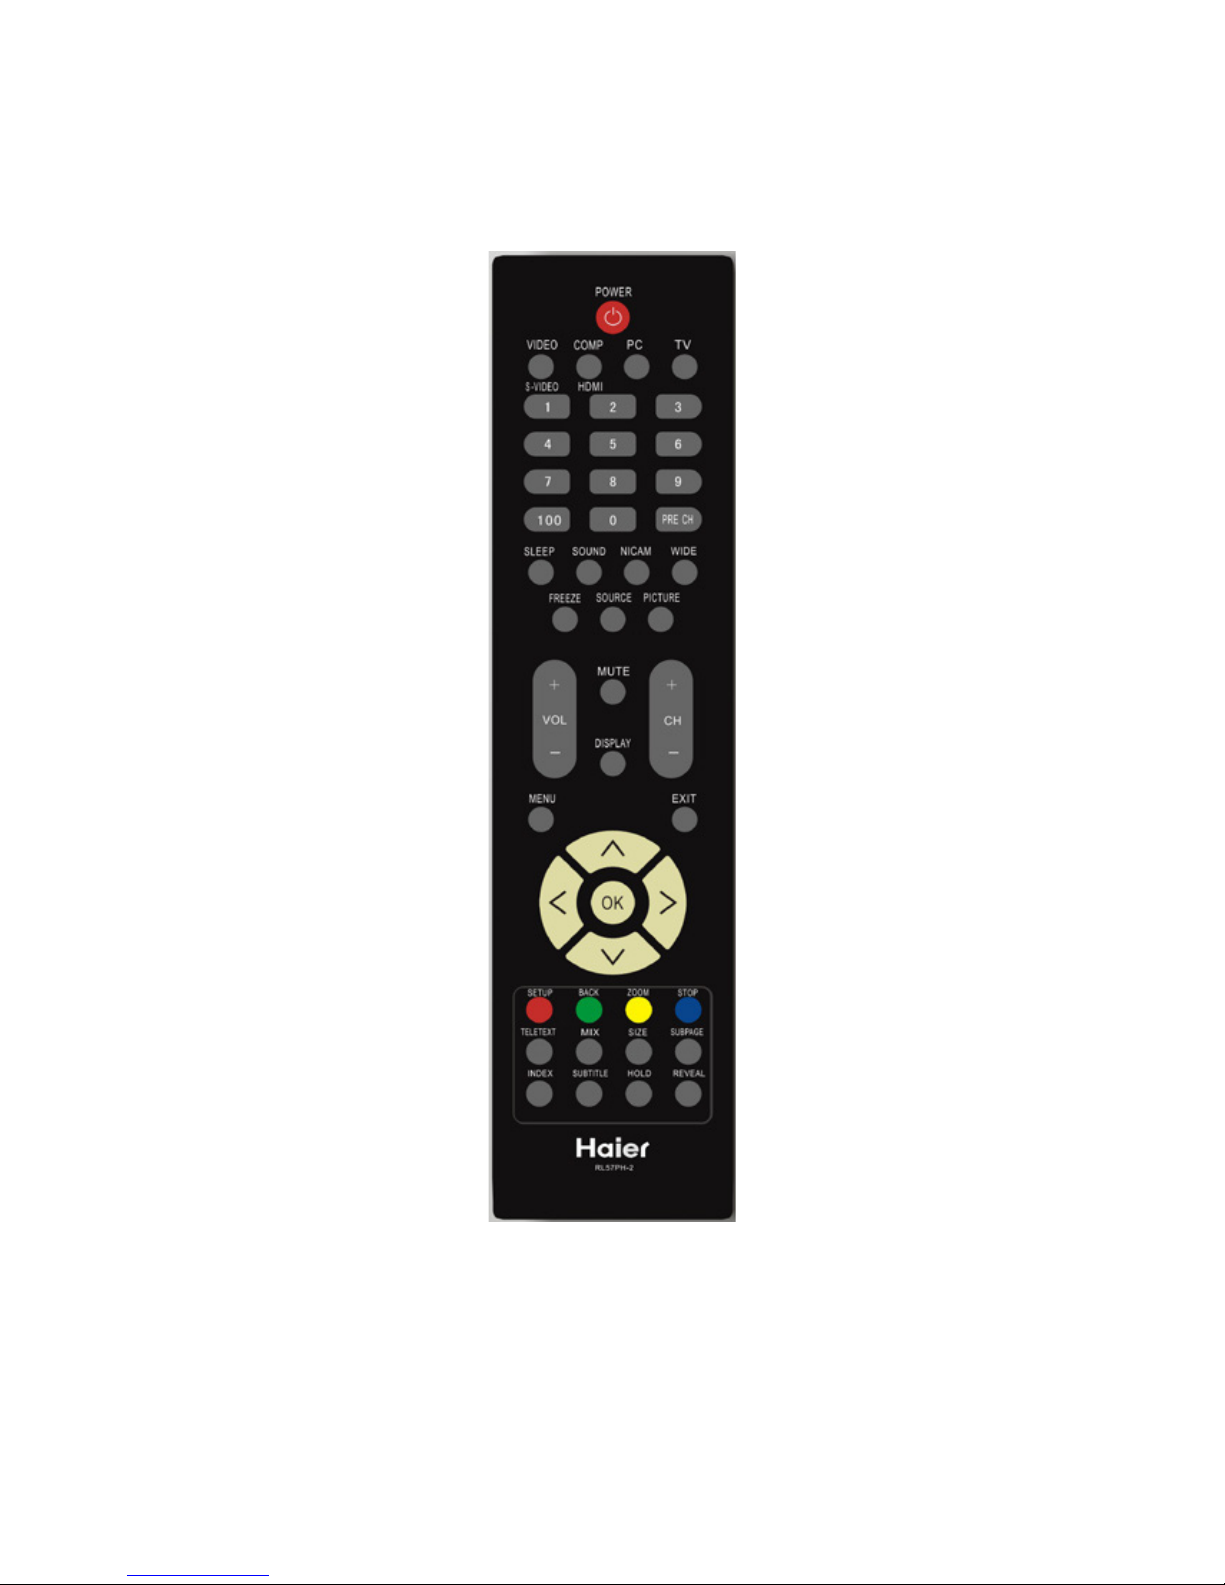
2.1 The Use of Remote Control
Note: Pressing most buttons once will activate the assigned function. Pressing a second time will de-activate it.
When a button enables multiple options, a small list will be shown. Press repeatedly to select the next item in the list.
The list will be removed automatically after three seconds or press OK to remove immediately.
POWER
Press to turn the LCD TV On or off
VIDEO/S-VIDEO BUTTON
Press the button to select CVBS-1,
CVBS-2 and S-VIDEO
HDMI/COMP BUTTON
Press to select YPbPr, HDMI 1,
HDMI 2
PC
Press the button to select PC source
TV BUTTON
Press the button to select TV source
NUMBER BUTTON
Press the number buttons for direct
access to the TV channels. For 2
digit channel, enter the 2nd digit after
enter 1st digit
PRE CH
It is only used in TV mode to go back
to the previously watched TV
channel.
SLEEP BUTTON
Press to set the LCD TV to turn itself
off within a certain time
SOUND BUTTON
Press this button, you can choose 3
smart mode: personal, speech,
music.
When in personal mode, you can
choose Bass, Treble.
NICAM
Press repeatedly to select Mono,
Stereo. Note: The sound mode
selections depend on TV program
and broadcast TV channel of that
region.
FREEZE BUTTON
It is used to freeze an instant picture,
and you can return to normal
watching by pressing any key.(Note:
It only works in TV mode. Do not use
freezed picture for long so as not to
burn the screen.
MUTE BUTTON
Press to eliminate or restore the
LCD TV sound. Mute will appear on
the screen when the sound is muted
WIDE BUTTON
Press this button to display a list of
available display formats. Available
display formats are determined by
the type of signal you are receiving.
To choose the display format you
prefer, press the WIDE button
repeatedly: 4:3, ZOOM 1, ZOOM 2,
1:1(For 720P/1080I).
DISPLAY BUTTON
Press to see the current channel
information on the TV screen
VOL+/-
Press + or - to adjust the volume
CH +/-
Press to adjust the channel up or
Down
MENU
Press menu to activate on screen
menu on/off
SOURCE BUTTON
Press to select the video input
source: TV, CVBS-1, CVBS-2,
S-VIDEO, YPbPr, HDMI1, HDMI2,
VGA.
OK BUTTON
Press the button to conf rm your
Selection
EXIT BUTTON
Press the button to exit OSD menu
PICTURE BUTTON
Press this button, you can choose
standard, vivid, movie, personal,
enco.
TELETEXT (The key does not work.)
MIX (The key does not work.)
SIZE (The key does not work.)
SUBPAGE (The key does not work.)
INDEX (The key does not work.)
SUBTITLE (The key does not work.)
HOLD (The key does not work.)
REVEAL (The key does not work.)
R/G/Y/B(Colour button) (The key
does not work.)
6
2.2 To Use the Menu
1. Pressing the menu button may display or exit the main menu.
2. In the main menu, you may use the / key to select the functional options to be adjusted by moving up or down, ∧∨
press the > to enter the sub-menu adjustment, and press the menu key to exit the main menu.
3. In the sub-menu, you may use the </> key to make adjustment, use the /∧∨ key to select the previous/next
option, and press the menu key to go back to the previous level.
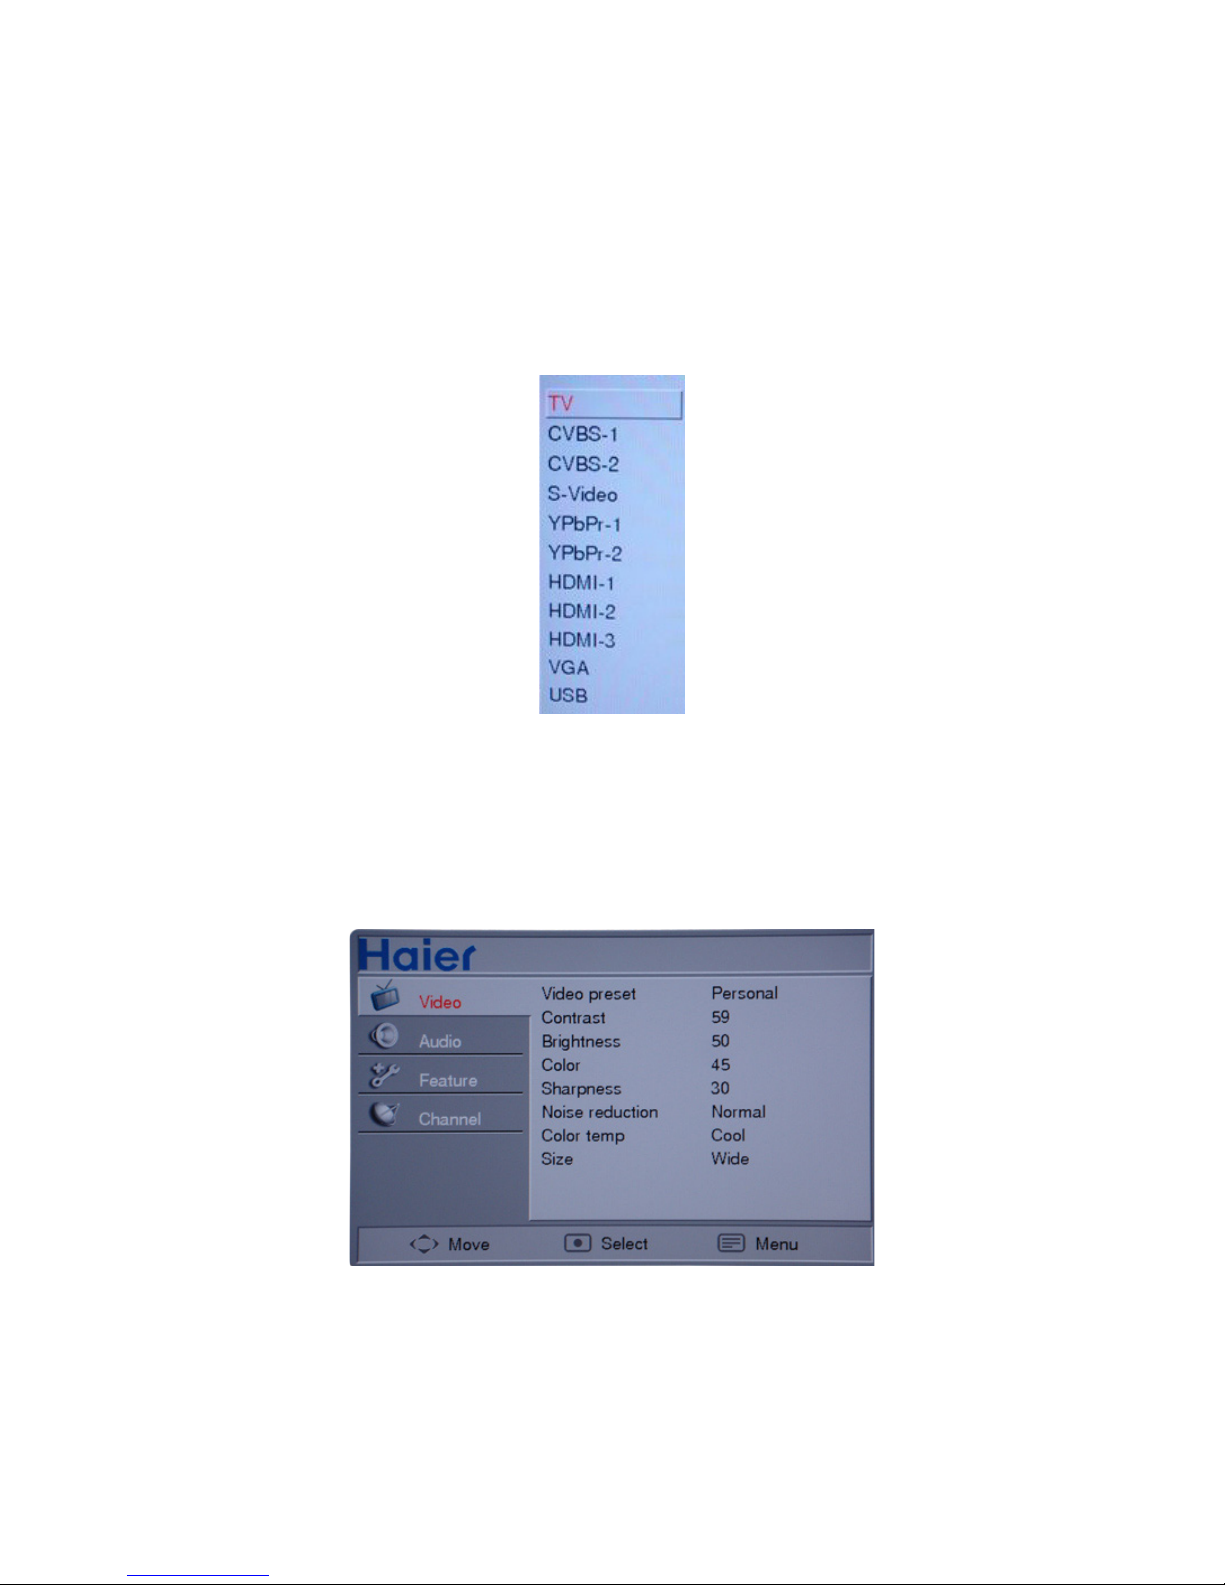
Signal source menu
Press "SOURCE" button to enter the SOURCE menu, including TV, CVBS-1, CVBS-2, S-Video, YPbPr1, YPbPr-2,
HDMI-1, HDMI-2, HDMI-3, VGA, USB. (with other signal sources, pressing number key or CH +/- key may switch to
the "TV" signal source.)
Pressing the Menu button to enter the main menu
While in TV mode, the adjustable options include picture, sound, function and channel.
While with CVBS-1, CVBS-2, S-Video, YPbPr1, YPbPr-2, HDMI-1, HDMI-2, HDMI-3, the adjustable options include
picture, sound and function.
While in PC mode, the adjustable options include picture, sound, function and PC.
Image setting
1. Video preset: Provide five image setting modes including Personal, Standard, Vivid, Movie, enco. You can adjust
the "Contrast, Brightness, Color and Sharpness" to your taste only in the Personal mode.
2. Contrast: Make the dark color in the black portion of the image enricher and make the white color brighter.
3. Brightness: Adjust the brightness of the image background; it is often used together with the Contrast, adjustable
from 0 to 100.
4. Color: Adjustable from 0 to 100. Adjustment of this option may change the color or streak of color of the picture
(not available in HDMI mode and PC mode).
5. Sharpness: Adjustable from 0 to 100. Adjustment to this option may change the degree of the clearness and
sharpness of the picture (not available in HDMI mode and PC mode).
7
6. Noise reduction: There are four selectable options, i.e. Off, Low, Normal, High. The user may judge the option
according to the actual conditions. It is selected as "Normal" as default. It is suggested to select "High" in case of
serious noise and close this option in case of minor noise. (not available in PC mode, USB mode.)
7. Color temp: Selecting this option in a mode other than PC mode, three options are available, i.e. Normal, Warm,
Cool. In the PC mode, the "User" option is added for adjusting the RGB color.
8. Size: In a mode other than PC mode, four options are available, i.e. 4:3, Zoom 1, Zoom 2 and Wide. When the
resolution is 720P or 1080I in the component/HDMI mode, "1:1" can be selected for the picture size. There are two
size options in PC mode, i.e. 4:3 and Wide. (not available in USB mode.)
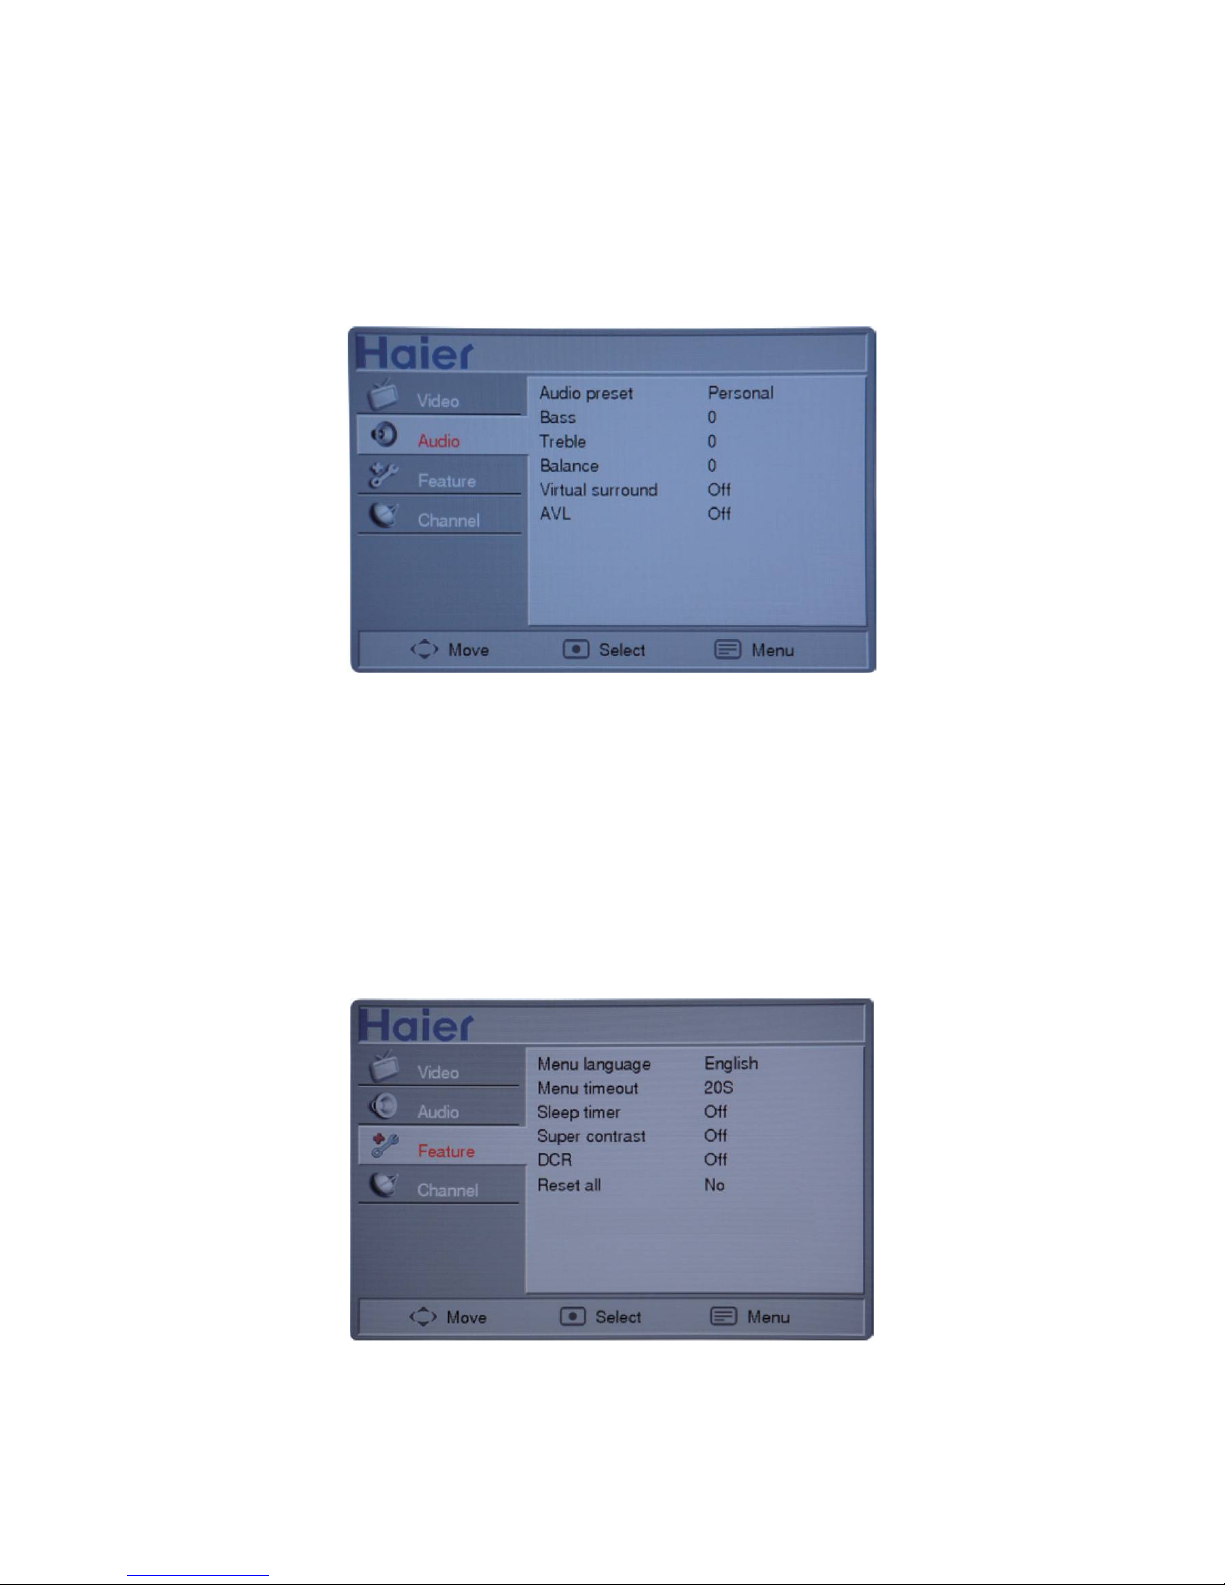
Sound setting
1. Audio preset: Three output sound modes can be set, i.e. Personal, Music and speech. In the speech and Music
modes, it is impossible to adjust Bass and Treble, while in the Personal mode, you may set the audio output effect
by adjusting the Bass and Treble to your taste.
2. Bass: Adjustable from -10 to +10, used to adjust the volume of the low frequency sound.
3. Treble: Adjustable from -10 to +10, used to adjust the volume of the high frequency sound.
4. Balance: Adjustable from -10 to +10; while adjusting from 0~-10, the volume of the R-CH decreases gradually to
zero, while adjusting from 0 to +10, the volume of the L-CH decreases gradually to zero.
5. Virtual surround: Switch of surrounding effect, defaulted as Off.
6. AVL: Automatic volume compensation feature, may control the volume of the audio output to a certain extent to
avoid volume up or down occasionally.
Function setting
1. Menu language: Set the menu language. Defaulted as English.
2. Menu timeout: Options including 10, 20, 30, 40, 50 and 60 seconds are available for you to set the menu timeout.
3. Sleep timer: Set the time interval for the TV set to enter standby mode automatically. (Not available in PC mode)
Timing starts immediately after the sleep timer is set. Available options of sleep timer include 15, 30, 45, 60, 90 and
120 minutes; select "Off" to cancel the sleep timer setting.
(Note: If the TV set is turned off after timed power on/off is set, the timed power on/off function cancels automatically)
8
(Pressing the Sleep key in the Function menu doesn't display the remaining sleep time, but switching directly to the
next sleep time set)
4. Super contrast: Further enhance the contrast of the TV picture.
5. DCR: Enhance the contrast of dynamic TV picture and give the picture more feel of layering.
6. Reset all: Restore to the preset default value, press the </> key to select and select OK key to execute, return to
the main menu option, and the menu language is restored to “English”. (Note: this operation is somewhat slower; it
will execute in 3 seconds, please wait patiently).
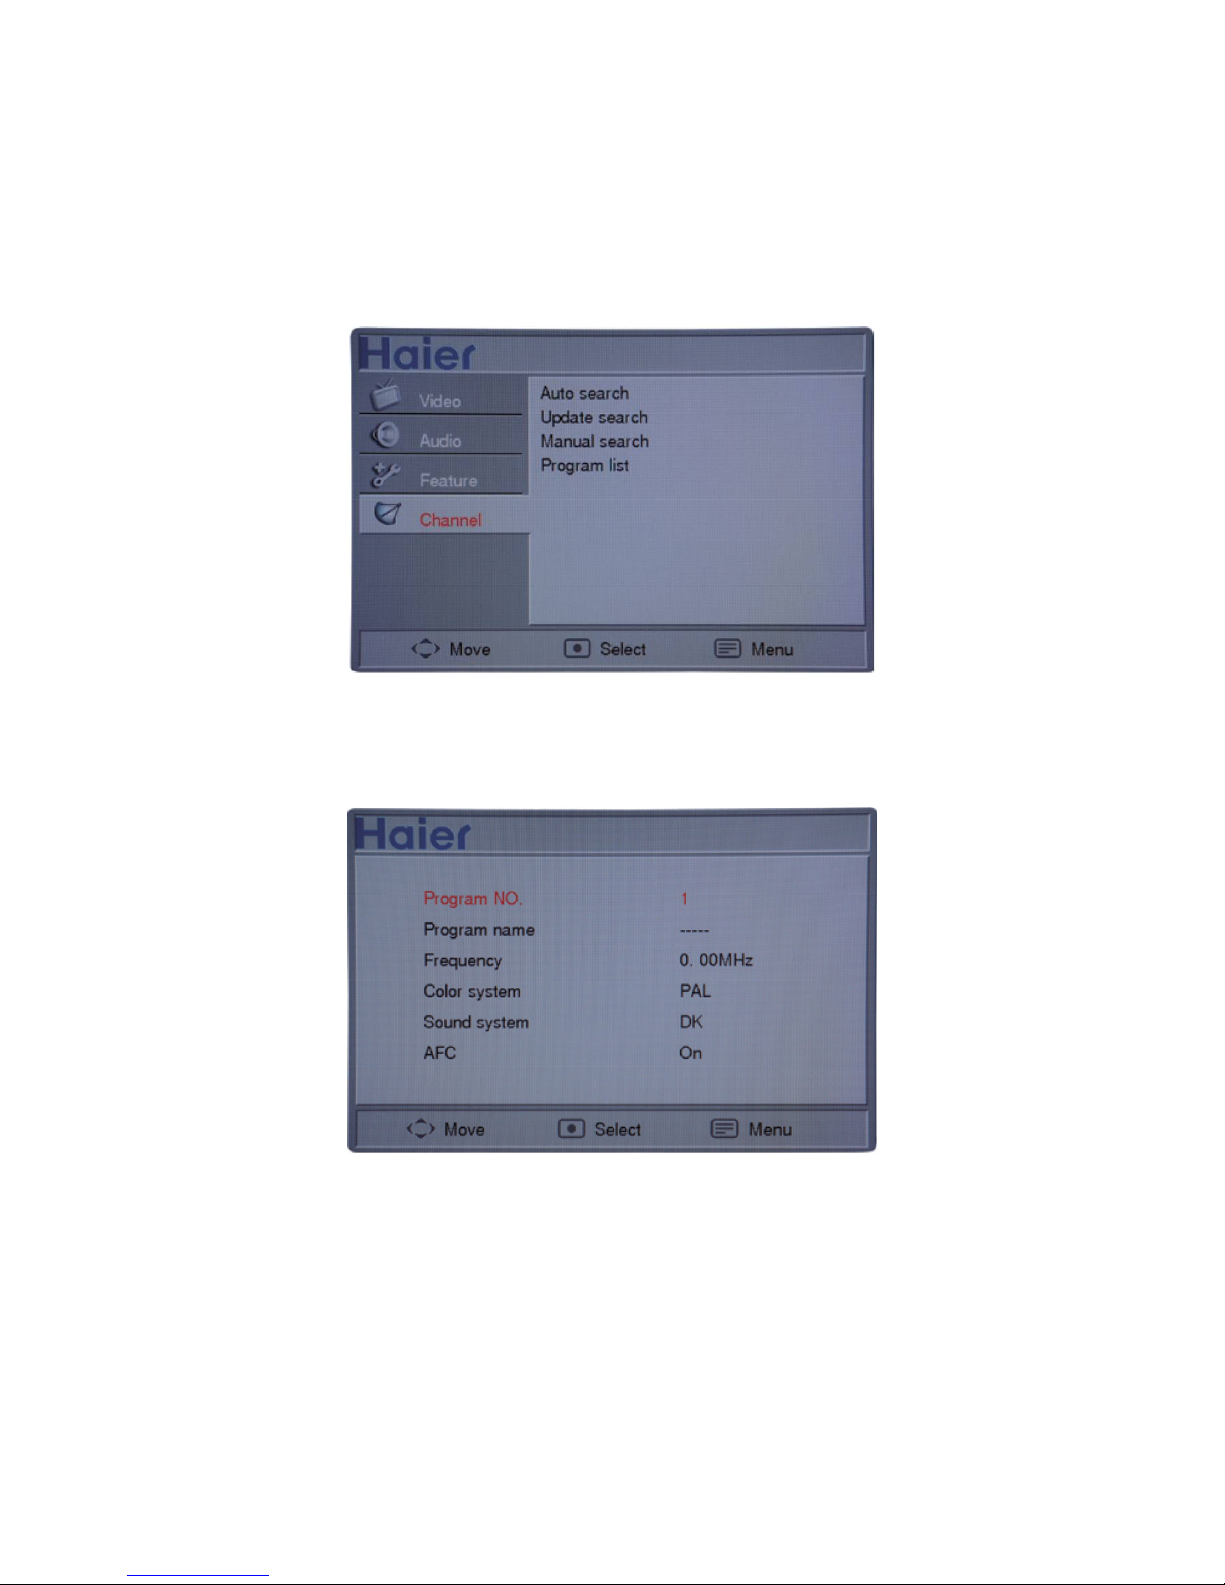
Channel setting (the following menus only appear in the TV mode)
1. Auto search: Search and store program automatically; press the "Menu" key to exit the Auto search mode.
2. Update search: Save the stored program and start a new search; Press the "Menu" key to exit the Update search
mode.
3. Manual search: Press > to enter the sub-menu as shown in the following diagram
(1) Program NO.: display the number of the current channel.
(2) Program name: allows you to edit the name of the current channel by pressing the /∧∨ key, and you can store
the program name after editing it.
(3) Frequency: Display the frequency of the current channel; press a frequency option once to adjust the frequency
by one step length, while pressing and holding it for 3 seconds to search channel manually and the search will stop
when a channel is found; press < to stop the upwards searching and press > to stop the downwards searching.
(4) Color system: display the color system of the current TV signal, available with Auto, PAL, NTSC, SECAM and
NTSC 443.
(5) Sound system: display the sound system of the current TV signal, available with DK, I, BG, M and AUTO.
(6) AFC: It can be set to On and Off. While it is set to On, the TV set will detect the TV signal automatically, and in
case of offset of the signal within a certain range, it can adjust the channel to the correct position.
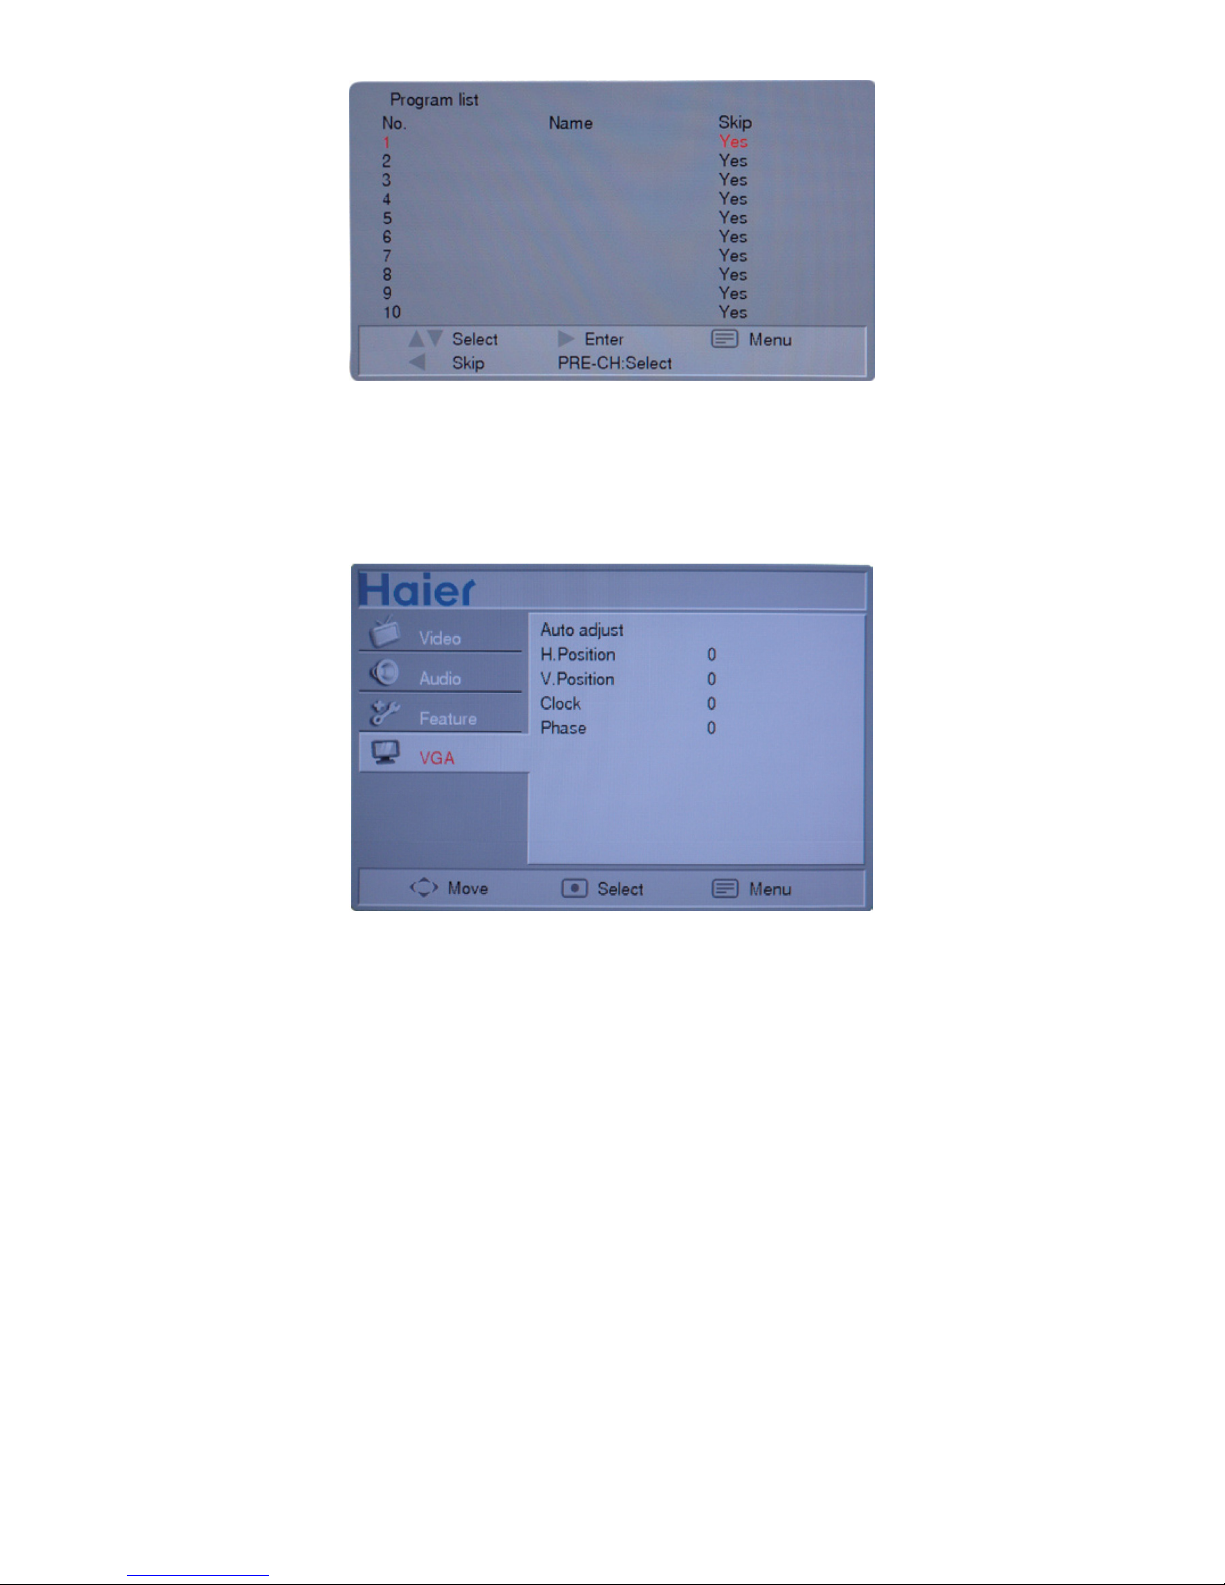
4. Program list: Press > to enter the sub-menu as shown in the following diagram
9
It is possible to edit the program list according to the indications at the bottom of the menu. While selecting a
different program with the Up/Down key in the program list, it will switch to the currently selected program
automatically in 3 seconds.
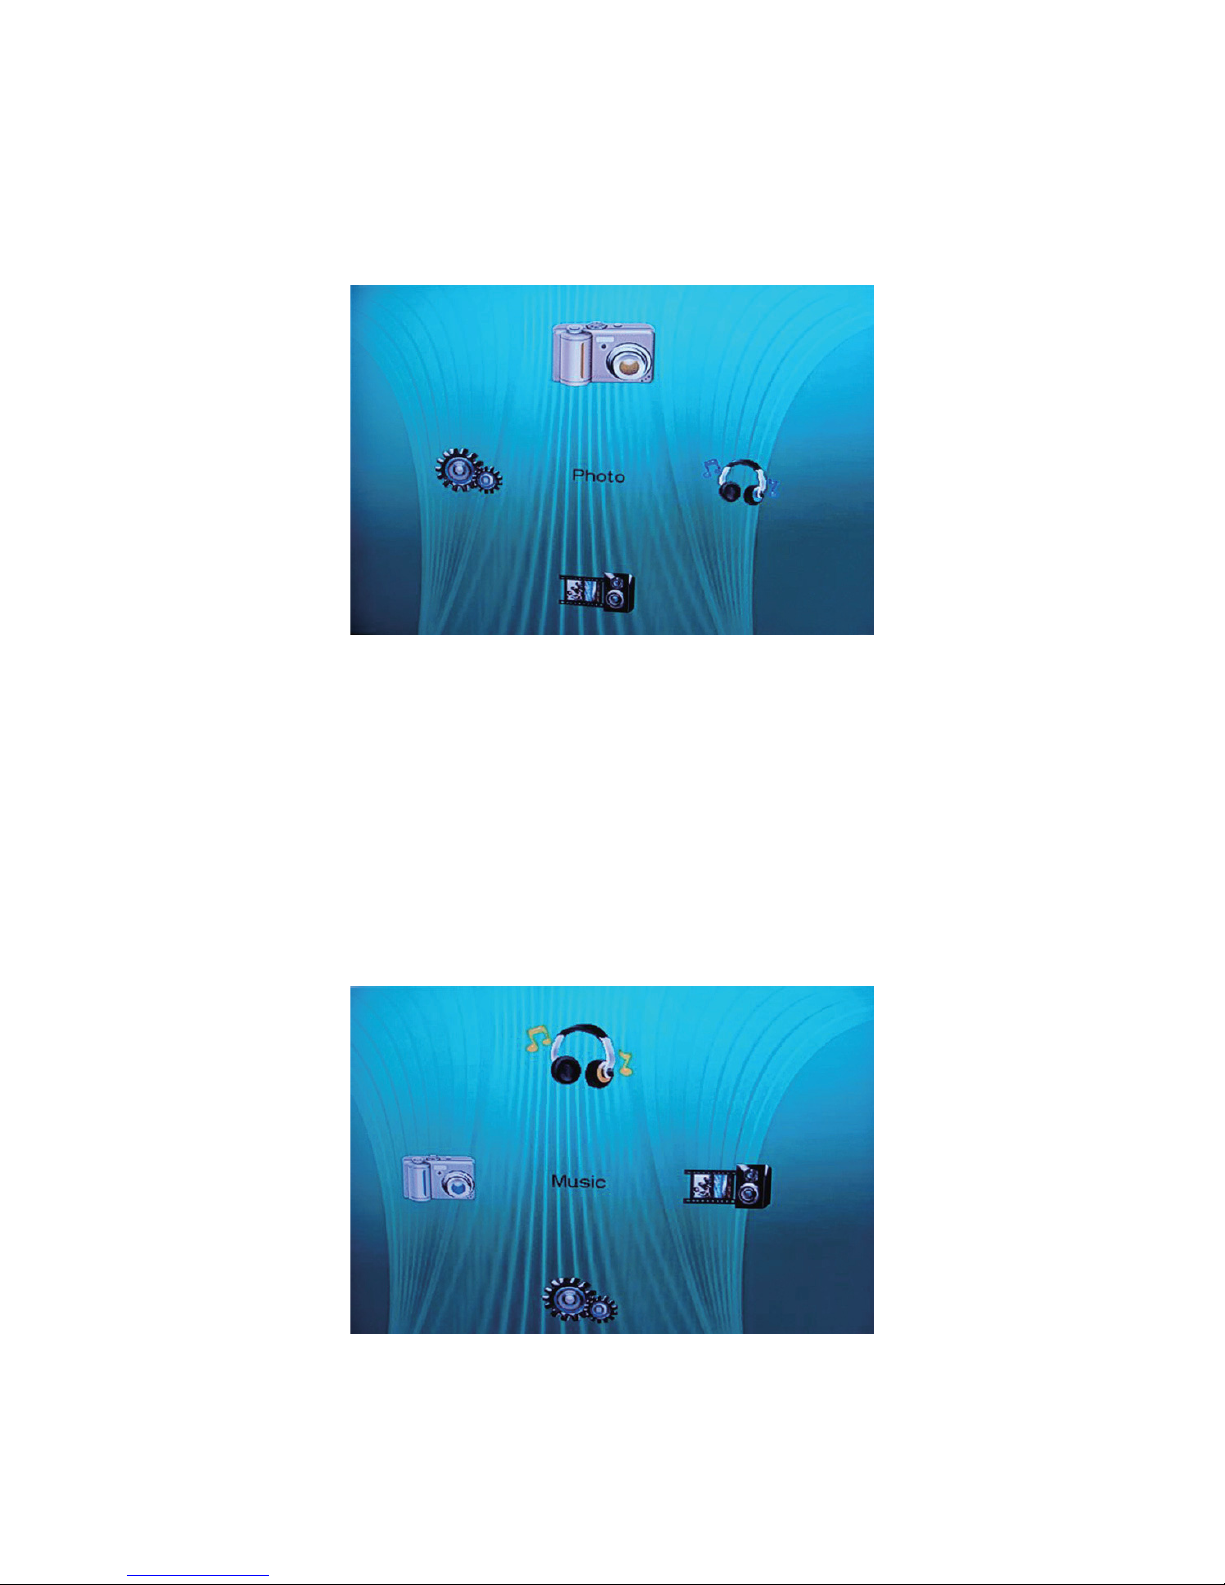
VGA setting (the following menus only appear in the VGA mode)
1. Auto adjust: Adjust the PC picture to the optimal position.
2. H. Position: Adjustable from -50 to 50, adjust the horizontal position of the picture.
3. V. Position: Adjustable from -50 to 50, adjust the vertical position of the picture.
4. Clock, Phase: Adjustable from -50 to 50, adjust the effect of the picture display.
10
Use the multimedia function
Insert USB storage device. Press SOURCE button entering the SOURCE main menu. Press /∧∨ button to select
USB. Press </> and select USB main menu. Press </> repetitively to select main menu.
The equipment is featured with one USB 2.0 High Speed Host port. It supports FAT16/FAT32 disk format but not
multi-partition disk system. Each f le folder can hold no more than 2944 each of f les and folders in total. In addition,
each folder is limited to less than 128 each of f les.
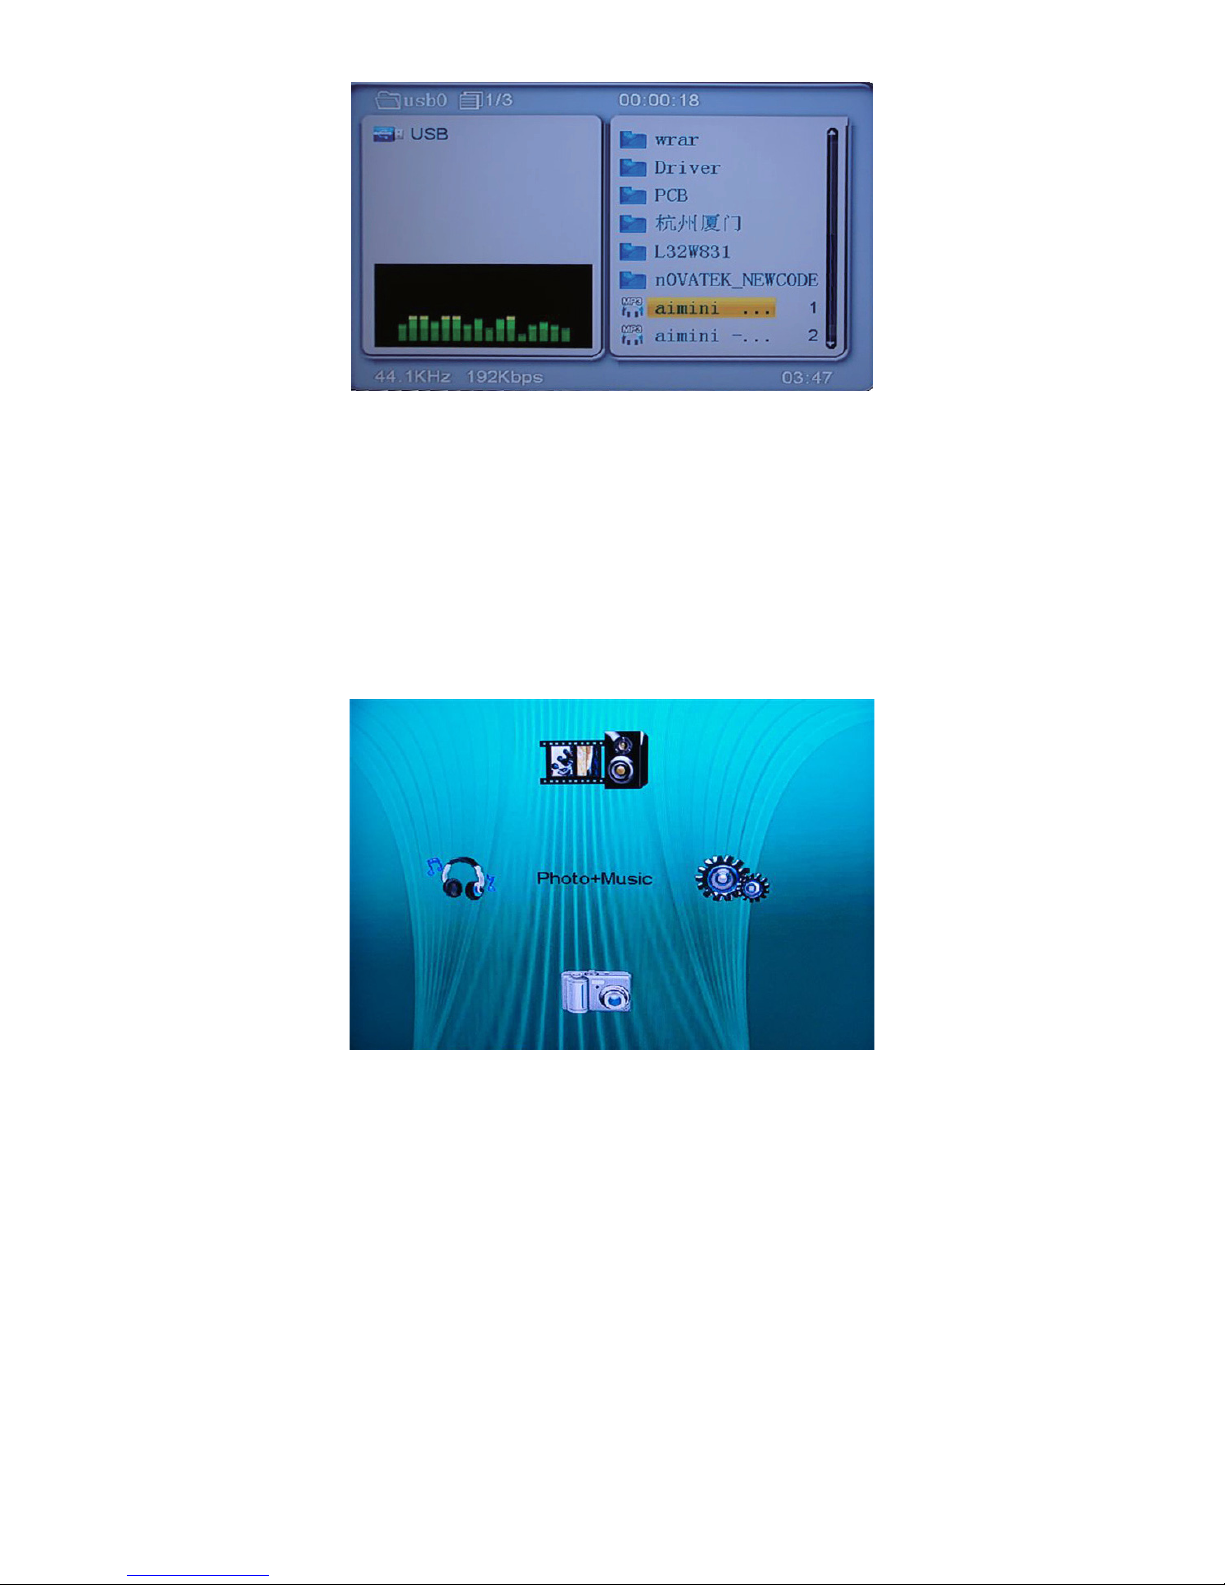
Photo
1. Select “Photo” and press “OK” to display photos (*.jpg format only) stored in USB.
2. Press </> button to rotate the photo 90° counterclockwise and clockwise respectively.
3. OK: Press OK to start and to pause for auto display.
4. /∧∨: Press /∧∨ to select back and next photo for display respectively.
5. ZOOM: Press ZOOM button to zoom in or out for scales at 150%, 200%, 25%, 50%, and 100% relative to the
original size. You may select ZOOM-PLUS and ZOOMEXTREME for photos at size around 7M pixels. Press
/∧∨/</> button to enlarge viewing area, press OK to resume normal viewing.
6. In photo display mode, you may press STOP button for browsing mode. You can select folders and picture f les
for display. Press “OK” for back to display mode.
7. Press “STOP” button to return to PHOTO menu.
8. Press “BACK” to exit.
Music
1. Press “Conf rm” button in MUSIC mode for music play menu.
The music player supports *.mp3 and *.wma f le formats only.
11
2. Playlist
2.1 The music play mode supports music playing only. Photo display is not supported.
2.2 Press /∧∨ button to select desired music track(s), Press “OK” button to start playing.
2.3 Press “OK” button to pause and resume playing.
2.4 </>: Press </> button to play music in speed 2-, 4-, 8-, 16- and 32-times faster or slower than the normal one.
(Variable play speed is supported for music mode only. It is unavailable for photo and photo+music modes.)
2.5 /∧∨: Press /∧∨ button to select back/next track for playing.
2.6 STOP: Press STOP button to stop playing and “OK” button to resume playing.
2.7 BACK: Press “BACK” button to exit play mode and return back to main menu.
Photo+music
1. Play music and display photos concurrently. In Photo+music play mode, you can play in sequence only. No
selection screen is available.
2. Press </>/ /∧∨ button to rotate selected photo.
3. ZOOM: Press ZOOM button to display photos in scales at 25%, 50%, 100%, 150%, and 200% relative to the
original size.
4. BACK: Press BACK button to return back to the main menu.
12
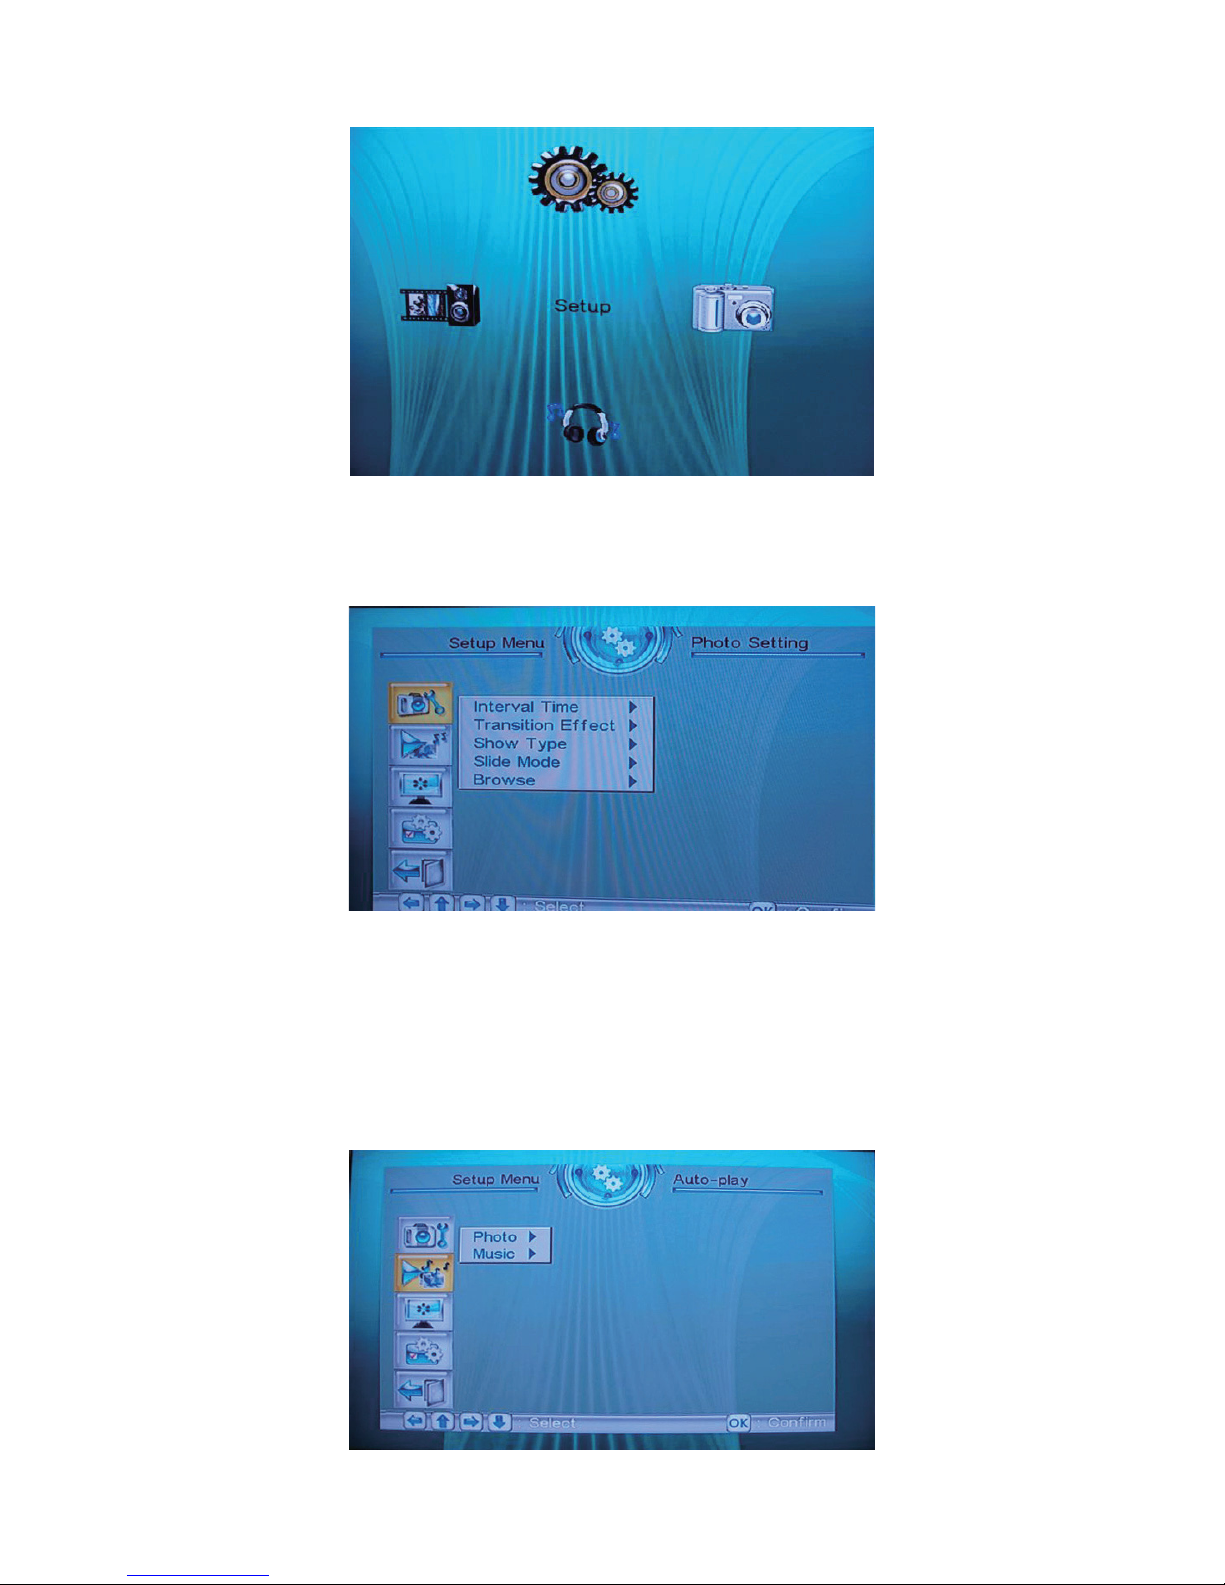
Setup
The Setup main menu has following options: Photo Setup, Auto Play, Display Setup, Custom Setup and Exit.
Press > button to select and < to back one menu up. Press “OK” button to conf rm selected settings.
1. Photo Setup
1.1 Time interval: time interval settings for photo display. There are 6 options available: 5 seconds, 10 seconds, 15
seconds, 30 seconds, 1 minute, and 3 minutes. Press /∧∨ button to enter selection. Press “OK” to conf rm
selection and back one menu up.
1.2 Effects: effect settings for photo displaying.
1.3 Display mode: Full Screen or Fixed Ratio Screen mode.
1.4 Slide Show mode: You may select “Normal” or “Dynamic” mode.
1.5 Browse mode: You may select “Thumbnail” or “Edit” mode.
2. Auto-play
2.1 Photo: You may select On or Off to activate the Auto-display function after entering the “Photo” menu.
13
2.2 Music: You may select whether to activate the Auto-play function after entering the “Music” menu.
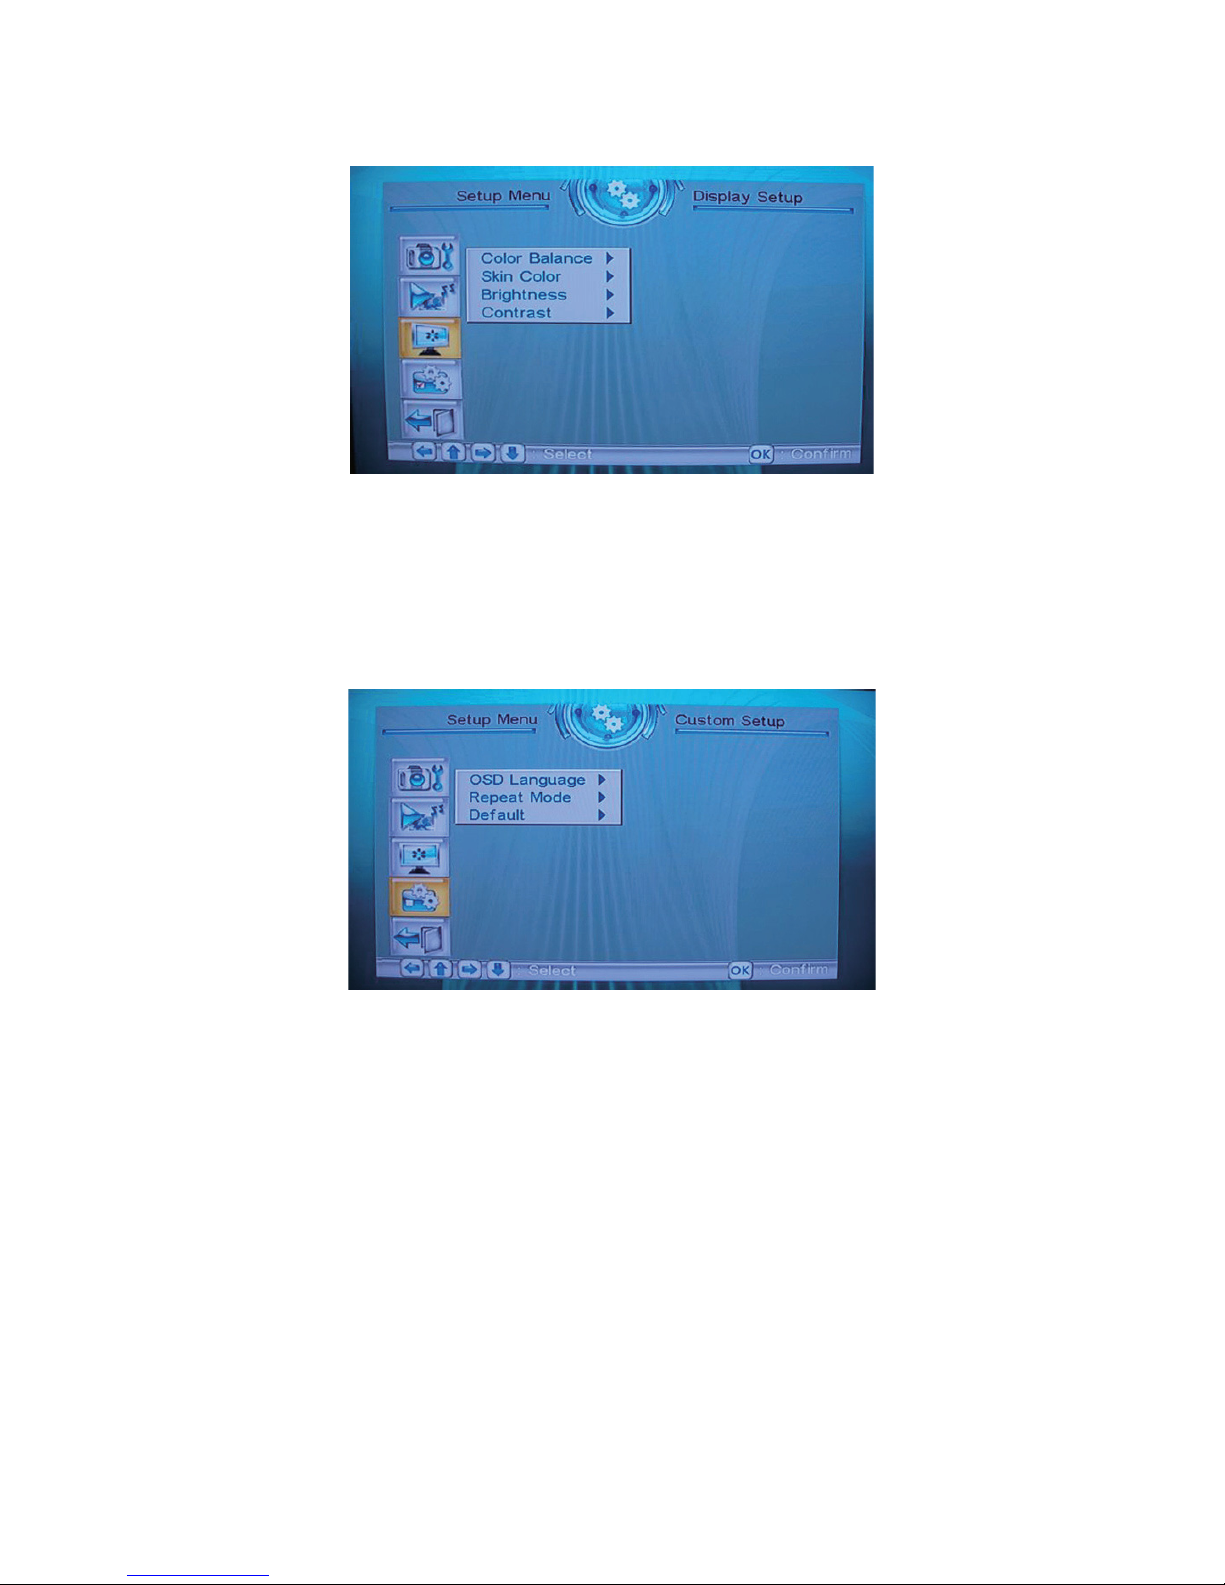
3. Display Setup
3.1 Color Balance: Adjustment for color balance especially the white balance of photo. There are four levels of tone
from 0 to 3, the greater the number the more the difference of white balances.
3.2 Skin Color: Adjustment for skin color enhancement. Available options are 0 and 1.
3.3 Brightness: Adjustment for screen brightness. Available options are Normal, Bright, and Mild.
3.4 Contrast: Adjustment for screen contrast. There are nine levels of contrast from -4 to +4, the greater the number
the higher the contrast.
4. Custom Setup
4.1 OSD Language: You may select English or Chinese for the OSD language in USB mode.
4.2 Repeat Mode: Settings for the repeat mode. Available options are “Off”, “Repeat1”, “Repeat Files”, and “Repeat
All”. (The settings selected here are applied to both Music and Photo modes.)
4.3 Default: Select and press “OK” to reset current settings.
5.Exit
Press OK button to back to the USB main menu.
14
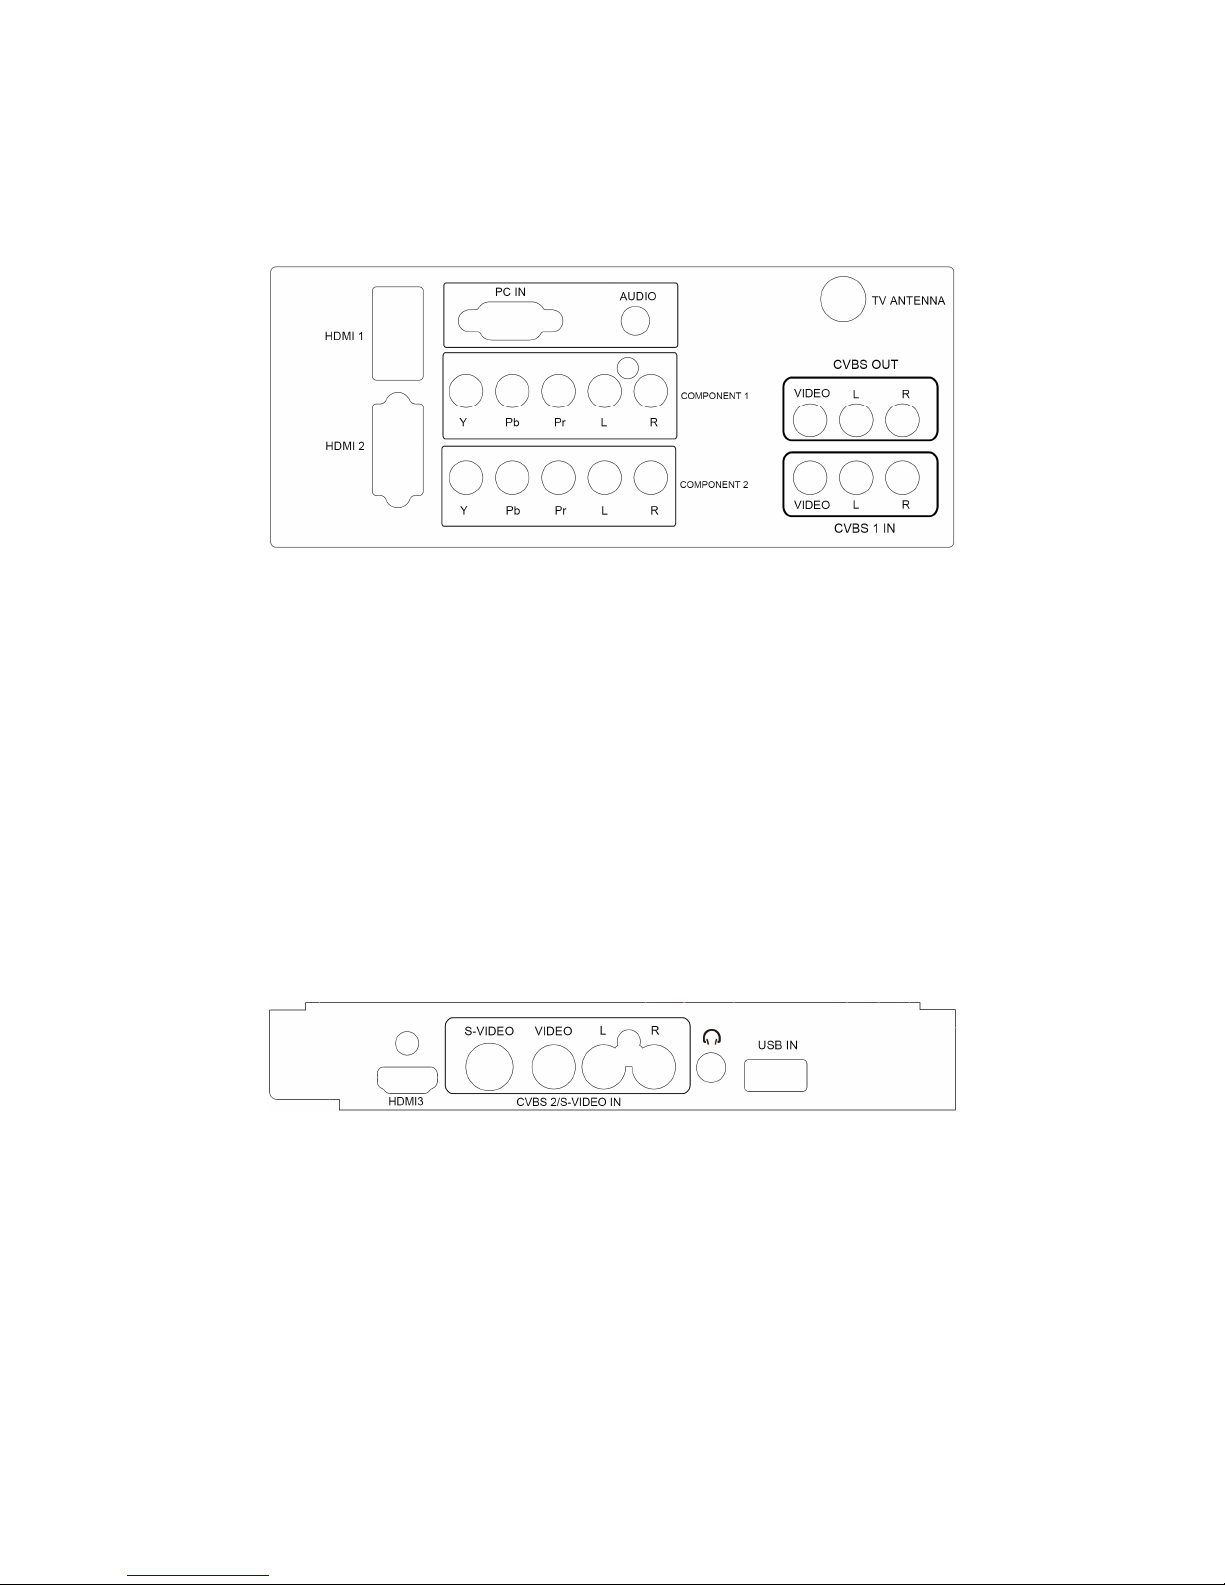
2.3 How to Connect
There are a lot of signal sources that can be connected to your TV set. The following diagram shows how to connect
them.
Friendly tips:
If you want to hang the TV set on a wall, all connecting lines must be inserted into the ports of the TV set in advance.
Whenever a peripheral equipment is connected to the TV set, be sure the TV set is powered off.
While connecting peripheral equipment, connect the cable to the terminal with the same color as its own.
Antenna input:
Insert the antenna terminal into the TV set's antenna socket. This socket is a 75Ω coaxial cable input.
CVBS:
Connect the VIDEO outputs of DVD player, LCD player, video recorder or video camera, etc. to the VIDEO input of
the TV set.
Audio input:
Connect the audio signal source (PC, DVD player, LCD player, video recorder or video camera, etc.) to the audio
input port.
CVBS output:
This interface can be used to output the TV signal of the unit to another TV set.
Component input:
Connect the audio / video of the component signal source (PC, DVD player, LCD player, video recorder or video
camera, etc.) to the component signal input port.
PC signal and PC audio input:
Connect the PC signal line to the PC and the PC interface of the TV set.
Connect the audio line to the PC audio input interface of a PC or a TV set.
HDMI:
It refers to "high def nitiion multimedia interface". It connects the HDMI signal connecting line to DVD player, etc.
USB port:
Insert any USB device to display stored photos or play recorded music tracks.
Earphone socket:
The user may use the earphone via the earphone socket.
CVBS-2 /S-VIDEO input:
Connect the VIDEO outputs or S-VIDEO outputs of DVD player, LCD player, video recorder or video camera, etc. to
the VIDEO input or S-VIDEO input of the TV set. (S-VIDEO is shared with the CVBS audio)
Audio input:
Connect the audio signal source (PC, DVD player, LCD player, video recorder or video camera, etc.) to the audio
input port.
HDMI:
This is the High-Definition Multimedia HDMI cable connector for DVD players.
15
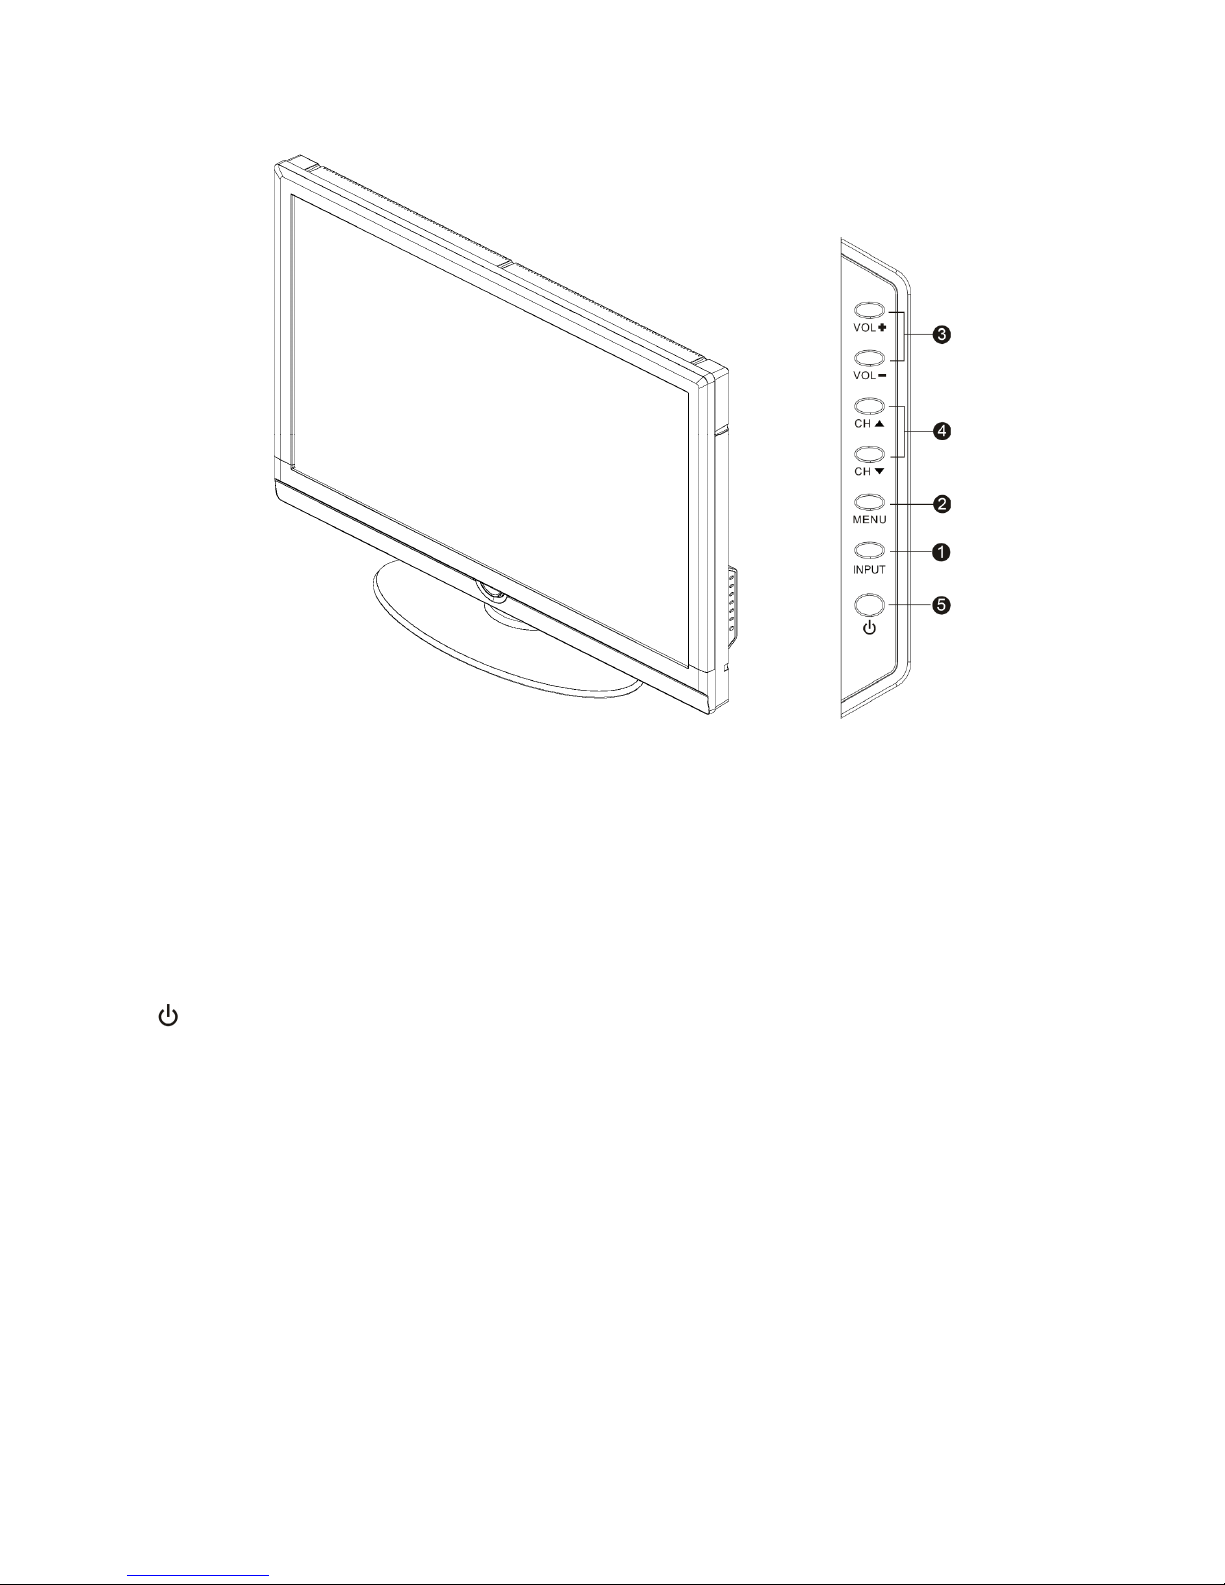
2.4 Front Panel Control Knobs
1. INPUT: Recall / Close the signal source menu.
2. MENU: Used to recall / Exit menu, etc.
3. VOL+/-:
In TV mode: Increase (+) or decrease (-) volume;
In TV menu: Move right (+) or move left (-) in the options.
4. CH▲/▼:
In TV mode: Select the next channel (▲) or the previous channel (▼);
In TV menu: Move up (▲) and down (▲) in the options; while in standby mode, the Channel▲/▼ may be used to
turn on the TV set.
5.
: Standby On/Off key.
16
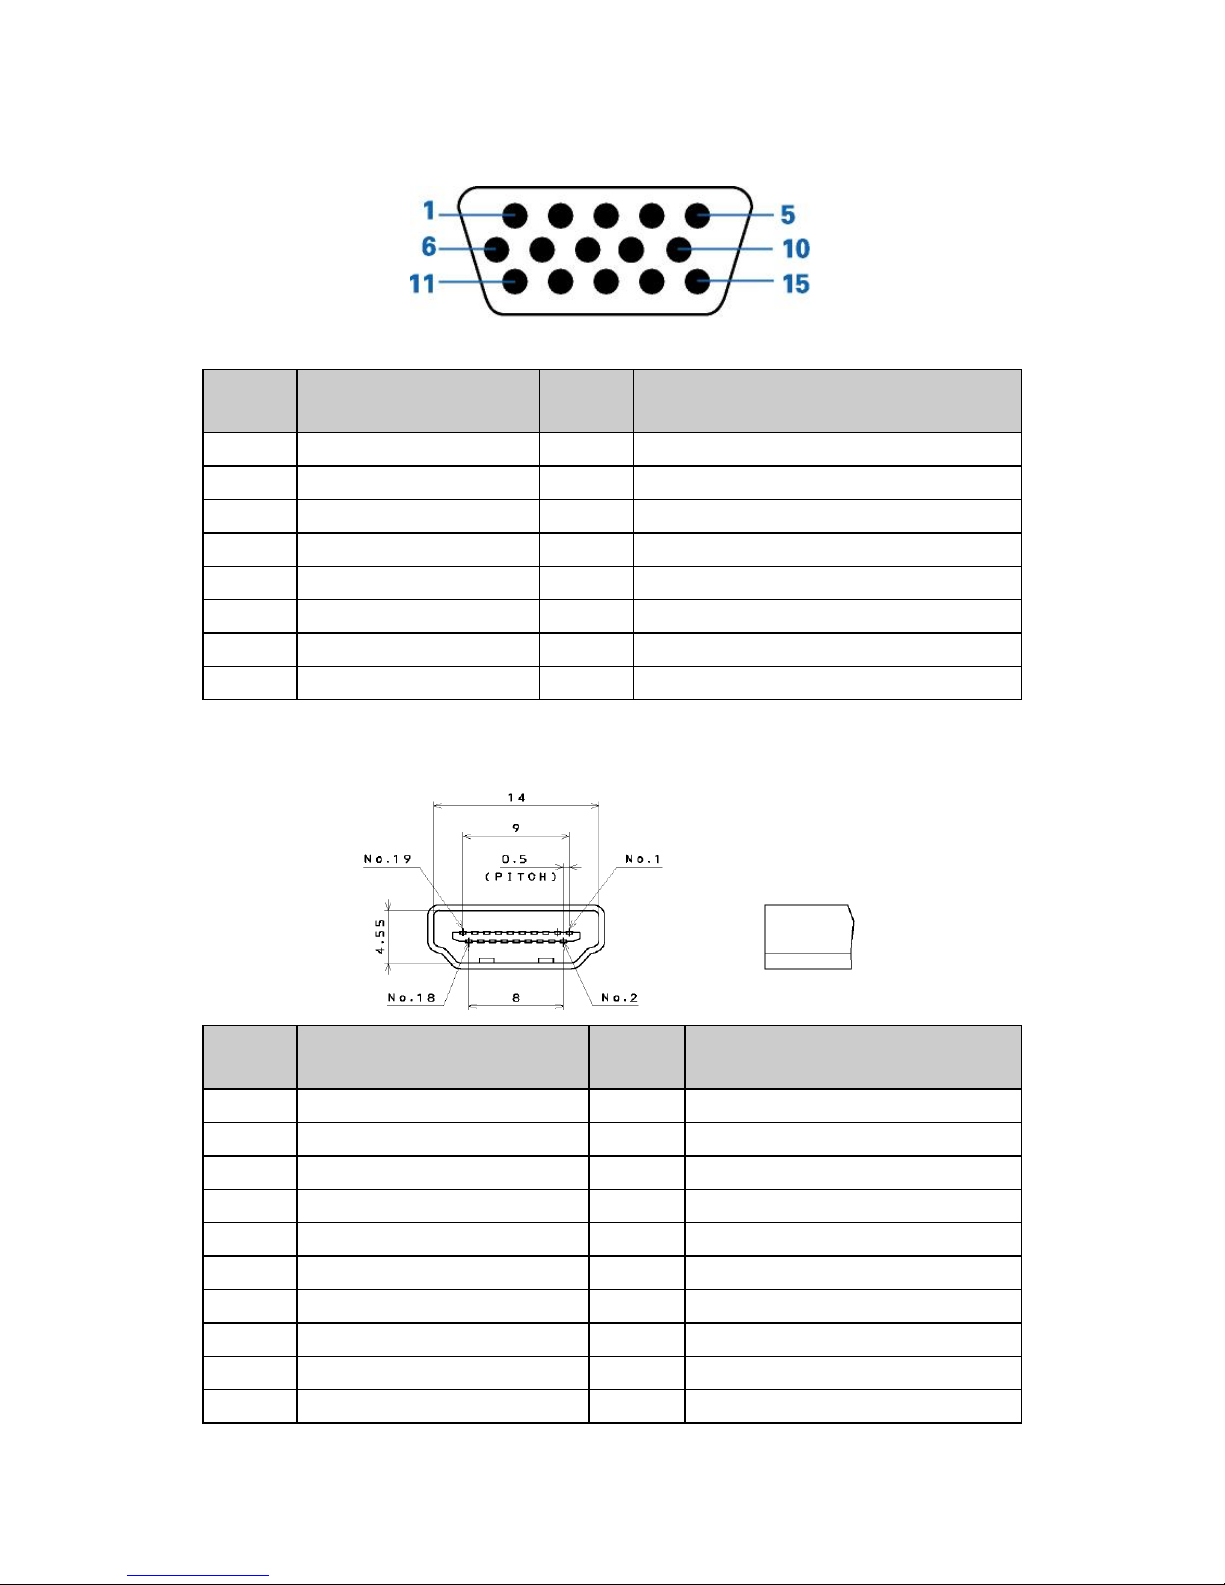
3. Input/Output Specification
3.1 RGB Signal Input
Pin No. Description Pin No. Description
1 Red Video 9 5V
2 Green Video 10 Sync Ground
3 Blue Video 11 Not Used
4 Not Used 12 Serial Data for DDC
5 Ground 13 H-Sync.
6 Red Video Ground 14 V-Sync.
7 Green Video Ground 15 Serial Clock for DDC
8 Blue Video Ground
3.2 HDMI Digital Connector
Pin No. Description Pin No. Description
1 TMDS Data2+ 2 TMDS Data2 Shield
3 TMDS Data2- 4 TMDS Data1+
5 TMDS Data1 Shield 6 TMDS Data1-
7 TMDS Data0+ 8 TMDS Data0 Shield
9 TMDS Data0- 10 TMDS Clock+
11 TMDS Clock Shield 12 TMDS Clock-
13 CEC 14 Reserved (N.C. on Device)
15 SCL 16 SDA
17 DDC/CEC Ground 18 +5V Power
19 Hot Plug Detect
17
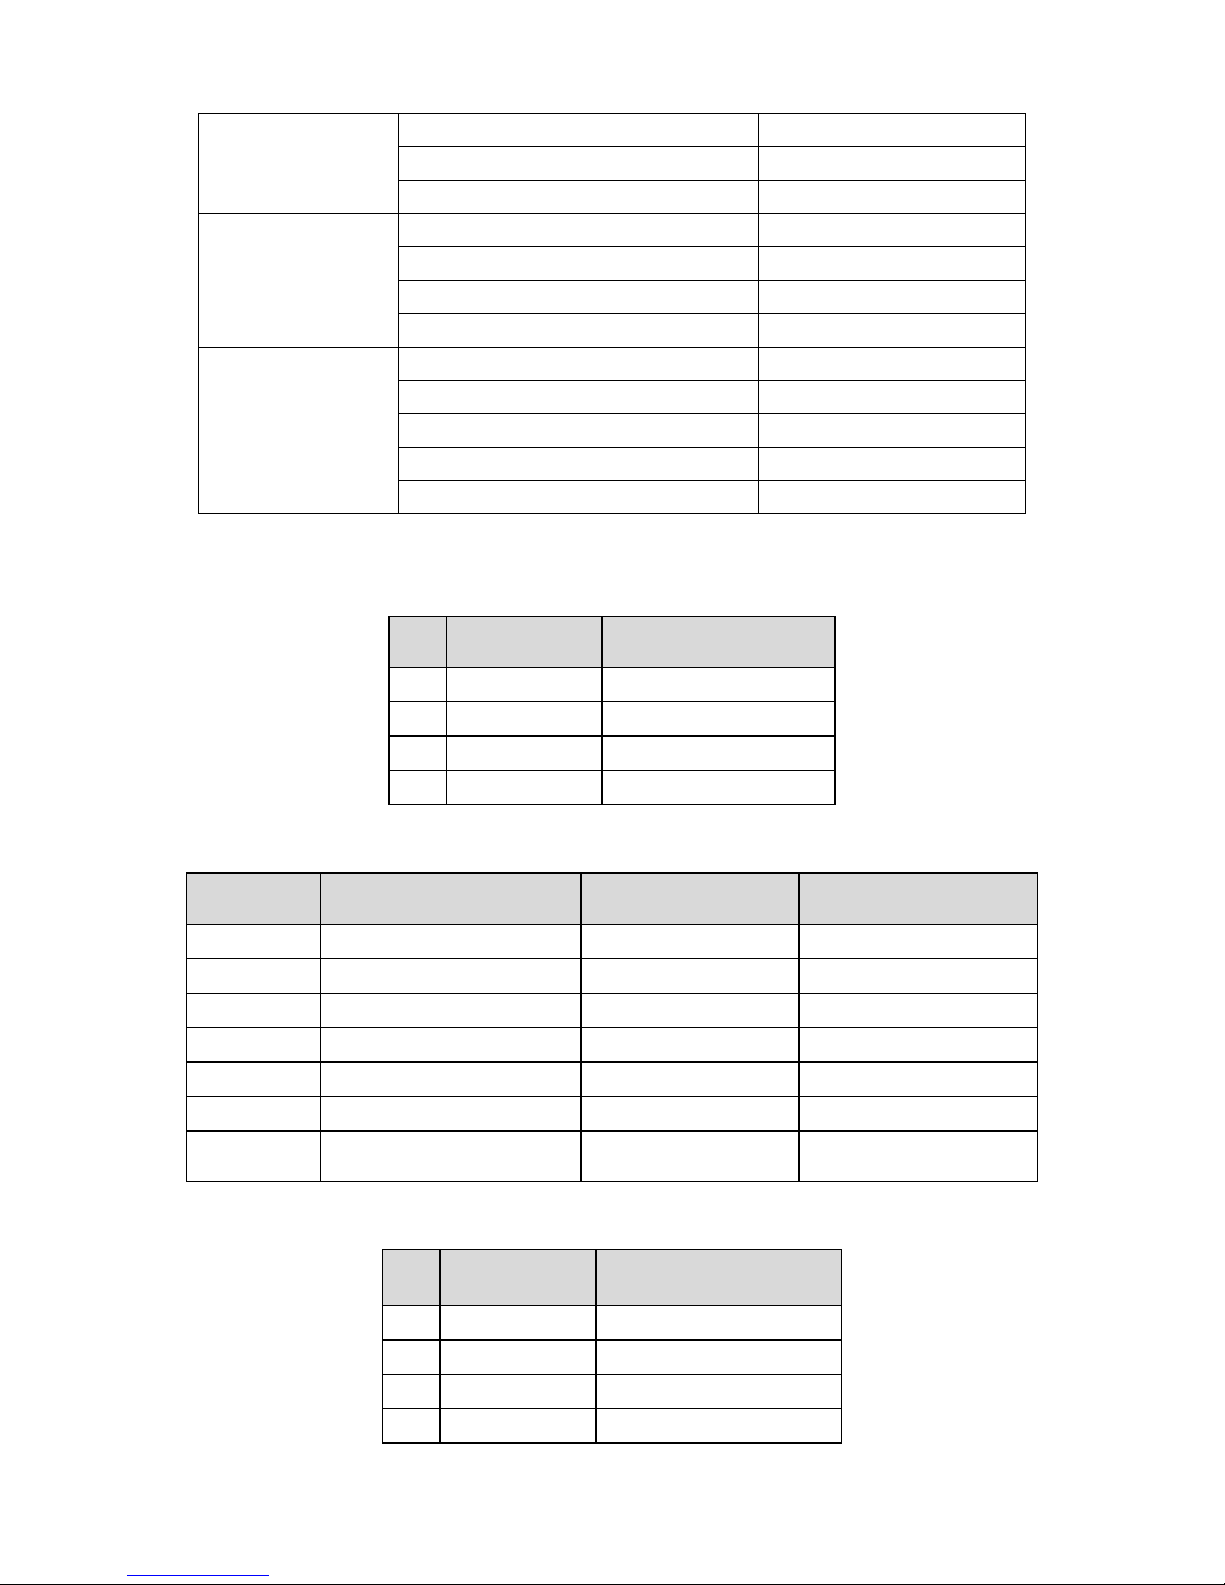
3.3 Signal Type
Composite Video
Video system NTSC/PAL
Amplitude 1.0Vpp (including sync)
Impedance 75 ohm terminated
S-Video
Video system NTSC/PAL
Y signal amplitude 1.0Vpp (including sync)
C signal amplitude 0.286Vpp
Impedance 75 ohm terminated
Component Video
Video system NTSC/PAL
DTV 480i, 480p, 720p, 1080i,
Y signal amplitude 1.0Vpp (including sync)
Pr,(R-Y)/Pb, (B-Y) signal amplitude 0.7Vpp
Impedance 75 ohm terminated
3.4 Compatible Mode Table
This unit supports HDTV/SDTV(YPbPr/YCbCr) formats:
SN Signal Format Refresh Frequency (Hz)
1 480i/480p 60
2 576i/576p 50
3 720p 50/60
4 1080i/1080p 50/60
Input format of supported PC interface:
Number Resolution Line Frequency (KHz) Refresh Frequency (Hz)
1 640*480@60Hz 34.46 60
2 800*600@60Hz 37.87 60
3 1024*768@60Hz 48.36 60
4 1360*768@60Hz 47.72 60
5 1440*900@60Hz 55.93 60
6 1680*1050@60Hz 65.29 60
7
1920*1080@60Hz
(recommended)
67.5 60
Input format of supported HDMI interface:
SN Name of Signal Refresh Frequency (Hz)
1 480i/480p 60
2 576i/576p 50
3 720p 50/60
4 1080i/1080p 50/60
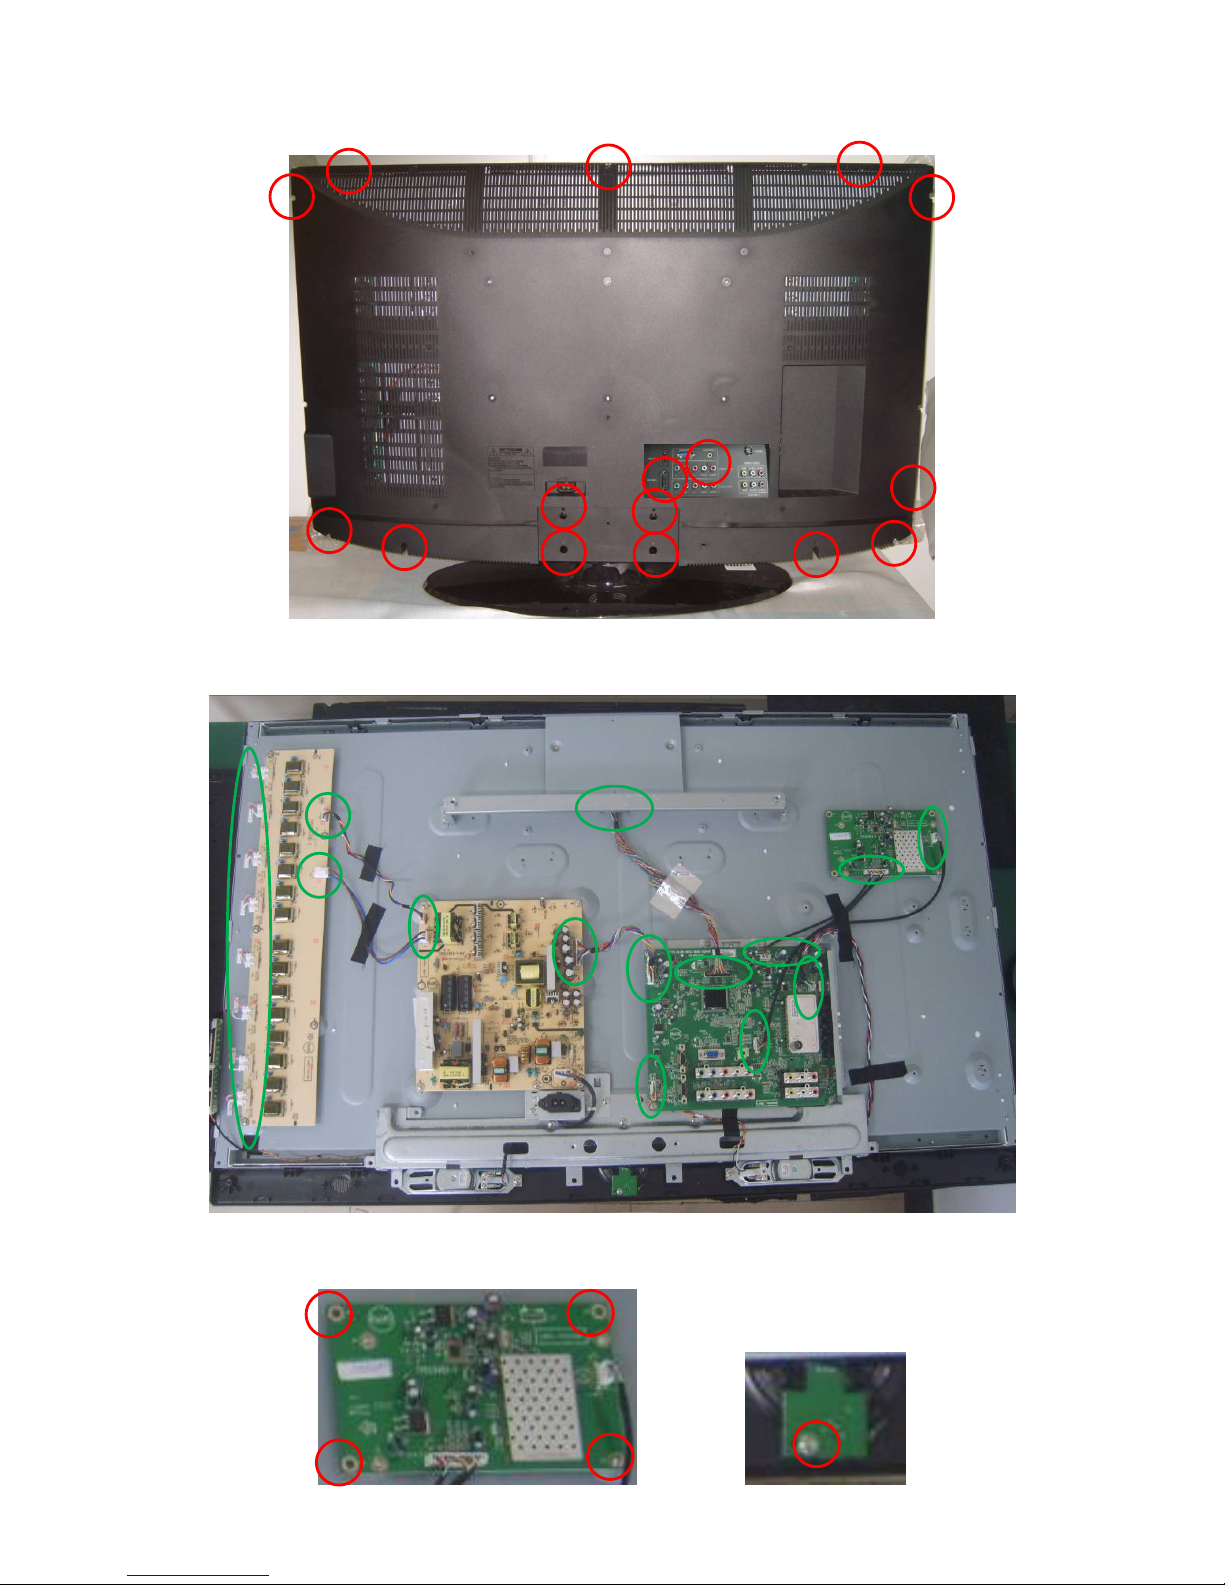
18
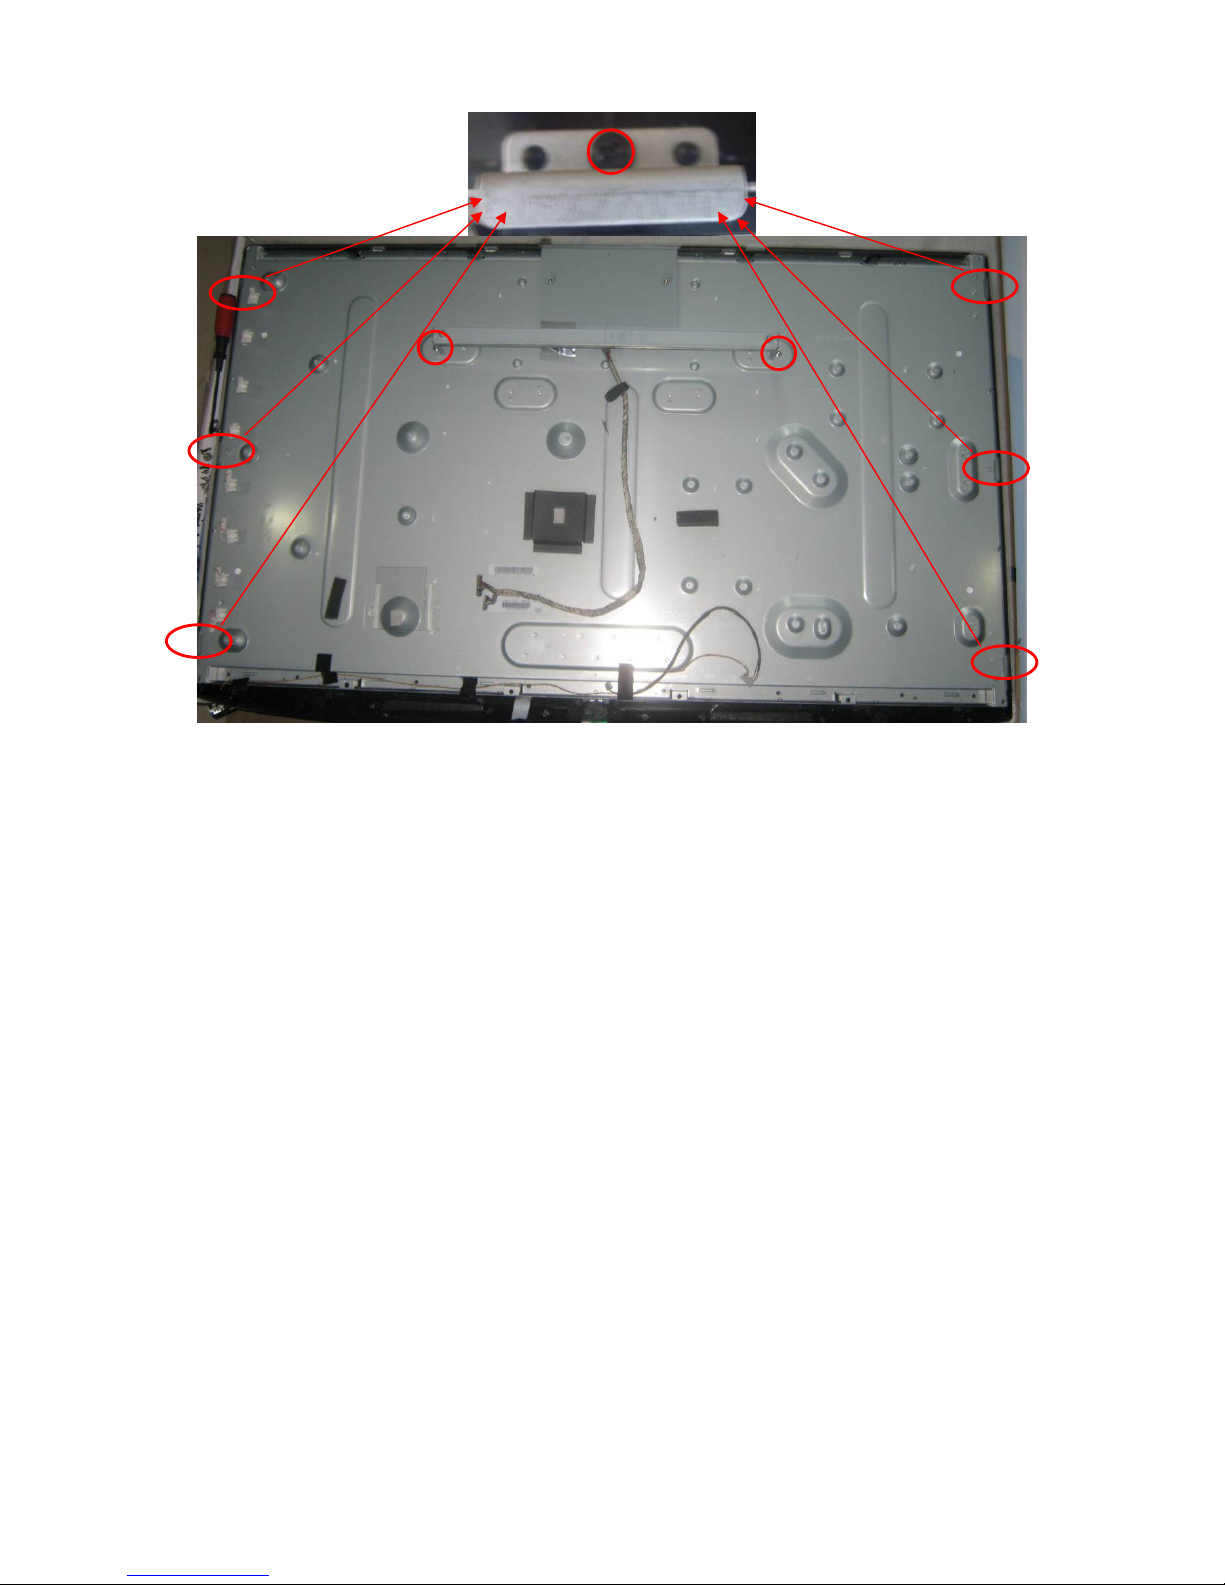
4. Mechanical Instructions
1. Remove the stand ass’y and rear cover.
2. Release the connectors.
3. Remove the main board, power board, inverter board, IO board, IR board, key board.
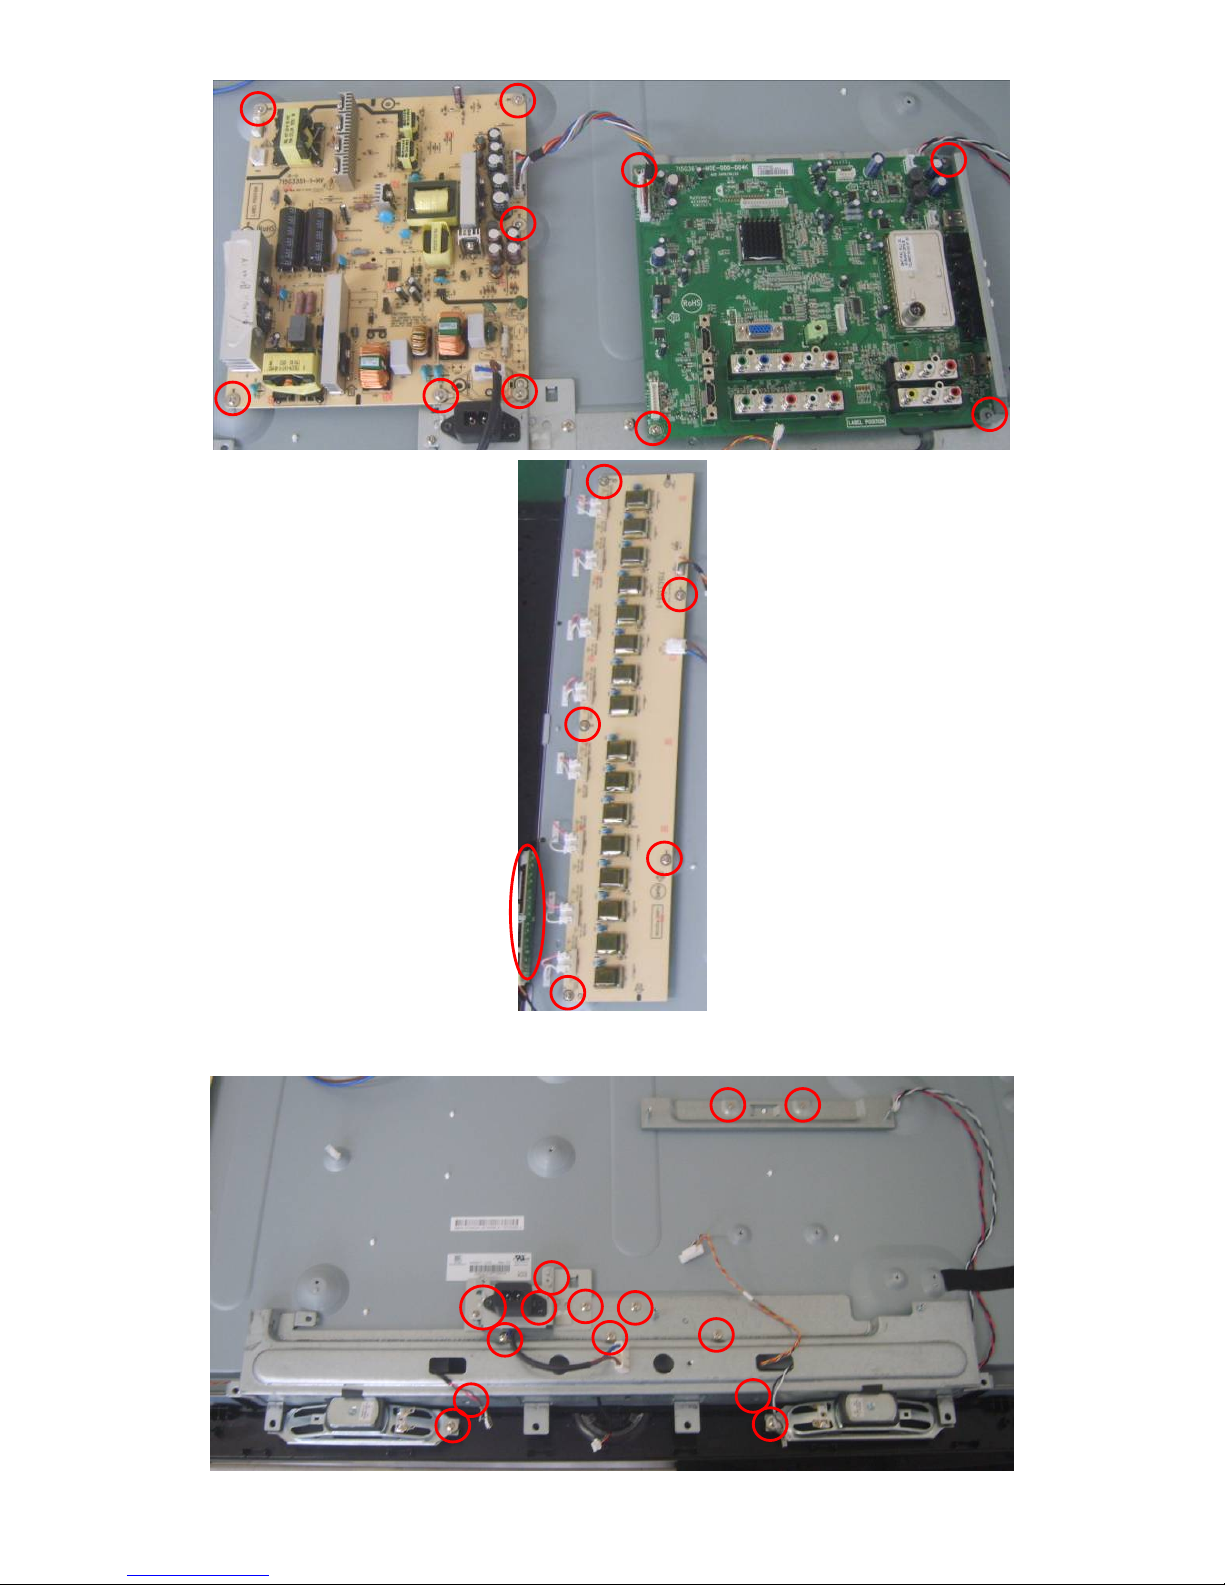
19
4. Remove the AC socket ass'y, speakers and BKT.
20
5. Remove the rest BKT and separate panel and bezel.
21
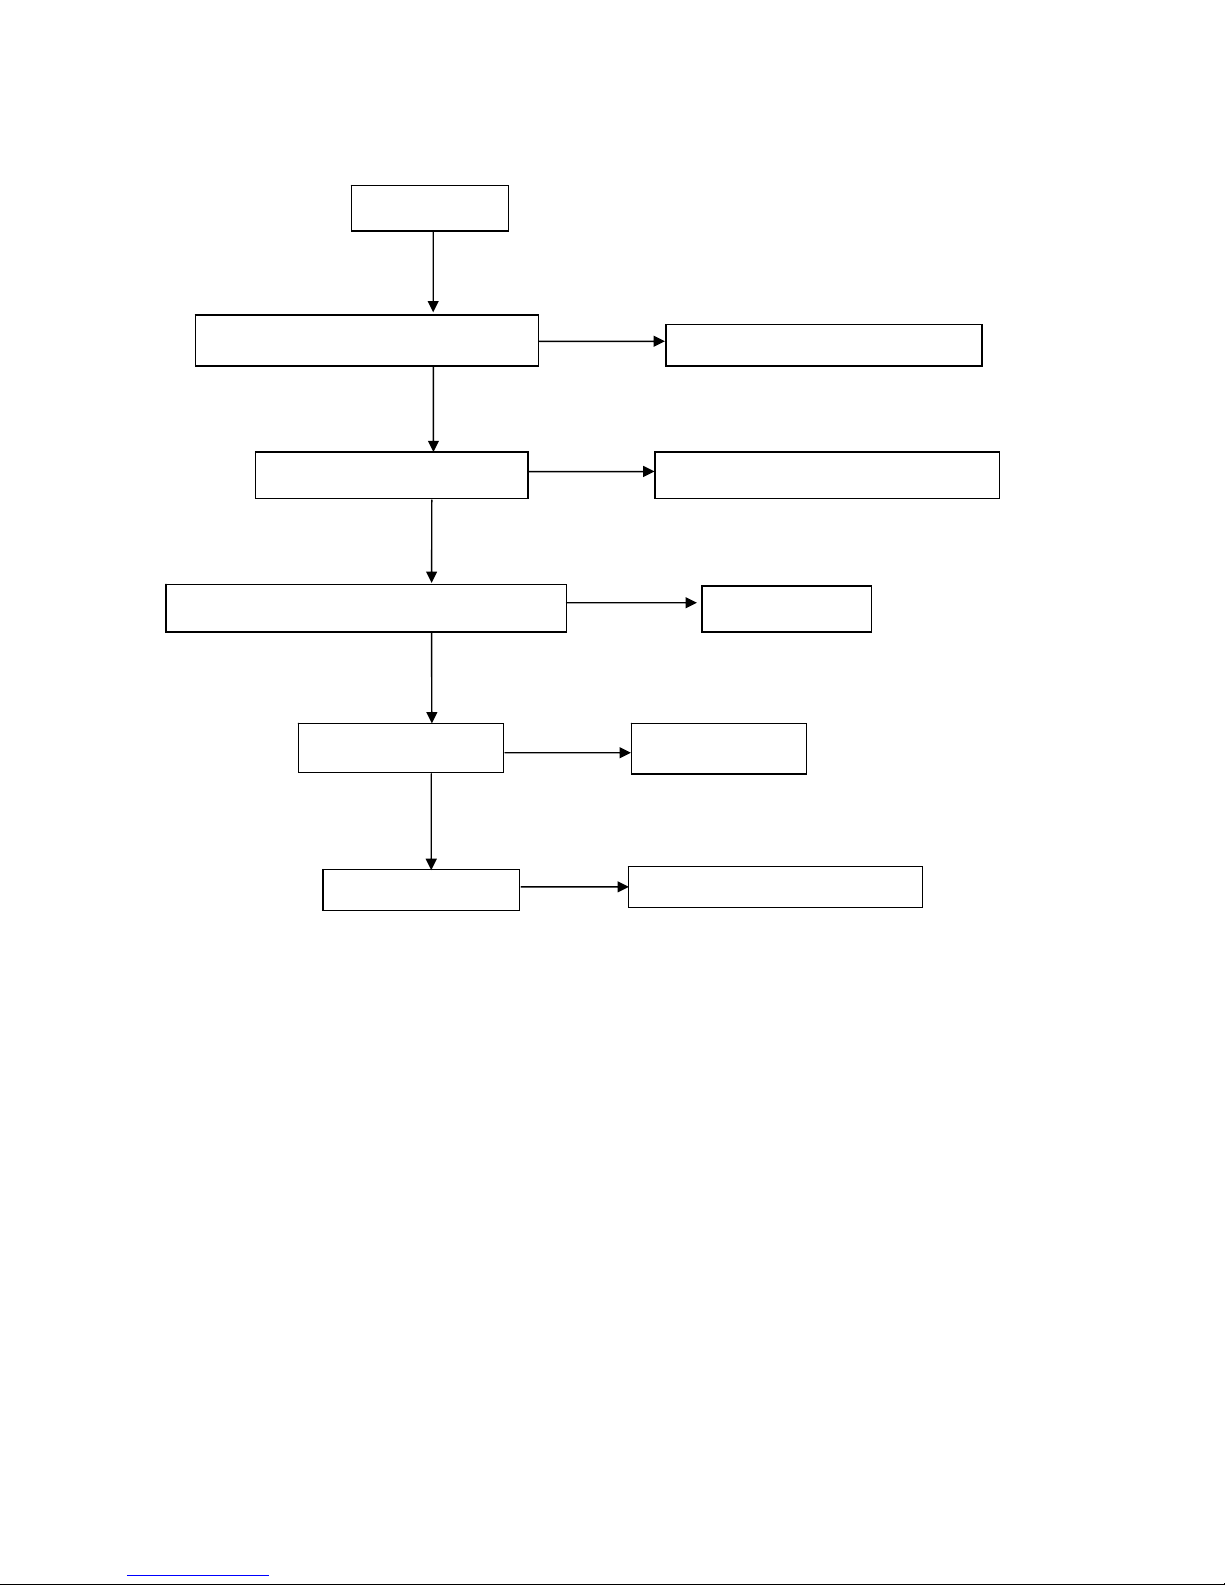
5. Repair Flow Chart
No Picture (LED Orange)
Check I2C bus
Check I2C communication
NG
OK
Change key board/IR board
Check U400 Change U400
Check key board/IR board
No picture
OK
NG
OK
NG
Check 24V power supply
OK
Check the power supply circuit
NG
Check main board Standby power supply
Change U705
OK
NG
22
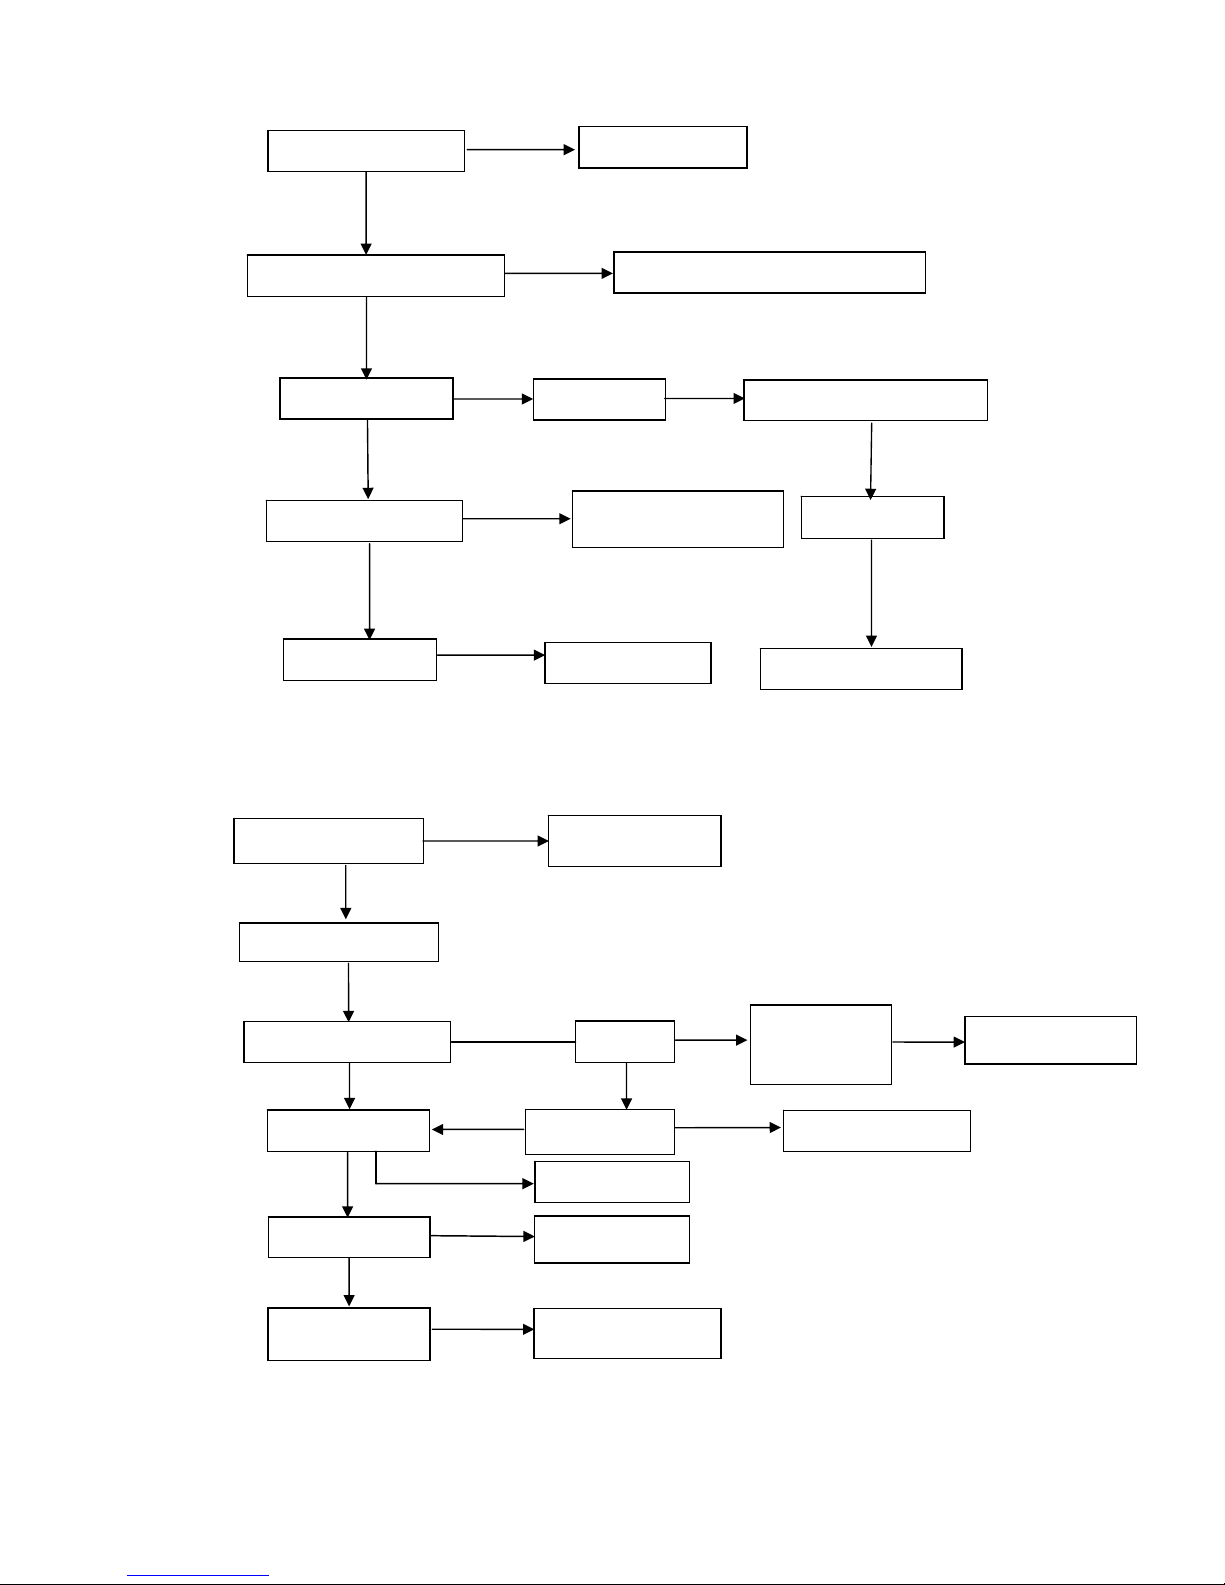
Abnormal Display
No Sound
Check TV system setup
Reset source
NG
Replace the filter or resistance
RF signal
Check Tuner
Replace Tuner
Check LVDS cable
Check input
Replace LVDS cable
Check panel
Replace panel
OK
OK
NG
OK
OK
NG
OK
OK
NG
OK
Check the source
Reset source
NG
OK
Check input signal
TV SIF
Check TV
system
Reset TV system
NG
Check TU100
NG
Change TU100
Check U400
OK
OK
Change U400
NG
Check U603
OK
NG
Change U603
Check speaker
NG
Change speaker
Check if mute
OK
Check signal filter circuit
Check the source
OK
23
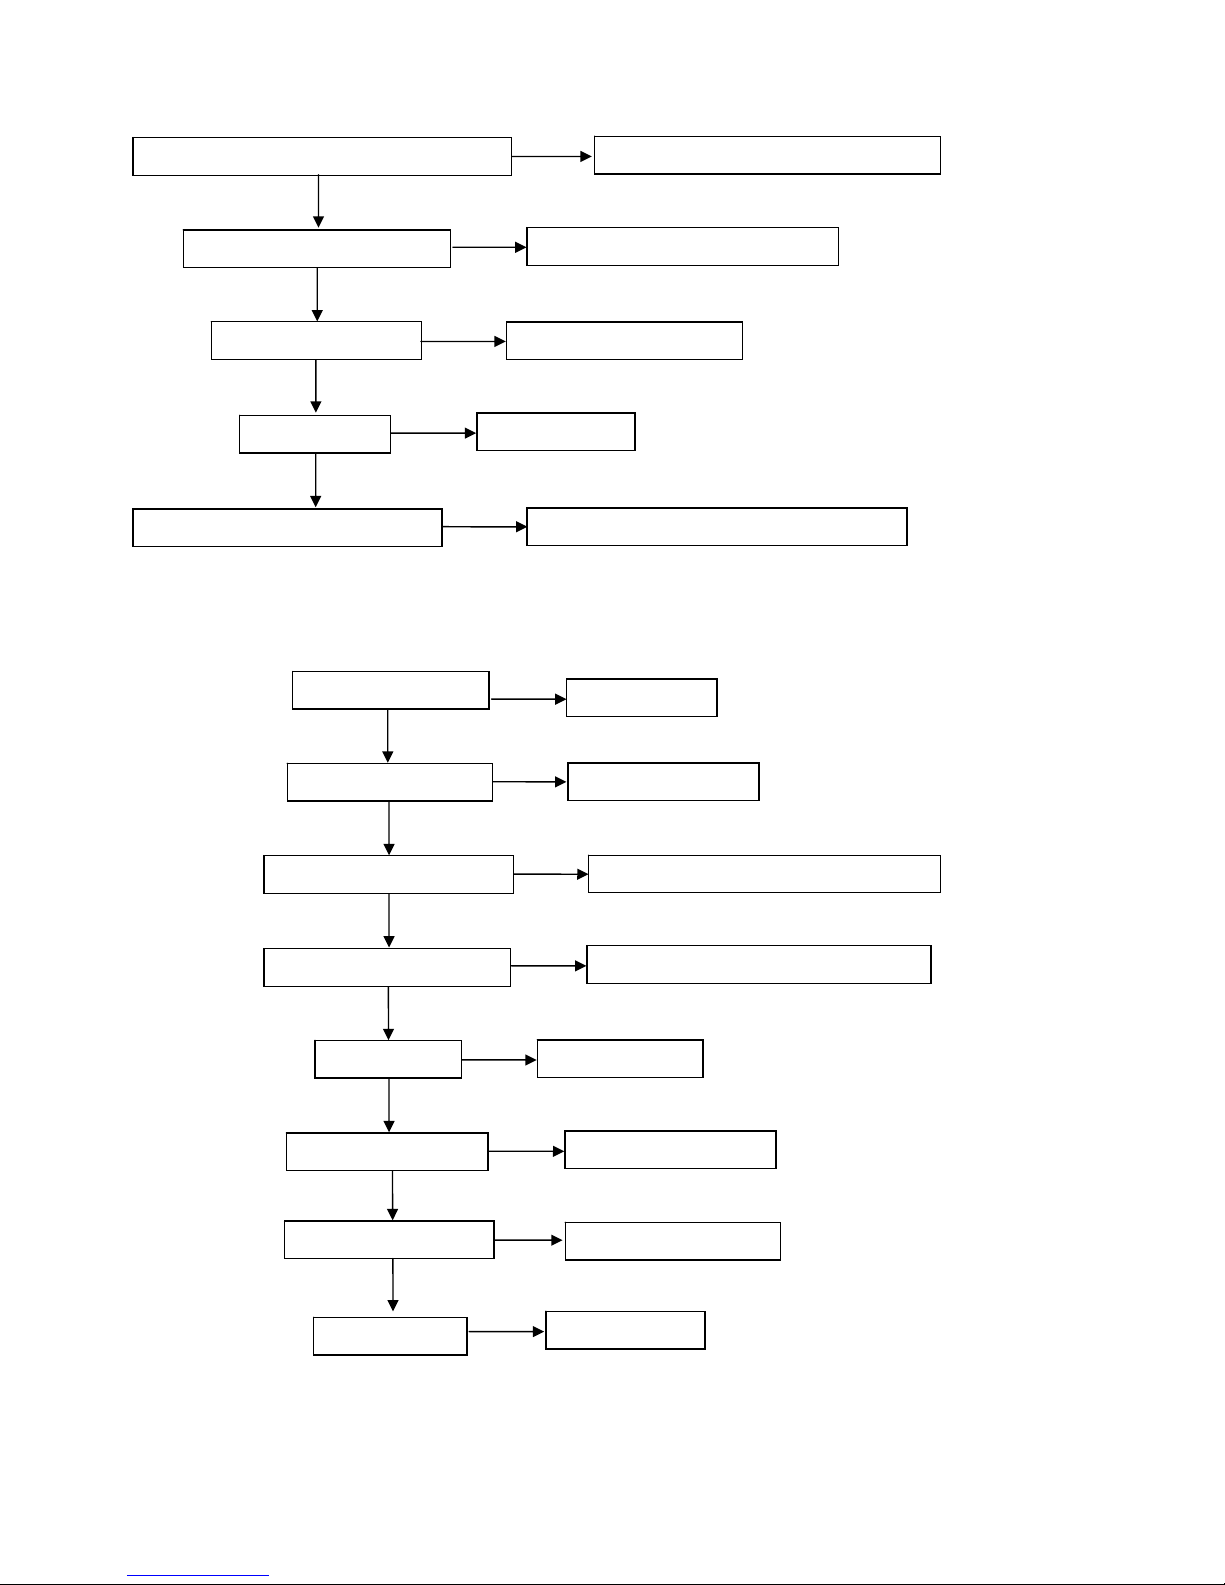
No Power (No LED Indicator)
No Display (LED Indicator Green)
NG
Check power cord and board interface
Plug in power cord and interface
OK
Check F901, BD901, C929
NG
Replace F901 or BD901 or C929
OK
Check IC901
Check D910, C945, C946, C947
NG
Replace IC901
OK
Check T901
OK
Replace T901
Replace D910 or C945 or C946 or C947
NG
NG
NG
Check the source
OK
Reset source
Check LVDS cable
NG
Reset LVDS cable
OK
Check IC904 circuit
NG
Replace IC904 or the correlative part
OK
OK
Check U400
NG
Replace main board
OK
Check panel
NG
Replace panel
Check IC902
NG
Replace IC902 or the correlative part
OK
Check T902
NG
Replace T902
OK
Check D907, D904
NG
Replace D907, D904
24
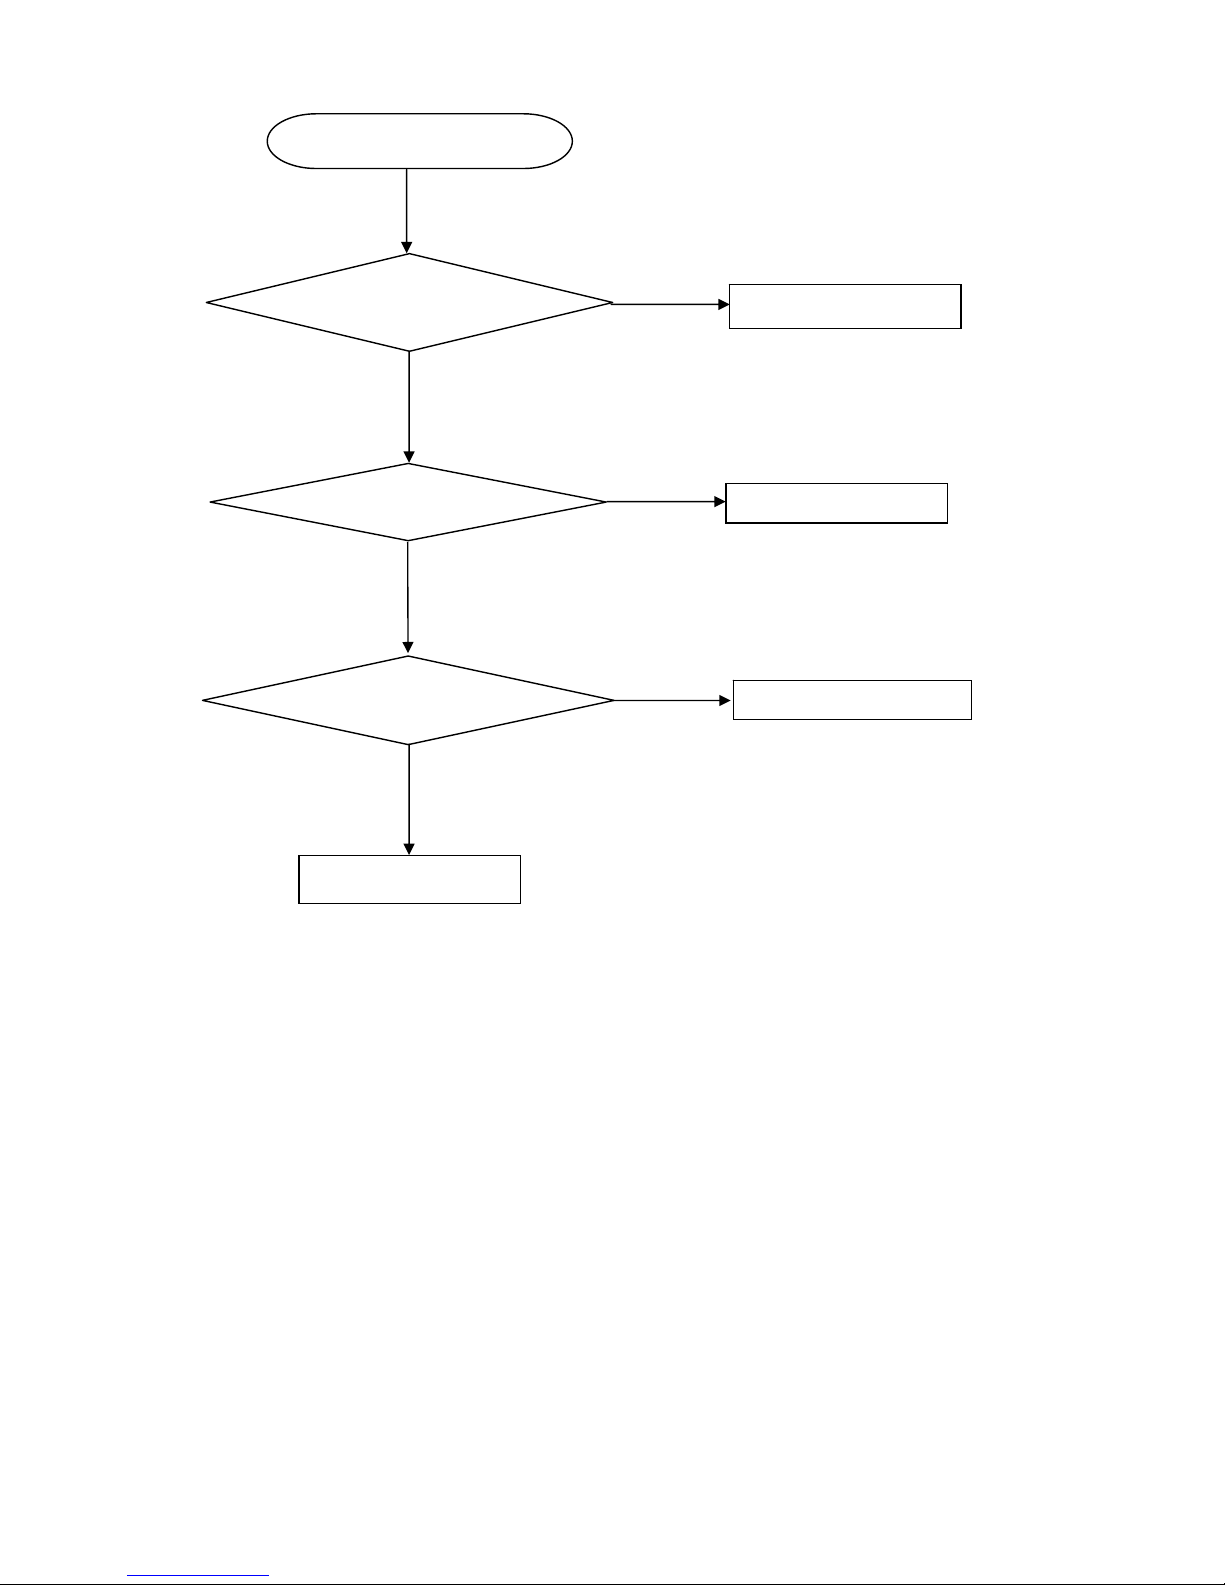
Key Board
OSD is unstable or not working
Is Key Pad Board connecting normally?
Connect Key Pad Board
Is Button Switch normally?
Replace Button Switch
Y
Is Key Pad Board Normally?
Replace Key Pad Board
Check Main Board
N
N
Y
Y
N
25
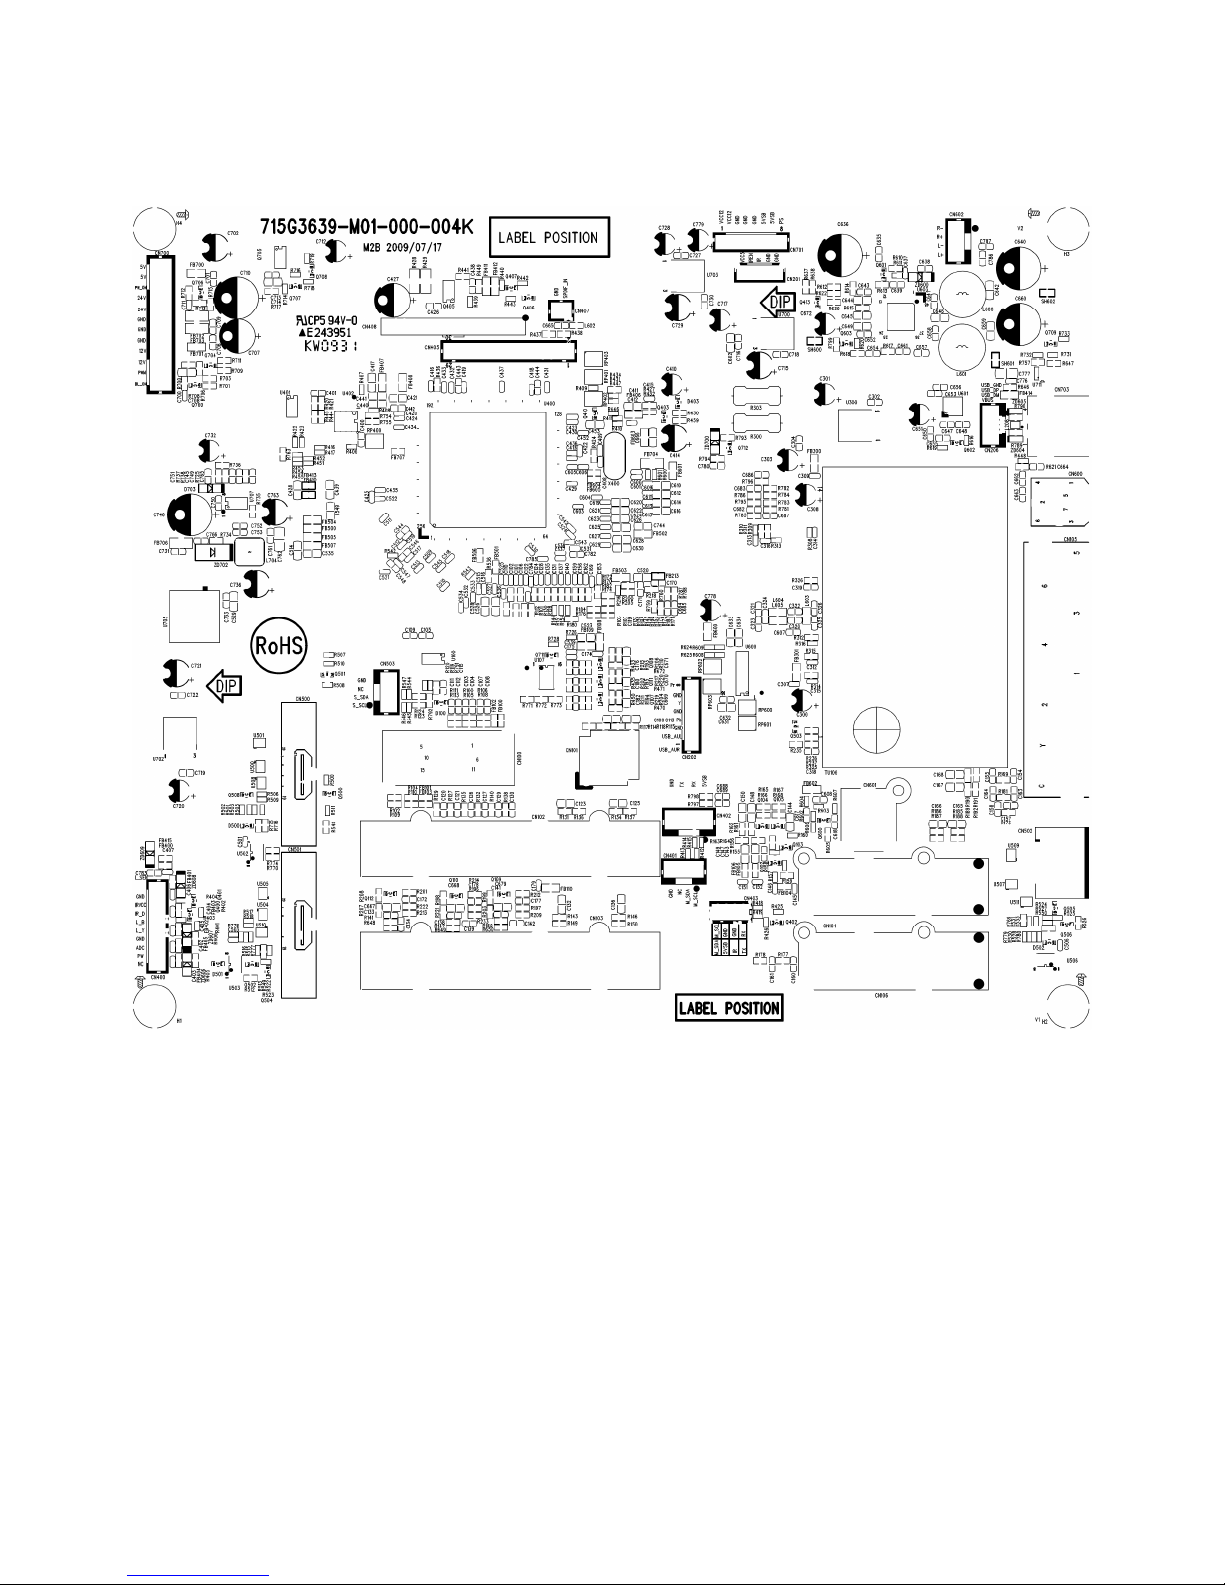
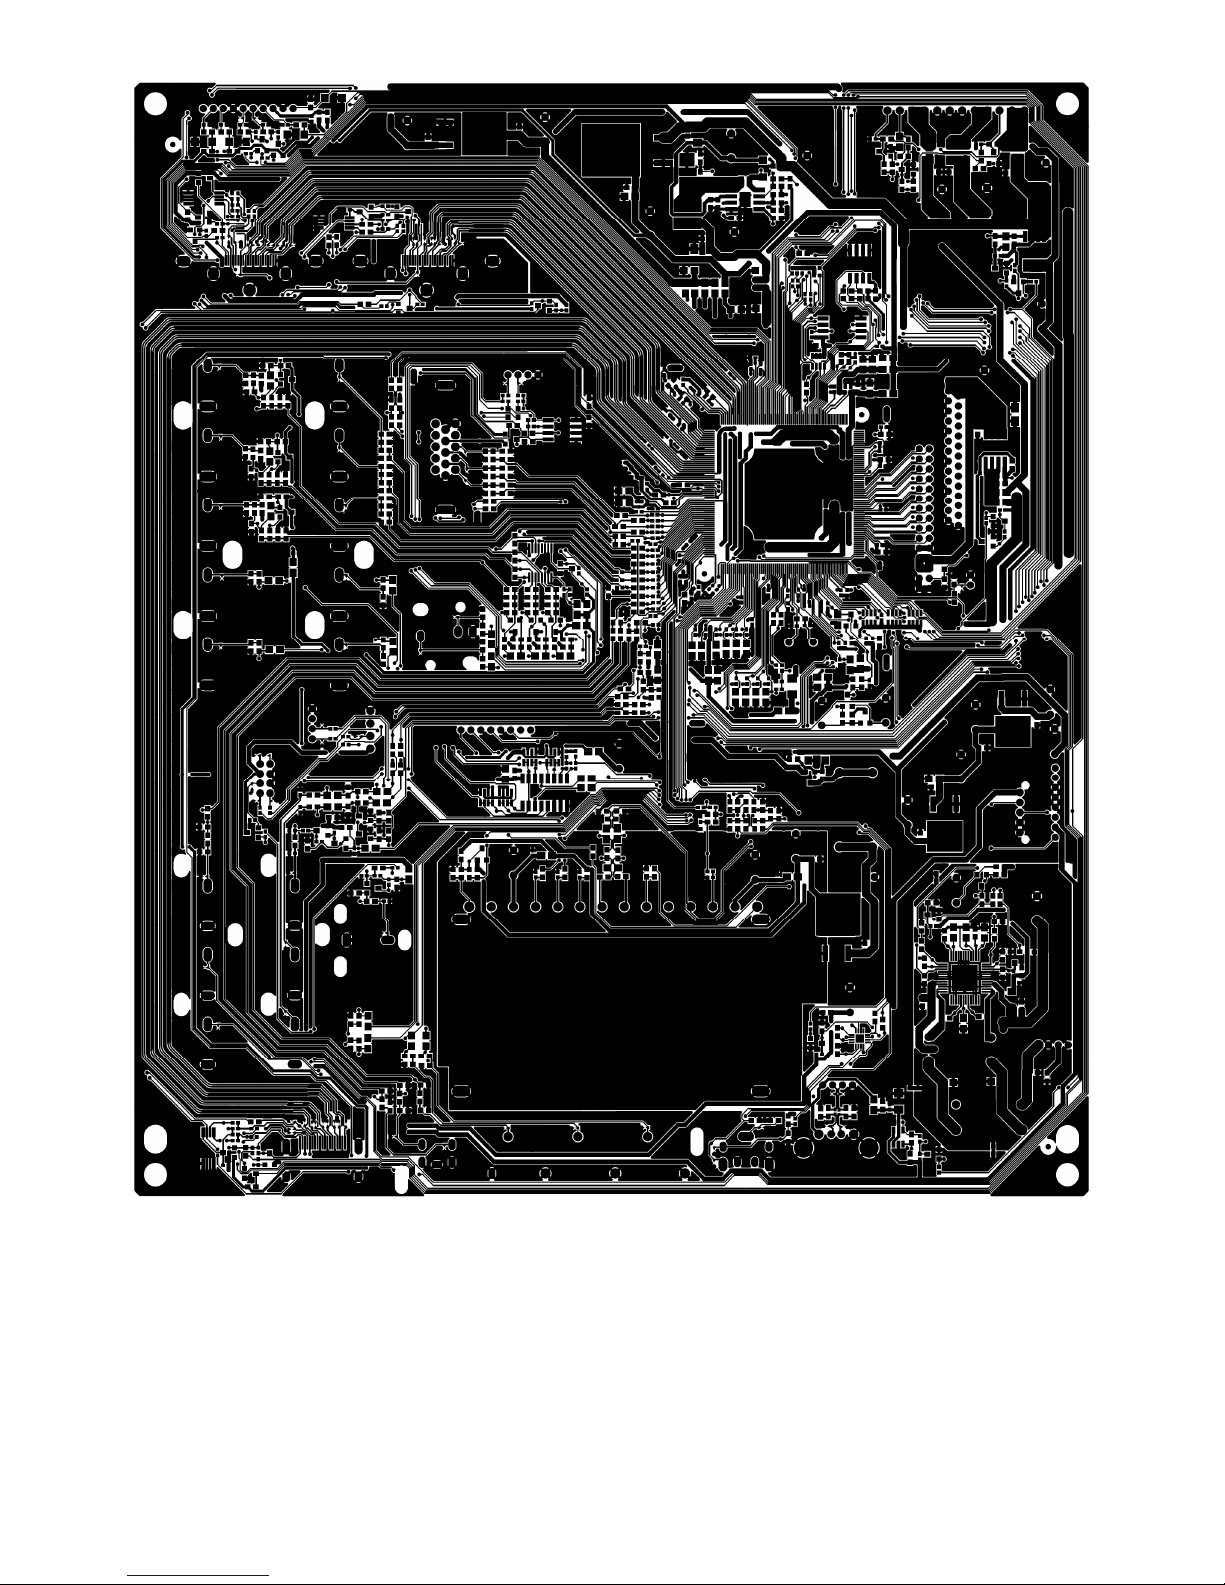
6. PCB Layout
6.1 Main Board
715G3639M01000004K
26
27
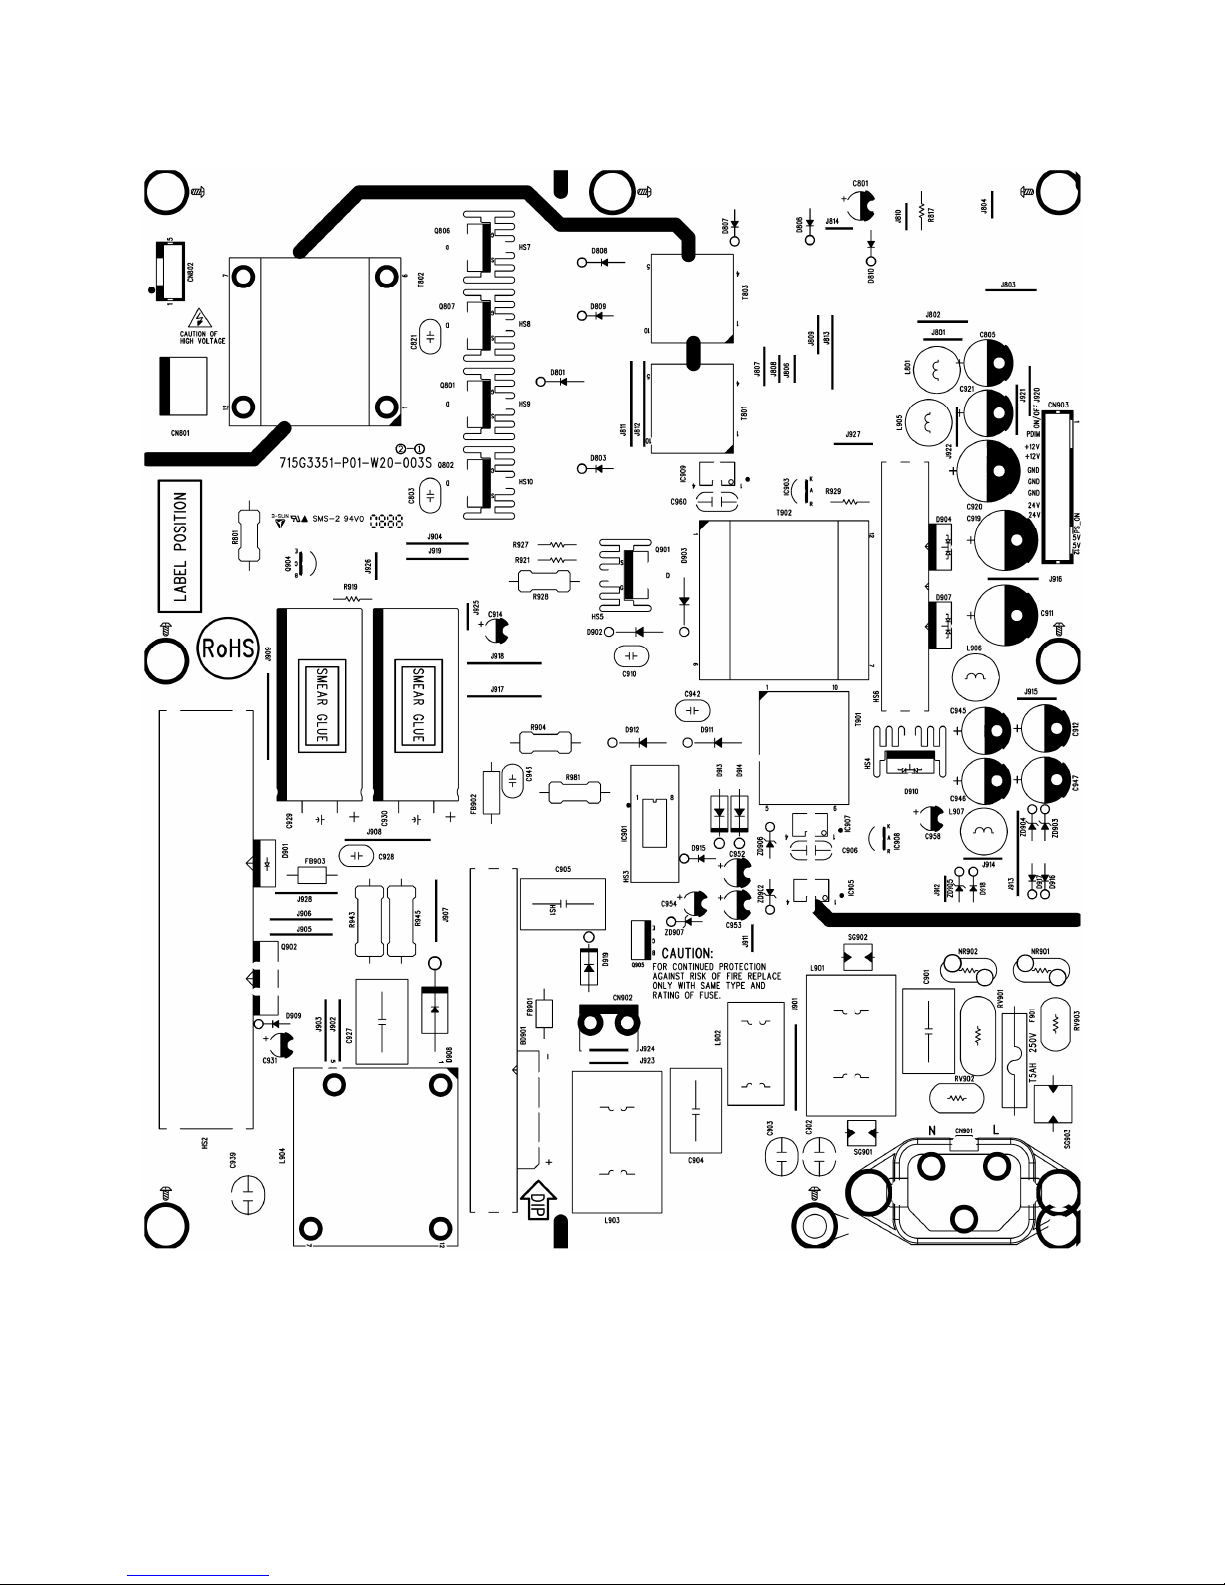
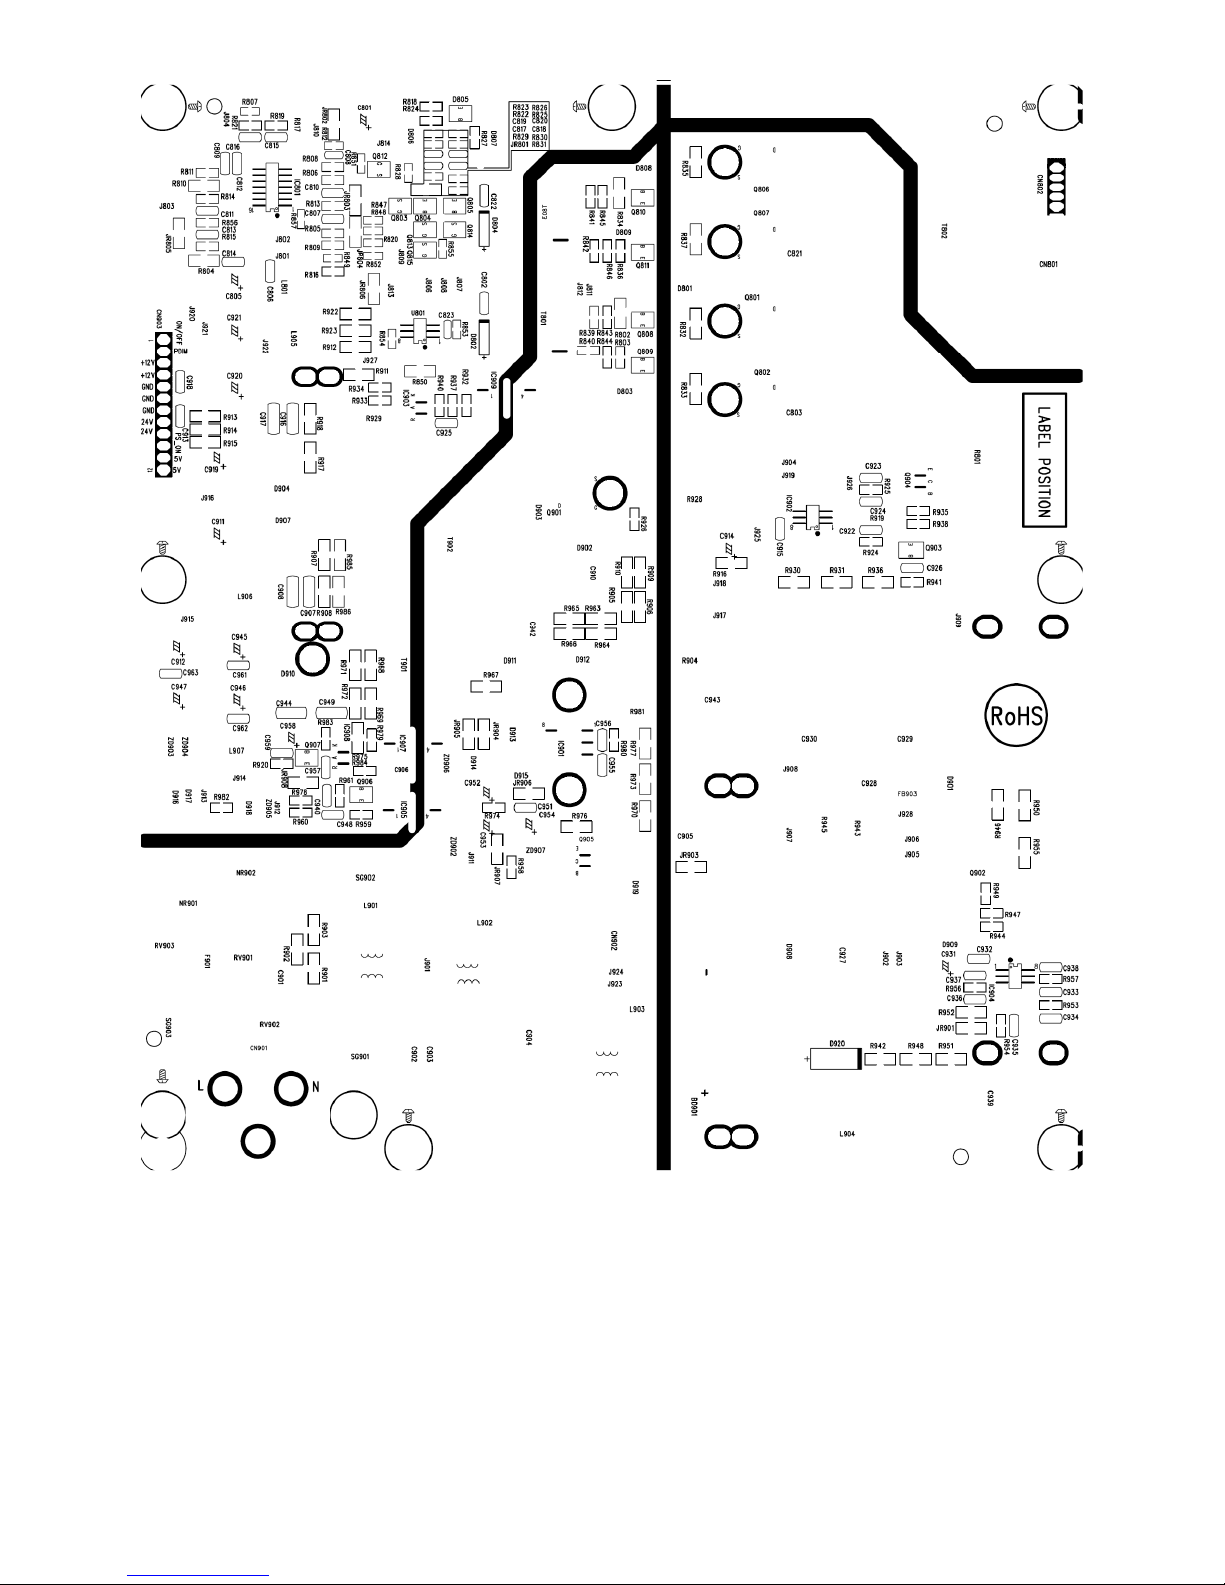
6.2 Power Board
715G3351P01W20003S
28
 Loading...