

HAIER HWD-C1200TXVE-F User Manual
WASHER DRYER
USER MANUAL
HWD–C1000TXVE
HWD–C1200TXVE
HWD–C1000TXVE ME
HWD–C1200TXVE ME
04 - 09 10 - 15 16 - 20
TABLE OF CONTENTS
BEFORE USE
¬ Components . . . . . . . .03
¬ Preparation ..........04
¬ Safety instructions ...05
¬ Installation . . . . . . . . . . 06
¬ Control Panel ........08
LEGEND
Yes
No
Optional
For your safety, any instructions in this manual with this "Warning" sign
must be followed strictly.
USING THE APPLIANCE
¬ Program selection . . . 10
¬ Consumption and
technical data ........11
¬ Washing & drying .... 12
MAINTENANCE
¬ Cleaning & Care ......16
¬ Display codes ........18
¬ Trouble shooting . . . . 19
¬ Electric Circuit Diagram 2 0
DISPOSAL
Do not dispose of electrical appliances as unsorted municipal waste, use separate collection facilities. Contact
your local government for information regarding the collection systems available. If electrical appliances are
disposed of in landfills or dumps, hazardous substances can leak into the groundwater and get into the food
chain, damaging your health and well-being.
When replacing old appliances with new ones, the retailer is legally obligated to take back your old appliance
for disposals at least free of charge.
BEFORE USE
03
COMPONENTS
THANKS FOR PURCHASING A HAIER PRODUCT
Please read these instructions carefully before using this appliance. The instructions contain important information which
will help you get the best out of the appliance and ensure safe and proper installation, use and maintenance.
Keep this manual in a convenient place so you can always refer to it for the safe and proper use of the appliance. If you
sell the appliance, give it away, or leave it behind when you move house, make sure you also pass on this manual so that the
new owner can become familiar with the appliance and safety warnings.
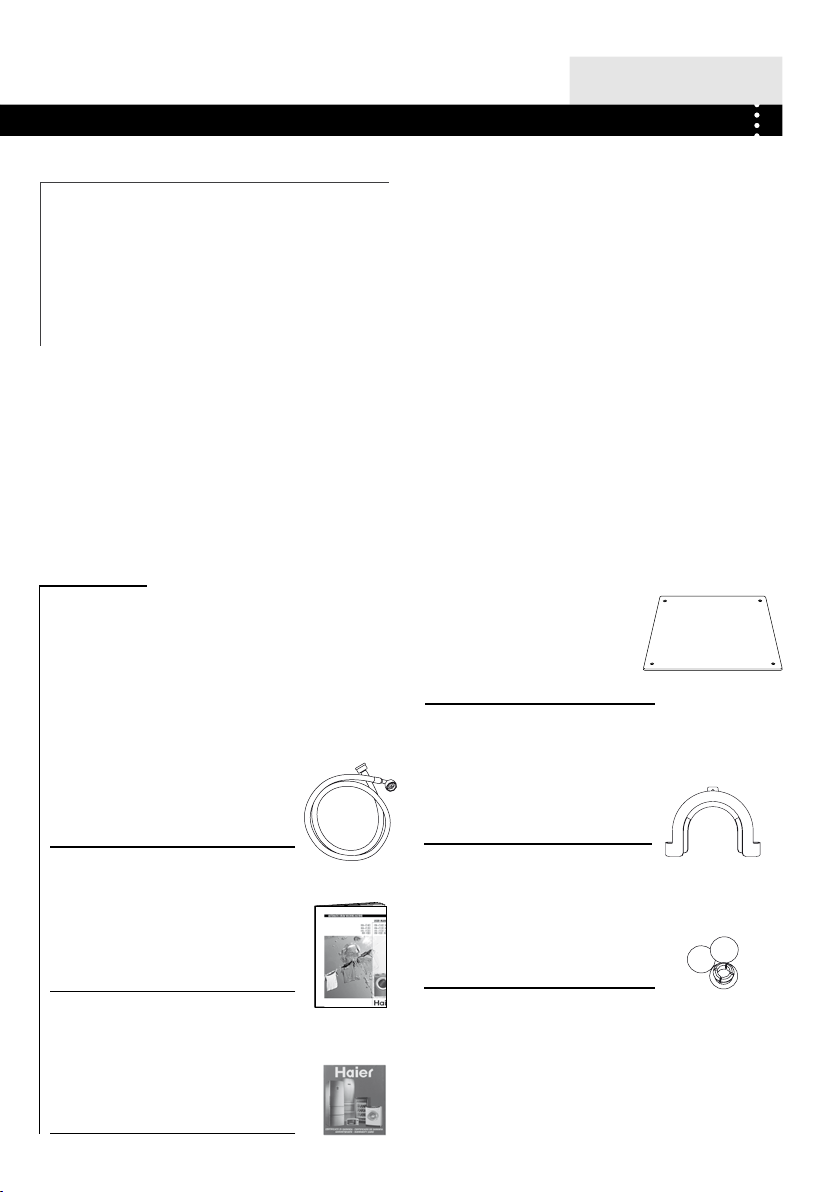
ACCESSORIES
Check the accessories and literature in accordance with
this list:
1x Inlet hose assembly
1x Service manual
1x Quality certificate (optional)
1x Bottom cover
1x Drain hose bracket
3x Blanking plugs
04
BEFORE USE
PREPARATION
PREPARING THE MACHINE
polystyrene base.
porthole. yrotcaf eht ni stset retaw morf gnitluser nonemonehp lamron si sihT .
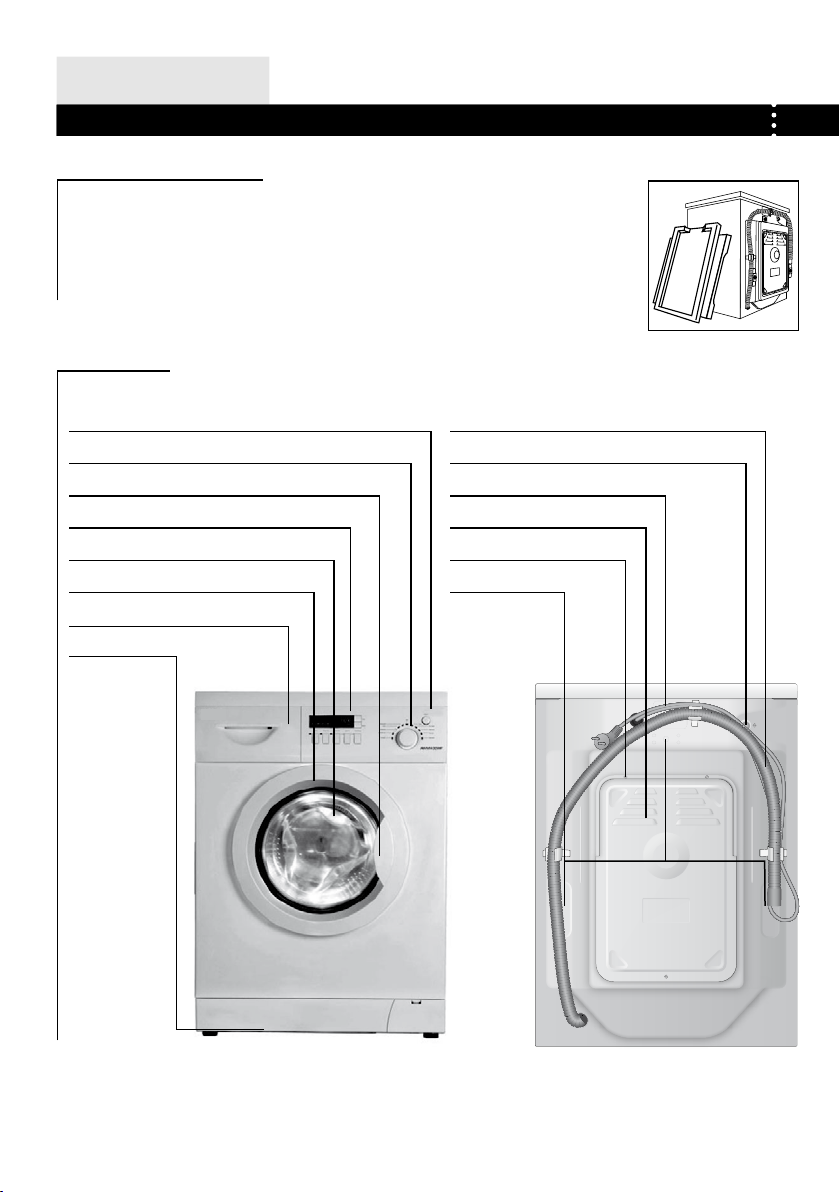
DESCRIPTION
eht gnidulcni ,ssenidaetsnu tneverp ot slairetam gnikcap eht lla evomeR
eht dna gab citsalp eht no nees eb yam spord retaw ,egakcap eht gninepo nopU
Power switch
Program knob
Door handle
Display
Porthole
Washer door
Detergent distribution drawer
Bottom trim
Drain hose
Water inlet valve
Power cord
Back cover
Back cover screws (3)
Transportation bolts (3)
rehsaw eht fo tuoyal eht morf tnereffid ylthgils eb yam margaid sihT
stnemevorpmi lacinhcet ot eud desahcrup tsuj evah uoy reyrd .
05
BEFORE USE
SAFETY INSTRUCTIONS
BEFORE SWITCHING THE APPLIANCE ON FOR THE FIRST TIME
DO ...
... ensure you connect the a ppliance directly to a domes-
R
tic mains water supply.
... make sure that the plug is accessible.
R
... keep surrounding areas free form accumulation of lint,
R
dust and dirt.
... keep away from heat sources and direct sun light to
R
p r e v e n t p l a s t i c an d r u b b e r c o m p o n e n t s f r o m a g i n g .
... make sure that the power cord is not caught under or in
R
t h e a p p l i a n c e an d a v o i d d a m a g e t o t h e p o w e r co r d .
... ensure that the appliance is not installed behind a
R
lockable door, a sliding door or a door with a hinge on the
opposite side to that of the appliance so that a full opening
of the appliance door is restricted.
... make sure that children or infirm persons do not play
R
with the packing materials.
DURING DAILY USE OF THE APPLIANCE
DO ...
... make sure that items soiled with cooking oil, acetone,
R
alcohol, petrol, kerosene, spot removers, turpentine,
waxes, wax removers or similar substances have been
washed with hot water and an extra amount of detergent
before being dried.
... in case the power cord is damaged, let it be replaced by
R
the manufacturer, his service agent or other accordingly
qualified persons.
. . . u n p l u g t h e a p p l i a n c e b e f o r e c a r r y i n g o u t a n y m a i n t e -
R
nance or repair.
. . . h o l d t h e p l u g a n d n o t th e e l e c t r i c c a b l e w h e n u n p l u g -
R
ging the power supply.
... ensure that the appliance is not used by persons with
R
reduced physical, sensory or mental capabilities, lack of
experience and knowledge without supervision or instruction by a person responsible for their safety.
... make sure not to place heavy objects or sources of
R
heat or damp on top of the appliance.
DO NOT ...
... touch or use the appliance when barefoot or with wet or
damp hands or feet.
... use flammable detergent or dry cleaning agent.
.. . use any flammabl e sprays in close v icinity to the ap pliance.
.. . remove or inser t the plug in the presence of flammable g as.
... install the appliance outdoors in a damp place, or in an
area which may be prone to water leaks such as under
or near a sink unit. In the event of a water leak allow the
machine to dry naturally.
... place the washer dryer directly on a carpet, or close to a
wall or furniture.
... connect the appliance to the power supply until installa -
tion is complete.
... use an appliance with missing parts.
... dry unwashed garments in the washer dryer.
DO NOT ...
... touch the washer dryer door during the washing or drying
process - it gets hot!
... block the ventilatio n o penings at the base of the appli-
ance with a carpet or by covering the appliance du ring use.
... hot wash or dry foam rubber or sponge-like materials,
shower caps or waterproof textiles.
... open the detergent distribution drawer during the wash cycle.
... force the washer dryer door open. The door is fitted with
a self-lock device and will not open until 2-3 minutes after
the washing machine stops.
... open the washer dryer door if the water level is visibly
over the porthole.
... attempt to repair the appliance yourself. Contact the
manufacturer or their approved service agent.
... stop the washer dryer before the end of the drying cycle
unless all items are quickly removed and spread out so that
the heat is dissipated.
06
BEFORE USE
INSTALLATION
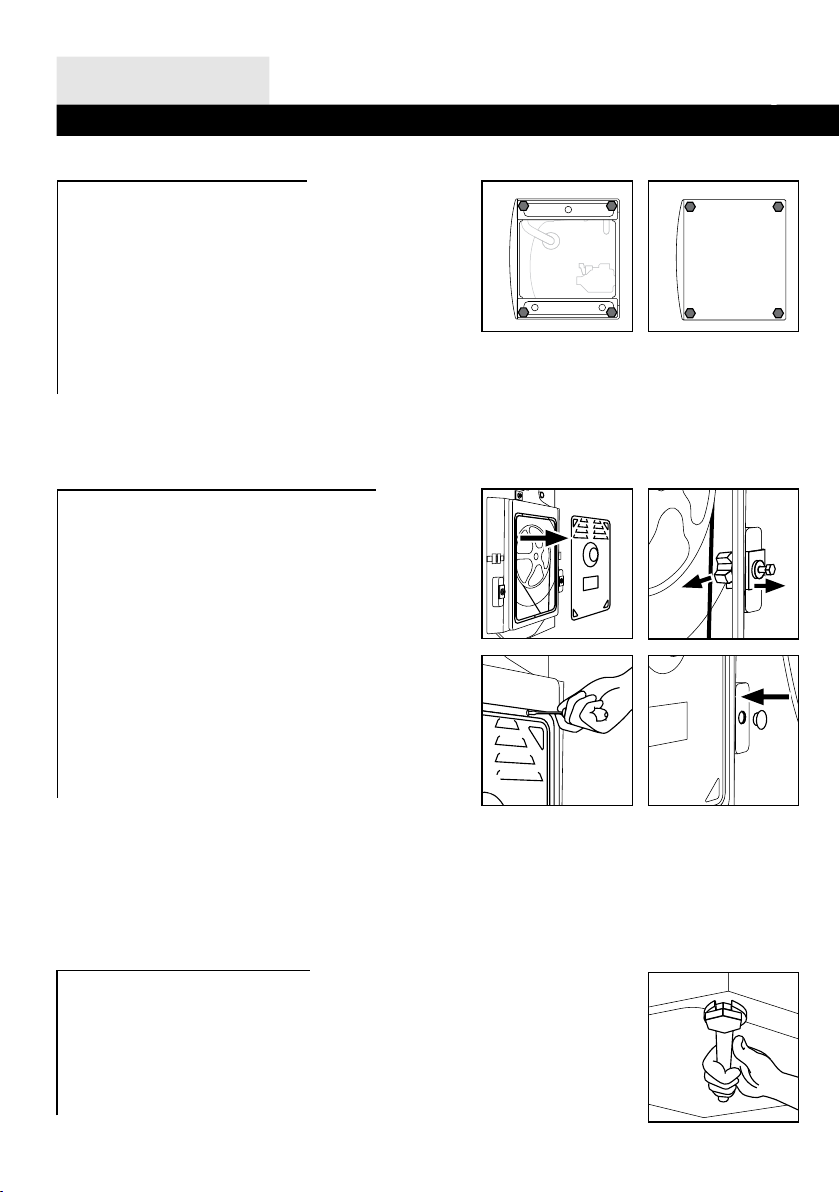
ADJUSTING THE BOTTOM COVER
Before removing the transportation bolts, please fix the
bottom cover to the bottom of the washer dryer. Lay down
the machine (fig. 1.), screw off the feet and adjust the
bottom cover with the four holes corresponding the screw
holes of the feet. Then screw the feet back on through the
cover and fix it thus securely to the bottom of the machine
(fig. 2.).
It keeps out the dampness and reduces the noise.
DISMANTLE THE TRANSPORTATION BOLTS
The transportation bolt s are designed fo r clamping antivibration components inside of the washer dryer during the
transportation process.
1.
2.
1. Remove the back cover.
2. Remove the three bolts on the rear side and take out
the synthetic stabilisers from within the machine.
3. Replace the back cover.
4. Fill the holes left by the bolts with blanking plugs.
Note: Keep the transportation bolts and synthetic stabilisers in a safe place for later use.
ADJUSTING THE WASHER DRYER
There are adjustable feet under the bottom of the washer dryer. Before use, they
should be adjusted so that the machine is level. This will minimise vibrations and
thus noise during use. It will also reduce wear and tear. We recommend using a
spirit level to level the appliance.
1.
3.
2.
4.
 Loading...