

Page 1

User manual
Washing machine
HW90-B14636
GB
Page 2

Thank You
GB
Thank you for purchasing a Haier Product.
Please read these instructions carefully before using this appliance. The instructions contain important information which will help you get the best out of the appliance and ensure
safe and proper installation, use and maintenance.
Keep this manual in a convenient place so you can always refer to it for the safe and proper
use of the appliance.
If you sell the appliance, give it away, or leave it behind when you move house, make sure
you also pass this manual so that the new owner can become familiar with the appliance
and safety warnings.
Legend
Warning – Important Safety information
General information and tips
Environmental information
Disposal
Help protect the environment and human health. Put
the packaging in applicable containers to recycle it.
Help to recycle waste of electrical and electronic appliances. Do not dispose appliances marked with this
symbol with the household waste. Return the product
to your local recycling facility or contact your municipal
oce.
WARNING!
Risk of injury or suocation!
Disconnect the appliance from the mains supply. Cut o the mains cable and dispose
of it. Remove the door catch to prevent children and pets to get closed in the appliance.
2
Page 3

GB
1-Safety information ......................................................................................................................... 4
2-Product description ...................................................................................................................... 7
3-Control panel .................................................................................................................................. 8
4-Programmes .................................................................................................................................11
5-Consumption ................................................................................................................................ 12
6-Daily use ......................................................................................................................................... 13
7-Eco-friendly washing ..................................................................................................................18
8-Care and cleaning ........................................................................................................................19
9-Troubleshooting ...........................................................................................................................22
10-Installation ................................................................................................................................... 25
Content
11-Technical data ............................................................................................................................. 29
12-Customer service ......................................................................................................................31
3
Page 4

1-Safety information
Before switching on the appliance for the rst time read the following safety hints!:
GB
WARNING!
Before rst use
▶ Make sure there is no transport damage.
▶ Make sure all transport bolts are removed.
▶ Remove all packaging and keep out of children´s reach.
▶ Handle the appliance always with at least two persons because it
is heavy.
Daily use
▶ This appliance can be used by children aged from 8 years and
above and persons with reduced physical, sensory or mental capabilities or lack of experience and knowledge if they have been
given supervision or instruction concerning use of the appliance
in a safe way and understand the hazards involved.
▶ Keep away children under 3 years of age from the appliance un-
less they are constantly supervised.
▶ Children shall not play with the appliance.
▶ Do not let children or pets come close to the appliance when the
door is open.
▶ Store washing agents out of reach of children.
▶ Pull up zips, x loose threads and take care for small items to pre-
vent laundry from being entangled. If necessary, use an appropri-
ate bag or net.
▶ Do not touch or use the appliance when barefoot or with wet or
damp hands or feet.
▶ Do not cover or encase the appliance during operation or after-
wards to allow any moisture or dampness to evaporate.
▶ Do not place heavy objects or sources of heat or damp on top of
the appliance.
▶ Do not use or store flammable detergent or dry cleaning agent in
close vicinity to the appliance.
▶ Do not use any flammable sprays in close vicinity to the appliance.
▶ Do not wash any garments treated with solvents in the appliance
without having dried them previously in the air.
4
Page 5

GB
1-Safety information
WARNING!
Daily use
▶ Do not remove or insert the plug in the presence of flammable
gas
▶ Do not hot wash foam rubber or sponge-like materials.
▶ Do not wash any laundry which is polluted with flour.
▶ Do not open detergent drawer during any wash cycle.
▶ Do not touch the door during the washing process, it gets hot.
▶ Do not open the door if the water level is visibly over the porthole.
▶ Do not force the door to open. The door is tted with a self-lock
device and will open shortly after the washing procedure is ended.
▶ Switch o the appliance after each wash programme and before
undertaking any routine maintenance and disconnect the appli-
ance from the electrical supply to save electricity and for safety.
▶ Hold the plug, not the cable, when unplugging the appliance.
Maintenance / cleaning
▶ Make sure children are supervised if they carry out cleaning and
maintenance.
▶ Disconnect the appliance from the electrical supply before un-
dertaking any routine maintenance.
▶ Keep the lower part of the porthole clean and open door and de-
tergent drawer if appliance is not in use to prevent odours.
▶ Do not use water spray or steam to clean the appliance.
▶ Replace a damaged supply cord only by the manufacturer, its ser-
vice agent or similarly qualied persons in order to avoid a hazard.
▶ Do not try to repair the appliance by yourself. In case of repair
please contact our customer service.
Installation
▶ The appliance should be placed in a well-ventilated place. Ensure
a location which allows opening the door fully.
▶ Never install the appliance outdoors in a damp place, or in an area
which may be prone to water leaks such as under or near a sink
unit. In the event of a water leak cut power supply and allow the
machine to dry naturally.
5
Page 6

1-Safety information
WARNING!
Installation
▶ Install or use the appliance only where the temperature is above
5 °C.
▶ Do not place the appliance directly on a carpet, or close to a wall
or furniture.
▶ Do not install the appliance in direct sunlight or in the near of heat
sources(e.g. stoves, heaters).
▶ Make sure that the electrical information on the rating plate
agrees with the power supply. If it does not, contact an electri-
cian.
▶ Do not use multi-plug adapters and extension cables.
▶ Make sure only the delivered electric cable and hose set are used.
▶ Make sure not to damage the electric cable and the plug. If dam-
aged have it replaced by an electrician.
▶ Use a separate earthed socket for the power supply which is easy
accessible after installation. The appliance must be earthed.
Only for UK: The appliance’s power cable is tted with 3-cord
(grounding) plug that ts a standard 3-cord (grounded) socket.
Never cut o or dismount the third pin (grounding). After the ap-
pliance is installed, the plug should be accessible.
▶ Make sure the hose joints and connections are rm and there is
no leakage.
GB
Intended use
This appliance is intended for washing machine-washable laundry only. Anytime follow the instructions given on the label of each
garment label. It is designed exclusively for domestic use inside the
house. It is not intended for commercial or industrial use.
Changes or modications to the device are not allowed. Unintended
use may cause hazards and loss of of all warranty and liability claims.
6
Page 7
GB
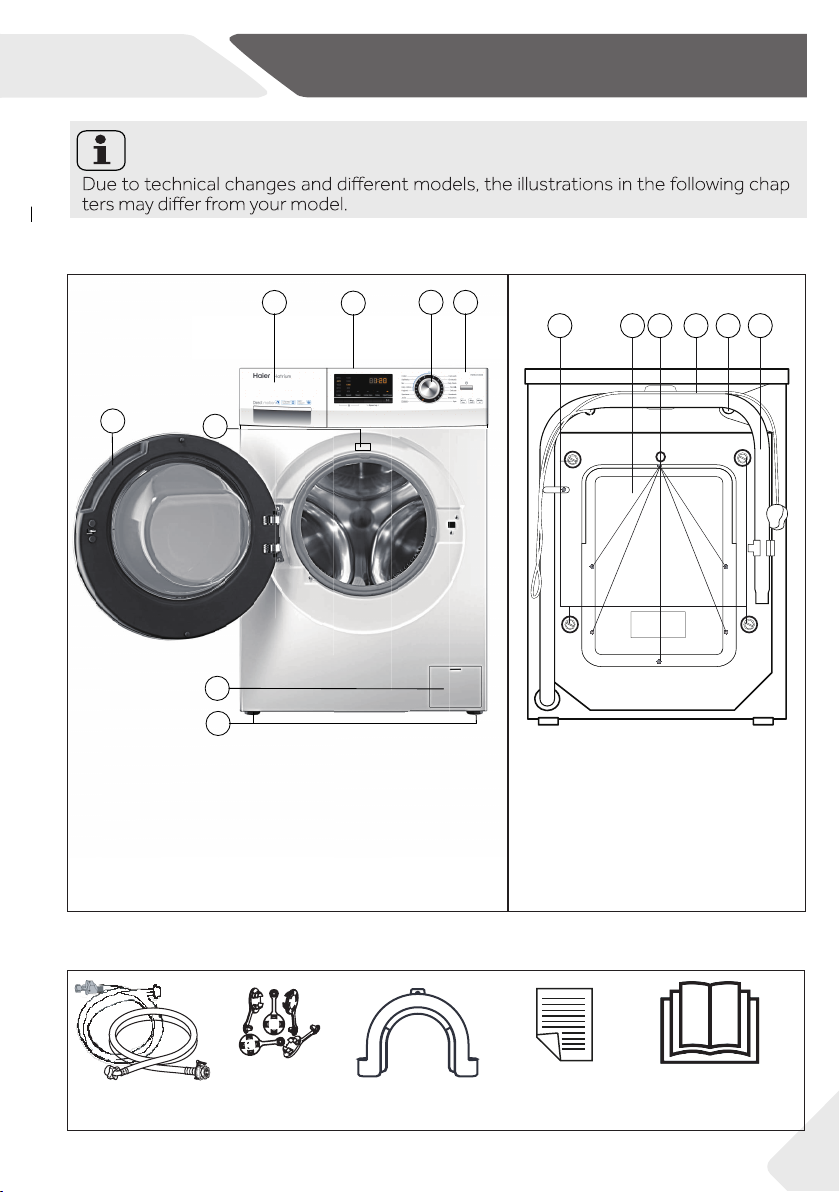
2-Product description
Note:
2.1 Picture of appliance
Front (Fig. 2-1): Rear side (Fig. 2-2):
2-1
4
1
2
3
1
2
-
2-2
4
3
65
6
5
T3
S2
S3
T1
7
S4
8
1 Detergent /Softener drawer
2 Worktop
3 Programme selector
4 Panel
5 Rating plate
6 Recessed grip
7 Sevice flap
8 Adjustable feet
1 Transportation bolts (T1-T4)
2 Back cover
3 Back cover screws (S1-S6)
4 Power cord
5 Water inlet vave
6 Drain hose
2.2 Accessories
Check the accessories and literature in accordance with this list (Fig.:2-3):
S1
S6
S5
T4
T2
2-3
Inlet hoseassembly
1)
Type of inlet hose depends on model.
1)
5 Blanking
plugs
Drain hose
bracket
Warranty-card
User manual
7
Page 8

3-Control panel
3-1
GB
1 “
2 Programme selector
3 Display
4 Detergent /Softener drawer
5 Function buttons
6 “Delay” button
7 “Start/Pause“ button
Note : Acoustic signal
In following cases an acoustic signal sounds:
▶ when pressing a button
▶ when turning the programme selector
▶ at the end of programme
▶ in case of failures
The acoustic signal can be deselected if necessary ; see DAILY USE.
3-2
Press this button (Fig. 3-2) gently to switch on, the display is shining, the indicator of the “Start/Pause” button
is flashing. Press it again for about 2 seconds to switch
ter a while machine will shut down automatically.
3-3
Cotton
Synthetics
Mix
Baby clothes
Hygienic
Sportwear
Jeans
Cotton
+
3.2 Programme selector
Fast wash
By turning the knob (Fig. 3-3) one of 16 programmes
Quick 15”
Daily Wash
can be selected, related LED will light up, its default
Wool
settings will be displayed.
Delicate
Handwash
Bedding
Spin
-
3-4
3.3 Display
The display (Fig. 3-4) shows following information:
▶ Washing time
▶ End time delay
▶ Error codes and service information
8
Page 9

GB
Start/Pause
3-Control panel
3.4 Detergent drawer
Open the drawer, three compartments can be
seen (Fig. 3-5):
Compartment 1 : Water inlet only, no detergent
Compartment 2 : Detergent for programme
Compartment
: Softener, Conditioning agent etc.
The recommendation on the type of detergents is
suitable for the various washing temperatures, please
refer to the manual of detergent.
3.5 Function buttons
The function buttons (Fig. 3-6) enable additional options in the selected programme before programme
starts. The related indicators are displayed.
-
gramme, all options are disabled.
If a button has multiple options, the desired option can
be selected by pressing the button sequentially.
To delete the setting or to cancel the setting process,
press the function button until the desired LED lights
Note: Factory settings
there is no special requirement default settings are recommended.
.
Temp.
3.5.1 3.5.2 3.5.3 3.5.4 3.5.5
Speed Steam
Extra rinse
3-5
3-6
Delay
3.5.1-Function button “ Temp.“
Press this button (Fig. 3-7) to change the washing
3-7 3-8
temperature of the programme. If no value is illuminated the water will not heated.
In conjunction with the “Steam“ button, the child lock
( )
3.5.2-Function button “Speed”
Temp.
Speed
Press this button (Fig. 3-8) to change or deselect the
spin of the programme. If no value is illuminated the
laundry will not spun.
3.5.3-Function button “Steam“
Press this button (Fig. 3-9) to activate the steam function.When this function is activated
the default temperature is the maximum temperature of the programme selected.This
function can be activated only with the following programmes: Hygienic, Baby clothes,
Mix, Synthetics, Cotton.When the function is activated the led above the button will light up.
Pushing again this button the function can be deactivated and the led above the button
will turn off.When the function is activated the temperature of the programme cannot
be changed.
9
Page 10

3-Control panel
If “Temp.” button is pushed the “Steam” function will be
3-9
3-10
3-11
3-12
Extra rinse
Extra rinse
Delay
Steam
Delay
Speed up
deactivated.You can activate “Steam” function only before to start any programme. You cannot activate “Steam”
function while the appliance is already executing a programme.
3.5.4 Function button“Extra rinse“
Press this button (Fig. 3-10) to rinse the laundry more
intense with fresh water. This is recommended for
people with sensitive skin.
By pressing the button several times one to three ad
ditional cycles can be selected. They appear in the dis
play with P--1/P--2/P--3.
3.5.5 Function “Speed up“
This function saves time and energy. Preferable if laundry is slightly soiled. Press simultaneously button “Extra
rinse“ and ”Delay” (Fig. 3-11) for about 3 seconds
to activate the “Speed up” function;
played. This function is not available in all programmes
(see PROGRAMMES).
3.6 “Delay” button
Press this button (Fig. 3-12) to start the programme
with a delay. End time delay could be increased in steps
6:30 means end of programme cycle will be in 6 hours
and 30 minutes. Press “Start/Pause” button to activate
the time delay. It is not applicable to programme SPIN.
SPEEd
uP
is dis
GB
-
-
-
Note: Liquid detergent
If using liquid detergent, it is not recommended to activate the end time delay.
3.7 “Start/Pause“ button
Press this button (Fig. 3-13) gently to start or inter
rupt the currently displayed programme. During pro
gramme setting and during programme run the LED
above the button is shining, or if interrupted blinking.
3.8 Child lock
Press button “Temp.“ and ”Steam” (Fig. 3-14) for 3
seconds simultaneously to block all panel elements
against activation. For unlocking please press again
the two buttons.
The display shows cLo
pressed, when the child lock is activated. The change
is not running.
I-
(Fig. 3-15) if a button will be
10
3-13
3-14
3-15
Temp.
Start/Pause
Speed Steam
-
-
-
Page 11

GB
Yes,
•
º
Programme
Cotton
Synthetics
Mix
4-Programmes
Detergent compartment for:
Water inlet only, no deter-
1
gent
2
Detergent
Optional,
/
No
Max. load Temperature Preset
1)
in kg
9.0 * to 90 30
4.5 * to 60 30
4.5 * to 60 30
in °C
seletable
range 2 1 Fibre type
Preset
2)
•
•
•
/
º
/
º
/
º
Softener or care product
Cotton 1000
Synthetics or
mixed fabric
Lightly soiled
mixed-laundry
of cotton and
synthetics
spin speed
in rpm
1200
1000
Function
Steam
Extra rinse
• • •
• • •
• • •
Speed up
Baby clothes
Hygienic 4.5 90 90
Sportwear
Jeans 4.5 * to 60 30
Cotton+
Fast wash
Quick 15”
Daily Wash
Wool
Delicate
Handwash
Bedding
Spin
1)
Relating to dry laundry.
2)
Choose 90 °C wash temperature only for special hygienic requirements. *: water will not heated (no
value is iluminated).
3)
Reduce detergent amount because programme duration is short.
4.5 * to 40 20
9.0
3)
4.5 * to 40 40
3)
2.25 * to 40 *
4.5 * to 60 30
2.25 * o 40 *
2.25
2.25
2.25
9.0 /
4.5 * o 90
2)
t t
*to 90
t
* to 30
* to 30
* to 60
40
•
º
/
•
º
/
•
º
/
•
/
º
/
•
º
/
•
º
/
•
º
/
•
º
/ 800
•
º
/
•
º
/
•
º
/
/
•
/ / /
2)
30
30
30
40
Co ton/Synthetics 1000
/
Cotton 1000
Sports wear 800
Jeans 1000
Cotton 1400
Lightly soiled laundry made of cotton or synthetics
Cotton / Syn-
thetics
Cotton fabrics 1000
Machine-washa-
ble fabric made of
wool or with wool
cont
ent
Delicate laundry
and silk
Laundry marked
with symbol for
handwash
Cotton
all fabrics
1000
1000
800
400
1000
1000
•
•
• • •
/
•
/
• •
/
• •
/
•
/
•
/
• •
/
•
/
•
/
•
/
• •
/ / /
•
/
/
/
/
/
/
11
Page 12
5-Consumption
GB
Programme
Cotton+ *
Synthetics
Temper-
ature
in °C
40°C 4:25
60°C
60°C 53
30
Max. load
in kg
4.5
4.5
9.0
4.5
Energy
in kWh
0.49
0.57
0.58
/ /
Water
in L
39
41
54
Washing time
in h:min
4:28
4:28
1:58
Spin
drying
perfor-
mance
in %
53
53
* Standard programme for the Energy Labelling according to 2010/30 EU:
Cotton+ 60°C / 40°C with max. spin speed setting.
The standard 60°C and 40°C cotton programmes are suitable to clean normally soiled
cycle temperature.
Note: Auto Weight
The appliance is equipped with a loading recognition. At low loading, energy, water and
washing time will be reduced automatically in some programs.
12
Page 13

GB
6-Daily use
6.1 Power supply
Connect the washing machine to a power supply
(220V to 240V~/50Hz; Fig. 6-1). Please refer also to
section INSTALLATION.
6-1 6-2
6.2 Water connection
▶ Before connecting check the cleanliness and clar-
ity of the water inlet.
▶ Tun on the tap (Fig.6-2).
Note: Tightness
Before use check for leakage in the joints between the tap and the inlet hose by turning
on the tap.
6.3 Preparing laundry
▶ Sort out clothes according to fabric (cotton, syn-
thetics, wool or silk) and to how dirty they are (Fig.
6-3). Pay attention to the care labelling of washing labels.
▶ Separate white clothes from coloured ones.
Wash coloured textiles rst by hand to check if
they fade or run.
▶ Empty pockets (keys, coins, etc.) and remove
harder decorative objects (e.g. brooches).
▶ Garments without hems, delicates and nely wo-
ven textile such as ne curtains are to be put into
a wash bag to care for this delicate laundry (hand
or dry cleaning would be better).
▶ Close zippers, velco fastener and hooks, make
sure the buttons are sewn on tightly.
▶ Place sensitive items like laundry without rm
hem, delicate underwear (Dessous) and small
items such as socks, belts, bras, etc. in a wash
bag.
▶ Unfold large pieces of fabric such as bed sheets,
bedspreads etc.
▶ Turn jeans and printed, decorated or color-inten-
sive textiles inside out; possibly wash separately.
6-3
CAUTION!
Non-textile, as well as small, loose or sharp-edged items may cause malfunctions and
damage of clothes and appliance.
13
Page 14

6-Daily use
Care chart
Washing
Washable up to 95°C
normal process
Washable up to 40°C
normal process
Washable up to 30°C
normal process
Wash by hand
max. 40°C
Bleaching
Any bleaching allowed Only oxygen/
Drying
Tumble drying possible
normal temperature
Line drying Flat drying
Ironing
ron at a maximum
I
temperature
up to 200 °C
Do not iron
Washable up to 60°C
normal process
Washable up to 40°C
mild process
Washable up to 30°C
mild process
Do not wash
non -chlorine
Tumble drying possible
lower temperature
ron at a medial tem-
I
perature
up to 150°C
GB
Washable up to 60°C
mild process
Washable up to 40°C
very mild process
Washable up to 30°C
very mild process
Do not bleach
Do not tumble dryr
Iron at a low temperature up to 110 °C;
without steam (steam
ironing may cause irreversible damage)
Professional Textile Care
Dry cleaning in tetrachloroethene
Professional wet clean Do not professional
Dry cleaning in hydrocarbons
wet clean
Do not dry clean
6.4 Loading the appliance
▶ Put in the laundry piece by piece
▶ Don‘t overload. Note the dierent maximum load according to programmes! Rule of
thumb for maximum load: Keep six inches between load and drum top.
▶ Close the door carefully. Make sure that no pieces of laundry are pinched.
14
Page 15
GB
6-Daily use
6.5 Selecting detergent
▶ W
▶ Use only machine wash approved detergent.
▶ ergents, e.g. for synthetic and woolen fabric.
▶ Mind always detergent manufacturer recommendations.
▶ Do not use dry cleaning agents such as trichloroethylene and similar products.
Choose the best detergent
Kind of detergent
Programme
Cotton
Synthetics L/P L/P L - o
Mix
Baby clothes L/P L/P - - o
Hygienic
Sportwear
Jeans L/P L/P L - o
Cotton+
Fast wash L L - - o
Quick 15”
Daily Wash L/P L/P L - o
Wool - - - L o
Delicate
Handwash
Bedding
Universal Colour Delicate Special Softener
L/P L/P - - o
L/P L/P - - o
L/P L/P L - o
- - - L o
L/P L/P - - o
L L - - o
- - L - o
- - - L o
- - L L -
L = gel-/liquid detergent P = powder detergent O = optional _ = no
If using liquid detergent, it is not recommended to activate the time delay.
We recomment by using:
▶ Laundry powder: 20°C to 90°C* (best use:: 40-60°C)
▶ Color detergent: 20°C to 60°C (best use: 30-60°C)
▶ Wool/delicate detergent: 20°C to 30°C (= best use:)
* Choose 90 °C wash temperature only for special hygienic requirements.
15
Page 16

6-Daily use
Start/Pause
GB
6-3
6.6 Adding detergent
1. Slide out the detergent drawer.
2. Put the required chemicals into corresponding
compartments (Fig. 6-3)
3. Push back the drawer gently.
Note:
▶ Remove detergent residues before next wash cycle from the detergent drawer.
▶ Do not overuse detergent or softener.
▶ Please follow the instruction on the detergent package.
▶
▶ Concentrated liquid detergent should be diluted before adding into compartment 2.
▶ The best use of liquid detergent is by using a dosing ball, which is given with the laun-
dry into the washing machine.
▶ Do not use liquid detergent if „end time delay“ is selected.
▶ Carefully choose the programme settings according to the care symbols on all laun-
dry labels and according to the programme table.
6-4 6-5
6.7 Switch on the appliance
(Fig. 6-4). The LED of the „Start/Pause“ button is flashing.
6.8 Select a programme
To get the best washing results, select a programme
type.
Turn the programme knob (Fig. 6-5) to select the right
programme. Related programme LED lights up and
the default settings are displayed.
Note: Odour removal
amount of detergent in washing agent compartment (2) or special machine cleaner to
remove possibly corruptive residues.
6-6
Temp.
Speed Steam
Extra rinse
6.9 Add individual selections
Delay
Select required options and settings
(Fig. 6-5);
CONTROL PANEL.
Speed up
16
refer to
Page 17

GB
6-Daily use
6.10 Start wash programme
Press “Start/Pause“ button (Fig. 6-7) to start. The LED
of the „Start/Pause“ button stops flashing and lights
up continuously
Appliance operates according to present settings.
Changes are only possible by cancelling the programme.
Start/Pause
6-7
6.11 Interrupt - cancel wash programme
To interrupt a running programme press gently “Start/Pause“. The LED above the button
is flashing. Press it again to resume operation.
To cancel a running programme and all its individual settings
1. Press “Start/Pause” button to interrupt the running programme.
2.
3.
4. Select a new programme and start it.
6.12 After washing
1. At programme cycle end EnD is displayed.
2.
3. Remove laundry as soon as possible to go easy on it and to prevent more wrinkling.
4.
5. Unplug the power cord.
6. Open the door to prevent formation of moisture and odours. Let it open while not used.
Note: Door lock
▶ For safety reasons the door is locked partially during the washing cycle. It is only pos-
sible to open the door at the end of the programme or after the programme was cancelled correctly (see description above).
▶ In case of high water level, high water temperature and during spinning it is not pos-
sible to open the door; Loc
is displayed
1-
Note: Standby mode / energy-saving mode
The switched on appliance will go into standby-mode if it will not be activated within 2
This saves energy. To interrupt the standby mode push “Start/Pause“ button.
6.13 Activate or deactivate the buzzer
The acoustic signal can be deselected if necessary:
1. Switch on the appliance.
2. Select the SPIN programme.
3. Press the “Delay “button and “Extra rinse” button at the same time for about 3 seconds. “
bEEP OFF
For activating the buzzer press these two buttons at the same time again. “
will be displayed.
” will be displayed and the buzzer will be deactivated.
bEEP ON
”
17
Page 18

7-Eco-friendly washing
Environmentally responsible use
▶ To achieve best use of energy, water, detergent and time you should use the recom-
mended maximum load size.
▶ Do not overload (hand width clearance above laundry).
▶ For slightly soiled laundry select the Quick Wash programme.
▶ Apply exact dosages of each washing agent.
▶ Choose the lowest adequate washing temperature - modern detergents are ef-
ciently cleaning below 60°C.
▶ Raise default settings only due to heavy staining.
▶ Select max. spinning speed if a domestic dryer is used.
GB
18
Page 19
GB
8-Care and cleaning
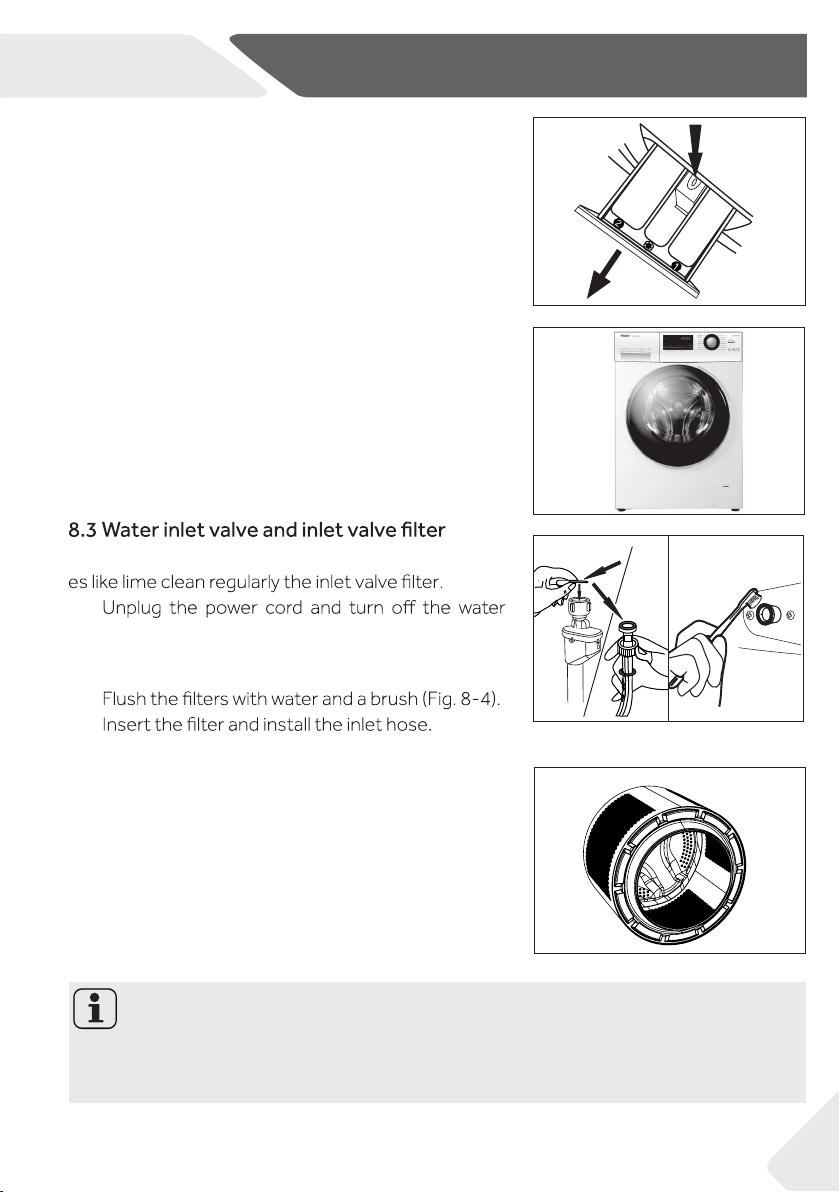
8.1 Cleaning the detergent drawer
Take always care there are no detergent residues.
Clean the drawer regularly (Fig. 8-1):
1. Pull out the drawer until it stops.
2. Press the release button and remove the drawer.
3. Flush the drawer with water until it is clean and
insert the drawer back in the appliance.
8.2 Cleaning the machine
▶ Unplug the machine during cleaning and mainte-
nance.
▶ Use a soft cloth with soap liquid to clean the ma-
chine case (Fig. 8-2) and rubber components.
▶ Do not use organic chemicals or corrosive sol-
vents.
To prevent blockage of water supply by solid substanc-
▶
supply.
▶ Unscrew the water inlet hose at the back (Fig.
8-3) of the appliance as well as on the tap.
▶
▶
8-1
2
1
8-2
8-38-4
8.4 Cleaning the drum
▶ Remove accidentally washed metal parts such as
pins, coins, etc. from the drum (Fig. 8-5) because
they cause rust stains and damage.
▶ Use a non-chloride cleaner for removing rust
stains. Observe the warning hints of the cleaning
agent manufacturer.
▶ Do not use any hard objects or steel wool for clean-
ing.
Note: Hygiene
For regular maintenance we recommend to run programme HYGIENIC with no load in
order to remove possible corruptive residues quarterly. Add a small amount of detergent in washing agent compartment (2) - or use a special machine cleaner
8-5
19
Page 20

8-Care and cleaning
GB
8-6 8-7
Note: Hygiene
After long periods of disuse we recommended to run programme HYGIENIC with no
load and small amount of detergent in washing agent compartment (2) or special machine cleaner to remove possibly corruptive residues.
8-8 8-9
8-10 8-11
8.5 Long periods of disuse
If the appliance is left idle for a longer period:
1. Pull out the electrical plug (Fig. 8-6).
2. Turn o water supply (Fig. 8-7).
3. Open the door to prevent formation of moisture
and odours. Let door open while not used.
Before next usage check carefully power cord, water
inlet and drain hose. Make sure everything is properly
installed and without leakage.
8.6 Pump lter
Clean the lter once a month and check the pump lter
for instanvce if the appliance:
▶ doesn´t drain the water.
▶ doesn´t spin.
▶ cause unusual noise while running.
WARNING!
Scalding Risk! Water in the pump lter can be very
hot! Before any action please ensure water has
cooled down.
8-12 8-13
20
1. Turn o and unplug the machine (Fig. 8-8).
2. Open service flap. You can either use a coin or a
screwdriver (Fig. 8-9).
3. Provide a flat container to catch leach water
(Fig. 8-10). There could be bigger amounts!
4. Pull the drainhose out and hold its end above the
container (Fig. 8-10).
5. Take the sealing plug out of the drainhose (Fig.
8-10).
6. After complete drainage close drainhose (Fig.
8-11). and push it back into the machine.
7. Unscrew and remove counter clockwise the pump
lter (Fig. 8-12).
8. Remove contaminants and dirt (Fig. 8-13).
Page 21

GB
8-Care and cleaning
9. Clean carefully pump lter, e.g. using running water
(Fig. 8-14).
10. Rex it thoroughly (Fig. 8-15).
11. Close service flap.
CAUTION!
▶ Pump lter sealing has to be clean and unhurt. If the lid is not full tightened, water
can escape.
▶ The lter must be in place, or it may lead to leakage.
8-14 8-15
21
Page 22

9-Troubleshooting
Problem
Cause
Solution
E1
•
E2
• Lock - error.
• Shut the door properly.
E4
•
• Drain hose is self-syphoning..
• Make sure that tap is fully opened and water
pressure is normal.
• Check drain hose installation.
E8
• Water protective level - error..
• Contact the After sales service.
of a problem please check all shown possibilities and follow below instructions before you
contact an after sales service. See CUSTOMER SERVICE.
GB
WARNING!
▶ Before maintenance, deactivate the appliance and disconnect the mains plug from
the mains socket.
▶
improper repairs can cause considerable consequential damages..
▶ A damaged power cable should only be replaced by the manufacturer, its service
9.1 Information codes
Following codes are displayed only for information referring to the washing cycle. No
measures must be performed.
Code Message
1:25
6:30
P--1/2/3
End
cLo1-
Loc
1-
bEEP OFF
bEEP ON
SPEEd up
The remaining wash cycle time will be 1 hour and 25 minutes
The remaining wash cycle time including chosen end-time delay will be 6 hours and 30 minutes
1/2/3 additional rinses are choosen (see FUNCTION BUTTONS „Extra rinse“).
Function child lock is activated
Door is closed because of high water level, high water temperature or spinning cycle.
The buzzer is deactivated
The buzzer is activated
Function “Speed up” is activated.
9.2 Troubleshooting with display code
Drainage error.
Water level not reached.
22
•
• Check drain hose installation.
Page 23

GB
Program Cause Solution
FA
Water level sensor-error• Contact the After sales service..•
9-Troubleshooting
F3
F4
F7
FC0、
or FC2
UnB
FC1
• Temperature sensor - error.. • Contact the After sales service..
• Heating error
• Motor - error.. • Contact the After sales service..
• Abnormal communication error
• Unbalanced load - error.. • .murd eht ni daol yrdnual ecnalab dna kcehC
• Contact the After sales service..
• Contact the After sales service..
Reduce the load.
9.3 Troubleshooting without display code
Problem Cause Solution
Washing machine fails
to operate.
Washing machine
water.
Machine is draining
Drainage failure. • Drain hose is blocked. • Unblock drain hose.
Strong vibration while
spinning.
Operation stops
before completing
wash cycle.
Operation stops for
a period of time.
• Programme is not yet started. • Check programme and start it.
• Door is not properly closed. • Close the door properly.
• Machine has not been switched on. • Switch the machine on.
• Power failure. • Check power supply.
• Child lock is activated. • Deactivate child lock.
• No water. • Check water tap.
• Inlet hose is kinked. • Check inlet hose.
•
• Water pressure is less than 0.03 MPa.
• Door is not properly closed. • Close the door properly.
• Water supply failure. • Ensure the water supply.
• Height of drain hose is below 80 cm.
• Drain hose end could reach into
water.
•
• Drain hose end is higher than 100 cm
above floor level.
• Not all transportation bolts have
been removed.
• Appliance has no solid position.
• Machine load is not correct. • Check load weight and balance.
• Water or electric failure. • Check power and water supply.
• Appliance displays error code. • Consider display codes.
• Problem due to load pattern. • Reduce or adjust load.
• Programme performs soaking cycle.
•
• Check water pressure.
• Make sure that drain hose is
properly installed.
• Make sure the drain hose is not
in water.
•
• Make sure that drain hose is
properly installed.
• Remove all transportation bolts
• Ensure solid ground and a levelled
position.
• Cancel programme and restart.
.
23
Page 24

9-Troubleshooting
Problem Cause Solution
Excessive foam floats
drum and/or detergent drawer.
Automatic adjustment of washing
time.
Spinning fails. • Unbalance of laundry. • Check machine load and laun-
Unsatisfactory washing result.
Washing powder
residues are on the
laundry.
Laundry has grey
patches.
• Detergent is not a appropriate. • Check detergent recommen-
• Excessive use of detergent. • Reduce amount of detergent.
• Washing programme duration will
be adjusted.
• Degree of pollution does not agree
with selected programme.
• Detergent quantitiy was not suf-
cient.
• Maximum load has been exceeded. • Reduce loading.
• Laundry was unevenly distributed
in the drum.
• Insoluble particles of detergent can
remain as white spots on the laundry.
• Caused by fats such as oils, creams
or ointments.
dations.
• This is normal and doesn‘t affect functionality.
dry and run a spinning programme again.
• Select an other programme.
• Choose the detergent accord-
ing to the degree of pollution
and according to manufacturer
specications.
• Loose the laundry.
• Perform extra rinse.
• Try to brush the points from the
dry laundry.
• Choose an other detergent.
• Pretreat the laundry with a spe-
cial cleaner.
GB
Note: Foam formation
If too much foam is inspected during spin cycle, motor stops and drain pump will be activated for 90 seconds. If that elimination of foam fails up to 3 times, programme ends
without spinning.
Should the error messages reappear even after the taken measures, switch o the appliance, disconnect the power supply and contact the customer service.
9-1
A
9.4 In case of power failure
The current programme and its setting will be saved.
When power supply is restored operation will be resumed.
In case of power failure during programme run door
opening is mechanically blocked. If the laundry is to
be removed, the water level must not be visible in the
glass door. - Danger of scalding!
▶ Lower the water level according to step 1 to 6 of
chapter CARE AN CLEANING (PUMP FILTER).
▶ Pull lever (A) beneath service flap (Fig. 9-1) until
door is unlocked by a gentle click.
▶ Fix all parts and close the service flap.
24
Page 25

GB
10-Installation
10.1 Preparation
▶ Take the appliance out of the packaging.
▶ Remove all packaging material including polystyrene base, keep them out of childrens
reach. While opening the package, water drops may be seen on plastic bag and porthole. This normal phenomenon results from water tests in the factory.
Keep all packaging materials out of children´s reach and dispose them in an environmentally friendly manner.
10.2 Dismantle the transportation bolts
The transportation bolts are designed for clamping
anti-vibration components inside the appliance during
transportation to prevent inner damage.
1. Remove the back cover (Fig. 10-1).
2. Remove all 4 bolts on the rear side and take out
3. Replace back cover by inserting it in the two gaps
4. Fill left holes with blanking plugs (Fig. 10-4).
Keep the transportation bolts in a safe place for later use. Whenever the appliance is to
be moved at rst reinstall the bolts.
Note: Packaging disposal
plastic spacers (A) from inner side of the machine
(Fig. 10-2).
its convexity is facing out (Fig. 10-3).
Note: Keep in safe place
10-1
A
10-3 10-4
3
10-2
10.3 Moving the appliance
If the machine is to be moved to a distant location, replace the transportation bolts removed before installation to prevent damage:
1. Remove the blanking plugs.
2. Remove the back cover
3. Insert the plastic spacers and the transportation bolts.
4. Tighten the bolts with a spanner.
5. Replace the back cover.
25
Page 26

10-Installation
GB
10-5
10.4 Aligning the appliance
Adjust all feet (Fig. 10-5) to achieve a complete level
position. This will minimize vibrations and thus noise
during use. It will also reduce wear and tear. We recommend to use a spirit level for adjustment. Floor should
be as stable and flat as possible.
1. Loose the locknut (1) by using a wrench.
2. Adjust the high by turning the foot (2).
3. Tighten locknut (1) against the housing.
10.5 Drain Water Connection
Fix the water drain hose properly to the piping. The hose has to reach at one point a height
between 80 and 100 cm above the appliance bottom line! If possible keep always drain
hose xed to the clip at the appliance back.
WARNING!
▶ Use only the supplied hose set for the connection.
▶ Never reuse old hose sets!
▶ Only connect to cold water supply.
▶ Before connection, check whether the water is clean and clear.
10-6 10-7
26
Following connections are possible:
10.5.1 Drain hose to sink
▶ Hang the drain hose with the U-support over the
edge of a sink with adequate size (Fig. 10-6).
▶ Protect the U-support suciently against slip-
ping.
10.5.2 Drain hose to waste water connection
▶ The internal diameter of the stand pipe with
vent-hole must be minimum 40 mm.
▶ Put the drain hose for approx. 80 mm in the
wastewater pipe.
▶ Attach the U-support and secure it suciently
(Fig. 10-7).
Page 27

GB
10-Installation
10.5.3 Drain hose to sink connection
▶ The junction must lie above the siphon
▶ A spigot connection is usually closed by a pad (A).
That must be removed to prevent any disfunction (Fig. 10-8).
▶ Secure the drain hose with a clamp.
CAUTION!
▶ The drain hose should not be submerged in water and should be securely xed and
leak-free. If the drain hose is placed on the ground or if the pipe is at a height of less
than 80 cm, the washing machine will continuously drain while being lled (self-siphoning).
▶ Drain hose is not to be extended. If necessary contact after sales service.
10.6 Fresh Water Connection
Make sure that the gaskets are inserted.
1. Connect the water inlet hose with the angled
end to the appliance (Fig. 10-9). Tighten the
screw joint by hand.
2. The other end connect to a water tap with a
3/4“ thread (Fig. 10-10).
10-9
10-8
10-10
Note: Aqua-stop-system:
Some models are equipped with an aqua-stop inlet hose (B).The aqua-stop system
protects against water damage by automatically cutting the fresh water supply in case
of a leaking hose. This is indicated by a red marker (C). The hose must be replaced.
27
Page 28

10-Installation
GB
10-11
10.7 Electrical Connection
Before each connection check if:
▶ power supply, socket and fusing are appropriate to
the rating plate.
▶ the power socket is earthed and no multi-plug or
extension are used.
▶ the power plug and socket are strictly according.
▶ Only UK: The UK plug meets BS1363A standard.
Put the plug into the socket (Fig. 10-11).
WARNING!
▶ Ensure always that all connections (power supply, drain and fresh water hose) are rm,
dry and leak free!
▶ Take care these parts are never to be crushed, kinked, or twisted
▶ If the supply cord is damaged, it must be replaced by the service agent (see warranty
card) in order to avoid a hazard. .
Note: Hygiene
After each installation or long periods of disuse, before rst use and for regular maintenance run programme HYGIENIC with no load and small amount of detergent in washing agent compartment (2) or with special machine cleaner to remove possibly corruptive residues.
28
Page 29

GB
11-Technical data
Suppliers name or trade mark Haier
HW90-B14636
Rated capacity (kg) 9
A+++
Energy consumption per year (AE
in kWh/year)
C
Energy consumption of standard cotton programme 60 °C, full load (kWh/cycle)
Energy consumption of standard cotton programme 60 °C, partial load (kWh/cycle)
Energy consumption of standard cotton programme 40 °C, partial load (kWh/cycle)
1)
124
0.58
0.57
0.49
0.5
Weighted power consumption of the left-on mode (W) 0.55
3)
in L/year)
C
4)
5)
5)
Water consumption per year (AW
Max. spin speed (rpm)
4)
Remaining moisture content (%)
Standard 60°C cotton programme
Standard 40°C cotton programme
Programme time of cotton 60°C full load (min)
2)
10200
B
1400
53
otton+ + 60°C
C
Cotton+ + 40°C + max. spin
+ max. spin
268
Programme time of cotton 60°C partial load (min) 268
Programme time of cotton 40°C partial load (min)
Duration of the left-on mode (T
Airborne accustical noise (washing/spinning)
in dB(A) re 1pW
7)
in min)
I
6)
Type
1) Based on 220 standard washing cycles for cotton programmes at 60°C and 40°C at full and partial load, and the consumption of the low-power modes. Actual energy consumption will depend on how the appliance is used.
2) Based on 220 standard washing cycles for cotton programmes at 60 °C and 40 °C at full and
partial load. Actual water consumption will depend on how the appliance is used
3)
4) Based on the standard 60 °C cotton programme at full load and the standard 40 °C cotton programme at partial load
5) “Standard 60 °C cotton programme“ and “standard 40 °C cotton programme“ are standard
.
265
not applicable
53/73
freestanding
.
in terms of combined energy and water consumption
6) In case there is a power management system.
7) Based on the standard 60°C cotton programme at full load.
.
29
Page 30

11-Technical data
11.2 Additional technical data
HW90-B14636
Dimension (HxWxD in mm) 850x595x550
Voltage in V 220-240 V~/50Hz
Current in A 10
Max power in W 2000
Water pressure in MPa 0.03≤P ≤1
Netto weight in kg 72
GB
11.3 Standards and Directives
This product meets the requirements of all applicable EC directives with the corresponding harmonised standards, which provide for CE marking.
30
Page 31

GB
We recommend our Haier Customer Service and the use of original spare parts.
If you have a problem with your appliance, please rst check section TROUBLESHOOTING.
If you cannot nd a solution there, please contact
▶ your local dealer or
▶ the Service & Support area at www.haier.com where you can nd telephone numbers
and FAQs and where you can activate the service claim.
To contact our Service, ensure that you have the following data available.
The information can be found on the rating plate.
Model ____________________ Serial No. _____________________
Also check the Warranty Card supplied with the product in case of warranty.
For general business enquiries please nd below our addresses in Europe:
12-Customer service
European Haier addresses
Country* Postal address Country* Postal address
Haier Europe Trading SRL
Italy
Spain
Portugal
Germany
Austria
United
Kingdom
*For more information please refer to www.haier.com
Via De Cristoforis, 12
21100 Verese
ITALY
Haier Iberia SL
Pg. Garcia Faria, 49-51
08019 Barcelona
SPAIN
Haier Deutschland GmbH
Hewlett-Packard-Str. 4
D-61352 Bad Homburg
GERMANY
Haier Appliances UK Co.Ltd.
One Crown Square
Church Street East
Woking, Surrey, GU21 6HR
UK
France
Belgium-FR
Belgium-NL
Netherlands
Luxembourg
Poland
Czechia
Hungary
Greece
Romania
Russia
Haier France SAS
3-5 rue des Graviers
92200 Neuilly sur Seine
FRANCE
Haier Benelux SA
Anderlecht
Route de Lennik 451
BELGIUM
Haier Poland Sp. zo.o.
Al. Jerozolimskie 181B
02-222 Warszawa
POLAND
31
Page 32

Page 33

Manuale dell'utente
Lavatrice
HW90-B14636
IT
Page 34

Grazie
IT
Vi ringraziamo per aver deciso di acquistare un prodotto Haier.
Vi invitiamo a leggere attentamente queste istruzioni prima di iniziare a usare il dispositivo.
Le istruzioni contengono informazioni importanti che vi aiuteranno a trarre il meglio da
questo dispositivo e vi garantiranno altresì sicurezza in fase di installazione, uso e manutenzione del dispositivo.
Conservare questo manuale in un luogo pratico, di modo da poterlo sempre consultare e
garantire un utilizzo sicuro e adeguato del dispositivo.
Qualora il dispositivo venga venduto, ceduto o lasciato nella vecchia abitazione in fase di
trasferimento, accertarsi sempre di lasciare anche il manuale, di modo che il nuovo proprietario possa acquisire familiarità col dispositivo e con le relative avvertenze di sicurezza.
Legenda
Avvertenza - Informazioni importanti per la sicurezza
Informazioni e suggerimenti generali
Informazioni ambientali
Smaltimento
Contribuire alla protezione dell'ambiente e alla salute
umana. Collocare l'imballaggio in contenitori adeguati per poterlo riciclare. Contribuire al riciclaggio dei ri-
uti provenienti da dispositivi elettrici ed elettronici.
Non smaltire i dispositivi recanti questo simbolo con i
normali riuti domestici. Riportare il prodotto presso
la struttura di riciclaggio locale o contattare il proprio
ucio municipale competente in merito.
AVVERTENZA!
Rischio di lesione o soocamento!
Scollegare il dispositivo dalla presa di corrente. Tagliare il cavo di rete e smaltirlo. Togliere
il blocco dell’oblò per evitare che bambini e animali restino bloccati all’interno dell’appa-
recchiatura stessa.
2
Page 35

IT
1-Informazioni di sicurezza .............................................................................................................4
2-Descrizione del prodotto .............................................................................................................8
3-Pannello di controllo ......................................................................................................................9
4-Programmi .......................................................................................................................................12
5-Consumo .........................................................................................................................................13
6-Uso quotidiano ...............................................................................................................................14
7-Lavaggio rispettoso dell’ambiente ............................................................................................19
8-Cura e pulizia ...................................................................................................................................20
9-Guida alla risoluzione dei problemi ............................................................................................23
10-Installazione ..................................................................................................................................27
11-Dati tecnici ....................................................................................................................................31
12-Assistenza clienti .........................................................................................................................33
Indice
3
Page 36

1-Informazioni di sicurezza
Prima di accendere il dispositivo per la prima volta, leggere i seguenti suggerimenti di sicurezza:
IT
4
AVVERTENZA!
Prima di iniziare a usare il dispositivo
▶ Vericare che non vi siano danni vericatisi in fase di trasporto.
▶ Vericare che siano stati rimossi tutti i bulloni usati in fase di tra-
sporto.
▶ Rimuovere completamente l’imballaggio e tenere fuori dalla por-
tata dei bambini.
▶ Spostare sempre il dispositivo in due persone, dato che è molto
pesante.
Uso quotidiano
▶ Questa apparecchiatura può essere usata da bambini a partire
dagli 8 anni di età ed oltre e da persone con ridotte capacità siche, sensoriali o mentali o con scarsa esperienza o conoscenza
sull'uso dell'apparecchiatura, solamente se sorvegliati o se sono
stati istruiti relativamente all'uso sicuro dell'apparecchiatura
stessa e se ne hanno compreso i rischi.
▶ Tenere i bambini di età inferiore ai 3 anni lontano dal dispositivo a
meno che non siano sotto costante supervisione.
▶ I bambini non devono giocare con l'apparecchiatura.
▶ Evitare che bambini e animali si avvicinino all’apparecchiatura
mentre l’oblò è aperto.
▶ Riporre gli agenti detergenti fuori dalla portata dei bambini.
▶ Chiudere le cerniere, riparare i li allentati e fare attenzione agli
oggetti di piccole dimensioni per evitare che il bucato si impigli
all’interno. Ove necessario, servirsi di una borsa o di una retina
adeguata.
▶ Non toccare o usare l’apparecchiatura quando ci si trova a piedi
scalzi oppure quando si hanno mani o piedi umidi.
▶ Non coprire o ricoprire l’apparecchiatura in fase di funzionamen-
to o subito dopo per consentire all’umidità o al bagnato di evaporare.
▶ Non posizionare fonti di calore, oggetti pesanti o umidi sopra
l'apparecchiatura.
▶ Non usare o conservare detergenti inammabili o agenti deter-
genti asciutti nelle immediate vicinanze dell’apparecchiatura.
▶ Non usare spray inammabili nelle immediate vicinanze dell’ap-
parecchiatura.
Page 37

IT
1-Informazioni di sicurezza
AVVERTENZA!
Uso quotidiano
▶ Non lavare indumenti trattati con solventi all’interno dell’appa-
recchiatura senza averli prima asciugati all’aria.
▶ Non togliere o inserire la spina in presenza di gas inammabili
▶ Non lavare a caldo materiali in gomma schiumosa o materiali si-
mili alla spugna.
▶ Non lavare bucato sporco di farina.
▶ Non aprire il cassetto del detergente durante il ciclo di lavaggio.
▶ Non toccare l’oblò durante il processo di lavaggio: si potrebbe
surriscaldare.
▶ Non aprire l’oblò se il livello dell’acqua è visibilmente al di sopra
della nestrella dell’oblò.
▶ Non forzare l’apertura dell’oblò. L’oblò è dotato di un dispositivo
di auto-blocco e si apre poco dopo il termine della procedura di
lavaggio.
▶ Spegnere l’apparecchiatura dopo ogni programma di lavaggio
e prima di intraprendere eventuali interventi di manutenzione
routinaria, quindi scollegare l’apparecchiatura dalla sorgente di
alimentazione elettrica per risparmiare elettricità oltre che a ni
di sicurezza.
▶ Tenere la presa e non il cavo in fase di scollegamento del dispo-
sitivo.
Manutenzione / pulizia
▶ Vericare che i bambini siano supervisionati se eseguono opera-
zioni di pulizia e manutenzione.
▶ Scollegare il dispositivo dall'alimentazione elettrica prima di intra-
prendere qualsiasi intervento di manutenzione.
▶ Tenere pulita la parte bassa dell’oblò, quindi pulire l’oblò e il cas-
setto del detergente qualora il dispositivo non sia in uso al ne di
evitare i cattivi odori.
▶ Non usare acqua spray o vapore per pulire il dispositivo.
▶ Sostituire un cavo danneggiato unicamente rivolgendosi al pro-
duttore, al suo agente di servizio o a persone debitamente qualicate per evitare di correre inutili rischi.
▶ Non cercare di riparare l’apparecchiatura da soli. In caso di ripara-
zioni rimandiamo al nostro centro assistenza clienti.
5
Page 38

1-Informazioni di sicurezza
AVVERTENZA!
Installazione
▶ L’apparecchiatura dovrebbe essere collocata in un luogo ben
ventilato. Posizionare l’apparecchiatura in una zona in cui sia pos-
sibile aprire completamente l’oblò.
▶ Non installare mai l’apparecchiatura all’esterno, in un luogo umi-
do o in zone che potrebbero essere soggette a perdite d’acqua
come ad esempio vicino a un lavandino o sotto allo stesso. In
caso di perdite di acqua, togliere la corrente e lasciare che la mac-
china si asciughi in modo naturale.
▶ Installare o usare l’apparecchiatura solo quando la temperatura è
superiore ai 5 °C.
▶ Non mettere l’apparecchiatura direttamente sul tappeto o vicino
a una parete o a mobili.
▶ Non installare il dispositivo direttamente esposto alla luce del sole
o vicino a sorgenti di alimentazione (ad esempio: stufe, riscaldatori).
▶ Vericare che le informazioni elettriche sulla targhetta elettrica
siano in linea con l'alimentazione disponibile. In caso contrario,
contattare un elettricista.
▶ Non usare ciabatte e prolunghe.
▶ Vericare di utilizzare unicamente il cavo elettrico e il tubo forniti
in dotazione.
▶ Vericare di non danneggiare il cavo elettrico e la presa. Qualora
siano danneggiati, rivolgersi a un elettricista per eettuare la so-
stituzione.
▶ Servirsi di una presa con messa a terra separata per l’alimentazio-
ne che sia facilmente accessibile dopo l’installazione. L'apparec-
chiatura deve disporre di una messa a terra.
Unicamente per il Regno Unito: Il cavo di alimentazione del dispositivo è dotato di una presa a 3 poli (con messa a terra), adatta
per una normale presa a 3 poli. Non tagliare o smontare mai il ter-
zo polo (messa a terra). Dopo aver installato il dispositivo, la presa
dovrebbe essere accessibile.
▶ Vericare che i giunti e i connettori del tubo siano saldamente s-
sati e che non vi siano perdite.
IT
6
Page 39

IT
Uso previsto
Questa apparecchiatura è stata pensata per lavare unicamente capi
che possono essere lavati in lavatrice. Attenersi sempre alle istruzioni fornite sull’etichetta di ogni indumento. L’apparecchiatura è stata
progettata unicamente per un uso domestico in casa. Non è stata
pensata per un uso di tipo commerciale o industriale.
Non sono ammesse modiche o trasformazioni all'apparecchiatura.
Un uso senza interruzioni potrebbe causare pericoli e perdita del ser-
vizio di copertura della garanzia, esponendo l’utente a responsabilità.
1-Informazioni di sicurezza
7
Page 40

2-Descrizione del prodotto
Nota:
2.1 Immagine dell’apparecchiatura
Lato anteriore (Fig. 2-1): Lato posteriore (Fig. 2-2):
2-1 2-2
1
5
2
4
3
1
T3
3
2
S1
IT
-
4
65
T4
S4
S6
T2
S3
6
7
1 Cassetto detersivo / Ammorbidente
2 Visualizzazione
3 Piano di lavoro
4 Selettore del programma
5 Targhetta
6 Aletta di servizio
S2
S5
T1
1 Bulloni di trasporto (T1-T4)
2 Coperchio posteriore
3 Viti del coperchio posteriore (S1-S6)
4 Cavo di alimentazione
5 Valvola di ingresso dell’acqua
6 Valvola di ingresso dell’acqua
7 Piedini regolabili
2.2 Accessori
Controllare gli accessori e la documentazione conformemente al presente elenco (Fig.:2-3):
2-3
Scheda di
di carico
1)
garanzia
5 Tappi di
chiusura
di scarico
1)
Manuale
dell’utente
8
Page 41

IT
3-Pannello di controllo
3
.
4
1 Pulsante “
2 Selettore del programma
Premere delicatamente questo pulsante (Fig. 3-2) per
eseguire l’accensione; il display si accende e anche l’in-
dicatore del pulsante Avvio/pausa lampeggia. Premerlo
nuovamente per 2 secondi per spegnere. Qualora
nessun elemento del pannello o programma venga
attivato dopo un po’ di tempo la macchina si spegnerà
automaticamente.
Nota: Segnale acustico
Nei seguenti casi viene emesso un segnale acustico:
▶ quando viene premuto un pulsante
▶ quando viene girato il selettore programma
Il segnale acustico può essere deselezionato ove necessario: cfr. USO QUOTIDIANO.
3 Display
4 Cassetto detersivo/
5 6 7
Ammorbidente
FineExtra
5 Pulsanti funzione
6 Pulsante “Fine ritardata”
7 Pulsante “Avvio/Pausa“
▶ al termine del programma
▶ in caso di guasti
3.2 Selettore programma
Ruotando la manopola (Fig. 3-3) sarà possibile selezio-
nare uno dei 16 programmi; il LED relativo si accende e
2
3-1
1
3-2
3-3
3.3 Display
Il display (Fig. 3-4) mostra le seguenti informazioni:
▶ Tempo di lavaggio
▶
▶ Codici di errore e informazioni di servizio
3-4
9
Page 42

3-Pannello di controllo
Start/Pause
IT
3-5
3-6
Extra
Centrifuga
Temp. Steam wash
3.5.1 3.5.2 3.5.3 3.5.4 3.5.5
Nota: Impostazioni di fabbrica
3-7
3-8
risciacquo
Turbo
Fine
ritardata
3.4 Cassetto del detersivo
Aprire il cassetto, si vedono tre scomparti (Fig.
3-5) :
Scomparto 1: Solo ingresso acqua, no detersivo
Scomparto 2: Detersivo per il programma
Scomparto
: Ammorbidente, agenti condizionanti, ecc.
Per consigli sul tipo di detersivo adatto alle varie temperature di lavaggio rimandiamo al manuale del detersivo.
3.5 Pulsanti funzione
I pulsanti funzione (Fig. 3-6) consentono di eseguire
ulteriori operazioni nel programma selezionato prima
dell’inizio. Vengono visualizzati i relativi indicatori.
Spegnendo l’apparecchiatura o impostando un nuovo
programma vengono disattivate tutte le opzioni.
Qualora un pulsante abbia diverse opzioni, sarà possibile selezionare l’opzione desiderata premendo il pulsante in sequenza.
Per eliminare l’impostazione premere il pulsante fun-
opzione - la spia LED si spegne.
3.5.1-Pulsante funzione “Temp.”
temperatura di lavaggio del programma. Qualora non
si illumini nessun valore l’acqua non verrà riscaldata.
Congiuntamente al pulsante “Steam wash”, la funzione di
Temp.
Centrifuga
blocco bambini può essere accesa/spenta (cfr. BLOCCO BAMBINI).
3.5.2-Pulsante funzione “Centrifuga”
deselezionare la centrifuga del programma. Qualora
3-9
Steam wash
nessun valore si illumini il bucato non verrà sottoposto
a centrifuga.
3.5.3-Pulsante funzione “Steam wash“
Premere questo pulsante (Fig. 3-9) per attivare l’opzione
Steam Wash (vapore).
Questa opzione garantisce migliori risultati di lavaggio ed è preferibile attivarla se il bucato è
molto sporco.Quando si sceglie l’opzione Steam Wash, la temperatura predefinita è la tem-
pera tura massima del programma selezionato. Essa può essere attivata solo con i seguenti
pro grammi: Cotone, Sintetici, Misti, Baby Care, Hygienic. Quando l’opzione è attivata, il led
sop ra il pulsante si accende; premendo di nuovo questo pulsante è possibile disattivare la
funzi one e il led sopra il pulsante si spegne. Utilizzando questa opzione il tempo del lavaggio
potr ebbe estendersi.Premere contemporaneamente il pulsante “Steam Wash” e “Temp.” per
attivare/disattivare il blocco bambini (cfr. BLOCCO BAMBINI).
1
Page 43

IT
3-Pannello di controllo
3.5.4 Pulsante funzione “Extra risciacquo”
Premere questo pulsante (Fig. 3-10) per risciacquare il
bucato più intenso con acqua fresca. Questa opzione
è particolarmente consigliata per le persone con una
pelle sensibile.
Premendo il pulsante diverse volte sarà possibile selezionare da uno a tre cicli aggiuntivi. Compaiono sul display con P--1 /P--2/P--3 .
3.5.5 Funzione “Turbo“
Questa funzione consente di risparmiare tempo ed
energia. Opzione preferibile se il bucato è leggermente sporco. Premere contemporaneamente il pulsante
“Extra risciacquo" e “Fine ritardata” (Fig. 3-11) per circa
3 secondi par attivare la funzione “Turbo”; viene visualizzato SPEEd uP. Questa funzione non è disponibile in
tutti i programmi (cfr. PROGRAMMI).
3.6 Pulsante “Fine ritardata”
Premere questo pulsante (Fig. 3-12) per avviare il pro-
essere aumentata a scaglioni di 30 minuti, da 0,5-24
6:30
del ciclo del programma sarà dopo 6 ore e 30 minuti.
Premere il pulsante “Start/Pause” per attivare il ritardo
di tempo. Non è applicabile al programma Centrifuga.
Nota: Detersivo liquido
Extra
risciacquo
Extra
risciacquo
Fine
ritardata
Turbo
Fine
ritardata
3-10
3-11
3-12
3.7 Pulsante “Avvio/Pausa”
Premere questo pulsante (Fig. 3-13) delicatamente
per avviare o interrompere il programma attualmente
in fase di visualizzazione. In fase di impostazione del
programma e in fase di esecuzione dello stesso, il LED
sul pulsante lampeggia, oppure - se viene interrotto lampeggia comunque.
3.8 Blocco bambini
Premere il pulsante “Temp.” e ”Steam wash” (Fig. 3-14)
per 3 secondi contemporaneamente per bloccare tutti
gli elementi del pannello e impedirne l’attivazione. Per
lo sblocco premere nuovamente i due pulsanti.
Il display mostra cLo
pulsante quando è attivato il blocco bambini. La variazione non funziona.
I-
(Fig. 3-15) se viene premuto un
Temp.
Avvio/pausa
Centrifuga
Steam wash
3-13
3-14
3-15
11
Page 44

4-Programmi
• Sì, º Opzionale, / No
Scomparto detergente per:
Solo ingresso acqua, no detersivo
1
2 Detersivo
Ammorbidente o prodotto per
la cura degli indumenti
IT
Programma
Cotone
Sintetici
Misti
Lana
Cotone +
Sport
Jeans
Hygienic
Rapido 60
3)
min
Express
3)
15 min
Quotidiano
Baby Care
Delicati/Seta
A mano
Piumone
Centrifuga
Carico mas-
simo
in kg
9.0 * a 90
4.5 * a 60 30
4.5 * a 60 30
2.25
9.0
4.5
4.5
4.5
4.5
2.25
4.5
4.5
2.25
2.25
2.25
9.0
Temperatura
1)
in °C
gamma
selezionabile 2 1
* a 40 *
* a 90
* a 40 20
* a 60 30
* a 40 40
* a 40 *
* a 60 30
* a 90 40
* a 30 30
* a 30 30
* a 40 40
2)
30
2)
30
90 90
2)
/ /
Temp. pre-
Cotone
/
•
º
/ Tessuti sintetici o misti
•
º
Bucato misto, leggermen sporco, cotone e
/
•
º
capi sintetici
Tessuti lavabili a
/
• º
•
•
•
•
•
•
•
•
•
•
•
/ / /
macchina, in lana o con
contenuto di lana
Intimo
/
º
Indumenti sportivi
/
º
/ Jeans
º
Cotone
/
º
Bucato misto, leggermen sporco, cotone e
/
º
capi sintetici
Cotone / Sintetici
/
º
Tessuti in cotone
/
º
Cotone/Sintetici
/
º
Bucato delicato e seta
/
º
Bucato contrassegnato
/
col simbolo per il lavaggio
º
a mano
Cotone
/ /
tutti i tessuti
Velocità
centrifuga
preim-
postata
in giri/
min
1400
1200
1000
800
1000
800
1000
1000
1000
1000
1000
1000
800
400
1000
1000
Opzione
Steam wash
Extra ri-
sciacquo
• • •
• • •
• • •
/
•
• •
/
•
/
/
• •
• • •
/
•
/
•
• •
/
• • •
/
•
/
•
/
• •
/ / /
Speed up
/
/
/
/
/
/
1) Relativamente al bucato asciutto.
2) *: l’acqua non viene riscaldata (non viene illuminato nessun valore)
3) Scegliere una temperatura di lavaggio 90 °C solo per particolari requisiti igienici.
4) Ridurre il quantitativo di detersivo in quanto la durata del programma è breve.
12
Page 45

IT
5-Consumo
I valori di consumo indicati potrebbero variare a seconda delle condizioni locali.
Programma
Cotone+ *
Sintetici
Tempe-
ratura
in °C
40°C 4.5 0.50 42 4:25 53
60°C 4.5 0.55 45 4:28 53
60°C
30 4.5 0.51 56 -
Carico mas-
simo
in kg
9.0
Energia
in kWh
0.58 58 4:28 53
Acqua
in L
Tempo di
lavaggio
in h:min
Presta-
zioni di
asciuga-
tura cen-
trifuga
in %
49
Cottone+ 60°C / 40°C con impostazione velocità di centrifuga massima
I programmi standard 60°C e 40°C Cotone sono adatti per pulire bucato con un livel-
energia e acqua per il bucato in cotone. La temperatura dell’acqua usata potrebbe variare
rispetto alla temperatura del ciclo indicata.
Nota: Peso automatico
L’apparecchiatura è dotata di un sistema di riconoscimento del carico. Con un carico
piccolo, energia, acqua e tempo di lavaggio verranno ridotti automaticamente in alcuni
programmi.
13
Page 46

6-Uso quotidiano
IT
6-1
6-2
6.1 Alimentazione
Collegare la lavatrice a una sorgente di alimentazione
(da 220V a 240V~/50Hz; Fig. 6-1). Rimandiamo inoltre
alla sezione INSTALLAZIONE.
6.2 Collegamento acqua
▶ Prima di eseguire il collegamento controllare la pu-
lizia e vericare che l’ingresso dell’acqua non sia
ostruito.
▶ Aprire il rubinetto (Fig.6-2).
Nota: Ermeticità
Prima dell’uso controllare la presenza di perdite nei giunti fra il rubinetto e il tubo di in-
gresso attivando il rubinetto.
6-3
6.3 Preparazione del bucato
▶ Ordinare gli indumenti a seconda del tessuto (co-
tone, sintetici, lana o seta) e a seconda del livello di sporcizia (Fig. 6-3). Prestare attenzione alle
etichette sugli indumenti che forniscono indica-
zioni a livello di lavaggio.
▶ Separare gli indumenti bianchi da quelli colorati.
Lavare prima a mano gli indumenti colorati per
vericare che non perdano colore o si rovinino.
▶ Svuotare le tasche (chiavi, monete, ecc.) e to-
gliere gli oggetti decorativi più duri (ad esempio
spille).
▶ Gli indumenti senza orli, i capi delicati e i tessuti
delicati come ad esempio le tende sottili, vanno
messi in un apposito sacchetto pensato per questa tipologia di indumenti (il lavaggio a mano o il
lavaggio a secco sarebbero due opzioni migliori).
▶ Chiudere cerniere, chiusure in velcro e gancetti,
vericare che i bottoni siano saldamente cuciti.
▶ Mettere i capi più particolari, ad esempio quelli
senza orlo, oppure quelli delicati (intimo) e quelli
piccoli come ad esempio calzini, cinghie, reggiseni, ecc. all’interno di un sacchetto da lavaggio.
▶ Srotolare i pezzi più grandi di tessuto quali ad
esempio lenzuola, copriletto, ecc.
▶ Capovolgere i jeans i tessuti stampati, decorati
o particolarmente carichi di colore; se possibile,
lavare separatamente.
14
ATTENZIONE!
Gli articoli non in tessuto, come anche quelli piccoli, slacciati o con estremità appuntite
potrebbero causare anomalie di funzionamento e danni sia agli indumenti che alle apparecchiature.
Page 47

IT
Tabella per prendersi cura degli indumenti
Lavaggio
Lavabile no a 95°C
lavaggio normale
Lavabile no a 40°C
lavaggio normale
Lavabile no a 30°C
lavaggio normale
Lavaggio a mano
max. 40°C
Candeggio
Qualsiasi candeg-
giante è consentito
Asciugatura
Asciugare normalmente
in asciugatrice
Asciugatura su lo da
bucato
Stiro
S
tirare a una temperatura massima
di 200 °C
Non stirare
Cura professionale per vostri tessuti
Lavaggio a secco con
tetracloroetene
Lavaggio a secco
professionale
Lavabile no a 60°C
lavaggio normale
Lavabile no a 40°C
lavaggio delicato
Lavabile no a 30°C
lavaggio delicato
Non lavare
Solo ossigeno/
non -cloro
Asciugare in asciugatrice
con il programma
delicato
Asciugatura in piano
tirare a una tempe-
S
ratura massima
150°C
Lavaggio a secco
con idrocarburi
Non eseguire lavag-
gio a secco professionale
6-Uso quotidiano
Lavabile no a 60°C
lavaggio delicato
Lavabile no a 40°C
lavaggio molto
delicato
Lavabile no a 30°C
lavaggio molto
delicato
Non candeggiare
Non asciugare in
asciugatrice
tirare a una tempe-
S
ratura bassa massima di 110 °C; senza
vapore (lo stiro a vapore potrebbe causare danni irreversibili)
Non lavare a secco
6.4 Caricamento dell’apparecchiatura
▶ Inserire il bucato, un pezzo alla volta
▶ Non sovraccaricare. Si prega di notare che il carico massimo varia a seconda dei pro-
grammi! Regola per il carico massimo: Lasciare uno spazio libero di quindici cm circa fra il
carico e la parte superiore del cestello.
▶ Chiudere l’oblò facendo attenzione. Vericare che non vi siano degli indumenti che
ostruiscono.
15
Page 48

6-Uso quotidiano
6.5 Selezionare il detersivo
▶
usato.
▶ Servirsi unicamente di detersivi approvati per essere usati all’interno di lavatrici.
▶
lana.
▶ Attenersi sempre alle indicazioni fornite dal produttore del detersivo.
▶ Non usare agenti detergenti secchi come ad esempio tricloroetilene e prodotti simili.
Scegliere il detergente migliore
Tipo di detergente
Quotidiano Colore Delicati Speciale Ammorbiden-
Programma
Cotone
Sintetici L/P L/P L - o
L/P L/P - - o
IT
te
Misti
Lana
Cotone +
Sport
Jeans
Hygienic
Rapido L L - - o
Express 15 min
Quotidiano L/P L/P L - o
Baby Care
Delicati/Seta - - L - o
A mano - - - L o
Piumone
L/P L/P - - o
- - - L o
L/P L/P - - o
- - - L o
L/P L/P L - o
L/P L/P L - o
L L - - o
L/P L/P - - o
L/P - - L -
L = detergente gel-/liquido P = detergente in polvere O = opzionale _ = no
Consigliamo di usare:
▶ Polvere per il bucato: da 20°C a 90°C* (miglior utilizzo: 40-60°C)
▶ Detersivo per i colori: da 20°C a 60°C (miglior utilizzo: 30-60°C)
▶ Detergente Lana/delicati: da 20°C a 30°C (= miglior uso:)
* Scegliere una temperatura di lavaggio 90°C solo per particolari requisiti igienici.
16
Page 49

IT
Start/Pause
6-Uso quotidiano
6.6 Aggiunta di detersivo
1. Far fuoriuscire il cassetto del detersivo.
2. Mettere le sostanze chimiche necessarie all’in-
terno degli scomparti corrispondenti (Fig. 6-3)
3. Spingere nuovamente all’interno il cassetto.
Nota:
▶ Togliere i residui di detersivo prima del ciclo di lavaggio successivo dal cassetto del
detergente.
▶ Non usare in modo eccessivo detergenti o ammorbidenti.
▶ Attenersi alle istruzioni fornite sulla confezione del detergente.
▶ Riempire sempre con detergente prima dell’inizio del ciclo di lavaggio.
▶ Il detergente liquido concentrato dovrebbe essere diluito prima di essere aggiunto
nello scomparto 2.
▶ L’uso migliore per il detergente liquido prevede di usare una palla di dosaggio, messa
insieme al bucato all’interno della lavatrice.
▶
▶ Scegliere con attenzione le impostazioni del programma a seconda dei simboli sulle
etichette del bucato e conformemente alla tabella programma.
6.7 Accendere l’apparecchiatura
recchiatura (Fig. 6-4). Il LED del pulsante “Avvio/Pausa”
lampeggia.
6.8 Selezionare un programma
Per ottenere risultati di lavaggio impeccabili, selezionare un programma che si adatti al livello di sporcizia,
e al tipo di bucato.
Ruotare la manopola del programma (Fig. 6-5) per
selezionare il programma giusto. Il LED del programma relativo di accende e vengono visualizzate le im-
-
6-3
6-46-5
Nota: Rimozione odori
Prima di iniziare a usare il dispositivo consigliamo di usare il programma Hygienic senza
carico e un po’ di detersivo nello scomparto del detersivo (2) oppure un detersivo particolare per togliere i residui che potrebbero causare danni.
6.9 Aggiungere singole opzioni
Selezionare le opzioni e le impostazioni richieste (Fig.
6-5);
rimandiamo al PANNELLO DI CONTROLLO.
Centrifuga
Temp. Steam wash
Extra
risciacquo
Turbo
Fine
ritardata
6-6
17
Page 50

6-Uso quotidiano
IT
6-7
Avvio/pausa
6.10 Avviare il programma di lavaggio
Premere il pulsante “Avvio/Pausa“ (Fig. 6-7) per avviare. Il LED del pulsante “Avvio/Pausa” smette di lampeg-
L’apparecchiatura opera conformemente alle impo-
lando il programma.
6.11 Interrompere - annullare il programma di lavaggio
Per interrompere un programma in funzione premere delicatamente il pulsante “Start/
Pause”. Il LED sopra al pulsante lampeggia. Premerlo nuovamente per riprendere il funzionamento.
Per annullare un programma di lavaggio e tutte le sue opzioni.
1. Premere il pulsante “Start / Pause” per interrompe
2.
3. Eseguire il programma CENTRIFUGA e selezionare “no Speed” (tutte le spie sono
spente) per scaricare l’acqua.
4. Selezionare un nuovo programma, quindi avviarlo.
re il programma in funzione.
6.12 Dopo il lavaggio
1.
2. L’apparecchiatura si spegne automaticamente.
3. Togliere il bucato non appena possibile in modo delicato, evitando così che si increspi
4. Spegnere l’alimentazione di acqua.
5. Togliere il cavo di alimentazione.
6. Aprire l’oblò per evitare la formazione di umidità e cattivi odori. Lasciarlo aperto men-
Nota: Blocco oblò
▶ Per ragioni di sicurezza l’oblò della lavatrice viene di norma parzialmente bloccato du-
aver annullato correttamente il programma (cfr. descrizione più sopra).
▶ In caso di elevato livello dell’acqua, temperatura dell’acqua elevata e in fase di centri-
fuga non sarà possibile aprire l’oblò; viene visualizzato il simbolo Loc1-
End.
ulteriormente.
tre l’apparecchiatura non è in funzione.
-
Nota: Modalità Standby / Modalità di risparmio energetico
L’apparecchiatura accesa passa in modalità standby se non viene attivata entro 2 minuti prima dell’avvio del programma oppure al termine del programma stesso. Il display si
spegne. Ciò consente di risparmiare energia. Per interrompere la modalità standby premere il pulsante “ON/OFF”.
6.13 Attivare o disattivare il segnale acustico
Il segnale acustico può essere deselezionato ove necessario:
1. Accendere l’apparecchiatura.
2. Selezionare il programma CENTRIFUGA.
3. Premere contemporaneamente il pulsante “Fine ritardata” e il pulsante “Extra risciacquo”, quindi tenerli premuti per circa 3 secondi. “
gnale acustico viene disattivato.
Per attivare il segnale acustico premere questi nuovamente questi due pulsanti. “ PEEb
ON” viene visualizzato.
18
bEEP OFF
” viene visualizzato e il se -
Page 51

IT
Uso rispettoso nei confronti dell’ambiente
▶ Per sfruttare al meglio l’energia, l’acqua, il detergente e il tempo consigliamo di atte-
nersi alle indicazioni relativamente al carico massimo.
▶ Non sovraccaricare (lasciare lo spazio di una mano sopra al bucato).
▶ Per indumenti leggermente sporchi, selezionare il programma di Lavaggio Rapido.
▶ Applicare dosaggi esatti per ogni lavaggio.
▶ Scegliere la temperatura di lavaggio adeguata più bassa possibile - i detergenti mo-
derni sono già ecaci a temperature inferiori ai 60°C.
▶ Alzare i valori predeniti solo in caso di elevato livello di sporco.
▶ Selezionare la velocità di centrifuga massima qualora venga asciugata un’asciugatri-
ce domestica.
7-Lavaggio rispettoso dell’ambiente
19
Page 52

8-Cura e pulizia
IT
8-1
1
8-2
8-3 8-4
8-5
8.1 Pulizia del cassetto detersivo
2
Pulire il cassetto a intervalli regolari (Fig. 8-1):
1.
2. Premere il pulsante di rilascio, quindi rimuovere il
cassetto.
3.
pulito, quindi reinserire il cassetto nell’apparecchiatura.
8.2 Pulizia dell’apparecchiatura
▶ Scollegare la macchina durante le operazioni di
pulizia e manutenzione.
▶ Servirsi di un panno morbido con un detergente
liquido per pulire l’alloggiamento della macchina
(Fig. 8-2) e le componenti in gomma.
▶ Non usare agenti chimici organici o solventi cor-
rosivi.
valvola di ingresso
Per evitare blocchi dell’alimentazione dell’acqua causati da sostanze solide come ad esempio la calce, pu-
dell’acqua
▶ Scollegare il cavo di alimentazione e chiudere
l’alimentazione idrica.
▶ Svitare il tubo di ingresso dell’acqua sulla parte
posteriore (Fig. 8-3) dell’apparecchiatura oltre
che sul rubinetto.
▶
8-4).
▶
8.4 Pulizia del cestello
▶ Togliere le componenti metalliche lavate per sba-
glio, come ad esempio spille, monete, ecc, dal cestello (Fig. 8-5) dato che causano macchine di ruggine e danni.
▶ Servirsi di un detergente senza cloro per la rimozio-
ne delle macchie di ruggine. Osservare i segnali di
avvertenza del produttore dell’agente detergente.
▶ Non usare oggetti pesanti o lana di roccia per le
Per interventi di manutenzione regolare consigliamo di avviare il programma Hygienic
senza carico per eliminare i possibili residui danni con cadenza trimestrale. Aggiungere
un po’ di detersivo nello scomparto dell detersivo(2) - oppure usare un detersivo speciale.
20
Nota: Igiene
operazioni di pulizia.
Page 53

IT
8-Cura e pulizia
8.5 Lunghi periodi di inutilizzo
Qualora l’apparecchiatura non venga usata per periodi
più lunghi:
1. Togliere la spina elettrica (g. 8-6).
2. Spegnere l’alimentazione idrica (Fig. 8-7).
3. Aprire l’oblò per evitare la formazione di umidità e
cattivi odori. Lasciare aperto l'oblò quando la macchina non è in funzione.
Prima dell’uso successivo controllare con attenzione il
cavo di alimentazione, la linea di ingresso dell’acqua e il
tubo di scarico. Vericare che tutto sia installato correttamente e che non vi siano perdite.
Nota: Igiene
Dopo lunghi periodi di inutilizzo, consigliamo di usare il programma Hygienic senza cari-
co e un po’ di detersivo nello scomparto dell’agente di lavaggio (2) oppure un detersivo
particolare per togliere i residui che potrebbero causare danni.
8.6 Filtro della pompa
Pulire il ltro una volta al mese e controllare il ltro della
pompa per vericare se il dispositivo:
▶ non scarica l’acqua.
▶ non gira.
▶ causa rumori anomali in fase di funzionamento.
AVVERTENZA!
Attenzione! Rischio di scottatura! L’acqua all’interno
del ltro della pompa può essere molto calda! Prima
di agire vericare che l’acqua si sia rareddata.
8-6 8-7
8-8
8-10 8-11
8-9
1. Spegnere e scollegare la macchina (Fig. 8-8).
2. Aprire l’aletta di servizio. Sarà possibile usare una
moneta o un cacciavite (Fig. 8-9).
3. Fornire un contenitore piatto per raccogliere l’acqua
(Fig. 8-10). Il quantitativo di acqua potrebbe esse-
re importante!
4. Estrarre il tubo di scarico e tenere l’estremità so-
pra al contenitore (Fig. 8-10).
5. Estrarre il tappo-guarnizione dal tubo di scarico
(Fig. 8-10).
6. Dopo aver completato lo scarico, chiudere il tubo
di scarico (Fig. 8-11) e spingerlo nuovamente
all’interno dell’apparecchiatura.
7. Svitare e togliere in senso anti-orario il ltro della
pompa (Fig. 8-12).
8. Eliminare contaminanti e sporcizia (Fig. 8-13).
8-12
8-13
21
Page 54

8-Cura e pulizia
IT
8-14 8-15
ATTENZIONE!
▶ La guarnizione del ltro della pompa deve essere pulita e non danneggiata. Qua-
lora il coperchio non sia completamente chiuso, l’acqua potrebbe fuoriuscire.
▶ Il ltro deve essere in posizione, oppure potrebbe portare a perdite.
9. Pulire con attenzione il ltro della pompa, ad
esempio servendosi di acqua di rubinetto (Fig.
8-14).
10. Fissarlo nuovamente in modo completo (Fig.
8-15).
11. Chiudere l’aletta di servizio.
22
Page 55

IT
9-Guida alla risoluzione dei problemi
caso di problemi controllare tutte le possibilità indicate e attenersi alle seguenti istruzioni
prima di contattare il servizio post vendita. Cfr. ASSISTENZA CLIENTI.
AVVERTENZA!
▶ Prima di eseguire qualunque intervento di manutenzione, spegnere l'apparecchio ed
estrarre la spina dalla presa.
▶ Gli interventi di manutenzione sulla strumentazione elettrica vanno eseguiti unica-
mente da elettricisti esperti, dato che l’esecuzione di riparazioni in modo non adeguato può causare gravi danni alla strumentazione.
▶ Un cavo di alimentazione danneggiato va sostituito unicamente dal produttore, dal
9.1 Codici informativi
I seguenti codici vengono visualizzati unicamente per informazioni relative al ciclo di lavaggio. Non è richiesto nessun intervento.
Codice Messaggio
:
25
1
:
6 30
/
P--1 2/3
End
cLo1-
LocI-
bEEP OFF
bEEP ON
SPEEd uP
Il tempo del ciclo di lavaggio restante sarà di 1 ora e 25 minuti
sarà di 6 ore e 30 minuti
Vengono scelti 1/2/3 risciacqui aggiuntivi (cfr. i PULSANTI FUNZIONE “Extra
risciacquo”).
Il ciclo di lavaggio è concluso. L’apparecchiatura si spegne automaticamente.
La funzione blocco bambini è attivata
L’oblò viene chiuso dato l’elevato livello dell’acqua, la temperatura dell’acqua elevata o il ciclo di centrifuga.
Il segnale acustico è disattivato
Il segnale acustico è attivato
La funzione “Turbo” è attivata
9.2 Guida alla risoluzione dei problemi con codice display
Problema Causa Soluzione
FA
FC1
FC2
UnB
oppure
• Sensore livello acqua.
• Errore di comunicazione anomalo
• Carico non equilibrato • Controllare ed equilibrare il carico del bucato
• Contattare il servizio post-vendita.
• Contattare il servizio post-vendita.
all’interno del cestello. Ridurre il carico.
23
Page 56

9-Guida alla risoluzione dei problemi
Problema Causa Soluzione
IT
E1
E2
E4
E8
F3
F4
F7
• Errore di scarico, l’acqua non è completamente scaricata dopo 6 minuti
• Blocco - errore. • Chiudere correttamente l’oblò.
• Livello dell’acqua non raggiunto dopo
8 minuti.
• Il tubo di scarico si sta svuotando da solo
mediante sifone.
• Livello di protezione acqua • Contattare il servizio Post vendita.
• Sensore di temperatura • Contattare il servizio post-vendita.
• Errore di riscaldamento
• Motore • Contattare il servizio post-vendita.
• Pulire il ltro della pompa.
• Controllare l’installazione del tubo di
scarico.
• Vericare che il rubinetto sia completamente
aperto e che la pressione dell’acqua sia nor-
male.
• Controllare l’installazione del tubo di scarico.
• Contattare il servizio post-vendita.
9.3 Guida alla risoluzione dei problemi senza codice display
Problema Causa Soluzione
La lavatrice non funziona.
La lavatrice non viene riempita di ac-
qua.
La macchina scarica
mentre è in fase di
riempimento.
Guasto del sistema
di scarico.
24
• Il programma non è ancora partito. • Controllare il programma, quin-
• L’oblò non è stato chiuso corretta-
mente.
• La macchina non è stata accesa. • Accendere la macchina.
• Guasto di alimentazione. • Controllare l’alimentazione.
• Il blocco bambini è attivato. • Disattivare il blocco bambini.
• Assenza di acqua. • Controllare il rubinetto dell’ac-
• Il tubo di ingresso è piegato. • Controllare il tubo di ingresso.
• Il ltro del tubo di ingresso è bloc-
cato.
• La pressione dell’acqua è inferiore a
0.03 MPa.
• L’oblò non è stato chiuso correttamente.
• Guasto dell’alimentazione dell’ac-
qua.
• L’altezza del tubo di scarico è inferiore
agli 80 cm.
• L’estremità del tubo di scarico arriva nell’acqua.
• Il tubo di scarico è bloccato. • Sbloccare il tubo di scarico.
• Il ltro della pompa è bloccato. • Pulire il ltro della pompa.
• L’estremità del tubo di scarico è superiore di 100 cm rispetto al livello del
pavimento.
di avviarlo.
• Chiudere correttamente l’oblò.
qua.
• Sbloccare il ltro del tubo di in-
gresso.
• Controllare la pressione dell’ac-
qua.
• Chiudere correttamente l’oblò.
• Controllare che l’alimentazione
dell’acqua funzioni corretta-
mente.
• Vericare che il tubo di scarico
sia installato correttamente.
• Vericare che il tubo di scarico
non sia immerso in acqua.
• Vericare che il tubo di scarico
sia installato correttamente.
Page 57

IT
Problema Causa Soluzione
Forti vibrazioni mentre la centrifuga è in
corso.
Il funzionamento si
interrompe prima
del completamento
del ciclo di lavaggio.
Il funzionamento si
interrompe per alcuni momenti.
C’è troppa schiuma
galleggiante nel ce-
stello e/o nel cassetto
del detergente.
Regolazione auto-
matica del tempo di
lavaggio.
La centrifuga non va
a buon ne.
Risultati di lavaggio
non soddisfacenti.
Sul bucato ci sono
residui del detersivo
in polvere.
Il bucato presenta
delle chiazze di colore grigio.
9-Guida alla risoluzione dei problemi
• Non sono stati rimossi i bulloni di
trasporto.
• L’apparecchiatura non ha una posizione solida.
• Il carico della macchina non è corretto.
• Guasto acqua o guasto elettrico. • Controllare l’alimentazione di
• L’apparecchiatura visualizza il codi-
ce di errore.
• Problema dovuto allo schema di
carico.
• Il programma esegue un ciclo di ammollo.
• Il detersivo non è adeguato. • Controllare le istruzioni del de-
• Uso di un quantitativo eccessivo di
detergente.
• Verrà regolata la durata del programma di lavaggio.
• Sbilanciamento del carico. • Controllare il carico della mac-
• Il livello di sporcizia non è conforme
al programma selezionato.
• La quantità di detergente non era
suciente.
• Il carico massimo è stato superato. • Ridurre il carico.
• Il bucato non è stato distribuito in
modo uniforme all’interno del cestello.
• Le particelle insolubili di detergente
possono ri-presentarsi come puntini bianchi sul bucato.
• Queste chiazze sono causate da
grassi quali ad esempio olio, panna
o pomate.
• Togliere tutti i bulloni di trasporto.
• Vericare che l’apparecchiatura sia
saldamente appoggiata in piano e
che sia a bolla.
• Controllare il peso e il bilanciamento del carico.
corrente e l’alimentazione idrica.
• Prendere in considerazione i
codici di errore.
• Ridurre o regolare il carico.
• Annullare il programma e riavviare.
tergente.
• Ridurre il quantitativo di detergente.
• Questo è normale e non inuisce sulle funzionalità dell’appa-
recchiatura.
china e del bucato ed eseguire
nuovamente il programma di
centrifuga.
• Selezionare un altro programma.
• Scegliere il detergente a secon-
da del livello di sporcizia, e in linea con le speciche tecniche
del produttore.
• Ammorbidire il bucato.
• Eseguire un ulteriore risciac-
quo.
• Provare a spazzolare via i punti
bianchi dal bucato.
• Scegliere un altro detergente.
• Pre-trattare il bucato con un
detergente speciale.
.
25
Page 58

9-Guida alla risoluzione dei problemi
IT
Qualora compaiano nuovamente i messaggi di errore dopo aver intrapreso le misure necessarie, spegnere l’apparecchiatura, scollegare l’alimentazione e contattare l’assistenza
clienti.
Nota: Formazione di schiuma.
Se durante il ciclo di centrifuga si forma troppa schiuma, il motore si ferma e la pompa di
scarico viene attivata per 90 secondi. Se l’eliminazione della schiuma non va a buon ne
per 3 volte consecutive, il programma si conclude senza centrifuga.
9-1
A
9.4 In caso di guasto all‘alimentazione
Il programma attuale, e le relative impostazioni, verranno salvate. Quando viene ripristinata l’alimentazione, l’apparecchiatura inizia nuovamente a funzionare.
In caso di guasto di alimentazione durante l’esecuzione del programma il meccanismo di apertura dell’oblò
è bloccato meccanicamente. Se il bucato deve essere tolto, il livello dell’acqua non deve essere visibile
dall’oblò. - Pericolo di ustioni!
▶ Abbassare il livello dell’acqua a seconda dei pas-
saggi da 1 a 6 del capitolo CURA E PULIZIA (FILTRO
DELLA POMPA).
▶ Tirare le leva (A) sotto all’aletta di servizio (Fig. 9-1)
no a che l’oblò non si sblocca con un clic delicato.
▶ Fissare tutte le componenti e chiudere l’aletta di
servizio.
26
Page 59

IT
10-Installazione
10.1 Procedimento
▶
Estrarre il dispositivo dall'imballaggio.
▶
Togliere tutti i materiali dell’imballaggio, la base in polistirene, e tenere il tutto
fuori dalla portata dei bambini. In fase di apertura della confezione, sul
sacchetto e sull’oblò si potrebbero vedere delle goccioline di acqua. Si tratta di
un fenomeno normale dovuto ai collaudi eseguiti in fabbrica.
Conservare tutti i materiali dell'imballaggio fuori dalla portata dei bambini e smaltirli in
modo rispettoso dell'ambiente.
Nota: Smaltimento dell’imballaggio
10.2 Eliminare i bulloni di trasporto
le componenti e proteggerle dalle vibrazioni all’interno
-
re danni interni.
Togliere il coperchio posteriore (Fig. 10-1).
1.
2. Togliere i 4 bulloni sul lato posteriore ed estrarre
i distanziatori in plastica (A) dal lato interno della
macchina (Fig. 10-2).
10-210-1
A
27
Page 60

10-Installazione
IT
10-3
Tenere i bulloni di trasporto in una posizione sicura per poterli riutilizzare in seguito.
Quando l’apparecchiatura deve essere spostata, come prima cosa procedere alla re-installazione dei bulloni.
Nota: Conservare in un luogo sicuro
10-4
3. Riposizionare il coperchio posteriore inserendolo
nei due fori, con la convessità rivolta all’esterno
(Fig. 10-3).
4. Riempire i fori rimasti con tappi di chiusura (Fig.
10-4).
10.3 Spostamento dell’apparecchiatura
Se l’apparecchiatura deve essere spostata in un luogo lontano, riposizionare i bulloni di
1. Togliere i tappi di chiusura.
2. Togliere il coperchio posteriore
3. Inserire i distanziatori in plastica e i bulloni di trasporto.
4. Serrare i bulloni con una chiave.
5. Riposizionare il coperchio posteriore.
10-5
10.4 Regolazione dei piedini
Regolare tutti i piedini (Fig. 10-5) per ottenere una posizione di perfetto equilibrio. In questo modo le vibrazioni e il conseguente rumore in fase di utilizzo, verranno ridotti al minimo. Verrà inoltre ridotta l’usura dei
materiali. Consigliamo di usare una bolla per eseguire
le regolazioni. Il pavimento dovrebbe essere quanto più
stabile e in piano.
1. Allentare il dado di blocco (1) servendosi di una
chiave inglese.
2. Regolare l’altezza ruotando i piedini (2).
3. Serrare il dado di blocco (1) contro l’alloggiamento.
28
Page 61

IT
10-Installazione
10.5 Collegamento dello scarico dell’acqua
Fissare il tubo di scarico dell’acqua in modo corretto alle tubazioni. Il tubo deve raggiungere un’altezza compresa fra 80 e 100 cm dal pavimento. Ove possibile, tenere sempre il
Sarà possibile eseguire i seguenti collegamenti:
10.5.1 Tubo di scarico al lavandino
10.5.2 Collegamento del tubo di scarico all’acqua di
scarico
10.5.3
lavandino
AVVERTENZA!
▶ Servirsi unicamente del set di tubi fornito in dotazione per eseguire il collegamento.
▶ Non riutilizzare mai set di tubi vecchi!
▶ Collegare unicamente ad alimentazioni di acqua fredda.
▶
10-7
▶ Sospendere il tubo di scarico col supporto a U
sull’estremità di un lavandino di dimensioni ade-
guate(fig.10-6).
▶ Proteggere quanto basta il supporto a U per im-
pedirne lo scivolamento.
▶ Il diametro interno del tubo di scarico deve come
minimo essere 40 mm.
▶ Mettere il tubo di scarico per circa 80 mm all’in-
terno del tubo dell’acqua di scarico.
▶ Fissare il supporto a U e tenerlo saldamente in
posizione (Fig. 10-7).
▶ La giunzione deve avvenire sopra al sifone
▶ Viene di norma usato un collegamento a tappo,
chiuso da un cuscinetto (A). Togliere per evitare
eventuali malfunzionamenti (Fig. 10-8).
▶ Fissare il tubo di scarico con una fascetta.
10-6
10-8
ATTENZIONE!
▶
perdite. Qualora il tubo di scarico venga posizionato a terra, oppure se il tubo si trova a
un’altezza inferiore agli 80 cm, la lavatrice continuerà a scaricare in fase di riempimento (autosifonaggio).
▶ Il tubo di scarico non va allungato. Ove necessario, contattare il servizio post-vendita.
29
Page 62

10-Installazione
IT
10-1010-9
Nota: Sistema di interruzione acqua (Aquastop):
stop protegge dalle perdite di acqua riducendo automaticamente la fornitura di acqua in
caso di tubi con delle perdite. Ciò è indicato da un indicatore rosso (C). Sarà necessario
provvedere alla sostituzione del tubo.
10-11
10.6 Collegamento all’acqua fredda
1. Collegare il tubo di ingresso dell’acqua con
l’estremità ad angolo all’apparecchiatura (Fig.
10-9). Serrare il giunto a vite con una mano.
2. Collegare l’altra estremità a un rubinetto
10-12
10.7 Collegamento Elettrico
▶ la sorgente di alimentazione, la presa e il fusibile
siano adeguati alla targhetta informativa.
▶ la presa di alimentazione sia dotata di messa a terra
e non vengano usate ciabatte o prolunghe.
▶ il cavo di alimentazione e la presa siano conformi a
quanto indicato.
▶ Solo per il Regno Unito: La spina del Regno Unito
soddisfa lo standard BS1363A.
Inserire la spina nella presa (Fig. 10-11).
AVVERTENZA!
▶
▶ Fare attenzione ed evitare che queste componenti vengano schiacciate, piegate o
attorcigliate.
▶ Se il cavo di alimentazione è danneggiato, deve essere sostituito dall’agente di servi-
30
Nota: Igiene
Dopo ogni installazione o dopo lunghi periodi di inutilizzo, prima di iniziare a usare il dispositivo e per interventi di normale manutenzione, consigliamo di usare il programma
HYGIENIC senza carico e un po’ di detersivo nello scomparto del detersivo (2) oppure
un detersivo particolare per togliere i residui che potrebbero causare danni.
Page 63

IT
11-Dati tecnici
11.1 Scheda prodotto conformemente alla normative UE numero 1061/2010
Nome del fornitore o marchio commerciale Haier
HW90-B14636
Capacità nominale (kg)
9
A+++
Consumo energetico all’anno (AE in kWh/anno)
C
Consumo energetico del programma standard cotone
60 °C pieno carico (kWh/ciclo)
Consumo energetico del programma standard cotone
60 °C, carico parziale (kWh/ciclo)
Consumo energetico del programma standard cotone
40 °C, carico parziale (kWh/ciclo)
1)
124
0,58
0,57
0,49
0.50
Consumo di corrente ponderato della modalità
“lasciata accesa” (W)
Consumo idrico all’anno (AW in L/anno)
Classe energetica dell’asciugatura mediante centrifu-
3)
ga
C
Velocità di centrifuga massima (giri/min)
Contenuto di umidità restante (%)
Programma standard Cotone 60°C
Programma standard Cotone 40°C
2)
4)
4)
5)
5)
Cotone +
+
Cotone
+
0,55
10200
B
1400
53
centrifuga max.
60°C +
+ 40°C + centrifuga max.
Tempo del programma cotone 60°C pieno carico (min) 268
Tempo del programma cotone 60°C carico parziale
(min)
Tempo del programma cotone 40°C carico parziale
(min)
Durata della modalità “lasciata accesa” (TI in min)
Rumore acustico trasmesso dall’aria (lavaggio/centri-
fuga) in dB(A) re 1pW
7)
6)
Tipo
268
265
non applicabile
53/73
indipendente
1) Sulla base di 220 cicli di lavaggio standard per programmi cotone a 60°C e 40°C e carico pieno
dipenderà dalla modalità d’uso.
2) Sulla base di 220 cicli di lavaggio standard per programmi cotone a 60 °C e 40 °C e carico pieno
.
3)
4) Sulla base del programma standard cotone 60 °C a pieno carico e il programma standard cotone
40 °C con carico parziale.
5) Il “programma cotone Standard 60 °C” e il “programma cotone standard 40 °C” sono programmi
di lavaggio standard ai quali si riferiscono le informazioni nell’etichetta e nella scheda. Questi
programmi sono adatti per pulire indumenti con livello di sporcizia medio; sono i programmi più
.
6) Qualora vi sia un sistema di gestione della corrente.
7) Sulla base del programma standard cotone 60°C a pieno carico.
31
Page 64

11-Datitecnici
11.2 Dati tecnici aggiuntivi
HW90-B14636
Dimensioni (HxLxP in mm) 850x595x550
Tensione in V 220-240 V~/50Hz
IT
Corrente in A
Potenza max in W 2000
Pressione dell’acqua in MPa
Peso netto in kg 72
11.3 Standard e Direttive
Questo prodotto soddisfa i requisiti di tutte le direttive CE applicabili con i corrispondenti
standard armonizzati, il che gli conferisce la marcatura CE.
10
0.03≤P ≤1
32
Page 65

IT
Consigliamo di fare riferimento alla nostra Assistenza Clienti Haier; consigliamo inoltre di
servirsi di componenti originali.
In caso di problemi col dispositivo, controllare come prima cosa la sezione GUIDA ALLA
RISOLUZIONE DEI PROBLEMI.
Qualora non fosse possibile trovare una soluzione, contattare
▶ il proprio rivenditore locale
▶ l’area Assistenza & Supporto su www.haier.com dove è possibile trovare numeri di
telefono e Domande Frequenti e da dove è possibile attivare la richiesta di intervento.
Per contattare il nostro Servizio, vericare di disporre dei seguenti dati.
Le informazioni si trovano sulla targhetta.
Modello ____________________ Numero seriale _____________________
Consigliamo inoltre di controllare la Scheda Garanzia fornita in dotazione col prodotto
qualora si debba fare ricorso alla garanzia.
Per richieste commerciali generiche indichiamo qui di seguito i nostri indirizzi in Europa:
Indirizzi Haier europei
12-Assistenza clienti
Paese* Indirizzo postale Paese* Indirizzo postale
Haier Europe Trading SRL
Italia
Spagna
Portogallo
Germania
Austria
Regno
Unito
*Per ulteriori informazioni rimandiamo a www.haier.com
Via De Cristoforis, 12
21100 Varese
ITALIA
Haier Iberia SL
Pg. Garcia Faria, 49-51
08019 Barcellona
SPAGNA
Haier Germania GmbH
Hewlett-Packard-Str. 4
D-61352 Bad Homburg
GERMANIA
Haier Appliances Regno Unito
Co.Ltd.
One Crown Square
Church Street East
Woking, Surrey, GU21 6HR
Regno Unito
Francia
Belgio-FR
Belgio-NL
Paesi Bassi
Lussemburgo
Polonia
Repubblica
Ceca
Ungheria
Grecia
Romania
Russia
Haier Francia SAS
3-5 rue des Graviers
92200 Neuilly sur Seine
FRANCIA
Haier Benelux SA
Anderlecht
Route de Lennik 451
BELGIO
Haier Polonia Sp. zo.o.
Al. Jerozolimskie 181B
02-222 Varsavia
POLONIA
33
Page 66

0020508374J
 Loading...