

Page 1

Delay
Power
Heavy
Sport wash
Quick
Spin
Wash
Rinse
Spin
Temp.
Speed
Auto
Silk
Wool
Synthetic
Memory
Cotton
Start/Pause
Press and hold 2seconds
to set door unlocked
Delicate
Silent
Se lf -c le an
Strong wash
Pre-wash
Soak
AutomAtic Drum WAshing mAchine
USER MANUAL
HW70 -I1286
HW80 -I1486
Page 2
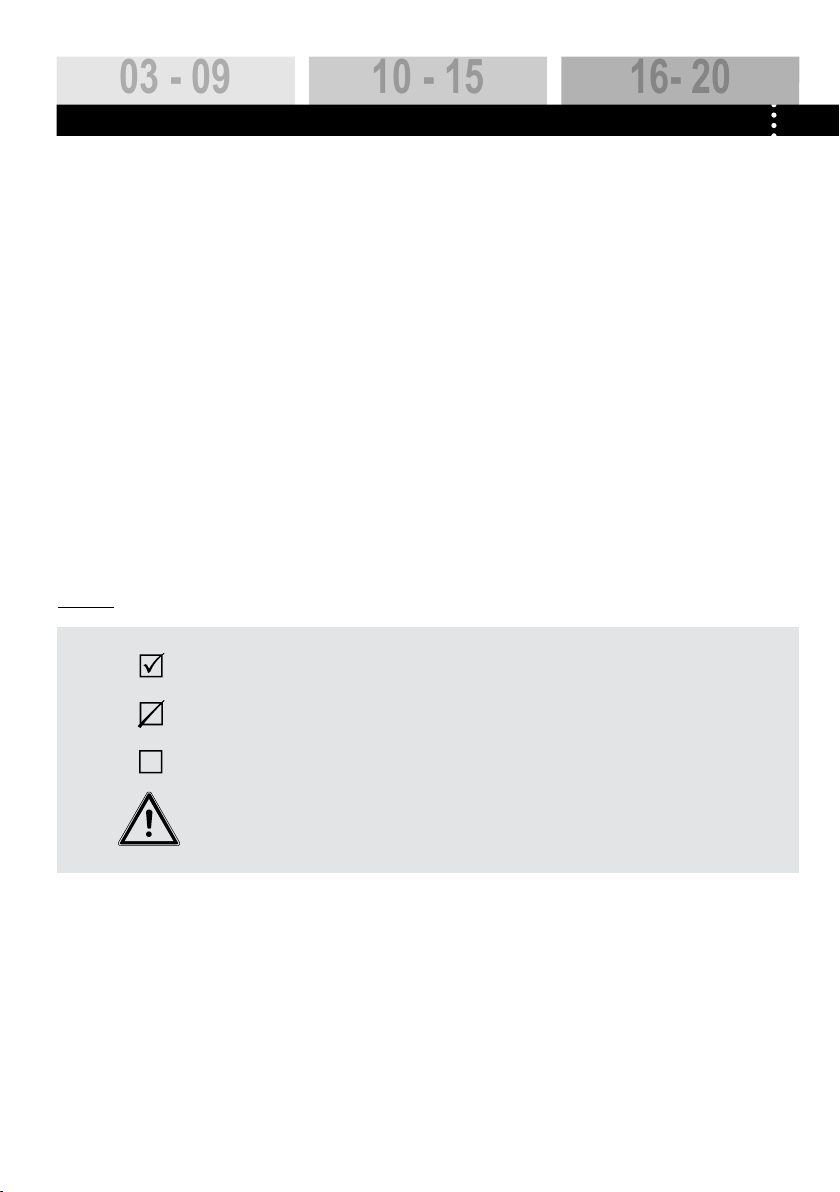
tAble of contents
03 - 09
10 - 15
16- 20
before use using the AppliAnce MAINTENANCE
COMPONENTS> ............................... 03
PREPARATION> ................................04
SAFETY INSTRUCTIONS> ................... 05
INSTALLATION> ................................ 06
CONTROL PANEL> ............................ 08
LEGEND
Yes
No
Optional
PROGRAM SELECTION> ..................... 10
CONSUMPTION AND TECHNICAL DATA> ..
WASHING METHODS> ...................... 12
CLEANING & CARE> .......................... 16
DISPLAY CODES> ............................. 18
TROUBLESHOOTING> ........................ 19
11
WIRING CIRCUIT..............................20>
For your safety, any instructions in this manual with this "Warning" sign must be followed strictly.
Page 3
03
Before use
WARRANTYCARD
(Customer’s Copy)
www.haier-mal.com
(THIS PORTION TOBE COMPLETED BYOWNER) No:
PRODUCT:
MODEL:
CUSTOMER’S NAME (IN BLOCK)
MR / MRS / MISS
CUSTOMER’S ADDRESS (IN BLOCK)
)O()H( :LET
ESAHCRUP FO ETAD)POHC( SSERDDA & EMAN S’RELAED
DATE MTH YEAR
SERIALNO:
HAIER ELECTRICALAPPLIANCES (MALAYSIA) SDN. BHD.
(594702-A)
No: 1, Jalan Industri PBP3, Perindustrian Pusat Bandar Puchong, 47100 Puchong, Selangor.
Tel : 603-5882 2888 Fax : 603-5882 4003 603-5882 4377 (Service) 603-5882 4462 (Sales)
Branches
PENANG No. 38, Grd Floor, Jln Perusahaan Jelutong 2 Georgetown, 11600 Pulau Pinang. Tel : 604-288 8500/8501 Fax : 604-288 8502
JOHOR BAHRU No. 58, Grd Floor, Jln Rosmarah 2/17, Tmn Johor Jaya, 81100 Johor Bahru, Johor. Tel : 607-353 5669 S ervice: 607-353 5680 Fax : 607-353 5787
KUANTAN No. 122, 1st Floor, Jln Haji Ahmad, 25300 Kuantan, Pahang Darul Makmur. Tel : 609 -514 6166 Fax : 609 - 514 5166
IPOH No. 21, Jln Medan Ipoh 10, Bandar Baru Medan, 31400 Ipoh. Tel : 605 -547 7897 Fax : 605 - 547 4739
REMINDER :- This Service Warranty is valuable. Preserved it carefully so that you can present it to your Authorized Haier Distributor
HAIER ELECTRICALAPPLIANCES (MALAYSIA) SDN. BHD.
whenever you have occasion to request the warranty service authorized herein
components
64&3."/6"-
)8#
AUTOMATIC DRUM WASHING MACHINE
Delay
Power
Heavy
Sport wash
Quick
Spin
Wash
Rinse
Spin
Temp.
Speed
Auto
Silk
Wool
Synthetic
Memory
Cotton
Start/Pause
Press and hold 2seconds
to set door unlocked
Delicate
Silent
Self-clean
Strong wash
Pre-wash
Soak
)8#
)8#
)8#
THANKS FOR PURCHASING A HAIER PRODUCT
Please read these instructions carefully before using this appliance. The instructions contain important information which will help you
get the best out of the appliance and ensure safe and proper installation, use and maintenance.
Keep this manual in a convenient place so you can always refer to it for the safe and proper use of the appliance.
If you sell the appliance, give it away, or leave it behind when you move house, make sure you also pass on this manual so that the
new owner can become familiar with the appliance and safety warnings.
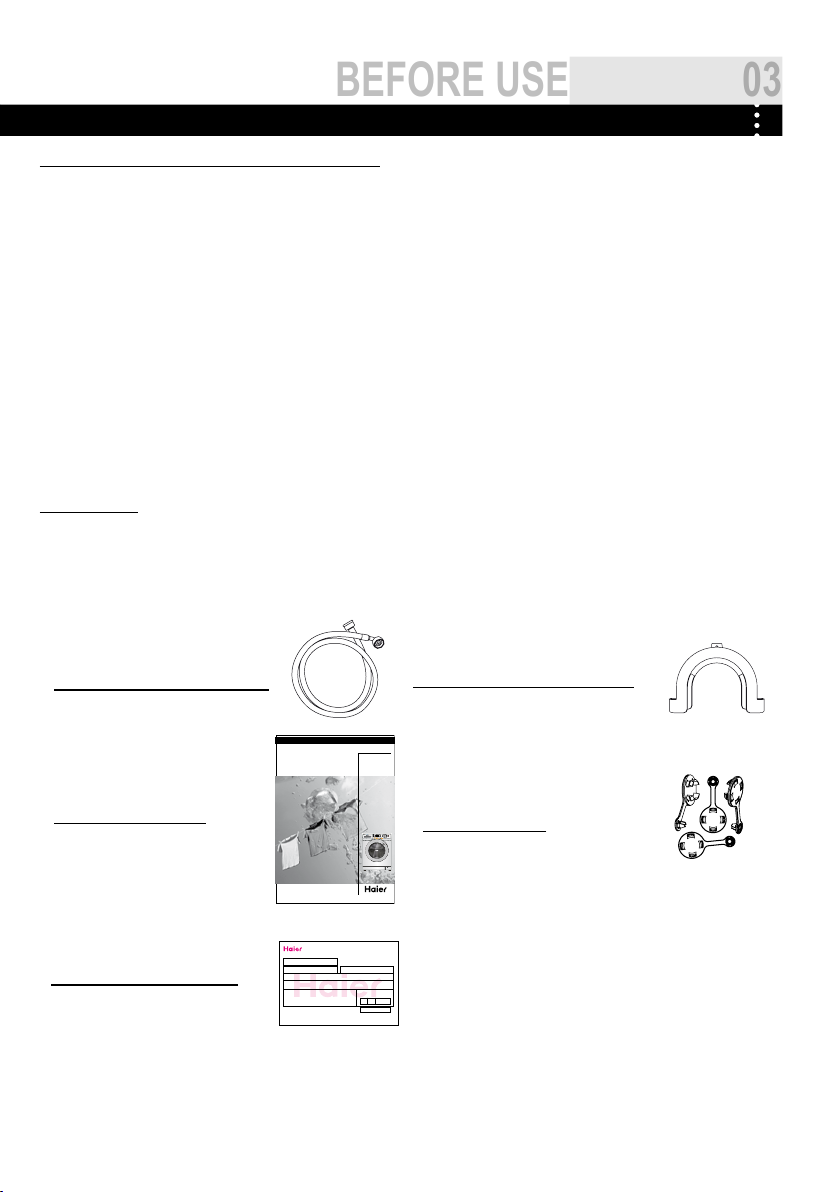
ACCESSORIES
Check the accessories and literature
in accordance with this list:
1x Inlet hose assembly
1x User manual
1x Warranty card
1x Drain hose bracket
4x Blanking plugs
Page 4
04
Before use
Delay
Power
Heavy
Sport wash
Quick
Spin
Wash
Rinse
Spin
Temp.
Speed
Auto
Silk
Wool
Synthetic
Memory
Cotton
Start/Pause
Press and hold 2seconds
to set door unlocked
Delicate
Silent
Se lf- cl ea n
Strong wash
Pre-wash
Soak
T1
T2
T3
S1
S2
S4
S3
T4
prepArAtion
PREPARING THE MACHINE
Remove all the packing materials to prevent unsteadiness, including the polystyrene base. Upon
opening the package, water drops may be seen on the plastic bag and the porthole. This is normal
phenomenon resulting from water tests in the factory.
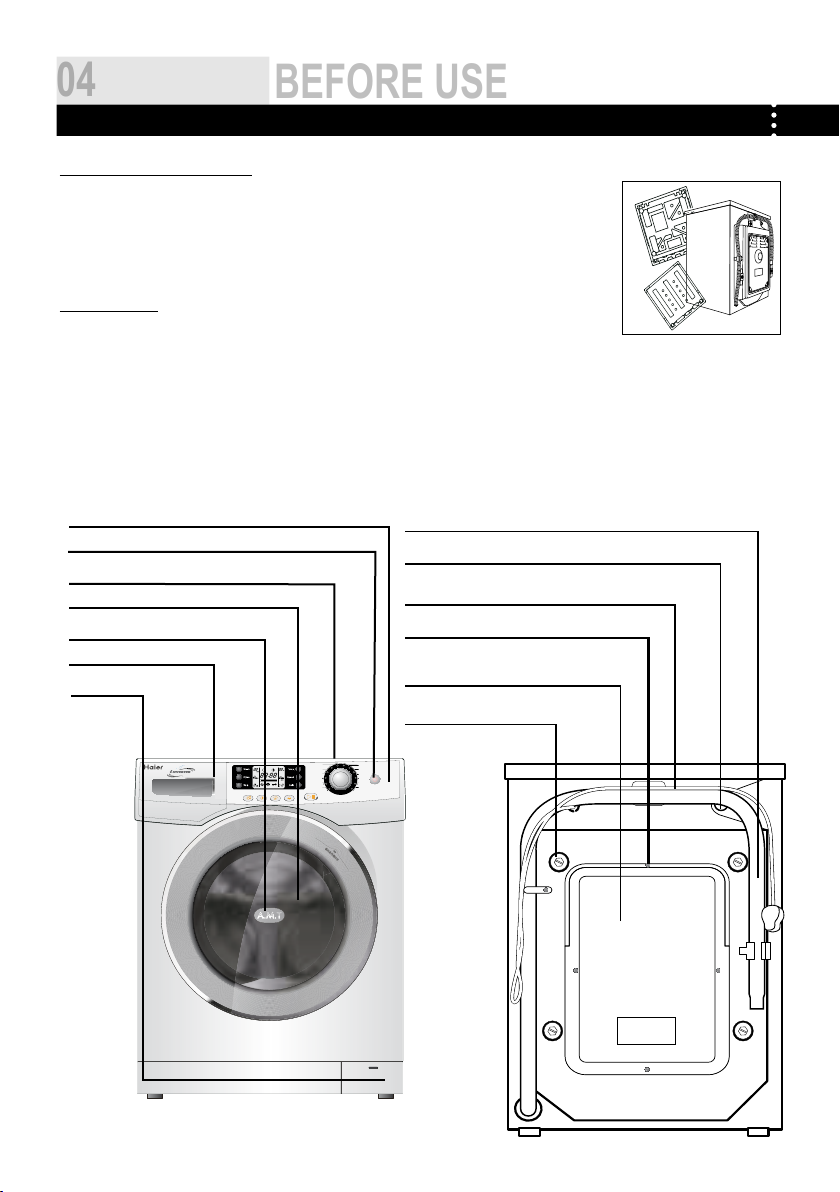
DESCRIPTION
This diagram may be slightly different from the layout of the washing machine you have just
purchased due to technical improvements.
Control panel
Power
Work top
Washer door
Door handle
Detergent distribution drawer
Filter cover
Drain hose
Water inlet valve
Power cord
Back cover screws
Back cover
Transportation bolts
Page 5

05
Before use
sAfety instructions
BEFORE SWITCHING THE APPLIANCE ON FOR THE FIRST TIME
DO ...
... Make sure that the transport bolt are removed.
... Use a separate earthed socket for the power supply.
... Make sure that the plug is accessible.
... Hold the plug and not the electric cable when
unplugging the power supply.
... Make sure that the fuses in the power circuit are rated
for 15A.
... Keep away from heat sources and direct sun light to
prevent plastic and rubber components from aging.
... Make sure that the power cord is not caught under or
in the appliance and avoid damage to the power cable.
... Check that hose joints and connections are firm and no
water can leak. If joints are loose or there is leakage, turn off the
water supply and refix. Do not use the washing machine until the
hoses are properly fixed.
DURING DAILY USE OF THE APPLIANCE
DO ...
... Pull up zips and fix loose threads to prevent the items
from being entangled. If necessary, put small items into a net bag
or pillow.
... Turn off the machine after each wash program and
switch it off at the mains to save electricity and for safety. Wipe
clean the lower part of the porthole.
... Keep the door slightly open when the washing machine
is not in use to prevent formation of odours.
... Let the power cord be replaced by the manufacturer, his
service agent or other accordingly qualified persons, in case it is
damaged.
... Ensure that the appliance is not used by persons
with reduced physical, sensory or mental capabilities, lack of
experience and knowledge without supervision or instruction by a
person responsible for their safety.
... Supervise children to ensure that they do not play with
the appliance.
DO NOT ...
... Touch or use the appliance when barefoot or with wet or
damp hands or feet.
... Use flammable detergent or dry cleaning agent.
... Use any flammable sprays in close vicinity to the
appliance.
... Remove or insert the plug in the presence of flammable
gas.
... Allow children or infirm persons to play with the appliance
or packing materials.
... Install the appliance outdoors in a damp place, or in an
area which may be prone to water leaks such as under or near a
sink unit. In the event of a water leak allow the machine to dry
naturally.
... Place the washing machine directly on a carpet, or close
to a wall or furniture.
DO NOT ...
... Touch the washer door during the washing process - it
gets hot!
...Place heavy objects or sources of heat or damp on top
of the appliance.
... Hot wash foam rubber or sponge-like materials.
... Open the detergent distribution drawer during the wash
cycle.
... Force the washer door open. The door is fitted with a
self-lock device and will open shortly after the washing procedure
is ended.
... Open the washer door if the water level is visibly over
the porthole.
... Cover the washing machine with plastic cover so that
inside dampness cannot be kept in.
Page 6
06
Before use
3.
1.
2.
4.
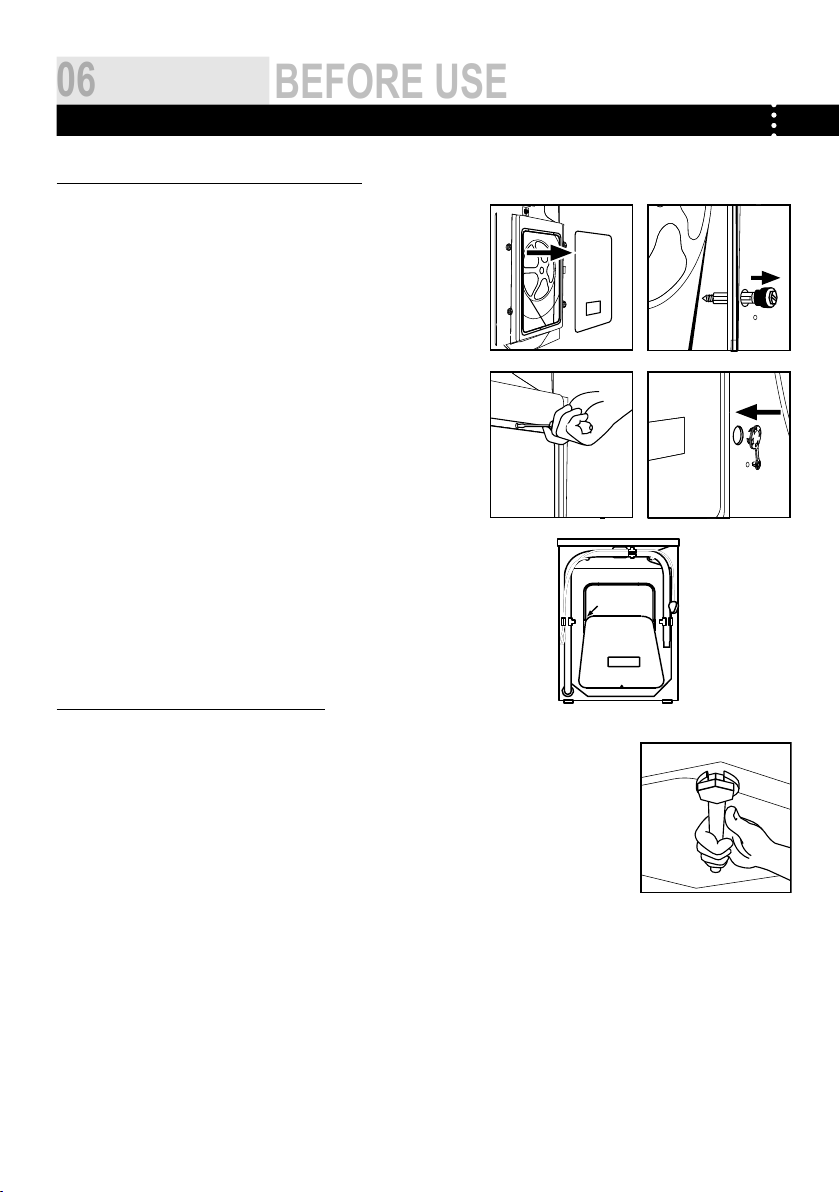
instAllAtion
DISMANTLE THE TRANSPORTATION BOLTS
The transportation bolts are designed for clamping anti-vibration components
inside of the washing machine during the transportation process.
Remove the back cover.1.
Remove the four bolts on the rear side and take out the synthetic 2.
stabilisers from within the machine.
Replace the back cover.3.
Fill the holes left by the bolts with blanking plugs.4.
Note:
1.When you replace the back cover,the convexity must face
to outside, and you have to insert the back cover from the
two gaps as shown in fig.5.
2.Keep the transportation bolts and synthetic stabilisers
in a safe place for later use.
ADJUSTING THE WASHING MACHINE
There are adjustable feet under the bottom of the washing machine. Before use, they should be
adjusted so that the machine is level. This will minimise vibrations and thus noise during use. It will also
reduce wear and tear. We recommend using a spirit level to level the appliance.The floor should be as
stable and flat as possible.
5.
Page 7

07
Before use
1.
2.
1.
8 0 - 1 0 0cm
2.
INLET HOSE
1. Connect the nut on the inlet hose to the connector on the water
valve.
2. Apply inlet hose to a water tap with cold, fresh water.
Note: Use the hose-set supplied with the appliance. Old
hose-sets should not be reused.
DRAIN HOSE
1. Use the drain hose bracket to keep the end of the drain hose retained
and prevent the outflow of water. Don't extend the length of the drain
hose; if an extended hose is required, please consult a serviceman.
2. The height of the drainage outlet must be 80-100 cm. Fix the drain
hose to the clip at the back of the washing machine to prevent it from
dropping off.
Note: The drain hose should not be submerged in water
and should be securely fixed and leak-free. If the drain hose is placed on the ground or if the pipe is at a
height of less than 80cm, the washing machine will continuously drain while being filled (self-siphoning).
CONNECTING TO THE POWER SUPPLY
Before connecting to the power supply, check:
¬ The socket is adequate for the maximum power of the washing machine
(For safety, fuses in the power circuit should be rated for no less than 15A).
¬ The voltage should meet the requirement.
¬ The power outlet should be capable of accepting the washing machine plug.
¬ Connect the machine to an earthed socket outlet.
Page 8

08
Before use
Delay
Power
Heavy
Sport wash
Silent
Quick
Spin
Sel f -c l ea n
Wash
Rinse
Spin
Temp.
Speed
Auto
Silk
Wool
Synthetic
Memory
Cotton
Start/Pause
Press and hold 2seconds
to set door unlocked
Delicate
Strong wash
Pre-wash
Soak
A
B
EDC
F
IHG
J
K
L
M
N
O
control pAnel
A Power Switch
B Program knob
C Auto button
D Spinning Speed Setting button
E Washing temperature button
OPERATIONAL FUNCTIONS
F Display screen
G Washing time
H Times of rinse
I Spinning time
J Detergent distribution drawer
K
Strong washing button
Delay Button
L
Pre-wash button
M
N Soak button
Start/Pause button
O
A ¬ Power
Switch
B ¬ Program
knob
Auto button The machine has automatic weighing function. Press the "Power" button to get the power on, then the door will
C ¬
_ Press this button to switch on the washing machine. Press it again to switch it off.Press On/Off button gently for
2 seconds to switch off the machine as buttons are soft touch sensitive.
_By turning the knob clockwise/counterclockwise, the required program can be selected. There are 12 programs
available. After a program is selected, the corresponding light will go on.
automatically pop open, so put clothes in, close the door, and the display screen will be ready. Press the "Start /
Pause" button, about 2 minutes later weighing will be finished and the machine will automatically calculate the
best washing process. This can save a lot of water. If you don’t need the automatic weighing, you can press “Auto
” button to switch to the gear of manually selecting the amount of clothing (screen display shows L-1 - L-A). When
gear is set up, the washing machine will adjust the water, heating and washing time and so on in accordance with
the set gears to save water, time and power.
(1) D "L-1"-"L-A" correspond to the amount of clothing in barrel of 1-7, in the manual selection, when the barrel
has a lot of clothes (more than one half), please select "L-6 " or "L-A". if the barrel of clothing is relatively few
(less than one half), please select one in "L-1", L-2", "L-3", "L-4" and " L-5"
(2) Please adjust the dosage of washing powder in accordance with the gears show on screen.
D ¬ Spinning
Speed Setting Button
_ Press the “Speed” button to select spinning speed. The maximum allowable spinning speed varies with
programs.
Note: Different water temperatures and spinning speeds can be set for different laundries.
Wash using the default settings if there is no special requirement.
E ¬ Washing
temperature
button
_ Press the “Temp.” button to select heating temperature (--, 30, 40, 50, 60, 90). The maximum allowable
heating temperature varies with programs.
Note:“--” in the temperature display indicates non-heated washing.
Page 9

09
Before use
F Display
2
1
1
3
2
screen
Washing time
G
Times of rinse
H
Spinning time
I
J ¬ Detergent
distribution
drawer
Strong wash-
K
ing button
¬Delay
L
Button
Pre-wash
M
button
Soak button Press "Soak" button to startup/shutdown the crease-resistant and soak function. When the process runs to the last
N
¬ Start/
O
Pause Button
_Display washing time, remaining time, times of rinsing, spinning time, temperature setting value, speed setting
value, position of clothes weight, child lock state, door lock state, washing progress and alarm message, etc.
Press the “Wash” button to set washing time. Press and hold this button to change the time continuously. Click this
button up until the end.
Note: This function is not applicable to “ Spin ” and “ Self-clean ” process
Press the “Rinse” button to select the times of rinsing and the maximum allowable times of rinsing is 8.
Press the “Spin” button to select spinning time. The maximum allowable spinning time varies with programs.
_Open the drawer, three compartments can be seen:
Compartment 1: Prewash detergent
Compartment 2: Detergent for programs 1 to 10.
Compartment 3: Softener, conditioning agent, perfume, etc.
Press "Strong wash" button to increase the washing time and times of rinsing during the main washing stage of
selected program.(This feature is applicable for dirty clothes ) The illuminated icon indicates the “strong wash”
function is selected. This additional function applies to “cotton”, “memory”, “synthetic” ,“Silent” “heavy”and
“Sport wash” programs only. This button is effective before starting a program.
Press the “Delay” button and the illuminated icon indicates that the “delay” function is selected. The delay time
(0.5-24h) increases by 30 minutes each press of “Delay” button. The time will change continuously if you press
and hold this button until you release it. The delay time is the end time of washing. For example, 6:00 means the
washing ends after 6 hours (the delay time must be longer than the program’s running time). The “Delay” function
is not available for “Spin” and “Self-clean” programs.
Note:The delay time must be longer than the program time;otherwise,the washing machine
will start the wash program directly.
Press the “Pre-wash” button to select or cancel the prewash program. The prewash program can be selected
for washing heavily soiled clothes. Press the “Prewash” button, the “Pre-wash” icon will illumin ate. Press the
“Pre-wash” again, the prewash function will be cancelled and the “Pre-wash” icon will go out. When selecting the
prewash function, add a proper amount of detergent into the prewash box, otherwise do not add any detergent
into the prewash box. This additional function applies to “cotton”, “memory”, “synthetic” and “Sport wash”
programs only.
rinse, the washing machine is not going to drain, clothes will be soaked in water, and the soak icon flashes, the
remain time not decreasing. If you need to dry the clothes, you can press "Soak" button or “start /pause”button,
then the icon will be off to cancel this function, and the washing machine continue to work. This feature and the
"Delay"button can not be chose at the same time. Also this feature is only effective in the “cotton”, “memory”,
“synthetic”,“heavy” , “Delicate”, “Sport wash”, “Silent” process.
_ Press the “Start/pause” button, the washer will start and the indicator light remains on. If this button is pressed
when the washer is in operation, the washer will pause and the indicator light will flash. When power is on, but
you do not press "Start / Pause" button to start the washing machine, if it meets door open condition,please press
the button for 2 seconds and the door will be open.
Page 10

2
1 Detergent compartment for prewash mode
2 Detergent compartment
3 Compartment for softener and
other additives
2
1
1
3
2
10
using the APPLiAnCe
progrAm selection
PROGRAM MODES
Preset spin speed
Temperature
Program Maximum Preset 2 3 1
1 ¬ Cotton - - to 90 °C 30°C Cotton fabrics 800 rpm
Recommended
Laundry
HW70-I1286/HW80-I1486
2 ¬ Memory - - to 90 °C 30°C
3 ¬ Synthetic - - to 60 °C 30°C
4 ¬ Wool - - to 40 °C -----
5 ¬ Silk - - to 40 °C -----
6 ¬Heavy - - to 60 °C 40°C
7 ¬ Delicate - - to 90 °C 60°C
8 ¬ Sport wash - - to 90 °C 30°C Sports wear 800 rpm
9 ¬ Silent - - to 90 °C 30°C Cotton or synthetic 600 rpm
10 ¬ Quick
11 ¬ Spin ----- ----- Cotton or synthetic 1000 rpm
¬ Self-clean
12
- - to 40 °C ----- Slight-soil cotton, linen
90°C 90°C None
Cotton or synthetic 800 rpm
Cotton fabrics 800 rpm
Woolen fabrics 600 rpm
Silk 400 rpm
Heavy soiling 800 rpm
Underwear 800 rpm
800 rpm
and synthetic fabrics
800 rpm
Yes No Optional
Page 11

11
using the APPLiAnCe
consumption AnD technicAl DAtA
CONSUMPTION TABLE
The wash cycle times are intended as a guide only. The actual time used may vary due to different water pressure, initial water
temperature, etc.
MAX. LOAD
PROGRAM
¬ Cotton
¬ Memory
¬ Synthetic
¬ Wool
¬ Silk
¬Heavy
¬ Delicate
¬ Sport wash
¬ Silent
¬
Quick
¬ Spin
¬ Self-clean
)
EN 60456 test program / Energy label program with Standard 60°C and max. spin speed and
*
function
.
HW70-I1286/HW80-I1486
7kg/8kg
7kg/8kg
3kg/3kg
1kg/1kg
1kg/1kg
7kg/8 kg
3kg/3kg
7kg/8 kg
7kg/8 kg
3kg/3kg
7kg/8 kg
0 kg
TEMPERATURE
30°C
30°C
30°C
-----
-----
40°C
60°C
30°C
30°C
-----
-----
90°C
WASHING TIME
1:32 h
1:32 h
1:00 h
0:44 h
0:42 h
2:12 h
1:39 h
1:32 h
1:32 h
0:26 h
0:09 h
1:00h
TECHNICAL DATA
HW70-I1286/HW80-I1486
Intense
Power source
Max. working current (A) 10
Water pressure (MPa) 0.03≤P ≤1
Nominal load (kg) 7/8
Spinning speed (r/min) 1200/1400
Washing programs 12
Max power (W) 2000
Dimensions (HxDxW mm)
Net weight (kg) 75
220 - 240V~/50Hz
850 x 650 x 595
Page 12
12
using the APPLiAnCe
WAshing methoDs
pleAse note
This washing machine is for domestic use only. If the machine is use for commercial purpose the guarantee
will not be valid anymore.Do not use it for purposes other than that for which it was designed. Follow the
instructions given on the label of each garment and wash only machine-washable garments.
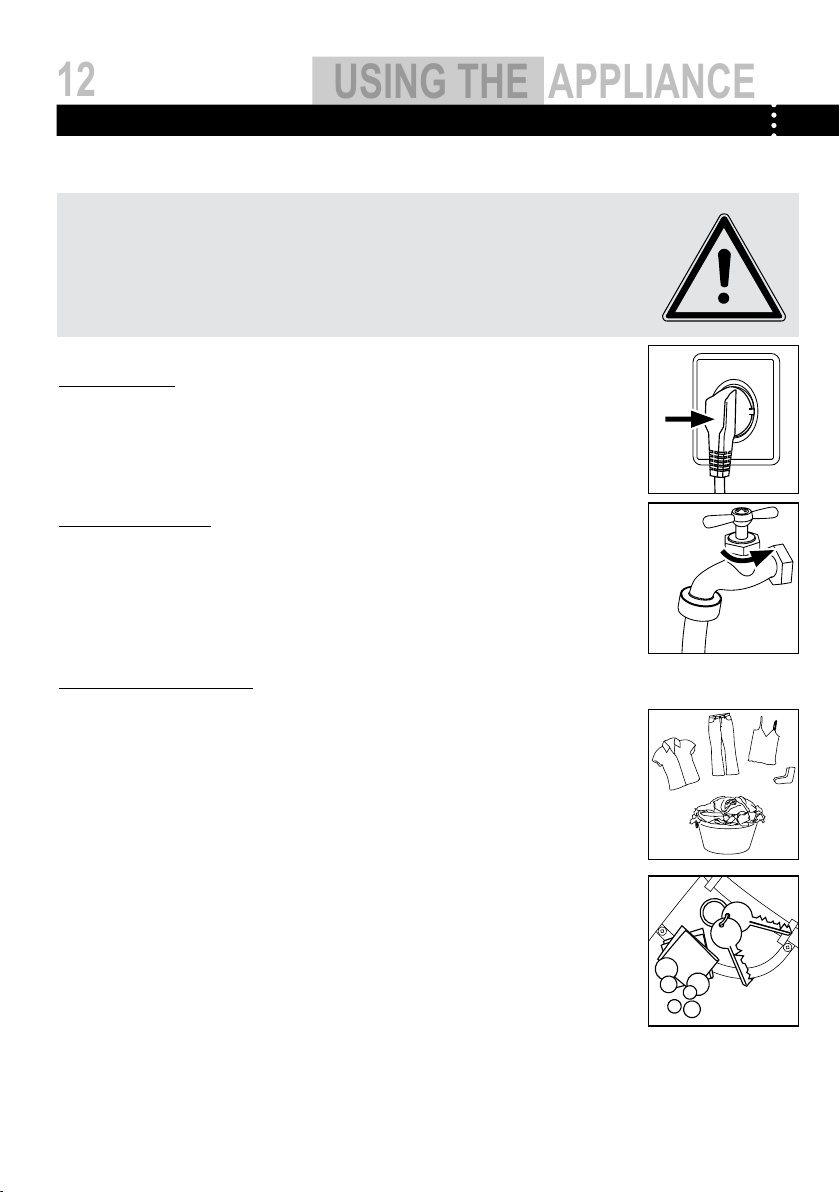
POWER SUPPLY
Connect the washing machine to the power supply (220V to 240V~/50Hz).
WATER CONNECTION
Turn on the tap. The water must be clean and clear.
Note: Before use, check for leakage in the joints between the tap and the inlet hose
by turning on the tap.
PREPARING THE LAUNDRY
¬ Sort out clothes according to fabric (cotton, synthetics, wool or silk) and to how dirty they are.
¬ Separate white clothes from coloured ones. Wash them first by hand to check if they fade or run.
¬ Empty pockets (keys, coins, etc.) and remove the harder decorative objects (e.g. brooches).
Attention: Small parts (like buttons, etc) may lead to repair work which user has to
pay by themselves and can cause damage in the machine.
¬ Garments without hems, underwear, finely woven textile such as fine curtains are to be put into wash
bag (it is better not to wash them in a washing machine).
¬ Close zippers and hooks, make sure the buttons are sewn on tightly and place small items such as
socks, belts, bras, etc. in the wash bag.
Unfold large pieces of fabric such as bed sheets, bedspreads, etc.
¬
¬ Turn shirts inside out.
Page 13

13
using the APPLiAnCe
LOADING THE MACHINE
2
1
1
3
2
Delay
Power
Heavy
Sport wash
Quick
Spin
Wash
Rinse
Spin
Temp.
Speed
Auto
Silk
Wool
Synthetic
Memory
Cotton
Start/Pause
Press and hold 2seconds
to set door unlocked
Delicate
Silent
Sel f - c l e a n
Strong wash
Pre-wash
Soak
Delay
Power
Heavy
Sport wash
Silent
Quick
Spin
Self-clean
Wash
Rinse
Spin
Temp.
Speed
Auto
Silk
Wool
Synthetic
Memory
Cotton
Start/Pause
Press and hold 2seconds
to set door unlocked
HW80-I1486
Delicate
Strong wash
Pre-wash
Soak
Open the washer door, put in the laundry piece by piece. Close the door tightly.
¬ When first using the washing machine, let it run unloaded for one program to prevent the laundry
from being tainted by oil or dirty water from the washing machine. Before washing you should run the
machine without laundry, but with detergent, with 60°C programm.
¬ Do not overload the washing machine.
SELECTING DETERGENT
The washing efficiency and the performance is determined by the quality of detergent used. Special
non-foaming detergent produces good washing results. Use specific detergents for synthetic and woollen
goods. Do not use dry cleaning agents such as trichloroethylene and similar products.
Note: Do not add more detergent than needed; otherwise, it may cause the situations as following and
washing machine malfunction impacting washing machine’s life.
1.Due to the increasing foam, the rinse time will be longer than normal;
2.The foam may overflow from the detergent drawer because of the increasing pressure of the foam;
3.It may remain foam without cleaning out after the final spinning cycle.
Recommendation:
1.Clean the detergent drawer once a week.
2.When using the prewashing program, please add half of the rating dosage.
3.Please follow the dosage recommendation on the powder or liquid detergent package.
ADDING DETERGENT
Slide out the detergent drawer and put the required detergent and softening agent into the corresponding
compartments. Push back the drawer gently. (Refer to the instructions on the drawer)
Caution:
¬ For prewashing program, detergent should be added to both compartments 1 and 2.
For other programs, do not add detergent to compartment 1.
¬ Use liquid detergent according to the instructions on its package. Do not use liquid detergent if the prewash mode or "Start delay" is selected.
¬ Do not overuse softener; otherwise, it will damage the artificial fibers.
SELECTING PROGRAM
To get the best washing results, an appropriate washing program should be
selected according to the laundry type. Please turn the program knob to
select the right program.
SELECTING FUNCTIONAL
Select the required options. (Refer to the "Control panel" pages 08 and 09)
Page 14
Delay
Power
Heavy
Sport wash
Silent
Quick
Spin
Self-clean
Wash
Rinse
Spin
Temp.
Speed
Auto
Silk
Wool
Synthetic
Memory
Cotton
Start/Pause
Press and hold 2seconds
to set door unlocked
HW80-I1486
Delicate
Strong wash
Pre-wash
Soak
14
using the APPLiAnCe
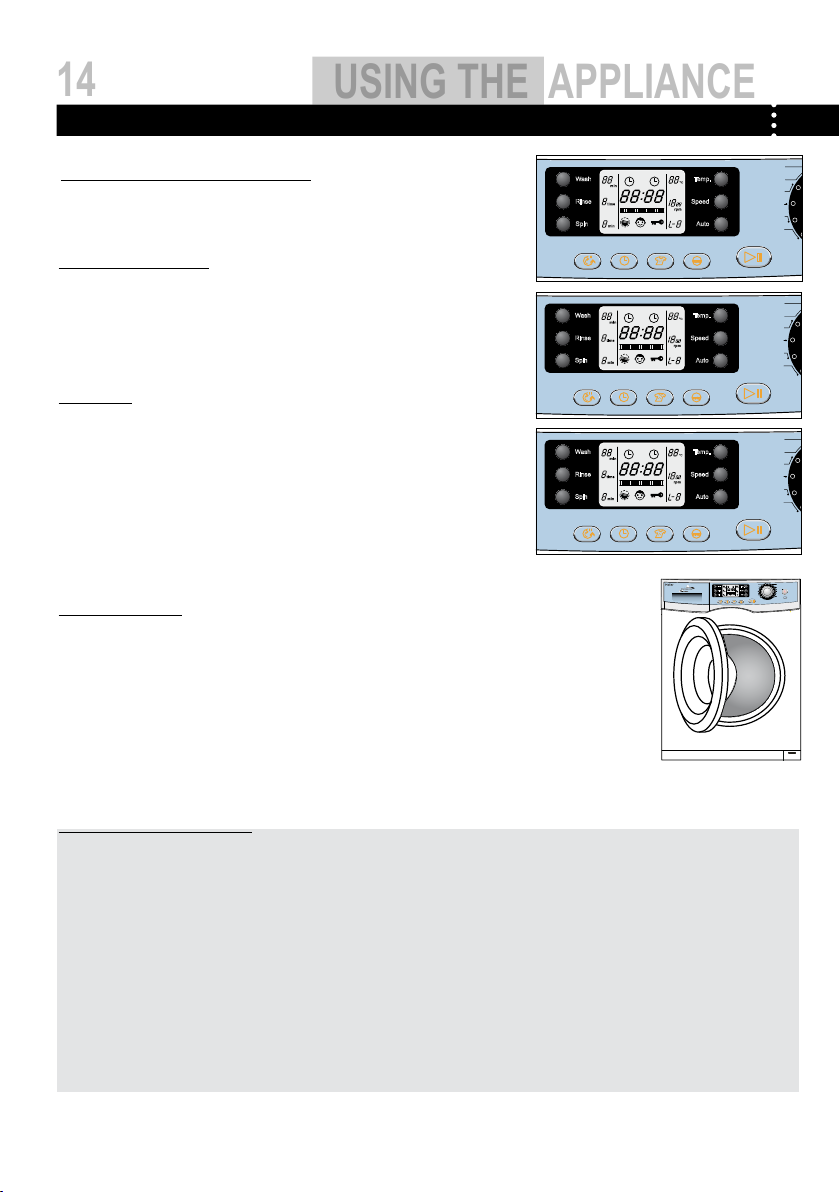
SETTING WASHING TEMPERATURE
Delay
Power
Heavy
Sport wash
Quick
Spin
Wash
Rinse
Spin
Temp.
Speed
Auto
Silk
Wool
Synthetic
Memory
Cotton
Start/Pause
Press and hold 2seconds
to set door unlocked
Delicate
Silent
Sel f- cl ea n
Strong wash
Pre-wash
Soak
Delay
Power
Heavy
Sport wash
Quick
Spin
Wash
Rinse
Spin
Temp.
Speed
Auto
Silk
Wool
Synthetic
Memory
Cotton
Start/Pause
Press and hold 2seconds
to set door unlocked
Delicate
Silent
Sel f- cl ea n
Strong wash
Pre-wash
Soak
Delay
Power
Heavy
Sport wash
Quick
Spin
Wash
Rinse
Spin
Temp.
Speed
Auto
Silk
Wool
Synthetic
Memory
Cotton
Start/Pause
Press and hold 2seconds
to set door unlocked
Delicate
Silent
Sel f- cl ea n
Strong wash
Pre-wash
Soak
Press and hold down the temperature button until the desired temperature is selected .
SETTING SPIN SPEED
Press and hold down the speed button until the desired speed is selected.See "Operational functions" on the "Control panel" pages (08 and 09) for selecting temperature
and spin speed. It is advisable to select the recommended value.
WASHING
Press the Start/Pause button. The washing machine will operate according to the
preset programs. The washing machine will stop operation automatically when a
washing cycle ends. The "End" sign will appear on the display. Open the washer door
and take out the laundry.
AFTER WASHING
Turn off the water supply and unplug the power cord. Open the washer door to prevent formation of
moisture and odours. Let the door open while not used.
TIPS FOR SAVING ENERGY
Collect clothes for one full wash load.1.
Avoid overloading the washing machine.2.
Prewash only heavily soiled clothes.3.
Reduce the amount of detergent or choose standard or delicate wash programs for slightly soiled clothes.4.
Choose a proper washing temperature. Modern detergents can wash with very good result already in lower 5.
temperature than 60°C. Only use higher temperature than 60°C for heavily soiled laundry.
Follow the dosage recommendation on the detergent package to avoid using too much detergent.6.
Page 15

15
using the APPLiAnCe
CARE CHART
Resistant material
Delicate fabric
Washable at 95 °C
Washable at 60 °C
Washable at 40 °C
Washable at 30 °C
Hand wash
Dry clean only
Wool Seal
LOAD REFERENCE
Bed sheet (single) Cotton Approximately 800g
Blanket Wool Approximately 3000g
Blended fabric clothes / Approximately 800g
Jackets Cotton Approximately 800g
Bleachable in cold water
Do not bleach
Iron at 200 °C
Iron at 150 °C
Iron at 100 °C
Don't iron
Dry cleaning with any solvent
Dry cleaning with pericloride
Dry cleaning with aviation fuel
Don't dry clean
Dry flat
Hung to dry
Dry on clothes hanger
Tumble dry, normal heat
Tumble dry, reduced heat
Don't tumble dry
Jeans / Approximately 800g
Overalls Cotton Approximately 950g
Ladies Pyjamas / Approximately 200g
Shirts / Approximately 300g
Socks Blended fabrics Approximately 50g
T-Shirts Cotton Approximately 300g
Underwear Blended fabrics Approximately 70g
Page 16

16
1
.
2.
maintenance
cleAning & cAre
1.
AFTER WASHING
Turn off the water supply and pull out electricity plug after each wash.
Open the washer door to prevent formation of moisture and odours. If
the washing machine is left idle for a long period, drain the water in
the machine and replace the drain hose.
CLEANING THE DETERGENT DRAWER
Clean the detergent distribution drawer regularly.
Swing out the drawer, flush it clean with water and then replace it.
CLEANING THE MACHINE
Unplug the machine during cleaning and maintenance. Use a soft cloth
dampened with soap liquid to clean the machine case and rubber components. Do not use organic chemicals or corrosive solvents.
CLEANING THE FILTER
Clean the filter once a month:
1. Open the bottom cover.
1.
2.
2.Remove the filter by turning counterclockwise.
3.Flush the filter clean with running water.
4.Replace the filter by turning clockwise and
remount the cover.
Caution:
1.The filter must be in place, or it may lead to leakage.
2.Place a container under the drain pump filter, to collect
any excess water that may come out of the drain pump
when the filter is removed.
2.
3.
4.
Page 17

17
Delay
Power
Heavy
Sport wash
Silent
Quick
Spin
Self-clean
Wash
Rinse
Spin
Temp.
Speed
Auto
Silk
Wool
Synthetic
Memory
Cotton
Start/Pause
Press and hold 2seconds
to set door unlocked
HW80-I1486
Delicate
Strong wash
Pre-wash
Soak
maintenance
WATER INLET VALVE AND INLET VALVE FILTER
4.
1.
3.
2.
To prevent blockage to the water supply by ingress of foreign substances, clean the water inlet valve and
inlet valve filter regularly.
MOVING THE MACHINE
If the machine is to be moved to a distant location, replace the transportation bolts removed before installation to prevent damage as
shown below.
Remove the back cover.1.
Remove the blanking plugs.2.
Insert the synthetic stabilisers and the transportation bolts.3.
Tighten the bolts with a spanner.4.
Replace the back cover.5.
LONG PERIODS OF DISUSE
If the washing machine is left idle for a long period, pull out the electrical plug and turn off the water supply. Open the washer door to
prevent formation of moisture and odours. Let the door open while not used.
Page 18

18
maintenance
DisplAy coDes
DISPLAY CODES AND SPECIAL FUNCTIONS
CODES
Err1 ¬ Door is not properly shut. _ Shut the door properly.
Err2 ¬ Drainage error, water not emptied within 6
Err3 ¬ Temperature sensor not properly connected or
Err4
Err5 ¬Water level not met in 8 minutes.
Err7 ¬ Motor error. _ Contact the maintenance personnel.
Err8 ¬ Water exceeds protective level. _ Contact the maintenance personnel.
End ¬ End of wash cycle.
1:25 ¬The remaining time is 1 hour 25 minutes.
19:30 ¬Status information:Preset time for delayed operation.
UNb After the last rinsing cycle finishes,spinning fails completely due to unbalance of the laundry.
¬ Control panel lock function: Press the "Delay" and the "Start/Pause" buttons simultaneously for 3 seconds after starting a program.
It can no longer be changed by operating buttons or knobs. To unlock press the "Delay" and "Start/Pause" buttons again for 3
seconds.
¬ Power-off memory function: In case of abrupt power failure or the need to cut off the power during a program cycle, the present
settings will be saved and the preset operation will resume when the power is on again.
¬ To cancel a program
Press the "Start/Pause" button, then switch off the power and the program is automatically cancelled. Turn the program selector
again to choose another program.
Note: During the spin process, if too much foam is inspected, in order to protect the motor, the washing machine will eliminate the
foam automatically; the motor will stop and the drain pump will drain the water continuously for 90 seconds. If it happens more than
3 times, the motor will stop until the end of cycle without spinning.
¬ AMT
Technology of anti-bacteria and mildew-proof with window pad.
CAUSES SOLUTIONS
_ Clean the filter and check the drain hose for blockage. If error
minutes.
damaged.
¬ Heater error (Appears at the end of a cycle).
¬The height of the drain hose is below 80 cm.
¬ The drain hose is in water.
still exists, please contact the maintenance personnel.
_ Contact the maintenance personnel.
_ Contact the maintenance personnel.
_ Make sure that tap is turned on, and water pressure is normal.
If problem still exists, please contact the maintenance personnel.
_ Install drain hose within 80-100 cm of height.
_ Make sure the drain hose is not in water.
Page 19

19
maintenance
troubleshooting
TROUBLESHOOTING
The following circumstances do not constitute problems. Do not contact the Service Center until the problem has been confirmed.
PROBLEM CAUSES SOLUTIONS
Washing machine fails to
operate.
Washing machine cannot be
filled with water.
Machine is draining while
being filled.
Drainage failure. ¬ Drain hose is blocked.
Strong vibration while
spinning.
Operation stops before
completing wash cycle.
Operation stops for a period
of time.
Excessive foam in the
drum, which is spilled to the
distribution drawer.
Automatic adjustment of the
washing time.
Spinning fails ¬ Unbalance of the laundry _ Add clothes or run a spinning program again.
¬ Poor connection to the power supply.
¬ Power failure.
¬ The washer door is not properly closed.
¬ Machine has not been switched on.
¬ The "Start/Pause" button is not pressed.
¬ Water tap is not turned on.
¬ Water pressure is less than 0,03 Mpa.
¬ The inlet hose is kinked.
¬ Water supply failure.
¬ The program knob is not properly set.
¬ The washer door is not properly closed.
¬ The inlet hose filter is blocked.
¬ The height of the drain hose is below 80 cm.
¬ The drain hose is in water.
¬ Drain hose end is higher than 100 cm above
the floor level.
¬ The filter is blocked.
¬ Not all transportation bolts have been removed.
¬ Washing machine is located on an uneven
surface or is not level.
¬ Machine load is over Max load.
¬ Water or electricity failure. _ Check the power supply.
¬ Washing machine gives an error message.
¬ Washing machine is in soaking cycle?
¬ The detergent is not a low-foaming type or for
manual wash.
¬ Excessive use of detergent.
¬ The washing program duration will be adjusted _ This is normal and doesn't affect the
_ Check connection to the power supply.
_ Check the power supply.
_ Close the washer door properly.
_ Make sure the machine is switched on.
_ press the "Start/Pause" button.
_ Turn on the water tap.
_ Check water pressure.
_ Check the inlet hose.
_ Ensure the water supply.
_ Set the program knob properly.
_ Close the washer door properly.
_ Unblock the inlet hose filter.
_ Install drain hose within 80-100 cm of height.
_ Make sure the drain hose is not in water.
_ Unblock the drain hose.
_ Make sure the drain hose end is lower than
100 cm above floor level.
_ Unblock the filter.
_ Remove all transportation bolts.
_ Make sure the washing machine is on
an even surface and levelled.
_ Reduce amount of laundry in the drum.
_ Check display codes.
_ Press the rinse hood button or the Start/pause
button again to cancel it.
_ Check if your detergent is appropriate.
_ Reduce amount of detergent in the distribution
drawer.
functionality.
Page 20

WIRING CIRCUIT
20
WIRING CIRCUIT
Waterlevel
sensor
X1- 1 X1- 2 X1- 3 X1- 4
X1- 8
X1- 7
X1- 6
X1- 5
heating wire
RTFR
N
FA3
X8- 4 X8- 1
X5- 3
X4- 1
X8- 3 X8- 2
FA
L
G
door lock
FA1
MRL
MRC
L'
MRN
X4- 3
X1- 5
X1- 4
X1- 3
driving board
X2- 3
EVF
EVFX
X2 -4
EVPX
display board
12V
INT
GND
RX/TX
EVP
temperature
sensor
X5 -1
BI
BIX
X6-3
X7-4
X7-3
X6-2
X7-1
J101- 1
J101- 2
inductor
J301- 1
J301- 2
J301- 3
frequency conversion
motor
FA:Anti-jamming suppresser
BIX:drain motor
EVPX:prewash Water inlet valve
EVFX:mainwash
Water inlet valve
 Loading...