

Page 1
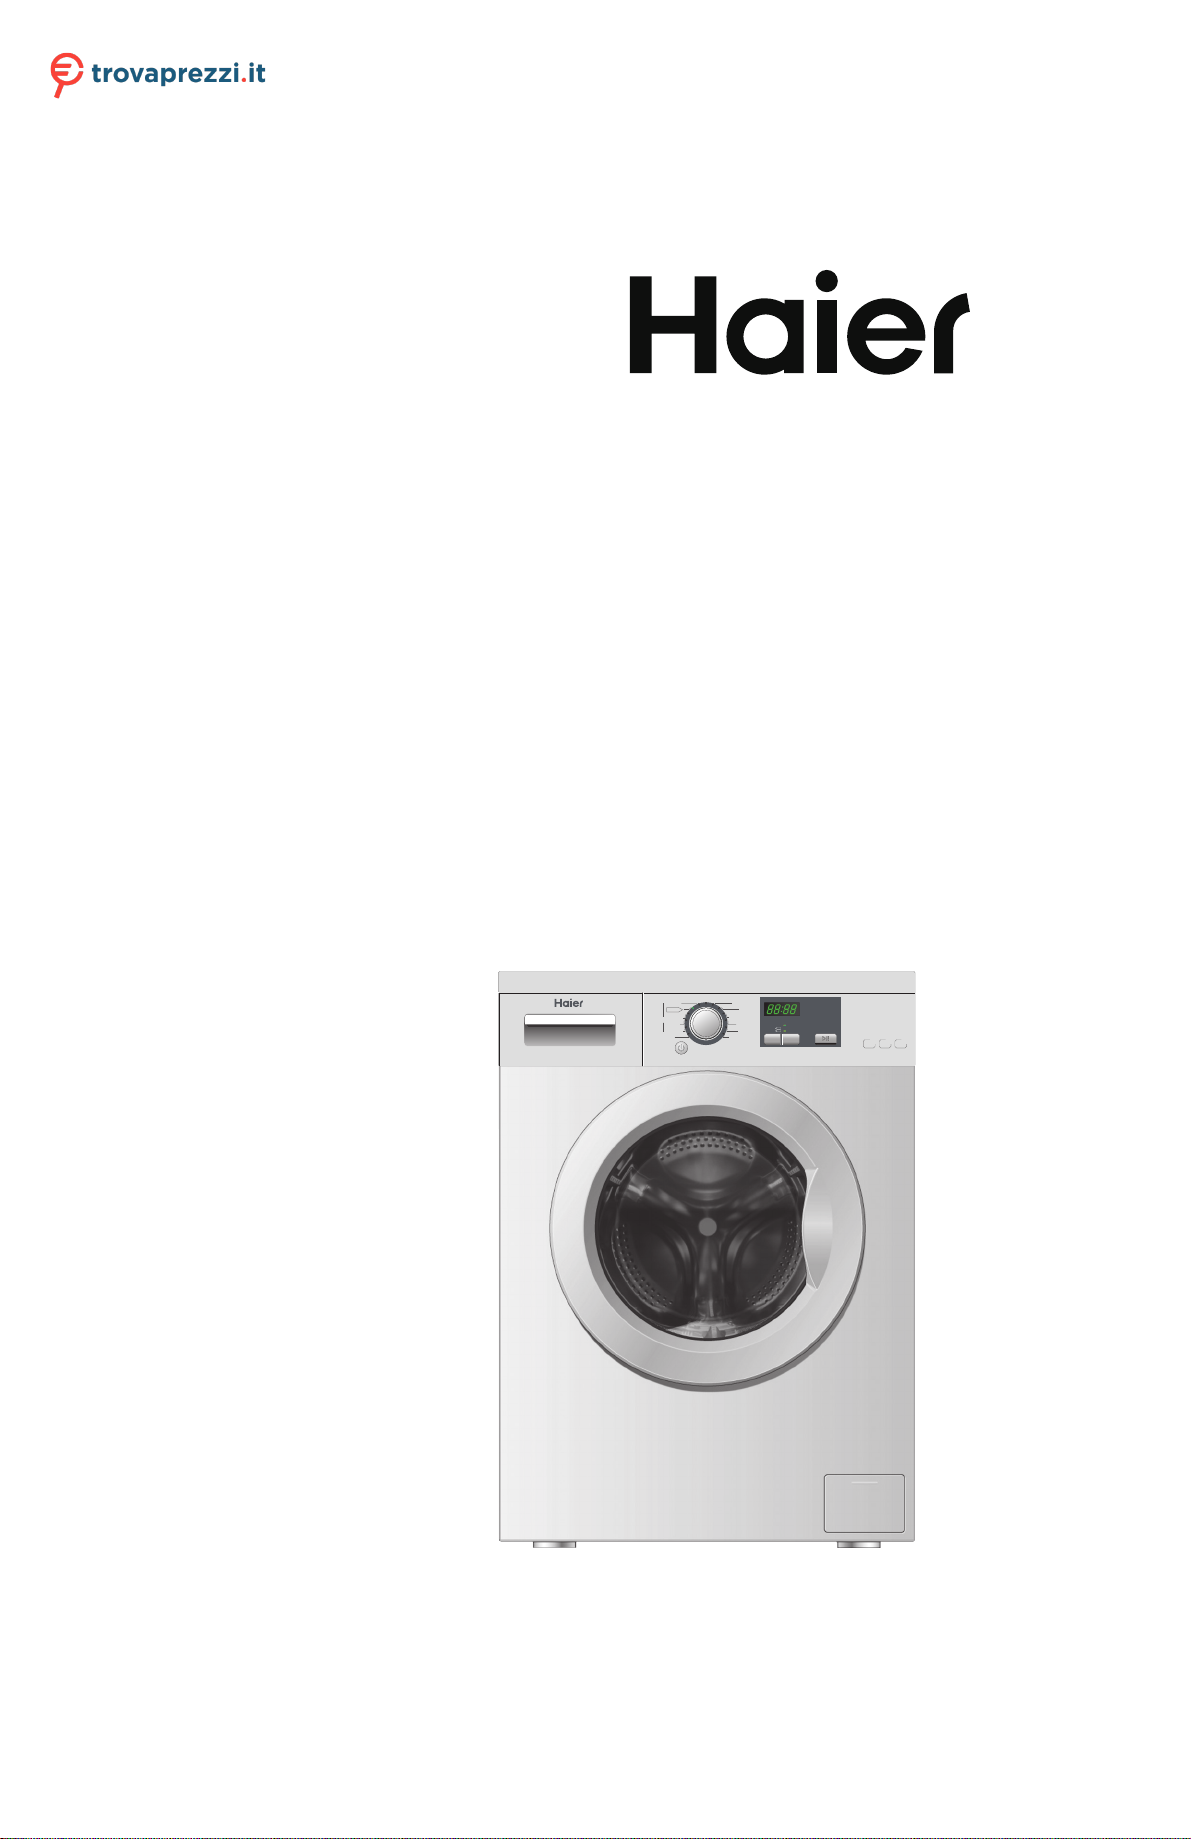
User Manual
HW100-1211N
HW70-1211N
HW70-1211N-S
HW60-1211N
HW60-1211N-S
Standard
Cotton
Synthetic
Wool
Power
Express 15 min
Pre-wash
Quick wash
Standard
Quick wash
Lingerie
Mix
Rinse
Spin
Drum clean
TTime to end
emperature
Extra rinse
Intense Start/pause
+++
A
CapicitySpin speedEnergy
1200
10kg
°C
60
°C
40
Sport wash
HW100-1211
Questo manuale d’istruzione è fornito da trovaprezzi.it. Scopri tutte le offerte per Haier HW60-1211N
o cerca il tuo prodotto tra le migliori offerte di Lavatrici e Asciugatrici
Page 2
Elements
Thanks for purchasing a Haier Product
Please read these in ons carefully before using this appliance. The ins ons contain
important informa
proper installa
Keep this manual in a convenient place so you can always refer to it for the safe and proper use of
the appliance.
If you sell the appliance, give it away, or leave it behind when you move house, make sure you also
pass on this manual so that the new owner can become familiar with the applian
warnings.
on which will help you get the best out of the appliance and ensure safe and
on, use and maintenance.
ce and safety
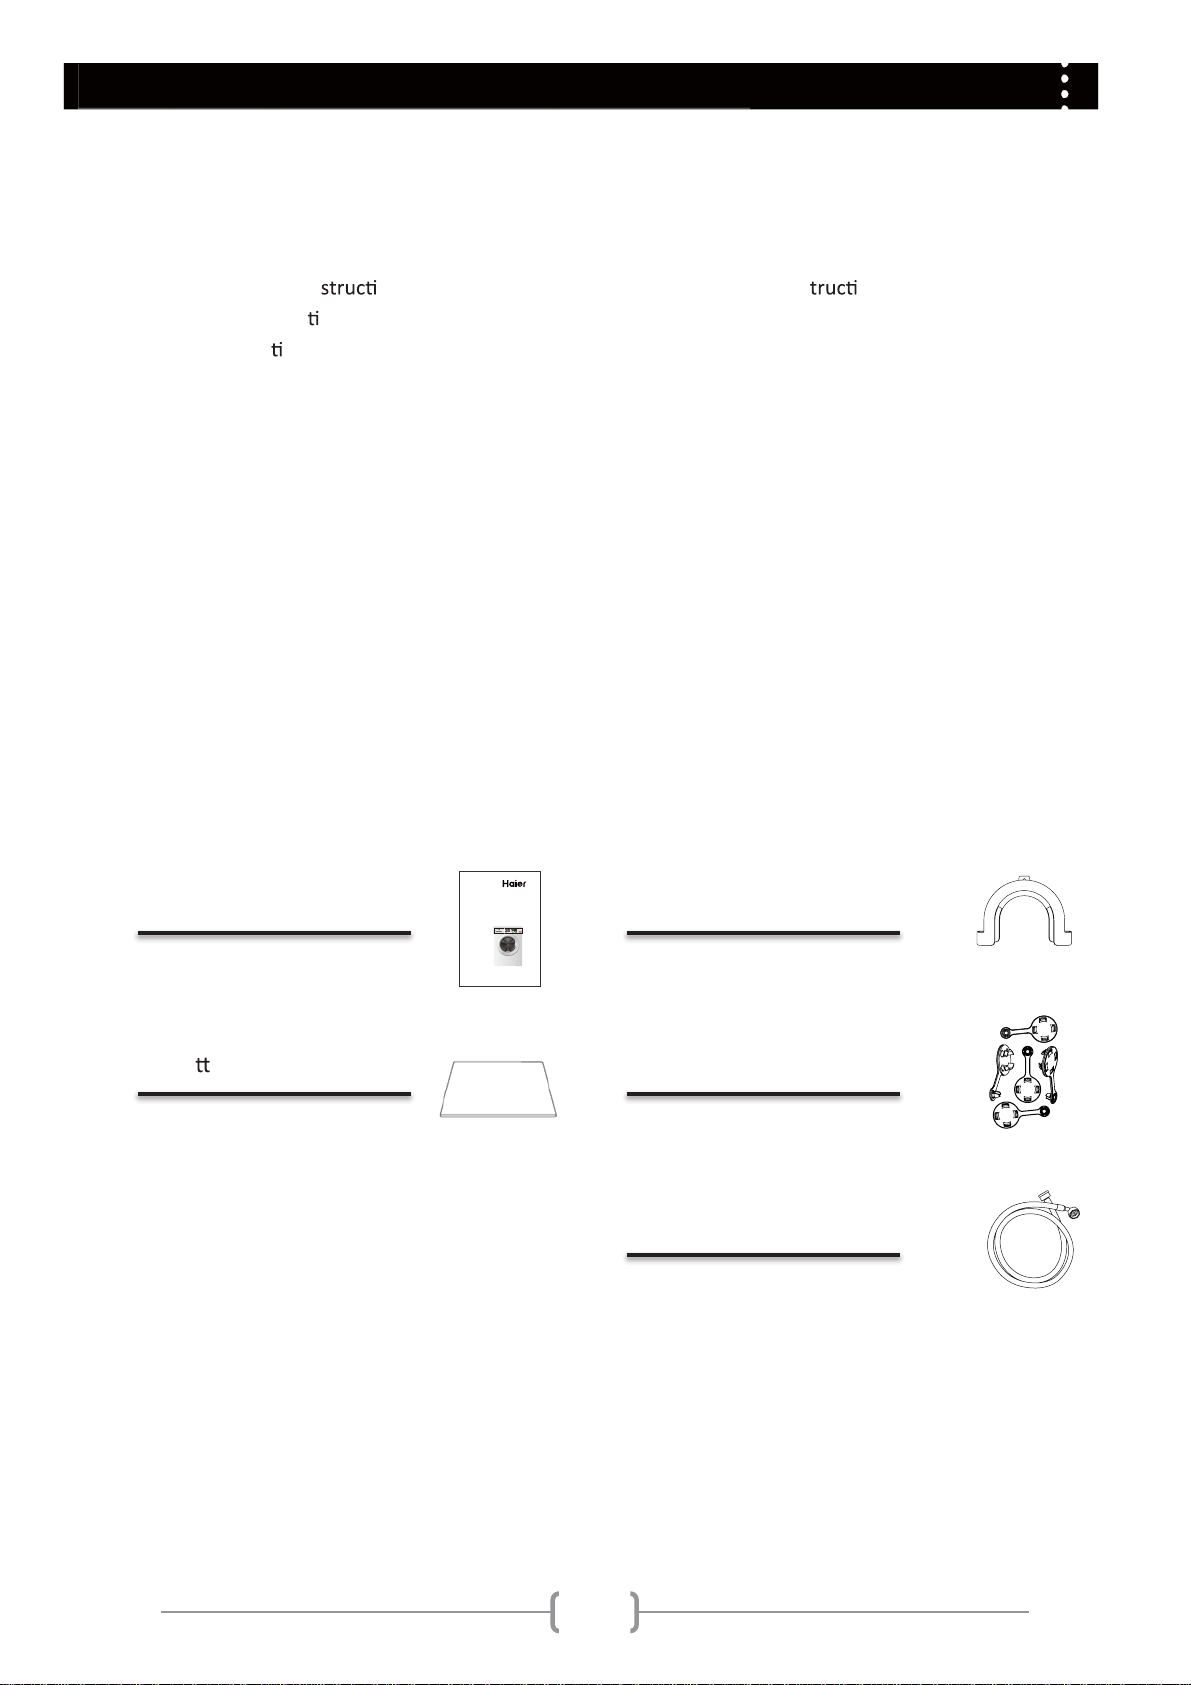
Accessories
Check the accessories and literature in accordance with this list:
HW100-1211
User Manual
HW70-1211
HW70-1211-S
HW60-1211
1x User Manual
1x Bo
om Cover
HW60-1211-S
Express 15 min
HW100-1211
Tiempo restante
Con prelavado
Ropa interior
Mezclados
Standard
Algodón
Ropa deportiva
Rápido
Standard
Aclarado
Temperatura
Aclarado Extra
Sintéticos
°C60
°C40
Intensivo
Inicio / Pausa
Rápido
Centrifugado
Limpieza tambor
Lana
+++
120010kg
A
Clase
Capacidad
rpm
energética
Encendido / Apagado
1x Drain hose brocket
5x Blanking Plugs
1x Inlet hose assembly
1
Page 3
Index
Tr
Technical date .......................................................................................................................................20
Legend
................................................................................................................................................. 3
re e ........................................................................................... .................................................... 5
............................... ........................................................................... ........................................8
e ............................... ......................................................................... ....................................16
uble g ................................................................................................................................. .19
rvi e ................................................................................. .................................................21
Ye
N
O l
Ca
Disposal
The pre b h i l e r a
a f life he el r a i (ex.
e i h a
T pr a ge he r r l
l a p
e e e . Th e e f a
ur .
h i he re her h e
p
e relev h e k
r r l afe re fe.
r a .
a e e i e r e
r
iaurpihT.eahrup a e h
rele
k he
2
Page 4
This appliance can be used by children aged from 8 years and above and persons with reduced physical, sensory
or mental capabilies or lack of experience and knowledge if they have been given supervision or instrucon
concerning use of the appliance in a safe way and understand the hazards involved. Children shall not play with
the appliance. Cleaning and user maintenance shall not be made by children without supervision.
Children of less than 3 years should be kept away unless connuously supervised.
Do…
Make sure that the transport bolt is removed.
Use a separate earthed socket for the power supply.
Make sure that the plug is accessible.
Hold the plug and not the electric cable when unplugging the
power supply.
Make sure that the fuses in the power circuit are rated for 15A.
and rubber components from aging.
Make sure that the power card is not caught under or in the appliance and avoid damage to
the power cable.
firm there will be leakage, turn off the water supply and refix it. Do not use the washing
Do not…
Touch or use the appliance when barefoot or with wet or damp hands or feet.
Use flammable detergent or dry cleaning agent.
Use any flammable sprays in close vicinity to the appliance.
Remove or insert the plug in presence of flammable gas.
Allow children or infirm persons to play with the appliance or packing materials.
Install the appliance outdoors in a damp place, or in an area which may be prone to water
leaks such as under or near a sink unit. In the event of a water leak allow the machine to dry
naturally.
Place the washing machine directly on a carpet, or close to a wall or furniture.
.
During daily use of the appliance
Do…
Pull up zips and fix loose threads to prevent the items from being entangled. If necessary, put
small items into a small bag or pillow.
3
Page 5
electricity, and for safety. Wipe clean the lower part of th
odors.
Let the power cord be replaced by the manufacturer, his service agent or other accordingly
qualified people, in case it is damaged.
Do not…
Touch de washer door during the washing process, it gets hot.
Place heavy objects or sources of heat or damp on top of the appliance.
Hot wash from rubber or sponge-like materials
Force de washer door to open, the door is fied with a self-lock device and will open shor tly
aer the washing procedure is ended.
e porthole.
.elcyc hsaw eht gnirud reward noitubirtsid tnegreted eht nepO
Open the washer door if the water level is visibly over the porthole.
Cover the washing machine with a plasc cover so that inside dampness cannot be kept in.
Saving Tips
Achieve the best use of energy, water, detergent and me by using the recommended
maximum load size
Do not exceed the detergent dosages indicated in the manufacturer’s instrucons.
The Eco-Ball –a special system in the outlet- will prevent detergent loss from the drum to
avoid detergent loss into de environment.
Use “Prewash” for heavily soiled laundry only. Save detergent, me, water and energy
consumpon by not selecng “Prewash” for slightly to normal soiled laundry.
Save energy and me by selecng a high spin speed to reduce the water content in laundry
Choose a proper washing temperature. Modern detergents can wash with very good result
already in lower temperature than 60°C. Only use higher temperature than 60°C for heavily
soiled laundry.
.reyrd elbmut a gnisu erofeb
4
Page 6
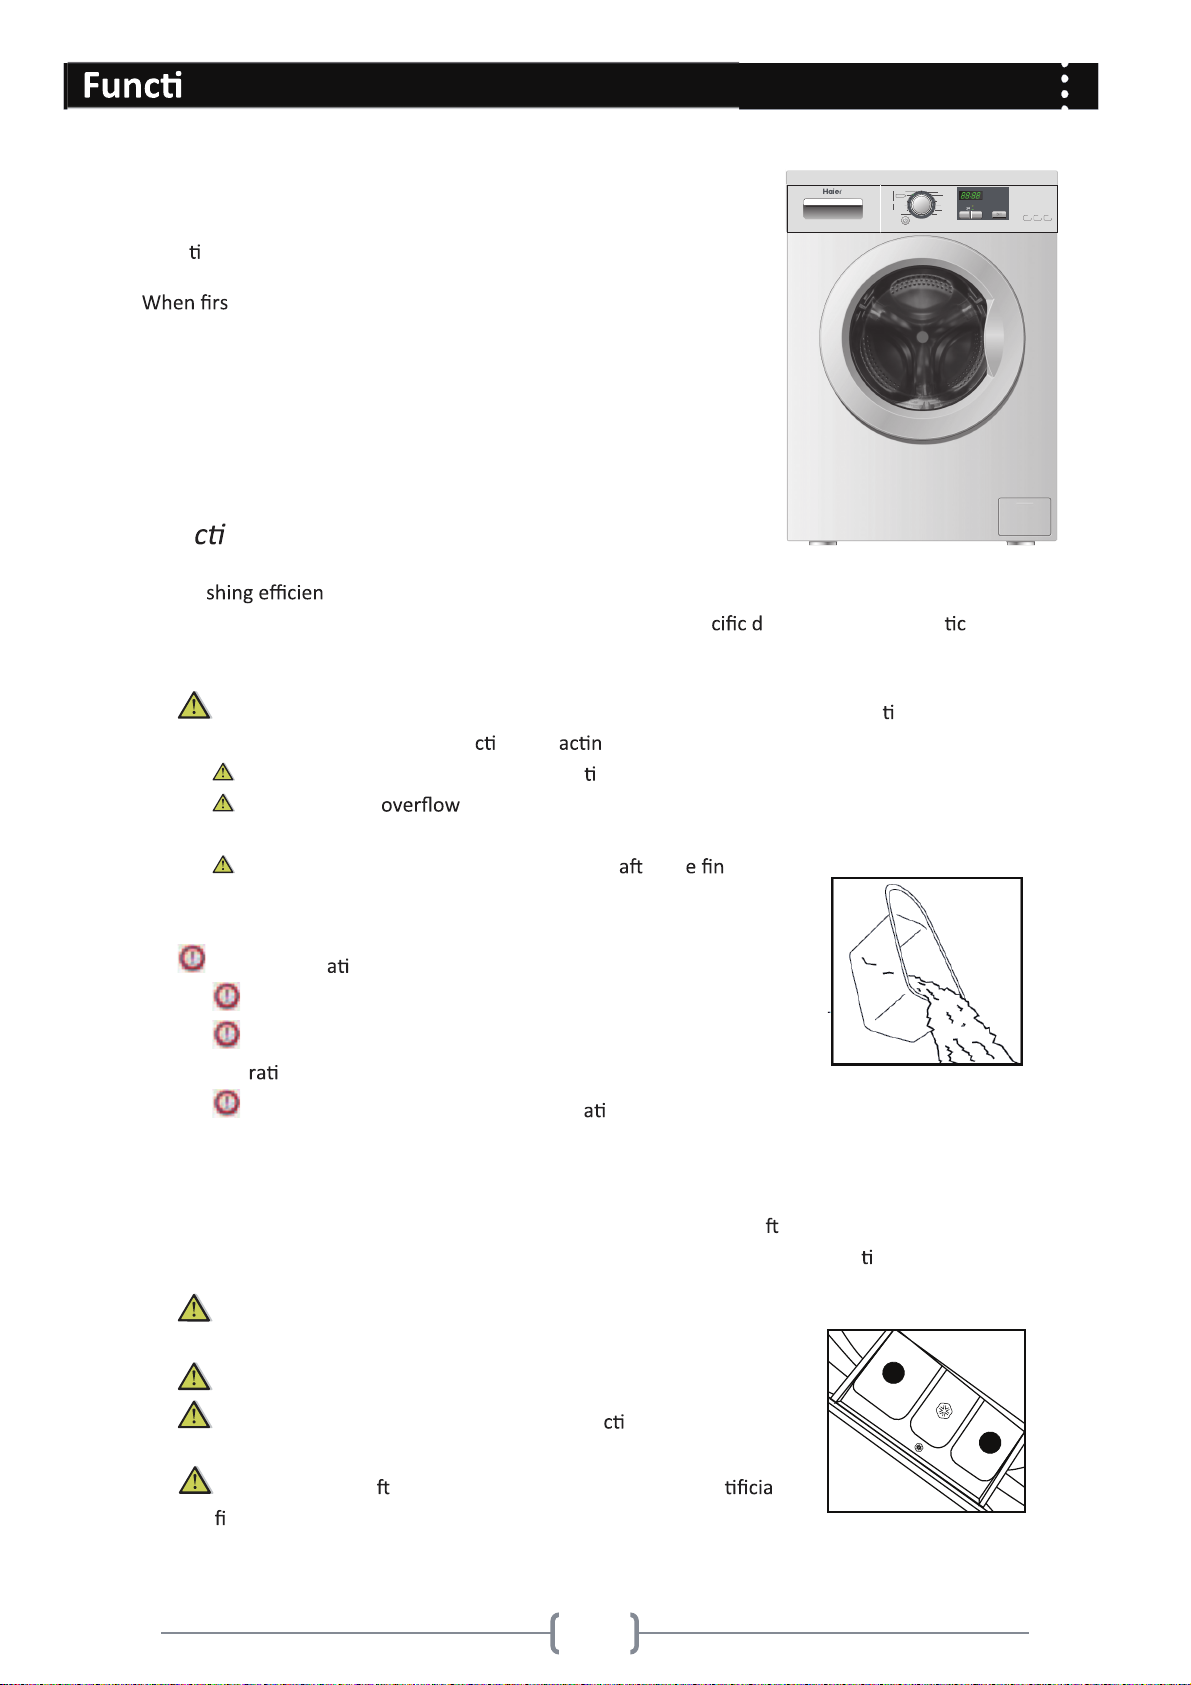
Before Use
Before Use
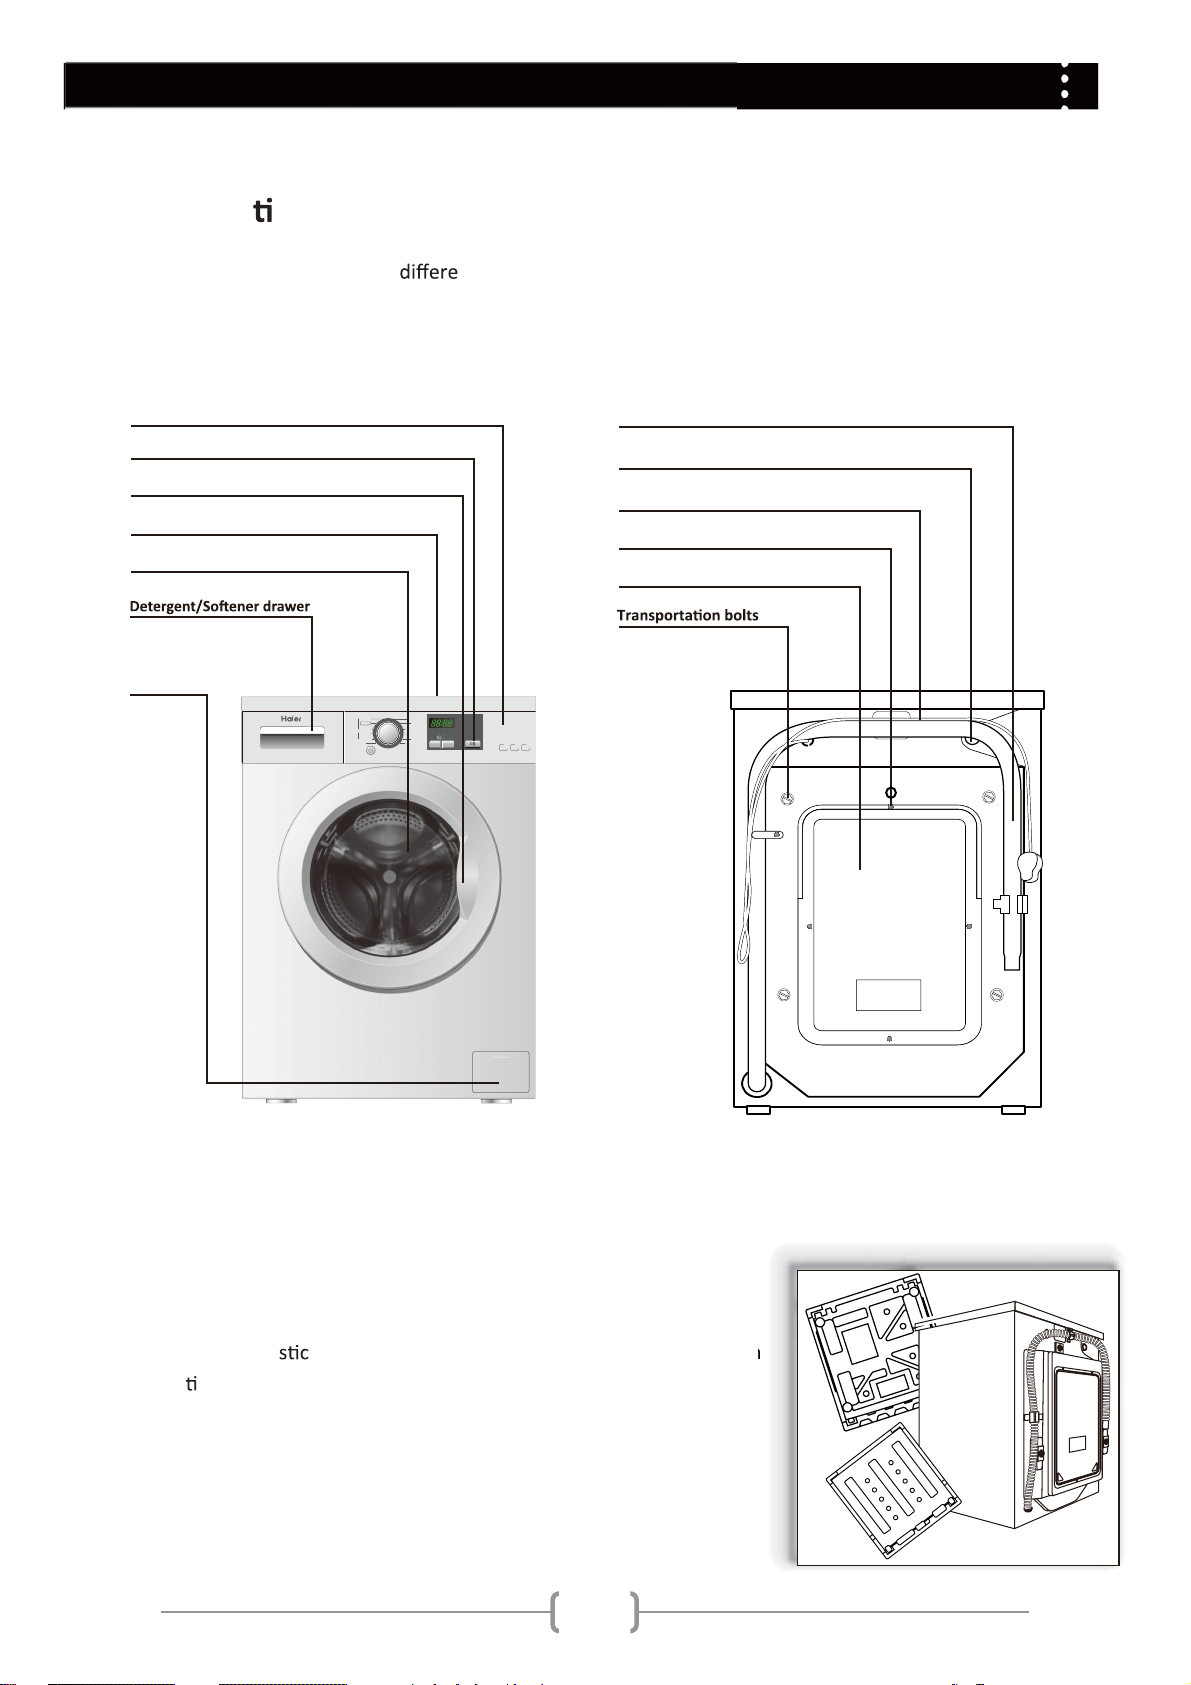
Descrip on
This diagram may be slightly nt from the layout of the washing machine you have just
purchased.
Control panel
Start/Pause
Door handle
Work top
Washer door
Filter cover
Drain hose
Water inlet valve
Power cord
Back cover screws
Back cover
Express 15 min
Pre-wash
Standard
Cotton
Quick wash
Standard
Synthetic
Quick wash
Wool
Power
TTime to end
Lingerie
Mix
Sport wash
Rinse
emperature
Extra rinse
°C
60
°C
40
Intense Start/pause
Spin
Drum clean
HW100-1211
Start/pause
Inicio / Pausa
+++
10kg
1200
A
CapicitySpin speedEnergy
T3
S1
S2
T4
S4
Preparing the machine
Remove all the packing materials to prevent unsteadiness, including
the polystyrene base. Upon opening the package, water drops may be
seen on the pla bag and the porthole. This is normal phenomenon
resul ng from water tests in the factory.
T1
T2
S3
5
Page 7
Before Use
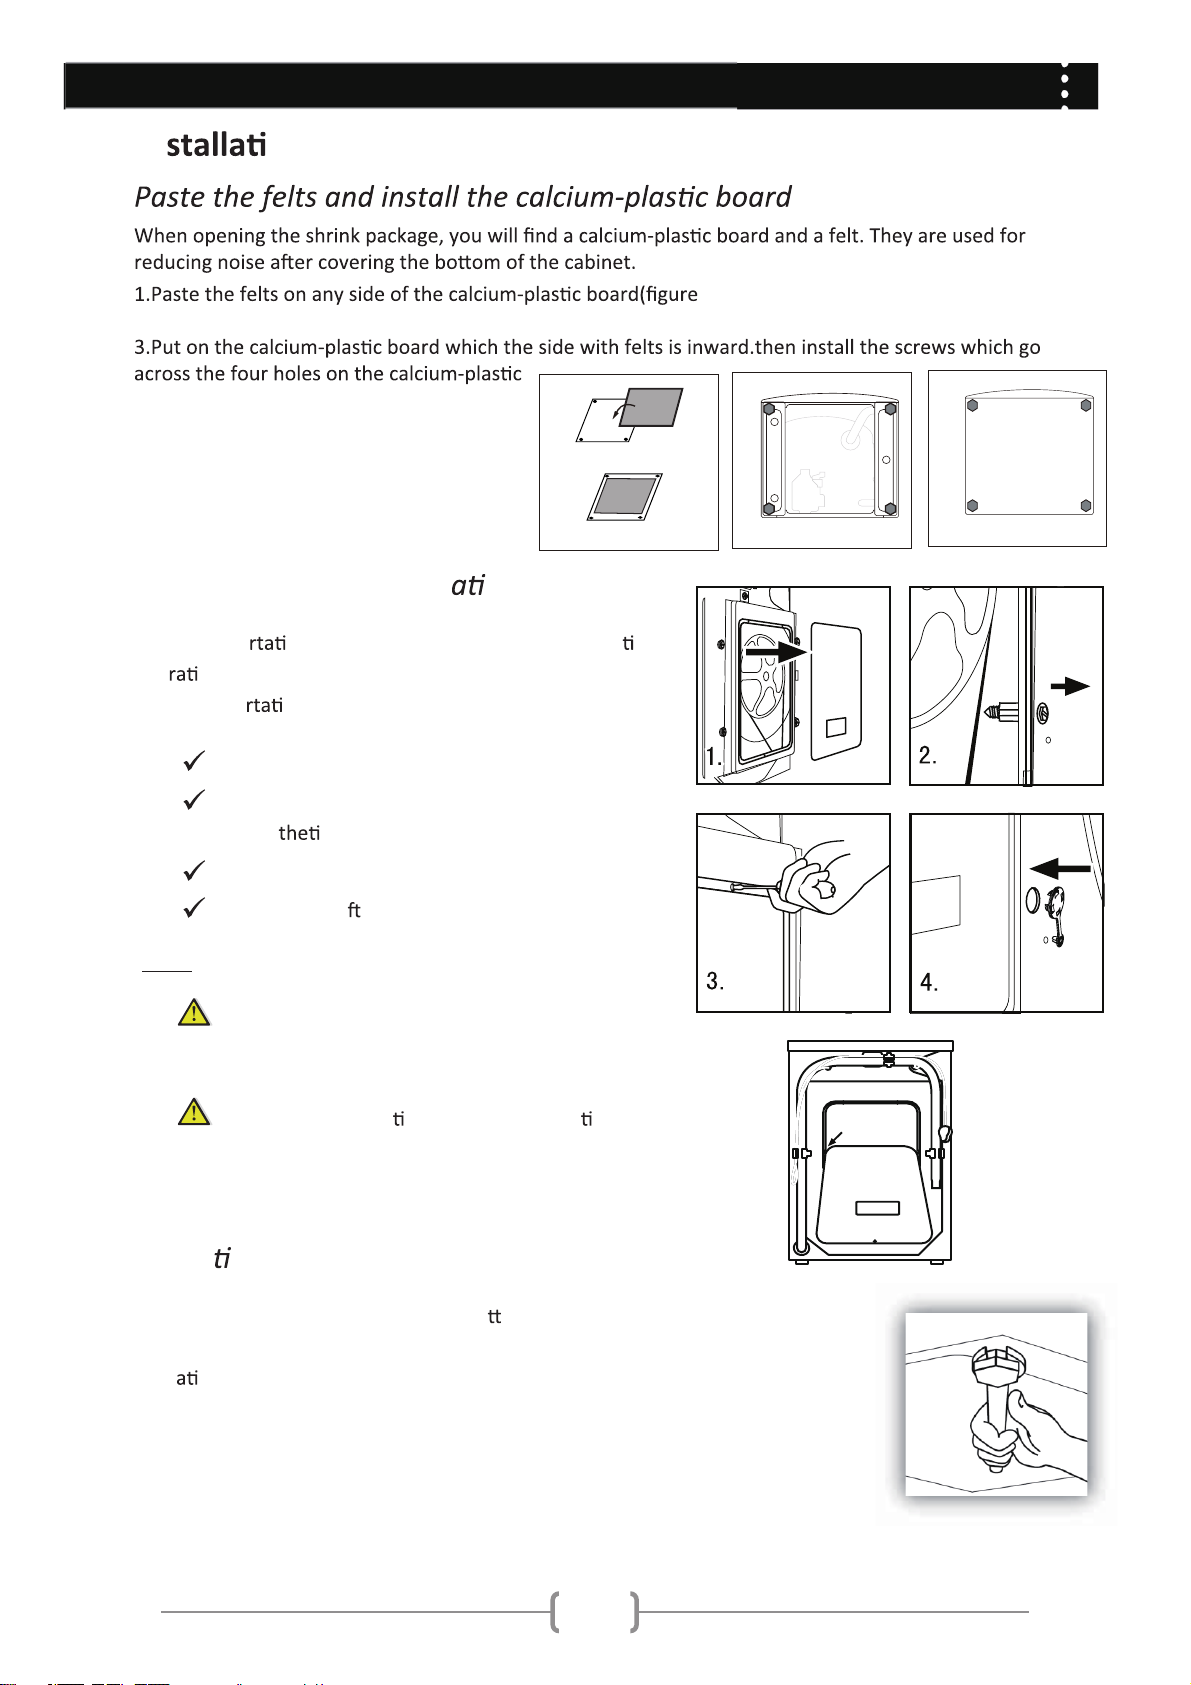
In on
2.Put down the machine backwards, Remove the four screws (figure 2.)
board (figure 3).Finally keep the machine
upright.
(HW100-1211,HW70-1211,HW70-1211-S)
1.)
1.
Dismantle the transport on bolts
The transpo on bolts are designed for clamping an -
on components inside of the washing machine during
vib
the transpo
Remove the back cover.
Remove the four bolts on the rear side and take out
the syn
Replace the back cover.
Fill the holes le by the bolts with blanking plugs.
Note:
When you replace the back cover, the convexity
must face to outside, and you have to insert the
back cover from the two gaps as shown in fig.5.
on process.
c stabilizers from within the machine.
2.
3.
Keep the transporta on bolts and synthe c
stabilizers in a safe place for later use.
5.
Adjus ng the feet
There are adjustable feet under the bo om of the washing machine. Before
use, they should be adjusted so that the machine is level. This will minimize
ons and thus noise during use. It will also reduce wear and tear. We
vibr
recommend using a spirit level to level the appliance. The floor should be as
stable and flat as possible.
6
Page 8
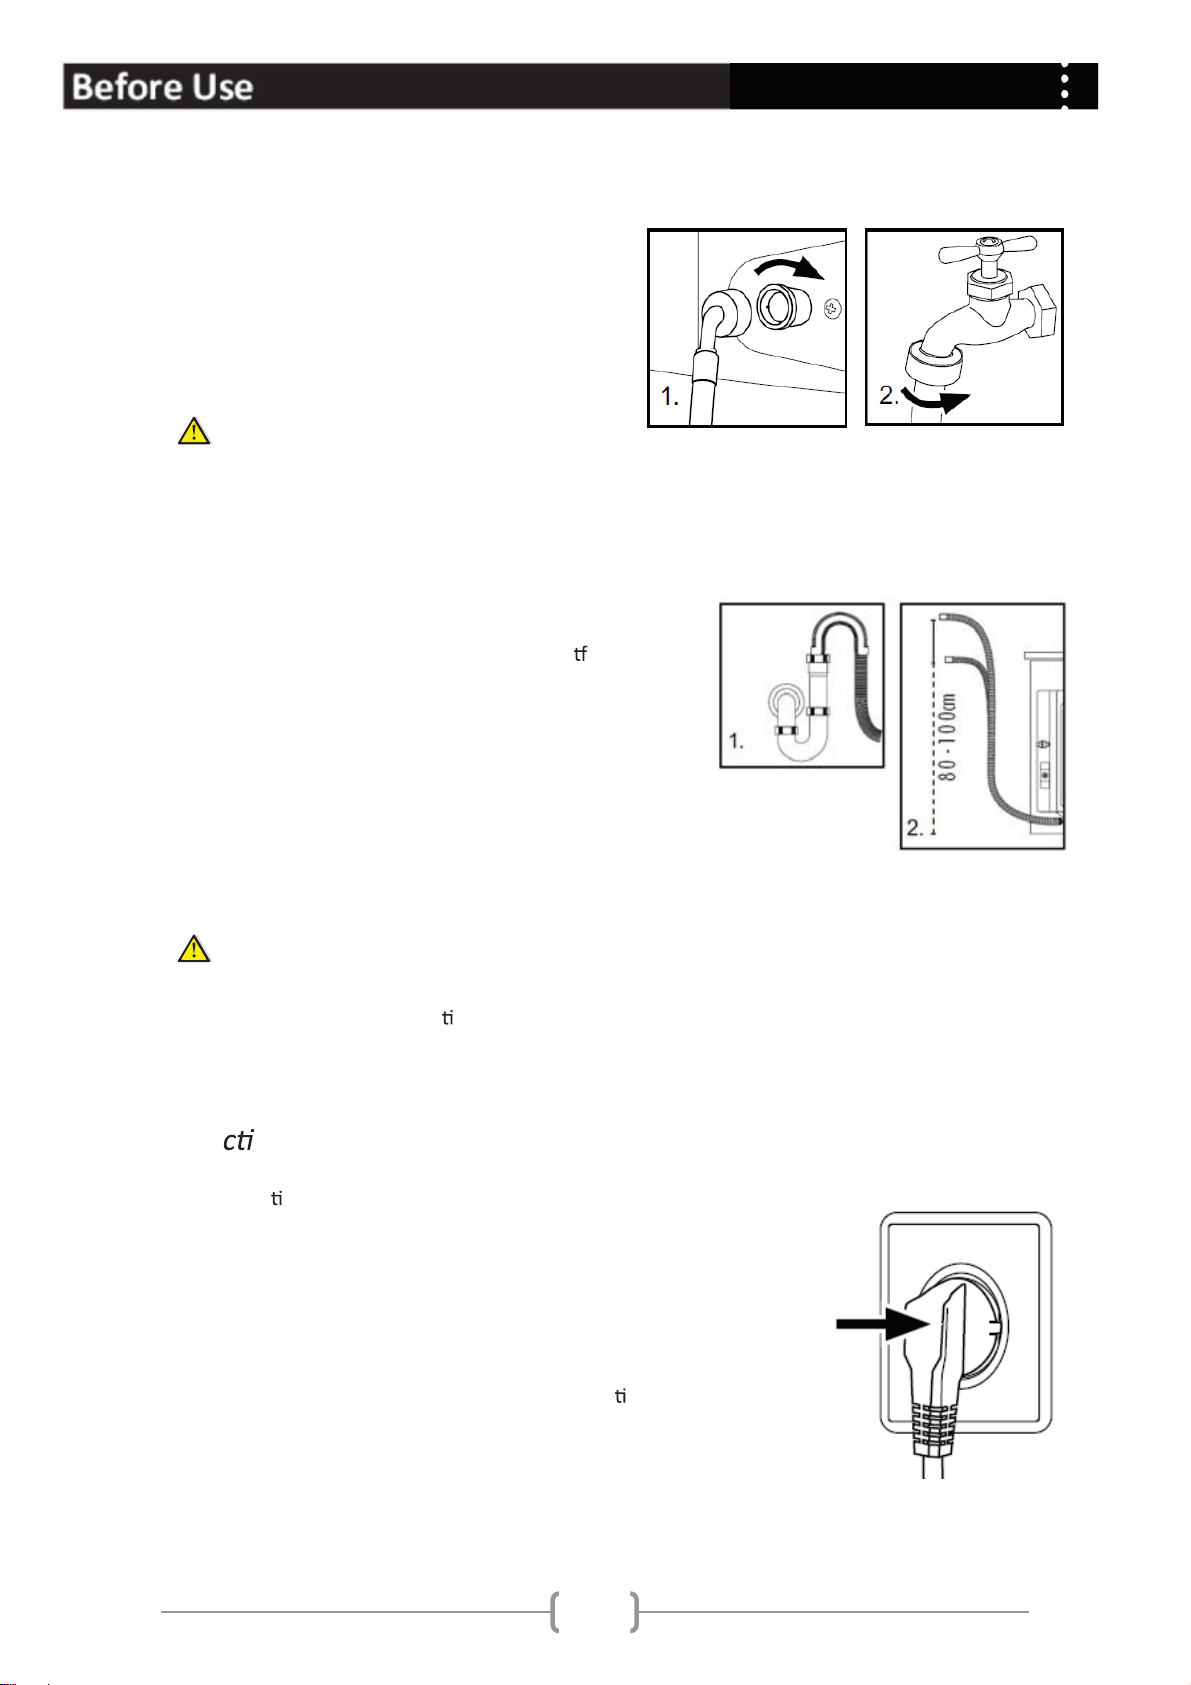
Inlet Hose
Connect the nut on the inlet hose to the
connector on the water valve.
Apply inlet hose to a water tap with cold,
fresh water.
Use the hose-set supplied with the appliance.
Old hose-sets should not be reused.
Drain Hose
Use the drain hose bracket to keep the end of the
drain hose retained and prevents the ou
water. Don't extend the length of the drain hose; if
an extended hose is required, please consult a
serviceman.
low of
The height of the drainage outlet must be 80-100
cm. Fix the drain hose to the clip at the back of the
washing machine to prevent it from dropping off.
The drain hose should not be submerged in water and should be securely fixed and leak-free.
If the drain hose is placed on the ground or if the pipe is at a height of less than 80cm, the
washing machine will con
nuously drain while being filled (self-siphoning).
Conne
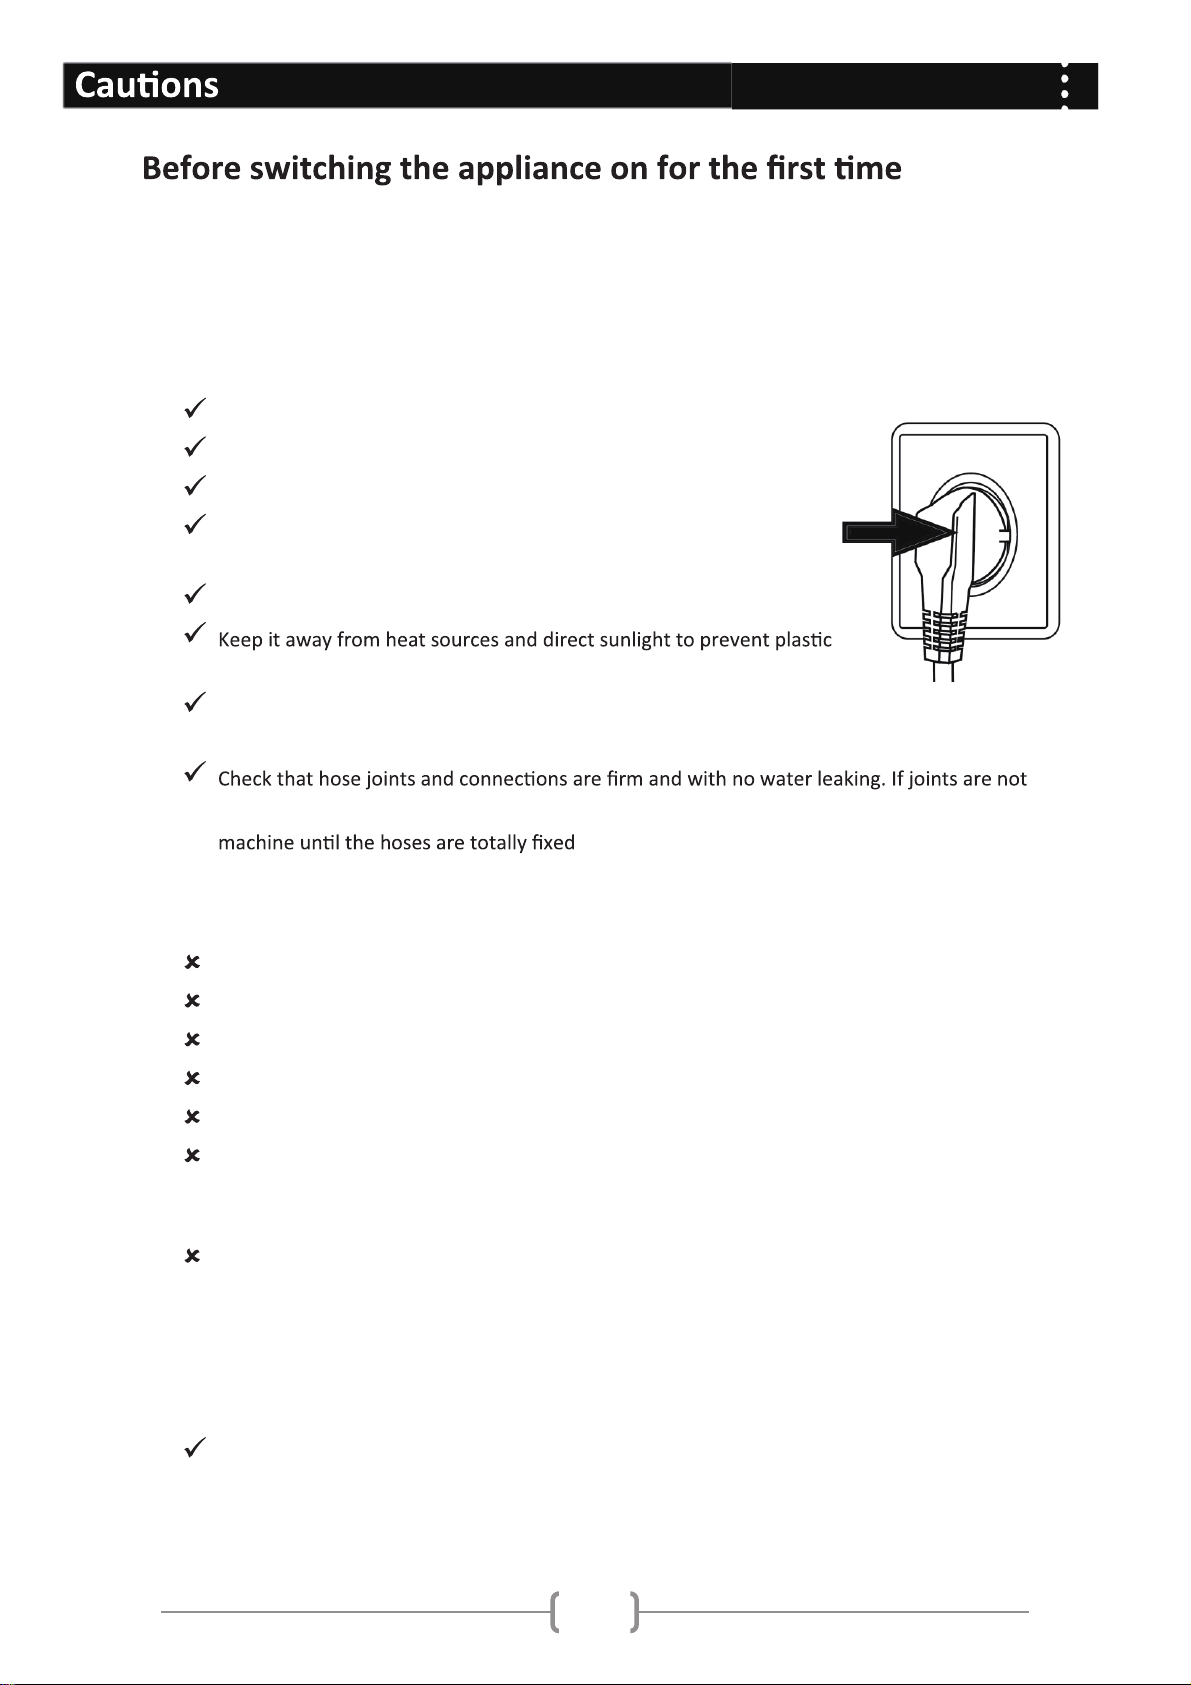
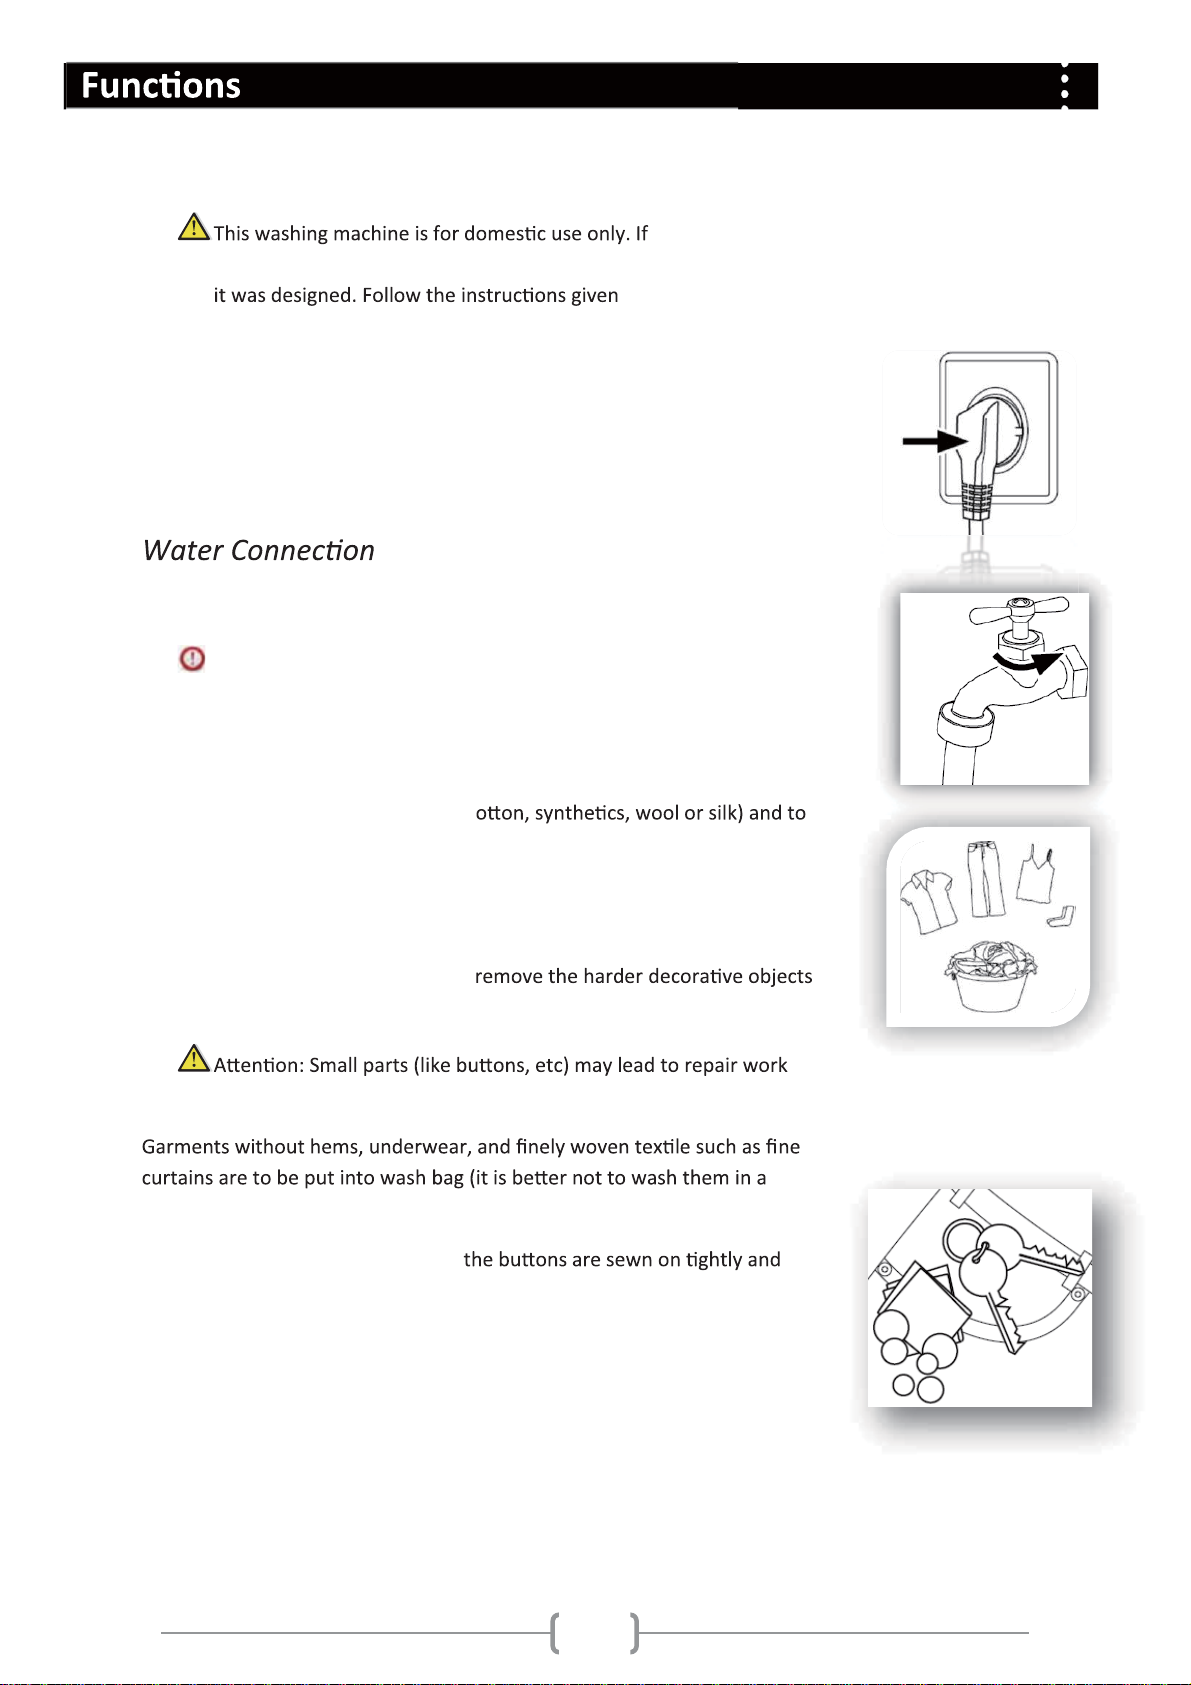
Before connec ng to the power supply, check:
ng to Power Supply
The socket is adequate for the maximum power of the washing
machine (For safety, fuses in the power circuit should be rated
for no less than 15A).
The voltage should meet the requirement.
The power outlet should be capable of accep ng the washing
machine plug.
Connect the machine to an earthed socket outlet.
7
Page 9
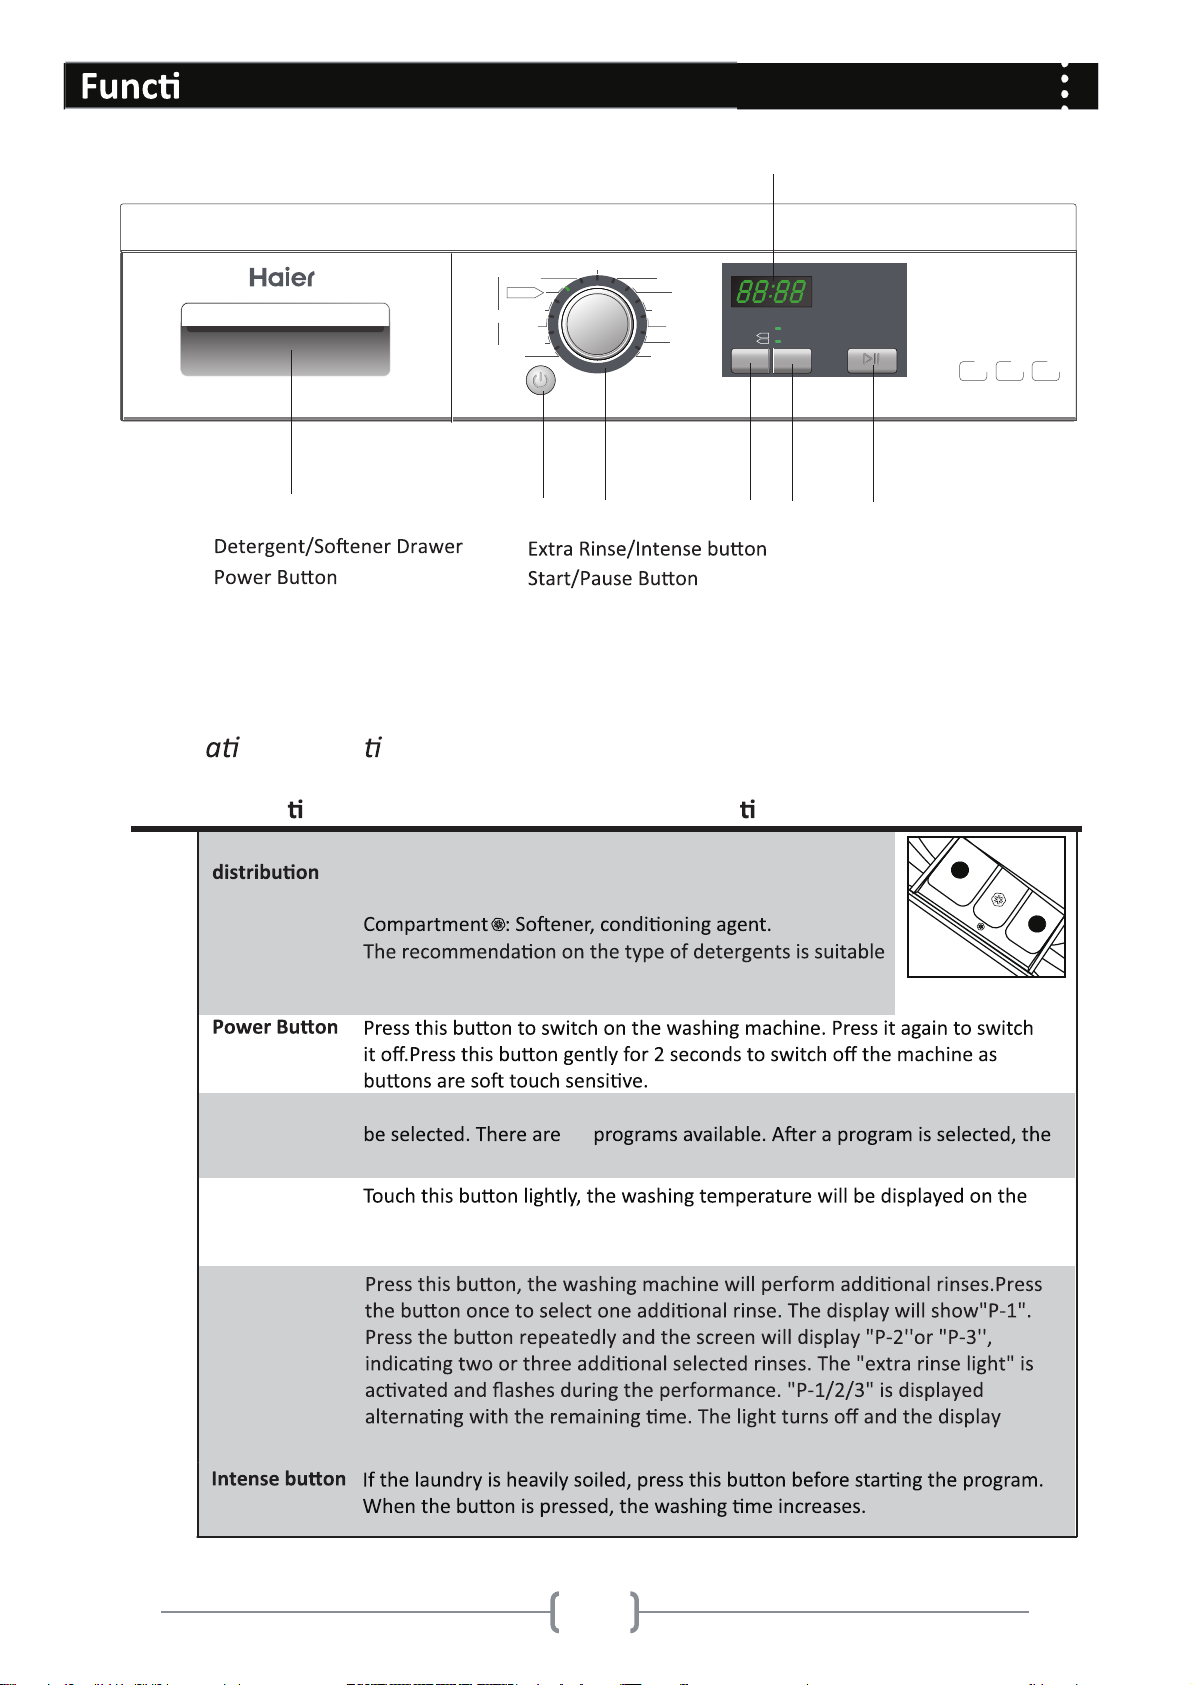
ons
Control Panel
1
1.
2.
3. Program Dial
4. Wash Temp
Cotton
Synthetic
Pre-wash
Standard
Quick wash
Standard
Quick wash
Wool
Power
Express 15 min
2
3
Lingerie
Sport wash
Drum clean
5.
6.
7.
LED Display
Rinse
7
TTime to end
Mix
emperature
Extra rinse
°C
60
°C
40
Spin
Intense Start/pause
4
5
6
HW100-1211N
+++
A
1200
10kg
CapacitySpin speedEnergy
Oper onal Func ons
Nº Func on Explica on
1 Detergent
drawer
2
Program Dial
3
Wash Temp
4
5
Extra Rinse
Open the drawer, three compartments can be seen:
Compartment 1: Prewash detergent
Compartment 2: Detergent for programs 1 to 10.
for the various washing temperatures, please refer to the
manual of detergent.
By turning the knob clockwise/counterclockwise, the required program can
13
corresponding light will go on.
indicator. Select a temperature according to the type of laundry.Note: If there
is no indicator light displayed, it means cold wash.
2
2
1
1
disappears when the extra rinse ends.
8
Page 10
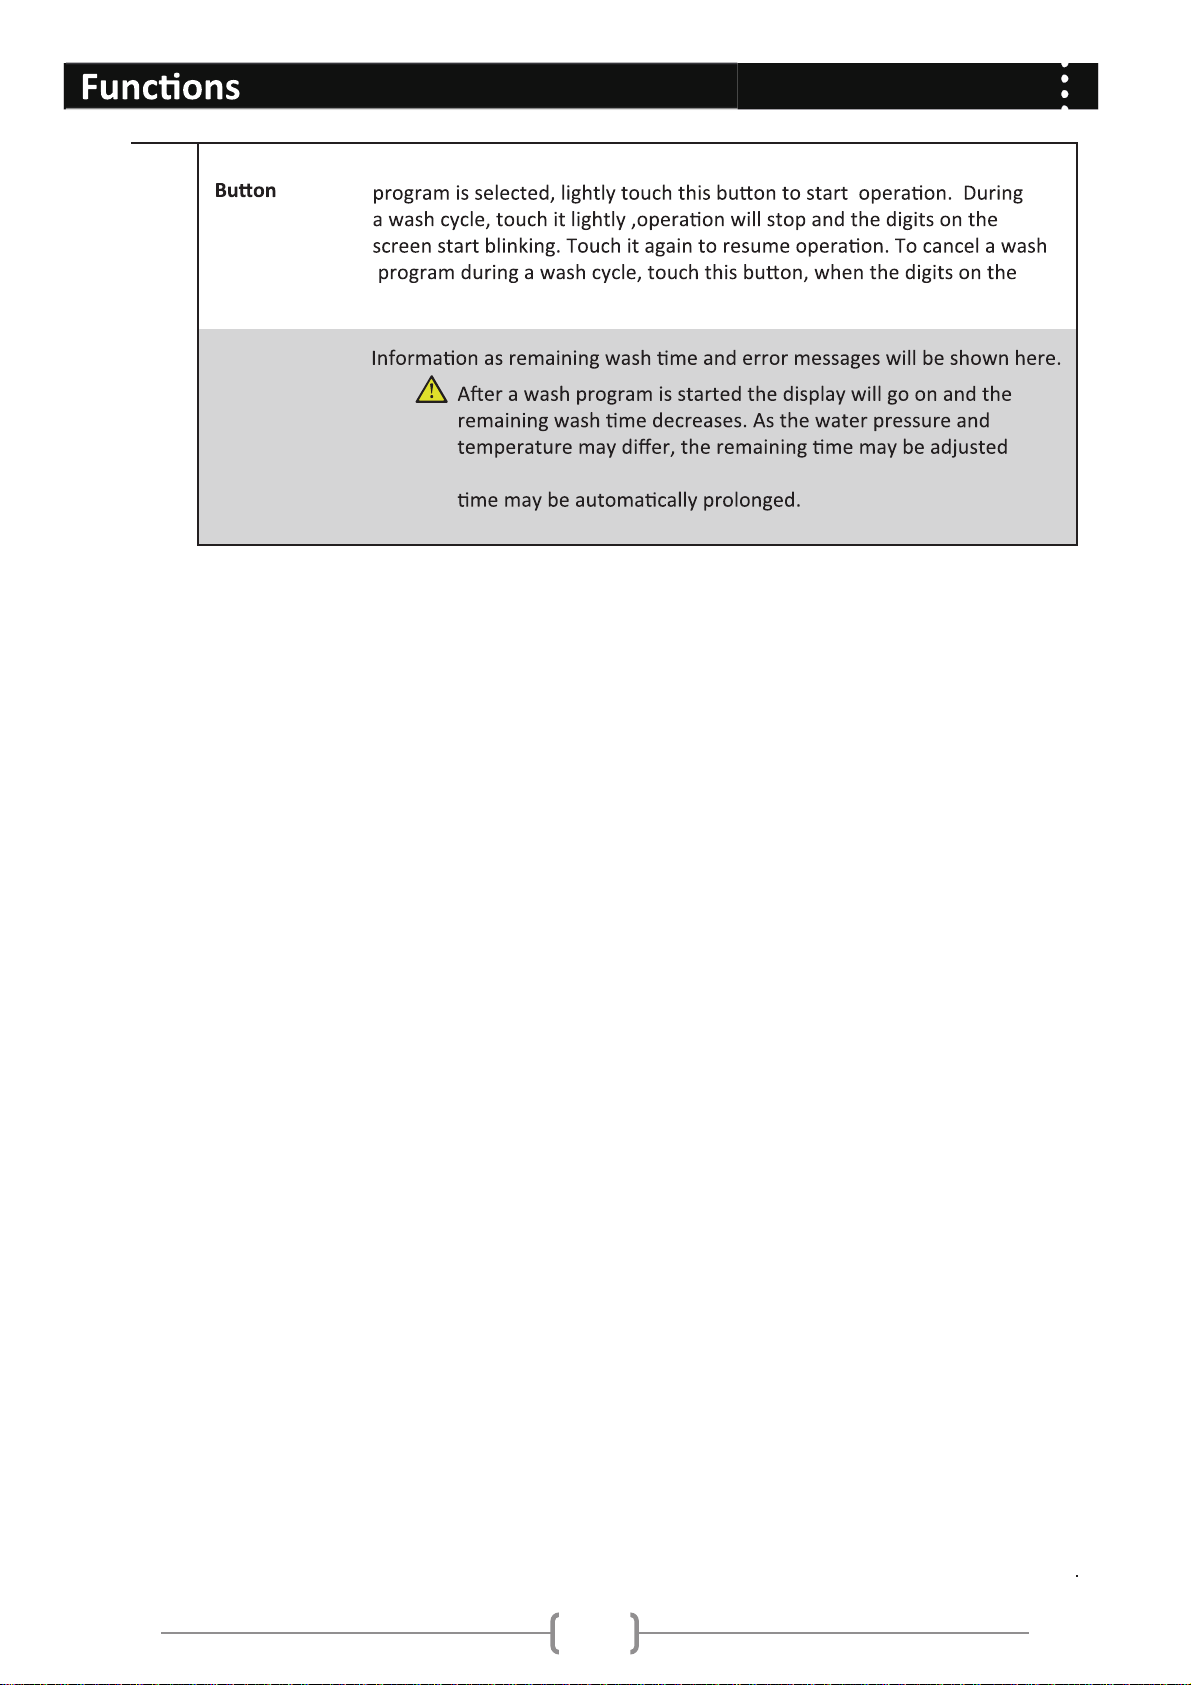
Start/Pause
6
When the washing machine is connected to the power socket and a
screen start blinking, press the Power switch, the program will be cancelled.
7
LED Display
accordingly. When the laundry is not balanced during spinning, the
9
Page 11
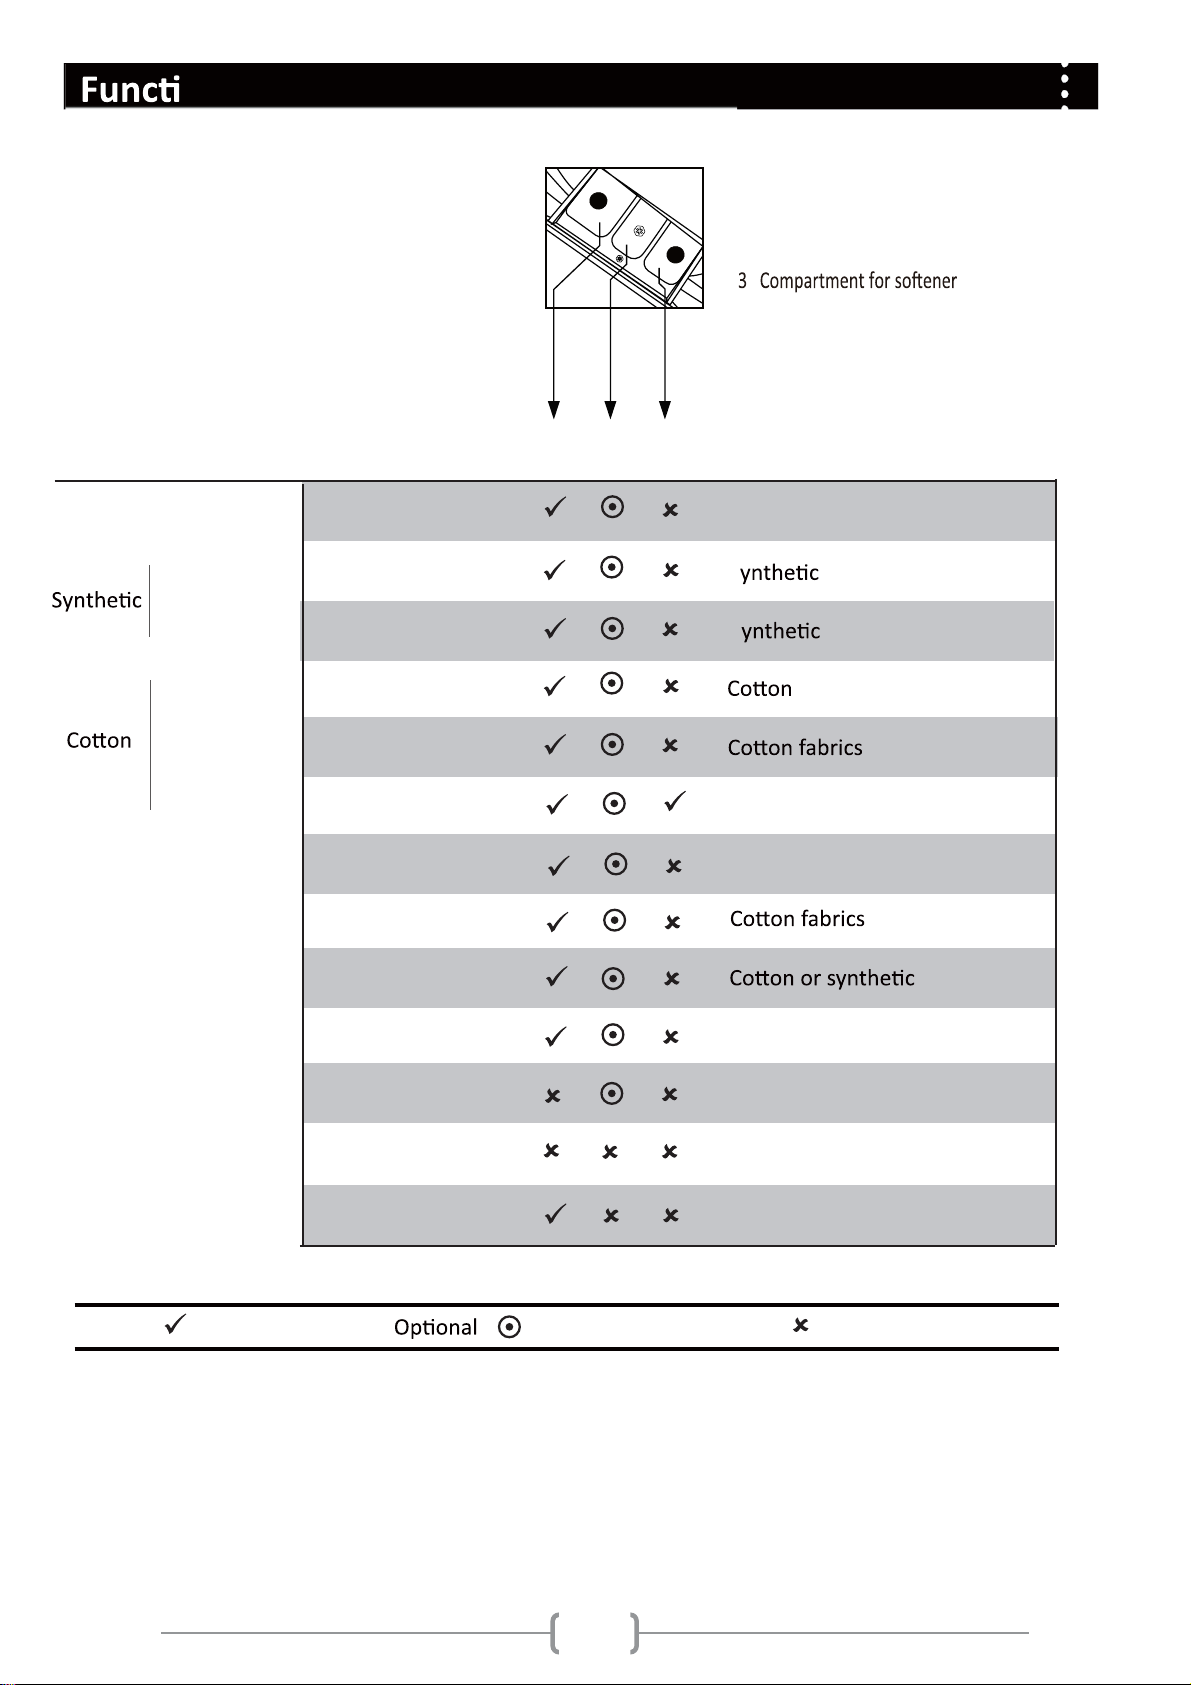
ons
Program Modes
2
2
1
1
1 Detergent compartment for prewash mode
2 Detergent compartment
Program
Wool
Quick Wash
Standard
Quick Wash
Standard
Pre-wash
Express 15 min
Lingerie
Mix
Temp Max
40 °C
40 °C
60 °C
40 °C
90 °C
90 °C
40 °C
90 °C
60 °C
Preset 2
--°C
--°C
40°C
40°C
60°C
60°C
20°C
60°C
60°C
1
3
Fiber type
Preset spin speed
Woolen fabrics 600 rpm
S
S
800 rpm
800 rpm
800 rpm
1200 rpm
Heavy soiling 1200 rpm
Heavy soiling
800 rpm
800 rpm
1000 rpm
Yes
Sport wash
Rinse
Spin
Drum clean
60 °C
/
/
90 °C
60°C
/
/
90 °C
Sports wear 1000 rpm
/
/
Cleans the unit on
first use
800 rpm
1000 rpm
400 rpm
No
10
Page 12
Program Temp.
Max.Load
HW100-1211
HW70-1211*
HW60-1211*
Energy
HW100-1211
HW70-1211*
HW60-1211*
Water
HW100-1211
HW70-1211*
HW60-1211*
Wash Time
HW100-1211
HW70-1211*
HW60-1211*
Spin
Performance
HW100-1211
HW70-1211*
HW60-1211*
Standard
Coon
Standard
laundry and they are the most efficient programs in terms of combined energy and water
differ from the declared cycle temperature.
2."
40 5kg
40 *
60 *
60 *
5kg
5kg
10kg
Choose the best Detergent
Universal Color Delicate Special
c L/P
Mix
Wool
Sport
Express 15 min
Quick Wash
L/P
L/P L/P - - O
L/P L/P
L/P
L/P
LL - O
/ /
0.673kWh
0.762kWh
40.6L
40.1L
1:50h
3:22h
3:28h
0.712kWh 57.8L 3:28h
- - O
-L
--- L O
--- L O
-
-L
O
O
49%
53%
53%
53%
Detergent
L
P
O
-
Info:Modern washing detergents at low temperatures.
Liquid cold - 60
Powder 40 - 90
No - - -
Temperture range in
- - -
11
Page 13
Washing Methods
the guarantee will not be valid anymore. Do not use it for purposes other than that for which
machine-washable garments.
the machine is use for commercial purpose
on the label of each garment and wash only
Power Supply
Connect the washing machine to the power supply (220V to 240V~/50Hz).
Turn on the tap. The water must be clean and clear.
Before use, check for leakage in the joints between the tap and the inlet
hoseby turning on the tap.
Preparing the Laundry
Sort out clothes according to fabric (c
how dirty they are.
Separate white clothes from colored ones. Wash them Įrst by hand to check
if they fade or run.
Empty pockets (keys, coins, etc.) and
(e.g. brooches).
which user has to pay by him and can cause damage in the machine.
washing machine).
Close zippers and hooks, make sure
place small items such as socks, belts, bras, etc. in the wash bag.
Unfold large pieces of fabric such as bed sheets, bedspreads, etc.
Turn shirts inside out.
12
Page 14
ons
Loading the appliance
Express 15 min
TTime to end
Lingerie
Mix
Sport wash
Rinse
emperature
Extra rinse
°C
60
°C
40
Intense Start/pause
Spin
Drum clean
Power
Open the washer door put in the laundry piece by piece. Close the
Pre-wash
Standard
Cotton
Quick wash
Standard
Synthetic
Quick wash
Wool
door ghtly.
t using the washing machine, let it run unloaded for one
program to prevent the laundry from being tainted by oil or dirty
water from the washing machine. Before washing you should run
the machine without laundry, but with detergent, with 60°C
program.
Do not overload the washing machine.
Sele ng Detergent
The wa cy and the performance is determined by the quality of detergent used. Special
non-foaming detergent produces good washing results. Use spe etergents for synthe
woollen goods. Do not use dry cleaning agents such as trichloroethylene and similar products.
Do not add more detergent than needed; otherwise, it may cause the situa ons as following
and washing machine malfun on imp g washing machine’s life.
Due to the increasing foam, the rinse me will be longer than normal;
The foam may from the detergent drawer because of the increasing pressure of
the foam;
It may remain foam without cleaning out er th al
spinning cycle.
and
+++
10kg
1200
A
CapicitySpin speedEnergy
Recommend on:
Clean the detergent drawer once a week.
When using the prewashing program, please add half of the
ng dosage.
Please follow the dosage recommend on on the powder or liquid detergent package.
Adding Detergent
Slide out the detergent drawer and put the required detergent and so ening agent into the
corresponding compartments. Push back the drawer gently. (Refer to the instruc
For prewashing program, detergent should be added to both
compartments 1 and 2.
For other programs, do not add detergent to compartment 1.
Use liquid detergent according to the instru ons on its package. Do
not use liquid detergent if the prewash mode .
Do not overuse so ener; otherwise, it will damage the ar l
bers.
ons on the drawer)
2
2
1
1
13
Page 15

ons
Sele ng program
To get the best washing results, an appropriate
washing program should be selected according to
the laundry type. Please turn the program knob to
Express 15 min
Pre-wash
Standard
Cotton
Quick wash
Standard
Synthetic
Quick wash
Wool
Power
Sport wash
Drum clean
TTime to end
Lingerie
Mix
Rinse
emperature
Extra rinse
°C
60
°C
40
Intense Start/pause
Spin
select the right program.
Sele ng fun onal
Select the required op ons. (Refer to the "Control panel" pages 8,9 and 10)
Se ng washing temperature
Press and hold down the temperature bu on un he desired temperature is selected.
Se ng spin speed
Press and hold down the speed bu on un e desired speed is selected. See " onal
fun ons" on the "Control panel" pages (08 and 09) for selec ng temperature and spin speed. It is
advisable to select the recommended value.
HW100-1211
+++
10kg
1200
A
CapacitySpin speedEnergy
Washing
Press the Start/Pause bu on. The washing machine will operate according to the preset programs.
The washing machine will stop op
will appear on the display. Open the washer door and take out the laundry.
the door will remain CLOSED.
>> First press Start/
>> Second press bu on to switch OFF the powe
Power
Pause
bu on.
>> Wait about 2 minutes before door could be opened.
on autom ly when a washing cycle ends. The "End" sign
Express 15 min
Pre-wash
Standard
Cotton
Quick wash
Standard
Synthetic
Quick wash
Wool
Power
2
second press Power
bu on to switch OFF
the power
Sport wash
Drum clean
TTime to end
Lingerie
Mix
Rinse
emperature
Extra rinse
°C
60
°C
40
Intense Start/pause
Spin
1
first press
Start/Pause
HW100-1211
+++
10kg
1200
A
CapacitySpin speedEnergy
A er washing
Turn o the water supply and unplug the power cord. Open the washer door to prevent forma on of
moisture and odors. Let the door open while not used.
14
Page 16

Care Chart
Machine Wash,
COLD
Machine Wash,
WARM
Machine Wash,
HOT
Machine Wash,COLD
Permanent Press
Machine Wash,WARM
Permanent Press
Machine Wash,HOT
Permanent Press
Machine Wash,COLD
Gentle Cycle
Machine Wash,WARM
Gentle Cycle
Machine Wash,HOT
Gentle Cycle
Load Reference
Hand Wash
Do Not Wash
Bleach as needed
Any bleach, like Clorox ,
may be safely used
Non-chlorine Bleach as needed
Use only a color-safe bleach,
like Clorox 2
Do Not Bleach
No bleach product should be
used including detergents with
bleach - or follow bleach package
test procedures to test for bleach
safety.
Wool Mark
®
®
Tumble Dry,NO HEAT
Tumble Dry ,L OW HEAT
Tumble Dry,MEDIUM
Tu mble Dry,HIGH
Tumble Dry,Permanent
Press, NO HEAT
Tumble Dry, Permanent
Press,LOW HEAT
Tumble Dry,Permanent
Press, MEDIUM
Tumble Dry,Gentle Cycle,
NO HEAT
Tumble Dry, Gentle Cycle,
LOW HEAT
Tumble Dry,Gentle Cycle,
MEDIUM
Do Not
Tumble Dry
Line Dry
Drip Dry
Dry Flat
Don't dry clean
Dry on clothes hanger
Tumble dry, Medium heat
Tumble dry, low heat
Don't tumble dry
Iron, Steam or Dry, with
LOW HEAT
Iron, Steam or Dry, with
MEDIUM HEAT
Iron, Steam or Dry, with
HIGH HEAT
Do Not Iron
with Steam
Do Not Iron
a professional drycleaner
Do Not Dryclean
Dry cleaning with any solvent
Dry cleaning with pericloride
Material Made of Load in grams
Bed Sheet Approximately 800
Blended fabric clothes / Approximately 800
Jeans / Approximately 800
Ladies Pyjamas / Approximately 200
Socks Blended fabrics Approximately 50
Underwear Blended fabrics Approximately 70
0003 yletamixorppA looW teknalB
003 yletamixorppA / strihS
15
Page 17

Maintenance
Cleaning and Care
A er washing
Turn o the water supply and pull out electricity plug
each wash. Open the washer door to prevent
form
machine is
in the machine and replace the drain hose.
Cleaning the detergent drawer
Clean the detergent distribu on drawer regularly.
Swing out the dra sh it clean with water and then replace it.
on of moisture and odors. If the washing
idle for a long period, drain the water
Cleaning the machine
Unplug the machine during cleaning and maintenance. Use a so cloth dampened with soap liquid to
clean the machine case and rubber components. Do not use
organic chemicals or corrosive solvents.
Clean the lter once a month:
Open the bo
Remove
Replace
om cover.
ter by turning counterclockwise.
r clean with running water.
ter by turning clockwise and remount the cover.
r must be in place, or it may lead to leakage.
Place a container under th ter, to collect any excess water that may come out
of the drain pump
16
Page 18

Maintenance
Water inlet valve and inlet valve r
To prevent blockage to the water supply by ingress of foreign
substances, clean the water inlet valve and inlet valve
Moving the machine
Remove the back cover.
Remove the blanking plugs.
Tighten the bolts with a spanner.
regularly.
Replace the back cover.
Long periods of disuse
ll out the electrical plug and turn o he water
moisture and odors. Let the door open while
not used.
Display Codes
Codes Causes
Err1 Door is not properly shut. Shut the door properly, and then press the
lter and check the drain hose
6 minutes.
contact the maintenance personnel.
Err3 Temperature sensor not properly
connected or damaged.
Err4 Heater error (Appears at the end of a
cycle).
Err5 Water level not met in 8 minutes.
The height of the drain hose is below 80
cm.
The drain hose is in water.
Contact the maintenance personnel.
Contact the maintenance personnel.
Make sure that tap is turned on, and water
pressure is normal.
maintenance personnel.
Install drain hose within 80-100 cm of
height.
Make sure the drain hose is not in water.
17
Page 19

Maintenance
Err8 Contact the maintenance personnel.
End
1:25
End of wash cycle.
.lennosrepecnanetniamehttcatnoCrorrErotoM7rrE
UNb
PAUS
Washing machine has an unbalanced
weight is greater than allowable maximum,
the washing machine will not spin and
will run at a low speed to avoidabnormal
If there is a power cut when the machine
is working, the machine will be in Pause
mode.
1.In case washing 1 piece of laundry (carpet,
bed sheet,table sheet,ect) make it
symmetrical inside the drum.
2.Lower the wet weight of laundry pieces
by wringing manually and placing them back
pieces inside the washing machine in a more
drum.
4.Add 1 or 2 pieces of laundry into the drum
to reduce the unbalanced load effects.
5.Restart the spin cycle by choosing Spin
programme.In case the failure persists,
please ask a qualified technician to repair it.
When power is reconnected, please press
Temperature
Intense
knobs. To unlock press the "Temperature" and
case of abrupt power failure or
resume when the power is on again.
program.
During the spin process, if too much foam is inspected, in order to protect the motor, the
Intense
the need to cut o
program selector again to choose another
power
18
Page 20

Trouble-Shoo ng
Trouble-Sho
Problem Causes Solu ons
Washing machine fails to operate.
Washing machine c
with water.
Machine is draining while being
Drainage failure.
Power failure.
The washer door is not properly closed.
Machine has not been switched on.
Water tap is not turned on.
Water pressure is less than 0,03 MPa.
The inlet hose is kinked.
Water supply failure.
The program knob is not properly set.
The washer door is not properly closed.
The height of the drain hose is below
80 cm.
The drain hose is in water.
Drain hose is blocked.
Drain hose end is higher than 100 cm
above
ter is blocked.
removed.
Washing machine is located on an uneven
surfaceor is not level.
Machine load is over 10/7/6kg.
ter is blocked.
vel.
Check the power supply.
Close the washer door properly.
Make sure the machine is switched on.
P
Turn on the water tap.
Check water pressure.
Check the inlet hose.
Ensure the water supply.
Set the program knob properly.
Close the washer door properly.
Install drain hose within 80-100 cm
of height.
Make sure the drain hose is not in
water.
Unblock the drain hose.
Make sure the drain hose end is lower
than 100 cm abov
ter.
Make sure the washing machine is on
an even surface and levelled.
Reduce amount of laundry in the
drum.
ter.
vel.
wash cycle.
Excessive foam in the drum, which is
Spinning fails
Water or electricity failure.
Washing machine gives an error message.
Washing machine is in soaking cycle?
The detergent is not a low-foaming type or
for manual wash.
Excessive use of detergent.
adjusted
Unbalance of the laundry
Check the power supply or water
supply.
Check display codes.
Check if your detergent is appropriate.
Reduce amount of detergent in the
This is normal and doesn't a ect the
Add clothes or run a spinning
program again.
19
Page 21

Technical date
Product Fiche (according EU 1061/2010)
kramedarT
.oNledoM
)gk(yticapacdetaR
ssalcycneiciffeygrenE
Energy consumption per year (kWh)
Energy consumption of cotton 60°C
Energy consumption of cotton 60°C
Energy consumption of cotton 40°C
Water consumption per year (L)
Spin-drying efficiency class
Max.spin speed (rpm)
Remaining moisture content (%)
standard 60
standard 40
cotton program
cotton program
4)
2)
3)
4)
5)
5)
1)
full load (kWh/cycle)
partial load (kWh/cycle)
partial load (kWh/cycle)
edom-ffoehtfonoitpmusnocrewopdethgieW
edomno-tfelehtfonoitpmusnocrewopdethgieW
Haier
HW100-1211
10
A+++
170
0.747
0.776
0.485
0.48
0.48
10908
B
1200
53
Cotton+60°C+Intense+Max speed
Cotton+40°C+Intense+Max speed
Haier
HW70-1211*
7
A+++
195
0.926
0.933
0.647
0.48
0.48
10220
B
1200
53
Haier
HW60-1211*
6
A+++
220
0.954
0.995
0.757
0.48
0.48
11040
B
1200
53
Program time of cotton 60°C
Program time of cotton 60°C
Program time of cotton 40°C
Duration of the left-on mode (min)
Airborne acoustical noise (washing/spinning)(dB(A))
Type
) Based on 220 standard washing cycles for cotton programmes at 60°C and 40°C at full and partial
1
load, and the consumption of the low-power modes. Actual energy consumption will depend on how the
appliance is used.
) Based on 220 standard washing cycles for cotton programmes at 60 and 40 at full and partial
2
load.Actual water consumption will depend on how the appliance is used.
) Class G is the least efficient and Class A is the most efficient.
3
) Based on the standard 60°C cotton program at full load and the standard 40°C cotton program at
4
partial load
) "standard 60 cotton program" and "standard 40 cotton program" are the standard washing
5
programms to which the information in the label and fiche relates.These programms are suitable to
clean normally soiled cotton laundry and they are the most efficient programmes in terms of combined
energy and water consumption.
) In case there is a power management system
6
) Based on the standard 60 cotton program at full load
7
full load (min)
partial load(min)
partial load (min)
6)
7)
200
200
175
-
58/77
200
200
175
-
59/78
freestanding
200
200
175
-
59/78
Basic technical informa
Power source
Water pressure (MPa)
Max power (W)
Net weight (kg)
on regarding the appliance.
HW100-1211
220 - 240V~/50 Hz
)A(tnerrucgnikrow.xaM
smargorpgnihsaW
)mmWxDxH(snoisnemiD
01
31
2000
64
HW70-1211*
220 - 240V~/50 Hz
01
31
2000
72
1
595x006x058
1
595x015x058
HW60-1211*
220 - 240V~/50 Hz
01
1
31
2000
595x056x058
74
20
Page 22

Card included in the product.
Haier Italy
AS Phone number; 199-100912
Haier Spain
AS Phone number (ES & PT) ; 902 50 91 23
Haier Germany
AS Phone number (DE/ AT) ; 0180 5 39 39 99 / 0820 00 12 05
Haier UK
AS Phone number;
Haier France
AS Phone number; 0980 406 409
not solved. Please check the Warranty
0333 003 8122
21
Page 23

Manuale utente HW100-1211N
HW70-1211N
HW70-1211N-S
HW60-1211N
HW60-1211N-S
Express 15 min
Prelavaggio
Lavaggio
Cotone
quotidiano
Rapido
30 min
Lavaggio
quotidiano
Sintetici
Rapido
30 min
Lana
ON/OFF
Fine lavaggio
Intimo
Misti
Sport
Risciacquo
Temperatura
Extra Risciacquo
°C
60
°C
40
Intensivo Avvio/Pausa
Centrifuga
Pulizia
Cestello
HW100-1211N
+++
1200 10kg
A
rpm
Page 24

Informazioni
un
Tenere a portata di mano questo manuale per potervi fare riferimento in qualsiasi momento e
Se la lavatrice viene venduta, regalata o lasciata in occasione di un trasloco, assicurarsi di consegnare il
e conoscere le avvertenze sulla sicurezza.
Accessori
1x Manuale utente
1x Coperchio inferiore
User Manual HW80-1479
1x Supporto per tubo di
scarico
Prewash
1400
C
C
1000
500
C
C
5x Tappi di chiusura
1x Tubo di carico e
1
Page 25

Indice
Funzioni dei comandi ...................................................................................................................................8
Manutenzione ............................................................................................................................................16
Risoluzione dei problemi ............................................................................................................................19
Servizio post-vendita ..................................................................................................................................21
Legenda
...............................3
.............................5
................................................................................................................................................20
Sì
No
dei materiali.
2
Page 26

Precauzioni
Prima di accendere la lavatrice per la prima volta
l'apparecchio. Le operazioni di pulizia e di manutenzione non dovranno essere volte da bambini senza la
Assicurarsi di aver rimosso il bullone per il trasporto.
Assicurarsi che la presa sia facilmente raggiungibile.
lavatrice
cavo.
danneggiare il cavo.
Rimuovere o inserire la spina in presenza di gas infiammabili.
confezione.
alled ilairetam i noc o ecirtaval al noc onihcoig emrefni enosrep o inibmab ehc eraicsaL
cuscino.
3
Page 27

Precauzioni
per maggiore sicurezza. Pulire la parte inferiore dell'oblò.
un tecnico autorizzato o ad altro personale qualificato.
Toccare lo sportello della lavatrice durante il lavaggio poiché può diventare molto caldo.
Lavare con acqua calda materiali di gomma o spugnosi
Aprire lo sportello della lavatrice se il livello dell'acqua è visibile dall'oblò.
e aigrene eraimrapsir rep enoizatnemila'l eragellocs e oiggaval ingo opod ecirtaval al erengepS
erative id enfi la enoiznuf ni è non ecirtaval al odnauq otrepa etnemreggel olletrops ol eraicsaL
Consigli per il risparmio
massimo consigliate.
dispersione.
acqua e consumo di energia non selezionando il "Prelavaggio" per biancheria leggermente
sporca.
Risparmiare energia e tempo selezionando una velocità di centrifuga elevata per ridurre il
temperature superiori ai 60 °C solo per biancheria molto sporca.
4
Page 28

Descrizione
Pannello di controllo
Avvio/Pausa
Maniglia dello sportello
Piano d'appoggio
Sportello della lavatrice
Coperchio
Tubo di scarico
Valvola per il carico dell'acqua
Cavo di alimentazione
Coperchio posteriore
Bulloni per il trasporto
Express 15 min
Prelavaggio
Lavaggio
Cotone
quotidiano
Rapido
30 min
Lavaggio
quotidiano
Sintetici
Rapido
30 min
Lana
ON/OFF
Fine lavaggio
Intimo
Misti
Sport
Risciacquo
Temperatura
Extra Risciacquo
°C
60
°C
40
Intensivo Avvio/Pausa
Centrifuga
Pulizia
Cestello
HW100-1211N
+++
1200 10kg
A
rpm
T3
S1
S2
T4
S4
Preparazione della lavatrice
T1
T2
S3
5
Page 29

Installazione
derivante dalla copertura della parte inferiore della lavatrice.
1).
2. Adagiare la lavatrice su un lato, con l'oblò rivolto verso l'alto, la parte inferiore verso l'operatore e
(HW100-1211N,HW70-1211N,HW70-1211N-S)
durante il trasporto.
Rimuovere il coperchio posteriore.
dall'interno della lavatrice.
Riposizionare il coperchio posteriore.
chiusura.
Nota:
Quando si riposiziona il coperchio posteriore, la
parte convessa deve essere rivolta verso l'esterno e
il coperchio posteriore deve essere inserito dai due
spazi come mostrato nella figura 5.
1.
2.
3.
2.
Conservare i bulloni per il trasporto e gli stabilizzatori
La lavatrice è dotata di piedini regolabili nella parte inferiore. Prima dell'uso,
è necessario regolare i piedini affinché la lavatrice si trovi in una posizione
pavimento deve essere il più possibile stabile e piano.
6
Page 30

Collegare il dado sul tubo di carico al conneore
della valvola dell'acqua.
Collegare il tubo di carico al rubineo dell'acqua
fredda.
Ulizzare il set di tubi in dotazione con la lavatrice.
Non riulizzare i set di tubi obsole.
Ulizzare il supporto del tubo di scarico per fissarne
l'estremità
Non aumentare la lunghezza del tubo di scarico; se è
necessario un tubo più lungo, contaare l'assistenza
tecnica.
ed evitare la fuoriuscita dell'acqua.
L'altezza per l'uscita del tubo di scarico deve essere
compresa tra 80 e 100 cm. Fissare il tubo di scarico
al gancio situato nella parte posteriore della lavatrice
affinché non cada.
Il tubo di scarico non deve essere immerso nell'acqua, deve essere fissato saldamente e
mantenuto sempre integro. Se il tubo di scarico viene posizionato per terra o a un'altezza
inferiore a 80 cm, la lavatrice connuerà a scaricare l'acqua mentre viene riempita
(autosifonaggio).
!
Prima di collegare la lavatrice all'alimentazione, verificare che:
La presa sia adeguata alla potenza massima della lavatrice
(per quesoni di sicurezza, i fusibili del circuito dovrebbero essere
almeno da 15 A).
Il voltaggio deve soddisfare i requisi della lavatrice.
La presa di corrente deve essere conforme alla spina della lavatrice.
Collegare la lavatrice a una presa con messa a terra.
7
Page 31

Funzioni dei comandi
Funzioni dei comandi
Pannello di controllo
1
1.
ammorbidente
2. Tasto ON/OFF
3. enoizeles al rep aloponaM
dei programmi
Cotone
Sintetici
Prelavaggio
Lavaggio
quotidiano
Rapido
30 min
Lavaggio
quotidiano
Rapido
30 min
Lana
ON/OFF
Express 15 min
2
3
Intimo
Sport
Risciacquo
Centrifuga
Pulizia
Cestello
Fine lavaggio
Misti
Temperatura
4
4. Temperatura lavaggio
5. Extra Risciacquo/Intensivo
6.
Tasto Avvio/Pausa
7.
Display a LED
7
Extra Risciacquo
°C
60
°C
40
Intensivo Avvio/Pausa
5
HW100-1211N
+++
1200 10kg
A
rpm
6
enoizircseDenoiznuFºN
1
per la
distribuzione
Scomparto 2: detergente per i programmi da 1 a 10.
del detergente
temperature di lavaggio, fare riferimento alle istruzioni
del detersivo stesso.
2 Tasto ON/OFF Premere questo tasto per accendere la lavatrice. Premerlo nuovamente per
premere leggermente questo tasto per due secondi.
3 Manopola per
la selezione
dei programmi
4 Temperatura
lavaggio
Extra
5
risciacquo
programma desiderato. Sono disponibili 11 programmi. Dopo aver selezionato
un programma, si accende il led corrispondente.
Toccando leggermente questo pulante, verrà visualizzata la temperatura del
biancheria. Nota: se non si accende alcun led, vuol dire che si sta eseguendo un
lavaggio a freddo.
visualizzato "P-1". Premere ripetutamente il tasto per visualizzare sul display
2
2
1
1
Tasto
Intensivo
rimanente. Una volta terminato il risciacquo extra, il led si spegne e non viene
più visualizzato nulla sul display.
Premere questo tasto prima di avviare un programma, in caso di biancheria
8
Page 32

Funzioni dei comandi
6 Tasto Avvio/
Pausa
7 Display a LED Su questo display vengono visualizzate informazioni quali il tempo di lavaggio
Premere leggermente questo tasto per avviare la lavatrice dopo averla collegata
alla presa di corrente e aver selezionato un programma. Se si preme questo
sullo schermo iniziano a lampeggiare. Premere nuovamente il tasto per
riavviare la lavatrice. Per annullare un programma di lavaggio durante un ciclo,
premere questo tasto. Quando i numeri sul display inizieranno a lampeggiare,
premere il tasto ON/OFF e il programma verrà annullato.
rimanente e i messaggi di errore.
Una volta avviato un programma di lavaggio, il display si accende e il
tempo di lavaggio rimanente inizia a diminuire. Poiché la pressione
e la temperatura dell'acqua possono variare, il tempo rimanente
viene regolato di conseguenza. Se durante la centrifuga la biancheria
non è ben bilanciata, è possibile che il tempo venga aumentato
9
Page 33

Funzioni dei comandi
Programmi
2
2
1
1
prelavaggio
id àtiladom al rep etnegreted otrapmocS 1
2 Scomparto detergente
3 Scomparto ammorbidente
Programma
Cotone
Lana
Rapido
30 min
Lavaggio
Rapido
30 min
Lavaggio
Prelavaggio
Express 15 min
Sport
Temperatura
max
40 °C
40 °C
60 °C
40 °C
90 °C
90 °C
40 °C
90 °C
60 °C
60 °C
Temperatura
--°C
--°C
40°C
40°C
60°C
60°C
20°C
60°C
60°C
60°C
2 3 1 Tipo di tessuto
Capi in cotone o
Velocità
centrifuga
600 giri/min
800 giri/min
800 giri/min
800 giri/min
1200 giri/min
1200 giri/min
800 giri/min
800 giri/min
1000 giri/min
1000 giri/min
Risciacquo
Centrifuga
Pulizia
Cestello
/
/
90 °C
/ /
/
90 °C
/
/
Sì No
10
800 giri/min
1000 giri/min
400 giri/min
Page 34

Funzioni dei comandi
Carico
Programma
Sintetici
Temperatura
40
massimo
HW100-1211N
HW70-1211N
HW60-1211N*
5kg
Standard
40 *
Standard
60 *
60 *
I programmi Cotone a 60 °C e 40 °C standard sono ideali per pulire biancheria di cotone
variare da quella indicata nel ciclo.
5kg
5kg
10kg
Consumo
HW100-1211N
HW70-1211N
HW60-1211N*
/ /
0.673kWh
0.762kWh
0.712kWh 57.8L 3:28h
Consumo
d’acqua
HW100-1211N
HW70-1211N
HW60-1211N*
40.6L
40.1L
Tempo
lavaggio
HW100-1211N
HW70-1211N
HW60-1211N*
1:50h
3:22h
3:28h
Prestazioni
centrifuga
easciugatura
HW100-1211N
HW70-1211N
HW60-1211N*
49%
53%
53%
53%
*)
1. “Cotone/Standard + 40°C + Intensivo + Massima velocità di centrifuga”
2. “Cotone/Standard + 60°C + Intensivo + Massima velocità di centrifuga”
Scegliere il miglior detersivo
Universale
- - -
L/P L/P
Eco
Standard
L/P L/P - - O
L/P L/P
L/P L/P
- -
Detersivo
L
P
O
-
Info: i moderni detersivi sono efficaci anche a basse temperature di lavaggio.
Liquido
Polvere
Opzionale
o
N
L
- - O
- - O
L
Intervallo di temperature °C
Speciali
L O
-
-
Freddo
Ammorbidente
O
O
06 –
09 – 04
- - -
- - -
11
Page 35

Funzioni dei comandi
Modalità di lavaggio
Questa lavatrice è progeata esclusivamente per uso domesco. In caso di ulizzo per scopi
commerciali, la garanzia non sarà più valida. Non ulizzare la lavatrice per scopi diversi da
quelli per cui è stata progeata. Seguire le istruzioni riportate sull'echea di ogni indumento
e lavare solo capi lavabili in lavatrice.
"
Collegare la lavatrice all'alimentazione generale (da 220V a 240V~/50Hz).
!#
Aprire il rubineo. L'acqua deve essere pulita e limpida.
Prima dell'uso, verificare che non ci siano perdite nei raccordi tra il
rubineo e il tubo del carico aprendo il rubineo.
$
Ordinare i capi in base al po di tessuto (cotone, sinteci, lana o seta) e al po di
sporco.
Separare i capi bianchi da quelli colora. Lavarli prima a mano per controllare se
sbiadiscono o si rovinano.
Svuotare le tasche (chiavi, monete ecc.) e rimuovere ogge decoravi rigidi (ad
esempio spille).
Aenzione: gli ogge di piccole dimensioni (come ad esempio booni
ecc.) possono causare danni alla lavatrice che richiedono interven di
riparazione a carico dell'utente.
Indumen senza orli, biancheria inma e tessu finemente ricama, come ad
esempio le tende, devono essere inseri in sacchi per il lavaggio (è consigliabile
non lavarli in lavatrice).
Chiudere zip e ganci, assicurarsi che i booni siano ben cuci e inserire i capi più
piccoli, come calzini, reggiseni ecc., in un saccheo per il lavaggio.
Spiegare i capi più grandi come lenzuola, coprileo ecc.
Meere le camice a rovescio.
12
Page 36

Funzioni dei comandi
Caricamento della lavatrice
Aprire lo sportello della lavatrice e inserire la biancheria un capo alla
volta. Chiudere bene lo sportello.
lavaggio a vuoto per evitare di macchiare la biancheria con olio o
acqua sporca che potrebbe essere presente nella lavatrice. Prima
di eseguire il lavaggio vero e proprio, avviare la lavatrice con un
programma a 60 °C senza biancheria e con detergente.
Non sovraccaricare la lavatrice.
Scelta del detergente
Non aggiungere più detergente del necessario; in caso contrario potrebbero verificarsi
Express 15 min
Prelavaggio
Lavaggio
Cotone
quotidiano
Rapido
30 min
Lavaggio
quotidiano
Sintetici
Rapido
30 min
Lana
ON/OFF
Fine lavaggio
Intimo
Misti
Sport
Risciacquo
Temperatura
Extra Risciacquo
°C
60
°C
40
Intensivo Avvio/Pausa
Centrifuga
Pulizia
Cestello
HW100-1211N
+++
1200 10kg
A
rpm
schiuma.
Consigli:
al dosaggio.
Aggiunta del detergente
Per il programma di prelavaggio, è necessario aggiungere il
Per gli altri programmi, non aggiungere detergente nel comparto 1.
Usare il detergente liquido seguendo le istruzioni riportate sulla
2
2
1
1
modalità di prelavaggio
Non fare un uso eccessivo dell'ammorbidente in quanto potrebbe danneggiare i capi in fibra
13
Page 37

Funzioni dei comandi
Selezione del programma
selezionare il programma di lavaggio appropriato
dei programmi per impostare il programma
Express 15 min
Prelavaggio
Lavaggio
Cotone
quotidiano
Rapido
30 min
Lavaggio
quotidiano
Sintetici
Rapido
30 min
Lana
ON/OFF
Risciacquo
Centrifuga
Fine lavaggio
Intimo
Misti
Sport
Temperatura
Extra Risciacquo
°C
60
°C
40
Pulizia
Cestello
Intensivo Avvio/Pausa
desiderato.
Selezione della funzione
Selezionare le opzioni richieste (fare riferimento alla sezione "Pannello di controllo" alle pagine 8, 9 e 10).
Impostazione della temperatura di lavaggio
Tenere premuto il tasto Temp. fino a selezionare la temperatura desiderata.
Lavaggio
HW100-1211N
+++
1200 10kg
A
rpm
IMPORTANTE – SISTEMA BLOCCO PORTA
Per interrompere un programma, prima della fine del ciclo, operare nel seguente modo o l’oblò rimarrà
chiuso.
1 – premere il tasto AVVIO/PAUSA
2 – premere il tasto ON/OFF per spegnere la macchina
Prelavaggio
Lavaggio
Cotone
quotidiano
Rapido
30 min
Lavaggio
quotidiano
Sintetici
Rapido
30 min
Lana
Premere il tasto
ON/OFF e spegnere
l’apparecchio
ON/OFF
2
Express 15 min
Risciacquo
Centrifuga
Pulizia
Cestello
Fine lavaggio
Intimo
Misti
Sport
Temperatura
Extra Risciacquo
°C
60
°C
40
Intensivo Avvio/Pausa
+++
A
1
Premere il tasto
AVVIO/PAUSA
Dopo il lavaggio
Interrompere l'erogazione dell'acqua e scollegare il cavo di alimentazione. Aprire lo sportello della
lavatrice per evitare la formazioni di umidità e odori. Lasciare lo sportello aperto quando non si
HW100-1211N
1200 10kg
rpm
14
Page 38

Funzioni dei comandi
Tabella dei simboli
Lavaggio in lavatrice
con acqua FREDDA
Lavaggio in lavatrice
con acqua TIEPIDA
Lavaggio in lavatrice
con acqua CALDA
Capi resisten
lavabili in lavatrice
con acqua FREDDA
Capi resisten
lavabili in lavatrice
con acqua TIEPIDA
Capi resisten
lavabili in lavatrice
con acqua CALDA
Lavaggio in lavatrice
con acqua FREDDA e
ciclo delicato
Lavaggio in lavatrice
con acqua TIEPIDA e
ciclo delicato
Lavaggio in lavatrice
con acqua CALDA e
ciclo delicato
Lavaggio a mano Asciugare in asciugabiancheria
Lavare solo a secco Asciugare in asciugabiancheria
Lavare con prodo
contenen candeggina,
come Clorox®, se
necessario
Ulizzare candeggina senza
cloro se necessario
Ulizzare solo candeggina
che non danneggia i colori
come Clorox 2®
Non candeggiare
Ulizzare prodo e
detergen che non
contengono candeggina
o consultare le procedure
di verifica riportate
sulla confezione per
verificarne la resistenza alla
candeggina.
Pura lana Asciugare in asciugabiancheria
a tamburo, TEMPERATURA
NORMALE
a tamburo, TEMPERATURA
RIDOTTA
Asciugare in asciugabiancheria a
tamburo, TEMPERATURA MEDIA
Asciugare in asciugabiancheria a
tamburo, TEMPERATURA ALTA
Capi resisten, asciugare in
asciugabiancheria a tamburo
TEMPERATURA BASSA
Capi resisten, asciugare in
asciugabiancheria a tamburo a
TEMPERATURA RIDOTTA
Capi resisten, asciugare in
asciugabiancheria a tamburo a
temperatura MEDIA
Asciugare in asciugabiancheria
a tamburo, ciclo delicato,
TEMPERATURA BASSA
Asciugare in asciugabiancheria
a tamburo, ciclo delicato,
TEMPERATURA RIDOTTA
a tamburo, ciclo delicato,
temperatura MEDIA
Non asciugare in
asciugabiancheria a
tamburo
Asciugare su
gruccia
Asciugatura rapida Srare con ferro da
Asciugare
orizzontalmente
Non lavare a secco Non srare
Asciugare su una
gruccia
Asciugare in
asciugabiancheria
a tamburo,
temperatura media
Asciugare in
asciugabiancheria
a tamburo,
temperatura ridoa
Non asciugare in
asciugabiancheria a
tamburo
Srare con ferro da
sro a vapore o a secco,
TEMPERATURA RIDOTTA
Srare con ferro da
sro a vapore o a secco,
TEMPERATURA MEDIA
sro a vapore o a secco
TEMPERATURA ALTA
Non srare con ferro da
sro a vapore
Lavare a secco.
Al simbolo potrebbero
essere abbinate ulteriori
leere e/o linee. Portare
ques capi in lavanderia.
Non lavare a secco
Lavare a secco con
qualsiasi solvente
Lavare a secco con
perclorato
Riferimento per il carico
Capo Tessuto Carico in grammi
Lenzuola Cotone Circa 800
Coperte Lana Circa 3000
Indumen in tessu mis / Circa 800
Giacche Cotone Circa 800
Jeans / Circa 800
Salopee Cotone Circa 950
Pigiama da donna / Circa 200
Camicie / Circa 300
Calzini
T-Shirt
Indumen inmi
Tessu mis Circa 50
Cotone Circa 300
Tessu mis Circa 70
15
Page 39

Manutenzione
Manutenzione
Pulizia e manutenzione
Interrompere l'erogazione dell'acqua e scollegare il cavo
di alimentazione dopo ogni lavaggio. Aprire lo sportello
della lavatrice per evitare la formazioni di umidità e
lunghi periodi di tempo, scaricare l'acqua presente nella
Scollegare il cavo di alimentazione quando si eseguono
morbido inumidito con sapone liquido per pulire la lavatrice
organici o corrosivi.
Pulire il filtro una volta al mese:
Aprire il coperchio inferiore.
Reinserire il filtro ruotando in senso orario e montare nuovamente il coperchio.
potrebbe fuoriuscire dalla pompa
16
Page 40

Manutenzione
Per evitare che sostanza esterne ostacolino la fornitura dell'acqua, pulire
regolarmente la valvola di carico dell'acqua e il filtro della valvola di carico.
Se è necessario spostare la lavatrice, reinserire i bulloni per
al fine di evitare danni come mostrato di seguito.
Rimuovere il coperchio posteriore.
Rimuovere i tappi di chiusura.
Riposizionare il coperchio posteriore.
alimentazione e interrompere l'erogazione dell'acqua. Aprire lo sportello della lavatrice per evitare
Codici del display
inoizuloS esuaC icidoC
Err1 Lo sportello non è chiuso
il tasto Avvio/Pausa.
Err2 Problema di scarico, l'acqua non è stata
Err3 Il sensore della temperatura non è
Err4 Problema di riscaldamento (viene
visualizzato al termine di un ciclo).
Err5 Il livello dell'acqua non viene raggiunto
Pulire il filtro e verificare che il tubo di scarico
non sia bloccato. Se il problema persiste,
pressione dell'acqua sia normale.
degli 80 cm.
Il tubo di scarico è immerso nell'acqua.
assistenza.
Installare il tubo di scarico a un'altezza
compresa tra 80 e 100 cm.
Assicurarsi che il tubo di scarico non sia
immerso nell'acqua.
17
Page 41

Manutenzione
Err8 L'acqua ha superato il livello di
sicurezza.
End Termine del ciclo di lavaggio.
La lavatrice ha una protezione per un
carico non bilanciato. Quando si è in
presenza di un carico eccessivamente
sbilanciato, la lavatrice non performerà
il ciclo di centrifuga e procederà ad una
velocità minima per evitare vibrazioni
e rumorosità eccessive.
voluminoso (tappeto, lenzuolo,
tovaglia, ecc.), ponetelo in modo simmetrico
all'interno del cestello
2. Diminuire il peso del bucato strizzandoli
maniera simmetrica.
3. Estrarre e riposizionare il bucato nel cestello
in una posizione più bilanciata.
4. Aggiungere 1 o 2 pezzi di bucato nel cestello
programma Centrifuga/Scarico. Se il problema
PAUS
In caso di interruzione di corrente
quando la macchina è in funzione,
passerà in modalità Pause.
Temperatura
contemporaneamente per tre secondi dopo aver avviato il programma. Non sarà più possibile
Temperatura
secondi.
necessario interrompere l'alimentazione durante un ciclo di lavaggio, se questa impostazione
Per annullare un programma. Premere il tasto "Avvio/Pausa", quindi interrompere
manopola per scegliere un altro programma.
Intensivo
Intensivo
18
Page 42

Risoluzione dei problemi
La lavatrice non carica acqua.
La lavatrice scarica l'acqua mentre sta
venendo caricata.
Problema nello scarico.
atagelloc neb è non anips aL
all'alimentazione.
osuihc è non ecirtaval alled olletrops oL
La lavatrice non è accesa.
Non è stato premuto il tasto "Avvio/Pausa".
La pressione dell'acqua è inferiore a 0,03 MPa.
Problemi nell'erogazione dell'acqua.
osuihc è non ecirtaval alled olletrops oL
Il filtro del tubo di carico è ostruito.
80 cm.
Il tubo di scarico è immerso nell'acqua.
Il tubo di scarico è ostruito.
a avort is ociracs id obut led àtimertse'L
un'altezza superiore di 100 cm dal livello del
pavimento.
Il filtro è ostruito.
rimossi.
irregolare o non si trova in piano.
Il carico della lavatrice supera gli 10/7/6 kg.
atatsopmi atats è non aloponam aL
eicfirepus anu us atanoizisop è ecirtaval aL
all'alimentazione.
Controllare l'alimentazione.
Assicurarsi che la lavatrice sia accesa.
Premere il tasto "Avvio/Pausa".
Verificare la pressione dell'acqua.
Controllare il tubo di carico.
Controllare l'erogazione dell'acqua.
obut led ortlfi len inoizurtso el eranimilE
di carico.
compresa tra 80 e 100 cm.
immerso nell'acqua.
id obut led àtimertse'l ehc israrucissA
scarico si trovi a un'altezza inferiore di
100 cm dal livello del pavimento.
Eliminare le ostruzioni del filtro.
atanoizisop ais ecirtaval al ehc israrucissA
su una superficie regolare e che sia in
piano.
all'interno della lavatrice.
otnemagelloc li erallortnoC
azzetla'nu a ociracs id obut li erallatsnI
ais non ociracs id obut li ehc israrucissA
.ociracs id obut lad inoizurtso el eranimilE
Il funzionamento si interrompe
prima del completamento del ciclo di
lavaggio.
Il funzionamento si interrompe per un
certo periodo di tempo.
Troppa schiuma nella lavatrice
distribuzione.
lavaggio.
o auqca'lled enoizagore'llen amelborP
nell'alimentazione.
La lavatrice riporta un messaggio di errore.
La lavatrice si trova in un ciclo di ammollo?
o idoneo per il lavaggio a mano.
Eccessivo uso di detergente.
àrrev oiggaval id ammargorp led atarud aL
regolata.
enoizagore'l o enoizatnemila'l erallortnoC
dell'acqua.
Controllare i codici del display.
alla centrifuga o il tasto Avvio/Pausa per
annullare il funzionamento.
appropriato.
nuovamente un programma di
centrifuga.
eraivva o ipac irtla eregnuiggA
19
Page 43

Product Fiche (according EU 1061/2010)
Marchio
Modello
Capacità nominale (kg)
Classe di efficenza energetica
Consumo energetico annuo (kWh/annum)
Consumo annuo di acqua (L)
Classe di efficienza di centrifugazione
Massima velocità di centrifuga (rpm)
Percentuale di umidità rimanente (%)
Programma Cotone standard a 60 °C
Programma Cotone standard a 40 °C
Durata della modalità "stand-by"
Livello di rumorosità (lavaggio/centrifuga)(dB(A))
Tipologia carica frontale a libera installazione
1
) Basato su 220 cicli di lavaggio con programma standard cotone a 60°C e 40°C a pieno e mezzo carico, e sul consumo delle
modalità a basso consumo. L’attuale consumo energetico per ciclo dipenderà da come verrà usato l’aparecchio.
2
) Basato su 220 cicli di lavaggio con programma standard cotone a 60°C e 40°C a pieno e mezzo carico, e sul consumo delle
modalità a basso consumo. L’attuale consumo di acqua per ciclo dipenderà da come verrà usato l’aparecchio.
3
) La classe G è la meno efficiente e la classe A è la più efficiente
4
) Basato sul programma Cotone Standard a 60 °C a pieno carico e sul programma Cotone Standard a 40 °C a carico parziale
5
) Il "Programma Cotone standard a 60°C" e il "Programma Cotone Standard a 40°C" sono i programmi di lavaggio standard su
cui si basano le informazioni presenti sull'etichetta energetica e sulla targhetta del prodotto. Questi programmi sono adatti per
lavare biancheria in cotone con un livello di sporco normale e sono i più efficienti in termini di consumo combinato di energia e di
acqua.
6
) Nel caso ci sia un sistema di gestione del consumo elettrico
7
) Basato sul programma Cotone standard a 60°C a pieno carico
2)
6)
1)
)olcic/hWk ()ocirac oneip a( C°06 a enotoC ammargorp ocitegrene omusnoC
)olcic/hWk ()ocirac ozzem a( C°06 a enotoC ammargorp ocitegrene omusnoC
)olcic/hWk ()ocirac ozzem a( C°04 a enotoC ammargorp ocitegrene omusnoC
)W( otneps àtiladom ni ocitegrene omusnoC
)W( "yb-dnats" àtiladom ni ocitegrene omusnoC
3)
4)
4)
5)
5)
)nim()ocirac oneip a( C°06 a enotoC ammargorp aidem ataruD
( C°06 a enotoC ammargorp aidem ataruD
7)
)nim()ocirac ozzem a
)nim()ocirac ozzem a( C°04 a enotoC ammargorp aidem ataruD
Haier
HW100-1211N
10
A+++
225
0.747
0.776
0.485
0.48
0.48
10908
B
1400
53
Cotone + 60°C + Intensivo +Massima velocità di centrifuga
Cotone + 40°C + Intensivo +Massima velocità di centrifuga
200
200
175
58/77
Haier
HW70-1211N*
7
A+++
170
0.747
0.776
0.485
0.48
0.48
10908
B
1400
53
200
200
175
58/77
Haier
HW60-1211N*
A+++
0.747
0.776
0.485
10908
1400
58/77
6
170
0.48
0.48
B
53
200
200
175
enoizatnemilA
)A( xam otnemanoiznuf id etnerroC
)aPM( auqca'lled enoisserP
oiggaval id immargorP
)W( xam aznetoP
Dimensioni (altezza x profondità x peso)
HW100-1211N
220 - 240V~/50 Hz
01
1
61
2000
595x015x058
64
20
HW70-1211N*
220 - 240V~/50 Hz
01
1
61
2000
595x006x058
72
HW60-1211N*
220 - 240V~/50 Hz
01
1
61
2000
595x056x058
74
Page 44

Servizio post-vendita
Haier Italia
Numero di telefono AS; 199-100912
Haier Spagna
Numero di telefono AS (ES e PT); 902 50 91 23
Haier Germania
Numero di telefono AS (DE/AT); 0180 5 39 39 99 / 0820 00 12 05
Haier Regno Unito
Numero di telefono AS;
Haier Francia
Numero di telefono AS;
0333 003 8122
0980 406 409
21
 Loading...