

Page 1

OPERATION MANUAL
HW-09CF03
Please keep it attentively.
No.0010551293
Page 2
Contents
Parts Name
Operation Guide
Maintenance
Trouble Shooting
Installation Guide
The machine is adaptive in following situation:
1. Applicable ambient temperature range:
Cooling
Indoor
Outdoor
Maximum:
Minimum:
Maximum:
Minimum:
D.B/W.B
D.B/W.B
D.B/W.B
D.B
2-3
4-9
10-12
12
13-14
32oC/23oC
18oC/14oC
43oC/26oC
18oC
2. If the supply cord is damaged, it must be replaced by the
manufacturer or its serviceagent or a similar qualified person.
3. After installation, the power plug should be easily reached.
4. The wiring method should be in line with the local wiring standard.
1
Page 3
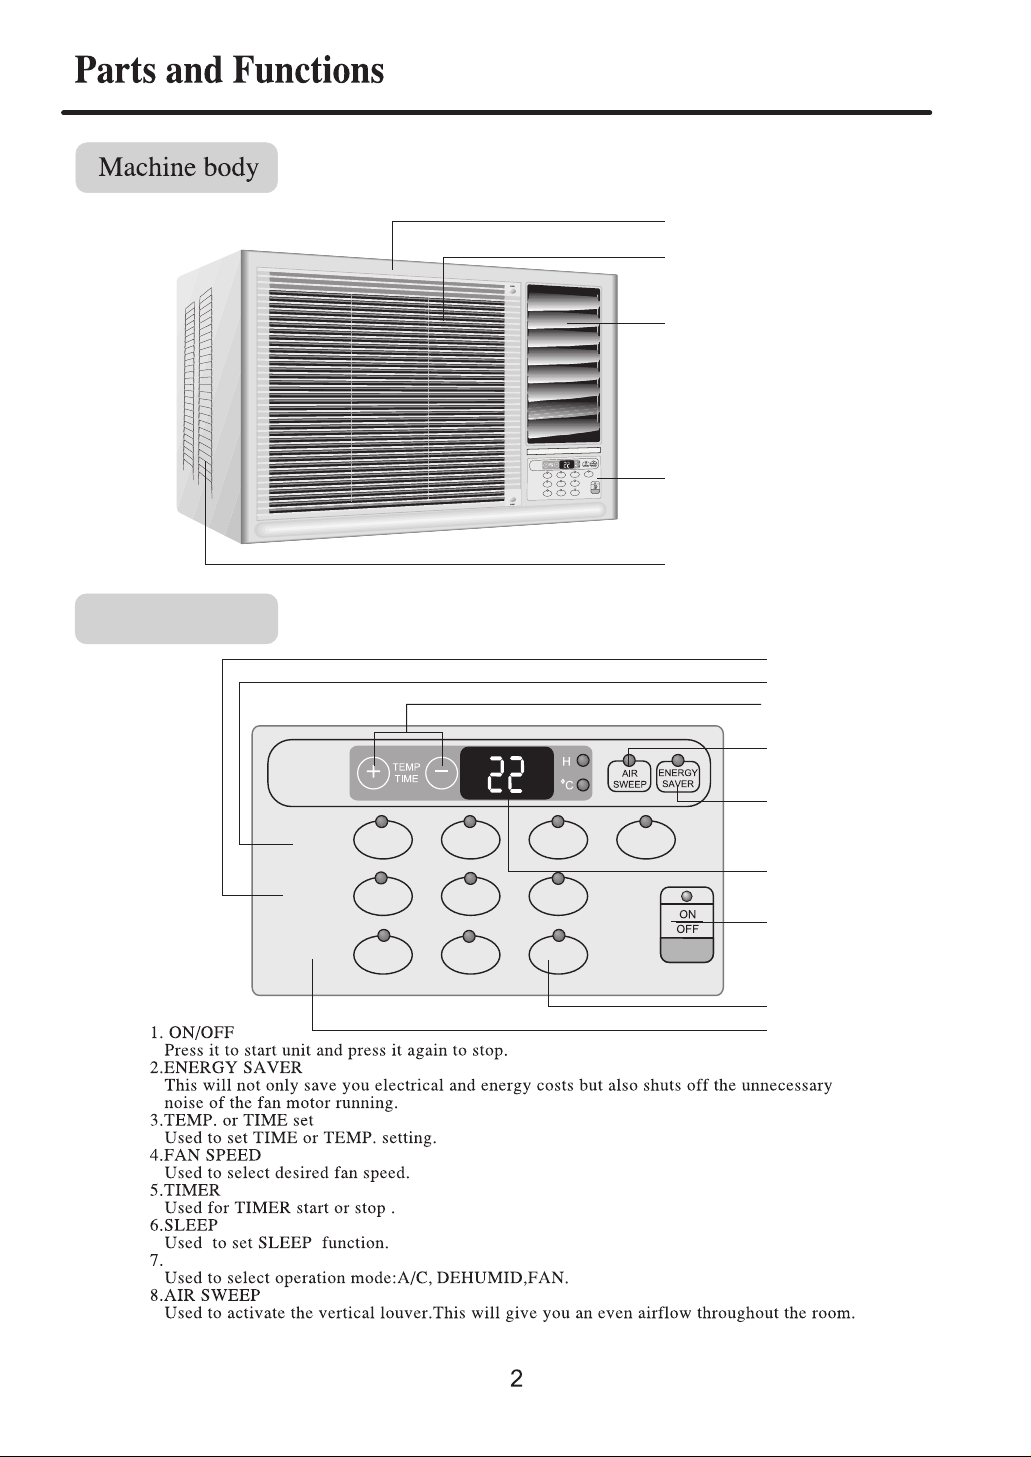
Control panel
Front panel
Air inlet(indoor side)
Air outlet(indoor side)
AUTO
LO
FAN
MED
HI
SPEED
FAN
DEHUMID
A/C
FUNCTION
SLEEP
STOP
START
TIMER
Control panel
Air inlet(outdoor side)
7
4
3
8
FAN
SPEED
FUNCTION
TIMER
FUNCTION
9.TEMP./TIME display
HI
A/C
START
MED
DEHUMID
STOP
LO
FAN
SLEEP
2
AUTO
9
1
6
5
Page 4
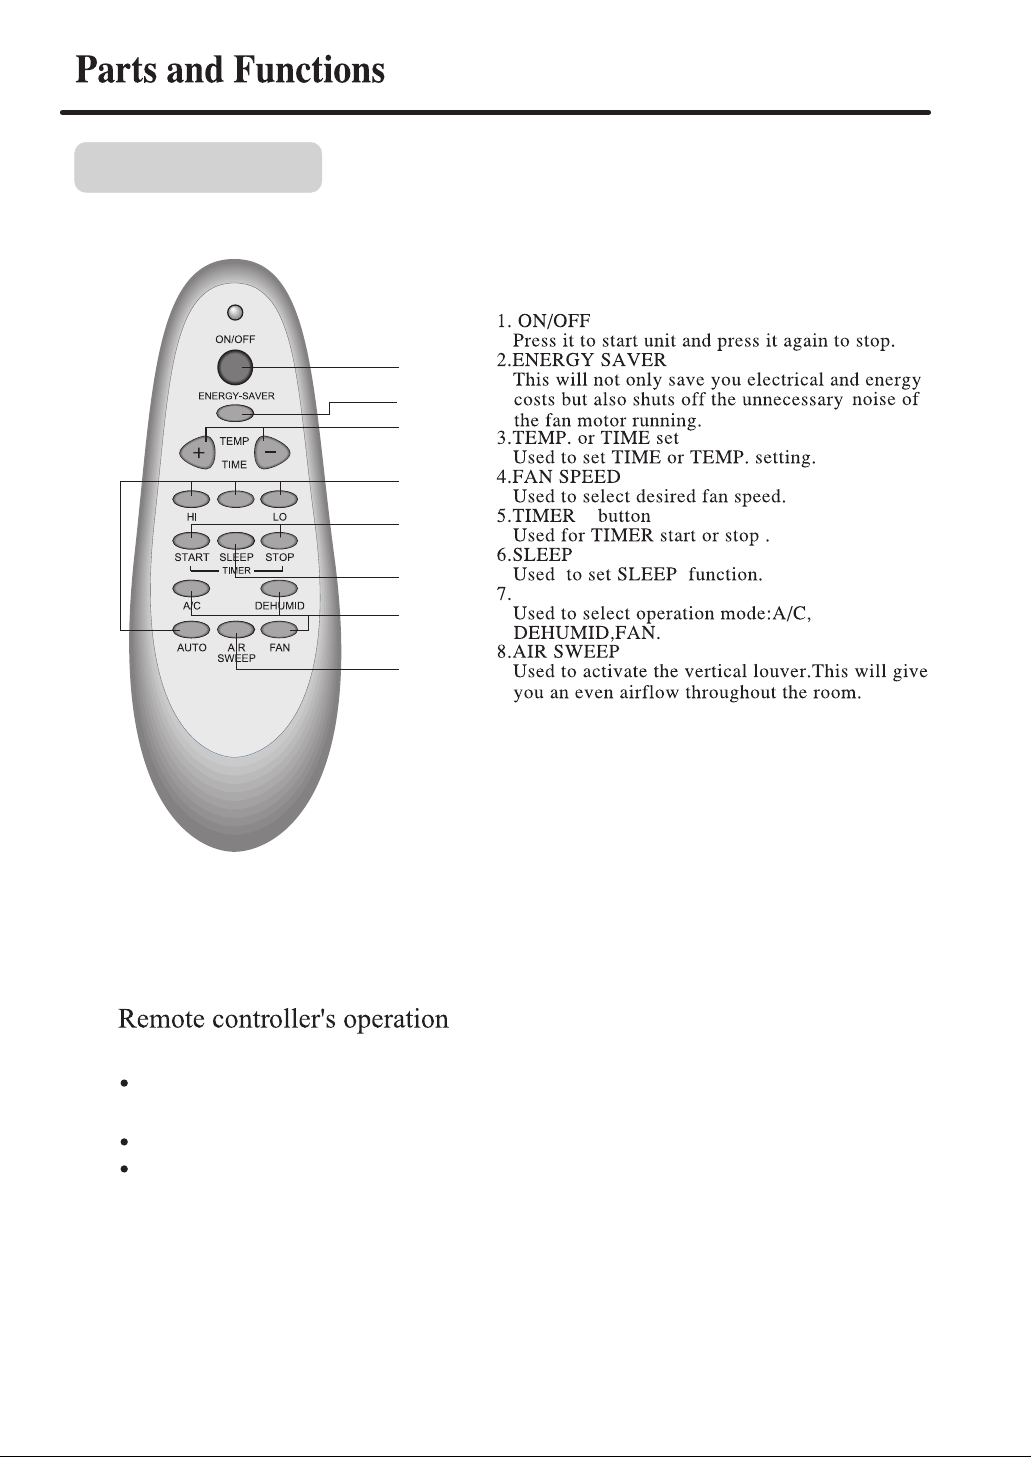
Remote controller
MED
1
2
3
4
5
6
FUNCTION
7
8
When in use, put the signal transmission head directly to the receiver
hole on the indoor unit.
Don't throw the controller, prevent it from being damaged.
When electronic-started type fluorescent lamp or change-over
type fluorescent lamp or wireless telephone is installed inthe room, the
receiver is apt to be disturbed in receiving the signals so the distance
to the indoor unit should be shorter.
3
Page 5
button
Remote controller
5
1
3
MED
4
4
or in the AUTO speed
Control panel
HI or MED or LO
3
FAN
SPEED
FUNCTION
TIMER
HI
4
A/C
2
START
MED
DEHUMID
STOP
LO
FAN
SLEEP
AUTO
2
1
5
grille.
Page 6
Remote controller
3
1
MED
2
Control panel
FAN
SPEED
FUNCTION
TIMER
HI
A/C
START
MED
DEHUMID
2
STOP
LO
FAN
SLEEP
AUTO
3
1
Page 7
In some
Remote controller
Press the FAN button.
Control panel
MED or LO speed.
4
1
MED
3
2
FAN
SPEED
FUNCTION
TIMER
HI
A/C
START
MED
3
DEHUMID
STOP
LO
FAN
2
SLEEP
AUTO
1
4
Page 8
SLEEP button
button
Remote controller
1
MED
2
Control panel
FAN
SPEED
FUNCTION
TIMER
HI
A/C
START
MED
DEHUMID
STOP
LO
FAN
SLEEP
AUTO
1
2
7
Page 9
1. Start unit and select desired operation mode.
(Electrify for the first time)
(Electrify for the first time)
MED
FAN
SPEED
FUNCTION
TIMER
HI
A/C
START
MED
DEHUMID
STOP
LO
FAN
SLEEP
AUTO
8
Page 10
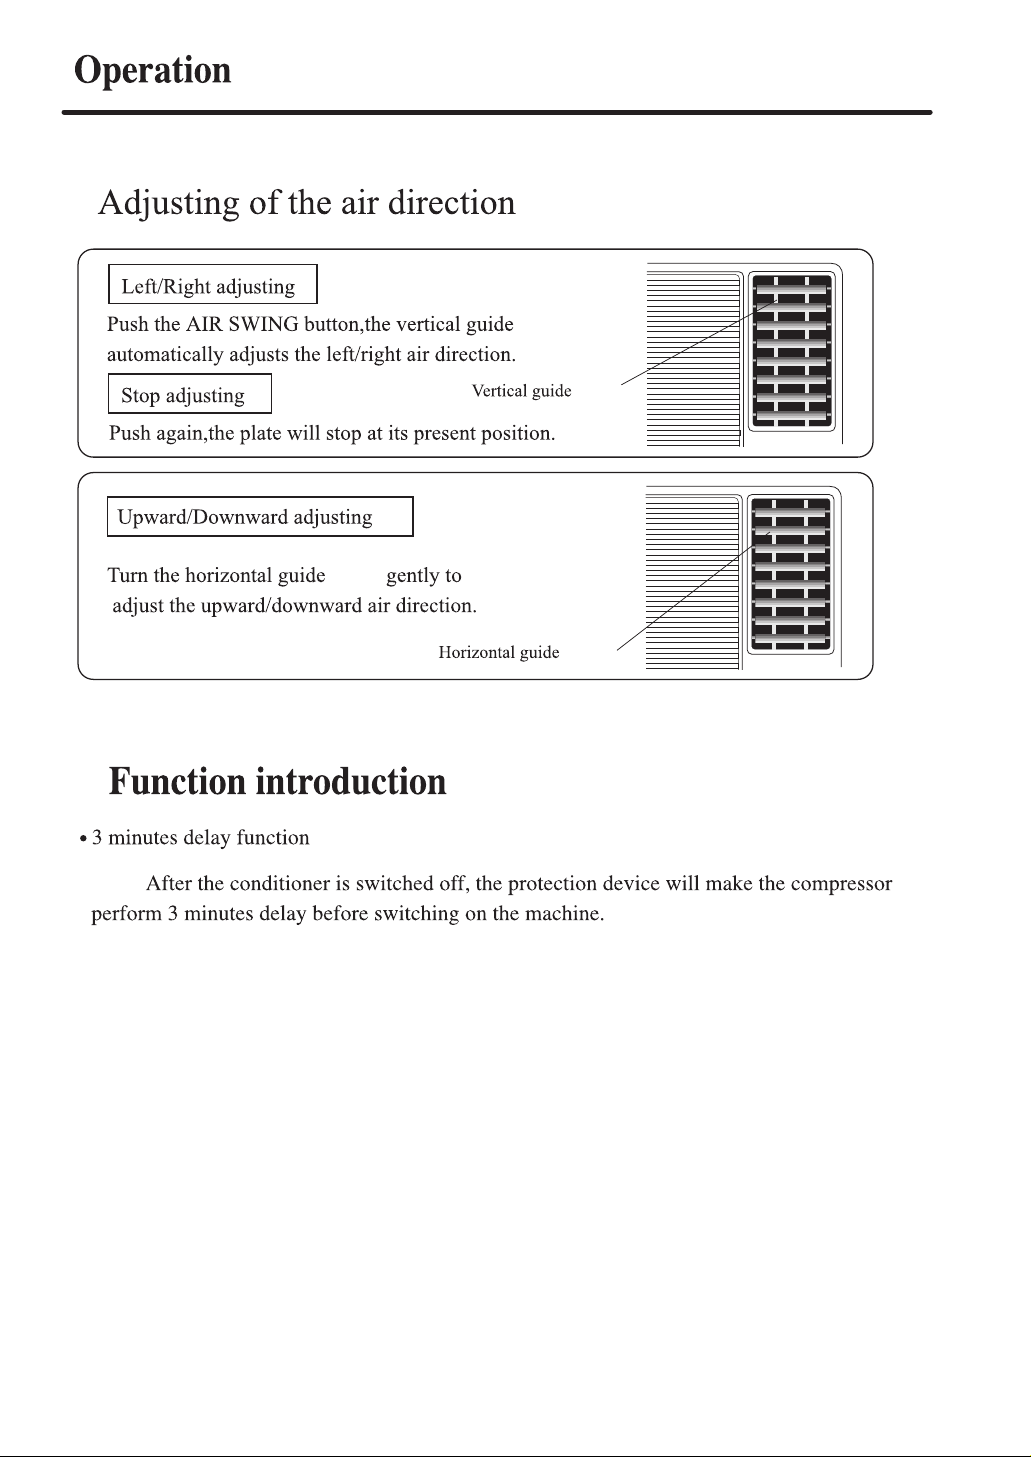
blade
blade
blade
blade
9
Page 11

Maintenance
Avoid opening doors and windows
unless necessary.
Use curtain or blind
Direct sunlight may reduce cooling
effect, always use window curtain.
Don't be exposed to cold air for
a long time.
Keep heat source away from
air conditioner.
Set temp . a little bit higher
before going to bed.
Proper
temperature
After unit stops, don't restart it
until 3 min. have elapsed.
OK! Enjoy a
3-min nap
10
Page 12

Rubber lid Rubber lid
Fig. 1 Fig. 2
drain elbow
drain elbow
drain elbow
Drain elbow
Extended hose
NOTE: When install drain elbow , adjust the direction of the drain elbow to make it be in
line with the hole in the rear of unit ; Insert the drain tube into hole and twist 90o .
Drain elbow
Extended hose
11
Page 13

LO
AUTO
MED
HI
FAN
SPEED
FAN
DEHUMID
A/C
FUNCTION
SLEEP
STOP
START
TIMER
3. Is plug firmly inserted?
12
Page 14

Selection of the installation position
1. The air-conditioner is better installed in shadow or in a place with short
period of sunshine. In case the air-conditioner is installed at the point
exposed directly to the sunshine, it should be protected from the direct
sunlight as possible in order to avoid the long time of direct sunlight
otherwise its performance will be lowered. (As illustrated in Fig. 1).
2. For the convenience of operation, it is recommended that air-conditioner
be installed at least at the height of 760-1300 mm above the floor and no obstacles
before it for a free airflow.
3. The shutters at both sides and the top of air-conditioner should be
protruded outdoors free from being blocked by wall, window, etc.
4. The back of air-conditioner should be kept over 500mm from the
obstacles (for example, wall, etc.) (As illustrated in Fig. 2).
5. To have an efficient drainage, the back part of the air-conditioner should
be inclined downward by 5-10mm (As illustrated in Fig. 3).
cover
support
fig.1
Drain elbow
(with seal ring)
5-10mm
>500mm
fig.2 fig.3
Battery
MED
13
Page 15

MODEL
HW-09CF03
drain elbow
350mm 530mm
Rubber lid
Drain elbow
drain elbow
extra pipe
7
extra pipe,
8
9
extra pipe
14
Page 16

Page 17

*******
*****
HW-09CF03
************
*****
Page 18

**
****
****
****
****
****
1. **********:
***
**
***
***
***
***
***
2-3
4-9
10-12
12
13-14
**/**
**/**
**/**
**
2. *************************
**************************
*********
3. ******************
4. *****************
1
Page 19

****
**
****
***
********
********
AUTO
LO
FAN
MED
HI
SPEED
FAN
DEHUMID
A/C
FUNCTION
SLEEP
STOP
START
TIMER
****
********
7
4
3
FAN
SPEED
FUNCTION
TIMER
HI
A/C
START
MED
DEHUMID
STOP
1. */**
*/**,**********
2. ***
******************************
3. **/***
************
4. *****
************
5. ***
************
6. ***
*********
7. ***
********:*********
8. *****
*************************
9. **/****
LO
FAN
SLEEP
8
2
AUTO
9
1
6
5
Page 20

****
***
MED
1. */**
1
*************
2
2. ***
3
************************
******
4
3. **/***
5
************
4. *****
6
**********
7
5. ***
************
8
6. ***
*********
7. ***
********:*********
8. *****
*************************
******
*********************
**********
*********************************
*********************************
************
3
Page 21

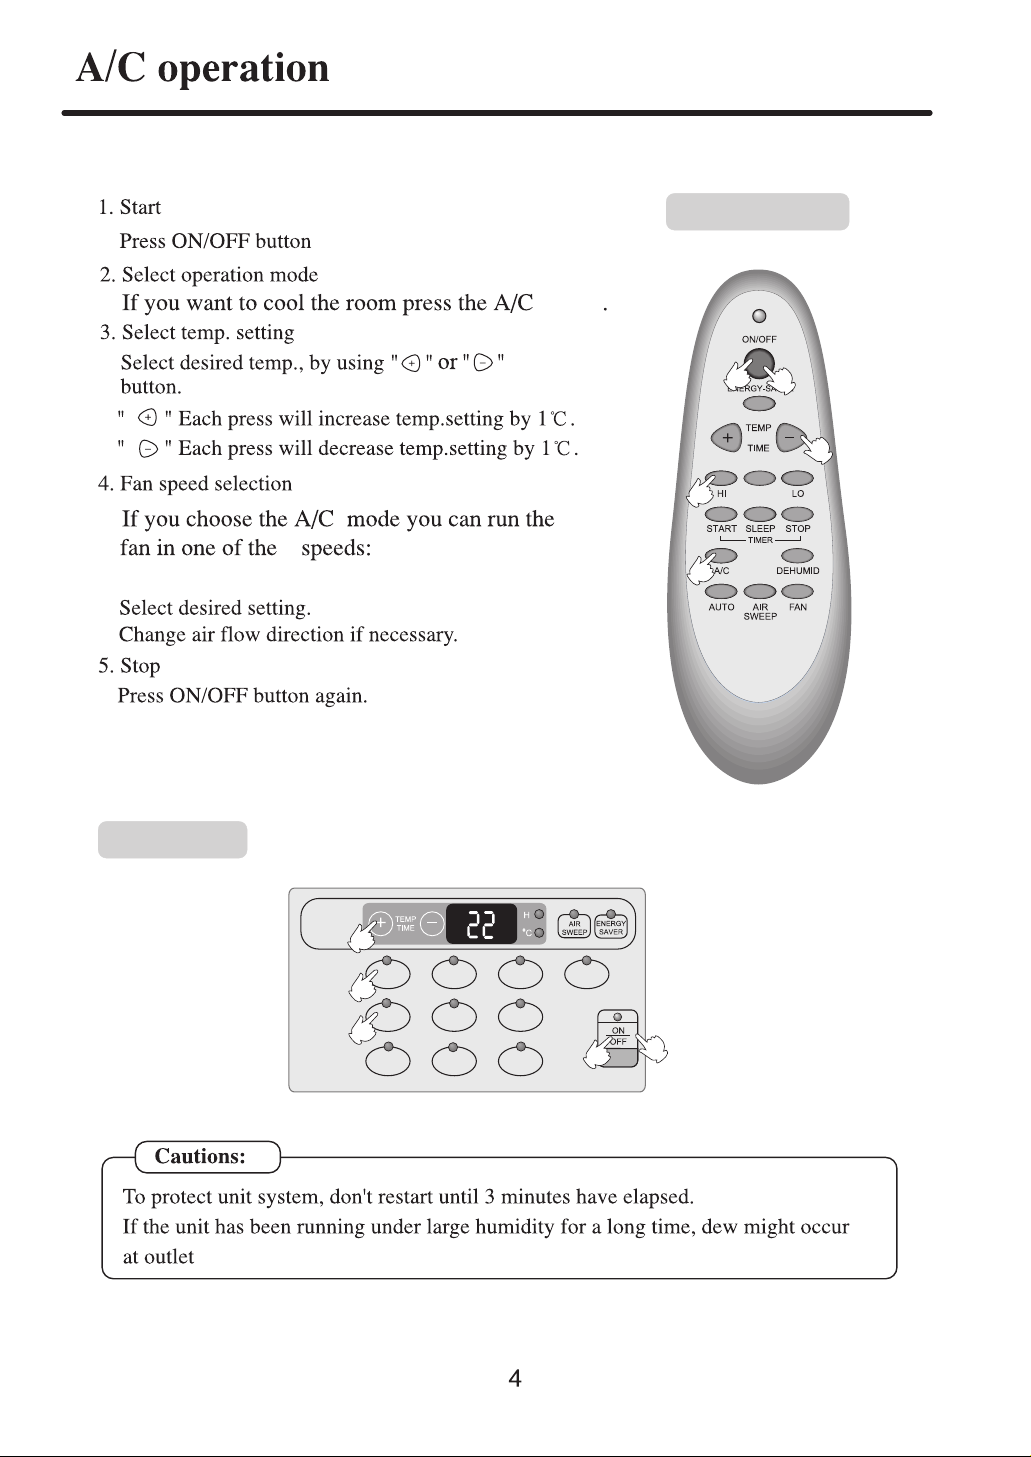
****
1.**
***/******
2.******
**"**"************
3.****
****
************* *
************* *
* *****
4.****
******************
*********
********
*************
5.**
***/******
***
4
2
5
1
3
MED
****
3
FAN
SPEED
FUNCTION
TIMER
***
********3***********
****************************.
HI
4
A/C
2
START
MED
DEHUMID
STOP
LO
FAN
SLEEP
AUTO
1
5
Page 22

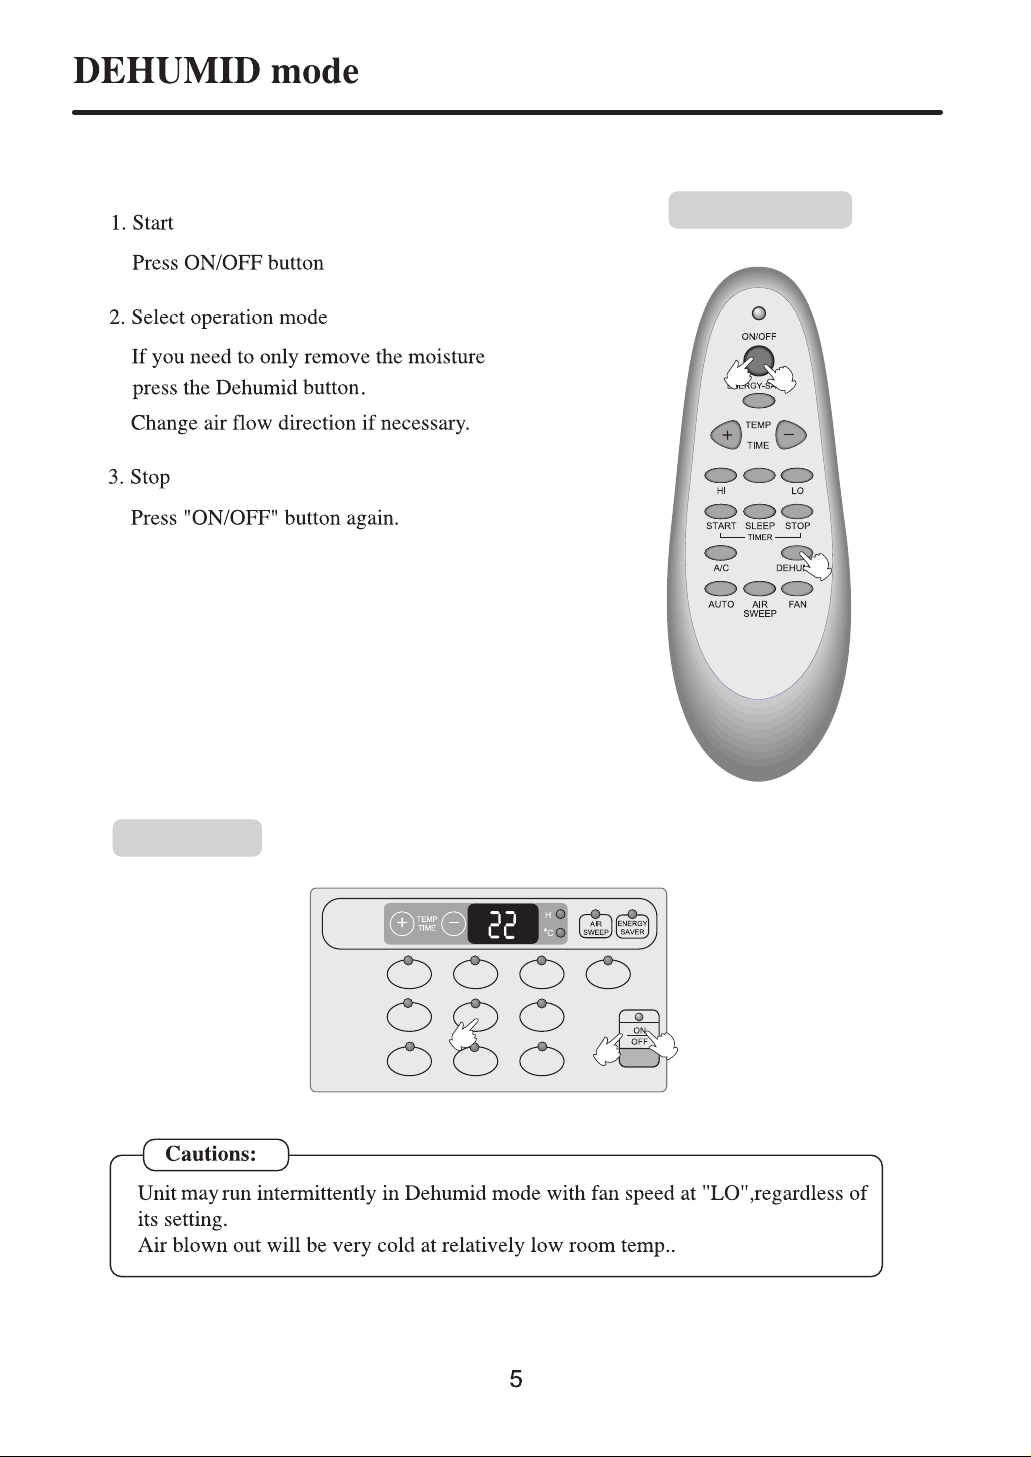
****
1.**
***/******
***
2.******
******************
*************
3.**
***/******
****
3
1
MED
2
FAN
SPEED
FUNCTION
HI
DEHUMID
A/C
2
START
TIMER
***
*******************************
********************
MED
STOP
LO
FAN
SLEEP
AUTO
3
1
Page 23

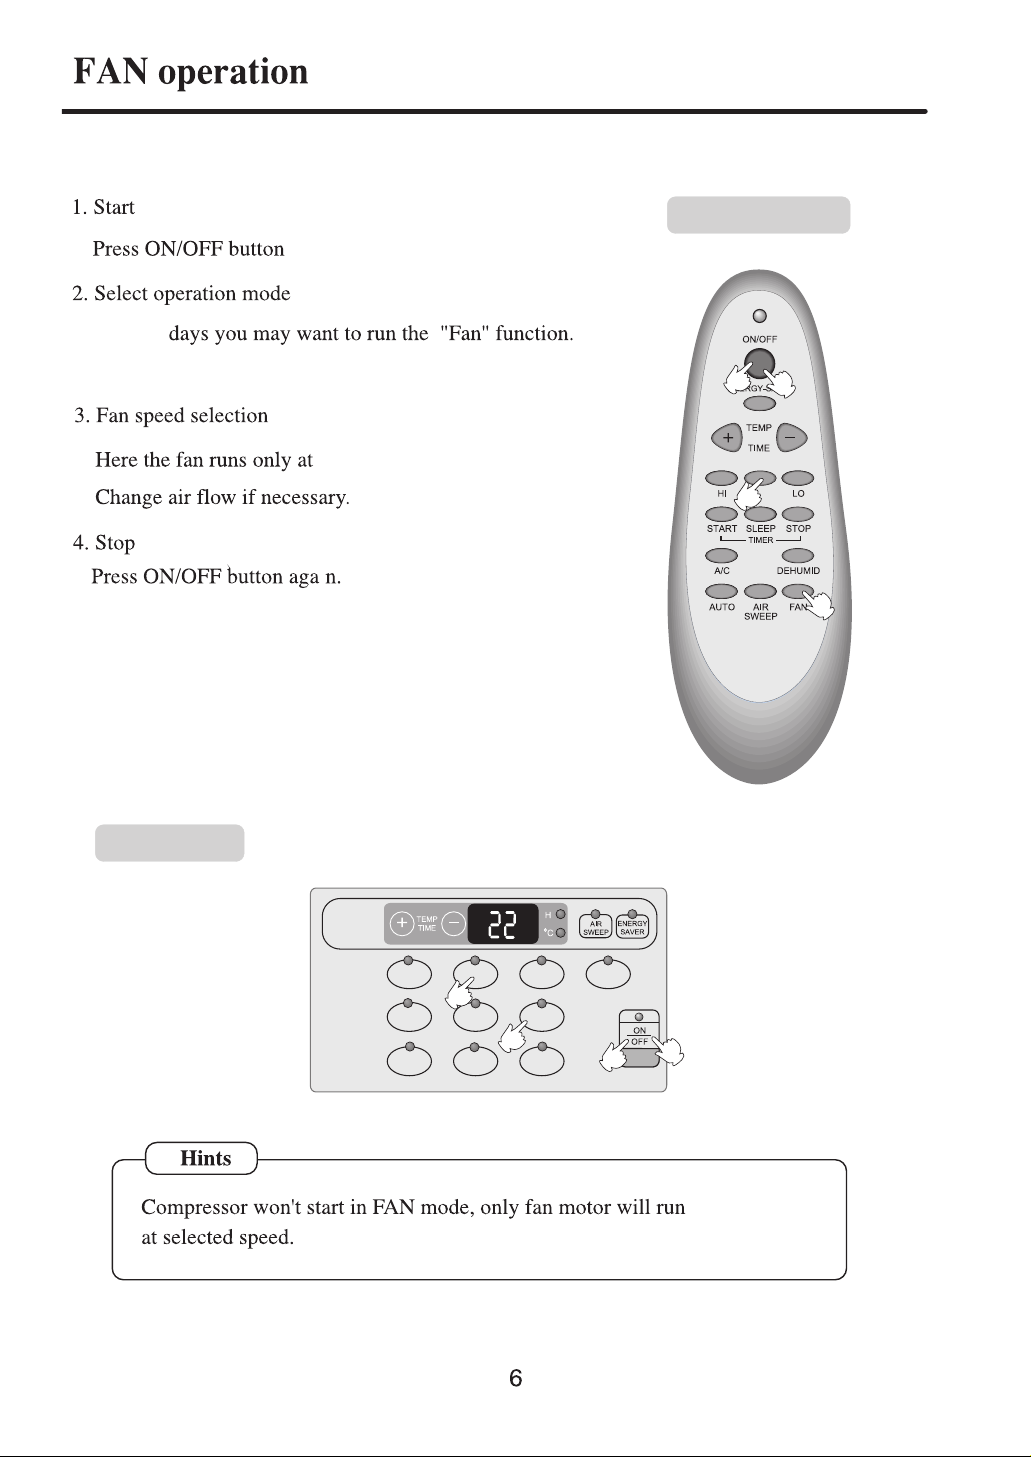
****
1.**
***/******
2.******
**************
****
*************
3.****
************
*************
4.**
***/******
***
4
3
1
MED
2
****
***
**************************
FAN
SPEED
FUNCTION
TIMER
HI
A/C
START
MED
3
DEHUMID
STOP
LO
FAN
2
SLEEP
AUTO
1
4
Page 24

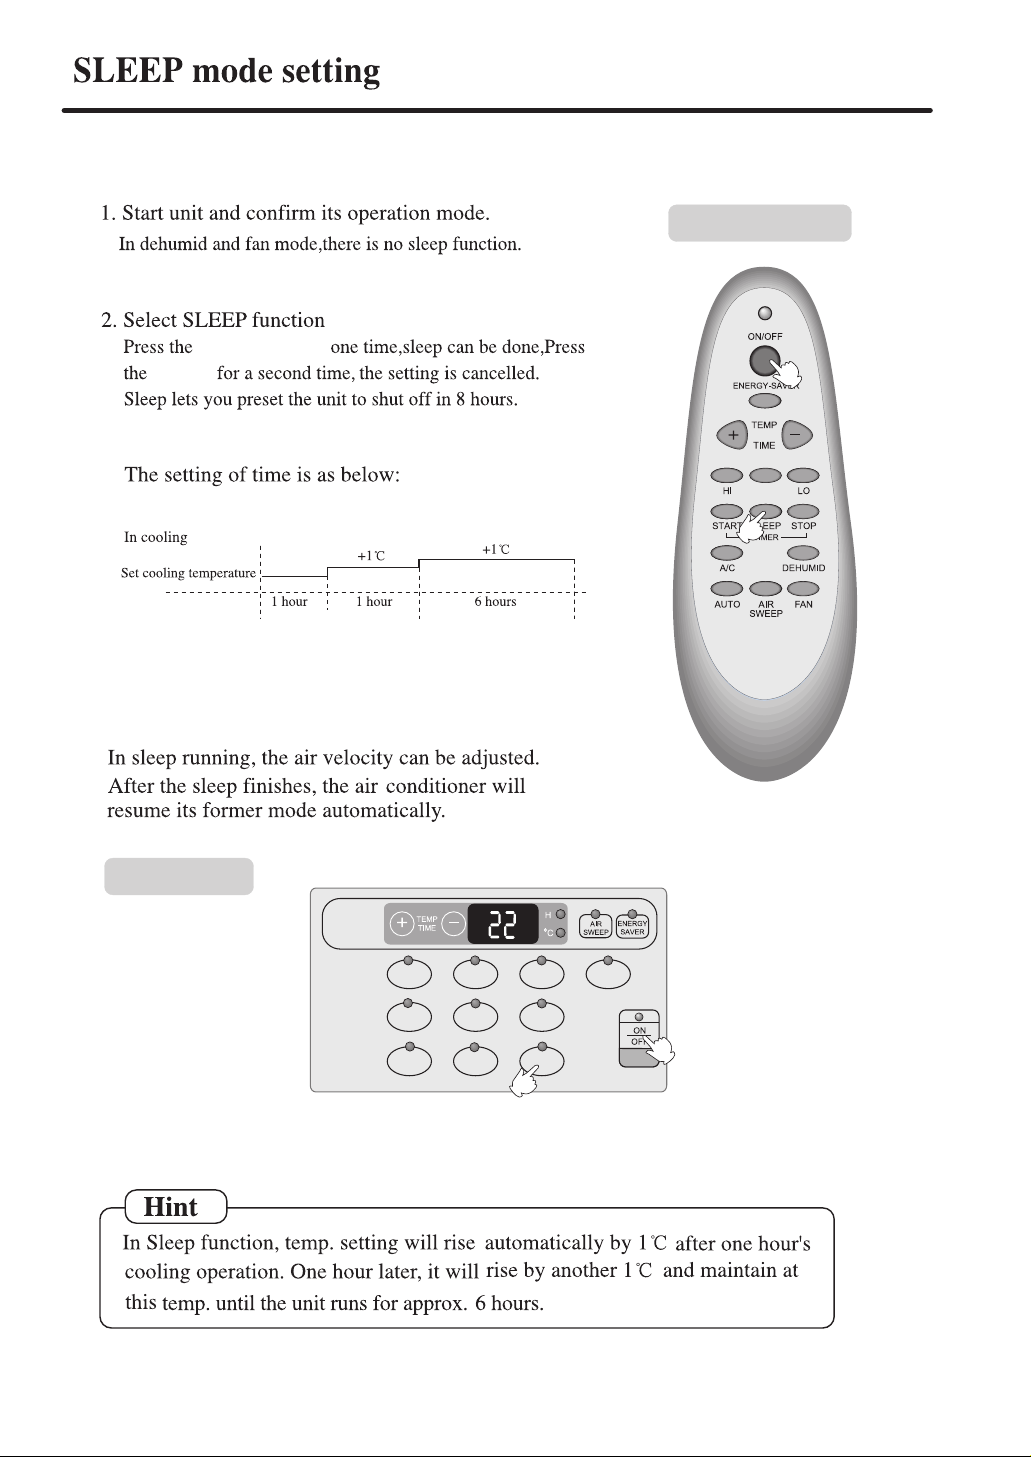
******
1.*********
*******************
2.******
*********************
**************
******8***********
**********
*****
****
1**
******************
*********************
1**
***
1
MED
2
6**
****
FAN
SPEED
FUNCTION
TIMER
***
*******1***************1****1****
*******1*,**********6***
HI
A/C
START
MED
DEHUMID
STOP
LO
FAN
SLEEP
2
AUTO
1
7
Page 25

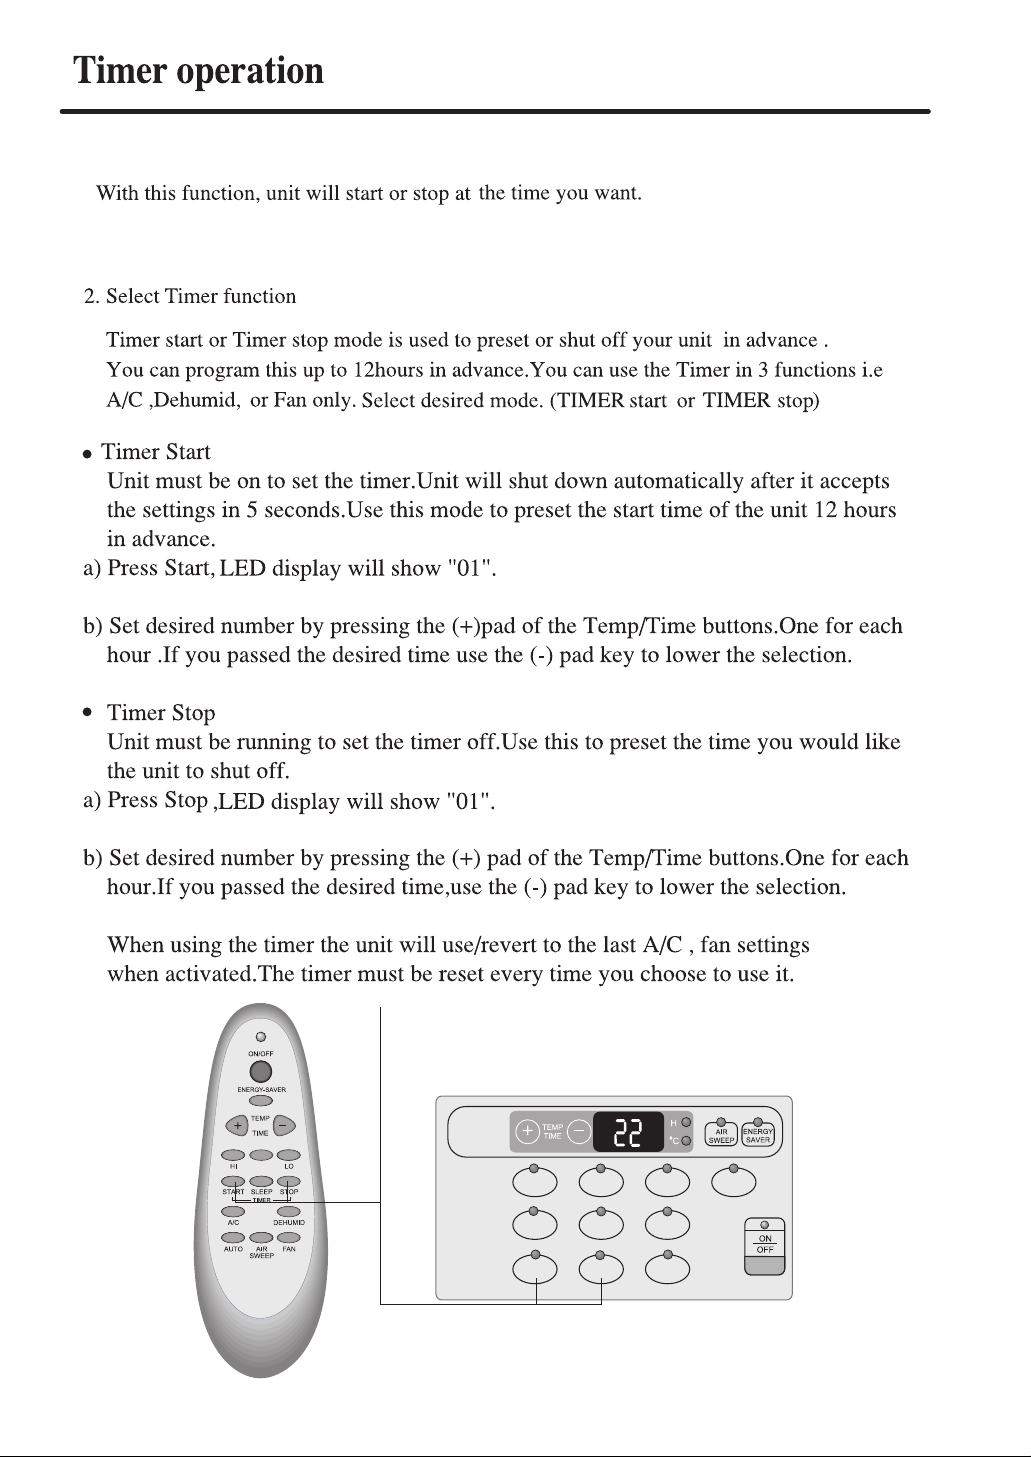
****
******************
1.*************
2.******
***************************
***
******************5*****************
******12*******
a) *******LED ***01********
b)*********+*************************
*********-***
***
********************
a)*******LED***01********
b)*********+*************************
*********-***
MED
FAN
SPEED
FUNCTION
TIMER
HI
A/C
START
MED
DEHUMID
STOP
LO
FAN
SLEEP
AUTO
8
Page 26

**
******
****
********(AIR SWING)***********
******
*********(AIR SWING)*********
****
****
******************
*****
****
3******
*************************3*******
****
****
9
Page 27

****
*********** ***************
****
***************
***************
**
***************
*****
***************
***************
**
*****
******
***
10
Page 28

****
******
******************
1. *********************************
******************
********************************
*********************
2. ************************************
******************
********************************
************
*** ***
**
****
*** ***
**********************90**
*********** ****************
*************
************
**
*****
**40oC*********
*******
****
11
Page 29

****
********
****
***************
***************
***************
**
LO
AUTO
MED
FAN
HI
SPEED
FAN
DEHUMID
A/C
FUNCTION
SLEEP
STOP
START
TIMER
***************
******
********************
** **
************
******
******
*********3********
*******
1.*******
2.********
3.*******
1.************
2.**********
3.*******
4.***********
5.*******************
12
Page 30

****
*******
1. *********************************
**********************************
2. ********************760~1300mm, *******
**********
3. ********************************
4. *******************500mm********2**
5. *******************5~10mm(**3**
**
***********
* *
* *
* *
*** ******* *** **
**
*1
5-10mm
500mm**
*2 *3
MED
13
Page 31

****
1.*********** 1**
**
HW-09CF03
350mm 530mm
2.***************
*******
3.***************
4.***************
****************
**2*
5.***************
***************
*3****P11*
6.***************
******16mm*******
**
*2
**
****
***
***
************
7.***************
****************
************* 4**
8.***************
****************
********
9.***************
**************
****
***
****
*3
*
***
****
*4
14
Page 32

 Loading...