

Page 1
Built-In / Freestanding Wine Cellar
Construire Dans / Indépendant Vin Cave
Construido En / Bodega Aislada
User Manual
Model # HVCE15, HVCE24
Guide de l’Utilisateur
Modéle # HVCE15, HVCE24
Manual del Usuario
Para Modelo de # HVCE15, HVCE24
Qualityß Innovation ß Style
HVCE24
Page 2

English
SAFETY PRECAUTIONS
When using this appliance, always exercise basic safety
precautions, including the following:
1) Read all of the instructions before using this appliance.
2) Use this appliance only for its intended purpose as described in this use
and care guide.
3) This wine cellar must be properly installed in accordance with the
installation instructions before it is used. See grounding instructions in the
installation section.
4) Never unplug your wine cellar by pulling on the power cord. Always grasp
the plug firmly and pull straight out from the outlet.
5) Repair or replace immediately, all electric service cords that have become
frayed or otherwise damaged. Do not use a cord that shows cracks or
abrasion damage along its length, the plug or the connector end.
6) Unplug your wine cellar before cleaning or before making any repairs.
Note: If for any reason this product requires service, we strongly
recommend that a certified technician performs the service.
7) If your old wine cellar is not being used, we recommend that you remove
the door and leave the shelves in place. This will reduce the possibility
of danger to children.
8) Do not operate your wine cellar in the presence of explosive fumes.
9) Do not store foods in wine cellar as interior temperature may not be cool
enough to prevent spoilage.
1
SAVE THESE INSTRUCTIONS
Page 3

DANGER
Risk of child entrapment. Before you throw away your
old wine cellar, take off the doors. Leave the shelves in
place so that children may not easily climb inside.
English
Thank you for using our Haier product.
This easy-to-use manual will guide you in
getting the best use of your wine cellar.
Remember to record the model and serial
number. They are on a label in back of the
wine cellar.
Staple your receipt to your manual. You will need it to obtain warranty service.
Model number
Serial number
Date of purchase
2
Page 4

English
TABLE OF CONTENTS
PAGE
Safety Precautions ..................................................................1
Parts And Features .................................................................4
Installing Your Wine Cellar......................................................5
Unpacking Your Wine Cellar.................................................................5
Leveling Your Wine Cellar.....................................................................5
Electrical Requirements .........................................................................5
Use of Extension Cord ..........................................................................5
Wine Cellar Features And Use.................................................6
Initial Set Up .......................................................................................6
Shelving..............................................................................................7
Interior Light ........................................................................................7
Normal Operating Sounds....................................................................7
Wine Cellar Installation...........................................................8
Installation Limitations...........................................................................8
Dimensions..........................................................................................8
Door Reversal......................................................................................9
Replace Light Bulbs ............................................................................11
Proper Wine Cellar Care and Cleaning..................................12
Cleaning and Maintenance.................................................................12
Power Interruptions.............................................................................12
Vacation and Moving Care.................................................................12
Troubleshooting ....................................................................13
Limited Warranty..................................................................14
3
Page 5

PARTS AND FEATURES
HVCE24 HVCE15
5
3
English
7
HVCE15
9
1.
bottle
capacity
adjustable
26 electronic
2.
temp.
control
(not
shown)
3.
shelving*4.interior
light
glide-out
with
woodtrim
yes
manual
(not
shown)
6
8
door
handle
tube type
grip
5.
6.
door trim7.leveling
legs
brushed
metal or
black
4
(not
shown)
7
8.
reversible
door
yes UV-blue
9
9.
tinted
glass
gray
HVCE24
* Quantity and style will vary per model purchased.
50 electronic
(not shown)
glide-out
with
woodtrim
yes
manual
(not
shown)
tube type
grip
brushed
metal or
black
4
(not
shown)
yes UV-blue
gray
4
Page 6

English
INSTALLING YOUR WINE CELLAR
Unpacking Your Wine Cellar
1. Remove all packaging material. This includes the foam base and all adhesive
tape holding the wine cellar accessories inside and outside.
2. Inspect and remove any remains of packing, tape or printed materials before
powering on the wine cellar.
Leveling Your Wine Cellar
• Your wine cellar has four leveling legs which are located in the front and rear
corners of your wine cellar. After properly placing your wine cellar in its final
position, you can level your wine cellar.
• Leveling legs can be adjusted by turning them clockwise to raise your wine
cellar or by turning them counterclockwise to lower your wine cellar. The wine
cellar door will close easier when the leveling legs are extended.
Electrical Requirements
• Make sure there is a suitable power outlet (115 volts, 15 amps outlet) with
proper grounding to power the wine cellar.
• Avoid the use of three plug adapters or cutting off the third grounding in
order to accommodate a two plug outlet. This is a dangerous practice
since it provides no effective grounding for the wine cellar and may result
in shock hazard.
Use of Extension Cord
• Avoid the use of an extension cord because of potential safety hazards under
certain conditions. If it is necessary to use an extension cord, use only a 3-wire
extension cord that has a 3-blade grounding plug and a 3-slot outlet that will
accept the plug. The marked rating of the extension cord must be equal to or
greater than the electrical rating of the appliance.
5
Page 7
WINE CELLAR FEATURES AND USE
Initial Setup
HVCE15 / HVCE24
• Once you have plugged the unit into an electrical outlet, let the unit run for
at least 30 minutes to acclimate itself before making any adjustments. During
this time the Red Wine light will stay on. Temperature inside the cooler, if not
adjusted, will be at 55°-60°F.
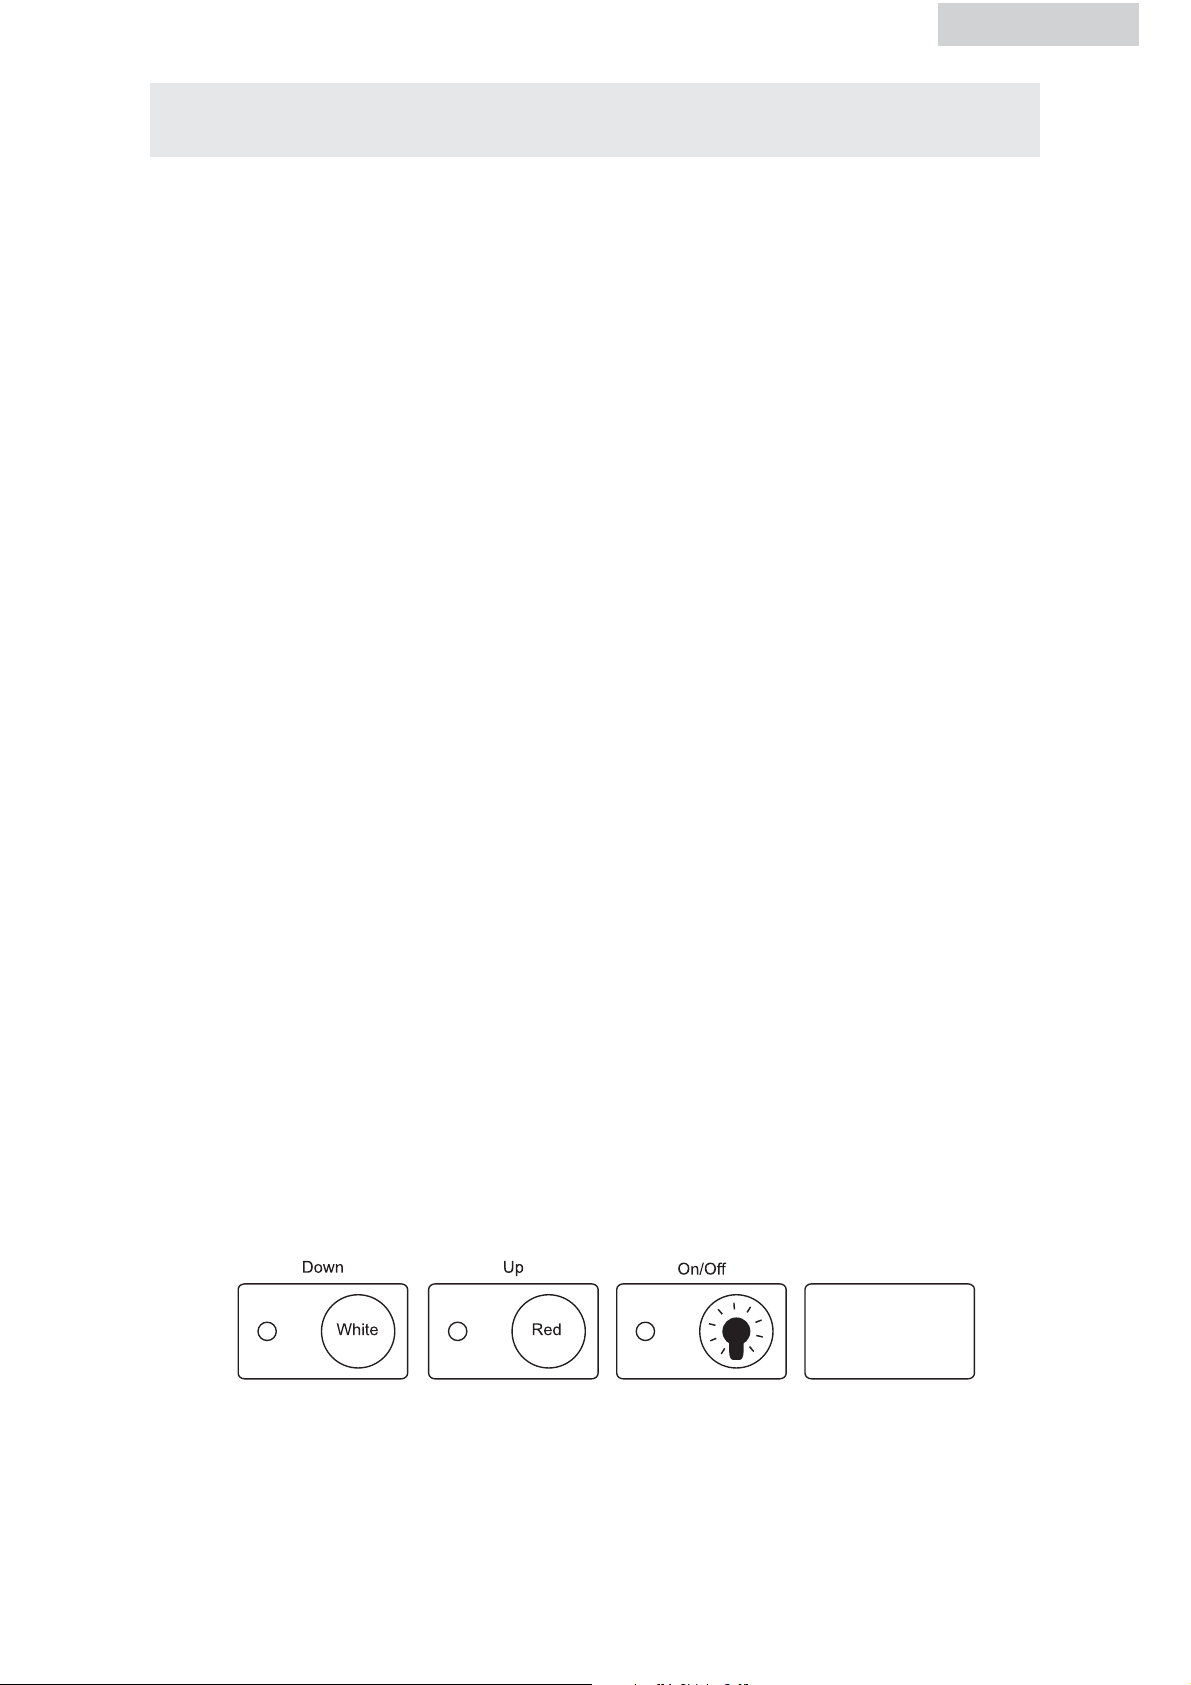
• The wine cellar can be set to any temperature you desire to accommodate
your wine storage requirements. To set the temperature, press both the “White
Wine” and “Red Wine” buttons simultaneously and hold for approximately 3
seconds. Now you are in temperature set mode. Decrease the temperature by
pushing the “White Wine” button and increase the temperature by pressing
the “Red Wine” button. Pressing the appropriate button 3 times will adjust the
English
temperature 3 degrees, pressing 4 times equals 4 degrees, 5 times equals 5
degrees, and so on. Once you have selected the temperature you desire, push
the "On/Off" button. Now the wine cellar is programmed and the LED readout
will return to current internal temperature reading.
• There will be a 3 degree variance +/- between the temperature you select and
the temperature indicated on the LED readout. This occurs because the wine
cellar activates and deactivates trying to maintain your desired temperature.
There is often a 10° variance between the top and bottom shelves of the wine
cellar. Therefore, if you have set the wine cellar for 50° and have a mix of
red and white wines, you may want to put the white wine on the bottom shelf
where the temperature will be 45° F, and place the red wine on the top shelf
where the temperature will be 55° F.
Temperature
6
Page 8

English
Shelving (will vary by model purchased)
• The shelves are chrome-plated glide-out with wood trim. They are designed
for flexibility and easy cleaning. The shelves are designed to allow free
air movement.
Interior Light
• To complement the look of your wine collection, a soft light has been built
into the wine cellar. The light switch is on the front bottom, or on the electronic
control panel.
Normal Operating Sounds You May Hear
• Boiling water, gurgling sounds or slight vibrations that are the result of the
refrigerant circulating through the cooling coils.
• The thermostat control will click when it cycles on and off.
WINE CELLAR INSTALLATIONS
Installation Limitations
• Do not install your wine cellar in any location not properly insulated or heated,
e.g. garage etc. Your wine cellar was not designed to operate in temperature
settings below 55˚ Fahrenheit.
• Select a suitable location for the wine cellar on a hard, even surface away
from direct sunlight or heat source, e.g. radiators, baseboard heaters, cooking
appliances etc. Any floor unevenness should be corrected with the leveling legs
located on the front and rear bottom corners of the wine cellar.
Dimensions
• Built-in wine cellars need to be ventilated from the front. This feature allows the
unit to be built-in in an enclosed area. The bottom front grille should be clear of
all obstructions. This is absolutely necessary for the air to circulate and for the
unit to operate efficiently. The dimensions for installation are as
follows (WxDxH):
7
Page 9
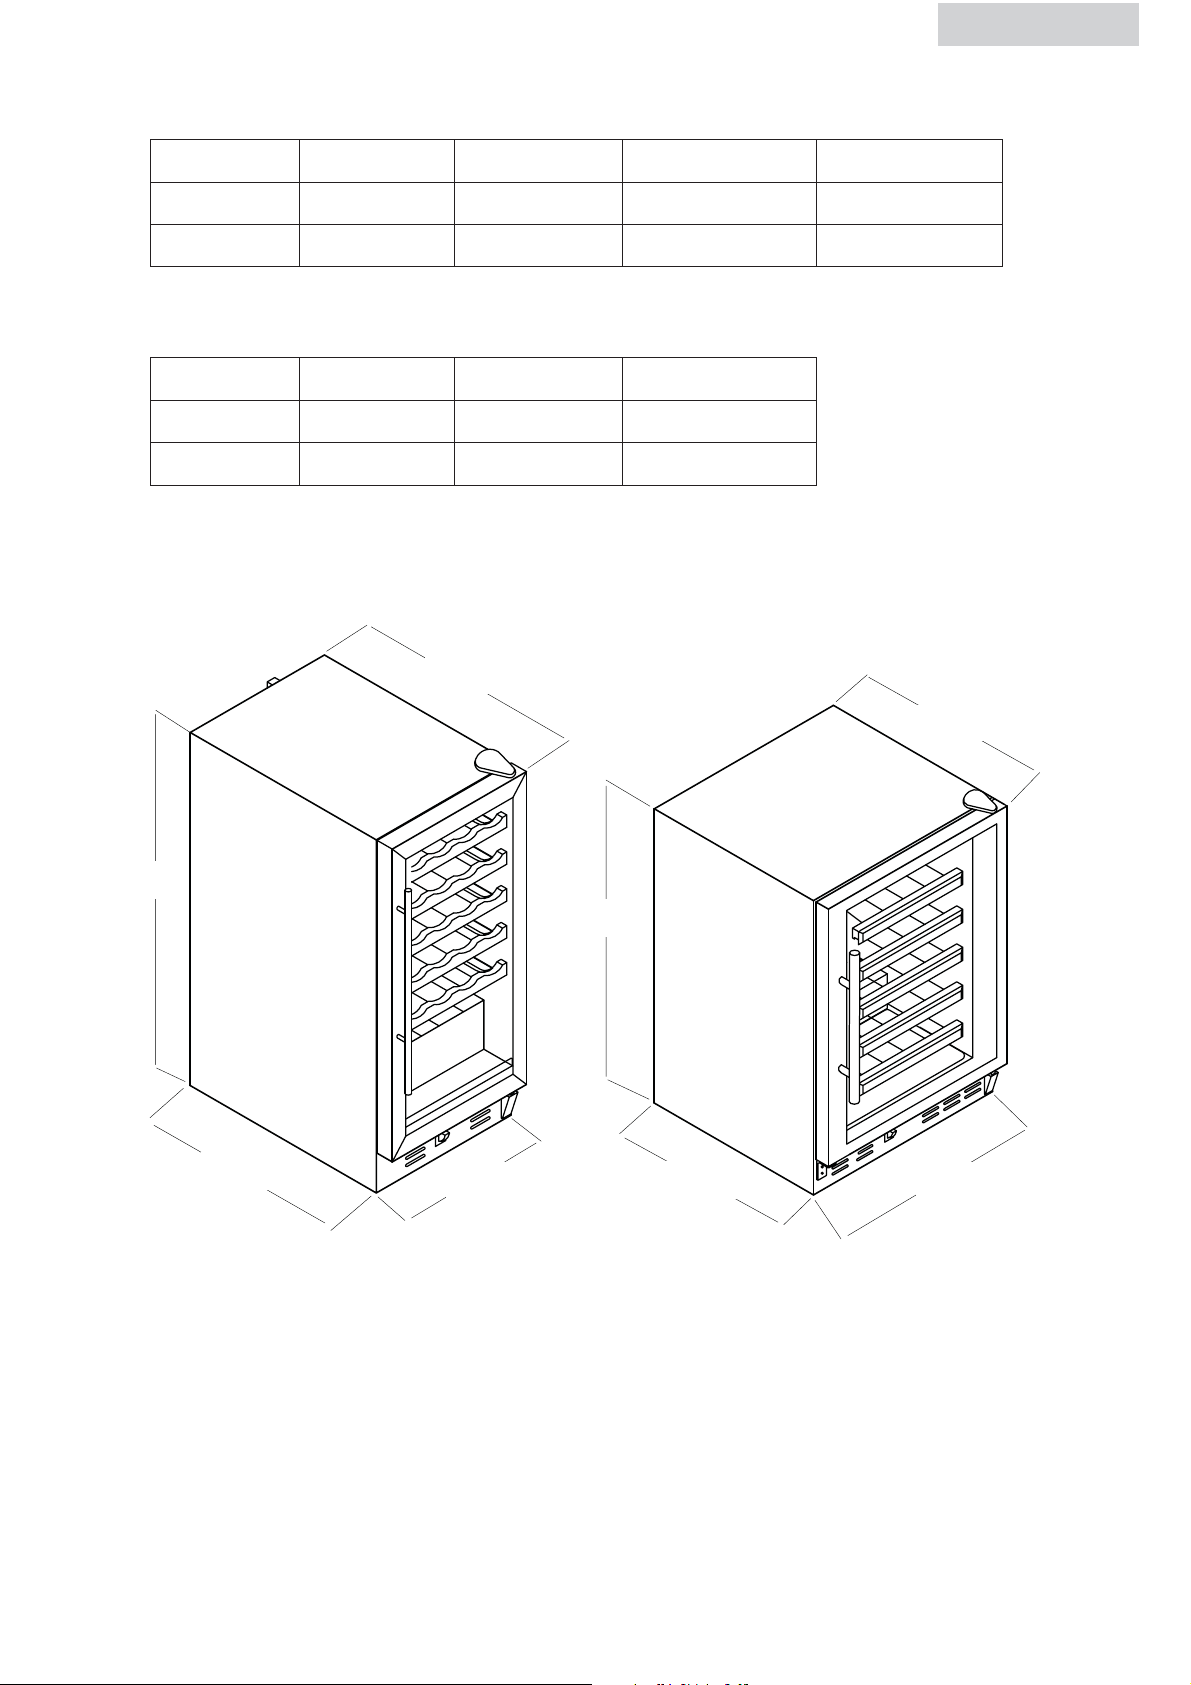
Unit Dimensions
MODEL W D1 D2 H
HVCE15 14-7/8" 20-5/8" 22-1/8" 34-1/4"
HVCE24 23-7/8" 21-15/32" 22-15/16" 34-1/4"
Built-In Dimensions
MODEL W D H
HVCE15 15" 24" 34-1/2"
HVCE24 24" 24" 35"
English
34-1/4"
20-5/8"
22-1/8"
14-7/8"
34-1/4"
21-15/32"
22-15/16"
23-7/8"
8
Page 10
English
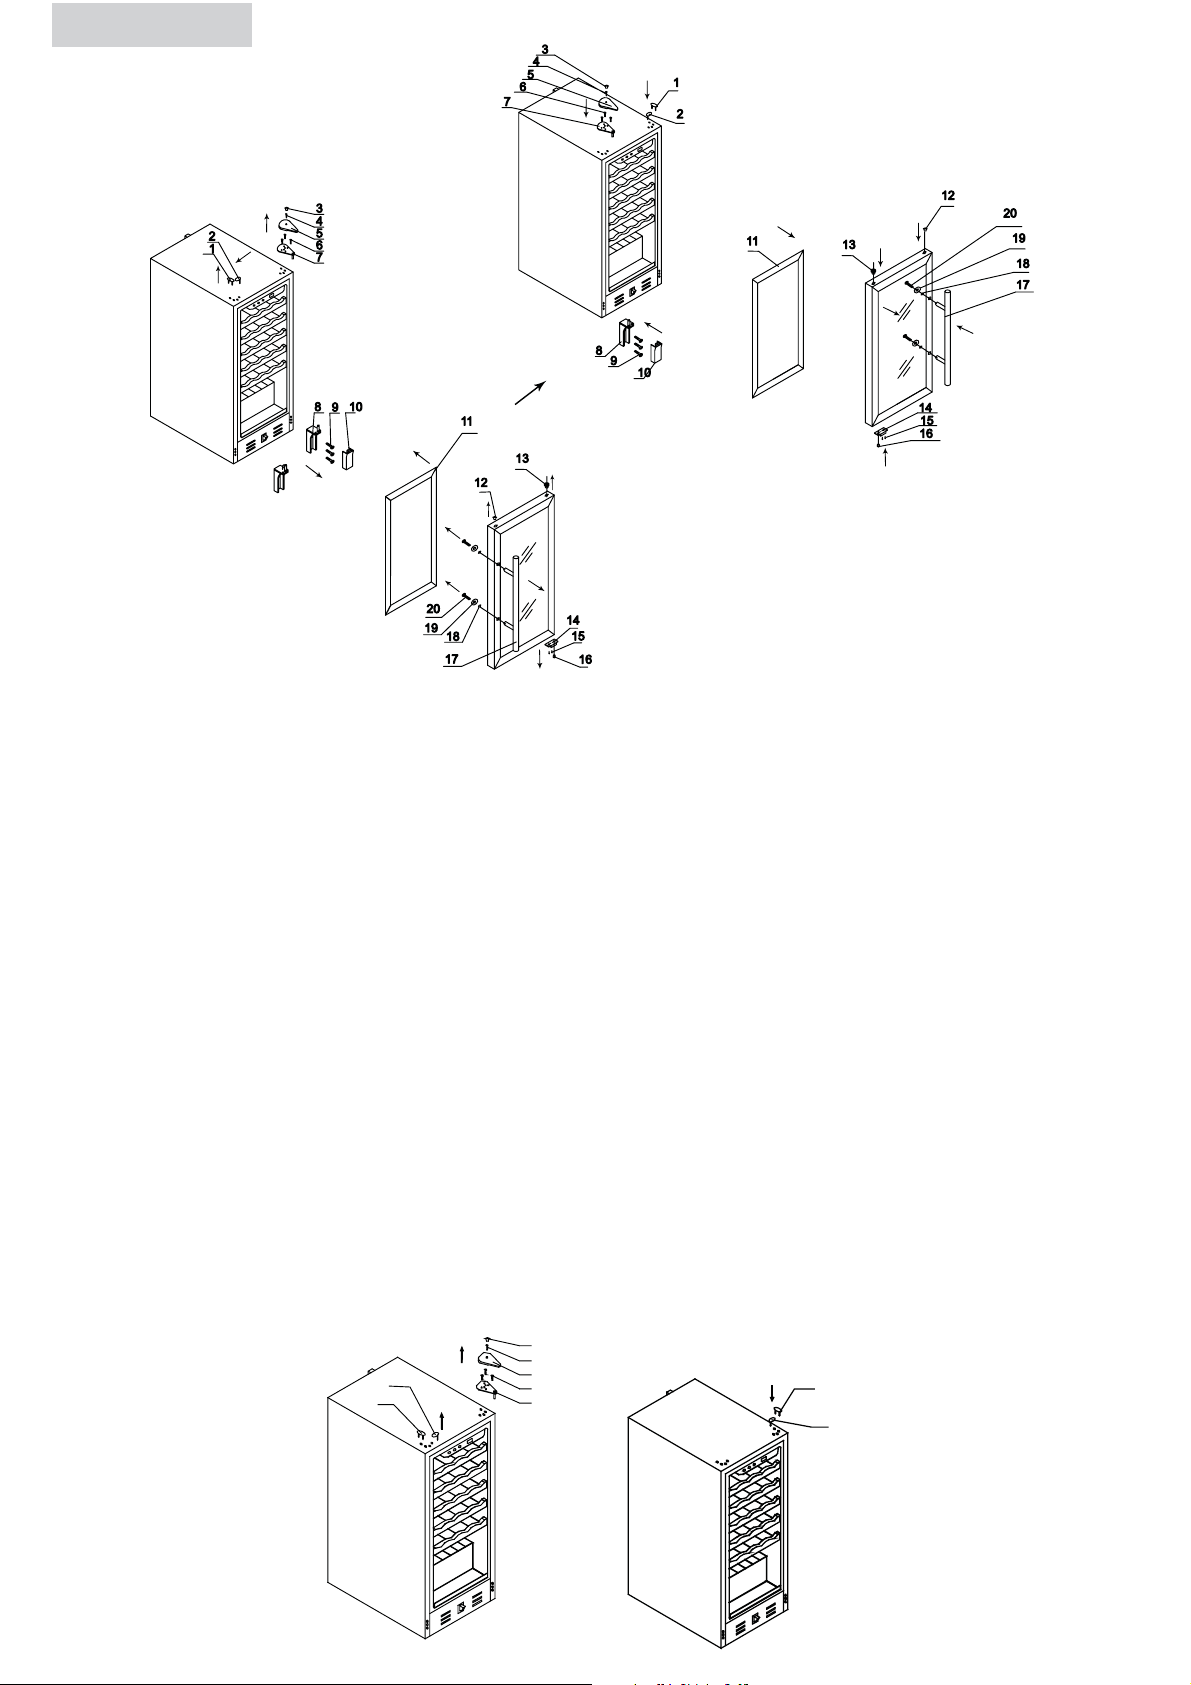
Door Reversal
1. Upper Hinge Hole Cover 1
2. Upper Hinge Hole Cover 2
3. Upper Hinge Screw Cover
4. Upper Hinge Cover Screw
5. Hinge Cover
6. Upper Hinge Screw
7. Upper Hinge
8. Lower Hinge
9. Lower Hinge Screw
10. Lower Hinge Cover
11. Door Seal
12. Hole Cover
13. Upper Hinge Axes Bushing
14. Door Bushing
15. Axis Bushing Screw
16. Lower Hinge Axes Bushing
17. Handle
18. Spring Gasket
19. Flat Gasket
20. Handle Screw
1. Remove the screw cover from the upper hinge cover. Use a Phillips
head screwdriver to remove the screw that holds the upper hinge cover in place.
Remove the upper hinge cover.
Loosen and remove the screws that hold the upper hinge in place.
Note: Make sure you hold door to prevent it from falling or
being damaged.
Lift and set aside for now.
Remove both of the upper hinge hole covers (left side) and set aside.
3
4
2
1
5
6
7
1
2
9
Page 11
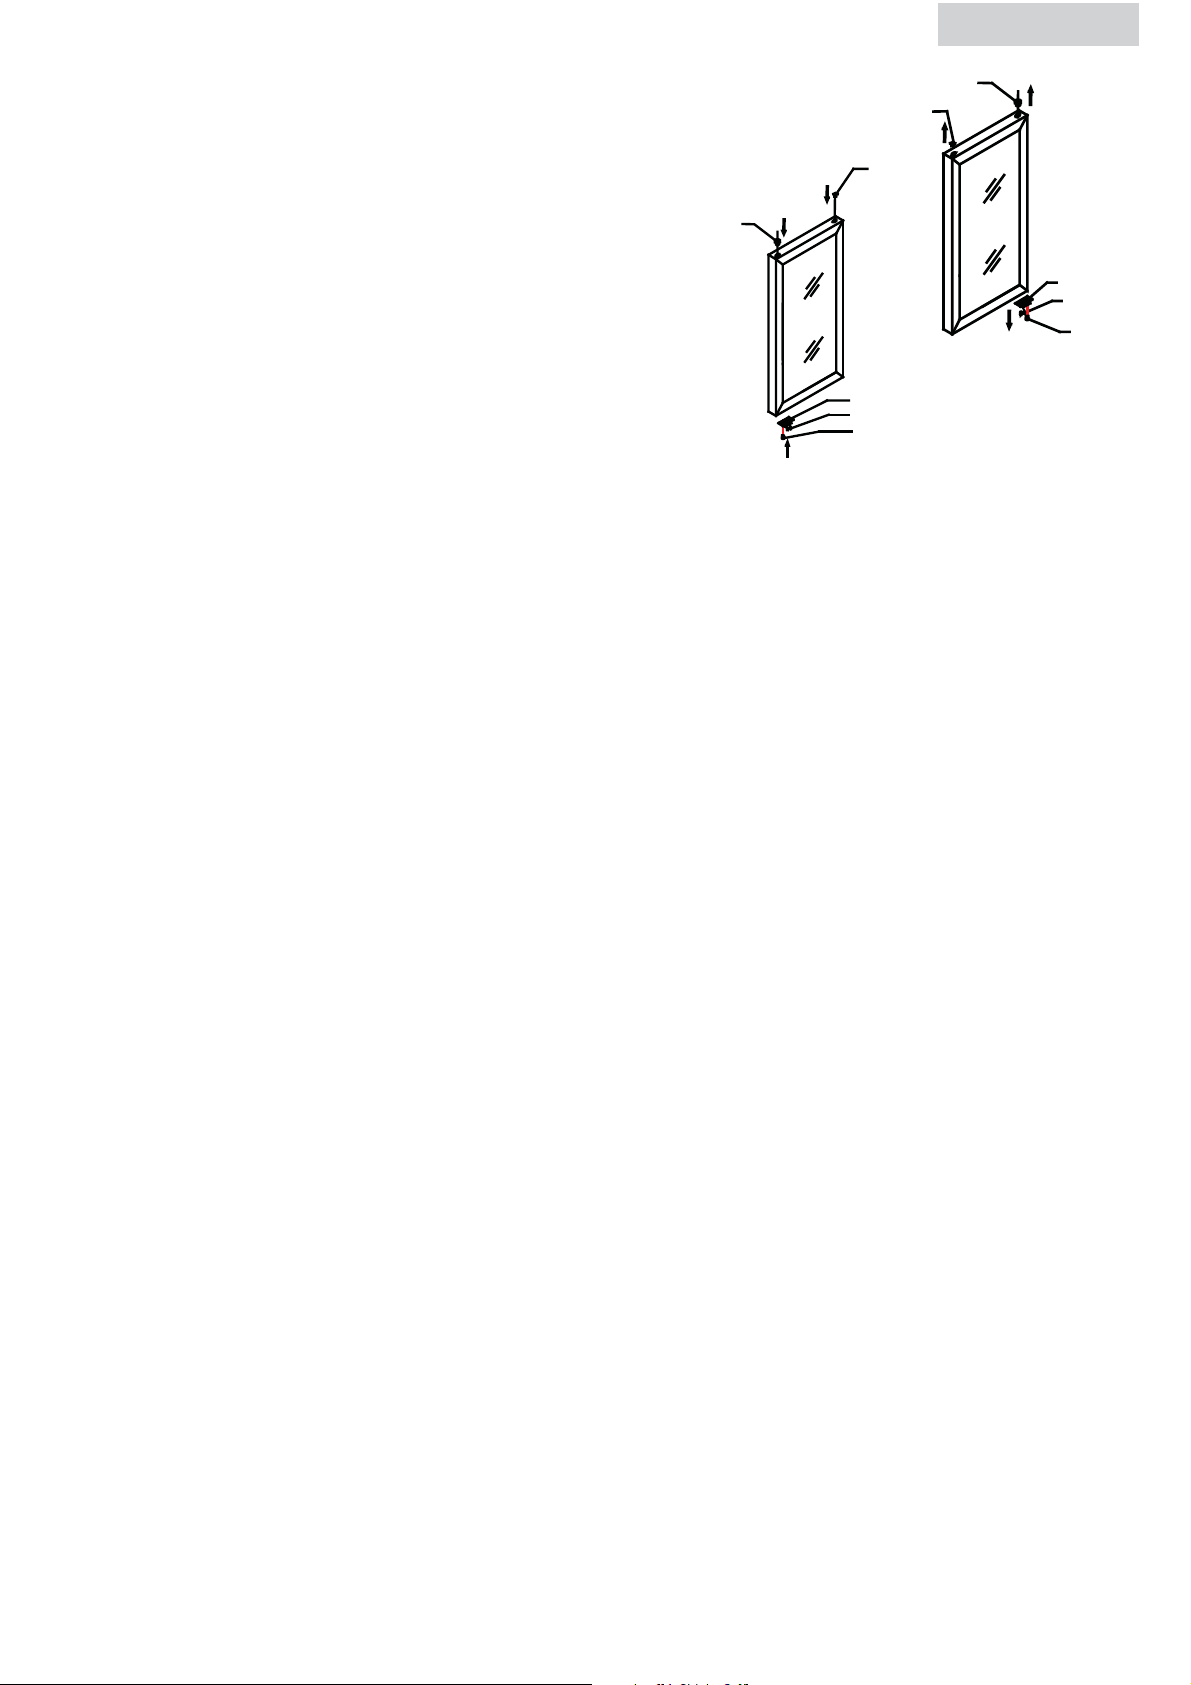
2. Remove the hole cover from the upper left side of door.
13
16
15
14
12
6
12
Remove the upper hinge block from right side of door.
Replace upper hinge block on the left side of door.
Replace the hole cover to the hole on the right.
3. Remove lower right hinge cover
Loosen and remove the screws that hold the lower right hinge in place
Remove the doorstopper on the bottom left and replace them on the bottom
right (where hinge was just removed).
Unscrew and move pin from right side position on hinge to left side position on
hinge. (Requires 9/32" hex socket.)
English
13
14
15
1
Place lower hinge removed from lower right to lower left side and fasten
in place with the screws.
Replace lower hinge cover.
4. Lay door down on a sturdy surface
Remove door seal (gasket) from rear side on door
Note: Do not use sharp instrument (knife, etc.).
Remove hole covers on right front side of door.
Use Phillips screwdriver to remove the two (2) screws that hold the door handle
in place on left side.
Note: Do not lose washer.
Place 1st screw through top hole on right side and screw into handle.
(Do not tighten completely at this time.)
Place 2nd screw through bottom hole and screw into handle and tighten.
Now tighten the 1st (upper) screw completely.
Replace hole cover previously removed into the open holes on left front
side of door.
5. Take door in hand and place bottom left hole in door over bottom left hinge pin
and put into place.
Note: Make sure you hold door to prevent it from falling or
being damaged.
Take previously removed upper hinge and place it in upper left hole of door.
Take screws and tighten upper hinge to cabinet of unit.
Note: Make sure door is level and closes properly (no gaps).
If it does not, loosen upper hinge screws slightly and adjust door and
retighten. Do this until door is level and closes properly.
Replace hinge cover and tighten with screw. Replace screw cover.
10
Page 12

English
Replacing Light Bulb
1. Turn off the wine cellar and unplug the power cord.
2. To remove the light bulb cover use a Phillips head screw driver to remove the
3 screws.
3. Make sure the light bulb is cool before removing it. Replace using a light bulb
10 watts or less.
4. After the bulb is secure, install the light bulb cover and replace the three screws.
5. Turn unit on to its original setting after plugging in the power cord.
11
Page 13

PROPER WINE CELLAR CARE & CLEANING
Cleaning and Maintenance
Warning: • To avoid electric shock always unplug your wine cellar
before cleaning. Ignoring this warning may result in death
or injury.
Caution: • Before using cleaning products, always read and follow
manufacturer’s instructions and warnings to avoid personal
injury or product damage.
General: • Prepare a cleaning solution of 3-4 tablespoons of baking
soda mixed with warm water. Use sponge or soft cloth,
dampened with the cleaning solution, to wipe down your
wine cellar.
English
• Rinse with clean warm water and dry with a soft cloth.
• Do not use harsh chemicals, abrasives, ammonia,
chlorine bleach, concentrated detergents, solvents or
metal scouring pads. SOME of these chemicals may
dissolve, damage and/or discolor your wine cellar.
Door Gaskets: • Clean door gaskets every three months according to
general instructions. Gaskets must be kept clean and pliable
to ensure a proper seal.
• Petroleum jelly applied lightly on the hinge side of gaskets
will keep the gasket pliable and ensure a good seal.
Power Interruptions
• Occasionally there may be power interruptions due to thunderstorms or other
causes. Remove the power cord from wall outlet when a power outage occurs.
When power has been restored, replug power cord to wall outlet.
Vacation and Moving Care
• For long vacations or absences, unplug the wine cellar and clean the wine
cellar and door gaskets according to “General cleaning” section. Prop doors
open, so air can circulate inside. When moving always move the wine cellar
vertically. Do not move with the unit lying down. Possible damage to the sealed
system could occur.
12
Page 14

English
TROUBLESHOOTING
Wine Cellar does not operate
• Check if wine cellarr is plugged in.
• Check if there is power at the AC outlet by checking the circuit breaker.
Wine appears too warm
• Frequent door openings.
• Allow time for recently added wine to reach desired temperature.
• Check gaskets for proper seal.
• Adjust temperature control to colder setting.
Wine temperature is too cold
• If temperature control setting is too cold, adjust to a warmer setting.
Wine Cellar runs too frequently
• This may be normal to maintain constant temperature during high temperature
and humid days.
• Doors may have been opened frequently or for an extended period of time.
• Check gasket for proper seal.
• Check to see if doors are completely closed.
Moisture build-up on interior or exterior of the Wine Cellar:
• This is normal during high humidity periods.
• Prolonged or frequent door openings.
• Check door gaskets for proper seal.
Wine Cellar door does not shut properly:
• Level the wine cellar.
• Check for blockages, e.g. wine bottles, shelves.
13
Page 15

LIMITED WARRANTY
English
What is covered and for how long?
This warranty covers all defects in
workmanship or materials for a period of:
12 months labor
12 months parts
5 years sealed system
The warranty commences on the date
the item was purchased and the original
purchase receipt must be presented to the
authorized service center before warranty
repairs are rendered.
EXCEPTIONS:
Commercial or Rental Use warranty
90 days labor (carry-in only)
90 days parts
No other warranty applies
What is covered.
1. The mechanical and electrical parts,
which serve as a functional purpose of this
appliance for a period of 12 months. This
includes all parts except finish
and trim.
3. Contact your nearest authorized service
center. For the name of the nearest service
center please call 1-877-337-3639.
THIS WARRANTY COVERS APPLIANCES
WITHIN THE CONTINENTAL UNITED
STATES,PUERTO RICO AND CANADA.
IT DOES NOT COVER THE FOLLOWING:
Damages from improper installation.
Damages in shipping.
Defects other than manufacturing.
Damage from misuse, abuse, accident,
alteration, lack of proper care and
maintenance or incorrect current or voltage.
Damage from other than household use.
Damage from service by other than an
authorized dealer or service center.
Decorative trims or replaceable light bulbs.
Transportation and shipping.
Labor (after the initial 12 months).
2. The components of the sealed system, e.g.
hermetic compressor, condenser
and evaporator from manufacturing
defects for a period of 5 years from the
date of purchase. Any damages to such
components caused by mechanical abuse
or improper handling or shipping will not
be covered.
What will be done?
1. We will repair or replace, at our
discretion, any mechanical or electrical
part which proves to be defective in
normal usage during the warranty period
so specified.
2. There will be no charge to the purchaser
for parts and labor on any covered items
during the initial 12 month period. Beyond
this period onlyparts are covered in the
remaining warranty. Labor is not provided
and must be paid by the customer.
THIS LIMITED WARRANTY IS GIVEN IN LIEU
OF ALL OTHER WARRANTIES, EXPRESSED
OR, INCLUDING THE WARRANTIES OF
MERCHANTABILITY AND FITNESS FOR A
PARTICULAR PURPOSE.
The remedy provided in this warranty
is exclusive and is granted in lieu of all
other remedies.
This warranty does not cover incidental or
consequential damages, so the above limitations may not apply to you. Some States do
not allow limitations on how long an implied
warranty lasts, so the above limitations may
not apply to you.
This warranty gives you specific legal rights,
and you may have other rights, which vary,
from state to state.
Haier America
New York, NY 10018
14
Page 16

Français
MESURES DE SECURITE
Lors de l’utilisation de cet appareil, prendre toutes les mesures de
sécurité de base, y compris les suivantes:
1) Lire l’ensemble des instructions avant d’utiliser l’appareil.
2) N’utiliser cet appareil que pour l’usage pour lequel il est prévu, tel qu’il est
indiqué dans le guide d’utilisation et d’entretien.
3) Ce réfrigérateur à vin doit être installé correctement, selon les instructions
d'installation, avant d'être utilisé. Voir les instructions de mise à la terre
dans la section d'installation.
4) Ne jamais débrancher le réfrigérateur à vin en tirant sur le cordon
d'alimentation. Saisissez toujours la fiche fermement et la tirez-la
directement de la prise de courant.
5) Réparez ou remplacez immédiatement tous les cordons d'alimentation qui
sont frangés ou endommagés. N'utilisez pas de cordon qui présente des
fissures ou de l'abrasion sur le fil ou aux extrémités.
6) Débranchez votre réfrigérateur avant de le nettoyer ou d'en faire l'entretien
général. Note: N'essayez pas de faire les réparations vous-mêmes.
Contactez un agent de service qualifié pour toute réparation.
7) Si vous remplacez un vieux réfrigérateur à vin, enlevez les portes avant de
l'entreposer ou de le jeter et laissez les étagères en place. Cela réduira les
dangers potentiels pour les enfants.
8) Ne faites pas fonctionner le réfrigérateur à vin en présence
d'émanations explosives.
9) N'enregistrez pas les nourritures dans le refroidisseur de vin car la tempéra
ture intérieure peut ne être assez fraîche pour empêcher ladétérioration.
VEUILLEZ CONSERVER
CES INSTRUCTION
1
Page 17

Français
DANGER
Les enfants pourraient se retrouver coincés dans votre réfrigérateur
à vin usagé avant que vous ne puissiez vous en débarrasser.
Retirer les portes. Laisser les étagères en place de manière à ce
que les enfants ne puissent pas grimper facilement à l’intérieur.
Nous vous remercions d’avoir choisi ce
produit Haier. Ce guide d’utilisation
facile d’emploi permet une utilisation
optimum du réfrigérateur á vin.
Ne pas oublier de prendre note du
numéro de modèle et de série. Ils
sont inscrits sur plaquette apposée sur
l’arrière du réfrigérateur à vin.
Agrafer le ticket de caisse au guide. Il devra être présenté pour tout
service après-vente sous garantie.
Numéro de modèle
Numéro de série
Date d’achat
2
Page 18

Français
SOMMAIRE
PAGE
Mesures de Sécuriteé ...............................................................1
Pièces et Caractéristiques......................................................... 4
Installation du Réfrigératuer á Vin ........................................... 5
Désemballage du Réfrigérateur á Vin ...................................................... 5
Réglage du Réfrigérateur á Vin............................................................... 5
Caractéristiques Electriques.................................................................... 5
Utilisation de Rallonges ......................................................................... 5
Caractéristques du Réfrigérateur á Vin..................................... 6
Montage Initial ..................................................................................... 6
Tablettes............................................................................................... 7
Lumière Intèrieure.................................................................................. 7
Bruits de Fonctionnement lors d'une Exploitation Normale ......................... 7
Installation du Compartiment à Vin..........................................8
Limitations............................................................................................8
Dimensions...........................................................................................8
Changer l'emplacement de la Porte ........................................................9
Remplacer les Ampoules ......................................................................11
Entretien et Nettoyage du Réfrigérateur á Vin........................ 12
Nettoyage et Maintenance................................................................... 12
Coupures de Courant .......................................................................... 12
Entretien lors des Vacances ou d'un Déménagement ............................... 12
Guide de Dépannage............................................................. 13
Garantie ................................................................................ 14
3
Page 19

PIÉCES ET CARACTÉRISTIQUES
HVCE24 HVCE15
5
3
Français
7
HVCE15
9
1.
capacité
de
bouteille
26 électronique
commande
température
réglable
(non
montrer)
2.
de
3.
*
rayonage
glissement
dehors
avec le
woodtrim
4.
lumière
intérieure
oui
manuel
(non
montrer)
6
8
poignée
de porte
poignée
de tube
5.
type
6.
équilibre
de porte
métal
balayé
ou noir
7.
mise à
niveau
des
jambes
4
(non
montrer)
7
8.
porte
réversible
si bleu
9
9.
verre
teinté
UV-gris
HVCE24
* Quantité et modèle changer par modèle acheter.
50 électronique
(non
montrer)
glissement
dehors
avec le
woodtrim
oui
manuel
(non
montrer)
type
poignée
de tube
métal
balayé
ou noir
4
(non
montrer)
si bleu
UV-gris
4
Page 20

Français
INSTALLATION DU RÉFRIGÉRATEUR Á VIN
Désemballage du Réfrigérateur á Vin
1. Retirer l’ensemble du material d’emballage. Ceci comprend la base en mousse
ainsi que l’ensemble du materiel adhesif qui maintient les accessoires du
réfrigérateur à vin l’intérieur tout comme à l’extérieur.
2. Inspecter et enlever tout restant d’emballage, de scotch ou de matériaux
imprimés avant de brancher le réfrigérateur à vin.
Réglage du Réfrigérateur á Vin
• Votre refroidisseur de vin a quatre jambes de mise à niveau qui sont plac dans
les coins avant et arrière de votre refroidisseur de vin.
• Pour régler les pieds de mise à niveau, les tourner dans le sens des aiguilles
d’une montre afin de surélever le réfrigérateur á vin et dans le sens inverse des
aiguilles d’une montre pour l’abaisser. La porte du réfrigérateur á vin se ferme
plus facilement lorsque les pieds de mise à niveau sont surélevés.
Caractéristiques Electriques
• Pour l’alimentation du réfrigérateur á vin, veiller à utiliser une prise de courant
convenable (prise de 115 volts,15 amp) raccordée à la terre.
• Eviter d’utiliser des adaptateurs à trois fiches ou de sectionner la troisième fiche
reliée à la terre dans le but d’utiliser un branchement à deux fiches. Cette
pratique pourrait s’avérer dangereuse dans la mesure où le réfrigérateur á vin
n’est pas relié convenablement à la terre, et risquerait de causer des risques
d’électrocution.
Utilisation de Rallonges
• Éviter d’utiliser une rallonge électrique car, dans certains cas, cela peut
entraîner des risques pour la santé. S’il est nécessaire d’utiliser une rallonge,
utiliser uniquement une rallonge possédant une fiche male à deux broches plus
terre à une extrémité et une prise femelle de même type à l’autre extrémité. La
capacité électrique de la rallonge doit être égale ou supérieure à la capacité
de l’appareil.
5
Page 21

CARACTÉRISTIQUES DU RÉFRIGÉRATEUR Á VIN
Montage Initial
HVCE15 / HVCE24
• Le réfrigérateur à vin est préréglé à la fabrique pour s‘adapter automatique-
ment aux conditions de température pour les vins rouge ou blanc. Si vous y
placer principalement des vins blancs, appuyez sur le bouton “Vin Blanc“ et le
réfrigérateur à vin maintiendra une température moyenne variant entre 7°C et
10°C. En appuyant sur le bouton “Vin Rouge“, la température se situera entre
13°C et 15°C.
• Le réfrigérateur à vin peut être réglé à la température que vous désirez pour
satisfaire vos exigences de refroidissement. Pour régler la température, pressez
simultanément sur les boutons “Vin Rouge“ et “Vin Blanc“ pendant environ 3
secondes. Vous serez au mode de réglage de la température. Baissez la
température en appuyant sur le bouton “Vin Blanc“ et augmentez la
température en appuyant sur le bouton “Vin Rouge“ En appuyant sur le bouton
3 fois la température s'ajustera de 3 degrés, 4 fois équivaut à 4 degrés, 5 fois
équivaut à 5 degrés et ainsi de suite. Une fois que vous avez sélectionné la
température désirée, appuyez sur le bouton “On/Off“. Le réfrigérateur à vin
est maintenant programmé et le dispositif d'affichage à diodes luminescentes
retournera à la lecture de température courante.
Français
• Il peut y avoir une variance de 3 degrés (+/-) entre la température choisie et
celle indiquée sur le dispositif d'affichage à diodes luminescentes. Cela se
produit parce que le réfrigérateur à vin s'active et se désactive pour essayer de
maintenir la température désirée. Il y a souvent une variance de 10˚ entre la
tablette du haut et celle du bas du réfrigérateur à vin. Donc, si vous avez réglé
le réfrigérateur à vin à 50˚ et que vous avez placé des vins rouges et blancs,
vous pourriez placer le vin blanc sur la tablette du bas où la température sera
de 45˚ F et placer le vin rouge sur la tablette du haut où la température sera
de 55º F.
La Temperature
Vers le bas
Vers le haut de
Sur / Outre de
Blanc
Rouge
6
Page 22

Français
Tablettes
(changez dans différents modèles)
• Les étagères sont enduites plaqué ou noir de chrome selon avec glissez-dehors
l'équilibre en bois votre modèle acheté. Elles sont conçues pour la flexibilité
et le nettoyage facile. Les étagères sont conçues pour permettre le mouvement
d'air libre et fournissent plus d'espace.
Lumière intérieure
• Pour compléter le regard de votre collection de vin, une lumière molle a été
établie dans le refroidisseur de vin. Le commutateur léger est sur le fond plan,
ou sur le panneau de commande électronique selon le modèle acheté.
Bruits de Fonctionnement lors d'une Exploitation Normale
• Les éléments de refroidissement tubulaires (serpentins refroidisseurs) font des
bruits d'ébullition, des gargouillements et provoquent de légères vibrations.
• La commande du thermostat émettra un déclic lorsque qu'elle s'allume
et s‘éteint.
INSTALLATION DU COMPARTIMENT Á VIN
Limitations relatives à l’Installation
• Ne pas installer le réfrigérateur á vin dans un endroit qui n’est pas
convenablement isolé ou chauffé; comme par exemple un garage, etc. Le
réfrigérateur á vin n’est pas conçu pour fonctionner à des températures
inférieures à 12°C.
• Choisir un endroit convenable et placer le réfrigérateur á vin sur une surface
solide et plane, loin de sources de chaleur telles que: les radiateurs, les
éléments chauffants à plinthes, les cuisinières, etc. N‘importe quelle inégalité
de plancher devrait être corrigée avec les jambes de mise à niveau plac sur les
coins plan et arrière de votre refroidisseur de vin.
Dimensions
• Les compartiments rafraîchisseurs à vin doivent être ventilés par l‘avant. Cette
fonction permet de pouvoir installer le compartiment dans un endroit clos. Rien
ne doit gêner la grille inférieure avant. Ceci est absolument nécessaire afin de
faire circuler l‘air et pour que le compartiment fonctionne de façon efficace. Les
dimensions de l‘installation sont les suivantes (LxPxH):
7
Page 23

Dimensions d'Unité
MODEL W D1 D2 H
HVCE15 378 524 562 870
HVCE24 606 545 583 870
Construire-Dans des Dimensions
MODEL W D H
HVCE15 381 610 876
HVCE24 610 610 889
Français
870
524
562
378
870
545
583
606
8
Page 24

Français
Changer l'emplacement de la porte
1. Le couvercle du trou de la
charniere superieure 1
2. Le couvercle du trou de la
charniere superieure 2
3. Le couvercle du vis de la
charniere superieure
4. Le couvercle du vis de la
charniere superieure
5. Le couvercle de la charniere
6. Le vis de la charniere superieure
7. La charniere superieure
8. La charniere inferieure
9. Le vis de charniere inferieure
10. Le couvercle de la charniere inferieure
11. Joint de porte
12. Le couvercle du trou
13. Le bloc superieur de haches de la
charniere
14. Le bloc de la porte
15. Le vis du bloc de l'axe
16. Le bloc inferieur de haches de charniere
17. La poignee
18. La garniture de ressort
19. La garniture plate
20. Le vis de la poignee.
1. Enlevez la couverture des vis de la couverture superieure du gond. Utilisez un
tournevis Phillips pour enlever le vis qui tient en place la couverture du gond
superieur.
Enlevez la couverture du gond superieur.
Desserez et enlevez les vies qui tiennent en place le gond superieur.
Note: Assurez vous de tenir la porte pour l’empecher de tomber
ou d’etre endommagee. Soulevez et mettez de cote pour le
moment.
Enlevez les deux ouvertures du trou du gond (cote gauche) et mettez de cote.
9
Page 25

3
2
16
12
13
14
15
4
2
1
5
6
7
1
2
2. Enlevez la couverture du trou du cote gauche superieur.
Français
Enlevez le gond superieur du cote droit de la porte
Replacez le bloc du gond superieur du cote gauche de la porte
Replacez la couverture du trou sur le trou du cote droit.
3. Enlevez la couverture du gond inferieur
Desserez et enlevez les vis qui tiennent le gond inferieur en place
Enlevez le doorstopper du cote gauche inferieur et replacez le sur le cote droit
inferieur (de l’endroit ou le gond vient d’etre retire)
Devissez et retirez l’epingle du cote droit de gond sur le cote gauche du gond.
(exige une douille de sortilege de 9/32“ )
Placez le gond inferieur retire du cote droit inferieur sur le cote gauche inferieur
et vissez le en place.
13
14
15
16
1
Replacez la couverture du gond inferieur.
4. Placez la porte horizontalement sur une surface ferme.
Enlevez le joint de la porte du dos de la porte
Note: N’utilisez pas des instruments pointus (comme couteau etc.)
Enevez la couverture du trou du cote droit de devant de la porte
Utlisez un tournevis Phillips pour retirer les deux (2) vis qui tiennent la poignee
de la porte en place sur le cote gauche.
Note: Ne perdez pas la rondelle.
Placez le premier vis a travers le trou superieur sur le cote droit et vissez dans
la poignee. ( Ne serrez pas completement pour ce moment)
Placez le deuxieme vis a travers le trou inferieur et vissez dans la poignee et
serrez completement.
A ce moment serrez le premier vis completement.
Replacez la couverture du trou precedemment retire dans les trous ouverts
sur le cote gauche de devant de la porte .
10
Page 26

Français
5. Prenez la porte en main et placez le trou inferieur gauche dans la porte ou
dessus de l’epingel du gond gauche et mettez la en place.
Note: Assurez vous de tenir la porte pour l’empecher de tomber
ou d’etre endommagee.
Placez le gond superieur precedemment retire et placez le dans le trou
superieur gauche de la porte.
Vissez completement le gond superieur au placard.
Note: Assurez vous que la porte soit nivelee et se ferme
correctement (aucun ecart) Si non, desserez les vis superieurs
legerement, ajustez et revissez de nouveau. Repetez si necessaire,
jusqu’a ce que la porte se ferme correctement.
Replacez le couvert du gond et vissez. Replacez le couvert des vis.
Remplacer les Ampoules
1. Éteignez le rafraîchisseur à vin et débranchez le cordon électrique.
2. Utilisez un tournevis cruciforme afin de retirer le cache de protection de
l'ampoule et dévissez les 2 vis.
3. Assurez-vous que l‘ampoule est froide avant de la retirer. Remplacez l‘ampoule
par une ampoule de 10 watts ou moins.
4. Après avoir placé l‘ampoule, remontez le cache de protection et replacez les
deux vis.
5. Mettez en marche le rafraîchisseur à vin à son réglage d‘origine après avoir
rebranché le cordon électrique.
11
Page 27

Français
ENTRETIEN E NETTOYAGE DU RÉFRIGÉRATEUR Á VIN
Nettoyage et Maintenance
Attention:
Précautions: • Avant d’avoir recours à des produits d’entretien,
Généralités:: • Préparer une solution de nettoyage comportant3à4
• Rincer à l’eau chaude et sécher à l’aide d’un tissu doux.
• Ne pas utiliser de détergents chimiques, abrasifs, ou
• Pour éviter les risques d’électrocution; toujours débrancher
le réfrigérateur á vin avant de le nettoyer. Le non
respect de cette mesure peut entraîner des blessures graves
ou mortelles.
toujours consulter et suivre les instructions du fabricant et
recommandations afin d’éviter toute blessure éventuelle et
risque de dégât de matériel.
cuillerées à soupe de bicarbonate de soda mélangé à
de l’eau chaude. A l’aide d’une éponge ou un tissu doux
humectés de solution de nettoyage; essuyer le réfrigérateur
á vin.
contenant de l’ammoniaque ou du chlore, ni de solvants ou
de tampons à récurer en métal. CERTAINS de ces produits
chimiques peuvent dissoudre, endommager et/ou décolorer
le réfrigérateur á vin.
Joints de porte: • Nettoyer les joints de porte tous les trois mois en suivant
les instructions générales fournies. Les joints doivent rester
propres et flexibles afin d’assurer une bonne étanchéité.
• Une fine couche de gelée de pétrole appliquée sur le côté
des joints comportant les charnières permet de préserver la
flexibilité de ces derniers et d’assurer une bonne étanchéité.
Coupures de Courant
• Des pannes d’alimentation occasionnelles peuvent survenir à cause d’une
tempête ou de causes autres. Retirer le cordon d’alimentation de la prise
CA pendant toute la durée de la coupure d’alimentation. Lorsque le courant
électrique est rétabli, rebrancher le cordon dans la prise CA. power cord to
mur outlet.
Vacances et Déménagement
• Pendant les périodes de vacances ou d’absence prolongée, placer le CADRAN
de température sur la position ‘OFF’ (arrêt) et nettoyer le réfrigérateur á vin
ainsi que les joints de porte en suivant lesprocédures du chapitre intitulé
‘Nettoyage général’. Faire en sorte que la porte reste ouverte de manière à
ce que l’air puisse circuler à l’intérieur. Toujours déplacer le réfrigérateur á vin
en position verticale. Ne pas déplacer l’appareil en position horizontale.Ceci
pourrait endommager le système d’étanchéité.
12
Page 28

Français
DÉPANNAGE
Le Réfrigérateur á vin ne fonctionne pas:
• Veiller à ce que le réfrigérateur á vin soit bien branché.
• Veiller à ce que la prise de courant CA fonctionne bien en vérifiant
le disjoncteur.
Le vin semble trop chaud:
• La porte est ouverte trop fréquemment.
• Accordez l'heure pour le vin récemment ajouté d'atteindre la
température désirée
• Vérifier l’étanchéité des joints.
• Régler le programmateur de température sur froid.
La température de vin est trop froide:
• Si le programmateur de température est placé sur une position trop froide, le
régler sur une position plus chaude.
Le réfrigérateur á vin se met en marche trop fréquemment:
• Il peut s’agir de l’activité normale pour maintenir une température constante
lorsque la température extérieure ou le taux d’humidité dans l’air sont élevés.
• Les portes ont été ouvertes trop fréquemment ou pendant une période de
temps prolongée.
• Vérifier l’étanchéité des joints.
• Veiller à ce que les portes soient bien fermées.
Accumulation d’humidité à l’intérieur ou à l’extérieur du
refrigérateur á vin:
• Ceci est normal pendant les périodes de grande chaleur humide.
• Ouvertures de la porte prolongée ou trop fréquente.
• Vérifier l’étanchéité des joints.
La porte du réfrigérateur á vin/congélateur ne ferme pas
correctement:
• Mettre le réfrigérateur à niveau.
• Vérifiez les colmatages, par exemple: bouteilles de viníetageres.
13
Page 29

GARANTIE LIMITEÉ
Français
Eléments sous garantie et durée de
la garantie:
Cette garantie couvre tous les défauts de
main-d’œuvre et de matériaux pour période de:
12 mois pour la main d’oeuvre
12 mois pour les pièces
5 ans pour le système d’étanchéité
La garantie prend effet le jour de l’achat de
l’article. Le ticket de caisse d’origine doit être
présenté au centre de réparation agréé pour toute
réparation sous garantie.
EXCEPTIONS: Garantie pour usage
commercial ou location.
90 jours pour la main d’œuvre
(service en atelier uniquement)
90 jours pour les pièces
Aucune autre garantie n’est applicable
Couverture.
1. Les pièces électriques et mécaniques servant
au fonctionnement de l’appareil, pour une
période de 12 mois. Ceci comprend l’ensemble
des pièces, à l’exception de la finition et des
garnitures.
2. Les composants du système d’étanchéité, tels
que le compresseur hermétique, le condenseur
et l’évaporateur, contre tous défauts de
fabrication, pour une période de 5 ans à
compter de la date d’achat. Tout dommage
concernant ces composants et résultant d'un
abus d’ordre mécanique, d’une utilisation incorrecte, ou de méthodes d’expédition
inadéquates, ne sera pas compris dans la
garantie.
Réparations qui seront effectuées:
1. Nous nous engageons à réparer ou
remplacer, à notre discrétion, toute pièce
électrique ou mécanique s’avérant défectueuse
dans des conditions normales d’utilisation, au
cours de la période de garantie spécifiée.
2. L’acheteur ne subira aucun frais pour les pièces
et la main-d’œuvre couvertes par la garantie,
au cours de la première période de 12 mois.
Au-delà de cette période, seules les pièces
seront couvertes par la durée restante de la
garantie. La main-d’œuvre n’est pas pourvue et
est à la charge du client.
3. Contacter le centre de réparations agréé le plus
proche. Pour obtenir les nom et adresse du centre le plus proche, appeler le
1-877-337-3639.
LES APPAREILS SONT COUVETRS PAR LA
GARANTIE SUR LE TERRITOIRE
CONTINENTAL DES ETATS-UNIS, Á PUERTO
RICO ET AU CANADA:
Les dommages résultant d’une installatio
incorrecte. Les dommages survenus pendant le
transport. Les défauts ne résultant pas de la
fabrication.Les dommages résultant d’un usage
incorrect ou abusif, d’un accident, de
modifications, d’un manque d’entretien ou de
maintenance, ou d’une tension incorrecte. Les
dommages résultant d’un usage autre que l’usage
ménager. Les dommages résultant d’un entretien
ou de réparations par quiconque autre qu’un
distributeur ou centre de réparations agréé.
Garnitures décoratives ou ampoules pouvant être
remplacées. Transport et Frais d’envoi. Main
d’œuvre (après la période initiale de 12 mois)
CETTE GARANTIE LIMITÉE REMPLACE TOUTE
AUTRE GARANTIE EXPRESSE OU IMPLICITE, Y
COMPRIS LES GARANTIES DE VALEUR
MARCHANDE OU D’ADÉQUATION A UN
USAGE PRECIS
Le recours offert dans cette garantie est exclusif et
est accordé à l’exclusion de tout autre.
La garantie ne couvrant pas les dommages directs
et indirects, les limitations ci-dessus peuvent ne pas
s’appliquer à tous les cas. Certains états ne permettant pas la limitation de la durée des garanties
implicites, les limitations ci-dessus
peuvent ne pas s’appliquer à tous les cas.
Cette garantie confère à l’acheteur des droits
spécifiques et celui-ci peut bénéficier d’autres
droits qui varient selon les états.
Haier America
New York, NY 10018
14
Page 30

Español
INSTRUCCIONES PRECAUTORIAS
Cuando utilice este aparato, siempre ejerza las precauciones de
seguridad básicas, incluyendo las siguientes:
1) Lea todas las instrucciones antes de utilizar este aparato.
2) Use este enfriador de vino solamente para el propósito que fue creado
como se describe en esta guía de usos y cuidados.
3) Este enfriador de vino debe de ser instalado apropiadamente de acuerdo
con las instrucciones de instalación antes de ser usado. Vea las instruc
ciones de conexión a tierra en la sección de instalación.
4) Nunca desconecte el enfriador de vino jalando del cordón. Siempre sujete
la clavija firmemente y jálela hacia fuera del tomacorriente.
5) Repare o reemplace inmediatamente todos los cables eléctricos que se
hayan quemado o dañado. No utilice un cable que muestre grietas a abra
siones a lo largo del mismo o en la clavija o el conectador.
6) Desconecte el enfriador de vino antes de limpiarlo o del mantenimiento
general. Nota: No intente repararlo usted mismo. Llame a un agente califi
cado para cualquier reparación.
7) Si usted está reemplazando un enfriador de vino antiguo, retire las puertas
del mismo antes de guardarlo o desecharlo, y deje los estantes en lugar.
Esto reducirá la posibilidad de peligro a los niños.
8) No opere el enfriador de vino en la presencia de humos explosivos.
9) No guarde comida en el enfriador de vino, ya que la temperatura dentro del
mismo puede no ser lo suficientemente fría para prevenir la descomposición
de la comida.
1
GUARDE ESTAS INSTRUCCIONES
para referencia futura.
Page 31

Español
PELIGRO
Existe el riesgo de que los niños puedan quedar atrapados
dentro. Antes de tirar su enfriador de vino, quite las puertas.
Deje los anaqueles en su lugar para que los niños no puedan
entrar fácilmente en el interior.
Gracias por utilizar nuestro producto Haier.
Este sencillo manual le orientará con respecto
al mejor uso que puede darle a su enfriador
de vino.
Recuerde tomar nota del modelo y número
de serie. Ambos se encuentran impresos en
una etiqueta en la parte posterior del enfriador
de vino.
Agrafer le ticket de caisse au guide. Il devra être présenté pour tout service
après-vente sous garantie.
Número de Modelo
Número de Serie
Fecha de Compra
2
Page 32

Español
INDICE
Instrucciones Precautorias ..............................................................1
Piezas y Características..................................................................4
Instalación de su Refrigerador del Vino .........................................5
Desempaque de su Refrigerador del Vino.......................................................5
Nivelación de su Refrigerador del Vino..........................................................5
Requisitos Eléctricos .....................................................................................5
Uso de Alargues..........................................................................................5
Características y uso del Refrigerador del Vino ..............................6
Programación Inicial ....................................................................................6
Anaqueles...................................................................................................7
Luz Interior. .................................................................................................7
Ruidos de Operacion normales que Pueda Escuchar........................................7
PAGINA
Instalación del Enfriador de Vino ...................................................8
Limitaciones.................................................................................................8
Dimensiones................................................................................................8
Cambio de la Instalación de la Puerta............................................................9
Reemplazo de las Bombillas........................................................................11
Cuidados y Limpieza Asecuada del Refrigerador del Vino............12
Limpieza y Mantenimiento ..........................................................................12
Interrupciones de la Corriente Eléctrica.........................................................12
Vacaciones y Mudanza ..............................................................................12
Verificación de Problemas............................................................13
Información de Garantía..............................................................14
3
Page 33

PIEZAS Y CARACTERISTICAS
HVCE24 HVCE15
5
3
Español
7
HVCE15
9
1.
capacidad
de la
control de la
temperatura
botella
26 electrónico
demostrado)
2.
ajustable
(no
3.
*estantería4.luz
interior
desliza-
miento
hacia fuera
con el
woodtrim
manual
demost-
rado)
si
(no
6
8
5.
poignée
de porte
tipo
apretón
del tubo
6.
ajuste
de la
puerta
metal
cepillado
o Negro
7.
nivelación
de las
piernas
4
(no demost-rado)
7
puerta
revers-
8.
cristal
teñido
ible
si azul
UV-gris
9
9.
HVCE24
50 electrónico
(no demost-
rado)
desliza-
miento
hacia fuera
con el
woodtrim
si
manual
(no
demost-
rado)
apretón
del tubo
* La cantidad y el estilo variarán por el modelo comprado.
tipo
metal
cepillado
o Negro
4
(no demost-rado)
si azul
UV-gris
4
Page 34

Español
INSTALACIÓN DE SU REFRIGERADOR DEL VINO
Desempaque de su Refrigerador del Vino
1. Retire todo el material de embalaje. Esto incluye la base de espuma y toda
la cinta adhesiva que sostiene los accesorios del refrigerador del vino en el
interior y exterior. Deslice y saque la protección de plástico o espuma usada
para proteger al compresor de daños durante el envíodebido a la vibración y
los golpes.
2. Inspeccione y retire cualesquier restos del embalaje, la cinta adhesiva o los
materiales impresos antes de encender el refrigerador del vino.
Nivelación de su Refrigerador del Vino
• Su refrigerador del vino tiene cuatro piernas de nivelación que estén situadas
en las esquinas delanteras y posteriores de su refrigerador del vino. Después
de haber colocado su refrigerador en la posición definitiva, puede nivelar su
refrigerador del vino.
• Puede ajustar las patas niveladoras girándolas a la derecha para elevar el
refrigerador del vino y girándolas a la izquierda para bajarlo. La puerta del
refrigerador del vino cerrará con más facilidad cuando las patas niveladoras
son elevadas.
Requisitos Eléctricos
• Asegúrese de que haya un tomacorriente apropiado (115 V, 15 Amp.) con
una conexión a tierra apropiada para hacer funcionar el refrigerador del vino.
• Evite el uso de adaptadores de tres patas o el cortar la tercer pata de
conexión a tierra para poder conectar en un tomacorriente bifásico. Esto
sería una práctica muy peligrosa ya que no proveería al refrigerador del
vino con una conexión a tierra adecuada y podría resultar un riesgo de
descarga eléctrica.
Uso de Alargues
• Evite el uso de alargues para mayor seguridad. Si fuese necesario utilice
solamente un alargue de tres cables que posea un enchuefe de tres patas.
5
Page 35

CARACTERISTICAS Y USO DEL REFRIGERADOR
DEL VINO CARACTERISTICAS
Programación Inicial
HVCE15 / HVCE24
• El enfriador de vino está programado de fábrica para que automáticamente
se ajuste a los requerimientos de temperatura para los vinos tinto o blanco. Si
usted en su mayoría guarda vinos blancos, p resione el botón de “White wine“
(vino blanco) y el enfriador de vino mantendrá una temperatura promedio
entre 7° y 10°C. Al presionar el botón de “Red Wine“ (vino tinto), mantendrá
una temperatura promedio de 13° a 15°C.
• El enfriador de vino puede programarse a cualquier temperatura que usted
desee dependiendo de las necesidades de enfriamiento que usted necesite.
Para programar la temperatura, presione ambos botones de “White Wine“ y
el “Red Wine“ simultáneamente y manténgalo oprimidos por aproximadamente
3 segundos. Ahora usted se encuentra en la modalidad de programación de
la temperatura. Para disminuir la temperatura oprima el botón “White Wine“ y
para incrementarla oprima el botón “Red Wine“. Al presionar el botón 3 veces
usted ajustará la temperatura 3 grados, oprima 4 veces y dará como resultado
4 grados, 5 veces y serán 5 grados y así sucesivamente. Una vez que haya
seleccionado la temperatura deseada, oprima el botón “On/Off“ (Luz). Ahora
el enfriador de vino ha sido programado y la pantalla LED retornará a la
temperatura interna actual.
Español
• Habrá una variante de 3 grados +/- entre la temperatura que usted seleccionó
y la temperatura indicada en la pantalla LED. Esto ocurre porque el enfriador
de vino se activa y desactiva tratando de mantener la temperatura que usted
programó. Hay a menudo una variante de 10° entre los anaqueles superiores
e inferiores del enfriador de vino. De manera que si usted ha programado el
enfriador de vino a 50° y tiene una mezcla de vino tinto y vino blanco, usted
deberá poner el vino blanco en el anaquel inferior donde la temperatura será
de 7°C y colocar el vino tinto en el anaquel superior donde la temperatura
será de 13°C.
Temperatura
Bajo
Alto
Blanco
Prendido / Apagado
Rojo
6
Page 36

Español
Anaqueles
(varíe en diversos modelos)
• Los estantes están revestidos plateado del cromo dependiendo de su modelo
comprado. Se diseñan para la flexibilidad y la limpieza fácil. Los estantes se
diseñan para permitir el movimiento de aire libre y proporcionan más espacio.
Luz Interior
• Para complementar la mirada de su colección del vino, una luz suave se
ha construido en el refrigerador del vino. El interruptor ligero está en el
fondo delantero, o en el panel de control electrónico dependiendo del
modelo comprado.
Ruidos de Operación Normales que Pueda Escuchar
• Agua hirviendo, ruidos gorgoteantes o ligeras vibraciones que son el resultado
del gas refrigerante circulando a través del serpentín de enfriamiento.
• La commande de thermostat cliquettera quand elle fait un cycle en marche
et en arrêt.
INSTALACIÓN DEL ENFRIADOR DE VINO
Limitaciones de Instalación
• No instale su refrigerador del vino en ningún lugar que no tenga el aislamiento
o la calefacción apropiada, por ejemplo una cochera, etc. Su refrigerador
del vino no fue diseñado para funcionar en temperaturas abajo de los 12°
Centígrados (55°F).
• Seleccione un lugar adecuado para el refrigerador del vino sobre una
superficie sólida y nivelada alejado de los rayos directos del sol o de una
fuente de calor como la de los radiadores, rejillas de calefacción, estufas, etc.
Cualquier desnivelación del piso debe ser corregido con las patas niveladoras
ubicadas en las esquinas inferiores frontales del refrigerador del vino.
Dimensiones
• Los enfriadores de vino, incorporados, necesitan ventilación por el frente.
Esta característica de su diseño permite que la unidad pueda instalarse en un
espacio cerrado. La parrilla en la parte de abajo del frente de la unidad debe
quedar libre de toda obstrucción. Esto es absolutamente necesario para que el
aire pueda circular y la unidad opere eficientemente. Las dimensiones para la
instalación son las siguientes (Largo x Ancho x Altura):
7
Page 37

Dimensiones De la Unidad
MODEL W D1 D2 H
HVCE15 378 524 562 870
HVCE24 606 545 583 870
Construir-En Dimensiones
MODEL W D H
HVCE15 381 610 876
HVCE24 610 610 889
Español
870
524
562
378
870
545
583
606
8
Page 38

Español
Cambio de la Instalación de la Puerta
1. La cubierta del agujero 1 de la
bisagra superior
2. La cubierta del agujero 2 de la
bisagra superior
3. La cubierta del tornillo de la
bisagra superior
4. La cubierta del tornillo de la
bisagra superior
5. La cubierta de la bisagra
6. El tornillo de la bisagra superior
7. La bisagra superior
8. La bisagra inferior
9. El tornillo de la bisagra inferior
10. La cubierta de la bisagra inferior
11. El burlete de la puerta
12. La cubierta del agujero
13. El buje de los ejes de la
bisagra superior
14. La traba de puerta
15. El tornillo del buje de los ejes
16. El buje de los ejes de la bisagra inferior
17. La manija
18. La junta de muelle
19. Junta plana
20. El tornillo de manija
1. Retire la cubierta del tornillo de lacubierta de la bisagra superior. Utilice un
destornillador Phillips paraquitar el tornillo que sostiene la cubierta de la
bisagra superior en sulugar.
Retire la cubierta de la bisagra superior.
Afloje y quite los tornillos que sostienen la bisagra superior en su lugar.
Nota: Asegúrese de sostener la puerta para evitar que
caiga o se dañe.
Levántela y ubíquela a un lado por ahora
Retire las dos cubiertas de los agujeros para la bisagra superior (lado
9
izquierdo) y póngalas a un lado.
Page 39

3
4
2
1
5
6
7
1
2
2. Retire la cubierta del agujero dellado izquierdo superior de la puerta.
Retire el bloque de la bisagra superior del lado derecho de la puerta.
Español
Coloque el bloque de la bisagra superior del lado izquierdo de la puerta.
Coloque la cubierta del agujero en el agujero de la derecha.
3. Retire la cubierta de la bisagrainferior derecha
Afloje y quite los tornillos que sostienen la bisagra inferior derecha en su lugar.
Retire el tope de la puerta de la parte izquierda inferior y vuelva a colocarlo en
la parte derecha inferior (donde acaba de quitarse la bisagra).
Destornille y cambie el pasador de la posición de la derecha en la bisagra
a la posición de la izquierda en la bisagra. (Es necesaria una llave de dado
hexagonal de 9/32”).
Ubique la bisagra inferior que retiró del lado derecho inferior en el lado
izquierdo inferior y ajústela con los tornillos.
Vuelva a colocar la cubierta de la bisagra inferior.
4. Recueste la puerta sobre una superficiefirme.
Retire el burlete de la puerta (junta) de la parte de atrás de la puerta
Nota: No utilice instrumentos filosos (cuchillo, etc.).
Retire las cubiertas de los agujeros del lado derecho de adelante de la puerta.
Utilice un destornillador Phillips para quitar los dos (2) tornillos que sostienen la
manija de la puerta en su lugar del lado izquierdo.
Nota: No pierda la arandela.
Ubique el primer tornillo en el agujero superior del lado derecho y atornille la
manija. (No ajuste completamente en este momento).
Ubique el segundo tornillo en el agujero inferior, atornille la manija y ajuste.
Ahora ajuste el primer tornillo (el de arriba) completamente.
10
Vuelva a colocar la cubierta del agujero que retiró antes en los agujeros
abiertos en el lado izquierdo de adelante de la puerta.
Page 40

Español
5. Tome la puerta con la mano y ubiqueel agujero izquierdo inferior de la puerta
sobre el pasador de la bisagraizquierda de abajo y colóquela en su lugar.
Nota: Asegúrese de sostener la puerta para evitar que caiga o se dañe.
Tome la bisagra superior que retiró antes y ubíquela en el agujero izquierdo
superior de la puerta.
Tome los tornillos y ajuste la bisagra superior al gabinete de la unidad.
Nota: Asegúrese de que la puerta esté nivelada y que cierre
correctamente (que no queden huecos). Si no lo está, afloje los
tornillos de la bisagra superior levemente, acomode la puerta y vuelva
a ajustar. Repita esta operación hasta que la puerta esté nivelada y
cierre correctamente.
Vuelva a colocar la cubierta de la bisagra y ajuste con el tornillo. Vuelva a
ubicar la cubierta de los tornillos.
REEMPLAZO DE LA BOMBILLA DE LUZ
1. Apague la corriente eléctrica y desenchufe el cable de alimentación del
enfriador de vinos.
2. Para remover la cubierta de la bombilla use un destornillador Philips para
sacar los 2 tornillos.
3. Verifique que la bombilla está fría, antes de removerla. Reemplácela usando
una bombilla de no más de 10 vatios.
4. Una vez que la bombilla ha quedado segura, vuelva colocar la cubierta de la
bombilla usando
nuevamente ambos tornillos.
5. Vuelva a poner la unidad en su graduación original una vez que ha
enchufado el cable de alimentación.
11
Page 41

Cuidados y Limpieza Asecuada del
Refrigerador del Vino
Advertencia: • Para evitar una descarga eléctrica siempre
desenchufe su refrigerador del vino antes de
limpiarlo. El ignorar esta advertencia puede
causar esiones o la muerte.
Precaución: • Antes de usar productos de limpieza, siempre
lea y siga las instrucciones y advertencias del
fabricante para evitar lesiones personales o
daños al producto.
En general: • Prepare una solución de limpieza de 3-4
cucharadas de bicarbonato de sodio mezclado
con agua tibia. Use una esponja o un trapo
suave, humedecidos con la solución de
limpieza, para limpiar su refrigerador del vino.
Español
• Enjuague con agua limpia tibia y seque con un
trapo suave.
• No use químicos fuertes, abrasivos, amoniaco,
cloro, detergentes concentrados, disolventes o
estropajos metálicos. ALGUNOS de estos
químicos pueden disolver, dañar y/o decolorar
su refrigerador del vino.
Empaques de la puerta: • Limpie los empaques de la puerta cada tres
meses de acuerdo a las instrucciones generales.
Los empaques deben mantenerse limpios y
flexibles para asegurar un sellado apropiado.
• El aplicar un poco de vaselina en el lado
articulado de los empaques mantendrá el
empaque flexible y asegurará un
sellado apropiado.
Interrupciones de Energía
• Pueden ocurrir ocasionalmente interrupciones de energía debido a
tormentas eléctricas u otras causas. Desenchufe el cable eléctrico del
tomacorriente de corriente alterna cuando ocurra una interrupción en el
sistema eléctrico. Cuando la electricidad haya regresado, vuelva a conectar
el cable eléctrico a un tomacorriente de corriente alterna.
Vacaciones y Mudanza
• Para las vacaciones o las ausencias largas, desenchufe el refrigerador del vino
y limpie las juntas del refrigerador y de la puerta del vino según la sección de
la "Limpieza General". Mantenga las puertas abiertas para que el aire pueda
circular en el interior. Al mudarse, siempre traslade el refrigerador del vino
verticalmente. No lo traslade con la unidad colocada horizontalmente. Pudiera
ocurrir un posible daño el sistema sellado.
12
Page 42

Español
VERIFICACIÓN DE PROBLEMAS
El Refrigerador de Vino no Funciona:
• Revise que el refrigerador del vino esté conectado.
• Revise que haya corriente eléctrica en el tomacorriente de corriente alterna,
revisando el interruptor de circuito.
El Vino Aparece Demasiado Caliente:
• Apertura constante de la puerta.
• Dé un plazo de la hora para el vino recientemente agregado de alcanzar
temperatura deseada.
• Revise que los empaques estén bien sellados.
• Limpie el serpentín del condensador.
• Ajuste el control de temperatura al ajuste más frío.
El Vino Aparece Demasiado Frío:
• Si la configuración del control de la temperatura es demasiado fría, ajuste a
una configuración más caliente
El Refrigerador de Vino se Enciende Frecuentemente:
• Esto puede ser normal para mantener una temperatura constante durante
temperaturas altas y días húmedos.
• Las puertas pudieron haberse abierto frecuentemente o durante un largo
periodo de tiempo.
• Limpie el serpentín del condensador.
• Revise que el empaque esté bien sellado.
• Revise que las puertas estén completamente cerradas.
Acumulación de humedad en el interior o exterior del refrigerador
del vino:
• Esto es normal durante periodos de alta humedad.
• Apertura constante o prolongada de la puerta.
• Revise que los empaques de la puerta estén bien sellados.
La puerta del refrigerador del vino no funciona:
• Nivele el refrigerador del vino.
• Controle para saber si hay obstrucciones tales como botellas y estantes
del vino.
13
Page 43

GARANTIA LIMITADO
Español
¿Qué está cubierto y por cuánto tiempo?
Esta garantía cubre cualquier defecto en la
manufactura o empleo de materiales por
un plazo de:
12 meses de mano de obra
12 meses en componentes
5 años en el sistema sellado
La garantía comienza en la fecha de compra del
artículo, y la factura original de compra debe
presentarse al centro de servicio autorizado para
poder efectuar cualquier reparación que esté bajo
garantía.
EXCEPCIONES: Garantía por Uso
Comercial o Bajo Arrendamiento
90 meses en mano de obra
(únicamente en taller)
90 días en componentes
Ninguna otra garantía es válida
¿Qué está cubierto?
1. Los componentes mecánicos y eléctricos que
cumplen con alguna función de este aparato
durante un plazo de 12 meses. Esto incluye
cualquier componente con excepción de acabados y molduras.
2. Los componentes del sistema sellado, como por
ejemplo: compresor hermético,
condensador, y evaporador, por defectos de
manufactura durante un plazo de 5 años a partir de la fecha de compra. Cualesquier daños a
tales componentes causados por abuso mecánico o manejo o transportación inadecuada no
serán cubiertos.
¿Qué se hará?
1. Repararemos o reemplazaremos, a discreción
nuestra, cualquier componente mecánico o
eléctrico que se muestre defectuoso por uso
normal durante el plazo así especificado.
2. No habrá cargos para el comprador por
las partes y la mano de obra en cualesquier
artículos cubiertos durante el periodo inicial de
12 meses. Al término de este periodo solo las
partes son cubiertas en la garantía restante. La
mano de obra no está provista y debe ser
cubierta por el cliente.
3. Localice su centro de servicio autorizado más
cercano. Para conocer el nombre del centro de
servicio más próximo a su domicilio, por favor
llame al 1-877-337-3639 (Válido
solo en E.U.A).
ESTA GARANTIA CUBRE APARATOS
DENTRO DEL TERRITORIO CONTINENTAL
DE LOS ESTADOS UNIDOS, PUERTO RICO
Y CANADÁ.
Daños por instalación inadecuada.
Daños por transportación.
Defectos que no sean por manufactura.
Daños por negligencia, abuso, accidente,
alteraci-ón, falta de cuidado adecuado y de
mantenimiento, o conexión a tensión eléctrica
incorrecta.
Daños que no sean por uso doméstico.
Daños por servicio que no sea proporcionado a
través de un distribuidor o centro de servicio
autorizado. Molduras decorativas o focos
reemplazables. Envío y transportación.
Mano de obra (después de los primeros
12 meses).
ESTA GARANTIA LIMITADA ES PROVISTA EN
SUSTITUCION A CUALQUIER OTRA GARANTIA
EXPRESADA O QUE IMPLIQUE LAS
GARANTIAS MERCANTILES SUJETAS A CIERTO
PROPOSITO.
El amparo provisto por esta garantía es de uso
exclusivo y se otorga en sustitución a cualquier
otro amparo.
Esta garantía no cubre daños incidentales o sus
derivados, por lo que las anteriores restricciones
pueden serle ajenas. En ciertos estados no se
permiten restricciones en lo que se refiere a la
duración implícita de una garantía, por lo que las
anteriores restricciones pueden serle ajenas.
Esta garantía le otorga ciertos derechos legales y
es posible que usted goce de otros derechos, los
cuales varían de estado a estado.
Haier America
New York, NY 10018
14
Page 44

IMPORTANT
Do Not Return This Product To The Store
If you have a problem with this product, please contact the "Haier Customer
Satisfaction Center" at 1-877-337-3639.
DATED PROOF OF PURCHASE REQUIRED FOR WARRANTY SERVICE
IMPORTANT
Ne pas Réexpédier ce Produit au Magasin
Pour tout problème concernant ce produit, veuillez contacter le service des
consommateurs ‘Haier Customer Satisfaction Center’ au 1-877-337-3639.
UNE PREUVE D’ACHAT DATEE EST REQUISE POUR BENEFICIER DE LA GARANTIE.
IMPORTANTE
No regrese este producto a la tienda
Si tiene algún problema con este producto, por favor contacte el "Centro de Servicio al
Consumidor de Haier" al 1-877-337-3639 (Válido solo en E.U.A).
NECESITA UNA PRUEBA DE COMPRA FECHADA PARA EL SERVICIO DE LA GARANTIA
115V, 60 Hz
Made in China
Fabriqué en Chine
Hecho en China
Haier America
New York, NY 10018
Printed in China
Part # RF-9999-C1
HVCE15/HVCE24 - 03
©2007 Haier America Trading, LLC. All RIghts Reserved. 100238 0607
 Loading...