

Page 1
(HTE15WAC)
Top Mount No Frost
Refrigerator
Refrigerateur
sans gel monte de dessus
Refrigerador
de Montaje Superior Sin Escarcha
User Manual-
Guide de l’Utilisateur-
Manual del Usuario-
Model #
HTV 15,16
Modèle
HTE 15,16
Para Modelo de
Page 2

English
English
SAFETY PRECAUTIONS
Read all of the instructions before using this appliance. When
using this appliance, always exercise basic safety precautions,
including the following:
1) Use this appliance only for its intended purpose as described in this use
and care guide.
2) This refrigerator must be properly installed in accordance with the
installation instructions before it is used. See grounding instructions in
the installation section.
3) Never unplug your refrigerator by pulling on the power cord. Always
grasp the plug firmly and pull straight out from the outlet.
4) Repair or replace immediately, all electric service cords that have
become frayed or otherwise damaged. Do not use a cord that shows
cracks or abrasion damage along its length, the plug or the connector
end.
5) Unplug your refrigerator before cleaning or making any repairs.
Note:
certified technician or call our customer service number for assistance.
6) Do not use any electrical device or any sharp instrument in defrosting
your refrigerator.
7) If your old refrigerator is not being used, we recommend that you
remove the doors and leave the shelves in place. This will reduce the
possibility of danger to children.
8) After your refrigerator is in operation, do not touch the cold surfaces in
the freezer compartment, particularly when hands are damp or wet.
Skin may adhere to these extremely cold surfaces.
9) Do not refreeze foods, which have been thawed completely. The United
States Department of Agriculture in Home and Garden Bulletin No. 69
reads: “…You may safely refreeze frozen foods that have thawed if
they still contain ice crystals or if they are still cold-below 40˚F”.
“…Thawed ground meats, poultry, or fish that have any off-odor or offcolor should not be refrozen and should not be eaten. Thawed ice
cream should be discarded. If the odor or color of any food is poor or
questionable, discard it. The food may be dangerous to eat.”
“…Even partial thawing and re-freezing reduce the eating quality of
foods, particularly fruits, vegetables, and prepared foods. The eating
quality of red meats is affected less than that of many other foods. Use
refrozen foods as soon as possible, to save as much of its eating quality as you can.”
If for any reason this product requires service, please contact a
1
Page 3

English
English
10) This refrigerator should not be recessed or built-in an enclosed cabinet.
It is designed for freestanding installation only.
11) Do not operate your refrigerator in the presence of explosive fumes.
SAVE THESE INSTRUCTIONS
For Future Reference Please
DANGER
Risk of child entrapment. Before you throw away your old refriger-
ator or freezer, take off the doors. Leave the shelves in place so
that children may not easily climb inside.
Thank you for using our Haier
product. This easy-to-use manual will
guide you in getting the best use from
your refrigerator.
Remember to record the model and
serial number. They are on a label in
back of the refrigerator.
Model number
Serial number
Date of purchase
Staple your receipt to your manual.
You will need it to obtain warranty service.
2
Page 4

English
English
Table Of Contents
Safety Precautions ......................................................................1-2
Parts and Features......................................................................4-5
Installing Your Refrigerator ............................................................6
Unpacking Your Refrigerator ..............................................................................6
Leveling Your Refrigerator ..................................................................................6
Proper Air Circulation ........................................................................................6
Electrical Requirements........................................................................................6
Use of Extension Cords ......................................................................................6
Install Limitations ................................................................................................7
Door Alignment..................................................................................................7
Reversing the Door Swing ..................................................................................7
Dismantling........................................................................................................8
Reinstallation......................................................................................................8
Installing and Reversing Door Handles ................................................................9
page
Refrigerator Features and Use......................................................10
Adjustable Temperature dial ..............................................................................10
Freezer Temperature Control..............................................................................10
Refrigerator Interior Shelves ..............................................................................10
Utility Drawer and Cover ..................................................................................11
Crisper and Crisper Cover ................................................................................11
Crisper Humidity Control ..................................................................................12
Proper Refrigerator Care and Cleaning ........................................16
Light Bulb Replacement ....................................................................................16
Power Interruptions ..........................................................................................17
Vacation and Moving Care ..............................................................................17
Troubleshooting ......................................................................17-18
Warranty Information ..................................................................19
3
Page 5
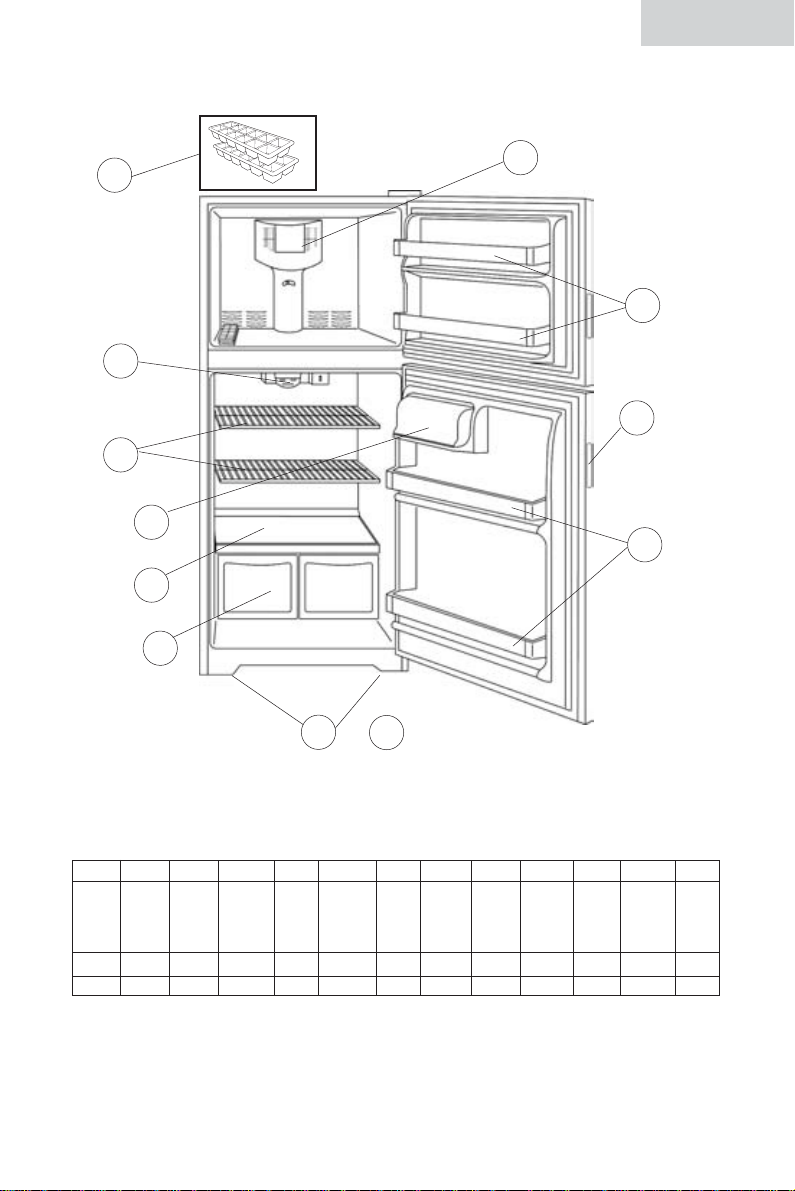
Parts and Features
English
English
1
2
3
4
5
6
(shown - HTV15WNC)
10
12
8
9
7
11
&
fig. 1
12 3 45 6 78 910111213
Ice
Adj.
Interior
Covered
Crisper
Cube
Temp.
Ref.
Trays
Control
& Light
2Yes 2 Opaque Glass 2 Opaque 2 2 Pocket 2 4 Yes No
HTV15
2Yes 2 Opaque Glass 2 Opaque 3 2 Pocket 2 4 Yes No
HTV16
Shelf
Dairy
Compar
tment
Crisper Refr.
Cover
Door
Shelves
Freezer
Door
Shelves
Door
Handle
Leveling
Legs
Bottom
Roller
Freezer
Temp.
Control
Ice
Maker
Ready
4
Page 6
English
English
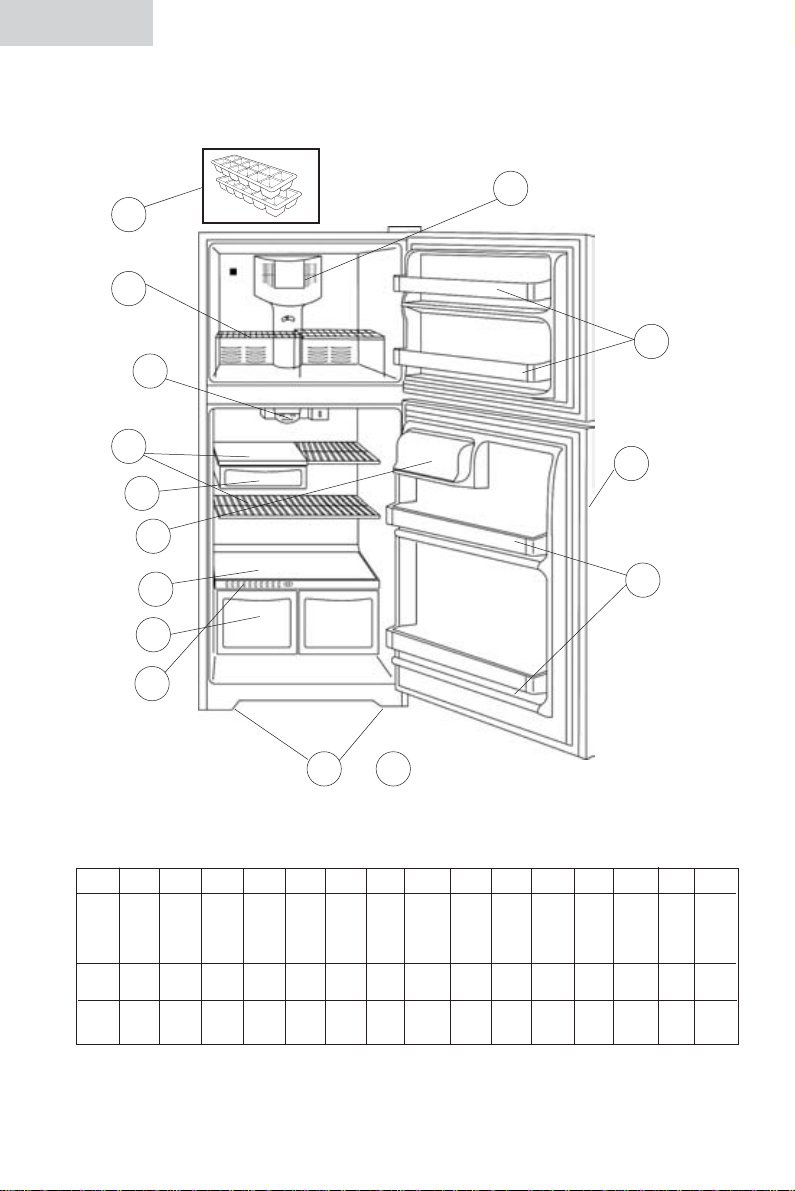
Parts and Features
15
9
8
16
10
1
12
7
3
4
2
5
6
13 14
dity
dity
Side
Side
Side
Side
Utility
Utility
Drawer
Drawer
&
fig. 1
Adj.
Freezer
Freezer
Ice
Door
Leve-
Adj.
Freezer
Freezer
Ice
Therm-
Shelf
Therm-
ostat &
ostat &
Light
Light
Door
Shelf
Door
Shelves
Shelves
1-Slide 2Yes Grip 2 4 2 Yes
1-Slide
Adjustable
Adjustable
Adjustable
Adjustable
2Yes Grip 2 4 2 Yes
1-Slide 2Yes Grip 2 4 2 Yes
1-Slide
2Yes Grip 2 4 2 Yes
Maker
Maker
Ready
Ready
Door
Handle
Handle
Leve-
ling
Legs
ling
Legs
Bottom
Bottom
Roller
Roller
(shown - HTE15WAC)
12345678910111213141516
12345678910111213141516
Interior
Door
Dairy
Crisper
Interior
Door
Shelves
Shelves
Dairy
Compa
Compa
rtment
rtment
Refrig.
Refrig.
Shelves
Shelves
Refrig.
Refrig.
22Clear Glass 2 Clear 1-Left Clear Yes
22Clear Glass 2 Clear 1-Left Clear Yes
HTE15
HTE15
23Clear Glass 2 Clear 1-Left Clear Yes
23Clear Glass 2 Clear 1-Left Clear Yes
HTE16
HTE16
Crisper
Cover
Cover
Crisper Humi-
Crisper Humi-
Control
Control
Crisper
Crisper
Ice
Cube
Tray
Ice
Cube
Tray
Freezer
Freezer
Temp.
Temp.
Control
Control
5
Page 7

English
English
Installing Your Refrigerator
Unpacking Your Refrigerator
1. Remove all packaging material. This includes the foam base and all adhesive
tape holding the refrigerator accessories inside and outside.
2. Inspect and remove any remains of packing, tape or printed materials before
connecting power to your refrigerator.
Leveling Your Refrigerator:
•Your refrigerator has two leveling legs which are located in the front corners of
your refrigerator. After properly placing your refrigerator in its final position,
you should level your refrigerator for horizontal standing.
• Leveling legs can be adjusted by turning them counterclockwise to raise your
refrigerator or by turning them clockwise to lower your refrigerator. The
refrigerator door will close easier when the leveling legs are raised.
Proper Air Circulation
•To assure your refrigerator works at the maximum efficiency it was designed
for, you should install it in a location where there is proper air circulation,
plumbing and electrical connections.
• The following are recommended clearances around the refrigerator:
Sides……………3/4" (19mm)
Top....................1" (25mm)
Back..................1" (25mm)
Electrical Requirement
• Make sure there is a suitable power outlet (115 volts, 15 amps outlet) with
proper grounding to power the refrigerator.
•Avoid the use of three plug adapters or cutting off the third grounding in order to
accommodate a two plug outlet. This is a dangerous practice since it provides no
effective grounding for the refrigerator and may result in shock hazard.
Use of Extension Cords
•Avoid the use of an extension cord because of potential safety hazards. If it is
necessary to use an extension cord, use only a 3-wire extension cord that has a
3-blade grounding plug and a 3-slot outlet that will accept the plug. The
marked rating of the extension cord must be equal to or greater than the
electrical rating of the appliance.
6
Page 8
English
English
Install Limitations
• Do not install your refrigerator in any location not properly insulated or heated
e.g. garage etc. Your refrigerator was not designed to operate in temperature
settings below 55˚ Fahrenheit.
• Select a suitable location for the refrigerator on a hard even surface away from
direct sunlight or heat source e.g. radiators, baseboard heaters, cooking
appliances etc. Any floor unevenness should be corrected with the leveling legs
located on the front bottom corners of the refrigerator.
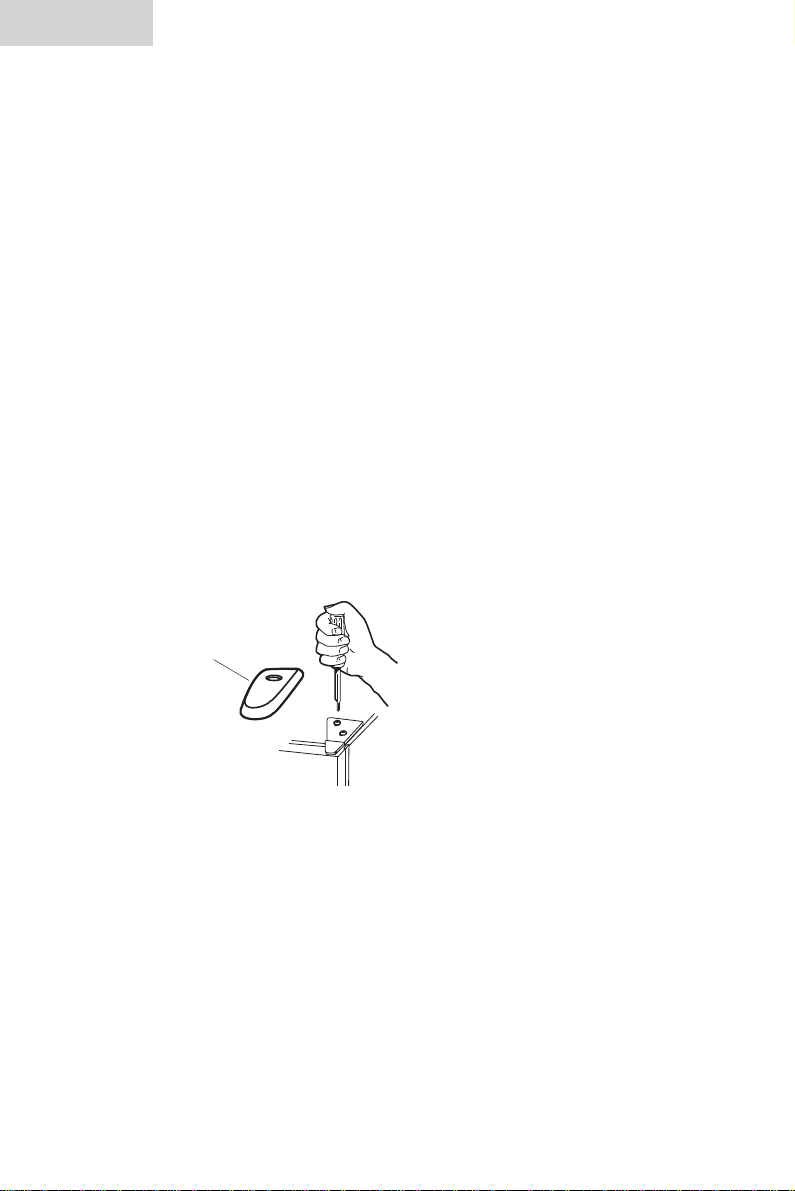
Door Alignment
(see fig. 1)
1. Remove hinge cover screw.
2. Remove top hinge cover.
3. Loosen the top hinge screws using a phillips head screwdriver.
4. Adust the door and then tighten the screws.
5. Replace the top hinge cover.
Reversing the Door Swing
(see fig. 1 to fig. 4)
Left/right door opening method:
This product provides the reversing of the left/right door opening. You can select
your preference of door opening by following the procedure to make the change.
fig. 1
hinge cover
top hinge
7
Page 9
English
English
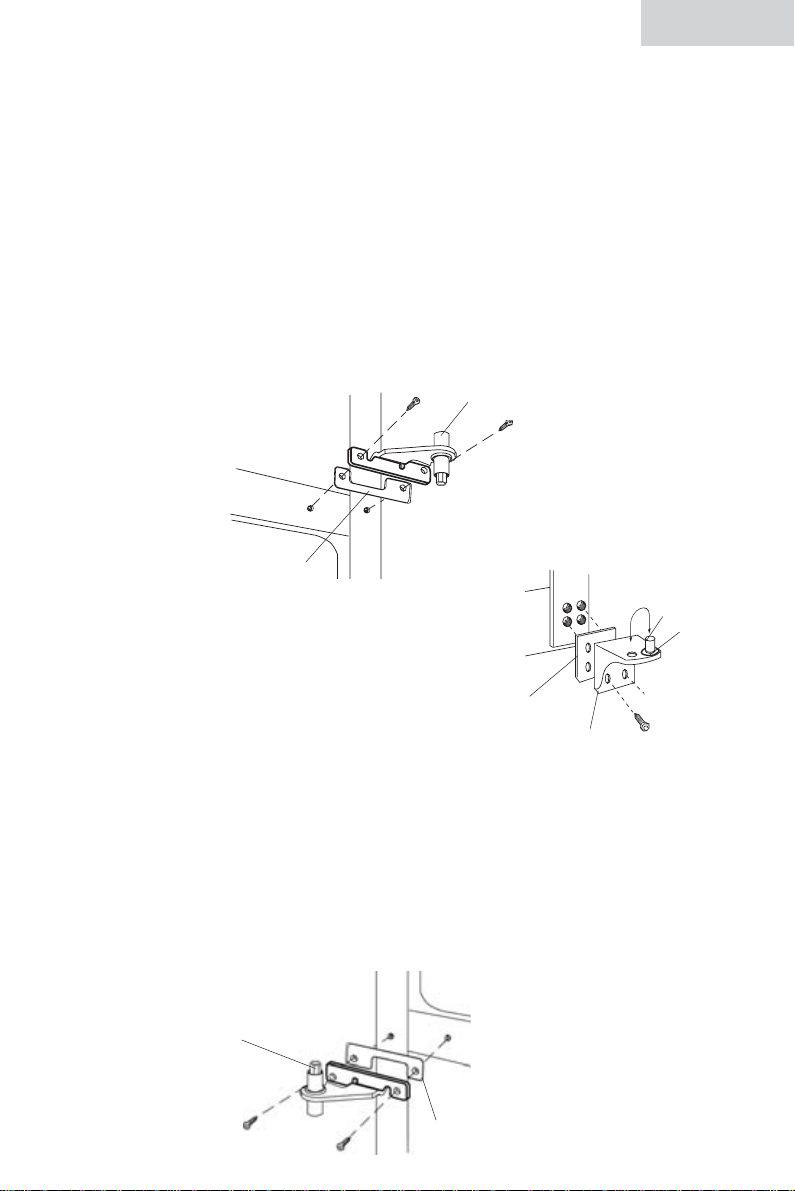
Dismantling
1. Fix refrigerator and freezer door by sticking adhesive tape on both sides to hold
doors in place.
2. As shown in fig. 1, remove hinge top cover on the upper part of freezer door.
Then remove the two screws from the hinge. Take out the hinge by pulling it vertically, and keep it in a safe place.
3. Remove the adhesive tape on freezer door, lift and take the door down, and
carefully put it aside.
4. As shown in fig. 2, remove screws of the central hinge, lift and take down the
central hinge and pad, and keep them in a safe place.
5. Remove the adhesive tape on refrigerator door, lift and take down
refrigerator door, and carefully put it aside.
fig. 2
central hinge pad
central hinge axle
Reinstallation
1. As shown in fig 3 remove the door axle and
install on the opposite hole with washer pads
(2) in place. Now dismantle the lower hinge
and install the opposite side with the hinge
spacer and washer pads in place.
2. Install refrigerator door: make the left bottom
hole of the refrigerator compartment door fall
over the lower hinge axle, move the door back and forth to make it straight
and in alignment with central hinge. Install the central hinge again, turn the
hinge axle until it completely enters the door body, then fix it with screws.
3. Install freezer door: align left bottom hole of freezer door over the central
axle. Take hinge and adjust so that hinge axle can be installed in the upper
hole of the freezer door; adjust door to make it straight and level. Tighten
the screws of upper hinge.
4. Install top hinge cover on the left side.
fig. 4
bottom hinge
spacer
bottom hinge
fig. 3
bottom hinge
door axle
washer
pads (2)
central
hinge axle
central hinge pad
8
Page 10
English
English
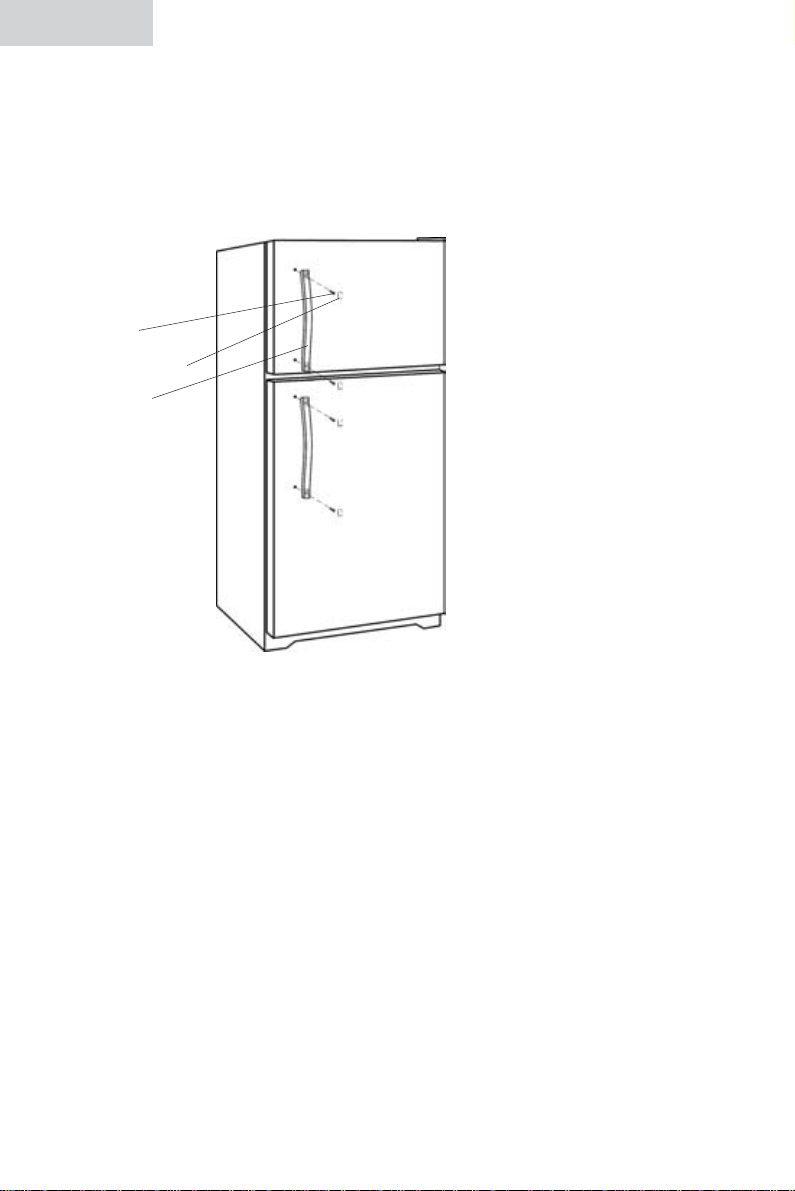
Installing and Reversing Door Handles:
For the HTE15WAC and the HTE16WAC your refrigerator has grip
handles. To install handle, align the upper and lower screw holes of the handle on
the freezer door (as shown in fig.5). Now fix with supplied screw and cover with
screw hole cover. Repeat the procedure with the refrigerator door handle.
Screw
Screw Cover
Handle
(see fig. 5)
fig. 5
To Reverse the door handles remove the screw cover screws and install on the
opposite side. Remove the screw hole plugs and install on the side of the just
removed handles.
9
Page 11
English
Refrigerator Features and Use
General Features
Adjustable temperature dial:
Your refrigerator will automatically maintain the temperature level you select. The
temperature control dial has 7 settings plus off. 1 is the warmest. 7 is the coldest.
Turning the dial to OFF stops cooling in both the refrigeration and freezer sections.
At first, set the dial to 4 and allow 24 hours to pass before adjusting the temperature to your needs.
Note: If the refrigerator has been placed in a horizontal or tilted position for any
period of time wait 24 hours before plugging the unit in.
Refrigerator Section Interior Light
Your refrigerator is equipped with an interior light in the fresh food section for you
to easily locate your food. It automatically goes on when the door opens.
English
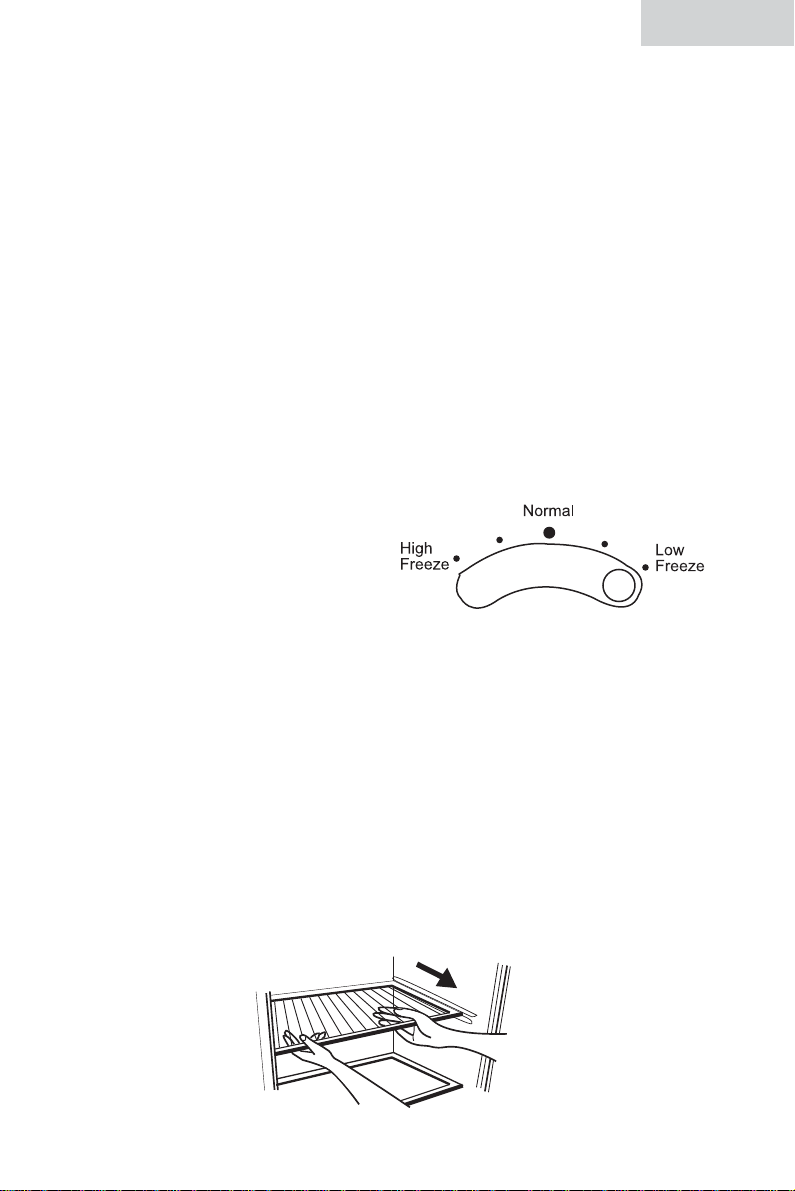
Freezer Temperature Control
The temperature in the freezer compartment can
be adjusted from low to high freeze.
Factory setting is at normal. To make
the freezer compartment cooler, shift the
temperature control towards high freeze.
This will lower the temperature in the
freezer section only.
Note: Be careful not to block the air vent. This will affect the air circulation of the
freezer and refrigerator compartment.
Refrigerator Interior Shelves
The refrigerator shelves can be adjusted to suit your varying storage needs.
To remove or adjust
a full-width slide-out shelf: (see fig. 7) (HTV15 & HTE15)
1. Gently tilt the shelf up and slide forward until the shelf has been completely
removed.
2. To replace the shelf, select the desired setting and gently slide the shelf back until
it rests in the locking position.
(see fig. 6)
(see fig. 7)
fig. 8
fig. 6
10
Page 12
English
English
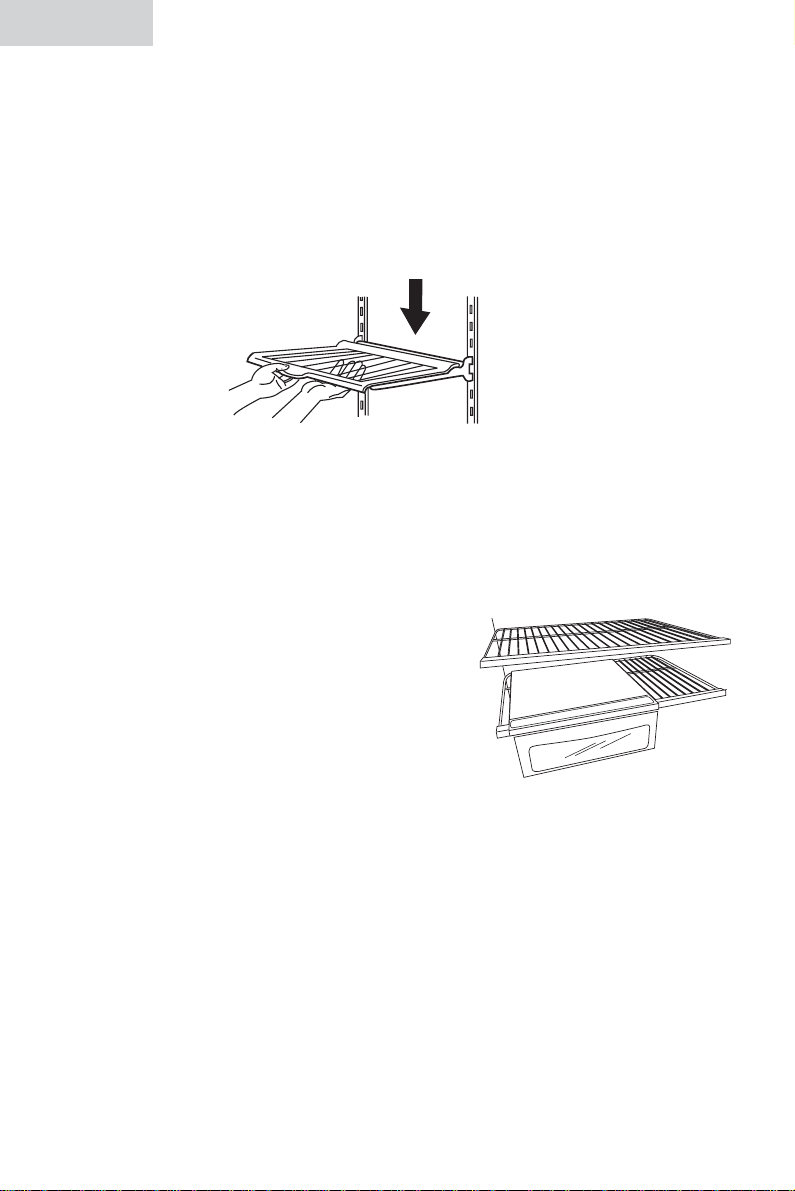
To remove or adjust a full-width cantilever shelf:
(see fig. 15) (HTV16 & HTE16)
1. Guide the rear shelf hooks into the desired slots in the metal shelf supports
located on the back refrigerator wall.
2. Tilt up front of the shelf to set the shelf hooks in place.
3. Lower the front of the shelf into position until the rear hooks lock into the slots of
the metal shelf supports.
fig. 15
4. Lift shelf gently out of the rear shelf hooks to remove.
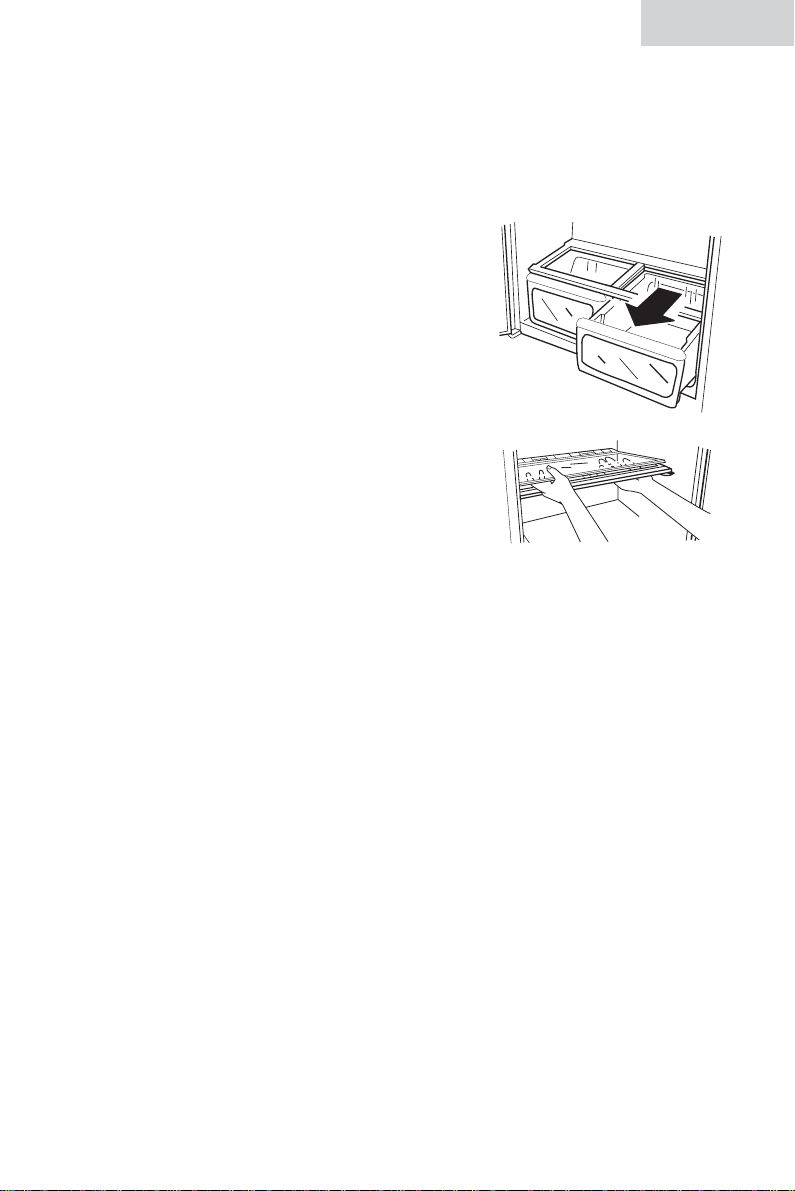
Utility Drawer and Cover: (HTE Series Only)
To remove the utility drawer: (see fig 8)
1. Slide utility drawer out until it reaches the stop.
2. Grasp front of drawer with one hand while sup-
porting the bottom of the drawer with the other
hand. Slide drawer out gently the rest of the
way.
fig. 8
To remove utility drawer cover shelf:
1. Remove utility drawer first following the above instructions.
2. Gently tilt up front of the shelf until the shelf rollers are no longer locked in place.
3. Pull the shelf gently until the rear shelf hooks are no longer locked with the rear
metal shelf support.
To install utility drawer cover shelf:
1. Guide the rear shelf hooks into the desired slots in the metal shelf supports
located on the refrigerator shelf.
2. Tilt up front of the shelf to set the shelf hooks in place.
3. Lower the front of the shelf into position until the rear hooks lock into the slots of
the metal shelf supports and the front shelf rollers are locked. Replace the utility
drawer.
11
Page 13
English
English
Crisper and Crisper Cover
Crispers
HTV Series: This series of refrigerators has 2 opaque crispers for you to store food.
HTE Series: This series of refrigerators has 2 clear crispers for you to store food.
Crisper cover on both series is made of glass.
To remove and install the crisper: (see fig. # 9)
1. Slide crisper straight out to the stop.
2. Gently lift the front of the crisper.
3. Grip the crisper firmly and slide out completely.
4. Replace the crisper by placing the crisper properly
in its tracks and gently sliding it back into place.
To remove the crisper cover: (see fig. # 10)
1. First remove both crispers.
2. Gently push upward from the underside of the crisper cover to remove it from the
crisper cover frame.
fig. 9
fig. 10
3. Carefully grasp the crisper cover and slide out to remove.
4. Lift crisper cover frame up and remove.
To replace the crisper cover: (see fig. # 10)
1. Insert the rear of the crisper cover frame into the support bracket the side walls of
the refrigerator.
2. Lower the front of the crisper cover frame into place.
3. Slide the rear of the crisper cover into the frame and carefully lower the front into
place.
4. Replace the crispers as previously instructed.
Crisper Humidity Control: (see fig. # 11) (HTE Series Only)
Your refrigerator model may be equipped with slide control to raise or lower the
humidity levels of your crisper. This feature will increase the storage life of your
fruits and vegetables. Simply adjust the controls to the appropriate setting for the
items you are storing in the crispers.
12
Page 14
English
English
• LOW setting allows moist air to exit the crisper for optimum storage of
fruits and/or vegetables, which have skins.
• HIGH setting retains moist air in the crisper for optimum storage of
fresh, leafy vegetables.
Low
High
High/Low
Settings
Refrigerator Door Shelves
Gallon door storage: (see fig. # 12)
Your refrigerator is equipped with gallon door storage shelves. This
feature will allow for the storage of gallon size containers.
To remove refrigerator door shelves: (see fig. # 12)
1. Remove all items stored on the shelf.
2. Gently push up each side until the shelf is clear of the door shelf
brackets and then remove.
To replace refrigerator door shelves: (see fig. # 12)
fig. 11
13
1. Align the ends of the shelves with the door shelf brackets.
2. Carefully push down on each end of the door shelf until it is locked in
place in the refrigerator door brackets.
upper door shelf
fig. 12
lower door shelf
Page 15
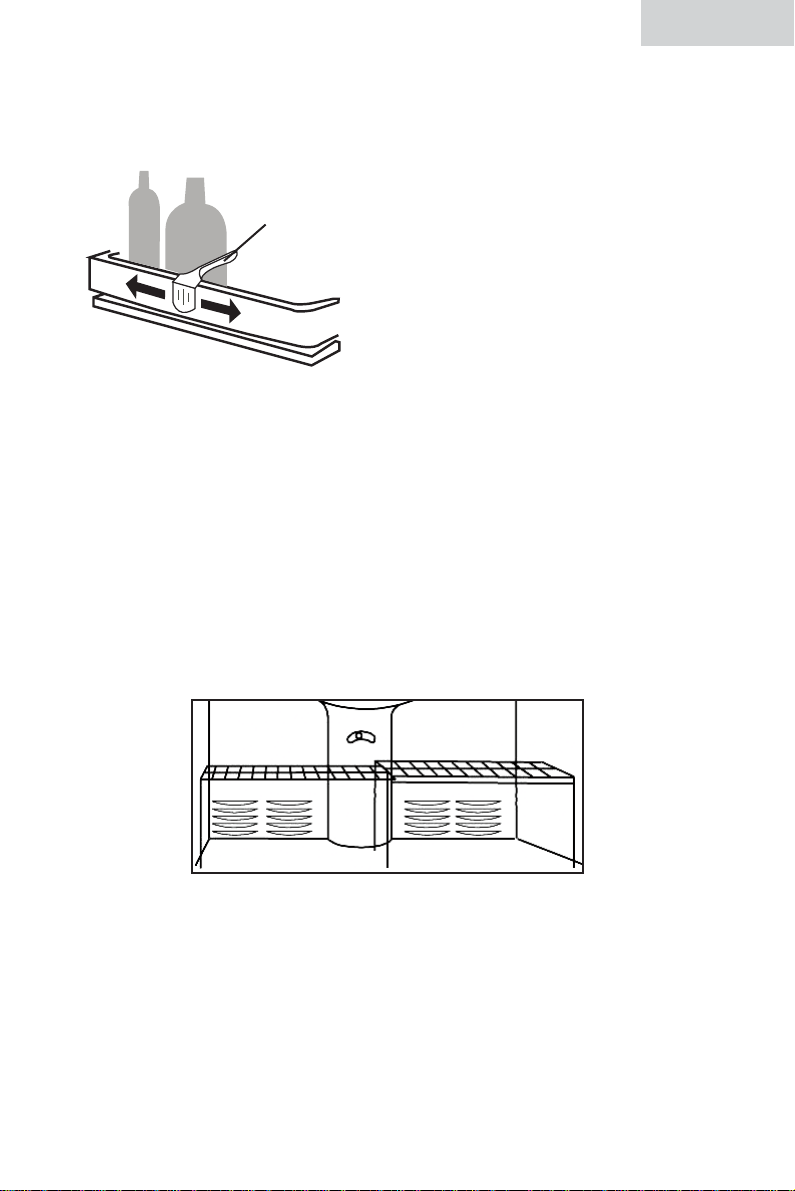
To adjust the door shelf bottle huggers: (see fig #13)
1. Grasp the hugger firmly and slide right or left until it is snug against the
items stored on the shelf.
shelf bottle hugger
Freezer Features
Adjusting or removing the full-width slide adjustable
freezer shelf: (see fig. # 14) (HTE Series Only)
1. Grasp the freezer shelf firmly and slide out as far as possible.
fig. 13
English
English
2. To replace the freezer shelf insert the shelf into the left side brackets as
far as possible.
3. To remove simply lift up and pull out of freezer compartment.
fig. 15
Ice Maker Ready: (HTE Series Only)
• Your refrigerator is equipped to install an ice maker if you desire. You
can install a Haier HI1MK ice maker. For more information see your
Haier dealer or call 1-800-461-8890 x3100.
14
Page 16

English
English
Normal Operating Sounds You May Hear
• The fan circulating air inside the interior of your unit to maintain the temperature you
have selected.
• Boiling water, gurgling sounds or slight vibrations that are the result of the refrigerant
circulating through the cooling coils.
• Sizzling or popping sounds resulting from frost melting during the defrost cycle and
dripping on the defrost heater.
• The sound of dripping water as ice melts from the evaporator and flows into the drip
pan during the defrost cycle.
• Cracking or popping sound caused by the expansion and/or contraction of the
cooling coils during the defrost cycle.
• Both the defrost timer and the thermostat control will click when they cycle on and off.
15
Page 17

English
English
Proper Refrigerator Care
and Cleaning
Warning: To avoid electric shock always unplug your refrigerator before clean-
ing. Ignoring this warning may result in death or injury.
Caution: Before using cleaning products, always read and follow manufacturer’s
instructions and warnings to avoid personal injury or product damage.
General: • Prepare a cleaning solution of 3-4 tablespoons of baking soda mixed
with warm water. Use sponge or soft cloth, dampened with the cleaning solution, to wipe down your refrigerator.
• Rinse with clean warm water and dry with a soft cloth.
• Do not use harsh chemicals, abrasives, ammonia, chlorine bleach,
concentrated detergents, solvents or metal scouring pads. SOME of
these chemicals may dissolve, damage and/or discolor your refrigerator.
Door Gaskets:
• Clean door gaskets every three months according to general instructions.
Gaskets must be kept clean and pliable to assure a proper seal.
• Petroleum jelly applied lightly on the hinge side of gaskets will keep
the gasket pliable and assure a good seal.
Rear Condenser Coils:
• We recommend that you clean the rear of the refrigerator at least
twice a year.
Note: Some operating environments may require more frequent
cleaning.
• After unplugging your refrigerator, use a vacuum or a brush to clean
the coils.
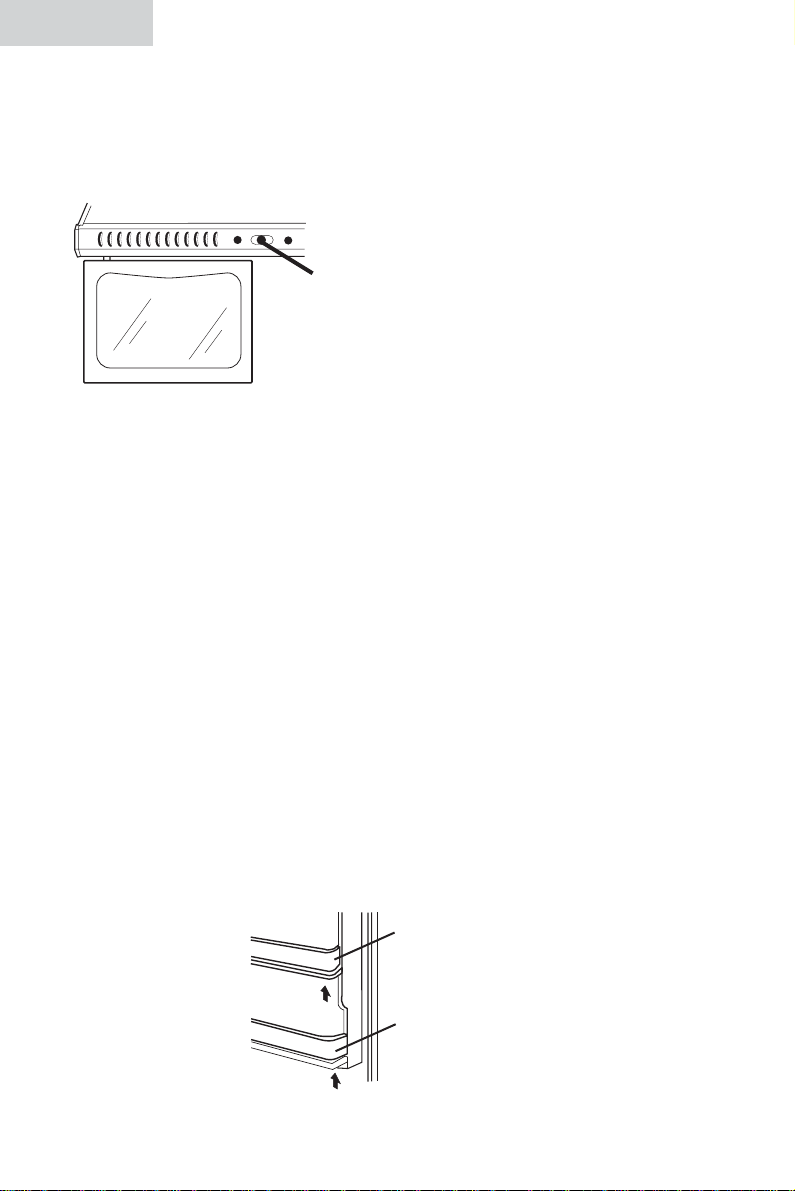
Light Bulb Replacement
1. Switch off the power to the refrigerator before unplugging.
2. Remove the highest shelf.
3. Allow light bulb to cool before removing.
4. To remove the bulb cover, hold the left side and gently press in the right side
until the cover locks are free.
5. Remove bulb by screwing it out counter-clockwise.
6. Always replace with appliance type light bulb rated at 40 watts
or lesser wattage.
7. Do not exceed the 40 watts rating at any time.
8. Reinstall the bulb cover.
9. Plug back the refrigerator power cord to the electrical wall outlet.
16
Page 18

English
English
Power Interruptions
• Occasionally there may be power interruptions due to thunderstorms or other
causes. Remove the power cord from AC outlet when a power outage occurs.
When power has been restored, replug power cord to AC outlet. If outage is
for a prolonged period, inspect and discard spoiled or thawed food in freezer
and refrigerator. Clean inside the refrigerator before reusing.
Vacation and Moving Care
• For long vacations or absences, empty food from refrigerator and freezer, move
the temperature DIAL to the OFF position and clean the refrigerator and door
gaskets according to “General cleaning” section. Prop doors open, so air may
circulate inside. When moving, always move the refrigerator vertically. Do not
move with the unit lying down. Possible damage to the sealed system could occur.
Trouble Shooting
Refrigerator Does Not Operate
• Check if the thermostat control is in the “OFF” position.
• Check if the refrigerator is plugged in.
• Check if there is power at the ac outlet, by checking the circuit breaker.
•Wait for 30-40 minutes to see whether refrigerator will start. It may be in
"defrost" mode and must complete this cycle before Compressor starts to operate.
Food temperature appears too warm
• May be caused by frequent opening of the door.
• Allow time for recently added warm food to reach fresh food or
freezer temperature.
• Check gaskets for proper seal.
•Clean condenser coils.
• Adjust temperature control to colder setting.
• Check freezer compartment for air duct blockage from frozen food packages.
Food temperature is too cold
• If temperature control setting is too cold, adjust to a warmer setting and allow
several hours for temperature to adjust.
17
Page 19

English
Refrigerator runs too frequently
• This may be normal to maintain constant temperature during high temperature
and humid days.
• Doors may have been opened frequently or for an extended period of time.
•Clean condenser coils.
• Check gasket for proper seal.
• Check to see if doors are completely closed.
Moisture build up on interior or exterior of the refrigerator
• This is normal during high humidity periods.
•Prolonged or frequent door openings.
• Check door gaskets for proper seal.
Refrigerator has an odor
• Interior needs cleaning.
• Foods improperly wrapped or sealed may give off odors.
Refrigerator light does not work
• Check power supply.
•Tighten bulb in socket.
• Replace burned out bulb.
English
Refrigerator/Freezer door does not shut properly
• Level the refrigerator.
• Re-align refrigerator/freezer door.
• Check for blockages i.e. food containers, crisper cover, shelves, bins etc.
18
Page 20

English
English
Limited Warranty
What is covered and for how
long?
This warranty covers all defects in
workmanship or materials for a period
of:
12 months labor
12 months parts
5 years sealed system
The warranty commences on the date
the item was purchased and the original
purchase receipt must be presented to
the authorized service center before
warranty repairs are rendered.
EXCEPTIONS: Commercial or
Rental Use warranty
90 days labor (carry-in only)
90 days parts
No other warranty applies
What is covered.
1. The mechanical and electrical parts,
which serve as a functional, purpose
of this appliance for a period of 12
months. This includes all parts except
finish, and trim.
2. The components of the sealed system
e.g. hermetic compressor, condenser
and evaporator from manufacturing
defects for a period of 5 years from
the date of purchase. Any damages
to such components caused by
mechanical abuse or improper
handling or shipping will not be
covered.
What will be done?
1. We will repair or replace, at our
discretion any mechanical or
electrical part which proves to be
defective in normal usage during the
warranty period so specified.
2. There will be no charge to the
purchaser for parts and labor on any
covered items during the initial 12
month period. Beyond this period
only parts are covered in the
remaining warranty. Labor is not
provided and must be paid by the
customer.
3. Contact your nearest authorized
service center. For the name of the
nearest service center please call
1-877-337-3639
THIS WARRANTY COVERS
APPLIANCES WITHIN THE
CONTINENTAL UNITED STATES,
PUERTO RICO AND CANADA.
IT DOES NOT COVER
THE FOLLOWING:
Damages from improper installation.
Damages in shipping.
Defects other than manufacturing.
Damage from misuse, abuse, accident,
alteration, lack of proper care and
maintenance or incorrect current or
voltage.
Damage from other than household use.
Damage from service by other than an
authorized dealer or service center.
Decorative trims or replaceable
light bulbs.
Transportation and shipping.
Labor (after the initial 12 months).
THIS LIMITED WARRANTY IS GIVEN IN
LIEU OF ALL OTHER WARRANTIES,
EXPRESSED OR, INCLUDING THE
WARRANTIES OF MERCHANTABILITY
AND FITNESS FOR A PARTICULAR
PURPOSE
The remedy provided in this warranty is
exclusive and is granted in lieu of all
other remedies.
This warranty does not cover incidental
or consequential damages, so the above
limitations may not apply to you. Some
States do not allow limitations on how
long an implied warranty lasts, so the
above limitations may not apply to you.
This warranty gives you specific legal
rights, and you may have other rights,
which vary, from state to state.
Haier America
New York, NY 10018
19
Page 21

Francais
Francais
PRECAUTIONS DE SU R ETE
Lisez toutes les instructions avant d’utiliser cet appareil. Quand
vous utilisez cet appareil, exercez toujours les precautions de
surete, y compris les suivantes:
1) Utilisez cet appareil uniquement pour l’usage auquel il est destine
comme indique dans ce guide d’utilisations et d’entretien.
2) Ce refrigerateur doit etre convenablement installe conformement aux
instructions d’installation avant d’etre utilise. Consultez les instructions
de mise a terre dans le chapitre consacre a l’installation.
3) Ne debranchez jamais votre refrigerateur en tirant sur le cordon d’alimentation. Saisissez fermement la fiche et tirez tout droit hors la sortie.
4) Reparez ou remplacez immediatement les cordons ou cables electriques
crailles ou endommages. N’utilisez pas des cordons presentat des fissures ou des abrasions tout au long de la corde, de la fiche ou de l’extremite du connecteur.
5) Debranchez votre refrigerateur avant de le nettoyer ou de faire
n’importe quelle reparation .
Notez:
de reparation , nous recommandons avec force qu’un technicien certifie
execute le service ou appelez notre service pour assistance.
Si pour n’importe quelle raison cet appareil exige un service
6) N’utilisez pas des devices ou des instruments aigus pour decongeler
votre refrigerateur.
7) Si vous n’utilisez plus votre ancient refrigerateur, nous recommandons
que vous enlevez les portes et laissez les etageres en place.. Ceci
reduira la possibilite de danger aux enfatns.
8) Apres avoir mis en marche votre refrigerateur, ne touchez pas aux surfaces froides du congelateur specialement si vos mains sont mouillees
ou humides. La peau peut adherer a ces surfaces extremement froides.
9) Ne pas congeler les aliments qui ont ete decongeles completement. Les
services des Etats Unis d’Agriculture dans le Bulletin de Maison et
Jardin No 69 lisent “Vous pouvez facilement congeler la nourriture qui
a ete decongelee si elle contient toujours les crystaux de glace ou si
leur temperature es moins de 40degres F”.
1
Page 22

Francais
Francais
“ Nourriture decongelee comme la viande hachee, volaille ou poisson qui
ont n’importe quelle odeur ou couleur ne doivent pas etre congeles de nouveau et doivent pas etre manges. La crème de glace decongelee doit etre
jetee. Si la couleur ou l’odeur de n’importe quelle nourriture est pauvre ou
discutable, jettez la. Cette nourriture est dangeureuse a manger.”
“Meme une decongelation partielle et re-congelation diminue la qualite de
la nourriture specialement , les fruits , les vegetables et les plats prepares.
La qualitee de la viande rouge peut etre moins affectee que d’autres aliments. Pour garder la qualitee des aliments, utilisez au plus tot possible
ceux qui ont ete recongeles.”
10) Ce refrigerateur ne doit pas etre place ou encastre a l’interieur d’un
placard. Il est designe a etre place tout seul et sans support.
11) N’operez pas votre refrigerateur dans la presence fumes explosives.
GARDEZ CES INTRUSCTIONS
comme references pour le future s’il vous plait
DANGER
Risque d’entrapement d’un enfant. Avant de disposer de votre
ancien refrigerateur ou congelateur, enlevez les portes. Laissez les
etageres en place comme ca les enfants ne pourront pas grimper
dedans facilement.
Nous vous remercions d’avoir utiliser un
produit Haier: Ce manuel, facile a utiliser vous guidera pou le meilleur resultat
d’utilisation de votre refrigerateur.
N’oubliez pas d’enregistrer le model et
le numero de serie. Ils sont sur une etiquette au dos de votre refrigerateur.
Attachez votre recu d’achat a votre manuel.
Vous en aurez besoin pour obtenir le service de la garantie.
2
Numero du model
Numero de serie
Date d’achat
Page 23

Francais
Francais
Table de Matiere
page
Precautions de Surete ................................................................1-2
Parties et Caracterisques ............................................................4-5
Installation de votre refrigerateur ..................................................6
Deballage de votre refrigerateur..........................................................................6
Mise a niveau votre refrigerateur ........................................................................6
Circulation d’air ................................................................................................6
Conditions electriques ........................................................................................6
Usage des rallonges ..........................................................................................6
Installations des limitations ..................................................................................7
Alignement de la porte ......................................................................................7
Inversion de l’ouverture de la porte......................................................................7
Demontage ........................................................................................................8
Reinstallation......................................................................................................8
Installation et reversions des poignees de porte ....................................................9
Caracteristiques et usage du refrigerateur ..................................10
Ajustement du reglage de la temperature ..........................................................10
Control de la temperature du congelateur ..........................................................10
Etageres interieures du refrigerateur ..................................................................10
Tiroir d’utilite et couvercle..................................................................................11
Tiroir de legumes et couvercle............................................................................11
Control d’humidite du tiroir ..............................................................................12
Nettoyage et entretien du refrigerateur ......................................16
Replacement de l’ampoule ................................................................................16
Interruption electrique ......................................................................................17
Entretien pendant vacances et demenagement ....................................................17
Depannage ............................................................................17-18
Information de la garantie ..........................................................19
3
Page 24

Francais
Francais
Parties et Caracteristiques
1
2
3
4
5
6
(montree - HTV15WNC)
10
12
8
9
7
11
&
fig. 1
12 3 45 6 78 910111213
Plateau
Ajust.de
Étagère
Compar
Tiroir
Tiroir de
Etagere
Etagere
Poignee
de
temp.,
interieur
tement
legumes
legumes
de la
glacons
control
e du
laitier
lumiere
refrig.
2 Oui 2 Opaque Poche 2 Opaque 2 2 Numero 2 4 Oui No
HTV15
2 Oui 2 Opaque Poche 2 Opaque 3 2 Numero 2 4 Oui No
HTV16
couvert
couver-
cle
porte
refrig.
porte
du con-
gelateur
Mises a
de porte
niveau
des
pieds
Les
roues
inferieur
4
Control
temp.
conge-
lateur
Dispens
eur a
glacons
pret
Page 25

Parties et Caracteristiques
15
9
8
16
10
Francais
Francais
1
12
7
3
4
2
5
6
13 14
Tiroir
Compa
rtiment
Contrôl
Gauche
Gauche
Thermo
Thermo
ajustab
ajustab
l'Etagè
l'Etagè
Congél
Congél
&
fig. 2
Porte
Fabric
Poigné
Niveler
Cylindr
Plateau
Porte
congél
congél
Rayon
Rayon
Fabric
ant de
ant de
glace
glace
Prêt
Prêt
1-Glisser
1-Glisser
Ajustable
Ajustable
1-Glisser
1-Glisser
Adjustable
Adjustable
Poigné
Niveler
des
des
Jambes
Jambes
Cylindr
inférieu
inférieu
e de
e de
porte
porte
2 Oui Poigne 2 4 2 Oui
2 Oui Poigne 2 4 2 Oui
2 Oui Poigne 2 4 2 Oui
2 Oui Poigne 2 4 2 Oui
Plateau
de
de
Glaçon
Glaçon
Cylindr
Cylindr
inférieu
inférieu
(montree - HTE15WAC)
123456 78910111213 141516
123456 7 8910111213 141516
Réfrigé
Porte
Compa
Couver
Compa
Réfrigé
Porte
Compa
rateur
réfrigér
rateur
réfrigér
ateur
térieur
ateur
Rayon
Rayon
Rayon
22Clair Poche 2 Clair 1-Cote Clair Oui
22Clair Poche 2 Clair 1-Cote Clair Oui
23Clair Poche 2 Clair 1-Cote Clair Oui
23Clair Poche 2 Clair 1-Cote Clair Oui
HTE15
HTE16
HTE15
HTE16
térieur
Rayon
rtiment
rtiment
laitier
laitier
Couver
parti-
parti-
ment à
ment à
légume
légume
Compa
rtiment
rtiment
à
légume
légume
à
Tiroir
Compa
rtiment
Contrôl
Gauche
Gauche
Plateau
Plateau
de
de
Glaçon
Glaçon
Contrôl
Contrôl
Temp.
Temp.
con-
con-
gélat
gélat
5
Page 26

Francais
Francais
Installation de Votre Refrigerateur
Deballage de votre refrigerateur
1. Retirez tout le materiel d’emballage ainsi que la base en mousse et le ruban
adhesive retenant les accessoires du refrigerateur de l’interieur et l’exterieur .
2. Inspectez et retirez le reste de l’emballage , le ruban adhesif et les documents
avant de mettre en marche votre refrigerateur.
Mettre a Niveau Votre Refrigerateur:
•Votre refrigerateur a 2 pieds de mise a niveau situes dans les coins de devant
du refrigerateur. Apres avoir place votre refrigerateur la ou vous le desirez,
mettez le a niveau pour une position horizontale.
•Les pieds de mise a niveau peuvent etre regles en les tournant dans le sens des
aiguilles d’une montre pour les relever ou dans le sens inverse pour les rabaisser. La porte du refrigerateur se fermera plus facilement lorsque les pieds mises
a niveau sont rehausses.
Circulation d’air
• Afin de vous assurer que le refrigerteur fonctione a plein rendement, installez
le dans un endroit lagement ventille et ou il existe des prises de raccrochement
electrique et pour la plomberie.
• Il est recommande de laisser les espaces suivants autour du refrigerateur.
Cotes..........................3/4” (19mm)
Au desssus..................1” (25mm)
Derriere ......................1” (25mm)
Recommandations Electriques
• Assurez vous qu’il y a une prise electrique adequate (115volts, prise
de15amps) avec mise a terre appropriee pour brancher le refrigerateur.
• Evitez l’usage d’adapteur a 3 broches et ne coupez pas la troisieme broche
afin d’accomoder une prise courante a 2 broches. Ceci est une pratique dangeureuse car elle n’offre pas de mise a terre pour le refrigerateur et vous
risquez des shocs electriques
Utilisation des Rallonges
• Evitez l’usage d’une rallonge electrique car cela peut resulter pas des hazards
potentials de securite. Si vous devez utiliser une rallonge, utilisez un cordon
d’estension a 3 conducteurs avec une fiche a 3 broches qui sera acceptee par
la mise a terre. Le calibre du cordon d’extension doit etre egal ou superieur au
calibre electrique du produit.
6
Page 27

Francais
Francais
7
Page 28

Francais
Francais
Demontage
1. Mettez la bande adhesive sur la porte du refrigerateur et congelateur des deux
cotes pour tenir les portes en place.
2. Selon la figure 1, enlevez le couvercle du gond superieur de la porte du congelateur. Enlevez les 4 vis du gond. Retirez le gond en le tirant verticalement et mettez le dans un endroit sure.
3. Enlevez la bande adhesive de la porte du congelateur, soulevez et enlevez la
porte puis deposez la doucement de cote.
4. Selon la figure 4, enlevez les vis du gond central, soulevez et retirez le gond central et rondelle et mettez les de cote.
5. Enlevez la bande adhesive de la porte du refrigerateur,soulevez et retirez la
porte et deposez la doucement de cote.
fig. 4
fig. 5
L’essieu du gond du centre
Coussinet du
Rondelle du gond central
gond du bas
ou inferieur
Gond
inferieur
Reinstallation
1. Selon la figure 5, enlevez l’essieu de la porte et installez dans le trou oppose
avec les rondelles d’etancheite (2) en place. Demontez le gond du bas et
installez sur le cote oppose avec le coussinet du gond et la rondelle d’etancheite en place.
2. Installez la porte du refrigerateur. Faites de facon que le trou gauche du
bas du compartement de la porte du refrigerateur soit au dessus du
coussinet du gond de l’essieu. Bougez en avant et en arriere la porte et
forcez la pour qu’elle soit droite et alignee avec les gonds du centre.
Installez le gond du centre de nouveau , tournez l’essieu du gond jusqu’a ce
qu’il soit completement dans la porte puis resserez avec les vis.
3. Installez la porte du congelateur. Alignez le trou gauche du bas de la porte
du congelateur au dessus de l’essieu central. Ajustez le gond de facon a ce
que l’essieu du gond peut etre installe dans le trou du haut de la porte du
congelateur .Ajustez la porte pour qu’elle soit droite et mise a niveau.
Resserez les vis du gond superieur.
4. Installez le couvercle superieur du
gond du cote gauche.
L’essieu du
gond du
centre
fig. 6
L’essieu du
gond de la
porte du
bas ou
inferieure
Les rondelles
d’etancheite
(2)
Etancheite du gond
du centre
8
Page 29

Francais
Francais
Installation et Inversion du Poigne des Portes:
Pour le model HTE15WAC et le HTE16WAC votre refrigerateu a des poignees.
Pour installer la poignee, alignez les trous des vis superieurs et inferieurs de la
poignee sur la porte du congelateur (selon la figure 7) Mettez les vis fournis et
couvercles avec les trous du couvercle de vis. Repetez la meme procedure pour la
poignee de la porte du refrigerateur.
fig. 7
Vis
Couvercle du vis
Poignee
(voir fig. 7)
Pour inverser les poignees de la porte enlevez les couvercles et les vis et placez les
sur le cote oppose. Enlevez les bouchons des trous des vis et installez du cote ou
l’on vient d’enlever les poignees.
9
Page 30

Francais
Francais
Usage Caracteristiques Refrigerateur
Caracteristiques Generales
Reglage du Control:
Votre refrigerateur maintiendra automatiquement la temperature que vous avez
choisie.Les controls de la temperature ont 7 differents reglage plus le OFF. Le
numero 1 est le plus chaud , le numero 7 est le plus froid. Quand vous tournez le
control sur OFF, le refrigerateur et le congelateur cesseront de fonctionner. Avant
tout , tournez le control au numero 4, attendez 24 heures avant d’ajuster la temperature necessaire.
Note: Si votre refrigerateur a ete place horizontalement ou a ete incline pour une
longue periode de temps, attendez 24 heures avant de le brancher.
Lumiere interieure dans la section du refrigerateur
Votre refrigerateur est equippe d’une lumiere interieure pour vous aider a trouver
plus facilement votre nourriture. La lumiere s’allumera automatiquement quand vous
ouvrez la porte du refigerateur.
Control de la temperature du
congelateur
La temperature dans le compartement du congelateur peut etre ajustee de bas a haut. Les reglages
faits par les fabriques sont normaux . Pour faire la
temperature plus froide, changez le control de temperature au cote plus froid. Ca vous donnera une temperature plus basse dans le
congelateur seulement.
Note: Faites attention a ne pas bloquer les conduits d’air . Ceci affectera la circu-
lation d’air dans le refrigerateur et le congelateur.
(voir fig. 8)
fig. 8
Les etageres interieures du refrigerateur
Les etageres du refrigerateur peuvent etre ajustes a votre satisfaction pour vos
besoins personels.
Pour enlever ou ajuster une étagère de pleine largeur qui glisse au
dehors: (voir fig. 9) (HTV15 & HTE15)
1. Doucement inclinez et retirez l’etagere jusqu’a ce que cette derniere est completement retiree.
2. Pour replacer l’etagere, choisissez votre reglage desire et glissez doucement l’etagere jusqu’a ce qu’elle soit posee dans la position serree.
fig. 9
10
(voir fig. 9)
Page 31

Francais
Francais
Pour enlever ou ajuster une étagère en aux-faux de pleine largeur:
(voir fig. 10) (HTV16 & HTE16)
1. Guidez les crochets qui sont a l’arriere de l’etagere dans les fentes correspon-
dents au support metallique se trouvant sur le mur du fond du refrigerateur.
2. Inclinez l’avant de l’etagere pour mettre les crochets en place.
3. Baissez l’avant de l’etagere jusqu’a ce que les crohets de derriere se bloquent
dans les fentes du support metallique de l’etagere.
4. Soulevez doucement l’etagere et retirez des crochets du fond pour enlever.
fig. 10
Tiroir a legume et Couvercle: (HTE Serie seulement)
Pour retirer le tiroir a legumes: (voir fig 11)
1. Retirez le tiroir de legumes jusqu’a l’arret.
2. Saisissez le devant du tiroir d’une main en supportant le bas du tiroir de l’autre
main. Glissez le tiroir a l’exterieur doucement.
fig. 11
Pour retirer l’etagere du couvercle du tiroir a
legumes:
1. Retirez le tiroir de legumes premierement en
suivant les indications ci dessus.
2. Doucement inclinez le devant de l’etagere
jusqu’a ce que les petites roues ne soient plus
bloquees en place.
3. Retirez l’etagere doucement jusqu’a ce que les crochets de derriere ne soient plus
bloques dans les fentes du support metallique.
Pour installer l’etagere du couvercle du tiroir a legumes:
1. Guidez les crochets qui sont a l’arriere de l’etagere dans les fentes correspon-
dentes du support metallique se trouvant sur l’etagere du refrigerateur.
2. Inclinez l’avant de l’etagere pour mettre les crochets en place.
3. Baissez l’avant de l’etagere jusqu’a ce que les crochets de derriere se bloquent
dans les fentes de support metallique de l’etagere et que les petites roues de l’etagere de devant se bloquent aussi. Replacez le tiroir a legumes.
11
Page 32

Francais
Francais
Tiroir et Couvercle du Tiroir a Legumes
Tiroirs a legumes
HTV Serie: Cette serie de refrigerateur a 2 tiroirs a legumes opaques pour emmagasiner votre nourriture.
THE Serie: Cette serie de refrigerateur a 2 tiroirs transparents pour emmagasiner
votre nourriture.
Le couvercle du tiroir a legumes dans les 2 series est fait en verre.
Pour retirer et installer le tiroir a legumes: (see fig. # 12)
1. Retirez le tiroir a legumes jusqu’a l’arret.
2. Soulevez doucement le devant du tiroir.
3. Saisissez fermement le tiroir et glissez le a l’ex-
terieur completement.
4. Replacez le tiroir a legumes en le placant conven-
ablement dans ses pistes et glissez le doucement
dans sa propre place.
Pour replacer le couvercle du tiroir a legumes: (voir fig. # 13)
1. Inserrez l’arriere du cadre du couvercle du tiroir a legumes dans les crochets du
soutien des murs du refrigerateur.
2. Abaissez le devant du cadre du tiroir a legumes et mettez le en place.
3. Glissez l’arriere du du tiroir a dans le cadre et abaissez le doucement dans sa
place.
4. Replacez les tiroirs a comme precedemment.
Pour replacer le couvercle: (voir fig. # 13)
1. Inserrez l’arriere du cadre du couvercle du tiroir a legumes dans les crochets du
soutien des murs du refrigerateur.
2. Abaissez le devant du cadre du tiroir a legumes et mettez le en place.
3. Glissez l’arriere du couvercle du tiroir a legumes dans le cadre et abaissez le
doucement dans sa place.
fig. 12
fig. 13
4. Replacez les tiroirs a legumes comme instruit precedemment.
Control d’humidite du tiroir a legumes:
(voir fig. # 14) (HTE Serie seulement)
Le model de votre refrigerateur peut etre equipe avec les controls de chute pour
eelever ou abaisser les niveaux d’humidite de votre tiroir a legumes. Cette caracteristique augmentera l’emmagasinage de vos fruits et legumes. Simplement ajustez le
control de montage approprie pour les articles que vous emmagasinez dans votre
tiroir a legumes.
12
Page 33

• Un reglage BAS permettra l’evacuation d’humidite du tiroir a legumes
pour emmagasiner au maximum les fruits et legumes non epluches.
• Un reglage HAUT gardera l’humidite du tiroir d’humidite pour emmagasiner au maximum les legumes fraix au foliage.
Francais
Francais
Low
High
fig. 14
Reglage
HAUT / BAS
Les Etageres de la Porte du Refrigerateur
L’emmagasinage des gallons dans la porte:
(voir fig. # 15)
Votre refrigerateur est equippe d’etageres pour emmagasiner des gallons.
Cette caracteristique vous permettra d’emmagasiner des recipients en
mesure des gallons.
Pour retirez les etageres de la porte de votre
refrigerateur: (voir fig. # 15)
1. Enlevez tous les articles situes sur les etageres.
2. Doucement rehaussez de chaque cote des etageres jusqu’a ce qu’elles
soient libres des fentes , puis retirez les.
Pour replacer les etageres de la porte de votre
refrigerateur: (voir fig. # 15)
1. Alignez la fin des etageres avec les crochets d’etagere de la porte.
2. Gentiment appuyez sur chaque fin d’etagere jusqu’a ce que cette
derniere est verouille dans sa place dans les crochets de la porte du
refrigerateur.
Etagere superieure de la porte
fig. 15
Etagere inferieure de la porte
13
Page 34

Francais
Francais
Pour ajuster l’etagere de la porte pour maintenir les
bouteilles: (voir fig #16)
1. Saisissez le hugger fermement et glissez le de droite a gauche jusqu’a
ce qui’il soit blottit contre les objets emmagasines sur l’etagerere.
shelf bottle hugger
fig. 16
Caracteristiques du Congelateur
Ajustement ou replacement l’etagere ajustable de
pleine largeur du congelateur: (voir fig. #14)
(HTE Serie seulement)
1. Saisissez fermement l’etagere et glissez la a l’exterieu jus’au maximum
2. Pour replacez l’etagere du congelateur, inserrez l’etagere dans les
fentes du cote gauche jusqu’au fond.
3. Pour retirez , simplement soulevez et retirez a l’exterieur du comparte-
ment du congelateur.
14
fig. 15
Dispenseur a Glacons prêt a utiliser:
(HTE Serie seulement)
• Votre refrigerateur est equippe pour installer un dispenseur a glacons si
vous le desirez. Vous pouvez installer un Haier HI1MK dispenseur a
glacons. Pour informations, contactez votre Haier agent ou appelez
nous au numero suivant 1-800-461-8890 x3100.
Page 35

Francais
Francais
Sons normaux du Fonctionement que vous Entendez
• La temperature selectionnee par vous se maintiendra grace a l’air ventille circulant a
l’interieur de votre refrigerateur.
• Les bruits d’eau bouillante et du gargouillement ou des vibrations legeres sont les
resultats de la refrigeration circulant a travers les tubes refroidissants.
• Les bruits de gresillement de crepitement resultant de degoulinement de la fonte du
cycle du decongelateur et le bruit de l’eau qui goutte du decongelation du chauffage
• Les bruits de l’eau qui goutte due aux glacons qui se decongelent de l’evaporation et
s’ecoulent dans le plateau de recuperation durant le cycle de decongelation.
• Pendant le cycle du decongelateur, des craquements et des crepitements sont causes
par la dilatation ou contraction des tubes refroidissants.
• La minuterie du decogelement et le thermostat vont cliqueter quand ils cyclent sur le
ON et OFF.
15
Page 36

Francais
Francais
Propre Nettoyage et Soin du
Refigerateur
Avetissement: Debranchez votre refrigerateur avant de le nettoyer afin d’eviter
des chocs electriques . En ignorant cet avertissement, un deces ou
une blessure grave pourra resulter.
Prudence: Avant d’utiliser un produit de nettoyage, lisez et suivez les instructions
du fabricant pour eviter des injuries et damages personels.
General: • Preparez une solution de nettoyage de 3-4 cuilleres a soupe de bicar-
bonate de soude mélange avec de l’eau tiede. Utilisez une eponge ou
un tissu doux trempe dans l’eau de nettoyage pur netoyer ovtre refrigerateur.
• Rincez a l’aide d’eau tiede propre et sechez acec un tissu doux.
• Ne pas utiliser des produits chimiques rauques, abrasives, l’ammoniaque, le javel, les detergents concentres , les dissolvants, les tampons a
recurer. Une partie de ces produits peut dissolver , endommager et ou
discolorer votre refrigerateur.
Les joints de la porte:
• Nettoyez les joints de porte chaque 3 mois selon les instructions generales. Les joints doivent etre proptre et pliable une bonne fermeture.
• Une application legere de gelle de petrole appliquée sur les gonds des
joints gardera les joints pliables et assurera une fermeture scellee..
Bobines de condensation de l’arriere:
• On vous recommande de nettoyer le derriere de votre refrigerateur au
moins 2 fois chaque annee..
Note: Quelques environnements peuvent un nettoyage frequent.
• Apres avoir debrancher votre refrigerature, utilisez un vaccum ou une
brosse pour nettoyer les bobines.
Replacement des Ampoules
1. Deconnectez la source du courant de votre refrigerateur.
2. Enlevez l’etagere la plus haute.
3. Permettez a l’ampoule de se refroidir avant de l’enlever.
4. Pour retirer le couvercle de l’ampoule, soutenez la partie gauche et pressez
doucement la partie droite jusqu’a ce que la serrure du couvert soit libre.
5. Enlevez l’ampoule en la vissant dans le sens inverse des aiguilles d’une montre.
6. Replacez toujours avec le type d’appareil evaluee a 40watts ou moins.
7. Ne depassez jamais l’equivalent des 40watts.
8. Reinstallez le couvert de l’ampoule.
9. Connectez de nouveau votre refrigerateur.
16
Page 37

Francais
Francais
Panne de Courant Electrique
• Occasionellement on peut avoir des pannes de courant dues aux orages ou
autre causes. Debranchez votre corde d’alimentation du AC de la prise de
courant quand une panne occure.Quand la panne est remise en marche,
branches votre refrigerateur. Si la panne est allongee pour une grande periode
de temps, inspetez la nourriture et disposez de celle qui est gatee, Nettoyez
votre refrigerateur avant de le reutiliser.
Entretiens lors des Vacances et Demenagement
• Pour une longue periode de vacances, videz votre refrigerateur et congelateur de
toute nourriture, et tournez le cadran de temperature jusqu’a OFF, nettoyez votre
refrigerateur et les joints de la porte selon le “Nettoyage General.” Laissez les
portes ouvertes pour la circulation d’air . Quand vous demenagez, soutenez toujours le refrigerateur dans le sens vertical. Ne le bougez pas dans le sens horizontal. Des dommages pour le systeme scelle peuvent occures.
Detections de Problemes
Le refrigerateur ne fonctionne pas
• Assurez que le control du thermostat n’est pas sur le OFF position.
• Assurez que le refrigerateur est branche.
• Assuerz que le courant electrique est en marche en inspectant le disjoncteur.
• Attendez 30-40minutes pour voir si le refrigerateur fonctionnera. Il se peut qu’il
soit sur le mode decongelation..Ce cycle doit etre complet avant que le compresseur commence a travailler.
La temperature de la nourriture est trop tiede
• Les portes sont ouvertes frequemment.
• Accordez le temps necessaire pour les aliments chaudes pour se refroidir
• Assurez les joints de la porte pour fermeture scellee
• Nettoyez les bobines de condensation.
• Ajustez la temperature a un reglage plus froid.
• Assurez dans le compartement du congelateur que les conduits d’air ne sont
pas bloques des paquets congeles.
La temperature de la nourriture est trop froide
• Si le control de montage est tres froid, ajustez la temperature a un reglage plus
chaud et attendez quelques heures pour que la temperature ajuste.
17
Page 38

Francais
Francais
Le refrigerateur fonctionne excessivement
• Ceci est normal pour maintenir constemment une temperature ambiante
pendant la haute temperature et les jours humides.
• Les portes sont ouvertes frequemment et pour une longue periode de temps.
• Nettoyez les bobines de condensation.
• Assurez les joints de porte pour une fermeture scellee.
• Assrez que les portes soient fermees completment.
Humidite s’accumule a l’interieur exterieur du refrigerateur
• Ceci est normal pendant les hautes periodes d’humidite.
• Les portes sont ouvertes frequemment et pour une longue periode de temps.
• Assurez les joints de porte pour fermeture scellee.
Refrigerateur a une mauvaise odeur
•L’interieur doit etre nettoye.
• Les aliments emballes ou scelles improprement donnent une mauvaise odeur
Lumiere du refrigerateur ne fonctionne pas
• Assurez la corde d’alimentation
• Resserez l’ampoule dans la douille
• Replacez l’ampoule brulee.
La porte du refrigerateur / congelateur ne se ferme pas
proprement
• Mettez a niveau votre refrigerateur.
• Realignez la porte du refrigerateur / congelateur.
• Assurez qu’il n’y a pas des obstructions par example, les recipients de
nourriture, le couvercle du tiroir a legumes, les etageres, les huches etc.
18
Page 39

Garantie Limitée
Eléments sous garantie et durée
de la garantie:
Cette garantie couvre tous les défauts de
main-d’œuvre et de matériaux pour une
période de:
12 mois pour la main d’oeuvre
12 mois pour les pièces
5 ans pour le système
d’étanchéité
La garantie prend effet le jour de l’achat
de l’article. Le ticket de caisse d’origine
doit être présenté au centre de réparation agréé pour toute réparation sous
garantie.
EXCEPTIONS : Garantie pour
usage commercial ou location.
90 jours pour la main d’œuvre
(service en atelier uniquement)
90 jours pour les pièces
Aucune autre garantie n’est
applicable
Couverture.
1. Les pièces électriques et mécaniques
servant au fonctionnement de l’appareil, pour une période de 12 mois.
Ceci comprend l’ensemble des pièces,
à l’exception de la finition et des
garnitures.
2. Les composants du système
d’étanchéité, tels que le compresseur
hermétique, le condenseur et
l’évaporateur, contre tous défauts de
fabrication, pour une période de 5
ans à compter de la date d’achat.
Tout dommage concernant ces
composants et résultant d'un abus
d’ordre mécanique, d’une utilisation
incorrecte, ou de méthodes
d’expédition inadéquates, ne sera
pas compris dans la garantie.
Réparations qui seront
effectuées:
1. Nous nous engageons à réparer ou
remplacer, à notre discrétion, toute
pièce électrique ou mécanique
s’avérant défectueuse dans des
conditions normales d’utilisation, au
cours de la période de
garantie spécifiée.
2. L’acheteur ne subira aucun frais pour
les pièces et la main-d’œuvre
couvertes par la garantie, au cours
de la première période de 12 mois.
Au-delà de cette période, seules les
pièces seront couvertes par la durée
Francais
Francais
restante de la garantie. La
main-d’œuvre n’est pas pourvue et
est à la charge du client.
3. Contacter le centre de réparations
agréé le plus proche. Pour obtenir les
nom et adresse du centre le plus
proche, appeler le 1-877-337-3639
CETTE GARANTIE COUVRE LES
APPAREILS UTILISÉS SUR LE
TERRITOIRE CONTINENTAL DES
ÉTATS-UNIS ET LE CANADA. ELLE
NE COUVRE PAS LES ELEMENTS
SUIVANTS:
Les dommages résultant d’une installatio
incorrecte. Les dommages survenus pendant le transport. Les défauts ne résultant pas de la fabrication.Les dommages
résultant d’un usage incorrect ou abusif,
d’un accident, de modifications, d’un
manque d’entretien ou de maintenance,
ou d’une tension incorrecte. Les
dommages résultant d’un usage autre
que l’usage ménager. Les dommages
résultant d’un entretien ou de
réparations par quiconque autre qu’un
distributeur ou centre de réparations
agréé. Garnitures décoratives ou
ampoules pouvant être remplacées.
Transport et Frais d’envoi. Main d’œuvre
(après la période initiale de 12 mois)
CETTE GARANTIE LIMITÉE REMPLACE
TOUTE AUTRE GARANTIE EXPRESSE
OU IMPLICITE, Y COMPRIS LES
GARANTIES DE VALEUR
MARCHANDE OU D’ADÉQUATION A
UN USAGE PRECIS
Le recours offert dans cette garantie est
exclusif et est accordé à l’exclusion de
tout autre.
La garantie ne couvrant pas les
dommages directs et indirects, les
limitations ci-dessus peuvent ne pas
s’appliquer à tous les cas. Certains états
ne permettant pas la limitation de la
durée des garanties implicites, les
limitations ci-dessus peuvent ne pas
s’appliquer à tous les cas.
Cette garantie confère à l’acheteur des
droits spécifiques et celui-ci peut
bénéficier d’autres droits qui varient
selon les états.
Haier America
New York, NY 10018
19
Page 40

Español
Español
MEDI DAS DE SEGUR I DAD
Lea siempre las instrucciones antes de utilizar esta unidad.
Siempre tenga en cuenta las precauciones básicas de seguridad
incluyendo las siguientes:
1) Utilice esta unidad sólo para su uso entendido, como se describe en
este manual y guía de cuidados.
2) Este refrigerador debe instalarse adecuadamente de acuerdo a las
instrucciones provistas en este manual antes de utilizarse. Vea las
instrucciones de conexión a tierra.
3) Nunca desenchufe esta unidad tirando del cable. Siempre sostenga
firmemente el enchufe y tire hacia atrás.
4) Repare o reemplace inmediatamente los cables de corriente que estén
dañados o presenten abrasiones. No utilice cables que muestren
rajaduras a lo largo del mismo ni enchufes o conexiones dañados.
5) Desenchufe su refrigerador antes de limpiar o antes de hacer alguna
reparación. Nota: Si por alguna razón el refrigerador necesita ser
reparado nosotros recomendamos que la reparación sea realizada por
un técnico calificado.
6) No utilice ningún artefacto eléctrico o cualquier elemento filoso para
descongelar el refrigerador.
7) Si su viejo refrigerador no esta en uso recomendamos que retire las
puertas del mismo, para reducir el riesgo de encierro de niños.
8) Una vez que el refrigerador este funcionando no toque las paredes
frías del compartimento del refrigerador, en especial cuando tenga las
manos mojadas o húmedas. La puede adherirse a estas superficies.
9) No congele nuevamente los alimentos que hayan sido descongelados
por completo. El departamento de Agricultura en casa de los Estados
unidos y el boletín número 69 dicen... “Usted puede congelar los alimentos por segunda vez si estos todavía contienen cristales de hielo o
si todavía tienen una temperatura menor a 40°F”.
“... Las carnes rojas, carnes de aves y pescados que sean descongelados y
que presenten un olor o color peculiar no deben congelarse nuevamente y
no deben comerse. El helado descongelado también debe descartarse.
Siempre que el olor o el color de los alimentos sean cuestionables conviene
deshacerse de los mismos. Es peligroso comer esos alimentos... “
“... Incluso el descongelado parcial y el re-congelado de los alimentos
reduce la calidad de los mismos, en especial frutas, vegetales y otras comidas elaboradas. La calidad de las carnes rojas es la menos afectada a
comparación de otros alimentos. Utilice los alimentos congelados lo mas
pronto posible de modo de preservar el mayor tiempo la calidad de los
mismos.”
1
Page 41

10) Este refrigerador no debe ubicarse en un gabinete cerrado. Está diseñado para la instalación libre únicamente.
11) No opere el refrigerador en presencia de gases explosivos.
GUARDE ESTAS INSTRUCCIONES
Para Referencia Futura
PELIGRO
Riesgo de niños. Antes de deshacerse de su viejo refrigerador o
freezer retire la puerta del mismo y deje los estantes en su lugar
para evitar que algún niño entre jugando y quede atrapado.
Gracias por utilizar nuestro producto
Haier Este manual de fácil uso lo guiará
para obtener el mejor uso de su
refrigerador.
Recuerde guardar el número de modelo
y de serie de su refrigerador. Ambos se
encuentran en la etiqueta en la parta
trasera de la unidad.
Número de modelo
Número de serie
Fecha de compra
Español
Español
Adjunte su boleta de compra o factura a este manual.
Será necesaria para hacer uso de los servicios de la garantía.
2
Page 42

Español
Español
Indice
Precauciones de seguridad ........................................................1-2
Partes y características ..............................................................4-5
Instalación del refrigerador............................................................6
Desempacando el refrigerador ............................................................................6
Nivelando el refrigerador....................................................................................6
Circulación de aire adecuada ............................................................................6
Requerimientos eléctricos ....................................................................................6
Uso de alargues ................................................................................................6
Limitaciones de instalación ..................................................................................7
Alineación de la puerta ......................................................................................7
Revirtiendo el eje de la puerta............................................................................7
Desmantelando ..................................................................................................8
Reinstalación......................................................................................................8
Instalación y cambio de la manija de la puerta ....................................................9
page
Características del refrigerador y uso ..........................................10
Dial de temperatura ajustable............................................................................10
Controle de temperatura del freezer ..................................................................10
Estantes interiores del refrigerador ....................................................................10
Cajón y cobertor ..............................................................................................11
Compartimento de puerta ................................................................................11
Cuidado y limpieza adecuada del refrigerador ..................................................12
Cuidado y limpieza adecuada del refrigerador ............................16
El Reemplazo de la Bombilla ............................................................................16
Interrupciones de energía..................................................................................17
Cuidados por vacaciones o traslados ................................................................17
Problemas generales ..............................................................18-19
Información de garantía ..............................................................20
3
Page 43

Partes y Caracteristicas
Español
Español
1
2
3
4
5
6
(shown - HTV15WNC)
10
12
8
9
7
11
&
fig. 1
12 3 45 6 78 910111213
12 3 45 6 78 910111213
CubeterasLuz y
CubeterasLuz y
control
ajuste
temp.
2Si2Opaco Bolsillo 2 Opaco 2 2 Pocket 2 4 Si No
HTV15
2Si2Opaco Bolsillo 2 Opaco 2 2 Pocket 2 4 Si No
HTV15
HTV16
2Si2Opaco Bolsillo 2 Opaco 3 2 Pocket 2 4 Si No
HTV16
2Si2Opaco Bolsillo 2 Opaco 3 2 Pocket 2 4 Si No
control
ajuste
temp.
Estante
Estante
interior
interior
Compar
Compar
timento
timento
tapa
tapa
diario
diario
Tapa de
Tapa de
compar-
compar-
timento
timento
Cajón Estantes
Cajón Estantes
puerta
puerta
del
refrig.
refrig.
del
Estantes
Estantes
de la
de la
puerta
puerta
freezer
freezer
Manija
Manija
de la
puerta
puerta
de la
Pies
nive-
ladores
ladores
Pies
nive-
Rueditas
Rueditas
inferi-
inferi-
ores
ores
Control
Control
temp.
temp.
freezer
freezer
Sistema
Sistema
creació
creació
n hiela
n hiela
4
Page 44

Español
Español
Partes y Caracteristicas
15
9
8
16
10
1
12
7
3
4
2
5
6
13 14
humed
Control
a más
Currus
Side
Side
Cajón
Cajón
de la
de la
utili-
utili-
dad
dad
&
Ter most
Ter most
ajustab
ajustab
le & la
le & la
Luz
Luz
Estante
Estante
del
del
conge-
conge-
lador
lador
1-Deslice
1-Deslice
Ajustable
Ajustable
1-Deslice
1-Deslice
Ajustable
Ajustable
fig. 2
Puerta
Fabric
El
Puerta
Fabric
conge-
ante
conge-
ante
lador
hielo
lador
hielo
Arrinc
Prepar
Arrinc
Prepar
2SiPuno 2 4 2 Si
2SiPuno 2 4 2 Si
2SiPuno 2 4 2 Si
2SiPuno 2 4 2 Si
El
Asider
Asider
o de la
o de la
puerta
puerta
Nivelar
Nivelar
PiernasElRodillo
PiernasElRodillo
inferior
inferior
(shown - HTE15WAC)
12345678910111213141516
12345678910111213141516
Refrige
La
El
Cubiert
Más
Refrige
La
El
rador
Puerta
rador
Puerta
del
interior
Arrinc
del
refrig.
Arrinc
refrig.
22Claro Vidrio 2 Claro 1-Lado Claro Si
22Claro Vidrio 2 Claro 1-Lado Claro Si
23Claro Vidrio 2 Claro 1-Lado Claro Si
23Claro Vidrio 2 Claro 1-Lado Claro Si
HTE15
HTE16
interior
HTE15
HTE16
Compa
Compa
rtimient
rtimient
o de la
o de la
Cubiert
a más
a más
currus-
currus-
cante
cante
Más
currus-
currus-
cante
cante
humed
Control
a más
Currus
Side
Side
Bandej
Bandej
a del
a del
Cubito
Cubito
hielo
hielo
Control
Control
conge-
conge-
lador
lador
Temp.
Temp.
5
Page 45

Español
Español
Instalacion Del Refrigerador
Desempacando el Refrigerador
1. Retire todos los elementos del packaging. Esto incluye la base de telgopor y
todas las cintas adhesivas que sostienen los accesorios dentro y fuera del
refrigerador.
2. Inspeccione y asegúrese de retirar todos los materiales del embalaje como cintas o materiales impresos antes de poner en funcionamiento la unidad.
Nivelando el Refrigerador:
• Su refrigerador posee dos pies niveladores ubicados en las esquinas inferiores
de la unidad. Luego de colocado el refrigerador en la posición final usted
deberá nivelarlo.
• Los pies niveladores pueden ajustarse, girando en dirección contraria a las
agujas del reloj para levantar la unidad o en dirección contraria para bajar.
La puerta del refrigerador cerrará más fácil cuando los pies niveladores estén
extendidos.
Circulación de aire Adecuada
• Para asegurarse que su refrigerador trabaje al máximo de eficiencia para el
que fue diseñado usted debe instalarlo en un lugar donde exista una circulación de aire suficiente y donde se encuentren las instalaciones de electricidad
adecuadas.
• Los siguientes son los espacios recomendados alrededor del refrigerador
Laterales ..............3/4”(19mm)
Parte superior ......1” (25mm)
Parte trasera ........1” (25mm)
Requerimientos Eléctricos
• Asegúrese de que haya una toma de corriente adecuada (115 vol., 15 amp)
con la conexión a tierra adecuada.
• Evite el uso de adaptadores de tres patas. Nunca corte el tercer cable o la
pata del enchufe de modo de poder insertar el enchufe en una toma de dos
patas. Esta practica puede ser peligrosa.
Uso de Alargues
• Evite el uso de alargues para evitar riesgos bajo ciertas condiciones. En caso
de ser necesario utilizar un alargue, use solo uno de tres patas.
6
Page 46

Español
Español
Limitaciones de la instalación
• No instale su refrigerador en un lugar sin el espacio suficiente o en lugares de
calor como por ejemplo un garaje, etc. Su refrigerador no fue diseñado para
operar a temperaturas menores a 55° F.
• Seleccione una superficie plana y resistente para colocar el refrigerador.
Asegúrese de estar lejos de la luz directa del sol y de radiadores u otros artefactos eléctricos que irradien calor. Cualquier desnivel del suelo debe ser corregido utilizando los pies niveladores ubicados en las esquinas inferiores del
refrigerador.
Alineación de la puerta
(ver fig. 3)
1. Retire el tornillo del cobertor del eje de la puerta.
2. Retire el cobertor superior
3. Afloje los tornillos de la bisagra utilizando un destornillador phillips.
4. Ajuste la puerta o coloque un espaciador entre medio y luego ajuste los tornillos.
5. Coloque en su lugar el cobertor de la bisagra.
Revirtiendo el eje de la puerta
fig. 3
Cobertor de bisagra
(ver fig. 3 to fig. 7)
Bisagra superior
Modo de apertura de izquierda a derecha:
Este producto le permite revertir la dirección de apertura de la puerta. Usted podrá
elegir la dirección de apertura de la puerta siguiendo las siguientes instrucciones
para realizar el cambio.
7
Page 47

Español
Español
Desmantelando
1. Fije las puertas del refrigerador y freezer colocando una cinta adhesiva a ambos
lados para mantener la puerta en su lugar.
2. Como se muestra en la figura #1 retire el cobertor del eje superior de la puerta
del refrigerador utilizando un destornillador Phillips. Luego retire el eje tirando
verticalmente hacia delante y pongalo en un lugar seguro.
3. Retire la cinta adhesiva de la puerta del refrigerador, levante y saque la puerta
de lugar, colóquela cuidadosamente a un lado.
4. Como se muestra en la figura 4, desmantele tres de los tornillos del eje central,
levante y retire el eje y soporte de puerta dejándolos en un lugar seguro.
5. Retire la cinta adhesiva de la puerta del freezer, levante y retire la puerta deján-
dola a un lado.
fig. 4
Pad central
Reinstalación
Eje central
Espaciador de
bisagra
Bisagra
inferior
1. Como se muestra en la figura 5 retire el eje de la puerta y colóquelo ne le
orificio opuesto junto con las arandelas del pad ( 2) en su lugar. Ahora
desarme la bisagra inferior y luego instale al lado izquierdo con el espaciador y pads en su lugar.
2. Instale la puerta del freezer: Inserte en el orificio izquierdo inferior de la
puerta del freezer el eje inferior, mueva la puerta hacia un lado y otro
para ajustar la alineación con el eje central. Instale el eje central nuevamente, gire la bisagra hasta que inserte completamente el la puerta y luego
ajuste con tornillos.
3. Instale la puerta del refrigerador: Coloque la puerta insertando la bisagra
del eje central en el orificio inferior de la puerta. Levante el eje superior de
manera que la bisagra superior pueda ser insertada en el orificio superior
de la puerta del refrigerador. Mueva y ajuste la puerta para que quede
nivelada. Ajuste los tornillos del eje superior.
4. Coloque el cobertor del ángulo superior al lado izquierdo.
fig. 5
Eje de la bisagra inferior
Arandela
s del pad
(2)
Eje de la
bisagra
central
fig. 6
Pad central de la bisagra
8
Page 48

Español
Español
Instalación y cambio de las manijas:
Los modelos HTE15WAC y HTE16WAC de refrigerador poseen asas. Para instalar
esta manija alinee los orificios de la misma superior e inferior con los orificios de
la puerta del freezer (como se muestra en la figura 7). Ajuste con los tornillos y
coloque las tapas en los orificios. Repita el procedimiento con la puerta del refrigerador.
Tornillo
Tapa de tornillo
Manija
(ver fig. 7)
fig. 7
Para revertir la manija de la puerta retire los tornillos e instale la manija en el lado
opuesto. Coloque los tapones de los orificios y colóquelos del lado donde fue retirada la manija.
9
Page 49

Español
Español
Características y Uso del Refrigerador
Características Generales
Dial de temperatura ajustable:
Su refrigerador automáticamente mantendrá el nivel de temperatura que usted
seleccione. EL control de temperatura presenta 7 opciones más OFF. 1 es la más
cálida y 7 es la opción más fría. Cuando gira el dial a OFF se detendrá ambos sectores, el freezer y refrigerador. En principio deje la opción 4 y permita pasar unas
24hs antes de volver a ajustar la temperatura.
Nota: Si el refrigerador fue colocado en posición horizontal o inclinado por
cualquier período, espere unas 24 horas antes de enchufar la unidad.
Luz interna del refrigerador
Su refrigerador esta equipado con una luz interior en el sector de los alimentos frescos para facilitar la ubicación de los alimentos. La luz se prende y apaga automáticamente al abrir y cerrar la puerta.
Control de temperatura del freezer
La temperatura en el compartimento del freezer
puede seleccionarse entre BAJA y ALTA. La selección desde fábrica es la Normal. Para que el mismo
enfríe más lleve el control a la opción ALTA. De esta
manera la temperatura del compartimento del freezer diminuirá.
Nota: Asegúrese de no bloquear las salidas de aire. Esto afectará a la circulación
del aire en ambos compartimentos.
Estantes interiores del refrigerador
Los estantes del refrigerador fueron diseñados para su mayor comodidad. Estos
pueden ajustarse de acuerdo a sus necesidades de almacenamiento de alimentos.
Para retirar o ajustar los estantes deslizables:
(ver fig. 9) (HTV15 & HTE15)
1. Gentilmente agarre el estante y deslice el mismo hasta retirarlo completamente
2. Para colocar nuevamente el estante seleccione el nivel deseado y deslice el
cuidadosamente el estante hacia atrás hasta que cierre en posición.
(ver fig. 8)
fig. 8
(ver fig. 9)
fig. 9
10
Page 50

Español
Español
Para reemplazar un estante voladizo de ancho entero:
(ver fig. 10) (HTV16 & HTE16)
1. Guie los ganchos en la parte trasera del estante y coloque en los orificios
deseados de la guía de metal en la pared del refrigerador.
2. Levante el frente del estante para que los soportes traseros del estante se
acomoden en su lugar.
3. Baje ahora el estante a la posición adecuada hasta que los soportes traben en
su lugar.
fig. 10
4. Para retirar levante gentilmente el estante, desenganche y retire.
Cajon y cobertor: (series HTE solamente)
Para retirar el cajón: (ver fig 11)
1. Deslice el cajón hacia delante hasta que llegue el borde
2. Agarre y tire del frente del cajón con una
mano mientras que con la otra mano sostiene la
parte inferior del mismo. Deslice gentilmente
hacia fuera.
fig. 11
Para retirar el estante o cobertor del cajón:
1. Retire primero el cajón de acuerdo a las instruc-
ciones dadas anteriormente
2. Levante del estante hasta que los ganchos traseron se suelten de la guía de
metal.
3. Tire del estante gentilmente hasta que salga completamente de su lugar.
Para instalar el estante o cobertor del cajón:
1. Guie los ganchos soportes del estante a las ranuras deseadas de la guía de
metal en la pared del refrigerador.
2. Levante el frente del estante para insertar los ganchos en en la ranura de la
guía.
3. Bajar el frente del estante a la posición original hasta que los soportes se
acomoden finalemente en la guía.
11
Page 51

Español
Español
Compartimentos y Tapas Compartimentos
Compartimentos
Series HTV: esta serie de refrigeradores posee 2 compartimentos opacos para
almacenaje de alimentos.
Series HTE: esta serie de refrigeradores posee 2 compartimentos translúcidos para
el almacenaje de los alimentos.
El cobertor en ambas series es de vidrio.
Para retirar e instalar los compartimentos:
(ver fig. # 12)
1. Deslice el cajón o compartimento hacia fuera hasta
que trabe.
2. Gentilmente levante el frente del mismo
3. Agarre el cajon firmemente y retire del todo.
4. Reubique el mismo colocandolo en las pistas y
deslizando suavemente hacia en interior.
Para retirar la tapa del compartimento:
(see fig. # 13)
1. Primero retire los dos compartimentos
2. Suavemente levante el estante sosteniendolo desde
abajo para despegarla del soporte.
3. Cuidadosamente deslice la tapa para retirar la misma.
4. Retire el soporte de la tapa.
fig. 12
fig. 13
Para ubicar nuevamente la tapa del compartimento: (ver fig. # 13)
1. Inserte la parte trasera del soporte de la tapa en las guías laterales refrigerador.
2. Baje el frente del soporte y deslice hacia atrás
3. Coloque el borde de la tapa del compartimento el soporte cuidadosamente.
4. Deslice y ubique finalmente la tapa de acuerdo a las instrucciones anteriores.
Control de humedad: (ver fig. # 14) (HTE Series)
Su refrigerador puede estar equipado, de acuerdo al modelo, con un control para
aumentar o disminuir el nivel de humedad de los compartimentos. Esta función
permite incrementar la vida de las frutas y vegetales guardados. Simplemente
ajuste el control al nivel deseado según los alimentos que usted desee guardar en
los compartimentos.
12
Page 52

Español
Español
• La opción BAJO permite que la humedad se escape del comparitmento
para un almacenamiento optimo de frutas y vegetales con piel.
• La opción ALTO retiene parte de la humedad en el compartimento
para optimizar la guarda de vegetales y verduras frescas.
Low
High
fig. 14
ALTO /BAJO
Estantes de la Puerta del Refrigerador
Estante de la puerta: (ver fig. # 15)
Su unidad esta equipada con estantes para colocar botellas en la puerta.
Los mismos le permitirán el almacenaje de recipientes o botellas de
tamaño en galones.
Para retirar los estantes de la puerta: (ver fig. # 15)
1. Retire todos los elementos que se encuentren almacenados en el estante
2. Gentilmente tire hacia arriba de ambos laterales hasta que el estante
salga de los soportes y retire.
13
Para colocar los estantes: (ver fig. # 15)
1. Alinee los laterales del estante con los soportes de la puerta.
2. Cuidadosamente empuje hacia abajo hasta que el mismo trabe
seguramente en su lugar.
Estante de puerta superior
fig. 15
Estante de puerta inferior
Page 53

Para ajustar los brazos soportes de botellas de los
estantes: (ver fig #16)
1. Sostenga el brazo firmemente y deslice hacia la derecha o izquierda
hasta que quede señido a los items almacenados en el estante.
Soporte de estante
fig. 16
Caracteristicas del Freezer
Ajustando o retirando el estante deslizable:
(ver fig. # 17) (HTE Series)
1. Sostenga el estante y deslice el mismo hacia delante hasta trabe.
2. Para colocar nuevamente el estante del freezer inserte y empuje el
mismo dentro de los soportes laterales izquierdos.
Español
Español
3. Para retirar simplemente levante y tire hacia fuera del compartimento
del freezer.
fig. 17
Creación de hielo: (series HTE solamente)
• Su refrigerador está equipado para la instalación de un kit para hacer
hielo si lo desea. Usted puede instalar un kit HAIER HI1MK. Para mayor
información llame al 1-800-461-8890/ 3100
14
Page 54

Español
Español
Sonidos de la operación normal
• El aire proveniente del ventilador circulando en el interior para mantener la
temperatura seleccionada.
• Burbujeo, sonido de agua hirviendo, o pequeñas vibraciones que son el resultado de
la circulación del líquido refrigerante.
• Sonido crujiente durante el ciclo de descongelado
• Goteo de agua mientras que el ciclo de descongelado esta funcionando
• Golpeteo o crujido debido a la expansión o contracción de las bovinas durante el
ciclo de descongelado.
• El termostato hara un “click” cuando se encienda y apague.
15
Page 55

Cuidado y Mantenimiento Apropiado
del Refrigerador de Bebidas
Cuidado: Para evitar riesgos de un shock eléctrico desenchufe siempre la
unidad antes de limpiar. No ignore nunca esta advertencia.
Precaución: Antes de utilizar productos de limpieza siempre lea y siga las
instrucciones le fabricante para evitar lesiones y daños a la unidad.
General: • Prepare una solución de 3 o 4 cucharadas de bicarbonato de
sosa mezclado con agua tibia. Utilice una esponja o paño suave
humedecida con la solución anterior para repasar el refrigerador.
• Lave com agua tibia y limpia y seque con un paño suave.
• No utilice químicos, abrasivos, amoníaco, cloro, detergentes concentrados, solventes o esponjas de metal. Algunos de estos materiales pueden dañar, corromper o decolorar se unidad.
Juntas de la puerta:
• Limpie las juntas cada tres meses mínimo de acuerdo a las instrucciones generales de limpieza. Las juntas deben mantenerse limpias
para permitir un correcto sellado de puerta mientras esté cerrada.
• Puede pasarse en la junta un poco de vaselina para mantener las
juntas flexibles y asegurar el sellado completo.
Español
Español
Parte trasera del refrigerador:
• Recomendamos que limpie la parte tasera del refrigerador por
los menos 2 veces al año.
Nota: Algunos ambientes requieren de una limpieza
mas frecuente.
• Luego de desenchufar el refrigerador utilice una aspiradora o un
cepillo para la limpieza.
Reemplazo de la lamparita:
1. Apague el refrigerador
2. Retire el estante superior
3. Permita que la lamparita se enfrie antes de cambiar
4. Para retirar la tapa de la lámpara sostenga del lado izquierdo y presione gentilmente del lado derecho hasta que la misma se suelte.
5. Retire la lampara desenroscando en dirección contraria a las agujas del reloj.
6. Siempre reemplace por una lamparita de 40 watts o de menor voltage.
7. Que la lampara nunca exceda los 40 watts
8. Coloque nuevamente la tapa.
9. Enchufe el refrigerador.
16
Page 56

Español
Español
Interrupciones de energía
• Ocasionalmente pueden ocurrir cortes de energía debido a tormentas u otras
causas. Desenchufe cuando esto ocurra. Cuando la corriente se reestablezca
enchufe el cable nuevamente. Si el corte de corriente fuese por un período de
tiempo prolongado inspeccione y descarte los alimentos que se hayan descongelado en el freezer o refrigerador. Limpie por dentro del refrigerador antes de
volver a enchufar.
Vacaciones y cuidados en el traslado de la unidad
• En caso de que usted tome vacaciones o esté ausente, vacíe el refrigerador y
freezer, mueva el dial de temperatura a Off y limpie la unidad de acuerdo a las
instrucciones generales de limpieza. Deje la puerta abierta de modo que el aire
pueda circular. Cuando necesite trasladar la unidad siempre mueva verticalmente. No la mueva en forma horizontal, puede causar daños al sistema.
17
Page 57

Español
Español
Problemas Generales
El refrigerador no funciona
• Controle que la perilla de la temperatura no esté en OFF
• Controle que la unidad esté enchufada
• Controle que haya corriente en la toma.
• Espere unos 30-40 minutos hasta ver que el refrigerador comience a funcionar.
Puede requerir de un tiempo hasta que el compresor termine el ciclo para
comenzar a operar.
La temperatura de los alimentos parece cálida
• La puerta es abierta frecuentemente
• Permita tiempo a los alimentos colocados recientemente a alcanzar la temper-
atura establecida.
• Controle que la puerta cierre correctamente
• Limpie el condensador (para los modelos que tienen el condensador a la vista)
• Ajuste el control de temperatura a mayor nivel de frío.
La temperatura de los alimentos es demasiado fría
• Ajuste el nivel de temperatura a una posición más cálida y permita un tiempo
para que la misma se ajuste.
18
Page 58

Español
Español
El motor trabaja muy seguido
• Puede ser normal para mantener la temperatura en días cálidos y de humedad
• La puerta es abierta frecuentemente por un largo tiempo.
• Limpie el condensador (para los modelos que tienen el condensador a la vista)
• Controle las juntas de la puerta para que cierre correctamente.
• Controle si la puerta cierra completamente
Formación de vapor en el interior o exterior del refrigerador
• Es normal en días de mucha humedad
• La puerta es abierta con mucha frecuencia
• Controle las juntas de la puerta
El refrigerador tiene olor
• El interior del mismo necesita limpieza
• Comidas no envueltas o tapadas correctamente estan provocando olores.
La luz del refrigerador no funciona
• Controle la corriente
• Ajuste la lamparita al enchufe
• Reemplace en caso de que esté la lampara quemada
La puerta no cierra correctamente
• Nivele la unidad
• Re-alinee la unidad
• Controle que no haya bebidas bloqueando la puerta
19
Page 59

Garantía Limitado
¿Qué está cubierto y por
cuánto tiempo?
Esta garantía cubre cualquier defecto en
la manufactura o empleo de materiales
por un plazo de:
12 meses de mano de obra
12 meses en componentes
5 años en el sistema sellado
La garantía comienza en la fecha de
compra del artículo, y la factura original
de compra debe presentarse al centro
de servicio autorizado para poder
efectuar cualquier reparación que esté
bajo garantía.
EXCEPCIONES: Garantía por Uso
Comercial o Bajo Arrendamiento
90 meses en mano de obra
(únicamente en taller)
90 días en componentes
Ninguna otra garantía es válida
¿Qué está cubierto?
1. Los componentes mecánicos y
eléctricos que cumplen con alguna
función de este aparato durante un
plazo de 12 meses. Esto incluye
cualquier componente con excepción
de acabados y molduras.
2. Los componentes del sistema sellado,
como por ejemplo: compresor
hermético, condensador, y
evaporador, por defectos de
manufactura durante un plazo de 5
años a partir de la fecha de compra.
Cualesquier daños a tales
componentes causados por abuso
mecánico o manejo o transportación
inadecuada no serán cubiertos.
¿Qué se hará?
1. Repararemos o reemplazaremos, a
discreción nuestra, cualquier
componente mecánico o eléctrico que
se muestre defectuoso por uso normal
durante el plazo así especificado.
2. No habrá cargos para el comprador
por las partes y la mano de obra en
cualesquier artículos cubiertos
durante el periodo inicial de 12
meses. Al término de este periodo
solo las partes son cubiertas en la
garantía restante. La mano de obra
no está provista y debe ser cubierta
por el cliente.
3. Localice su centro de servicio
autorizado más cercano.
Español
Español
Para conocer el nombre del centro de
servicio más próximo a su domicilio,
por favor llame al 1-877-337-3639
(Válido solo en E.U.A).
ESTA GARANTIA CUBRE
APARATOS DENTRO DEL
TERRITORIO CONTINENTAL DE
LOS ESTADOS UNIDOS Y
CANADA. ESTA GARANTIA NO
CUBRE LO SIGUIENTE:
Daños por instalación inadecuada.
Daños por transportación.
Defectos que no sean por manufactura.
Daños por negligencia, abuso,
accidente, alteraci-ón, falta de cuidado
adecuado y de mantenimiento, o
conexión a tensión eléctrica incorrecta.
Daños que no sean por uso doméstico.
Daños por servicio que no sea
proporcionado a través de un
distribuidor o centro de servicio
autorizado. Molduras decorativas o
focos reemplazables.
Envío y transportación.
Mano de obra (después de los primeros
12 meses).
ESTA GARANTIA LIMITADA ES
PROVISTA EN SUSTITUCION A
CUALQUIER OTRA GARANTIA
EXPRESADA O QUE IMPLIQUE LAS
GARANTIAS MERCANTILES SUJETAS A
CIERTO PROPOSITO.
El amparo provisto por esta garantía es
de uso exclusivo y se otorga en
sustitución a cualquier otro amparo.
Esta garantía no cubre daños
incidentales o sus derivados, por lo que
las anteriores restricciones pueden serle
ajenas. En ciertos estados no se
permiten restricciones en lo que se
refiere a la duración implícita de una
garantía, por lo que las anteriores
restricciones pueden serle ajenas.
Esta garantía le otorga ciertos derechos
legales y es posible que usted goce de
otros derechos, los cuales varían de
estado a estado.
Haier America
New York, NY 10018
20
Page 60

IMPORTANT
Do Not Return This Product To The Store
If you have a problem with this product, please contact the "Haier Customer
Satisfaction Center" at 1-877-337-3639.
DATED PROOF OF PURCHASE REQUIRED FOR WARRANTY SERVICE
IMPORTANT
Ne pas Réexpédier ce Produit au Magasin
Pour tout problème concernant ce produit, veuillez contacter le service des
consommateurs ‘Haier Customer Satisfaction Center’ au 1-877-337-3639.
UNE PREUVE D’ACHAT DATEE EST REQUISE POUR BENEFICIER DE LA GARANTIE.
IMPORTANTE
No regrese este producto a la tienda
Si tiene algún problema con este producto, por favor contacte el "Centro de Servicio al
NECESITA UNA PRUEBA DE COMPRA FECHADA PARA EL SERVICIO DE LA GARANTIA
Consumidor de Haier" al 1-877-337-3639 (Válido solo en E.U.A).
115V, 60 Hz
HTV15.16/HTE15.16
Issued: February-04
Haier America
New York, NY 10018
Printed in China
Part # RF-9999-142
 Loading...