

Page 1
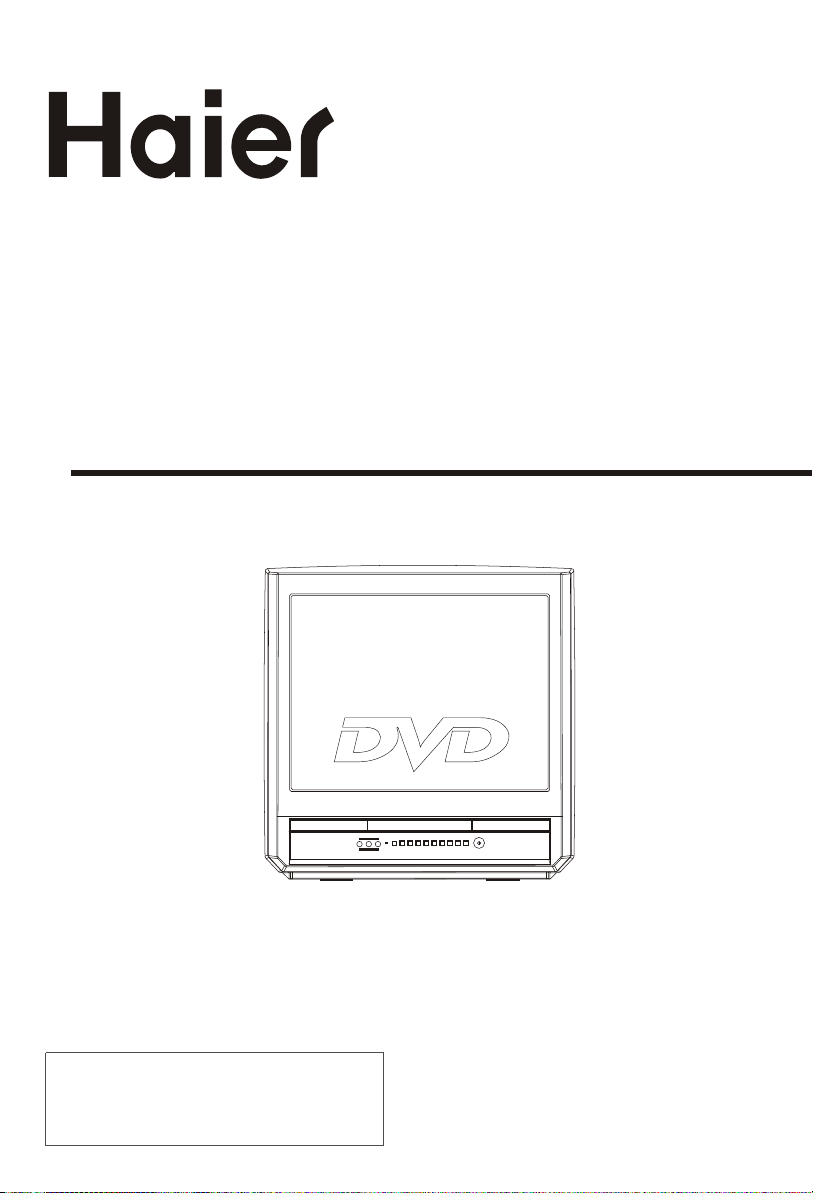
COMBINED 21" TV AND DVD PLAYER
DTA-2198
OWNER'S MANUAL
TVTV
++
Please read this manual carefully
before using this TV set and keep it
for future reference.
Page 2

CONTENTS
Before Operation
Warning and cautions
..............................................................
Installation..............................................................................................3
Antenna Connection
..............................................................................
Preparation for the remote control..........................................................3
Function buttons and ........................................
Front panel of the TV set.....................................................................4
Rear panel of the TV set.......................................................................4
Using the remote control......................................................................5
Basic operation
Menu
DVD Operation
DVD Features.......................................................................................18
Advanced Playback..............................................................................19
Special Function Playback...................................................................20
DVD System Setup................................................................................22
Playable Discs.......................................................................................26
Disc Protection and DVD Characteristics..........................................27
Others
Connection to the External Audio and Video Equipment.................28
Troubleshooting guide
Specifications .....................................................................................
Functions
External Connections
......................................................................................
........................................................................
1
2
2
2
3
3
3
4
5
14
15
16
17
21
22
23
24
25
Page 3
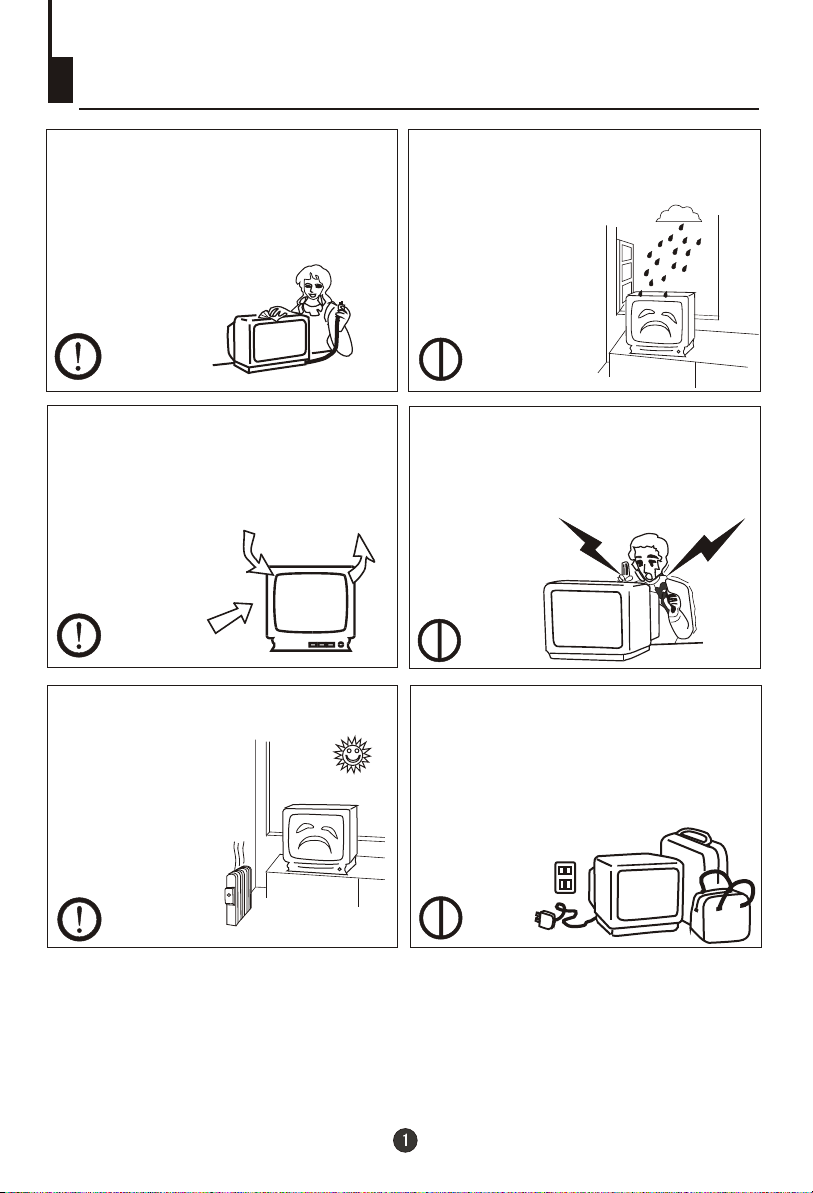
Warning and cautions
1. When you clean the TV set, please
pull out the power plug from AC outlet.
Don't clean the cabinet and the
screen with benzene, petrol and other
chemicals.
2. In order to prolong the using life of
the TV set, please place it in a well
ventilated location.
3. Don't place the TV
set in direct sunlight
or near a heat source.
4. Do not place the TV set near rain or
moisture as it may cause an electric
shock, or the TV set to catch fire. The
TV set must only
be used in dry in
door locations.
5. The back cover must only be
removed by a registered electrical
service person. Removing the back
cover may result in electric shock, fire
or damage to
the TV set.
6. If the TV set is not going to be used
for a long time, or there is a severe
thunder & Lighting storm, it is
recommended that the TV set be
disconnected from the AC power outlet
and the aerial plug removed.
Explanation on the display tube
Should the picture tube require cleaning, disconnect the power and use a dry
soft cotton cloth. Do not use any cleaner or abrasive cloths.
Page 4
Installation
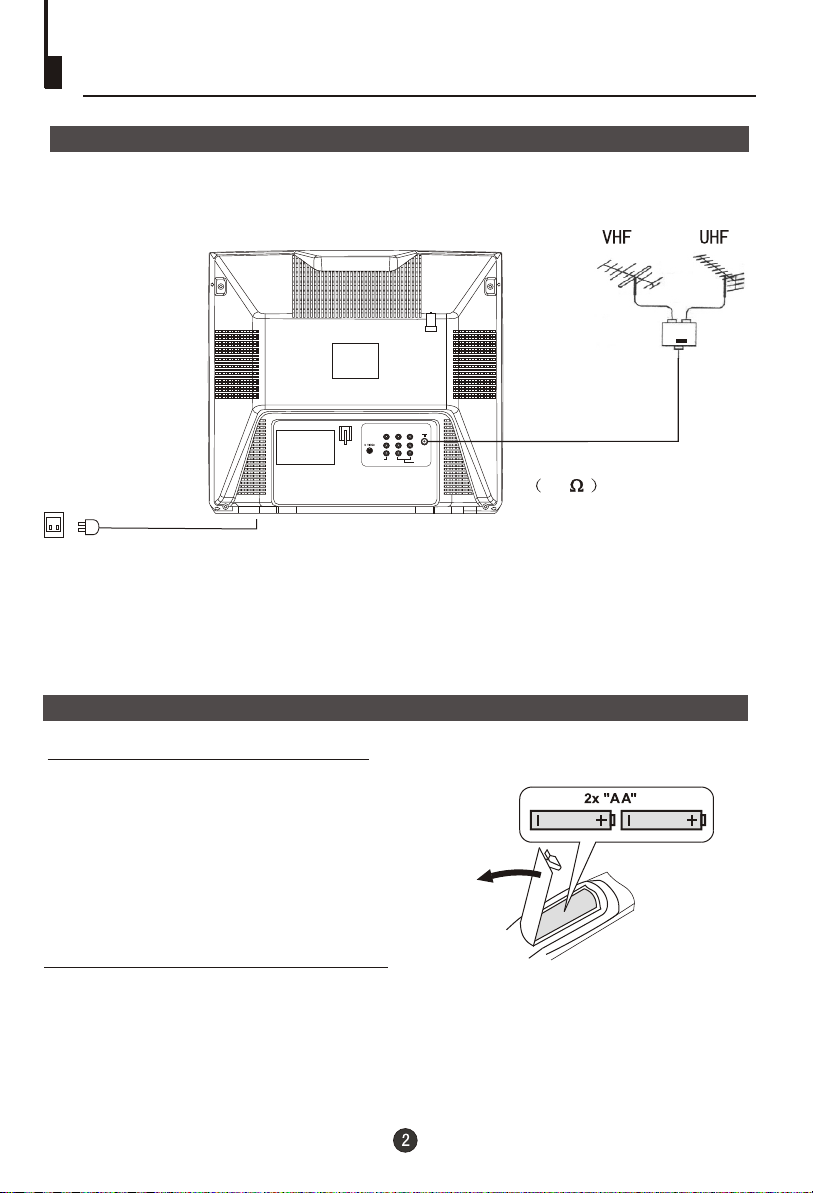
Antenna connection
Generally speaking, to enjoy a clearer picture, we recommend that you use a CATV
system or an outdoor antenna .In different places, the suitable antenna type and position
may vary.
Mixer
(not incl.)
Y Cb Cr
OUT
IN
L R
VIDEO
AUDIO
AC power socket
Note:
* It is recommended that a 75 ohm coaxial antenna is used to avoid
interference.
*To avoid interference from electrical signals, do not bind the antenna cable
together with any mains lead.
Antenna/ CATV input
75 standard
coaxial type
Preparation for the remote control
Battery installation
!
Remove the battery cover.
!
Insert two size AA batteries matching
the +/-polarities of the battery to the +/marks inside the battery compartment.
Tips for remote operation
! When the remote control will not be used for a long period of time or when the
batteries are worn out, remove the batteries to prevent leakage.
! Do not throw the batteries into fire. Dispose of used batteries in the specified
manner.
! Do not drop, dampen or disassemble the remote control.
Page 5
Function Buttons and External
Connections
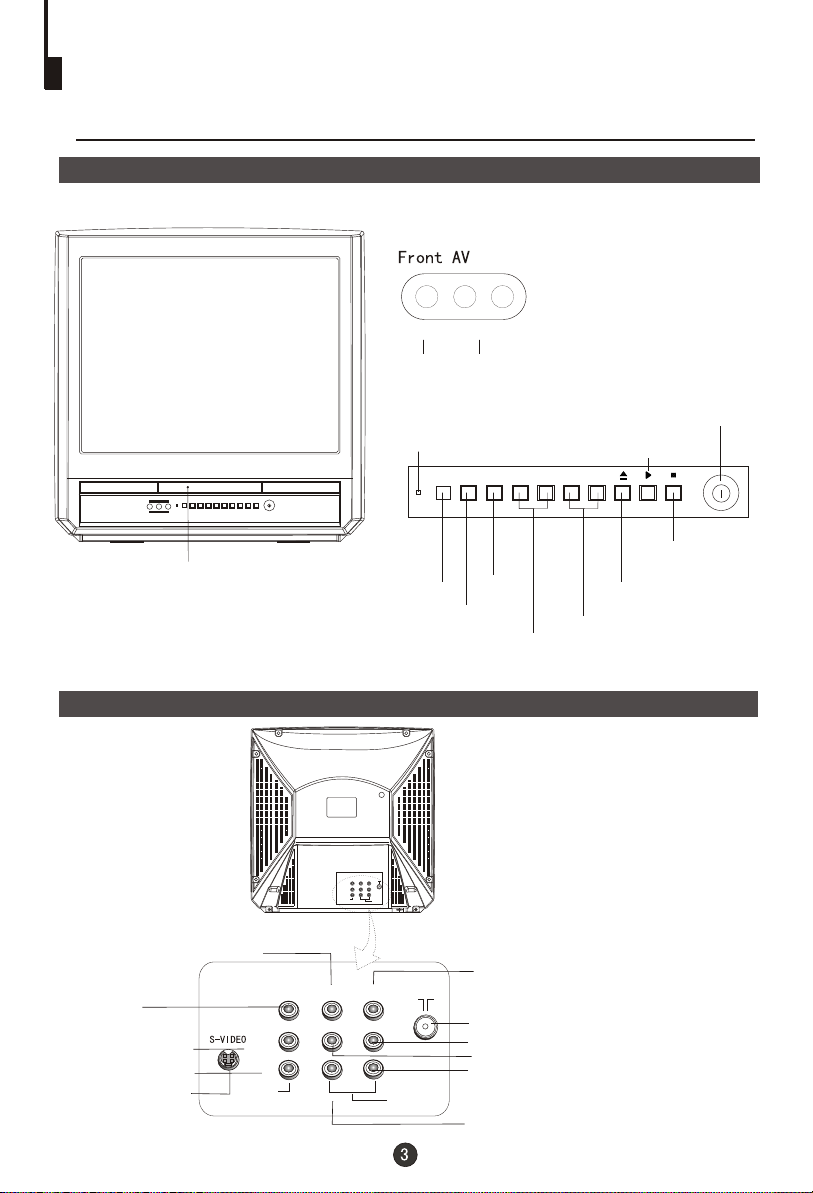
Front panel of the TV set
VIDEO L-AUDIO-R
R/LAudio
Video
Power Indicator
MENU
TV/DVD
VOL- VOL+
Play the DVD
CH- CH+
Power Switch
The DVD Player
Rear panel of the TV set
DVD component Cb terminal
DVD component
Y terminal
Video output terminal
Video input terminal
S-VIDEO input terminal
OUT
IN
VIDEO
Signal Receiver
TV/DVD Switching
Y Cb Cr
OUT
IN
L R
VIDEO
AUDIO
Y Cb Cr
L R
Menu
Stop the DVD
Open/close the DVD
Channel Position up/down
Volume up/ down
DVD component Cr terminal
Antenna input socket
Audio right channel output terminal
Audio left channel output terminal
Audio right channel input terminal
AUDIO
Audio left channel input terminal
Page 6
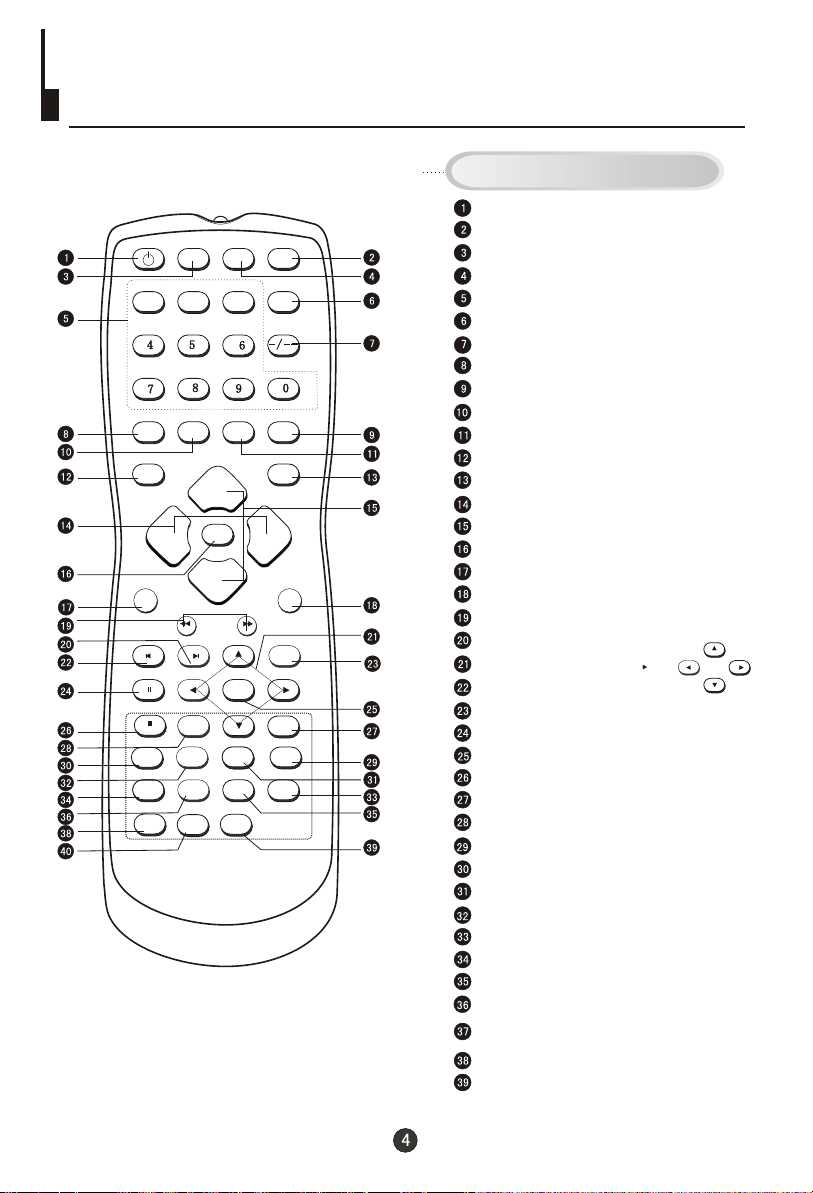
Using the Remote Control
Buttons on the remote control
Stand By
POWER
11
DISPLAY
VOL-VOL-
ZOOMZOOM
PAUSE/STEPPAUSE/STEP
STOPSTOP
A-B A-B
ANGLEANGLE
D.CALL
DVD/TV
22
EXIT
REVREV
NEXTNEXTPREVPREV
10+
REPEATREPEAT
AUDIOAUDIO
SETUPSETUP
MUTE
TIMETIME
CH+CH+
MENU
CH-CH-
FWDFWD
PLAY/ENTERPLAY/ENTER
SLOWSLOW
SLSL
SEARCHSEARCH
OPEN/CLOSE
CCD
33
SWAP
TV/AVP.STD
VOL+VOL+
SCAN
SLEEP SLEEP
D.MENUD.MENU
SUBTITLESUBTITLE
PROGRAMPROGRAMTITLE/PBCTITLE/PBC
DVD Open/close
TV/DVD
Mute
Number Buttons
CCD: closed caption display.
Digital Selector
Call Screen Display
Former Program
Exit TV Menu
Time Menu
Picture Mode
TV/AV Exchange
Volume Adjust
Channel Selection
TV MENU
ZOOM
Scan through TV channels
DVD FAST REVERSE / FAST FORWARD
DVD NEXT
DVD Cursor Move button
DVD PREVIOUS
SLEEP
DVD PAUSE/STEP
DVD PLAY/ENTER
DVD STOP
DVD MENU
1O+
DVD SUBTITLE
DVD A-B REPEAT
DVD SLOW
DVD REPEAT
DVD PROGRAM
DVD ANGLE
DVD TITLE
DVD AUDIO
DVD Status display CALL
DVD SEARCH
DVD SETUP
LEFT
UP
RIGHT
DOWN
Page 7
Menu Functions
Information to user: This television receiver is equipped with
close caption decoder and parental blocking technology as
required by the FCC.
Menu Functions
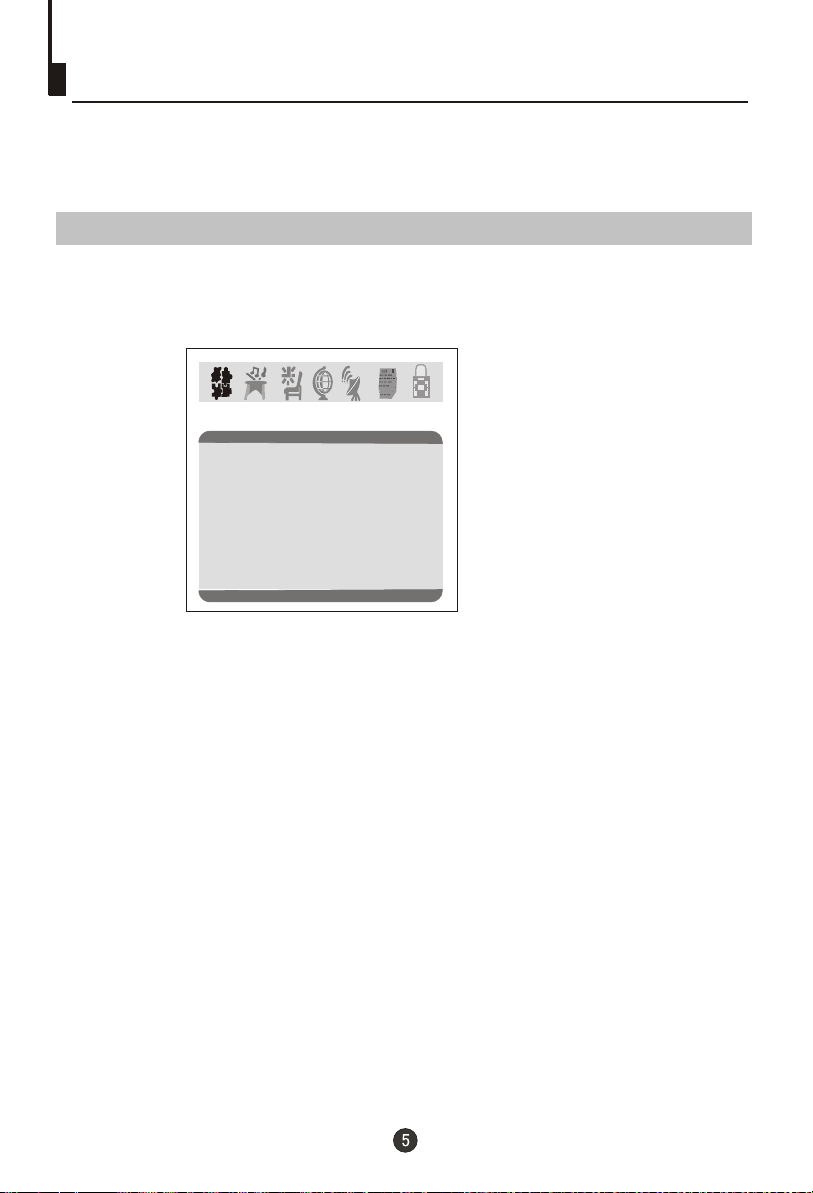
Video Setup:
Pressing MENU button once will bring the Video Setup menu on the TV.
The following is shown on your TV screen:
Video
Picture 70
Brightness 32
Color 50
Sharpness 40
Hue 50
Color Temp. Neutral
Follow the procedure below to adjust the picture quality of your choice:
1.Press the CH(+) and CH(-) button to go up and down the menu.
2.Press the VOL(+) and VOL(-) button to increase and decrease the level to your
preference for each item.
Picture Quality Adjustments:
Picture: By increasing the level. It will adjust white areas of picture and by
decreasing the level , it will adjust black areas of picture.
Brightness:
increasing the level, the brightness level will be increased.
Color:
increasing the level, color intensity will be increased.
Sharpness: By decreasing the level, the picture becomes softer. By increasing
the level, the picture becomes clearer.
Hue:
By decreasing the level, it will give red tint to skin color and by
increasing the color it will give green tint to skin color.
Color Temp : Press the VOL(-/+) buttons to select
settings: A)Neutral, B)Warm, C)Cool.
By decreasing the level, the brightness level will be decreased. By
By decreasing the level, color intensity will be decreased. By
This setting allows you to adjust the tint of the picture.
from three color temperature
Page 8
Menu Functions (Continued)
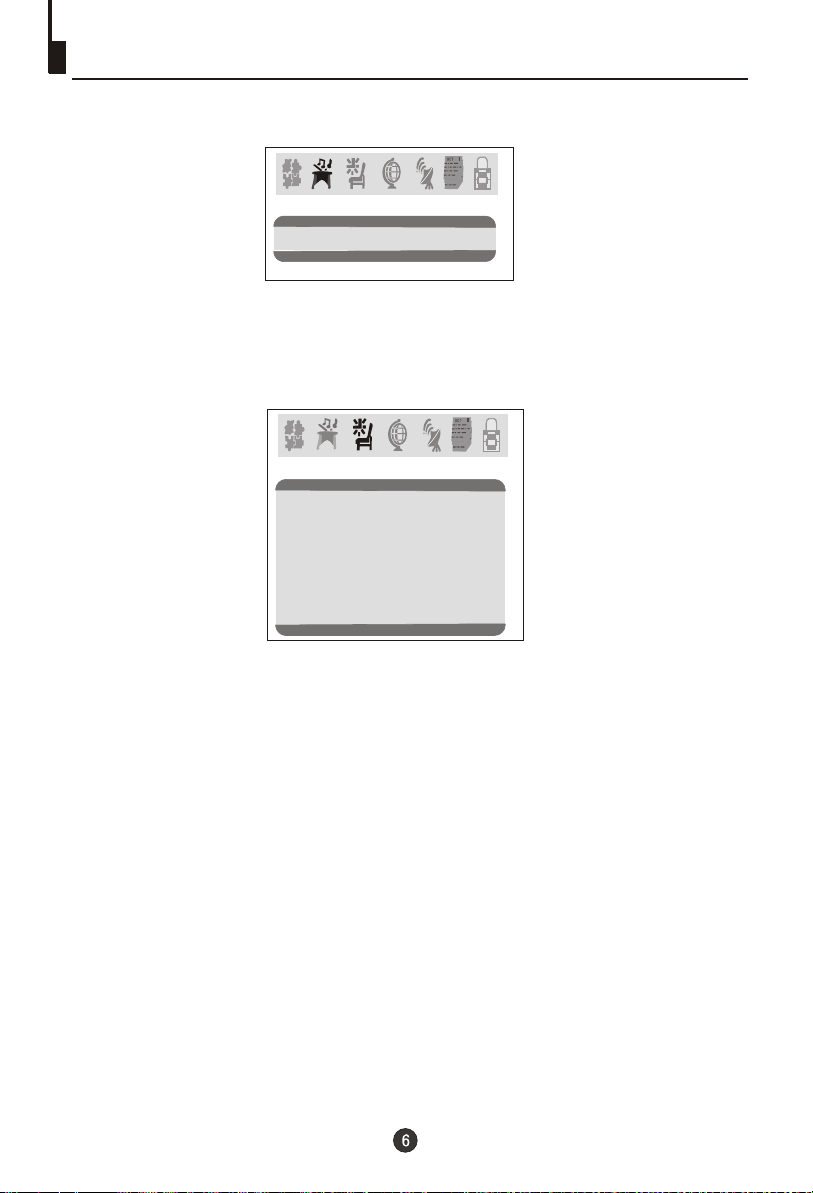
Audio Setup:
By pressing MENU button ,and then pressing VOL(-/+) buttons it will bring you to
Audio Setup display. You will see the following menu on your TV screen:
Audio
Volume 45
Follow the procedure below to adjust the sound quality:
Press VOL (+) button to increase and VOL (-)button to decrease the level to your
preference.
Timer Setup:
By pressing MENU button ,and then pressing VOL(-/+) buttons it will bring you to
Timer Setup display. You will see the following menu on your TV screen:
Timer
Clock 17:18
Time-on 18:00
Ch. Select 1
Time-off --:-Sleep Time 0
Remind Time --:-Ch. Switch 1
Follow the procedure below to select one of the above options:
1.Press the CH(+) and CH(-) button to go up and down the menu.
2.Press VOL (+) button or VOL (-) button to select your preference.
Clock: Press VOL (-/+) buttons for HOURS and VOL(-/+) buttons for MINUTES
adjustment.
Time-On: Press VOL(-/+) buttons for HOURS and VOL (-/+) buttons for
MINUTES adjustment. This feature works like an alarm clock. Your
TV will turn on at the set time.
Ch. Select: This feature switches you to your favorite channel at the set time.
Press VOL(+) and VOL(-) buttons to select the channel.
Time-Off : Press VOL (+/-) buttons for HOURS and VOL (+/-) buttons for
MINUTES adjustment. This feature works like an alarm clock. Your TV
will turn off at the set time.
Sleep Time: This feature allows you to turn off the television after a pre-selected
minutes (180, 170,160, ........,10 and 0).
number of
Remind Time: Press VOL(+/-) buttons to set HOURS of attention and VOL (+/-) buttons
to set MINUTES of attention. You will see the flashing time on your TV
when the reminder time arrives.
Note: This exclusive feature can
remind you of important tasks when watching TV.
Ch. Switch:
This feature lets you store your favorite channel. Once you store the
channel number in this function, when the set time is up, it will switch
over to the set channel. This feature is used with the Exchange feature.
Press VOL(+) or VOL(-) button to select the channel.
Page 9

Menu Functions (Continued)
Function Setup:
By pressing the MENU button, and then pressing VOL(-/+) buttons
Function Setup menu. You will see the following menu on your screen:
Setup
Language English
Background on
Black stretch on
VNR on
Fade off
AVL on
C. Caption on
Demo mode
Follow the procedure below to select one of the above options:
1.Press the CH(+) and CH(-) button to go up and down the menu.
2.Press the VOL(+) and VOL(-) button to increase and decrease the level to your
preference for each item.
Language:
Use VOL(-/+) buttons to select the OSD language.
Background: Press the VOL (-/+) buttons to select between Background ON or
Background OFF. When the Background ON function is chosen, a
moving "NO SIGNAL" sign will be displayed if there is no input signal
to the set.
Black Stretch: Press VOL (-/+) buttons to turn the Black Stretch feature on or off.
When the Black Stretch function is on, the screen automatically
increases the contrast range.
VNR: Press VOL (-/+) buttons to turn the VNR function on or off. VNR is a
term for Video Noise Reduction, a built-in device that reduces video
noise interference so the viewer is assured a clear picture.
Fade: FADE control allows for the picture tube to warm up and gently turn
on,
which can help prolong the life of the picture tube.
AVL: Automatic Volume Limit control reduces effect of large volume changes
such as when the ads come on.Press
set it ON or OFF.
VOL(+) button or VOL (-) button to
C.Caption: Press VOL (-/+) buttons to select the Closed Caption options. Closed
Captioning helps the hearing impaired with the broadcast program, as
well as helping children learn how to read. A built in decoder displays
the audio portion of a program as text on the screen when this option is
selected.
OFF: When OFF is displayed on C.Caption is turned off.
CC1: When Cc1 on TV means C.Caption is turned on.
is displayed
TV, it means
CC2 to CC4: For other modes of video related broadcast information.
T1: For program guide and other information displayed by broadcasters.
(This blocks a large portion of the picture on your screen).
T2 to T4 :For other modes of information displayed by broadcasters.
(This blocks a large portion of the picture on your screen).
IMPORTANT: Closed captioning availability entirely depends on broadcasters
supplying the signal. Therefore, closed captioning might not always be available and
language availability will differ by broadcast.
Note: Select CC1 for full translation of the primary language such as English in your
area. Select CC2 for secondary language translation such as French or any other
language that may be broadcast in your area.
Demo Mode: This will display the main functions of the TV set.
, you will enter the
Page 10
Menu Functions (Continued)
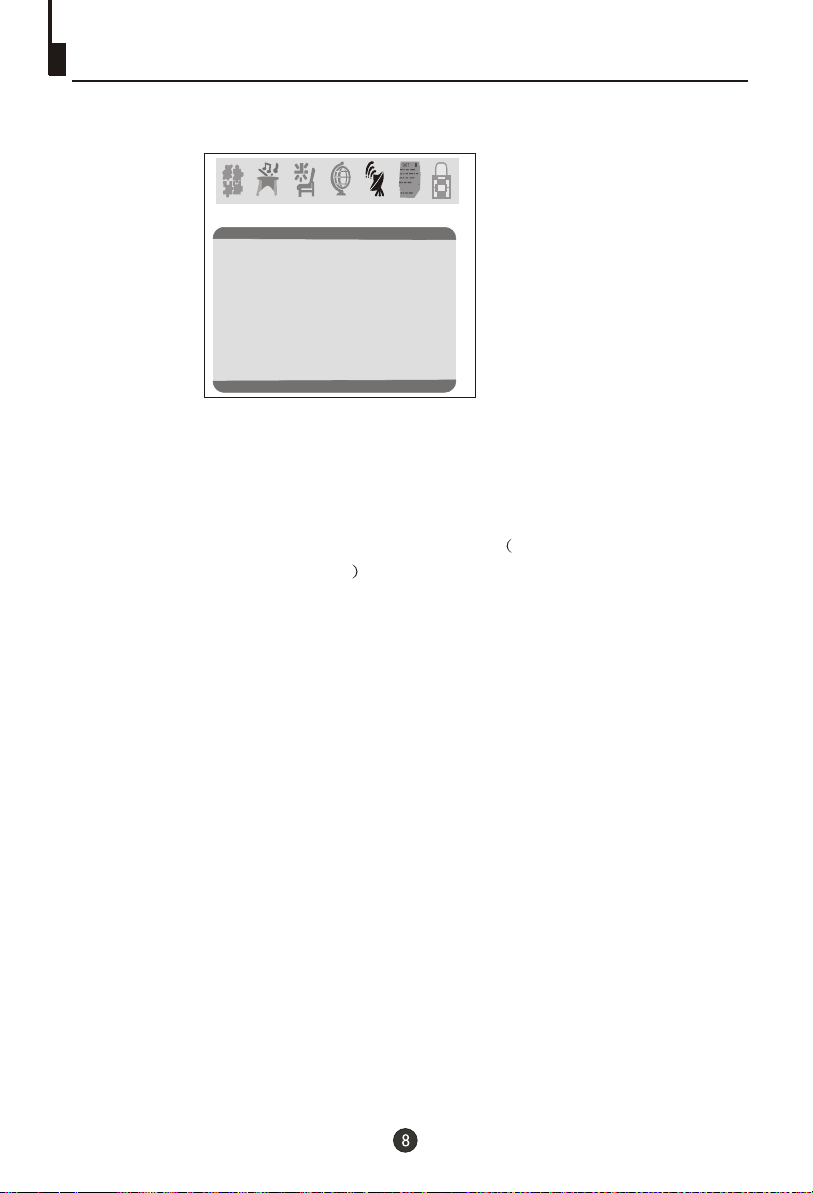
Channel setup:
By pressing MENU button ,and then pressing VOL-/+ button it will bring you to
Channel Setup menu. You will see the following display on TV screen.
Channel
Channel System Auto
Air Cable Air
Skip off
Current Ch. 2
Fine
Auto Program
Follow the procedure below to select above options:
1.Press the CH(+) and CH(-) button to go up and down the menu.
2.Press VOL (+) button or VOL (-) button to select your preference.
Channel System: Press the VOL(-/+) buttons to select the correct channel system.
In general, you can set it as "AUTO" AUTO,NTSC and NTSC443
will display in turn
Air Cable: Press VOL (+) button or VOL(-) button to select
(VHF and UHF) or Cable Antenna (CATV) reception preference.
Skip : Press VOL(+) button or VOL(-) button to add or delete a channel
from the stored memory.
Current Ch. : Press VOL(+) button to go up and VOL (-) button to go down to set
the channel position. The display will show the current playing
channel.
Channel Coverage by Antenna:
Antenna Type Channel Range
VHF 2-13
UHF 14-69
CATV 1-125
Fine: If the picture and/or sound are poor, try using the FINE TUNE
feature. Do not use this feature unless reception is poor. Press
VOL (+/-) to start the Fine Tune function.
Auto Program:
Note: The Auto Search function will scan the channels on the selected antenna
input. If the TV is connected to cable, please select Cable under
Press VOL (+) button to auto program channels. This search
automatically adds only the active channels in your area to the TV's
memory. It deletes any channels on which there is no broadcast or
a poor signal.
Aerial Antenna
' Air Cable ' sub menu.
Page 11
Menu Functions (Continued)
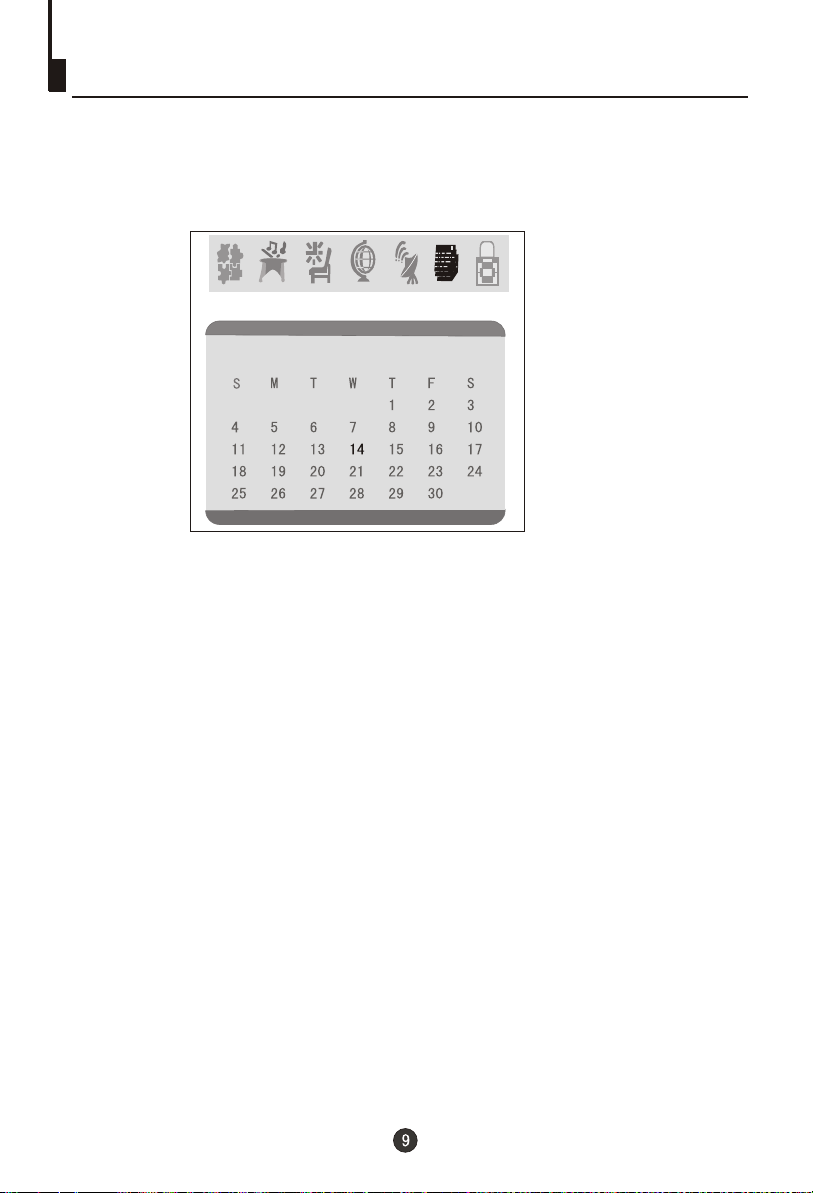
Calendar:
Your TV has been designed with a calendar. By pressing MENU button ,and then
pressing VOL(-/+) buttons it will bring you to Calendar. You will see the following
display on TV screen.
OCT
OCT
OCT
Calendar
2005 9 14
Follow the procedure below to adjust the Calendar
Press the CH( to select the year item, the month item or the date item.
1. +/-) buttons
2. Press the VOL(-/+) buttons to change
the year, month or day.
date:
3. Press EXIT button to exit the calendar mode.
Page 12
Menu Functions (Continued)
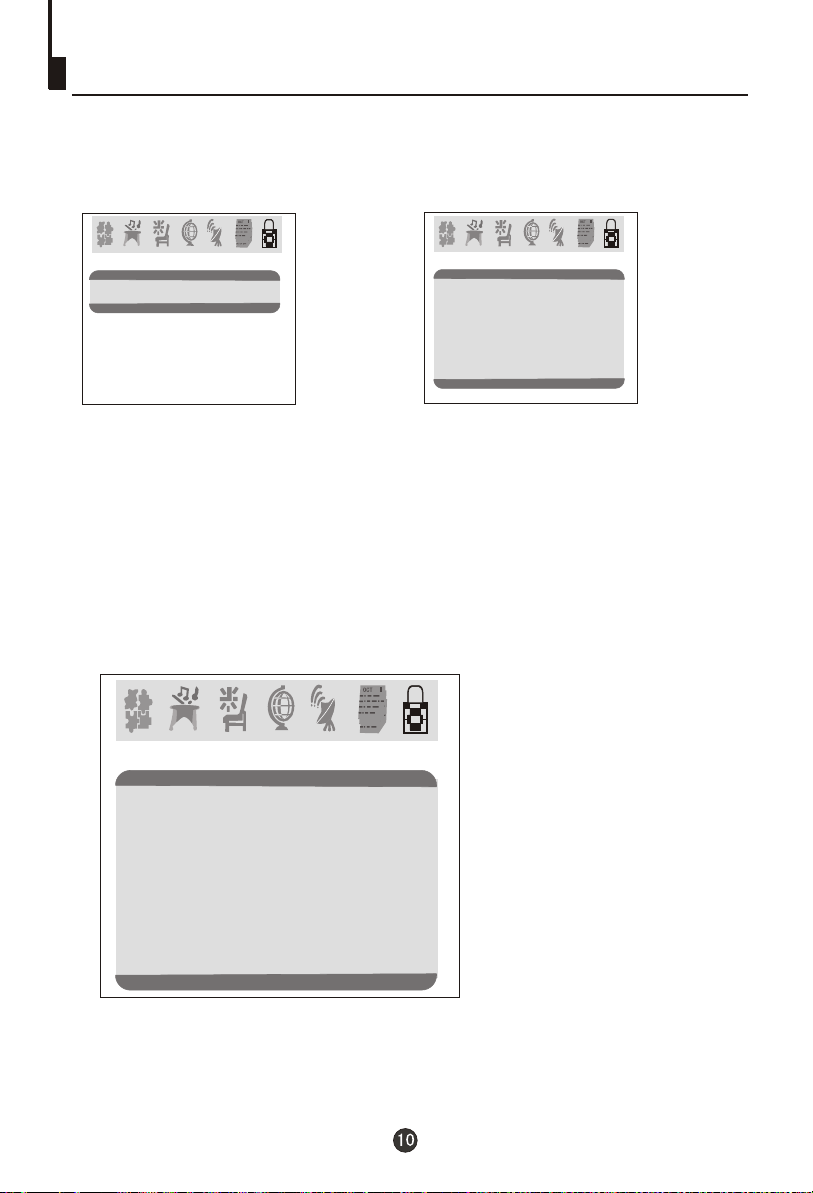
PARENTAL LOCK Setup:
Press the MENU Button on your remote control to go to Password menu, then input
the password (0000). It will bring Parental Lock set up the screen. You
will see the following menu on your screen:
menu onto
Passsword
Password ----
Parental Lock
Parental Lock off
TV Rating
MPAA Rating
Lock Menu
Change Password
This function enables you to lock certain TV channels in accordance to the V-CHIP
requirement established by the FCC.
setup PARENTAL LOCK
To the function:
Select the TV Rating option. You will see the TV Rating menu on your TV screen:
1.Press CH(+/-) buttons to go up and down the menu.
2. Press VOL(-/+) buttons to go into TV Rating and Movie Rating menus.
3.Press VOL(-/+) buttons to set the Parental Lock ON and Parental Lock OFF.
When TV rating is selected, you will see the following rating table on your TV screen.
TV Rating
Rating FV
TV-Y
U
U
TV-Y7
U
TV-G
U
TV-PG
U
TV-14
U
TV-MA
D L S V
>
U
U U U U
U U U U
U U U
Note: You can press CH(+/-) buttons to go up and down the menu, then press VOL(+)
button to select "B" (block channel) or "U" (unblock channel).
Page 13

Menu Functions (Continued)
When MPAA Rating is selected, you will see the following rating table on your TV
screen.
MPAA Rating
G U
PG U
PG-13 U
R U
NC-17 U
X U
Parental Lock off means the lock function is turned off . If the Parental Lock is in
"off" mode then function will not be active to accept the broadcast signal.
Parental Lock on means the lock function is turned on. If the lock is in the "on"
mode then function is activated to accept the broadcast signal.
Password
The "Default Password" preset by the manufacturer is "0000" . If you want to change
the preset password to your own password, just choose any four digits that can be
easily remembered and set. Once you set password for a particular channel, that
channel will be blocked. This channel can only be accessed with the password.
Lock Menu
AV Lock: When it is set to ON,
the AV inputs are locked and therefore the TV will not
allow you to view sources hooked up via AV inputs on the front and back of the TV.
To unlock this feature, simply set this option to OFF
Program Lock: When it is set to ON, the current channel is
locked and can therefore
not be viewed. To view the channel (unlock) once again, set this option to OFF.
Page 14

Menu Functions (Continued)
PARENTAL LOCK TECHNOLOGY:
The "P.L. Technology" allows you to use U.S. and Canadian Movies and TV
PROGRAMS Guide ratings to block certain types of TV programs and movies.
To clearly understand TV program rating codes, read the following
U.S. TV Program Ratings
NR: Not Rated-this means that programs are not rated or rating does not apply.
TV-Y: For all children - of rated programs are designed for a very young
audience, including children from ages 2-6.
TV-Y7: Directed older children - this type of rated programs may include
comedic violence of mild physical, or may frighten children under the age of 7.
TV-G: General audience - of rated programs contains little or no
violence, no strong language, and little or no sexual dialogue and situations.
TV-PG:Parental Guidance Suggested-this type of rated programs may contain
limited violence, some suggestive sexual dialogue and situations, and rare
language.
TV-14: Parents strongly cautioned-these types of rated programs may contain sexual
content, strong language and more intense violence.
TV-MA:Mature audience only of rated programs may contain sexual
violence, explicit sexual content and profane language.
FV: This type of rated programs contain Fantasy and cartoon violence.
Violence: This type of rated programs contain violence.
S: This type of rated programs contain sex.
L: This type of rated programs contain offensive language.
D: This type of rated programs contain dialogue with sexual content.
towards
these types
these types
these types
information:
Page 15

Menu Functions (Continued)
To understand clearly about movie rating codes, read the following list:
U.S. Movie Rating Chart
NR: This means movie is not rated yet. It is pending government rating approval.
G: General Audience-this type of movie rating means all ages admitted to see
the movie.
PG-13:Parents Strongly Cautioned - this type of movie rating means some material
may not be appropriate for children under13.
R: Restricted- This type of movie rating means children under 17 of age require
to be with parent or guardian.
NC-17:This type of movie rating means no one 17 and under admitted.
X: This type of movie rating means adults only.
To clearly understand Canadian program rating codes, read the
following list:
Canadian English Rating Chart
These types of programs are exempt from the rating system. Exempt
E:
programming includes:
videos, and variety of other programs.
This type of programming is intended
C: for children under age 8. There is no
offensive language, nudity or sexual content.
hese types
C8+:T of rated programs are generally considered acceptable for children
8 years and over. There is no profanity, nudity or sexual content.
hese types
G: T of rated programs are generally suitable for all audiences.
PG: Parental Guidance Suggested -in of rated programs, some material
may not be suitable for children.
14+: In of rated programs, some content may not be suitable for viewers
under the age of 14.Parents are strongly cautioned not to have their children
view 14+ rated programs by pre-teens and early teens.
18: Adults Only-these types of rated programs are only for adult viewers only.
these types
news, sports, documentaries, talk shows, music
these types
Page 16
DVD Features
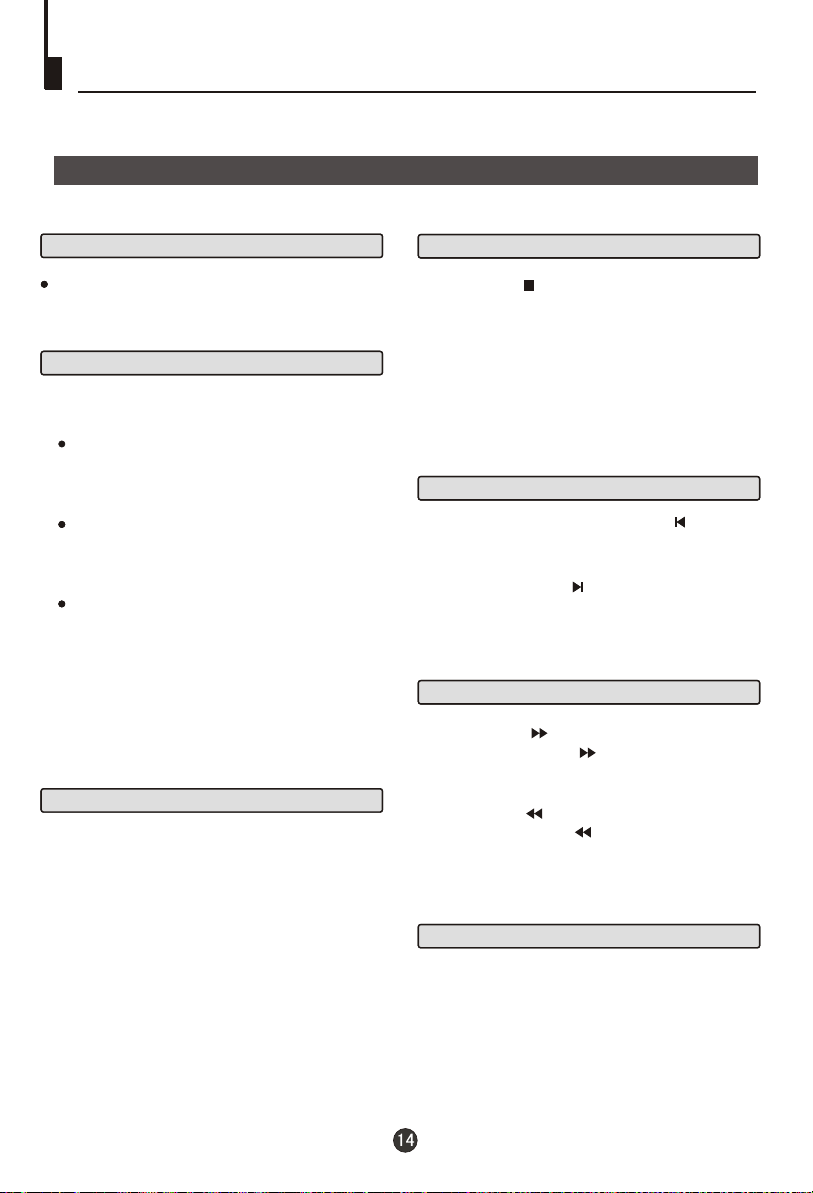
Basic Playback
Preparations
Preparations
Press the DVD/TV button on the remote control or
the TV to enter the DVD status.
Basic playback
Basic playback
1. Press OPEN/CLOSE to open the disc tray,
place a disc in the disc tray.
There are two different disc sizes. Place the
disc in the correct guide on the disc tray. If the
disc is out of the guide, it may damage the disc
and cause the DVD player to malfunction.
Do not place a disc which is unplayable in this
DVD player.
2. Press OPEN/CLOSE to close the disc tray, the
playback will automatically start.
Some discs do not start automatically. Press
Some discs do not start automatically. Press
PLAY/ENTER to start playback.
PLAY/ENTER to start playback.
Stop playback
Stop playback
1. Press STOP button to go to stop mode, the TV
1. Press STOP button to go to stop mode, the TV
screen will show the start logo. As some disc the
screen will show the start logo. As some disc the
player can recall the location where stopped, such
player can recall the location where stopped, such
as DVDs and audio CDs.
as DVDs and audio CDs.
2. Press PLAY/ENTER to playback to resume play-
2. Press PLAY/ENTER to playback to resume play-
back from the location where playback is stopped
back from the location where playback is stopped
or from the beginning of the disc.
or from the beginning of the disc.
3. Press STOP twice to stop completely.
3. Press STOP twice to stop completely.
Previous and Next
Previous and Next
During Playing, pressing the PREV key will
During Playing, pressing the PREV key will
restart the current chapter and skip chapters
restart the current chapter and skip chapters
backwards with each subsequent press until the
backwards with each subsequent press until the
start of the disc is reached.
start of the disc is reached.
Each press of NEXT key during playing will
Each press of NEXT key during playing will
skip the current chapter and play the next one.
skip the current chapter and play the next one.
3. Some discs may start playback with a menu. Use
the cursor buttons on the remote control to select
menu options and press PLAY/ENTER to start. You
may also press the digit buttons to select a menu
option directly. Many DVDs will not allow this during
start-up.
Pause playback
Pause playback
1. Press PAUSE/STEP to pause playback (still mode).
The sound will be muted during still mode.
2. Press PLAY/ENTER to resume normal playback.
Fast forward and Fast reverse
Fast forward and Fast reverse
1. Press FWD to fast forward through the disc.
Each time the FWD button is pressed, the
fast forward motion speed changes.
2. Press PLAY/ENTER to resume normal playback.
3. Press REV to fast reverse through the disc.
Each time the REV button is pressed, the
fast reverse motion speed changes.
4. Press PLAY/ENTER to resume normal playback.
Single step playback
Single step playback
1. When paused, press PAUSE/STEP continuous
to single step forward to the next frame in the
video.
2. Press PLAY/ENTER to resume normal playback.
Page 17
DVD Features(Continued)
Advanced PlaybackAdvanced Playback
Advanced Playback
IMPORTANT NOTE:
ALL DESCRIBED FUNCTION IS FOR DVD DISCS. IF YOU PLAY OTHER FORMAT
DISCS, THE OPERATION AND ON SCREEN DISPLAY WILL BE DIFFERENT.
PROGRAM
CAPTION
SUBTITLE
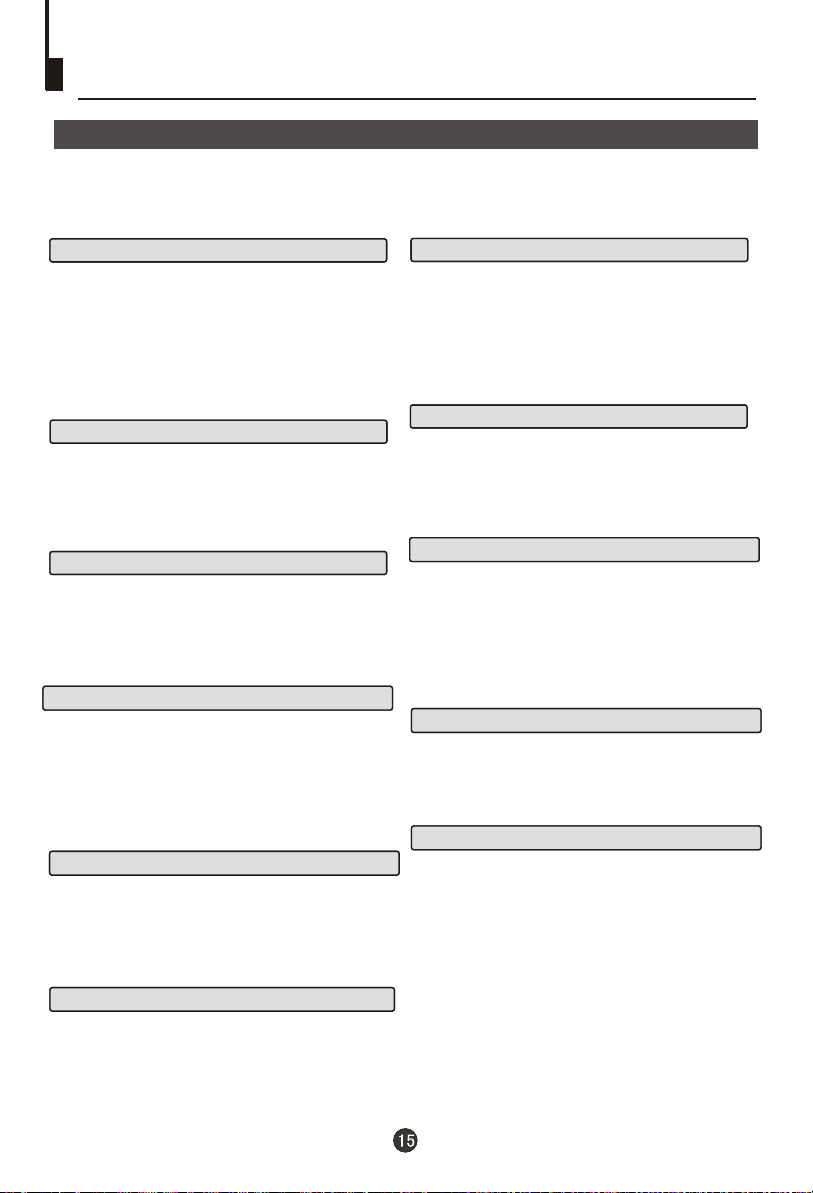
Press " SUBTITLE ", the screen will display "SUBTITLE 01/XX XXXXX", "01" indicates the ordinal
number of this language; "XX" indicates total number
of language; "XXXXXX" indicates the language of
country. (the number of language depends on disc).
This function can select up to 32 languages displayed on screen.
REPEAT
REPEAT
Press " REPEAT " and Chapter repeat will be
displayed on screen, the second press will display
Title repeat, the third press will display All repeat,
the fourth press will cancel this function.
A-B
A-B
Press " A-B " to begin start-point, press again
Press " A-B " to begin start-point, press again
to set an end point and complete setting. The
to set an end point and complete setting. The
selected section A-B will be repeated. The third
selected section A-B will be repeated. The third
press will cancel this function.
press will cancel this function.
ANGLE
ANGLE
When enjoying sports, concert or theatre, press this
key to watch same actions in different angles. (Valid
for discs possessing this function. Using a disc
recorded in multi-angle you can view the scene from
different angles,for example,front, side, whole view
and exterior scene).
D.MENU
D.MENU
Press this key to display root menu,select item
according to your preference. (This function will work
with a DVD having a multi-layer menu.)
D.CALL
D.CALL
Pressing this key will cycle through "Title Elapsed",
"Title Remain", "Chapter Elapsed", "Chapter Remain"
and "Display off ".
PROGRAM
When playing discs, press "PROGRAM" to enter
program mode. Press the digit buttons to select the
program number that you want. When finished move
the cursor to select "START" . This will start the
program playback.
SEARCH
SEARCH
Press "SEARCH" once to display the search
menu. Press the button again to select. Press
the program number buttons to input the item
you require. Press PLAY/ENTER to confirm.
SLOW
SLOW
Press SLOW to play a disc in slow forward. Each
time the SLOW button is pressed, the slow
motion speed changes.
Press PLAY/ENTER to resume normal playback;
Note: This function dose not work for CD and MP3.
TITLE/PBC
TITLE/PBC
With some DVD discs pressing this key will display
the title menu. You can then use the digit buttons
to select the item you prefer.
AUDIO
AUDIO
Press this key can change the mode of audio.
such as: Audio 1/2: AC 3 2 CH English
Audio 2/2: AC 3 5.1 CH English
Press this button to cycle between Mono Left, Mono
Right, Mix-Mono and Stereo.
Note: When press this button continuously, you must
above 3 seconds interval.
Page 18

Special Function Playback
JPEG DISC PLAYBACK
When a disc containing standard JPEG picture files is inserted into the player, a
navigation menu will be displayed automatically. Use the UP and DOWN cursor
buttons to select a file then press PLAY/ENTER. The slide show will commence.
Press PREVIOUS or NEXT to move between pictures. Press pause to stop on the
current picture. Press PLAY/ENTER to resume normal playing.
A JPEG disc contains JPEG (.jpg) format picture information that can be decoded
by a micro-computer software and displayed through the video output interface or on
the television screen.
This function has many applications. For example one can save files from a scanner
or digital camera in the JPEG format, record these on a CD-R disc and present them
to an audience through this player.
The JPEG format is a convienient method to store images in a small amount of
memory space, and is ideal for archiving information.
MP3 PLAYBACK
When playing an MP3 disc, a navigation menu will be displayed automatically. In the menu, use UP
or DOWN cursor buttons to choose the folder, then press PLAY/ENTER to enter the folder. Use the
UP and DOWN cursor buttons to select the file and press PLAY/ENTER. Pressing the LEFT cursor
button will take you to the previous screen/menu.
SCREEN SAVER FUNCTION
This unit employs a screen saver mode to help protect the tube during static video pictures. This can
be turned off on the GENERAL SETUP PAGE.
Page 19
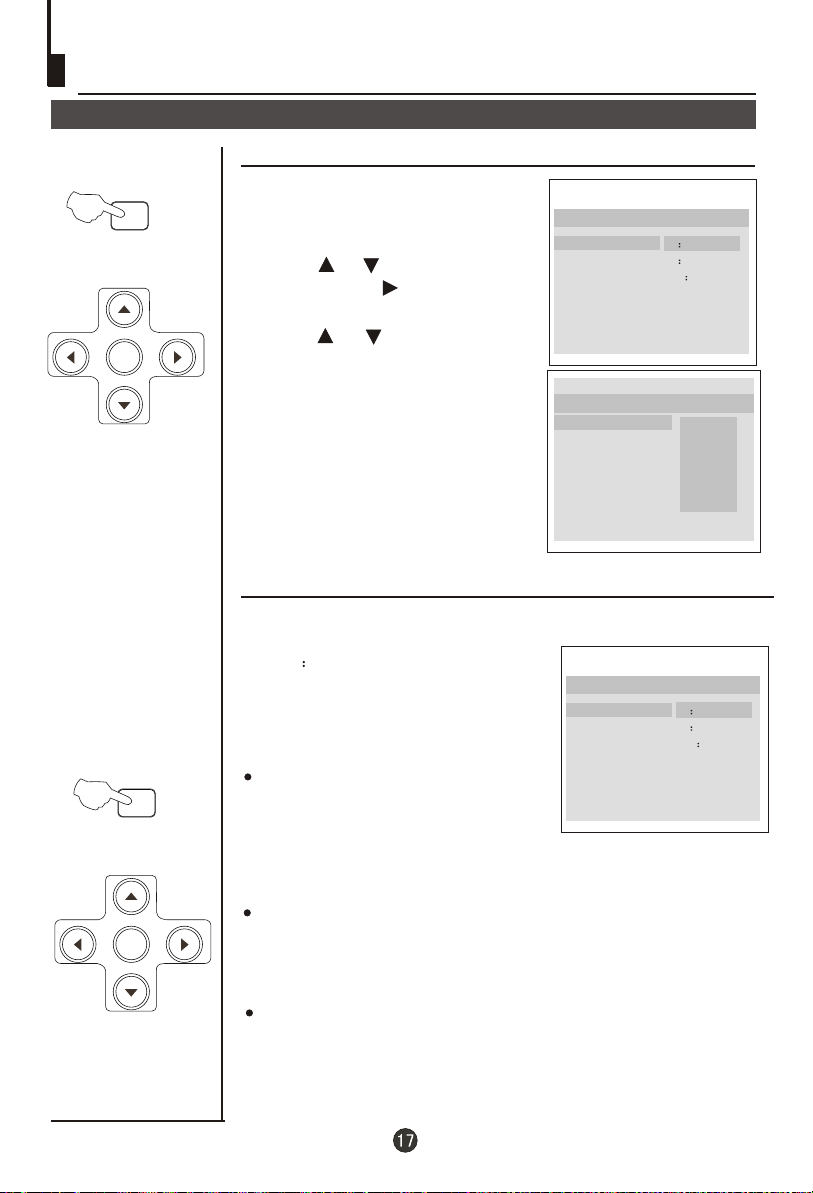
DVD System Setup
DVD System Setup
General Setup Process
SETUP
PLAY/ENTER
1.Press the SETUP button, the
General Setup Page,Preference
Page will be displayed in turn.
2.Press CH+/- b to select, the
item, then press to enter the
submenu.
3.Press CH+/- bu to select then
press PLAY/ENTER to confirm.
or
or
..General Setup Page..
TV Display LB
Angle Mark On
OSD Lang ENG
Spdif Output
Caption On
Screen Saver Off
4 3:Ps
4 3:Lb
16 9
.
.
SETUP
PLAY/ENTER
4.Press EXIT key or press SETUP
repeatedly to exit the set-up
menus.
General Setup Page
..Preference Page..
Parental
Password
Default
1 Kid Saf
2 G
3 Pg
4 Pg 13
5 Pgr
6 R
7 Nc17
8 Adult
ASPECT RATIO DESCRIPTION
When using the DVD with the internal TV,
select 4 3/LB.
The following information applies only
when the DVD output is connected to an
external TV.
4:3/PS (PS = Pan and Scan)
You may select if you have a normal aspect
ratio (4:3) TV, although the NORMAL/LB
(letter box) is a more common choice. In PS
mode, widescreen material will fill the screen, but at the expense of chopping
off extreme left and right edges of the original film picture. For this feature to
work, the disc must be specially coded. Such discs are uncommon.
4:3/LB (LB = Letter Box)
You may select this if you have a normal aspect ratio (4:3) TV. Widescreen
material will be shown in pure unaltered form, allowing the entire picture area
of the original film to be viewed without any side cropping. Black bars will
appear above and below the picture.
16:9
You may select this if you have a widescreen (16:9) TV. Back bars may still
appear above and below the picture even if using a widescreen TV. This is
because some film directors prefer to use ultra widescreen aspect ratios e.g.
2.35:1. This will normally be indicated on the DVD packaging.
..General Setup Page..
TV Display LB
Angle Mark On
OSD Lang ENG
Spdif Output
Caption On
Screen Saver Off
4 3:Ps
4 3:Lb
16 9
.
.
Page 20
DVD System Setup(Continued)
DVD System Setup
General Setup Page
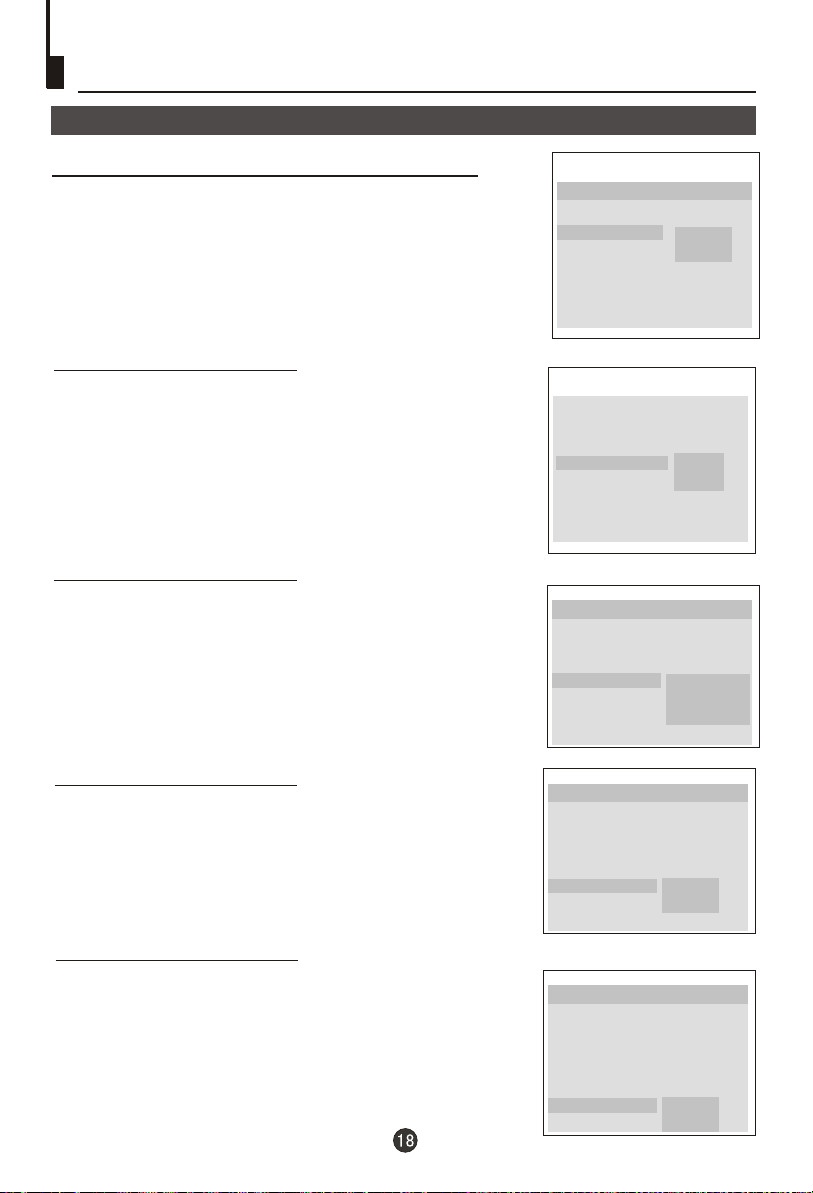
ANGLE MARK: Users can select a particular
camera angle when playing a DVD which offers
multiple angles.
This item allows you to set Angle Mark ON or OFF.
.
..General Setup Page..
TV Display LB
Angle Mark On
OSD Lang ENG
Spdif Output
Captions On
Screen Saver Off
On
Off
On Screen Display (OSD) Language: Users
can select on-screen display language.
SPDlF OUTPUT MODE: Sets the audio outputs.
This DVD player includes three kinds of audio output:
1. SPDlF OFF: An analog surround sound format is output through
the back-paneI connections for 2-CH audio out or 5.1 CH audio
out.
2. SPDlF/RAW or SPDIF/PCM: This surround sound format is
output to a Dolby Digital/DTS decoder through the coaxial
connector on the back panel of the product.
CAPTIONS: This function allows you to display or
hide the caption.
..General Setup Page..
TV Display LB
Angle Mark On
OSD Lang ENG
Spdif Output
Caption On
Screen Saver Off
..General Setup Page..
TV Display LB
Angle Mark On
OSD Lang ENG
Spdif Output
Caption On
Screen Saver Off
..General Setup Page..
TV Display LB
Angle Mark On
OSD Lang ENG
Spdif Output
Captions On
Screen Saver Off
English
Spanish
Spdif Off
Spdif / Raw
Spdif / Pcm
On
Off
SCREEN SAVER: If the screen saver is on, then
there will be an animated picture of DVD on the
screen whenever the DVD player is idle for more
than 3 minutes .
..General Setup Page..
TV Display LB
Angle Mark On
OSD Lang ENG
Spdif Output
Caption On
Screen Saver Off
On
Off
Page 21
DVD System Setup(Continued)
DVD System Setup
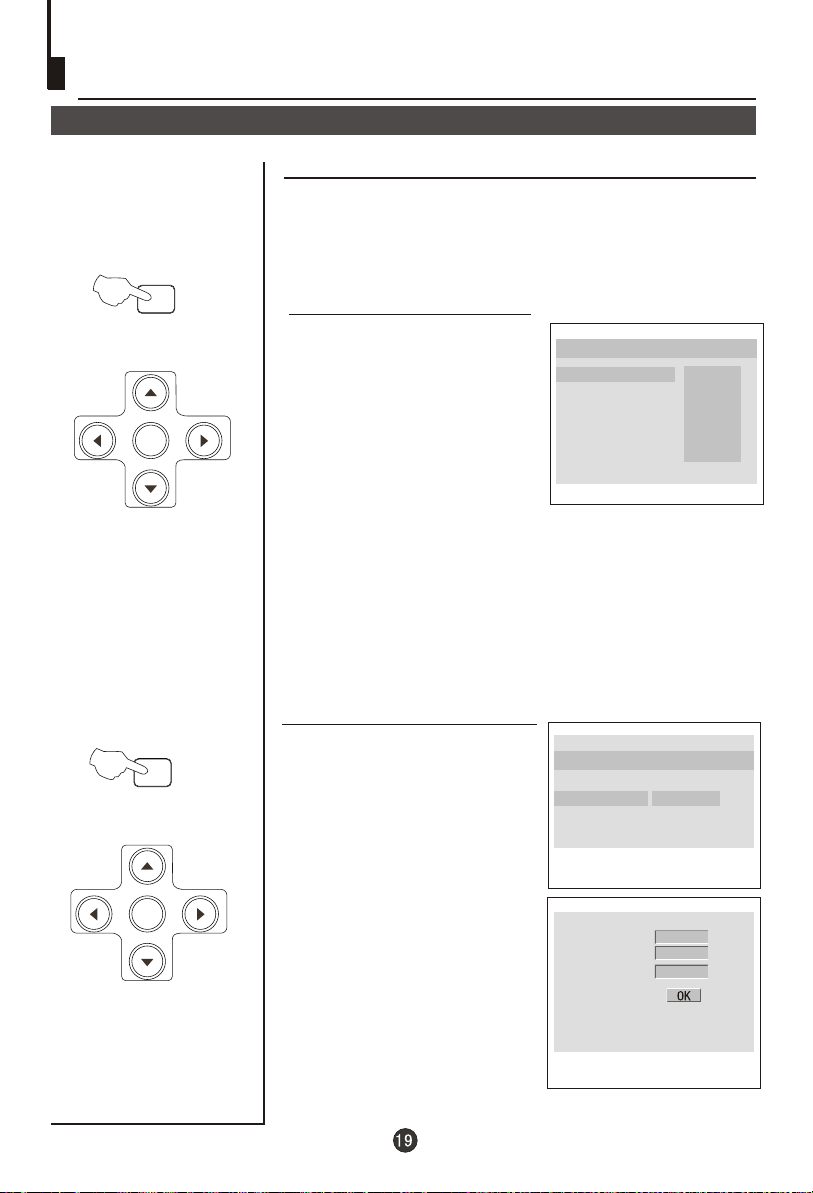
Preference Page
The Preference Page is only available when there is no disc
in the player. These settings are applied consistently to all
discs which are inserted and played.
SETUP
PLAY/ENTER
SETUP
PLAY/ENTER
PARENTAL: The parental
control function works in
conjunction with the
different censorship classes
assigned to DVDs. These
classes help to control the
types of DVDs that the family
..Preference Page..
Parental
Password
Default
1 Kid Saf
2 G
3 Pg
4 Pg 13
5 Pgr
6 R
7 Nc17
8 Adult
watches, There are up to 8
censorship classes for DVDs.
Note:
1 To change this setting you must enter your password.
(Initial password is 0000)
2 When set to OFF, all discs may be viewed.
PASSWORD CHANGE:
You can change your password by
entering 4 digits. You must confirm
the 4 digits before the new password
can be accepted.
..Preference Page..
Parental
Password Change
Default
NOTE:If you forget your password
or a password is accidentally set
enter 2881 as the password. This
will enable you to regain control.
Old Password
New Password
Confirm PWD
Page 22
DVD System Setup(Continued)
DVD System Setup
SETUP
PLAY/ENTER
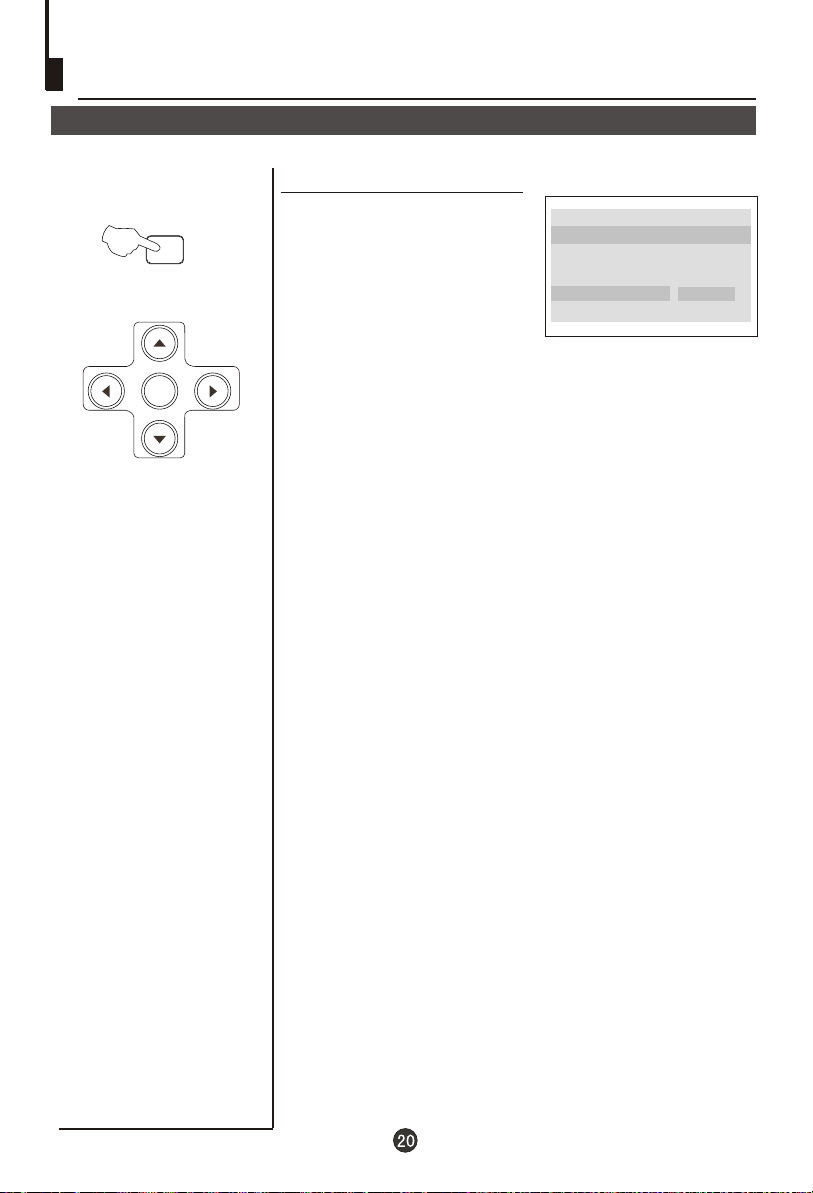
DEFAULT: Resets all settings
(except password and parental
lock status) for this DVD player
back to the manufacturers
original settings. Press ENTER
..Preference Page..
Parental
Password
Default
Reset
to perform the reset.
Note:
Some functions may not be available depending on the type of disc.
Page 23
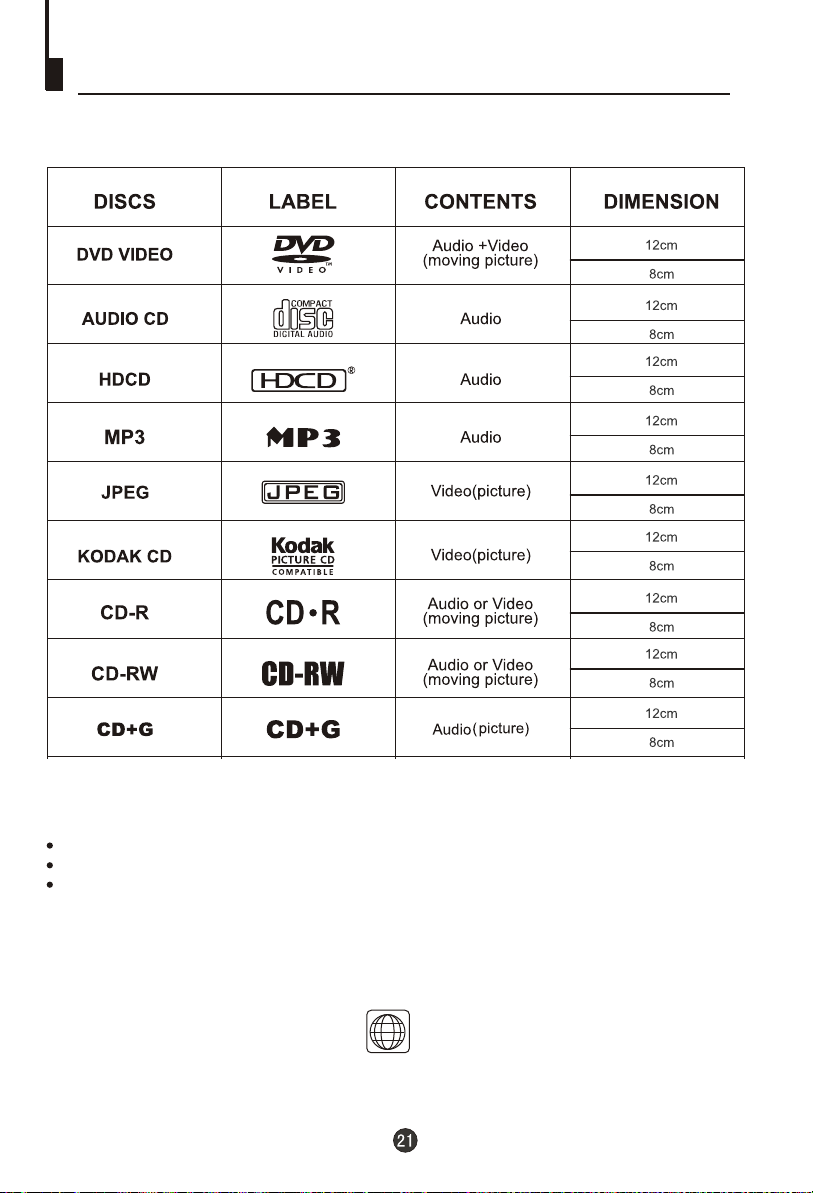
Playable Discs
The following discs can be played:
You cannot play discs other than those listed above.
You cannot play non-standardized discs, even if they may be labelled as above.
The performance of CD-R or CD-RW disc depends on the way the disc was burned. In a few cases,
their performance may not be consistant or may not even operate at all.
This DVD Player is designed and manufactured according to the Region Management
Information that is recorded on a DVD disc. If the Region number described on the DVD disc
does not correspond to the Region number of this DVD Player, this DVD player will not play
that disc.
This Region number of this DVD Player is .
11
Page 24
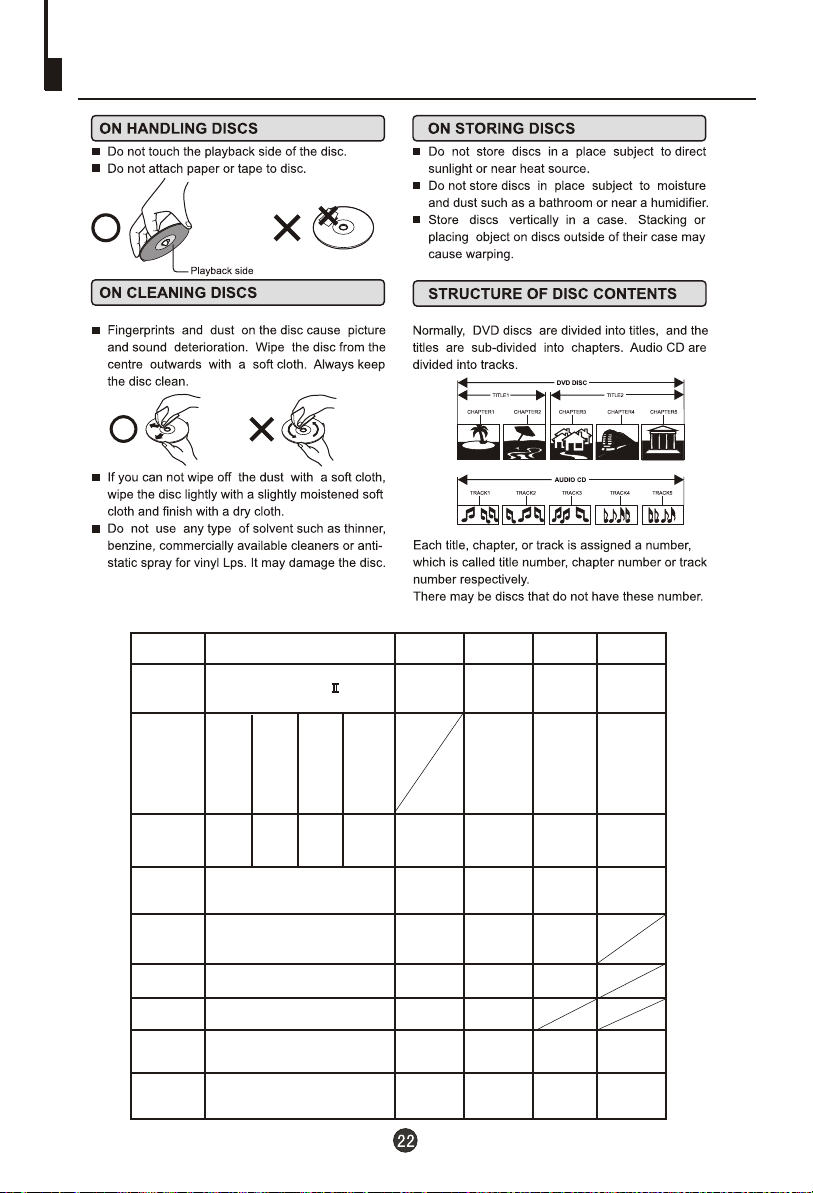
Disc Protection and DVD Characteristics
Compare DVD disc with other discs:
Encode
method
Capacity
Playing Time
Disc diameter
Horizontal
resolution
Picture
proportion
Subtitle
Language
Sound quality
DVD LD
Digital/MPEG
Double
Singleside
singlelayer
4.7G
133
minutes
Single-
-side
side
single
double-
-layer
layer
8.5G
9.4G
242
266
minutes
minutes
12cm/8cm 12cm/8cm
More than 500 line
Multiple kinds
32 kinds
8 kinds
48KHz, 96KHz/
6, 20, 24bit
Doubleside
doublelayer
17G
484
minutes
Analog
Single-side
60 minutes
double-side
120 minutes
30cm/20cm
No more than
430 line
One kind
16 kinds
at most
4 kinds
at most
44.1KHz/
16bit
SVCD
Digital
650MB 650MB 650MB
45 minutes
12cm 12cm
No more than
350 line
One kind
4 kinds
4 kinds
at most
44.1KHz/
16bit
VCD CD
Digital/
Digital
I
MPEG
74 minutes 74 minutes
No more than
250 line
One kind
2 kinds 2 kinds
16bit
44.1KHz/
16bit
44.1KHz/
Page 25
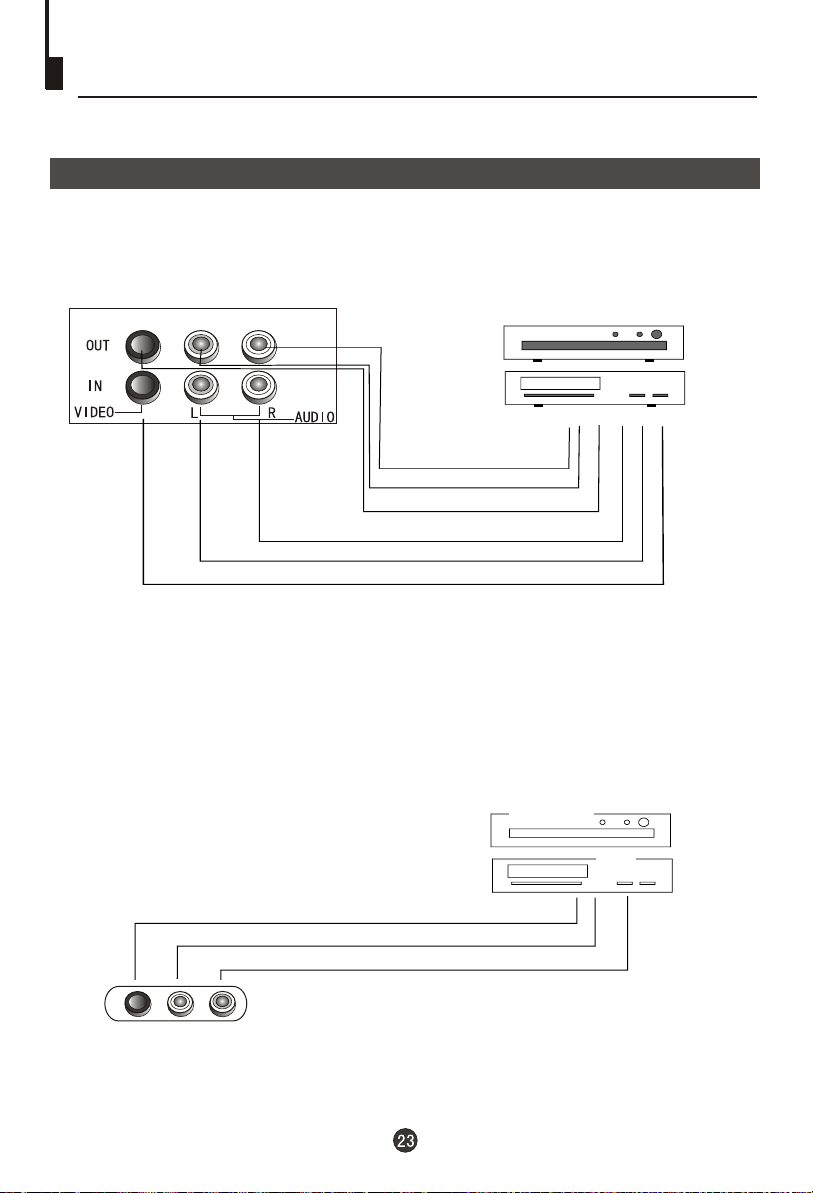
Connection to the External Audio and Video Equipment
Connection of AV input /output terminal
The figure below shows how to connect external equipment using AV signals.
DVD Player
VCR
output
output
input
input
input
Audio right
Audio left
Video
Audio right
Audio left
output
Video
There is also an AV input on the front of your television. Use the Left Audio input
(white terminal on the TV), if you are connecting equipment with mono sound. The
MONO sound will be delivered by both left and right speakers.
DVD player
ideo output
V
Audio left output
Audio right output
VCR
VIDEO L/MONO-AUDIO/R
Page 26
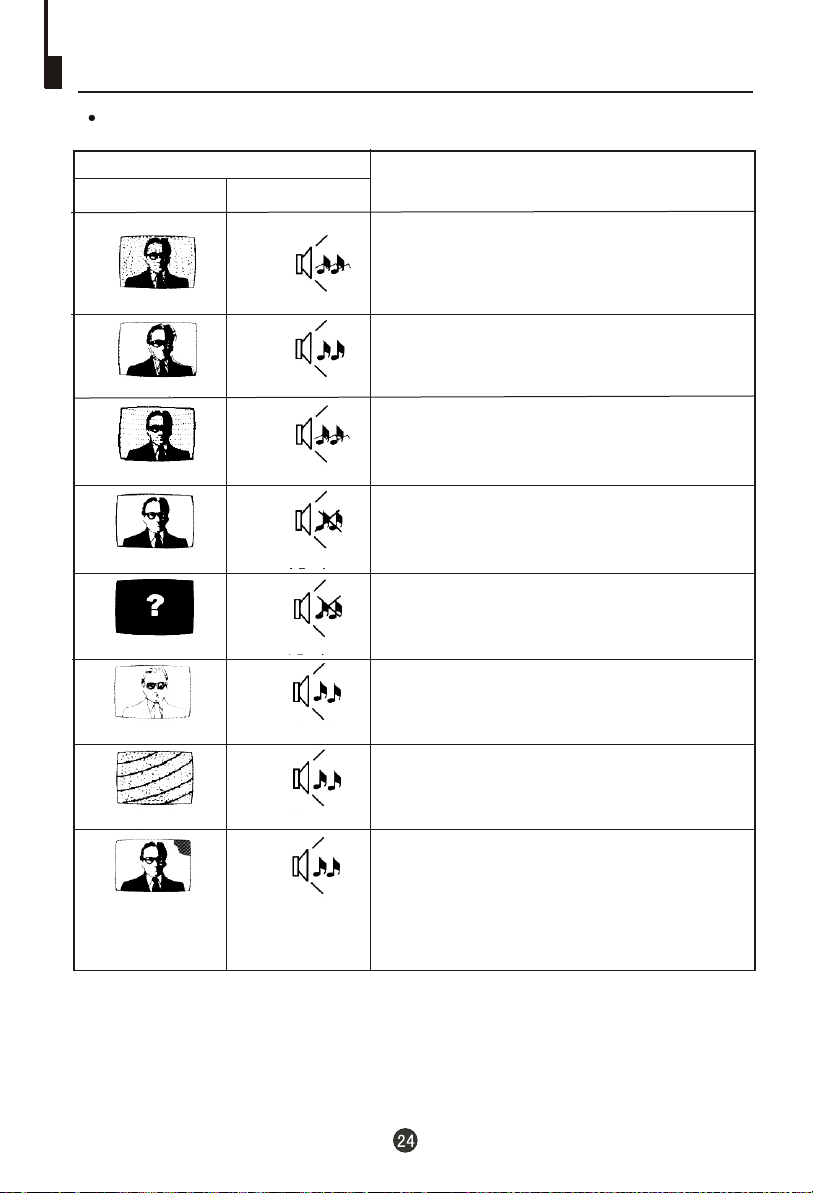
Troubleshooting guide
To assist in location possible faults use help guide below.
BREAKDOWN PHENOMENON
PICTURE
Picture with snow
Double or Triple Image
Disturb
No Picture No sound
No colour Normal volume
SOUND
Noise
Normal
Noise
No soundNormal
CHECKING
The aerial direction and connection
This is called "ghosting" and can be minimized with
an outside aerial, and good quality cable and
terminations. Altering the aerial direction can also
minimize this effect.
Electrical interference which can be caused by cars,
motorbikes etc, Fluorescent lamps and dirty
insulators on overhead power cables.
Volume Sound mute
Ensure that the power supply is connected to
the TV set and turned on. Also ensure that the
TV set is not in "Listen Mode" or that the
brightness and contrast are not turned down.
Adjust colour control
Adjust channel again
Scramble
Colour Spot
Note:
1.If the fault can not be corrected using the above guide consult with your local authorized service
center.
2.The TV set must only be repaired by a qualified registered service person. Never attempt to
remove the back cover as TV set has dangerous voltages inside that may cause a fatality or fire.
3. The cabinet may produce the occasional "snapping sound" This is normal and caused by the
materials in the cabinet expanding with room temperature changes.
Normal or Weak Volume
Normal volume
Colour Purity is a fault that can be caused by moving the
TV set, placing magnets near the TV screen or turning
on/off house hold appliances such as vacuum cleaners
near the TV set. Turn the TV off with the main power
switch for 15 minutes. When the power is turned on
again the TV set will automatically degauss the picture.
In severe cases leave the TV set turned off over night.
Page 27
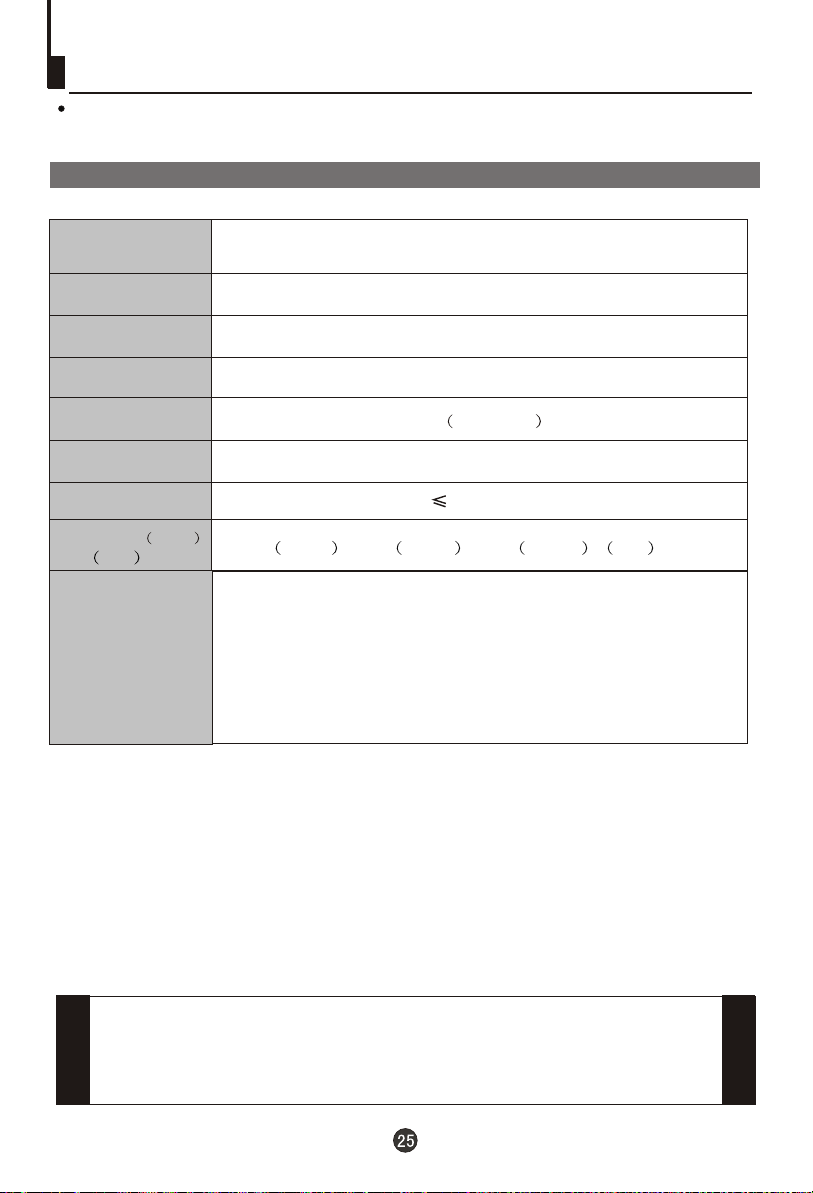
Specifications
The specifications offered you here are for reference only. With product improvement
there may be some differences between the description and the final product.
Specifications
Mode
Colour system
Sound system
Picture tube
Sound output power
Power requirements
Power consumption
Dimension WDH
mm
Accessories
HTARC21
NTSC
M
colour picture tube
2X2W 10% THD
AC 110-220V~ 60/50Hz
80W
504 Width x482 Depth x512 Height mm
Remote control X1
Owner's manual X1
Battery X2('AA' size)
NOTE
Design and specifications are subject to change without notice.
Dimensions quoted in this manual are approximate.
Page 28

Page 29

Page 30

0090508023A
Ver.3.0
 Loading...