

Page 1
Frost-Free Top Mount
Refrigerator / Freezer
Réfrigérateur/congélateur sans
givre à compartiments superposés
Refrigerador/congelador sin
escarcha, de puertas horizontales
User Manual
Guide de l’Utilisateur
Manual del Usuario
Model HT SERIES
Design may vary by model number.
La conguration peut varier selon le numéro de modèle.
El diseño puede variar conforme al número de modelo.
Page 2

Page 3

TABLE OF CONTENTS
SAFETY INFORMATION
Important Safety Instructions ......................................................................................................................2
SET UP & USE
Electrical Requirements ................................................................................................................................4
Installation Guide .......................................................................................................................................4-5
Instructions for Unpacking ............................................................................................................................5
Installing Your Refrigerator ............................................................................................................................6
Parts-Included ................................................................................................................................................6
Accessories ....................................................................................................................................................6
Parts & Features .............................................................................................................................................7
Door Handle Installation ............................................................................................................................8-9
Reversing the Door ............................................................................................................................... 10-12
Features and Use ........................................................................................................................................ 12
Operation Instructions ......................................................................................................................... 13-15
Food Storage Information .......................................................................................................................... 16
CLEANING AND CARE
Proper Care and Maintenance .............................................................................................................. 17-18
ENGLISH
TROUBLE SHOOTING & WARRANTY
Normal Operating Sounds.......................................................................................................................... 19
Troubleshooting .................................................................................................................................... 20-21
Customer Service ....................................................................................................................................... 22
Limited Warranty ........................................................................................................................................ 23
PRODUCT REGISTRATION
Thank you for purchasing our Haier
product. This easy-to-use manual will guide you in
getting the best use of your product.
Remember to record the model and serial numbers.
They are on a label inside of the Product.
Model number
Serial number
Date of purchase
Staple your receipt to your manual. You will need it to obtain warranty service.
Page 4

IMPORTANT SAFETY INSTRUCTIONS
ENGLISH
WARNING
READ ALL INSTRUCTIONS BEFORE USING THIS APPLIANCE:
WHEN USING THIS APPLIANCE, ALWAYS EXERCISE BASIC SAFETY
PRECAUTIONS, INCLUDING THE FOLLOWING:
NOTE: If the refrigerator has been placed in a horizontal or tilted position for any period of time, wait 24
hours before plugging the unit in.
1) Use this appliance only for its intended purpose as described in this use and care guide.
2) This refrigerator must be properly installed in accordance with the installation instructions before it is
used. See Electrical Requirements in the Set Up & Use section.
3) This refrigerator should not be recessed or built-in an enclosed cabinet. It is designed for freestanding
installation only.
4) Never unplug your refrigerator by pulling on the power cord. Always grasp the plug firmly and pull
straight out from the outlet.
5) Repair or replace immediately, all electric service cords that have become frayed or otherwise
damaged. Do not use a cord that shows cracks or abrasion damage along its length, the plug or the
connector end.
6) If your old refrigerator is not being used, we recommend that you remove the doors. This will reduce
the possibility of danger to children.
WARNING
AFTER YOUR REFRIGERATOR IS IN OPERATION, DO NOT TOUCH THE COLD
SURFACES IN THE FREEZER COMPARTMENT, PARTICULARLY WHEN HANDS ARE
DAMP OR WET. SKIN MAY ADHERE TO THESE EXTREMELY COLD SURFACES.
7) Do not refreeze foods, that have been thawed completely. The United States Department of
Agriculture in Home and Garden Bulletin No. 69 reads:
"…You may safely refreeze frozen foods that have thawed if they still contain ice crystals or if they are
still cold-below 40°F."
"…Thawed ground meats, poultry, or fish that have any off-odor or off color should not be refrozen
and should not be eaten. Thawed ice cream should be discarded. If the odor or color of any food is
poor or questionable, discard it. The food may be dangerous to eat."
"…Even partial thawing and re-freezing reduce the eating quality of foods, particularly fruits,
vegetables, and prepared foods. The eating quality of red meats is affected less than that of many
other foods. Use refrozen foods as soon as possible to save as much of their eating quality as you
can."
PAGE 2 • SAFETY INFORMATION
Page 5

IMPORTANT SAFETY INSTRUCTIONS CONT.
8) Do not use any electrical device or any sharp instrument in defrosting your refrigerator.
9) Unplug your refrigerator before cleaning or before making any repairs.
NOTE: If for any reason this product requires service, we strongly recommend that a certified
technician perform service.
10) Do not operate your refrigerator in the presence of explosive fumes.
SAVE THESE INSTRUCTIONS
DANGER
RISK OF CHILD ENTRAPMENT. BEFORE YOU THROW AWAY YOUR OLD
REFRIGERATOR OR FREEZER, TAKE OFF THE DOORS. LEAVE THE SHELVES IN
PLACE SO THAT CHILDREN MAY NOT EASILY CLIMB INSIDE.
ENGLISH
PAGE 3 • SAFETY INFORMATION
Page 6

ELECTRICAL REQUIREMENTS
GROUNDING INSTRUCTIONS
ENGLISH
WARNING
ELECTRICAL REQUIREMENT - SHOCK HAZARD
• Make sure there is a suitable power outlet. 115 Volts, 15 Amps, 3 Prong (Grounded) power outlet with
proper grounding to power the refrigerator.
• Avoid the use of three prong adapters or cutting off the third grounding prong in order to
accommodate a two prong outlet. This is a dangerous practice since it provides no effective grounding
for the refrigerator and may result in shock hazard.
USE OF EXTENSION CORDS
WARNING
USE OF EXTENSION CORDS- POTENTIAL SAFETY HAZARD
• Avoid the use of an extension cord because of potential safety hazards under certain conditions.
If it is necessary to use an extension cord, use only a 3-wire extension cord that has a 3-blade
grounding plug and a 3-slot outlet that will accept the plug. The marked rating of the extension cord
must be equal to or greater than the electrical rating of the appliance. DO NOT USE EXTENSION
CORD LONGER THAN 12 FT.
INSTALLATION GUIDE
INSTALLATION LIMITATIONS
• Select a suitable location for the refrigerator on a hard even surface away from direct sunlight or heat
source, e.g. radiators, baseboard heaters, cooking appliances, etc. Any floor unevenness should be
corrected with the leveling legs located on the front bottom corners of the refrigerator.
UNPACKING YOUR REFRIGERATOR
1. Remove all packaging material. This includes the corrugated base and all adhesive tape holding the
refrigerator accessories inside and outside.
2. Inspect and remove any remains of packing, tape or printed materials before powering on the
refrigerator.
NOTE: If your refrigerator comes with a snack pan, remove the blue adhesive tape from the rear of the
pan. The pan will not slide in and out without removing the tape.
PAGE 4 • SET UP & USE
Page 7
INSTALLATION GUIDE CONT.
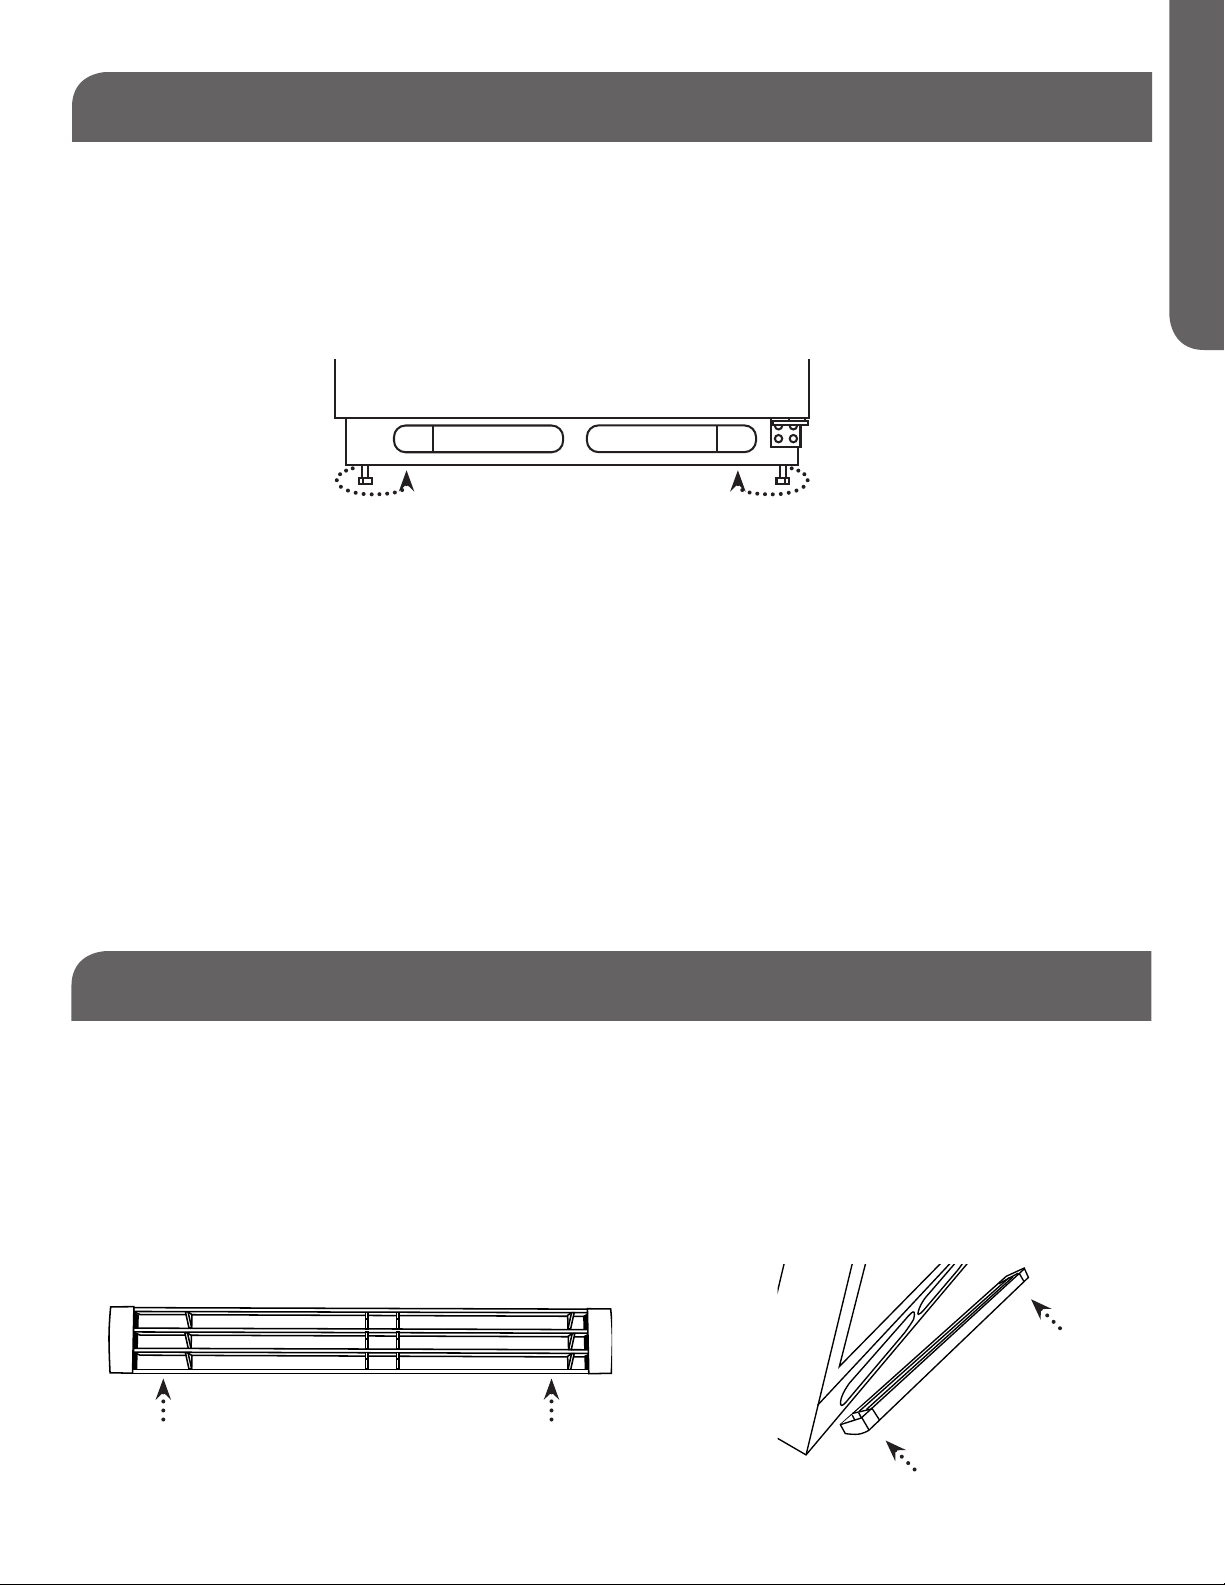
LEVELING YOUR REFRIGERATOR
• Your refrigerator has two leveling legs that are located in the front bottom corners of your refrigerator.
After properly placing your refrigerator in its final position, you can level your refrigerator.
• Leveling legs can be adjusted by turning them counterclockwise to raise your refrigerator or by turning
them clockwise to lower your refrigerator. The refrigerator door will close easier when the leveling legs
are extended.
LOWER RAISE
PROPER AIR CIRCULATION
• To ensure your refrigerator works at the maximum efficiency it was designed for, you should install it in
a location where there is proper air circulation, plumbing and electrical connections. Your refrigerator
is not designed to operate in temperatures below 55˚F (12˚C ) or above 95˚F (35˚C).
• Do not install your refrigerator in any location not properly insulated or heated, e.g. garage, etc.
Keep out of direct sunlight and away from heating sources such as radiators, heaters, and cooking
appliances.
ENGLISH
• The following are recommended clearances around the refrigerator:
Sides……………1” (25 mm) Top....................1" (25 mm) Back..................2" (50mm)
INSTRUCTIONS FOR UNPACKING
FRONT GRILLE
Your refrigerator comes with a front grille (toe kick), which is reversible based on which side of the
refrigerator the hinges are mounted on. To install the front grille, locate the non-hinge end using the
diagram below and follow the instructions below.
1. Snap the non-hinge side into the air flow opening on the lower rail of the refrigerator.
2. Then, snap the hinge side into the opposite air flow opening in the lower rail beside the bottom hinge.
Hinge side
Non-hinge side Hinge side
PAGE 5 • SET UP & USE
Non-hinge side
Page 8
INSTALLING YOUR REFRIGERATOR
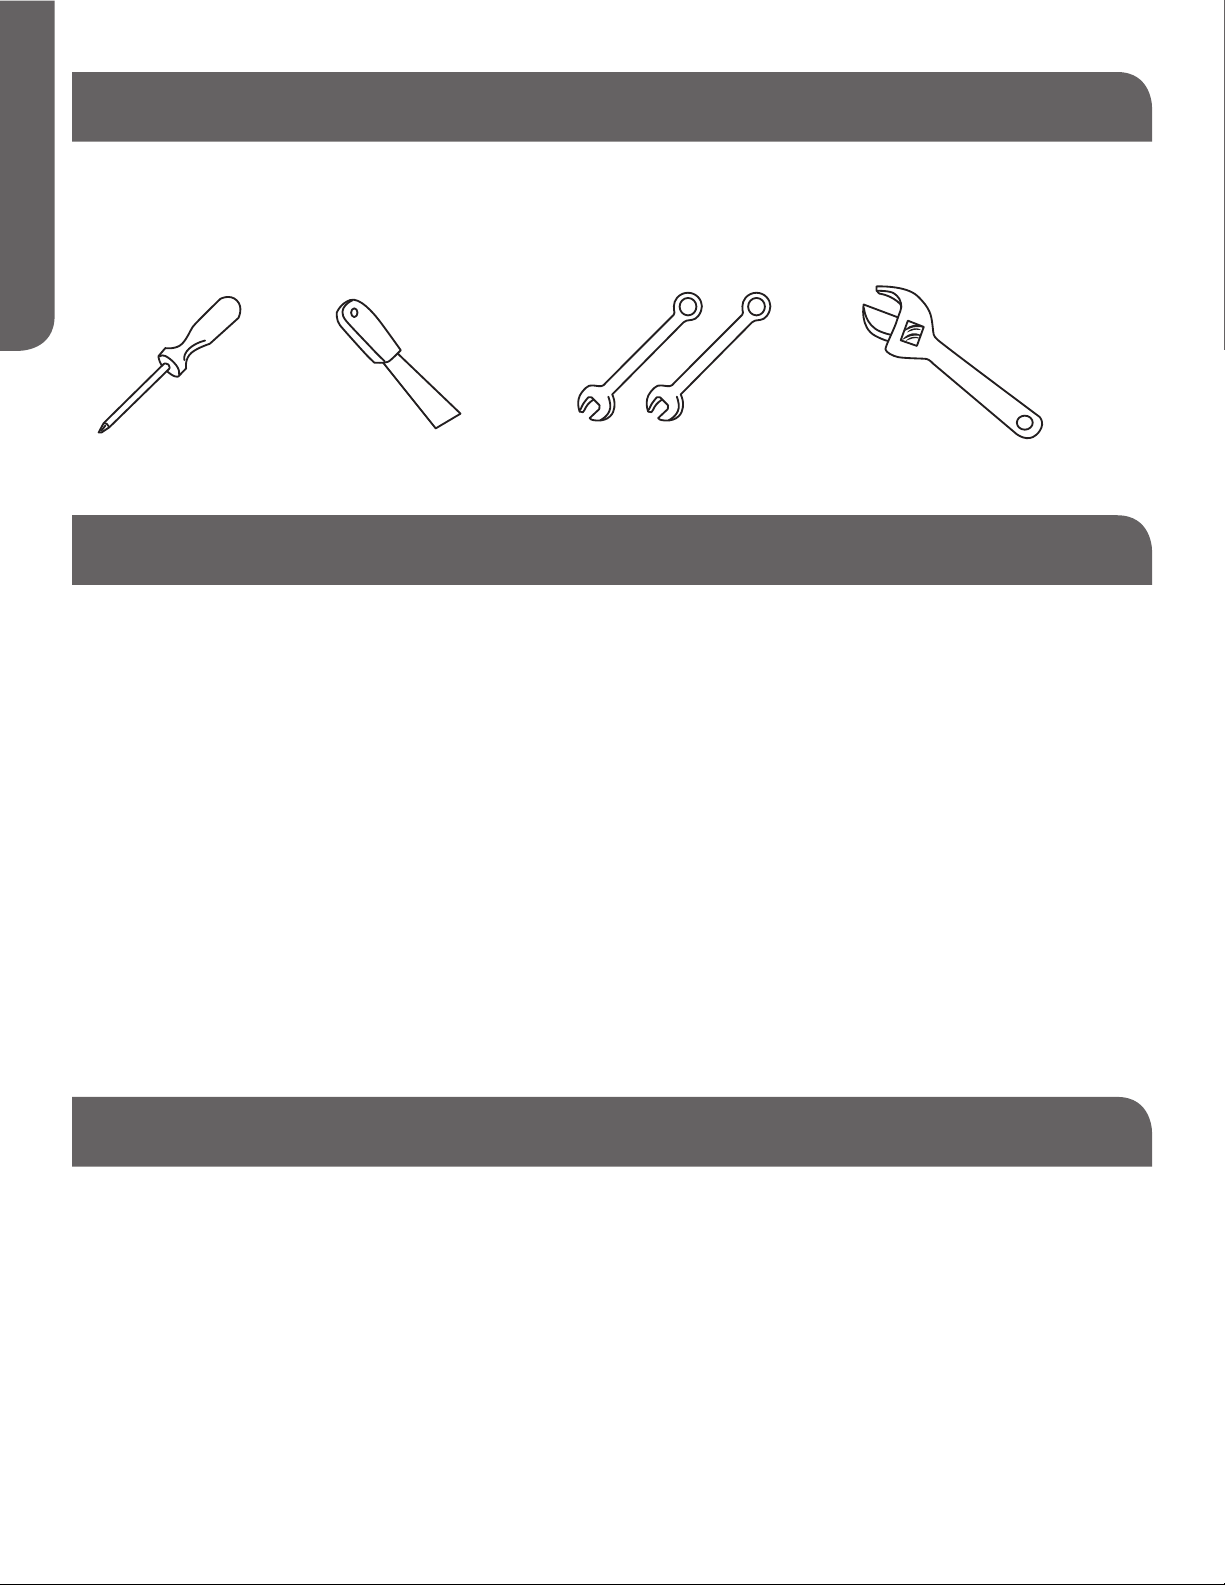
TOOLS NEEDED FOR INSTALLATION
ENGLISH
DO NOT USE POWER TOOLS TO INSTALL DOOR HANDLES! OVERTIGHTENING THE SCREWS COULD
STRIP THE THREADS!
5/16 and 3/8 Wrenches or Adjustable WrenchPhillips Screwdriver Putty Knife
PARTS-INCLUDED
PARTS-INCLUDED BAG MAY DIFFER BASED ON UNIT PURCHASED.
For non-stainless steel models
that come with a handle
mounting screw factory installed
on the faces of the doors, the
parts-included bag will consist
of:
• 2 Handles
• 1 Front Grille
• 4 Handle attachment screws
• 1 Extra Haier logo badge
• 1 Color-matched screw-plug
• Owner’s manual
For models that don’t come with
a handle mounting screw factory
installed on the faces of the
door, the parts-included bag will
consist of:
• 2 Handles
• 1 Front Grille
• 2 Door face mounting screws
• 4 Door edge mounting screw
• 1 Extra Haier logo badge
• 1 White screw-plug
• Owner’s manual
• 2 Handle cover/trim pieces
ACCESSORIES
The following accessories are available:
• Ice maker Kit HI5MK
For stainless steel models, the
parts-included bag will consist
of:
• 2 Handles
• 1 Front Grille
• 4 Handle attachment screws
• Owner’s manual
• Wire Shelf for Freezer Compartment
• Replacement Light Bulbs
To order accessories, call 1-877-337-3639 or visit us at www.haieramerica.com/support
PAGE 6 • SET UP & USE
Page 9
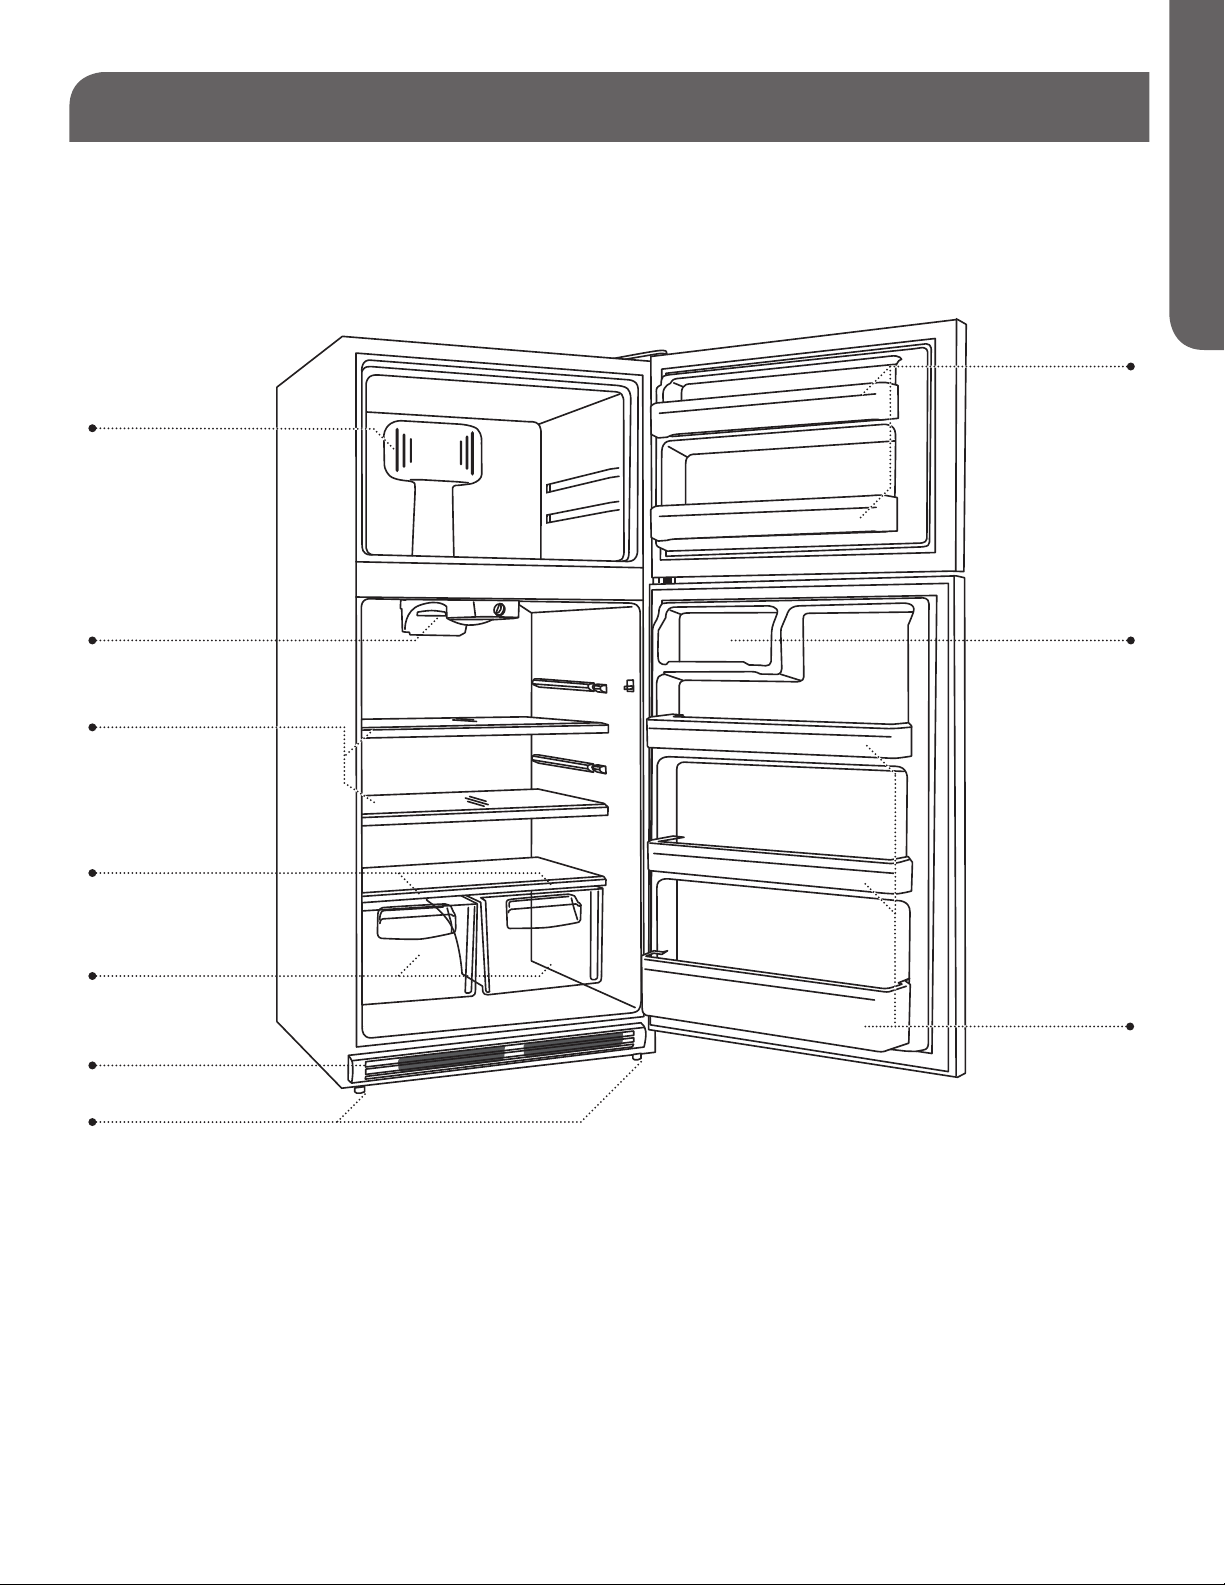
PARTS & FEATURES
Air Flow
Control
Temperature
Control with
Interior Light
Full-Width
Shelves
ENGLISH
Freezer
Door Shelves
Dairy
Compartment
Crisper
Humidity
Controls
Crisper Bins
Front Grille
Leveling Legs
Full-Width
Door Shelves
Diagram for instructional purposes only.
Design may vary by model number.
PAGE 7 • SET UP & USE
Page 10
DOOR HANDLE INSTALLATION
DOOR HANDLE INSTALLATION
ENGLISH
For refrigerators with a mounting screw installed
on the face of both doors:
Remove both handles from inside freezer
compartment and screws from parts-included
bag.
FREEZER DOOR HANDLE
1. Place the tapered end of the handle over the
mounting screw on the freezer door and gently
slide handle in the direction of the flat end of
the handle. (Fig. 1)
2. Once the handle is fully seated around the
mounting screw, slowly rotate the flat end of
the handle toward the bottom of the freezer
door.
Fig. 1
3. Open the freezer door and install the screws
into the underside of the freezer door through
the flat end of the handle. Do not use power
tools to install screws. Do not over-tighten the
screws.
Fig. 2
REFRIGERATOR DOOR HANDLE
1. Place the tapered end of the handle over the
mounting screw on the refrigerator door and
gently slide handle in the direction of the flat
end of the handle. (Fig. 1)
2. Once the handle is fully seated around the
mounting screw, slowly rotate the flat end of
the handle toward the top of the refrigerator
door. (Fig. 1)
3. Open the refrigerator door and install
the screws in to the top of the refrigerator
door through the flat end of the handle
Do not over-tighten screws. (Fig. 2)
4. If re-installing handles after reversing the
door swing, remove screw hole plug from
the parts-included bag and place it in the
handle-mounting screw hole on the face of the
refrigerator door.
5. The name badge can be removed by using a
putty knife or flat head screwdriver to pry the
badge off the door face, being careful not to
damage the finish. Any residue left on the face
of the door from the badge should be removed
by using Goo Gone© or WD-40©. Be sure to
follow the manufacturer’s instructions when
using these products.
Do not use any abrasives or scouring pads to
remove the residue.
An extra logo badge is provided in the partsincluded bag with your refrigerator. That badge
can be used to cover the handle mounting screw
hole on the face of the freezer door.
PAGE 8 • SET UP & USE
Page 11

DOOR HANDLE INSTALLATION CONT.
ENGLISH
DOOR HANDLE INSTALLATION
For refrigerators without a mounting screw
installed on the face of both doors:
Remove both handles from the freezer
compartment and the screws and handle trim
pieces from the parts-included bag.
FREEZER DOOR HANDLE
1. Mount the tapered end of the handle to the
door face using the enclosed screw. Do not
use the screw hole closest to the center of the
handle.
Fig. 3
2. Attach the flat end of the handle to the
underside of the door using the enclosed
screws.
REFRIGERATOR DOOR HANDLE
1. Mount the tapered end of the handle to the
door face using the enclosed screw. (Fig. 3) Do
not use the screw hole closest to the center of
the handle.
2. Attach the flat end of the handle to the top of
the door using the enclosed screws. (Fig. 4)
3. Insert tab on handle trim cover into slot in
handle then press firmly onto handle. (Fig. 5)
4. If re-installing handles after reversing the
door swing, remove the screw hole plug from
the parts-included bag and place it in the
handle-mounting screw hole on the face of the
refrigerator door.
5. The name badge can be removed by using a
putty knife or flat head screwdriver to pry the
badge off the door face, being careful not to
damage the finish. Any residue left on the face
of the door from the badge should be removed
by using Goo Gone© or WD-40©. Be sure to
follow the manufacturer’s instructions when
using these products.
Do not use any abrasives or scouring pads to
remove the residue.
Fig. 4
3. Insert tab on handle trim cover into slot in
handle and then press firmly onto handle.
Fig. 5
PAGE 9 • SET UP & USE
An extra logo badge is provided in the partsincluded bag with your refrigerator. That badge
can be used to cover the handle-mounting screw
hole on the face of the freezer door.
Page 12
REVERSING THE DOOR
DOOR SWING REVERSAL
ENGLISH
On black or white models, the door hinges and
handles can be reversed to accommodate your
needs.
NOTE: Door reversal is not available on stainless
steel door models.
REMOVING THE HANDLES
Please refer to the appropriate Door Handle
Installation section to determine how to remove
the handles from your refrigerator.
REMOVING DOORS AND HINGES
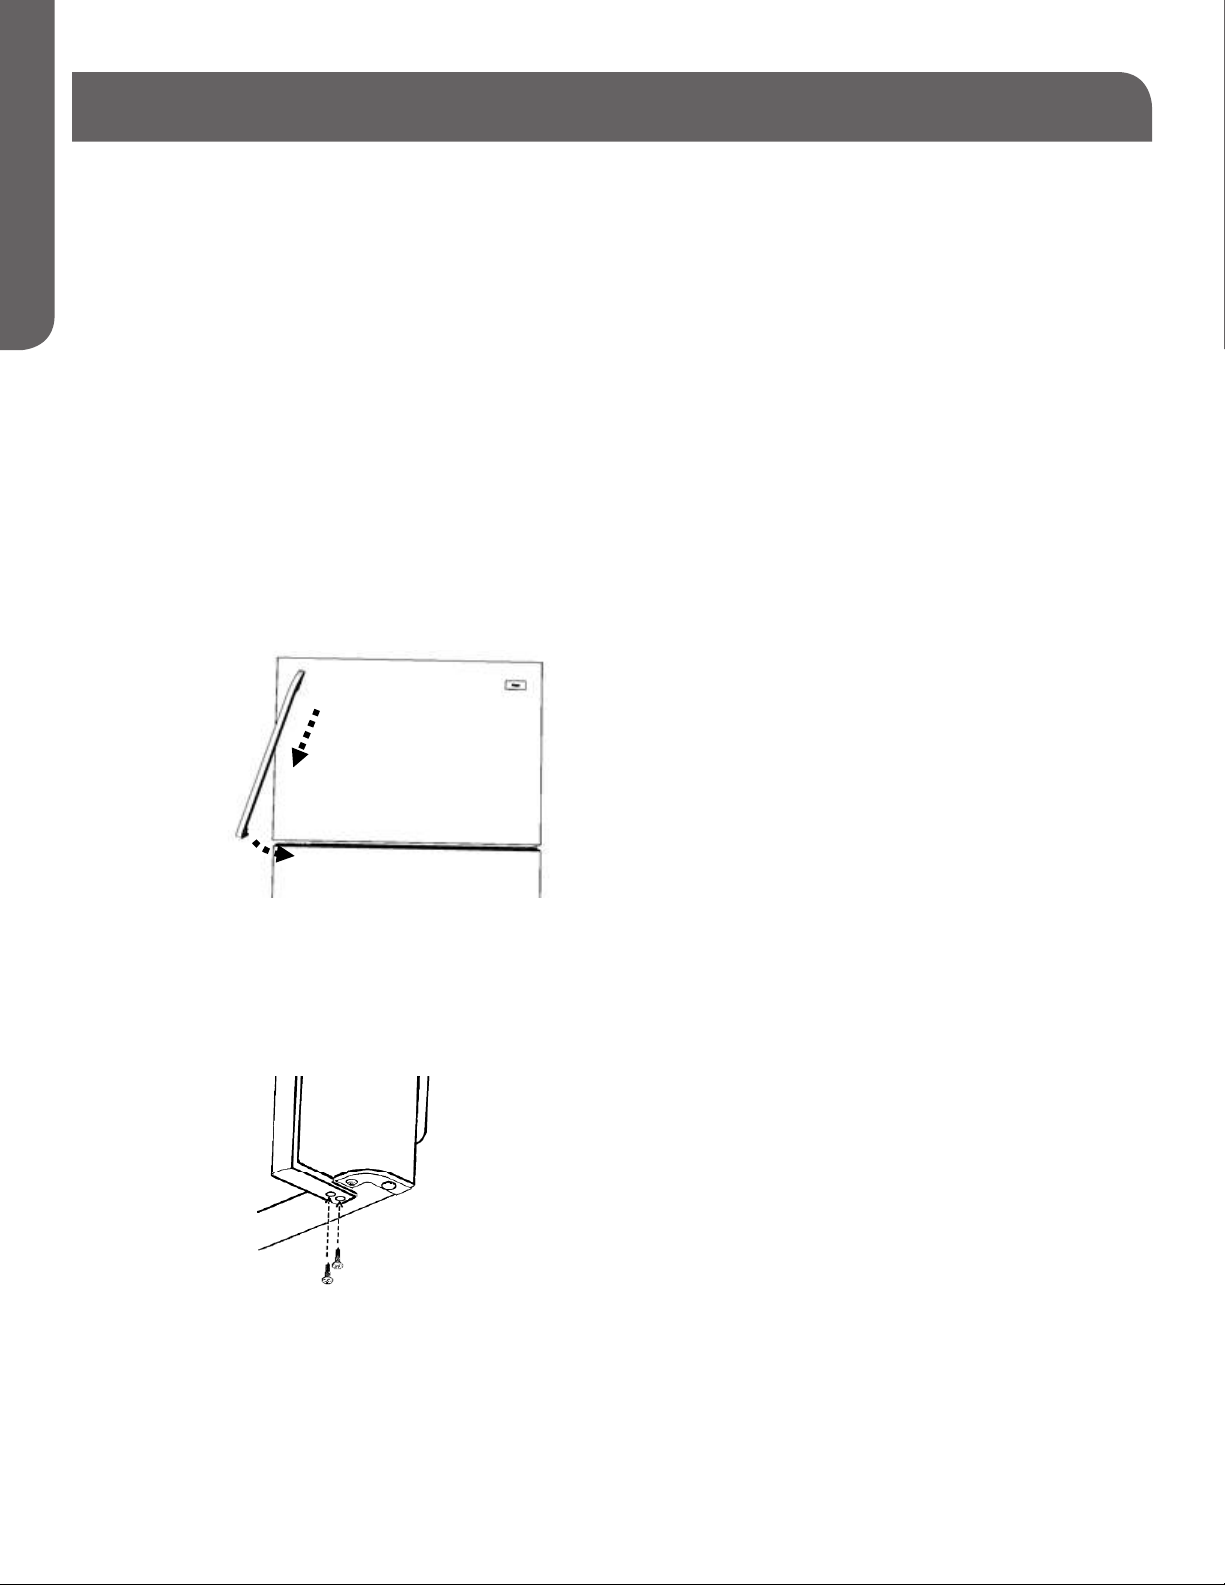
1. Use adhesive tape to secure both sides of the
freezer and refrigerator doors to the sides of the
cabinet. (Fig.6)
Fig. 6
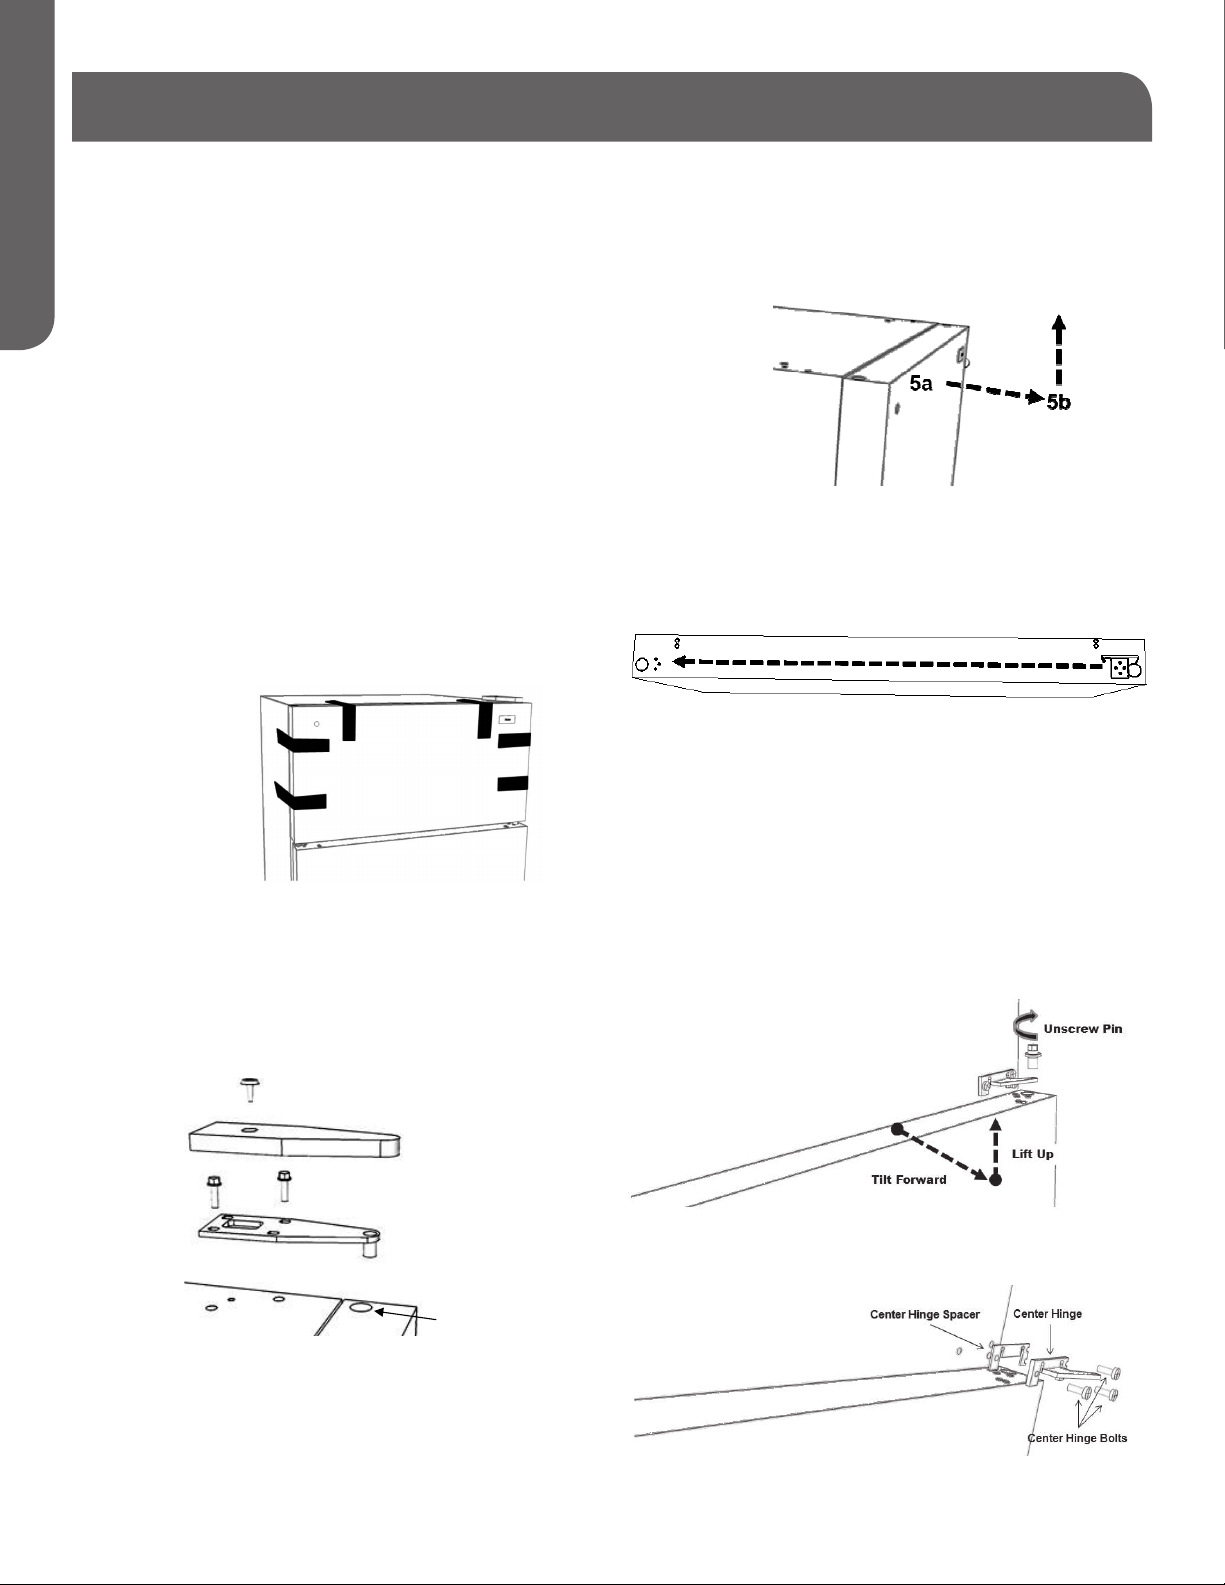
5. Remove the door by (a) pulling the top of the
door away from the cabinet and (b) lifting it at
the same time. (Fig. 8)
Fig. 8
6. Move the door stop on the bottom of the door
to the opposite side and secure with original
screws, then place the door aside.
Fig. 9
7. Unscrew the center hinge pin by rotating
counterclockwise, being careful not to lose the
spacers from the top section of the pin. (Fig. 10)
2. Remove the hinge cover screw and the top hinge
cover. (Fig. 7)
3. Remove the two bolts that mount the top hinge
to the cabinet and then remove the hinge by
raising it vertically. (Fig. 7)
Hinge Cover Screw
Fig. 7
Hinge Cover
Bolts
Top Hinge
Thimble Hole
4. Carefully remove the adhesive tape holding the
freezer door to the cabinet while holding the
door to the cabinet.
8. Remove the refrigerator door in the same
manner as the freezer door, first removing
the tape and then lifting up and away from the
cabinet. (Fig. 10) Relocate the door stop on the
bottom of the door to the opposite side of the
door. (Fig. 9) Place the door aside.
Fig. 10
9. Remove the center hinge and spacer. (Fig. 11)
Fig. 11
PAGE 10 • SET UP & USE
Page 13
REVERSING THE DOOR CONT.
ENGLISH
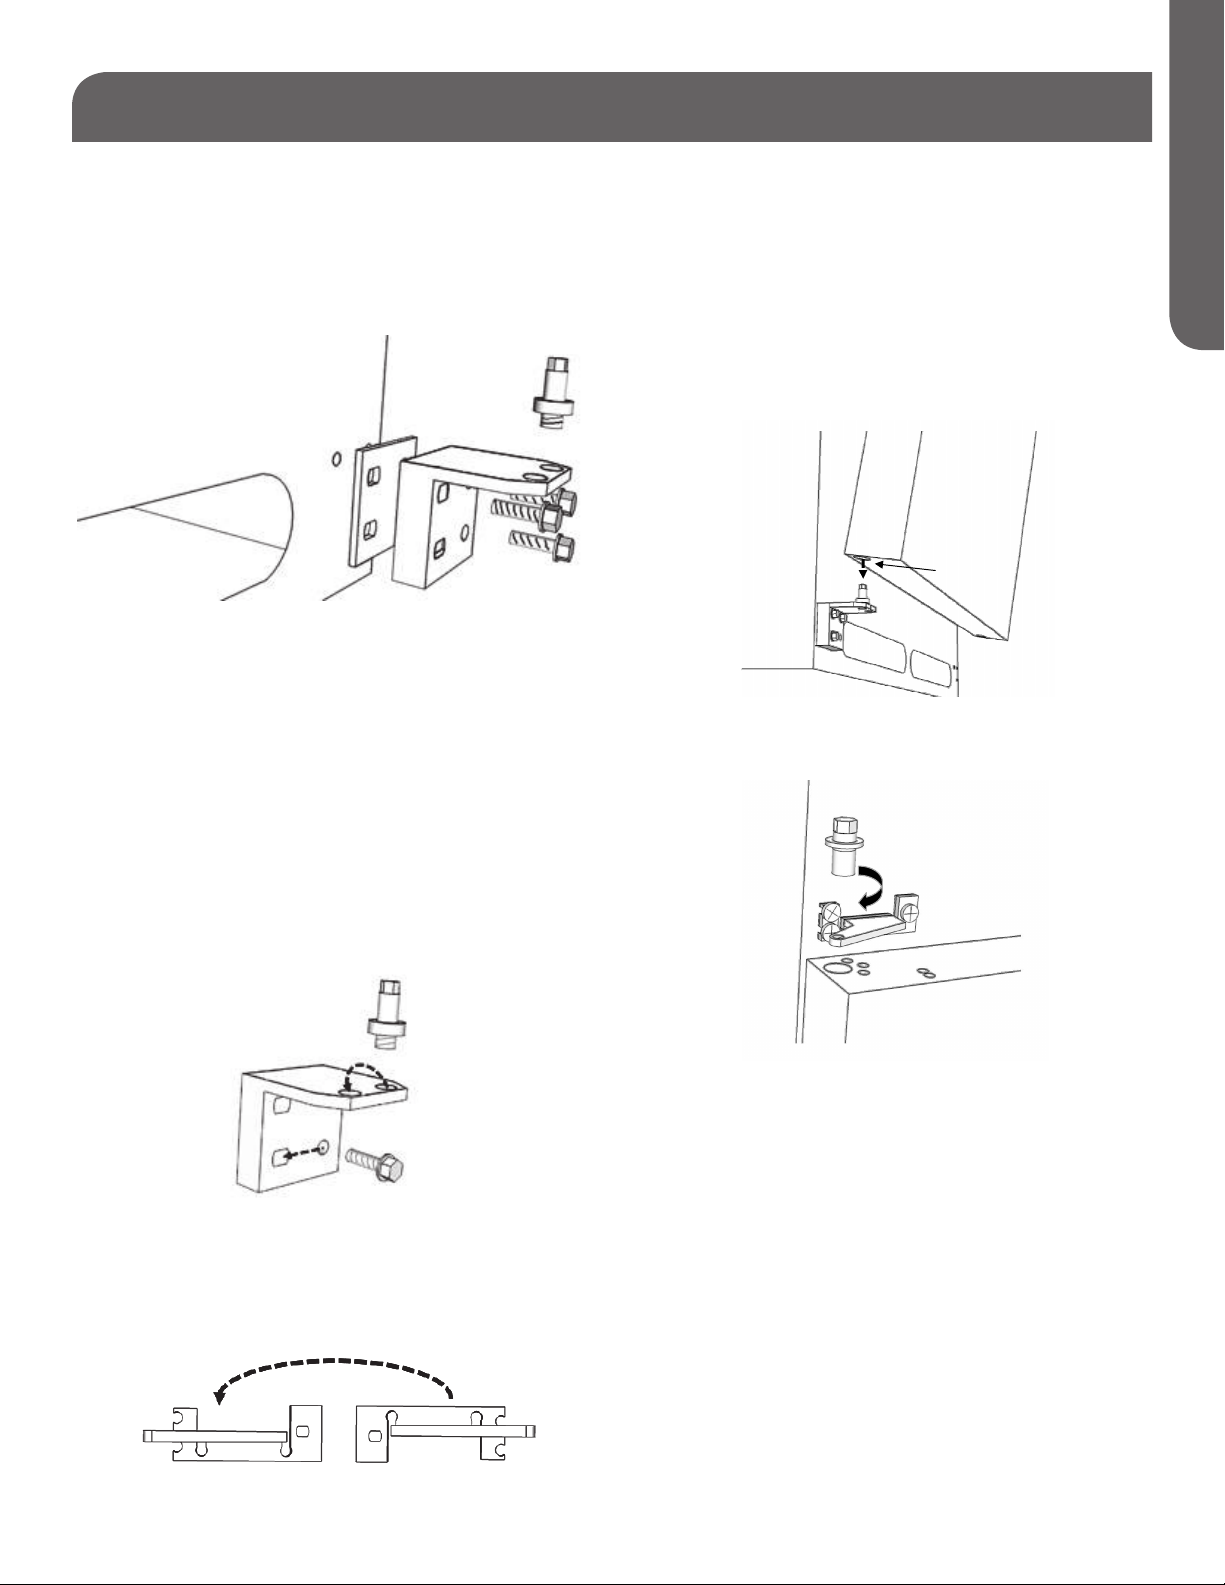
10. Remove the bottom hinge by unscrewing the
bolts mounting it to the cabinet.
NOTE: It is easier to remove and re-install the
bottom hinge pin while the hinge is itself is
still attached to the cabinet.
Fig. 12
RE-INSTALLING THE HINGES AND
DOORS
1. Unscrew the bottom hinge pin and re-locate
it to the opposite hole on the top of the hinge.
(Fig. 13)
4. Remove the top thimble cover on the hinge side
of the refrigerator door and relocate it to the
opposite thimble hole. Use both hands to mount
the door on bottom hinge pin, making sure the
pin goes fully into the bottom thimble hole.
When the top thimble hole is aligned with the
hole in the center hinge, place the hinge pin into
the hole, threaded end down, and tighten.
Fig. 15
Thimble Hole
2. Attach the bottom hinge spacer and bottom
hinge to the cabinet using the bolts originally
provided. Be sure to use the top two mounting
holes on the hinge and the bottom hole on the
same side that the hinge is being moved to.
Fig. 13
3. Flip the center hinge according to the diagram
below and attach the hinge spacer and hinge to
the cabinet. (Fig. 14) Do not install the center
hinge pin yet.
Fig. 14
Fig. 16
Do Not Over-Tighten
5. Remove the top thimble plug on the hinge
side of the freezer door and relocate it to the
opposite thimble hole. Place the door onto the
center hinge pin, being sure that the pin goes
fully into the bottom thimble hole. Tape may be
used as it was during the removal steps to hold
the door in place during the next step.
6. Place the top hinge pin into the thimble hole on
the same side as the lower hinges.
PAGE 11 • SET UP & USE
Page 14
REVERSING THE DOOR CONT.
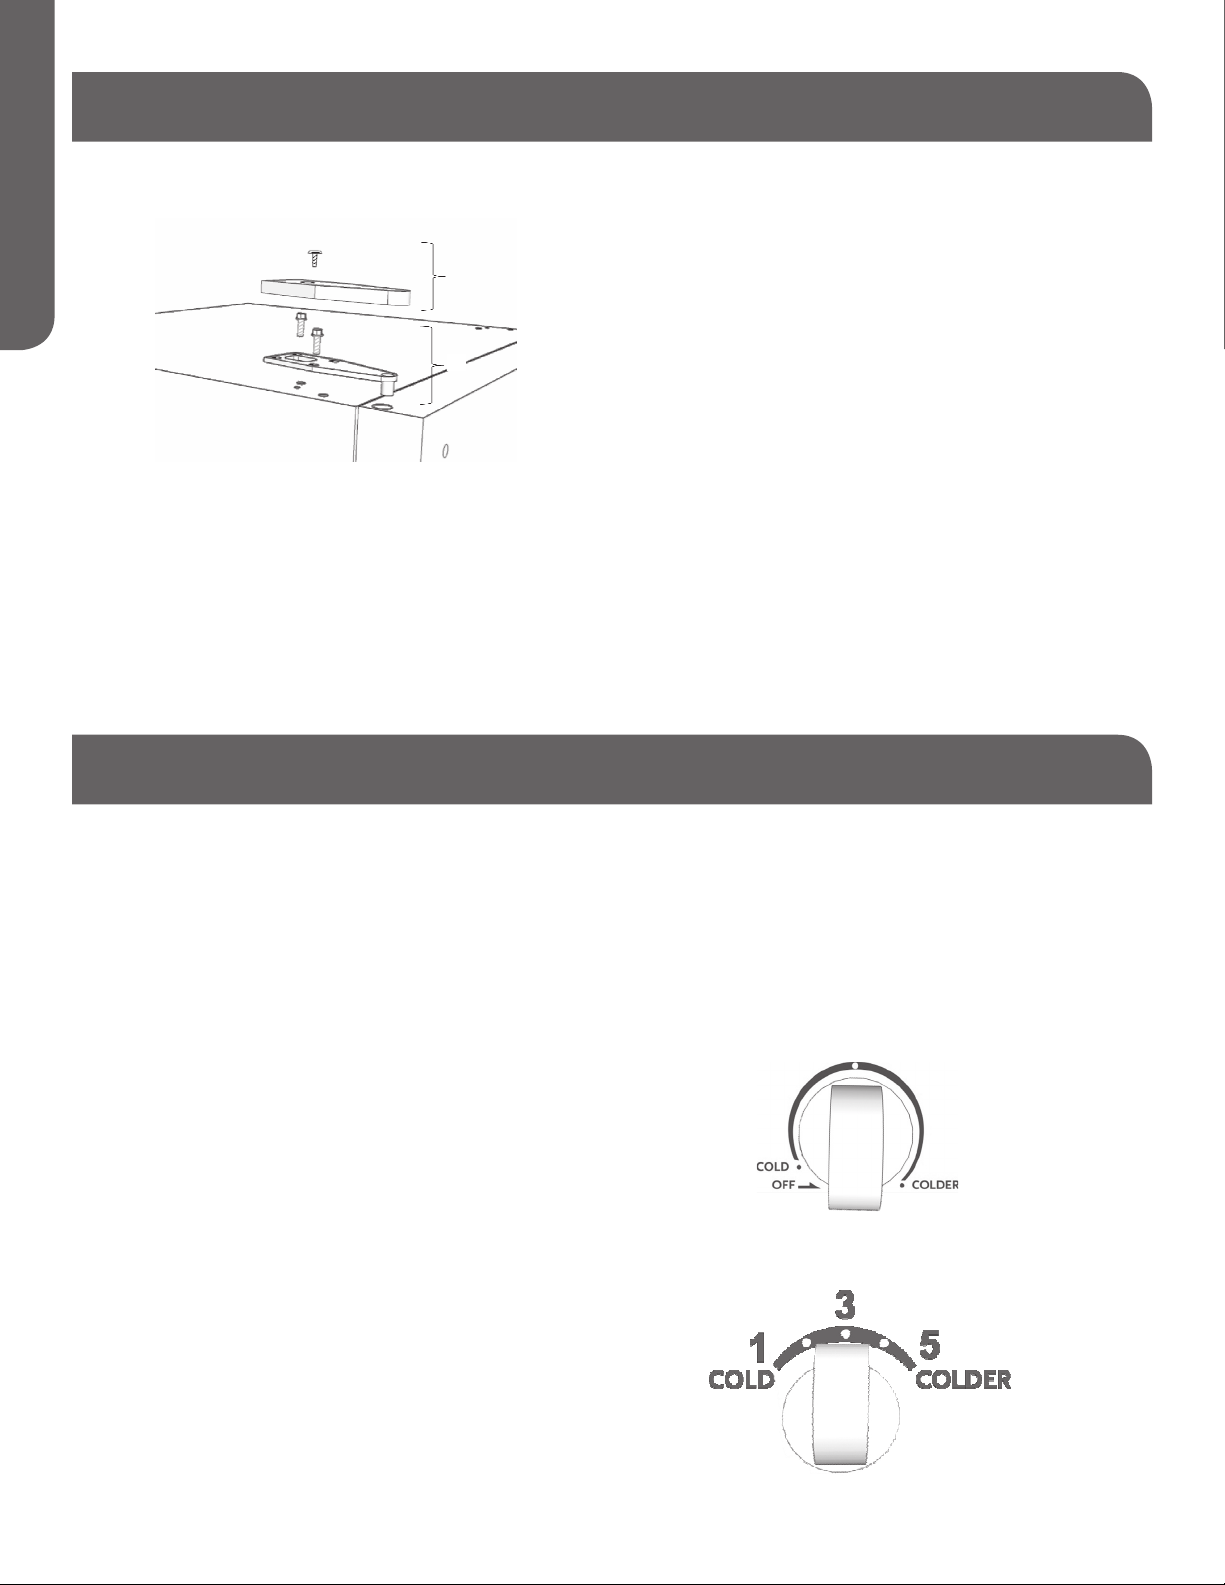
7. Replace top hinge cap and secure using original
screw.
ENGLISH
Fig. 17
NOTE: Prior to re-installing handles, remove the
Haier© logo badge from the face of the
door using a putty knife to gently pry it
from the door face. Any residue left on the
face of the door from the badge should be
removed by using Goo Gone© or WD-40©.
7
6
Be sure to follow the manufacturer’s instructions
when using these products.
Do not use any abrasives or scouring pads to
remove the residue. Use a putty knife to pry out
the plug buttons covering the handle mounting
holes on the face of the door, being careful not to
scratch the door finish.
To re-install handles, please see the Door Handle
Installation section.
FEATURES AND USE
NOTE: All features not available on all models.
NOTE: If refrigerator has been placed in a
horizontal position for any period of time,
wait 4 hours after returning it to the upright
position before plugging it in.
TEMPERATURE CONTROL KNOBS
Your refrigerator will automatically maintain the
set temperature level. Turning the temperature
knob to the left will make both refrigerator and
freezer compartments warmer. Turning the knob
to the right will make both compartments colder.
You can turn the knob in either direction to adjust
the temperature to your needs. We recommend
setting the knob to the straight up and down
position and allowing it to run for at least 24 hours
before adjusting the temperature. Turning the
knob all the way left to the Off position will turn
off the refrigeration system, but does not remove
power to the refrigerator.
The freezer compartment also features a fan
tower knob, which is used to regulate air flow into
the compartment to fine tune the freezer. As with
the refrigerator temperature knob, we recommend
setting the knob to the straight up and down
position and allowing it to run for at least 24 hours
before adjusting it.
Refrigerator Temperature Knob
Freezer Fan Tower Knob
PAGE 12 • SET UP & USE
Page 15
OPERATION INSTRUCTIONS
ENGLISH
LIGHTING
All models come with an interior light located on
the ceiling of the refrigerator compartment. For
models with a single bulb, no cover is provided.
For models with dual bulbs, a cover is provided.
Some models may feature a light in the freezer
and/or a “mid-level” light on the back wall of the
refrigerator above the crisper. Please see the
Proper Care and Maintenance section for light bulb
replacement instructions.
REFRIGERATOR UPPER LIGHT W/ COVER
(NOT ALL MODELS)
FREEZER LIGHT (NOT ALL MODELS)
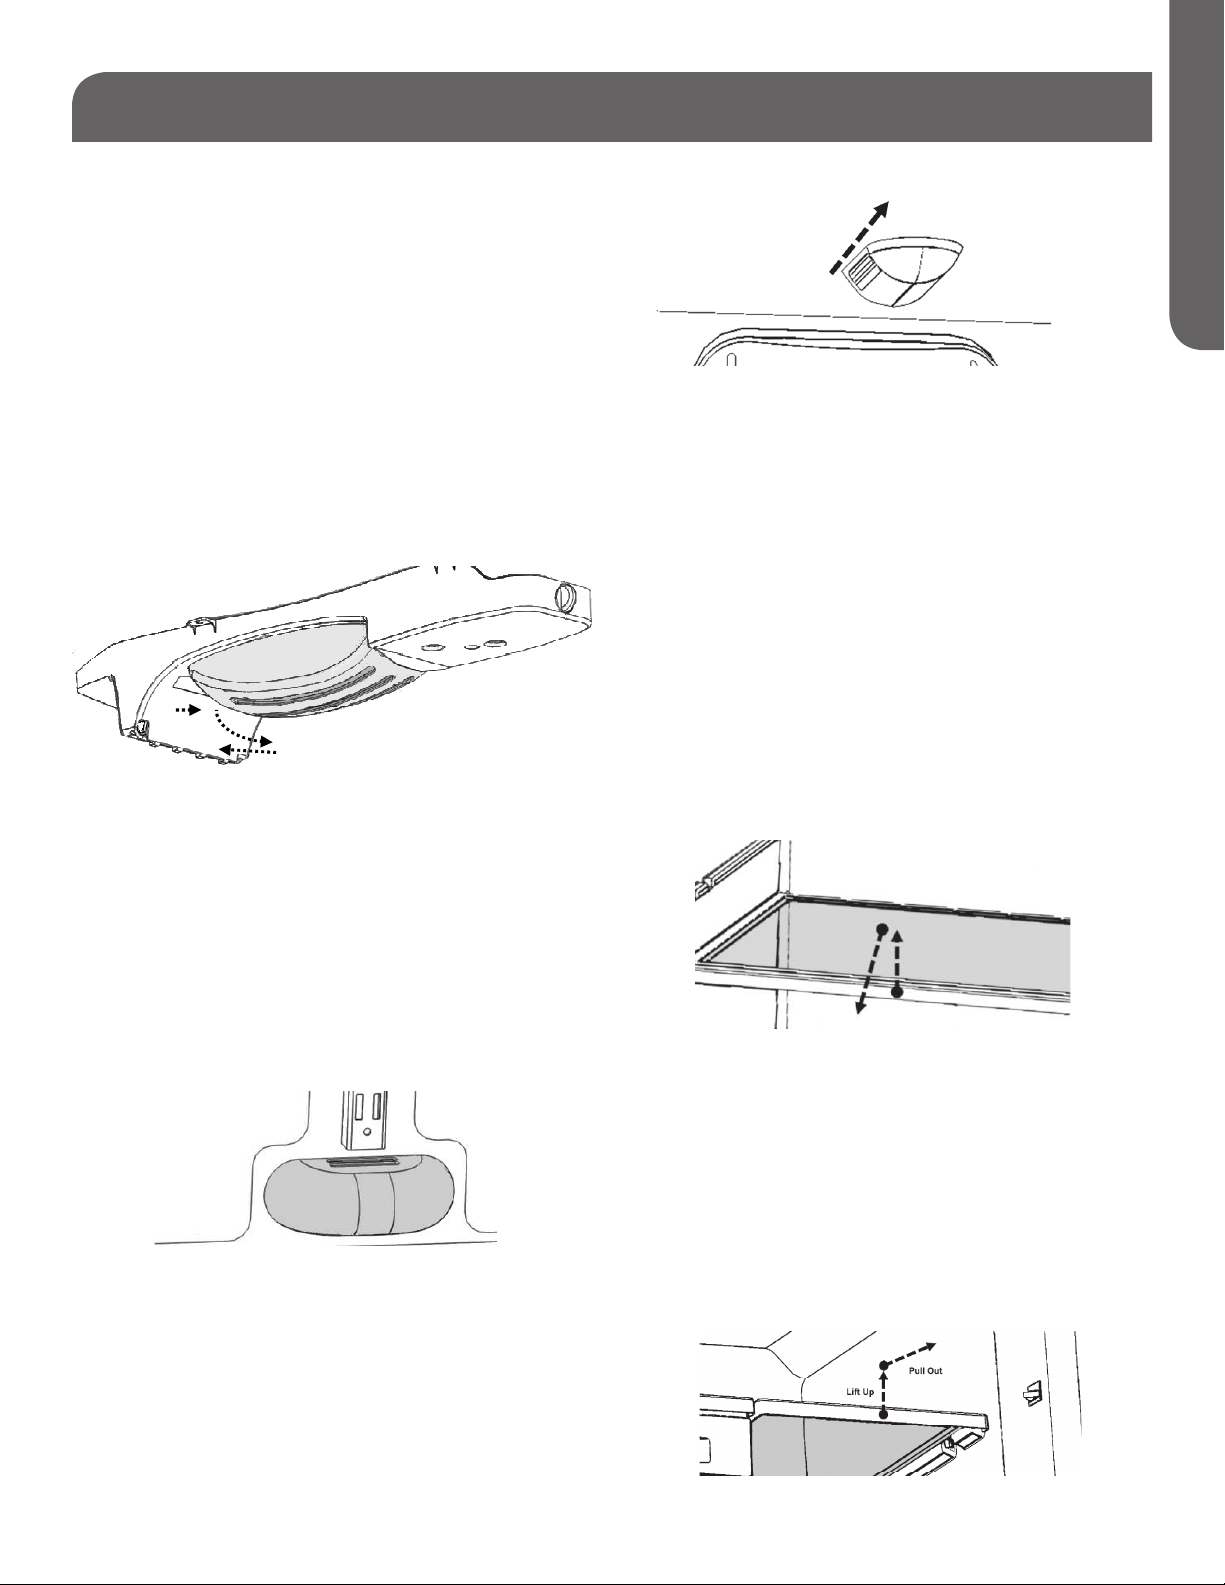
To Remove Freezer Light Cover (if included):
1. Pull the cover to the front of the cabinet.
REFRIGERATOR INTERIOR SHELVES
All refrigerator models include shelving that can
be adjusted to suit your personal storage needs.
Depending on model, shelves can be wire or
encapsulated glass, full-width or half-width.
FULL-WIDTH WIRE AND ENCAPSULATED
GLASS SHELVES
To Remove Upper Light Cover (if included):
1. Push in the tab at the far end of the cover.
2. Rotate the far end of the cover down.
3. Push the cover toward the back of the
compartment.
REFRIGERATOR MID-LEVEL LIGHT (NOT
ALL MODELS)
To Remove Refrigerator Mid-Level Light Lens (if
included):
1. Push up on the bottom of the cover.
Can be adjusted to four different levels. These
shelves slide in and out by lifting the front of the
shelf and gently pulling it towards you.
HALF-WIDTH ENCAPSULATED GLASS
SHELVES
Can be set to 4 different levels and can be moved
independent of each other, giving you the widest
variety of shelving options. Keep in mind that
refrigerators with half-width shelving only have a
support track in the center of the refrigerator back
wall. Right-hand and left-hand shelves can’t be
interchanged.
2. Rotate the bottom of the cover away from rear
of compartment.
3. Lift the top of the cover up and out.
PAGE 13 • SET UP & USE
Page 16
OPERATION INSTRUCTIONS CONT.
To adjust a half-width shelf, remove any items
on the shelf and tilt the front of the shelf up with
ENGLISH
one had while stabilizing the shelf with the other.
Once the shelf is high enough for the rear hook to
disengage, you may pull the shelf toward you.
To move the shelf to another level, slide the
outside (non-center) edge along the side rail until
the back of the refrigerator is reached. Lift the
center side slightly to allow the rear hook to enter
the cantilever track. Then, slowly lower the center
of the shelf until it rests on the side rail and is
supported from the back by the cantilever track.
SNACK PAN (SOME MODELS)
Refrigerators that feature half-width encapsulated
glass shelves also include a snack pan.
If your refrigerator is equipped with a snack pan,
you will want to remove the pan before adjusting
the shelf that covers it.
NOTE: To remove a crisper on the same side as
the door, remove the bottom door bin first.
To remove the crisper cover, remove both crisper
pans using the instructions above:
1. Use one hand to push the crisper glass up from
underneath while taking hold of it from the top
with the other hand.
2. Use both hands to carefully pull the glass shelf
out and set aside.
To Remove the Snack Pan (if included):
1. Pull the pan out until it stops.
2. Pull up on the pan.
3. Pull the pan completely out of its track.
4. Follow the instructions above to adjust the shelf
to your desired height.
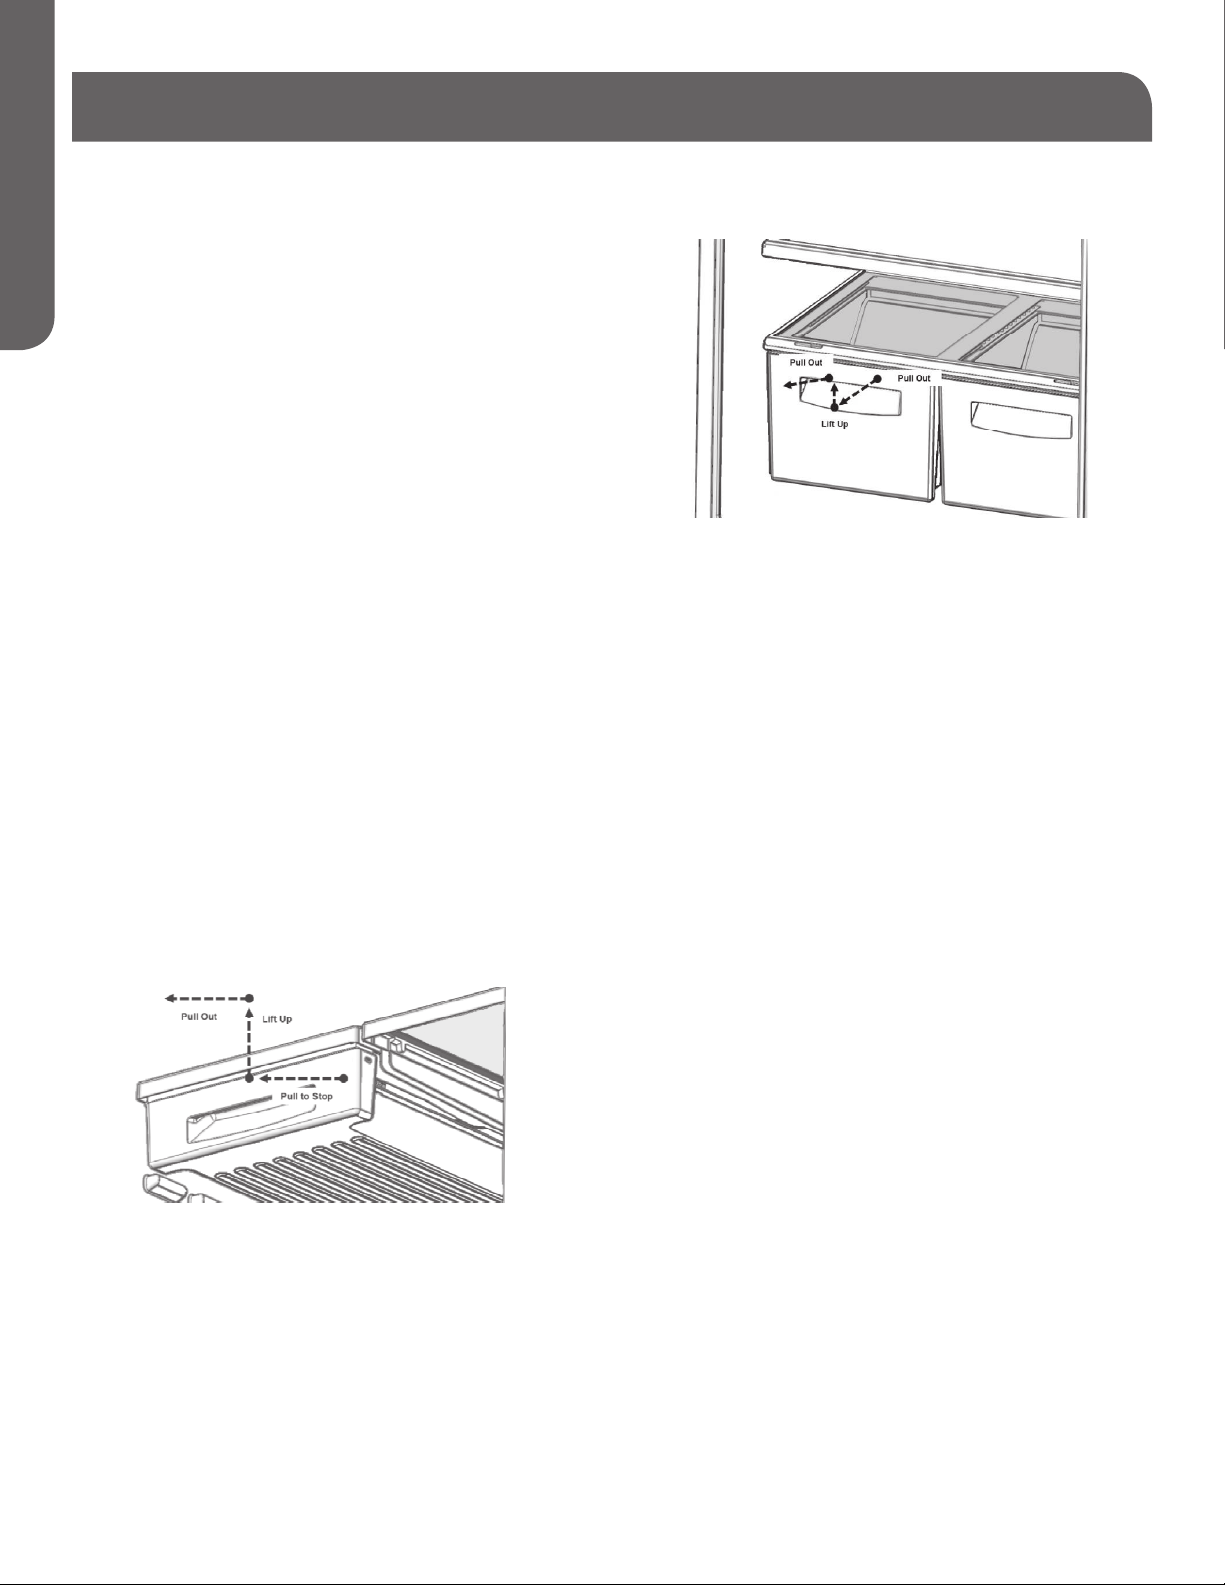
CRISPERS AND CRISPER COVER
To Remove a Crisper:
1. Slide the crisper out until it stops.
3. Use both hands to lift the crisper frame up and
out of the refrigerator.
To replace the cover, insert the crisper frame back
into the refrigerator, gently replace the glass in the
recessed space in the frame and then replace the
crispers.
2. Lift the front of the crisper.
3. Pull out until it is removed.
PAGE 14 • SET UP & USE
Page 17
OPERATION INSTRUCTIONS CONT.
ENGLISH
CRISPERS AND CRISPER COVER (CONT.)
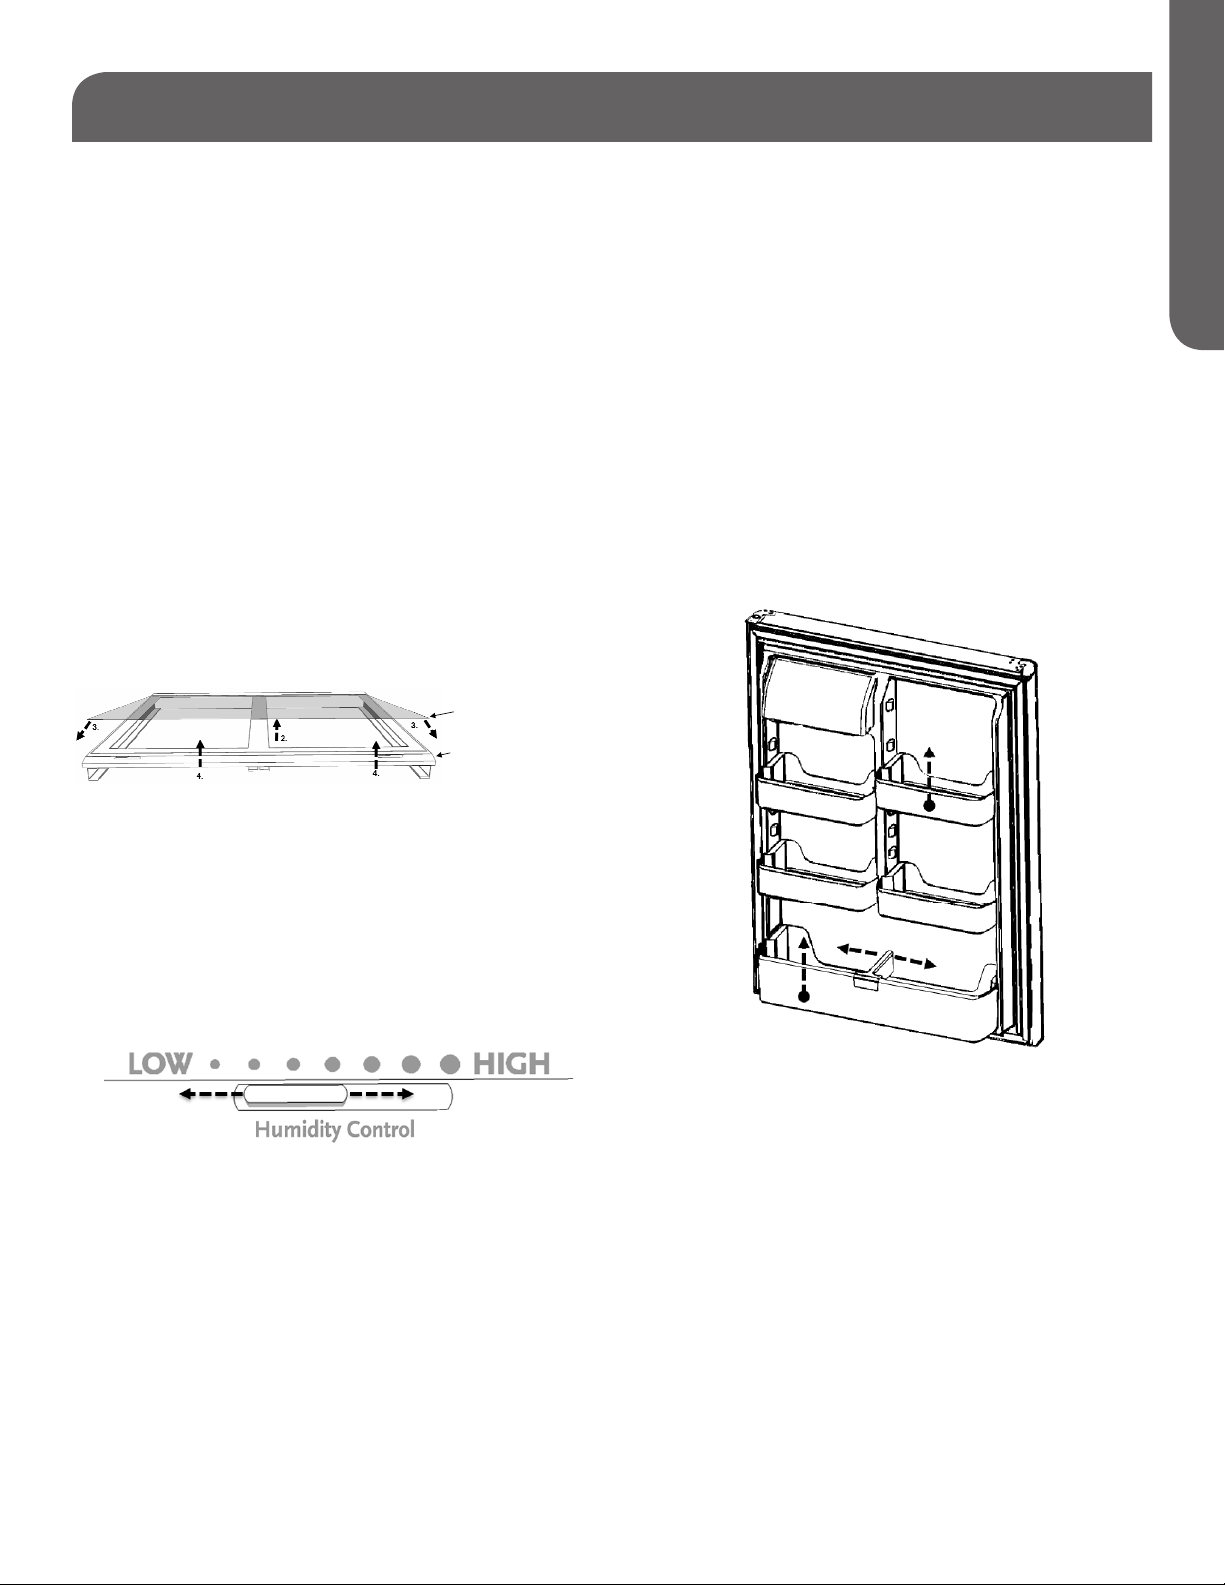
To Remove the Crisper Cover:
1. Remove both crisper pans using the instructions
above.
2. Use one hand to push the crisper glass up from
underneath while taking hold of it from the top
with the other hand.
3. Use both hands to carefully pull the glass shelf
out and set aside.
4. Use both hands to lift the crisper frame up and
out of the refrigerator.
To replace the cover in the refrigerator, insert the
crisper frame into the refrigerator, gently replace
the glass in the recessed space in the frame and
then re-insert the crispers.
Crisper glass
Crisper frame
DOOR FEATURES
Depending on the model, your refrigerator comes
with either full-width door racks or a combination
of a full-width door rack and half-width bins. To
remove either full-width racks or half-width bins,
use two hands to grasp both the bottom and top
edges of the bin or rack and lift straight up.
All models feature a dairy compartment with a flipup lid.
Some models feature a bottle hugger on the
bottom refrigerator door rack that can be adjusted
by gripping firmly and sliding left or right until it is
snug against items stored on the rack.
CRISPER HUMIDITY CONTROLS
Each crisper pan has its own humidity control.
For fruits and vegetables with skins, move the
humidity slide to LOW.
For leafy vegetables, move the humidity slide to
HIGH.
PAGE 15 • SET UP & USE
Page 18

FOOD STORAGE INFORMATION
FRESH FOOD:
ENGLISH
• When storing fresh food that is not prepackaged,
be sure to wrap or store food in airtight and
moisture proof material unless otherwise noted.
This will ensure proper shelf life and prevent the
transfer of odors and tastes.
• Wipe containers before storing to avoid needless
spills.
• Eggs should be stored in an upright position in
their original carton to maximize shelf life.
• Fruit should be washed and dried, then stored
in sealed plastic bags before storing in the
refrigerator.
• Vegetables with skins should be stored in plastic
bags or containers.
• Leafy vegetables should be washed and drained
and then stored in plastic bags or containers.
• Hot food should be allowed to cool before storing
in the refrigeration. This will prevent unnecessary
energy use.
• Fresh seafood should be used the same day as
purchased.
• When storing meats in the fresh food section,
keep in the original packaging or rewrap as
necessary.
These are some suggestions for safe storage:
• Chicken 1-2 Days
• Ground Beef 1-2 Days
• Cold Cuts 3-5 Days
• Steaks/Roasts 3-5 Days
• Smoked/Cured Meats 7-10 Days
For detailed storage chart visit FDA website:
www.cfsan.fda.gov/~dms/fttstore.html
FROZEN FOOD
• Wipe containers before storing to avoid needless
spills.
• Hot food should be allowed to cool before storing
in the freezer. This will prevent unnecessary
energy use.
• When storing meats, keep in the original
packaging or rewrap as necessary.
• Proper freezer storage requires correct
packaging. All foods must be in packages, that
do not allow the flow of air or moisture in, or out.
Improper storage will result in odor and taste
transfer and will result in the drying out of the
improperly packaged food.
• Follow package or container instructions for
proper storage.
• Packaging Recommendations:
Plastic containers with air tight lids
Heavy duty aluminum foil
Plastic wrap made from saran film
Self-sealing plastic bags
• Do not refreeze defrosted/thawed foods.
• It is recommended that the freezing date be
marked on the packaging.
These are some suggestions for safe storage:
• TV Dinners 3 - 4 Months
• Fresh Shrimp, scallops, crawfish 3 - 6 Months
• Hamburger & stew meats 3 - 4 Months
• Ground Turkey, veal, pork 3 - 4 Months
• Chops 4 - 6 Months
• Steaks 6 - 12 Months
• Chicken or Turkey 6 - 8 Months
For detailed storage chart visit FDA website:
www.cfsan.fda.gov/~dms/fttstore.html
PAGE 16 • SET UP & USE
Page 19
PROPER CARE AND MAINTENANCE
Never use a dirty cloth to clean the exterior of
WARNING
Before cleaning your refrigerator, ALWAYS
unplug it from the power source. Failure to heed
this warning could result in injury or death from
electric shock.
NOTE: Before using any cleaning products, be sure
to read the manufacturer’s instructions
and warnings. This will help avoid personal
injury or damage to property.
the refrigerator. Dirty cloths may leave residue
on the refrigerator that can damage the finish.
Also, avoid the use of harsh chemicals, ammonia,
chlorine bleach, concentrated detergent, solvents,
abrasives or metal scouring pads to clean the
outside of the refrigerator.
LIGHT BULB REPLACEMENT
WARNING
ENGLISH
INTERIOR CLEANING:
Prepare a cleaning solution of 3-4 tablespoons of
baking soda mixed with warm water. Use a sponge
or soft cloth, dampened with the cleaning solution,
to wipe the inside of your refrigerator.
Avoid cleaning any cold glass (shelves, crisper
cover glass, etc.) with hot water. The glass can
break and cause personal injury. Handle all glass
parts with care at all times.
Do not attempt to wash any parts in a dishwasher.
Do not use harsh chemicals, ammonia, chlorine
bleach, concentrated detergent, solvents,
abrasives or metal scouring pads to clean your
refrigerator, inside or out. They can damage and/
or discolor the refrigerator finish.
EXTERIOR CLEANING:
Use a clean, soft, lightly dampened cloth with
kitchen appliance wax or a mild detergent to clean
the exterior of the refrigerator.
Use a clean, soft, lightly dampened cloth with
warm soapy water to clean the handles and trim.
Use a clean, soft towel to dry.
Before changing a bulb, ALWAYS unplug unit from
the power source. Failure to heed this warning
could result in injury or death from electric shock.
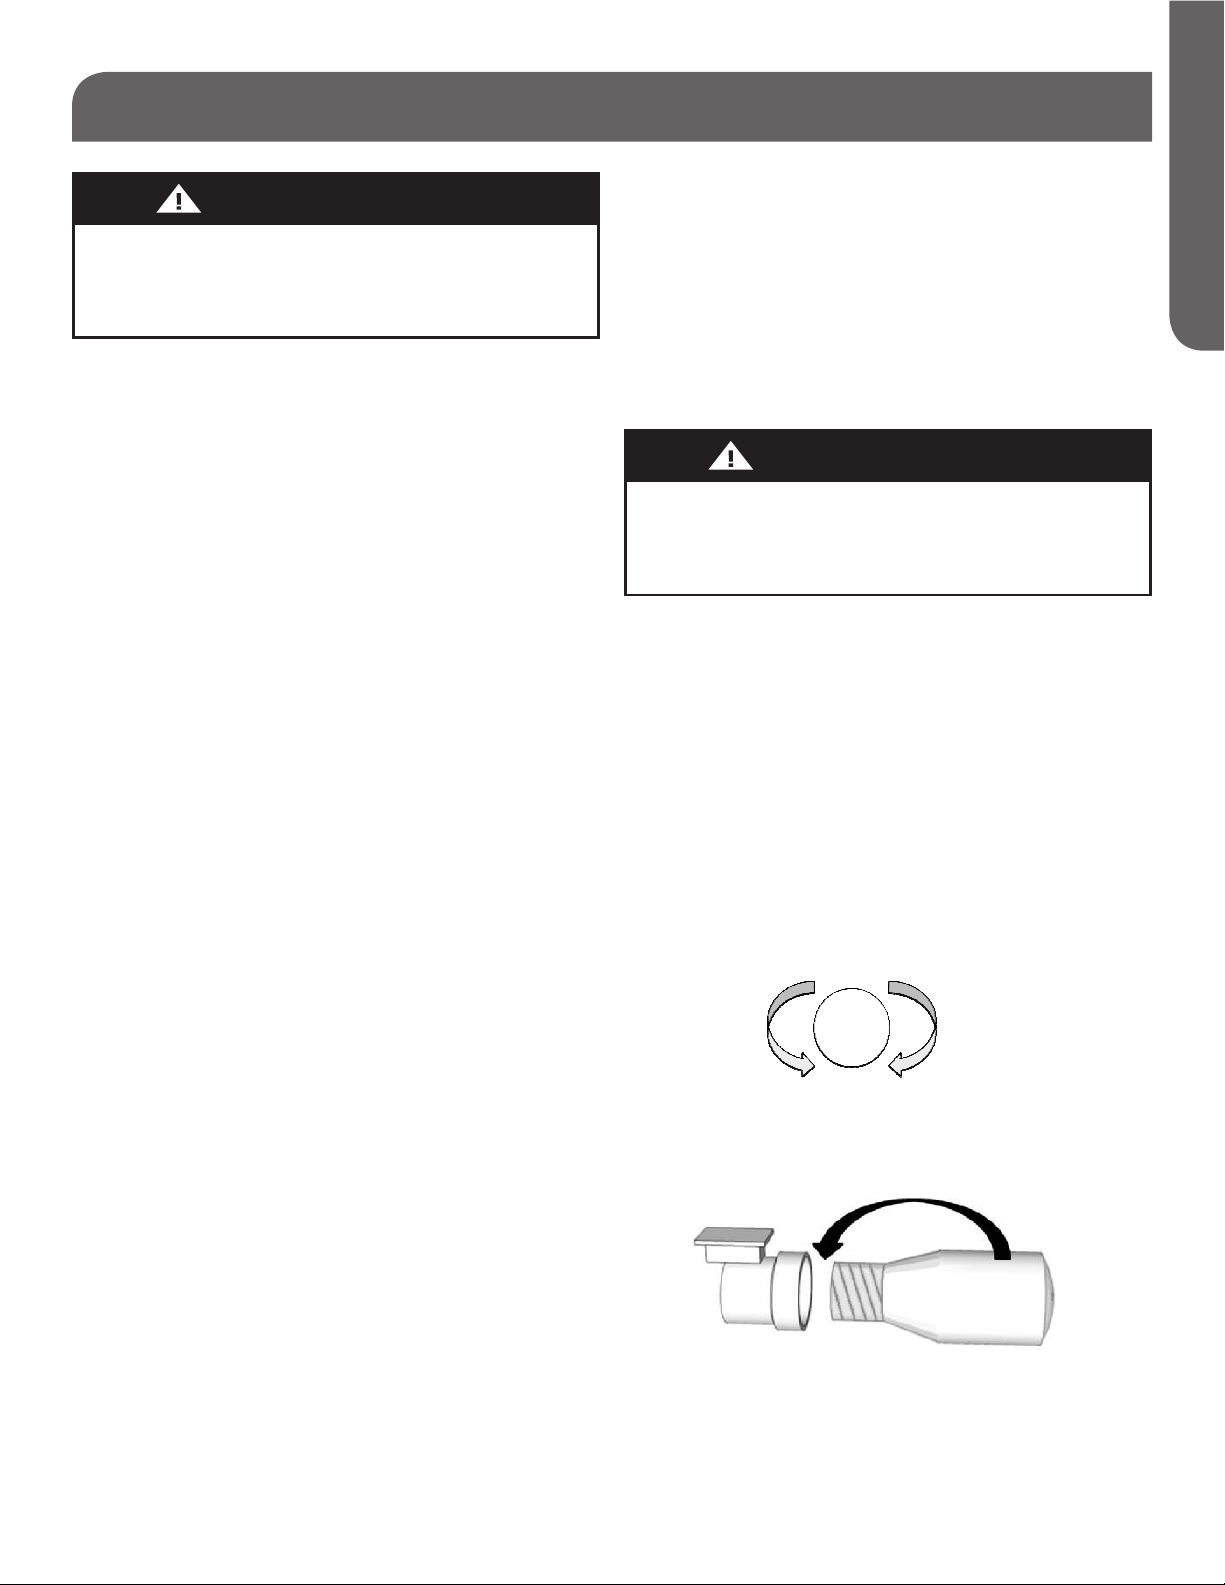
1. In order to replace a light bulb, first unplug your
refrigerator from the power outlet.
2. After allowing bulb to cool, turn bulb counterclockwise in order to remove it from the socket.
3. Screw a new bulb into the socket by turning the
bulb clockwise.
4. Plug in your refrigerator and open the door to
check that the bulb is working.
To Tighten: Turn bulb clockwise
To Loosen: Turn bulb counterclockwise
For stainless steel models, use a dry cloth and
stainless steel polish.
Door gaskets should be cleaned every three
months following the instructions for interior
cleaning. Clean gaskets will maintain a better seal
than dirty gaskets. Lightly apply petroleum jelly to
the hinge side of the gaskets to keep the gasket
pliable and assure a good seal.
PAGE 17 • CLEANING AND CARE
Page 20

PROPER CARE AND MAINTENANCE
LIGHT BULB REPLACEMENT GUIDE
ENGLISH
Use the guide below to determine the appropriate
bulb for each fixture:
Upper Refrigerator Light - 40 W Daylight Appliance
Bulb (1 or 2 depending on model)
Mid-Level Refrigerator Light - 25 W Appliance Bulb
Freezer Light - 25 W Appliance Bulb
All bulbs have medium bases
POWER INTERRUPTIONS
In the event of a power interruption, unplug your
refrigerator from the power source. Avoid opening
the doors until after power has been restored.
Your refrigerator will maintain a cold temperature
for longer if door opening is avoided or kept to a
minimum.
Once power has been restored, plug your
refrigerator back into the power source and
inspect food in the refrigerator for spoilage
or thawing. Cleaning your refrigerator after a
prolonged power outage is strongly recommended
to avoid odors and potential health hazards due to
thawing.
VACATION
For long vacations or absences, unplug your
refrigerator and remove all food from it. Turn
the temperature control knob in the refrigerator
section to the OFF position and clean the
refrigerator, including the gaskets, according to
the Proper Care and Maintenance section. Leave
the doors propped open to allow air to circulate
inside the refrigerator.
MOVING
Before moving your refrigerator, empty the
food from it and use adhesive tape to secure all
loose items such as shelves, door bins and racks,
crispers and pans, etc. and unplug it. Always move
the refrigerator in an upright position in order to
avoid damaging the sealed refrigerant system.
PAGE 18 • CLEANING AND CARE
Page 21
NORMAL OPERATING SOUNDS
ENGLISH
Whirring
There are multiple high-speed fans inside
your refrigerator which help it to maintain the
temperature you have selected. Whirring is
common when the refrigerator is first plugged in,
when the doors have been opened often or for an
extended period of time and when a large amount
of food has been added.
Humming
This is a common noise that comes from
the compressor and is a part of making your
refrigerator run efficiently.
• There are a lot of things going on in your
refrigerator at any given time. Additional noises
you may hear, and possible causes include:
• Gurgling is most likely due to the circulation of
refrigerant through the cooling coils.
• Sizzling or popping sounds can be frost melting
and falling onto the defrost heater during the
defrost cycle.
• Clicking or chirping may be heard as the
compressor attempts to re-start.
• Cracking or popping noises may be from the
expansion and contraction of cooling coils during
and after the defrost cycle.
• Also, when your refrigerator is first plugged
in, the foam insulation in the walls will cool and
contract, which can result in cracking or popping
noises.
• The defrost timer and thermostat control will
click as each cycles on and off.
If the refrigerator has been placed in a horizontal
position for any period of time, wait 4 hours after
returning it to the upright position before plugging
it in.
Whooshing
It is possible that you may hear a whooshing
noise when closing the doors. This is no cause
for concern. It is simply the pressure in the
refrigerator equalizing.
PAGE 19 • TROUBLE SHOOTING & WARRANTY
Page 22

TROUBLESHOOTING
PROBLEM POSSIBLE CAUSE(S) SOLUTION
ENGLISH
Refrigerator does
not run
Refrigerator or
freezer is too warm
Refrigerator or
freezer is too cold
Refrigerator runs
frequently or for
long periods of time
Moisture on
exterior/interior of
refrigerator
Refrigerator has an
odor
Light does not
come on
Temperature Control Knob is set to
OFF
Refrigerator is unplugged Plug power cord into power source
Breaker is tripped or turned off / Fuse is
blown
Refrigerator is in defrost mode Wait about 40 minutes for defrost cycle to end
Temperature control is not set low
enough
Doors opened frequently or left open Keep door closed / Check that a package isn’t
Warm food added recently Allow time for food and refrigerator to cool
Items against back of compartments
are blocking proper airflow
Temperature control is set too low Turn knob counter-clockwise to change to a
Normal when first plugged in Allow 24 hours for the refrigerator to cool down
Warm or large amounts of food added This is normal
Door is left open Ensure that door is not being held open by an
Hot weather or frequent openings This is normal
Temperature control set to coldest
setting
High humidity This is normal; Dry surface and adjust
Doors opened frequently or left open Keep door closed / Check that a package isn’t
Open container of water in refrigerator Cover or seal container
Food is not sealed or packaged properly Re-seal packaging / Place an opened box of
Interior needs to be cleaned Follow cleaning instructions in Proper Care and
Turn temperature knob clockwise to turn on
cooling system
Reset / Turn on breaker or replace fuse
and cooling system to restart
Turn temperature knob clockwise to adjust to a
lower temperature; allow 24 hours to adjust
preventing door from closing
Store items only inside the trim of the glass
shelves; don’t place items against sides of the
compartments or directly in front of any vents
warmer setting; allow 24 hours to adjust
item
Adjust knob to a warmer setting
temperature knob to slightly colder setting
preventing door from closing
baking soda in the refrigerator, replace every
three months
Maintenance section
Refrigerator is unplugged Plug refrigerator in to power source
Bulb is loose Tighten bulb by turning clockwise
Bulb is burned out Follow instructions in Light Bulb
Replacement section
Not all models come with a freezer
or mid level light
PAGE 20 • TROUBLE SHOOTING & WARRANTY
Page 23

TROUBLESHOOTING CONT.
PROBLEM POSSIBLE CAUSE(S) SOLUTION
Frost or ice crystals
on frozen food
Hot or warm air
from bottom of
refrigerator
Food freezing in
refrigerator
Freezer door pops
open when closing
the refrigerator
door
Door does not
close properly
Vibration or rattling Refrigerator is not resting firmly on
Freezer door left open or opened
frequently
Items blocking freezer air vents and
preventing proper air flow
Air flow coming from compressor
during refrigeration process
Food placed to close the air vent Move items away from back and top of the
Temperature control knob set too low Adjust the knob counter-clockwise to a warmer
Normal if freezer door closes
afterwards on its own
If freezer doesn’t close on its own after
popping open, adjust leveling legs
Refrigerator isn’t level See leveling leg feature instructions in Installing
Something is obstructing door closure Check for and remove obstructions
floor
Turn knob counter-clockwise to change to a
warmer setting; allow 24 hours to adjust
Move items away from rear wall
This is normal
refrigerator
setting
This indicates a good seal if freezer door closes
on its own
See leveling leg feature instructions in Installing
Your Refrigerator section
Your Refrigerator section
See leveling leg feature instructions in Installing
Your Refrigerator section
ENGLISH
PAGE 21 • TROUBLE SHOOTING & WARRANTY
Page 24

CUSTOMER SERVICE
ENGLISH
IMPORTANT
DO NOT RETURN THIS PRODUCT TO THE STORE
CUSTOMER
SERVICE
If you have a problem with this product, please contact the Haier
Customer Satisfaction Center at 1-877-337-3639.
DATED PROOF OF PURCHASE, MODEL # AND SERIAL #
REQUIRED FOR WARRANTY SERVICE
SERVICE DU
CENTRE DE
REPARATION
A LA CLIENTELE
SERVICIO
AL CLIENTE
Hotline 24/7
1-877-337-3639
PAGE 22 • TROUBLE SHOOTING & WARRANTY
Page 25

LIMITED WARRANTY
ENGLISH
What is covered and for how long?
This warranty covers all defects in workmanship
or material for a period of:
12 Months on Parts and Labor
5 Years on Sealed System
This warranty commences on the date the item
was purchased and the original purchase receipt
must be presented to the authorized service
center before any warranty service is rendered.
Exceptions: Commercial or Rental Use
90 Days on Labor (Carry-In Only)
90 Days on Parts
No Other Warranty Applies
What is Covered:
The mechanical and electrical parts, which serve
a functional purpose of this appliance for a period
of 12 months from the date of purchase. This
includes all parts except finish and trim.
The components of the sealed system (e.g.
hermetic compressor, condenser and evaporator)
from manufacturing defects for a period of 5
years from the date of purchase. Any damage to
such components caused by mechanical abuse
or improper shipping and handling will not be
covered.
What will be done?
We will repair or replace, at our discretion, any
mechanical or electrical part which proves to be
defective in normal usage during the warranty
period as specified.
There will be no charge to the purchaser for parts
and labor on any covered items during the initial 12
month period. Beyond this period, only parts are
covered in the remaining warranty. Labor is not
provided and must be paid by the consumer.
What to do if you need service:
Contact your nearest authorized service center.
For the name of the nearest service center, please
call 1-877-337-3639.
THIS WARRANTY COVERS APPLIANCES WITHIN
THE CONTINENTAL UNITED STATES AND
CANADA. THIS WARRANTY DOES NOT COVER
THE FOLLOWING:
• Service calls to correct the installation on your
refrigerator
• Service calls to instruct you on proper use of your
refrigerator
• Service calls to replace or correct house wiring or
plumbing
• Service calls to replace light bulbs
• Damages from improper installation
• Damages from shipping
• Defects other than manufacturing
• Damage from misuse, abuse, accident, alteration,
lack of proper care and maintenance or incorrect
current or voltage
• Damage from use other than household use
• Damage from service performed by a non-
authorized dealer or service center
• Decorative trim
• Transportation and shipping
• Labor (after the initial 12 month warranty period)
THIS LIMITED WARRANTY IS GIVEN IN LIEU
OF ALL OTHER WARRANTIES, EXPRESSED
OR IMPLIED, INCLUDING THE WARRANTIES
OF MERCHANTABILITY AND FITNESS FOR A
PARTICULAR PURPOSE
The remedy provided in this warranty is exclusive
and is granted in lieu of all other remedies.
The warranty does not cover incidental or
consequential damages, so the above limitations
may not apply to you. Some states do not allow
limitations on how long an implied warranty lasts,
so the above limitations may not apply to you.
This warranty gives you specific legal rights and
you may have other rights which vary from state to
state.
Haier America
New York, NY 10018
PAGE 23 • TROUBLE SHOOTING & WARRANTY
Page 26

TABLE DES MATIÈRES
RENSEIGNEMENTS SUR LA SÉCURITÉ
Consignes de sécurité importantes .............................................................................................................2
RÉGLAGES ET UTILISATION
Exigences en matière d'électricité ................................................................................................................4
Guide d'installation ....................................................................................................................................4-5
Instructions de désemballage .......................................................................................................................5
Installation de votre réfrigérateur ................................................................................................................6
Pièces comprises ...........................................................................................................................................6
Accessoires ....................................................................................................................................................6
Pièces et caractéristiques .............................................................................................................................7
Installation des poignées de porte ...........................................................................................................8-9
Inversion des portes ............................................................................................................................. 10-12
Caractéristiques et utilisation ................................................................................................................... 12
Consignes d'utilisation ......................................................................................................................... 13-15
Renseignements sur le stockage de nourriture ........................................................................................ 16
NETTOYAGE ET ENTRETIEN
Entretien approprié .............................................................................................................................. 17-18
DÉPANNAGE ET GARANTIE
Bruits normaux pendant le fonctionnement ............................................................................................. 19
Dépannage ............................................................................................................................................ 20-21
FRANÇAIS
Service à la clientèle ................................................................................................................................... 22
Garantie limitée ........................................................................................................................................... 23
ENREGISTREMENT DU PRODUIT
Merci d'avoir acheté un produit Haier. Ce guide convivial vous aidera à utiliser votre réfrigérateur de
façon optimale. Rappelez-vous de prendre en note
les numéros de modèle et de série.
Ils sont indiqués sur une étiquette apposée à
l'intérieur du produit.
Numéro de modèle
Numéro de série
Date d'achat
Brochez votre reçu de caisse à votre guide. Vous en aurez besoin pour obtenir du service en vertu de la
garantie..
Page 27

TABLE DES MATIÈRES
AVERTISSEMENT
LISEZ TOUTES LES INSTRUCTIONS AVANT D'UTILISER CET APPAREIL
ÉLECTROMÉNAGER. LORS DE L’UTILISATION DE CET APPAREIL, IL EST
IMPORTANT DE RESPECTER CERTAINES PRÉCAUTIONS D’USAGE,
Y COMPRIS LES INSTRUCTIONS SUIVANTES :
REMARQUE: Si le réfrigérateur a été entreposé en position horizontale ou inclinée pour une certaine
période de temps, attendez 24 heures avant de le rebrancher.
1) N'utilisez cet appareil qu'aux fins prévues, tel que décrit dans ce guide d'utilisation et d'entretien.
2) Ce réfrigérateur doit être installé conformément aux instructions d'installation avant d'être utilisé.
Consultez les Exigences en matière d'électricité de la partie Réglage et l’utilisation.
3) Ce réfrigérateur ne doit être ni encastré, ni incorporé dans une armoire. Il est conçu pour une
installation amovible seulement.
4) Ne débranchez jamais votre réfrigérateur en tirant sur le cordon d'alimentation. Agrippez toujours la
fiche fermement et tirez-la en ligne droite pour la sortir de la prise de courant.
5) Réparez ou remplacez immédiatement tous les cordons d'alimentation électrique qui s'effilochent
ou autrement endommagés. N'utilisez pas de cordon si celui-ci, la fiche ou l'embout du connecteur
présente des fissures ou d'autres dommages causés par l'abrasion.
6) Si votre ancien réfrigérateur n'est pas actuellement utilisé, nous recommandons d'en retirer les
portes. Cela réduira les risques pour les enfants.
AVERTISSEMENT
LORSQUE VOTRE RÉFRIGÉRATEUR EST EN MARCHE, NE TOUCHEZ PAS AUX
SURFACES FROIDES DU CONGÉLATEUR, PARTICULIÈREMENT SI VOS MAINS SONT
HUMIDES. LA PEAU POURRAIT RESTER COLLÉE À CES SURFACES TRÈS FROIDES
7) Ne recongelez pas les aliments qui ont complètement décongelé. Dans le numéro 69 de son Bulletin «
Home and Garden », le Département de l’Agriculture des États-Unis déclare :
«...Vous pouvez recongeler en toute sécurité des aliments congelés ayant décongelé, pourvu qu’ils
contiennent encore des cristaux de glace ou que leur température soit encore inférieure à 4 °C (40 °F)
».
«...Les viandes hachées, les volailles ou les poissons présentant une odeur ou une couleur atypique
ne devraient être ni recongelés, ni consommés ». Les crèmes glacées fondues devraient être mises
au rebut. Lorsqu’un aliment présente une odeur ou une couleur douteuse, jetez-le. Le consommer
pourrait être dangereux ».
FRANÇAIS
«...Même partielle, la décongélation et la recongélation réduisent la qualité gustative des aliments,
particulièrement s’il s’agit de fruits, de légumes et d’aliments préparés. Dans un tel contexte, la
qualité gustative des viandes rouges est moins compromise que bon nombre d’autres aliments.
Consommez les aliments recongelés le plus tôt possible afin de sauvegarder le maximum de leur
qualité gustative. »
PAGE 2 • RENSEIGNEMENTS DE SÉCURITÉ
Page 28

CONSIGNES DE SÉCURITÉ IMPORTANTES
8 N'utilisez aucun appareil électrique ou instrument coupant pour dégivrer votre réfrigérateur.
9 Débranchez votre réfrigérateur avant de le nettoyer ou de procéder à des réparations.
REMARQUE : Si pour une raison ou une autre, ce produit nécessite un entretien, nous vous
recommandons fortement de faire appel aux services d'un technicien agréé.
10) Ne faites pas fonctionner votre réfrigérateur en présence de fumées explosives.
CONSERVEZ CES
INSTRUCTIONS
DANGER
RISQUE QU'UN ENFANT RESTE PRIS AU PIÈGE. ENLEVEZ LES PORTES
DE VOTRE ANCIEN RÉFRIGÉRATEUR OU CONGÉLATEUR AVANT DE LE
METTRE AU REBUT. LAISSEZ LES ÉTAGÈRES EN PLACE POUR RENDRE
L'ACCÈS PLUS DIFFICILE AUX ENFANTS.
FRANÇAIS
PAGE 3 • RENSEIGNEMENTS DE SÉCURITÉ
Page 29

EXIGENCES CONCERNANT
L'ALIM. ÉLECTRIQUE
DIRECTIVES DE MISE À LA TERRE
AVERTISSEMENT
EXIGENCE ÉLECTRIQUE - RISQUE D’ÉLECTROCUTION
• Assurez-vous de la proximité d'une prise de courant adéquate pour alimenter le réfrigérateur : une
prise de 115 volts, 15 ampères tripolaire (mise à la terre) avec mise à la masse appropriée.
• Évitez d'utiliser les adaptateurs tripolaires ou de couper la broche de mise à la terre pour brancher
l'appareil à une prise bipolaire. Cette pratique est dangereuse puisqu'elle ne fournit aucune mise à la
terre au réfrigérateur et peut entraîner un risque d'électrocution.
UTILISATION DE RALLONGES
AVERTISSEMENT
UTILISATION DE RALLONGES ÉLECTRIQUES – RISQUE POUR LA SÉCURITÉ
• Évitez d'utiliser une rallonge électrique en raison des risques pour la sécurité dans certaines conditions.
En cas de nécessité absolue, n'utilisez qu'une rallonge tripolaire munie d'une fiche à trois broches, dont
une de mise à la terre, et une prise tripolaire pouvant loger la fiche. La capacité nominale indiquée sur
la rallonge doit être égale ou supérieure à la capacité nominale de l'appareil. N’UTILISEZ AUCUNE
RALLONGE DE PLUS DE 3,6 M (12 PI).
GUIDE D’INSTALLATION
LIMITES D'INSTALLATION
• Choisissez un emplacement convenant à l'appareil, sur une surface plane et dure, à l'abri des rayons
directs du soleil et des sources de chaleur (p. ex., les radiateurs, plinthes chauffantes, appareils de
cuisson, etc.). Toute inégalité du plancher devrait être compensée au moyen des pattes de nivellement
installées sous l'appareil.
DÉSEMBALLAGE DE VOTRE RÉFRIGÉRATEUR
1. Retirez tous les matériaux d'emballage. Cela inclut la base en carton ondulé ainsi que tous les rubans
adhésifs retenant des accessoires à l'intérieur et à l'extérieur du réfrigérateur.
FRANÇAIS
2. Inspectez le réfrigérateur et enlevez tout résidu d'emballage, de ruban adhésif ou de matériel imprimé
avant de le mettre en marche.
REMARQUE: Si votre réfrigérateur est muni d’un tiroir à collations, retirez le ruban adhésif bleu collé à
l'arrière de celui-ci. Vous ne pourrez ni ouvrir, ni refermer le tiroir si vous ne le faites pas.
PAGE 4 • RÉGLAGES ET UTILISATION
Page 30

GUIDE D’INSTALLATION
NIVELAGE DE VOTRE RÉFRIGÉRATEUR
• Votre réfrigérateur est muni de deux pattes de nivellement, situées aux coins avant de l'appareil. Après
avoir correctement positionné votre réfrigérateur dans sa position finale, vous pouvez procéder au
nivelage.
• Pour ajuster la hauteur des pattes de nivellement, tournez-les dans le sens inverse des aiguilles d'une
montre pour relever l'appareil, ou dans le sens des aiguilles d'une montre pour l'abaisser. La porte du
réfrigérateur est plus facile à fermer lorsque les pattes de nivellement sont prolongées.
ABAISSER SOULEVER
CIRCULATION APPROPRIÉE DE L'AIR
• Afin d'assurer l'efficacité maximale de votre réfrigérateur, vous devez l'installer dans un emplacement
où il y a une bonne circulation d'air ainsi qu’une tuyauterie et des connexions électriques appropriées.
Votre réfrigérateur n’est pas conçu pour fonctionner sous les 12 °C (55 °F) ou à une température
excédant les 35 °C (95 °F).
• N’installez pas votre réfrigérateur dans un emplacement qui n’est pas correctement isolé ou chauffé
(p. ex. dans un garage). Gardez votre appareil loin des sources de chauffage comme les radiateurs,
chaufferettes et appareils de cuisson.
• Voici les dégagements recommandés autour du réfrigérateur :
FRANÇAIS
Côtés...............25 mm (1 po) Dessus....................25 mm (1 po) Back..................2" (50mm)
INSTRUCTIONS DE DÉSEMBALLAGE
GRILLE AVANT
Votre réfrigérateur est muni d’une grille avant (coup-de-pied) réversible selon le côté du réfrigérateur
où les charnières ont été posées. Pour installer la grille avant, situez le côté sans charnières au moyen du
schéma suivant, et conformez-vous aux directives suivantes.
1. Encliquetez le côté sans charnières dans l’ouverture de circulation d’air de la glissière inférieure du
réfrigérateur.
2. Puis, encliquetez le côté avec charnières dans l’orifice de circulation d’air opposé de la glissière
inférieure située à côté de la charnière inférieure.
Côté sans charnières
Côté avec charnières
Côté avec charnières
Côté sans charnières
PAGE 5 • RÉGLAGES ET UTILISATION
Page 31

INSTALLATION DE VOTRE RÉFRIGÉRATEUR
OUTILS REQUIS POUR L'INSTALLATION
N’UTILISEZ AUCUN OUTIL ÉLECTRIQUE POUR INSTALLER LES POIGNÉES DE PORTE! LE SERRAGE
EXCESSIF DES VIS POURRAIT ENDOMMAGER LE PAS DE LA VIS!
Clés à ouverture fixe de 5/16 et 3/8, ou clé à ouverture variableTournevis cruciforme Couteau à mastic
PIÈCES FOURNIES
LE SAC DE PIÈCES FOURNIES PEUT VARIER SELON L’APPAREIL.
Voici le contenu du sac de pièces
des modèles qui ne sont pas
en acier inoxydable et munis
d’une vis de fixation de poignée
installée en usine sur la façade
de la porte:
• 2 poignées
• 1 grille avant
• 4 vis de fixation de poignée
• 1 plaque logo Haier
supplémentaire
• 1 bouchon à vis de couleur
assortie
• Guide du propriétaire
ACCESSOIRES
Voici le contenu du sac de pièces
des modèles qui ne sont pas
munis d’une vis de fixation de
poignée installée en usine sur la
façade de la porte :
• 2 poignées
• 1 grille avant
• 2 vis de fixation pour façade de
porte
• 4 vis de fixation pour rive de
porte
• 1 plaque logo Haier
supplémentaire
• 1 bouchon à vis blanc
• Guide du propriétaire
• 2 pièces de revêtement/
garniture de poignée
Voici le contenu du sac de pièces
des modèles en acier inoxydable:
• 2 poignées
• 1 grille avant
• 4 vis de fixation de poignée
• Guide du propriétaire
FRANÇAIS
Les accessoires suivants sont offerts en option:
• Trousse de fabrication de glaçons - HI5MK
• Étagère en treillis pour congélateur
• Ampoules de rechange
Pour commander des accessoires, composez le 1-877-337-3639 ou visitez notre site, au www.
haieramerica.com/support
PAGE 6 • RÉGLAGES ET UTILISATION
Page 32

PIÈCES ET CARACTÉRISTIQUES
Commande de
débit d’air
Régulateur de
température avec
lumière intérieure
Étagères en treillis
pleine largeur
Balconnets de
congélateur
Casier laitier
FRANÇAIS
Régulateurs
d’humidité du
bac à légumes
Bacs à légumes
Balconnets
pleine largeur
Grille avant
Pattes de
nivellement
Schéma utilisé uniquement à des ns d’information.
La conguration peut varier selon le numéro de modèle.
PAGE 7 • RÉGLAGES ET UTILISATION
Page 33

INSTALLATION DE LA POIGNÉE DE PORTE
INSTALLATION DE LA POIGNÉE DE
PORTE
Dans le cas des réfrigérateurs dont la façade des
deux portes est munie d’une vis de fixation :
Retirez les deux poignées du congélateur et les vis
du sac de pièces.
POIGNÉE DE PORTE DU CONGÉLATEUR
1. Placez l’embout conique de la poignée sur la vis
de fixation de la porte du congélateur et faites
glisser doucement la poignée vers l’embout plat
de celle-ci. (Fig. 1)
2. Une fois la poignée bien appuyée sur la vis de
fixation, faites pivoter lentement l’embout
plat de la poignée vers le bas de la porte du
congélateur.
Fig. 1
3. Ouvrez la porte du congélateur et installez les
vis sur son revers inférieur en les faisant passer
par l’embout plat de la poignée. N’utilisez aucun
outil électrique pour poser ces vis. Ne serrez
pas les vis de façon excessive.
Fig. 2
POIGNÉE DE PORTE DU RÉFRIGÉRATEUR
1. Placez l’embout conique de la poignée sur la vis
de fixation de la porte du réfrigérateur et faites
glisser doucement la poignée vers l’embout plat
de celle-ci. (Fig. 1)
2. Une fois la poignée bien appuyée sur la vis de
fixation, faites pivoter lentement l’embout
plat de la poignée vers le haut de la porte du
réfrigérateur. (Fig. 1)
3. Ouvrez la porte du réfrigérateur et vissez les
vis dans le haut de la porte du réfrigérateur à
travers l’embout plat de la poignée. Ne serrez
pas trop les vis. (Fig. 2)
4. Si vous réinstallez les poignées après l’inversion
du battant, retirez le bouchon à vis du sac
de pièces et insérez-le dans le trou de vis de
fixation de poignée de la façade de la porte du
réfrigérateur.
5. La plaque du logo Haier peut être soulevée de
la façade de la porte au moyen d’un couteau
à mastic ou d’un tournevis à lame plate qui
servira de levier, en prenant soin de ne pas
abîmer la surface. Tout résidu laissé sur la porte
par le retrait de la plaque devrait être nettoyé
au moyen de Goo Gonemc ou de WD-40mc.
Assurez-vous de vous conformer aux directives
du fabricant lorsque vous utilisez ces produits.
N’utilisez aucun abrasif ou tampon à récurer pour
enlever ces résidus.
Une plaque de logo supplémentaire est fournie
dans le sac de pièces distribué avec votre
réfrigérateur. Cette plaque peut être utilisée pour
recouvrir le trou de vis de fixation de la façade de
la porte du congélateur.
FRANÇAIS
PAGE 8 • RÉGLAGES ET UTILISATION
Page 34

INSTALLATION DE LA POIGNÉE DE PORTE
INSTALLATION DE LA POIGNÉE DE
PORTE
Dans le cas des réfrigérateurs dont la façade des
deux portes n’est pas munie d’une vis de fixation :
Retirez les deux poignées du compartiment du
congélateur et les vis ainsi que les garnitures pour
poignée du sac de pièces.
POIGNÉE DE PORTE DU CONGÉLATEUR
1. Fixez la poignée à la porte par l’embout conique
au moyen de la vis fournie. N’utilisez pas le trou
de vis le plus près du centre de la poignée.
Fig. 3
N’UTILISEZ PAS
CE TROU
FRANÇAIS
2. Fixez l’embout plat de la poignée au revers
inférieur de la porte au moyen des vis fournies.
POIGNÉE DE PORTE DU RÉFRIGÉRATEUR
1. Fixez la poignée à la porte par l’embout conique
au moyen de la vis fournie. (Fig. 3) N’utilisez
pas le trou de vis le plus près du centre de la
poignée.
2. Fixez l’embout plat de la poignée au haut de la
porte au moyen des vis fournies. (Fig. 4)
3. Insérez la languette de la garniture dans la fente
de la poignée, puis appuyez fermement sur
celle-ci. (Fig. 5)
4. Si vous réinstallez les poignées après inversion
du battant, sortez le bouchon à vis du sac
de pièces et insérez-le dans le trou de vis de
fixation de poignée de la façade de la porte du
réfrigérateur.
5. La plaque du logo Haier peut être soulevée de
la façade de la porte au moyen d’un couteau
à mastic ou d’un tournevis à lame plate qui
servira de levier, en prenant soin de ne pas
abîmer la surface. Tout résidu laissé sur la porte
par le retrait de la plaque devrait être nettoyé
au moyen de Goo Gonemc ou de WD-40mc.
Assurez-vous de vous conformer aux directives
du fabricant lorsque vous utilisez ces produits.
Fig. 4
3. Insérez la languette de la garniture dans la fente
de la poignée et appuyez fermement.
Fig. 5
N’utilisez aucun abrasif ou tampon à récurer pour
enlever ces résidus.
Une plaque de logo supplémentaire est fournie
dans le sac de pièces distribué avec votre
réfrigérateur. Cette plaque peut être utilisée pour
recouvrir le trou de vis de fixation de la façade de
la porte du congélateur.
PAGE 9 • RÉGLAGES ET UTILISATION
Page 35

INVERSION DE LA PORTE
INVERSION DU BATTANT DE PORTE
Sur les modèles blancs ou noirs, les charnières
et les poignées de porte peuvent être inversées
selon vos besoins.
REMARQUE: L’inversion des portes n’est pas
offerte sur les modèles munis de
porte en acier inoxydable.
RETRAIT DES POIGNÉES
Veuillez vous rapporter à la partie Installation des
poignées appropriée pour déterminer comment
enlever les poignées de votre réfrigérateur.
RETRAIT DES PORTES ET CHARNIÈRES
1. Utilisez du ruban adhésif pour retenir les
deux côtés des portes du réfrigérateur et du
congélateur aux côtés du caisson. (Fig.6)
Fig. 6
5. Retirez la porte (a) en tirant celle-ci vers vous et
en (b) en la soulevant simultanément. (Fig. 8)
Fig. 8
6. Déplacez le butoir de porte situé au bas de celleci vers le côté opposé de la porte, et fixez-le
solidement au moyen de ses vis; mettez la porte
de côté.
Fig. 9
7. Dévissez l'axe de charnière centrale en le
tournant dans le sens contraire des aiguilles
d’une montre et en prenant soin de ne pas
perdre les rondelles d’espacement de la partie
supérieure de l’axe. (Fig. 10)
FRANÇAIS
2. Retirez la vis du couvercle de charnière et le
couvercle de charnière supérieur. (Fig. 7)
3. Retirez les deux boulons retenant la charnière
supérieure au caisson, puis retirez la charnière
en la soulevant verticalement. (Fig. 7)
Vis de couvercle de charnière
Fig. 7
Couvercle à charnière
Boulons d’articulation
Charnière
supérieured’articulation
Trou annulaire
4. Décollez doucement le ruban adhésif retenant
la porte du congélateur au caisson tout en
maintenant la porte contre le caisson.
PAGE 10 • RÉGLAGES ET UTILISATION
8. Retirez la porte du réfrigérateur de la même
façon que celle du congélateur, soit en décollant
le ruban adhésif puis en tirant la porte vers vous
tout en la soulevant. (Fig. 10) Déplacez le butoir
du bas de porte vers le côté opposé de celle-ci.
(Fig. 9) Mettez la porte de côté.
Dévisser l’axe
Fig. 10
Soulever
Incliner vers l’avant
9. Retirez la charnière centrale et la rondelle
d'espacement. (Fig. 11)
Fig. 11
Rondelle d’espacement
de la charnière centrale
Charnière centrale
Boulons d’articulation
de la charnière centrale
Page 36

INVERSION DE LA PORTE
10. Retirez la charnière inférieure en dévissant les
boulons d’articulation la retenant au caisson.
REMARQUE: Il est plus facile de retirer et de
remettre en place l’axe de charnière
inférieure alors que la charnière elle-
même est toujours fixée au caisson.
Fig. 12
RÉINSTALLATION DES CHARNIÈRES ET
DES PORTES
1. Dévissez l’axe de charnière inférieur et
repositionnez-le dans le trou opposé, au-dessus
de la charnière. (Fig. 13)
2. Fixez la rondelle d’espacement de la charnière
FRANÇAIS
inférieure ainsi que cette dernière au caisson
au moyen des boulons d’origine. Assurez-vous
d’utiliser les deux trous de fixation supérieurs
de la charnière et le trou inférieur du côté où la
charnière est déplacée.
4. Retirez le couvercle du manchon supérieur du
côté à charnières de la porte du réfrigérateur
et installez-le sur le trou du manchon opposé.
Avec les deux mains, installez la porte sur l’axe
de charnière inférieur, en vous assurant que l’axe
s’insère complètement dans le trou du manchon
inférieur. En alignant le trou du manchon
supérieur au trou de la charnière centrale, placez
l'axe de charnière dans le trou, embout fileté
vers le bas, puis serrez.
Fig. 15
Trou du
manchon
Fig. 16
Fig. 13
3. Faites pivoter la charnière de 180 ° tel qu’illustré
ci-dessous, et fixez la rondelle d’espacement de
la charnière ainsi que la charnière elle-même au
caisson. (Fig. 14) Attendez avant d’installer l’axe
de la charnière centrale.
Fig. 14
PAGE 11 • RÉGLAGES ET UTILISATION
Ne serrez pas trop
5. Retirez le couvercle du manchon supérieur du
côté avec charnières de la porte du congélateur,
et posez-le sur le trou du manchon opposé.
Placez la porte sur l'axe de charnière centrale,
en vous assurant que l'axe s'insère à fond dans
le trou du manchon inférieur. Il est possible
d’utiliser encore une fois du ruban adhésif pour
retenir la porte en place durant la prochaine
étape.
6. Insérez l’axe de charnière supérieure dans
l'orifice du manchon situé du même côté que les
charnières inférieures.
Page 37

INVERSION DE LA PORTE
7. Remettez le couvercle de la charnière supérieure
en place au moyen des vis d’origine.
Fig. 17
REMARQUE: Avant de réinstaller les poignées,
retirez la plaque du logo Haier© de la façade de la
porte en la soulevant doucement au moyen d’un
couteau à mastic, qui servira de levier. Tout résidu
laissé sur la porte par le retrait de la plaque devrait
être nettoyé au moyen de Goo Gonemc ou de
WD-40mc.
7
6
Assurez-vous de vous conformer aux directives du
fabricant lorsque vous utilisez ces produits.
N’utilisez aucun abrasif ou tampon à récurer
pour enlever ces résidus. Utilisez un couteau à
mastic comme levier pour soulever les bouchons
recouvrant les trous de fixation de la poignée sur
la façade de la porte, en prenant soin de ne pas
égratigner la surface.
Pour remettre les poignées en place, veuillez vous
rapporter à la partie Installation des portes.
CARACTÉRISTIQUES ET UTILISATION
FRANÇAIS
REMARQUE: Les caractéristiques ne sont pas
toutes offertes sur tous les modèles.
REMARQUE: Si le réfrigérateur a été entreposé
en position horizontale ou inclinée
pour une certaine période de temps,
attendez 4 heures avant de le
rebrancher.
BOUTONS DE RÉGLAGE DE
TEMPÉRATURE
Votre réfrigérateur se conservera
automatiquement à la température réglée. Le
fait de tourner le bouton vers la gauche élèvera la
température du réfrigérateur et du congélateur.
En le tournant vers la droite, vous abaisserez la
température des deux compartiments. Vous
pouvez tourner le bouton dans un sens ou dans
l’autre pour ajuster la température suivant les
besoins. Nous recommandons de mettre le bouton
en position verticale et de laisser le réfrigérateur
fonctionner ainsi pendant 24 heures avant de
régler sa température. Le fait de tourner le bouton
complètement vers la gauche (position Off)
éteindra le système de réfrigération sans toutefois
mettre le réfrigérateur hors tension.
Le compartiment congélateur est également
doté d’un bouton de commande du ventilateur,
utilisé pour réguler la circulation d’air dans le
compartiment et régler la température du
congélateur avec précision. Tout comme avec
le bouton de température du réfrigérateur, nous
recommandons de mettre le bouton en position
verticale et de laisser le congélateur fonctionner
ainsi pendant 24 heures avant de régler sa
température.
Bouton régulateur de température du
réfrigérateur.
Bouton du ventilateur du congélateur
PAGE 12 • RÉGLAGES ET UTILISATION
Page 38

INSTRUCTIONS D'UTILISATION
ÉCLAIRAGE
Tous les modèles sont munis d’un plafonnier, situé
sur la paroi supérieure du réfrigérateur. Dans le cas
des modèles à ampoule unique, aucun couvercle
n’est fourni. Dans le cas des modèles à ampoule
double, un couvercle sera fourni. Certains modèles
peuvent être munis d’une lumière de congélateur
et (ou) d'une lumière de niveau moyen située sur
la paroi arrière du réfrigérateur, au-dessus du
bac à légumes. Veuillez vous rapporter à la partie
Entretien approprié pour connaître les directives
de remplacement de l'ampoule.
PLAFONNIER AVEC COUVERCLE
(EXCLUSIF À CERTAINS MODÈLES)
Pour retirer le couvercle du plafonnier (si inclus) :
FRANÇAIS
1. Appuyez sur la languette de l’extrémité éloignée
du couvercle.
2. Faites pivoter l’extrémité éloignée vers le bas.
3. Poussez le couvercle vers le fond du
compartiment.
LUMIÈRE DE CONGÉLATEUR (EXCLUSIF
À CERTAINS MODÈLES)
Pour retirer le couvercle de la lumière du
congélateur (si incluse) :
1. Tirez le couvercle vers vous.
CLAYETTES DU RÉFRIGÉRATEUR
Tous les modèles de réfrigérateur comportent des
clayettes pouvant être ajustées pour convenir à
vos besoins de rangement. Selon le modèle, les
clayettes peuvent être faites de treillis métallique
ou de verre encapsulé, pleine largeur ou demilargeur.
CLAYETTES PLEINE LARGEUR EN
TREILLIS MÉTALLIQUE ET EN VERRE
ENCAPSULÉ
Elles peuvent être ajustées à quatre différents
niveaux. Ces clayettes s'installent et se retirent
en soulevant le devant de la clayette et en la tirant
doucement vers vous.
LUMIÈRE DE NIVEAU MOYEN (EXCLUSIF
À CERTAINS MODÈLES)
Pour retirer la lentille de la lumière de niveau
moyen du réfrigérateur (si incluse) :
1. Appuyez sur le bas du couvercle en poussant
vers le haut.
2. Détachez le couvercle du compartiment en le
faisant pivoter vers vous.
3. Soulevez la partie supérieure du couvercle pour
le sortir complètement de son socle.
PAGE 13 • RÉGLAGES ET UTILISATION
TABLETTES DEMI-LARGEUR EN VERRE
ENCAPSULÉ
S'ajustent à quatre hauteurs différentes et
peuvent être déplacées indépendamment l'une de
l'autre, vous procurant ainsi la plus vaste gamme
d'options de rangement. Gardez à l’esprit que les
réfrigérateurs munis de tablettes demi-largeur ne
sont munis que d’une seule glissière de soutien,
située au centre de la paroi arrière du réfrigérateur.
Ainsi, les clayettes de gauche ne peuvent être
interchangées avec celles de droite (et vice-versa).
Tirer
Soulever
Page 39

DIRECTIVES D’UTILISATION
Pour ajuster une clayette demi-largeur, retirez
tout article qui s’y trouve et inclinez le devant
de la clayette vers le haut avec une main tout
en stabilisant la clayette avec l’autre. Une fois la
clayette suffisamment élevée pour que le crochet
arrière se dégage, vous pouvez la tirer vers vous.
Pour poser la clayette sur un autre niveau, glissez
le rebord extérieur (non central) le long de la
glissière latérale jusqu’à ce que vous touchiez au
fond du réfrigérateur. Soulevez le côté central
légèrement pour permettre au crochet arrière de
s’insérer dans la glissière en porte-à-faux. Ensuite,
abaissez doucement le centre de la clayette
jusqu’à ce qu'elle repose contre la glissière latérale
et qu’elle soit soutenue par la glissière en porte-àfaux.
TIROIR À COLLATIONS (EXCLUSIF À
CERTAINS MODÈLES)
Les réfrigérateurs munis de tablettes en verre
encapsulé comportent également un tiroir à
collations.
BACS À LÉGUMES ET COUVERCLE DE
BAC À LÉGUMES
Pour retirer un bac à légumes :
1. Ouvrez le bac jusqu’à ce qu’il s’arrête.
2. Soulevez le devant du bac.
3. Tirez dessus jusqu’à ce qu’il soit sorti.
Tirer
Tirer
Soulever
REMARQUE: Pour enlever un bac à légumes du
même côté que la porte, retirez
le bac inférieur du même côté en
premier lieu.
FRANÇAIS
Dans un tel contexte, il vous faudra retirer le tiroir
avant d'ajuster la tablette qui le recouvre.
Pour retirer le tiroir à collations :
1. Ouvrez le tiroir jusqu’à ce qu’il s’arrête.
2. Soulevez le bac vers le haut.
3. Sortez le bac complètement de sa glissière.
4. Suivez les directives d’ajustement de la tablette
à la hauteur désirée.
Tirer
Soulever
Tirer jusqu’à
l’arrê t
Pour retirer le couvercle de bac à légumes,
ôtez les deux bacs à légumes tel qu'indiqué
précédemment.
1. Avec une main, soulevez la vitre du bac par le
dessous tout en la retenant par l’avant de l’autre
main.
2. Avec les deux mains, délogez doucement
l'étagère en verre et mettez-la de côté.
3. Encore avec les deux mains, soulevez le cadre du
bac à légumes et sortez-le du réfrigérateur.
Pour remettre le couvercle en place, réinsérez
le cadre du bac à légumes dans le réfrigérateur,
replacez doucement la vitre dans l'espace encastré
du cadre, et replacez les bacs à légumes.
PAGE 14 • RÉGLAGES ET UTILISATION
Page 40

DIRECTIVES D’UTILISATION
BACS À LÉGUMES ET COUVERCLE DE
BAC À LÉGUMES (SUITE)
Pour retirer un couvercle de bac à légumes :
1. Retirez les deux bacs à légumes en suivant les
directives précédentes.
2. Avec une main, soulevez la vitre du bac par le
dessous tout en la retenant par l’avant de l’autre
main.
3. Avec les deux mains, délogez doucement
l'étagère en verre et mettez-la de côté.
4. Encore avec les deux mains, soulevez le cadre du
bac à légumes et sortez-le du réfrigérateur.
Pour remettre le couvercle en place, réinsérez
le cadre du bac à légumes dans le réfrigérateur,
remettez doucement la vitre en place dans
l'espace encastré du cadre, et replacez les bacs à
légumes.
Vitre du bac à
légumes
Cadre du bac à
légumes
CARACTÉRISTIQUES DE LA PORTE
Selon le modèle, votre réfrigérateur est muni soit
de balconnets pleine largeur ou d’une combinaison
de balconnets pleine largeur et de casiers demilargeur. Pour retirer un balconnet pleine largeur
ou un casier demi-largeur, prenez vos deux mains
pour agripper les rebords inférieur et supérieur du
casier ou du balconnet et le soulever à la verticale.
Tous les modèles sont munis d’un casier laitier à
couvercle rabattable.
Le balconnet inférieur de certains modèles est
muni d’un serre-bouteille que l’on peut ajuster
en l’agrippant fermement et en le glissant
latéralement jusqu’à ce qu’il serre bien les articles
rangés sur le balconnet.
FRANÇAIS
RÉGULATEURS D’HUMIDITÉ DES BACS À
LÉGUMES
Chaque bac à légumes est muni de son propre
régulateur d’humidité.
Dans le cas des fruits et légumes à peau, glissez la
barre à LOW (Bas).
Dans le cas des légumes-feuilles, déplacez la
commande d’humidité à HIGH (Élevé).
PAGE 15 • RÉGLAGES ET UTILISATION
Page 41

RENSEIGNEMENTS SUR LE STOCKAGE
DE NOURRITURE
ALIMENTS FRAIS:
• Sauf avis contraire, lorsque vous stockez des
aliments frais n’ayant pas été préemballés,
assurez-vous de bien emballer ou stocker ces
aliments dans des matières hermétiques et à
l'épreuve de l'humidité. Vous en préserverez
ainsi la durée de conservation et empêcherez le
transfert d'odeurs et de goûts.
• Essuyez les contenants avant de les ranger pour
éviter tout déversement inutile.
• Les œufs devraient être rangés à la verticale
dans leur carton d’origine pour en maximiser la
durée de conservation.
• Les fruits devraient être lavés et séchés, puis
insérés dans des sacs de plastique avant d’être
rangés au réfrigérateur.
• Les légumes à pelure devraient être rangés dans
des sacs ou des contenants de plastique.
• Les légumes-feuilles devraient être lavés et
séchés, puis rangés dans des sacs ou des
contenants de plastique.
• Les aliments chauds devraient être laissés à
refroidir avant d’être stockés au réfrigérateur.
Ceci évitera toute utilisation d’électricité inutile.
• Les fruits de mer frais devraient être consommés
le jour de leur achat.
• Lorsque vous stockez des viandes dans la
section des aliments frais, gardez-les dans leur
emballage d’origine ou réemballez-les au besoin.
Voici quelques conseils de conservation
d'aliments:
• Poulet – 1 à 2 jours
• Bœuf haché – 1 à 2 jours
• Viandes froides – 3 à 5 jours
• Steaks/rôtis – 3 à 5 jours
• Viandes fumées/salaisonnées – 7 à 10 jours
Pour consulter un tableau de conservation détaillé,
visitez le site de la FDA, à l'adresse www.cfsan.fda.
gov/~dms/fttstore.html
ALIMENTS SURGELÉS
• Essuyez les contenants avant de les ranger pour
éviter tout déversement inutile.
• Les aliments chauds devraient être laissés à
refroidir avant d’être stockés au congélateur. Ceci
évitera toute dépense superflue d’électricité.
• Lorsque vous stockez des viandes, gardez-les
dans leur emballage d’origine ou réemballez-les
au besoin.
• Les aliments stockés au congélateur doivent être
emballés de façon appropriée. Tous les aliments
doivent être emballés de manière à empêcher
l’infiltration ou l’évacuation d’air ou d’humidité.
Le stockage inapproprié des aliments entraînera
le transfert d'odeurs et de saveurs, et fait sécher
les aliments mal emballés.
• Conformez-vous aux directives de bonne
utilisation figurant sur les emballages ou les
contenants.
• Recommandations sur l’emballage :
Contenants en plastique avec couvercles
hermétiques
Papier d’aluminium ultra résistant
Pellicule rétractable faite de fibre de saran
Sacs de plastique auto-scellant
• Ne pas recongeler les aliments dégelés /
décongelés.
• Il est recommandé d’inscrire la date de mise au
congélateur sur l’emballage.
Voici quelques conseils de conservation
d'aliments :
• Repas congelés – 3 à 4 mois
• Crevettes, langoustines, écrevisses frais –
3 à 6 mois
• Bœuf haché et viandes à ragoût – 3 à 4 mois
• Dinde, veau ou porc haché – 3 à 4 mois
• Côtelettes – 4 à 6 mois
• Steaks – 6 à 12 mois
• Poulet ou dinde – 6 à 8 mois
Pour consulter un tableau de conservation détaillé,
visitez le site de la FDA, à l'adresse www.cfsan.fda.
gov/~dms/fttstore.html
FRANÇAIS
PAGE 16 • RÉGLAGES ET UTILISATION
Page 42

ENTRETIEN APPROPRIÉ
AVERTISSEMENT
Débranchez TOUJOURS le réfrigérateur de la
prise de courant avant de le nettoyer. Le non-
respect de cette directive pourrait entraîner une
électrocution grave ou mortelle
REMARQUE: Avant d’utiliser quelque produit
nettoyant que ce soit, assurez-vous de consulter
les instructions et avertissements du fabricant.
Vous éviterez ainsi toute blessure éventuelle et
risque de dégât matériel.
NETTOYAGE DE L’INTÉRIEUR:
Préparez une solution nettoyante avec 3 ou
4 cuillérées à table de bicarbonate de soude
dissoutes dans de l'eau chaude. Servez-vous
d'une éponge ou d'un linge doux, humidifié avec
la solution nettoyante pour nettoyer l'intérieur de
votre réfrigérateur.
Évitez de nettoyer le verre froid (tablettes, verre
du couvercle du bac à légumes, etc.) avec de l’eau
chaude. Le verre pourrait se briser et vous blesser.
FRANÇAIS
Manipulez toutes les pièces de verre avec soin en
tout temps.
Ne mettez aucune pièce du réfrigérateur au lavevaisselle. N'utilisez pas de substances chimiques
rudes, d'abrasifs, d'ammoniaque, d'agent chloré
de blanchiment, de détergents concentrés, de
solvants ou de tampons à récurer métalliques.
Ces éléments pourraient abîmer et (ou) altérer la
couleur du fini de surface du réfrigérateur.
Les joints de porte devraient être nettoyés
tous les trois mois en suivant les directives de
nettoyage de l'intérieur. La propreté des joints
assurera une plus grande étanchéité. La gelée de
pétrole appliquée en petite quantité sur le côté
des charnières des joints d'étanchéité préservera
la flexibilité du joint et assurera une bonne
étanchéité.
N’utilisez jamais un chiffon sale pour nettoyer
l’extérieur du réfrigérateur. Les linges sales
peuvent laisser des résidus qui abîmeront le fini de
surface de l'appareil. En outre, évitez l’utilisation
de produits chimiques rudes, d’ammoniaque,
d’agent chloré de blanchiment, de détergents
concentrés, de solvants, d’abrasifs ou de tampons
à récurer métalliques pour nettoyer l’extérieur du
réfrigérateur.
REMPLACEMENT DES AMPOULES
AVERTISSEMENT
TOUJOURS débrancher l’appareil de sa source
d’alimentation avant de changer une ampoule. Le
non-respect de cette directive pourrait entraîner
une électrocution grave ou mortelle.
1. Pour remplacer une ampoule, débranchez tout
d'abord le réfrigérateur de sa prise de courant.
2. Après avoir laissé l’ampoule refroidir, tournez-la
dans le sens inverse des aiguilles d’une montre
pour la dégager de son socle.
3. Vissez une nouvelle ampoule dans le socle en la
tournant dans le sens des aiguilles d’une montre.
NETTOYAGE DE L’EXTÉRIEUR:
Utilisez un linge propre, doux et légèrement
humidifié avec une cire pour appareils de cuisine
ou un détergent doux pour nettoyer l’extérieur du
réfrigérateur.
Utilisez un linge propre, doux et légèrement
humecté dans l’eau chaude savonneuse pour
nettoyer les poignées et les bordures décoratives.
Séchez au moyen d’une serviette propre et sèche.
Dans le cas des modèles en acier inoxydable,
utilisez un linge sec et un produit à polir pour l’acier
inoxydable.
PAGE 17 • NETTOYAGE ET ENTRETIEN
4. Rebranchez votre réfrigérateur et ouvrez la
porte pour vérifier si l’ampoule fonctionne.
Pour serrer : Tourner l’ampoule dans le sens des
aiguilles d’une montre.
Pour desserrer : Tourner l’ampoule dans le sens
inverse des aiguilles d’une montre.
Page 43

SOIN APPROPRIÉ
GUIDE DE REMPLACEMENT DES
AMPOULES
Utilisez le guide ci-dessous pour déterminer
l’ampoule appropriée à chaque luminaire.
Plafonnier du réfrigérateur – Ampoule lumière
du jour pour appareil électroménager, 40 W (1 ou
deux, selon le modèle)
Lumière demi-niveau du réfrigérateur – Ampoule
d’appareil électroménager, 25 W
Lumière du congélateur - Ampoule d’appareil
électroménager, 25 W
Les ampoules sont toutes à culot moyen.
PANNES DE COURANT
En cas de panne de courant, débranchez votre
réfrigérateur de sa source d’alimentation. Évitez
d’ouvrir les portes avant le rétablissement de
l’électricité. Votre réfrigérateur gardera sa
température froide plus longtemps si l’on évite ou
réduit au minimum l’ouverture des portes.
VACANCES
Si vous prévoyez vous absenter pour une longue
période, débranchez votre réfrigérateur et videzle complètement. Mettez le bouton de réglage
de température à la position OFF et nettoyez
le réfrigérateur et ses joints d’étanchéité,
conformément aux directives de la partie
Entretien approprié. Laissez les portes légèrement
ouvertes pour permettre à l’air de circuler à
l’intérieur du réfrigérateur.
DÉMÉNAGEMENT
Avant de déplacer votre réfrigérateur, videz-le
complètement et utilisez du ruban adhésif pour
bien retenir tous les articles lâches (clayettes,
casiers, balconnets, bacs, etc.), puis débranchez-
le. Déplacez toujours le réfrigérateur en position
verticale afin d’éviter d’endommager le système
réfrigérant hermétique
FRANÇAIS
Une fois le courant rétabli, branchez votre
réfrigérateur dans sa source d’alimentation et
inspectez les aliments à l’intérieur pour vérifier
s’ils sont décongelés ou s’ils se sont détériorés.
Il est fortement recommandé de nettoyer votre
réfrigérateur après une panne de courant pour
éviter la formation d’odeurs et d’éventuels risques
pour la santé en raison de la décongélation des
aliments.
PAGE 18 • NETTOYAGE ET ENTRETIEN
Page 44

BRUITS NORMAUX PENDANT
LE FONCTIONNEMENT
Vrombissement
Votre réfrigérateur comporte de multiples
ventilateurs à débit élevé qui contribuent au
maintien de la température sélectionnée. Les
vrombissements sont courants lorsque vous
branchez votre réfrigérateur pour la première fois,
lorsque les portes sont ouvertes fréquemment
ou pendant de longues périodes et lorsque de
grandes quantités d’aliments viennent d’être
stockés.
Ronronnement
FRANÇAIS
Claquements
Craquements
• Plusieurs choses se passent dans votre
réfrigérateur à tout moment. Voici quelques
bruits que vous pourriez également entendre
ainsi que les causes possibles :
• Les gargouillements sont probablement le fait
de la circulation du fluide frigorigène dans les
serpentins de refroidissement.
• Les grésillements ou claquements peuvent être
liés au dégivrage et à la chute de gouttes d'eau
sur l'élément chauffant pendant le cycle de
dégivrage.
• Des cliquetis ou des bruits stridents peuvent
être émis lors de la tentative de redémarrage du
compresseur.
• Les craquements ou claquements peuvent
être dus à l’expansion et à la contraction des
serpentins de refroidissement pendant et après
le cycle de dégivrage.
Cliquetis
Gargouillements
Grésillements
Ce bruit courant provient du compresseur et
fait partie des processus permettant à votre
réfrigérateur de fonctionner efficacement.
Chuintement
Vous pourriez entendre une sorte de chuintement
en refermant les portes. Il n’y a pas lieu de
s’alarmer. Ce bruit est simplement le produit
de l’égalisation de la pression à l’intérieur du
réfrigérateur.
• De plus, la première fois que vous brancherez
votre réfrigérateur, la mousse isolante des
parois se refroidira et se contractera, ce qui
pourrait être à l’origine de craquements ou de
claquements.
• La minuterie de dégivrage et la commande
thermostatique émettront des cliquetis au début
et au terme de chaque cycle.
Si le réfrigérateur a été entreposé en position
horizontale ou inclinée pendant une certaine
période de temps, attendez 4 heures avant de le
rebrancher.
PAGE 19 • DÉPANNAGE ET GARANTIE
Page 45

DÉPANNAGE
PROBLÈME CAUSE(S) POSSIBLE(S) SOLUTION
Le réfrigérateur ne
fonctionne pas.
Il fait trop chaud
dans le réfrigérateur
ou le congélateur.
Il fait trop froid dans
le réfrigérateur ou le
congélateur.
Le réfrigérateur
fonctionne
fréquemment ou
pendant de longues
périodes.
Humidité se formant
à l’extérieur/
intérieur du
réfrigérateur
Une odeur
se dégage du
réfrigérateur
Le bouton de réglage de température est
en position OFF (Arrêt).
Le réfrigérateur est débranché. Branchez la fiche dans une prise de courant.
Le disjoncteur est déclenché ou fermé /
un fusible est grillé.
Le réfrigérateur est en mode dégivrage. Attendez la fin du cycle de dégivrage (environ
La commande de température n'est pas
assez basse.
Les portes sont ouvertes trop
fréquemment, ou laissées ouvertes.
Des aliments chauds ont été récemment
ajoutés.
Des articles appuyés sur la paroi arrière
des compartiments empêchent la bonne
circulation de l'air.
Le bouton de commande est réglé à une
température trop froide.
Ceci est normal lors du premier
branchement.
De la nourriture chaude ou en grande
quantité vient d’être rangée.
La porte est ouverte. Assurez-vous que rien ne retient la porte en position
Chaleur ambiante ou ouvertures
fréquentes.
La température est réglée à son plus bas
degré.
Taux d’humidité ambiante élevé C’est normal; séchez la surface et réglez la température
Les portes sont ouvertes trop
fréquemment, ou laissées ouvertes.
Contenant d’eau non recouvert dans le
réfrigérateur
Aliment non scellé ou emballé
inadéquatement
L’intérieur a besoin d’être nettoyé. Conformez-vous aux directives de nettoyage de la
Tournez le bouton de réglage de température vers la
droite pour actionner le système de refroidissement.
Réinitialisez / réenclenchez le disjoncteur ou remplacez
le fusible.
40 minutes) et le redémarrage du système de
refroidissement.
Tournez le bouton de réglage de température dans
le sens des aiguilles d’une montre pour abaisser la
température; allouez 24 heures pour l’ajustement.
Gardez les portes fermées / vérifiez si un article
empêche la bonne fermeture de la porte.
Laissez la nourriture et le réfrigérateur se refroidir.
Ne rangez les articles qu’à l’intérieur des limites de la
bordure des étagères en verre; n'appuyez aucun article
sur les côtés des compartiments ou contre les orifices
d’aération.
Tournez le bouton de réglage de température dans le
sens inverse des aiguilles d’une montre pour augmenter
la température; allouez 24 heures pour l’ajustement.
Allouez 24 heures pour que le réfrigérateur se
refroidisse.
C'est normal.
ouverte.
C'est normal.
Ajustez le bouton à une température plus chaude.
à un niveau un peu plus froid.
Gardez les portes fermées / vérifiez si un article
empêche l’enclenchement de la porte.
Recouvrez ou étanchéifiez le contenant.
Scellez l'emballage/placez une boîte ouverte de
bicarbonate de soude dans le réfrigérateur, que vous
remplacerez aux trois mois.
partie Entretien approprié
FRANÇAIS
PAGE 20 • DÉPANNAGE ET GARANTIE
Page 46

DÉPANNAGE
PROBLÈME CAUSE(S) POSSIBLE(S) SOLUTION
La lumière ne
s’allume pas.
Du givre ou des
cristaux de glace
se forment sur les
aliments congelés.
De l'air chaud se
dégage du bas du
réfrigérateur.
Les aliments
gèlent dans le
réfrigérateur.
FRANÇAIS
La porte du
congélateur s’ouvre
d’elle-même lors de
la fermeture de la
porte du frigo.
La porte ne se
referme pas
correctement.
Vibrations, cliquetis Le réfrigérateur ne repose pas
Le réfrigérateur est débranché. Branchez le réfrigérateur à une source
L’ampoule est mal vissée. Resserrez l’ampoule en la tournant dans le
L’ampoule est grillée. Suivez les instructions de la partie
Les modèles ne sont pas tous munis
d’une ampoule de congélateur ou de
niveau moyen.
La porte du congélateur est ouverte, ou
s’ouvre trop fréquemment.
Des articles obstruent les évents d’air
du congélateur et empêchent la bonne
circulation de l’air.
Flux d’air se dégageant du compresseur
durant le processus de réfrigération.
Les aliments sont trop près de l’évent
d'aération.
Le bouton de commande est réglé à
une température trop froide.
Si la porte du congélateur se referme
d'elle-même ensuite, c'est normal.
Si la porte du congélateur ne se referme
pas d'elle-même ensuite, ajustez les
pattes de nivellement.
Le réfrigérateur n’est pas de niveau. Consultez les directives de réglage des pattes
Quelque chose obstrue la fermeture de
la porte.
complètement sur le sol.
d’alimentation.
sens des aiguilles d’une montre.
Remplacement des ampoules.
Tournez le bouton de réglage de température
dans le sens inverse des aiguilles d’une montre
pour augmenter la température; allouez 24
heures pour l’ajustement.
Éloignez les articles de la paroi arrière.
C'est normal.
Éloignez les articles du fond et du haut du
réfrigérateur.
Tournez le bouton de réglage de température
dans le sens des aiguilles d'une montre, vers une
température plus chaude.
Si elle se referme d'elle-même, c’est le signe
qu’il est étanche.
Consultez les directives de réglage des pattes
de nivelage à la partie Installation de votre
réfrigérateur.
de nivelage à la partie Installation de votre
réfrigérateur.
Vérifiez s’il y a des obstructions et enlevez-les.
Consultez les directives de réglage des pattes
de nivelage à la partie Installation de votre
réfrigérateur.
PAGE 21 • DÉPANNAGE ET GARANTIE
Page 47

SERVICE À LA CLIENTÈLE
IMPORTANT
NE RETOURNEZ PAS CE PRODUIT CHEZ LE DÉTAILLANT
En cas de problème avec ce produit, veuillez contacter le service
des consommateurs « Haier Customer Satisfaction Center » au
1-877-337-3639.
UNE PREUVE D’ACHAT DATÉE, LE NUMÉRO DE MODÈLE ET LE
NUMÉRO DE SÉRIE SONT REQUIS POUR OBTENIR DU SERVICE EN
VERTU DE LA GARANTIE.
CUSTOMER
SERVICE
SERVICE DU
CENTRE DE
REPARATION
A LA CLIENTELE
SERVICIO
AL CLIENTE
Hotline 24/7
1-877-337-3639
FRANÇAIS
PAGE 22 • DÉPANNAGE ET GARANTIE
Page 48

GARANTIE LIMITÉE
Couverture et durée de la garantie
Cette garantie couvre tous les vices de fabrication ou
de matériaux pour une période de :
12 mois sur les pièces et la main-d’œuvre
5 ans sur le système hermétique
La garantie prend effet à la date originale d'achat et le
reçu d'achat original doit être présenté au dépositaire
autorisé pour que des réparations soient effectuées en
vertu de la garantie.
Exceptions : Usage commercial ou locatif
90 jours sur la main-d'œuvre (en atelier seulement)
90 jours sur les pièces
Aucune autre garantie ne s'applique.
Éléments couverts:
Les pièces mécaniques et électriques, qui agissent
comme élément fonctionnel de cet ensemble, sont
garantis pour une durée de douze mois à partir de
la date d’achat. Cela englobe toutes les pièces, à
l'exception de la finition extérieure du caisson et des
joints d'étanchéité.
Les organes du système hermétique (p. ex. le
motocompresseur hermétique, le condensateur et
l'évaporateur) sont garantis contre tous les vices de
fabrication pour une durée de cinq (5) ans suivant la
FRANÇAIS
date d'achat. Tout dommage à ces organes causé par
un abus mécanique ou une manipulation inadéquate
n'est pas couvert par cette garantie.
Services couverts
Nous réparerons ou remplacerons, à notre discrétion, tout organe mécanique ou électrique qui s'avère
défectueux dans le cadre d'un usage normale durant la
période de garantie précisée dans ce guide.
Les pièces et la main-d'œuvre seront fournies sans
frais à l'acheteur au cours de la période initiale de douze
(12) mois. Au-delà de cette période, seules les pièces
sont couvertes pour le reste de la période de garan-
tie. La main-d'œuvre ne sera plus fournie et doit être
défrayée par le client.
Quoi faire en cas de besoin de service:
Communiquez avec le dépositaire autorisé le plus près
de chez vous. Pour connaître le nom du dépositaire
autorisé le plus près de chez vous, veuillez composer le
1-877-337-3639
CETTE GARANTIE COUVRE LES APPAREILS DANS
LES LIMITES DES ÉTATS CONTINENTAUX DES
ÉTATS-UNIS ET DU CANADA. ELLE NE COUVRE PAS
LES ÉLÉMENTS SUIVANTS:
• Les appels de service pour corriger les problèmes
d’installation de votre réfrigérateur.
• Les demandes d'information téléphoniques sur
l'emploi approprié de votre réfrigérateur.
• Les appels de service pour remplacer ou corriger le
câblage ou la tuyauterie domestique.
• Les appels de service pour le remplacement des
ampoules.
• Les dommages imputables à une installation inadéquate.
• Les dommages subis par l'appareil pendant
l'expédition.
• Les défauts autres que de fabrication.
• Les dommages causés par l'emploi incorrect ou
abusif, les accidents, les modifications, l'entretien et
le soin inadéquat de l'appareil, ou encore un voltage
incorrect.
• Les dommages subis autres que dans le cadre d'une
utilisation domestique.
• Les dommages découlant d'un entretien effectué
ailleurs que chez un détaillant ou un dépositaire autorisé.
• Les garnitures décoratives
• Le transport et l'expédition.
• La main-d'œuvre (après la période initiale de douze
mois)
CETTE GARANTIE LIMITÉE EST DONNÉE EN GUISE
ET LIEU DE TOUTE AUTRE GARANTIE, EXPRESSE OU
TACITE COMPRENANT LES GARANTIES DE VALEUR
MARCHANDE ET DE CONVENANCE PRÉCISE.
Le recours fourni par cette garantie est exclusif et
accordé en remplacement de tout autre recours. La
garantie ne couvre pas les dommages accessoires ou
indirects. Par conséquent, les limitations précédentes
peuvent ne pas s'appliquer à vous. Certains États ne
permettent pas de limites concernant la durée d'une
garantie implicite, alors les limites susmentionnées ne
s'appliquent peut-être pas à vous. Cette garantie vous
confère des droits particuliers reconnus par la Loi, et
vous pourriez avoir d'autres droits pouvant varier d'un
état ou d’une province à l'autre.
Haier America
New York, NY 10018
PAGE 23 • DÉPANNAGE ET GARANTIE
Page 49

ÍNDICE
INFORMACIÓN DE SEGURIDAD
Instrucciones importantes de seguridad .....................................................................................................2
INSTALACIÓN Y USO
Requisitos eléctricos......................................................................................................................................4
Guía de instalación .....................................................................................................................................4-5
Instrucciones para desempacar ....................................................................................................................5
Instalación del refrigerador ...........................................................................................................................6
Partes incluidas ..............................................................................................................................................6
Accesorios ......................................................................................................................................................6
Partes y características .................................................................................................................................7
Instalación de la manija de la puerta .........................................................................................................8-9
Para cambiar la dirección de apertura de la puerta ............................................................................. 10-12
Características y uso .................................................................................................................................. 12
Instrucciones de funcionamiento ........................................................................................................ 13-15
Información para almacenar los alimentos................................................................................................ 16
LIMPIEZA Y CUIDADO
Cuidado y mantenimiento adecuados ................................................................................................. 17-18
SOLUCIÓN DE PROBLEMAS Y GARANTÍA
Sonidos normales de funcionamiento ....................................................................................................... 19
Solución de problemas ......................................................................................................................... 20-21
Servicio al cliente ........................................................................................................................................ 22
Garantía limitada ......................................................................................................................................... 23
REGISTRO DEL PRODUCTO
Gracias por adquirir nuestro producto Haier. Este
manual de fácil uso lo guiará para que aproveche al
máximo su producto.
Número de modelo
Recuerde registrar el modelo y números de serie
que se encuentran en una etiqueta dentro del producto.
Engrape el recibo al manual. Lo necesitará para recibir el servicio de garantía.
Número de serie
Fecha de compra
ESPAÑOL
Page 50

INSTRUCCIONES IMPORTANTES DE
SEGURIDAD
ADVERTENCIA
LEA TODAS LAS INSTRUCCIONES ANTES DE USAR ESTE APARATO: CUANDO
UTILICE ESTE APARATO, SIEMPRE TOME LAS PRECAUCIONES BÁSICAS DE
SEGURIDAD, INCLUIDAS LAS SIGUIENTES:
NOTA: Si el refrigerador se coloca en posición horizontal o inclinada durante un lapso de tiempo, espere
24 horas antes de enchufar la unidad..
1) Utilice este aparato solamente para lo que fue diseñado, según se describe en esta guía de uso y
cuidado.
2) Antes de utilizar este refrigerador debe instalarse adecuadamente de conformidad con las
instrucciones de instalación. Consulte Requisitos eléctricos en la sección Instalación y uso.
3) Este refrigerador no debe colocarse en un lugar ahuecado ni empotrarse en un gabinete cerrado. Está
diseñado sólo para instalarse no empotrado.
4) Nunca jale el cable de suministro eléctrico para desconectar el refrigerador. Siempre tome la clavija
con firmeza y jálela en línea recta del tomacorriente.
5) Repare o sustituya de inmediato todos los cables del servicio eléctrico que estén desgastados o
dañados de alguna otra manera. No utilice un cable que tenga fisuras o abrasiones a lo largo del cable
mismo, en la clavija o en el extremo conector.
6) Si su refrigerador antiguo ya no está en uso, le recomendamos quitarle las puertas. Esto reducirá la
posibilidad de que represente un peligro para los niños.
ADVERTENCIA
UNA VEZ QUE EL REFRIGERADOR ESTÉ EN FUNCIONAMIENTO, EVITE TOCAR
LAS SUPERFICIES FRÍAS DENTRO DEL COMPARTIMIENTO DEL CONGELADOR, EN
ESPECIAL SI TIENE LAS MANOS MOJADAS O HÚMEDAS. LA PIEL PUEDE ADHERIRSE
A ESTAS SUPERFICIES EXTREMADAMENTE FRÍAS.
7) No vuelva a congelar alimentos que se han descongelado completamente. En el boletín Hogar y jardín
(Home and Garden Bulletin) No. 69, el Departamento de Agricultura de los Estados Unidos afirma que:
“...Puede volver a congelar sin peligro alimentos que se han descongelado si aún contienen cristales
de hielo o si aún tienen una temperatura por debajo de los 40 °F (4.4 °C)”.
“...La carne molida, pollo o pescado descongelados que tengan mal olor o color extraño no deberán
volver a congelarse y no deben comerse. El helado descongelado deberá desecharse. Si algún
alimento tiene mal o dudoso olor o color, deséchelo. Puede ser peligroso comer ese alimento”.
“...Incluso al descongelar parcialmente los alimentos y volver a congelarlos se reduce su calidad,
particularmente la de las frutas, las verduras y los alimentos preparados. La calidad alimenticia de las
ESPAÑOL
carnes rojas se ve menos afectada que la de muchos otros alimentos. Utilice los alimentos vueltos a
congelar tan pronto como le sea posible para aprovechar lo más que pueda su calidad alimenticia”.
PÁGINA 2 • INFORMACIÓN DE SEGURIDAD
Page 51

IMPORTANT SAFETY INSTRUCTIONS CONT.
8) No utilice ningún dispositivo eléctrico o instrumento filoso para quitar el hielo del refrigerador.
9) Desconecte el refrigerador antes de limpiarlo o hacer cualquier reparación.
NOTA: Si por algún motivo este producto requiere servicio, le recomendamos ampliamente que un
técnico certificado lo realice.
10) No ponga en funcionamiento el refrigerador en presencia de vapores explosivos.
GUARDE ESTAS
INSTRUCCIONES
PELIGRO
EXISTE EL RIESGO DE QUE LOS NIÑOS QUEDEN ATRAPADOS.
ANTES DE DESECHAR SU REFRIGERADOR O CONGELADOR VIEJO, QUÍTELE
LAS PUERTAS. MANTENGA LAS REPISAS COLOCADAS DE MODO QUE LOS NIÑOS
NO PUEDAN METERSE FÁCILMENTE.
PÁGINA 3 • INFORMACIÓN DE SEGURIDAD
ESPAÑOL
Page 52

REQUISITOS ELÉCTRICOS
INSTRUCCIONES DE CONEXIÓN A TIERRA
ADVERTENCIA
REQUISITOS ELÉCTRICOS - RIESGO DE DESCARGA
• Asegúrese de que haya un tomacorriente adecuado: 115 voltios, 15 amperios, 3 clavijas (con conexión a
tierra) con conexión a tierra apropiada para suministrar energía al refrigerador.
• Evite usar adaptadores de tres clavijas o cortar la tercera clavija de conexión a tierra para adaptarlo
a un tomacorriente de dos clavijas. Hacer esto es peligroso, ya que el refrigerador no cuenta con una
conexión a tierra eficaz y puede producirse un riesgo de descarga.
USO DE CABLES DE EXTENSIÓN
ADVERTENCIA
USO DE CABLES DE EXTENSIÓN - POSIBLE RIESGO DE SEGURIDAD
• Evite usar un cable de extensión debido a los posibles riesgos de seguridad que se producen en
determinadas condiciones. Si necesita usar un cable de extensión, utilice sólo un cable de extensión de
3 hilos que tenga un enchufe de tres clavijas con conexión a tierra y un tomacorriente de tres clavijas
que admita el enchufe. El valor nominal marcado en el cable de extensión debe ser igual o mayor al
valor nominal eléctrico del aparato. NO UTILICE UN CABLE DE EXTENSIÓN DE MÁS DE 12
PIES (3.65 M).
GUÍA DE INSTALACIÓN
LIMITACIONES PARA LA INSTALACIÓN
• Seleccione un lugar adecuado para el refrigerador en una superficie firme y nivelada lejos de
la luz directa del sol o una fuente de calor, por ejemplo, radiadores, calentadores de zoclo,
electrodomésticos para cocinar, entre otros. Si el piso está desnivelado, corrija el problema con las
patas niveladoras que se localizan en las esquinas frontales inferiores del refrigerador.
CÓMO DESEMPACAR EL REFRIGERADOR
1. Quite todos los materiales de empaque, esto incluye la base corrugada y toda la cinta adhesiva que
sostiene los accesorios del refrigerador por dentro y por fuera.
2. Inspeccione y quite cualquier resto de empaque, cinta o material impreso antes de poner en
funcionamiento el refrigerador.
NOTA: Si el refrigerador viene con un compartimiento para bocadillos, retire la cinta adhesiva azul de
la parte trasera del compartimiento. El compartimiento no se deslizará hacia adentro ni hacia
afuera si no retira la cinta adhesiva.
ESPAÑOL
PÁGINA 4 • INSTALACIÓN Y USO
Page 53

GUÍA DE INSTALACIÓN
CÓMO NIVELAR EL REFRIGERADOR
• El refrigerador tiene dos patas niveladoras ubicadas en las esquinas frontales inferiores del
refrigerador. Después de colocar correctamente el refrigerador en la posición final, puede nivelarlo.
• Las patas niveladoras pueden ajustarse girándolas hacia la izquierda para elevar el refrigerador o
hacia la derecha para bajarlo. La puerta del refrigerador se cerrará con mayor facilidad si las patas
niveladoras quedan extendidas.
BAJAR LEVANTAR
CIRCULACIÓN DE AIRE ADECUADA
• Para asegurarse de que el refrigerador funcione al máximo rendimiento para el que fue diseñado,
deberá instalarlo en un lugar donde haya circulación de aire, tubería y conexiones eléctricas adecuadas.
El refrigerador no está diseñado para funcionar a temperaturas por debajo de los 55 °F (12 °C) o por
arriba de los 95 °F (35 °C).
• No instale el refrigerador en un lugar que no esté correctamente aislado o que tenga calefacción, por
ejemplo, en la cochera, entre otros lugares. Manténgalo lejos de la luz directa del sol y lejos de fuentes
de calor como radiadores, calentadores y electrodomésticos.
• A continuación se muestran los espacios recomendados que debe haber alrededor del refrigerador:
Lados ..........1 pulg. (25 mm) Parte superior ...........1 pulg. (25 mm) Parte posterior ......... 2 pulg. (50 mm)
INSTRUCIONES PARA DESEMPACAR
REJILLA FRONTAL
El refrigerador viene con una rejilla frontal (zócalo), que tiene base reversible en cuyo costado se montan
las bisagras. Para instalar la rejilla frontal, ubique el extremo que no tiene bisagra en el diagrama a
continuación y siga las instrucciones que se indican abajo.
1. Ajuste el lado que no tiene bisagra en la abertura de flujo de aire en el riel inferior del refrigerador.
2. Después coloque a presión el lado con bisagra en la abertura de flujo de aire opuesta en el riel inferior
junto a la bisagra inferior.
Lado que no tiene
bisagra
Lado con bisagra
PÁGINA 5 • INSTALACIÓN Y USO
Lado que no tiene
bisagra
Lado con bisagra
ESPAÑOL
Page 54

INSTALACIÓN DEL REFRIGERADOR
HERRAMIENTAS NECESARIAS PARA LA INSTALACIÓN
¡NO UTILICE HERRAMIENTAS ELÉCTRICAS PARA INSTALAR LAS MANIJAS DE LA PUERTA! ¡SI APRIETA
DEMASIADO LOS TORNILLOS PODRÍA DAÑAR LAS ROSCAS!
Llaves de 5/16 y 3/8 o llave ajustableDestornillador de cruz Espátula
PARTES INCLUIDAS
LA BOLSA DE PARTES INCLUIDAS PUEDE VARIAR SEGÚN LA UNIDAD QUE SE
ADQUIERA.
Para los modelos que no son de
acero inoxidable que vienen con
tornillos de montaje para manija
instalados de fábrica en el frente
de las puertas, la bolsa de partes
incluidas consta de:
• 2 manijas.
• 1 rejilla frontal.
• 4 tornillos de fijación para
manija.
• 1 emblema adicional de Haier.
• 1 tapón de tornillo de color
acorde.
• Manual del usuario.
Para los modelos que no vienen
con tornillos de montaje para
manija instalados de fábrica en
el frente de la puerta, la bolsa de
partes incluidas consta de:
• 2 manijas.
• 1 rejilla frontal.
• 2 tornillos de montaje para el
frente de la puerta.
• 4 tornillos de montaje para el
borde de la puerta.
• 1 emblema adicional de Haier.
• 1 tapón de tornillo blanco.
• Manual del usuario.
• 2 cubiertas/molduras para
manija.
Para modelos de acero
inoxidable, la bolsa de partes
incluidas consta de:
• 2 manijas.
• 1 rejilla frontal.
• 4 tornillos de fijación.
• Manual del usuario.
ACCESORIOS
Los siguientes accesorios están disponibles:
• Equipo para fabricar hielo HI5MK.
• Repisa de alambre para compartimiento de congelador.
• Bombillas de reemplazo.
Para solicitar accesorios, llame al 1-877-337-3639 o visítenos en www.haieramerica.com/support
ESPAÑOL
PÁGINA 6 • INSTALACIÓN Y USO
Page 55

PARTES Y CARACTERÍSTICAS
Control de
ujo de aire
Control de
temperatura
con luz interior
Repisas
completas
Repisas de la puerta
del congelador
Compartimiento
para lácteos
Controles de
humedad para el
cajón de verduras
Cajones para
verduras
Rejilla frontal
Patas niveladoras
Repisas completas
en las puertas
El diagrama es únicamente para nes instructivos.
El diseño puede variar conforme al número de modelo.
ESPAÑOL
PÁGINA 7 • INSTALACIÓN Y USO
Page 56

INSTALACIÓN DE LA MANIJA DE LA PUERTA
INSTALACIÓN DE LA MANIJA DE LA
PUERTA
Para los refrigeradores con un tornillo de montaje
instalado al frente de ambas puertas:
Retire ambas manijas desde el interior del
compartimiento del congelador y los tornillos de la
bolsa de partes incluidas
MANIJA DE LA PUERTA DEL
CONGELADOR
1. Coloque el extremo curvo de la manija sobre el
tornillo de montaje en la puerta del congelador y
deslice suavemente la manija en dirección hacia
el extremo angular (Figura 1).
2. Una vez que la manija esté completamente
asentada en el tornillo de montaje, gire el
extremo angular de la manija hacia la parte
inferior de la puerta del congelador.
Fig. 1
MANIJA DE LA PUERTA DEL
REFRIGERADOR
1. Coloque el extremo curvo de la manija sobre el
tornillo de montaje en la puerta del refrigerador
y deslice suavemente la manija en dirección
hacia el extremo angular (Figura 1).
2. Una vez que la manija esté completamente
asentada en el tornillo de montaje, gire el
extremo angular de la manija hacia la parte
inferior de la puerta del refrigerador (Figura 1).
3. Abra la puerta del refrigerador e instale los
tornillos en la parte superior de la puerta del
refrigerador a través del extremo angular de
la manija. No apriete demasiado los tornillos
(Figura 2).
4. Si va a instalar las manijas después de cambiar
la dirección de apertura de la puerta, saque
el tapón del orificio del tornillo de la bolsa de
partes incluidas y colóquelo en el orificio del
tornillo de montaje de la manija en el frente de la
puerta del refrigerador.
3. Abra la puerta del congelador e instale los
tornillos en la parte de abajo de la puerta del
congelador a través del extremo plano de la
manija. No utilice herramientas eléctricas para
instalar los tornillos. No apriete en exceso los
tornillos.
Fig. 2
5. El emblema de nombre se puede retirar con
ayuda de la espátula o de un destornillador
de cabeza plana para levantar el emblema del
frente de la puerta, con cuidado para no dañar
el acabado. Cualquier residuo del emblema que
quede en el frente de la puerta deberá retirarse
con Goo Gone© o WD-40©. Asegúrese de
seguir las instrucciones del fabricante cuando
utilice estos productos.
No utilice ningún abrasivo ni estropajo para retirar
el residuo.
Se incluye con el refrigerador un emblema
adicional en la bolsa de partes incluidas que se
puede utilizar para cubrir el orificio del tornillo de
montaje en la manija en el frente de la puerta del
congelador.
ESPAÑOL
PÁGINA 8 • INSTALACIÓN Y USO
Page 57

INSTALACIÓN DE LA MANIJA DE LA PUERTA
INSTALACIÓN DE LA MANIJA DE LA
PUERTA (CONTINUACIÓN)
Para los refrigeradores sin un tornillo de montaje
instalado al frente de ambas puertas:
Retire ambas manijas del compartimiento del
congelador, y los tornillos y molduras para las
manijas de la bolsa de partes incluidas.
MANIJA DE LA PUERTA DEL
CONGELADOR
1. Monte el extremo curvo de la manija en el frente
de la puerta con la ayuda del tornillo incluido.
No utilice el orificio del tornillo más cercano al
centro de la manija.
Fig. 3
NO UTILICE
ESTE ORIFICIO
2. Fije el extremo angular de la manija a la parte
inferior de la puerta con los tornillos incluidos.
Fig. 4
MANIJA DE LA PUERTA DEL
REFRIGERADOR
1. Monte el extremo curvo de la manija en el frente
de la puerta con la ayuda del tornillo incluido
(Figura 3). No utilice el orificio del tornillo más
cercano al centro de la manija.
2. Fije el extremo angular de la manija a la parte
superior de la puerta con los tornillos incluidos
(Figura 4).
3. Inserte la pestaña en la moldura de la manija
en la ranura de la manija, después presione
firmemente la manija (Figura 5).
4. Si va a instalar las manijas después de cambiar
la dirección de apertura de la puerta, saque
el tapón del orificio del tornillo de la bolsa de
partes incluidas y colóquelo en el orificio del
tornillo de montaje de la manija en el frente de la
puerta del refrigerador.
5. El emblema de nombre se puede retirar con
ayuda de la espátula o de un destornillador
de cabeza plana para levantar el emblema del
frente de la puerta, con cuidado para no dañar
el acabado. Cualquier residuo del emblema que
quede en el frente de la puerta deberá retirarse
con Goo Gone© o WD-40©. Asegúrese de
seguir las instrucciones del fabricante cuando
utilice estos productos.
3. Inserte la pestaña en la moldura de la manija
en la ranura de la manija y después presione
firmemente la manija.
Fig. 5
PÁGINA 9 • INSTALACIÓN Y USO
No utilice ningún abrasivo ni estropajo para retirar
el residuo.
Se incluye con el refrigerador un emblema
adicional en la bolsa de partes incluidas que se
puede utilizar para cubrir el orificio del tornillo de
montaje en la manija en el frente de la puerta del
congelador.
ESPAÑOL
Page 58

PARA CAMBIAR LA DIRECCIÓN DE APERTURA
DE LA PUERTA
PARA CAMBIAR LA DIRECCIÓN DE
APERTURA DE LA PUERTA
En los modelos negro o blanco, las bisagras y
manijas de la puerta se pueden cambiar de sentido
para ajustarse a sus necesidades.
NOTA: En los modelos con puerta de acero
inoxidable no se puede cambiar la dirección
de apertura de la puerta.
PARA RETIRAR LAS MANIJAS
Consulte la sección Instalación de la manija de la
puerta apropiada para determinar cómo retirar las
manijas del refrigerador.
PARA RETIRAR LAS PUERTAS Y
BISAGRAS
1. Utilice cinta adhesiva para asegurar ambos lados
de las puertas del congelador y del refrigerador
a los lados del gabinete (Fig.6)
2. Retire el tornillo de la cubierta de la bisagra y la
cubierta de la bisagra superior (Figura 7).
Fig. 6
3. Retire los dos tornillos que fijan la bisagra
superior al gabinete y después retire la bisagra
levantándola verticalmente. (Fig. 7)
Tornillo de la cubierta de la bisagra
Fig. 7
Tornillos
Cubierta de la
bisagracubierta de la
bisagra
5. Retire la puerta (a) sacando la parte superior de
la puerta fuera del gabinete y (b) levantándola al
mismo tiempo (Fig. 8)
Fig. 8
6. Mueva el tope de la puerta en la parte inferior de
la puerta hacia el lado opuesto y asegure con los
tornillos originales, después coloque la puerta a
un lado.
Fig. 9
7. Desatornille el perno de la bisagra del centro
girando hacia la izquierda, con cuidado de no
soltar los separadores de la sección superior del
perno (Figura 10).
8. Retire la puerta del refrigerador de la misma
manera que la puerta del congelador, retirando
primero la cinta y después levantándola y
separándola del gabinete (Figura 10). Cambie de
posición el tope de la puerta en la parte inferior
de la puerta al lado opuesto de ella (Figura 9).
Coloque la puerta a un lado.
Desatornille el
Fig. 10
Incline hacia
adelante
perno
Levante
Bisagra superior
Guardacabo
4. Retire cuidadosamente la cinta adhesiva que
sostiene la puerta del congelador al gabinete
ESPAÑOL
mientras sostiene la puerta en el gabinete.
PÁGINA 10 • INSTALACIÓN Y USO
9. Retire la bisagra del centro y el separador. (Fig.
11)
Fig. 11
Separador de la bisagra
del centro
Bisagra del centro
Tornillos de la bisagra
del centro
Page 59

PARA CAMBIAR LA DIRECCIÓN DE APERTURA
DE LA PUERTA
10. Retire la bisagra inferior desatornillando los
tornillos que la fijan en el gabinete..
NOTA: Es más fácil retirar y volver a colocar el
perno de la bisagra inferior mientras la bisagra
sigue fija en el gabinete.
Fig. 12
PARA VOLVER A INSTALAR LAS
BISAGRAS Y LAS PUERTAS
1. Desatornille el perno de la bisagra inferior y
vuelva a colocarlo en el orificio opuesto en la
parte superior de la bisagra (Figura 13).
4. Retire la cubierta del guardacabo superior en el
lado de la bisagra de la puerta del refrigerador
y vuelva a colocarla en el guardacabo opuesto.
Utilice ambas manos para montar la puerta en el
perno de la bisagra inferior asegurándose de que
el perno entre completamente en el guardacabo
inferior. Cuando el guardacabo superior esté
alienado con el orificio de la bisagra del centro,
coloque el perno de la bisagra en el orificio, con
el extremo de rosca hacia abajo y apriete.
Fig. 15
Guardacabo
2. Fije el separador de la bisagra inferior y la
bisagra inferior al gabinete con ayuda de los
tornillos incluidos originalmente. Asegúrese de
utilizar los dos orificios de montaje superiores
en la bisagra y el orificio inferior del mismo lado
al que se movió la bisagra.
Fig. 13
3. Voltee la bisagra del centro como se muestra en
el diagrama a continuación y fije el separador de
la bisagra y la bisagra al gabinete (Figura 14). No
instale todavía el perno de la bisagra del centro.
Fig. 14
Fig. 16
No apriete en exceso.
5. Retire el tapón del guardacabo superior en el
lado de la bisagra de la puerta del congelador y
vuelva a colocarlo en el guardacabo opuesto.
Coloque la puerta en el perno de la bisagra
del centro y asegúrese de que el perno entre
completamente en el guardacabo inferior. Se
debe utilizar cinta como se utilizó en los pasos
para retirar a fin de sostener la puerta en su
lugar durante el siguiente paso.
6. Coloque el perno de la bisagra superior en el
guardacabo del mismo lado que las bisagras
inferiores.
ESPAÑOL
PÁGINA 11 • INSTALACIÓN Y USO
Page 60

PARA CAMBIAR LA DIRECCIÓN DE APERTURA
DE LA PUERTA
7. Vuelva a colocar la tapa de la bisagra superior y
asegúrela con la ayuda del tornillo original.
Fig. 17
NOTA: Antes de volver a instalar las manijas, retire
el emblema de Haier© del frente de la puerta con
la ayuda de la espátula para levantarla con cuidado.
7
6
CARACTERÍSTICAS Y USO
NOTE: No todas las características están
disponibles en todos los modelos.
NOTE: Si el refrigerador se coloca en posición
horizontal durante un lapso de tiempo, espere 4
horas después de regresarlo a la posición vertical
antes de enchufar la unidad.
PERILLAS DE CONTROL DE
TEMPERATURA
El refrigerador mantendrá automáticamente la
configuración de nivel de temperatura. Al girar
la perilla de temperatura a la izquierda, tanto el
compartimiento del refrigerador como el del
congelador estarán más calientes. Al girar la perilla
a la derecha, ambos compartimientos estarán
más fríos. Puede girar la perilla en cualquier
dirección para ajustar la temperatura según sus
necesidades. Recomendamos mover la perilla
hacia un lado y hacia otro y dejar que funcione
durante por lo menos 24 horas antes de ajustar la
temperatura. Si se gira la perilla totalmente hacia
la izquierda hasta la posición Off (apagado), se
apagará el sistema de refrigeración, pero seguirá
ESPAÑOL
suministrándose energía al refrigerador.
Cualquier residuo del emblema que quede en
el frente de la puerta deberá retirarse con Goo
Gone© o WD-40©.
Asegúrese de seguir las instrucciones del
fabricante cuando utilice estos productos.
No utilice ningún abrasivo ni estropajo para retirar
el residuo. Utilice una espátula para levantar los
tapones que cubren los orificios de montaje de la
manija en el frente de la puerta, con cuidado de no
rayar el acabado de la puerta.
Para volver a instalar las manijas, consulte la
sección Instalación de la manija de la puerta.
El compartimiento del congelador cuenta
también con una perilla tipo torre del ventilador
que se utiliza para regular el flujo de aire en el
compartimiento para ajustar con exactitud
el congelador. Al igual que con la perilla de
temperatura del refrigerador, recomendamos
mover la perilla hacia un lado y hacia el otro y dejar
que funcione durante por lo menos 24 horas antes
de ajustarla.
Perilla de temperatura del refrigerador.
Perilla tipo torre del ventilador del congelador
PÁGINA 12 • INSTALACIÓN Y USO
Page 61

INSTRUCCIONES DE FUNCIONAMIENTO
ILUMINACIÓN
Todos los modelos vienen con una luz interior
en el techo del compartimiento del refrigerador.
Para modelos con un solo foco, no se incluye
tapa. Para modelos con dos focos, se incluye
una tapa. Algunos modelos pueden tener una
luz en el congelador y/o una luz de "nivel medio”
en la pared trasera del refrigerador arriba del
cajón para verduras. Consulte la sección Cuidado
y mantenimiento adecuados para conocer las
instrucciones para reemplazar la bombilla de luz.
LUZ SUPERIOR DEL REFRIGERADOR CON
CUBIERTA (NO TODOS LOS MODELOS)
Para quitar la cubierta de la luz superior (si viene
incluida):
1. Empuje la lengüeta en el extremo más alejado
de la cubierta.
2. Gire el extremo más alejado de la cubierta hacia
abajo.
3. Empuje la cubierta hacia atrás del
compartimiento.
LUZ DE NIVEL MEDIO DEL
REFRIGERADOR (NO TODOS LOS
MODELOS)
3. Levante la parte superior de la cubierta hacia
arriba y hacia afuera.
LUZ DEL CONGELADOR (NO TODOS LOS
MODELOS)
Para quitar la cubierta de la luz del congelador (si
viene incluida):
1. Jale la cubierta hacia el frente del gabinete.
REPISAS INTERIORES DEL
REFRIGERADOR
Todos los modelos de refrigeradores incluyen
repisas que se pueden ajustar para adaptarse a
las necesidades de almacenamiento personales.
Dependiendo del modelo, las repisas pueden ser
de alambre o de vidrio encapsulado, completas o
de medio ancho.
REPISAS DE ALAMBRE Y DE VIDRIO
ENCAPSULADO COMPLETAS
Se pueden ajustar en cuatro niveles diferentes.
Estas repisas se deslizan hacia adentro y hacia
afuera levantando el frente de la repisa y jalándola
con cuidado hacia uno.
Para retirar las lentes de luz de nivel medio del
refrigerador (si se incluyen):
1. Empuje hacia arriba la parte inferior de la
cubierta.
2. Gire la parte inferior de la cubierta hacia afuera
de la parte posterior del compartimiento.
PÁGINA 13 • INSTALACIÓN Y USO
ESPAÑOL
Page 62

INSTRUCCIONES DE FUNCIONAMIENTO
REPISAS DE VIDRIO ENCAPSULADO DE
MEDIO ANCHO
Se pueden ajustar a 4 niveles diferentes y se
pueden mover de manera independiente unas de
otras, con lo que usted tiene la máxima variedad
de opciones de colocación. Considere que los
refrigeradores con repisas de medio ancho sólo
tienen una guía de soporte en el centro de la
pared posterior del refrigerador. Las repisas del
lado derecho y del lado izquierdo no se pueden
intercambiar.
Jale
Levante
Para ajustar una repisa de medio ancho, retire
cualquier objeto que haya encima e incline hacia
arriba el frente de la repisa con una mano mientras
estabiliza la repisa con la otra. Una vez que la repisa
esté lo suficientemente arriba para que el gancho
posterior se libere, podrá jalarla hacia usted.
Para mover la repisa a otro nivel, deslice el borde
externo (no del centro) por el riel lateral hasta
que se alcance la parte trasera del refrigerador.
Levante ligeramente la parte del centro para dejar
que el gancho trasero entre en la guía volada.
Después, baje lentamente el centro de la repisa
hasta que descanse en el riel lateral y la parte de
atrás se apoye en la guía volada.
3. Saque el compartimiento completamente de su
guía.
4. Siga las instrucciones anteriores para ajustar la
repisa a la altura deseada.
CAJONES PARA VERDURAS Y CUBIERTA
Jale
Para quitar un cajón para verduras:
1. Deslice hacia afuera el cajón para verduras hasta
que se atore.
2. Levante el frente del cajón para verduras.
3. Jale hacia afuera hasta sacarlo.
NOTA: Para quitar un cajón para verduras del
mismo lado de la puerta, retire primero el
compartimiento inferior de la puerta.
Jale
Levante
Levante
Jale hasta
que se atore
Jale
COMPARTIMIENTO PARA BOCADILLOS
(ALGUNOS MODELOS)
Los refrigeradores que vienen con repisas de vidrio
encapsulado de medio ancho también incluyen un
compartimiento para bocadillos.
Si su refrigerador está equipado con uno, querrá
retirarlo antes de ajustar la repisa que lo cubre.
Para retirar el compartimiento para bocadillos (si
viene incluido):
1. Jale el compartimiento hacia afuera hasta que
se atore.
ESPAÑOL
2. Jale hacia arriba el compartimiento.
PÁGINA 14 • INSTALACIÓN Y USO
Para retirar la cubierta del cajón para verduras,
retire ambos cajones siguiendo las instrucciones
anteriores:
1. Utilice una mano para empujar desde abajo
hacia arriba el vidrio del cajón mientras lo
sostiene desde arriba con la otra mano.
2. Utilice ambas manos para jalar cuidadosamente
hacia afuera la repisa de vidrio y colóquela a un
lado.
3. Utilice ambas manos para levantar y sacar del
refrigerador el marco del cajón para verduras.
Page 63

INSTRUCCIONES DE FUNCIONAMIENTO
Para volver a colocar la cubierta, vuelva a insertar
el marco del cajón para verduras en el refrigerador,
vuelva a colocar con cuidado el vidrio en el espacio
en el que quedó el hueco en el marco y coloque de
nuevo los cajones para verduras.
CAJONES PARA VERDURAS Y CUBIERTA
(CONTINUACIÓN)
Para retirar la cubierta del cajón para verduras:
1. Retire ambos cajones para verduras siguiendo
las instrucciones anteriores.
2. Utilice una mano para empujar desde abajo
hacia arriba el vidrio del cajón mientras lo
sostiene desde arriba con la otra mano.
3. Utilice ambas manos para jalar cuidadosamente
hacia afuera la repisa de vidrio y colóquela a un
lado.
4. Utilice ambas manos para levantar y sacar del
refrigerador el marco del cajón para verduras.
CARACTERÍSTICAS DE LA PUERTA
Dependiendo del modelo, el refrigerador viene
con rejillas completas en la puerta o con una
combinación de rejilla completa en la puerta y
compartimientos de medio ancho. Para retirar
las rejillas completas o los compartimientos de
medio ancho, utilice las dos manos para tomar los
extremos inferior y superior del compartimiento o
rejilla y jale hacia arriba.
Todos los modelos cuentan con un
compartimiento para lácteos con una tapa
abatible.
Algunos modelos cuentan con un soporte para
botellas en la rejilla inferior de la puerta del
refrigerador, que se puede ajustar sosteniéndolo
con firmeza y deslizándolo a la izquierda o derecha
hasta que sostenga los artículos almacenados en
la rejilla.
Para volver a colocar la cubierta en el refrigerador,
inserte el marco del cajón para verduras en el
refrigerador, vuelva a colocar con cuidado el vidrio
en el espacio en el que quedó el hueco en el marco
e inserte de nuevo los cajones para verduras.
Vidrio del cajón
para verduras
Marco del cajón
para verduras
CONTROLES DE HUMEDAD DEL CAJÓN
PARA VERDURAS
Cada cajón para verduras tiene su propio control
de humedad.
Para frutas y verduras con cáscara, mueva la barra
deslizable de humedad a LOW (bajo).
Para vegetales con hojas, mueva la barra deslizable
a HIGH (alto).
ESPAÑOL
PÁGINA 15 • INSTALACIÓN Y USO
Page 64

INFORMACIÓN PARA ALMACENAR LOS
ALIMENTOS
ALIMENTOS FRESCOS:
• Cuando almacene alimentos frescos que no
vengan empacados, asegúrese de envolverlos o
almacenarlos con material a prueba de humedad
o hermético, a menos que se indique otra
cosa. De esta forma no caducarán antes de lo
previsto y evitará que se contaminen con olores
y sabores.
• Limpie los recipientes antes de guardarlos para
evitar derrames innecesarios.
• Los huevos deben almacenarse en posición
vertical, en su caja de cartón original para
maximizar su caducidad.
• La fruta debe lavarse y secarse, y después
almacenarse en bolsas de plástico selladas
antes de guardarse en el refrigerador.
• Las verduras con cáscara deben almacenarse en
bolsas o recipientes de plástico.
• Los vegetales con hojas deberán lavarse y
escurrirse, y después almacenarse en bolsas o
recipientes de plástico.
• Los alimentos calientes deben dejarse enfriar
antes de meterlos al refrigerador. Esto evitará el
uso innecesario de energía.
• Los mariscos frescos deberán utilizarse el
mismo día en que se compren.
• Cuando almacene carnes en la sección de
alimentos frescos, manténgalas en el empaque
original o vuelva a envolverlas si es necesario.
Estas son algunas sugerencias para un
almacenamiento seguro:
• Pollo, de 1 a 2 días.
• Carne de res molida, de 1 a 2 días.
• Carnes frías, de 3 a 5 días.
• Bisteces/cortes para asar, de 3 a 5 días.
• Carnes ahumadas/curadas, de 7 a 10 días.
Consulte la tabla detallada de almacenamiento en
el sitio web de la FDA www.cfsan.fda.gov/~dms/
fttstore.html
ALIMENTOS CONGELADOS
• Limpie los recipientes antes de guardarlos para
evitar derrames innecesarios.
• Los alimentos calientes deben dejarse enfriar
antes de meterlos al congelador. Esto evitará el
uso innecesario de energía.
• Cuando almacene carnes, manténgalas en el
empaque original o vuelva a envolverlas si es
necesario.
• Para almacenar alimentos en el congelador es
necesario empacarlos correctamente. Todos
los alimentos deben estar en empaques que
impidan el flujo de aire o humedad hacia adentro
o hacia afuera. Un almacenamiento inadecuado
provocará que se transmitan olores y sabores,
los alimentos mal empacados se resecarán.
• Siga las indicaciones de almacenamiento
adecuado del empaque o del recipiente.
• Recomendaciones de empacado:
Recipientes de plástico con tapas herméticas.
Papel aluminio de alta resistencia.
Película transparente para envolver alimentos.
Bolsas de plástico de autosellado.
• No vuelva a congelar los alimentos
descongelados.
• Se recomienda que marque la fecha de
congelamiento en el empaque.
Estas son algunas sugerencias para un
almacenamiento seguro:
• Comidas preparadas, de 3 a 4 meses.
• Camarones, vieiras, langostinos frescos, de 3 a
6 meses.
• Hamburguesas y carne guisada, de 3 a 4 meses.
• Carne molida de pavo, ternera y cerdo, de 3 a 4
meses.
• Chuletas, de 4 a 6 meses.
• Bisteces, de 6 a 12 meses.
• Pollo o pavo, de 6 a 8 meses.
Consulte la tabla detallada de almacenamiento en
el sitio web de la FDA www.cfsan.fda.gov/~dms/
fttstore.html
ESPAÑOL
PÁGINA 16 • INSTALACIÓN Y USO
Page 65

CUIDADO Y MANTENIMIENTO ADECUADOS
ADVERTENCIA
Antes de limpiar el refrigerador, desconéctelo
SIEMPRE de la fuente de energía. Si se hace caso
omiso de esta advertencia podría producir una
lesión o muerte por descarga eléctrica.
NOTA: Antes de utilizar cualquier producto
de limpieza, asegúrese de leer las
instrucciones y advertencias del fabricante.
Esto ayudará a evitar una lesión personal o
daño material.
LIMPIEZA DEL INTERIOR:
Prepare una solución limpiadora de 3 a 4
cucharadas de bicarbonato de sodio mezclado con
agua tibia. Limpie el interior del refrigerador con
una esponja o un paño suave humedecido con la
solución limpiadora.
Evite limpiar cualquier vidrio frío (repisas, vidrio de
la cubierta del cajón para verduras, entre otros)
con agua caliente, ya que el vidrio puede romperse
y provocar una lesión. Manipule siempre todas las
partes de vidrio con cuidado.
No intente lavar ninguna de las partes en el
lavavajillas.
No utilice sustancias químicas fuertes, amoníaco,
blanqueador a base de cloro, detergente
concentrado, solventes, abrasivos o fibras
metálicas para limpiar por dentro el refrigerador,
ya que pueden dañar y/o decolorar el acabado del
refrigerador.
LIMPIEZA DEL EXTERIOR:
Utilice un paño limpio, suave, ligeramente
humedecido con cera para aparatos de cocina o
un detergente suave para limpiar el exterior del
refrigerador.
meses siguiendo las instrucciones para la limpieza
del interior. Con empaques limpios las puertas
sellarán mejor que con empaques sucios.
Aplique un poco de gel de petróleo en el lado de las
bisagras del empaque para mantenerlo flexible y
asegurar que selle correctamente.
No utilice nunca un paño sucio para limpiar el
exterior del refrigerador. Los paños sucios pueden
dejar residuos en el refrigerador y pueden dañar
el acabado. También evite utilizar sustancias
químicas fuertes, amoníaco, blanqueador a base
de cloro, detergente concentrado, solventes,
abrasivos o fibras metálicas para limpiar por fuera
el refrigerador.
ADVERTENCIA
Antes de cambiar una bombilla, desconecte
SIEMPRE la unidad de la fuente de energía. Si
se hace caso omiso de esta advertencia podría
producir una lesión o muerte por descarga
eléctrica.
REEMPLAZO DE BOMBILLAS
1. Para remplazar una bombilla, desconecte
primero el refrigerador del tomacorriente.
2. Después de dejar que se enfríe el foco, gírelo
hacia la izquierda para retirarlo del receptáculo.
3. Inserte un nuevo foco en el receptáculo
girándolo hacia la derecha.
4. Conecte el refrigerador y abra la puerta para
verificar que el foco esté funcionando.
Para apretar: gire el foco hacia la derecha.
Utilice un paño limpio, suave, ligeramente
humedecido con agua jabonosa tibia para limpiar
las manijas y molduras. Utilice una toalla limpia y
suave para secar.
Para los modelos de acero inoxidable, utilice un
paño seco y pulimento para acero inoxidable.
Debe limpiar los empaques de la puerta cada tres
PÁGINA 17 • LIMPIEZA Y CUIDADO
Para aflojar: Gire el foco hacia la izquierda.
ESPAÑOL
Page 66

CUIDADO Y MANTENIMIENTO ADECUADOS
GUÍA PARA REEMPLAZO DE BOMBILLAS
Utilice la guía que se muestra a continuación para
determinar el foco apropiado para cada accesorio:
Luz superior del refrigerador - Foco de luz natural
de 40 W para electrodomésticos (1 o 2, según el
modelo).
Luz de nivel medio del refrigerador - Foco de 25 W
para electrodomésticos.
Luz del congelador - Foco de 25 W para
electrodomésticos.
Todos los focos tienen bases medianas.
INTERRUPCIONES DE ENERGÍA
En caso de una interrupción de energía,
desconecte el refrigerador de la fuente de energía.
Evite abrir las puertas y hágalo hasta que se haya
restablecido la energía. El refrigerador mantendrá
una temperatura fría durante más tiempo si se
evita abrir la puerta o si se abre lo mínimo.
VACACIONES
Si va a salir de vacaciones o se va a ausentar por
mucho tiempo, desconecte el refrigerador y saque
todos los alimentos que tenga guardados. Gire la
perilla de control de temperatura en la sección del
refrigerador a la posición OFF (apagado) y limpie
el refrigerador, incluidos los empaques, según se
explica en la sección Cuidado y mantenimiento
adecuados. Deje las puertas abiertas y aseguradas
para permitir que el aire circule dentro del
refrigerador.
CÓMO MOVER EL REFRIGERADOR
Antes de mover el refrigerador, saque todos los
alimentos que tenga guardados en él y utilice
cinta adhesiva para asegurar todos los artículos
sueltos como repisas, compartimientos de la
puerta y rejillas, cajones para verduras y demás
compartimientos, y desconéctelo. Mueva siempre
el refrigerador en posición vertical para evitar
dañar el sistema de refrigerante sellado.
Una vez que se haya restablecido la energía, vuelva
a conectar el refrigerador a la fuente de energía
y revise los alimentos para ver si hay alguno en
descomposición o que se haya descongelado. Se
recomienda ampliamente limpiar el refrigerador
después de una falla de energía prolongada para
evitar olores y peligros potenciales contra la salud
a causa de alimentos descongelados.
ESPAÑOL
PÁGINA 18 • LIMPIEZA Y CUIDADO
Page 67

SONIDOS NORMALES DE FUNCIONAMIENTO
Zumbido
Hay muchos ventiladores de alta velocidad dentro
del refrigerador que lo ayudan a mantener la
temperatura que ha seleccionado. El zumbido
es común cuando el refrigerador se conecta por
primera vez, cuando se han abierto las puertas en
varias ocasiones o por un periodo amplio y cuando
se guarda una cantidad grande de alimentos.
Ronroneo
Estallido
Crujido
Chasquido
Gorgoteo
Crepitación
• Suceden muchas cosas en el refrigerador a la
vez. Otros sonidos que puede escuchar y sus
posibles causas son los siguientes:
• El gorgoteo se debe muy probablemente a la
circulación del refrigerante por el serpentín de
enfriamiento.
• La crepitación o estallidos se pueden deber
al derretimiento de la escarcha que cae en el
calentador de descongelamiento durante el
ciclo de descongelamiento.
• Se puede escuchar un chasquido o chirrido
cuando el compresor intenta volver a arrancar.
• Los crujidos o estallidos pueden deberse a
la expansión y contracción del serpentín de
enfriamiento durante y después del ciclo de
descongelamiento.
Este es un sonido común que proviene del
compresor y forma parte de lo que hace que el
refrigerador funcione de manera eficaz.
Silbido
Es posible que llegue a escuchar un silbido
cuando cierre las puertas. Esto no es motivo de
preocupación. Es simplemente que se nivela la
presión en el refrigerador.
• Además, cuando se conecta por primera vez
el refrigerador, el aislamiento de espuma de las
paredes se enfriará y contraerá, lo que puede
provocar crujidos o estallidos.
• El temporizador de descongelamiento y el
control del termostato emitirán un chasquido
cada vez que un ciclo se activa y desactiva.
Si el refrigerador se coloca en posición horizontal
durante un lapso de tiempo, espere 4 horas
después de regresarlo a la posición vertical antes
de enchufar la unidad.
ESPAÑOL
PÁGINA 19 • SOLUCIÓN DE PROBLEMAS Y GARANTÍA
Page 68

SOLUCIÓN DE PROBLEMAS
PROBLEMA CAUSAS POSIBLES SOLUCIÓN
El refrigerador no
funciona.
El refrigerador
o el congelador
están demasiado
calientes.
El refrigerador o el
congelador está
demasiado frío.
El refrigerador
entra en
funcionamiento
con demasiada
frecuencia o por
periodos largos.
Humedad en el
exterior/interior del
refrigerador
El refrigerador
despide un olor.
La perilla de control de temperatura está en
OFF (apagado).
El refrigerador está desconectado. Conecte el cable de suministro eléctrico a la fuente de
El interruptor de carga se disparó o apagó/
el fusible se fundió.
El refrigerador está en modo de
descongelamiento.
El control de temperatura no está
configurado lo suficientemente bajo.
Las puertas se abren con frecuencia o se
quedan abiertas.
Se guardaron alimentos calientes
recientemente.
Los objetos que están en la parte trasera de
los compartimientos están bloqueando el
flujo de aire adecuado.
El control de temperatura está ajustado
muy bajo.
Es normal cuando se conecta por primera
vez.
Se han guardado alimentos calientes o
grandes cantidades de comida.
La puerta se dejó abierta. Asegúrese de que la puerta no quede abierta por algún
Clima caliente o se abre con frecuencia. Esto es normal.
El control de temperatura está ajustado en
lo más frío.
Nivel alto de humedad. Esto es normal; seque la superficie y ajuste la perilla de
Las puertas se abren con frecuencia o se
quedan abiertas.
Recipiente de agua abierto en el
refrigerador.
Los alimentos no están sellados o
empacados de manera adecuada.
El interior necesita limpieza. Siga las instrucciones de limpieza en la sección
Gire la perilla de temperatura hacia la derecha para
encender el sistema de enfriamiento.
energía.
Restablezca/encienda el interruptor de carga o cambie
el fusible.
Espere aproximadamente 40 minutos para que
termine el ciclo de descongelamiento y para que se
restablezca el sistema de enfriamiento.
Gire la perilla de temperatura hacia la derecha para
ajustar a una temperatura más baja; deje transcurrir 24
horas para que se ajuste.
Mantenga cerradas las puertas/verifique que no haya
un empaque que esté impidiendo que se cierre la
puerta.
Deje pasar un tiempo para que el alimento y el
refrigerador se enfríen.
Coloque los objetos sólo dentro de la moldura
de las repisas de vidrio, no en los costados de los
compartimientos ni directamente enfrente de los
orificios de ventilación.
Gire la perilla hacia la izquierda para cambiar a un
ajuste más caliente; deje transcurrir 24 horas para que
se ajuste.
Deje transcurrir 24 horas para que el refrigerador se
enfríe.
Esto es normal.
objeto.
Ajuste la perilla a una configuración más caliente.
la temperatura a una configuración ligeramente más
fría.
Mantenga cerradas las puertas/verifique que no haya
un empaque que esté impidiendo que se cierre la
puerta.
Tape o selle el recipiente.
Vuelva a sellar el empaque/coloque una caja abierta de
bicarbonato de sodio en el refrigerador y remplácela
cada tres meses.
Cuidado y mantenimiento adecuados.
ESPAÑOL
PÁGINA 20 • SOLUCIÓN DE PROBLEMAS Y GARANTÍA
Page 69

SOLUCIÓN DE PROBLEMAS
PROBLEMA CAUSAS POSIBLES SOLUCIÓN
La luz no enciende. El refrigerador está desconectado. Conecte el refrigerador a la fuente de energía.
El foco está flojo. Apriete el foco girándolo hacia la derecha.
El foco está fundido. Siga las instrucciones de la sección Reemplazo de las
bombillas.
No todos los modelos vienen con una luz
para el congelador o luz de nivel medio.
Escarcha o
cristales de hielo
en los alimentos
congelados.
Aire caliente o tibio
de la parte inferior del
refrigerador.
Los alimentos se
congelan en el
refrigerador.
La puerta del
congelador se abre
por sí sola cuando se
cierra la puerta del
refrigerador.
La puerta no se cierra
de manera adecuada.
Vibración o golpeteo. El refrigerador no está firmemente
La puerta del congelador se dejó abierta o
se estuvo abriendo con frecuencia.
Hay objetos que bloquean los orificios de
ventilación del congelador e impiden el
flujo de aire adecuado.
Flujo de aire procedente del compresor
durante el proceso de refrigeración.
Hay alimentos colocados cerca de los
orificios de ventilación.
La perilla de control de temperatura está
configurada en demasiado frío.
Es normal si la puerta del congelador se
cierra por sí sola después.
Si la puerta del congelador no se cierra por
sí sola después de abrirse, ajuste las patas
niveladoras.
El refrigerador no está nivelado. Consulte las instrucciones para nivelar las patas en la
Algo está obstruyendo el cierre de la
puerta.
apoyado en el piso.
Gire la perilla hacia la izquierda para cambiar a un
ajuste más caliente; deje transcurrir 24 horas para
que se ajuste.
Aleje los objetos de la pared posterior.
Esto es normal.
Aleje los alimentos de la parte trasera y superior del
refrigerador.
Ajuste la perilla hacia la izquierda a una configuración
más caliente.
Si la puerta del congelador se cierra por sí sola, es
indicativo de que sella bien.
Consulte las instrucciones para nivelar las patas en la
sección Instalación del refrigerador.
sección Instalación del refrigerador.
Verifique y retire los objetos que obstruyan.
Consulte las instrucciones para nivelar las patas en la
sección Instalación del refrigerador.
PÁGINA 21 • SOLUCIÓN DE PROBLEMAS Y GARANTÍA
ESPAÑOL
Page 70

SERVICIO AL CLIENTE
IMPORTANTE
NO DEVUELVA ESTE PRODUCTO A LA TIENDA
Si tiene algún problema con este producto, comuníquese con el
Centro de satisfacción del cliente al 1-877-337-3639.
ES NECESARIO TENER EL COMPROBANTE DE COMPRA
FECHADO, EL NÚMERO DE MODELO Y EL NÚMERO DE SERIE
PARA RECIBIR EL SERVICIO DE LA GARANTÍA.
CUSTOMER
SERVICE
SERVICE DU
CENTRE DE
REPARATION
A LA CLIENTELE
SERVICIO
AL CLIENTE
Hotline 24/7
1-877-337-3639
ESPAÑOL
PÁGINA 22 • SOLUCIÓN DE PROBLEMAS Y GARANTÍA
Page 71

GARANTÍA LIMITADA
¿Qué cubre y por cuánto tiempo?
Esta garantía cubre todos los defectos de
fabricación o de material durante un período de:
12 meses en partes y mano de obra
5 años en sistema sellado
Esta garantía es válida a partir de la fecha de
compra del producto. El recibo original de compra
debe presentarse al centro de servicio autorizado
antes de que se lleve a cabo cualquier servicio
cubierto por la garantía.
Excepciones: Uso comercial o de renta.
90 días en mano de obra (únicamente en el taller).
90 días en partes.
No aplica ninguna otra garantía.
¿Qué cubre?
Las partes mecánicas y eléctricas cuyo objetivo
es poner en funcionamiento este aparato, por
un período de 12 meses a partir de la fecha de
compra. Esto incluye todas las partes, excepto el
acabado y las molduras.
Los componentes del sistema sellado (por
ejemplo, el compresor hermético, el condensador
y el evaporador) por defectos de fabricación,
por un período de 5 años a partir de la fecha
de compra. No se cubrirá ningún daño a dichos
componentes producido por maltrato mecánico,
transporte y manipulación inadecuados.
¿Qué se hará?
Repararemos o reemplazaremos, a nuestro
criterio, cualquier parte mecánica o eléctrica que
resulte estar defectuosa por uso normal durante el
período de garantía especificado.
No se le cobrará al comprador las partes y la mano
de obra de ningún artículo cubierto durante el
período inicial de 12 meses. Después de dicho
período, la garantía restante sólo cubre las partes.
No incluye la mano de obra y el consumidor deberá
pagarla.
¿Qué hacer en caso de que necesite servicio?
Comuníquese con el centro de servicio autorizado
más cercano. Para obtener el nombre del centro de
servicio más cercano, llame al 1-877-337-3639.
ESTA GARANTÍA CUBRE APARATOS DENTRO
DE LOS ESTADOS UNIDOS CONTINENTAL
Y CANADÁ. ESTA GARANTÍA NO CUBRE LO
SIGUIENTE:
• Llamadas de servicio para realizar la instalación
correcta del refrigerador.
• Llamadas de servicio para instruirle sobre el uso
adecuado del refrigerador.
• Llamadas de servicio para reemplazar o corregir
cableado o tubería domésticos.
• Llamadas de servicio para remplazar bombillas.
• Daños por instalación inadecuada.
• Daños producidos en el envío.
• Defectos distintos a los de fabricación.
• Daño por uso incorrecto, maltrato, accidente,
alteración, falta de cuidado y mantenimiento
adecuados, o corriente o voltaje incorrectos.
• Daño por uso distinto al doméstico.
• Daño por un servicio brindado por un distribuidor
o centro de servicio no autorizado.
• Adornos decorativos.
• Transporte y envío.
• Mano de obra (después de los primeros 12 meses
del período de garantía).
ESTA GARANTÍA LIMITADA SE OTORGA EN
LUGAR DE CUALQUIER OTRA GARANTÍA,
EXPRESA O IMPLÍCITA, INCLUSO LAS
GARANTÍAS DE COMERCIALIZACIÓN E
IDONEIDAD PARA UN FIN EN PARTICULAR.
La solución ofrecida en esta garantía es exclusiva
y se otorga en lugar de cualquier otra solución. La
garantía no cubre daños incidentales o indirectos,
de modo que es posible que las limitaciones
anteriores no apliquen en su caso. Algunos
estados no permiten limitaciones sobre la duración
de una garantía implícita, de modo que es posible
que las limitaciones anteriores no apliquen en su
caso. Esta garantía le otorga derechos legales
específicos, y usted puede tener otros derechos
que varían en cada estado.
Haier America
New York, NY 10018
ESPAÑOL
PÁGINA 23 • SOLUCIÓN DE PROBLEMAS Y GARANTÍA
Page 72

www.HaierAmerica.com
Model # HT Series
Issued: January 2012
115 V, 60 Hz
Assembled in U.S.A.
Fabriqué en É.-U.
Hecho en EE. UU.
Printed in the U.S.A.
Imprimé aux É.-U.
Impreso en los EE. UU.
Haier America
New York, NY 10018
©2012 Haier America Trading, LLC.
 Loading...