

Haier HT18TS77SE Owner’s Manual
Frost-Free Top Mount
Refrigerator / Freezer
Réfrigérateur/congélateur sans
givre à compartiments superposés
Refrigerador/congelador sin
escarcha, de puertas horizontales
User Manual
Guide de l’Utilisateur
Manual del Usuario
Model HT SERIES
Design may vary by model number.
La conguration peut varier selon le numéro de modèle.
El diseño puede variar conforme al número de modelo.


TABLE OF CONTENTS
SAFETY INFORMATION
Important Safety Instructions ......................................................................................................................2
SET UP & USE
Electrical Requirements ................................................................................................................................4
Installation Guide .......................................................................................................................................4-5
Instructions for Unpacking ............................................................................................................................5
Installing Your Refrigerator ............................................................................................................................6
Parts-Included ................................................................................................................................................6
Accessories ....................................................................................................................................................6
Parts & Features .............................................................................................................................................7
Door Handle Installation ............................................................................................................................8-9
Reversing the Door ............................................................................................................................... 10-12
Features and Use ........................................................................................................................................ 12
Operation Instructions ......................................................................................................................... 13-15
Food Storage Information .......................................................................................................................... 16
CLEANING AND CARE
Proper Care and Maintenance .............................................................................................................. 17-18
ENGLISH
TROUBLE SHOOTING & WARRANTY
Normal Operating Sounds.......................................................................................................................... 19
Troubleshooting .................................................................................................................................... 20-21
Customer Service ....................................................................................................................................... 22
Limited Warranty ........................................................................................................................................ 23
PRODUCT REGISTRATION
Thank you for purchasing our Haier
product. This easy-to-use manual will guide you in
getting the best use of your product.
Remember to record the model and serial numbers.
They are on a label inside of the Product.
Model number
Serial number
Date of purchase
Staple your receipt to your manual. You will need it to obtain warranty service.

IMPORTANT SAFETY INSTRUCTIONS
ENGLISH
WARNING
READ ALL INSTRUCTIONS BEFORE USING THIS APPLIANCE:
WHEN USING THIS APPLIANCE, ALWAYS EXERCISE BASIC SAFETY
PRECAUTIONS, INCLUDING THE FOLLOWING:
NOTE: If the refrigerator has been placed in a horizontal or tilted position for any period of time, wait 24
hours before plugging the unit in.
1) Use this appliance only for its intended purpose as described in this use and care guide.
2) This refrigerator must be properly installed in accordance with the installation instructions before it is
used. See Electrical Requirements in the Set Up & Use section.
3) This refrigerator should not be recessed or built-in an enclosed cabinet. It is designed for freestanding
installation only.
4) Never unplug your refrigerator by pulling on the power cord. Always grasp the plug firmly and pull
straight out from the outlet.
5) Repair or replace immediately, all electric service cords that have become frayed or otherwise
damaged. Do not use a cord that shows cracks or abrasion damage along its length, the plug or the
connector end.
6) If your old refrigerator is not being used, we recommend that you remove the doors. This will reduce
the possibility of danger to children.
WARNING
AFTER YOUR REFRIGERATOR IS IN OPERATION, DO NOT TOUCH THE COLD
SURFACES IN THE FREEZER COMPARTMENT, PARTICULARLY WHEN HANDS ARE
DAMP OR WET. SKIN MAY ADHERE TO THESE EXTREMELY COLD SURFACES.
7) Do not refreeze foods, that have been thawed completely. The United States Department of
Agriculture in Home and Garden Bulletin No. 69 reads:
"…You may safely refreeze frozen foods that have thawed if they still contain ice crystals or if they are
still cold-below 40°F."
"…Thawed ground meats, poultry, or fish that have any off-odor or off color should not be refrozen
and should not be eaten. Thawed ice cream should be discarded. If the odor or color of any food is
poor or questionable, discard it. The food may be dangerous to eat."
"…Even partial thawing and re-freezing reduce the eating quality of foods, particularly fruits,
vegetables, and prepared foods. The eating quality of red meats is affected less than that of many
other foods. Use refrozen foods as soon as possible to save as much of their eating quality as you
can."
PAGE 2 • SAFETY INFORMATION

IMPORTANT SAFETY INSTRUCTIONS CONT.
8) Do not use any electrical device or any sharp instrument in defrosting your refrigerator.
9) Unplug your refrigerator before cleaning or before making any repairs.
NOTE: If for any reason this product requires service, we strongly recommend that a certified
technician perform service.
10) Do not operate your refrigerator in the presence of explosive fumes.
SAVE THESE INSTRUCTIONS
DANGER
RISK OF CHILD ENTRAPMENT. BEFORE YOU THROW AWAY YOUR OLD
REFRIGERATOR OR FREEZER, TAKE OFF THE DOORS. LEAVE THE SHELVES IN
PLACE SO THAT CHILDREN MAY NOT EASILY CLIMB INSIDE.
ENGLISH
PAGE 3 • SAFETY INFORMATION

ELECTRICAL REQUIREMENTS
GROUNDING INSTRUCTIONS
ENGLISH
WARNING
ELECTRICAL REQUIREMENT - SHOCK HAZARD
• Make sure there is a suitable power outlet. 115 Volts, 15 Amps, 3 Prong (Grounded) power outlet with
proper grounding to power the refrigerator.
• Avoid the use of three prong adapters or cutting off the third grounding prong in order to
accommodate a two prong outlet. This is a dangerous practice since it provides no effective grounding
for the refrigerator and may result in shock hazard.
USE OF EXTENSION CORDS
WARNING
USE OF EXTENSION CORDS- POTENTIAL SAFETY HAZARD
• Avoid the use of an extension cord because of potential safety hazards under certain conditions.
If it is necessary to use an extension cord, use only a 3-wire extension cord that has a 3-blade
grounding plug and a 3-slot outlet that will accept the plug. The marked rating of the extension cord
must be equal to or greater than the electrical rating of the appliance. DO NOT USE EXTENSION
CORD LONGER THAN 12 FT.
INSTALLATION GUIDE
INSTALLATION LIMITATIONS
• Select a suitable location for the refrigerator on a hard even surface away from direct sunlight or heat
source, e.g. radiators, baseboard heaters, cooking appliances, etc. Any floor unevenness should be
corrected with the leveling legs located on the front bottom corners of the refrigerator.
UNPACKING YOUR REFRIGERATOR
1. Remove all packaging material. This includes the corrugated base and all adhesive tape holding the
refrigerator accessories inside and outside.
2. Inspect and remove any remains of packing, tape or printed materials before powering on the
refrigerator.
NOTE: If your refrigerator comes with a snack pan, remove the blue adhesive tape from the rear of the
pan. The pan will not slide in and out without removing the tape.
PAGE 4 • SET UP & USE

INSTALLATION GUIDE CONT.
LEVELING YOUR REFRIGERATOR
• Your refrigerator has two leveling legs that are located in the front bottom corners of your refrigerator.
After properly placing your refrigerator in its final position, you can level your refrigerator.
• Leveling legs can be adjusted by turning them counterclockwise to raise your refrigerator or by turning
them clockwise to lower your refrigerator. The refrigerator door will close easier when the leveling legs
are extended.
LOWER RAISE
PROPER AIR CIRCULATION
• To ensure your refrigerator works at the maximum efficiency it was designed for, you should install it in
a location where there is proper air circulation, plumbing and electrical connections. Your refrigerator
is not designed to operate in temperatures below 55˚F (12˚C ) or above 95˚F (35˚C).
• Do not install your refrigerator in any location not properly insulated or heated, e.g. garage, etc.
Keep out of direct sunlight and away from heating sources such as radiators, heaters, and cooking
appliances.
ENGLISH
• The following are recommended clearances around the refrigerator:
Sides……………1” (25 mm) Top....................1" (25 mm) Back..................2" (50mm)
INSTRUCTIONS FOR UNPACKING
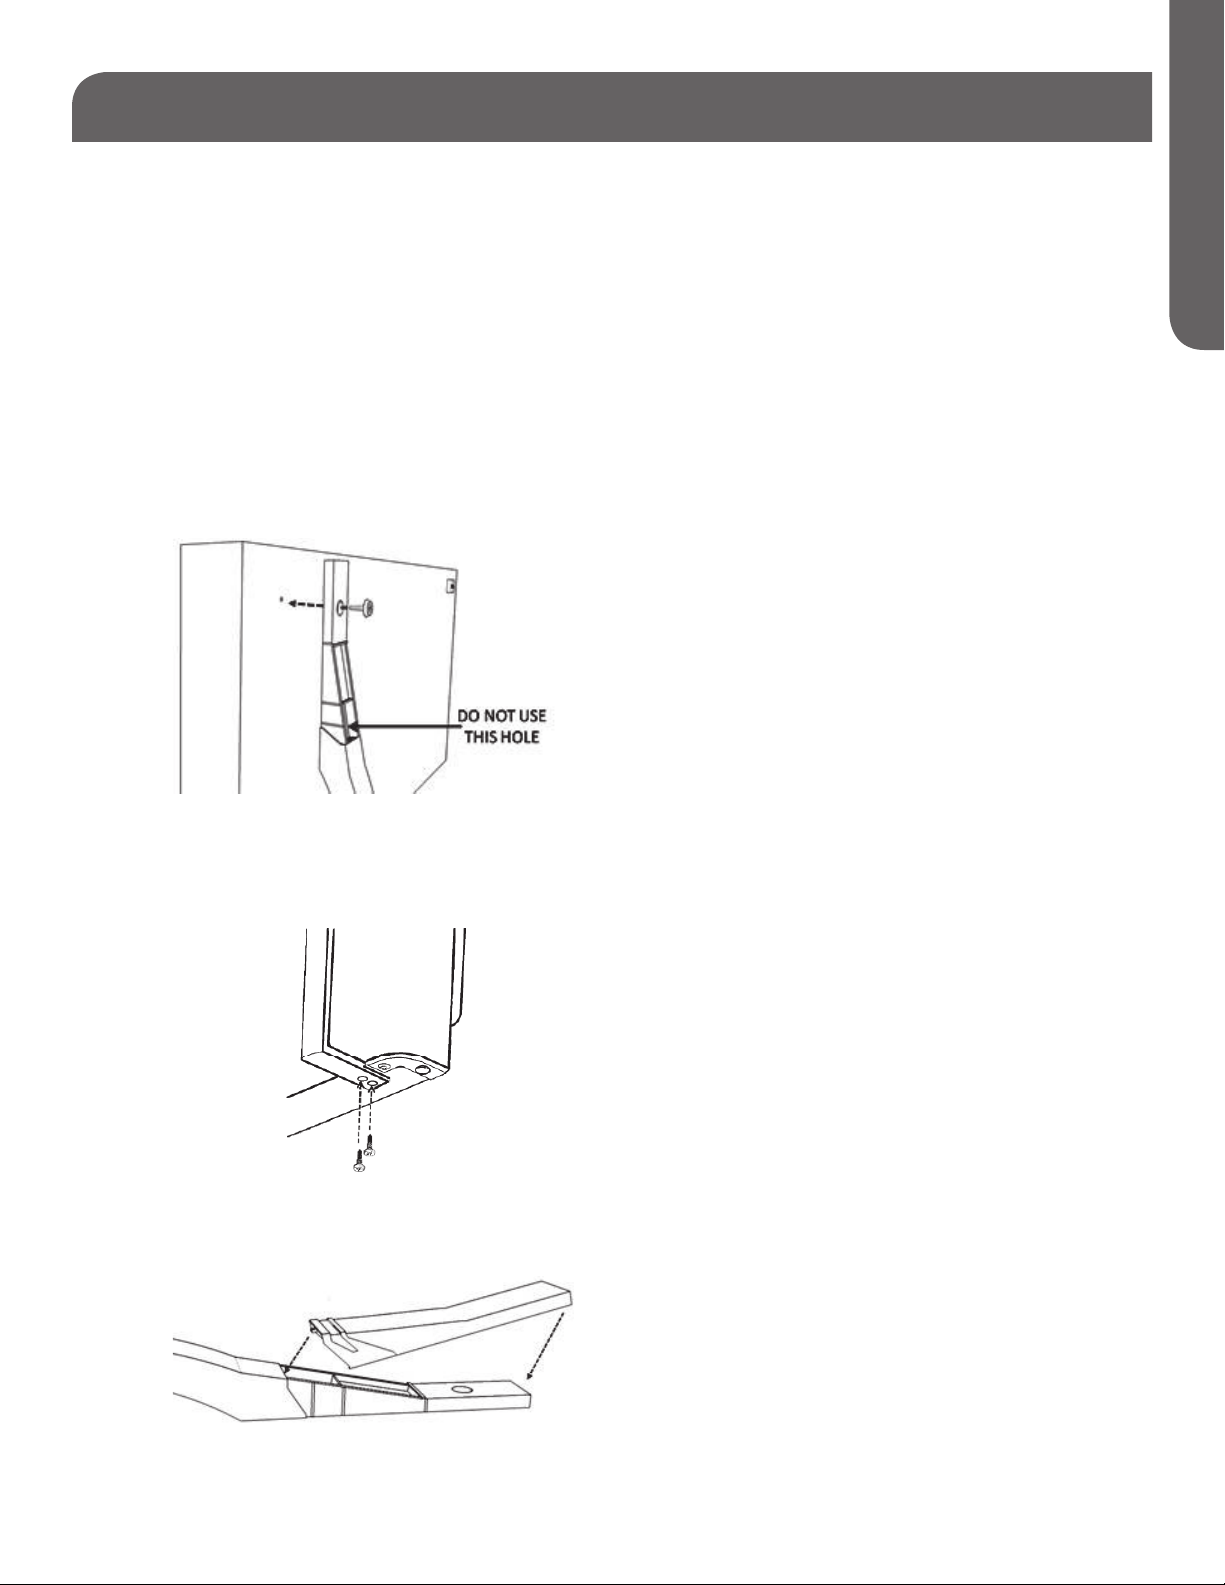
FRONT GRILLE
Your refrigerator comes with a front grille (toe kick), which is reversible based on which side of the
refrigerator the hinges are mounted on. To install the front grille, locate the non-hinge end using the
diagram below and follow the instructions below.
1. Snap the non-hinge side into the air flow opening on the lower rail of the refrigerator.
2. Then, snap the hinge side into the opposite air flow opening in the lower rail beside the bottom hinge.
Hinge side
Non-hinge side Hinge side
PAGE 5 • SET UP & USE
Non-hinge side

INSTALLING YOUR REFRIGERATOR
TOOLS NEEDED FOR INSTALLATION
ENGLISH
DO NOT USE POWER TOOLS TO INSTALL DOOR HANDLES! OVERTIGHTENING THE SCREWS COULD
STRIP THE THREADS!
5/16 and 3/8 Wrenches or Adjustable WrenchPhillips Screwdriver Putty Knife
PARTS-INCLUDED
PARTS-INCLUDED BAG MAY DIFFER BASED ON UNIT PURCHASED.
For non-stainless steel models
that come with a handle
mounting screw factory installed
on the faces of the doors, the
parts-included bag will consist
of:
• 2 Handles
• 1 Front Grille
• 4 Handle attachment screws
• 1 Extra Haier logo badge
• 1 Color-matched screw-plug
• Owner’s manual
For models that don’t come with
a handle mounting screw factory
installed on the faces of the
door, the parts-included bag will
consist of:
• 2 Handles
• 1 Front Grille
• 2 Door face mounting screws
• 4 Door edge mounting screw
• 1 Extra Haier logo badge
• 1 White screw-plug
• Owner’s manual
• 2 Handle cover/trim pieces
ACCESSORIES
The following accessories are available:
• Ice maker Kit HI5MK
For stainless steel models, the
parts-included bag will consist
of:
• 2 Handles
• 1 Front Grille
• 4 Handle attachment screws
• Owner’s manual
• Wire Shelf for Freezer Compartment
• Replacement Light Bulbs
To order accessories, call 1-877-337-3639 or visit us at www.haieramerica.com/support
PAGE 6 • SET UP & USE

PARTS & FEATURES
Air Flow
Control
Temperature
Control with
Interior Light
Full-Width
Shelves
ENGLISH
Freezer
Door Shelves
Dairy
Compartment
Crisper
Humidity
Controls
Crisper Bins
Front Grille
Leveling Legs
Full-Width
Door Shelves
Diagram for instructional purposes only.
Design may vary by model number.
PAGE 7 • SET UP & USE

DOOR HANDLE INSTALLATION
DOOR HANDLE INSTALLATION
ENGLISH
For refrigerators with a mounting screw installed
on the face of both doors:
Remove both handles from inside freezer
compartment and screws from parts-included
bag.
FREEZER DOOR HANDLE
1. Place the tapered end of the handle over the
mounting screw on the freezer door and gently
slide handle in the direction of the flat end of
the handle. (Fig. 1)
2. Once the handle is fully seated around the
mounting screw, slowly rotate the flat end of
the handle toward the bottom of the freezer
door.
Fig. 1
3. Open the freezer door and install the screws
into the underside of the freezer door through
the flat end of the handle. Do not use power
tools to install screws. Do not over-tighten the
screws.
Fig. 2
REFRIGERATOR DOOR HANDLE
1. Place the tapered end of the handle over the
mounting screw on the refrigerator door and
gently slide handle in the direction of the flat
end of the handle. (Fig. 1)
2. Once the handle is fully seated around the
mounting screw, slowly rotate the flat end of
the handle toward the top of the refrigerator
door. (Fig. 1)
3. Open the refrigerator door and install
the screws in to the top of the refrigerator
door through the flat end of the handle
Do not over-tighten screws. (Fig. 2)
4. If re-installing handles after reversing the
door swing, remove screw hole plug from
the parts-included bag and place it in the
handle-mounting screw hole on the face of the
refrigerator door.
5. The name badge can be removed by using a
putty knife or flat head screwdriver to pry the
badge off the door face, being careful not to
damage the finish. Any residue left on the face
of the door from the badge should be removed
by using Goo Gone© or WD-40©. Be sure to
follow the manufacturer’s instructions when
using these products.
Do not use any abrasives or scouring pads to
remove the residue.
An extra logo badge is provided in the partsincluded bag with your refrigerator. That badge
can be used to cover the handle mounting screw
hole on the face of the freezer door.
PAGE 8 • SET UP & USE
DOOR HANDLE INSTALLATION CONT.
ENGLISH
DOOR HANDLE INSTALLATION
For refrigerators without a mounting screw
installed on the face of both doors:
Remove both handles from the freezer
compartment and the screws and handle trim
pieces from the parts-included bag.
FREEZER DOOR HANDLE
1. Mount the tapered end of the handle to the
door face using the enclosed screw. Do not
use the screw hole closest to the center of the
handle.
Fig. 3
2. Attach the flat end of the handle to the
underside of the door using the enclosed
screws.
REFRIGERATOR DOOR HANDLE
1. Mount the tapered end of the handle to the
door face using the enclosed screw. (Fig. 3) Do
not use the screw hole closest to the center of
the handle.
2. Attach the flat end of the handle to the top of
the door using the enclosed screws. (Fig. 4)
3. Insert tab on handle trim cover into slot in
handle then press firmly onto handle. (Fig. 5)
4. If re-installing handles after reversing the
door swing, remove the screw hole plug from
the parts-included bag and place it in the
handle-mounting screw hole on the face of the
refrigerator door.
5. The name badge can be removed by using a
putty knife or flat head screwdriver to pry the
badge off the door face, being careful not to
damage the finish. Any residue left on the face
of the door from the badge should be removed
by using Goo Gone© or WD-40©. Be sure to
follow the manufacturer’s instructions when
using these products.
Do not use any abrasives or scouring pads to
remove the residue.
Fig. 4
3. Insert tab on handle trim cover into slot in
handle and then press firmly onto handle.
Fig. 5
PAGE 9 • SET UP & USE
An extra logo badge is provided in the partsincluded bag with your refrigerator. That badge
can be used to cover the handle-mounting screw
hole on the face of the freezer door.
REVERSING THE DOOR
DOOR SWING REVERSAL
ENGLISH
On black or white models, the door hinges and
handles can be reversed to accommodate your
needs.
NOTE: Door reversal is not available on stainless
steel door models.
REMOVING THE HANDLES
Please refer to the appropriate Door Handle
Installation section to determine how to remove
the handles from your refrigerator.
REMOVING DOORS AND HINGES
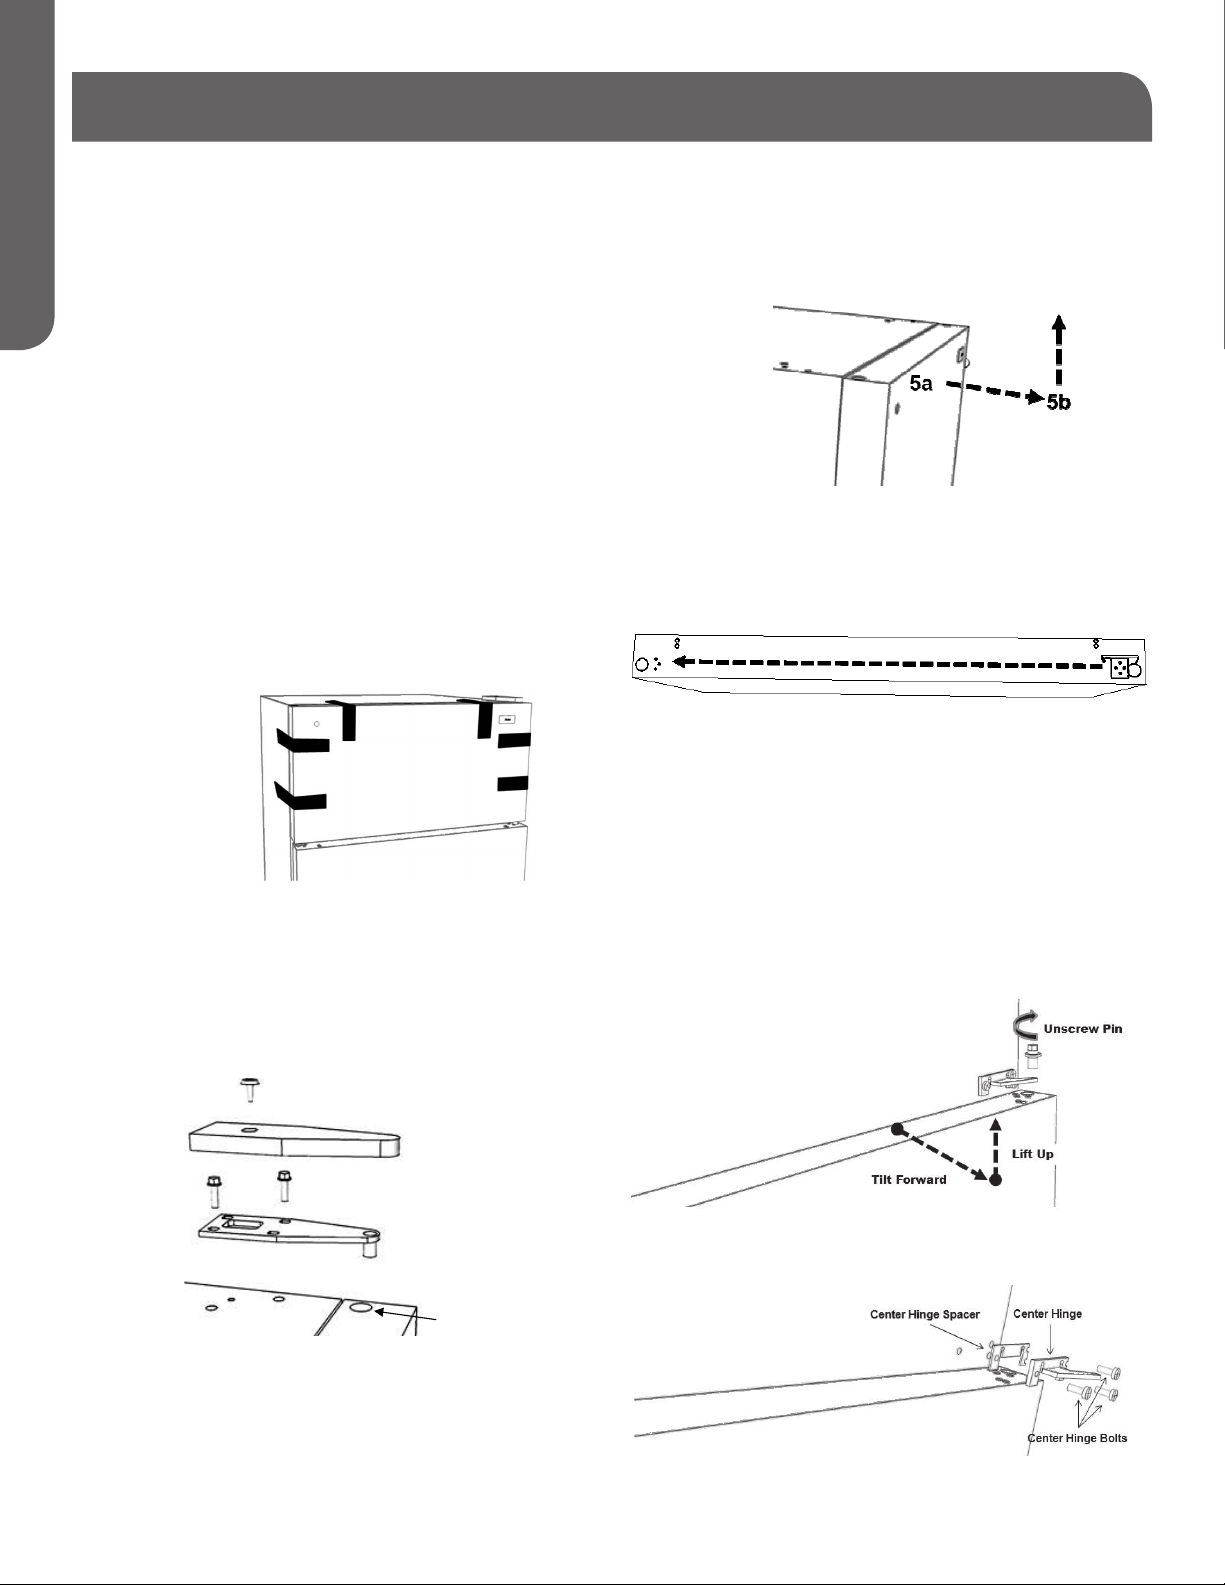
1. Use adhesive tape to secure both sides of the
freezer and refrigerator doors to the sides of the
cabinet. (Fig.6)
Fig. 6
5. Remove the door by (a) pulling the top of the
door away from the cabinet and (b) lifting it at
the same time. (Fig. 8)
Fig. 8
6. Move the door stop on the bottom of the door
to the opposite side and secure with original
screws, then place the door aside.
Fig. 9
7. Unscrew the center hinge pin by rotating
counterclockwise, being careful not to lose the
spacers from the top section of the pin. (Fig. 10)
2. Remove the hinge cover screw and the top hinge
cover. (Fig. 7)
3. Remove the two bolts that mount the top hinge
to the cabinet and then remove the hinge by
raising it vertically. (Fig. 7)
Hinge Cover Screw
Fig. 7
Hinge Cover
Bolts
Top Hinge
Thimble Hole
4. Carefully remove the adhesive tape holding the
freezer door to the cabinet while holding the
door to the cabinet.
8. Remove the refrigerator door in the same
manner as the freezer door, first removing
the tape and then lifting up and away from the
cabinet. (Fig. 10) Relocate the door stop on the
bottom of the door to the opposite side of the
door. (Fig. 9) Place the door aside.
Fig. 10
9. Remove the center hinge and spacer. (Fig. 11)
Fig. 11
PAGE 10 • SET UP & USE
REVERSING THE DOOR CONT.
ENGLISH
10. Remove the bottom hinge by unscrewing the
bolts mounting it to the cabinet.
NOTE: It is easier to remove and re-install the
bottom hinge pin while the hinge is itself is
still attached to the cabinet.
Fig. 12
RE-INSTALLING THE HINGES AND
DOORS
1. Unscrew the bottom hinge pin and re-locate
it to the opposite hole on the top of the hinge.
(Fig. 13)
4. Remove the top thimble cover on the hinge side
of the refrigerator door and relocate it to the
opposite thimble hole. Use both hands to mount
the door on bottom hinge pin, making sure the
pin goes fully into the bottom thimble hole.
When the top thimble hole is aligned with the
hole in the center hinge, place the hinge pin into
the hole, threaded end down, and tighten.
Fig. 15
Thimble Hole
2. Attach the bottom hinge spacer and bottom
hinge to the cabinet using the bolts originally
provided. Be sure to use the top two mounting
holes on the hinge and the bottom hole on the
same side that the hinge is being moved to.
Fig. 13
3. Flip the center hinge according to the diagram
below and attach the hinge spacer and hinge to
the cabinet. (Fig. 14) Do not install the center
hinge pin yet.
Fig. 14
Fig. 16
Do Not Over-Tighten
5. Remove the top thimble plug on the hinge
side of the freezer door and relocate it to the
opposite thimble hole. Place the door onto the
center hinge pin, being sure that the pin goes
fully into the bottom thimble hole. Tape may be
used as it was during the removal steps to hold
the door in place during the next step.
6. Place the top hinge pin into the thimble hole on
the same side as the lower hinges.
PAGE 11 • SET UP & USE
REVERSING THE DOOR CONT.
7. Replace top hinge cap and secure using original
screw.
ENGLISH
Fig. 17
NOTE: Prior to re-installing handles, remove the
Haier© logo badge from the face of the
door using a putty knife to gently pry it
from the door face. Any residue left on the
face of the door from the badge should be
removed by using Goo Gone© or WD-40©.
7
6
Be sure to follow the manufacturer’s instructions
when using these products.
Do not use any abrasives or scouring pads to
remove the residue. Use a putty knife to pry out
the plug buttons covering the handle mounting
holes on the face of the door, being careful not to
scratch the door finish.
To re-install handles, please see the Door Handle
Installation section.
FEATURES AND USE
NOTE: All features not available on all models.
NOTE: If refrigerator has been placed in a
horizontal position for any period of time,
wait 4 hours after returning it to the upright
position before plugging it in.
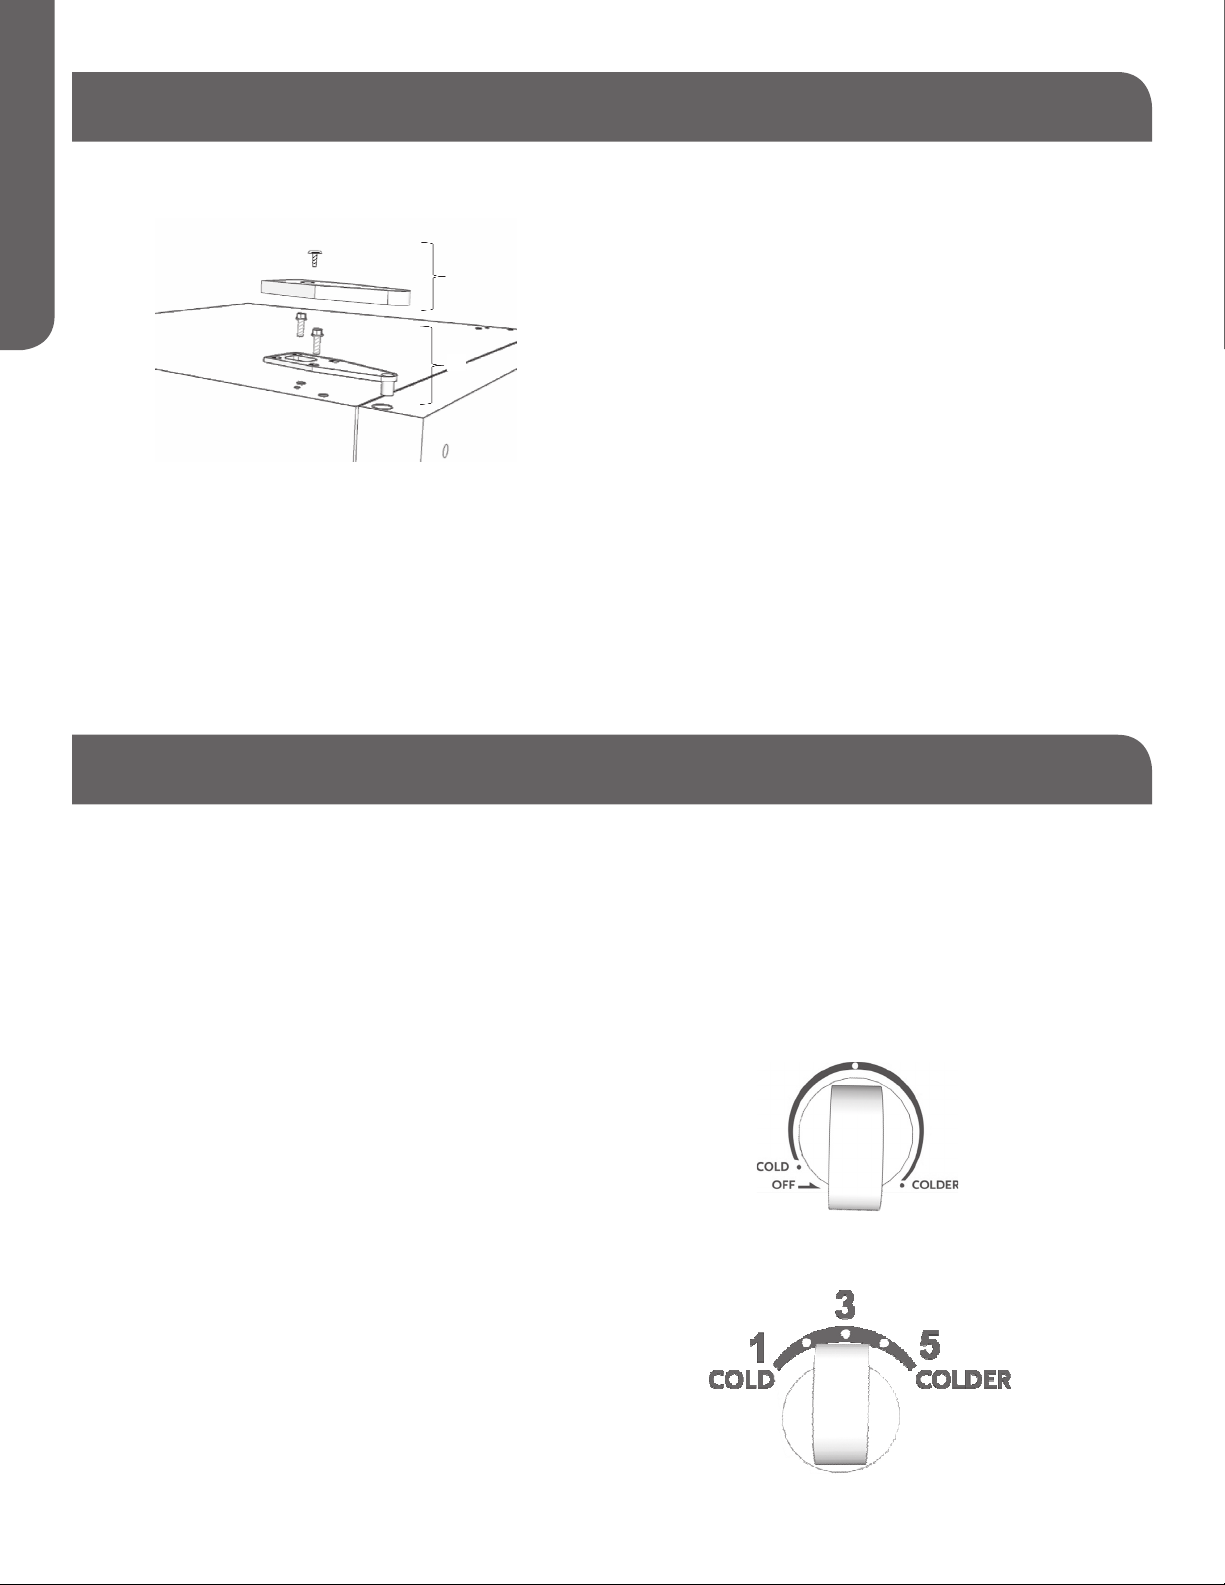
TEMPERATURE CONTROL KNOBS
Your refrigerator will automatically maintain the
set temperature level. Turning the temperature
knob to the left will make both refrigerator and
freezer compartments warmer. Turning the knob
to the right will make both compartments colder.
You can turn the knob in either direction to adjust
the temperature to your needs. We recommend
setting the knob to the straight up and down
position and allowing it to run for at least 24 hours
before adjusting the temperature. Turning the
knob all the way left to the Off position will turn
off the refrigeration system, but does not remove
power to the refrigerator.
The freezer compartment also features a fan
tower knob, which is used to regulate air flow into
the compartment to fine tune the freezer. As with
the refrigerator temperature knob, we recommend
setting the knob to the straight up and down
position and allowing it to run for at least 24 hours
before adjusting it.
Refrigerator Temperature Knob
Freezer Fan Tower Knob
PAGE 12 • SET UP & USE
OPERATION INSTRUCTIONS
ENGLISH
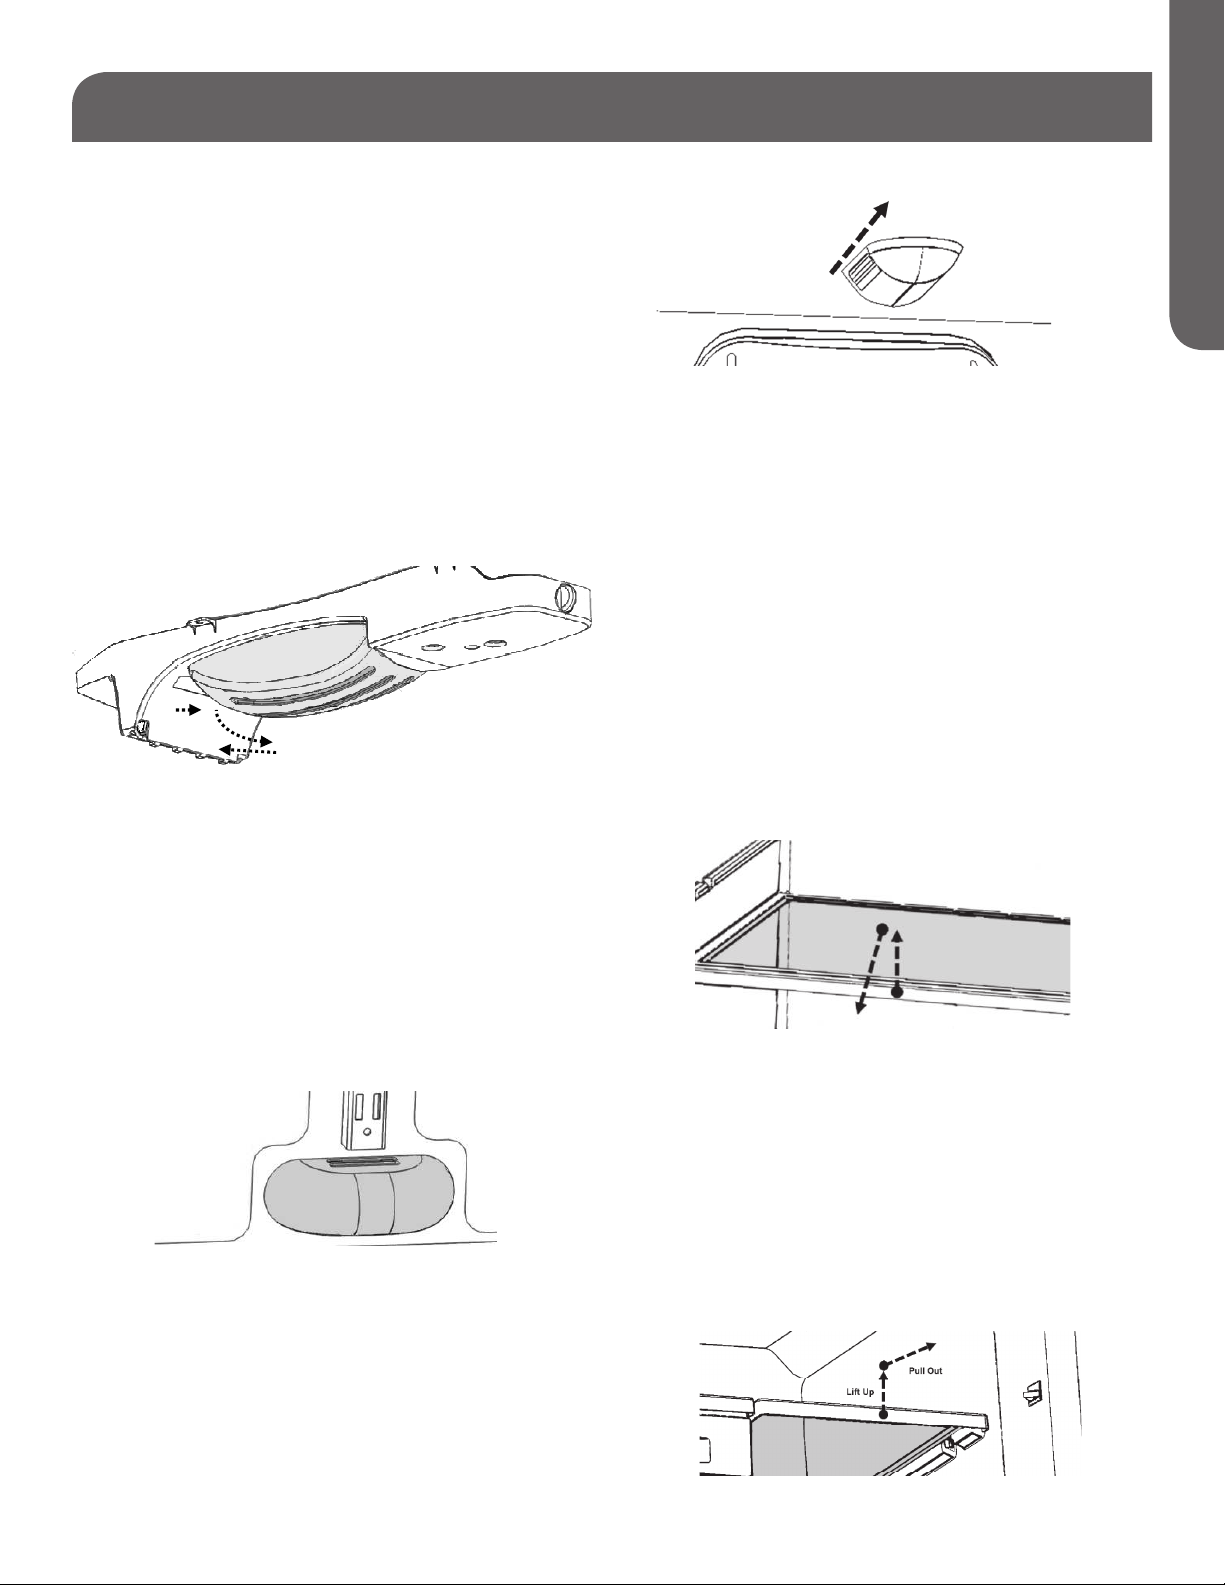
LIGHTING
All models come with an interior light located on
the ceiling of the refrigerator compartment. For
models with a single bulb, no cover is provided.
For models with dual bulbs, a cover is provided.
Some models may feature a light in the freezer
and/or a “mid-level” light on the back wall of the
refrigerator above the crisper. Please see the
Proper Care and Maintenance section for light bulb
replacement instructions.
REFRIGERATOR UPPER LIGHT W/ COVER
(NOT ALL MODELS)
FREEZER LIGHT (NOT ALL MODELS)
To Remove Freezer Light Cover (if included):
1. Pull the cover to the front of the cabinet.
REFRIGERATOR INTERIOR SHELVES
All refrigerator models include shelving that can
be adjusted to suit your personal storage needs.
Depending on model, shelves can be wire or
encapsulated glass, full-width or half-width.
FULL-WIDTH WIRE AND ENCAPSULATED
GLASS SHELVES
To Remove Upper Light Cover (if included):
1. Push in the tab at the far end of the cover.
2. Rotate the far end of the cover down.
3. Push the cover toward the back of the
compartment.
REFRIGERATOR MID-LEVEL LIGHT (NOT
ALL MODELS)
To Remove Refrigerator Mid-Level Light Lens (if
included):
1. Push up on the bottom of the cover.
Can be adjusted to four different levels. These
shelves slide in and out by lifting the front of the
shelf and gently pulling it towards you.
HALF-WIDTH ENCAPSULATED GLASS
SHELVES
Can be set to 4 different levels and can be moved
independent of each other, giving you the widest
variety of shelving options. Keep in mind that
refrigerators with half-width shelving only have a
support track in the center of the refrigerator back
wall. Right-hand and left-hand shelves can’t be
interchanged.
2. Rotate the bottom of the cover away from rear
of compartment.
3. Lift the top of the cover up and out.
PAGE 13 • SET UP & USE
 Loading...