

Page 1

SPLITTYPEROOMAIRCONDITIONER
OPERATION MANUAL
Contents
HSU09XCK-G
HSU12XCK-G
HSU18VCK-G
HSU24VCK-G
PARTS AND FUNCTIONS
OPERATION
MAINTENANCE
CAUTIONS
TROUBLE SHOOTING
Índice
COMPONENTES Y FUNCIONES
FUNCIONAMIENTO
MANTENIMIENTO
PRECAUCIONES
RESOLUCIÓN DE PROBLEMAS
Table des matières
PIÈCES ET FONCTIONS
UTILISATION
MAINTENANCE
AVERTISSEMENTS
DÉPANNAGE
1
2
5
6
7
8
9
12
13
14
15
16
19
20
21
●
Please read this operation manual before using the air conditioner.
Keep this operation manual for future reference.
0010536241
Page 2

Page 3

Parts and Functions
Indoor Unit
1
2
3
4
5
1
Inlet
2
Inlet grille
3
Outlet
4
Vertical blade
(adjust left and
5
Horizontal flap
right air flow)
6
7
8
(adjust up and down air flow.
Don't adjust it manually)
Please be subject to the actual produce purchased the
above picture is just from your reference
8
6
7
Display board
Emergency
Switch
Air Purifying Filter
(inside)
Remote controller
1
2
3
4
5
9
10
11
12
13
14
15
16
1. Mode display
Operation mode
Remote controller
2. Signal sending display
3. SWING display
4. FAN SPEED display
LO MED HI
5. LOCK display
6. TIMER OFF display
TIMER ON display
7.TEMP display
AUTO FANCOOL DRY
Display
circulated
AUTO
Additional functions display
6
8.
Operation mode
Remote controller
7
9. QUIET button
10. COOL button
11. AUTO button
12. FAN button
8
13. TIMER button
17
14. HEALTH button
15. LOCK button
Used to lock buttons and LCD display
18
16. LIGHT button
19
Control the lightening and extinguishing
of the indoor LED display board.
20
17. POWER ON/OFF button
18. DRY button
21
19. TEMP button
20. SWING button
22
21. HOUR button
23
22. EXTRA FUNCTION button
Function: Air sending--- Healthy
24
airflow position1--- Healthy airflow
position 2 --- Restore the original
flap position
--- A-B yard--- Sleeping--- Refresh air
(reserved function)
Fahrenheit/Celsius mode conversion
23.CANCEL/CONFIRM button
Function: Setting and cancel to the
timer and other additional functions.
24. RESET button
When the remote controller appears
abnormal, use a sharp pointed
article to press this button to reset
the remote.
SLEEP
QUITE
--- Right & left air airflow
HEALTH
--- Power ---
POWER
Outdoor Unit
4
OUTLET
INLET
Please be subject to the actual produce purchased the
above picture is just from your reference
CONNECTING PIPING AND ELECTRICAL WIRING
DRAIN HOSE
Healthy function is not available for some units.
Loading of the battery
Remove the battery cover;
1
Load the battery,then put on the cover again.
4
Note:
The distance from the remote to the receiver should be less than
23 feet (7 meters) with no obstructions.
Fluorescent lights or cordless telephones will reduce the range
of the remote.
If the display is dim the remote batteries may need to be replaced.
Remote malfunctions can sometimes be corrected by removing
the batteries for a few minutes and then replacing them.
Hint:
Remove the batteries in case won't be in use for a long period. If
there is any display after taking-out, just press reset key.
Load the batteries as illustrated.
2
2 AAA batteries, resetting key
(cylinder);
Be sure battery polarity is
3
correct
" + "/"-";
1
Page 4
Operation
Base Operation
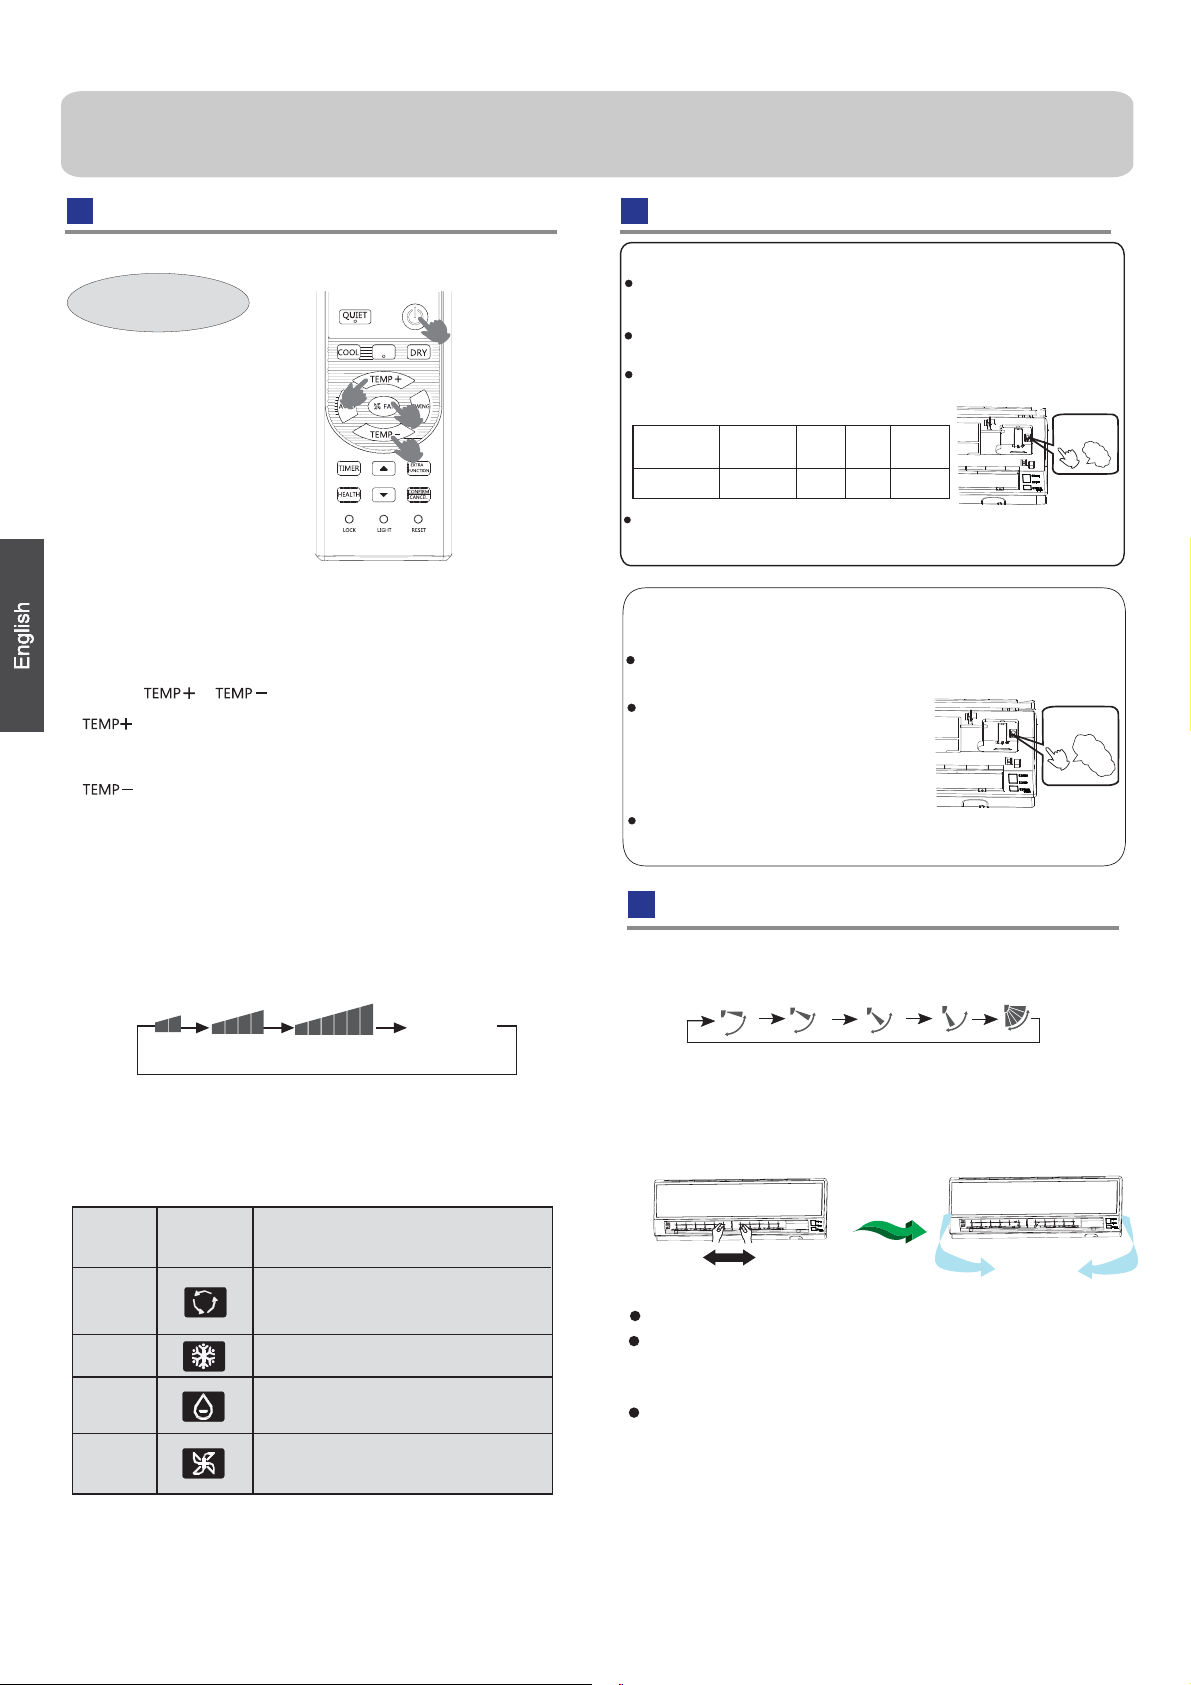
Remote controller
1. Unit start
Press ON/OFF on the remote controller, unit starts.
2.Select temp.setting
Press
Every time the button is pressed, temp.setting
increase 1
rapidly
Every time the button is pressed, temp.setting
decrease 1
decrease rapidly
Select a desired temperature.
button
o
C,if kept depressed, it will increase
o
C,if kept depressed, it will
Emergency operation and test operation
Emergency Operation:
Use this operation only when the remote controller is defective
or lost, and with function of emergency running, air conditoner
can run automatically for a while.
When the emergency operation switch is pressed, the unit
beeps once, which means the start of this operation.
When power switch is turning on for the first time and
emergency operation starts, the unit will run automatically in
the following modes:
Room
temperature
Above 23oC 26oC AUTO COOL
It is impossible to change the settings of temp. and fan speed,It
is also not possible to operate in timer or dry mode.
Designated
temperature
Timer
mode
No
Fan
speed
Operation
mode
Test operation:
Test operation switch is the same as emergency switch.
Use this switch in the test operation when the room temperature
is below 16
Continue to press the test operation
switch for more than 5 seconds.After
you hear two beeps, release your finger
from the switch: the cooling operation
starts with the air flow speed "Hi".
Under this operation mode,the fan motor of indoor
unit will run in high speed.
o
C, do not use it in the normal operation.
emergency
operation switch
test operation
switch
Pi
Pi
Pi
3.Fan speed selection
Press FAN button. For each press, fan speed
LOW
Remote
Controller
Icon
follows:
MED HI
Under the mode of auto operation , air conditioner
will automatically select Cool operation according to
room temperature.
conditioner automatically adjusts the fan speed according
to room temperature.
In DRY mode , when room temperature becomes
lower than temp.setting+2
intermittently at LOW speed regardless of FAN
setting.
In FAN operation mode , the unit will not operate in
COOL mode but only in FAN mode, AUTO is not
available in FAN mode. And temp.setting is disabled.
In FAN mode, sleep operation is not available.
Display
circulated
AUTO
Note
When FAN is set to AUTO the air
o
C, unit will run
changes as
Remote controller:
Air conditioner is running under displayed fan speed.
When FAN is set to AUTO, the air conditioner
automatically adjusts the fan speed according to room
temperature.
Operation
Mode
AUTO
COOL
DRY
FAN
Air Flow Direction Adjustment
1.Status display of air flow
COOL/DRY:
2.Left and right air flow adjustment
Move the vertical blade by a knob on air
to adjust left and right direction referring to the
figure below.
Cautions:
When adjusting the flap by hand,turn off the unit.
When humidity is high,condensate water might occur
at air outlet if all vertical louvers are
right.
It is advisable not to keep horizontal flap at downward
position for a long time in COOLor DRY
otherwise, condensate water might occur.
Note:
When restart after remote turning off, the remote
controller will automatically
set swing position.
return to the previous
(manual)
conditioner
'
adjusted to left or
mode ,
2
Page 5
Operation
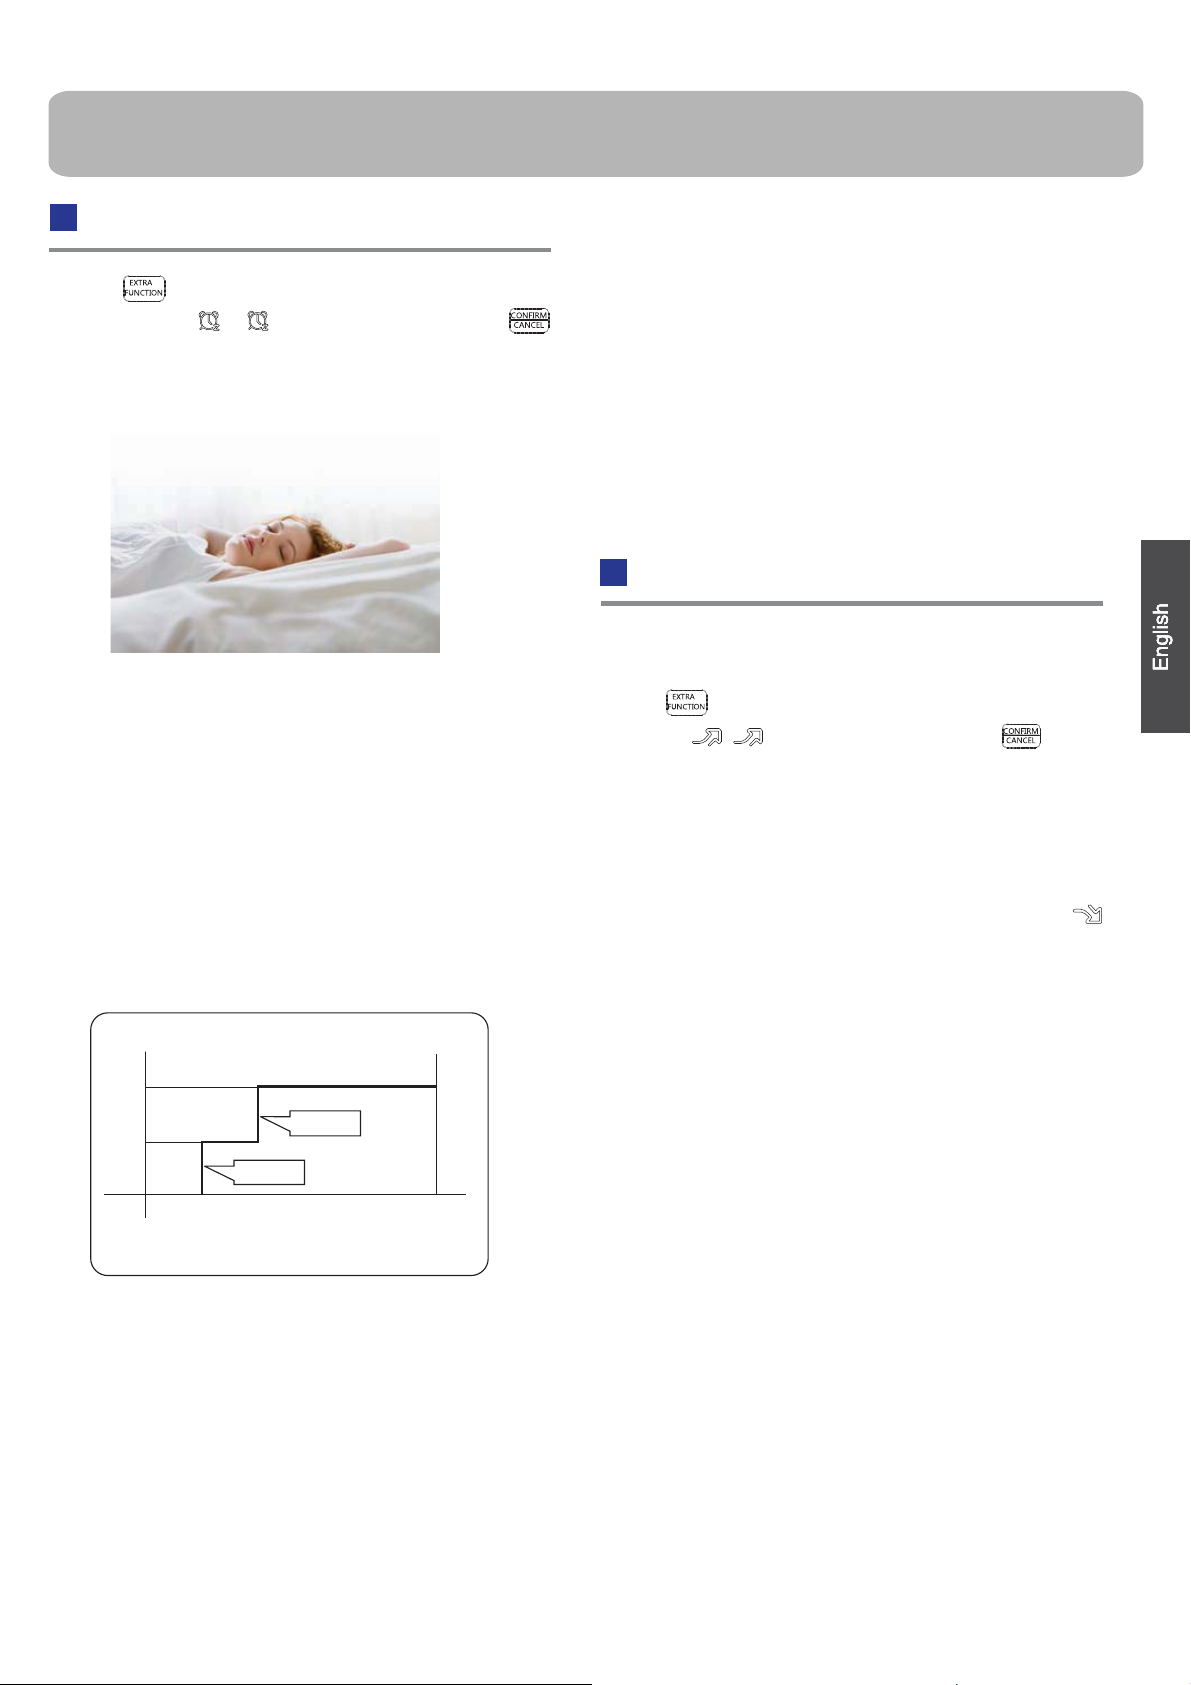
Sleep Operation
Press button to enter additional options, when
cycle display to , will flash. And then press
enter to sleep function.
Operation Mode
1. In COOL,DRY mode
1 hours after SLEEP mode starts,temp.will become
O
higher than temp.setting.After another 1 hours,
C
1
O
temp.risesby 1 futher .The unit will run for further
6 hours then stops Temp. is higher than temp.setting
so that room temperature won’t be too low for your
sleep.
C
4.Set the wind speed change when sleeping
If the wind speed is high or middle before setting for the
sleep, set for lowing the wind speed after sleeping.
If it is low wind, no change.
Note
When TIMER function is set, the sleeping function can’t be
if user resets
,
set up .After the sleeping function is set u
p
TIMER function, the sleeping function will be cancelled; the
machine will be in the state of
timing-on.
POWER/QUIET Operation
(1)
POWER Operation
When you need rapid heating or cooling, you can use this function.
Press button to enter additional options, when cycle
display to , will flash,and then press ,enter to
power function. When cancel the function, please enter
additional options again and to cancel power function.
(2)
QUIET Operation
You can use this function when silence is needed for rest or reading.
Press QUIET button, the remote controller will show ,
and then achieve to the quiet function. Press again this
QUIET button , the quiet function will be cancelled.
SLEEP operation starts SLEEP operation stops
Approx.6hrs
O
C
Rises 1
Rises 1
O
C
Unit stop
1 hr
1 hr
Temp.setting
In COOL, DRY mode
In AUTO mode
2.
The unit operaters in corresponding sleep mode
adapted to the automatically selected operation
mode.
3. In FAN mode
It has no SLEEP function.
Note ˖
During POWER operation, in rapid COOL mode ,
will show inhomogeneous temperature distribution.
Long period QUIET operation will cause effect of not too
cool or not too warm.
the room
3
Page 6

Operation
Timer On/Off On-Off Operation
1.After unit starts, select your desired operation mode.
2.Press TIMER button to change TIMER mode. Every
time the button is pressed, display changes as follows:
Remote controller:
0.5h
TIMER ON TIMER OFF TIMER ON-OFF
0.5h 0.5h
0.5h
TIMER OFF-ON
Then select your desired TIMER mode (TIMER ON or
TIMER OFF or TIMER ON-OFF). " "or " "will flash.
3.Press / button to set time.
Press the button for each time, setting time in the first
12 hours increased by 0.5 hour every time, after 12
hours,increased by 1 hour every time.
Press the button for each time, settiing time in the first
12 hours decreased by 0.5 hour every time, after 12
hours,decreased by 1 hour every time.
It can be adjusted within 24 hours.
4.Confirm timer setting
After adjust the time,press button and confirm the
time ON or OFF button will not flash any more.
BLANK
Healthy airflow Operation
1.Press to starting
Setting the comfort work conditions.
2.The setting of healthy airflow function
Press button to enter additional options,Press this
button continuously, the louvers location will cycle between
in the following three locations, to choose the swing location
what you needed,and then press button to confirm.
Healthy
airflow
upwarder
3.The cancel of the healthy airflow function
Press button to enter additional options,Press this
button continuously, the louvers location will cycle between
in the following three locations again,and then press
button to cancel.
Notice: Do not direct the flap by hand. Otherwise, the
grille will run incorrectly. If the grille is not run correctly, stop
for a minute and then start, adjusting by remote
controller.
Healthy
airflow
downwarder
Present
position
5.Cancel timer setting
Press the timer button by times until the time display
eliminated.
Hints:
After replacing batteries or a power failure happens, time
setting should be reset.
According to the Time setting sequence of TIMER ON or
TIMER OFF, either Start-Stop or Stop-Start can be achieved.
Note:
1.After setting the healthy airflow function, the position
grill is fixed.
2.In cooling, it is better to select the
3.In cooling and dry, using the air conditioner for a long
time under the high air humidity, condensate water may
occur at the grille .
mode.
4
Page 7
Maintenance
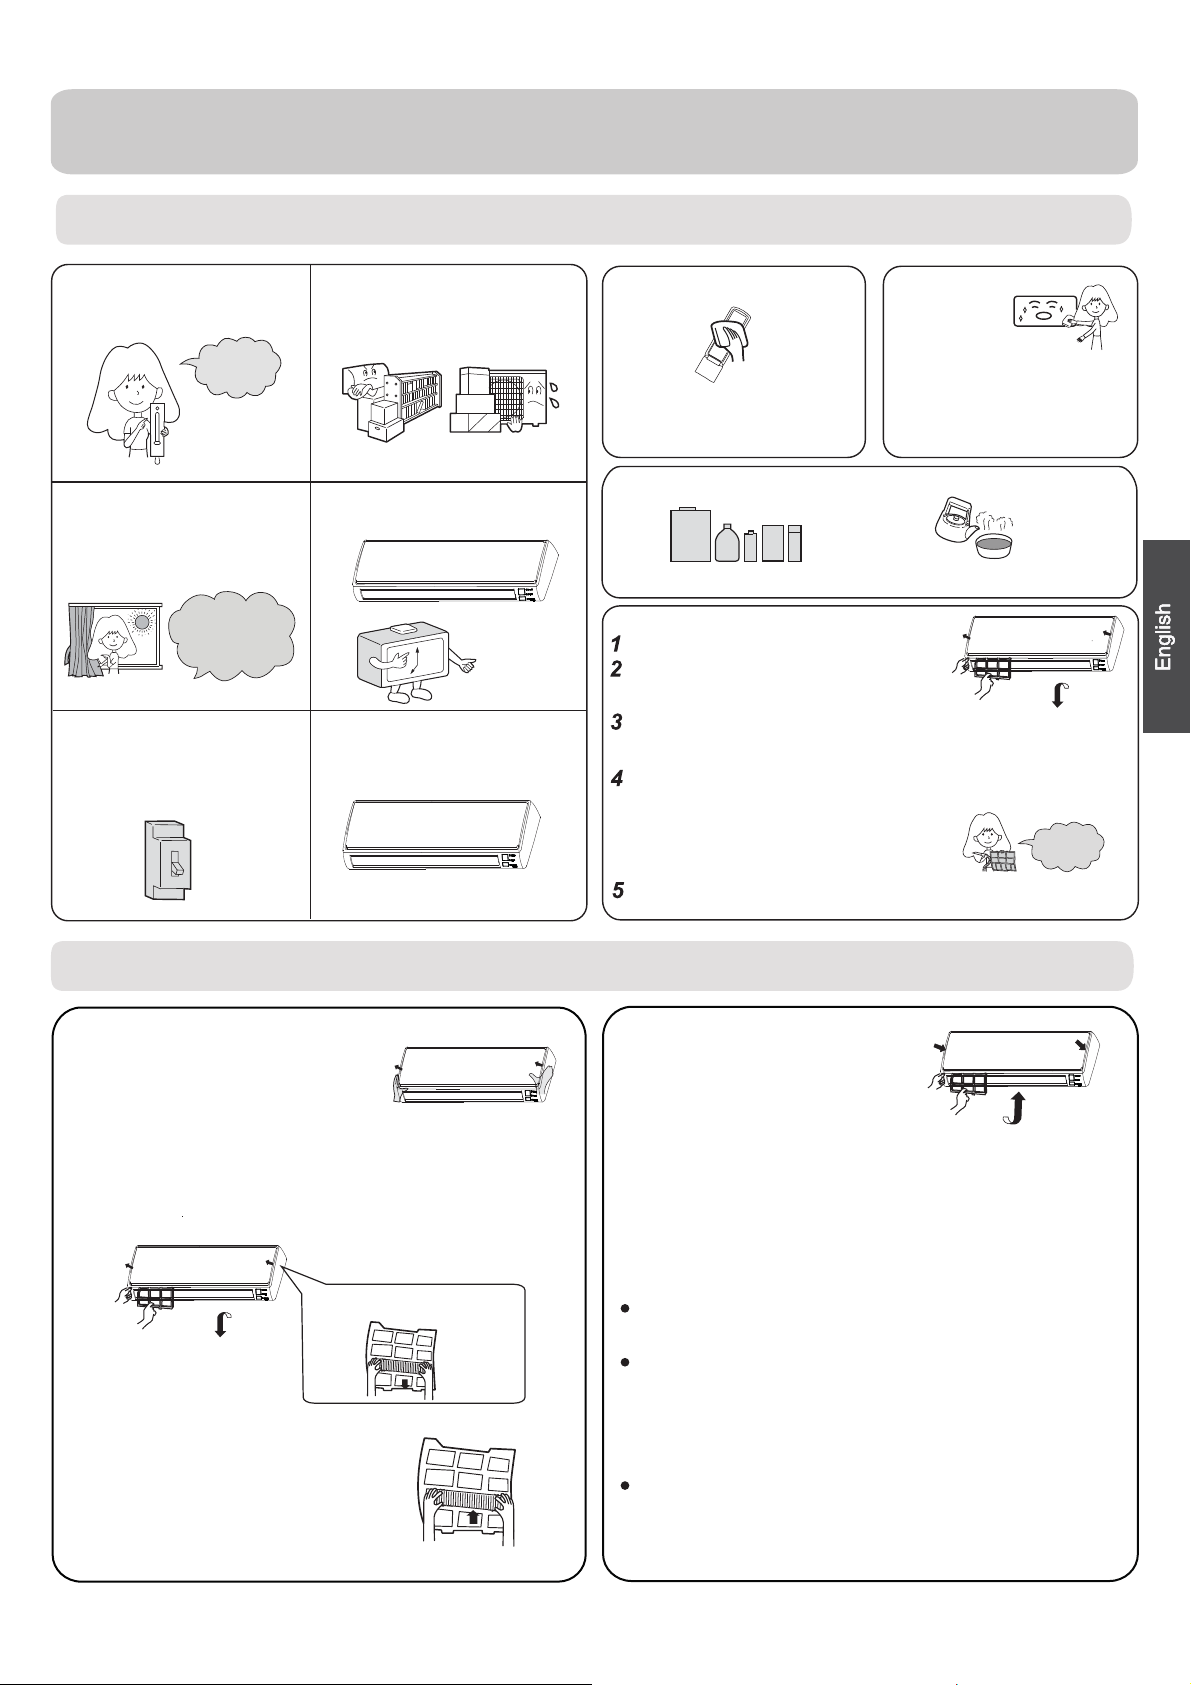
For Smart Use of The Air Conditioner
Setting of proper room
temperature
Proper
temperature
Close doors and windows
during operation
During cooling operation
prevent the penetration
of
direct sunlight with
curtain or blind
If the unit is not to be used
for a long time, turn off the
power supply main switch.
OFF
Do not block the air inlet
or outlet
Use the timer effectively
Use the louvers effectively
Remote Controller Indoor Body
wipe the air conditioner by using a
soft and dry cloth.For serious stains,
Do not usewater,wipe the controller
with a dry cloth.Do not use glass
cleaner or chemical cloth.
use a neutral detergent diluted with
water.Wring the water out of the
cloth before wiping,then wipe off the
detergent completely.
Do not use the following for cleaning
Gasoline,benzine, thinner or cleanser
damage the coating of the unit.
ay
m
Hot water over 40
cause
discoloring or deformation.
Air Filter cleaning
Open the inlet grille by pulling it upward.
Remove the filter.
Push up the filter's center tab slightly until it is
released
Clean the filter.
Use a vacuum cleaner to remove dust, or wash the filter with
water.After washing, dry the filter completely in the shade.
Attach the filter.
Attach the filter correctly so that the "FRONT" indication
is
completely
and left filters are not
may cause defects.
Close the inlet grille.
from the stopper, and remove the filter do
facing to the front.Make sure that the filter is
fixed behind the stopper.If the right
attached correctly, that
O
C(104OF) may
wnw
ard.
Once every
two weeks
Replacement of Air Purifying Filter
1.Open the lnlet Grille
Prop up the inlet grille by with a grille
support located in the right side of
the indoor unit.
2.Detach the standard air filter
Slide the knob slightly up
release the filter, then withdraw it.
3.Attach Air Purifying Filter
Put air purifying filter appliances into the
right and left filter frames.
ward to
Detach old Air Purifying Filter
4.Attach the standard air filter
(Necessar
y installation)
ATTENTION:
The white side of the photocatalyst air purifying filter
face outside,and the black side face the unit The green
side of the bacteria-killing medium air purifying filter face
outside,and the white side face the unit.
5.Close the Inlet Grille
Close the Grille surely
NOTE:
The photocatalyst air purifying filter will be solarized in fixed
time. In normal family,
The bacteria-killing medium air purifying filter will be used
for a long time,no need for replacement. But in the period
of using them ,you should remove the dust frequently by
using vacuum cleaner or flaping them lightly,otherwise ,
its performance will be affected.
Please keep the bacteria-killing medium air purifying filter in
the cool and dry conditions
when you stop using it,or its ability of sterilization will
reduced.
it will be solarized every 6 months.
avoid long time directly sunshine
be
5
Page 8

Cautions
WARNING
This system should be installed by a qualified HVAC professional.
Do not attempt to install the air conditioner by yourself because improper works
may cause fire, water leakage, personal injury or cleath.
WARNING
When abnormality such as burnt-small found,
immediately stop the operation button and
contact sales shop.
Use an exclusive
power source
with a circuit
breaker
Check proper
installation of the
drainage securely
OFF
Connect power supply cord
to the outlet completely
STRICT
ENFORCEMENT
Do not use power supply
cord in a bundle.
PROHIBITION
Do not start or stop the
operation by disconnecting
the power supply cord
and so on.
PROHIBITION
Do not use for the purpose of storage of
food, art work, precise equipment,
breeding, or cultivation.
STRICT
ENFORCEMENT
Use the proper voltage
Take care not to damage
the power supply cord.
Do not channel the air flow directly
at people, especially at infants or
the aged.
1.Do not use power supply cord extended
or connected in halfway
2.
Do not install in the place where there is any
possibility of inflammable gas leakage around the unit.
STRICT
ENFORCEMENT
PROHIBITION
PROHIBITION
3.Do not get the unit exposed
to vapor or oil steam.
Do not insert objects into the air
inlet or outlet.
Do not try to repair or
reconstruct by yourself.
CAUTION
Take fresh air occasionally especially
when gas appliance is running at the
same time.
STRICT
ENFORCEMENT
PROHIBITION
PROHIBITION
Connect the earth
cable.
earthing
Do not operate the switch with
wet hand.
Do not install the unit near a fireplace
or other heating apparatus.
Do not place animals or plants in
the direct path of the air flow
6
PROHIBITION
PROHIBITION
PROHIBITION
STRICT
ENFORCEMENT
Check good condition of the
installation stand
PROHIBITION
Do not place any objects on or
climb on the unit.
PROHIBITION
PROHIBITION
Do not pour water onto the unit
for cleaning
PROHIBITION
Do not place flower vase or water
containers on the top of the unit.
PROHIBITION
Page 9

Trouble shooting
Cautions
Before asking for service, check the following
first.
Cause or check points
When unit is stopped, it won't restart
immediately until 3 minutes have
elapsed to protect the system.
When the electric plug is pulled out
and reinserted, the protection circuit
will work for 3 minutes to protect the
air conditioner.
During unit operation or at stop,
a swishing or gurgling noise may
be heard.At first 2-3 minutes after
unit start, this noise is more noticeable.
(This noise is generated by
refrigerant flowing in the system.)
During unit operation, a cracking
noise may be heard.This noise is
generated by the casing expanding
or shrinking because of
temperature changes.
Should there be a big noise from
air flow in unit operation, air
filter may be too dirty.
This is because the system
circulates smells from the interior
air such as the smell of furniture,
paint, cigarettes.
During COOL or DRY operation,
indoor unit may blow out mist.
This is due to the sudden cooling
of indoor air.
In DRY mode, when room temperature
becomes lower than temp.
setting+2
intermittently at LOW speed
regardless of FAN setting.
Is power plug inserted?
Is there a power failure?
Is fuse blownout?
Is the air filter dirty?
Normally it should be cleaned
every 15 days.
Are there any obstacles before
inlet and outlet?
Is temperature set correctly?
Are there some doors or
windows left open?
Is there any direct sunlight
through the window during the
cooling operation?(Use curtain)
Are there too much heat sources
or too many people in the room
during cooling operation?
o
C,unit will run
Normal
Performance
inspection
Multiple
check
Phenomenon
The system
does not restart
immediately.
Noise is heard
Smells are
generated.
Mist or steam are
blown out.
In dry mode,
speed can’t be
changed.
Poor cooling
fan
Do not obstruct or cover the ventilation
conditoner.Do not put fingers
inlet/outlet and
Do not allow children to play with the air
case should children be
swing louver.
or any other things into the
allowed to sit on the outdoor unit.
grille of the air
conditioner
Specifications
The refrigerating circuit is a sealed system.
The machine is adaptive in following
1.Applicable ambient temperature range:
Cooling
Indoor
Outdoor
2. If the power supply cord is damaged, it
manufacturer
3. If the fuse of indoor unit on PC board is
it with the type of
broken,change it with the type of
4. The wiring method should be in line with
5. After installation, the power plug should
6. The waste battery should be disposed
7. The appliance is not intended for use
without supervision.
persons
8.Young children should be supervised
the appliance.
with
9. Please employ the proper power plug,
cord.
The power plug and connecting cable
10.
attestation.
11.In order to protect the units,please turn
30 seconds
Maximum:D.B/W.B
Minimum:D.B/W.B
Maximum:D.B/W.B
Minimum:D.B/W.B
or its service agent or a similar
T. 3.15A/ 250V
later, cutting off the power.
32oC/23oC
o
19.4
o
46.1
o
19.4
must be replaced
broken,please
. If the fuse of
T.25A/250V
the local wiring
be easily reached.
properly.
by young children or
to ensure that th
which fit into the
must have
off the A/C first,
situation
( )
89.6
C/13.9oC
C/23.9oC
C/11.9oC
qualified
outdoor
.In no
o
F/73.4oF
o
( )
F/57oF
67
o
( )
F/75oF
115
o
( )
F/57oF
67
by the
person.
change
unit is
standard.
infirm
ey
do not play
p
ower supply
acquired the local
and at least
7
Page 10

Componentes y funciones
Unidad interior
2
3
Toma de entrada
1
Rejilla de la toma de
2
entrada
3
Toma de salida
4
Pala vertical (permite
ajustar
la dirección del
flujo de aire hacia la
izquierda y hacia la
derecha)
1
4
5
5
Alerón horizontal
(permite
del flujo
y hacia
manual
6
Panel de indicadores
Interruptor de emergencia
7
8
Filtro purificador de aire
(interior)
8
6
7
ajustar la dirección
de aire hacia arriba
abajo; no lo ajuste
mente)
Recuerde que la ilustración anterior podría no reflejar fielmente el
producto adquirido y debe utilizarse únicamente como referencia.
Unidad exterior
Mando a distancia
1
2
3
4
5
9
10
11
12
13
14
15
16
1. Indicador de modo
Modo de
funcionamiento
Mando a
distancia
2. Indicador de envío de señal
3. Indicador de OSCILACIÓN
4. Indicador de VELOCIDAD DE
VENTILADOR
BAJA MEDIA ALTA AUTOMÁTICO
5. Indicador de BLOQUEO
6. Indicador
TEMPORIZADOR DE
APAGADO
TEMPORIZADOR DE
ENCENDIDO
La función Saludable no está disponible para algunas unidades.
REFRIGERACIÓN SECO VENTILADOR
AUTOMÁTICO
Visualización
circular
6
7. Indicador de TEMPERATURA
8. Indicador de funciones adicionales
Modo de
SILENCIO SUELO SALUDABLE INTENSO
funcionamiento
7
Mando a
distancia
9. Botón SILENCIO
10. Botón FRÍO
11. Botón AUTOMÁTICO
8
12. Botón VENTILADOR
17
13. Botón TEMPORIZADOR
14. Botón SALUDABLE
15. Botón BLOQUEAR
18
Se utiliza para bloquear los botones y
19
la pantalla LCD.
16. Botón LUZ
Controla la activación y desactivación
20
de la iluminación del panel de
indicadores LED de la unidad interior.
17. Botón ENCENDIDO / APAGADO
21
18. Botón SECO
22
19. Botón TEMPERATURA
20. Botón OSCILACIÓN
23
21. Botón HORA
22. Botón FUNCIÓN ADICIONAL
24
Función: Dirección del aire
de flujo de aire saludable
de flujo de aire
Reestablecer la posición original de la
aleta
izquierda
Refrescar aire ( función reservada )
Fahrenheit/Celsius
23. Botón CANCELAR/CONFIRMAR
Función: establecer y cancelar el
temporizador y otras funciones
adicionales.
24. Botón RESTABLECER
Si el mando a distancia presenta
alguna anomalía, introduzca un objeto
puntiagudo a través del orificio para
pulsar este botón y restablecer el
mando a distancia.
Flujo de aire a la derecha e
Potencia Modo de conversión
saludable 2
Jardín A-B Dormir
1
Posición
Posición
4
SALIDA DE AIRE
ELÉCTRICO
ENTRADA DE AIRE
TUBOS DE CONEXIÓN Y CABLEADO
MANGUITO DE DRENAJE
Recuerde que la ilustración anterior podría no reflejar
fielmente el producto adquirido y debe utilizarse únicamente
como referencia.
8
Instalación de las pilas
Extraiga la tapa de las pilas;
1
En la figura se muestra el modo
2
de carga de las pilas. 2 pilas
AAA, botón reinicio (botella);
segúrese de que la polaridad de
A
3
labateríaeslacorrecta:
Instale las pilas y vuelva a colocar de nuevo la tapa.
4
"+"/ "-";
Nota:
Debe haber menos de 23 pies (7 metros) de distancia libre de
obstrucciones entre el mando y el receptor.
Las lámparas fluorescentes y teléfonos inalámbricos reducirán el
rango del mando a distancia.
Si la pantalla parece tenue, es posible que las baterías del mando
a distancia deban ser sustituidas.
En ocasiones se puede corregir el mal funcionamiento del mando
a distancia quitando las baterías durante unos minutos y luego
recolocándolas.
Sugerencia:
Extraiga las pilas si no tiene intención de utilizar la unidad durante un
periodo largo de tiempo. Si observa alguna pantalla extraña después de
extraer las pilas deberá pulsar el botón Restablecer.
Page 11

Funcionamiento
Funcionamiento básico
Mando a distancia
1. Arranque de la unidad
Pulse el botón de ENCENDIDO / APAGADO en el mando
a distancia para arrancar la unidad.
2. Selección de la configuración de temperatura
Pulse el botón / .
Cada vez que pulse este botón, la configuración
de temperatura aumentará en 1 ºC. Si mantiene el
botón pulsado, la temperatura aumentará rápidamente.
Cada vez que pulse este botón, la configuración
de temperatura bajará 1 ºC. Si mantiene el botón
pulsado, la temperatura bajará rápidamente.
Seleccione la temperatura que desee.
3. Selección de la velocidad del ventilador
Pulse el botón VENTILADOR. Cada vez que pulse el
botón, la velocidad del ventilador
cambiará de acuerdo con el ciclo ilustrado a continuación:
Mando a distancia:
ed odom ne otneimanoicnuF
emergencia en modo de prueba
Funcionamiento de emergencia:
Utilice esta operación únicamente cuando el mando a distancia
esté defectuoso o se haya perdido. Si la función de emergencia
está en funcionamiento, el acondicionador de aire podrá funcionar
automáticamente durante un tiempo.
Al pulsar el botón de operación de urgencia, la unidad emite un pitido;
esto representa el inicio de esta operación.
Cuando se enciende el interruptor de alimentación
por primera vez y comienza el funcionamiento de
emergencia, la unidad funcionará automáticamente
en los siguientes modos:
Temperatura de la
habitación
Por encima de 23 OC26OC No AUTOMÁTICO REFRIGERACIÓN
Es imposible cambiar la configuración de temperatura y velocidad del
ventilador, como tampoco es posible utilizar el modo de temporizador o seco.
Temperatura
seleccionada
Modo de
temporizador
Velocidad del
ventilador
Modo de
funcionamiento
Funcionamiento de prueba:
El interruptor de funcionamiento de prueba es similar al interruptor de emergencia.
Utilice este interruptor en el uso de prueba si la temperatura de
la sala es inferior a 16 ºC. No lo utilice durante el uso normal.
Siga pulsando el botón de operación de prueba durante
más 5 segundos. Tras oír dos pitidos, suelte el botón.
La operación de enfriamiento empieza con la velocidad
de flujo de aire “Hi” (Alto).
Bajo este modo de funcionamiento el motor del ventilador de la unidad interior
funcionará a alta velocidad.
Ajuste de dirección del flujo de aire
1. Indicador de estado flujo de aire
FRÍO/SECO:
Interruptor del modo
de funcionamiento de
emergencia
Interruptor del modo
de funcionamiento
de prueba
Pi
Pi
Pi
Visualización
circular
BAJA MEDIA ALTA AUTOMÁTICO
El aparato de aire acondicionado funciona según la velocidad de ventilador indicada.
Si el VENTILADOR se configura en el modo AUTOMÁTICO,
el aparato de aire acondicionado ajustará automáticamente la
velocidad del mismo según la temperatura de la habitación.
Modo de
funcionamiento
AUTOMÁTICO
REFRIGERACIÓN
SECO
VENTILADOR
Icono del
mando a
distancia
Nota
En el modo de funcionamiento automático, el acondicionador de aire
seleccionará de forma automática la operación Frío o Calor en función
temperatura de la habitación. Si el VENTILADOR se configura
de la
AUTOMÁTICO, el aparato de aire acondicionado ajustará
en el modo
automáticamente la velocidad del mismo según la temperatura de la
habitación.
En el modo SECO, cuando la temperatura de la sala es inferior a la
temperatura configurada +2ºC, el equipo funcionará de forma
intermitente a BAJA
configuración del ventilador.
En el modo VENTILADOR, la unidad no funcionará en los modos de
REFRIGERACIÓN o CALEFACCIÓN, sino únicamente en el modo
VENTILADOR. El modo AUTOMÁTICO no está disponible en el modo
VENTILADOR. El ajuste de temperatura quedará deshabilitado. En el
modo VENTILADOR, la función Sueño no estará disponible.
velocidad, independientemente de la
2. Ajuste del flujo de aire hacia la izquierda y
hacia la derecha (manual)
Desplace el control vertical mediante una perilla en la
unidad de aire acondicionado para ajustar la dirección hacia
la izquierda y la derecha. Consulte la figura a continuación
Precauciones:
Apague la unidad antes de ajustar la posición del alerón con
la mano.
Si el nivel de humedad es alto podría condensarse
humedad
en la salida de aire si se ajustan todas las lamas verticales a
la izquierda o la derecha.
Es aconsejable no mantener la aleta horizontal en posición
descendida durante mucho tiempo en el modo FRÍO o SECO.
De lo contrario podría producirse condensación de agua.
Nota:
Al reiniciar la unidad tras haberla apagado mediante el
tomáticamente
a distancia, el mando a distancia volverá
viamente configurada.
a la posición de oscilación
pre
au
man
do
9
Page 12

Funcionamiento
Funcionamiento en modo Sueño
Pulse el botón para acceder a opciones adicionales.
Cuando la secuencie muestre
continuación, pulse
para entrar en la función Sueño.
Modo de funcionamiento
1. En el modo REFRIGERACIÓN, SECO
1 hora después de que se haya iniciado el modo
SUEÑO,
la temperatura aumentará 1
configuración de temperatura. Transcurrida otra
hora, la temperatura
aumentará 1
se mantendrá en funcionamiento entonces durante 6
horas más y, a continuación, se detendrá. La
temperatura será entonces superior a la configuración
de temperatura, por lo que la temperatura de la
habitación ya no será tan reducida y le permitirá dormir
con tranquilidad.
Se iniciará el funcionamiento
en modo SUEÑO
1 h
1 h
Configuración de temperatura
En los modos de REFRIGERACIÓN y SECO
Aumenta 1 oC
2. En el modo AUTO
La unidad funcionará en el modo de sueño
correspondiente, adaptado al modo de
funcionamiento seleccionado automáticamente.
3. En el modo FAN
No dispone de función SUEÑO.
, parpadeará. Y, a
o
C sobre la
o
C más. La unidad
Se detendrá el funcionamiento
en modo SUEÑO
Aprox. 6 horas
Aumenta 1
o
C
La unidad se
detiene
4. Configurar los cambios en la velocidad del viento
durante el sueño
Si la velocidad del viento es alta o media antes de
activar la función SUEÑO, active esta función para que
la velocidad del viento se reduzca una vez activada la
función SUEÑO.
Si la velocidad del viento es baja, no se llevará a cabo
ningún cambio.
Nota
Si se configura la función TEMPORIZADOR, la función
SUEÑO no se podrá activar. Si el usuario restablece la
función TEMPORIZADOR después de activar la función
SUEÑO, ésta se cancelará; la máquina activará entonces
el temporizador de encendido.
Funcionamiento en modo INTENSO/
SILENCIOSO
(1) Funcionamiento en modo INTENSO
Utilice esta función si necesita calentar o refrigerar
rápidamente una habitación.
Pulse el botón
Cuando la secuencia muestre
Presione
Cuando cancele la función, vuelva a entrar en las opciones
adicionales para cancelar la función del modo Intenso.
(2) Funcionamiento en modo SILENCIOSO
Utilice esta función si desea que la unidad funcione de forma
silenciosa y le permita leer o descansar.
Pulse el botón SILENCIO. El mando a distancia mostrará
y podrá entrar en la función de silencio. Pulse de nuevo el
botón SILENCIO para cancelar la función de silencio.
Nota:
Si se selecciona el modo rápido FRÍO en el modo
funcionamiento INTENSO, la habitación no presentará
una distribución homogénea de la temperatura.
Si el modo de funcionamiento SILENCIO se mantiene activo
durante un periodo prolongado de tiempo, no se alcanzarán
niveles eficaces de calefacción o refrigeración.
para acceder a opciones adicionales.
, parpadeará.
para entrar en la función del modo Intenso.
de
10
Page 13

Funcionamiento
/odidnecne ed rodaziropmet led osU
apagado
1. Una vez que la unidad se encuentre en marcha, seleccione el
modo de funcionamiento que desee
2. Pulse el botón TEMPORIZADOR para cambiar al modo de
TEMPORIZADOR. Cada vez que pulse este botón, la pantalla
cambiará de acuerdo con el ciclo ilustrado a continuación:
Mando a distancia:
0,5 h 0,5 h
TEMPORIZADOR
DE ENCENDIDO
TEMPORIZADOR
DE APAGADO
0,5 h
TEMPORIZADOR DE
ENCENDIDO-APAGADO
Seleccione a continuación el modo de TEMPORIZADOR que
desee (TEMPORIZADOR DE ENCENDIDO, TEMPORIZADOR DE
APAGADO o TEMPORIZADOR DE ENCENDIDO-APAGADO). "
comenzará a parpadear el indicador
3. Pulse
/
para configurar la hora.
Pulse el botón para cada hora. Para las primeras 12 horas, se
aumentará 0,5 horas cada vez. Después de las primeras 12
horas, se aumentará 1 hora cada vez.
Pulse el botón para cada hora. Para las primeras 12 horas, se
reducirá 0,5 horas cada vez. Después de las primeras 12 horas,
se reducirá 1 hora cada vez.
Puede ajustar cualquier hora comprendida dentro de un intervalo
de 24 horas.
4. Confirmar la configuración del temporizador
Después de ajustar el tiempo, presione el botón
el
tiempo. El botón ENCENDIDO o APAGADO no volverá a
parpadear.
5. Cancelar la configuración del temporizador
Presione el botón del temporizador las veces que sea necesario
que desaparezca el indicador del tiempo.
hasta
Sugerencias:
Después de sustituir las pilas o si se produce un fallo en el suministro
eléctrico, la configuración de hora se restablecerá.
Según la secuencia de configuración de hora aplicada a las funciones
TEMPORIZADOR DE ENCENDIDO y TEMPORIZADOR DE
APAGADO, podrá realizar operaciones de Inicio-Parada o ParadaInicio.
.
TEMPORIZADOR DE
ENCENDIDO-APAGADO
" " u " ".
0,5 h
BLANK
y confirme
ed ojulf ed odom le ne otneimanoicnuF
aire saludable
1. Pulse para comenzar
Establezca las condiciones de funcionamiento confortables.
2. Configuración de la función de flujo de aire saludable
Pulse el botón
este botón continuamente. Las lamas cambiarán cíclicamente entre
las tres ubicaciones siguientes. Elija la ubicación de oscilación que
necesite y, a continuación, presione el botón
3. Cancelación de la función de flujo de aire saludable. Pulse el
botón
botón continuamente. Las lamas cambiarán cíclicamente entre las
tres ubicaciones siguientes. Pulse el botón
operación.
Aviso:
No dirija el alerón con la mano. Si no sigue esta indicación,
no funcionará correctamente. Si la rejilla no funciona correctamente,
detengan el funcionamiento durante un minuto y, a
vuelva a intentarlo realizando el ajuste con el mando a
Nota:
1. Después de establecer la función de flujo del aire saludable, la
posición de la rejilla se fijará.
2. En el modo de refrigeración, es mejor seleccionar el modo
3. En el modo de enfriamiento y seco, si utiliza el aparato de aire
acondicionado durante un prolongado período de tiempo en un
entorno con alta humedad, se puede producir condensación de
agua
para entrar en las opciones adicionales. Pulse
para confirmar.
Flujo de aire
saludable
hacia arriba
Flujo de aire
saludable
hacia abajo
Posición
actual
para entrar en las opciones adicionales.Pulse este
para cancelar la
continuación,
distancia.
en la rejilla exterior.
la rejilla
.
11
Page 14

Mantenimiento
Para utilizar el aparato de aire acondicionado de forma inteligente
Configure una temperatura
adecuada para la habitación.
Temperatura
adecuada
No bloquee las tomas de
entrada o salida de aire.
Durante la
refrigeración, evite
la entrada de
luz solar directa
utilizando cortinas
o mamparas
Si no tiene intención de usar
la unidad durante un periodo
prolongado de tiempo, apague
el interruptor principal de la
fuente de alimentación.
APAGAR
No bloquee las tomas de
entrada o salida de aire.
Utilice el temporizador de
forma eficiente
Utilice las lamas de forma
eficiente
mando a distancia
No use agua; limpie el mando a
distancia con un paño seco. No use
limpiacristales ni paños impregnados
en productos químicos.
Equipo interior
Limpie el aparato de aire acondicionado
utilizando un paño suave y seco. Si
aprecia manchas graves, utilice un
detergente neutro diluido con agua.
Escurra el agua del paño antes
de la limpieza. Limpie entonces
completamente el detergente.
No utilice ninguno de los siguientes productos para limpiar la unidad
Gasolina, benceno, disolvente o productos
de limpieza; podrían dañar el revestimiento
de la unidad.
Agua caliente a más de 40 OC (104
O
F); podría provocar efectos de
decoloración o deformación.
Limpieza del filtro de aire
Abra la rejilla de la toma de entrada tirando
1
de ella hacia arriba.
Extraiga el filtro.
2
Presione ligeramente hacia arriba la pestaña
central del filtro hasta liberarla del tope y extraiga
el filtro hacia abajo.
Limpie el filtro.
3
Utilice un aspirador para eliminar el polvo o lave el filtro con agua. Después del
lavado, permita que el filtro se seque completamente a la sombra.
Instale el filtro.
4
Instale el filtro correctamente, de modo que la marca
"FRONTAL" quede orientada hacia delante. Asegúrese
de que el filtro encaje completamente tras el tope. La
instalación incorrecta de los filtros izquierdo y derecho
podría provocar defectos.
Cierre la rejilla de la toma de entrada.
5
Una vez cada
dos semanas
Sustitución del filtro purificador de aire
1. Abrir la rejilla de
Soporte la rejilla de entrada mediante
el soporte de rejilla del lateral
derecho de la unidad para interiores.
2. Extraiga el filtro de aire estándar
Deslice el mando ligeramente hacia arriba para liberar el filtro y, a
continuación, tire de él.
3. Instale el filtro purificador de aire
Coloque los accesorios del filtro
purificador de aire en los soportes
izquierdo y derecho del filtro.
entrada
Extraiga el filtro purificador de
aire antiguo
4. Instale el filtro de aire estándar
(Instalación necesaria)
ATENCIÓN:
La superficie de color blanco del filtro purificador de aire fotocatalizador debe
quedar orientada hacia fuera, mientras que la superficie de color negro debe
quedar orientada hacia la unidad. Por su parte, la superficie de color verde del
filtro purificador de aire antibacterias debe quedar orientada hacia fuera, mientras
que la superficie de color blanco debe quedar orientada hacia la unidad.
5. Cierre la rejilla de la toma de entrada
Cierre la rejilla firmemente.
NOTA:
● El filtro purificador de aire fotocatalizador se solarizará en un periodo
de tiempo fijo. En el caso de una familia normal, suele solarizarse
cada 6 meses.
● El filtro purificador de aire antibacterias disfruta de una gran
durabilidad y no es necesario sustituirlo. No obstante, durante las
temporadas de uso es recomendable eliminar el polvo con frecuencia
utilizando un aspirador o agitándolo ligeramente. De lo contrario, su
rendimiento puede verse afectado.
● Cuando no se encuentre en uso, conserve el filtro purificador de aire
antibacterias en un lugar fresco y seco y evite su exposición a la luz
solar directa durante periodos prolongados de tiempo. De lo contrario,
su capacidad de esterilización se reducirá.
12
Page 15

Precauciones
ADVERTENCIA
Este sistema debe ser instalado por un profesional cualificado de climatización.
No intente instalar la unidad de aire acondicionado usted mismo, ya que una
instalación incorrecta puede resultar en incendios, fugas de agua, lesiones o la muerte.
ADVERTENCIA
Si aprecia alguna anomalía, como una pequeña
quemadura, detenga inmediatamente el
funcionamiento del aparato y póngase en contacto
con su punto de venta.
Utilice una fuente
de alimentación
exclusiva equipada
con un interruptor
de circuito.
Compruebe que la instalación del drenaje se haya
llevado a cabo correctamente.
CUMPLIMIENTO
ESTRICTO
Conecte el cable de la fuente de
alimentación completamente a la toma
de suministro eléctrico.
CUMPLIMIENTO
ESTRICTO
No enrolle el cable de la fuente de
alimentación.
PROHIBIDO
No inicie ni detenga el funcionamiento
del aparato desconectando el cable de
la fuente de alimentación.
PROHIBIDO
No utilice el aparato con fines de
conservación de alimentos, obras de arte,
equipos de precisión o cultivos, ni tampoco
en instalaciones agrarias.
Extreme la precaución para
evitar dañar el cable de la fuente
de alimentación.
No dirija el flujo de aire
directamente hacia personas, en
especial hacia niños o ancianos.
Utilice un nivel de voltaje
adecuado.
CUMPLIMIENTO
ESTRICTO
PROHIBIDO
PROHIBIDO
PRECAUCIÓN
Aspire aire fresco con frecuencia,
especialmente si hay algún aparato de gas
en funcionamiento al mismo tiempo.
1. No prolongue el cable de la fuente de alimentación ni lo
conecte por un punto intermedio.
2. No instale el aparato en un lugar en el que sea posible
la generación de fugas de gas inflamable alrededor de la
unidad.
3. No permita que la unidad resulte
expuesta a vapores de agua o de
aceite.
No inserte objetos a través de la toma de entrada o salida
de aire.
No intente reparar o
reconstruir el aparato
personalmente.
CUMPLIMIENTO
ESTRICTO
PROHIBIDO
PROHIBIDO
Conecte el cable de conexión
a tierra.
Conexión
a tierra
No accione el interruptor con las manos
mojadas.
PROHIBIDO
No instale la unidad cerca de una chimenea
u otro aparato de calefacción.
PROHIBIDO
No coloque animales o plantas en la ruta
directa del flujo de aire.
PROHIBIDO
CUMPLIMIENTO
ESTRICTO
Compruebe que el soporte de instalación se
encuentre en buenas condiciones.
PROHIBIDO
No coloque ningún objeto sobre la unidad ni
se suba a ella.
PROHIBIDO
PROHIBIDO
No deposite agua sobre la unidad para
limpiarla.
PROHIBIDO
No coloque jarrones o contenedores de
agua de otro tipo sobre la unidad.
PROHIBIDO
13
Page 16

Resolución de problemas
Antes de solicitar asistencia técnica,
compruebe los siguientes puntos.
Problema Causa o puntos a comprobar
Cuando se detiene la unidad, ésta no se
reinicia inmediatamente hasta después
de transcurridos 3 minutos para proteger
el sistema.
Si la toma eléctrica se extrae y vuelve a
insertarse, el circuito de protección se
activa durante 3 minutos para proteger el
acondicionador de aire.
Es posible que se escuche un susurro o
gorgoteo durante el funcionamiento de la
unidad o al detenerla. El sonido es aún
más intenso después de 2-3 minutos una
vez puesta en marcha la unidad.
(El ruido viene generado por el
refrigerante que fluye por el sistema).
Es posible que se escuchen crujidos
durante el funcionamiento de la
unidad. Este sonido se genera como
consecuencia de la expansión o
contracción de la carcasa que se deriva
de los cambios de temperatura.
Si se escucha un ruido muy fuerte durante
el funcionamiento de la unidad, el filtro de
aire podría estar demasiado sucio.
Esto se debe a que el aire del entorno,
con olor a muebles, pintura o cigarrillos,
circula a través del sistema.
Durante el funcionamiento en el modo
FRÍO o SECO, el equipo podría expulsar
vapores.
Esto se debe a la refrigeración repentina
del aire interior.
El el modo SECO, cuando la temperatura
de la habitación desciende por debajo
de la configuración de temperatura + 2 C,
la unidad pasa inmediatamente a la
velocidad BAJA independientemente de
la configuración de VENTILADOR.
¿Está insertada la toma de alimentación?
¿Se ha producido un fallo de
alimentación?
¿Se ha fundido algún fusible?
¿Está sucio el filtro de aire?
Normalmente debe limpiarse cada 15
días.
¿Existen obstáculos en la entrada o
salida de aire?
¿Se ha configurado a temperatura
correctamente?
¿Existen puertas o ventanas abiertas?
¿Penetra la luz solar directamente
a través las ventanas durante el
funcionamiento en modo de refrigeración?
(Utilice cortinas)
¿Existen demasiadas fuentes de calor o
demasiadas personas en la habitación
durante la refrigeración?
o
Inspección de
comportamiento
normal
Pruebas
múltiples
El sistema
no se reinicia
inmediatamente.
La unidad emite
ruidos.
Se aprecian olores.
El aparato expulsa
vapor o vaho.
No es posible
cambiar la velocidad
del ventilador en el
modo seco.
Refrigeración
insuficiente
Precauciones
No obstruya ni cubra la rejilla de ventilación del aire acondicionado. No
coloque los dedos ni ningún otro objeto en la entrada/salida y las lamas
móviles.
No permita que los niños jueguen con el aparato de aire acondicionado. En
ningún caso debe permitirse a los niños sentarse sobre la unidad exterior
Especificaciones
El circuito de refrigerante ha sido diseñado a prueba de fugas.
La máquina puede adaptarse a las siguientes situaciones
1. Intervalos válidos de temperatura ambiental:
o
o
C/13.9oC
o
C/23.9oC
o
C/11.9oC
( )
F/73.4oF
89.6
( )
67
( )
115
( )
67
Máximo: D.B/W.B
Interior
Exterior
Mínimo: D.B/W.B
Máximo: D.B/W.B
Mínimo: D.B/W.B
Refrigeración
2. Si el cable de alimentación está dañado deberá ser reemplazado por el
fabricante, agente de servicio o persona cualificada similar.
3. Si se funde el fusible de la placa de PC de la unidad interior, cámbielo por otro
de tipo T. 3,15 A / 250 V. Si se funde el fusible de la unidad exterior, cámbielo
por otro de tipo T. 25 A / 250 V.
4. El método de cableado debe satisfacer los requisitos de las normas locales
de cableado.
5. Después de la instalación, el enchufe de alimentación debe encontrarse
ubicado en un lugar fácilmente accesible.
6. Las pilas gastadas deben ser eliminadas correctamente.
7. El aparato no ha sido diseñado para su uso por niños o personas enfermas
sin supervisión.
8. Los niños pequeños deberán ser supervisados por un adulto para asegurarse
de que no juegan con el aparato.
9. Emplee la toma de alimentación adecuada para el cable de alimentación
utilizado.
10. El enchufe de alimentación y el cable de conexión deben satisfacer los
requisitos de la normativa local.
11. Para proteger los equipos, apague primero el interruptor A/C, y desconecte
la alimentación después de 30 segundos.
32oC/23oC
19.4
46.1
19.4
o
F/57oF
o
F/75oF
o
F/57oF
.
14
Page 17

Pièces et fonctions
Unité intérieure
1
2
3
4
5
Panneau d'affichage
Entrée d'air
1
2
Grille d'entrée d'air Sélecteur d'urgence
3
Sortie d'air Filtre de purification d'air
4
Pale verticale (règle les
d'air gauche et droit)
flux
Pale horizontale (réglage
5
des
flux d'air vers le haut
Ne pas
le bas.
et vers
6
7
8
(intérieur)
8
6
7
régler manuellement).
Selon l'article réel acheté l'image ci-dessus est seulement pour
référence.
Unité extérieure
Télécommande
1
2
3
4
5
9
10
11
12
13
14
15
16
1. Affichage Mode
Mode de
fonctionnement
Télécommande
2. Affichage d'envoi de signal
3. Affichage POSITION
4. Affichage VITESSE DE
VENTILATION
BAS MOY HAUT AUTO
5. Affichage VERROUILLAGE
6. Affichage MINUTERIE ARRÊT
Affichage MINUTERIE MARCHE
AUTO
REFROI-
DISSE-
MENT
SEC
Affichage
alternatif
VENTILATION
6
7. Affichage TEMP
8. Affichage des fonctions supplémentaires
Mode de fonctionne
7
9. Bouton SILENCE
10. Bouton REFROIDISSEMENT
11. Bouton AUTO
8
12. Bouton VENTILATION
13. Bouton MINUTERIE
17
14. Bouton SANTÉ
15. Bouton VERROUILLAGE
Utilisé pour verrouiller les boutons et l'affi-
18
chage LCD.
19
16. Bouton VOYANT
Contrôle l'allumage et l'extinction des diodes
du panneau d'affichage intérieur.
20
17. Bouton MARCHE/ARRÊT
18. Bouton SEC
21
19. Bouton TEMP
20. Bouton POSITION
22
21. Bouton HEURE
23
22. Bouton de FONCTION EXTRA
Fonction : Envoi d’air
24
d’air sain 1
Retour à la position de départ des
ailettes
zone A-B
rafraîchissement (fonction réservée)
Puissance Mode de conversion
Fahrenheit/Celsius
23. Bouton ANNULER/CONFIRMER
Fonction : Activez et désactivez la minuterie
et autres fonctions supplémentaires.
24. Bouton RÉINITIALISER
Si le fonctionnement de la télécommande
devient anormal, utilisez un objet pointu
pour appuyer sur ce bouton afn de réinitialiser la télécommande.
-
SILENCE VEILLE SANTÉ
ment
Télécommande
ALIMENTATION
Position de débit d’air sain 2
Débit d’air droit et gauche
Sommeil Air de
La fonction Santé n'est pas disponible pour certaines unités.
ALIMENTA-
TION
Position de débit
4
SORTIE
ENTRÉE
CONNEXION DE LA TUYAUTERIE ET DU CÂBLAGE
ÉLECTRIQUE
TUYAU DE VIDANGE
Selon l'article réel acheté l'image ci-dessus est seulement
pour référence.
Installation des piles
Enlever le couvercle du comparti-
1
ment à pile,
Placer les piles comme illustré. 2
2
piles R-03, touche de réinitialisation
(cylindre) ;
Assurez-vous que la polarité de
3
la pile est correcte « + / - ».
Installer les piles, puis replacer le couvercle.
4
Remarque :
La distance entre la télécommande et le récepteur doit être inférieure
à 23 pieds (7 mètres) et sans obstacle.
Les éclairages fluorescents et les téléphones sans fil réduisent la
portée de la télécommande.
Si l’afficheur est réduit cela signifie que les piles de la télécommande
doivent être remplacées.
Les dysfonctionnements de la télécommande peuvent parfois être
corrigés en retirant les piles pendant quelques minutes puis en les
remettant en place.
Astuce :
En cas de non utilisation durant une longue période, retirer les piles. Si
quelque chose reste affiché après le retrait des piles, appuyer simplement sur la touche de réinitialisation.
15
Page 18

Utilisation
Opération de base
Télécommande
1. Démarrage de l'unité
Appuyez sur MARCHE/ARRÊT sur la télécommande, l'unité
démarre.
2. Sélectionner le réglage de température
Appuyez sur le bouton
/ .
À chaque pression du bouton, le paramètre de tempé-
rature augmente de 1ºC ; appuyez sur le bouton sans
le relâcher pour augmenter rapidement cette valeur.
À chaque pression du bouton, le paramètre de tempé-
rature baisse de 1ºC ; appuyez sur le bouton sans le
relâcher pour réduire rapidement cette valeur.
Sélectionner la température désirée.
3. Sélection de la vitesse de ventilation
Appuyez sur le bouton VENTILATEUR. Pour chaque vitesse,
la vitesse de ventilation
change de la façon suivante :
Télécommande :
Affichage
alternatif
BAS MOY HAUT AUTO
Le climatiseur fonctionne à la vitesse affichée du ventilateur.
Lorsque la VENTILATION est réglée sur AUTO, le climatiseur
ajuste automatiquement la vitesse du ventilateur en fonction
de la température de la pièce.
nement de test
Fonctionnement d'urgence :
Utilisez cette fonction uniquement lorsque la télécommande est en panne ou a été
perdue ; en mode de fonctionnement d'urgence, le climatiseur peut fonctionner
pendant un moment.
Lorsque le bouton de fonctionnement d’urgence est enfoncé, l'appareil bipe une
fois, ce qui indique le début de ce fonctionnement.
Lorsque l'unité est mise sous tension pour la première fois et que la fonction d'ur-
gence est lancée, l'unité fonctionne automatiquement dans les modes suivants :
Température
de la pièce
Au-dessus de
Il est impossible de régler la température et la vitesse de ventilation. Il est aussi
impossible de faire fonctionner l'unité en mode minuterie ou sec.
Température
fixée
O
23
C
26
Mode
Vitesse de
minuterie
ventilation
O
C Non AUTO
Mode de
fonctionne-
ment
REFROIDIS-
SEMENT
Fonction de test :
Le commutateur de la fonction de test est identique au commutateur d'urgence.
Utiliser ce commutateur en mode test lorsque la tempéra-
ture de la pièce est inférieure à 16ºC, ne pas l'utiliser en
fonctionnement normal.
Maintenez enfoncé le bouton du fonctionnement de test
pendant plus de 5 secondes. Après avoir entendu 2 bips,
relâchez le bouton. Les opérations de refroidissement
démarrent avec le débit d’air sur « Hi » (élevé).
Dans ce mode, le moteur de ventilation qui se trouve dans
l'unité intérieure tournera à grande vitesse.
Réglage de l'orientation du souffle d'air
1. Affichage de l'état du souffle d'air
REFROIDISSEMENT/SEC :
2 Réglage du flux d'air gauche et droit (manuel)
Réglez les lamelles verticales à l’aide de la molette su le
climatiseur pour ajuster le sens gauche et droit en vous reportant
à la figure ci-dessous.
Interrupteur de
fonctionnement
d'urgence
Pi
Interrupteur du
mode test
Pi
Pi
-noitcnof te ecnegru'd tnemennoitcnoF
fonctionne-
16
Mode de
ment :
AUTO
REFROI-
DISSE-
MENT
SEC
VENTILA-
TION
Icône du
contrôle à
distance
Remarque
En mode de fonctionnement auto, le climatiseur sélectionne automatiquement
le mode de fonctionnement Refroidissement ou Chauffage en fonction de la
température de la pièce. Lorsque la VENTILATION est réglée sur AUTO, le
climatiseur ajuste automatiquement la vitesse du ventilateur en fonction de la
température de la pièce.
En mode SEC, lorsque la température de la pièce est inférieure de 2ºC à la
température de réglage, l'appareil fonctionne de façon intermittente à vitesse
LENTE, quel que soit le réglage de VENTILATION.
En mode de fonctionnement VENTILATION, l’appareil ne fonctionnera pas en
mode REFROIDISSEMENT ou CHAUFFAGE, mais fonctionnera seulement en
mode VENTILATION ; AUTO n’est pas disponible lorsque le mode VENTILATION est sélectionné. Et le réglage température est désactivé. En mode
VENTILATION, le fonctionnement veille n'est pas disponible.
Mises en garde :
Lors d'un réglage manuel du volet, éteindre l'appareil.
Lorsque l'humidité est élevée, de la condensation peut se former
au niveau de la sortie d'air si tous les volets horizontaux sont
réglés à gauche ou à droite.
Il est recommandé de ne pas maintenir le volet horizontal en
position abaissée durant une longue période en mode REFROIDISSEMENT ou SEC, sinon de la condensation risque de se
former.
Remarque :
Lorsque vous redémarrez après un arrêt, le contrôleur
télécommandé revient automatiquement dans la position de
balayage précédemment réglée.
Page 19

Utilisation
Fonction veille
Appuyez sur le bouton pour accéder aux options supplémentaire, lorsque vous faites basculer l'écran sur
clignote. Puis appuyez sur
pour accéder à la fonction
veille.
Mode de fonctionnement :
1. En mode REFROIDISSEMENT, SEC
Une heure après le démarrage du mode VEILLE, la
température sera de 1
de température. Au bout d'une autre heure, la témpérature augmente à nouveau de 1
nera encore 6 heures puis s'arrêtera. La température
est maintenue plus élevée que le paramètre de
température afin que la température de la pièce ne soit
pas trop basse durant le sommeil.
o
C plus élevée que le paramètre
o
C. L'appareil fonction-
,
4. Paramètre le changement de vitesse de ventilation
durant le sommeil.
Si la vitesse de ventilation est élevée ou moyenne au moment de se coucher, régler afin de réduire la vitesse de
ventilation pendant le sommeil.
Aucun changement si le souffle est faible.
Remarque
Lorsque la fonction MINUTERIE est activée, la fonction de
veille ne peut pas être activée. Une fois la fonction de veille
activée, si l'utilisateur réinitialise la fonction MINUTERIE, la
fonction de veille est désactivée et l'appareil revient à l'état
de minutage.
Fonctionnement PUISSANCE/DOUX.
(1) Fonctionnement PUISSANCE
Lorsque vous avez besoin d'un chauffage ou d'un
refroidissement rapide, vous pouvez utiliser cette fonction.
Appuyez sur le bouton
plémentaires, lorsque vous faites basculer l'écran sur
clignote , puis appuyez sur pour accéder à la fonc-
tion puissance. Pour désactiver cette fonction, veuillez accé-
pour accéder aux options sup-
,
La fonction VEILLE
démarre
1 hr
1 hr
Paramétrage de temp.
En mode REFROIDISSEMENT, SEC
Augmente de
Arrêt de la fonction
VEILLE
Environ 6 hr
Augmente de
o
1
C
Arrêt de l'appareil
o
C
1
2. En mode AUTO
L'appareil fonctionne dans le mode de veille correspondant adapté au mode de fonctionnement sélectionné
automatiquement.
3. En mode VENTILATION
Pas de fonction de VEILLE.
der à nouveau aux options supplémentaires pour annuler la
fonction puissance.
(2) Fonctionnement SILENCIEUX
Utilisez cette fonction lorsque vous avez besoin de silence
pour lire ou vous reposer.
Appuyez sur le bouton SILENCIEUX, la télécommande
affiche
, puis activez la fonction silencieux. Appuyez de
nouveau sur ce bouton SILENCIEUX pour désactiver la fonction silencieux.
Remarque :
Pendant le fonctionnement PUISSANCE, en mode ou
REFROIDISSEMENT, la distribution de la température
dans la pièce ne sera pas homogène.
Une fonctionnement SILENCE sur une période prolongée
permettra d'avoir ni trop froid ni trop chaud.
17
Page 20

Utilisation
Utilisation de la minuterie Marche/Arrêt.
1. Une fois l'appareil démarré, sélectionner le mode de
fonctionnement désiré :
2. Appuyer sur le bouton MINUTERIE pour changer le
mode de MINUTERIE. À chaque pression du bouton,
l'affichage change de la façon suivante :
Télécommande :
BLANK
0,5 h 0,5 h 0,5 h 0,5 h
MINUTERIE MINUTERIE MINUTERIE MINUTERIE
MARCHE ARRÊT MARCHE-ARRÊT MARCHE-ARRÊT
Sélectionner ensuite le mode de MINUTERIE voulu (MINUTERIE MARCHE ou MINUTERIE ARRÊT ou MINUTERIE
MARCHE-ARRÊT). "
3. Appuyez sur le bouton
"ou " "clignotera.
/ pour régler l'heure.
ér el ,notuob el rus zeyuppa suov euq siof euqahc À -
glage de l'heure augmente de 0,5 heure pour les 12
premièrs heures, puis d'1 heure.
Fonction Souffle d'air sain
1. Appuyez sur pour démarrer
Réglage de conditions de travail confortables.
2. Activation de la fonction souffle d'air sain
Appuyez sur le bouton
pour accéder aux options supplémentaires. Continuez à appuyer sur ce bouton et les volets se déplaceront sur l'une des trois positions prédéfinies ;
choisissez la position que vous voulez, puis appuyez sur le
bouton
pour confirmer.
Élévation
du souffle
d'air sain
Abaissement
du souffle
d'air sain
3. Pour désactiver la fonction souffle d'air sain, appuyez sur
le bouton
pour accéder aux options supplémentaires.
Continuez à appuyer sur ce bouton et les volets se déplaceront sur l'une des trois positions prédéfinies ; appuyez de
nouveau sur le bouton
pour désactiver.
Position
actuelle
ér el ,notuob el rus zeyuppa suov euq siof euqahc À glage de l'heure augmente de 0,5 heure pour les 12
premièrs heures, puis d'1 heure.
Le réglage peut se faire sur 24 heures.
4. Confirmer le réglage de l'heure
Après avoir réglé l'heure, appuyez sur le bouton
et
confirmez l'heure. Le bouton MARCHE ou ARRÊT s'arrête
alors de clignoter.
5. Annuler le réglage de l'heure
Appuyez plusieurs fois sur le bouton minuterie jusqu'à ce
que l'affichage de l'heure soit effacé.
Astuces :
Après remplacement des piles ou si une coupure de
courant se produit, l'heure doit être à nouveau réglée.
Selon les horaires de MINUTERIE MARCHE ou MNUTERIE
ARRÊT, Marche-Arrêt ou Arrêt-Marche se produira.
Remarque : Ne dirigez pas directement les volets à la main.
Sinon, la grille ne pourra pas fonctionnement correctement.
Si la grille ne ne fonctionne pas correctement, à l'aide de la
commande, arrêtez une minute puis redémarrez.
Remarque :
1. Lorsque vous avez activé la fonction souffle d'air sain, la
position de la grille est fixe.
Pour le refroidissement, mieux vaut sélectionner le mode .
2.
3.
En modes refroidissement et sec, l'utilisation du climati-
seur pendant une durée prolongée alors que l'air est humide
provoque la formation de gouttes d'eau au niveau de la grille.
18
Page 21

Maintenance
Pour une utilisation intelligente du climatiseur
Paramétrage d'une température de pièce appropriée
Température
appropriée
Ne pas obstruer l'entrée ou la
sortie d'air
En mode de
refroidissement,
ensoleillement direct avec
un
empêcher
la pénétration d'un
rideau ou des volets.
Si l'appareil n'est pas utilisé
durant une longue période,
couper l'alimentation principale.
ARRÊT
OFF
Ne pas obstruer l'entrée
ou la sortie d'air
Utiliser la minuterie efficacement.
Utiliser les volets
efficacement.
Télécommande
Ne pas utiliser d'eau, nettoyer le
contrôleur avec un chiffon sec. Ne
pas utiliser de nettoyant pour vitres
ou de chiffon chimique.
Boîtier intérieur
Essuyez le cimatiseur avec un doux et
sec. Pour les saletés rebelles, utilisez
un détergent neutre dilué dans de
l'eau. Essorez bien l'eau du chiffon
avant d'essuyer, et essuyez bien le
détergent.
Ne pas nettoyer avec les produits suivants :
L'essence, le benzène, les diluants ou les
produtis nettoyant risquent d'endommager
le revêtement de l'unité.
De l'eau chaude au delà de 40oC (104oF)
risque de provoquer une décoloration
ou une déformation. .
Nettoyage du filtre à air
1
vers le haut.
Retirer le filtre.
2
Pousser légèrement vers le haut l'onglet central
du filtre jusqu'à le libérer de la butée, et retirer le
filtre par le bas.
Nettoyer le filtre.
3
Utilisez un aspirateur pour éliminer la poussière, ou lavez le filtre avec de l'eau.
Après le lavage, laissez le filtre sécher à l'ombre complètement.
Fixer le filtre.
4
Fixez le filtre correctement de façon à ce que l'indication "FACE" soit de face. Assurez-vous que le filtre est
complètement fixé derrière la butée. Si les filtres droit
et gauche ne sont pas correctement fixés, des défauts
peuvent se produire.
Fermer la grille d'entrée d'air.
5
tnarit al ne ria'd eértne'l ed ellirg al rirvuO
Toutes les
deux semaines
Remplacement du filtre de purification d'air
1. Ouvrez le grille d’entrée
Maintenez la grille d’entrée avec le support
de grille situé du côté droit de l’élément
intérieur.
2. Détacher le filtre à air standard
Faire glisser le bouton légèrement vers le haut pour libérer le filtre, puis
l'enlever.
Retirer l'ancien filtre de purification d''air
3. Fixer le filtre de purification d'air
Placer les dispositifs de filtre de purification dans les cadres à filtre gauche et
droit.
4. Fixer le filtre à air standard
(Installation nécessaire)
ATTENTION :
Le côté blanc du filtre de purification d'air photocatalytique doit être tourné
vers l'extérieur, et le côté sombre vers l'appareil. Le côté vert du filtre de purification d'air anti-bactérien doit être tourné vers l'extérieur, et le côté blanc vers
l'appareil.
5. Fermer la grille d'entrée d'air.
Fermer la grille avec soin.
Remarque
Le filtre de purification d'air photocatalytique doit être solarisé à dates
fixes. Dans une famille normale, il doit être solarisé tous les 6 mois.
Le filtre de purification d'air anti-bactérien peut être utilisé longtemps,
inutile de le remplacer. Toutefois en cours d'utilisation, la poussière
doit être enlevée en utilisant un aspirateur ou en tapotant légèrement,
sinon les performances pourraient être affectées.
Veiller à maintenir le filtre de purification d'air anti-bactérien dans un
environnement frais et sec, et à éviter une exposition directe au soleil
lors d'un arrêt d'utilisation, ceci pouvant réduire la capacité de stérili-
sation.
:
19
Page 22

Mises en garde
AVERTISSEMENT
Ce système doit être installé par un professionnel HVAC qualifié.
N’essayez pas d’installer le climatiseur vous-même car un travail mal effectué peut provoquer un incendie,
une fuite d’eau, des blessures voire la mort.
AVERTISSEMENT
Si une anomalie telle qu'une petite combustion se
produit, arrêter immédiatement l'appareil et contacter le vendeur.
Utiliser une source d'alimentation exclusive
munie d'un coupe-circuit.
Vérifier soigneusement l'installation adéquate du
drainage.
ARRÊT
Engager totalement la prise du cordon
d'alimentation.
OBLIGATOIRE
Ne pas utiliser un cordon enroulé.
INTERDIT
Ne pas démarrer ou arrêter le fonctionnement en déconnectant le cordon
d'alimentation.
INTERDIT
OBLIGATOIRE
OBLIGATOIRE
Utiliser la tension appropriée. 1. Ne pas utiliser une rallonge électrique ou des cordons
OBLIGATOIRE
Prendre soin de ne pas endommager le cordon électrique.
INTERDIT
Ne pas diriger le souffle d'air
directement vers des personnes, en particulier des enfants
ou des personnes âgées.
INTERDIT
raccordés.
2. Ne pas installer dans un endroit exposé à un risque de
fuite de gaz inflammable.
3. Ne pas exposer l'appareil à de l'eau
ou de l'huile vaporisée.
INTERDIT
Ne pas insérer d'objets dans l'entrée ou la sortie d'air.
INTERDIT
Ne pas tenter de réparer ou
reconstruire par soi-même.
Connecter la prise de terre.
mise à
la terre
Ne pas utiliser à des fins de stockage de
nourriture, de travaux d'art, d'équipements
de précision, d'élevage ou de culture.
INTERDIT
Ne pas installer l'appareil près d'une cheminée ou d'un autre appareil de chauffage.
INTERDIT
Ne pas placer d'animaux ou de plantes sur
le chemin direct du souffle d'air.
INTERDIT
20
MISE EN GARDE
Prendre de l'air frais régulièrement, particulièrement lorsqu'un appareil à gaz fonctionne au même moment.
OBLIGATOIRE
Vérifier le bon état du support d'installation. Ne pas verser d'eau sur l'appareil pour le
INTERDIT
Ne placer aucun objet sur l'appareil ou fixé à
l'appareil.
INTERDIT
Ne pas utiliser le commutateur avec des
mains mouillées.
INTERDIT
nettoyage.
INTERDIT
Ne pas placer de vase de fleurs ou de
conteneur d'eau sur le haut de l'appareil.
INTERDIT
Page 23

Page 24

Dépannage
Mises en garde
Avant de demander de l'assistance, vérifier la
liste suivante.
Phénomène Cause ou points de contrôle
Inspection
normale des
performances
Vérification
multiple
Le système ne redémarre
pas automatiquement.
Il y a du bruit
Génération d'odeurs
De la vapeur ou de la
brume se dégage.
En mode sec, la vitesse
de ventilation ne peut pas
être changée.
Mauvais refroidissement
Lorsque l'appareil est stoppé, il ne
redémarrera pas avant 3 minutes afin de
protéger le système.
Lorsque la prise de courant est retirée
puis réinsérée, le circuit de protection
fonctionnera durant 3 minutes pour
protéger le climatiseur.
Durant le fonctionnement de l'appareil
ou à l'arrêt, un bruissement ou un gargouillement peut se faire entendre. Au
bout de 2 à 3 minutes après démarrage
de l'appareil, ce bruit devient plus notable.
(Ce bruit est produit par la circulation du
liquide réfrigérant dans le système)
Durant le fonctionnement de l'appareil,
un bruit de craquement peut se faire entendre. Ce bruit est produit par l'expansion ou la réduction de l'enveloppe en
raison des changements de température.
Si le souffle d'air de l'appareil en cours
de fonctionnement produit un bruit élevé,
c'est peut-être parce que le filtre à air est
sale.
Ceci se produit parce que le système fait
circuler les odeurs de l'air intérieur telles
que odeurs de meubles, peinture ou
tabac.
En fonctionnement REFROIDISSE-
MENT ou SEC, l'appareil d'intérieur peut
produire de la vapeur.
Ceci est dû au soudain refroidissement
de l'air intérieur.
En mode SEC, lorsque la température
de la pièce devient supérieure à la température réglée de 2oC, l'appareil fonctionne de façon intermittente à vitesse
BASSE quel que soit le paramétrage de
la VENTILATION.
La prise de courant est-elle bien insérée
?
Y a-t-il une panne de courant ?
Le fusible a-t-il grillé ?
Le filtre à air est-il sale ?
Normalement, il doit être nettoyé tous les
15 jours.
Y a-t-il un obstacle devant l'entrée et la
sortie d'air ?
La température est-elle correctement
réglée ?
Des portes ou des fenêtres sont-elles
ouvertes ?
Existe-t-il un ensoleillement direct venant
d'une fenêtre durant le refroidissement ?
(Utiliser un rideau)
La pièce contient-elle trop de sources
de chaleur ou de personnes durant le
refroidissement ?
Ne pas obstruer ni couvrir la grille de ventilation du climatieseur. Ne pas pla-
cer les doigts ou des objets dans les entrées et sorties d'air ni dans le volet de
positionnement.
Ne pas laisser d'enfant jouer avec le climatiseur. Ne jamais laisser un enfant
s'asseoir sur l'appareil extérieur
.
Spécifications
Le circuit de réfrigération est étanche.
L'appareil est adapté aux situations suivantes :
1. Plage de température ambiante applicable :
Intérieur
Maximum : D.B/W.B
Minimum : D.B/W.B
Refroidissement
Plein air
2. Si le cordon d'alimentation est endommagé, il doit être remplacé par le fabricant, un de ses agents d'entretien ou une personne qualifiée.
3. Si le fusible de l'unité d'intérieur sur la carte PC a grillé, le remplacer avec un
fusible de type T. 3.15A/ 250V. Si le fusible de l'appareil d'extérieur a grillé, le
remplacer par un fusible de type T.25A/250V.
4. La méthode de câblage doit être conforme aux normes locales de câblage.
5. Après installation, la prise de courant doit être d'accès facile.
6. Les piles usagées doivent être mises au rebut de façon appropriée.
7. L'appareil n'est pas destiné à être utilisé par de jeunes enfants ou des personnes infirmes sans supervision.
8. Il doit être veillé à ce que des jeunes enfants ne jouent pas avec l'appareil.
9. Veiller à utiliser une prise de courant appropriée, correspondant au cordon
électrique.
10. La prise de courant et le câble de connexion doivent disposer des autorisa-
tions locales.
11. Afin de protéger l'appareil, veiller à éteindre d'abord le climatiseur, puis à
attendre au moins 30 secondes avant de couper l'alimentation.
Maximum : D.B/W.B
Minimum : D.B/W.B
32oC/23oC
19.4
46.1
19.4
o
C/13.9oC
o
C/23.9oC
o
C/11.9oC
o
( )
F/73.4oF
89.6
o
( )
F/57oF
67
o
( )
F/75oF
115
o
( )
F/57oF
67
21
 Loading...