

Page 1

SPLIT TYPE ROOM AIR CONDITIONER
OPERATION MANUAL
HSU-09CRA03-HK
HSU-12CRA03-HK
Please read this operation manual before using the air conditioner.
0010517254
Page 2

Cautions
1
The machine is adaptive in following situation
I. Applicable ambient temperature range:
Indoor
Cooling
Outdoor
2. If the supply cord is damaged, it must be replaced by the manufacturer or its service agent
or a similar qualified person. The type of connecting wire is H05/07RN-F or 245IEC57(YZW).
3. If the fuse on PC board is broken please change it with the type of T. 3.15A/250V.
4. The distance between the indoor unit and the floor should be more than 2m.
5. The wiring method should be in line with the local wiring standard.
6. After installation, the power plug should be easily reached.
7. The waste battery should be disposed properly.
8. The appliance is not intended to use by young children or infirm persons without supervision.
9.Young children should be supervised ensure that they do not play with the appliance.
10.The appliance must be installed on strong enough supporter.
11.The wiring diagram is attached inside the machine.
Maximum: D.B / W.B 32oC/23oC
Minimum: D.B / W.B
Maximum: D.B/W.B
Minimum: D.B
18oC/14oC
43oC/26oC
18oC
Page 3
Parts and Functions
2
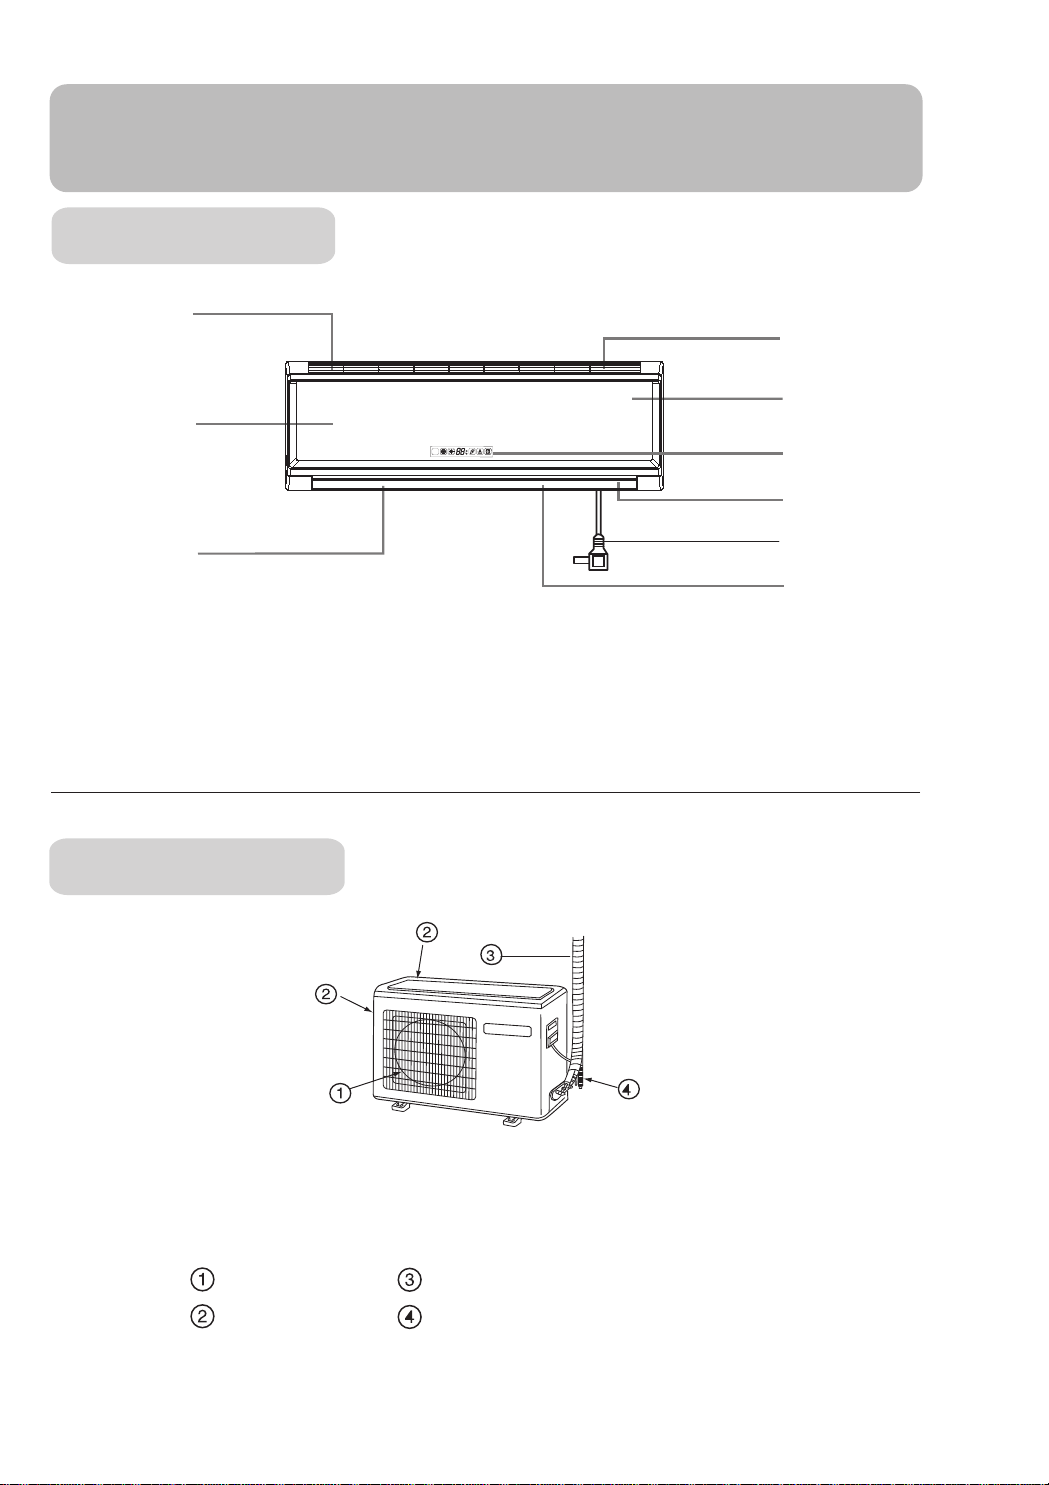
Indoor Unit
Inlet grill
Anion generator
Inlet
Front panel
Display board
Outlet
Horizontal flap
(Adgust up and down air flow.
Don't adgust it manually)
(Adgust left and right air flow)
Power plug
Vertical blade
Actual inlet grille may vary from the one shown in the manual according to
the product purchased
Outdoor Unit
HSU-09CRA03-HK
HSU-12CRA03-HK
OUTLET
INLET
CONNECTING PIPING AND ELECTRICAL WIRING
DRAIN HOSE
Page 4

Parts and Functions
3
Operation
1
2
5
3
23
24
13
18
12
21
19
17
Clock set
HEALTH
TIMER
CL
SE
LOCK
1. Mode display
AUTO
COOL
DRY
FAN
2. SWING display
3. FAN SPEED display
4. SLEEP display
5. LOCK display
OCK
ON/OFF
MODE
SWING
T
Buttons and display of the remote controller.
10
6
7
8
9
4
FAN
11
25
1
6. SIGNAL SENDING
7. TIMER OFF display
8. TIMER ON display
9. CLOCK display
10. TEMP display
11. POWER ON/OFF
SLEEP
RE
15
20
14
16
SET
22
12. MODE
13. FAN
14. HOUR
15. SWING
16. SLEEP
17. LOCK
18. TEMP.SETTING
19. SET
20. TIMER
21. CLOCK
LO MED HIAUTO
22. RESET
23. HEALTH display
24. HEALTH
25. Signal receiver hole
10
Used for unit start and stop.
Used to select AUTO run, COOL,
DRY and FAN operation
Used to select fan speed LO, MED, HI, AUTO
Used to set clock and timer setting.
Used to set auto fan direction.
Used to select sleep mode.
Used to lock buttons and LCD
display.
Used to select your desired temp.
Used to confirm timer and clock settings.
Used to select TIMER ON, TIMER OFF,
TIMER ON-OFF
Used to set correct time
Used to reset the controller back to
normal condition.
Used to operate the healthy function.
1
23
87
4
When unit is started for the first time and after replacing batteries in remote controller,
clock should be adjusted as follows:
Press CLOCK button, "AM" or "PM" flashes.
Press or to set correct time. Each press will increase or decrease 1min. If the
button is kept depressed, time will change quickly.
After time setting is confirmed, press SET, "AM "and "PM" stop flashing, while clock
starts working.
NOTE: Cooling only unit do not have displays and functions related with heating
Hints
After replacing with new batteries, remote controller will conduct self-check, displaying
all information on LCD. Then, it will become normal.
Page 5

Operation
4
Remote controller's operation
When in use, put the signal transmission head directly to the
receiver hole on the indoor unit.
The distance between the signal transmission head and the
receiver hole should be within 7m without any obstacle as well.
Don't throw the controller, prevent it from being damaged.
When electronic-started type fluorescent lamp or change-over
type fluorescent lamp or wireless telephone is installed in the
room, the receiver is apt to be disturbed in receivering the signals
so the distance to the indoor unit should be shorter.
Loading of the battery
Load the batteries as illustrated. 2 R-03 batteries, resetting key (cylinder)
Remove the battery cover:
Slightly press " " and push down the cover.
Load the battery:
Be sure that the loading is in line with the" + "/"-"
pole request as illustrated.
Put on the cover again
Confirmation indicator:
In disorderation, reload the batteries or load the new batteries after 6mins.
Note:
Use two new same-typed batteries when loading.
If the remote controller can't run normally or doesn't work at all,
use a sharp pointed item to press the reset key.
Hint:
Remove the batteries in case unit won't be in usage for a long period.
If there are any display after taking-out just need to press reset key.
Power failure resume(please set and apply as necessary)
If sudden power failure occurs, the unit will resume original operation when power is
supplied again.
Note:
When sudden power failure happens during unit operation in power failure resume mode, if
the air conditioner is not desired for use in a long period, please shut off the power supply
in case that the unit automatically resume operation when power is re-supplied, or press
ON/OFF to turn off the unit when power resumes.
Page 6
Operation
5
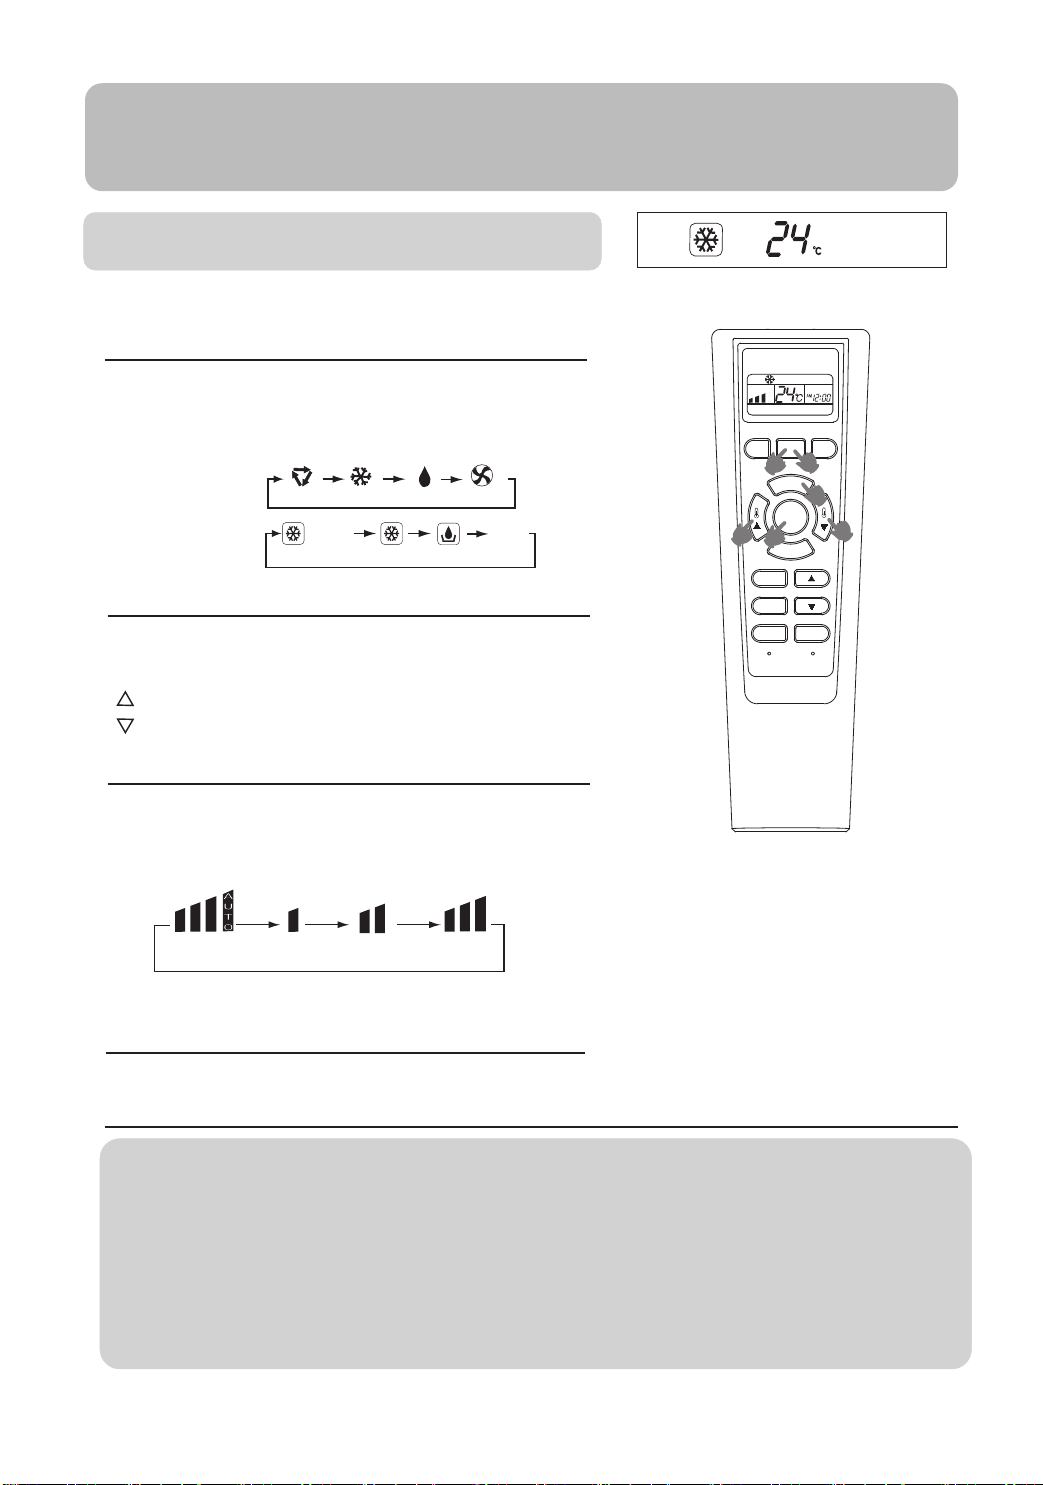
Auto,Cool,Dry and Fan operation
(1) Unit start
Press ON/OFF button, unit starts.
(2) Select operation mode
Press MODE button. For each press, operation
mode changes as follows:
Remote controller:
Display board:
Unit will run in selected mode.
(3) Select temp. setting
Press TEMP button.
Every time the button is pressed, temp. setting increases 1oC
Every time the button is pressed, temp. setting decreases 1oC
Unit will start running to reach the temp. setting on LCD.
AUTO
AUTO
(BLANK)
COOL
COOL
DRY
DRY
FAN
BLANK
FAN
HEALTH
3
TIMER
CL
SE
LOCK
2
OCK
ON/OFF
5
MODE
SWING
T
1
FAN
4
3
SLEEP
RE
SET
(4) FAN
Press FAN button. For each press, fan speed changes
as follows:
AUTO LO MED HI
Unit will run at selected fan speed.
Note:AUTO is not available in FAN mode.
(5) Unit stop
Press ON/OFF button.
Note:
1.
When FAN is set to AUTO, the air conditioner automatically adjusts the fan speed according
to room temperature.
2.In DRY mode, when room temperature becomes lower than temp.setting+2oC,
unit will run intermittently at LOW speed regardless of FAN setting.
In FAN operation mode, the unit will not operate in
3.
AUTO is not available in FAN mode.And temp.setting is disabled.
In FAN mode,SLEEP operation is not available.
COOL mode but only in FAN mode ,
Page 7

Operation
6
Air Flow Direction Adjustment
1.Status display of air sending
Horizontal flap
( Cool/Dry standard position)
Pos.1
( Upward swing )
Pos.2
Pos.3
( Downward swing )
Pos.4
( Auto swing )
Remotecontr
Blank
o
ller
2.Up and down air flow direction(Use remote controller)
For each press of SWING button, air flow direction on remote
controller display as follows according to different operation modes:
Pos.1 Pos.2 Pos.3 Pos.4
The horizontal flap
3.Left and right air flow adjustment
Move the vertical blade by a knob on air
conditioner to adjust left and right direction
referring to Fig.
will
swing according to the above positions
(manual)
HEALTH
TIMER
CL
SE
LOCK
OCK
ON/OFF
MODE
SWING
T
FAN
SLEEP
RE
SET
Cautions:
Do not try to adjust the flap by hand.
When adjusting the flap by hand,turn off the unit ,and use the remote controller to restart the unit.
When humidity is high,condensate water might occur at air outlet if all vertical louvers are
adjusted to left or right.
It is advisable not to keep horizontal flap at downward position for a long time in COOLor DRY
mode ,otherwise, condensate water might occur..
Hints
As cold air flows downward in COOL mode, adjusting air flow horizontally will be much more
helpful for a better air circulation.
Page 8

Operation
7
TIMER Operation
Set Clock correctly before starting Timer operation
You can let unit start or stop automatically at following times: Before you wake up in the
morning, or get back from outside or after you fall asleep at night.
TIMER ON/OFF
(1)After unit start, select your desired operation mode.
Operation mode will be displayed on LCD.
Power indicator on indoor unit lights up.
(2)TIMER mode selection
Press TIMER button to change TIMER mode.
Every time the button is pressed, display changes as follows:
ON
OFF
ON
12:00AM12:00
TIMER ON TIMER OFF
PM
OFF
AM
12:00
N
TIMER ON-OFF
Select your desired TIMER mode (TIMER ON or
OFF), ON or OFF will flash.
(3)Timer setting
Press HOUR / button.
Every time the button is pressed, time increases 10 min.
If button is kept depressed, time will change quickly.
Every time the button is pressed, time decreases 10 min.
If button is kept depressed, time will change quickly. Time
will be shown on LCD. It can be adjusted within 24 hours.
ON
OFF
12:00
PM
TIMER ON-OFF
blank
TIMER
HEALTH
2
4
TIMER
CL
LOCK
ON/OFF
1
FAN
MODE
SWING
OCK
SE
T
SLEEP
RESET
3
3
(4)Confirming your setting
After setting correct time, press SET button to confirm, "ON"
or "OFF" stops flashing
Time displayed: Unit starts or stops at x hour x min. (TIMER
ON or TIMER OFF).
Timer mode indicator on indoor unit lights up.
To cancel TIMER mode
Just press TIMER button several times until TIMER mode disappears.
Hints
After replacing batteries or a power failure happens, Time setting should be reset.
Remote controller possesses memory function, when use TIMER mode next time, just
press SET button after mode selecting if timer setting is the same as previous one.
Page 9

Operation
8
TIMER ON-OFF
TIMER ON-OFF
(1)After unit start, select your desired operation mode
Operation mode will be displayed on LCD.
(2) Press TIMER button to change TIMER mode.
Every time the button is pressed, display changes
as follows:
ON
OFF
12:00AM12:00
TIMER ON TIMER OFF
PM
ON
OFF
AM
12:00
N
TIMER ON-OFF
ON
OFF
12:00
PM
TIMER ON-OFF
blank
Select TIMER ON-OFF. "ON" will flash.
(3)Time setting for TIMER ON
Press HOUR button.
Every time the button is pressed, time increases 10 min.
If button is kept depressed, time will change quickly.
Every time the button is pressed, time decreases 10 min.
If button is kept depressed, time will change quickly.
Time will be shown on LCD.
It can be adjusted within 24 hours.
AM refers to morning and PM to afternoon
(4) Time confirming for TIMER ON
After time setting, press TIMER button to confirm.
"ON" stops blinking, While "OFF" starts blinking.
Time displayed: Unit starts at x hour x min.
(5)Time setting for TIMER OFF
Follow the same procedures in "Time setting for TIMER ON".
HEALTH
2
6
TIMER
CL
SE
LOCK
OCK
ON/OFF
MODE
SWING
T
1
FAN
3
4
5
SLEEP
RE
SET
(6) Time confirming for TIMER OFF
After time setting, press SET button to confirm, "OFF" stops flashing
Time displayed: Unit stops at X hour X min.
To cancel TIMER mode
Just press TIMER button several times until TIMER mode disappears.
Page 10

Operation
9
HEALTH Operation
1.Unit start
Press the ON/OFF switch
2.Health anion function
Press HEALTH button
controller and is displayed on the display
board .
3.To Cancel HEALTH Model
is displayed on the remote
HEALTH ON/OFF
3
2
TIMER
CLOCK
SET
LOCK
1
FAN
MODE
SWING
SLEEP
RESET
Press the " HEALTH"again, then the healthy function
stops.
When indoor fan motor is running, it has healthy
process function. (It's available under any mode)
Brief introduction to health anion function
The anion generator in the air conditioner can generate a lot of anion
effectively balance the quantity of position and anion in the air and also to
kill bacteria and speed up the dust sediment in the room and finally clean
the air in the room.
Page 11

Operation
10
Comfortable SLEEP
Operation
Before going to bed, you can simply press the
SLEEPbutton and unit will operate in SLEEP
mode and bringyou a sound sleep.
Use of SLEEP function
After the unit starts, set the operation status,
then press SLEEP button before which the
clock must be adjusted and time being set.
ON/OFF
HEALTH
FAN
MODE
SWING
TIMER
CLOCK
SET
SLEEP
LOCK
RESET
In AUTO mode
2.
The unit operates in corresponding sleep
mode adapted to the automatically selected
operation mode.
3. In FAN mode
It has no SLEEP function.
4.
When quiet sleeping function is set to 8 hours,the quiet
sleeping time can not be adjusted.
When TIMER function is set , the quiet sleeping function
can't be set up .After the sleeping function is set up,
if user resets TIMER function, the sleeping function
will be cancelled; the machine will be in the state of
timing-on,if the two modes are set up at the same time ,
either of their operation time is ended first ,the unit will stop
automatically,and the other mode will be cancelled.
Power Failure Resume Function
Operation Mode
1. In COOL,DRY mode
1 hours after SLEEP mode starts, temp. will
become 1
another 1 hours, temp.risesby 1
The unit will runfor further 6 hours then stops.
Temp. is higher than temp. setting so that room
temperaturewon't be too Iowforyour sleep.
O
C higher than temp. setting. After
SLEEP operation starts SLEEP operation stops
Approx.6hrs
Rises 1
1 hr
O
Rises 1
1 hr
Temp.setting
In COOL, DRY mode
C
O
C further.
O
C
Unit stop
If the unit is started for the first time, the
compressor will not start running unless 3
minutes have elapsed. When the power
resumes after power failure, the unit will run
automatically,
and 3 minutes later the
compressor starts running.
Note to the power failure resume:
press the sleep button ten times in five seconds
and enter this function after hearing four sounds.
And press the sleep button ten times within five
seconds and leave this function after hearing
two sounds.
Page 12

Operation
11
Emergency operation and test operation
Emergency Operation:
Use this operation only when the remote controller is defective or lost,and with
function of emergency running, air conditoner can run automatically for a while.
When the emergency operation switch is pressed, the " Pi "sound is
heard once, which means the start of this operation.
When power switch is turning on for the first time and emergency operation starts,
the unit will run automatically in the following modes:
Room
temperature
ABOVE 23oC 26oC AUTO COOLING
It is impossible to change the settings of temp.and fan
speed,It is also not possible to operate in timer or dry mode.
Designated
temperature
Timer
mode
NO
Fan
speed
Operation
mode
Test operation:
Test operation switch is the same as emergency switch.
Use this switch in the test operation when the room
temperature is below 16oC, do not use it in the
normal operation.
Continue to press the test operation switch for more
than 5 seconds. After you hear the "Pi" sound twice,
release your finger from the switch: the cooling
operation starts with the air flow speed "Hi".
Under this operation mode,the fan motor of indoor
unit will run in high speed.
emergency
operation switch
test operation
switch
Pi
Pi
Pi
Removal of the restriction of emergency or test operation:
Press the emergency operation switch once more, or manipulate through the
ON/OFF button of remote controller;after you heard the "Pi" sound, the eme-
rgency or test operation will be terminated.
When the remote controller is manipulated, it gets the system back to the
normal operation mode.
Page 13

Maintenance
12
For Smart Use of The Air Conditioner
WARNING
Before maintenance,be sure to turn off the system and the circuit breaker.
Remote Controller
Do not use water,wipe the controller with a
dry cloth.Do not use glass cleaner or chemical
cloth.
Do not use the following for cleaning
Gasoline,benzine, thinner or cleanser may
damage the coating of the unit.
Air Filter cleaning
Open the inlet grille by pulling it upward.
Indoor Body
Wipe the air conditioner by using a soft and
dry cloth.For serious stains,use a neutral
detergent diluted with water.Wring the water
out of the cloth before wiping.then wipe off
the detergent completely.
Hot water over 40OC(104OF) may cause
discoloring or deformation.
Remove the filter.
Push up the filter's center tab slightly until it is released
from the stopper, and remove the filter downward.
Clean the filter.
Use a vacuum cleaner to remove dust, or wash the filter with
water.After washing, dry the filter completely in the shade.
Attach the filter.
Attach the filter correctly so that the "FRONT" indication is
facing to the front.Make sure that the filter is completely
fixed behind the stopper.If the right and left filters are not
attached correctly, that may cause defects.
Close the inlet grille.
Once every
two weeks
Page 14

Maintenance
13
Replacement of Air Purifying Filter
NOTE: Air purifying filter is optional part
1.Open the lnlet Grille
2.Detach the standard air filter
Slide the knob slightly upward to release the
filter, then withdraw it.
3.Detach the Air Purifying Filter
Put air purifying filter appliances into the
right and left filter frames.
4.Attach the standard air filter
(Necessary installation)
ATTENTION:
When installing the unit,please insert the photocatalyst filter into the left frame,
and insert the bacteria-killing medium into the right frame.
The green side of the bacteria-killing medium air purifying filter face outside,
and the white side face the unit.
5.Close the Inlet Grille
Close the Grille surely
Hints:
The photocatalyst filter and bacteria-killing medium air purifying filter will be used
for a long time,no need for replacement.But in the period of using them ,you should
remove the dust frequently by using vacuum cleaner or flaping them lightly,otherwise ,
its performance will be affected.
The photocatalyst filter and bacteria-killing medium air purifying filter are forbidden
to be washed by waer.
Please keep the bacteria-killing medium air purifying filter in the cool and dry conditions
avoid long time directly sunshine when you stop using it,or its ability of sterilization will
be reduced.
Page 15

Maintenance
14
For Smart Use of The Air Conditioner
Setting of proper room
temperature
Proper
temperature
Close doors and windows
during operation
During cooling operation
prevent the penetration of
direct sunlight with
curtain or blind
Do not block the air inlet
or outlet
Use the timer effectively
If the unit is not to be used
for a long time, turn off the
power supply main switch.
OFF
Use the louvers effectively
Page 16

Trouble shooting
15
Before asking for service, check the following first.
Normal
Performance
inspection
Phenomenon
The system does not restart
immediately.
Noise is heard
Smells are generated.
Mist or steam are blown out.
Cause or check points
When unit is stopped, it won't restart
immediately until 3 minutes have elapsed
to protect the system.
When the electric plug is pulled out and
reinserted, the protection circuit will work
for 3 minutes to protect the air conditioner.
During unit operation or at stop, a swishing
or gurgling noise may be heard. At first 2-3
minutes after unit start, this noise is more
noticeable. (This noise is generated by
refrigerant flowing in the system.)
During unit operation, a cracking noise may
be heard. This noise is generated by the
casing expanding or shrinking because of
temperature changes
Should there be a big noise from air flow in
unit operation, air filter may be too dirty.
This is because the system circulates smells
from the interior air such as the smell of
furniture, paint, cigarettes.
During COOL or DRY operation, indoor unit
may blow out mist. This is due to the sudden
cooling of indoor air.
In dry mode,
speed can
be
changed.
Multiple
check
Application temp. range of air conditioner -7oC~43oC.
Poor cooling
fan
In DRY mode, when room temperature becom-
es lower than temp.setting+2oC,unit will run
intermittently at LOW speed regardless of FAN
setting.
Is power plug inserted?
Is there a power failure?
Is fuse blownout?
Is the air filter dirty? Normally it should be
cleaned every 15 days.
Are there any obstacles before inlet and outlet?
Is temperature set correctly?
Are there some doors or windows left open?
Is there any direct sunlight through the
window during the cooling operation?(Use
curtain)
Are there too much heat sources or too many
people in the room during cooling operation?
Page 17

HSU-12CRA03-HK
分体式房间空调器
使用前请仔细阅说明书
请妥善保存,以备参阅
使用说明书
HSU-09CRA03-HK
Page 18

注意事项
17
如何处理旧空调机
在处理不再使用的旧空调机之前,请查看其是
否已停机确保安全。拔掉电源插头以防止儿童
靠近产生危险。
务必注意空调内的冷凝剂需要经过特殊的废物
处理。空调内包含一些有价值的材料,可以循
环利用。联系您当地的废物处理中心由他们
来处理废旧的空调。如有任何疑问,请联系
当地相关负责部门或者为您供货的经销商。
在相关废物处理中心领取机器之前,请确保
空调管路没有损坏。并请要求他们采用合适
无污染的处理方法,为环保贡献一份力量。
如何处理新购买空调的包装
所有用于您的空调包装材料都可以处理而不
对环境造成污染。
您可以将纸壳盒包装裁开或者剪成小片交给
废纸处理站。由聚乙烯材料制成的包装袋和
泡沫垫不含有任何氟氯碳水化合物。
所有这些有价值的材料都可以送至废品回收中
心,经过循环再造可以重新使用。
请联系当地相关部门查询联系您住所附近的
废物回收中心及废纸处理站。
安全性指导和警告
在启动空调前,请仔细阅读“操作指南”。
其内容包含有关安装,操作和维护空调时需
遵守的各项重要信息。
生产厂家在此申明,对由于不遵守如下操作
规范而引起的任何损失,我公司不承担责任:
任何带电维修都必须请合格的电工进行操作。
不正当的维修操作可能会对空调使用者构成
危险。
带有冷凝剂的空调器,请不要用利器扎刺空
调管路,或者对其挤压扭曲,或者刮蹭其表
面涂层,以免损伤部件,一旦冷凝剂喷出溅
入眼内,可能会对眼部造成严重伤害。
在风叶运转时,不要触碰出风口,不要把任
何工具插到风栅中,以免发生危险。
儿童要在远离空调的地方玩耍,任何情况下,
都不能让儿童坐在室外机上。
说明
本空调适用的环境温度范围是:
1.
单
冷
机
如果本空调器的电源线已破损,需由厂家
2
指定的备件商店更换,或请与您的设备销
售店联系,也可以找有资格的专业人员进
行更换。
如果您的室内机电脑板保险丝破损,请更
3.
换为T.3.15A/250V型号。
4.
接线方式应当与当地的用线标准一致。
安装完毕后,电源插座应易于用户使用。
5.
最低制冷工况:干球/湿球
最大制冷工况:干球/湿球
室外
最低制冷工况:干球/湿球
最大制冷工况:干球/湿球
室内
32℃/23℃
18℃/14℃
43℃/26℃
18℃
不要使用损坏的空调。如有疑问,请咨询您
的供货商。
使用空调时,请严格遵守“操作指南”里
的相关操作方法。
请专业人员进行安装,不要擅自操作。
为保证安全,必须根据其规格将空调置地。
请牢记在打开进风栅之前拔下电源插头。
拔插头时请不要拽电源线。正确的方法是
抓紧插头将其从插座上拔出。
6.
用过之后的废旧电池请妥善处理。
老人、小孩、伤残人士未经监护,建议
7.
不要使用空调。
儿童玩耍应确保远离空调。
8.
9.
请选择适用电源线的接头。
10.
电源接头、连机线必须已经获取当地认证。
为保护空调器,请关机30秒后再切换电源。
11.
Page 19

注意事项
18
标志解释
尊敬的海尔用户:
您好!感谢您使用海尔空调。为了您能更好的阅读本说明书和使用空调,以下是我们对
说明书中出现标志符号的解释说明:
凡带有该“警示”标志的内容,有关产品安全和使用者的人身安全,
必须严格按警示的内容操作。
凡带有该“禁止”标志的内容,是必须绝对禁止的行为,否则可能会
造成机器的损坏或危及使用者的人身安全。
安全注意事项
电源插座必须配
有地线,以保证
空调器通过电源
插座有效接地。
不接地或接地不
完全,有可能会
发生触电危险。
定期清洁空气滤尘网
若滤尘网被阻塞,制冷和制热效果
不佳,耗电量增大,引起故障,制
冷运转时会滴水。
电源安装后应通电进行漏电检测。
使用规定容量的保险丝
绝对不要用钢丝或铜丝代替保险丝。
保险丝 钢丝 铜丝
Page 20

安全注意事项
19
接地线不要接在气体管道、
自来水管道、避雷针、电话地线上。
不要 让任何油漆 或杀虫剂喷
涂在 机器表面上。
杀
虫
剂
不要把水直接泼在室内机上。
油
漆
空调 器不要安装 在可燃性气 体易泄
露的 地方,以免泄露引起火灾。不要
在易燃易爆和腐蚀性气体环境中使用。
在风叶运转时,不要触碰出风口。
不要把任何工具插到风栅中,以免
发生危险。
要使室内外机组的进风口和出风
口保持畅通无阻。
应选择室内机下方无电视机、收
音机、无线电装置等贵重物品并且
距日光灯1米以上的地方。
长时间不使用时,请断掉空调器电源。
应使用遥控器来控制机器的运转。
Page 21

构件名称与功能简介
20
室内机
过滤网(内部)
负离子发生器
(内部)
进风口
前面板
显示面板
出风口
导风板
上下风向调节
室外机
电源插头
竖摆叶(内部)
左右风向调节
出风口
进风口
HSU-09CRA03-HK
HSU-12CRA03-HK
连接管及电气接线
排水管
Page 22

构件名称与功能简介
21
显示面板
制冷运转显示
健康运行显示
遥控信号接收窗
用于接收遥控器发出的信号
温度显示
遥控器显示
除湿运转显示
制冷运转显示
自动运转显示
风向显示
锁定状态显示
风速显示
负离子运转显示
HEALTH ON/OFF
FAN
MODE
SWING
TIMER
CLOCK
SET
LOCK RESET
睡眠状态显示
定时开显示
定时关显示
除湿运转显示
送风运转显示
信号发射显示
定时开/关显示
时钟显示
静眠状态显示
SLEEP
注:
1. 单冷型空调不具有与制热相关的功能。
2. 无注释部分,本说明书中机型无此功能。
Page 23

构件名称与功能简介
22
遥控器按键介绍
健康键
用於设定负离子功能。
风速键
用於选择风速:
自动、低风、
中风、高风。
聪明风键
用於设定聪明风功能
和自动风向功能。
HEALTH ON/OFF
FAN
MODE
开机/关机键
用於开机/关机。
温度设定键
用于设定温度。
定时键
用於选择定时方式:
定时开、定时关、
定时开-关。
时钟键
用於时钟时间的调节。
设定键
用於对定时和时钟调节
时间的确定。
锁定键
用於锁定操作键和液晶
显示内容。 用一尖状物按
此键后其余各键不起作用,
锁定状态显示出现;再按
一下, 取消锁定,锁定状
态显示消失。
(锁定后按复位键可复位)
SWING
TIMER
CLOCK
SLEEP
SET
LOCK RESET
模式键
用於选择工作方
式:自动、制冷、
除湿、送风。
时间调节键
用於调节时钟和定时时间
静眠键
用於设定静眠状态。
复位键
遥控器出现异常时,
用一尖状物按此键
可使遥控器恢复正常。
Page 24

构件名称与功能简介
23
时钟校准
首次开机和更换电池后需校准时钟,校准方法为:
1. 按“时钟”键,时钟显示“AM”或“PM”闪烁。
2. 按时间调节键调节时间,每按一次,时间增加或减少1分钟,
按住不放将快速增加或减少。
3. 确定时间后,按“设定”键,“AM”或“PM”不再闪烁,
时钟开始走时。
注:AM指上午,PM指下午。
遥控器的使用
使用时把信号发射头对准室内机上的信号接收窗。
信号发射头和接收窗之间一般应在七米以内,且不应有障碍物。
不要抛掷磕碰遥控器。
在装有电子启动型日光灯、转换型日光灯或无线电话的房间,信号接收窗接收信号
易受干扰,使用时只要遥控器距室内机近一些即可。
电池的安装
取下电池盒盖
◆
首先轻轻按下标有 的部位推
下电池盒盖,如图所示:
装入电池
◆
确认电池的安装符合盒底部图示“ ”“ ”极要求。
重新装好电池盒盖
◆
安装电池盒盖过程与取下电池盒盖过程正好相反。
核定显示
◆
若按下开/关键后,无显示,则重新装一下电池。
注意:
◆
使用两节型号相同的新电池。
在遥控器使用过程中,如出现异常情况,请取出电池,过几分钟再装入电池即可。
若遥控器显示变淡(有时易出现异常状态),则说明电池没电了,请更换电池。
遥控器废旧电池,请妥善处理。
小常识:
◆
长时间不用遥控器时应将电池取出,取出电池后如有显示,则用一尖状物按一下复
位键即可。
两节R-03(7号)电池
Page 25

操作指南
ON/OFF
HEALTH
FAN
MODE
TIMER
CLOCK
SET
SLEEP
LOCK
RESET
1
5
2
3
3
4
SWING
24
自动 制冷 除湿 送风运转
1. 开机
按下开/关键开机
2. 工作方式选择
按下运转模式键,每按一次,工作方式按如下顺序改变
遥控器
显示面板
(无)
选择合适的工作方式。
除湿时,室内温度介于设定温度与设定温度+2℃ 时,
空调器以低风速间歇运转,不管风速设定情况。
3. 设定温度
按下设定温度键
每按一次,设定温度增加一度,按住不放将快速增加。
每按一次,设定温度减少一度,按住不放将快速减少。
设定合适的温度。
无
4. 调节风速
按下风速键,每按一次,风速按如下顺序改变
设定合适的风速。
5. 关机
按下开/关键关机
小提示:
关於自动运转:在自动运转方式下,不能设定温度,在该运行方式下,空调运转时,
将根据室温自动选择制冷方式。
关於送风运转:送风运转是指空调器不进行制冷、制热运转,只进行送风运转,在这
种状态下空调不能进行自动送风运转,并且不可进行温度设定。
送风时无静眠运转。
关於除湿运转:除湿运转时,室内温度降至高于设定温度2oC时,空调器以低风速间歇
运转,不管风速设定情况。
Page 26

操作指南
ON/OFF
HEALTH
FAN
MODE
TIMER
CLOCK
SET
SLEEP
LOCK
RESET
SWING
25
风向调节
1.送风方向状态显示
导风板
位置一
(制冷标准位置)
位置二
(健康上吹)
位置三
(健康下吹)
位置四
(自动摆动)
遥控器显示
无显示
2.送风方向(遥控器操作)
每按一次聪明风键,遥控器显示屏根据不同的工作状态
显示如下:
位置三 位置四位置一 位置二
3. 左右风向调节(手动操作)
如图所示,拨动空调器上的竖直摆叶
可以调节左右送风方向。
注意:
不能用手直接扳动导风板,否则可能会使导风板工作异常。
若导风板工作
異常,可停机一次,再开机用遥控器调节。
在湿度很大的情况下,如果竖直摆叶全部向左或向右侧出风口可能会滴水。
当制冷或除湿运行时,导风板最好不要长时间处于向下的位置,以免出风口会凝露。
小常识
制冷时,由於冷空气向下凝聚,风向调节成水平状态更有利於房间空气循环。
Page 27

操作指南
26
定时开/关功能
使用定时功能前,请先校准时钟
1. 开机
开机后,设定好工作状态
2. 定时方式设定
按遥控器上定时键改变定时方式,每按一次,定时方式指
示按以下顺序改变:
遥控器
OFF
OFF
OFF
ON
PM
12:00AM12:00
定时开 定时关
然后根据需要确定定时方式
此时 或 会闪烁。
ON OFF
ON
AM
12:00
定时开—关
(定时开或定时关)
3. 设定时间
按下时间调节键
每按一次,设定时间增加十分钟,按住不放将快速增加。
每按一次,设定时间减少十分钟,按住不放将快速减少。
可以在24小时之内任意调节
ON
PM
12:00AM12:00
定时开—关
无显示
HEALTH
2
4
TIMER
CL
SET
LOCK
OCK
ON/OFF
FAN
MODE
SWING
5
1
SLEEP
RESET
3
3
4. 确定设定
调节好时间后,按下设定键,确定时间。
ON OFF
此时 或 不再闪烁。
显示时间为:到几点几分开机(定时开)或者关机(定
时关)。
5. 取消定时
按定时键数次,使定时方式显示消除即可。
小常识:
更换电池或停电后需重新设定时间。
遥控器具有记忆功能,下次使用定时功能时,如果设定时间同上次一样,只需选定定
时方式然后按设定键确认即可。
Page 28

操作指南
ON/OFF
HEALTH
FAN
MODE
TIMER
CLOCK
SET
SLEEP
LOCK
RESET
1
6
2
3
4
SWING
5
27
定时开-关功能
使用定时功能前,请先校准时钟
1. 开机
开机后,设定好工作状态
2. 定时方式设定
按遥控器上定时键改变定时方式,每按一次,定时方式指
示按以下顺序改变:
遥控器
OFF
OFF
OFF
ON
PM
12:00AM12:00
定时开 定时关
ON
AM
12:00
定时开—关
然后选择定时开—关 ,此时 会闪烁。
3. 设定定时开时间
按下时间调节键
每按一次,设定时间增加十分钟,按住不放将快速增加。
每按一次,设定时间减少十分钟,按住不放将快速减少。
可以在24小时之内任意调节。AM表示上午,PM表示下午。
ON
12:00AM12:00
定时开—关
ON
PM
无显示
4. 确定定时开时间
调节好时间后,按下定时键,确定时间。
ON
此时 不再闪烁, 开始闪烁。
OFF
显示定时开时间为:到几点几分开机。
5. 设定定时关时间
按下时间调节键,调节时间方法同设定定时开方法。
6. 确定定时关时间
调节好时间后,按下设定键,确定时间。
此时遥控器 不再闪烁,显示定时关时间为:到几
OFF
分关机。
取消定时
◆
按定时键数次,使定时方式显示消除即可。
根据设定定时开,定时关时间的先后,可以实现先开机再关
◆
机或先关机再开机。
点几
Page 29

操作指南
ON/OFF
HEALTH
FAN
MODE
TIMER
CLOCK
SET
SLEEP
LOCK
RESET
SWING
28
睡眠功能
遥控操作
◆
睡觉前,您可以按下睡眠键,空调器会按
睡眠方式运行,使您的睡眠更舒适。
睡眠功能的使用
◆
使用该功能前,建议先校准时钟并设定时间。
开机后,设定好运行状态,然后按下睡眠键。
2. 自动运行时
空调器按自动选择的工作方式进行相应
的睡眠运行。
3. 送风运行时
不能使用睡眠功能。
4. 设定为8小时睡眠,睡眠时间不可调;
设定定时开功能后,不能设定睡眠功能;
设定睡眠功能后,若再设定定时开,则
睡眠取消,进入定时开状态。
睡眠和定时关同时设定的时候,无论哪
一种操作时间先到,都会自动关机,另
一种设定功能取消。
停电补偿功能
(请根据实际情况设定使用)
设定停电补偿功能后,整机运行过程中突然停
电,再次恢复供电时,则整机恢复原来的工作
模式(定时、睡眠、聪明风等除外)。
设定方法:在遥控器开机且睡眠键有效的
状态下,5秒钟内连续按遥控器
睡眠键
10 次,蜂鸣器响4声后进入停电补偿状态。
取消方法:5秒钟内连续按遥控器睡眠键10次,
蜂鸣器响2声后取消停电补偿状态。
运行方式
◆
1. 制冷、除湿运行
睡眠操作开始后 1小时温度比设定温度升
高1℃ ,运行 1小时后再升高 1℃,再持
续6小时后关机,温度比设定温度高,以
防睡眠时着凉(见下图)。
睡眠运行开始
设定温度
1小时
1小时
制冷、除湿运行时
约6小时
上升1℃
上升1℃
睡眠运行停止
关机
注:
1.当空调器设定停电补偿功能后在使用过程
中突然停电,这时若长时间不需要使用空调器,
请切断电源以防来电后空调器自动恢复运转,
或来电后按开关键关机。
2.停电补偿功能设定后,若再设定定时
状态,则主机断电后恢复供电时,主机处
、
睡眠
於关
机状态。
3分钟保护功能
若停机后马上再开机,压缩机需3分钟后才能
启动以保护机器。
Page 30

操作指南
1
2
HEALTH ON/OFF
FAN
MODE
SWING
TIMER
CLOCK
SET
SLEEP
LOCK
RESET
3
29
健康运行
1. 开机
按下ON/OFF键开机
2. 健康运行
按下遥控器 HELATH 键,遥控器和显示面板分别显示“ ”和
“ ”,同时开始负离子功能。再按一下 HEALTH 键,遥控器
和显示面板上“ ”和“ ”显示消失,负离子功能取消。
3. 取消健康运行
再按一下健康键,遥控器健康运转符号显示消失,健康运行取消。
备注:当室内风机不动(正常状态)时,无健康运行功能。
关於健康运行
负离子发生器能激发大量负离子,有效平衡空气中正负离子的浓度,並有除菌及加速家中尘埃
沉淀的功能,使房间中的空气清新健康。
Page 31

操作指南
30
应急运转与试验运转
应急运转
当你的遥控器丢失或不能使用时,使用应急运转功能可以使空调器暂时进行自动运转。
开机
按一下应急运转开关后,听到开机提示音,表明应急运转已经开始。
首次上电进入应急,空调器按照下面的工作方式进行自动运转:
室内温度
应急运转时,不能改变温度设定值和风速。
同时也不能进行除湿运行和定时运行。
关机(取消应急运转)
按一下应急运转开关,听到关机提示音。
使用遥控器取消应急运转
按一下遥控器上的开/关键,听到“哔”的一声即可。
空调器按照遥控器上显示的工作状态运行。
设定温度 定时方式 风速
自动
工作方式
制冷无
试验运转
用於室温在16℃以下时的制冷试验运行,正常时请不要使用。
开机
按下试验运转开关有“哔”的声响,连续按5秒钟以上。
听到“哔”“哔”两声声响以后松开手指。
此时试验运转开始。
空调器室内机转速为高速。
应急运转
开关
哔!
试验运转
开关
哔!哔!
关机(取消试验运转)
按一下试验运转开关,听到关机提示音。
使用遥控器取消试验运转
按一下遥控器上的开/关键,听到“哔”的一声即可。
空调器按照遥控器上显示的工作状态运行。
Page 32

维护保养
31
使用空调
温度设定要合适,以免有不适之感。
门窗非必要时请勿开启。
建議
合适
温度
要使室内外机组的进风口和出风口
保持畅通无阻,否则会降低空调制
冷效果。
有效利用定时功能。
长时间不使用时,
请断掉空调器电源
放下窗帘
若房间直接受到阳光照射,
冷气效果将会降低,制冷
开机时请放下窗帘。
OFF
有效利用导风板与竖摆叶。
Page 33

清洁保养
32
使用空调
建議
特别提示
维护保养前请确保系统与电源关闭。
遥控器
遥控器清洁请用乾布擦,不可水洗。
清洁器切不可用玻璃制品或化学试剂。
室内机
用热的湿布或中性洗涤剂清洗,然后用
干布擦净。不要用过热的水(大於40℃)
否则可能导致面板腿色变形。不要用杀
虫剂或其他化学洗涤剂。
清洗过滤网
打开进风栅
用机器右侧的进风栅顶板支起进风栅。
取下过滤网
轻轻向上推过滤网中心突起,然后向下拉。
清洗过滤网
用吸尘器吸附过滤网上的灰尘或用水清洗,
清洗后要在阴凉处完全晾干。
安装过滤网
关闭进风栅
( 必须安装)
每两周
一次
Page 34

清洁保养
33
更换空气滤清器
打开进风栅
1.
取下过滤网
2.
轻轻向上推过滤网中心突起,然后向下拉。
安装空气滤清器(以随机附件为准)
3.
将空气滤清器嵌入过滤网左右框中。
取出旧的空气滤清器
4.
安装空气过滤网( 必须安装)
安装时,将多元光触媒空气滤清器嵌入左框
中,强力杀菌媒空气滤清器嵌入右框中。
注意:强力杀菌媒滤清器绿色的一面朝外,
白色的一面朝向机器。
关闭进风栅
5.
小常识:
多元光触媒和强力杀菌媒滤清器长期有效,不需要更换。但是在使用过程中应该注意
经常给滤清器除尘(取下后用吸尘器吸除或轻轻拍打),以免灰尘覆盖影响滤清器的
使用效果。多元光触媒和强力杀菌媒滤清器严禁用水清洗。
强力杀菌媒滤清器在停止使用时,请保存在阴凉的地方,请勿长时间暴露在日光之
下,否则除菌性能会降低。
Page 35

维护保养
34
维修之前请先排除以下现象
疑问 解答
在空调器被启动时;在运转中压缩机启动或停止时;或在
听见有水流声。
发出“霹叭”响声 这是由于塑料的热膨胀或冷收缩所引起的。
出风有異味。
室
在运转中,
室内机组冒出水雾。
内
在制冷运行时自动
转换到送风方式。
空调器停止时;有时会发出“哗--哗--”声或“咕笃咕笃”
的声音。这是制冷剂的流动声而不是故障。
从室内机组送出的风中有时有
油漆、香烟等的气味被室内机吸入所致。
当制冷或除湿运行中,可以看到机器喷出一股股薄薄的
水雾。这是由于骤然冷却的室内空气从机内吹出而产生
的冷凝水雾。
为防止在室内机组的热交换器上积霜,有时会自动转换
到送风方式,但不久仍会返回到冷气方式。
異
味,此異味是室内家具、
空调停止后不能立即
机
启动。空调器不启动?
在制热运行时,室外
机组产生水或蒸汽。
在制热运转时,
即使运转停止,
室内风机仍然运转。
在除湿中不吹出空气
或不能改变风扇速度。
出风口附近可能
有熏黑现象,
并伴有“嘶嘶”声。
请
空调器不能启动。
作
再
一
次
制冷、制热效果不好。
检
查
若经上述各项检查、处理后空调器仍不正常运转,或者发现有下列现象时请停止空调器运转
並
与您的特约维修点联系。
这是
由於系统的自我保护功能,因此在停机后约3分钟
不能重新投入运行。
这是当积在室外机散热器上的霜被除去时(除霜运转
时)而产生的。
为了去掉余热,自动停机后室内风机会继续运转一段时间。
除湿时,室内温度介於设定温度与设定温度+2℃时,
空调器以低风速间歇运转,不管风速设定情况。
於
这是由
“嘶嘶”声为负离子激发的正常现象。
电源开关是否接通?线路供电是否正常?漏电断路器
是否跳闸?(务必立即关掉电源,并向特约维修点联系。)
是否按要求调节运转控制器?过滤网是否太脏?
门或窗户是否开着?在进风口或出风口有无阻塞物?
室内是否有很多人?室内是否有其他的热源?
水平摆叶是否向下?太阳光是否直射室内?
负离子集尘所致,只需时常停机擦拭即可。
保险丝或断路器经常断路。
在制冷或除湿运转中有水漏出。
运转不正常或能听到不正常的声音。
Page 36

 Loading...