

Page 1
User Manual
User Manual
Refrigerator-Freezer
Refrigerator-Freezer
HRF520BW
HBM450WH1
HRF520BS
HBM450SA1
HBM450HSA1
HRF520BHS
HRF520FS
HRF520FHS
Page 2

Page 3
Thank You
Thank you for purchasing a Haier Product.
Please read these instructions carefully before using this appliance. The instructions contain important information which will help you get the best out of the appliance and ensure
safe and proper installation, use and maintenance.
Keep this manual in a convenient place so you can always refer to it for the safe and proper
use of the appliance.
If you sell the appliance, give it away, or leave it behind when you move house, make sure
you also pass on this manual so that the new owner can become familiar with the appliance and safety warnings.
Legend
Warning – important safety information
General information and tips
Environmental information
Disposal
Help protect the environment and human health. Put
the packaging in applicable containers to recycle it.
Help to recycle waste of electrical and electronic appliances. Do not dispose appliances marked with this
symbol with the household waste. Return the product
to your local recycling facility or contact your municipal
oce.
WARNING!
Risk of injury or suocation!
Refrigerants and gases must be disposed of professionally. Ensure that the tubing of
the refrigerant circuit is not damaged before being properly disposed of. Disconnect
the appliance from the mains supply. Cut o the mains cable and dispose of it. Remove
the trays and drawers as well as the door catch and seals, to prevent children and pets
from getting closed in the appliance.
3
Page 4

Content
Intended Use .................................................................................................................................... .5
Safety ..................................................................................................................................................6
Product Description ......................................................................................................................10
Use .....................................................................................................................................................14
Equipment .......................................................................................................................................24
Care and Cleaning ..........................................................................................................................27
Troubleshooting .............................................................................................................................29
Installation ........................................................................................................................................32
Technical Data.................................................................................................................................37
4
Page 5

Intended Use
Intended use
This appliance is intended for cooling and freezing food. It has been designed exclusively
for use in dry-interior house holds. It is not intended for commercial or industrial use.
Changes or modications to the device are not allowed. Unintended use may cause hazards and loss of warranty claims.
Accessories
Check the accessories and literature in accordance with this list:
Ice cube tray
with cover
*
*
Egg trays
Door
hinges
**
Hinge
cover
Warranty
card
User
manual
Notice
Due to technical changes and dierent models, some of the illustrations in this manual
may dier from your model.
This appliance is intended to be used in household and similar applications such as:
– sta kitchen areas in shops, oces and other working environments;
– farm houses and by clients in hotels, motels and other residential type environments;
– bed and breakfast type environments;
– catering and similar non-retail applications.
5
Page 6

Safety
Before switching on the appliance for the rst time do…
▶ make sure there is no transport damage.
▶ make sure all packaging is removed and is kept out of children´s
reach.
▶ wait at least two hours after installing appliance before using to
ensure refrigerant circuit is fully ecient.
▶ handle the appliance always with at least two persons because it
is heavy.
▶ install the appliance in a well-ventilated place. Ensure a space of at
least 5cm above and 5cm around the appliance. Install and level
the appliance in an area suitable for its size and use.
▶ keep ventilation openings in the appliance or in the in-built struc-
ture clear of obstruction.
▶ make sure that the electrical information on the rating plate
agrees with the power supply. If it does not, contact an electrician.
▶ consider that the appliance is operated by a 220~240 VAC/50 Hz
power supply. Abnormal voltage uctuation may cause the appliance to fail to start or not to operate correctly and damage the
temperature control or compressor, originating abnormal noise
too. To eliminate abnormal uctuation it is suggested to use an
automatic regulator.
▶ use a separate earthed socket for the power supply which is easily ac-
cessible. The appliance must be earthed. Make sure the plug is easily accessible.
▶ ensure that the power cable is not trapped by the refrigerator. Do
not step on the power cable.
WARNING!
Make sure not to damage the electric cable and the plug. If damaged it must only be re-placed by either the manufacturer or the
authorised service agent.
6
Page 7

Safety
Before switching on the appliance for the rst time do not…
x install the appliance in direct sunlight or near sources of heat (eg
stoves, heaters).
x damage the refrigerant circuit. If it does become damaged, do not
use the appliance.
x use multi-plug adapters and extension cables.
During daily use do…
▶ ensure this appliance is only used by adults or those aged over 8
years of age. People with reduced physical, sensory or mental capabilities should be supervised or be instructed how to use in a
safe way and understand hazards involved.
▶ keep away children under 3 years of age from the appliance unless
they are constantly supervised.
▶ make sure children are not playing with the appliance.
▶ make sure children are supervised if they carry out cleaning and
maintenance.
▶ hold the plug, not the cable, when unplugging the appliance.
▶ replace a damaged supply cord only by the manufacturer, its ser-
vice agent or similarly qualied persons in order to avoid a hazard.
▶ follow these instructions if coal, gas or other ammable gas is leak-
ing in the vicinity of the appliance: turn o the valve of the leaking
gas, open the doors and windows and do not unplug or plug in the
power cable of the appliance or any other appliance.
▶ open and close the doors only with the handles. The gap between
the doors and between the doors and the cabinet is very narrow.
Do not extend your hands in these areas to avoid pinching your n-
gers. Open or close the refrigerator doors only when there are no
children standing within the range of door movement.
▶ disconnect the appliance from the electrical supply before under-
taking any routine maintenance. Allow at least 5 minutes before
restarting the appliance, as frequent starting may damage the
compressor.
▶ eliminate the dust on the back of the unit at least once in the year
to avoid hazard by re, as well as increased energy consumption.
▶ notice that the product is set for operation at a specic ambient
range between 10 and 43°C. The appliance may not work properly
if it is left for a long period at a temperature above or below the
7
Page 8

Safety
indicated range.
▶ check the condition of food if an increase in the freezer tempera-
ture has occurred.
During daily use do not…
x set unnecessarily low temperature in the refrigerator compart-
ment. Minus temperatures may occur at high settings. Attention:
bottles can burst.
x store medicines which need a precision storage temperature or
bacteria or chemical agents in the appliance.
x store liquids in bottles or cans (besides high percentage spirits)
especially carbonated beverages in the freezer, as these will burst
during freezing.
x place unstable articles (heavy objects, containers lled with water)
on the top of the appliance, to avoid personal injury caused by falling or electric shock caused by contact with water.
x pull on the door shelves. The door may be pulled slant, the bottle
rack, may be pulled away, or the appliance may topple.
x damage the refrigerant circuit. If it does become damaged, do not
use the appliance.
x step on the freezer storage compartment door or drawer.
x touch the inside surface of the freezer storage compartment
when in operation, especially with wet hands, as your hands may
freeze onto the surface.
x touch frozen goods with wet hands (wear gloves). Especially do
not eat ice lollies immediately after removal from the freezer com-
partment. There is the risk to freeze or the formation of frost blis-
ters. First aid: keep immediately under running cold water. Do not
pull away!
x scrape o frost and ice with sharp objects. Do not use sprays, elec-
tric heaters, hair dryers, steam cleaners or other sources of heat in
order to avoid damage to the plastic parts.
x use mechanical devices or other means to accelerate the defrost-
ing process, other than those recommended by the manufacturer.
x clean the appliance with hard brushes, wire brushes, detergent
powder, petrol, amyl acetate, acetone and similar organic solu-
tions, acid or alkaline solutions. Please clean with special refrigera-
tor detergent to avoid damage.
x spray or ush the appliance during cleaning.
8
Page 9
Safety
x use water spray or steam to clean the appliance.
x clean the cold glass shelves with hot water. Sudden temperature
change may cause the glass to break.
x use electrical devices inside the food storage compartments of
the appliance, unless they are of the type recommended by the
manufacturer.
x try to repair the appliance by yourself. In case of repair please con-
tact our customer service.
x store explosive substances such as aerosol cans with a ammable
propellant in this appliance.
WARNING!
Do not store or use ammable, explosives or corrosive materials in
the appliance or in the vicinity.
Refrigerant gas information
WARNING!
The appliance contains the ammable refrigerant isobutane
(R600a). Make sure the refrigerant circuit is not damaged during
transportation or installation. Leaking refrigerant may cause eye
injuries or ignite. If a damage has occurred, keep away open re
sources, thoroughly ventilate the room, do not plug or unplug the
power cords of the appliance or any other appliance. Inform the
customer service.
If eyes come into contact with the refrigerant, rinse immediately
under running water and call immediately the eye specialist.
It is hazardous for anyone other than an Authorised Service Person
to service this appliance.
In Queensland - the authorised service person MUST hold a gas
work authorisation for hydrocarbon refrigerants to carry out servicing or repairs which involve the removal of covers.
9
Page 10
Product Description
1
2
3
4
5
6
7
8
9
10
13
14
15
10
11
12
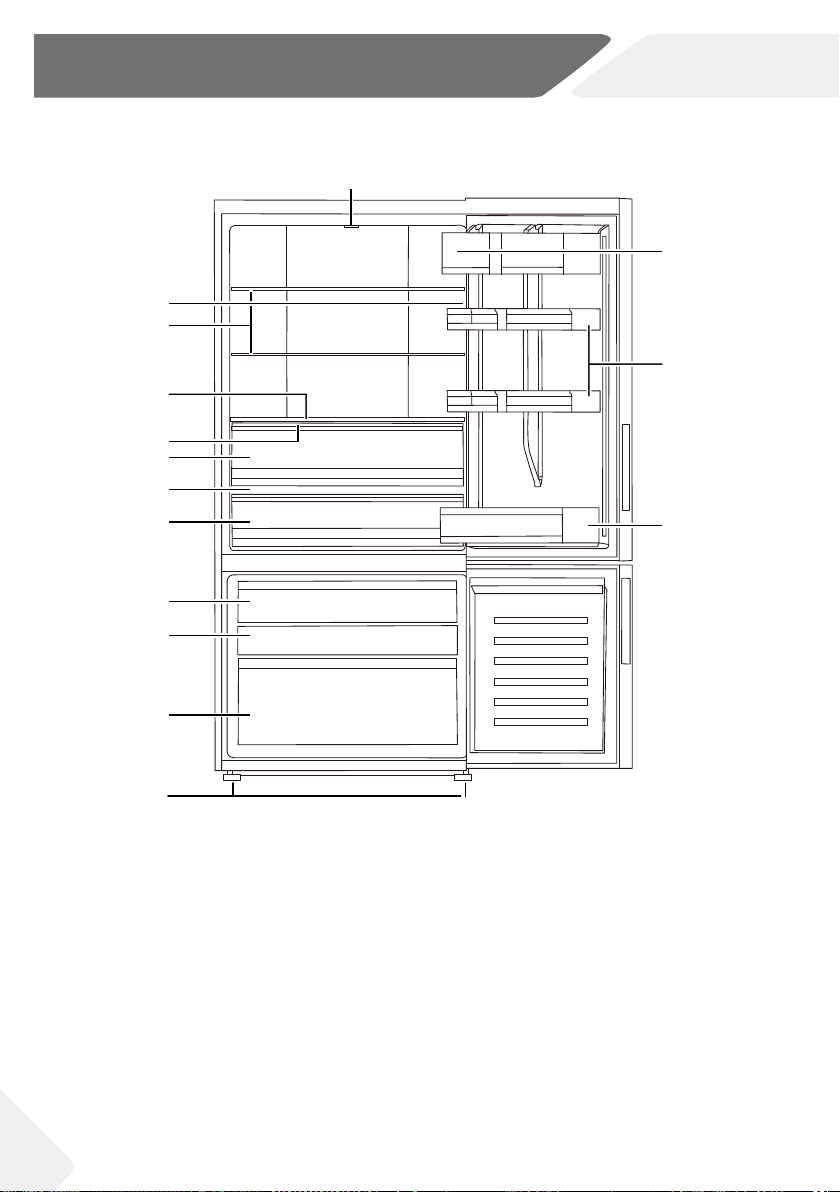
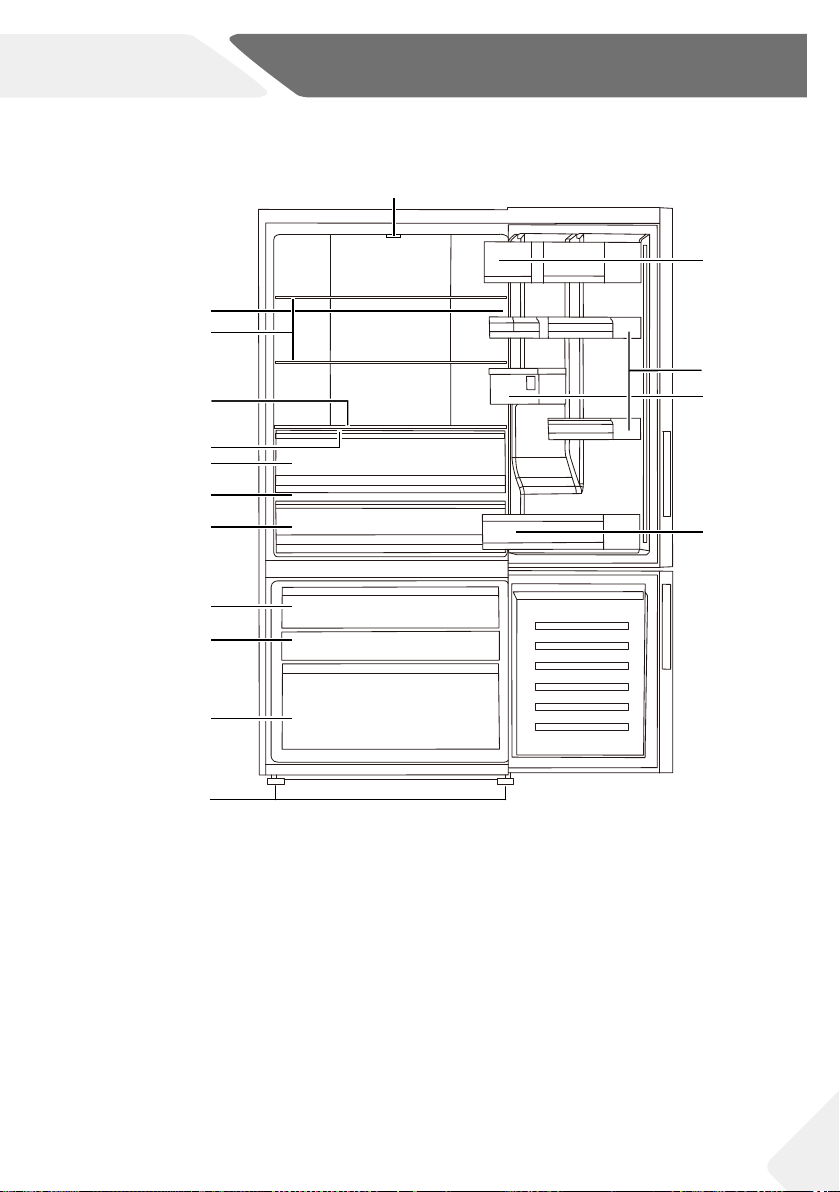
(HRF520BW HRF520BS)
1 Refrigerator LED lamp
2 Rating plate
3 Glass shelves
4 Fresh storage box cover
5 HCS (Humidity Control System)
6 Fresh storage box
7 My Zone glass cover
8 My Zone box
9 Upper freezer storage drawer
10 Middle freezer storage drawer
11 Lower freezer storage drawer
12 Adjustable feet
13 Upper door dairy bin
14 Middle door shelves
15 Bottom door shelf
Page 11
Product Description
1
13
2
3
14
4
5
6
7
8
9
10
16
15
11
12
(HRF520BHS)
1 Refrigerator LED lamp
2 Rating plate
3 Glass shelves
4 Fresh storage box cover
5 HCS (Humidity Control System)
6 Fresh storage box
7 My Zone glass cover
8 My Zone box
9 Upper freezer storage drawer
10 Middle freezer storage drawer
11 Lower freezer storage drawer
12 Adjustable feet
13 Upper door dairy bin
14 Middle door shelves
15 Bottom door shelf
16 Water tank
11
Page 12
Product Description
1
2
3
16
4
5
6
7
8
9
10
13
14
15
12
11
12
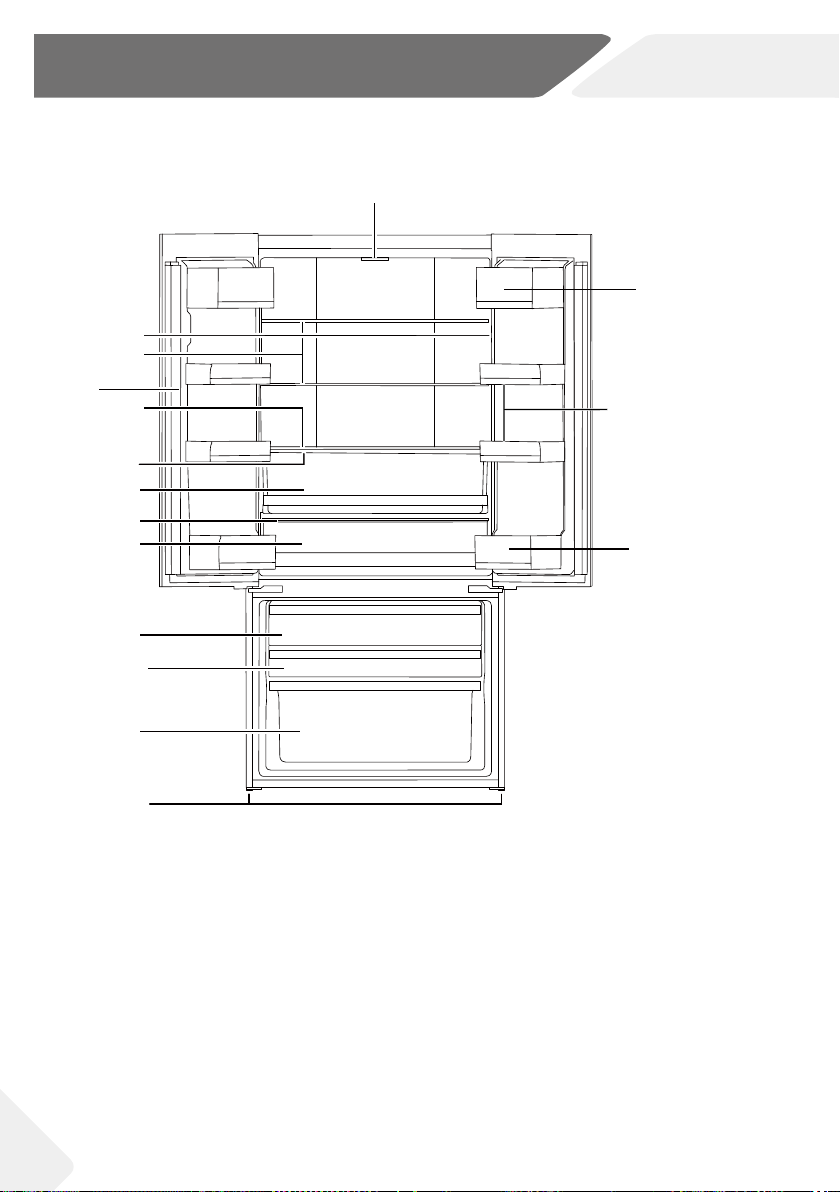
HRF520FS
1 Refrigerator LED lamp
2 Rating plate
3 Glass shelves
4 Fresh storage box cover
5 HCS (Humidity Control System)
6 Fresh storage box
7 My Zone glass cover
8 My Zone box
9 Upper freezer storage drawer
10 Middle freezer storage drawer
11 Lower freezer storage drawer
12 Adjustable feet
13 Upper door dairy bin
14 Middle door shelves
15 Bottom gallon door shelf
16 Door apper
Page 13

Product Description
1
13
2
3
16
4
14
5
6
7
8
9
10
11
12
1 Refrigerator LED lamp
2 Rating plate
3 Glass shelves
4 Fresh storage box cover
5 HCS (Humidity Control System)
6 Fresh storage box
7 My Zone glass cover
8 My Zone box
17
15
HRF520FHS
9 Upper freezer storage drawer
10 Middle freezer storage drawer
11 Lower freezer storage drawer
12 Adjustable feet
13 Upper door dairy bin
14 Middle door shelves
15 Bottom gallon door shelf
16 Door apper
17 Water Tank
13
Page 14

Use
Before rst use
▶ Remove all packaging materials, keep them out of children`s reach and dispose
them in an environmentally friendly manner.
▶ Clean the inside and outside of the appliance with water and a mild detergent before
putting any food in it.
▶ After the appliance has been levelled and cleaned, wait for at least 2 hours before
connecting it to the power supply. See INSTALLATION.
▶ Precool the compartments at high settings before loading with food. The function
Super Cool and Super Freeze help to cool down the compartments quickly.
▶ The refrigerator temperature and freezer temperature are automatically set to 3°C
and -18°C respectively. These are the recommended settings. If desired, you can
change these temperatures manually. Please see FUNCTIONS.
14
Page 15

Control panel
Use
a1
a2
A
b1
b2
B
Buttons:
A. Fridge selector
B. Freezer selector
C. My Zone selector
D. Panel lock selector
Beverage Cooling
Meat & Poultry
C
D
c1
c2
c3
d
Indicators:
a1. Super Cool function
a2. Temperature fridge
b1. Super Freeze function
b2. Temperature freezer
c1.Beverage Cooling function
c2. Meat & Poultry function
c3. Seafood function
d. Panel lock
15
Page 16

Use
Sensor keys
The buttons on the control panel are sensor keys, which respond when lightly touched
with the nger.
Switch on/o the appliance
The appliance is in operation as soon as it is connected to the power supply.
When the appliance is powered on for the rst time, indicator “b2” is shining on the display
until the temperature reaches -5°C or after 1 hour working. The temperatures displayed
in “a2” and “b2” will show the actual temperatures in the compartment.
Notice
▶ The appliance is preset to the recommended temperature of 3°C (refrigerator) and
- 18°C (freezer). Under normal ambient conditions you need not set a temperature.
▶ When the appliance is switched on after disconnection from the main power supply, it
may take up to 12 hours for the correct temperatures to be reached.
Empty the appliance before switching o. To switch o the appliance, pull the power cord
out o the power socket.
Standby-mode
The display screen turns o automatically 30 seconds after pressing a key. The display will
be automatically locked. It lights up automatically when pressing any key or opening the
door (alarm does not light up the display screen).
Lock/unlock panel
▶ Touch button “D” for 3 seconds to block all panel
elements against activation. The related indicator
“d” is now displayed.
▶ To unlock, press button “D” again.
Lock
Hold 3 Sec.
Notice
The control panel is automatically blocked against activation if after 30 seconds no button is pressed. To change any settings the control panel must be unlocked.
16
Page 17

Door/drawer opening alarm
When the refrigerator door or the freezer drawer is
opened for more than 3 minutes, the door/drawer
opening alarm will sound. The alarm can be silenced
by either closing the door/drawer. If the door/drawer is
left open for more than 7 minutes, the light inside the
refrigerator/under the refrigerator door and control
panel illumination will automatically switch o.
Adjust the temperature
The internal fridge/freezer temperatures are inuenced
by the following factors:
▶ ambient temperature;
▶ frequency of door opening;
▶ amount of stored foods;
▶ installation of the appliance;
Adjust the temperature for fridge
1. Unlock the panel if it is locked.
2. Press button “A“ (Fridge) to select the fridge com-
partment. Indicator “a2“ is ashing.
3. Press button “A” to set the refrigerator temperature.
The temperature increases in sequences of 1°C
from a minimum of 2°C to a maximum of 8°C,
switching to 2°C again when pressing further.
The optimum temperature in the refrigerator is
5°C. Colder temperatures mean unnecessary
energy consumption.
4. Press any key except “A“ to conrm, or the setting
conrms automatically after 5 seconds. Indicator
“a2“ stops ashing.
Use
Adjust the temperature for freezer
1. Unlock the panel if it is locked.
2. Press button “B” (Freezer) to select the freezer
compartment. Indicator “b2” is ashing.
3. Press button “B” (Freezer) to set the freezer temperature.
The temperature increases in sequences of 1°C
from a minimum of -14°C to a maximum of -24°C,
switching to -14°C again when pressing further.
17
Page 18

Use
The optimum temperature in the freezer is -18°C. Colder temperatures mean unnecessary
energy consumption.
4. Press any key except “B” (Freezer) to conrm, or the setting conrms automatically after 5
seconds. Indicator “b2” stops ashing.
Super Cool function
Switch on the Super Cool function if larger quantities of food need to be stored (for example after the
purchase). The Super Cool function accelerates the
cooling of fresh food and protects the goods already
stored from undesirable warming. The factory setting
temperature is +2°C.
1. Unlock the panel if it is locked.
2. Press button “A“ (Fridge) for 3 seconds. Indicator
“a1“ illuminates and the function is activated.
3. The same operation can exit Super Cool function.
Notice
This function will be automatically disabled after 3 hours.
Super Freeze function
Fresh food should be frozen as quickly as possible to
the core. This preserves the best nutritional value,
appearance and taste. The Super Freeze function accelerates the freezing of fresh food and protects the
goods already stored from undesirable warming. If you
need to freeze a large amount of food once, it is recommended to turn the Super Freeze function on 24h
before needing to use.
1. Unlock the panel if it is locked.
2. Press button “B“ (Freeze) for 3 seconds. Indicator
“b1“ illuminates and the function is activated.
3. The same operation can exit Super Freeze function.
Notice
The Super Freeze function will automatically switch o after 56 hours. The appliance is
then operated at the previously set temperature.
18
Page 19

Use
My Zone drawer
The fridge compartment is equipped with a My Zone
drawer. In accordance with the food’s storage demands, the most suitable function can be selected to
get the optimal nutritional value of the foods.
following functions are available:
▶ Beverage Cooling (2-4°C). This function is suitable
to cool beverages like beer, soft-drinks, yogurts, etc.
Notice
The Beverage Cooling function has a temperature range of 2~4°C. This has been designed
to store drinks at a cold temperature for consumption. It is also suitable to store some fruits
and vegetables that will not be damaged at this temperature. Please note cold-sensitive
fruits like pineapple, avocado, bananas, grapefruits and vegetables such as potatoes,
aubergines, beans, cucumbers, zucchini and tomatoes and cheese should not be
stored in the My Zone drawer.
▶ Meat & Poultry (0°C). This function is suitable to store fresh food such as meat or
poultry for immediate consumption. Most foods stay fresh at 0°C, but not frozen.
The
YZONE
M
▶
Sea Food
seafood
mussels.
Notice
Due to the different water content within different types of meat or seafood, on occasions
it may occur that some food will experience freezing to a degree when stored at temperature
of 0°C or below. Freshly cut meat should be stored in the My Zone drawer.
Please do not store fruit and vegetables in the Meat & Poultry or Seafood functions.Due to the
high water content of fruits and vegetables, it is likely they will experience some freezing and
be damaged. It is easy to freeze the fruit and vegetables.
Select the function for My Zone drawer
1. Unlock the panel if it is locked.
2. Press button “C” to select the My Zone function.
Beverage Cooling “c1” light.
Meat & Poultry “c2” light.
Seafood “c3” light.
C
Beverage
Cooling
Meat & Poultry
Seafood
and
C1
C2
C3
19
Page 20

Use
Water dispenser
Filling the water tan
Make sure the glass is in line with the dispenser to
Fresh storage drawer
The Fresh Storage drawer is suitable
to store fruits and vegetables. It has a
Humidity Control System (HCS) module which automatically controls the
moisture above 85%. It can maintain
this level for several weeks.
(Only models with water dispenser)
With the water dispenser. drinking water can be conveniently stored in your tank.
k
HCS
WARNING!
Use drinking water only.
1. Ensure that the water tank is properly inserted
(see EQUIPMENT).
2.
tank up with fresh drinking water.
3. Fill water only up to the mark (2.5L); as it could
2.5
4. Close the round lid until it clicks into place.
Notice
▶
▶ When you don‘t need water for a long time, please empty the water tank and insert
the cleaned tank.
▶ The cover (C) on the water tank is additionally used to save energy. If you do not want
to use water from the water dispenser for a long period, please still install the cover
because of better insulating and saving energy.
WATER DISPENSER
Getting water from the dispenser
1. Place a glass underneath the water outlet.
2. Push gently against the water dispenser lever
with your glass.
A
C
20
prevent the water from splashing out.
Page 21

Use
Tips on storing fresh food
Storing in the refrigerator compartment
▶ Keep your fridge temperature below 5°C.
▶ Hot food must be cooled to room temperature before storing in the appliance.
▶ Foods stored in the refrigerator should be washed and dried before storing.
▶ Food to be stored should be properly sealed to avoid odour or taste alterations.
▶ Do not store excessive quantities of food. Leave spaces between foods to allow cold
air owing around them, for a better and more homogeneous cooling.
▶ Foods eaten daily should be stored at the front of the shelf.
▶ Leave a gap between foods and the inner walls, allowing air ow. Don’t store foods
against the rear wall: foods could freeze against rear wall. Avoid direct contact of
food (especially oily or acidic food) with the inner liner, as oil/acid can erode the inner
liner. Clean away oily/acid dirt whenever it is found.
▶ Defreeze frozen food in the fridge storage compartment. This way, you can use the
frozen food to decrease the temperature in the compartment and save energy.
▶ The ageing process of fruit and vegetables such as courgettes, melons, papaya, ba-
nana, pineapple, etc. can be accelerated in the refrigerator. Therefore, it is not advisable to store them in the refrigerator. However, the ripening of strongly green fruits
can be promoted for a certain period. Onions, garlic, ginger and other root vegetables should also be stored at room temperature.
▶ Unpleasant odours inside the fridge are a sign that something has spilled and clean-
ing is required. See CARE AND CLEANING.
▶ Dierent foods should be placed in dierent areas according to their properties:
Butter, cheese, spices,
etc.
Medicines, nail polish
Cooling water ( only
models with water
dispenser)
Canned food, spices,
eggs etc.
Drinks and bottled
foods. etc.
1
6
2
3
4
7
8
9
10
1
Pickled foods, canned food, etc.
2
5
4
Wines, snack foods, etc.
Pasta, milk, tofu, dairy, etc.
Fruits, vegetables, etc.
Fresh meat, fresh fish, sausages,
cooked foods, etc.
21
Page 22

Use
Storage in the freezer compartment
▶ Keep the freezer temperature at -18°C.
▶ 24 hours before freezing, switch on the Super Freeze function; for small quantities of
food 4-6 hours are sucient.
▶ Hot food must be cooled to room temperature before storing in the freezer com-
partment.
▶ Food cut into small portions will freeze faster and be easier to defrost and cook. The
recommended weight for each portion is less than 2.5Kg
▶ It is better to pack food before putting it into the freezer. The outside of the pack-
aging must be dry to avoid bags sticking together. Packaging materials should be
odour-free, airtight, non-poisonous and nontoxic.
▶ In order to avoid expiration of storage periods, please note the freezing date, time
limit and name of the food on the packaging according to the storage periods of different foods.
▶ WARNING! Acid, alkali and salt etc. could erode the internal surface of the freezer.
Do not place food with these substances (eg. seafood) directly on internal surfaces.
Salt water in the freezer should be cleaned up immediately.
▶ Do not exceed the food storage times recommended by the manufacturers. Only
take the required amount of food out of the freezer.
▶ Consume defrosted food quickly. Defrosted food cannot be re-frozen unless it is
rst cooked, otherwise it may be less edible.
▶ Do not load excessive quantities of fresh food in the freezer compartment. Refer to
the freezing capacity of the freezer (see TECHNICAL DATA).
▶ Food can be stored in the freezer at a temperature of at least -18°C for 2 to 12
months, depending on its properties (eg. meat: 3-12 months, vegetables: 6-12
months).
▶ When freezing fresh food, avoid bringing it in contact with already frozen food. Risk
of thawing!
▶ Defreeze frozen food in the fridge. This way, you can use the frozen food to decrease
the temperature in the fridge compartment and save energy.
22
Page 23

Dierent foods should be placed in dierent areas according to their properties:
Use
Ice cream, bread, etc.
Small frozen food such as
meat,pizza, ice cubes,
pre-rolled pastry packet, etc.
11
12
13
Large/heavier portions of food,
such as meat, joints for roasng,
pizza, etc.
When storing commercially frozen foods, please follow these guidelines:
▶ Always follow manufacturers’ guidelines for the length of time you should store food
for. Do not exceed these guidelines!
▶ Try to keep the length of time between purchase and storage as short as possible to
preserve food quality.
▶ Buy frozen foods, which have been stored at a temperature of –18°C or below.
▶ Avoid buying food which has ice or frost on the packaging. This indicates that the
products might have been partially defrosted and refrozen at some point, which may
aect the quality of food.
23
Page 24

Equipment
Multi-air-ow
The refrigerator is equipped with a multi-air-ow system, with which cool air ows are located on every shelf
level. This helps to maintain a uniform temperature to
ensure that your food is kept fresher for longer.
Adjustable shelves
The height of the shelves can be adjusted to t your
storage needs.
1. To relocate a shelf, remove it rst by uplifting its
2. To reinstall it, put it on the lugs on both sides and
Notice
Ensure that both ends of a shelf are level.
My Zone drawer and Fresh Storage drawer
For use and setting of the My Zone drawer please
check section USE.
To remove the drawer:
Pull out (1) to the maximum extent.
Lift (2) to separate the drawer from the rail and re-
move (3).
2
3
1
It can be mounted in reverse order.
Use same process for the Fresh Storage drawer.
hind edge (1) and pulling it out (2).
push it to the most rearward position until the rear
of the shelf is xed inside the slots in the sides.
24
Removable door racks
1
1
2
The door racks can be removed for cleaning:
Place hands on each side of the rack, lift it upwards (1)
and pull it out (2).
In order to insert the door rack, the above steps are
carried out in reverse order.
Page 25

Equipment
-
or
Stop
Limit
A
(only models with water dispenser)
The water tank can be removed and reinstalled f
cleaning in the same way as the door racks.
Insert water tank
(only models with water dispenser)
Removable water tank
B
Place the water tank in the position that the water out
the water tank is locked.
Ice cube tray
1. Fill the ice cube tray 3/4 full of water, close with the
cover and put it into the pre-freezing compartment.
2.
ing water to loosen the ice cubes.
Removable freezer drawer
The freezer drawers are removable:
-
1.Pull out the drawer to the maximum extent.
2. Lift the drawer and remove.
D1
①
②
D2
Drawer D2
1. Pull out the drawer to maximum extent,
D3
2. Press the Stop limit on both sides.
3. Lift the drawer and remove.
1. Pull out the drawer to maximum extent.
D1
①
②
D2
D4
2. Lift to separate the box from the rails and remove.
In order to insert the boxes and drawer, the above
steps are carried out in reverse order.
25
Page 26

Equipment
Energy saving tips
▶ Make sure the appliance is properly ventilated (see INSTALLATION).
▶ Do not install the appliance in direct sunlight or near sources of heat (eg. stoves,
heaters).
▶ Avoid unnecessarily low temperature in the appliance. The energy consumption in-
creases the lower the temperature in the appliance is set.
▶ Functions like Super Cool or Super Freeze consume more energy.
▶ Allow warm food to cool down before placing it in the appliance.
▶ Open the appliance door as little and as briey as possible.
▶ Do not overll the appliance to avoid obstructing the air ow.
▶ Avoid air within the food packaging.
▶ Keep door seals clean so that the door always closes correctly.
▶ Defreeze frozen food in the fridge storage compartment.
26
Page 27

Care and Cleaning
and
Cleaning the water tank
WARNING!
Disconnect the appliance from the power supply before cleaning.
Cleaning
Clean the appliance when only little or no food is stored.
The appliance should be cleaned every four weeks for good maintenance and to prevent
bad stored food odors.
WARNING!
▶ Do not clean the appliance with hard brushes, wire brushes, detergent powder, petrol,
amyl acetate, acetone and similar organic solutions, acid or alkaline solutions. Please
clean with special refrigerator detergent to avoid damage.
▶ Do not spray or ush the appliance during cleaning.
▶ Do not use water spray or steam to clean the appliance.
▶ Do not clean the cold glass shelves with hot water. Sudden temperature change may
cause the glass to break.
▶ Do not touch the inside surface of the freezer storage compartment, especially with
wet hands, as your hands may freeze onto the surface.
▶ In case of heating check the condition of frozen goods.
▶ Always keep the door gasket clean.
▶ Clean the inside and housing of the appliance
with a sponge dampened in warm water and
neutral detergent.
▶ Rinse and dry with soft cloth.
▶ Do not clean any of the parts of the appliance in a
dishwasher.
▶ Allow at least 5 minutes before restarting the
appliance as frequent starting may damage the
compressor.
(only models with water dispenser)
1.
A
B
2. Remove the cover (A).
3. Unscrew the dispenser cock (B).
4. Clean the tank and dispenser cock with warm
water and liquid dishwashing detergent. Make
sure all
5. Mount the dispenser cock, close the cover
replace the tank inside the appliance.
27
Page 28

Care and Cleaning
Defrosting
The defrosting of the refrigerator and the freezer compartment are done automatically;
no manual operation is needed.
Replacing the LED lamps
WARNING!
Do not replace the LED lamp yourself, it must only be replaced by either the manufacturer or the authorised service agent.
The appliance uses LED lamps as its light, featuring low energy consumption and long
service life. If there is any abnormality, please contact customer service. See CUSTOMER
SERVICE.
Parameters of the lamp:
Refrigerator compartment Freezer compartment
Model
HRF520BW
HRF520BS
HRF520BHS
HRF520FS
HRF520FHS
Non-use for a longer period
If the appliance is not used for an extended period of time, and the Holiday function for the
refrigerator is not being used:
▶ Take out the food.
▶ Unplug the power cord.
▶ Clean the appliance as described above.
▶ Keep the door and freezer drawers/door open to prevent the creation of bad odours
inside.
Voltage max Power Voltage max Power
12V 2W - -
Notice
Turn the appliance o only if strictly necessary.
Moving the appliance
1. Remove all food and unplug the appliance.
2. Secure shelves and other moveable parts in the fridge and the freezer with adhesive
tape.
3. Do not tilt the refrigerator more than 45° to avoid damaging the refrigerating system.
WARNING!
▶ Do not lift the appliance by its handles.
▶ Never place the appliance horizontally on the ground.
28
Page 29

Troubleshooting
Many problems that occur can be solved without specic expertise. In case of a problem,
please refer to the below list of possibilities and follow instructions before contacting after
sales service. See CUSTOMER SERVICE.
WARNING!
▶ Before maintenance, deactivate the appliance and disconnect the mains plug from
the mains socket.
▶ Electrical equipment should be serviced only by qualied electrical experts, because
improper repairs can cause considerable consequential damages.
▶ A damaged power supply should only be replaced by the manufacturer, its service
agent or similarly qualied persons in order to avoid a hazard.
Problem Possible Cause Possible Solution
The compressor
does not work.
The appliance runs
frequently or runs
for too long a period
of time.
The inside of the refrigerator is dirty and/
or smells.
• Mains plug is not connected in the
mains socket.
• The appliance is in the defrosting
cycle.
• The indoor or outdoor temperature is too high.
• The appliance has been powered
o for a period of time.
• A door/drawer of the appliance is
not tightly closed.
• The door/drawer has been opened
too frequently or for too long.
• The temperature setting for the
freezer compartment is too low.
• The door/drawer gasket is dirty,
worn, cracked or mismatched.
• The required air circulation is not
guaranteed.
• The inside of the refrigerator
needs cleaning.
• Food of strong odour is stored in
the refrigerator.
• Connect the mains plug.
• This is normal for an automatic
defrosting.
• In this case, it is normal for the
appliance to run longer.
• Normally, it takes 8 to 12 hours
for the appliance to cool down
completely.
• Close the door/drawer and
ensure the appliance is located
on level ground and there is no
food or container holding door
ajar.
• Do not open the door/drawer
too frequently.
• Set the temperature higher
until a satisfactory refrigerator temperature is obtained. It
takes 24 hours for the refrigerator temperature to become
stable.
• Clean the door/drawer gasket
or replace them through customer service.
• Ensure adequate ventilation.
• Clean the inside of the refrigerator.
• Wrap the food thoroughly.
29
Page 30

Troubleshooting
Problem Possible Cause Possible Solution
It is not cold enough
i
nside the appli-
ance.
It is too cold inside
the appliance.
Moisture formation
on the inside of the
refrigerator compartment.
Moisture accumulates on the refrigerator outside
surface or between
the doors/door and
drawer.
Strong ice and frost
in the freezer compartment.
• The temperature is set too high.
• The temperature of the food
stored is too warm.
• Too much food has been stored at
one time.
• The goods are too close to each
other.
• A door/drawer of the appliance is
not tightly closed.
• The door/drawer has been opened
too frequently or for too long.
• The temperature is set too low.
• The Super Freeze/Super Cool function is activated or is running too
long.
• The climate is too warm and too
damp.
• A door/drawer of the appliance is
not tightly closed.
• The door/drawer has been opened
too frequently or for too long.
• Food containers or liquids are left
open.
• The climate is too warm and too
damp.
• The door/drawer is not closed
tightly. The cold air in the appliance
and the warm air outside it condensates.
• The goods were not adequately
packaged.
• A door/drawer of the appliance is
not tightly closed.
• The door/drawer has been opened
too frequently or for too long.
• The door/drawer gasket is dirty,
worn, cracked or mismatched.
• Something on the inside prevents
the door/drawer to close properly.
• Reset the temperature.
• Always cool down goods before storing them.
• Always store small quantities of
food.
• Leave a gap between several
foods allowing air ow.
• Close the door/drawer.
• Do not open the door/drawer
too frequently.
• Reset the temperature.
• Switch o the Super Freeze/
Super Cool function.
• Increase the temperature.
• Close the door/drawer.
• Do not open the door/drawer
too frequently.
• Let hot foods cool to room
temperature and cover foods
and liquids.
• This is normal in damp climate
and will change when the humidity decreases.
• Ensure that the door/drawer is
tightly shut.
• Always pack the goods well.
• Close the door/drawer.
• Do not open the door/drawer
too frequently.
• Clean the door/drawer gasket
or replace them with new ones.
• Reposition the shelves, door
racks, or internal containers to
allow the door/drawer to close.
30
Page 31

Troubleshooting
Problem Possible Cause Possible Solution
The appliance
makes abnormal
sounds.
A slight sound is
heard si
milar to that
• The appliance is not located on
level ground.
• The appliance touches some object around it.
• - • This is normal.
of owing water.
You hear an alarm
beep.
You hear a faint hum. • The anti-condensation system is
The interior lighting
or cooling system
does not work
• The fridge storage compartment
door is open.
• The temperature in the freezer is
too high.
working.
• Mains plug is not connected in the
mains socket.
• The power supply is not intact.
.
• The LED lamp is out of order.
• Adjust the feet to level the appliance.
• Remove objects around the
appliance.
• Close the door or silence the
alarm manually.
• The alarm is normal when it is
rst started due to relatively
higher temperature. You can
silence the alarm manually (see
USE).
• This prevents condensation
and is normal.
• Connect the mains plug.
• Check the electrical supply to
the room. Call the local electricity company!
• Please call customer service to
change the lamp.
Power interruption
In the event of a power cut, food should remain safely cold for about 16 hours. Follow these
tips during a prolonged power interruption, especially in summer:
▶ Open the door/drawer as few times as possible.
▶ Do not put additional food into the appliance during a power interruption.
▶ If prior notice of a power interruption is given and the interruption duration is longer
than 16 hours, make some ice and put it in a container in the top of the refrigerator
compartment.
▶ An inspection of the goods is required immediately after the interruption.
▶ As temperature in the refrigerator will rise during a power interruption or other fail-
ure, the storage period and edible quality of food will be reduced. Any food that de-
frosts should be either consumed, or cooked and refrozen (where suitable) soon
afterwards in order to prevent health risks.
31
Page 32

Installation
Unpacking
WARNING!
▶ The appliance is heavy. Always handle with at least two persons.
▶ Keep all packaging materials out of children´s reach and dispose them in an environ-
mentally friendly manner.
▶ Take the appliance out of the packaging.
▶ Remove all packaging materials.
Environmental conditions
The room temperature should always be between 10°C and 43°C, since it can inuence
the temperature inside the appliance and its energy consumption. Do not install the appli-
ance near other heat-emitting appliances (ovens, refrigerators) without isolation.
Door reversibility
Before the appliance is permanently installed, check the correct position of the door
hinge. If necessary see door reversibility below.
Space requirement
Required space when door is opened:
32
Model
HRF520BW
HRF520BS
HRF520BHS
Model
HRF520FS
HRF520FHS
Appliance width
in mm
Appliance depth
in mm
W1 W2 D1 D2
1241 - 619 1423
Appliance width
in mm
Appliance depth
in mm
W1 W2 D1 D2
1008 1226 619 1024
W1
1241
W1
1008
W2
1226
d1
619
d2
1423
D1
619
D2
1024
Page 33

Installation
30 mm
Positioning your appliance
This appliance should be installed in a room
that is dry and well ventilated.To provide
adequate ventilation,make sure the refrigerator is at least 20mm clear on all sides from
kitchen cabinetry, and 30mm from the back
wall. Any units placed above the appliance
must be clear by 50mm to allow sufficient
ventilation.
If locating the refrigerator close to a corner,
sufficient spacing must be left for opening the
doors and removing the shelves.
This appliance should be at least 100mm from
any electric or gas cooker. If this is not possible, make sure that appropriate insulation is
used (eg insulated wall).
Avoid exposing the appliance to direct
sunlight, and sources of heat (such as radiators, heaters or cookers).
Locating this appliance in a cold environment
(such as a shed, outhouse or garage) may
compromise its performance. A consistent
room temperature of 10°C or above is recommended to ensure optimum performance and
food care.
50 mm
Installation distance
30 mm
20 mm20 mm
33
Page 34

Installation
2 h
1. 2.
3.
Aligning the appliance
The appliance should be placed on a at and solid surface.
1. Tilt the appliance slightly backwards.
2. Set the feet to the desired level.
Make sure the distance to the wall on the hinge side is
at least 100mm for the door to open properly.
3. The stability can be checked by alternately bumping on the diagonals. The slightly swaying should
be the same in both directions. Otherwise the
frame can warp; possible leaking door seals are
the result. A lowering of the rear feet facilitates the
door.
Waiting time
Maintenance-free lubrication oil is located in the
capsule of the compressor. This oil may get through
closed pipe system during transportation. Before connecting the appliance to the power supply you have to
wait 2 hours so that the oil runs back into the capsule.
Electrical connection
Before each connection check if:
▶ power supply, socket and fusing are appropriate to the rating plate.
▶ the power socket is earthed and no multi-plug or extension is being used.
▶ the power plug and socket are of sound condition.
Connect the plug to a properly installed household socket.
WARNING!
To avoid risks, a damaged power cord must be replaced by customer services (see warranty card).
34
Page 35

Installation
25
Door reversibility
Before connecting the appliance to the power supply, you should check whether the door
swing must changed from right (as delivered) to left, as required by the installation location and the usability.
WARNING!
▶ The appliance is heavy. You need two persons to carry out the door reversibility.
▶ Before any operation, rst unplug the appliance from the mains .
▶ Do not tilt the appliance more than 45° to prevent damage of the cooling system.
1. Locate necessary tools.
2. Unplug the appliance.
3. Remove the xation of the cover.
4. Remove the faceplate of the body.
5. Remove the top-plate of the upper door.
6. Remove the hinge cover.
7. Unplug the connection cable.
8. Unscrew the upper hinge.
9. Lift the loose upper door carefully o the lower
hinge.
10. Turn the upper door upside down and change the
position of the hinge barrel on the lower side of
the door.
1. 2.
3. 4.
5.
7. 8.
9.
6.
10.
11. Change the door stop from the current position
to opposite side.
12. Unscrew the lower hinge of the upper door.
11.
12.
35
Page 36

Installation
13.
a
b
d e
14.
13. Change the positions of the blanking plugs and
the screw on the other side.
a Remove lower door.
b Change the door stop at the bottom of the lower
door from the current position to opposite side.
c
c Unscrew the bottom hinge.
d Take out the new bottom hinge from the acces-
sory bag and screw the new bottom hinge to the
other side of the door opening.
e Lift the lower door carefully onto the bottom hinge
so that the pivot ts into the hinge barrel.
14. Take out the new hinge from the accessory bag
and screw the new middle hinge of upper door to
the other side of the door opening.
15. 16.
17. 18.
19.
36
Be sure the pivot ts into the hinge barrel of lower
door.
15. Lift the door carefully on to the lower hinge so
that the pivot ts into the hinge barrel.
16. Fix the upper hinge with the screws.
17. Put the connection cable through the hinge
cover (delivered in the accessory bag) and put it
over the hinge.
18. Plug in the connection cable and t it into the
opening.
19. Replace faceplate and cover, x it with the screws
and reinsert the xation (see g. 3).
After changing the door check that the door seals
are located properly on the housing and all screws are
tightened well.
Page 37

Technical Data
Trademark
Model No.
Category of the model Refrigerator-freezer
Voltage/Frequency
Energy Star
Frost-free system
Product group
Total gross volume
Total storage volume
Fresh food compartment volume
Freezer compartment volume
Climate class
Refrigerant
Insulation blowing gas
Haier
HRF520BW
HRF520BS
HRF520BHS
220V-240V~/50Hz
4 star
Yes
5B
517L
433L
344L
89L
T
R600a 64g
HC-C601
Haier
HRF520FS
HRF520FHS
Refrigerator-freezer
220V-240V~/50Hz
4 star
Yes
5B
514L
430L
341L
89L
T
R600a 64g
HC-C601
Dimension (DxWxH)
Protection class
686x790x1725mm
I
686x790x1725mm
I
37
Page 38

 Loading...