

Page 1
Installation and User Manual
Instructions d’installation et
guide de l’utilisateur
Instrucciones de instalación y
Manual del usuario
HRF15N3AGS
French-Door Bottom Mount Refrigerator
Réfrigérateur à double porte à congélateur inférieur
Refrigerador de dos puertas de montaje inferior
Part # XXXXXXXXXX
Page 2

Page 3

TABLE OF CONTENTS
REFRIGERATOR SAFETY ........................................................................................................................................................................ 2
PART AND FEATURES ............................................................................................................................................................................ 3
INSTALLATION INSTRUCTIONS ............................................................................................................................................................. 4
Unpack the Refrigerator ............................................................................................................................................................................................. 4
Location Requirements ..............................................................................................................................................................................................4
Electrical Requirements .............................................................................................................................................................................................5
Complete the Installation ...........................................................................................................................................................................................5
Leveling and Door Adjustment (if needed) ...............................................................................................................................................................5
REFRIGERATOR USE ............................................................................................................................................................................... 6
Opening and Closing Doors .......................................................................................................................................................................................6
Using the Controls ......................................................................................................................................................................................................6
Features ......................................................................................................................................................................................................................8
REFRIGERATOR CARE ............................................................................................................................................................................ 9
Cleaning ......................................................................................................................................................................................................................9
Lights ...........................................................................................................................................................................................................................9
Vacation and Moving Care .........................................................................................................................................................................................9
TROUBLESHOOTING ........................................................................................................................................................................... 10
LIMITED WARRANTY ........................................................................................................................................................................... 12
RECORD KEEPING
Thank you for purchasing this Haier product. This user manual will
help you get the best performance from your new refrigerator.
For future reference, record the model and serial number located on
the inside wall of the refrigerator, and the date of purchase.
Staple your proof of purchase to this manual to aid in obtaining
warranty service if needed.
___________________________________________________________
Model number
___________________________________________________________
Serial number
___________________________________________________________
Date of purchase
1
Page 4
REFRIGERATOR SAFETY
Your safety and the safety of others are very important.
We have provided many important safety messages in this manual and on your appliance. Always read and obey all
safety messages.
This is the safety alert symbol.
This symbol alerts you to potential hazards that can kill or hurt you and others. All safety messages will
follow the safety alert symbol and either the word “DANGER,” “WARNING” or “CAUTION.”
These words mean:
An imminently hazardous situation. You could be killed or seriously injured if you don’t
DANGER
WARNING
CAUTION
All safety messages will tell you what the potential hazard is, tell you how to reduce the chance of injury, and tell you what
can happen if the instructions are not followed.
immediately follow instructions.
A potentially hazardous situation which, if not avoided, could result in death or serious
bodily injury.
A potentially hazardous situation which, if not avoided, may result in moderate or minor
injury.
IMPORTANT SAFETY INSTRUCTIONS
WARNING: To reduce the risk of re, electrical shock, injury to persons, or damage when using the refrigerator, follow
basic precautions, including the following:
Plug into a grounded 3 prong outlet.
•
Do not remove ground prong.
•
Do not use an adapter.
•
Do not use an extension cord.
•
Disconnect power before servicing.
•
Replace all parts and panels before operating.
•
Remove doors from your old refrigerator.
•
Use nonammable cleaner.
•
Keep ammable materials and vapors, such as gasoline,
•
away from refrigerator.
Use two or more people to move and install
•
refrigerator.
This refrigerator should not be recessed or built-in
•
an enclosed cabinet. It is designed for freestanding
installation only.
Disconnect power before installing ice maker (on ice
•
maker kit ready models only).
Use a sturdy glass when dispensing ice (on some
•
models).
Turn o the water supply to the refrigerator before
•
removing or replacing the water lter or locking cap (on
some models).
If your refrigerator is not being used, remove the doors.
•
This will reduce the possibility of danger to children.
READ AND SAVE THESE INSTRUCTIONS
State of California Proposition 65 Warnings:
WARNING: This product contains one or more chemicals known to the State of California to cause cancer.
WARNING: This product contains one or more chemicals known to the State of California to cause birth defects or other
reproductive harm.
2
Page 5
PROPER DISPOSAL OF YOUR OLD
WARNING
REFRIGERATOR
Suffocation Hazard
Remove doors from your old refrigerator.
Failure to do so can result in death or brain damage.
IMPORTANT: Child entrapment and suocation are not problems
of the past. Junked or abandoned refrigerators are still dangerous even if they will sit for “just a few days.” If you are getting rid of your
old refrigerator, please follow these instructions to help prevent
accidents.
PART AND FEATURES
Before You Throw Away Your Old Refrigerator or Freezer:
Take o the doors.
•
Leave the shelves in place so that children may not easily climb
•
inside.
a
c
d
e
b
b
b
f
f
g
h
i
j
b
b
b
l
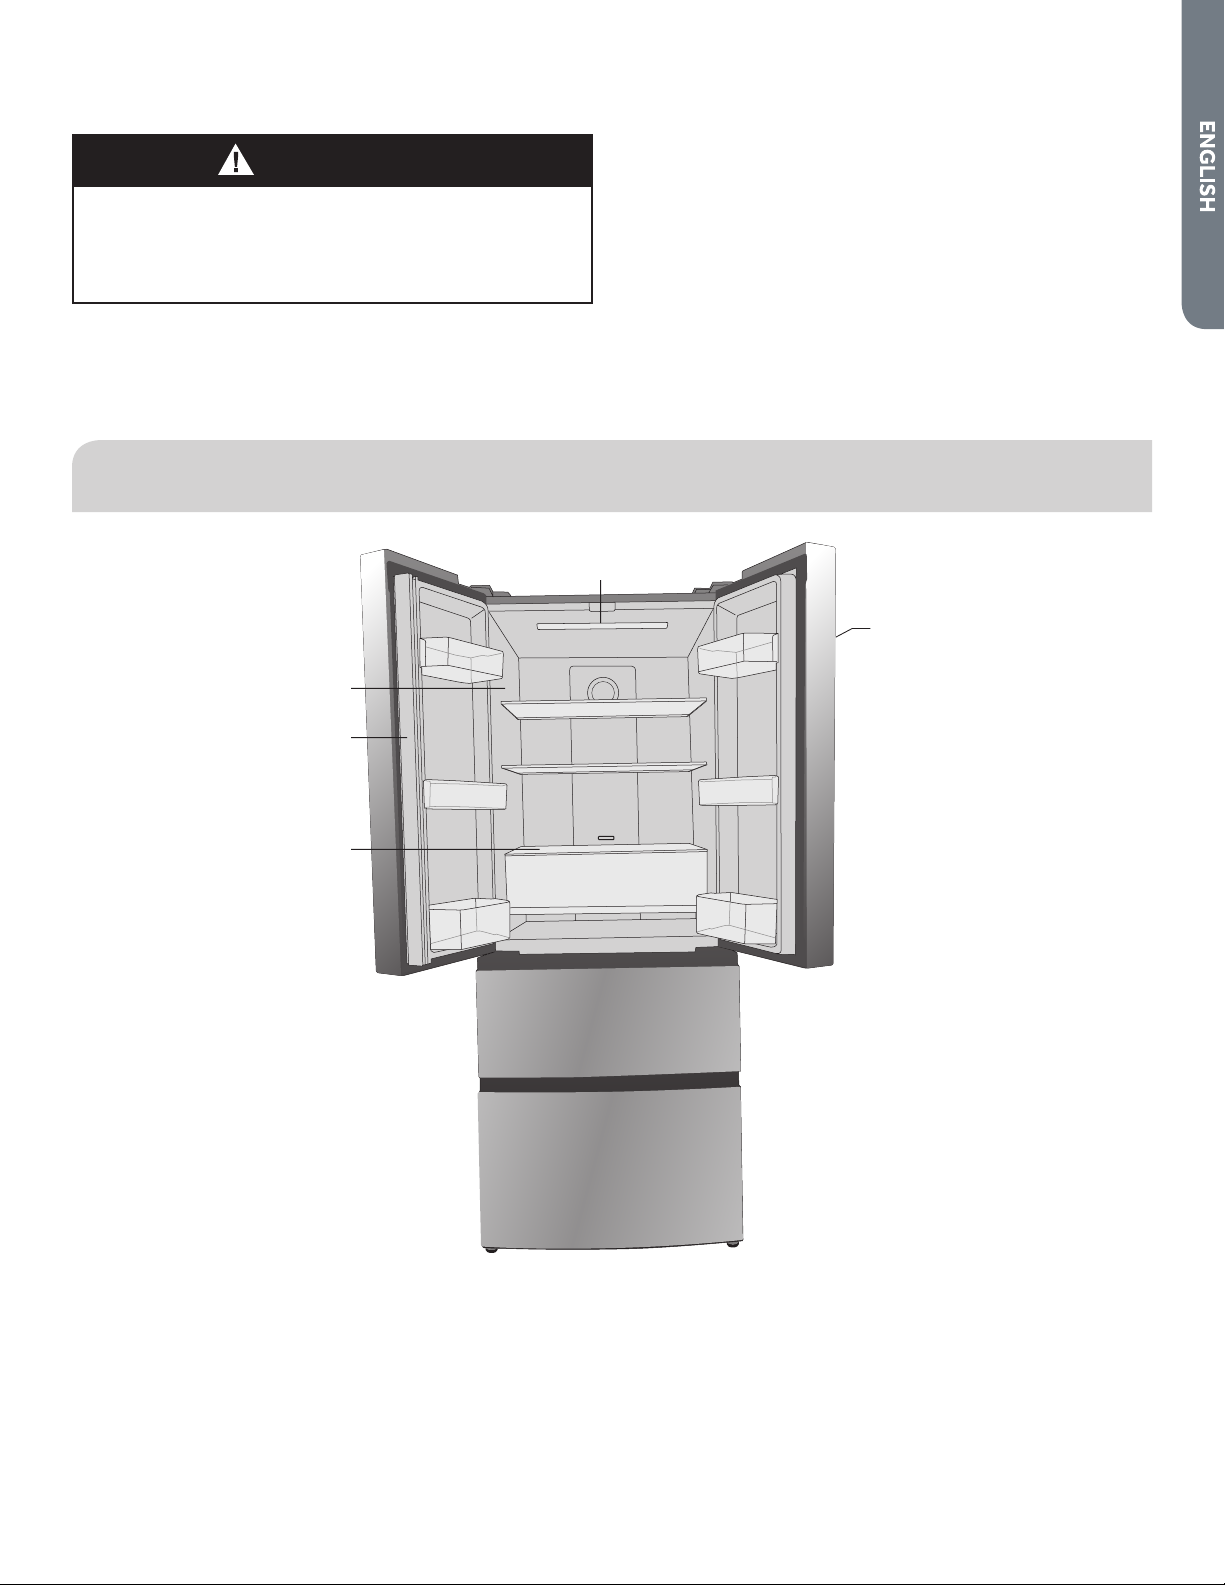
a LED Lights
b Door Bin
c Model and Serial # Plate
d Vertically-Hinged Bar
e Cool Zone Glass Cover
f Glass Shelf
k
k
g Cool Zone Control
h Cool Zone Drawer
i Upper Freezer Storage Drawer
j Lower Freezer Storage Drawer
k Adjustable Foot
l Control Panel
3
Page 6
INSTALLATION INSTRUCTIONS
WARNING
UNPACK THE REFRIGERATOR
Excessive Weight Hazard
Use two or more people to move and install refrigerator.
Failure to do so can result in back or other injury.
REMOVE THE PACKAGING
Remove tape and glue residue from surfaces before turning on
•
the refrigerator. Rub a small amount of liquid dish soap over the
adhesive with your ngers. Wipe with warm water and dry.
Do not use sharp instruments, rubbing alcohol, ammable
•
uids, or abrasive cleaners to remove tape or glue. These
products can damage the surface of your refrigerator. For
more information, see “Refrigerator Safety.”
Dispose of/recycle all packaging materials.
•
When Moving Your Refrigerator:
Your refrigerator is heavy. When moving the refrigerator
for cleaning or service, be sure to cover the oor with
cardboard or hardboard to avoid oor damage. Always pull
the refrigerator straight out when moving it. Do not wiggle or
“walk” the refrigerator when trying to move it, as oor damage
could occur.
LOCATION REQUIREMENTS
WARNING
Explosion Hazard
Keep flammable materials and vapors, such as gasoline,
away from appliance.
Failure to do so can result in death, explosion or fire.
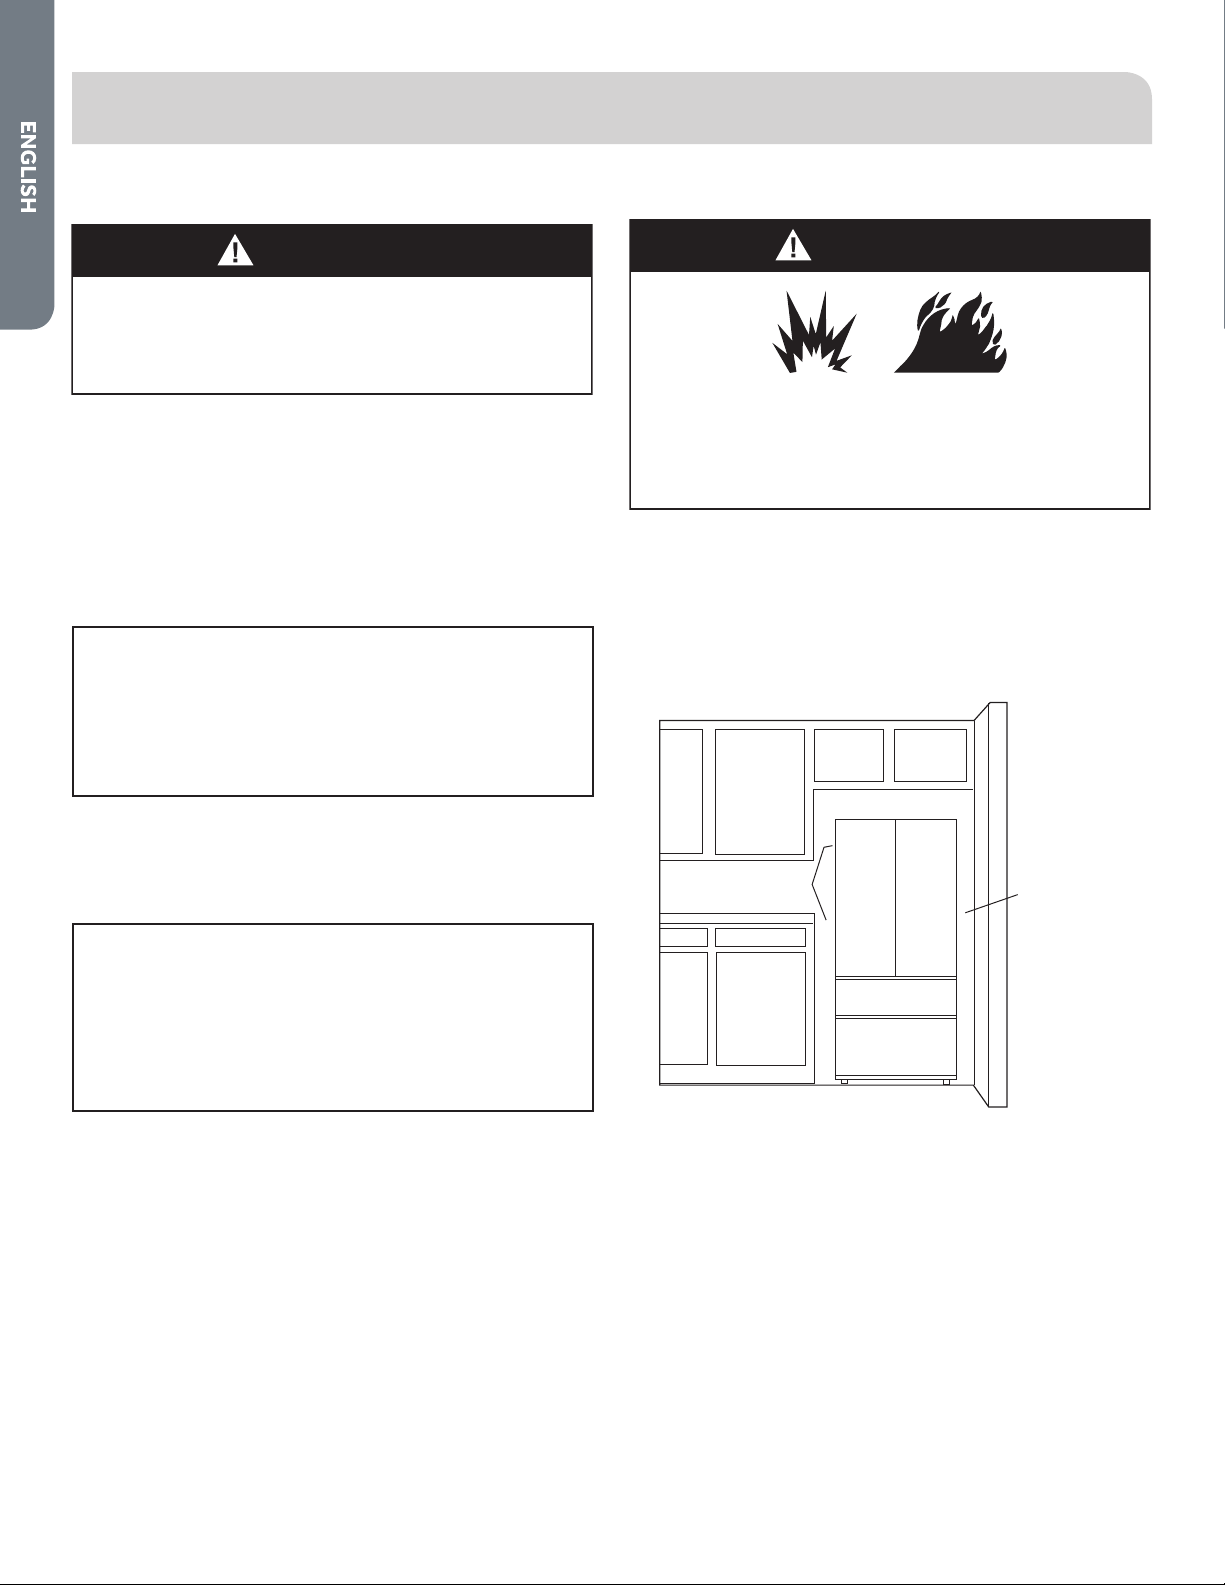
IMPORTANT: This refrigerator is designed for indoor, household
use only. This refrigerator should not be recessed or built-in an
enclosed cabinet. It is designed for freestanding installation only.
To ensure proper ventilation for your refrigerator, allow for 2”
(5.08cm) of space on each side and at the top. Allow for 2” (5.08 cm)
of space behind the refrigerator. When installing your refrigerator
next to a xed wall, leave 4” (10 cm) minimum to allow for the door
to swing open.
CLEAN BEFORE USING
After you remove all of the packaging materials, clean the inside
of the refrigerator before using it. See the cleaning instructions in
“Refrigerator Care.”
Important information to know about glass shelves and
covers:
Do not clean glass shelves or covers with warm water when
they are cold. Shelves and covers may break if exposed to
sudden temperature changes or impact, such as bumping.
Tempered glass is designed to shatter into many small, pebblesize pieces. This is normal. Glass shelves and covers are heavy.
Use both hands when removing them to avoid dropping.
2" (5.08 cm)
2" (5.08 cm)
NOTE: This refrigerator is intended for use in a location where
the temperature ranges from a minimum of 55°F (13°C) to a
maximum of 110°F (43°C). The preferred room temperature range
for optimum performance, which reduces electricity usage and
provides superior cooling, is between 60°F (15°C) and 90°F (32°C). It
is recommended that you do not install the refrigerator near a heat
source, such as an oven or radiator.
4" (10.2 cm)
4
Page 7
ELECTRICAL REQUIREMENTS
COMPLETE THE INSTALLATION
WARNING
Electrical Shock Hazard
Plug into a grounded 3 prong outlet.
Do not remove the ground prong from the power
cord plug.
Do not use an adapter.
Do not use an extension cord.
Failure to do so can result in death, fire or
electrical shock.
Before you move your refrigerator into its nal location, it is
important to make sure you have the proper electrical connection.
Recommended Grounding Method
A 115 volt, 60 Hz, AC only 15- or 20-amp fused, grounded electrical
supply is required. It is recommended that a separate circuit serving
only your refrigerator be provided. Use an outlet that cannot be
turned o by a switch. Do not use an extension cord.
NOTE: Before performing any type of installation or cleaning,
disconnect the refrigerator from the electrical source. When you
are nished, reconnect the refrigerator to the electrical source and
reset the temperature controls to the desired setting.
WARNING
Electrical Shock Hazard
Plug into a grounded 3 prong outlet.
Do not remove the ground prong from the power
cord plug.
Do not use an adapter.
Do not use an extension cord.
Failure to do so can result in death, fire or
electrical shock.
1. Plug into a grounded 3 prong outlet.
2. Return all removable door parts to door and food to refrigerator.
NOTE: This refrigerator begins operating as soon as it is connected
to the power supply.
LEVELING AND DOOR
ADJUSTMENT (IF NEEDED)
The refrigerator must be level to maintain optimal performance and
appearance.
LEVELING
1. Move the refrigerator to its nal location.
2. Turn the feet on the bottom, front of the cabinet to raise or
lower that side of the refrigerator until the refrigerator is level
side-to-side.
3. Turn both front legs, by the same amount, to slightly raise the
front of the refrigerator. This will make it easier for the doors to
close.
NOTE: Having someone push against the top of the refrigerator
takes some weight o the leveling screws. This makes it easier
to turn the screws.
5
Page 8
REFRIGERATOR USE
OPENING AND CLOSING DOORS
There are two refrigerator compartment doors. The doors can be
opened and closed either separately or together.
There is a vertically-hinged bar on the left-hand refrigerator
•
door.
When closing the left-hand refrigerator door, the hinged bar
•
folds behind the right-hand door, joining the two refrigerator
doors.
NOTE: Before closing the left-hand door, make sure the
vertically-hinged bar is folded inward. If the bar is pulled outward
it may become damaged when you try to close the door.
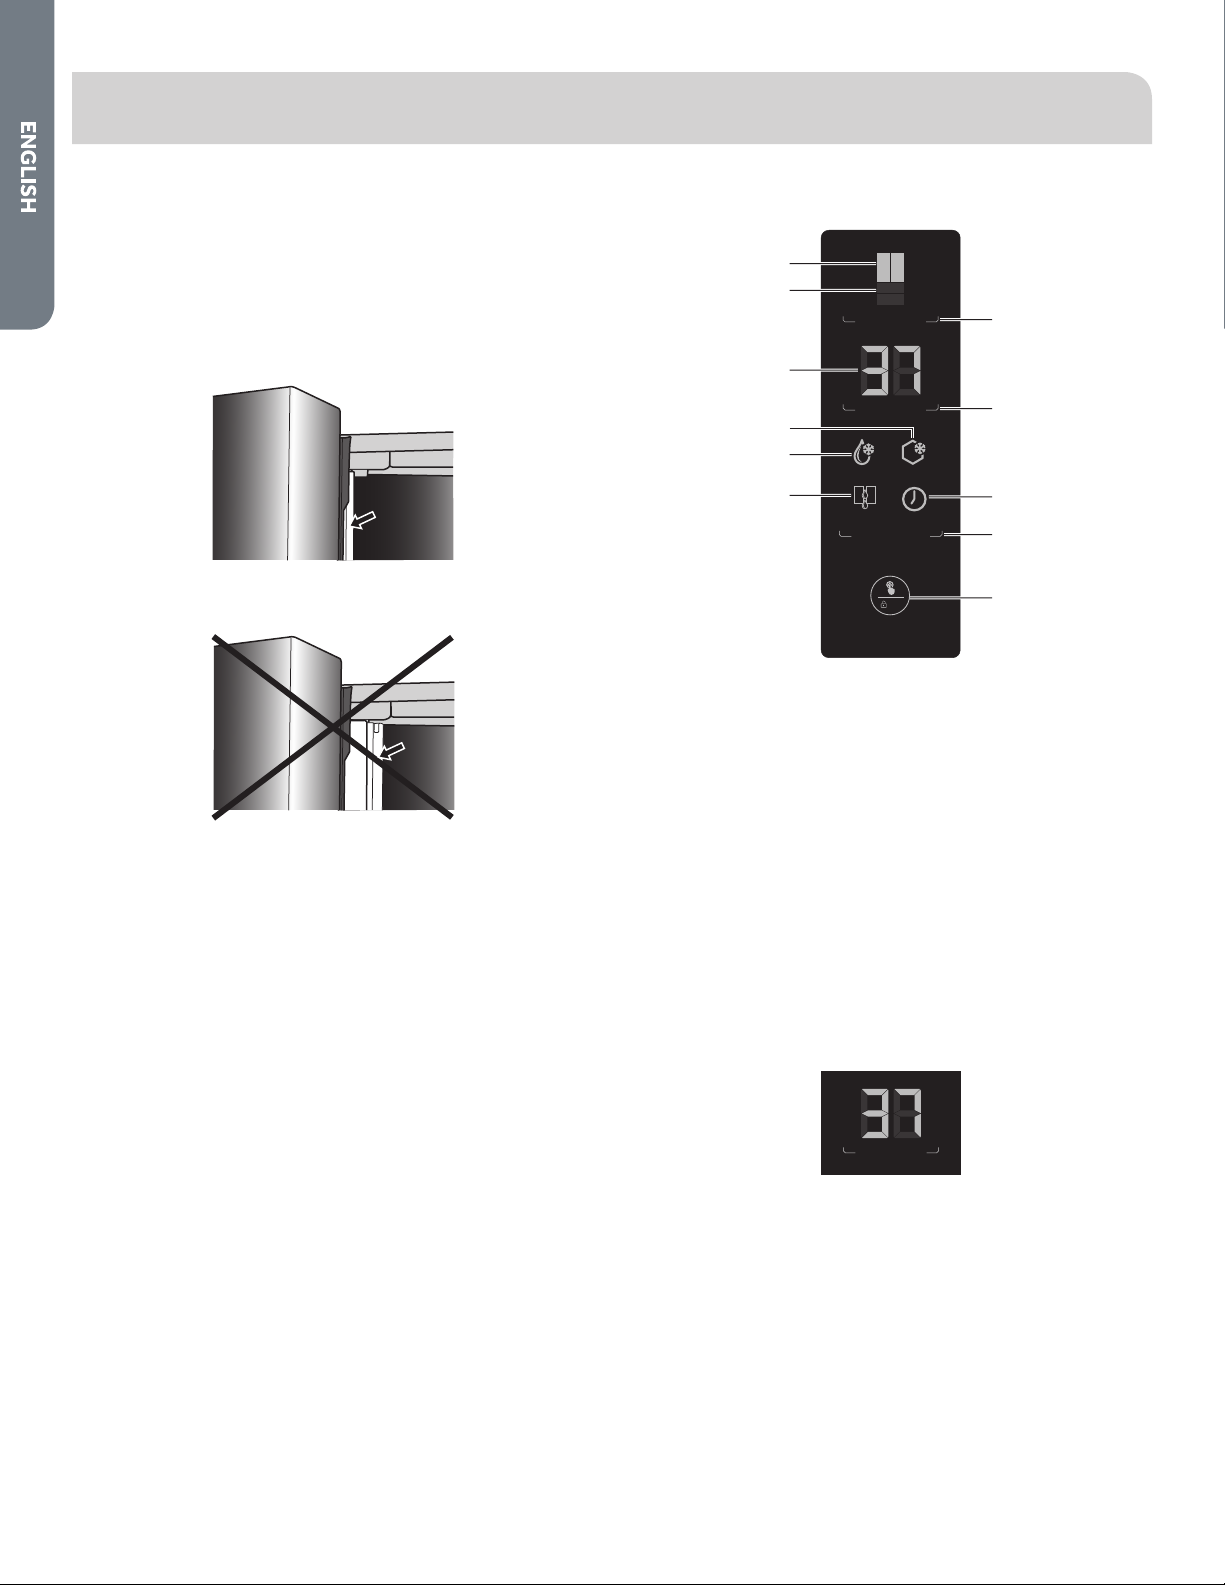
USING THE CONTROLS
a
b
Temp Zone
c
Temp Set
°F
d
e
f
Quick Cool
Dehumidify
Function Set
3S
Quick Frz
Sabbath
a Refrigerator Compartment Indicator
b Freezer Compartment Indicator
c Temperature Indicator
d Quick Freeze Indicator
e Quick Cool Indicator
f Dehumidify Indicator
When the refrigerator is powered on for the rst time, the
•
indicator for the refrigerator compartment lights up and the
temperature is displayed. The control lock is active. See Control
Panel Lock later in this section to unlock the controls.
g
h
i
j
k
g Temp Zone Button
h Temp Set Button
i Sabbath Indicator
j Function Set Button
k Conrm Selection
Button
SENSOR KEYS
The buttons on the control panel are sensor keys, which respond
when lightly touched.
CONTROL PANEL DISPLAY
Temp Set
When no buttons or doors are operated for 30 seconds, all the LEDs
on display panel turn o.
When a button is pressed or a door opened, the LEDs on display
panel illuminate.
6
°F
Page 9
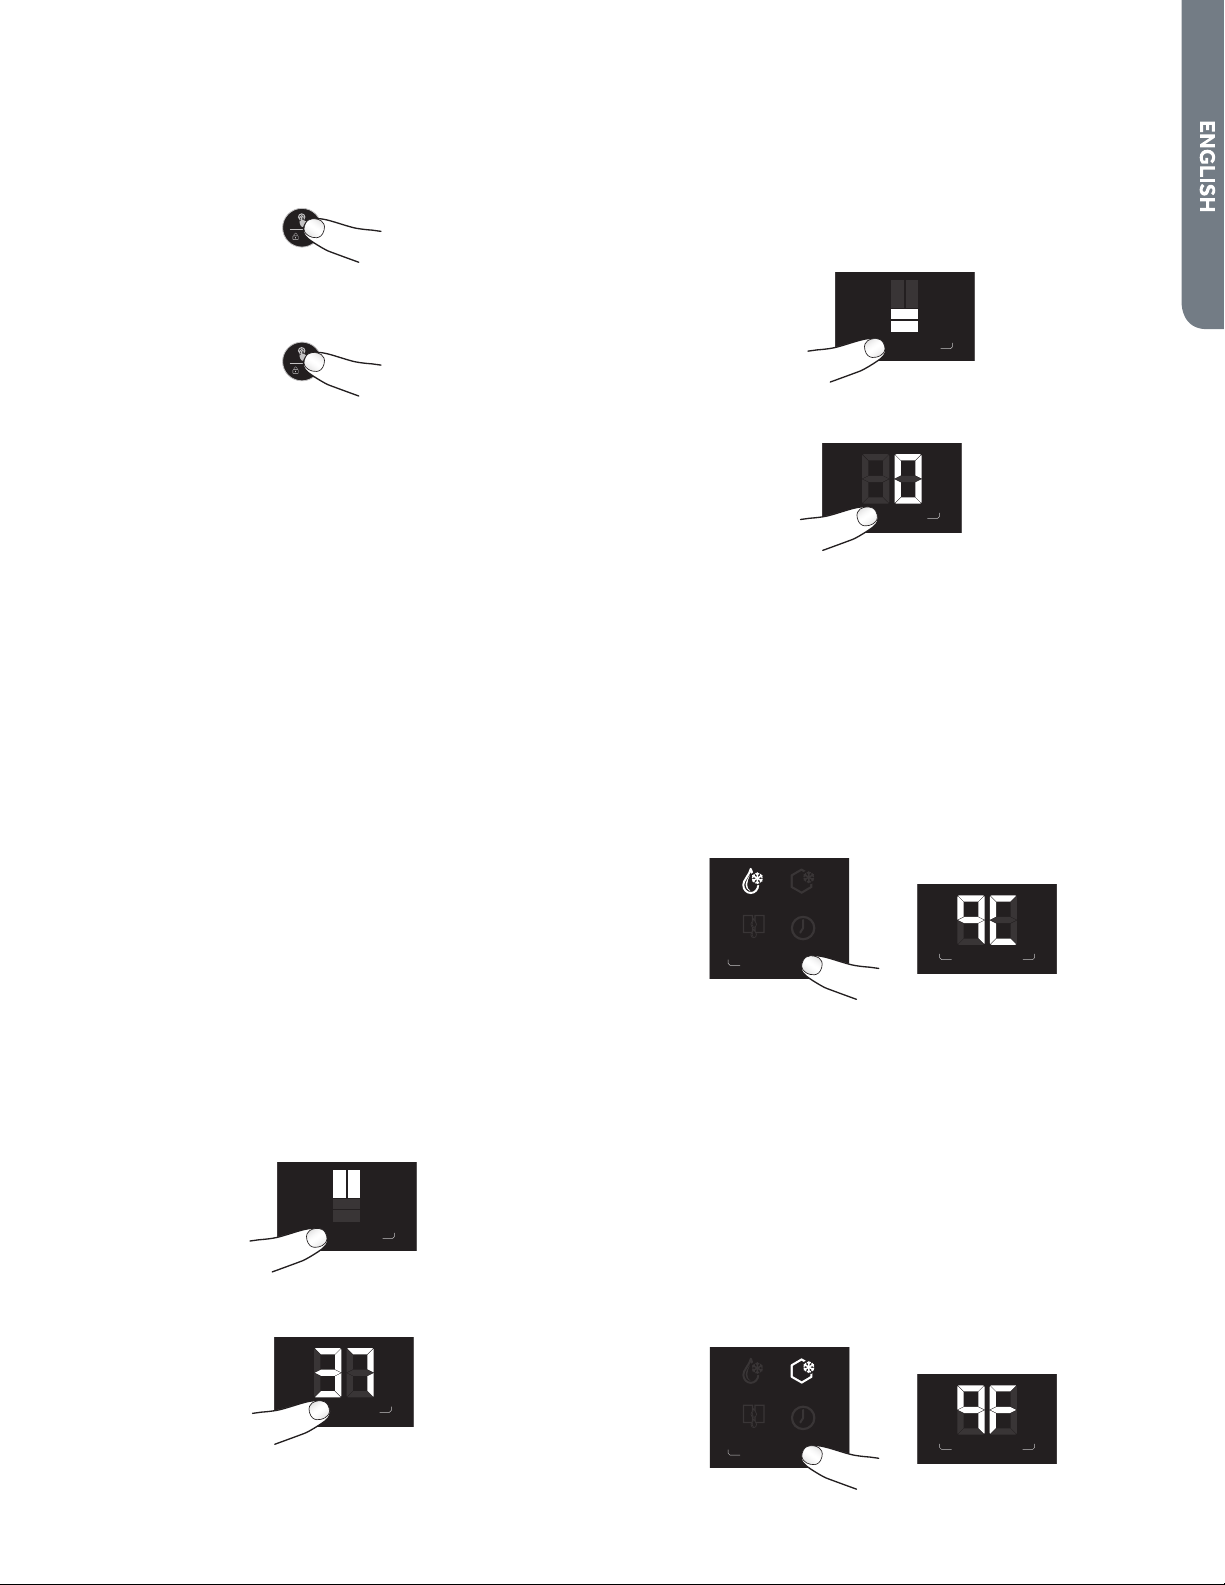
CONTROL PANEL LOCK
The control panel is automatically locked after 30 seconds. To
change any settings the control panel must be unlocked.
To lock the control panel:
1. Press and Hold the Conrm Selection button for 3 seconds.
3S
To unlock the control panel:
1. Press and Hold the Conrm Selection button for 3 seconds.
3S
DOOR ALARM
When the refrigerator door is open for more than 2 minutes, the
Door Open alarm will sound. The alarm can be silenced by closing
the door. If the door is left open for longer than 7 minutes, the light
inside the refrigerator will automatically switch o.
TEMPERATURE CONTROLS
The temperature range for the refrigerator compartment is
34°F to 42°F (1°C to 6°C). The temperature range for the freezer
compartment is -6°F to 4°F (-21°C to -16°C).
The refrigerator compartment is preset to the recommended
temperature of 37°F (5°C) and the freezer compartment is
preset to the recommended temperature of 0°F (-18°C). When
the refrigerator is rst plugged in, the display will show the
recommended temperature settings.
IMPORTANT:
The recommended setting should be correct for normal
•
household refrigerator use.
When the refrigerator is rst turned on, it may take up to 12
•
hours to cool to the preset temperatures. Wait 24 hours for your
refrigerator to cool completely before adding food. If you add
food before the refrigerator has cooled completely, your food
may spoil.
If the temperature is too warm or too cold in the refrigerator or
•
freezer, rst check the air vents to be sure they are not blocked
before adjusting the controls.
Adjusting Controls
Except when starting the refrigerator, do not adjust either
control more than one setting at a time. Wait 24 hours between
adjustments for the temperature to stabilize.
To adjust the refrigerator temperature:
1. If locked, unlock the control panel by pressing and holding the
Conrm Selection button for 3 seconds.
2. Press TEMP ZONE until the Refrigerator Compartment Indicator
lights up.
Temp Zone
The current temperature setting is displayed.
3. Press TEMP SET to adjust the temperature.
4. Press Conrm Selection button.
If you do not press the Conrm Selection button after 5 seconds
the control will return to the previous set temperature.
To adjust the freezer temperature:
1. If locked, unlock the control panel by pressing and holding the
Conrm Selection button for 3 seconds.
2. Press Temp Zone until the Freezer Compartment Indicator
lights up.
Temp Zone
The current temperature setting is displayed.
3. Press TEMP SET to adjust the temperature.
°F
Temp Set
The temperature increases by one degree with each press of
Temp Set.
4. Press Conrm Selection button.
If you do not press the Conrm Selection button after 5 seconds
the control will return to the previous set temperature.
QUICK COOL
The Quick Cool function accelerates the cooling of fresh food and
protects the foods already stored from undesirable warming.
1. If locked, unlock the control panel by pressing and holding the
Conrm Selection button for 3 seconds.
2. Press FUNCTION SET until the Quick Cool Indicator starts to
blink.
Quick Cool
Quick Frz
Dehumidify
Function Set
Sabbath
Temp Set
°F
3. Press Conrm Selection button.
4. The temperature display will read qC to indicate Quick Cool is
activated.
5. Repeat steps 1-3 to deselect Quick Cool.
NOTE: Quick Cool will automatically turn o after 3 hours.
QUICK FREEZE
The Quick Freeze function accelerates the freezing of fresh food
and protects the foods already stored from undesirable warming. If
you need to freeze a large amount of food, it is recommended you
set the Quick Freeze function a few hours in advance.
1. If locked, unlock the control panel by pressing and holding the
Conrm Selection button for 3 seconds.
2. Press FUNCTION SET until the Quick Freeze Indicator starts to
blink.
Temp Set
°F
The temperature increases by one degree with each press of
Temp Set.
Quick Cool
Quick Frz
Sabbath
Dehumidify
Function Set
3. Press Conrm Selection button.
Temp Set
°F
7
Page 10
4. The temperature display will read qF to indicate Quick Freeze is
activated.
5. Repeat steps 1-3 to deselect Quick Freeze.
NOTE: Quick Freeze will automatically turn o after 24 hours.
DEHUMIDIFY
If moisture appears on the vertically-hinged bar on the left-hand
refrigerator door, select the Dehumidify function.
1. If locked, unlock the control panel by pressing and holding the
Conrm Selection button for 3 seconds.
2. Press FUNCTION SET until the Dehumidify Indicator starts to
blink.
Quick Cool
Quick Frz
Sabbath
Dehumidify
Function Set
3. Press Conrm Selection button.
4. Repeat steps 1-3 to deselect Dehumidify.
SABBATH
The Sabbath function is designed for those whose religious
observances require turning o the lights. All interior lights and
alarms will be disabled.
1. If locked, unlock the control panel by pressing and holding the
Conrm Selection button for 3 seconds.
2. Press FUNCTION SET until the Sabbath Indicator starts to blink.
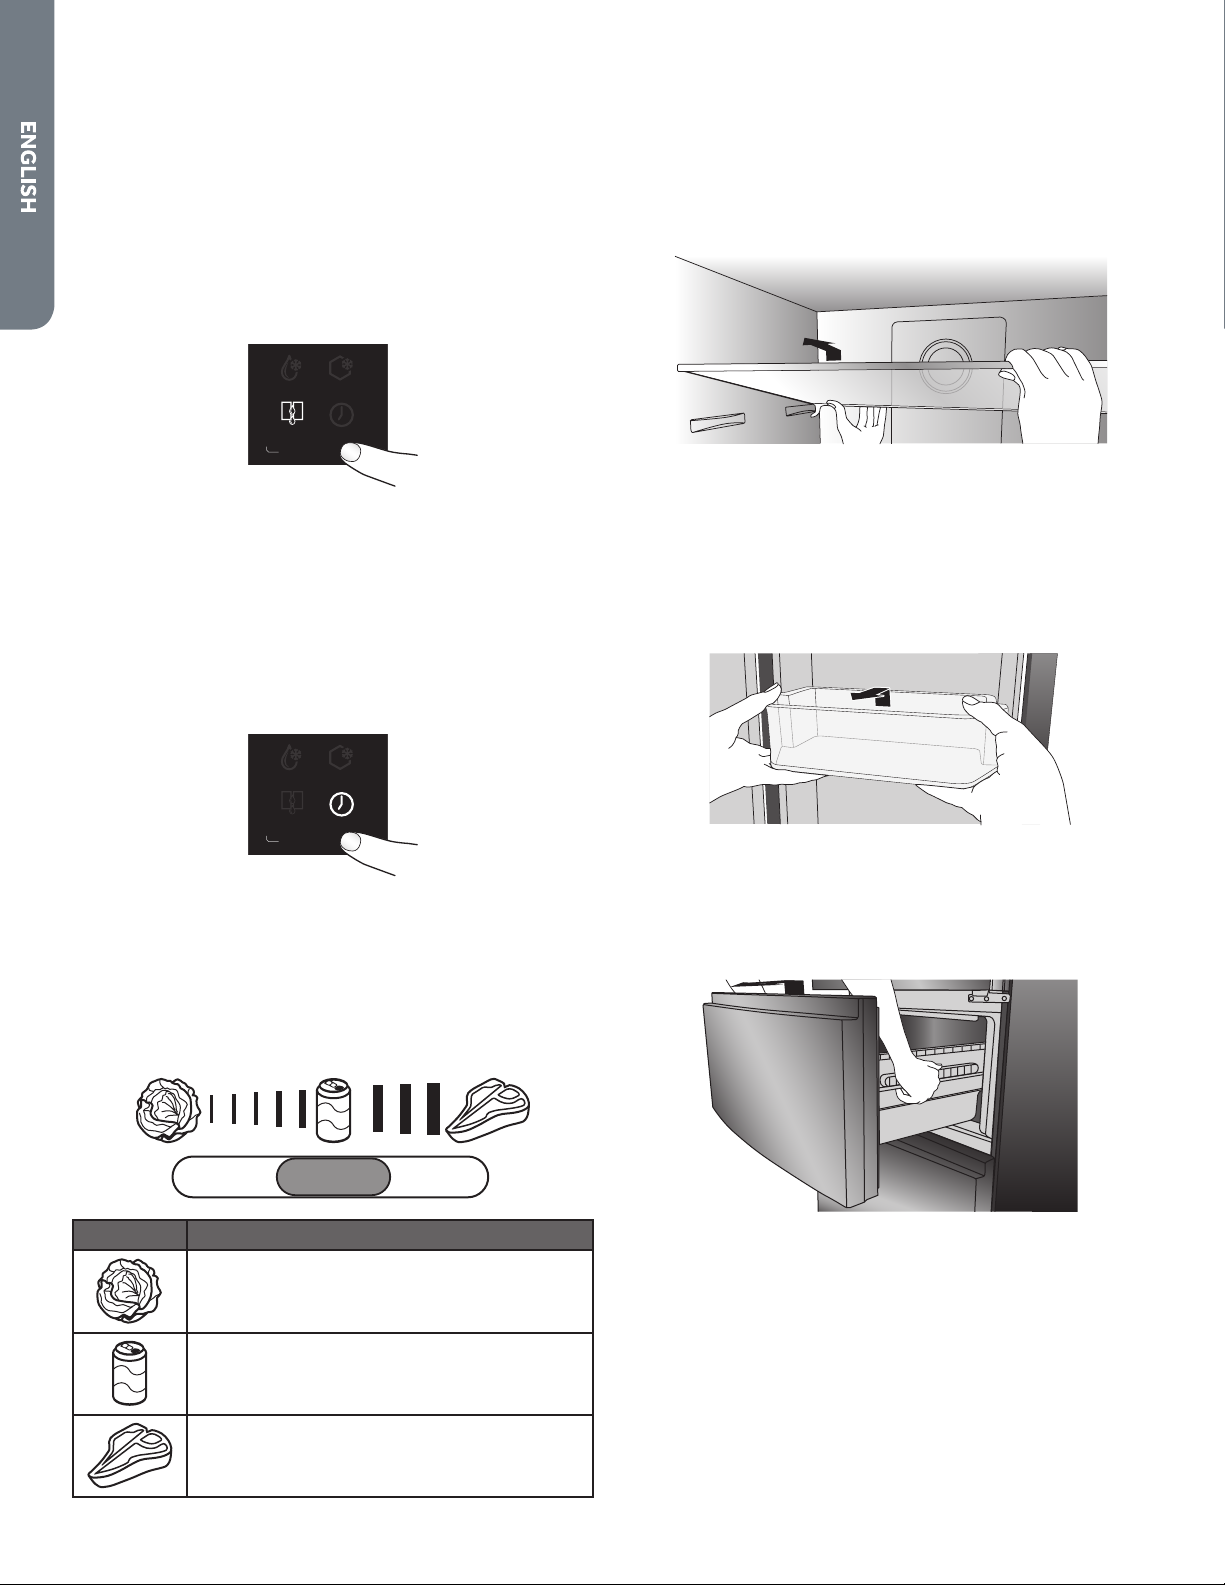
FEATURES
ADJUSTABLE SHELVES
The height of the shelves can be adjusted to t your storage needs.
1. To remove a shelf, lift up on both the front and back edge to
disengage the shelf hooks from the shelf supports along the
refrigerator wall and pull it out.
2. To reinstall a shelf, rest the shelf on both the front and rear
supports. Push the shelf toward the rear of the refrigerator until
the back of the shelf hooks around the rear shelf supports.
REMOVABLE DOOR BINS
The door bins can be removed for cleaning:
1. Place hands on both sides of the bin and lift upward.
2. Pull the door bin out.
Quick Cool
Quick Frz
Sabbath
Dehumidify
Function Set
3. Press Conrm Selection button.
4. To deselect the Sabbath function, press and hold the Conrm
Selection button for 5 seconds.
COOL ZONE DRAWER
The refrigerator compartment is equipped with a Cool Zone drawer
which allows you to store food at the proper temperature, to ensure
its optimal nutritional value.
1. Slide the control to the desired setting.
Setting Description
Fruits and Vegetables
Suitable to store fruits and vegetables
Soft Drinks
Rapid cooling and storage of beverages
REMOVABLE FREEZER STORAGE DRAWER
IMPORTANT: Do not overload the drawers. Max. load of each
drawer is 77 lbs (35 kg).
1. Remove the freezer draw by extending the drawer fully, and then
lift up on the drawer and pull out to remove.
Meats
Suitable to store meat.
8
Page 11
REFRIGERATOR CARE
WARNING
WARNING
CLEANING
Both the refrigerator and freezer sections defrost automatically.
However, clean both sections about once a month to avoid buildup
of odors. Wipe up spills immediately.
Because air circulates between both sections, any odors formed in
one section will transfer to the other. You must thoroughly clean
both sections to eliminate odors. To avoid odor transfer and drying
out of food, wrap or cover foods tightly.
Explosion Hazard
Use nonflammable cleaner.
Failure to do so can result in death, explosion or fire.
IMPORTANT:
Do not use harsh chemicals, ammonia, chlorine bleach,
•
concentrated detergent, solvents, abrasives or metal scouring
pads to clean your refrigerator inside or out. They can damage
and/or discolor the refrigerator nish.
Do not use warm water to clean glass shelves while they are still
•
cold. Glass may break when exposed to sudden temperature
changes or impact.
1. Unplug refrigerator or disconnect power.
2. Clean the interior. Hand wash, rinse, and dry removable parts
and interior surfaces thoroughly. Use a clean sponge or soft
cloth and a mild detergent in warm water.
3. Clean the exterior surfaces.
Painted metal: Wash painted metal exteriors with a clean, soft
cloth or sponge and a mild detergent in warm water. Rinse
surfaces with clean, warm water and dry immediately to avoid
water spots.
Stainless steel: Stainless steel is corrosion resistant and not
corrosion-proof. To help avoid corrosion of your stainless steel,
wash stainless steel surfaces with a clean, soft cloth or sponge
and a mild detergent in warm water. Rinse surfaces with clean,
warm water and dry immediately to avoid water spots.
NOTE: When cleaning stainless steel, always wipe in the
direction of the grain to avoid cross-grain scratching.
4. Plug in refrigerator or reconnect power.
LIGHTS
The interior lights of the refrigerator turn o when the doors are
open for more than 7 minutes.
IMPORTANT: Your refrigerator is equipped with LED lighting. These
lights are designed to last for the life of your refrigerator. However,
if the lights stop operating, please contact a qualied technician for
replacement.
VACATION AND MOVING CARE
VACATION
If You Choose to Leave the Refrigerator On While You’re Away:
1. Use up any perishables and freeze other items.
If You Choose to Turn O the Refrigerator Before You Leave:
1. Remove all food from the refrigerator and freezer.
2. Unplug refrigerator or disconnect power.
3. Clean refrigerator, wipe it, and dry well.
4. Tape rubber or wood blocks to the tops of both doors to prop
them open far enough for air to get in. This stops odor and mold
from building up.
MOVING
Excessive Weight Hazard
Use two or more people to move and install refrigerator.
Failure to do so can result in back or other injury.
When you are moving your refrigerator to a new home, follow these
steps to prepare it for the move.
1. Remove all food from the refrigerator and pack all frozen food in
dry ice.
2. Unplug refrigerator.
3. Clean, wipe, and dry thoroughly.
4. Take out all removable parts, wrap them well, and tape them
together so they don’t shift and rattle during the move.
5. Raise the leveling legs so they don’t scrape the oor. See
“Leveling.”
6. Tape the doors closed and tape the power cord to the back
of the refrigerator. When you get to your new home, put
everything back and refer to the “Installation Instructions”
section for preparation instructions.
9
Page 12
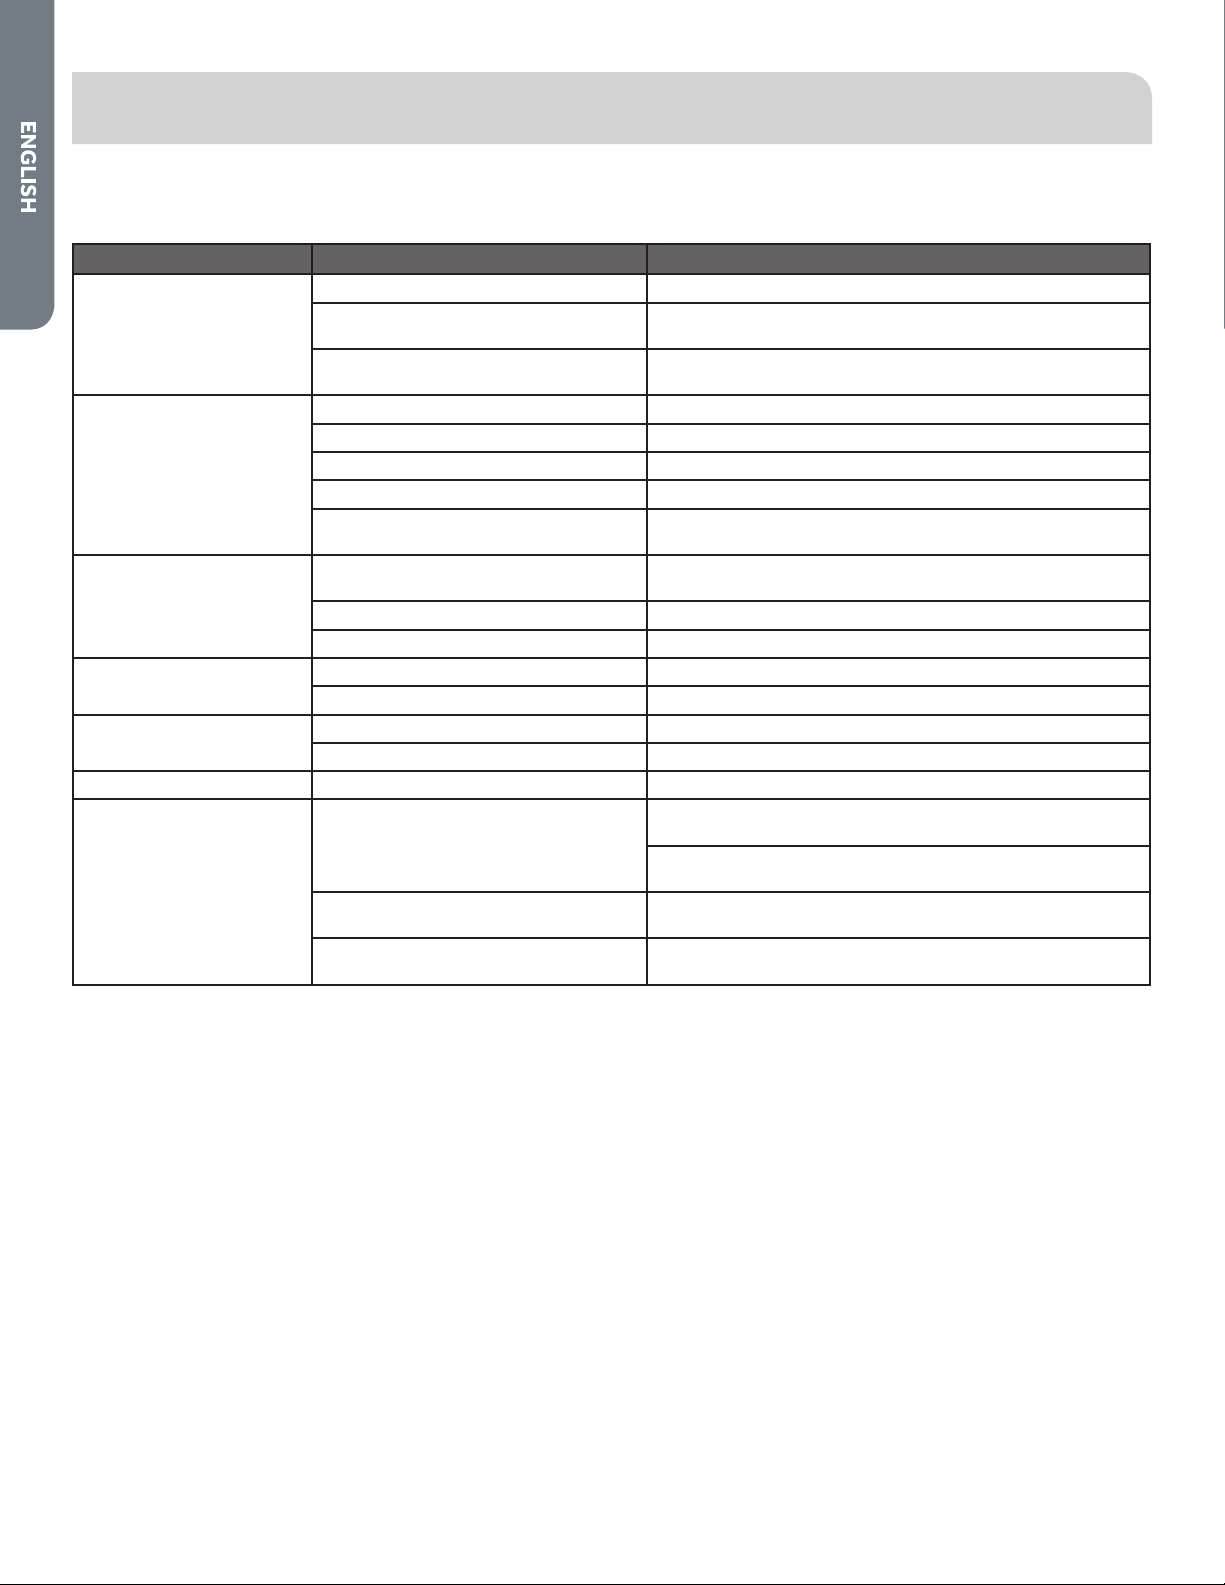
TROUBLESHOOTING
Try the solutions suggested here rst in order to avoid the cost of an unnecessary service call.
REFRIGERATOR IS NOT OPERATING
PROBLEM POSSIBLE CAUSE(S) SOLUTION
Refrigerator does not run Refrigerator is unplugged. Plug power cord into power source.
Breaker is tripped or turned o / Fuse is
blown.
Refrigerator is in defrost mode. Wait about 40 minutes for defrost cycle to end and cooling
Refrigerator compressor
runs frequently or for long
periods of time
NOTE: This refrigerator is
designed to run for longer
periods of time at a lower
energy usage.
Refrigerator has an odor Food is not sealed or packaged properly. Reseal packaging. Place an opened box of baking soda in the
Light does not come on Refrigerator is unplugged. Plug refrigerator in to power source.
Doors do not close properly Refrigerator is not level. See “Leveling.”
Vibration or rattling Refrigerator is not resting rmly on oor. See “Leveling.”
Normal Sounds It sounds like water is owing from the
Refrigerator is rst plugged in. This is normal. Allow 24 hours for the refrigerator to cool down.
Warm or large amounts of food added. This is normal.
Door is left open. Ensure that door is not being held open by an item.
Hot weather or frequent openings This is normal.
Temperature control set to coldest
setting.
Interior needs to be cleaned. Clean the interior. See “Cleaning.”
Food stored too long. Dispose of spoiled food.
LED light is burned out. Contact a qualied technician to replace the burned out LED.
Something is obstructing door closure. Check for and remove obstructions.
refrigerator.
Humming or buzzing sounds The compressor and fans for cold air circulation can make this
Cracking or clicking sounds The interior parts will make this sound as they contract and
Reset / Turn on breaker or replace fuse.
system to restart.
Adjust temperature to a warmer setting.
refrigerator, replace every 3 months.
Refrigerant owing in the lines will make this sound when the
compressor starts and stops.
The refrigerator has an automatic defrosting system. The
defrosted water will make this sound.
sound. If the refrigerator is not level, the sound will be louder.
expand in response to temperature changes.
10
Page 13

TEMPERATURE AND MOISTURE
PROBLEM POSSIBLE CAUSE(S) SOLUTION
Refrigerator or
freezer is too warm
Refrigerator or
freezer is too cold
Moisture on
exterior/interior of
refrigerator
Frost or ice crystals
on frozen food
Food freezing in
refrigerator
Temperature control is not set low enough. Adjust the compartment to a colder setting; allow 24 hours for the
Doors opened frequently or left open. Keep door closed / Check that a package is not preventing door from
Warm food added recently. Allow time for food and refrigerator to cool.
The space between the back of the
refrigerator and the wall is too close.
Items against back of compartments are
blocking proper airow.
Temperature control is set too low. Adjust temperature in the compartment to the next warmer setting;
High humidity This is normal. Dry surface and adjust temperature to slightly colder
Doors opened frequently or left open. Keep door closed. Check that a package is not preventing door from
Open container of water in refrigerator Cover or seal container
Freezer door left open or opened frequently. Adjust the temperature to a warmer setting; allow 24 hours to adjust.
Items blocking freezer air vents and
preventing proper air ow.
Food placed too close to the air vent. Move items away from back and top of the refrigerator.
Temperature control set too cold. Adjust the temperature to a less cold setting.
temperature to adjust.
closing.
Allow 2” (5 cm) space between the back of the refrigerator and the
wall.
Store items only inside the trim of the glass shelves; don’t place
items against sides of the compartments or directly in front of any
vents.
allow 24 hours to adjust.
setting. Turn on the “Dehumidify” function if moisture appears on
the hinged bar on the left-hand refrigerator door.
closing.
Move items away from rear wall.
FOR MORE HELP, VISIT HAIER.COM OR CALL THE CONSUMER HELP LINE AT
1-877-377-3639.
11
Page 14

LIMITED WARRANTY
IN-HOME SERVICE
FULL ONE YEAR WARRANTY
For 12 months from the date of original retail purchase, Haier will
repair or replace any part free of charge including labor that fails due
to a defect in materials or workmanship.
Haier may replace or repair at their sole discretion any part, sub
system including the entire product.
Product must be accessible, without encumbrance and installed
properly to receive for warranty repair service.
LIMITED WARRANTY
After one year from the original retail purchase date, Haier will
provide a part at no cost, as indicated below, to replace said part
as a result of a defect in materials or workmanship. Haier is solely
responsible for the cost of the part. All other costs, such as labor,
trip charge, etc., are the responsibility of the owner.
Second through Fifth Year
For 60 months from the date of original retail purchase. The
components of the sealed system (e.g. hermetic compressor,
condenser and evaporator) from manufacturing defects. Any
damage to such components caused by mechanical abuse or
improper shipping and handling will not be covered.
NOTE: This warranty commences on the date the item was
purchased, and the original purchase receipt must be presented to
the authorized service representative before warranty repairs are
rendered.
Exceptions: Commercial Use Warranty
90 days labor from date of original purchase
90 days parts from date of original purchase
No other warranty applies.
FOR WARRANTY SERVICE
All service must be performed by a Haier authorized service center.
For the name and telephone number of the nearest authorized
service center, please call 1-877-337-3639.
Before calling please have available the following information:
Model number and serial number of your appliance. The name and
address of the dealer you purchased the unit from and the date of
purchase.
A clear description of the problem.
A proof of purchase (sales receipt).
This warranty covers home appliance services within the
contiguous United States and Canada and where available in
Alaska, Hawaii and Puerto Rico.
What is not covered by this warranty:
Replacement or repair of household fuses, circuit breakers, wiring
or plumbing.
A product whose original serial number has been removed or
altered.
Any service charges not specically identied as normal such as
normal service area or hours.
Replacement of light bulbs.
Damage incurred in shipping.
Damage caused by improper installation or maintenance.
Damage from misuse, abuse accident, re, ood, or acts of nature.
Damage from service other than an authorized Haier dealer or
service center.
Damage from incorrect electrical current, voltage or supply.
Damage resulting from any product modication, alteration or
adjustment not authorized by Haier.
Adjustment of consumer operated controls as identied in the
owner’s manual.
Hoses, knobs, lint trays and all attachments, accessories and
disposable parts.
Labor, service transportation, and shipping charges for the removal
and replacement of defective parts beyond the initial 12-month
period.
Damage from other than normal household use.
Any transportation and shipping charges.
THIS LIMITED WARRANTY IS GIVEN IN LIEU OF ALL OTHER
WARRANTIES, EXPRESS ED OR IMPLIED, INCLUDING BUT NOT
LIMITED TO, THE WARRANTIES OF MERCHANTABILITY AND
FITNESS FOR A PARTICULAR PURPOSE
The remedy provided in this warranty is exclusive and is granted in
lieu of all other remedies.
This warranty does not cover incidental or consequential damages,
so the above limitations may not apply to you. Some states do
not allow limitations on how long an implied warranty lasts, so the
above limitations may not apply to you.
This warranty gives you specic legal rights, and you may have
other rights, which vary from state to state.
Haier America
Wayne, NJ 07470
12
Page 15

TABLE DES MATIÈRES
SÉCURITÉ DU RÉFRIGÉRATEUR ............................................................................................................................................................ 14
PIÈCES ET CARACTÉRISTIQUES .......................................................................................................................................................... 15
INSTRUCTIONS D’INSTALLATION ....................................................................................................................................................... 16
Déballage du réfrigérateur .......................................................................................................................................................................................16
Exigences d’emplacement .......................................................................................................................................................................................16
Spécications électriques ........................................................................................................................................................................................17
Achever l’installation ................................................................................................................................................................................................17
Nivellement et ajustement des portes ....................................................................................................................................................................17
UTILISATION DU RÉFRIGÉRATEUR ....................................................................................................................................................... 18
Ouverture et fermeture des portes .........................................................................................................................................................................18
Utilisation des commandes ......................................................................................................................................................................................18
Caractéristiques .......................................................................................................................................................................................................21
ENTRETIEN DU RÉFRIGÉRATEUR ......................................................................................................................................................... 22
Nettoyage .................................................................................................................................................................................................................22
Éclairage ....................................................................................................................................................................................................................22
Précautions à prendre pour les vacances ou le déménagement ...........................................................................................................................22
DÉPANNAGE ........................................................................................................................................................................................ 23
GARANTIE LIMITÉE .............................................................................................................................................................................. 25
DOCUMENTS À CONSERVER
Merci d’avoir acheté ce produit Haier. Ce manuel vous aidera
à obtenir les meilleures performances de votre nouveau
réfrigérateur.
Pour référence ultérieure , notez le modèle et le numéro de série
situés sur la paroi interne du compartiment de réfrigération, et la
date d’achat.
Pour faciliter l’obtention d’un service sous garantie, agrafer la
preuve de la date d’achat à ce manuel.
___________________________________________________________
Numéro de modèle
___________________________________________________________
Numéro de série
___________________________________________________________
Date d’achat
13
Page 16

SÉCURITÉ DU RÉFRIGÉRATEUR
Votre sécurité et celle des autres est très importante.
Nous donnons de nombreux messages de sécurité importants dans ce manuel et sur votre appareil ménager.
Assurez-vous de toujours lire tous les messages de sécurité et de vous y conformer.
Voici le symbole d’alerte de sécurité.
Ce symbole d’alerte de sécurité vous signale les dangers potentiels de décès et de blessures graves à
vous et à d’autres. Tous les messages de sécurité suivront le symbole d’alerte de sécurité et le mot
“DANGER,” “AVERTISSEMENT” ou “ATTENTION.”
Ces mots signifient :
Une situation de danger imminent. Vous courez le risque d’un décès ou de
DANGER
AVERTISSEMENT
ATTENTION
Tous les messages de sécurité vous diront quel est le danger potentiel et vous disent comment réduire le risque de
blessure et ce qui peut se produire en cas de non-respect des instructions.
blessures graves si vous ne suivez pas immédiatement les instructions.
Une situation potentiellement dangereuse qui, si vous ne l’évitez pas, peut
provoquer la mort ou des blessures graves.
Une situation potentiellement dangereuse qui, si vous ne l’évitez pas, peut
entraîner des blessures légères à modérées.
IMPORTANTES INSTRUCTIONS DE SÉCURITÉ
AVERTISSEMENT : An de réduire le risque d’incendie, de choc électrique, de blessures corporelles ou de dommage lors
de l’utilisation du réfrigérateur, il convient d’observer certaines précautions fondamentales, notamment :
Brancher sur une prise de courant à 3 alvéoles, reliée à
•
la terre.
Ne pas enlever la prise de liaison à la terre.
•
Ne pas utiliser d’adaptateur.
•
Ne pas utiliser de rallonge.
•
Déconnecter la source de courant électrique avant
•
l’entretien.
Replacer pièces et panneaux avant de faire la mise en
•
marche.
Enlever les portes de votre ancien réfrigérateur.
•
Utiliser un produit de nettoyage ininammable.
•
Garder les matières et les vapeurs inammables, telles
•
que l’essence, loin du réfrigérateur.
Utiliser au moins deux personnes pour déplacer et
•
installer le réfrigérateur.
Le réfrigérateur ne doit pas être encastré ou installé
•
dans un placard fermé. Il est conçu uniquement pour
être utilisé d’une manière autoportante.
Déconnecter la source de courant électrique avant
•
d’installer la machine à glaçons (sur les modèles
prêts pour l’installation d’une machine à glaçons
uniquement.)
Utiliser un verre robuste pour prendre des glaçons (sur
•
certains modèles).
Couper l’arrivée d’eau du réfrigérateur avant de retirer
•
ou de remplacer le ltre à eau ou le couvercle de
verrouillage (sur certains modèles).
Si le réfrigérateur n’est pas utilisé, ôter les portes. Cela
•
réduira le risque de danger pour les enfants.
LIRE ET CONSERVER CES INSTRUCTIONS
14
Page 17

MISE AU REBUT DE VOTRE ANCIEN
AVERTISSEMENT
RÉFRIGÉRATEUR
IMPORTANT : Le problème des enfants pouvant se retrouver coincés
et suoquer n’est pas un problème du passé. Un réfrigérateur jeté
ou abandonné est encore dangereux, même s’il est laissé abandonné
pendant “quelques jours seulement”. Si vous vous débarrassez de
votre ancien réfrigérateur, veuillez suivre les instructions suivantes
pour aider à éviter les accidents.
Risque de suffoquer
Ôter les portes de votre ancien réfrigérateur.
Le non-respect de cette instruction peut causer un
décès ou des lésions cérébrales.
PIÈCES ET CARACTÉRISTIQUES
a
b
c
d
b
e
b
f
f
g
h
Avant de jeter votre ancien réfrigérateur ou congélateur :
Ôter les portes.
•
Laisser les tablettes en place de sorte que les enfants ne puissent
•
pas y pénétrer facilement.
b
l
b
b
a Lampes DEL
b Balconnet
c Plaque signalétique des numéros de
modèle et de série
d Joint à charnière verticale
e Couvercle en verre de la zone de
refroidissement
f Tablette en verre
k
i
j
k
g Commande de la zone de refroidissement
h Tiroir de la zone de refroidissement
i Tiroir de rangement supérieur du
congélateur
j Tiroir de rangement inférieur du
congélateur
k Pied réglable
l Tableau de commande
15
Page 18

INSTRUCTIONS D’INSTALLATION
AVERTISSEMENT
DÉBALLAGE DU RÉFRIGÉRATEUR
Risque du poids excessif
Utiliser deux ou plus de personnes pour déplacer et
installer le réfrigérateur.
Le non-respect de cette instruction peut causer une
blessure au dos ou d'autres blessures.
RETRAIT DES MATÉRIAUX D’EMBALLAGE
Enlever tout résidu de ruban adhésif et de colle des surfaces du
•
réfrigérateur avant de le mettre en marche. Frotter une petite
quantité de savon liquide à vaisselle sur l’adhésif avec les doigts.
Rincer à l’eau tiède et sécher.
Ne pas utiliser d’instruments coupants, d’alcool à friction, de
•
liquides inammables ou de nettoyants abrasifs pour enlever le
ruban adhésif ou la colle. Ces produits peuvent endommager
la surface du réfrigérateur. Pour plus de renseignements, voir
“Sécurité du réfrigérateur”.
Jeter/recycler tous les matériaux d’emballage.
•
Lors du déplacement de votre réfrigérateur :
Votre réfrigérateur est lourd. Lors du déplacement de votre
réfrigérateur pour le nettoyage ou un entretien ou réparation,
veiller à recouvrir le plancher avec du carton ou un panneau de
bre dur pour éviter qu’il ne subisse tout dommage. Toujours
tirer le réfrigérateur tout droit lors du déplacement. Ne pas
incliner le réfrigérateur d’un côté ou de l’autre ni le « faire
marcher » en essayant de le déplacer car le sol pourrait être
endommagé.
EXIGENCES D’EMPLACEMENT
AVERTISSEMENT
Risque d'explosion
Garder les matériaux et les vapeurs inflammables, telles
que l'essence, loin de l’appareil.
Le non-respect de cette instruction peut causer un
décès, une explosion ou un incendie.
IMPORTANT : Ce réfrigérateur est conçu pour un usage
domestique, à l’intérieur uniquement. Le réfrigérateur ne doit
pas être encastré ou installé dans un placard fermé. Il est conçu
uniquement pour être utilisé d’une manière autoportante.
Pour obtenir une aération appropriée pour votre réfrigérateur,
laisser un espace de 2” (5,08 cm) de chaque côté et au sommet.
Laisser un espace de 2” (5,08 cm) derrière le réfrigérateur. En cas
d’installation du réfrigérateur près d’une cloison xe, laisser un
minimum de 4” (10 cm) pour permettre à la porte de s’ouvrir sans
obstruction.
2" (5,08 cm)
NETTOYAGE AVANT UTILISATION
Après avoir enlevé tous les matériaux d’emballage, nettoyer
l’intérieur du réfrigérateur avant de l’utiliser. Voir les instructions de
nettoyage dans “Entretien du réfrigérateur”.
Informations importantes à propos des tablettes et des
couvercles en verre :
Ne pas nettoyer les tablettes ou les couvercles de verre avec
de l’eau tiède lorsqu’ils sont froids. Les tablettes et couvercles
peuvent se briser s’ils sont exposés à des changements de
températures ou impacts soudains, tels qu’une chute. Le
verre trempé est conçu pour se briser en de multiples petits
morceaux de la taille de gravillons. Ceci est normal. Les
tablettes en verre et les couvercles sont lourds. Les retirer à
deux mains pour éviter de les faire tomber.
2" (5,08 cm)
REMARQUE : Ce réfrigérateur est conçu pour être utilisé dans un
endroit où la température est comprise entre un minimum de 55°F
(13°C) et un maximum de 110°F (43°C). La plage de température
ambiante idéale pour une performance optimale est comprise
entre 60°F (15°C) et 90°F (32°C). Respecter cette plage de
température permet aussi de réduire la consommation d’électricité
et d’optimiser l’ecacité du refroidissement. Il est recommandé
de ne pas installer le réfrigérateur près d’une quelconque source de
chaleur, telle qu’un four ou un radiateur.
4" (10,2 cm)
16
Page 19

SPÉCIFICATIONS ÉLECTRIQUES
AVERTISSEMENT
AVERTISSEMENT
ACHEVER L’INSTALLATION
Risque de choc électrique
Brancher sur une prise à 3 alvéoles reliée à la terre.
Ne pas enlever la broche de liaison à la terre du cordon
d'alimentation.
Ne pas utiliser un adaptateur.
Ne pas utiliser un câble de rallonge.
Le non-respect de cette instruction pourrait causer un
décès, un incendie ou un choc électrique.
Avant de déplacer le réfrigérateur à son emplacement nal, il est
important de vous assurer d’avoir le raccordement électrique
approprié.
Méthode recommandée de liaison à la terre
Chaque appareil doit être alimenté par un circuit 115 volts (CA
seulement, 60 Hz) relié à la terre et protégé par un fusible de
capacité 15 A ou 20 A. Il est recommandé d’utiliser un circuit
distinct pour alimenter le réfrigérateur uniquement. Utiliser une
prise de courant dont l’alimentation ne peut pas être interrompue
par un interrupteur. Ne pas utiliser de rallonge.
REMARQUE : Avant d’exécuter tout type d’installation, nettoyage
ou remplacement d’une ampoule d’éclairage, déconnecter le
réfrigérateur de la source de courant électrique. Une fois l’opération
terminée, reconnecter le réfrigérateur à la source de courant
électrique et remettre les commandes de température au réglage
désiré.
Risque de choc électrique
Brancher sur une prise à 3 alvéoles reliée à la terre.
Ne pas enlever la broche de liaison à la terre du cordon
d'alimentation.
Ne pas utiliser un adaptateur.
Ne pas utiliser un câble de rallonge.
Le non-respect de cette instruction pourrait causer un
décès, un incendie ou un choc électrique.
1. Brancher sur une prise de courant à 3 alvéoles, reliée à la terre.
2. Réinstaller l’ensemble des pièces de porte amovibles sur la
porte et remettre les aliments dans le réfrigérateur.
REMARQUE: Ce réfrigérateur se met en marche dès qu’il est
branché à la source d’alimentation.
NIVELLEMENT ET AJUSTEMENT
DES PORTES (SI NÉCESSAIRE)
Le réfrigérateur doit être d’aplomb pour une performance et un
aspect optimaux.
NIVELLEMENT
1. Déplacer le réfrigérateur jusqu’à son emplacement dénitif.
2. Tourner les pieds situés en bas et à l’avant de la caisse pour
élever ou abaisser le réfrigérateur, jusqu’à ce que le réfrigérateur
soit d’aplomb dans le sens transversal.
3. Tourner les deux pieds avant d’une manière identique pour
élever légèrement l’avant du réfrigérateur. Cela permettra de
fermer plus facilement les portes.
REMARQUE : Le fait d’exercer une pression contre le dessus
du réfrigérateur permet d’alléger le poids appliqué aux vis de
nivellement. Ceci facilite le réglage des vis.
17
Page 20

UTILISATION DU RÉFRIGÉRATEUR
OUVERTURE ET FERMETURE DES
PORTES
Il y a deux portes pour le compartiment de réfrigération. Les portes
peuvent être ouvertes et fermées séparément ou ensemble.
Il y a sur la porte de gauche du réfrigérateur un joint à charnière
•
verticale.
Lorsque l’on ferme la porte de gauche du réfrigérateur, le joint à
•
charnière se replie derrière la porte de droite, joignant les deux
portes du réfrigérateur.
REMARQUE : Avant de fermer la porte de gauche, s’assurer que
le joint à charnière verticale est replié vers l’intérieur. Si le joint
est déployé vers l’extérieur, il peut être endommagé lorsque l’on
essaie de fermer la porte.
UTILISATION DES COMMANDES
a
b
c
d
e
f
Quick Cool
Dehumidify
Function Set
a Témoin du compartiment
de réfrigération
b Témoin du compartiment
de congélation
c Témoin de la température
d Témoin Quick Freeze
(congélation rapide)
e Témoin Quick Cool
(refroidissement rapide)
f Témoin Dehumidify
(déshumidication)
Temp Zone
°F
Temp Set
Quick Frz
Sabbath
3S
g Bouton Temp Zone (zone
de température)
h Bouton Temp Set (réglage
de température)
i Témoin du mode Sabbath
(Sabbat)
j Bouton Function Set
(réglage de la fonction)
k Bouton de validation de la
sélection
g
h
i
j
k
18
Lorsque le réfrigérateur est mis en marche pour la première
•
fois, le témoin du compartiment de réfrigération s’allume et
la température s’ache. Le verrouillage des commandes est
activé. Voir Verrouillage du tableau de commande plus loin dans
cette section pour déverrouiller les commandes.
TOUCHES SENSITIVES
Les boutons du tableau de commande sont des touches sensitives,
réagissant lorsqu’elles sont eeurées.
Page 21

AFFICHAGE DU TABLEAU DE COMMANDE
°F
Temp Set
Lorsqu’aucun bouton ou porte n’est actionné(e) pendant
30secondes, toutes les DEL de l’achage du tableau de commande
s’éteignent.
Lorsqu’un bouton est actionné ou qu’une porte est ouverte, toutes
les DEL de l’achage du tableau de commande s’illuminent.
VERROUILLAGE DU TABLEAU DE
COMMANDE
Le tableau de commande se verrouille automatiquement après
30secondes. Il doit être déverrouillé pour modier tout réglage.
Pour verrouiller le tableau de commande:
1. Appuyer sans relâcher sur le bouton de validation de la sélection
pendant 3secondes.
Réglage des commandes
Ne pas ajuster les commandes de plus d’un cran à la fois, sauf lors
de la mise en marche du réfrigérateur. Attendre 24 heures entre
chaque réglage pour que la température puisse se stabiliser.
Réglage de la température du réfrigérateur:
1. Si le tableau de commande est verrouillé, le déverrouiller
en appuyant sans relâcher sur le bouton de validation de la
sélection pendant 3secondes.
2. Appuyer sur TEMP ZONE (zone de température) jusqu’à ce que
l’indicateur du compartiment de réfrigération s’allume.
Temp Zone
Le réglage de température actuel s’ache.
3. Appuyer sur TEMP SET (réglage de température) pour modier
la température.
3S
Pour déverrouiller le tableau de commande:
1. Appuyer sans relâcher sur le bouton de validation de la sélection
pendant 3secondes.
3S
ALARME DE LA PORTE
Lorsque la porte du réfrigérateur est ouverte pendant plus de
2minutes, l’alarme d’ouverture de porte retentit. Cette alarme
peut s’éteindre en fermant la porte. Si la porte est laissée ouverte
pendant plus de 7minutes, l’éclairage intérieur du réfrigérateur
s’éteint automatiquement.
COMMANDES DE TEMPÉRATURE
La température du compartiment de réfrigération se situe entre
34°F et 42 °F (entre 1 °C et 6 °C). La température du compartiment
de congélation se situe entre -6 °F et 4 °F (entre -21 °C et -16 °C).
Le compartiment de réfrigération est préréglé à la température
recommandée de 37 °F (5 °C) et le compartiment de congélation est
préréglé à la température recommandée de 0 °F (-18 °C). Lorsque le
réfrigérateur est branché pour la première fois, l’achage indique
les réglages de température recommandés.
IMPORTANT :
Le réglage recommandé doit être correct pour une utilisation
•
domestique normale du réfrigérateur.
Lorsque le réfrigérateur est branché pour la première fois, une
•
période de 12heures maximum est nécessaire pour atteindre
la température recommandée. Attendre 24 heures pour que
le réfrigérateur refroidisse complètement avant d’y placer des
aliments. Si on ajoute des aliments avant que le réfrigérateur ne
soit complètement refroidi, les aliments risquent de s’abîmer.
Si la température est trop tiède ou trop froide dans le
•
réfrigérateur ou le congélateur, vérier d’abord les évents
pour s’assurer qu’ils ne sont pas bloqués, avant de régler les
commandes.
Temp Set
°F
La température augmente d’un degré à chaque pression sur
TEMP SET (réglage de température).
4. Appuyer sur le bouton de validation de la sélection.
Si l’on n’appuie pas sur le bouton de validation de la sélection
dans les 5secondes, la commande retourne au réglage de
température précédent.
Réglage de la température du congélateur:
1. Si le tableau de commande est verrouillé, le déverrouiller
en appuyant sans relâcher sur le bouton de validation de la
sélection pendant 3secondes.
2. Appuyer sur TEMP ZONE (zone de température) jusqu’à ce que
l’indicateur du compartiment de congélation s’allume.
Temp Zone
Le réglage de température actuel s’ache.
3. Appuyer sur TEMP SET (réglage de température) pour modier
la température.
°F
Temp Set
La température augmente d’un degré à chaque pression sur
TEMP SET (réglage de température).
4. Appuyer sur le bouton de validation de la sélection.
Si l’on n’appuie pas sur le bouton de validation de la sélection
dans les 5secondes, la commande retourne au réglage de
température précédent.
19
Page 22

QUICK COOL (REFROIDISSEMENT RAPIDE)
La fonction Quick Cool (refroidissement rapide) accélère le
refroidissement des aliments frais et maintient les aliments déjà
entreposés à l’abri d’un réchauement indésirable.
1. Si le tableau de commande est verrouillé, le déverrouiller
en appuyant sans relâcher sur le bouton de validation de la
sélection pendant 3secondes.
2. Appuyer sur FUNCTION SET (réglage de la fonction) jusqu’à ce
que l’indicateur Quick Cool (refroidissement rapide) se mette à
clignoter.
DEHUMIDIFY (DÉSHUMIDIFICATION)
Si de l’humidité se forme sur le joint à charnière verticale sur
la gauche de la porte du réfrigérateur, sélectionner la fonction
Dehumidify (déshumidication).
1. Si le tableau de commande est verrouillé, le déverrouiller
en appuyant sans relâcher sur le bouton de validation de la
sélection pendant 3secondes.
2. Appuyer sur FUNCTION SET (réglage de la fonction) jusqu’à
ce que l’indicateur Dehumidify (déshumidication) se mette à
clignoter.
Quick Cool
Quick Frz
Dehumidify
Function Set
Sabbath
Temp Set
°F
3. Appuyer sur le bouton de validation de la sélection.
4. L’achage de température ache qC pour indiquer que la
fonction Quick Cool (refroidissement rapide) est activée.
5. Répéter les étapes1 à 3 pour désactiver la fonction Quick Cool
(refroidissement rapide).
REMARQUE: La fonction Quick Cool (refroidissement rapide)
s’éteint automatiquement après 3heures.
QUICK FREEZE (CONGÉLATION RAPIDE)
La fonction Quick Freeze (congélation rapide) accélère la
congélation des aliments frais et maintient les aliments déjà
entreposés à l’abri d’un réchauement indésirable. Si une grande
quantité d’aliments doit être congelée, il est recommandé de régler
la fonction Quick Freeze (congélation rapide) quelques heures à
l’avance.
1. Si le tableau de commande est verrouillé, le déverrouiller
en appuyant sans relâcher sur le bouton de validation de la
sélection pendant 3secondes.
2. Appuyer sur FUNCTION SET (réglage de la fonction) jusqu’à ce
que l’indicateur Quick Freeze (congélation rapide) se mette à
clignoter.
Quick Cool
Quick Frz
Dehumidify
Function Set
Sabbath
Temp Set
°F
Quick Cool
Quick Frz
Sabbath
Dehumidify
Function Set
3. Appuyer sur le bouton de validation de la sélection.
4. Répéter les étapes1 à 3 pour désactiver la fonction Dehumidify
(déshumidication).
SABBATH (SABBAT)
La fonction Sabbath (mode Sabbat) est conçue pour les personnes
dont les pratiques religieuses requièrent l’extinction des lumières.
Toutes les lumières intérieures et tous les signaux sonores sont
désactivés.
1. Si le tableau de commande est verrouillé, le déverrouiller
en appuyant sans relâcher sur le bouton de validation de la
sélection pendant 3secondes.
2. Appuyer sur FUNCTION SET (réglage de la fonction) jusqu’à ce
que l’indicateur Sabbath (Sabbat) se mette à clignoter.
Quick Cool
Quick Frz
Sabbath
Dehumidify
Function Set
3. Appuyer sur le bouton de validation de la sélection.
4. Pour désactiver la fonction Sabbath (Sabbat), appuyant sans
relâcher sur le bouton de Conrm Selection (validation de la
sélection) pendant 5 secondes.
3. Appuyer sur le bouton de validation de la sélection.
4. L’achage de température ache qF pour indiquer que la
fonction Quick Freeze (congélation rapide) est activée.
5. Répéter les étapes1 à 3 pour désactiver la fonction Quick
Freeze (congélation rapide).
REMARQUE: La fonction Quick Freeze (congélation rapide) s’éteint
automatiquement après 24heures.
20
Page 23

TIROIR DE LA ZONE DE REFROIDISSEMENT
Le compartiment de réfrigération est équipé d’un tiroir de zone
de refroidissement permettant d’entreposer des aliments à la
température appropriée pour garantir une valeur nutritionnelle
optimale.
1. Faire glisser la commande au réglage désiré.
Réglage Description
Fruits et légumes
Convient à l’entreposage des fruits et légumes
Boissons gazeuses
Refroidissement rapide et entreposage des
boissons
Viandes
Convient à l’entreposage de la viande
BALCONNETS AMOVIBLES
Les balconnets peuvent être enlevés pour faciliter le nettoyage.
1. Placer les mains de chaque côté du balconnet et soulever vers
le haut.
2. Dégager le balconnet.
TIROIR DE RANGEMENT AMOVIBLE DU
CONGÉLATEUR
IMPORTANT: Ne pas surcharger les tiroirs. Chaque tiroir peut
contenir une charge maximum de 77 lb (35 kg).
1. Retirer le tiroir du congélateur en le déployant entièrement, puis
en soulevant le tiroir et en le dégageant.
CARACTÉRISTIQUES
TABLETTES RÉGLABLES
La hauteur des tablettes peut être réglée pour convenir à vos
besoins d’entreposage.
1. Pour retirer une tablette, soulever les coins avant et arrière pour
dégager les crochets de la tablette des supports de tablette
situés sur la paroi du réfrigérateur, et tirer vers l’extérieur.
2. Pour réinstaller une tablette, faire reposer la tablette sur les
supports avant et arrière. Pousser la tablette vers l’arrière du
réfrigérateur jusqu’à ce que l’arrière de la tablette s’accroche
aux supports arrière de la tablette.
21
Page 24

ENTRETIEN DU RÉFRIGÉRATEUR
AVERTISSEMENT
AVERTISSEMENT
NETTOYAGE
Les sections de réfrigération et de congélation se dégivrent
automatiquement. Toutefois, nettoyer les deux compartiments
environ une fois par mois an d’éviter une accumulation d’odeurs.
Essuyer les renversements immédiatement.
Comme l’air circule entre les deux sections, toutes les odeurs
formées dans une section seront transférées à l’autre. Les deux
sections doivent être nettoyées avec soin pour éliminer les odeurs.
Pour éviter le transfert d’odeurs et l’assèchement des aliments,
envelopper ou recouvrir hermétiquement les aliments.
Risque d'explosion
Utiliser un produit de nettoyage ininflammable.
Le non-respect de cette instruction peut causer un
décès, une explosion ou un incendie.
IMPORTANT:
Ne pas utiliser de produits chimiques corrosifs, d’ammoniaque,
•
d’agent de blanchiment, de détergents concentrés, de solvant
ou de tampons à récurer métalliques ou abrasifs pour nettoyer
l’intérieur ou l’extérieur du réfrigérateur. Ceux-ci peuvent
endommager et/ou décolorer le ni du réfrigérateur.
Ne pas nettoyer les tablettes de verre à l’eau chaude lorsque
•
celles-ci sont encore froides. Le verre peut se briser lorsqu’il
est exposé à un impact ou à un changement brusque de
température.
1. Débrancher le réfrigérateur ou déconnecter la source de
courant électrique.
2. Nettoyer l’intérieur. Laver à la main, rincer et sécher les pièces
amovibles et les surfaces internes soigneusement. Utiliser une
éponge propre ou un linge doux et un détergent doux dans de
l’eau tiède.
3. Nettoyer les surfaces extérieures.
Métal peint : Laver les parties métalliques extérieures à l’aide
d’un chion ou d’une éponge doux/douce et propre et d’un
détergent doux dans de l’eau tiède. Rincer les surfaces avec
une eau propre et tiède et sécher immédiatement an d’éviter
d’éventuelles taches laissées par l’eau.
Acier inoxydable : L’acier inoxydable est résistant à la
corrosion et non anticorrosion. Pour éviter la corrosion sur
l’acier inoxydable, laver les surfaces en acier inoxydable à l’aide
d’un chion ou d’une éponge doux/douce et propre et d’un
détergent doux dans de l’eau tiède. Rincer les surfaces avec
une eau propre et tiède et sécher immédiatement an d’éviter
d’éventuelles taches laissées par l’eau.
REMARQUE : Lors du nettoyage de l’acier inoxydable, toujours
frotter dans le sens du grain an d’éviter d’éraer la surface.
4. Brancher le réfrigérateur ou reconnecter la source de courant
électrique.
22
ÉCLAIRAGE
Les lampes intérieures du réfrigérateur s’éteignent si les portes
sont ouvertes pendant plus de 7 minutes.
IMPORTANT : Le réfrigérateur est équipé d’un éclairage à DEL. Cet
éclairage est conçu pour durer pendant toute la durée de vie utile
du réfrigérateur. Toutefois, si l’éclairage s’arrête de fonctionner,
contacter un technicien qualié pour eectuer le remplacement.
PRÉCAUTIONS À PRENDRE
POUR LES VACANCES OU LE
DÉMÉNAGEMENT
VACANCES
Si vous choisissez de laisser le réfrigérateur en marche pendant
votre absence :
1. Consommer toutes les denrées périssables et congeler les
autres articles.
Si vous choisissez d’éteindre le réfrigérateur avant votre absence :
1. Enlever tous les aliments du réfrigérateur et du congélateur.
2. Débrancher le réfrigérateur ou déconnecter la source de
courant électrique.
3. Nettoyer le réfrigérateur, l’essuyer et bien le sécher.
4. À l’aide d’un ruban adhésif, placer des blocs de caoutchouc ou
de bois dans la partie supérieure de chaque porte de façon à ce
qu’elles soient susamment ouvertes pour permettre l’entrée
de l’air à l’intérieur, an d’éviter l’accumulation d’odeurs ou de
moisissure.
DÉMÉNAGEMENT
Risque du poids excessif
Utiliser deux ou plus de personnes pour déplacer et
installer le réfrigérateur.
Le non-respect de cette instruction peut causer une
blessure au dos ou d'autres blessures.
En cas de déménagement et de déplacement du réfrigérateur
dans une nouvelle habitation, suivre ces étapes pour préparer le
déménagement.
1. Retirer tous les aliments du réfrigérateur et placer tous les
aliments congelés dans de la neige carbonique.
2. Débrancher le réfrigérateur.
3. Bien nettoyer, essuyer et sécher.
4. Retirer toutes les pièces amovibles, bien les envelopper et
les attacher ensemble avec du ruban adhésif pour qu’elles ne
bougent ou ne s’entrechoquent pas durant le déménagement.
5. Soulever les pieds de nivellement pour qu’ils n’éraent pas le
sol. Voir “Nivellement”.
6. Utiliser du ruban adhésif pour maintenir les portes fermées
et xer le cordon d’alimentation à l’arrière du réfrigérateur.
Lorsque vous arriverez à votre nouveau domicile, remettez tout
en place et consultez la section “Instructions d’installation”
pour les instructions de préparation.
Page 25

DÉPANNAGE
Veuillez essayer les solutions suggérées ci-dessous an d’éviter le coût d’un appel de service inutile.
LE RÉFRIGÉRATEUR NE FONCTIONNE PAS
PROBLÈME CAUSE(S) POSSIBLE(S) SOLUTION
Le réfrigérateur ne
fonctionne pas
Le compresseur du
réfrigérateur se met en
route souvent ou pendant
des périodes prolongées.
REMARQUE: Ce
réfrigérateur a été conçu
pour fonctionner pendant
des périodes prolongées
avec une consommation
d’énergie inférieure.
Le réfrigérateur a une odeur Les emballages alimentaires ne sont pas
La lumière ne s’allume pas Le réfrigérateur est débranché. Brancher le réfrigérateur à la source de courant électrique.
Les portes ne ferment pas
correctement
Vibration ou cliquetis Le réfrigérateur n’est pas en contact
Sons normaux Son donnant l’impression que de l’eau
Le réfrigérateur est débranché. Brancher le cordon d’alimentation électrique dans la prise de
Le disjoncteur est ouvert ou déclenché/
un fusible est grillé.
Le réfrigérateur est en mode de
dégivrage.
Ceci est normal lorsque le réfrigérateur
est branché pour la première fois.
Des aliments chauds ou de grosses
quantités d’aliments ont été ajoutés.
La porte a été laissée ouverte. S’assurer qu’un article ne bloque pas la fermeture de la porte.
Temps chaud ou ouvertures fréquentes. Ceci est normal.
Commande de la température au réglage
le plus froid.
étanches ou les aliments ne sont pas
emballés correctement.
L’intérieur a besoin d’être nettoyé. Nettoyer l’intérieur. Voir “Nettoyage”.
Les aliments ont été conservés trop
longtemps.
L’ampoule DEL est grillée. Contacter un technicien qualié pour remplacer la DEL grillée.
Le réfrigérateur n’est pas de niveau. Voir “Nivellement”.
Quelque chose bloque la fermeture de la
porte.
ferme avec le plancher.
s’écoule du réfrigérateur.
Ronement ou bourdonnement. Ce son peut être émis par le compresseur et les ventilateurs
Craquements ou cliquetis. Ce son est émis par les parties intérieures lorsqu’elles se
courant.
Réenclencher le disjoncteur ou remplacer le fusible.
Attendre environ 40 minutes que le programme de dégivrage
se termine et que le système de refroidissement redémarre.
Accorder 24 heures pour que le réfrigérateur refroidisse.
Ceci est normal.
Ajuster la température à un réglage plus chaud.
Refermer hermétiquement les emballages. Placer une boîte
ouverte de bicarbonate de soude dans le réfrigérateur,
remplacer tous les 3 mois.
Jeter les aliments abîmés.
Vérier et retirer tout obstacle.
Voir “Réglage de l’aplomb”.
Ce son est émis par le réfrigérant qui s’écoule dans les
canalisations lorsque le compresseur se met en marche et
s’arrête.
Le réfrigérateur est équipé d’un système de dégivrage
automatique. Ce son est émis par l’eau dégivrée.
servant à la circulation de l’air froid. Si le réfrigérateur n’est pas
d’aplomb, le son sera plus fort.
contractent ou se dilatent en réponse à des changements de
température.
23
Page 26

TEMPÉRATURE ET HUMIDITÉ
PROBLÈME CAUSE(S) POSSIBLE(S) SOLUTION
Le réfrigérateur ou
le congélateur est
trop chaud
Le réfrigérateur ou
le congélateur est
trop froid
Humidité sur
l’extérieur/
l’intérieur du
réfrigérateur
Givre ou cristaux
de glace sur les
aliments surgelés
Les aliments
gèlent dans le
réfrigérateur
La commande de la température n’est pas
placée à un réglage susamment bas.
Porte ouverte souvent ou laissée ouverte. Maintenir la porte fermée / vérier qu’un emballage ne bloque pas la
Des aliments tièdes ont été ajoutés
récemment.
Il n’y a pas assez d’espace entre l’arrière du
réfrigérateur et le mur.
Les articles dans le fond des compartiments
empêchent l’air de circuler correctement.
La commande de la température est placée à
un réglage trop bas.
Forte présence d’humidité. Ceci est normal. Sécher la surface et placer la commande de la
Porte ouverte souvent ou laissée ouverte. Garder la porte fermée. Vérier qu’un emballage ne bloque pas la
Récipient d’eau ouvert dans le réfrigérateur. Couvrir ou fermer le récipient hermétiquement.
La porte du congélateur est restée ouverte
ou est ouverte trop fréquemment.
Des articles bloquent les ouvertures
d’aération du congélateur et empêchent l’air
de circuler librement.
Aliments placés trop près de l’ouverture
d’aération.
La commande de la température est placée à
un réglage trop froid.
Régler la température du compartiment à un réglable plus froid;
attendre 24 heures que la température s’ajuste.
fermeture de la porte.
Attendre que les aliments et le réfrigérateur aient refroidi.
Laisser un espace libre d’au moins 2” (5 cm) entre l’arrière du
réfrigérateur et le mur.
Ranger les articles à l’intérieur des bordures des tablettes de verre;
ne pas placer d’articles contre les parois des compartiments ou
directement devant les ouvertures d’aération.
Augmenter la température du compartiment au réglage inférieur
(plus chaud) suivant; attendre 24 heures que la température s’ajuste.
température à un réglage légèrement plus froid.
fermeture de la porte.
Placer la commande de la température à un réglage plus chaud;
attendre 24 heures que la température s’ajuste.
Éloigner les articles de la paroi arrière.
Retirer les articles de l’arrière et du sommet du réfrigérateur.
Ajuster la température du congélateur à un réglage moins froid.
POUR OBTENIR DE L’AIDE SUPPLÉMENTAIRE, VISITER HAIER.COM OU CONTACTER LA
LIGNE D’ASSISTANCE À LA CLIENTÈLE AU 1 877 377 3639.
24
Page 27

GARANTIE LIMITÉE
SERVICE À DOMICILE
GARANTIE COMPLÈTE D’UN AN
Pendant 12 mois à compter de la date d’achat d’origine, Haier réparera
ou remplacera gratuitement n’importe quelle pièce (main-d’œuvre
comprise) comportant un défaut de matériau ou de fabrication.
Haier peut choisir à sa seule discrétion de remplacer ou réparer des
pièces, des sous-systèmes ou le produit tout entier.
Le produit doit être accessible, dégagé et installé correctement
pour bénécier du service de réparation sous garantie.
GARANTIE LIMITÉE
Après un an à compter de la date d’achat d’origine en magasin,
Haier fournira à ses frais, tel que stipulé ci-dessous, une pièce pour
remplacer la pièce défectueuse résultant d’un vice de matière ou de
fabrication. Haier ne prend en charge que le coût de la pièce. Tous
les autres coûts tels que main-d’œuvre, déplacement, etc. sont à la
charge du propriétaire.
De la deuxième à la cinquième année
Pendant 60 mois à compter de la date d’achat d’origine en magasin.
Composants du circuit étanche (p. ex. compresseur hermétique,
condenseur et évaporateur) contre tout vice de fabrication. Les
éventuels dégâts à ces composants provoqués par des contraintes
mécaniques abusives ou des méthodes de transport et de
manipulation incorrectes ne seront pas pris en charge.
REMARQUE : Cette garantie entre en vigueur à la date d’achat de
l’article et le bon d’achat d’origine doit être présenté à l’agent de
service agréé préalablement à une quelconque réparation sous
garantie.
Exceptions : Garantie à usage commercial
90 jours sur la main-d’œuvre à compter de la date d’achat d’origine
90 jours sur les pièces à compter de la date d’achat d’origine
Aucune autre garantie ne s’applique.
SERVICE AU TITRE DE LA GARANTIE
Contacter le centre de dépannage autorisé le plus proche. Tout
dépannage doit être eectué par un centre de dépannage autorisé
Haier. Pour le nom et le numéro de téléphone du centre de dépannage
autorisé le plus proche de votre domicile, composer le
1-877-337-3639.
Avant d’appeler le centre, veuillez garder à disposition les
renseignements suivants :
Numéros de plaque signalétique de l’appareil. Le nom et l’adresse du
revendeur auprès duquel vous avez acheté l’appareil, ainsi que la date
d’achat.
Une description claire du problème rencontré.
Une preuve d’achat (reçu de vente).
Cette garantie est valable pour le service des appareils
domestiques aux États-Unis contigus et au Canada et lorsque le
service est disponible, en Alaska, à Hawaï et Porto Rico.
Cette garantie ne couvre pas :
Le remplacement ou la réparation des fusibles, disjoncteurs, du
câblage ou du circuit de plomberie du domicile.
Un produit dont le numéro de série d’origine a été enlevé ou modié.
Tous frais de dépannage non identiés comme étant normaux tel un
dépannage dans une zone ou une tranche horaire normale.
Remplacement de la lumière bubls
Les dommages liés à l’expédition.
Les dommages liés à une installation ou un entretien inadapté.
Les dommages causés par l’un des éléments suivants : Mauvaise
utilisation, utilisation abusive, accident, incendie ou catastrophe
naturelle.
Les dommages résultant d’un dépannage fourni par une entité autre
qu’un revendeur ou centre de dépannage autorisé Haier.
Les dommages causés par un courant, une tension ou une
alimentation électrique incorrects.
Les dommages résultant d’une quelconque modication ou altération
du produit ou d’un ajustement non autorisé par Haier.
Un ajustement des commandes utilisées par le consommateur tel
qu’identié dans le manuel de l’utilisateur.
Les tuyaux, boutons, plateaux à charpie et tout accessoire ou pièce
jetable.
Les frais de main-d’œuvre, transport pour dépannage et d’expédition
pour le retrait et le remplacement de pièces défectueuses au-delà de
la période de 12 mois.
Les dommages liés à une utilisation autre qu’une utilisation
domestique normale.
Tout frais de transport et d’expédition.
CETTE GARANTIE LIMITÉE REMPLACE TOUTE AUTRE GARANTIE
EXPRESSE OU IMPLICITE, Y COMPRIS, MAIS PAS SEULEMENT, LES
GARANTIES IMPLICITES, Y COMPRIS LES GARANTIES DE QUALITÉ
MARCHANDE OU D’APTITUDE À UN USAGE PARTICULIER
Le recours oert dans cette garantie est exclusif et se substitue à
toute autre garantie.
Cette garantie ne couvre pas les dommages fortuits ou indirects; aussi
les limitations décrites ci-dessus peuvent ne pas s’appliquer à votre
cas. Certains États ne permettent pas de limitation sur la durée d’une
garantie implicite, aussi les limitations décrites ci-dessus peuvent ne
pas s’appliquer à votre cas.
Cette garantie vous confère des droits juridiques spéciques. Vous
pouvez également jouir d’autres droits qui peuvent varier d’un État à
l’autre.
Haier America
Wayne, NJ 07470
25
Page 28

ÍNDICE
SEGURIDAD DEL REFRIGERADOR ........................................................................................................................................................ 27
PIEZAS Y CARACTERÍSTICAS .............................................................................................................................................................. 28
INSTRUCCIONES DE INSTALACIÓN ..................................................................................................................................................... 29
Desempaque el refrigerador ....................................................................................................................................................................................29
Requisitos de ubicación ............................................................................................................................................................................................29
Requisitos eléctricos ................................................................................................................................................................................................30
Finalización de la instalación ....................................................................................................................................................................................30
Nivelación y ajuste de la puerta (si es necesario) ....................................................................................................................................................30
USO DE SU REFRIGERADOR ................................................................................................................................................................. 31
Cómo abrir y cerrar las puertas ................................................................................................................................................................................31
Uso de los controles .................................................................................................................................................................................................31
Características ..........................................................................................................................................................................................................33
CUIDADO DEL REFRIGERADOR ........................................................................................................................................................... 34
Limpieza ....................................................................................................................................................................................................................34
Luces .........................................................................................................................................................................................................................34
Cuidado durante las vacaciones y mudanzas ..........................................................................................................................................................34
SOLUCIÓN DE PROBLEMAS ................................................................................................................................................................. 35
GARANTÍA LIMITADA ........................................................................................................................................................................... 37
INFORMACIÓN A TENER EN CUENTA
Le agradecemos la compra de este producto de marca Haier.
Este manual para el usuario le ayudará a obtener el mejor
funcionamiento de su nuevo refrigerador.
Para referencia futura, anote el modelo y número de serie ubicados
en la pared interior del compartimiento del refrigerador, y la fecha
de compra.
Engrape la prueba de compra de este manual para asistirle cuando
necesite obtener servicio bajo la garantía.
___________________________________________________________
Número de modelo
___________________________________________________________
Número de serie
___________________________________________________________
Fecha de compra
26
Page 29

SEGURIDAD DEL REFRIGERADOR
Su seguridad y la seguridad de los demás es muy importante.
Hemos incluido muchos mensajes importantes de seguridad en este manual y en su electrodoméstico. Lea y obedezca
siempre todos los mensajes de seguridad.
Este es el símbolo de advertencia de seguridad.
Este símbolo le llama la atención sobre peligros potenciales que pueden ocasionar la muerte o una
lesión a usted y a los demás. Todos los mensajes de seguridad irán a continuación del símbolo de
advertencia de seguridad y de la palabra “PELIGRO”, “ADVERTENCIA” o “PRECAUCIÓN”.
Estas palabras significan:
Se trata de una situación de peligro inminente. Si no sigue las instrucciones
PELIGRO
ADVERTENCIA
PRECAUCIÓN
Todos los mensajes de seguridad le dirán el peligro potencial, le dirán cómo reducir las posibilidades de sufrir una lesión y
lo que puede suceder si no se siguen las instrucciones.
de inmediato, usted puede morir o sufrir una lesión grave.
Se trata de una situación posiblemente peligrosa que, de no evitarse, podría
causar la muerte o una lesión grave.
Se trata de una situación posiblemente peligrosa que, de no evitarse, podría
causar lesiones moderadas o leves.
INSTRUCCIONES IMPORTANTES DE SEGURIDAD
ADVERTENCIA: Para reducir el riesgo de incendio, choque eléctrico, lesiones a personas o daños al utilizar el refrigerador,
siga precauciones básicas, incluyendo las siguientes:
Conecte el aparato a un tomacorriente de 3 terminales
•
con conexión a tierra.
No quite el terminal de conexión a tierra.
•
No use un adaptador.
•
No use un cable eléctrico de extensión.
•
Desconecte el suministro de energía antes de darle
•
servicio técnico.
Vuelva a colocar todas las piezas y paneles antes de
•
ponerlo en funcionamiento.
Quite las puertas de su refrigerador viejo.
•
Use un limpiador no inamable.
•
Mantenga los materiales y vapores inamables, tales
•
como la gasolina, alejados del refrigerador.
Con la ayuda de dos o más personas, mueva e instale el
•
refrigerador.
Este refrigerador no debe estar empotrado ni
•
integrado en un armario cerrado. Se ha diseñado para
instalarse de forma independiente únicamente.
Desconecte el suministro de energía antes de instalar
•
la fábrica de hielo (solamente en aquellos modelos que
incluyen el juego listo de la fábrica de hielo).
Use un vaso resistente para recibir hielo del
•
despachador (en algunos modelos).
Cierre el suministro de agua al refrigerador antes de
•
quitar o volver a colocar el ltro de agua o la tapa de
bloqueo (en algunos modelos).
Si no utiliza el refrigerador, quite las puertas. De esta
•
manera, reducirá la posibilidad de ocasionar daños a los
niños.
LEA Y GUARDE ESTAS INSTRUCCIONES
27
Page 30

CÓMO DESHACERSE ADECUADAMENTE DE
ADVERTENCIA
SU APARATO REFRIGERADOR VIEJO
Peligro de asfixia
Quite las puertas de su aparato refrigerador viejo.
No seguir esta instrucción puede ocasionar la muerte o
daño al cerebro.
IMPORTANTE: El atrapamiento y asxia de niños no es un problema
del pasado. Un aparato refrigerador desechado y abandonado es un
peligro, aun si va a quedar ahí “por unos pocos días”. Si usted está por
deshacerse de su aparato refrigerador viejo, siga las instrucciones a
continuación para evitar accidentes.
PIEZAS Y CARACTERÍSTICAS
a
Antes de descartar su aparato refrigerador o congelador viejo:
Quite las puertas.
•
Deje los estantes en su lugar así los niños no pueden meterse
•
adentro con facilidad.
c
d
e
b
b
b
f
f
g
h
i
j
b
b
b
l
28
a Luces LED
b Recipiente de la puerta
c Placa con el número de modelo y de serie
d Junta con bisagras verticales
e Cubierta de vidrio de la zona de enfriamiento
f Estante de vidrio
k
k
g Control de la zona de enfriamiento
h Cajón de la zona de enfriamiento
i Cajón de depósito superior del congelador
j Cajón de depósito inferior del congelador
k Pie regulable
l Panel de control
Page 31

INSTRUCCIONES DE INSTALACIÓN
ADVERTENCIA
ADVERTENCIA
DESEMPAQUE EL REFRIGERADOR
Peligro de Peso Excesivo
Use dos o más personas para mover e instalar el
refrigerador.
No seguir esta instrucción puede ocasionar una lesión
en la espalda u otro tipo de lesiones.
CÓMO QUITAR EL EMPAQUE
Quite los restos de cinta y goma de las supercies de su
•
refrigerador antes de encenderlo. Frote un poco de detergente
líquido para vajilla sobre el adhesivo con los dedos. Limpie con
agua tibia y seque.
No use instrumentos losos, alcohol isopropílico, líquidos
•
inamables o productos de limpieza abrasivos para eliminar
los restos de cinta o goma. Estos productos pueden dañar la
supercie de su refrigerador. Para obtener más información, vea
“Seguridad del refrigerador”.
Deshágase de todos los materiales de empaque o recíclelos.
•
Cuando mueva su refrigerador:
Su refrigerador es pesado. Cuando mueva el refrigerador
para la limpieza o para darle servicio, cerciórese de cubrir el
piso con cartón o madera para evitar daños en este. Al mover
el refrigerador, siempre tire directamente hacia afuera. No
menee el refrigerador de lado a lado ni lo haga “caminar”
cuando trate de moverlo, ya que podría dañar el suelo.
REQUISITOS DE UBICACIÓN
Peligro de Explosión
Mantenga los materiales y vapores inflamables, tales
como gasolina, alejados del aparato.
No seguir esta instrucción puede ocasionar la muerte,
explosión, o incendio.
IMPORTANTE: Este refrigerador ha sido diseñado únicamente para
usarse dentro del hogar. Este refrigerador no debe estar empotrado
ni integrado en un armario cerrado. Se ha diseñado para instalarse
de forma independiente únicamente.
Para asegurar la adecuada ventilación de su refrigerador, deje un
espacio de 2” (5,08cm) a cada lado y en la parte superior. Deje
un espacio de 2” (5,08cm) detrás del refrigerador. Si instala el
refrigerador próximo a una pared ja, deje como mínimo 4” (10 cm)
para permitir que la puerta abra bien.
2" (5,08 cm)
LIMPIEZA ANTES DEL USO
Una vez que usted haya quitado todos los materiales de empaque,
limpie el interior del refrigerador antes de usarlo. Vea las
instrucciones de limpieza en “Cuidado del refrigerador”.
Información importante acerca de los estantes y tapas de
vidrio:
No limpie los estantes y tapas de vidrio con agua caliente
mientras estén fríos. Los estantes y tapas pueden romperse
si se exponen a cambios bruscos de temperatura o a impactos
como golpes bruscos. El vidrio templado se ha diseñado para
hacerse añicos. Esto es normal. Los estantes y tapas de vidrio
son muy pesados. Use ambas manos al quitarlos para evitar
que se caigan.
2" (5,08 cm)
NOTA: Este refrigerador ha sido diseñado para usarse en un lugar en
donde los rangos de temperatura varíen entre un mínimo de 55 °F
(13 °C) y un máximo de 110 °F (43 °C). Para un óptimo rendimiento,
el rango preferido de temperatura ambiente (que reduce el uso de
electricidad y provee un enfriamiento superior) es entre 60 °F (15
°C) y 90 °F (32 °C). No se recomienda instalar el refrigerador cerca
de una fuente de calor, como puede ser un horno o un radiador.
4" (10,2 cm)
29
Page 32

REQUISITOS ELÉCTRICOS
FINALIZACIÓN DE LA INSTALACIÓN
ADVERTENCIA
Peligro de Choque Eléctrico
Conecte a un contacto de pared de conexión a tierra de
3 terminales.
No quite el terminal de conexión a tierra del cable de
alimentación.
No use un adaptador.
No use un cable eléctrico de extensión.
No seguir estas instrucciones puede ocasionar la
muerte, incendio o choque eléctrico.
Antes de mover el refrigerador a su ubicación nal, es importante
asegurarse de que tiene la conexión eléctrica adecuada.
Método de conexión a tierra recomendado
Se requiere un suministro eléctrico de 115 voltios, 60 hertzios,
CA solamente, de 15 o 20 amperios y protegido con fusibles,
conectado a tierra. Se recomienda utilizar un circuito separado solo
para su refrigerador. Use un tomacorriente que no se pueda apagar
con un interruptor. No use un cable eléctrico de extensión.
NOTA: Antes de realizar cualquier tipo de instalación o limpieza,
desconecte el refrigerador de la fuente de suministro eléctrico.
Cuando haya terminado, vuelva a conectar el refrigerador a la
fuente de energía eléctrica y reajuste los controles de temperatura
en la posición deseada.
ADVERTENCIA
Peligro de Choque Eléctrico
Conecte a un contacto de pared de conexión a tierra de
3 terminales.
No quite el terminal de conexión a tierra del cable de
alimentación.
No use un adaptador.
No use un cable eléctrico de extensión.
No seguir estas instrucciones puede ocasionar la
muerte, incendio o choque eléctrico.
1. Conecte el aparato a un tomacorriente de 3 terminales con
conexión a tierra.
2. Vuelva a colocar todas las piezas removibles en la puerta y los
alimentos en el refrigerador.
NOTA: Este refrigerador comienza a funcionar apenas se conecta al
suministro eléctrico.
NIVELACIÓN Y AJUSTE DE LA
PUERTA (SI ES NECESARIO)
El refrigerador debe estar nivelado para mantener un mejor
desempeño y apariencia.
NIVELACIÓN
1. Mueva el refrigerador a su ubicación nal.
2. Gire los pies en la parte inferior, la parte frontal del armario para
subir o bajar ese lado del refrigerador hasta que el aparato esté
nivelado de lado a lado.
3. Gire las dos patas frontales, la misma cantidad de veces, para
elevar ligeramente el frente del refrigerador. Esto hará que las
puertas se cierren con más facilidad.
NOTA: Para quitar un poco de peso de los tornillos niveladores,
haga que alguien empuje la parte superior del refrigerador. Esto
facilita el giro de los tornillos.
30
Page 33

USO DE SU REFRIGERADOR
CÓMO ABRIR Y CERRAR LAS
PUERTAS
El compartimiento del refrigerador tiene dos puertas. Las puertas
pueden abrirse y cerrarse ya sea en forma separada o juntas.
Hay una junta con bisagras verticales en la puerta del
•
refrigerador del lado izquierdo.
Al cerrar la puerta del refrigerador del lado izquierdo, la junta con
•
bisagras se pliega detrás de la puerta del lado derecho, uniendo
las dos puertas del refrigerador.
NOTA: Antes de cerrar la puerta del lado izquierdo, asegúrese
de que la junta con bisagras verticales se pliegue hacia dentro.
Si se tira de la junta hacia el exterior, puede dañarse cuando
intente cerrar la puerta.
USO DE LOS CONTROLES
a
b
Temp Zone
c
Temp Set
°F
d
e
f
a Indicador del compartimiento
del refrigerador
b Indicador del compartimiento
del congelador
c Indicador de temperatura
Quick Cool
Dehumidify
Function Set
3S
Quick Frz
Sabbath
g Botón Temp Zone
h Botón Temp Set
i Indicador de Sabbath
d Indicador de congelamiento
rápido
j Botón Function Set
e Indicador de enfriamiento
rápido
k Botón Conrm
f Indicador de
deshumidicación
Cuando el refrigerador se enciende por primera vez, se
•
enciende el indicador para el compartimiento del refrigerador
y aparece la temperatura. La función Control Lock (Bloqueo de
control) está activada. Vea Bloqueo del panel de control más
adelante en esta sección para desbloquear los controles.
g
h
i
j
k
(Temperatura de la zona)
(Temperatura jada)
(Día de descanso)
(Función jada)
Selection (Conrmar
selección)
TECLAS DEL SENSOR
Los botones del panel de control son teclas del sensor, que
responden cuando se tocan suavemente.
PANTALLA DEL PANEL DE CONTROL
°F
Temp Set
Cuando no se utilicen los botones ni las puertas durante
30segundos, se apagarán todas las luces LED en la pantalla del
panel.
Cuando se presiona un botón o se abre una puerta, todas las luces
LED en la pantalla del panel se iluminarán.
31
Page 34

BLOQUEO DEL PANEL DE CONTROL
El panel de control se bloquea automáticamente después de 30
segundos. Para cambiar los ajustes, el panel de control debe estar
desbloqueado.
Para bloquear el panel de control:
1. Mantenga presionado el botón Conrm Selection (Conrmar
selección) durante 3 segundos.
3S
Para desbloquear el panel de control:
1. Mantenga presionado el botón Conrm Selection (Conrmar
selección) durante 3 segundos.
3S
ALARMA DE LA PUERTA
Cuando la puerta del refrigerador está abierta durante más de
2 minutos, se escuchará la alarma de puerta abierta. La alarma
se puede apagar cerrando la puerta. Si se deja la puerta abierta
por más de 7 minutos, la luz interior del refrigerador se apagará
automáticamente.
CONTROLES DE TEMPERATURA
El rango de temperatura para el compartimiento del refrigerador
es de 34 °F a 42 °F (1 °C a 6 °C). El rango de temperatura para el
compartimiento del congelador es de -6 °F a 4 °F (-21 °C a -16 °C).
El compartimiento del refrigerador está prejado en la temperatura
recomendada de 37 °F (5 °C) y el compartimiento del congelador
está prejado en la temperatura recomendada de 0 °F (-18 °C).
Cuando el refrigerador se conecta por primera vez, la pantalla
mostrará los ajustes de temperatura recomendados.
IMPORTANTE:
El ajuste recomendado debe ser el correcto para un uso
•
doméstico normal del refrigerador.
Cuando el refrigerador se enciende por primera vez, puede
•
tardar hasta 12 horas para enfriar hasta las temperaturas
prejadas. Espere 24 horas para que el refrigerador se enfríe
completamente antes de agregar alimentos. Si agrega
alimentos antes de que el refrigerador se haya enfriado por
completo, podrían echarse a perder.
Si la temperatura está demasiado elevada o demasiado baja en
•
el refrigerador o en el congelador, antes de regular los controles,
revise primero los ductos de ventilación para cerciorarse de que
no estén obstruidos.
Cómo ajustar los controles
No ajuste ningún control de temperatura en más de un ajuste por
vez, excepto cuando encienda el refrigerador. Espere 24 horas
entre los ajustes para que se estabilice la temperatura.
Para ajustar la temperatura del refrigerador:
1. Si está bloqueado, desbloquee el panel de control manteniendo
presionado el botón Conrm Selection (Conrmar selección)
durante 3 segundos.
2. Presione el botón TEMP ZONE (Temperatura de la zona)
hasta que se encienda el indicador del compartimiento del
refrigerador.
Temp Zone
Se muestra el ajuste de temperatura actual.
3. Presione el botón TEMP SET (Temperatura jada) para ajustar la
temperatura.
Temp Set
°F
La temperatura aumenta en un grado cada vez que presione el
botón Temp Set (Temperatura jada).
4. Presione el botón Conrm Selection (Conrmar selección).
Si no presiona el botón Conrm Selection (Conrmar selección)
después de 5 segundos, el control volverá a la temperatura
previamente jada.
Para ajustar la temperatura del congelador:
1. Si está bloqueado, desbloquee el panel de control manteniendo
presionado el botón Conrm Selection (Conrmar selección)
durante 3 segundos.
2. Presione el botón Temp Zone (Temperatura de la zona) hasta
que se encienda el indicador del compartimiento del congelador.
Temp Zone
Se muestra el ajuste de temperatura actual.
3. Presione el botón TEMP SET (Temperatura jada) para ajustar la
temperatura.
Temp Set
°F
La temperatura aumenta en un grado cada vez que presione el
botón Temp Set (Temperatura jada).
4. Presione el botón Conrm Selection (Conrmar selección).
Si no presiona el botón Conrm Selection (Conrmar selección)
después de 5 segundos, el control volverá a la temperatura
previamente jada.
ENFRIAMIENTO RÁPIDO
La función Quick Cool (Enfriamiento rápido) acelera el enfriamiento
de los alimentos frescos y protege los alimentos ya almacenados
del calentamiento no deseado.
1. Si está bloqueado, desbloquee el panel de control manteniendo
presionado el botón Conrm Selection (Conrmar selección)
durante 3 segundos.
2. Presione el botón FUNCTION SET (Función jada) hasta que el
indicador de enfriamiento rápido comience a destellar.
Quick Cool
Quick Frz
Sabbath
Dehumidify
Function Set
Temp Set
3. Presione el botón Conrm Selection (Conrmar selección).
4. La pantalla de la temperatura mostrará “qC” para indicar que la
función Quick Cool (Enfriamiento rápido) está activada.
5. Repita los pasos 1 a 3 para quitar la selección de Quick Cool
(Enfriamiento rápido).
NOTA: Quick Cool (Enfriamiento rápido) se apagará
automáticamente después de 3 horas.
°F
32
Page 35

CONGELAMIENTO RÁPIDO
La función Quick Freeze (Congelamiento rápido) acelera el
congelamiento de los alimentos frescos y protege los alimentos ya
almacenados del calentamiento no deseado. Si necesita congelar
una gran cantidad de alimentos, se recomienda jar la función Quick
Freeze (Congelamiento rápido) un par de horas con antelación.
1. Si está bloqueado, desbloquee el panel de control manteniendo
presionado el botón Conrm Selection (Conrmar selección)
durante 3 segundos.
2. Presione el botón FUNCTION SET (Función jada) hasta que el
indicador de congelamiento rápido comience a destellar.
Quick Cool
Quick Frz
Dehumidify
Function Set
Sabbath
Temp Set
°F
CAJÓN DE LA ZONA DE ENFRIAMIENTO
El compartimiento del refrigerador está equipado con un cajón de
la zona de enfriamiento, que le permite almacenar los alimentos a la
temperatura adecuada, para asegurar su óptimo valor nutricional.
1. Deslice el control hacia el ajuste deseado.
Ajuste Descripción
Frutas y verduras
Adecuado para almacenar frutas y verduras.
3. Presione el botón Conrm Selection (Conrmar selección).
4. La pantalla de la temperatura mostrará “qF” para indicar que la
función Quick Freeze (Congelamiento rápido) está activada.
5. Repita los pasos 1 a 3 para quitar la selección de Quick Freeze
(Congelamiento rápido).
NOTA: Quick Freeze (Congelamiento rápido) se apagará
automáticamente después de 24 horas.
DESHUMIDIFICACIÓN
Si aparece humedad en la junta con bisagras verticales en la
puerta izquierda del refrigerador, seleccione la función Dehumidify
(Deshumidicación).
1. Si está bloqueado, desbloquee el panel de control manteniendo
presionado el botón Conrm Selection (Conrmar selección)
durante 3 segundos.
2. Presione el botón FUNCTION SET (Función jada) hasta que el
indicador de deshumidicación comience a destellar.
Quick Cool
Quick Frz
Sabbath
Dehumidify
Function Set
3. Presione el botón Conrm Selection (Conrmar selección).
4. Repita los pasos 1 a 3 para quitar la selección de Dehumidify
(Deshumidicación).
DÍA DE DESCANSO
La función Sabbath (Día de descanso) ha sido diseñada para
aquellas personas cuyas prácticas religiosas requieren apagar las
luces. Se desactivarán todas las luces interiores y las alarmas.
1. Si está bloqueado, desbloquee el panel de control manteniendo
presionado el botón Conrm Selection (Conrmar selección)
durante 3 segundos.
2. Presione el botón FUNCTION SET (Función jada) hasta que el
indicador de Sabbath (Día de descanso) comience a destellar.
Quick Cool
Quick Frz
Bebidas gaseosas
Enfriamiento rápido y almacenamiento de bebidas.
Carnes
Adecuado para almacenar carne.
CARACTERÍSTICAS
ESTANTES REGULABLES
La altura de los estantes se puede regular para adaptarse a sus
necesidades de almacenamiento.
1. Para quitar un estante, levante la parte frontal y el borde
posterior para desenganchar los ganchos del estante de los
soportes del estante a lo largo de la pared del refrigerador y
quitarlo.
2. Para volver a instalar un estante, colóquelo en los soportes
frontales y traseros. Empuje el estante hacia la parte trasera del
refrigerador hasta la parte posterior de los ganchos del estante
alrededor de los soportes del estante trasero.
RECIPIENTES DE LA PUERTA
DESMONTABLES
Los recipientes de la puerta pueden quitarse para limpiarlos:
1. Coloque las manos a ambos lados del recipiente y levántelo
hacia arriba.
2. Jale hacia afuera el recipiente de la puerta.
Sabbath
Dehumidify
Function Set
3. Presione el botón Conrm Selection (Conrmar selección).
4. Para quitar la selección de Sabbath (Día de descanso),
manteniendo presionado el botón Conrm Selection (Conrmar
selección) durante 5 segundos.
33
Page 36

CAJÓN DEL DEPÓSITO DEL CONGELADOR
ADVERTENCIA
ADVERTENCIA
DESMONTABLE
IMPORTANTE: No sobrecargue los cajones. La carga máx. de cada
cajón es de 77 libras (35 kg).
1. Quite el cajón del congelador extendiendo el cajón por
completo, y luego levante el cajón y jale hacia fuera para
quitarlo.
CUIDADO DEL REFRIGERADOR
LIMPIEZA
Tanto las secciones del refrigerador como la del congelador se
descongelan automáticamente. No obstante, limpie ambas
secciones más o menos una vez al mes para evitar la acumulación
de olores. Limpie los derrames de inmediato.
Debido a que el aire circula entre ambas secciones, cualquier
olor que se forma en una sección pasará a la otra. Debe limpiar
bien ambas secciones para eliminar los olores. Para evitar la
transferencia de olores y la deshidratación de los alimentos,
envuelva o tape bien los alimentos.
Peligro de Explosión
Use un limpiador no inflamable.
No seguir esta instrucción puede ocasionar la muerte,
explosión o incendio.
IMPORTANTE:
No use productos químicos fuertes, amoníaco, blanqueador con
•
cloro, detergente concentrado, solventes o estropajos de metal
o abrasivos para limpiar su refrigerador por dentro o por fuera.
Estos pueden dañar o decolorar el acabado del refrigerador.
No utilice agua tibia para limpiar los estantes de vidrio mientras
•
aún están fríos. El vidrio se podría romper si se lo expone a
cambios bruscos de temperatura o a impactos.
1. Desenchufe el refrigerador o desconecte el suministro de
energía.
2. Limpie el interior. Lave a mano, enjuague y seque bien todas las
piezas removibles y las supercies interiores. Use una esponja
limpia o un paño liso y un detergente suave en agua tibia.
3. Limpie las supercies exteriores.
Metal pintado: Limpie el exterior de metal pintado con un
paño limpio y liso, o una esponja y detergente suave en agua
tibia. Enjuague las supercies con agua tibia limpia y séquelas
inmediatamente para evitar las manchas de agua.
Acero inoxidable: El acero inoxidable es resistente a la corrosión
y no a prueba de corrosión. Para ayudar a evitar la corrosión del
acero inoxidable, lave las supercies de acero inoxidable con un
paño limpio y liso o una esponja y un detergente suave en agua
tibia. Enjuague las supercies con agua tibia limpia y séquelas
inmediatamente para evitar las manchas de agua.
NOTA: Cuando limpie el acero inoxidable, siempre hágalo en la
dirección de la veta para evitar rayas perpendiculares a esta.
4. Enchufe el refrigerador o vuelva a conectar el suministro de
energía.
LUCES
Las luces del interior del refrigerador se apagan cuando las puertas
están abiertas durante más de 7 minutos.
IMPORTANTE: El refrigerador está equipado con luces LED. Estas
luces se diseñaron para durar toda la vida útil del refrigerador.
Sin embargo, si las luces dejan de funcionar, llame a un técnico
calicado para su reemplazo.
CUIDADO DURANTE LAS
VACACIONES Y MUDANZAS
VACACIONES
Si usted decide dejar el refrigerador funcionando mientras está
ausente:
1. Use todos los artículos perecederos y congele el resto.
Si decide apagar el refrigerador antes de irse:
1. Quite toda la comida del refrigerador y del congelador.
2. Desenchufe el refrigerador o desconecte el suministro de
energía.
3. Limpie el refrigerador, pásele un trapo y séquelo bien.
4. Fije bloques de goma o de madera con cinta adhesiva en la parte
superior de ambas puertas para que queden abiertas y el aire
circule. Esto evita que se formen olores y se desarrollen hongos.
MUDANZA
Peligro de Peso Excesivo
Use dos o más personas para mover e instalar el
refrigerador.
No seguir esta instrucción puede ocasionar una lesión
en la espalda u otro tipo de lesiones.
Si Ud. muda su refrigerador a una casa nueva, siga estos pasos para
prepararse para la mudanza.
34
Page 37

1. Saque todos los alimentos del refrigerador y empaque todos los
alimentos congelados en hielo seco.
2. Desenchufe el refrigerador.
3. Limpie, enjuague y seque bien.
4. Saque todas las piezas removibles, envuélvalas bien y
asegúrelas con cinta adhesiva para que no se muevan ni se
sacudan durante la mudanza.
5. Levante las patas niveladoras para que no dañen el piso. Vea
“Nivelación”.
6. Sostenga las puertas para que queden cerradas y el cable
pegado a la parte posterior del refrigerador con cinta adhesiva.
Cuando llegue a la casa nueva, coloque todo de nuevo en su
sitio y lea la sección “Instrucciones de instalación” para obtener
instrucciones de preparación.
SOLUCIÓN DE PROBLEMAS
Pruebe primero las soluciones recomendadas en esta sección para evitarse el costo de una visita innecesaria del servicio técnico.
EL REFRIGERADOR NO FUNCIONA
PROBLEMA POSIBLE(S) CAUSA(S) SOLUCIÓN
El refrigerador no funciona El refrigerador no está enchufado. Enchufe el cable de suministro de energía en la fuente de
Se ha disparado o se ha apagado el
cortacircuitos/Se ha quemado un fusible.
El refrigerador está en modo de
descongelación.
El compresor del
refrigerador funciona con
frecuencia o durante largos
períodos de tiempo
NOTA: Este refrigerador ha
sido diseñado para funcionar
durante períodos más largos
de tiempo con un consumo
de energía más bajo.
El refrigerador huele mal Los alimentos no están sellados o
La luz no se enciende El refrigerador no está enchufado. Enchufe el refrigerador a una fuente de energía.
Las puertas no cierran
correctamente
Vibración o traqueteo El refrigerador no está apoyado
Sonidos normales Se escucha un sonido como si uyera
El refrigerador se enchufó por primera
vez.
Se han agregado alimentos tibios o una
gran cantidad de alimentos.
La puerta está abierta. Asegúrese de que la puerta no queda abierta a causa de un
Hace calor o se abre con frecuencia. Esto es normal.
Control de temperatura jo en la posición
más fría.
envasados correctamente.
Debe limpiar el interior. Limpie el interior. Vea “Limpieza”.
Se han guardado los alimentos por
mucho tiempo.
La luz LED está quemada. Llame a un técnico calicado para cambiar la luz LED quemada.
El refrigerador no está nivelado. Vea “Nivelación”.
Algo está obstruyendo el cierre de la
puerta.
rmemente en el suelo.
agua del refrigerador.
Zumbidos o chirridos Este sonido es ocasionado por el compresor y los ventiladores
Crujidos o chasquidos Este sonido es ocasionado por las piezas interiores cuando
energía.
Reajuste/Encienda el cortacircuitos o reemplace el fusible.
Espere unos 40 minutos para que nalice el ciclo de
descongelación y se reanude el sistema de refrigeración.
Esto es normal. Deje transcurrir 24 horas para que el
refrigerador se enfríe.
Esto es normal.
artículo.
Ajuste la temperatura a un ajuste más caliente.
Vuelva a sellar los envases. Coloque una caja abierta con
bicarbonato de sodio en el refrigerador y cámbiela cada
3meses.
Deseche los alimentos que se han echado a perder.
Revise si hay obstrucciones y quítelas.
Vea “Nivelación”.
El refrigerante que uye por las líneas hace este sonido cuando
se enciende y se apaga el compresor.
El refrigerador tiene un sistema de descongelación automático.
El sonido es ocasionado por el agua descongelada.
de circulación de aire frío. Si el refrigerador no está nivelado, el
sonido será más fuerte.
se contraen y se expanden en respuesta a los cambios de
temperatura.
35
Page 38

TEMPERATURA Y HUMEDAD
PROBLEMA POSIBLE(S) CAUSA(S) SOLUCIÓN
Refrigerador
o congelador
demasiado caliente
Refrigerador
o congelador
demasiado frío
Humedad en el
exterior/interior
del refrigerador
Escarcha o
cristales de hielo
en alimentos
congelados
Se congelan los
alimentos en el
refrigerador
El control de temperatura no está en un ajuste
sucientemente bajo.
Las puertas se abren con frecuencia o quedan
abiertas.
Se agregaron alimentos calientes
recientemente.
El espacio entre la parte posterior del
refrigerador y la pared es demasiado
pequeño.
Los artículos ubicados contra la parte
posterior de los compartimientos están
bloqueando el ujo de aire adecuado.
El control de temperatura se jó en un ajuste
demasiado bajo.
Humedad elevada Esto es normal. Seque la supercie y je la temperatura en un
Las puertas se abren con frecuencia o quedan
abiertas.
Recipiente con agua abierto en el refrigerador Cubra o selle el recipiente.
La puerta del congelador queda abierta o se
abre con frecuencia
Los artículos bloquean los ductos de
ventilación del congelador e impiden el ujo
de aire adecuado.
Alimentos colocados demasiado cerca del
ducto de ventilación.
El control de temperatura tiene un ajuste
demasiado frío.
Ajuste el compartimiento a un ajuste más frío; espere 24 horas para
que se ajuste la temperatura.
Mantenga la puerta cerrada/Verique que no haya un paquete que
evite que se cierre la puerta.
Deje transcurrir un rato para que se enfríen los alimentos y el
refrigerador.
Deje un espacio de por lo menos 2” (5 cm) entre la parte posterior
del refrigerador y la pared.
Almacene los artículos únicamente dentro de los estantes de vidrio;
no coloque los artículos contra los lados de los compartimientos o
directamente enfrente de los ductos de ventilación.
Fije la temperatura en el compartimiento en el próximo ajuste más
cálido; espere 24 horas para que se ajuste.
ajuste ligeramente más frío. Encienda la función “Dehumidify”
(Deshumidicación) si la humedad aparece en la junta con bisagras
de la puerta izquierda del refrigerador.
Mantenga la puerta cerrada. Verique que no haya un paquete que
evite que se cierre la puerta.
Ajuste la temperatura a un ajuste más caliente; espere 24 horas para
que se ajuste.
Aleje los artículos de la pared trasera.
Aleje los artículos de la parte posterior y superior del refrigerador.
Ajuste la temperatura a un ajuste menos frío.
SI NECESITA MÁS AYUDA, VISITE HAIER.COM O COMUNÍQUESE CON LA LÍNEA DE AYUDA
AL CONSUMIDOR LLAMANDO AL 1‑877‑377‑3639.
36
Page 39

GARANTÍA LIMITADA
SERVICIO EN EL HOGAR
GARANTÍA COMPLETA POR UN AÑO
Durante 12 meses a partir de la fecha de compra original en la
tienda, Haier reparará o reemplazará cualquier pieza del aparato
sin costo, incluyendo la mano de obra, si la misma falla debido a
defectos en los materiales o en la mano de obra.
Haier puede reemplazar o reparar, a su sola discreción, cualquier
pieza, subsistema, incluso el producto entero.
El producto debe ser accesible, sin inconvenientes, e instalarse de
forma adecuada para recibir el servicio técnico de reparación por
parte de la garantía.
GARANTÍA LIMITADA
Después de un año a partir de la fecha de compra original en
la tienda, Haier proveerá una pieza sin costo, como se indica a
continuación, para reemplazar la pieza mencionada como resultado
de defectos en los materiales o en la mano de obra. Haier se
hará responsable solamente por el costo de la pieza. Cualquier
otro costo como la mano de obra, los cargos por viaje, etc. será
responsabilidad del propietario.
Del segundo al quinto año
Durante 60 meses a partir de la fecha de compra original en
la tienda. Los componentes del sistema sellado (por ejemplo,
compresor, condensador y evaporador herméticos) con defectos
de fabricación. No se cubrirá ningún daño a tales componentes
causados por excesivo uso mecánico o envío y manipulación
inadecuada.
NOTA: Esta garantía comienza en la fecha de compra de este
producto, y el recibo original deberá presentarse al representante
autorizado de servicio antes de hacerse las reparaciones bajo la
garantía.
Excepciones: Garantía bajo uso comercial
90 días en la mano de obra a partir de la fecha de compra original
90 días en las piezas a partir de la fecha de compra original
No es aplicable ninguna otra garantía.
PARA OBTENER SERVICIO BAJO LA GARANTÍA
Todo servicio deberá ser realizado por un centro de servicio
autorizado por Haier. Para obtener el nombre y el número de
teléfono del centro de servicio autorizado más cercano, llame al
1-877-337-3639.
Antes de llamar, tenga a mano la siguiente información:
Número de modelo y de serie del aparato. El nombre y la dirección
del distribuidor en donde compró la unidad y la fecha de compra.
Una descripción clara del problema.
Un comprobante de compra (recibo de compra).
Esta garantía cubre servicios para electrodomésticos dentro de
los Estados Unidos continental y Canadá y donde esté disponible
en Alaska, Hawaii y Puerto Rico.
Lo que no está cubierto bajo esta garantía:
Reemplazo o reparación de fusibles domésticos, cortacircuitos,
cableado o plomería.
Un producto cuyo número de serie original haya sido removido o
alterado.
Cualquier cargo por servicio que no haya sido identicado
especícamente como servicio normal, como puede ser el área o
las horas de servicio.
Sustitución de las bombillas de luz.
Daños ocurridos durante el transporte.
Daños ocasionados por la instalación o el mantenimiento
inadecuados.
Daños por el uso incorrecto, abuso, accidente, incendio, inundación
o fenómenos de la naturaleza.
Daños debidos al servicio efectuado por un distribuidor o centro de
servicio que sea diferente del autorizado por Haier.
Daños ocasionados por la corriente, el voltaje o el suministro
eléctrico incorrectos.
Daños que resulten de cualquier modicación hecha en el producto,
alteración o ajustes no autorizados por Haier.
Ajuste de los controles manejados por el cliente según han sido
identicados en el manual del propietario.
Mangueras, perillas, bandejas de pelusa y todos los otros
aditamentos, accesorios y piezas desechables.
Cargos por mano de obra, transporte para el servicio y envío para la
remoción y el reemplazo de las piezas defectuosas que se efectúen
después del período inicial de 12 meses.
Daños ocasionados por un uso diferente al doméstico normal.
Cualquier gasto de transporte y de envío.
ESTA GARANTÍA LIMITADA REEMPLAZA TODAS LAS OTRAS
GARANTÍAS, EXPRESAS O QUE INCLUYAN LAS GARANTÍAS DE
COMERCIABILIDAD O DE CAPACIDAD PARA UN PROPÓSITO EN
PARTICULAR
El recurso provisto en esta garantía es exclusivo y está otorgado en
lugar de cualquier otro recurso.
Esta garantía no cubre daños incidentales o consecuentes, de modo
que las limitaciones indicadas anteriormente pueden no aplicarse
en su caso. Algunos estados no permiten las limitaciones acerca
de cuánto tiempo dura una garantía implícita, de modo que las
limitaciones arriba indicadas quizás no le correspondan.
Esta garantía le otorga derechos legales especícos, y es posible
que usted tenga otros derechos, los cuales varían de un estado a
otro.
Haier America
Wayne, NJ 07470
37
Page 40

IMPORTANT
Do Not Return This Product To The Store
If you have a problem with this product, please contact the
“Haier Customer Satisfaction Center” at
1-877-337-3639.
DATED PROOF OF PURCHASE, MODEL #, AND SERIAL #
REQUIRED FOR WARRANTY SERVICE
IMPORTANT
Ne pas Réexpédier ce Produit au Magasin
Pour tout problème concernant ce produit, veuillez contacter
le service des consommateurs “Haier Customer Satisfaction Center” au
1-877-337-3639.
UNE PREUVE D’ACHAT DATEE EST REQUISE POUR BENEFICIER DE LA GARANTIE.
IMPORTANTE
No regrese este producto a la tienda
Si tiene algún problema con este producto, por favor contacte el
“Centro de Servicio al Consumidor de Haier” al
1-877-337-3639 (Válido solo en E.U.A).
NECESITA UNA PRUEBA DE COMPRA FECHADA, NÚMERO DE MODELO
Y DE SERIE PARA EL SERVICIO DE LA GARANTÍA
Made in China
Fabriqué en Chine
Hecho en China
Haier America
Wayne, NJ 07470
HRF15N3AGS
Issued: June 2015 Printed in China Part # 00XXXXXXXXX
 Loading...