

Page 1
Features
Removing and Installing the Doors
Connecting the Water Supply Line
Preparation Before Use
Precaution when Refrigerating Food
Tip and Hints in Using the Fresh Food Compartment
Use of the Ice-maker and the Cold Water Dispenser
Removing and Installing the Ice Bucket
Precautions in Using the Dispenser
Defrosting, Cleaning
Shutting off the Refrigerator
Page 2
Before operating this appliance, please thoroughly read and retain this manual for your
reference. Because we offer a variety of models, the features of your refrigerator may differ
slightly from those described in this manual. The appliance is not intended for use by children
without adult supervision. Children should be supervised to ensure that they do not play with
the appliance.
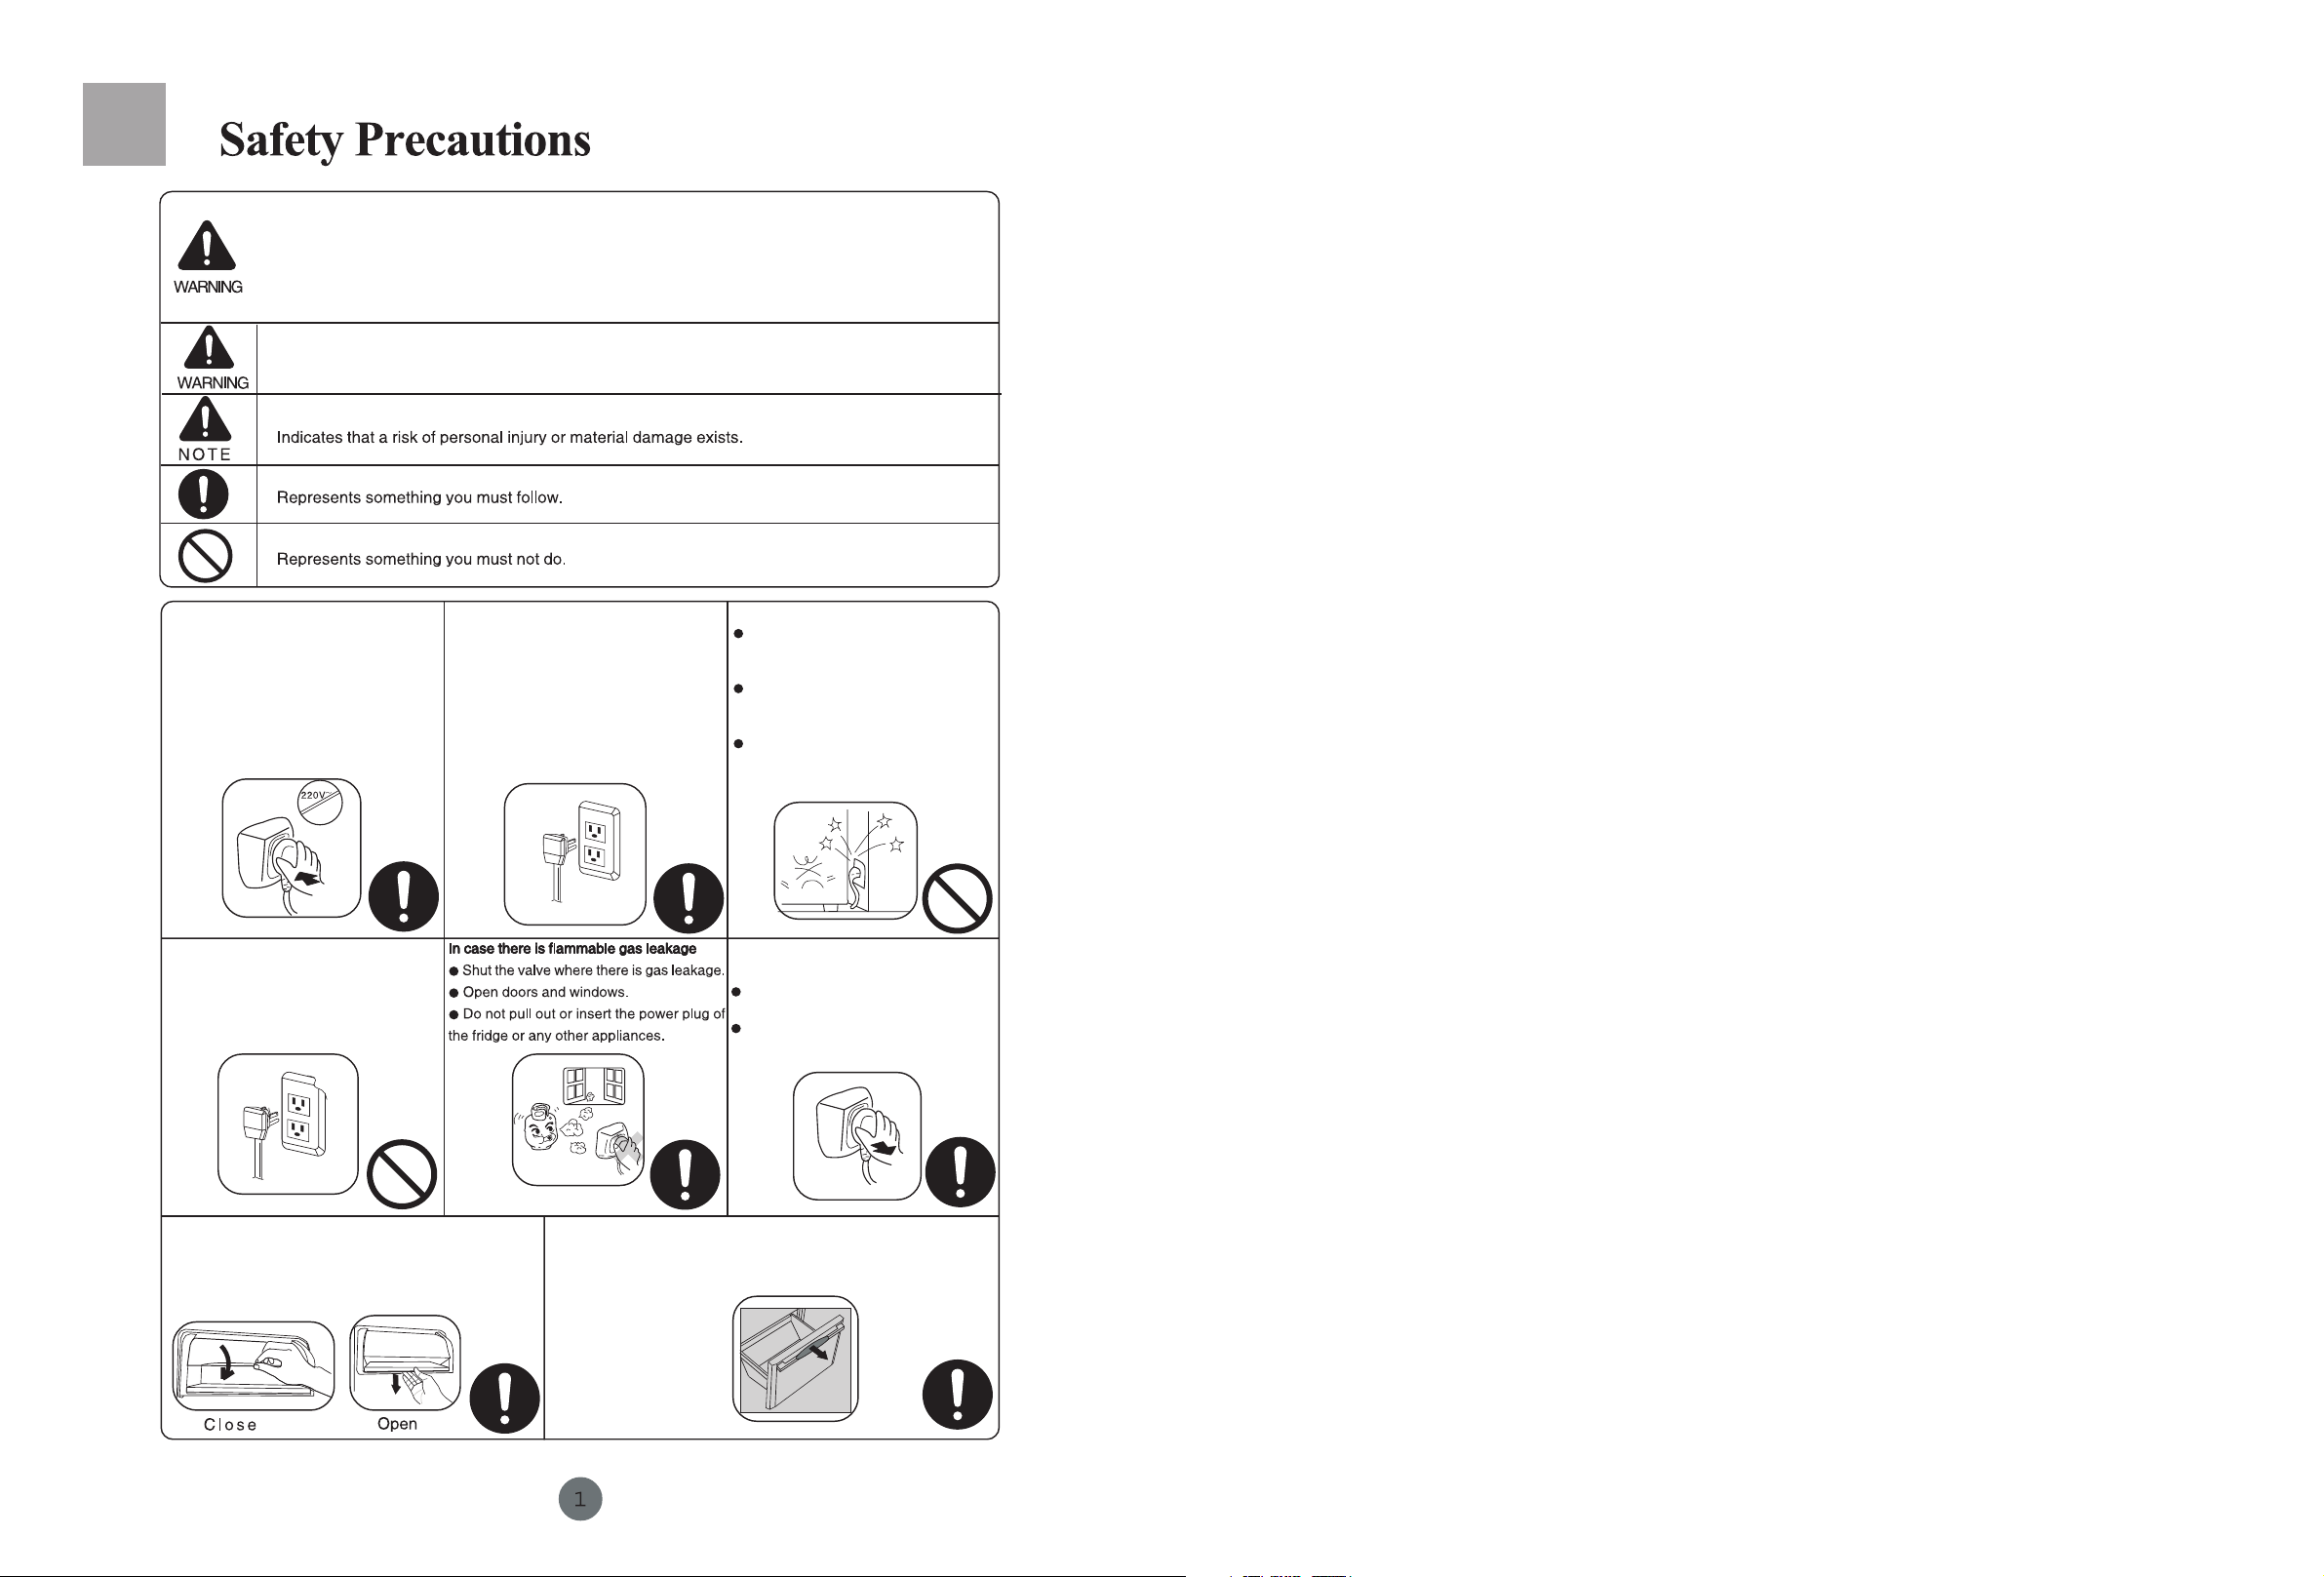
Indicates that a danger or risk of serious injury exists.
This refrigerator uses 220-240V~
50Hz AC power.
Failure in operation and damage to
the Control panel,thermostator and
compressor will occur if voltage is
outside the range 187-242V unless
a regulator with a capacity of over
750W or higher is install.
50Hz
In case the power cord is damaged:
If the cord or plug is worn or damaged,
stop using it.
Contact a service engineer to replace
it.
A separated socket is a must and
a reliable grounded plug is
needed as well.
This refrigerator uses a three-prong
(grounding) socket. In every case,
cutting off or removing the third
prong (grounding) plug is prohibited.
After the refrigerator is installed, the
plug must be within reach.
Do not damage the power cord.
Do not disconnect the power cord
by pulling on it. Hold the plug and
pull it out from the socket directly.
The refrigerator must not press
on the cord. Do not step on the
cord.
When you move the refrigerator
away from the wall, make sure that
you do not roll over or press on the
cord.
Unplug the fridge in the following
cases:
Before you clean or maintain the
fridge, unplug the fridge.
Before changing the light bulb,
unplug the fridge to prevent potential
shock.
When you open or close the dairy bin, please
do so as shown to prevent pinching finger:
Do not pull the convertible drawer with too much force,
or food might fall out. Do not put too much food in the
convertible drawer, or the food might fall out.
Page 3
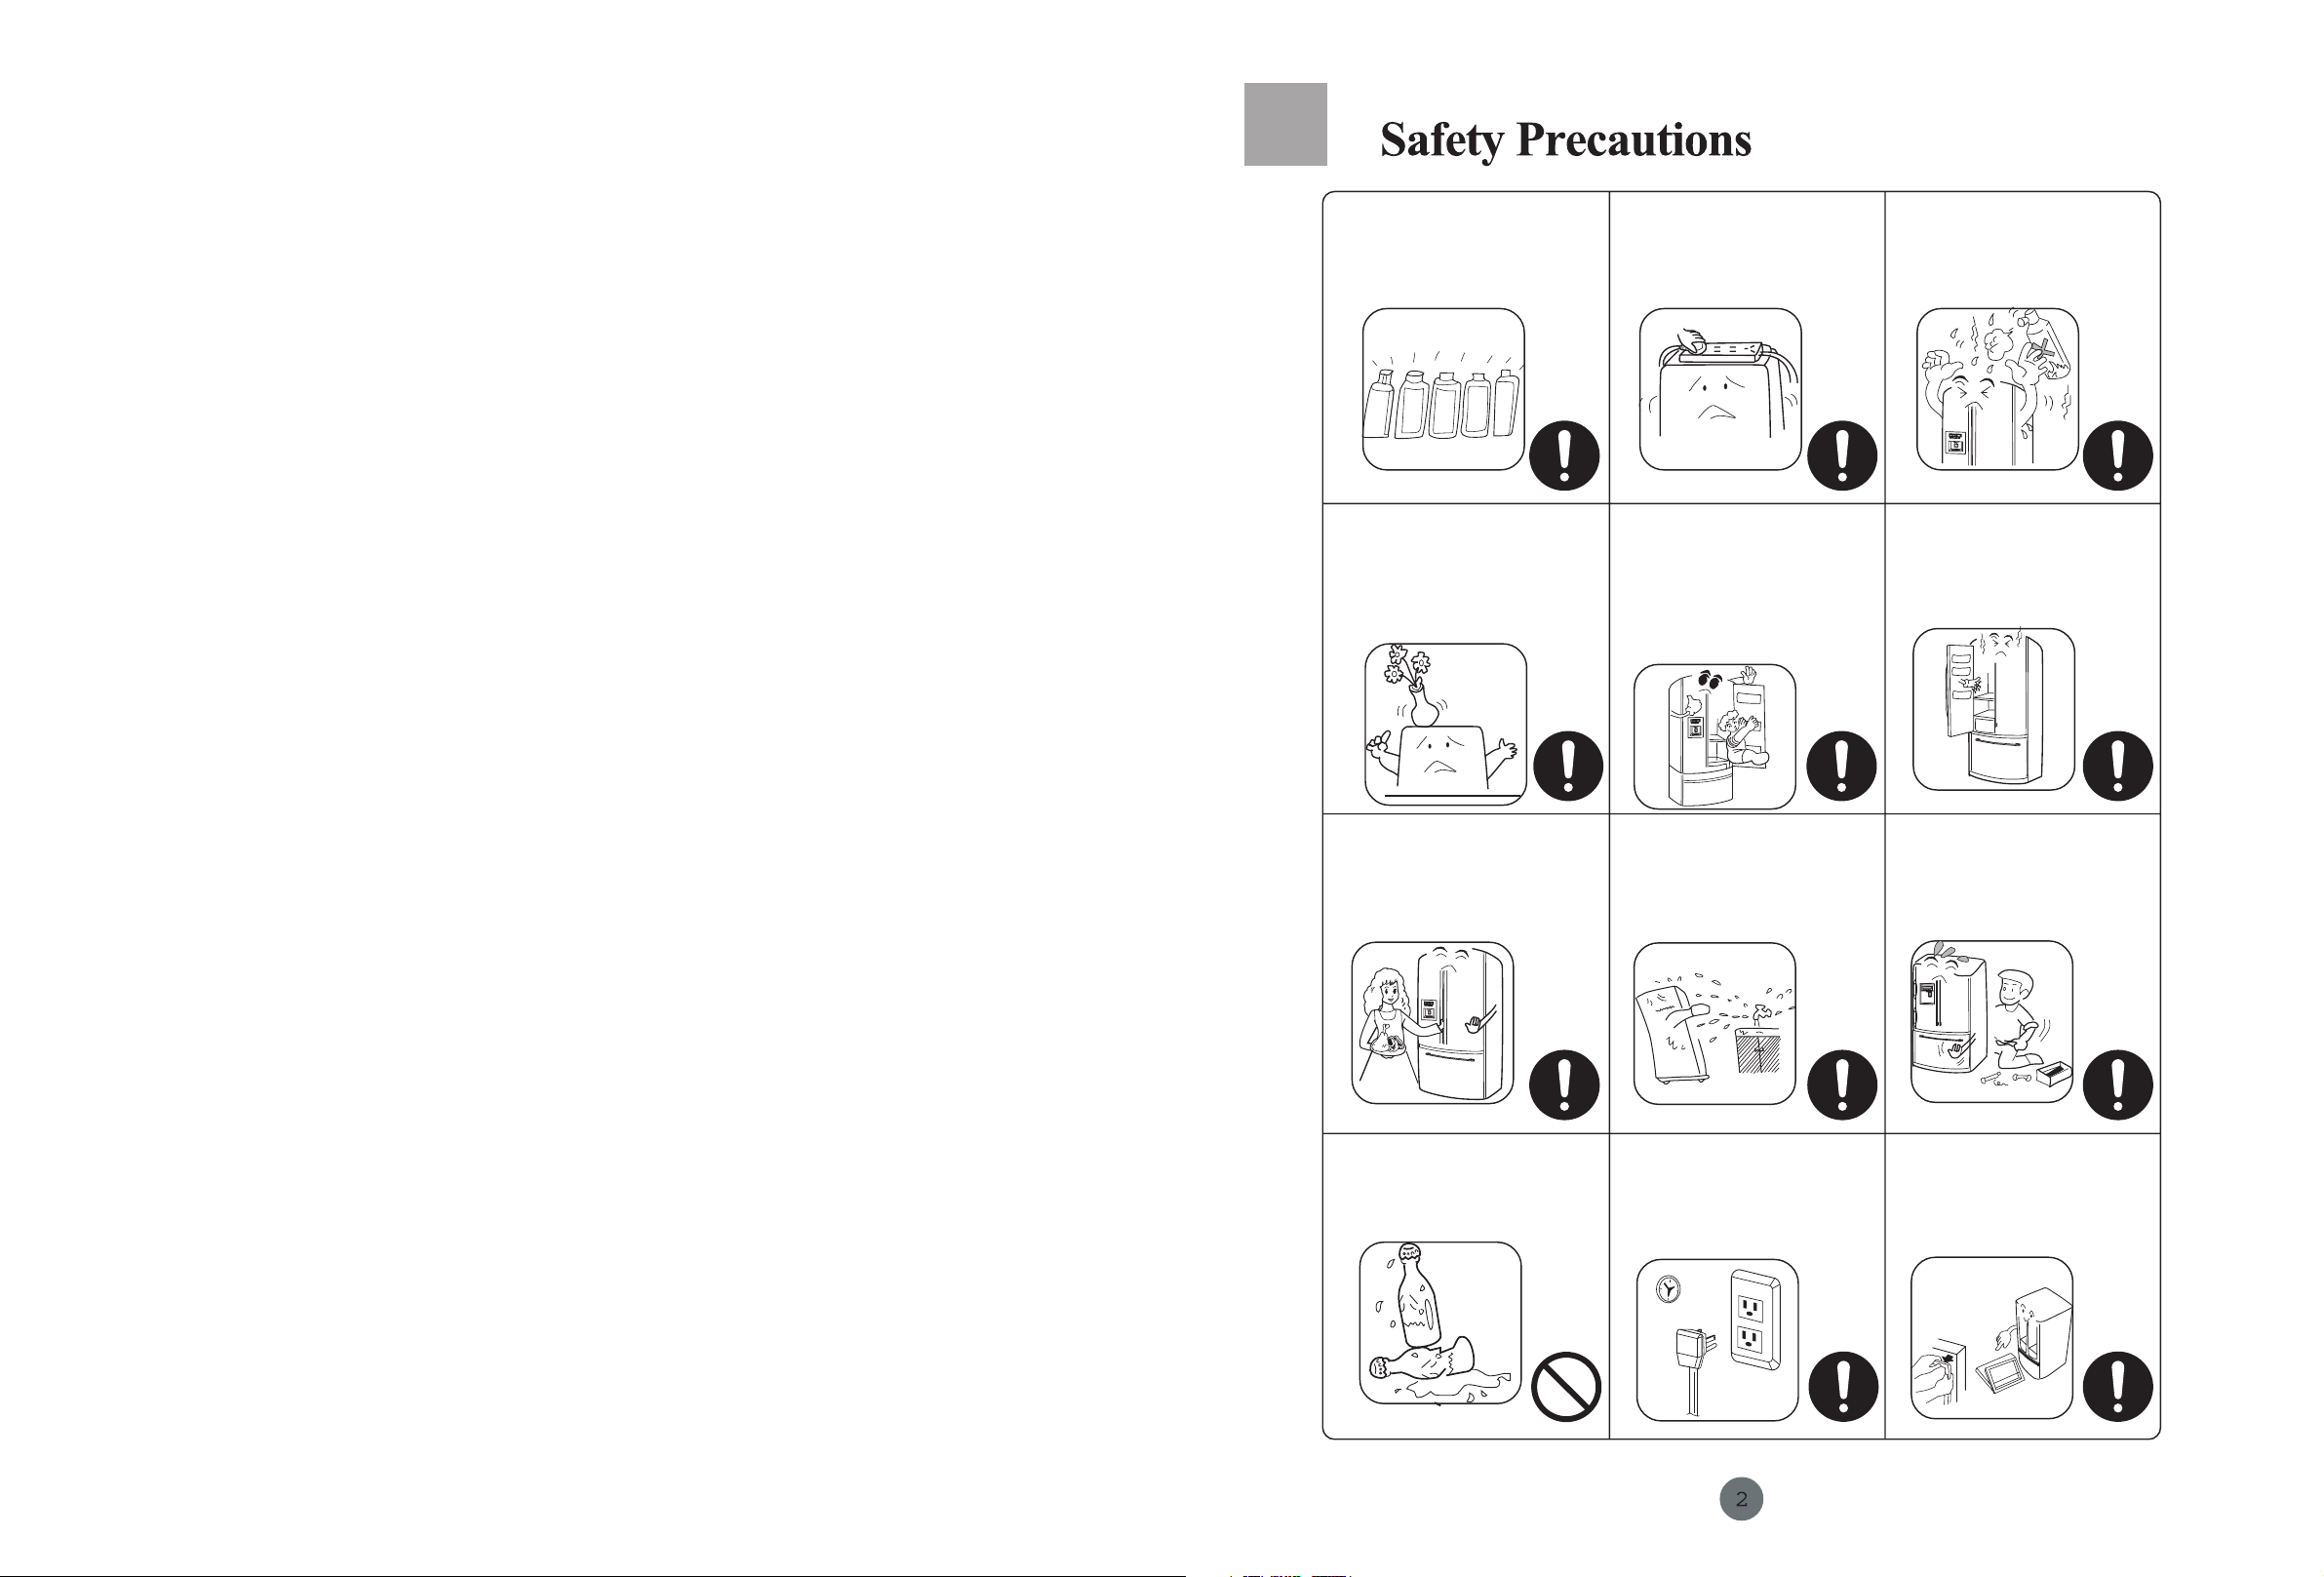
Flammable, explosive, and dangerous
items, and highly corrosive acid and
alkali must be put in fridge.
alkali
gas
spray
mousse
acid
Drugs, vaccines, and chemical
reagents must not be put in fridge.
This fridge is for household use only.
It cannot store temperature-sensitive
materials.
Do not store or use petrol or other
flammable substances near the
fridge to avoid fire hazard.
Do not put unstable materials on the
fridge, such as heavy containers full of
water, to avoid personal injury. Do not
rest water containers on the fridge to
prevent spills that could damage the
electrical workings of the unit.
The gaps among doors and cabinets
are small. Please do not put your
finger in these gaps. While opening or
closing the fridge door, keep children
away from the fridge.
Do not play or hang on the bottle bin
or drawers on the inside of the doors.
This may damage the bottle bin and
drawers or lead to them falling off the
fridge and causing personal injury.
Do not step on the convertible drawer
while adding or removing food from
the main compartments.
Do not spray or rinse the fridge, and
do not put the fridge in a humid
environment. This will prevent
damage to the electrical insulation
and performance of the fridge from
water exposure.
While the fridge is in operation, do
not touch the frozen surface of the
freezer(s), especially with wet hands,
to prevent frostbite.
Dismantling or modifying the fridge is
prohibited. Damage to the cooling
piping is also not allowed. Any repair
work must be done by a service
engineer or technician.
Do not put bottled beer or soft drinks in
the freezer to avoid broken glass. You
also must not put these beverages in
the convertible drawer when it is set to
freezer.
During a power failure or when
cleaning, pull out the plug. You must
wait at least 5 minutes before putting
the plug back in, otherwise it may
cause compressor start-up damage.
After the fridge is no longer in use,
take off the doors, the gaskets, and
the shelves, and place them in a safe
place. This avoids the danger of
children playing in and getting caught
in the discarded refrigerator.
Page 4
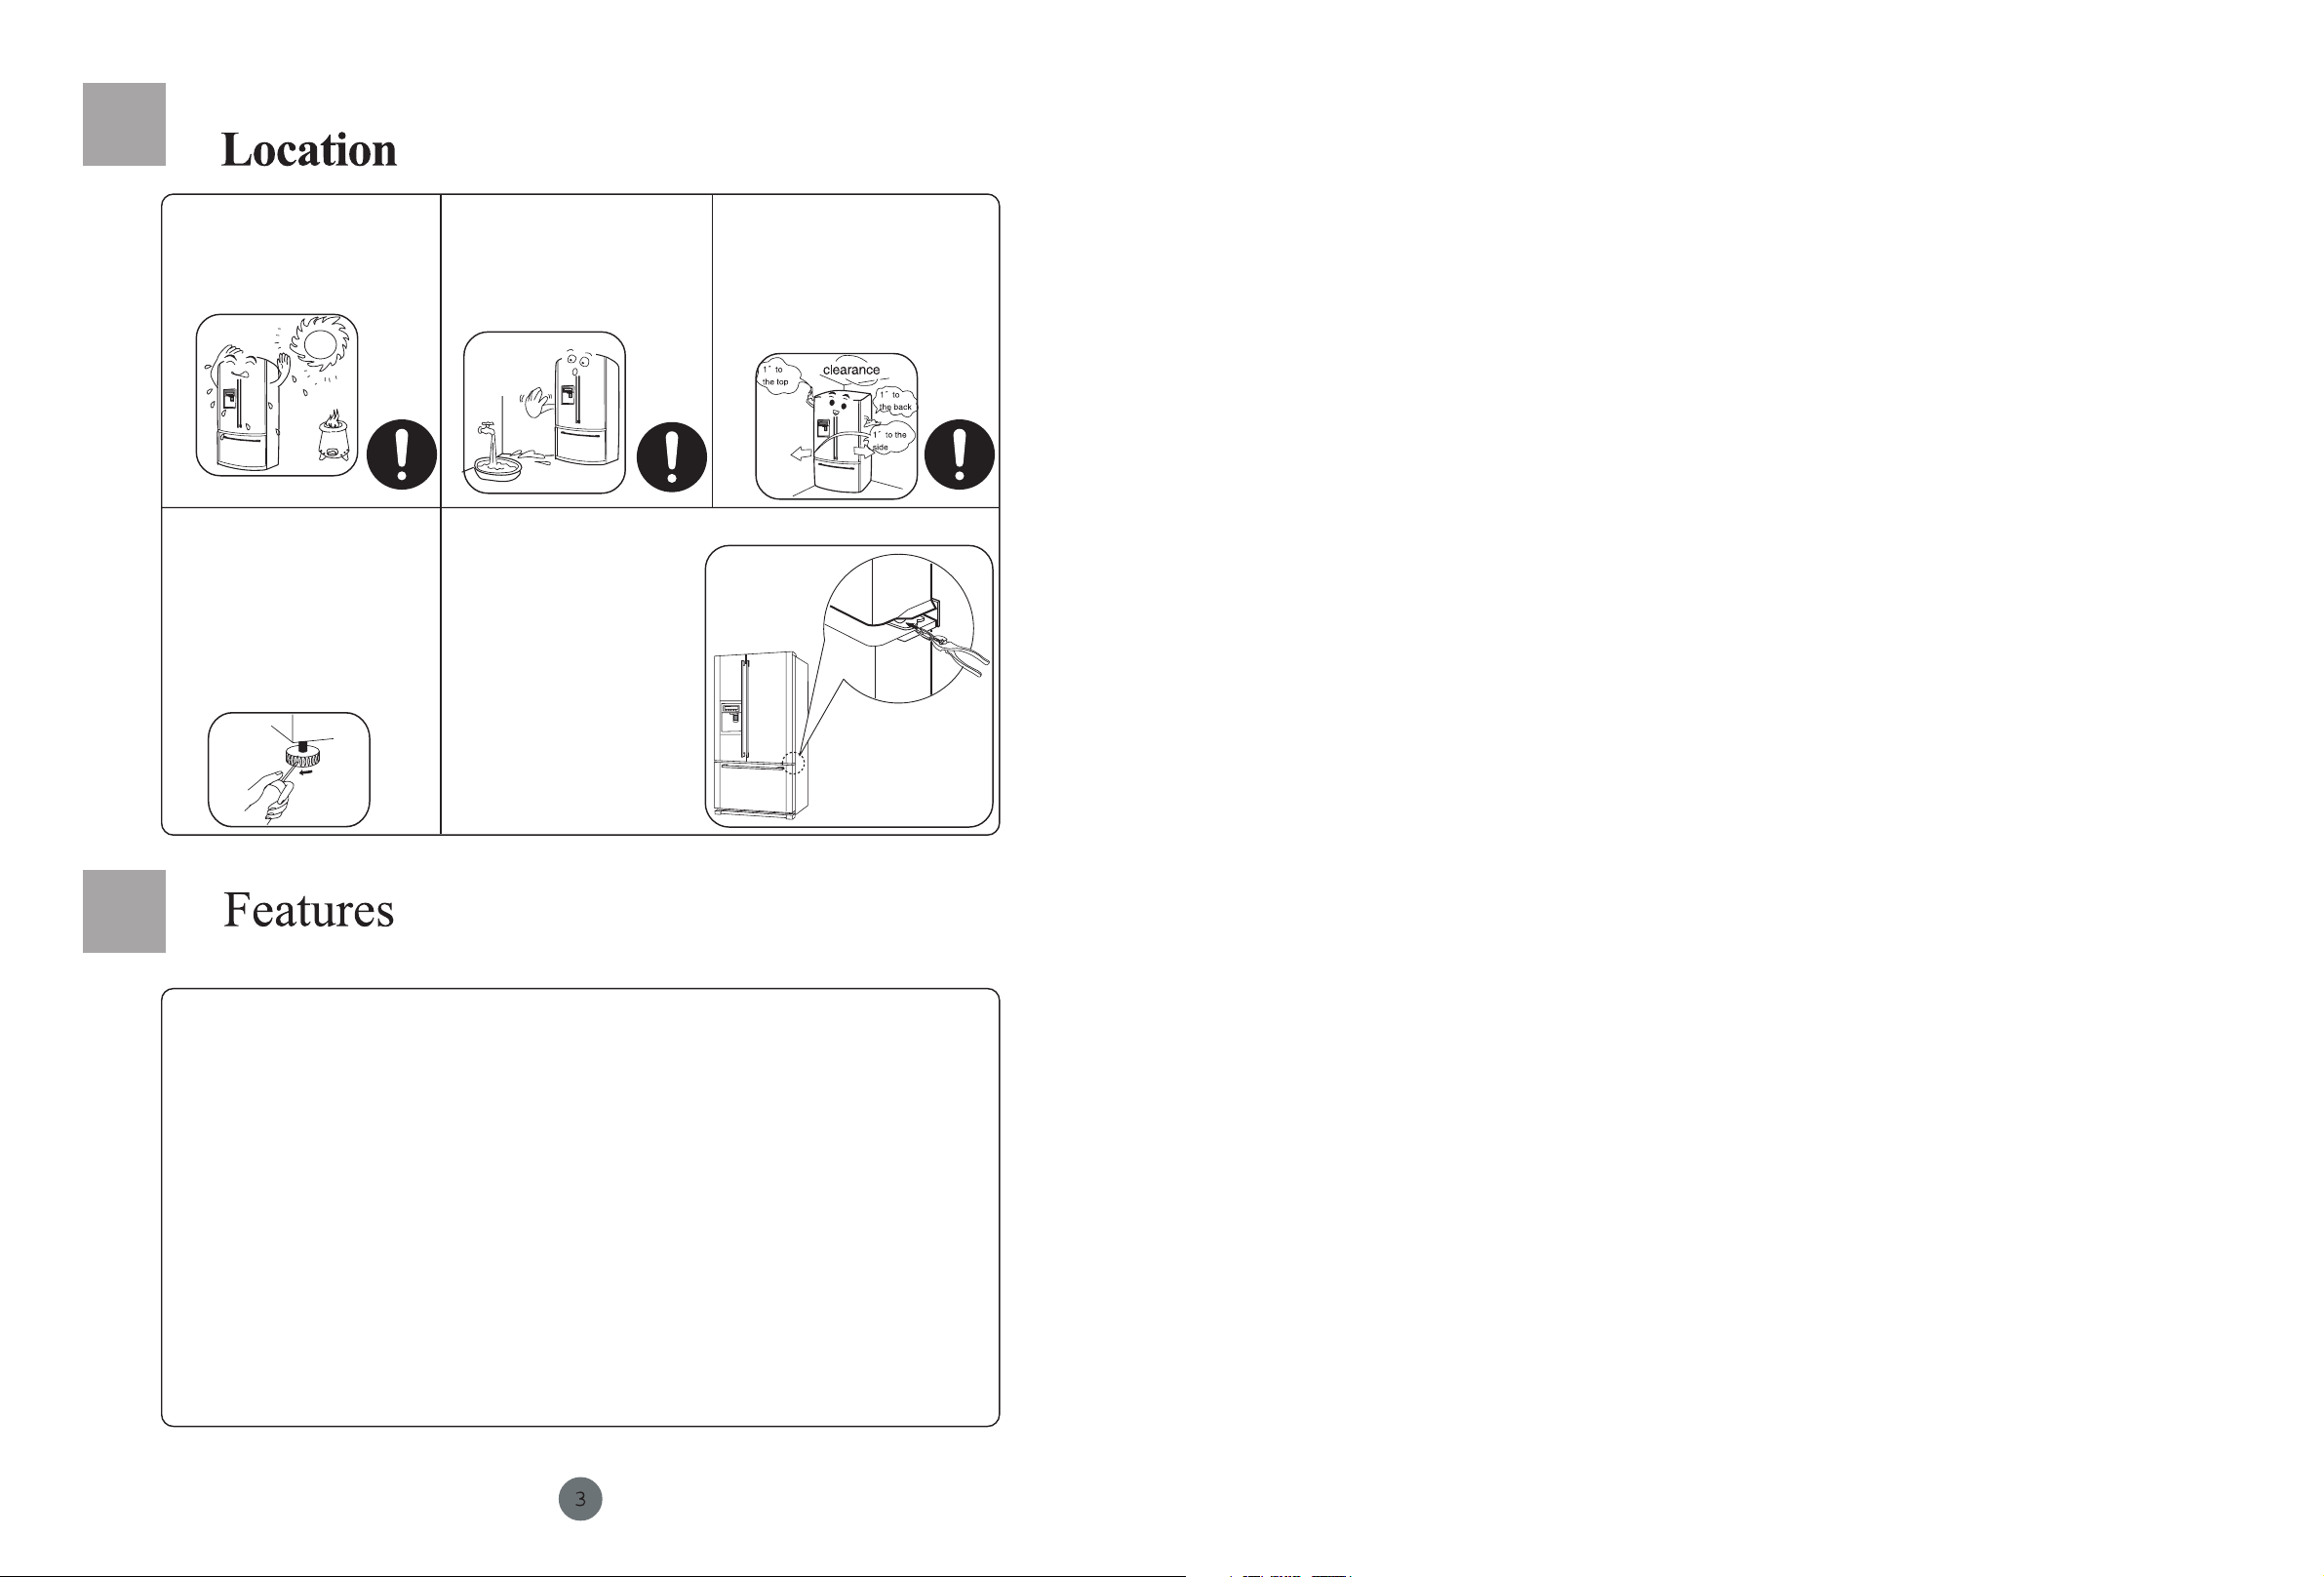
The fridge should be put in a location
that is far away from any heat source
or direct sunlight. This will improve
the performance of the fridge.
Do not put the fridge in a place
where it is humid, or where there
may be splashing water. Clean off
any splashing water or dirt with a soft
cloth.
The fridge must be put in an
environment with good ventilation. It
must be near a safe water resource,
and there must be at least 1 inch of
space on each of the three sides and
top.
Cabinet Adjustment
The fridge must be on a flat, solid
floor. You can put a flat, hard, nonflammable spacer underneath it if you
wish. Do not use the packing foam as
a spacer. If the fridge is on a slightly
uneven surface, adjust the leveling
legs. Raise the fridge by turning one
leg clockwise, and lower it by tuning
the leveling leg counterclockwise.
1. Water Filter:
This provides chlorine and odor free high quality water. The filter is easy to change.
2. Convertible Drawer:
This drawer can be set as a freezer, soft freeze, or refrigerator.
3. Extra-Large, Spacious Design:
Large capacity in refrigerator and freezer sections. Tempered glass shelves are adopted in the refrigerator
compartment. There are also spacious crispers for produce storage.
4. CFC-Free, Frost-Free, Fast-Freeze, Fast-Cool, and Extra-Ice Options.
5. Air Curtain Technology:
The air curtain is on the top front of the refrigerator section. It prevents cold air from escaping when the door is
open, and distributes cool air evenly. This ensures food is kept evenly, longer.
6. Automatic Display
7. Door Ajar Alarm.
Door Heights
If the door heights are not even,
follow these instructions for
alignment:
1. Raise the door from the middle
hinge with one hand.
2. Insert clip ring with pliers with
the other hand, as shown.
3. Insert the other clip rings until
the doors are aligned. (Three
clip rings are provided.)
Page 5
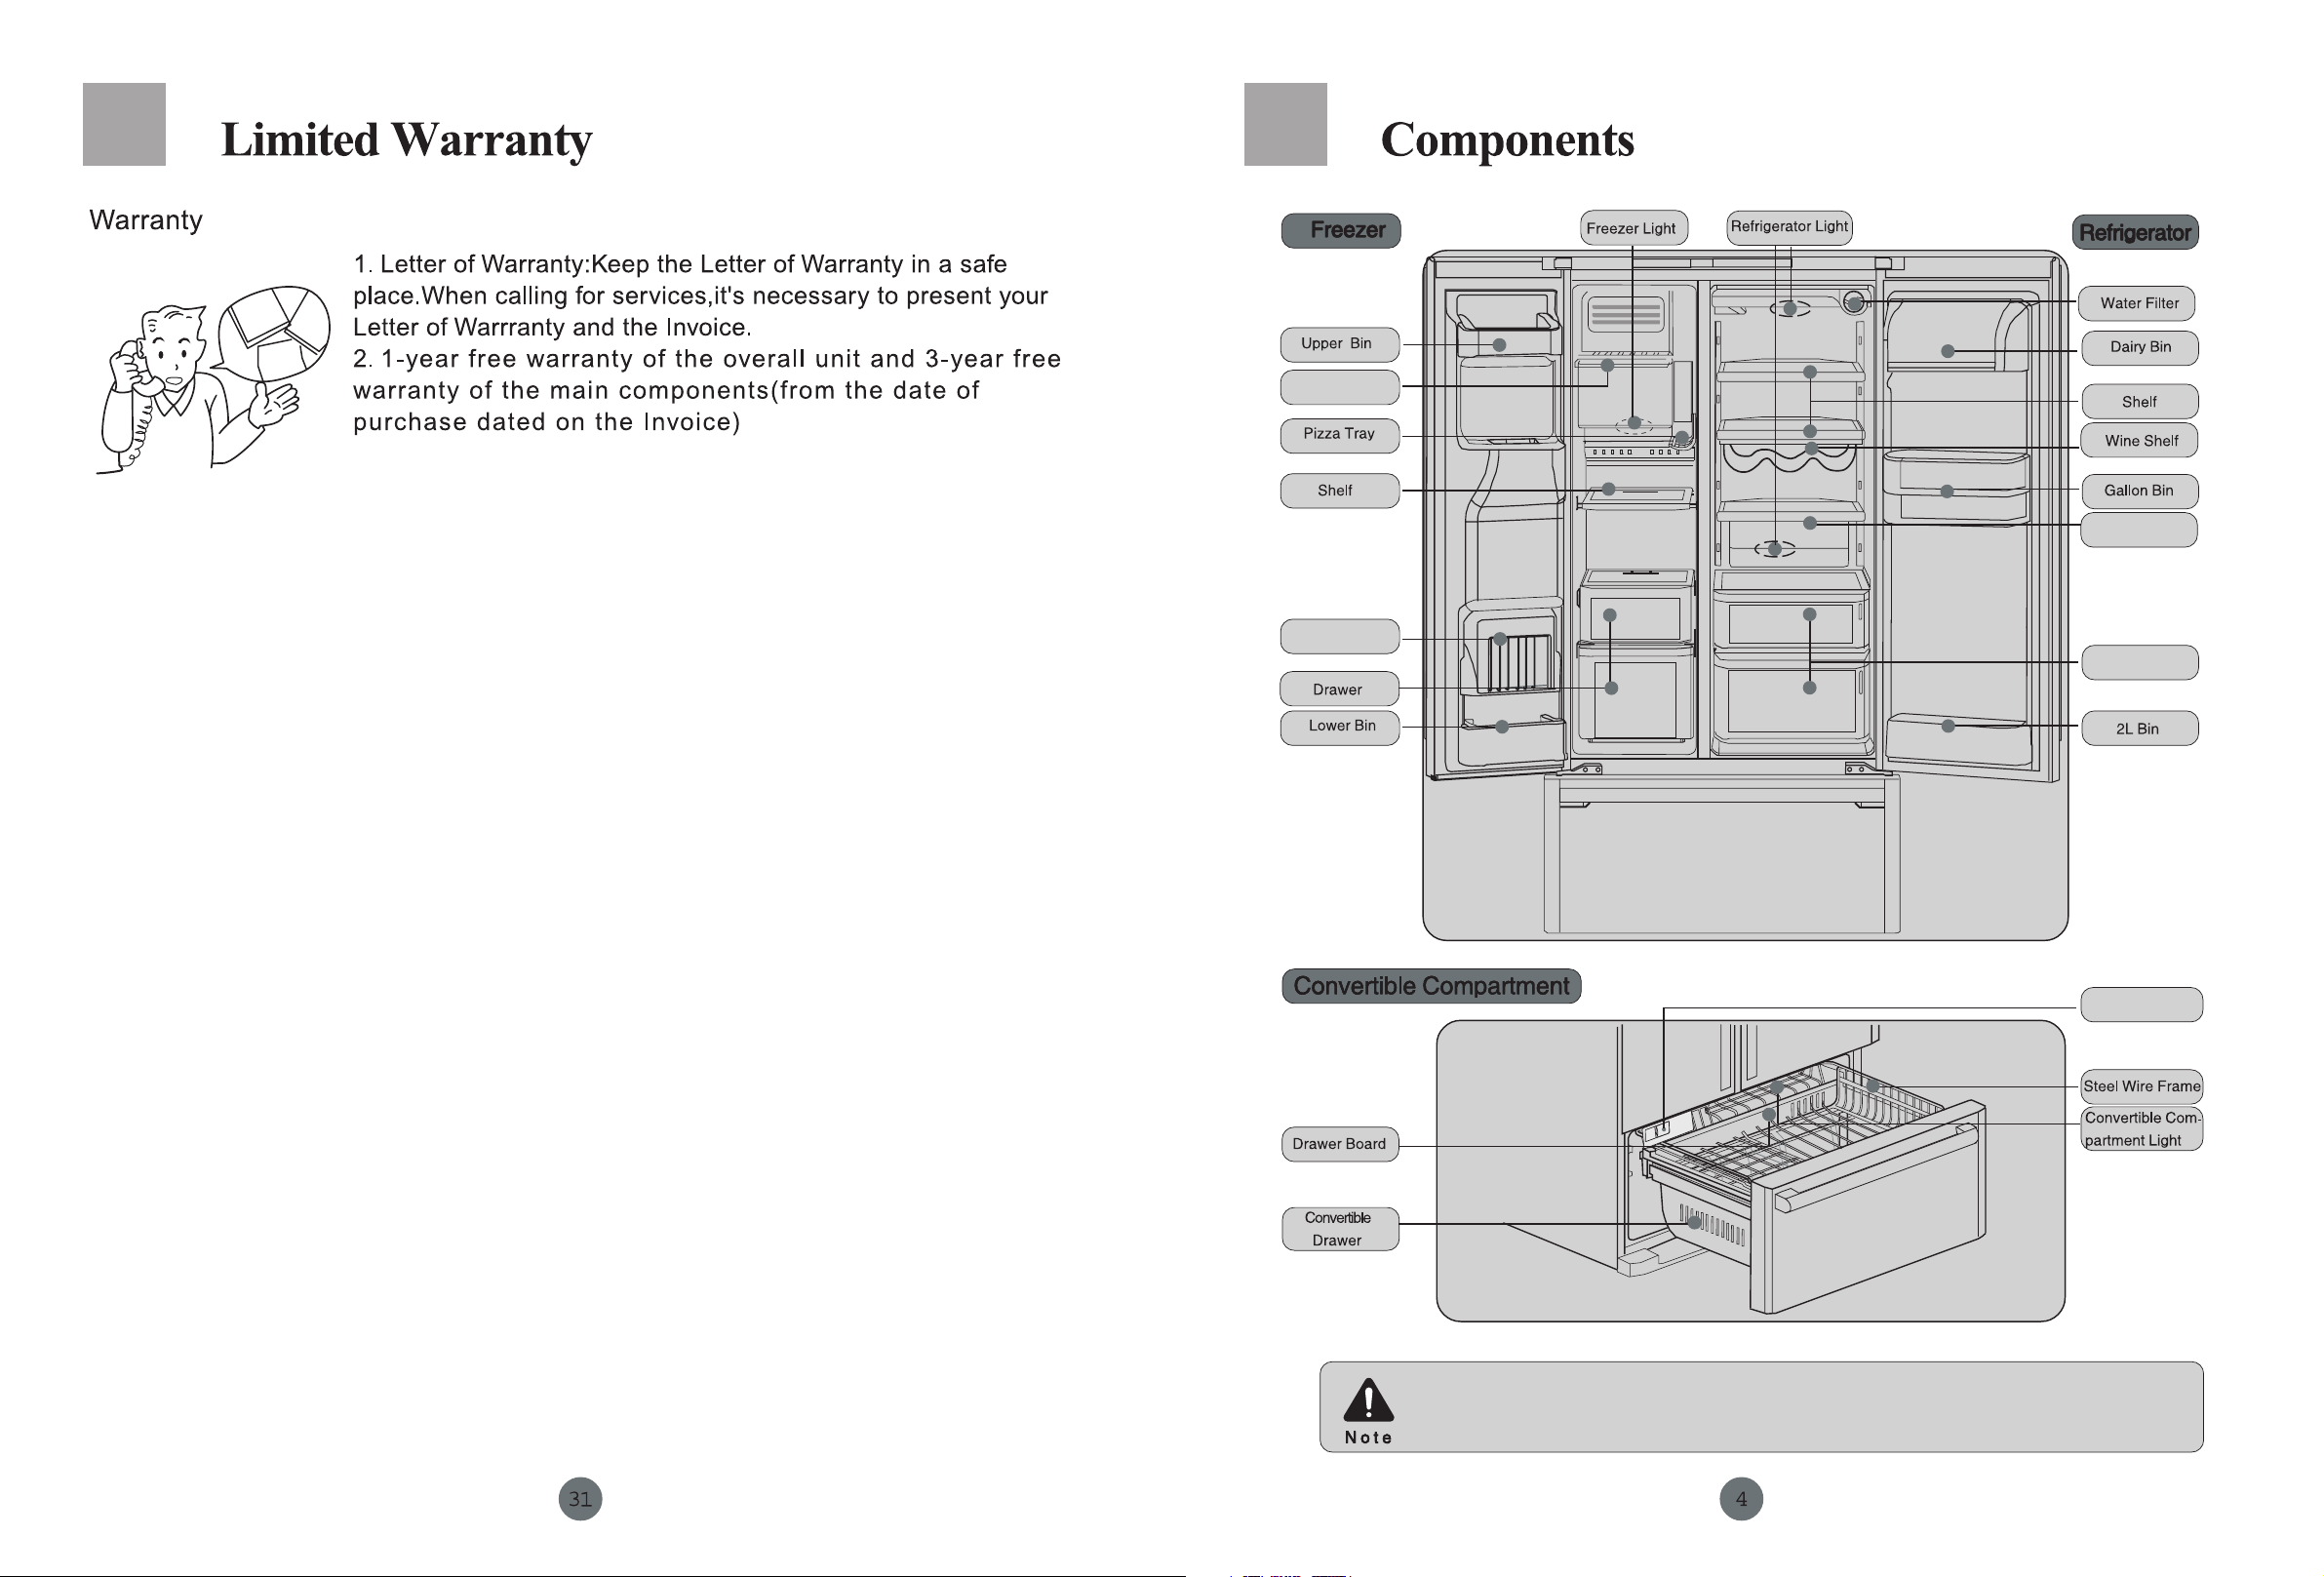
Ice-cream Shelf
Tilt bin
Glide Shelf
Crispers
Due to product modification, your purchased Haier refrigerator may not be identical with the one
shown in the manual. We hereby express our apologies to you for this possible difference.
Movable Board
Page 6
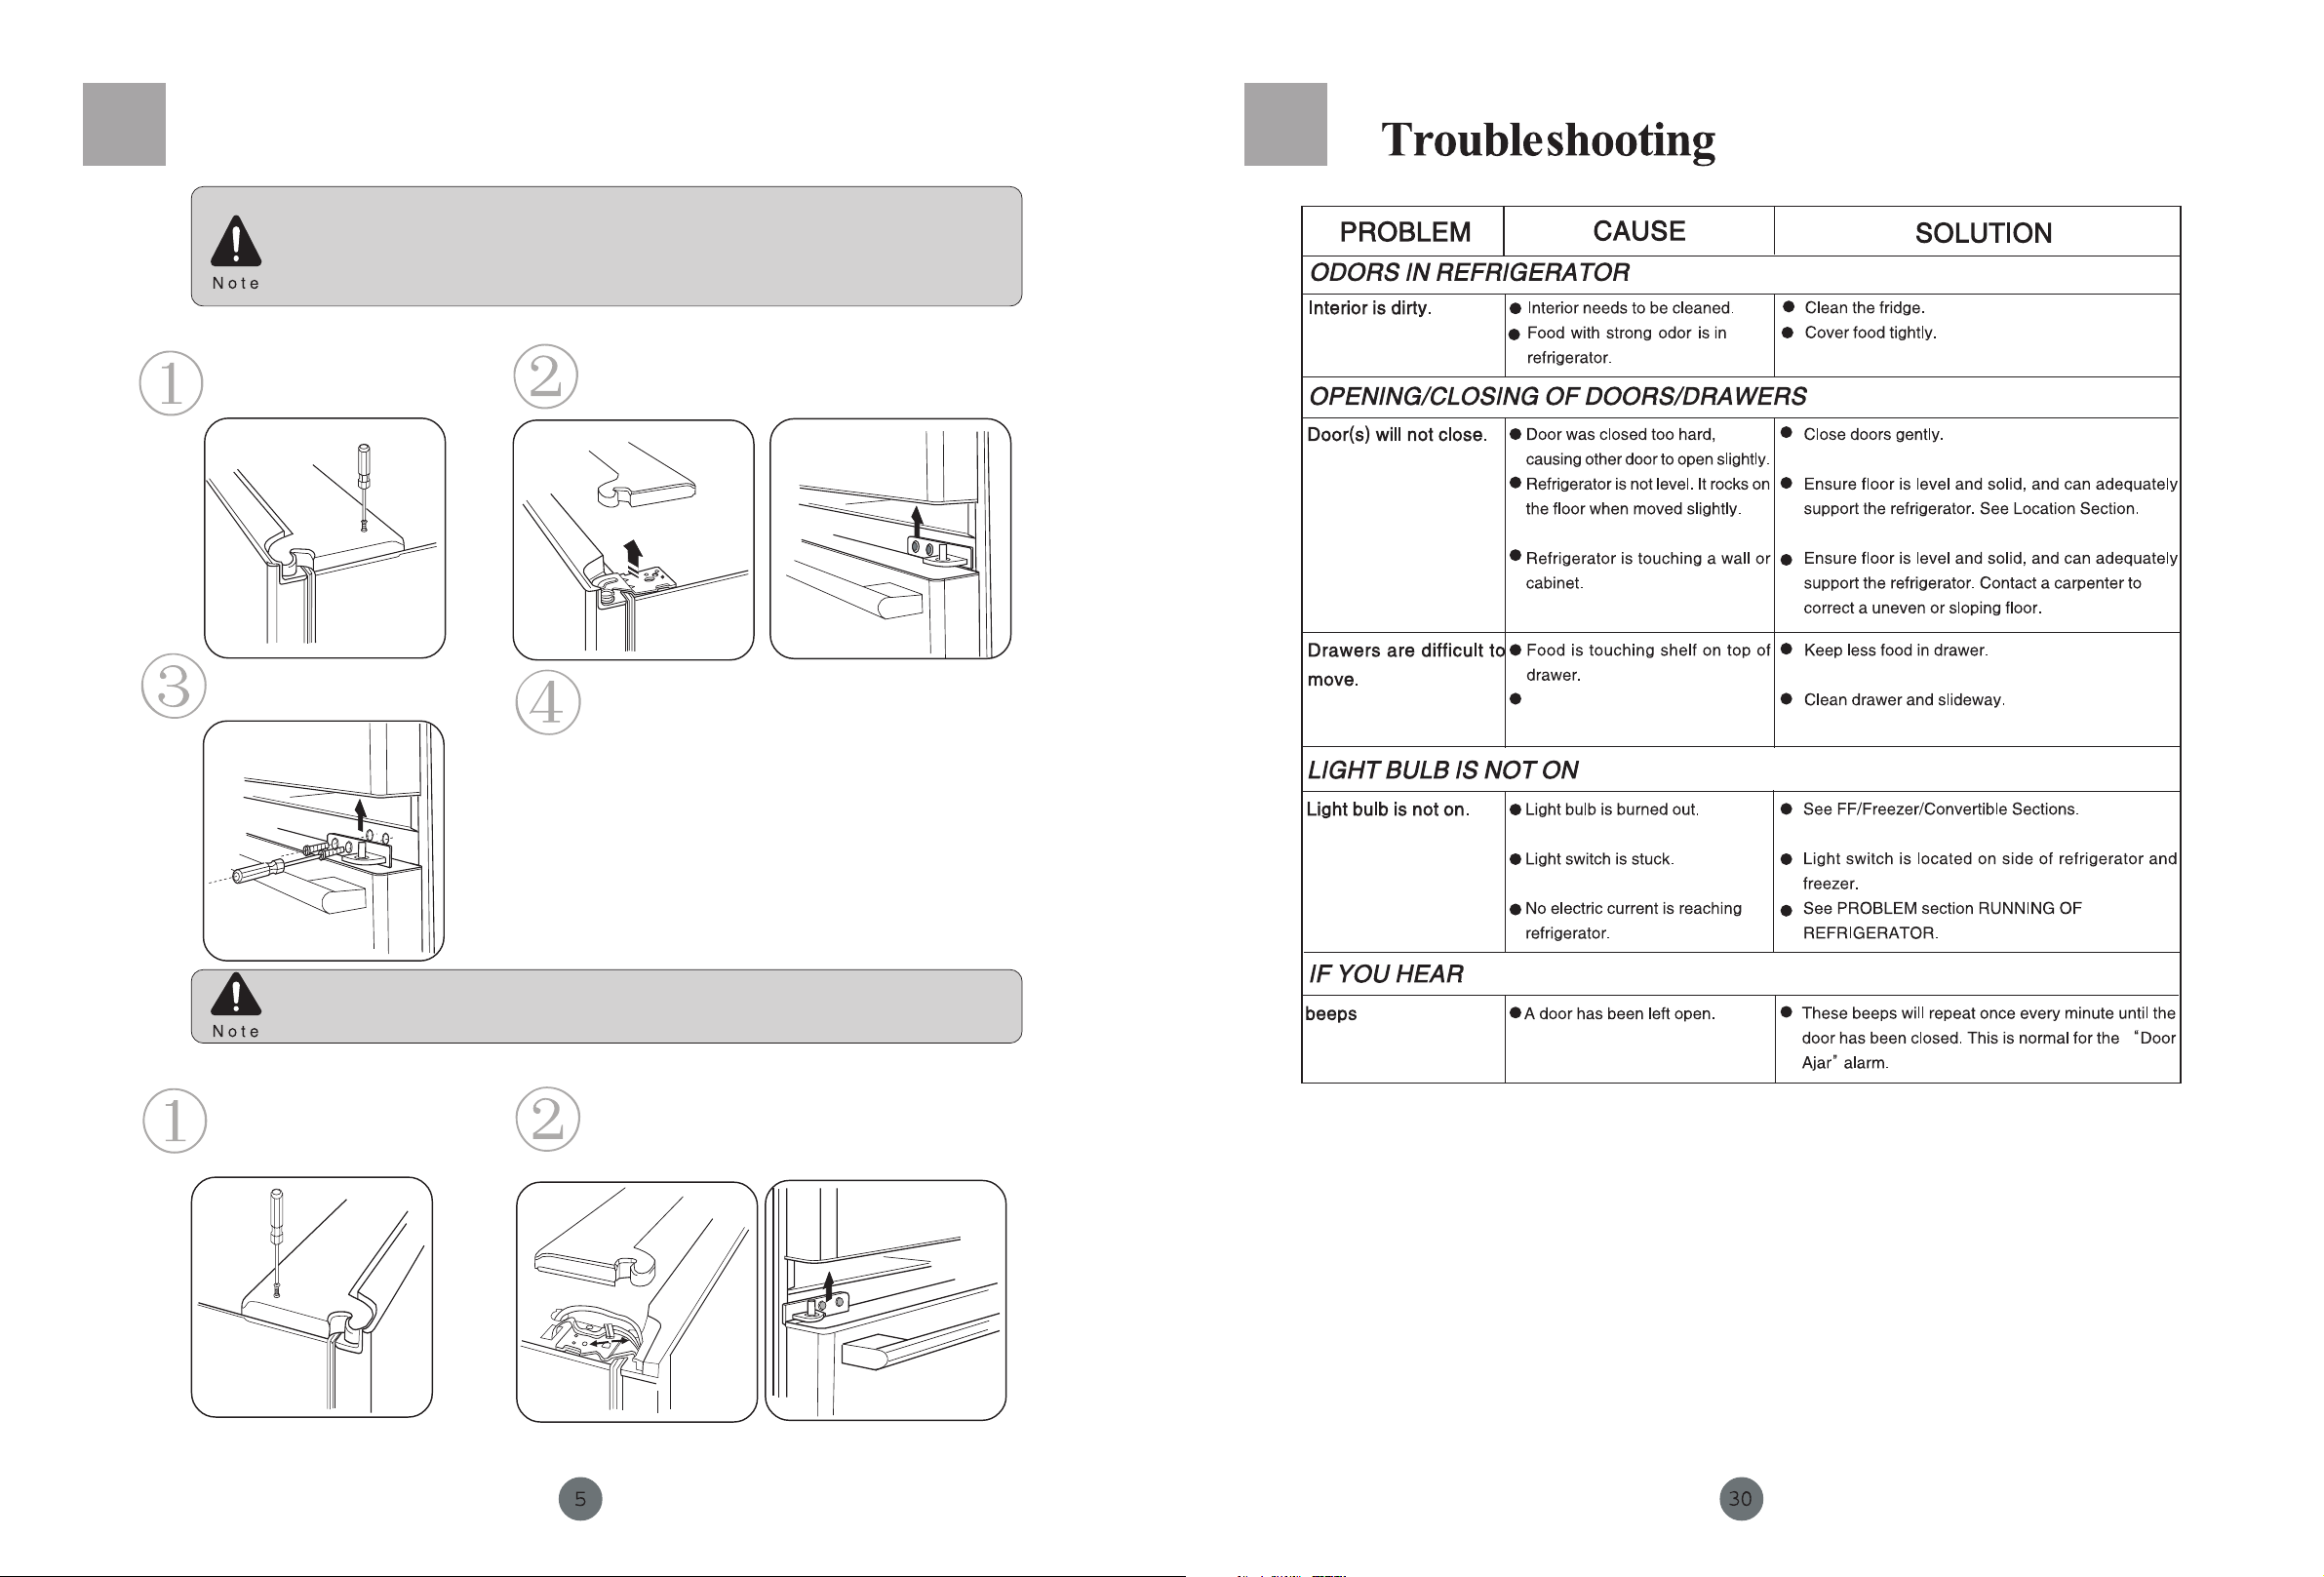
Removing and Installing the Doors
Only required in the event your refrigerator has clearance problems entering your home or
getting it to it's operating location.
It is suggested you have 2 or more people present when doing this job in order to complete
the job correctly and avoid personal injury.
Removing and Installing the Fresh Food Door.
Using a philips screwdriver remove
the top hinge cover screw and lift off
the top hinge cover.
Then take off the fresh food door and place it in a safe
place.
If necessary, remove the
middle hinge.
When raising the hinge to separate it from the door, be careful the door doesn't drop
to the floor.
To install the fresh food door follow reverse order.
Removing and Installing the Freezer Door
Perform Step 1 in "Removing and
Installing the Fresh Food Door" above.
Disconnect the wire joint and the water pipe. With a
screwdriver remove the to hinge screw. Remove the freezer
door and place it in a safe place.
Track that drawers slide on are dirty.
Page 7

Removing and Installing the Doors
If necessary, remove the middle hinge.
When raising the hinge to separate it from the door, be careful not to drop the door. When reinstalling the door water line connector please seat all the way in the water pipe in the union and
add union black clips to secure line in place.
To install the freezer door, follow reverse order.
Removing and Installing the Convertible Drawer (only if necessary)
Open the drawer completely.
Using a screwdriver remove the screws on both sides of
the glide (as shown). Take off the supports on both sides,
then remove the drawer and place in a safe place.
To install the drawer use the reverse order.
To prevent a suffocation hazard for children or pets, do not allow them to play
inside the drawer.
Page 8

Connecting the Water Supply Line
sediment
Confirm whether the ice maker
is closed.
Ice maker is producing less ice
than expected.
120
Page 9

Connecting the Water Supply Line
Raise the refrigerator temperature slightly.
Close the door gently.
Open the door less often.
REFREGERATOR
After installing the water line,please confirm no leakage in every
connect place before use the refrigerator.
Page 10

Preparation Before Use
Remove all packing materials,
including foam, base pads,
and tape used to attach
accessories.
Handles Install and Removal:
Note: Remove protective plastic covering from all handles.
1. Refrigerator and Freezer Door Handles Installation
a.) handles are packed inside the fresh food compartment.
b.) carefully remove the handles from the packing material.
c.) Position the long handle marked REF TOP to the right door of the refrigerator.
d.) Align the handle onto the handle bolts.
e.) Pull the handle downward until handle locks in place.
f.) Repeat steps above for long freezer door handle (FRZ TOP).
2. Convertible Drawer Handle Installation
a.) Position the short handle onto the Convertible Drawer Bolts (slight horizontal bend upward).
b.) Pull the handle to the left until handle locks in place.
3. Removing Handles Follow Opposite Process
4. Door Bin Installation
a.) Remove 4 door bins from inside the fresh food and freezer compartments.
b.) Carefully remove all protective wrappers.
c.) Position the narrow bins (2L) onto the lower door liner tabs of the fresh food door to clear crispers properly.
d.) Position bins down over tabs to lock in place.
e.) Position the remaining bins as shown (see picture).
Check accessories and
documents:
Check materials against the
packing list. If any are different
or missing, inquire with the
retailer.
section
Copy the fridge model number and manufacturer's serial number for all service calls
or inquiries you may have in the future.
It is recommended to clean the fridge
before use. Mix 4 liters of water with 1
tsp baking soda. Wipe the interior and
exterior with a soft cloth moistened with
this mixture
Connecting the Power:
The default temperatures for all
three compartments are set at the
middle range for freezer,
refrigerator and convertible drawer
as a refrigerator.
Put food inside the fridge:
After the fridge has been plugged in
and is fully cooled, it is safe to put in
food and begin use.
On Standby:
After the fridge is put into place, adjusted, and
cleaned, connect the power to begin normal
operation.
Fridge work mode:
Manual adjustment: Set the temperature by
pushing the temperature-adjusting button.
(Refer to "Function"section.) Convertible
drawer will be set in the refrigerator mode by the
factory.
Every time the temperature settings
are changed, it takes some time for the
temperature to adjust. The length of
time depends on the amount of change,
the ambient temperature, frequent
door openings, quantity of stored food,
etc.
Page 11

Shutting off the Refrigerator
Handling Power Failure
Foods can be stored well after several hours of power failure, even
during the summer. You should call your electric company to ask
how long the food will last.
After a power failure, do not put new food into the fridge, and
open the door as infrequently as possible.
If you are aware that there will be a power failure ahead of time,
make cubed ice and put it in the upper part of the fresh food
compartment.
If the temperature becomes warmer in the freezer due to a power failure or other
malfunction, the expiration date on frozen food may change, and food quality may
decrease.
Discontinuing Usage
If you do not want to use the fridge for a long period of time, pull out the
plug. Cut off all power supply and water source. Clean the fridge as
directed in this manual. Leave the fridge door open to prevent any odors
from accumulating.
Extra Ice Button
Vacation
If you will be on vacation for a long time, cut off the power source and
water supply, and take out all the food. Clean the interior of the fridge after
any frost melts. Wipe it clean to remove any food residue that could cause
odors.
During Transport
Pull out the plug and cut off the power
Remove all foods.
Fix all moveable parts, such as fresh food shelves, the
crisper, and freezer shelves, with tape.
Close the fridge doors and fix with tape to prevent
opening during transport.
During transport, the maximum slant angle must not be
over 45 degrees (from vertical standing) to prevent
damage to oil draining out of the compressor.
During transport, do not hold the handle of the fridge.
This could cause property damage and is a threat to
personal safety.
Express Freeze Button
Express Chill Button
It is suggested that you should not lay the refrigerator flat
at any time. If you have to put it flat, refer to the notice on
the package.
Page 12

Lock and Unlock
I
Push I Button --- the lock button will light, and it is now in lock status.
Push I Button again --- the lock button light will turn off, and it is now not in lock status.
setting mode. The temperature range is 1 to 8 . The range increases one level till the maximum
th st
7 level every time you push S Button, the range decreases one level till the minimum 1 level every time you
push R Button.
Page 13

Push once O or N Button, Freezer Compartment Temperature Indicator P flashes, indicating temperature setting
mode. The temperature range is -14 to -21 . The range increases one level till the maximum 7
l st
evel every time you push O Button, the range decreases one level till the minimum 1 level every time you push
th
N Button.
AB K L CD
Convertible Drawer Settings:
1. Refrigerator Mode: in the unlock status, then Press A & B for 3 seconds until LED (K) lights up 1 to 8 .
2. Soft Freeze Mode: , Press A&B and hold until LED (L) lights up -1 -7 .
3. Freeze Mode: , Press A button for 3 seconds until lights up in LED (L) area.
in the unlock status
in the lock status
SC
Page 14

Express Freeze Setting
The "Filter Indicator" Light
The filter indicator light alerts you when it is time to change the filter cartridge.
If you don't change it often enough, water quality will be affected. You should change the filter at least every
6 months, or when water flow from the dispenser or ice maker decreases noticeably. Please note that you
may have to change the filter more often than every 6 months, depending on local water conditions.
and " " on the door displayCF
The function is designed to preserve food's nutritional value by deeply freezing it in a short period of time. Press
the M button. The express freeze indicator will light up. This indicates that the express freeze mode is chosen,
and express freeze will function automatically. It will stop after 3 hours. If you want to turn off express freeze
before 3 hours is up, press the M button again. The express freeze will then turn off.
Express Chill Setting
Press the T button. The express chill indicator will light up. This indicates that the express chill mode is chosen,
and express chill will function automatically. It will exit automatically. If you want to turn off express chill press
the T button again. The express chill will then turn off.
Fast Cooling Function of Convertible Compartment
When the convertible compartment is used as refrigerator and the unit is in the locked status, press the A button for
3 seconds to enter the convertible compartment's fast cooling mode. "K" displays the set range, and "L" displays .
Press the A button for 3 seconds again to stop the fast cooling of the convertible compartment.
""
Fast Freezing Function of Convertible Compartment
When the convertible compartment is use as soft freeze andthe unit is in the locked status, press the A button for 3
seconds to enter the convertible compartment's fast freezing mode. "L" displays the set range, and "K" displays .
Press the A button for 3 seconds again to stop the fast freezing of the convertible compartment.
""
1. Remove the old filter by turning the filter cartridge
handle CCW.
2. The cartridge will eject slightly from the filter housing.
3. Pull out the cartridge from the filter housing.
Water may be retained in the old filter cartridge.
This could cause some water spillage through the
filter housing drain.
4. Remove the protective heat seal from the new filter cartridge. Insert
it into the filter housing with the filter cartridge handle in the vertical
position. Then push the filter cartridge into the housing until it stops.
5. Gently turn the cartridge handle CW until it stops. The cartridge
handle should now be horizontal.
Ice maker Switch Function:
When the unit is in the locked status, Press the G and F buttons at the same time for 3 seconds. A buzzer will
sound, indicating the ice maker is off and in the locked status. To turn the ice maker back on, press the G and F
buttons again for 3 seconds. You will hear another buzzer, and the ice maker will be back on.
When the fridge is in the fast freezing and fast cooling status, the fridge will keep cooling
continuously.
6. Run the refrigerator water dispenser for 5 minutes after replacing the
filter, to flush out the water tank. Discard the water.
7. After replacing the Haier filter cartridge, reset the refrigerator display.
The refrigerator water dispenser and ice maker cannot be used
without the water filter.
1. Do not use water filter, dispenser, or ice maker with water that is microbiologically unsafe or if
you are not sure that it is safe, without disinfecting the water before or after it goes through the
system. Systems certified for cyst reduction may be used on disinfected waters that may contain
filterable cysts.
2. After installing a new water filter, discard all ice produced during he first 24 hours.
3. If the refrigerator drinking dispenser or ice maker has been used actively for an extensive
period of time, or if ice cubes have an unpleasant taste or odor, change the water filter.
4. Air trapped in the system may cause water and filter cartridge to eject. Use caution when
removing.
Page 15

When it is used as a refrigerator or as a freezer.
1. When the convertible compartment is changed from fresh food to freezer temperatures,
remove all of the food and store it temporarily in the main fresh food section. Open the moveable
baffle on the back basket wall from fresh to frozen. After about 2 hours, you can put the food for
freezing into the convertible drawer. Do not put bottled food or soft drink cans in the convertible
drawer.
2. When the convertible compartment is changed from freezer to fresh food, remove all of the
food and store temporarily in the main freezer compartment. After about 2 hours, you can put the
food you want to refrigerate in the convertible compartment.
3. Do not store fruits and vegetables in front of the moveable baffle.
Changing the Light Bulb
Parameter: 220-240V~/25W
Socket: E14 (25W max)
While changing the lamp:
Pull out the plug to cut the power source.
1. Remove the cover screw.
2. Press the stopper pin on the lamp cover to separate it
from the square hole.
3. Pull the lamp cover forward while holding it to separate
the jaw from the square hole.
Turn the lamp CCW to take it off and replace it with a new
bulb.
Defrosting, Cleaning
Defrosting the freezer
The freezer defrosts automatically. No manual work is
needed.
When the water filter indicator V is lit and K or L displays (change filter), the water filter needs to be replaced.
After you replace the water filter, press U to indicate that the water filter was reset. The water filter indicator V
will turn off and K or L resumes.
When you change the water filter, please refer to the "Water Filter" section of this manual.
30 seconds after pressing an operation button, the display turns off automatically. Press any button or open
any door to light up the display again.
If the display is broken but you still hear accompanying noises when you press button, this means the buttons
are still working. However you should call an after-sales service engineer to fix the problem to ensure optimum
performance.
""
Open Door Alarm
The refrigerator will sound an alarm automatically if any door or drawer is open for over 60 seconds. The alarm
will turn off when the door or drawer is closed.
SABBATH MODE
When the refrigerator is in the locked status, press the "LIGHT" button for 3 seconds. The buzzer will sound.
All cooling functions will remain in place but all of LEDs lights and alarms will shut off when you open the doors
or when you get ice and water. To turn the lights and alarm back on, press the "LIGHT" button for 3 seconds
again. All of LEDs, lights and alarms will resume working.
Cleaning
Food that is in the fridge for too long can produce an odor.
Periodically cleaning of the fridge is necessary.
Pull out the power plug before cleaning for your safety.
Clean the fridge with a soft towel or sponge moistened with
warm water.
Wipe off the water on the fridge with a dry cloth.
1. The fridge is heavy. When you move the fridge for cleaning or maintenance, be careful to
protect the floor. When you move the fridge, keep it vertical. Do not tilt the fridge. This
prevents damage to the floor.
2. During cleaning, do not spray or rinse the fridge with water or liquids. This could harm the
electrical parts.
3. When you clean the buttons and the lamp, use a dry cloth.
4. Do not clean the fridge with a stiff or wire brush, an organic solvent such as detergent,
petrol, lacquer, thinner, or acetone, hot water, acid, or alkali.
5. Make sure your hands are not wet when you touch cold steel parts, to prevent your skin
sticking to the steel parts.
6. During cleaning, do not use hot water to clean cold glass shelves, or they may break or
crack. This could damage the refrigerator and cause personal injury.
7. Door gaskets often become dirty. Clean them often.
Demo Mode
1. Compressor and fan motors do not operate in the demo mode.
2. On the upper freezer side control panel: Press the "COLD" and "COLDER" buttons at the same time for 3 seconds, it
will then enter the demo mode when you hear the buzzer sound and the cabinet display panel will show 2 dash lines.
3. The display panel on the door appears as usual.
Be sure to reset to standard operations mode BACK the same way (pressing again 3 seconds) when
making consumer sale.
Page 16

Temporary stored food or frequently used foods should
be kept in the fresh food compartment.
Although the average fresh food temperatures are between 1 to 8 food
shelf life should be checked periodically.
Adjusting cantilever shelves:
You have the option of adjusting the glass shelves to different locations to
accommodate different stored food heights. Raise the shelf up (as shown)
to disengage the rear hooks in the vertical ladders and pull up and out.
Reverse the order when re-positioning by tilting down into a new slot ladder
location and hooking into place.
Make sure the shelf is level on both sides of the ladder slot
locations to prevent food from dropping or leaking out.new
slot ladder location and hooking into place.
Select one - crushed ice, cold water, and ice cubes - and push the ice/water lever gently as follows:
1. When you want crushed ice:
Press the selecting button until
the crushed ice indicator is lit.
Push the lever gently with the cup.
Crushed ice will be provided.
2. When you want cubed ice:
Press the selecting button until
the cubed ice indicator is lit.
Push the lever gently with the cup.
Cubed ice will be provided.
3. When you want cold water:
Press the selecting button until the cold
water indicator is lit.
Push the lever gently with the cup. Cold
water will be provided.
When you use crushed ice:
Even if you are using cubed ice, you may still get some crushed ice. This can happen when
several ice cubes are sent to the ice crusher.
Sometimes a small amount of snow or frost will form on the door in the ice chute It is best to
remove this to prevent ice from binding in the chute.
When you use cold water:
Use of Crispers:
The fridge comes with 2 crispers which you can adjust
using the humidity control knobs.
For high humidity, turn up the knob. This suits storing
cucumbers, grapes, and lettuce.
For low humidity, turn down the knob. This suits
meats, cheeses, strawberries. tomatoes, and fruits.
When removing crispers, make sure to remove the
top cover after pulling out the crispers.
Adjusting and cleaning the door bins. Lift the door
bin as shown in step 1. Take both sides and pull out
as shown in step 2. After cleaning, reinstall the bin in
reverse order, and adjust the height as desired.
Removing the crisper cover. Refer to the picture and
note it is down similar to the cantilever shelves.
When you adjust the bins, do not place gallon bins or dairy bin in the lower door location. This will
prevent interference with the crispers.
When you first push the lever, cold water might not come out immediately. This is because
there may be air in the pipe. Press the lever for at least 2 minutes to clear out the air and
then fill your cup with water.
The first cup of water may be warmer than the following cups. This is normal. If you take out
2 cups, or 16 oz., the water may become warmer again.
To avoid injury, NEVER put your fingers or and other objects in the ice dispenser
Warning
opening.
Precautions of Using the Water
and Ice Dispenser:
Do not use a cup that is too deep, too narrow, or too
soft.
Keep the cup as proper distance from the dispenser.
Raise the cup near the ice outlet to prevent an ice
cube jumping or splashing out. If the cup is too
close, the ice might break when it hits the bottom.
5 seconds after you take ice, you will here a sound.
This is the sound of the ice chute door closing.
After you take ice ice and release the lever, keep
your cup in the ice outlet for 2-3 seconds, as cubed
ice might still come out.
After you take water, keep your cup under the
dispenser for 2-3 seconds, as water might still come
out.
Do not pour extra water into the spill shelf. Wipe
water dripped from the drink dispenser with a cloth.
If you choose cubed ice right after crushed ice, you
may get some crushed ice mixed in.
If you only use crushed ice, the outlet may become
blocked by crushed ice. Remove the remaining
crushed ice to continue using.
Do not put a drink bottle or other food in the ice
When you are making cubed ice, the water valve will make a noise. This is normal.
container for fast cooling. This could damage the ice maker.
Do not touch the ice outlet by hand - it may cause injury to
your hand. Do not dismantle the ice maker cover.
Throw out the first 7 glasses of water and 20 ice cubes to
flush out impurities in the pipe. Throw away the first
several batches of ice cubes after a long period of non use.
Do not put purchased cubed ice in the ice container. It may
not crush or dispense well.
If cubed ice is too small, it means the inlet water amount is
too small. If cubed ice is too big, or there is a water
overflow in the ice maker that causes ice blocks to occur,
the inlet water amount is too big. Water Ice tray fill
adjustments can be made on the Freezer control by
pressing the (<) and (>) buttons for 3 seconds until you
hear a chime. The display will read the default setting of 40
(for 4 second water flow in). If you press the (>) button it
can raise up flow rate to 60 (a max of 6 second fill rate).
Check water tray level to not over fill the ice tray.
Page 17

Usage of Ice Maker and Cold Water
Dispenser
The ice content will depend on room temperature, door openings, water pressure, freezer temperature,
etc. It is considered normal when ice cubes stick together.
Wait 24 hours after installing your refrigerator before you begin using the ice maker
feature. This gives the ice maker time to load the ice bucket.
Occasionally you may hear some sounds, like water flowing or ice dropping. These sounds are
normal. Occasionally, in periods of infrequent ice use, cubes may stick together and clog the
dispenser. Remove the ice cream holder and lift up the ice bucket. Shake it from side to side to
dislodge the cubes. Return the ice bucket and ice cream holder. Cubes should dispense normally
now.
If you do not use ice often:
Because of the cool air circulation, there is a temperature difference among
different sections in the cabinet. Therefore, different foods should be put in
the different temperature sections.
1. eggs, butter, cheese, etc 2. cans, glass jars, spices, batteries, gallon milk, etc.
3. soft drinks, gallon milk, bottled foods 4. preserved foods, cans, jars, etc.
5. meats, snacks, etc. 6. pasta, cans, yogurts, jars, etc.
7. cooked meats, sausage, etc. 8. fruits, vegetables, salads, etc.
220-240V~
(25W max)
E27
Older ice cubes can get stale. Clean the ice bucket periodically and use warm water to clean. Before
putting it back, make sure to dry it so new ice does not stick to it.
When you do no use the ice container for an extended time:
If you will not be using the ice container for a long time, throw out the remaining ice cubes, wash the
container with warm water, dry it with a towel, and put it back in the refrigerator. Then close the
valve between the water supply and the fridge.
Removing and Installing the Ice Container
Removing the Ice Container
Take down food in the ice cream shelf. Raise the
center of the container away from the shelf frame,
hold down the front, and pull the container out.
Reinstall the Ice Container
Reinstall the ice container and fix the clamp in the lower right side
into the groove on the back wall. If the ice container cannot be fully
inserted, remove it and turn the driving device in a 1/4 circle. Try to
reinstall the ice container. Repeat until the clamp can be fixed in the
groove on the two slide ways of the shelf.
Precaution when Refrigerating Food
putting
Food should be stored based on use.
Food should be classified according
to its use. Daily food should be put
in front of the shelves in order to
shorten the time that the door is
open. This will prevent food spoilage
and save energy.
Do not put too much food in the
fridge and overcrowd it. The
stored food in the fridge should
have space around it and not
touching other food. This will allow
better air circulation and uniform
temperatures.
Before storing food in the fridge, it
is suggested to cover all food. It
will keep fruits and vegetables
moist and fresh, and prevent
mixing of food odors.
The stored food should not be near
the inner walls. Avoid storing food
against the inside walls. This will
protect the food from freezing.
There should be a space between
the food and inner liners.
Page 18

Radish leaves should be
cut off - otherwise the
leaves will absorb some of
the nutrients from the
vegetables.
Defrost frozen food in the
fresh food compartment or
convertible compartment
to save energy
Some foods, like onion,
bananas, garlic, and
certain root and stem
vegetables can be stored
at room temperature. It
is not always necessary
to store them in the
fridge.
Refrigeration can
accelerate the ripening of
certain fruits like melons,
bananas, pineapples,
and more. Do not keep
these fruits in the fridge
unless you want them to
ripen faster.
Before putting hot food into
the freezer, cool it to room
temperature.
Separate food into small batches to
make it easier to freeze and defrost
for later. Do not freeze in batches
larger than 5.5 lbs. each.
Before freezing food, it is better to pack it
securely and make sure the outside of the
package is dry. The packing material
should be flavorless, airproof, nontoxic,
and contamination-free to avoid tainting
the food inside.
It is suitable to store food for a long period of time.
The temperature is very low, and can keep food fresh and safe for a
long time. Therefore, food you intend to store for a long time should
be kept in the freezer compartment. Follow the storage time
indicated on the food package.
Shelf can be removed to clean
Move the shelf as shown in step 1.
Raise the right side of the shelf as seen in step 2.
Write the date, expiration date,
and food name on the outside
of packing materials so you
can be assured of the food and
when it is safe to eat.
Take food from the freezer to defrost
when needed. Defrosted food cannot
be frozen again unless it is cooked.
Otherwise, it will affect food quality
and safety.
Do not put too much fresh food into the
freezer at once. This could go beyond
the freezer's cooling capacity. (Refer to
"Technical Data")
Using the Ice Maker and Cold
Water Dispenser
Preparation before using the ice maker and cold water dispenser.
Cut the water pipe according to need, and avoid bending the water pipe too much. Usually the length should
be less than 5 m. If the water pipe is too long, the ice and water content are affected because of low water
pressure.
The water pipe cannot stand heat. Keep it away from heat sources.
You may want to have a service engineer install the water pipe.
During the first use, in order to supply water to the fresh food compartment, press the cold water button
several times for 1 minute each. Do not press the cold water button for longer than a minute, to prevent
overheating the water valve. Cold water will begin to flow from the outlet.
Water supply pipe instruction: The cold water pressure should be 21-120 psi for automatic ice making.
The purifier is only for filtering. It cannot sterilize or destroy anything - therefore, make sure to connect the
water pipe to a drinkable water source.
220-240V~/40W
(40W max)
E27
Turn the bulb counterclockwise to take it out. Replace with a new
bulb of the same or lower watts.
Reinstall by following these directions in reverse.
While storing frozen food like ice cream, be sure to put it all the way inside the freezer
and not in or near the door. This keeps the frozen food colder.
show 1 and 2 on the drawingfor bulb removal
To prevent the pipe from freezing, do not install the water pipe in a place below 0 .
Open water valve to flush pipe, and check leakage in water pipe joints until water is clean.
When temperature of ice maker is equal to or below -15 , the ice maker will begin to make ice. (Throw out the
first several batches of ice cubes if you make ice after not having made it for a long time.)
After the fridge is installed, put the water supply pipe in a proper place to prevent pressing and damage.
The filter in the water pipe is there to filter impurities in the water and to make the ice chlorine and odor free.
After a long time of usage, if the cubed ice becomes smaller, it may mean that the filter is blocked from the
water impurities. After about 6 months of use, the "Change Filter" indicator light will turn on. At this time, we
suggest you call the number on the filter or go to an authorized Haier after-sale service center to buy a new filter.
After you change the filter, the indicator light will turn off. The refrigerator comes with a filter installed; after this
you have to buy and change the filter yourself.
The ice maker should only be connected to a source of drinkable water.
 Loading...