

Haier HRB10N2BGS Use & Care
Installation and User Manual
Instructions d’installation et
Instrucciones de instalación y
Bottom Mount Refrigerator
Réfrigérateur à congélateur inférieur
Refrigerador de montaje inferior
guide de l’utilisateur
Manual del usuario
HRB10N2
Part # 0570000227 REV B


TABLE OF CONTENTS
REFRIGERATOR SAFETY ................................................................................................................................................... 2
PARTS AND FEATURES ..................................................................................................................................................... 3
Fresh Food Cold Wall (Rear Wall of Refrigerator Compartment) .......................................................................................................4
INSTALLATION REQUIREMENTS ....................................................................................................................................... 4
Location Requirements .......................................................................................................................................................................4
Electrical Requirements ......................................................................................................................................................................4
INSTALLATION INSTRUCTIONS ........................................................................................................................................ 5
Unpack the Refrigerator ......................................................................................................................................................................5
Reverse Door Swing (Optional) ...........................................................................................................................................................5
Leveling and Door Adjustment (if needed).........................................................................................................................................7
Complete the Installation ....................................................................................................................................................................7
REFRIGERATOR USE .......................................................................................................................................................... 7
Temperature Control ..........................................................................................................................................................................7
Storage .................................................................................................................................................................................................8
Freezer ..................................................................................................................................................................................................8
REFRIGERATOR CARE ....................................................................................................................................................... 9
Cleaning ................................................................................................................................................................................................9
Defrosting ...........................................................................................................................................................................................9
Power Failure ........................................................................................................................................................................................9
Lights ................................................................................................................................................................................................. 10
Vacation and Moving Care ................................................................................................................................................................ 10
TROUBLESHOOTING ...................................................................................................................................................... 11
LIMITED WARRANTY ...................................................................................................................................................... 13
RECORD KEEPING
Thank you for purchasing this Haier product. This user
manual will help you get the best performance from your new
refrigerator.
For future reference, record the model and serial number
located on the inside wall of the refrigerator, and the date of
purchase.
Staple your proof of purchase to this manual to aid in
obtaining warranty service if needed.
_____________________________________________________
Model number
_____________________________________________________
Serial number
_____________________________________________________
Date of purchase
1
REFRIGERATOR SAFETY
Your safety and the safety of others are very important.
We have provided many important safety messages in this manual and on your appliance. Always read and obey all
safety messages.
This is the safety alert symbol.
This symbol alerts you to potential hazards that can kill or hurt you and others. All safety messages will
follow the safety alert symbol and either the word “DANGER,” “WARNING” or “CAUTION.”
These words mean:
An imminently hazardous situation. You could be killed or seriously injured if you don’t
DANGER
WARNING
CAUTION
All safety messages will tell you what the potential hazard is, tell you how to reduce the chance of injury, and tell you what
can happen if the instructions are not followed.
immediately follow instructions.
A potentially hazardous situation which, if not avoided, could result in death or serious
bodily injury.
A potentially hazardous situation which, if not avoided, may result in moderate or minor
injury.
IMPORTANT SAFETY INSTRUCTIONS
WARNING: To reduce the risk of re, electrical shock, injury to persons, or damage when using the refrigerator, follow
basic precautions, including the following:
Plug into a grounded 3 prong outlet.
•
Do not remove ground prong.
•
Do not use an adapter.
•
Do not use an extension cord.
•
Disconnect power before servicing.
•
Replace all parts and panels before operating.
•
Flammable refrigerant used. To be repaired only by
•
trained service personnel. Do not puncture refrigerant
tubing.
Flammable refrigerant used. Dispose of properly in
•
accordance with federal or local regulations.
Flammable refrigerant used. Follow handling
•
instructions carefully. Risk of re or explosion due to
puncture of refrigerant tubing.
Use nonammable cleaner.
•
Keep ammable materials and vapors, such as gasoline,
•
away from refrigerator.
Use two or more people to move and install
•
refrigerator.
This refrigerator should not be recessed or built-in
•
an enclosed cabinet. It is designed for freestanding
installation only.
If your refrigerator is not being used, remove the doors.
•
This will reduce the possibility of danger to children.
READ AND SAVE THESE INSTRUCTIONS
State of California Proposition 65 Warnings:
WARNING: This product contains one or more chemicals known to the State of California to cause cancer.
WARNING: This product contains one or more chemicals known to the State of California to cause birth defects or other
reproductive harm.
2

PROPER DISPOSAL OF YOUR OLD
WARNING
d
REFRIGERATOR
Before You Throw Away Your Old Refrigerator or Freezer:
Take o the doors.
•
Leave the shelves in place so that children may not easily
•
climb inside.
Suffocation Hazard
Remove doors from your old refrigerator.
Failure to do so can result in death or brain damage.
IMPORTANT: Child entrapment and suocation are not
problems of the past. Junked or abandoned refrigerators are
still dangerous - even if they will sit for “just a few days.” If
you are getting rid of your old refrigerator, please follow these
instructions to help prevent accidents.
PARTS AND FEATURES
a
j
j
j
Important information to know about disposal of
refrigerants:
Dispose of refrigerator in accordance with Federal and
Local regulations. Refrigerants must be evacuated
by a licensed, EPA certied refrigerant technician in
accordance with established procedures.
b
b
i
h
a Control Dial and Interior Light
b Door Bins (3)
c Bottle Retainer
d Adjustable Feet
e Frozen Food Storage Drawers (3)
f Frozen Food Storage Compartment
g
c
b
f
e
e
e
d
g Crisper Compartment
h Crisper Compartment Cover
i Drain
j Full-width Shelves (3)
3

FRESH FOOD COLD WALL (REAR WALL OF REFRIGERATOR
WARNING
WARNING
COMPARTMENT)
Your new refrigerator features Cold Wall technology to better
store perishable food.
The rear wall of the refrigerator compartment promotes
moisture condensation, similar to what you see in the
produce aisles of a grocery.
The excess moisture will drip into the drain at the bottom of
the wall.
a
a Moisture Condesation
INSTALLATION REQUIREMENTS
LOCATION REQUIREMENTS
Explosion Hazard
Keep flammable materials and vapors, such as gasoline,
away from appliance.
Failure to do so can result in death, explosion or fire.
IMPORTANT: This refrigerator is designed for indoor,
household use only. This refrigerator should not be recessed
or built-in an enclosed cabinet. It is designed for freestanding
installation only.
To ensure proper ventilation for your refrigerator, allow at
least ¼" (0.64 cm) of space on each side of the refrigerator
and 4" (10 cm) of space behind the refrigerator. The area
above the refrigerator should be open. When installing your
refrigerator next to a xed wall, leave 4" (10 cm) minimum to
allow for the door to swing open.
NOTE: This refrigerator is intended for use in a location
where the temperature ranges from a minimum of 55°F
(13°C) to a maximum of 110°F (43°C). The preferred room
temperature range for optimum performance, which
reduces electricity usage and provides superior cooling, is
between 60°F (16°C) and 90°F (32°C). It is recommended that
you do not install the refrigerator near a heat source, such as
an oven or radiator, or in direct sunlight.
ELECTRICAL REQUIREMENTS
Electrical Shock Hazard
Plug into a grounded 3 prong outlet.
Do not remove the ground prong from the power
cord plug.
Do not use an adapter.
Do not use an extension cord.
Failure to do so can result in death, fire or
electrical shock.
Before you move your refrigerator into its nal location, it
is important to make sure you have the proper electrical
connection.
¼" (0.64 cm)
4" (10.2 cm)
4
Recommended Grounding Method
A 115 volt, 60 Hz, AC only 15- or 20-amp fused, grounded
electrical supply is required. It is recommended that a
separate circuit serving only your refrigerator be provided.
Use an outlet that cannot be turned o by a switch. Do not
use an extension cord.
NOTE: Before performing any type of installation or cleaning,
disconnect the refrigerator from the electrical source. When
you are nished, reconnect the refrigerator to the electrical
source and reset the temperature controls to the desired
setting.
INSTALLATION INSTRUCTIONS
WARNING
WARNING
WARNING
UNPACK THE REFRIGERATOR
Fire or Explosion Hazard
Do not puncture refrigerant tubing.
Follow handling instructions carefully.
Flammable refrigerant used.
Failure to do so can result in death, explosion or fire.
IMPORTANT: Handle with care when moving refrigerator to
avoid either damaging the refrigerant tubing or increasing
the risk of a leak.
Excessive Weight Hazard
Use two or more people to move and install refrigerator.
Failure to do so can result in back or other injury.
When Moving Your Refrigerator:
Your refrigerator is heavy. When moving the refrigerator
for cleaning or service, be sure to cover the oor with
cardboard or hardboard to avoid oor damage. Always
pull the refrigerator straight out when moving it. Do not
wiggle or “walk” the refrigerator when trying to move it,
as oor damage could occur.
CLEAN BEFORE USING
After you remove all of the packaging materials, clean the
inside of the refrigerator before using it. See the cleaning
instructions in “Refrigerator Care.”
Important information to know about glass shelves
and covers:
Do not clean glass shelves or covers with warm water
when they are cold. Shelves and covers may break if
exposed to sudden temperature changes or impact,
such as bumping. Tempered glass is designed to shatter
into many small, pebble-size pieces. This is normal.
Glass shelves and covers are heavy. Use both hands
when removing them to avoid dropping.
REVERSE DOOR SWING
(OPTIONAL)
REMOVE THE PACKAGING
Remove tape and glue residue from surfaces before
•
turning on the refrigerator. Rub a small amount of liquid
dish soap over the adhesive with your ngers. Rinse with
warm water and dry.
Do not use sharp instruments, rubbing alcohol,
•
ammable uids, or abrasive cleaners to remove tape
or glue. These products can damage the surface of your
refrigerator. For more information, see “Refrigerator
Safety.”
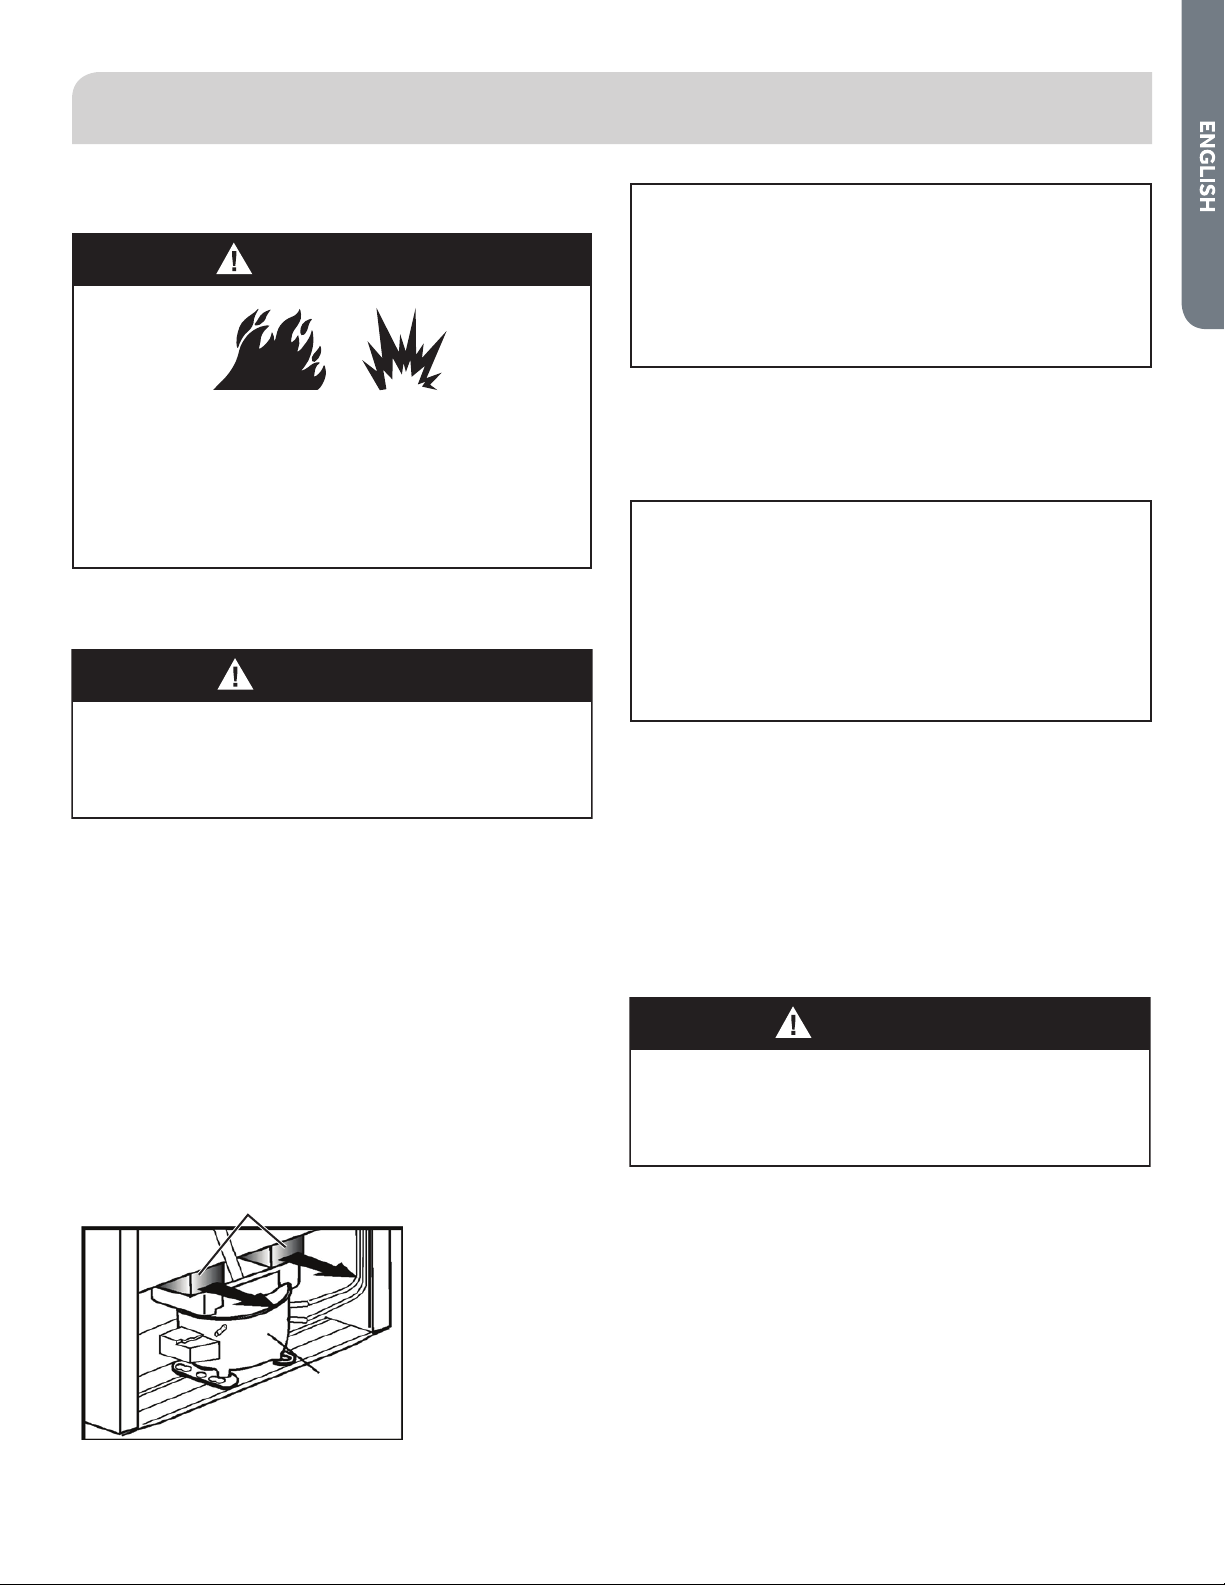
Remove foam block(s) inserted between the compressor
•
motor and the cabinet, as shown.
NOTE: Do not remove the plastic drain tray located
above the compressor motor on models with autodefrost.
a
a Foam Blocks
b Compressor
b
If you want to reverse the door swing so that the doors open
from the opposite side see the following instructions.
IMPORTANT: The graphics referenced in the following
instructions are included later in this section. See “Reverse
Door Swing” graphic.
REMOVE THE DOORS
Excessive Weight Hazard
Use two or more people to move and install refrigerator.
Failure to do so can result in back or other injury.
1. Unplug refrigerator or disconnect power.
2. Remove all food, shelves, drawers, trays and bins from the
interior refrigerator cabinet and the door.
3. Remove tabs on both sides of the refrigerator top to
access the screws and remove the screws.
Dispose of/recycle all packaging materials.
•
5
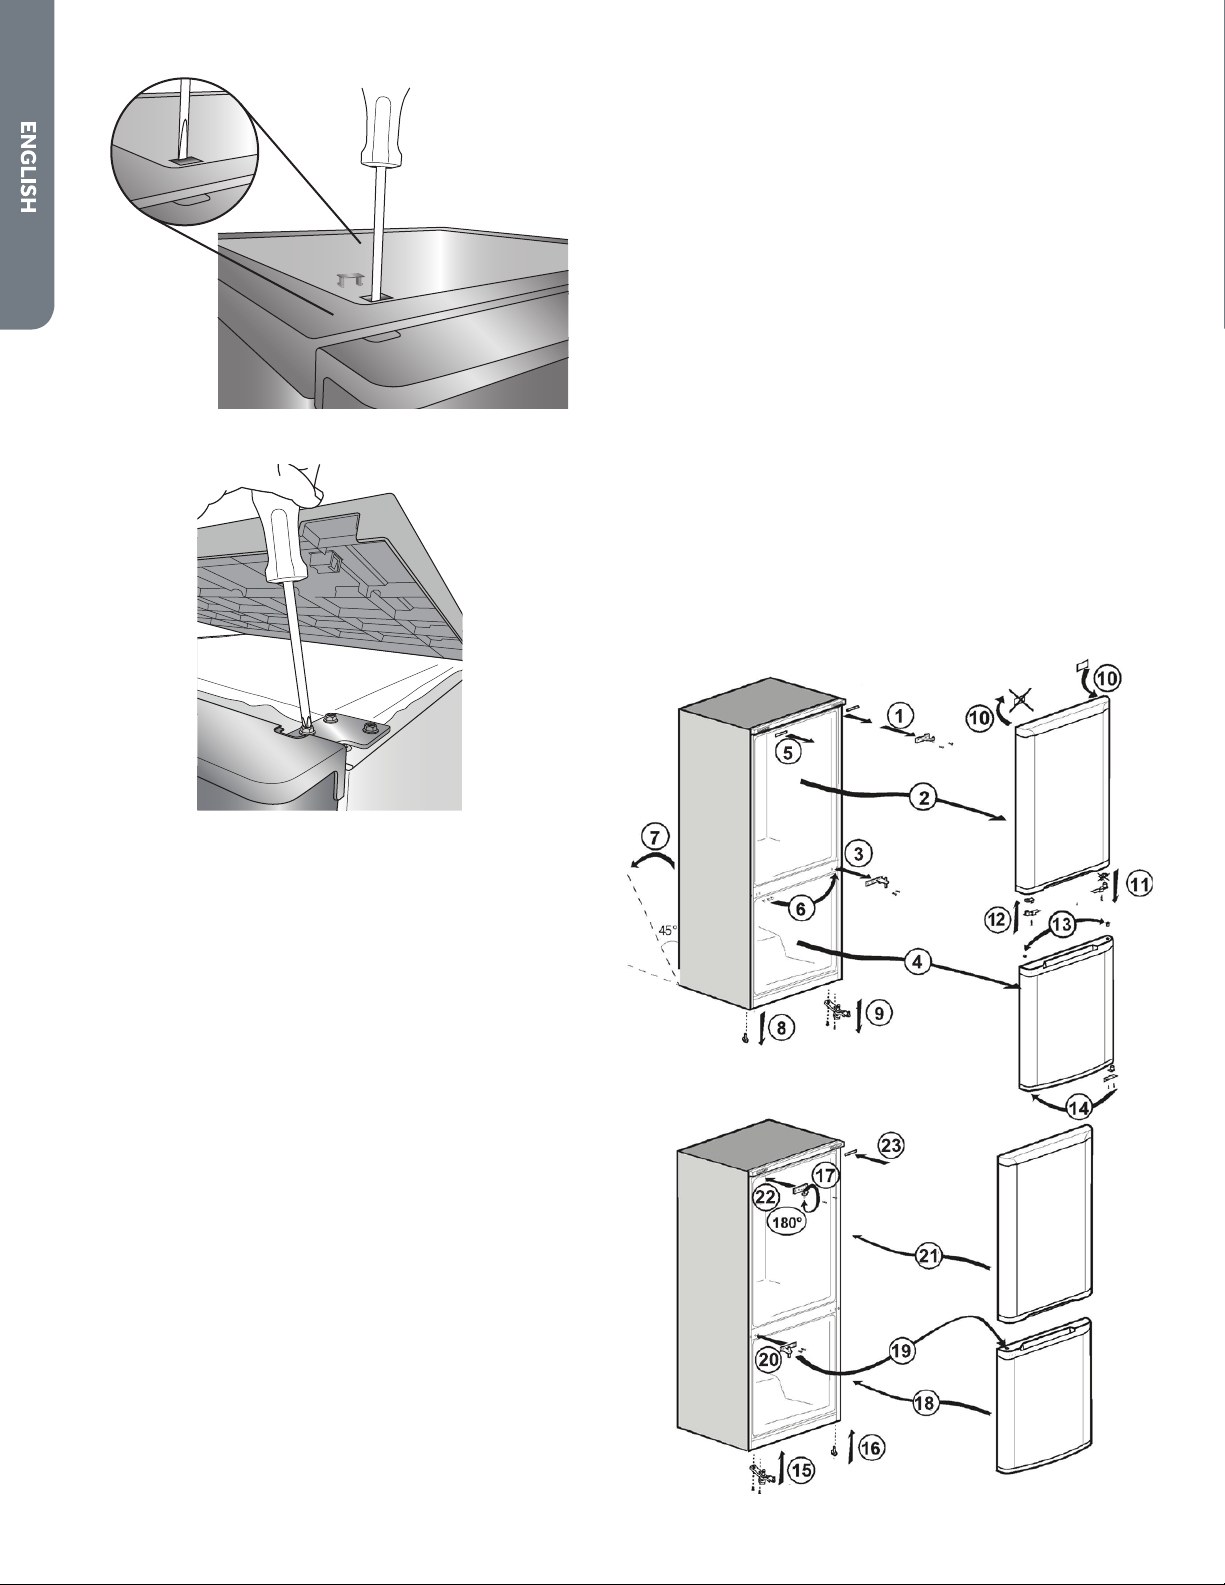
4. Lift the front of the refrigerator top enough to access the
door hinge screws.
REPLACE THE DOORS
1. Reassemble and install the bottom hinge on the opposite
side. (15)
2. Using two or more people, reinsert the leveling foot to
the opposite side with the bottom door hinge. (16)
3. Rotate the top hinge 180°. Unscrew the hinge pin and
reinstall it to the opposite side. (17)
4. Place the freezer door onto the bottom hinge and close
the door. (18)
5. Place the center hinge on top of the freezer door. (19)
6. Fasten the center hinge to the cabinet, and then align and
adjust the door. (20)
7. Install the refrigerator door on top of the center
hinge. (21)
8. Reinstall the top hinge and tighten the bolts. (22)
9. Reinstall the plastic cover on the front, top trim. (23)
10. Completely tighten all bolts.
11. Using two or more people, stand the refrigerator
completely upright, and adjust the front feet to level. See
“Leveling and Door Adjustment.”
12. Return all removable parts to the cabinet and door.
REVERSE DOOR SWING
5. Remove the bolts from the top hinge and remove top
hinge (1).
6. Lift the refrigerator door from the center hinge (2).
7. Unscrew the bolts and remove the center hinge (3).
8. Lift the freezer door from the bottom hinge (4).
9. Remove the plastic cover from the front, top trim (5).
10. Using two or more people, tilt the refrigerator toward the
back at a 45° angle to access and remove the leveling
foot (7 & 8).
11. Remove the bottom door hinge and leveling foot (9).
NOTE: The leveling foot on the hinge side must be
moved to the opposite side with the door hinge.
REVERSE THE DOORS
1. Remove the hole plugs from the center divider and
place the plugs in the holes remaining after removing the
center hinge (6).
2. Remove the plastic cover. Install the stopper (provided in
the parts bag), to the opposite side (10).
3. Unscrew and remove the middle hinge bushing from the
bottom of the refrigerator door (11).
4. Install the middle hinge bushing (provided in the parts
bag) to the opposite side. (12)
5. Remove the hinge bushing and the stopper from the
freezer door and reinstall each to the opposite side of the
door. (13)
6. Remove the bottom hinge bushing from the freezer door
and reinstall it on the opposite side. (14)
6
LEVELING AND DOOR
ADJUSTMENT (IF NEEDED)
COMPLETE THE INSTALLATION
The refrigerator must be level to maintain optimal
performance and appearance, and to avoid excess vibration
and noise.
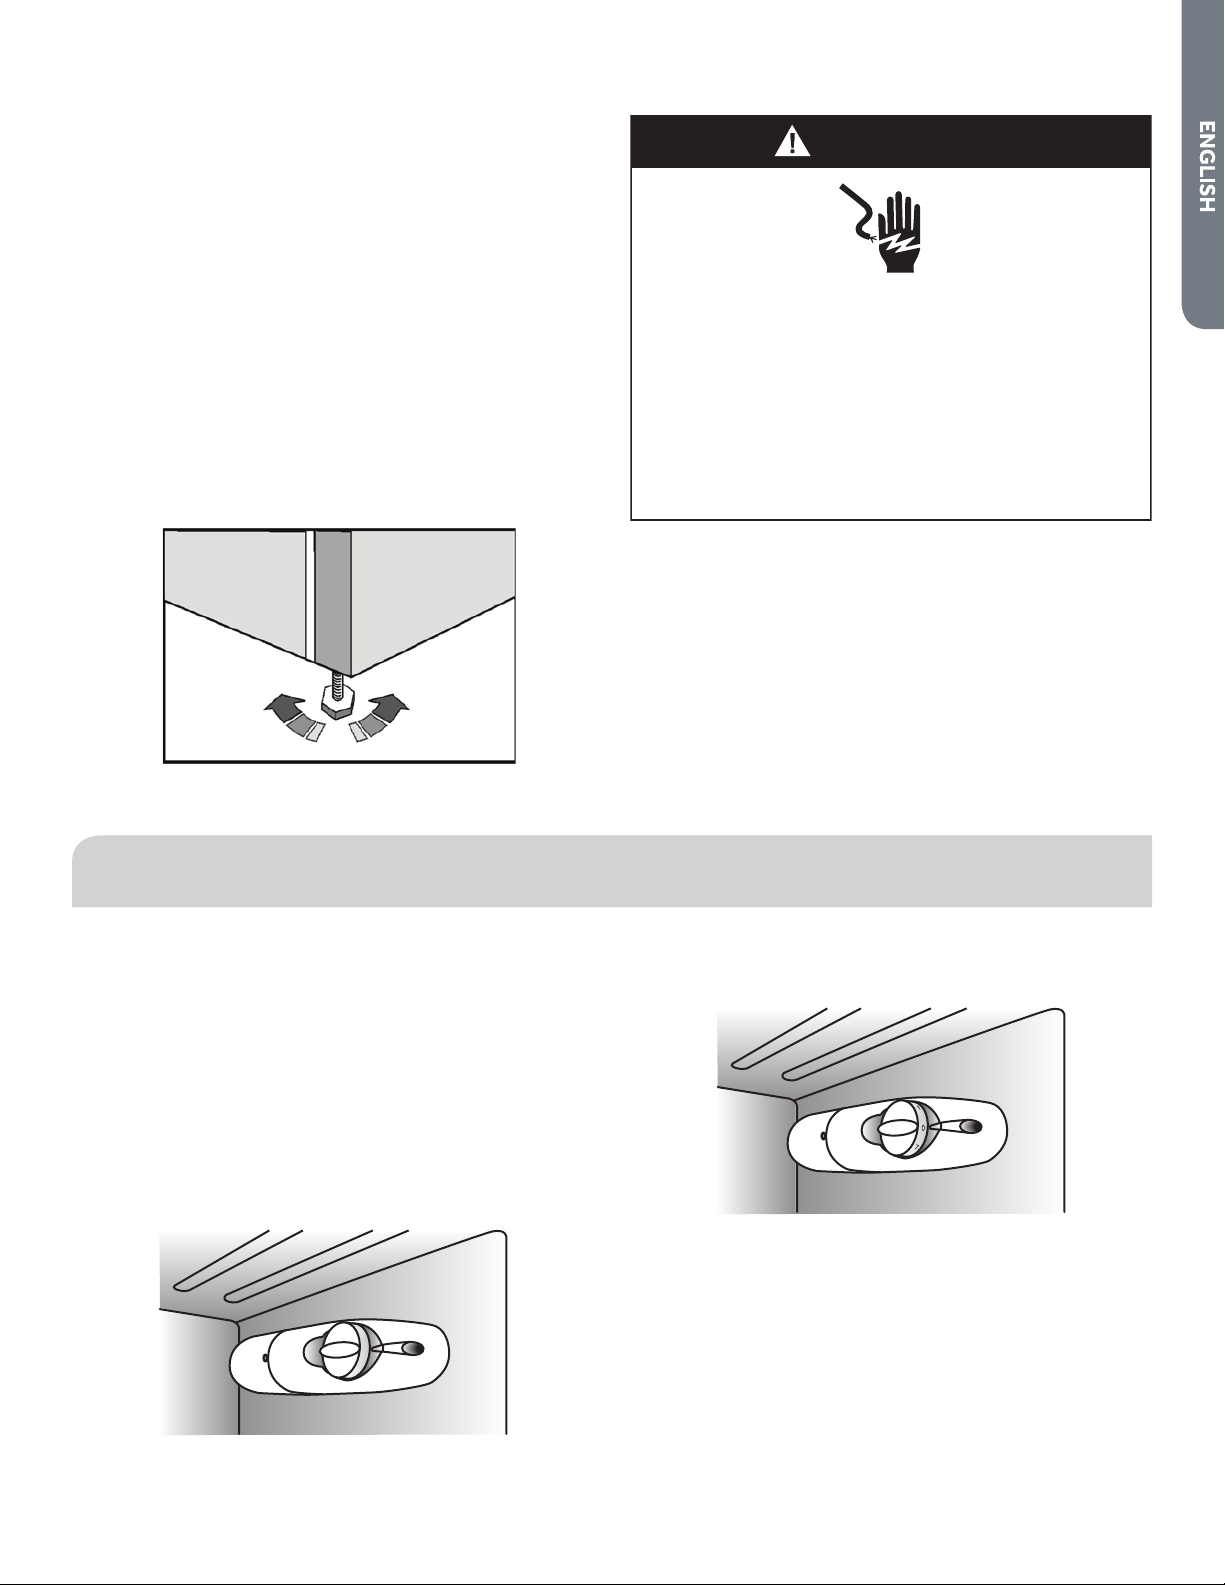
LEVELING
1. Move the refrigerator to its nal location on a at, even
oor.
2. Turn the feet on the bottom, front of the cabinet to raise
or lower that side of the refrigerator until the refrigerator
is level side-to-side.
NOTE: Having someone push against the top of the
refrigerator takes some weight o the leveling screws.
This makes it easier to turn the screws.
3. Turn both front legs, by the same amount, to slightly raise
the front of the refrigerator. This will make it easier for
the doors to close.
WARNING
Electrical Shock Hazard
Plug into a grounded 3 prong outlet.
Do not remove the ground prong from the power
cord plug.
Do not use an adapter.
Do not use an extension cord.
Failure to do so can result in death, fire or
electrical shock.
1. Wait a minimum of 4 hours to allow the cooling system to
settle before turning on cooling.
2. Plug into a grounded 3 prong outlet.
3. Wait until the refrigerator has cooled to the
recommended temperatures, before adding food.
REFRIGERATOR USE
TEMPERATURE CONTROL
Temperatures are controlled by the Temperature Control
dial.
Set the Temperature Control dial to the recommended
setting “4” on the dial.
The average temperature inside the refrigerator
compartment should be approximately 37°F (2.8°C). You may
need to adjust the temperature control to obtain the desired
temperature.
Recommended Setting “4”
5
4
3
To Turn OFF Cooling:
Turn the Temperature Control dial to the “0” OFF position.
To Adjust the Temperature:
The control can be set at any position between 1 (least cold)
and 7 (coldest).
NOTE: Sections of the refrigerator compartment may be
cooler or warmer (such as salad crisper and top part of the
cabinet) which is normal.
Frequent door openings cause internal temperatures to rise,
so close the door as soon as possible after use.
7

STORAGE
a
FULL-WIDTH SHELVES
The height of the shelves can be adjusted to t your storage
needs.
1. To remove a shelf, lift up on both the front and back edge
to disengage the shelf hooks from the shelf supports
along the refrigerator wall and pull it out.
2. To reinstall a shelf, slide the shelf toward the back of the
refrigerator until the back of the shelf drops down behind
the shelf supports.
DOOR BINS
The door bins can be removed for cleaning.
FREEZER STORAGE
Your new refrigerator oers the exibility of either drawer
or shelf storage for your freezer storage needs. Remove any
freezer drawer to use the shelf underneath.
To Remove a Drawer:
1. Pull out the drawer as far as possible.
2. Tilt the drawer upward to remove.
3. Store the drawer, for future use, in a location where it will
not be damaged.
To Remove a Door Bin:
1. Place hands on both sides of the bin and lift upward.
2. Pull out to remove.
FREEZER
The freezer compartment is suitable for the long-term
storage of commercially frozen foods and also can be used to
freeze fresh food.
IMPORTANT: The fan inside the freezer compartment
circulates the cold air essential to the performance of the
freezer. Make sure the air ducts are not blocked by food
items or packaging. Blocking the air ducts can result in an
increase of the internal freezer temperature (Thawing).
a Air Ducts
8
REFRIGERATOR CARE
WARNING
CLEANING
Clean both the freezer and refrigerator compartments
about once a month to avoid buildup of odors. Wipe up spills
immediately.
Explosion Hazard
Use nonflammable cleaner.
Failure to do so can result in death, explosion or fire.
IMPORTANT:
Do not use harsh chemicals, ammonia, chlorine bleach,
•
concentrated detergent, solvents, abrasives or metal
scouring pads to clean your refrigerator inside or out.
They can damage and/or discolor the refrigerator nish.
Do not use warm water to clean glass shelves while they
•
are still cold. Glass may break when exposed to sudden
temperature changes or impact.
1. Unplug refrigerator or disconnect power.
2. Using a clean sponge or soft cloth and a mild detergent
dissolved in warm water, wash removable parts and the
interior surfaces. Rinse well and dry thoroughly.
3. Clean the exterior surfaces.
Painted metal: Wash painted metal exteriors with a
clean, soft cloth or sponge and a mild detergent in warm
water. Rinse surfaces with clean, warm water and dry
immediately to avoid water spots.
Stainless steel: Stainless steel is corrosion resistant
and not corrosion-proof. To help avoid corrosion of
your stainless steel, wash stainless steel surfaces with a
clean, soft cloth or sponge and a mild detergent in warm
water. Rinse surfaces with clean, warm water and dry
immediately to avoid water spots.
NOTE: When cleaning stainless steel, always wipe in the
direction of the grain to avoid cross-grain scratching.
4. Clean the condenser at least once a year. Using a vacuum
cleaner, remove the dust that has accumulated on the
condenser.
NOTE: The condenser is located at the back of the
refrigerator.
5. Plug in refrigerator or reconnect power.
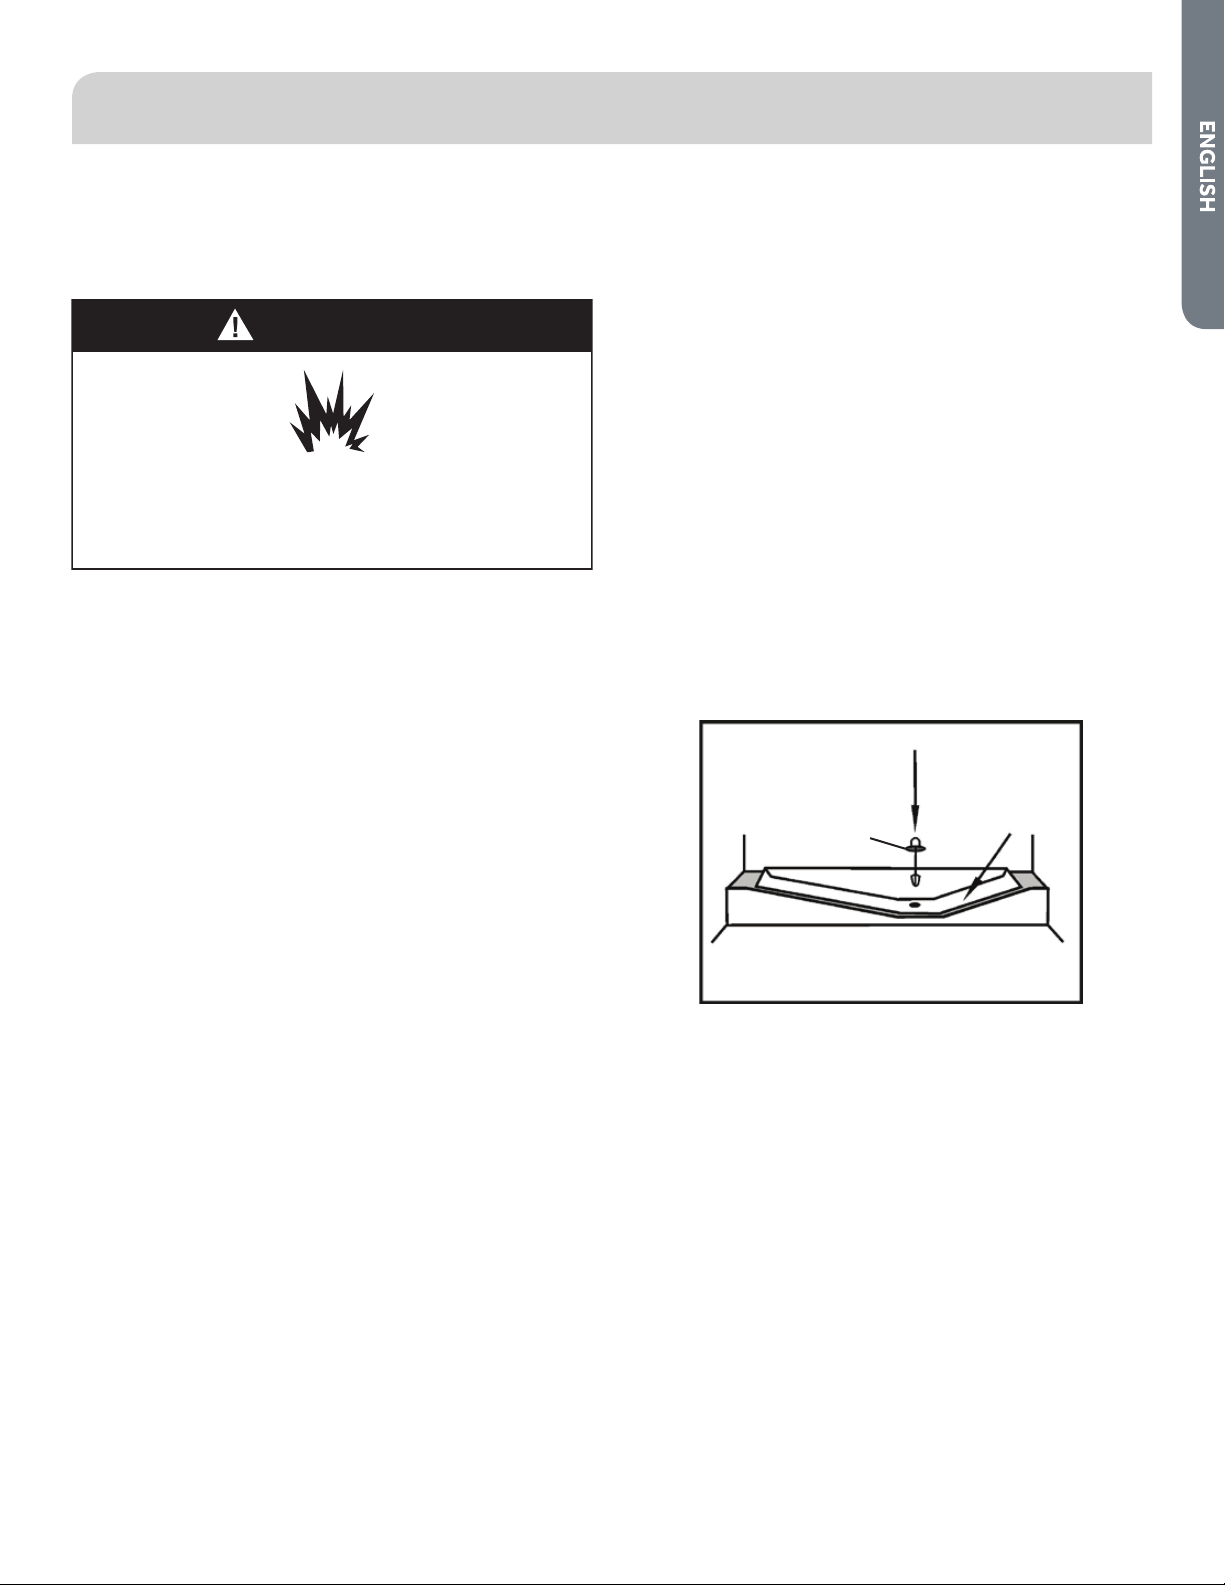
DEFROSTING
The refrigerator and freezer compartments defrost
automatically. A small amount of frost buildup on the Fresh
Food Cold Wall is normal. If the amount of frost becomes
excessive, you may need to raise the temperature by
adjusting the Temperature Control dial to a lower number
(less cold) setting. See “Control.”
The defrost water goes through a collection channel and into
the drain tube which is attached to the drain tray at the back
of the refrigerator. To avoid water spilling onto the oor, it is
important to make sure the end of the drain tube is inserted
fully into the drain tray.
If the defrost water does not drain from the collection
channel, check that the drain tube is clear. The drain tube
can be cleared with a pipe cleaner or by pushing the plastic
plunger (provided) down the drain tube.
During defrosting, water droplets may form at the back of
the refrigerator compartment where a concealed evaporator
is located. Some moisture will remain on the Fresh Food Cold
Wall (rear wall) and refreeze when defrosting is completed.
Do not use pointed or sharp-edged objects such as knives or
forks to remove the frozen droplets.
a
b
c
a Rear Refrigerator Wall
b Plastic Plunger
c Defrost Water Collection Channel
POWER FAILURE
If there is a power failure, do not open the freezer door.
Frozen food should not be aected if the power is restored
within several hours.
If power is out for an extended period of time, check the
food for thawing.
9
LIGHT
WARNING
Depending on your model, the light located behind
the Temperature control, may use either an LED or an
incandescent bulb. To order a replacement light bulb for your
model, call 1-877-337-3639 or visit us at www.haieramerica.
com/support.
To Replace a Light Bulb:
NOTE: You may need to remove the top shelf to access the
light bulb.
1. Unplug refrigerator or disconnect power.
2. Remove the screw fastening the lightshield, and then
remove the light shield.
3. Remove the burned-out bulb and replace it with an
appliance bulb of the same size, shape and wattage.
IMPORTANT:
DO NOT replace with an incandescent bulb greater
•
than 10 Watts.
The refrigerator compartment is considered to be a
•
wet/damp environment, and some LED replacement
bulbs are not recommended for wet/damp
environments. Before installation, read and follow all
instructions on the LED packaging.
4. Replace the light shield.
5. Plug in refrigerator or reconnect power.
MOVING
Fire or Explosion Hazard
Do not puncture refrigerant tubing.
Follow handling instructions carefully.
Flammable refrigerant used.
Failure to do so can result in death, explosion or fire.
IMPORTANT: Handle with care when moving refrigerator to
avoid either damaging the refrigerant tubing or increasing
the risk of a leak.
WARNING
Excessive Weight Hazard
Use two or more people to move and install refrigerator.
Failure to do so can result in back or other injury.
VACATION AND MOVING CARE
VACATION
If You Choose to Leave the Refrigerator On While You’re
Away:
1. Use up any perishables and freeze other items.
If You Choose to Turn O the Refrigerator Before You
Leave:
1. Remove all food from the refrigerator and freezer.
2. Unplug refrigerator or disconnect power.
3. Clean refrigerator, wipe it, and dry well.
4. Tape rubber or wood blocks to the tops of both doors to
prop them open far enough for air to get in. This stops
odor and mold from building up.
When you are moving your refrigerator to a new home, follow
these instructions to prepare it for the move.
IMPORTANT:
If possible, move the refrigerator in an upright position.
•
If the refrigerator must be moved horizontally, it must be
placed only on its right-hand side (as you are facing the
front of the refrigerator). After standing the refrigerator
upright, wait at least 12 hours to allow the system to
settle before plugging in the refrigerator.
1. Remove all food from the refrigerator and pack all frozen
food in dry ice.
2. Unplug refrigerator.
3. Empty any water in the drain tray.
4. Make sure that the defrost water drain tube at the back of
the refrigerator is attached to the drain tray on the top of
the compressor, to avoid defrost water spilling onto the
oor.
5. Take out all removable parts, wrap them well, and tape
them together so they will not shift and rattle during the
move.
6. Wash and rinse the interior, and then dry thoroughly.
7. Raise the leveling legs so they don’t scrape the oor. See
“Leveling.”
8. Tape the doors closed and tape the power cord to the
back of the refrigerator.
9. When you get to your new home, put everything back and
refer to the “Installation Instructions” section.
10

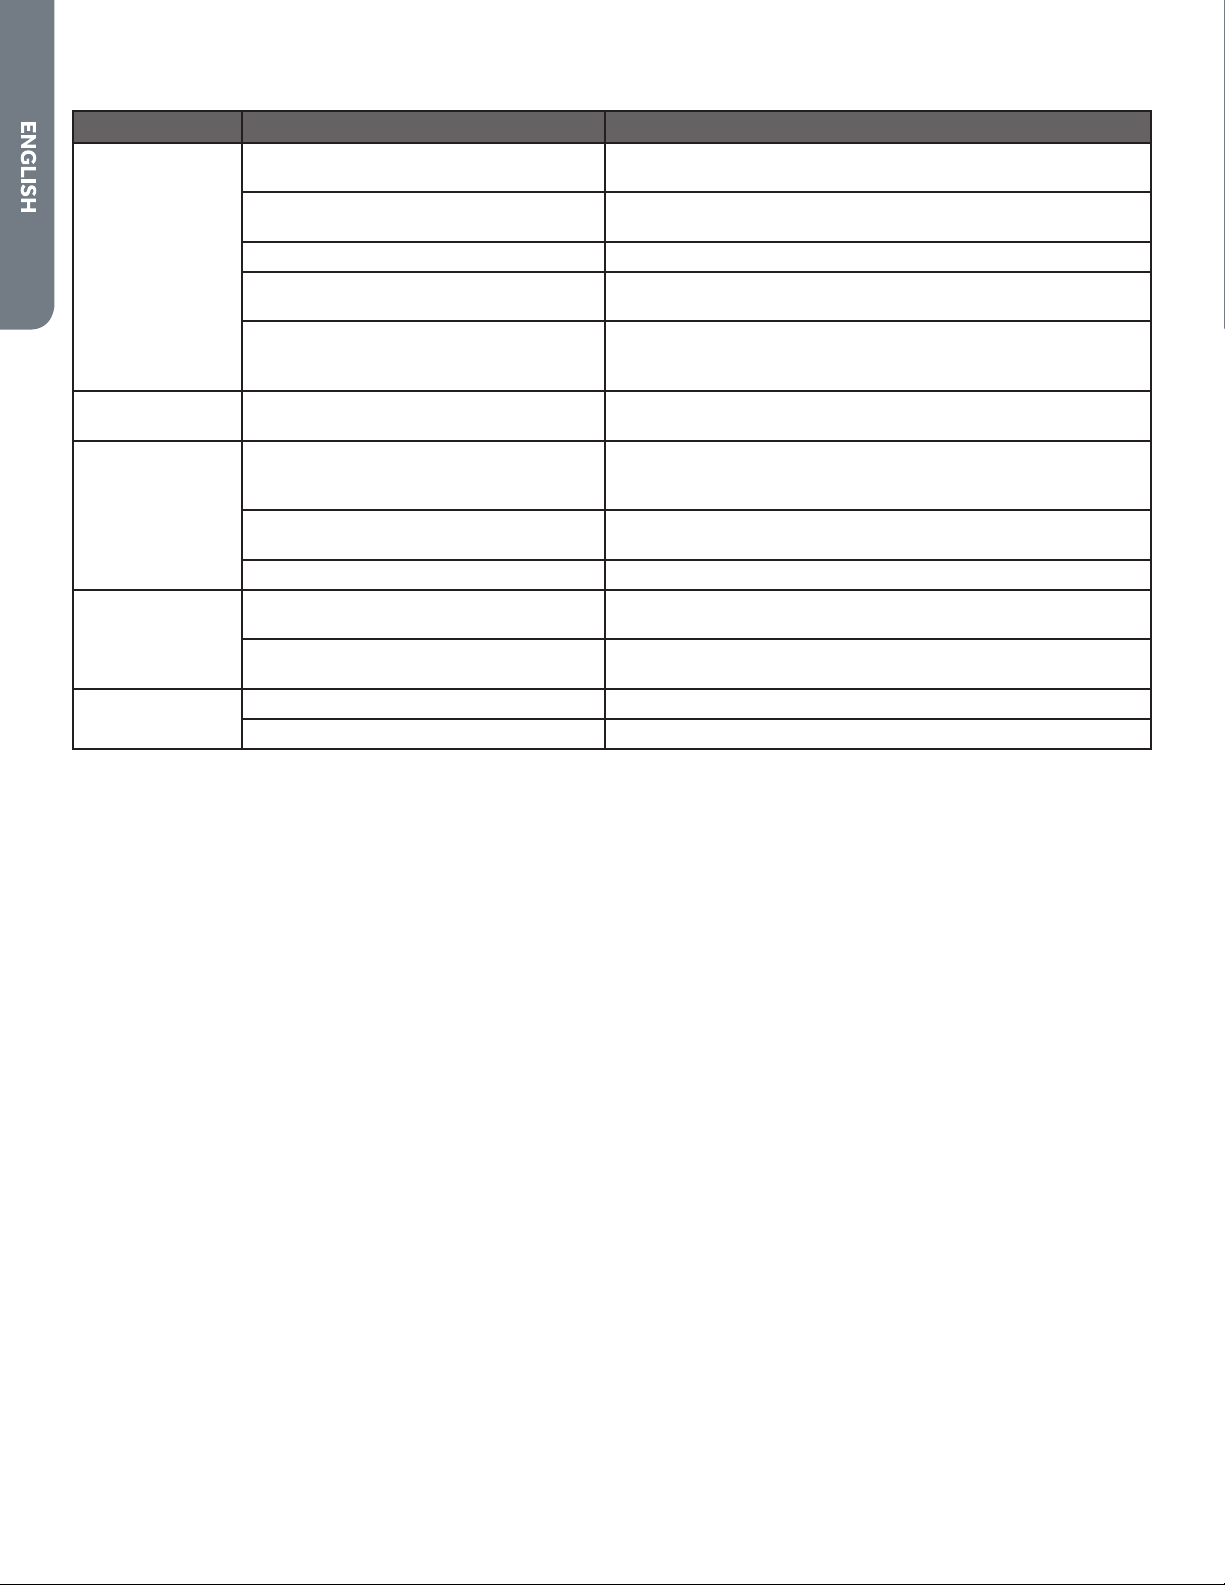
TROUBLESHOOTING
First try the solutions suggested here to possibly avoid the cost of a service call.
REFRIGERATOR IS NOT OPERATING
PROBLEM POSSIBLE CAUSE(S) SOLUTION
Refrigerator does not run Refrigerator is unplugged. Plug power cord into power source.
Breaker is tripped or turned o /
Fuse is blown.
Refrigerator is in defrost mode. Wait about 40 minutes for defrost cycle to end and
Refrigerator compressor
runs frequently or for long
periods of time
NOTE: This refrigerator is
designed to run for longer
periods of time at a lower
energy usage.
Refrigerator has an odor Food is not sealed or packaged
Light does not come on Refrigerator is unplugged. Plug refrigerator in to power source.
Doors do not close
properly
Vibration or rattling Refrigerator is not resting rmly on
Normal Sounds It sounds like water is owing from
Refrigerator is rst plugged in. This is normal. Allow 24 hours for the refrigerator to cool
Warm or large amounts of food
added.
Door is left open. Ensure that door is not being held open by an item.
Hot weather or frequent openings This is normal.
Temperature control set to coldest
setting.
properly.
Interior needs to be cleaned. Clean the interior. See “Cleaning.”
Food stored too long. Dispose of spoiled food.
Light is burned out. Replace burned out light bulb. See “Light.”
Refrigerator is not level. See “Leveling.”
Something is obstructing door
closure.
oor.
the refrigerator.
Humming or buzzing sounds The compressor and fans for cold air circulation can
Cracking or clicking sounds The interior parts will make this sound as they contract
Reset / Turn on breaker or replace fuse.
cooling system to restart.
down.
This is normal.
Adjust temperature to a warmer setting.
Reseal packaging. Place an opened box of baking soda in
the refrigerator, replace every 3 months.
Check for and remove obstructions.
See “Leveling.”
Refrigerant owing in the lines will make this sound when
the compressor starts and stops.
The refrigerator has an automatic defrosting system.
The defrosted water will make this sound.
make this sound. If the refrigerator is not level, the sound
will be louder.
and expand in response to temperature changes.
11
TEMPERATURE AND MOISTURE
PROBLEM POSSIBLE CAUSE(S) SOLUTION
Refrigerator or
freezer is too
warm
Refrigerator or
freezer is too cold
Moisture on
exterior/interior
of refrigerator
Frost or ice
crystals on frozen
food
Food freezing in
refrigerator
Temperature control is not set low
enough.
Doors opened frequently or left open. Keep door closed / Check that a package is not preventing
Warm food added recently. Allow time for food and refrigerator to cool.
The space between the back of the
refrigerator and the wall is too close.
Items against back of compartments are
blocking proper airow.
Temperature control is set too low. Adjust temperature in the compartment to the next warmer
High humidity This is normal. Condensation on the rear wall of the
Doors opened frequently or left open. Keep door closed. Check that a package is not preventing
Open container of water in refrigerator Cover or seal container
Freezer door left open or opened
frequently.
Items blocking freezer air vents and
preventing proper air ow.
Food placed too close to the air vent. Move items away from back and top of the refrigerator.
Temperature control set too cold. Adjust the temperature to a lower number (less cold) setting.
Adjust the compartment to a colder setting; allow 24 hours
for the temperature to adjust.
door from closing.
Allow 4” (10 cm) space between the back of the refrigerator
and the wall.
Store items only inside the trim of the glass shelves; don’t
place items against sides of the compartments or directly in
front of any vents.
setting; allow 24 hours to adjust.
refrigerator compartment is due to the use of Fresh Food
Cold Wall technology. See “Parts and Features.”
door from closing.
Check that a package is not preventing the door from closing
completely. Limit door openings.
Move items away from rear wall.
FOR MORE HELP, VISIT HAIERAMERICA.COM OR CALL THE CONSUMER HELP LINE AT
1-877-337-3639.
12
 Loading...