

Page 1
Microwave Oven
Convection, Grill &
Sensor Cooking
Horno Microondas
Cocción con
Convección, Grill y
Sensor
User Manual
Manual del Usuario Modelo
HMC1285SESS
POWER LEVEL GRILL CONVECTION
COMBINATION SENSOR
SENSOR
COOK
HEAT
POPCORN WEIGHT DEFROST TIME DEFROST
TIMER CLOCK
Start/+30Sec./
Stop/Clear
Select
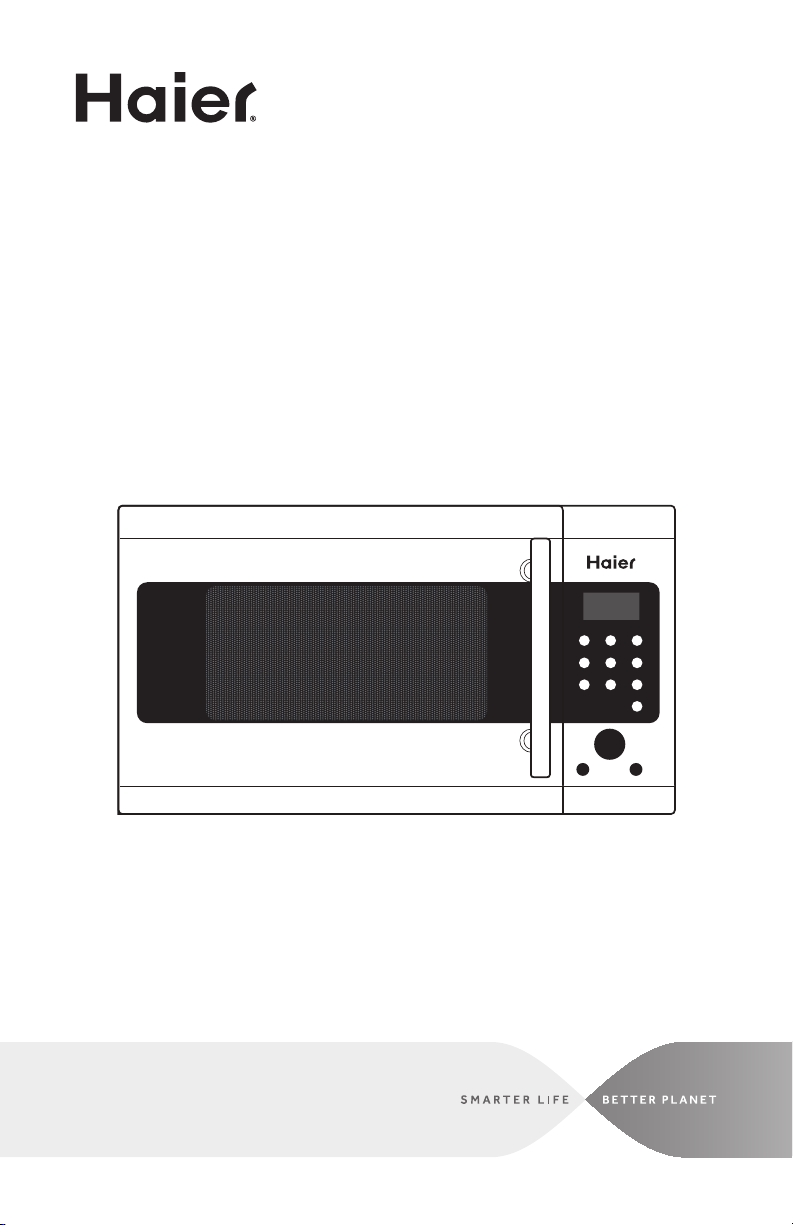
Design may vary by model number.
El diseño puede variar conforme al número de modelo
Page 2

Page 3

TABLE OF CONTENTS
SAFETY INFORMATION
Precautions to Avoid Possible Exposure to Excessive Microwave Energy ......... 2
A Special Note on Arcing ....................................................................................... 2
Addendum .............................................................................................................. 2
Important Safety Instructions ..........................................................................3-5
Grounding Instructions .........................................................................................6
Cookware and Utensil Guide ............................................................................. 7-8
SET UP & USE
Specifications .........................................................................................................9
Installation Guide ................................................................................................... 9
Parts & Features ...................................................................................................10
Control Panel ..................................................................................................11-12
Operation Instructions ..................................................................................13-20
Cooking Techniques............................................................................................. 21
CLEANING AND CARE ........................................................................................22
TROUBLE SHOOTING & WARRANTY
Before You Call For Service .................................................................................23
Customer Service ................................................................................................23
Limited Warranty .................................................................................................25
ENGLISH
PRODUCT REGISTRATION
Thank you for purchasing our Haier
product. This easy-to-use manual will
guide you in getting the best use of
your microwave oven.
Remember to record the model and
serial numbers. They are on a label
inside of the microwave oven.
Staple your receipt to your manual. You will need it to obtain warranty service.
Model number
Serial number
Date of purchase
Page 4

PRECAUTIONS TO AVOID
ENGLISH
POSSIBLE EXPOSURE TO
EXCESSIVE MICROWAVE
ENERGY
A. Do not attempt to operate this oven with the door open. This can result in
harmful exposure to microwave energy. It is important not to disable or tamper
with the safety interlocks.
B. Do not place any object between the oven front face and the door or allow soil or
cleaner residue to accumulate on sealing surfaces.
C. Do not operate the oven if damaged. It is especially important that the oven
door closes properly and that there is no damage to the:
1. DOOR (bent)
2. HINGES AND LATCHES (broken or loosened)
3. DOOR SEALS AND SEALING SURFACES
D. The oven should not be adjusted or repaired by anyone except properly qualified
service personnel.
A SPECIAL NOTE ON ARCING
“Arcing” refers to the presence of sparks inside the microwave oven. It can be
caused by:
• Metal or foil touching the inside walls of the oven.
• Foil not closely molded to food, where edges have been left sticking up.
• Small metal parts such as twist-ties, poultry pins, or gold-rimmed dishes.
• Recycled paper towels which may contain small amounts of metal.
CAUTION
IF YOU SEE SPARKS IN YOUR MICROWAVE OVEN, IMMEDIATELY PRESS
STOP/START TO CEASE COOKING AND CORRECT THE PROBLEM.
ADDENDUM
If this product is not maintained in a good state of cleanliness, its surface could
be degraded. This could affect the lifespan of the product and lead to a dangerous
situation.
PAGE 2 • SAFETY INFORMATION
Page 5

IMPORTANT SAFETY
INSTRUCTIONS
WARNING
When using electrical appliances, basic safety precautions
should be followed, including the following:
WARNING - To reduce the risk of burns, electric shock, fire, and
injury to persons or exposure to excessive microwave energy:
1. Read all instructions before using the appliance.
2. Read carefully and follow the specific "PRECAUTIONS TO AVOID
POSSIBLE EXPOSURE TO EXCESSIVE MICROWAVE ENERGY" on
page 2.
3. This appliance must be grounded. Connect only to properly
grounded outlet. See "GROUNDING INSTRUCTIONS” on page 6.
4. Install or position this appliance only in accordance with the
provided installation instructions on page 9.
5. Some products such as whole eggs and sealed containers -for
example, closed glass jars- can potentially explode and should
not be heated in this oven.
ENGLISH
6. Use this appliance only for the intended uses as described in this
manual. This type of oven is specifically designed to heat, cook, or
dry food. It is not designed for industrial or laboratory use. Do not
use corrosive chemicals or vapors in this appliance.
7. As with any appliance, close supervision is necessary when used
by children.
8. To reduce the risk of fire in the oven cavity:
• Do not overcook food. Carefully attend the appliance when
paper, plastic, or other combustible materials are placed inside
the oven to facilitate cooking.
• Remove wire twist-ties from paper or plastic bags before
placing bag in oven.
PAGE 3 • SAFETY INFORMATION
Page 6

IMPORTANT SAFETY
ENGLISH
INSTRUCTIONS
• If materials inside the oven ignite, keep oven door closed, turn
oven off, and disconnect the power cord or shut off power at
the fuse or circuit breaker panel.
• Do not use the cavity for storage purpose. Do not leave paper
products, cooking utensils or food inside the cavity when not in
use.
9. Liquids, such as water, coffee, or tea can be overheated beyond
the boiling point without appearing to be boiling due to surface
tension of the liquid. Visible bubbling or boiling when the container
is removed from the microwave oven is not always present. THIS
COULD RESULT IN VERY HOT LIQUIDS SUDDENLY BOILING
OVER WHEN A SPOON OR OTHER UTENSIL IS INSERTED INTO
THE LIQUID.
10. Do not heat oil or fat for deep-frying. It is difficult to control the
temperature of oil in a microwave oven.
11. Foods with heavy skins such as potatoes, whole squash, apples
and chestnuts should be pierced with a fork or the tip of a sharp
knife before cooking.
12. The contents of feeding bottles and baby food jars should be
stirred or shaken and the temperature should be checked before
serving in order to avoid burns.
13. Cooking utensils may become hot because of heat transferred
from the heated food. Pot holders may be needed to handle the
utensil.
14. Do not cover or block any openings on the appliance.
15. Do not store or use this appliance outdoors. Do not use this
product near water, for example, near a kitchen sink, in a wet
basement, near a swimming pool, or similar locations.
16. Do not operate this appliance if the cord or plug is damaged, if it
is not working properly, or if it has been damaged or dropped.
17. Do not immerse cord or plug in water. Keep cord away from
heated surfaces. Do not let cord hang over the edge of a table or
counter.
PAGE 4 • SAFETY INFORMATION
Page 7

IMPORTANT SAFETY
INSTRUCTIONS
18. Use only thermometers, specifically designed for use in
microwave ovens.
19. Be certain the glass tray and roller rings are in place before
operating the oven
20. This appliance should be serviced only by qualified service
personnel. Contact nearest authorized service facility for
examination, repair, or adjustment.
21. When cleaning sealing surfaces of the oven, such as the door
jamb, use only mild, nonabrasive soaps, or mild detergents
applied with a sponge or soft cloth.
22. Oversized foods or oversized metal utensils should not be
inserted in a microwave/convection oven as they may create a
fire or risk of electrical shock.
23. Do not clean with metal scouring pads. Pieces can burn off the
pad and touch electrical parts involving a risk of electric shock.
24. Do not use paper products when appliance is operated in the grill
mode.
ENGLISH
25. Do not cover racks or any other part of the oven with metal foil.
This will cause overheating of the oven.
SAVE THESE INSTRUCTIONS
HOUSEHOLD USE ONLY
PAGE 5 • SAFETY INFORMATION
Page 8
GROUNDING INSTRUCTIONS
ELECTRICAL REQUIREMENTS
ENGLISH
The electrical requirements are a 120 volt 60 Hz, AC only, 15 amp. It is
recommended that a separate circuit serving only the oven be provided. The oven
is equipped with a 3-wire cord having a 3-prong grounding plug. It must be plugged
into a wall receptacle that is properly installed and grounded.
This appliance must be grounded. In the event of an electrical short circuit,
grounding reduces risk of electric shock by providing an escape wire for the electric
current. The cord provided with this appliance is equipped with a grounding wire
and a grounding plug. The plug must be plugged into an outlet that is properly
installed and grounded. Do not attempt to defeat this safety feature by modifying
the plug in any way.
WARNING
Improper use of the grounding plug can result in a risk of electric shock.
Consult a qualified electrician or serviceman if:
1) The grounding instructions are not completely understood.
2) You are unsure that the appliance is properly grounded.
3) You have any questions about the grounding or electrical instructions.
POWER SUPPLY CORD
1. A short power supply cord is provided to reduce the risk of becoming entangled in
or tripping over a longer cord.
2. If the power supply cord is too short, do not use an extension cord. Have a
qualified electrician or serviceman to install an outlet near the appliance.
3. If it is absolutely necessary to use longer cord sets or an extension cord, extreme
care must be exercised.
a) Use only a grounding type 3-wire extension cord that
has a 3-blade grounding plug and a 3-slot receptacle
that will accept the plug on the appliance.
b) The marked electrical rating of the cord set or extension
cord must equal to or greater than the electrical rating
of the appliance. The longer cord should be arranged
so that it will not drape over the counter top or table
top where it can be pulled on by children or tripped over
unintentionally.
NOTE: Neither Haier nor the dealer can accept any liability for damage to the oven
or personal injury resulting from failure to observe the electrical connection
procedures.
PAGE 6 • SAFETY INFORMATION
Page 9

COOKWARE AND UTENSIL GUIDE
This section lists which utensils can be used in the microwave, which have limited
use, and which should not be used in the microwave at all.
RECOMMENDED
• Microwave browning dish: Use to brown the exterior of small items such as steaks,
chops, or pancakes. Follow the directions provided with your browning dish.
• Microwaveable plastic wrap: Use to retain steam. Leave a small opening for some
steam to escape and avoid placing it directly on the food.
• Paper towels and napkins: These absorb excess moisture and prevent spattering.
Use for short-term heating and covering. Do not use recycled paper towels, which
may contain metal and could ignite.
• Heat-proof glass or glass-ceramic bowls and dishes: Use for heating or cooking.
• Paper plates and cups: Use for short-term heating at low temperatures. Do not
use recycled paper, which may contain metal and could ignite.
• Wax paper: Use as a cover to prevent spattering.
• Thermometers: Use only those labeled “Microwave Safe” and follow all directions.
Check the temperature of food in several places. Conventional thermometers
may be used on microwaved food once the food has been removed from the oven.
LIMITED USE
• Aluminum foil: Smooth, narrow strips of foil may be used to shield delicate areas
on food items like drumsticks and wings to prevent overcooking.
NOTE: Using too much foil can damage your oven, so be careful.
• Ceramic, porcelain, and stoneware: Use these only if they are labeled “Microwave
Safe”. If they are not labeled, test them to make sure they can be used safely.
• Plastic: Use only if labeled “Microwave Safe”. Other plastics can melt.
• Straw, wicker, and wood: Use only for short-term heating, such as warming dinner
rolls for a few seconds. Baskets and bowls may be flammable.
ENGLISH
PAGE 7 • SAFETY INFORMATION
Page 10

COOKWARE AND UTENSIL GUIDE CONT.
NOT RECOMMENDED
ENGLISH
• Glass jars and bottles: Regular glass is too thin to be used in a microwave. It can
shatter, causing damage and injury.
• Paper bags: These are a fire hazard, except for popcorn bags that are designed for
microwave use.
• Styrofoam plates and cups: These can melt and leave a harmful chemical residue
on food.
• Plastic storage and food containers: Containers meant for cold storage, such as
margarine tubs, can melt in the microwave.
• Metal utensils: These can damage your microwave oven. Remove all metal from
food and containers before cooking.
NOTE: To test if a dish is safe for microwaving, place the empty dish in the oven and
microwave on HIGH for 30 seconds. A dish which becomes very hot should
not be used.
• Parchment paper: Use as a cover to prevent spattering or as a wrap for steaming.
• Aluminum tray: May cause arcing. Transfer food to a microwave-safe container.
• Take-out carton with metal handle: May cause arcing. Transfer food to a
microwave-safe container.
• Metal or metal-trimmed utensils: Metal cookware, metal trim, and metallic glazes
may cause arcing.
• Wood: Wood will dry out when used in the microwave oven and may split or crack.
PAGE 8 • SAFETY INFORMATION
Page 11
SPECIFICATIONS
Power Consumption: 120V~60Hz, 1500W
MWO Power: 1000W
Output Power (Grill) 1100W
Output Power (Convection) 1500W
Operation Frequency: 2450MHz
Unit Dimensions (WxDxH): 20-3/8" x 20-1/8" x 12-3/8"
Oven Capacity: 1.2 cubic feet
Cooking Uniformity: Turntable Diameter 12-3/8"
Net Weight: Approx. 41.4 lbs.
INSTALLATION GUIDE
ENGLISH
1. Make sure that all the packing
materials are removed from the
inside of the door.
2. Check the oven for any damage, such
as misaligned or bent door, damaged
door seals and sealing surfaces,
broken or loose door hinges and
latches, and dents inside the cavity or
on the door. If there is any damage,
do not operate the oven. Contact
qualified service personnel.
3. This microwave oven must be placed
on a flat, stable surface capable of
supporting the weight of the oven
plus the heaviest food likely to be
cooked in the oven.
4. Do not place the oven where heat,
moisture, or high humidity are
generated, or near combustible
materials.
5. To function correctly, the oven must
have sufficient airflow on all sides.
Allow 8" of space above the oven, 4"
at back, and 2" at both sides. Do not
cover or block any openings on the
appliance. Do not remove feet on
which oven stands.
6. Do not operate the oven without
glass tray, roller support, and shaft in
their proper positions.
7. Make sure that the power supply cord
is undamaged and does not run under
the oven or over any hot or sharp
surface.
8. The socket must be readily
accessible so that the cord can be
quickly reached
and easily
unplugged in an
emergency.
RADIO OR TV INTERFERENCE
Should the microwave oven cause interference to your radio or TV, check that the
microwave oven is on a different circuit, relocate the radio or TV as far away from
the oven as possible or check position and signal of receiving antenna.
PAGE 9 • SET UP & USE
Page 12
POWER LEVEL GRILL CONVECTION
COMBINATION SENSOR
COOK
SENSOR
HEAT
POPCORN WEIGHT DEFROST TIME DEFROST
TIMER CLOCK
Stop/Clear
Start/+30Sec./
Select
ENGLISH
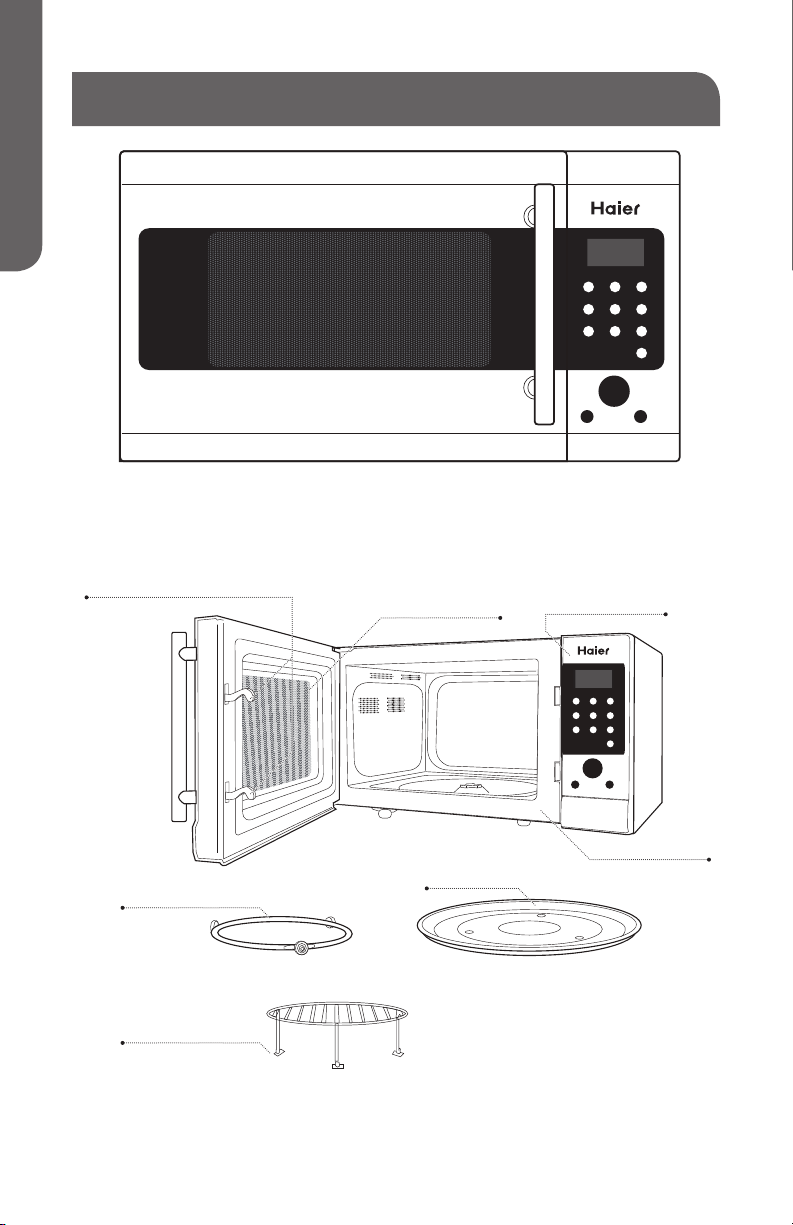
PARTS & FEATURES
Diagram for instructional purposes only.
Design may vary by model number.
POWER LEVEL GRILL CONVECTION
COMBINATION SENSOR
COOK
POPCORN WEIGHT DEFROST TIME DEFROST
Start/+30Sec./
Stop/Clear
SENSOR
HEAT
TIMER CLOCK
Select
Door Safety Lock System
Turntable Roller
Grill Rack
Oven Window
Glass Tray
PAGE 10 • SET UP & USE
Control Panel
POWER LEVEL GRILL CONVECTION
COMBINATION SENSOR
SENSOR
COOK
HEAT
POPCORN WEIGHT DEFROST TIME DEFROST
TIMER CLOCK
Start/+30Sec./
Stop/Clear
Select
Door Jamb
Page 13
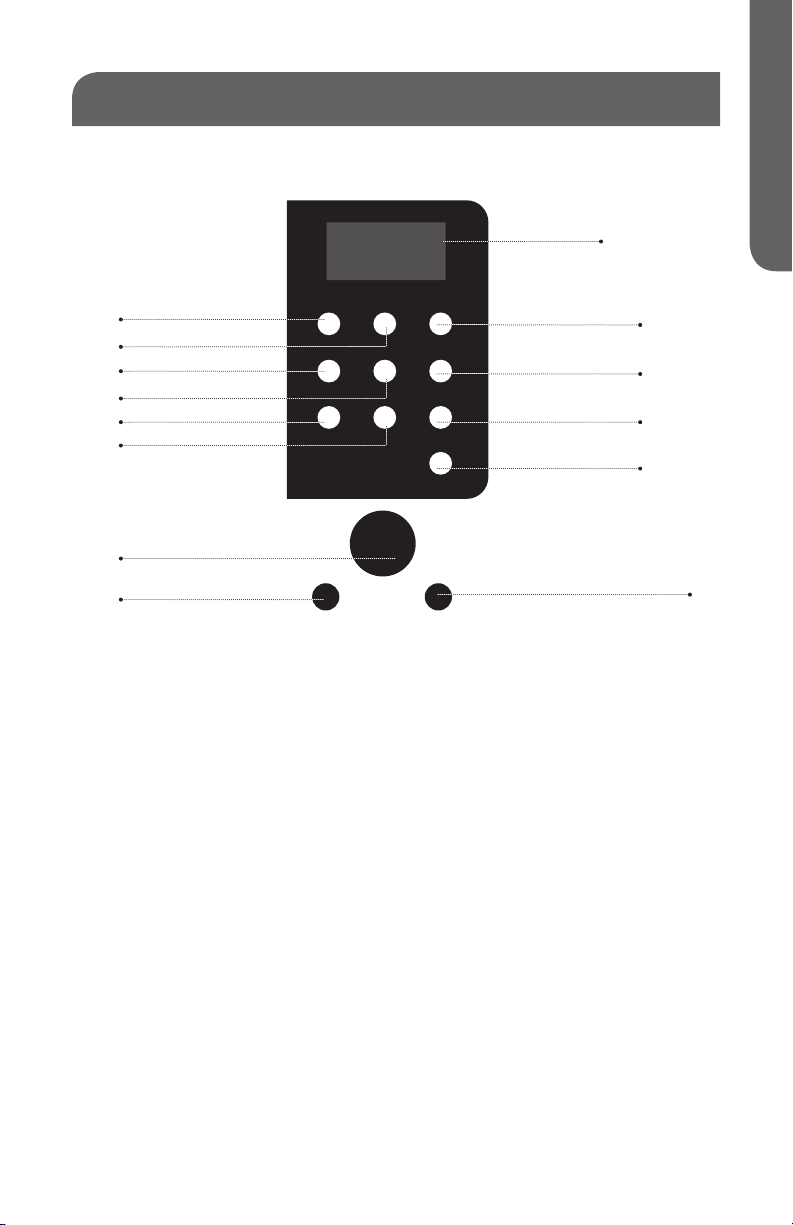
CONTROL PANEL
ENGLISH
Display
Power Level
Grill
Combination
Sensor Cook
Popcorn
Weight Defrost
Dial
Stop / Clear
POWER LEVEL GRILL CONVECTION
COMBINATION SENSOR
POPCORN WEIGHT DEFROST TIME DEFROST
Stop/Clear
SENSOR
COOK
HEAT
TIMER CLOCK
Start/+30Sec./
Select
Convection
Sensor Heat
Time Defrost
Timer Clock
Start/+30sec./Select
PAGE 11 • SET UP & USE
Page 14

CONTROL PANEL
DISPLAY
ENGLISH
Shows cooking time, power, indicators
and present time.
GRILL
Top radiant element allow foods to be
crisped or browned.
CONVECTION
Combines radiant heat and a fan for
accurate bake and roast foods.
COMBINATION
Combination cooking offers the best
features of microwave energy and
convection cooking.
SENSOR COOK
Automatically sets power and time
based on moisture levels for optimum
results.
SENSOR REHEAT
The sensor reheat feature allows you
to reheat food without setting the
oven manually.
POWER LEVEL
Use to set power level. Also lets you
check power level during cooking.
WEIGHT DEFROST
Programs defrosting based on the
weight of the foods to be defrosted.
based on desired defrosting time.
TIMER
Timer functions independently.
DIAL
Used to set time, weight, temperature
and power level.
POPCORN
Cook popcorn automatically without
entering a power level or time.
START / +30SEC / SELECT
Touch to start cooking or add 30
seconds to the cooking time.
CONVENIENCE COOKING BUTTONS
Instant settings to cook popular
foods.
TIMER/CLOCK
Timer functions independently.
Use to set the time of day or recall the
time of day.
STOP / CLEAR
Clears all previous settings or sets the
child lock.
TIME DEFROST
Quickly and effectively defrosts foods
PAGE 12 • SET UP & USE
Page 15

OPERATION INSTRUCTIONS
ENGLISH
SETTING THE CLOCK
When you first plug in your microwave,
you must first set the time.
1. Plug in the microwave.
2. Turn the Dial to select hours.
3. Press the Start/+30 sec/Select
button.
4. Turn the Dial to select minutes.
5. Press start/+30 sec/select button
to finish.
To reset the clock:
1.Press the Timer/Clock button twice.
2. Turn the Dial to select hours.
3. Press the Start/+30 sec/Select
button.
4. Turn the Dial to select minutes.
5. Press Start/+30 sec/select button
to finish.
NOTE:
1. You can use the oven without setting
the clock
2. The oven uses a 12-Hour clock.
3. The clock will keep the time of day
as long as the oven is plugged in and
electricity it provided.
QUICK 30 SECONDS
The Start/+30sec/Select button can be
used to set the time for cooking or for
adding extra cooking time while food is
already cooking.
NOTE: The microwave’s power level is
automatically set to 100%
1. To set the time for cooking, press
Start/+30sec/Select button and
the oven will begin cooking for 30
seconds.
2. To add extra cooking time during
cooking, press the Start/+30sec/
Select button during cooking this will
increase cooking time by 30 seconds.
The maximum amount of time that
can be added is 95 minutes.
STOP / CLEAR
1. To stop the microwave at any point
during cooking, press the Stop/Clear
button.
SETTING THE POWER LEVEL
Variable power levels add flexibility to
microwave cooking. Each power level
gives you microwave energy a certain
percent of the time, for example, Power
Level 3 is microwave energy 30% of the
time. Power Level 10 will cook faster but
food may need more frequent stirring,
rotating or turning over. A lower setting
will cook more evenly and need less
stirring or rotating of the food. Some
foods may have better flavor, texture or
appearance if one of the lower settings
is used. Use a lower power level when
cooking foods that have a tendency to
boil over, such as scalloped potatoes.
Rest periods (when the microwave
energy cycles off) give time for the
food to transfer heat to the inside of
the food. An example of this is with the
defrost cycle (Power Level 3). If the
microwave energy did not cycle off, the
outside of the food would cook before
the inside was defrosted.
1. Press the Power Level button.
2. Turn the dial to select the power level.
3. Press the Start/+30 sec/Select
button to enter.
PAGE 13 • SET UP & USE
Page 16

OPERATION INSTRUCTIONS CONT.
4. Turn the Dial to select the time.
ENGLISH
5. Press Start/+30 sec/Select button to
start cooking.
DISPLAY COOKING
POWER
PL10 100% PL5 50%
PL9 90% PL4 40%
PL8 80% PL3 30%
PL7 70% PL2 20%
PL6 60% PL1 10%
DISPLAY COOKING
SETTING A COOKING PROGRAM
A. Multi-stage cooking
Two or three cooking stages can be
set. If defrosting is one of the stages,
it should be programmed as the first
stage. It will beep once when one stage
finishes and the next stage will begin.
NOTE: Sensor menu cannot be set as
one of the multi-stages.
B. Tw o Stages Cooking Example
If you want to defrost the food for
5 minutes, then cook with 80%
Microwave power for 7 minutes. Follow
these steps:
Stage 1: Defrost
5. Press Start/+30 sec/Select to input
your selected power level.
6. Turn the dial to adjust the cooking
time of 7 minutes.
POWER
7. Press Start/+30Sec/Select to start
cooking.
B. Th ree Stages Cooking Example
If you want to defrost the food for
5 minutes, and cook with 100%
microwave power for 7 minutes, then
cook with grill 3 minutes. Follow these
steps:
Stage 1: Defrost
1. Press Time Defrost, “d-2” will display.
2. Turn the dial to select the cooking
time of 5 minutes.
Stage 2: Microwave
3. Press the Power Level button, “PL10”
will display.
4. Press Start/+30sec/Select to input
your selected power level.
5. Turn the dial to adjust the cooking
time to 7 minutes.
1. Press Time Defrost,“d-2” will display.
2. Turn the dial to select the cooking
time of 5 minutes.
Stage 2: Microwave
3. Press the Power level button. “PL10”
displays.
4. Turn the dial to choose 80%
microwave power, “PL8” will display.
PAGE 14 • SET UP & USE
Stage 3: Grill
6. Press Grill.
7. Turn the dial to adjust the cooking
time to 3 minutes.
8. Press Start/+30sec/select to start
cooking.
Page 17

OPERATION INSTRUCTIONS CONT.
ENGLISH
GRILL
The Grilling Feature uses direct heat
from the upper heating elements to
cook and brown your food from above.
The temperature of the Grilling Feature
is preset to 311°F.
When using the grilling features,
remember that the oven, door and
dishes will be very hot.
• Cookware will become very hot, use
oven mitts to handle the cookware.
• In addition to the cookware provided,
you can use non-metal casserole
dishes, pie plates and other heat-safe
cookware. Place them directly onto
the metal rack.
• Be sure to select a cookware size that
will rotate easily.
• Place the metal tray directly on the
turntable support.
• Do not use cookware or coverings
made of paper, plastic or foil when
using the grilling features.
• When grilling is finished, the turntable
is very hot, do not rinse the turntable
when hot as this may cause breakage.
1. Press the Grill button.
2. Turn the dial to adjust the cooking
time, to a maximum of 95 minutes.
3. Press the Start/+30sec/Select button
to begin grilling.
NOTE: When half the grill time passes,
the oven should sound two beeps. This
is normal, to alert you to turn the food.
CAUTION
Remove cookware from oven before
turning food. To continue, close the
door and press Start/+30sec/Select. If
the oven door is not opened oven will
continue grilling normally.
CAUTION
When grilling is finished use oven mitts
to handle the food as it is extremely hot.
During and after use, do not let clothing,
pot holders, or other flammable
materials come into contact with the
heating elements; these surfaces are
hot enough to burn. Allow sufficient
cooling time.
POPCORN
1. Press popcorn until the weight of
your popcorn bag appears in the
screen.
2. Press Start/+30sec/Select to begin
cooking.
• Prepackaged microwave popcorn
comes in 3.5 oz (99g) ,3.0oz (85g) and
1.75oz (50 g) bags.
• Place the bag in the oven according to
the manufacturer's direction.
• Pop only one bag at a time.
• When popping multiple bags
consecutively, the cooking times may
vary slightly. This does not affect the
cooking results.
• After popping, open the bag carefully.
Popcorn and steam are extremely hot.
• Do not reheat unpopped kernels or
reuse bag.
PAGE 15 • SET UP & USE
Page 18

OPERATION INSTRUCTIONS CONT.
• Use only the package weight, or
ENGLISH
results will be unsatisfactory and
popcorn may scorch.
• If popcorn is undercooked after the
countdown, use Start/+30Sec/Select
to add additional cooking time.
WEIGHT DEFROST
Weight Defrost will automatically set
the defrosting time and power level to
give even defrosting results.
1. Press the Weight Defrost button, the
oven will display “d-1.”
2. Turn the dial to select the weight of
the food (Between 4-100OZ), and the
“OZ” light will turn on.
3. Press the Start/+30sec/Select button
to begin defrosting.
Conversion Guide
Weight of food in Lbs Enter Weight in OZ
0.1 1-2
0.2 3
0.3 4-5
0.4 6-7
0.5 8
0.6 9-10
0.7 11
0.8 12-13
0.9 14-15
TIME DEFROST
1. Press the Time Defrost button, the
oven will display “d-2.”
2. Turn the dial to select the time, to a
maxium of 95 minutes.
3. Press the Start/+30sec/Select button
to begin defrosting.
NOTE: Power level for Time Defrost is
preset at 30%.
SENSOR COOK
Sensor Cooking is a technology
designed to detect the increasing
humidity released by food during the
cooking process. As food cooks in a
microwave oven, steam is produced.
Once steam is detected by the sensor,
the microwave will automatically
calculate and adjust the remaining
cooking time for the type and amount
of food. Sensor Cooking simplifies
microwave programming with excellent
cooking results.
1. Press the Sensor Cook button.
2. Turn the dial to select the desired
food type.
3. Press the Start/+30sec/Select button
to start cooking.
NOTE: For best results, do not use one
of the sensor cook food categories
twice in succession on the same food
portion -- this may result in severely
overcooked or burnt food. If there
is a need to continue cooking, it is
suggested to use the manual controls,
instead of Pre-set Sensor Cooking
• The oven door should not be opened
while the sensor cook is on. Opening
the door may cause inaccurate
cooking results. Once the two beep
signal is heard, the remaining cooking
time immediately appears in the
screen and begins to count-down.
At this time, the oven door may be
opened to stir, turn, or add food.
PAGE 16 • SET UP & USE
Page 19

OPERATION INSTRUCTIONS CONT.
ENGLISH
• Cover foods loosely, but completely,
with plastic wrap or place foods in a
casserole dish with a proper fitting lid.
• The oven will not cook food properly
when the oven is still hot.Allow time
for the oven to cool down before
proceeding to cook.
• Foods less than 4oz. (110g) should
be cooked by power and time, not by
sensor cook.
• Cover food with lid, or with vented
plastic wrap. Never use tightly sealed
plastic containers, as they may prevent
• All foods for sensor cooking should be
at their normal storage temperature.
• Before using sensor cooking, make
sure the inside cavity of the oven is
dry.
steam from escaping and this will
cause food to overcook.
After cooking/reheating: All food should
have a specific Sensor Cooking setting.
See the “sensor cook chart” for specific
food cooking instructions.
Sensor Cook Chart
Menu Weight Display Additional Instructions
Frozen Entrée
Fish
Fillets
Potato
Frozen Vegetables 6~16 Oz
Pasta 2~8 Oz
Fresh Vegetables
Frozen
Pizza
Ground
Meat
8~32Oz
(225~900g) SC-1
4~16Oz
110~450g)
1~4 Unit
(6~8Oz
each)
(170~450g)
(56~225g)
4~16Oz
110~450g) SC-7
6~12 Oz
(225g each)
8~24 Oz
(225~680g) SC-8
SC-5. Arange in a single layer. Cover with lid or
SC-2
SC-6
SC-3 Place pasta with hot tap water in a microwave
SC-4 Follow manufacturer's directions
Follow manufacturer's instructions on
preparation. Be careful when removing the film
cover after cooking. Remove facing away from
you to avoid steam burns. If additional time is
needed, continue to cook manually.
vented plastic wrap.
Pierce each potato with a fork 6 times around
its surface. Place potatos around the edge of a
paper-towel-lined turntable, at least 1" (2.5cm)
apart. Do not cover.
Wash thoroughly, add 1 tbsp. of water per
1/2 cup of vegetables, and cover with a lid
or vented plastic wrap. Do not salt/butter
vegetables until after cooking.
casserole dish. Cover with lid or vented
plastic wrap..
All pieces should be the same size.Wash
thoroughly, add 1 tbsp. of water per 1/2 cup
of vegetables, and cover with a lid or vented
plastic wrap. Do not salt/butter vegetables until
after cooking.
for preparation.
Break apart in glass bowl or colander. Cover
with lid or vented plastic wrap. Juices should be
clean when done. Drain.
PAGE 17 • SET UP & USE
Page 20

OPERATION INSTRUCTIONS CONT.
SENSOR REHEAT FEATURE
ENGLISH
The sensor reheat feature allows you to
reheat food without setting the oven
manually.
1. Press the Sensor Reheat button.
Then place your food in the
microwave. SA-1 will be displayed.
2. Press the Start/+30sec/Select button
to begin reheating.
Two beeps will signal when the sensor
detects the steam. The time will
count down, and display the remaining
cooking time in the display window.
When the cooking has finished, 5 beeps
will signal and the oven will turn back to
the waiting state.
NOTE: Avoid the following foods while
sensor heating:
1. Bread and other dry foods, such as
biscuit or cake.
2. Beverages and frozen foods.
• The oven cannot cook automatically
when the temperature of the oven is
too high.
air moves over and around the food,
producing golden brown exteriors with
rich, moist interiors. Most foods will
cook faster and better with Convection
Cooking than conventional cooking
methods.
Convection time cook with preheat:
1. Press the Convection button, “100F”
will flash.
2. Turn the dial to enter the desired
temperature between 100ºF (38ºC) to
425ºF(218ºC).
3. Press the Start/+30sec/Select button
twice to begin preheating.
4. When preheating is complete, two
beeps will signal. If you do not open
the oven within 5 minutes, the oven
will turn off automatically.
5. Open the oven door, and carefully
place the food inside. Close the oven
door.
6. Turn the dial to enter the desired
cooking time, up to a maximum of 95
minutes.
• The reheated food can be covered
with a lid. But ensure the lid has
ventilation in order to release steam.
Sealed containers and utensils should
never be used.
CONVECTION
Convection Cooking is a technology
used to cook foods more efficiently.
Convection cooking uses a special
heating element and fan to raise the
temperature of the air inside the
microwave oven, circulating the uniform
heated air throughout the oven. The
PAGE 18 • SET UP & USE
7. Press the Start/+30sec/Select button
to begin cooking.
Convection without preheat:
1. Press the Convection button, “100F”
will flash.
2. Turn the dial to enter the desired
temperature between 100ºF (38ºC) to
425ºF(218ºC).
3. Press the Start/+30sec/Select button
to enter temperature.
Page 21

OPERATION INSTRUCTIONS CONT.
ENGLISH
4. Turn the dial to enter the desired
cooking time, up to a maximum of 95
minutes.
5. Press the Start/+30sec/Select button
to begin cooking.
COMBINATION COOKING
Combination cooking offers the best
features of microwave energy and
convection cooking. Microwaves cook
food fast and convection circulation
of heated air browns foods beautifully.
Any oven temperature from 100°F
(38°C) to 375°F (190°C) may be set. The
microwave oven power level is preset at
30% power.
CAUTION
When using the combination feature,
remember that the oven, door and
dishes will be very hot.
• Cookware will become hot. Oven mitts
will be needed to handle the cookware.
• Place food or oven-safe cookware
directly on the black metal tray when
cooking.
• Make sure food is cooked all the way
through before browning.
• In addition to the cookware provided
you can use non-metal casserole
dishes, pie plates and other heat-safe
cookware. Place them directly on the
black metal tray.
• Be sure to select a size that will rotate
easily.
• Place the metal rack directly on the
turntable support.
• Do not use cookware or coverings
made of paper, plastic or foil when
using the combination feature.
PAGE 19 • SET UP & USE
Page 22

OPERATION INSTRUCTIONS CONT.
Combination cook with preheat:
ENGLISH
1. Press the Combination button,
“100F” will flash.
2. Turn the dial to enter the desired
temperature between 100ºF (38ºC)
to 375ºF(190ºC). Don't enter cooking
time yet.
3. Press the Start/+30sec/Select button
twice to begin preheating.
4. When oven is preheated, two beeps
will signal.
5. Open the oven door, and carefully
place the food inside. Close the oven
door.
6. Turn the dial to enter the desired
cooking time, up to a maximum of 95
minutes.
7. Press the Start/+30sec/Select button
to begin cooking.
Combination cook with without
preheat:
TIMER
1. PressTimer/ Clock button once. The
screen will read 0:00.
2. Turn the dial to enter the desired
time, up to a maximum of 95 minutes.
3. Press the Start/+30sec/Select button
to start the timer.
The microwave will beep five times
when the timer is finished.
CHILD LOCK
1. Press Stop/ Clear and hold for 3
seconds. A long beep will sound to
signal that the lock is now on. You
will see the locked icon on the LCD
screen.
2. To unlock, press and hold the Stop/
Clear button for 3 seconds. A long
beep will sound. The microwave is
now unlocked.
1. Press the Combination button,
“100F” will flash.
2. Turn the dial to enter the desired
temperature between 100ºF (38ºC)
to 375ºF(190ºC).Don't enter cooking
time yet.
3. Press the Start/+30sec/Select button
to enter temperature.
4. Turn the dial to enter the desired
cooking time, up to a maximum of 95
minutes.
5. Press the Start/+30sec/Select button
to begin cooking.
PAGE 20 • SET UP & USE
Page 23

COOKING TECHNIQUES
ENGLISH
Your microwave can make cooking
quicker and easier than conventional
cooking. For best results, exercise the
following techniques:
STIRRING
Stir foods such as casseroles and
vegetables while cooking to distribute
heat evenly. Food at the outside of the
dish absorbs more energy and heats
more quickly, so stir from the outside
to the center. The oven will pause
automatically when you open the door
to stir your food.
ARRANGEMENT
Arrange unevenly shaped foods, such
as chicken pieces or chops, with the
thicker, meatier parts toward the
outside of the turntable where they
receive more microwave energy. To
prevent overcooking, place delicate
areas, such as asparagus tips, toward
the center of the turntable.
SHIELDING
You may shield food with narrow
strips of aluminum foil to prevent
overcooking. Areas that need shielding
include poultry wing-tips, the ends
of poultry legs, and corners of square
baking dishes. Use only small amounts
of aluminum foil. Larger amounts can
damage your oven. Apply foil strips
as smoothly as the food item allows,
avoiding creases wherever possible.
TURNING
Turn foods over midway through
cooking to expose all parts to
microwave energy. This is especially
important with large items such as
roasts.
STANDING
Foods cooked in the microwave build
up internal heat and continue to cook
for a few minutes after heating stops.
Let foods stand to complete cooking,
especially foods such as cakes and
whole vegetables. Roasts need this
time to complete cooking in the center
without overcooking the outer areas.
All liquids, such as soup or hot
chocolate, should be shaken or stirred
prior to cooking, midway through, and
when cooking is complete. Let liquids
stand a moment before serving. When
heating baby food, stir well at removal
and test the temperature before
serving.
ADDING MOISTURE
Microwave energy is attracted to water
molecules. Food that is uneven in
moisture content should be covered
or allowed to stand so that the heat
disperses evenly. Add a small amount
of water to dry food to help it cook.
PAGE 21 • SET UP & USE
Page 24

CLEANING AND CARE
1. Keep the inside of the oven clean.
ENGLISH
When food splatters or spilled liquids
adhere to oven walls, wipe with a
damp cloth. Mild detergent may be
used if the oven gets very dirty. Avoid
the use of spray and other harsh
cleaners as they may stain, streak or
dull the door surface.
2. When cleaning surfaces such as the
door jamb, use only mild, nonabrasive
soaps, or mild detergents applied
with a sponge or soft cloth.
3. Turn off the oven and unplug the
power cord from the wall socket
before cleaning.
4. The outside surfaces should be
cleaned with a damp cloth. To prevent
damage to the operating parts inside
the oven, water should not be allowed
to seep into the ventilation openings.
5. Wipe the window on both sides with
a damp cloth to remove any spills or
spatters.
6. Do not allow the control panel to get
wet. Clean with a soft, damp cloth.
When cleaning the control panel,
leave oven door open to prevent
oven from accidentally turning on.
7. If steam accumulates inside or
around the outside of the oven door,
wipe with a soft cloth. This may occur
when the microwave oven is operated
under high humidity conditions. This
is normal in such conditions.
8. It may be necessary to remove the
glass tray for cleaning. Wash the
tray in warm sudsy water or in a
dishwasher.
9. The roller ring and oven floor should
be cleaned regularly. Simply wipe
the bottom surface of the oven with
mild detergent. The roller ring may
be washed in mild sudsy water or
dishwasher. When removing the roller
ring from cavity floor for cleaning, be
sure to replace in the proper position.
10. Remove odors from your oven by
combining a cup of water with the
juice and skin of one lemon in a deep
bowl, microwave for 5 minutes. Wipe
thoroughly and dry with a soft cloth.
11. When the oven light burns out,
please consult a dealer to have it
replaced.
12. If the power cord becomes soiled,
unplug and wipe down with a damp
cloth. Make sure to dry thoroughly
before plugging back into outlet.
13. Please do not dispose of this
appliance with regular garbage.
It should be disposed of through
an appropriate disposal facility
provided by your municipality.
PAGE 22 • CLEANING AND CARE
Page 25

BEFORE YOU CALL FOR SERVICE
IF THE OVEN FAILS TO OPERATE:
A) Check to make sure that the oven is plugged in securely. If it is not, remove the
plug from the outlet, wait 10 seconds and plug it in again securely.
B) Check for a blown circuit fuse or a tripped main circuit breaker. If these seem to
be operating properly, test the outlet with another appliance.
C) Check to make sure the control panel is programmed correctly and the timer is
set.
D) Check to ensure that the door is securely closed engaging the door safety lock
system. Otherwise, the microwave energy will not flow into the oven.
IF NONE OF THE ABOVE SOLVES THE PROBLEM, CONTACT A QUALIFIED
TECHNICIAN. DO NOT TRY TO ADJUST OR REPAIR THE OVEN YOURSELF.
CUSTOMER SERVICE
IMPORTANT
DO NOT RETURN THIS PRODUCT TO THE STORE
If you have a problem with this product, please contact the Haier
Customer Satisfaction Center at 1-877-337-3639.
ENGLISH
DATED PROOF OF PURCHASE, MODEL # AND SERIAL #
REQUIRED FOR WARRANTY SERVICE
CUSTOMER
SERVICE
SERVICIO
AL CLIENTE
Hotline 24/7
1-877-337-3639
PAGE 23 • TROUBLE SHOOTING AND WARRANTY
Page 26

TROUBLESHOOTING
Check your problem by using the chart below and try the solutions for each problem. If
ENGLISH
the microwave oven still does not work properly, contact Haier customer service center
or the nearest authorized service center. Customers must never troubleshoot internal
components. Microwaves hold dangerous voltage (5000V) even after power is removed. Only
a certified technician should attempt Microwave repair.
TROUBLE POSSIBLE CAUSE POSSIBLE REMEDY
Oven will not start A. Electrical cord for oven is not
Arcing or sparkling A. Materials to be avoided in
Unevenly cooked
foods
Overcooked foods Cooking time, power level is not
Under cooked foods A. Materials to be avoided in
Improper defrosting A. Materials to be avoided in
plugged in.
B. Door is open.
C. Wrong operation is set.
microwave oven , such as metal,
were used.
B. The oven is operated when
empty.
C. Spilled food remains in the
cavity.
A. Materials to be avoided in
microwave oven were used.
B. Food is not defrosted
completely.
C. Cooking time, power level is not
suitable.
D. Food is not turned or stirred.
suitable. Use correct cooking time,
power level.
microwave oven were used.
B. Food is not defrosted
completely.
C. Oven ventilation ports are
restricted.
D. Cooking time, power level is not
suitable.
microwave oven were used.
B. Cooking time, power level is not
suitable.
C. Food is not turned or stirred.
A. Plug into the outlet.
B. Close the door and try
again.
C. Check instructions.
A. Use microwave-safe
cookware only.
B. Do not operate with oven
empty.
C. Clean cavity with wet
towel.
A. Use microwave-safe
cookware only.
B. Completely defrost food.
C. Use correct cooking time,
power level.
D. Turn or stir food.
Use correct cooking time and
power level.
A. Use microwave-safe
cookware only.
B. Completely defrost food.
C. Check to see that oven
ventilation ports are not
restricted.
D. Use correct cooking time
and power level.
A. Use microwave-safe
cookware only.
B. Use correct cooking time
and power level.
C. Turn or stir food.
PAGE 24 • TROUBLE SHOOTING AND WARRANTY
Page 27

LIMITED WARRANTY
ENGLISH
What is covered and for how long?
This warranty covers all defects in
workmanship or materials for a period of:
12 months for labor
12 months for parts (Functional Parts Only)
2 years Magnetron Tube for Microwave (part
only)
The warranty commences on the date of
item purchase. Customer shall provide Haier
with proof of the date of purchase and the
original receipt along with; brand, model and
serial number for verification prior to any
warranty service being provided.
Carry-In Service is available for selected
products at the discretion of Haier America.
EXCEPTIONS:
Commercial or Rental Use warranty
90 days for labor 90 days for parts No other
warranty applies.
What is covered.
1. The mechanical and electrical parts of
the appliance which serve the functional
purpose of this appliance are covered for
a period of 12 months or as stated above.
This includes all parts except finish, trim
and glass.
2. The limited warranty does not cover
any credit or refund for any loss or injury
caused by the product or defects to
the product including but not limited to
incidental or consequential damages.
3. If the magnetron tube fails (for Microwave)
due to poor workmanship or material, the
part will be replaced.
What will be done?
1. Any mechanical or electrical part that
proves to be defective in normal usage
during the specified warranty period will be
repaired or replaced at Haier’s discretion.
ALL WARRANTY SERVICE MUST BE
PROVIDED BY ONLY OUR FACTORY
SERVICE CENTERS, OR BY AN AUTHORIZED
HAIER CUSTOMER TECHNICIAN.
If it is determined that repair is not
appropriate or replacement parts are
unavailable for repair, Haier will exchange the
product with a refurbished or new product
the same or similar to the original at its
discretion.
2. There will be no charge to the purchaser
for functional replacement parts and labor
on any covered items during the initial 12month period or as stated above.
3. THIS WARRANTY COVERS APPLIANCES
WITHIN THE CONTINENTAL UNITED
STATES, PUERTO RICO AND CANADA. IT
DOES NOT COVER THE FOLLOWING:
Damages from improper installation.
Damages incurred during shipping.
Defects other than manufacturing. Damage
from misuse, abuse, accident, alteration,
lack of proper care and maintenance or
incorrect current or voltage or acts of
God. Damage from other than household
use. Damage from service by other than
an authorized dealer or service center.
Decorative trims, glass or replaceable light
bulbs. Transportation and shipping costs.
Labor (after the initial 12 months). Credit or
Refund for products over 30 days past date
of purchase Food loss for food spoiled as
a direct result of mechanical failure of the
product or of any delay in providing service,
repair, replacement. This limited warranty
doesn’t apply to refurbished product or unit
purchased as/like new or second-hand. THIS
LIMITED WARRANTY IS GIVEN IN LIEU OF
ALL OTHER WARRANTIES, EXPRESSED
OR INCLUDING THE WARRANTIES OF
MERCHANTABILITY AND FITNESS FOR
A PARTICULAR PURPOSE. The remedy
provided in this warranty is exclusive and
is granted in lieu of all other remedies.
This warranty does not cover incidental
or consequential damages, so the above
limitations may not apply to you. Some
states do not allow limitations on how long
an implied warranty lasts, so the above
limitations may not apply to you. This
warranty gives you specific legal rights, and
you may have other rights, which vary from
state to state.
Haier America,
New York, NY 10018
PAGE 25 • TROUBLE SHOOTING AND WARRANTY
Page 28

ÍNDICE
INFORMACIÓN DE SEGURIDAD
Precauciones para evitar posible sobre exposición a energía de microondas ... 2
Nota especial acerca del arco de voltaje ..............................................................2
Apéndice .................................................................................................................2
Instrucciones importantes de seguridad ........................................................ 3-5
Instrucciones de conexión a tierra .................................................................... 6-7
Guía para utensilios y trastos de cocina ........................................................... 7-8
COLOCACIÓN Y USO
Especificaciones ....................................................................................................9
Guía de instalación ................................................................................................. 9
Partes y funciones ...............................................................................................10
Panel de control .............................................................................................11-12
Instrucciones de funcionamiento .................................................................13-22
Técnicas para cocinar ........................................................................................... 23
LIMPIEZA Y CUIDADO ........................................................................................24
SOLUCIÓN DE PROBLEMAS Y GARANTÍA
Antes de llamar a servicio técnico ......................................................................25
Servicio al cliente ................................................................................................. 25
Garantía limitada ..................................................................................................27
REGISTRO DEL PRODUCTO
Gracias por adquirir nuestro producto
Haier. Este manual de uso sencillo lo
guiará para que aproveche al máximo su
horno de microondas.
Recuerde registrar los números de
modelo y de serie que se encuentran en
una etiqueta en el interior del horno de
microondas.
Engrape el recibo al manual. Lo necesitará para recibir el servicio de garantía..
ESPAÑOL
Número de modelo
Número de serie
Fecha de compra
Page 29

PRECAUCIONES PARA EVITAR
POSIBLE SOBRE EXPOSICIÓN A
LA ENERGÍA DEL MICROONDAS
A. No intente operar este horno con la puerta abierta. Esto puede generar una
exposición dañina a la energía del microondas. Es importante no inhabilitar o
violar los seguros.
B. No coloque ningún objeto entre el frente del horno y la puerta, ni permita que se
acumule suciedad o residuos del limpiador en las superficies de sellado.
C. No utilice el horno si está dañado. Es especialmente importante que la puerta
del horno cierre bien y que no haya daños en:
1. LA PUERTA (arqueada).
2. LAS BISAGRAS Y SEGUROS (rotos o flojos).
3. LOS SELLOS DE LA PUERTA Y LAS SUPERFICIES DE SELLADO.
D. Únicamente personal de servicio con capacitación adecuada debe ajustar o
reparar el horno.
NOTA ESPECIAL ACERCA DEL ARCO DE VOLTAJE
Un “arco de voltaje” se refiere a la presencia de chispas dentro del horno de
microondas. Puede generarse por las siguientes causas:
• Alguna pieza metálica o papel aluminio está en contacto con las paredes
interiores del horno.
• El papel aluminio no está cubriendo herméticamente los alimentos sino que hay
bordes puntiagudos levantados.
• Hay partes pequeñas metálicas, como amarres, trinches para pollo o platos con
bordes dorados.
• Se están usando servilletas de papel reciclado que pueden contener pequeñas
cantidades de metal.
PRECAUCIÓN
SI OBSERVA QUE SE GENERAN CHISPAS EN SU HORNO DE
MICROONDAS, OPRIMA DE INMEDIATO EL BOTÓN DE PARO/INICIO
PARA DETENER LA COCCIÓN Y CORREGIR EL PROBLEMA.
APÉNDICE
Si este producto no se mantiene en buenas condiciones de limpieza, su superficie
podría degradarse. Esto podría afectar su vida útil y generar situaciones de peligro.
PÁGINA 2 • INFORMACIÓN DE SEGURIDAD
ESPAÑOL
Page 30

INSTRUCCIONES
IMPORTANTES DE SEGURIDAD
ADVERTENCIA
Cuando use electrodomésticos, se deben seguir las precauciones
básicas de seguridad, incluyendo las siguientes:
ADVERTENCIA - Para reducir el riesgo de quemaduras, descargas
eléctricas, incendio y lesiones personales, o reducir la sobreexposición a
la energía del microondas:
1. Lea todas las instrucciones antes de usar el aparato.
2. Lea cuidadosamente y cumpla con las precauciones específicas
de la página 2: “PRECAUCIONES PARA EVITAR UNA POSIBLE
SOBREEXPOSICIÓN A LA ENERGÍA DEL MICROONDAS”.
3. Este electrodoméstico debe conectarse a tierra. Conéctelo
únicamente a un tomacorriente con conexión a tierra adecuada.
Véase "INSTRUCCIONES DE CONEXIÓN A TIERRA" en la página
6.
4. Instale o coloque este electrodoméstico únicamente conforme a
las instrucciones de instalación descritas en la página 9.
5. Algunos productos, como los huevos enteros y los envases
sellados (por ejemplo, frascos de vidrio cerrados), pueden
explotar, por lo que no deben calentarse en este horno.
6. Utilice este aparato solamente para lo que fue diseñado, según
se describe en este manual. Este tipo de horno está diseñado
específicamente para calentar, cocinar o deshidratar comida.
No está diseñado para uso industrial o de laboratorio. No use
químicos corrosivos ni vapores con este aparato.
7. Al igual que con cualquier electrodoméstico, es necesario
supervisar a los niños atentamente cuando lo usen.
8. Para reducir el riesgo de incendio dentro del horno:
• No cocine los alimentos en exceso. Preste atención al
electrodoméstico cuando coloque en su interior papel, plástico u
otros materiales combustibles para facilitar la cocción.
ESPAÑOL
PÁGINA 3 • INFORMACIÓN DE SEGURIDAD
Page 31

INSTRUCCIONES
IMPORTANTES DE SEGURIDAD
• Retire los amarres de alambre de las bolsas de papel o plástico
antes de colocarlas en el horno.
• Si se incendian materiales dentro del horno, mantenga cerrado
el horno, apáguelo y desconecte el cable de suministro eléctrico
o interrumpa el suministro eléctrico en el tablero de fusibles o
interruptor de carga.
• No utilice el interior del horno para guardar cosas. No deje
productos de papel, artículos de cocina ni alimentos en el interior
del horno cuando no esté en uso.
9. Los líquidos como agua, café o té pueden sobrecalentarse más
allá del punto de ebullición sin que parezca que están hirviendo,
debido a la tensión superficial del líquido. No siempre aparecen
burbujas o signos visibles de ebullición cuando se saca el envase
del horno de microondas. LOS LÍQUIDOS MUY CALIENTES
PODRÍAN COMENZAR A HERVIR REPENTINAMENTE CUANDO
SE INTRODUCE EN EL LÍQUIDO UNA CUCHARA O ALGÚN OTRO
UTENSILIO DE COCINA.
10. No caliente aceite o grasas para freír. Es difícil controlar la
temperatura del aceite dentro de un horno de microondas.
11. Los alimentos con cáscara gruesa, como es el caso de las
papas, calabazas, manzanas y castañas deben perforarse con un
tenedor o la punta de un cuchillo afilado, antes de cocinarse.
12. El contenido de los biberones y vasos para alimentos de bebé
se deben mover o menear y revisar su temperatura antes de
servirlos para evitar quemaduras.
13. Los utensilios de cocina pueden calentarse debido al calor
transferido por los alimentos calientes. Se deben usar
agarraollas para manejar los utensilios.
14. No cubra ni obstruya ninguna abertura del electrodoméstico.
15. No guarde ni use este aparato en exteriores. No use este
producto cerca del agua, por ejemplo, cerca de un fregadero, en
un sótano húmedo, cerca de una alberca o en lugares similares.
PÁGINA 4 • INFORMACIÓN DE SEGURIDAD
ESPAÑOL
Page 32

INSTRUCCIONES
IMPORTANTES DE SEGURIDAD
16. No use este electrodoméstico si el cable o el enchufe está
dañado, si no está funcionado adecuadamente o si se ha dañado
o caído.
17. No sumerja en agua el cable o enchufe. Mantenga el cable
alejado de superficies calientes. No permita que el cable cuelgue
sobre el borde de una mesa o mostrador.
18. Use únicamente termómetros diseñados específicamente para
hornos de microondas.
19. Asegúrese de que la base de vidrio y los anillos giratorios se
encuentren en su sitio antes de utilizar el horno.
20. Únicamente personal de servicio calificado deben dar servicio
a este electrodoméstico. Comuníquese con el centro de
servicio autorizado más cercano en caso de requerir revisiones,
reparaciones o ajustes.
21. Cuando limpie las superficies de sellado del horno, como por
ejemplo el marco de la puerta, use únicamente jabón suave no
abrasivo o detergentes suaves aplicados con una esponja o paño
suave.
22. No se deben introducir en el horno alimentos demasiado
grandes o utensilios metálicos demasiado grandes ya que esto
puede producir riesgo de descarga eléctrica o incendio.
23. No limpie con esponjas de lana de acero. Las piezas pueden
romper la esponja y tocar partes eléctricas creando un riesgo de
descarga eléctrica.
24. No utilice productos de papel cuando el artefacto está
funcionando en el modo grill.
25. No cubra los soportes o cualquier otra pieza del horno con papel
metálico. Esto puede causar un recalentamiento del horno.
GUARDE ESTAS
INSTRUCCIONES
ESPAÑOL
SÓLO PARA USO DOMÉSTICO
PÁGINA 5 • INFORMACIÓN DE SEGURIDAD
Page 33

INSTRUCCIONES DE
CONEXIÓN A TIERRA
REQUISITOS ELÉCTRICOS
Los requisitos eléctricos son únicamente corriente alterna de 120 voltios, 15
amperios y 60 Hertz. Se recomienda que se suministre un circuito por separado
para servicio único del horno. El horno está equipado con un cable de 3 hilos
que tiene enchufe de tres puntas con conexión a tierra. Se debe conectar en un
tomacorriente de pared que esté instalado y conectado a tierra correctamente.
Este electrodoméstico debe conectarse a tierra. En caso de corto circuito eléctrico,
la conexión a tierra reduce el riesgo de sufrir una descarga eléctrica al proporcionar
un cable de escape para la corriente eléctrica. El cable que se entrega con este
electrodoméstico está equipado con un cable, enchufe y alambre de conexión
a tierra. El enchufe se debe conectar en un tomacorriente que esté instalado y
conectado a tierra correctamente. No intente inutilizar de ninguna manera esta
característica de seguridad, modificando el enchufe de alguna forma.
ADVERTENCIA
El uso inadecuado del enchufe de conexión a tierra puede provocar
riesgo de descarga eléctrica.
Consulte a un técnico o electricista calificado en los siguientes casos:
1) No entiende por completo las instrucciones para la conexión a tierra.
2) No está seguro de que el electrodoméstico se encuentre debidamente
conectado a tierra.
3) Tiene dudas acerca de las instrucciones de conexión eléctrica o a tierra.
CABLE DE SUMINISTRO ELÉCTRICO
1. El cable de suministro eléctrico que se incluye es corto para reducir el riesgo de
enredarse o tropezarse con uno más largo.
2. Si el cable de suministro eléctrico es muy corto, no use una extensión eléctrica.
Pida a un técnico o electricista calificado que instale una toma corriente cerca del
electrodoméstico.
3. Si es absolutamente necesario el uso de cables largos o de una extensión, debe
extremar precauciones.
a) Use únicamente un cable de extensión de tres hilos con conexión
a tierra que tenga un enchufe de tres clavijas con conexión a
tierra y un tomacorriente de tres ranuras que acepte la clavija del
electrodoméstico.
b) El valor eléctrico nominal marcado en el cable o la extensión debe
ser igual o mayor al valor nominal eléctrico del electrodoméstico. Los cables más
largos deben acomodarse de modo que no queden tendidos sobre el mostrador
o la mesa, donde los niños puedan jalarlos o puedan provocar tropiezos
accidentalmente.
PÁGINA 6 • INFORMACIÓN DE SEGURIDAD
ESPAÑOL
Page 34

INSTRUCCIONES DE
CONEXIÓN A TIERRA CONT.
NOTA: Ni Haier ni el distribuidor aceptarán responsabilidad alguna por daños en el
horno eléctrico o lesiones personales que sean resultado del incumplimiento
de los procedimientos de conexión eléctrica.
GUÍA PARA EL USO DE UTENSILIOS
Y TRASTOS DE COCINA
Esta sección enumera los utensilios que pueden utilizarse en el microondas, los
que pueden usarse de modo limitado y los que no deben utilizarse nunca en el
microondas.
RECOMENDADOS
• Platón dorador para microondas: Úselo para dorar el exterior de piezas pequeñas,
como bisteces, chuletas o panques. Siga las instrucciones incluidas con su plato
de asado.
• Envoltura plástica para microondas: Úsela para retener el vapor. Debe dejarse
una abertura pequeña para que escape una parte del vapor y evitar colocarlo
directamente sobre los alimentos.
• Toallas y servilletas de papel: Estas absorben el exceso de humedad y evitan
salpicaduras. Úselas para cubrir y calentar por tiempos cortos. No deben usarse
toallas de papel reciclado, pues podrían contener residuos de metal y encenderse.
• Platos y recipientes de cerámica vitrificada y de vidrio resistente al calor. Úselos
para calentar o cocinar.
• Platos y vasos de cartón: Úselos para calentar por tiempos cortos a bajas
temperaturas. No debe usarse papel reciclado, pues podría contener metal y
encenderse.
• Papel encerado: Úselo para cubrir y evitar salpicaduras.
• Termómetros: Deben usarse únicamente los etiquetados como “seguros para
microondas”, además de seguir todas las instrucciones. Revise la temperatura
de los alimentos en diferentes partes. Los termómetros convencionales pueden
usarse en los alimentos únicamente cuando se hayan retirado del horno.
USO LIMITADO
• Papel aluminio: Se pueden usar tiras delgadas y lisas de papel para cubrir áreas
delicadas de los alimentos, como por ejemplo muslos y alas de pollo, para evitar
que se cocinen en exceso.
ESPAÑOL
PÁGINA 7 • INFORMACIÓN DE SEGURIDAD
Page 35

GUÍA PARA EL USO DE UTENSILIOS
Y TRASTOS DE COCINA CONT.
NOTA: Tenga mucho cuidado, el uso excesivo del papel aluminio puede dañar el
horno.
• Cerámica, porcelana y barro: Úselos únicamente si están etiquetados como
“seguros para microondas”. Si no tienen esta instrucción, pruébelos para
asegurarse de que puedan utilizarse de manera segura.
• Plástico: Úselo únicamente si está etiquetado como “seguro para microondas”.
Otros tipos de plásticos pueden derretirse.
• Paja, mimbre y madera. Úselos solamente para calentar por tiempos cortos, por
ejemplo para calentar roles por algunos segundos. Las canastitas y los cuencos
pueden ser inflamables.
NO RECOMENDADOS
• Botellas y jarras de cristal: El cristal regular es muy delgado para usarse en un
microondas. Puede estrellarse y provocar lesiones y daños.
• Bolsas de papel: Representan un riesgo de incendio, excepto en el caso de las
bolas de palomitas, las cuales están diseñadas para usarse en microondas.
• Platos y vasos de espuma de estireno (unicel): Pueden derretirse y dejar residuos
químicos dañinos en los alimentos.
• Contenedores de plástico para alimentos y para almacenamiento: Los
contenedores normalmente están diseñados para almacenar los alimentos en frío,
por ejemplo las mantequilleras, por lo que pueden derretirse en un microondas.
• Utensilios metálicos: Pueden dañar su horno de microondas. Retire todo lo que
sea de metal de los alimentos y recipientes antes de cocinar.
NOTA: Para probar si es seguro usar un recipiente en el microondas, colóquelo vacío
y caliente a ALTA potencia por 30 segundos. Si el plato queda muy caliente
NO debe usarlo.
• Papel para horno: Úselo para cubrir y evitar salpicaduras o para envolver y cocinar
al vapor.
• Charola de aluminio: Puede generar arcos de voltaje. Vacíe los alimentos en un
recipiente apto para microondas.
• Recipientes de cartón con asa de metal. Puede generar arcos de voltaje. Vacíe los
alimentos en un recipiente apto para microondas.
• Artículos de cocina de metal o con adornos metálicos Los recipientes de metal, los
adornos o recubrimientos metálicos pueden provocar arcos de voltaje.
• Madera: La madera puede deshidratarse cuando se usa en el horno de microondas
y podría quebrarse o agrietarse.
ESPAÑOL
PÁGINA 8 • INFORMACIÓN DE SEGURIDAD
Page 36

ESPECIFICACIONES
Consumo eléctrico:
Potencia del horno de microondas:
Energía de entrada (parrilla)
De potencia de salida (convección)
Frecuencia de operación:
Dimensiones del interior del horno (largo,
ancho y alto):
Capacidad del horno: Volumen de 1.2 pies cúbicos
Uniformidad de la cocción: Base giratoria con un diámetro de 12-3/8"
Peso neto: Aproximadamente 41.4 libras (18.8 kg)
120V~60Hz, 1500W
1000W
1100W
1500W
2450MHz
20-3/8" x 20-1/8" x 12-3/8" pulgadas
(52 x 51 x 31 cm)
de pulgada (31 cm)
GUÍA DE INSTALACIÓN
1. Asegúrese de que todos los materiales
de empaque se hayan retirado del
interior de la puerta.
2. Revise que no haya ningún daño en
el horno, como por ejemplo un mal
alineado de la puerta o que se encuentre
doblada, daños en los sellos de la puerta
y superficies de sellado, ganchos o
bisagras rotos o sueltos en la puerta o
desportillados dentro del horno o en la
puerta. Si encuentra cualquier daño, no
use el horno. Póngase en contacto con
el personal de servicio calificado.
3. Este horno de microondas debe
colocarse sobre una superficie estable,
capaz de soportar el peso del horno más
el de los alimentos más pesados que
pueda contener y que se vayan a cocinar
en él.
4. No coloque el horno en áreas donde
se genere calor, agua o niveles altos
de humedad, ni cerca de materiales
combustibles.
5. Para un funcionamiento correcto, el
horno debe contar con un flujo de
aire suficiente por todos sus lados. Deje
un espacio de 8 pulgadas (20.32 cm) por
encima del horno, 4 pulgadas (10.16 cm)
por la parte posterior y 2 pulgadas (5.08
cm) a ambos lados. No cubra ni obstruya
ninguna abertura del electrodoméstico.
No retire las patas sobre las cuales se
sostiene el horno.
6. No opere el horno sin la base de vidrio,
el soporte con rodillos y el eje en sus
posiciones correctas.
7. Asegúrese de que el cable de suministro
eléctrico no se encuentre dañado, que
no se haya tendido debajo del horno,
ni sobre ninguna superficie caliente o
borde filoso.
8. El contacto debe estar
al alcance de modo
que pueda alcanzarse
rápidamente
y desenchufar
fácilmente el horno en
caso de emergencia.
INTERFERENCIA CON SEÑALES DE RADIO O TELEVISIÓN
Los hornos de microondas pueden generar interferencia con las señales de radio y
televisión, revise que el horno de microondas se encuentre en un circuito diferente,
cambie de posición el radio o el televisor para alejarlos lo más posible del horno o
ESPAÑOL
revise la posición y señal de la antena receptora.
PÁGINA 9 • COLOCACIÓN Y USO
Page 37

PARTES Y FUNCIONES
POWER LEVEL GRILL CONVECTION
COMBINATION SENSOR
COOK
SENSOR
HEAT
POPCORN WEIGHT DEFROST TIME DEFROST
TIMER CLOCK
Stop/Clear
Start/+30Sec./
Select
El diagrama es únicamente para nes ilustrativos.
El diseño puede variar conforme al número de modelo.
Sistema de cierre de
seguridad de la puerta
Ventana abierta
POWER LEVEL GRILL CONVECTION
COMBINATION SENSOR
SENSOR
COOK
HEAT
POPCORN WEIGHT DEFROST TIME DEFROST
TIMER CLOCK
Start/+30Sec./
Stop/Clear
Select
Panel de control
Base giratoria
Rejilla para el grill
Base de vidrio
PÁGINA 10 • COLOCACIÓN Y USO
POWER LEVEL GRILL CONVECTION
COMBINATION SENSOR
SENSOR
COOK
HEAT
POPCORN WEIGHT DEFROST TIME DEFROST
TIMER CLOCK
Start/+30Sec./
Stop/Clear
Select
Marco de la puerta
ESPAÑOL
Page 38

PANEL DE CONTROL
Display
Power Level
Grill
Combination
Sensor Cook
Popcorn
Weight Defrost
Dial
Stop / Clear
POWER LEVEL GRILL CONVECTION
COMBINATION SENSOR
POPCORN WEIGHT DEFROST TIME DEFROST
Stop/Clear
SENSOR
COOK
HEAT
TIMER CLOCK
Start/+30Sec./
Select
Convection
Sensor Heat
Time Defrost
Timer Clock
Start/+30sec./Select
ESPAÑOL
PÁGINA 11 • COLOCACIÓN Y USO
Page 39

PANEL DE CONTROL
INDICADOR
Se muestran el tiempo de cocción,
la potencia, los indicadores y la hora
actual.
GRILL
El elemento radiante superior permite
que la comida esté crujiente o dorada.
CONVECCIÓN
Combina calor radiante y un
ventilador para hornear y asar los
alimentos de forma adecuada.
COMBINACIÓN
La cocción combinada ofrece las
mejores funciones de la energía
de microondas y la cocción por
convección.
COCCIÓN CON SENSOR
Programa automáticamente la
potencia y el tiempo basándose en
niveles de humedad para resultados
óptimos.
RECALENTAMIENTO CON SENSOR
La función de recalentamiento con
sensor le permite recalentar los
alimentos sin configurar el horno
manualmente.
NIVEL DE POTENCIA
Utilícelo para fijar el nivel de potencia.
También le permite verificar el nivel de
potencia durante la cocción.
DESCONGELAR POR PESO
Descongelación programada basada
en el peso de los alimentos que van a
descongelarse.
TIEMPO DE DESCONGELACIÓN
Descongela rápidamente y
efectivamente los alimentos
basándose en el tiempo de
descongelación deseado.
TEMPORIZADOR
El temporizador funciona de manera
independiente.
DIAL
Usado para programar tiempo, peso,
temperatura y nivel de potencia.
PALOMITAS DE MAÍZ
Cocina palomitas de maíz
automáticamente sin ingresar un nivel
de potencia o tiempo.
COMENZAR/+30 SEG./SELECCIONAR
Presiónelo para comenzar la cocción
o agregar 30 segundos al tiempo de
cocción.
BOTONES PARA COCCIÓN
CONVENIENTE
Configuraciones instantáneas para
cocinar comidas habituales.
TEMPORIZADOR/RELOJ
El temporizador funciona de manera
independiente. Utilícelo para
configurar la hora del día o recordar la
hora del día.
DETENER/ BORRAR
Borra todas las configuraciones
previas o configura el bloqueo infantil.
PÁGINA 12 • COLOCACIÓN Y USO
ESPAÑOL
Page 40

INSTRUCCIONES DE OPERACIÓN
CONFIGURACIÓN DEL RELOJ
Cuando enchufa por primera vez el
microondas, primero debe configurar la
hora.
1. Enchufe el microondas
2. Gire el dial para seleccionar hours.
3. Presione Start/+30 sec/Select.
4. Gire el dial para seleccionar minutos.
5. Presione Start/+30 sec/Select para
terminar.
Para reiniciar el reloj:
1. Presione Timer/Clock button dos
veces.
2. Gire el dial para seleccionar hours.
3. Presione Start/+30 sec/Select.
4. Gire el dial para seleccionar minutos.
5. Presione Start/ +30 sec/Select para
terminar.
N OTA:
1. Puede utilizar el horno sin configurar
el reloj
2. El horno usa el modo de reloj de 12
horas.
3. El reloj mantendrá la hora del día
siempre que el horno esté enchufado
y tenga provisión de electricidad.
FUNCIÓN RÁPIDA DE 30
SEGUNDOS
El botón “Start/+30sec/Select”
(“Comenzar/+ 30 seg./Seleccionar”)
puede usarse para configurar la hora de
cocción o para agregar tiempo extra de
cocción mientras los alimentos ya se
están cocinando.
NOTA: El nivel de energía
del microondas se configura
automáticamente al 100%.
1. Para configurar el tiempo de cocción,
presione “Start/+30sec/Select”
(“Comenzar/+ 30 seg./Seleccionar”)
para que el horno comience la cocción
durante 30 segundos.
2. Para agregar tiempo de cocción
extra mientras cocina, presione
“Start/+30sec/Select” (“Comenzar/+
30 seg./Seleccionar”) durante
la cocción, de esta manera se
aumentará el tiempo de cocción en
30 segundos. La cantidad máxima de
tiempo que puede agregarse es 95
minutos.
DETENER/ BORRAR
1. Para detener el microondas en
cualquier momento durante la
cocción, presione “DETENER/
BORRAR” (“STOP/CLEAR”).
ESPAÑOL
PÁGINA 13 • COLOCACIÓN Y USO
Page 41

INSTRUCCIONES DE OPERACIÓN CONT.
NIVEL DE POTENCIA VARIABLE
Los niveles variables de potencia
suman flexibilidad a la cocción con
microondas. Cada nivel de potencia
le da energía de microondas un
determinado porcentaje del tiempo,
por ejemplo, el nivel de potencia 3 es
energía de microondas 30% del tiempo.
Con el nivel de potencia 10 cocinará
más rápido pero es probable que los
alimentos necesiten que se los revuelva,
rote o dé vuelta con mayor frecuencia.
Con una configuración más baja se
cocinará de forma más pareja y no
será tan necesario revolver o rotar los
alimentos. Algunos alimentos pueden
tener mejor sabor, textura o apariencia
si se utiliza una de las configuraciones
más bajas. Utilice un nivel de potencia
más bajo cuando cocine alimentos que
tienen tendencia a rebasar durante el
hervor, como las patatas cortadas en
rebanadas. Los períodos de descanso
(cuando la energía del microondas entra
en el ciclo apagado) le dan tiempo a
los alimentos para transferir el calor
a su interior. Un ejemplo de esto se
manifiesta en el ciclo de descongelación
(nivel de potencia 3). Si la energía
del microondas no entrara en ciclos
de apagado, la parte exterior de los
alimentos se cocinaría antes de que se
descongele el interior.
1. Presione Power Level (Nivel de
potencia).
2. Gire el dial para seleccionar el nivel de
potencia.
3. Presione Start/ +30 sec/Select para
aceptar.
4. Gire el dial para seleccionar la hora.
5. Presione Start/ +30 sec/select para
comenzar la cocción.
VISOR
PL10 100% PL5 50%
POTENCIA
PL9 90% PL4 40%
PL8 80% PL3 30%
PL7 70% PL2 20%
PL6 60% PL1 10%
VISOR
POTENCIA
COCCIÓN EN VARIAS ETAPAS
A. Cocción en varias etapas
Pueden configurarse dos o tres etapas
de cocción. Si una de las etapas
es la descongelación, ésta debe
seleccionarse como primera etapa.
Sonará un pitido una vez cuando finalice
una etapa, y comenzará la siguiente.
N OTA: Menú con sensor por peso no
pueden configurarse como una de las
etapas de la cocción en varias etapas.
B. Ej emplo de cocción en dos etapas
Si desea descongelar alimentos
durante 5 minutos, entonces cocine
con potencia de microondas de 80%
durante 7 minutos. Siga estos pasos:
Etapa 1: Descongelar
1. Presione Time Defrost
(Descongelación por tiempo), en la
pantalla aparecerá “d-2”.
2. Gire el dial para seleccionar el tiempo
de cocción de 5 minutos.
Etapa 2: Microondas
3. Presione Power Level. Aparecerá
PL10”.
4. Gire el dial para elegir potencia de
microondas del 80%, Aparecerá
“PL8”.
ESPAÑOL
PÁGINA 14 • COLOCACIÓN Y USO
Page 42

INSTRUCCIONES DE OPERACIÓN CONT.
5. Presione Start/+30 sec/Select
para introducir el nivel de potencia
seleccionado.
6. Gire el dial para ajustar el tiempo de
cocción de 7 minutos.
7. Presione Start/ +30Sec/Select para
comenzar a cocinar.
B. E jemplo de cocción en tres etapas
Si desea descongelar alimentos
durante 5 minutos, entonces cocine
con potencia de microondas de 100%
durante 7 minutos y luego cocine con
grill durante 3 minutos. Siga estos
pasos:
Etapa 1: Descongelar
1. Presione Time Defrost en la pantalla
aparecerá “d-2”.
2. Gire el dial para seleccionar el tiempo
de cocción de 5 minutos.
Etapa 2: Microondas
3. Presione el botón Power Level, en la
pantalla aparecerá “PL10”.
4. Presione Start/+30 sec /Select
para introducir el nivel de potencia
seleccionado.
5. Gire el dial para ajustar el tiempo de
cocción a 7 minutos.
Etapa 3: Grill
6. Presione Grill.
7. Gire el dial para ajustar el tiempo de
cocción en 3 minutos.
GRILL
La función Grill usa el calor directo
de los elementos de calentamiento
superiores para cocinar y tostar los
alimentos desde arriba. La temperatura
de la función Grill está preconfigurada
en 311°F.
PRECAUCIÓN
Cuando utilice las funciones de Grill,
recuerde que el horno, la puerta y las
fuentes estarán muy calientes.
• Los utensilios se calientan mucho, use
manoplas para el horno para tocarlos.
• Además de los utensilios provistos,
puede usar cacerolas que no sean
de metal, fuentes para pasteles y
otros elementos resistentes al calor.
Ubíquelos directamente sobre la rejilla
de metal.
• Asegúrese de seleccionar utensilios
que tengan un tamaño que les permita
rotar con facilidad.
• Ubique la bandeja de metal
directamente sobre el soporte del
plato giratorio.
• No utilice utensilios ni recubrimientos
hechos de papel, plástico o papel
metálico cuando use las funciones de
grill.
• Cuando se termina de usar la función
Grill, el plato giratorio está muy
caliente, no enjuague el plato giratorio
caliente, dado que se pueden producir
roturas.
8. Presione Start/+30sec/select para
comenzar la cocción.
ESPAÑOL
PÁGINA 15 • COLOCACIÓN Y USO
Page 43

INSTRUCCIONES DE OPERACIÓN CONT.
1. Presione el botón Grill.
2. Girar el dial para regular el tiempo
de cocción, hasta un máximo de 95
minutos.
3. Presione Start/+30sec/Select para
iniciar la función Grill.
NOTA: Cuando transcurre la mitad
del tiempo de la función Grill, el horno
emitirá dos pitidos. Esto es normal,
y es para avisarle que debe girar los
alimentos. Quite los utensilios del horno
antes de dar vuelta los alimentos. Para
continuar, cierre la puerta y presione
Start/+30sec/Select (Comenzar/+30
seg./Seleccionar). Si la puerta del horno
no está abierta, el horno seguirá la
cocción con grill normalmente.
PRECAUCIÓN
Cuando termine la función Grill,
use la manopla para el horno para
manipular los alimentos, ya que estarán
extremadamente calientes. Durante
y después del uso, no permita que la
ropa, las agarraderas para las ollas u
otros materiales inflamables entren
en contacto con los elementos de
calentamiento; estas superficies están
lo suficientemente calientes como para
prender fuego. Permita que transcurra
un tiempo suficiente de enfriamiento.
• Las palomitas de maíz para
microondas con empaquetado previo
vienen en bolsas de 3,5 onzas (99g),
3,0 onzas (85g) y 1,75 onzas (50g).
• Ubique la bolsa en el horno de acuerdo
con las instrucciones del fabricante.
• Prepare sólo una bolsa por vez.
• Cuando prepare varias bolsas
sucesivamente, los tiempos de
cocción pueden variar levemente. Esto
no afecta los resultados de la cocción.
• Después de hacer estallar las
palomitas, abra la bolsa con cuidado.
Las palomitas de maíz y el vapor
estarán extremadamente calientes.
• No vuelva a calentar semillas que no
hayan estallado ni vuelva a usar la
bolsa.
• Use únicamente el peso del paquete,
de lo contrario, los resultados pueden
no ser satisfactorios y las palomitas de
maíz pueden quemarse.
• Si les falta cocción a las palomitas
de maíz una vez transcurrido el
tiempo, use “Start/+30sec/Select”
(“Comenzar/+ 30 seg./Seleccionar”),
para agregar tiempo de cocción
adicional.
PALOMITAS DE MAÍZ
1. Presione Popcorn (Palomitas de
maíz) hasta que el peso de su bolsa
de palomitas de maíz aparezca en la
pantalla.
2. Presione Start/+30sec/select
(Comenzar/+30 seg./Seleccionar)
para comenzar la cocción.
PÁGINA 16 • COLOCACIÓN Y USO
DESCONGELAR POR PESO
La descongelación por peso
determinará automáticamente el
tiempo de descongelación y el nivel de
potencia para que los resultados de la
descongelación sean parejos.
ESPAÑOL
Page 44

INSTRUCCIONES DE OPERACIÓN CONT.
1. Presione Weight Defrost, el horno
mostrará “d-1”.
2. Gire el dial para seleccionar el peso de
la comida (entre 4 y 100 onzas), la luz
de “OZ” (onzas) se encenderá.
3. Presione Start/+30sec/Select para
comenzar a descongelar.
Guía de Conversión
Peso de los alimentos
en libras
0.1 1-2
0.2 3
0.3 4-5
0.4 6-7
0.5 8
0.6 9-10
0.7 11
0.8 12-13
0.9 14-15
Introducir peso en
DESCONGELAR POR TIEMPO
1. Presione Time Defrost, el horno
mostrará “d-2”.
2. Gire el dial para seleccionar el tiempo,
hasta un máximo de 95 minutos.
3. Presione Start/+30sec/Select para
comenzar a descongelar.
NOTA: El nivel de potencia para la
descongelación por tiempo está fijado
previamente en el 30%.
COCCIÓN CON SENSOR
La cocción con sensor es una tecnología
diseñada para detectar la humedad
creciente liberada por los alimentos
durante el proceso de cocción.
Cuando los alimentos se cocinan en
un horno microondas, se produce
vapor. Cuando el sensor detecta
ESPAÑOL
el vapor, el microondas calculará
automáticamente el tiempo de cocción
restante y lo regulará según el tipo y
la cantidad de comida. La cocción con
sensor simplifica la programación del
microondas con resultados de cocción
excelentes.
1. Presione el botón Sensor Cook
2. Gire el dial para seleccionar el tipo de
comida deseada.
onzas
3. Presione Start/+30sec/para
comenzar la cocción.
NOTA: Para obtener mejores
resultados, no utilice las categorías de
cocción con sensor dos veces seguidas
para la misma porción de comida,
dado que la comida puede quedar
extremadamente recocida o quemada.
Si es necesario continuar la cocción, se
sugiere usar los controles manuales,
en lugar de la cocción con sensor con
configuración previa.
• No debe abrirse la puerta del horno
cuando está encendida la cocción
con sensor. Si se abre la puerta, los
resultados de la cocción pueden
no ser los correctos. Una vez que
se oiga la señal de dos pitidos, el
tiempo de cocción restante aparecerá
inmediatamente en la pantalla y
comenzará el descuento del tiempo.
En este momento puede abrirse la
puerta del horno para revolver o dar
vuelta la comida o agregar más.
• Cubra los alimentos holgada pero
completamente con envoltorio
plástico o ubique los alimentos en
una cacerola con una tapa que cierre
correctamente.
PÁGINA 17 • COLOCACIÓN Y USO
Page 45

INSTRUCCIONES DE OPERACIÓN CONT.
• Los alimentos de menos de 4 onzas (1
10g) deben cocinarse por potencia y
tiempo, no con la cocción con sensor.
• Todos los alimentos que van a
cocinarse con la cocción con sensor
deben estar a su temperatura de
almacenamiento normal.
• Antes de usar la cocción con sensor,
asegúrese de que la cavidad interior
del horno esté seca.
• El horno no cocina la comida
adecuadamente cuando aún está
caliente. Permita que el horno se
enfríe antes de seguir cocinando.
Cuadro de cocción con sensor
Menu Weight Display Additional Instructions
Entrada congelada
Filetes de pescado 4~16 Onzas
Patatas
Verdura congelada 6~16 Onzas
Pastas 2~8 Onzas
Verdura Fresca
Pizza congelada 6~12 Onzas
Carne picada
8~32 Onzas
(225~900g) SC-1
110~450g)
1~4 unidades
(6~8 onzas cada
una)
(170~450g)
(56~225g)
4~16 Onzas
110~450g) SC-7
(225g cada una)
8~24 Oz
(225~680g) SC-8
SC-5. Acomode en una sola capa. Cubra con la tapa
SC-2
SC-6
SC-3 Ubique la pasta con agua corriente caliente en
SC-4 Siga las instrucciones del fabricante sobre
• Cubra los alimentos con una tapa
o con un envoltorio plástico con
ventilación. No use nunca recipientes
plásticos con sellado completo, dado
que pueden evitar que el vapor escape
y esto provoca que los alimentos se
cocinen en demasía.
Después de cocinar/recalentar:
Todos los alimentos deben tener una
configuración de cocción con sensor
específica. Consulte el “cuadro de
cocción con sensor” en la página
siguiente para leer las instrucciones de
cocción para alimentos específicos.
Siga las instrucciones del fabricante sobre la
preparación. Tenga cuidado cuando quite
la película protectora después de cocinar.
Quítela alejándola de su cuerpo para evitar
quemaduras con vapor. Si es necesario más
tiempo, continúe la cocción manualmente.
o con envoltorio plástico con ventilación.
Agujeree cada patata con un tenedor 6 veces
en toda su superficie. Ubique las patatas
alrededor del borde de un plato giratorio
cubierto con toalla de papel con una distancia
mínima de 1” (2,5cm) entre sí. No cubra.
Lávelas concienzudamente, agregue 1
cucharada de agua por cada ½ taza de
verduras y cubra con una tapa o envoltorio
plástico con ventilación. No agregue ni sal ni
manteca a las verduras hasta después
de cocinarlas.
una cacerola apta para microondas. Cubra con
la tapa o con envoltorio plástico con ventilación.
Todas las piezas deben ser del mismo
tamaño. Lávelas concienzudamente, agregue
1 cucharada de agua por cada ½ taza de
verduras y cubra con una tapa o envoltorio
plástico con ventilación. No agregue ni sal ni
manteca a las verduras hasta después
de cocinarlas.
la preparación.
Sepárela en un bol de vidrio o colador. Cubra
con la tapa o con envoltorio plástico con
ventilación. Los jugos deben ser limpios cuando
está hecha. Escurra.
ESPAÑOL
PÁGINA 18 • COLOCACIÓN Y USO
Page 46

INSTRUCCIONES DE OPERACIÓN CONT.
FUNCIÓN DE RECALENTAMIENTO
CON SENSOR
La función de recalentamiento con
sensor le permite recalentar los
alimentos sin configurar el horno
manualmente.
1. Presione el botón Sensor Reheat.
Luego ubique la comida en el
microondas. Aparecerá SA-1.
2. Presione Start/+30sec/Select para
comenzar a recalentar.
Dos pitidos señalarán cuando el
sensor detecte el vapor. El tiempo se
descontará y en la ventana del visor se
mostrará el tiempo de cocción restante.
Cinco pitidos señalarán la finalización de
la cocción, y el horno volverá al estado
en espera.
NOTA: Evite los siguientes alimentos
cuando caliente con sensor:
1. Pan u otros alimentos secos, tales
como biscochos o torta.
CONVECTION
La cocción por convección es una
tecnología usada para cocinar alimentos
con mayor eficiencia. La cocción
por convección usa un elemento de
calentamiento especial y un ventilador
para elevar la temperatura del aire
dentro del horno microondas, al hacer
circular el aire caliente de manera
uniforme en todo el horno.
2. Bebidas o alimentos congelados.
• El horno no puede cocinar
automáticamente
• El horno no puede cocinar
automáticamente cuando su
temperatura es demasiado alta.
• Los alimentos recalentados pueden
cubrirse con una tapa. Asegúrese de
que la tapa tenga ventilación para que
se libere el vapor. No deben usarse
nunca recipientes y utensilios sellados.
ESPAÑOL
PÁGINA 19 • COLOCACIÓN Y USO
Page 47

INSTRUCCIONES DE OPERACIÓN CONT.
El aire se mueve sobre la comida y
alrededor de ella, lo que produce
exteriores marrones dorado con
interiores ricos y húmedos. La mayoría
de los alimentos se cocinan más rápido
y mejor con la cocción por convección
que con los métodos de cocción
convencionales.
Tiempo de cocción por convección con
precalentamiento:
1. Presione el botón Convection ,
“100F” destellará.
2. Gire el dial para introducir la
temperatura deseada entre 100ºF
(38ºC) y 425ºF(218ºC).
3. Presione Start/+30sec/Select dos
veces para comenzar a precalentar.
4. Dos pitidos señalan que se ha
completado el precalentamiento.
Si no abre la puerta del horno en
5 minutos, el horno se apagará
automáticamente.
5. Abra la puerta del horno y ubique con
cuidado los alimentos adentro. Cierre
la puerta del horno.
6. Gire el dial para introducir el tiempo
de cocción deseado, hasta un máximo
de 95 minutos.
7. Presione Start/+30sec/Select para
comenzar a cocinar.
Convección sin precalentamiento :
1. Presione el botón Convection
(Convección), “100F” destellará.
2. Gire el dial para introducir la
temperatura deseada entre 100ºF
(38ºC) y 425˚F (218˚C).
3. Presione Start/+30sec/Select para
introducir la temperatura.
4. Gire el dial para introducir el tiempo
de cocción deseado, hasta un máximo
de 95 minutos.
5. Presione Start/+30sec/Select para
comenzar a cocinar.
COCCIÓN COMBINADA
La cocción combinada ofrece las
mejores funciones de la energía
de microondas y la cocción por
convección. Las microondas cocinan los
alimentos con rapidez y la circulación
del aire caliente de la convección dora
los alimentos agradablemente. Puede
configurarse cualquier temperatura
para el horno, desde los 100°F (38°C) a
los 375°F (190°C). El nivel de potencia
del horno microondas está configurado
previamente en el 30% de potencia.
PRECAUCIÓN
Cuando utilice las funciones de
combinación, recuerde que el horno,
la puerta y las fuentes estarán muy
calientes.
• Los utensilios se calentarán. Para
manipularlos será necesario usar
manoplas para el horno.
• Ubique los alimentos o los utensilios
aptos para microondas directamente
sobre la bandeja negra de metal
cuando cocine.
• Asegúrese de que la comida esté toda
cocida antes de dorarse.
ESPAÑOL
PÁGINA 20 • COLOCACIÓN Y USO
Page 48

INSTRUCCIONES DE OPERACIÓN CONT.
PRECAUCIÓN
• Además de los utensilios provistos,
puede usar cacerolas que no sean
de metal, fuentes para pasteles y
otros elementos resistentes al calor.
Ubíquelos directamente sobre la
bandeja negra de metal.
• Asegúrese de seleccionar utensilios
que tengan un tamaño que les permita
rotar con facilidad.
• Ubique la bandeja de metal
directamente sobre el soporte del
plato giratorio.
• No utilice utensilios ni recubrimientos
hechos de papel, plástico o papel
metálico cuando use las funciones de
combinación.
Cocción combinada con
precalentamiento:
1. Presione el botón Combination,
“100F” destellará.
2. Gire el dial para introducir la
temperatura deseada entre 100ºF
(38ºC) y 375ºF (190ºC). No introduzca
todavía el tiempo de cocción. .
3. Presione Start/+30sec/Select dos
veces para comenzar a precalentar.
4. Dos pitidos señalan que el horno está
precalentado.
5. Abra la puerta del horno y ubique con
cuidado los alimentos adentro. Cierre
la puerta del horno.
6. Gire el dial para introducir el tiempo
de cocción deseado, hasta un máximo
de 95 minutos.
7. Presione Start/+30sec/Select para
comenzar a cocinar.
Cocción combinada sin
precalentamiento:
1. Presione el botón Combination,
“100F” destellará.
2. Gire el dial para introducir la
temperatura deseada entre 100ºF
(38ºC) y 375ºF (190ºC). No introduzca
todavía el tiempo de cocción.
3. Presione Start/+30sec/Select para
introducir la temperatura.
4. Gire el dial para introducir el tiempo
de cocción deseado, hasta un máximo
de 95 minutos.
ESPAÑOL
5. Presione Start/+30sec/Select para
comenzar a cocinar.
PÁGINA 21 • COLOCACIÓN Y USO
Page 49

INSTRUCCIONES DE OPERACIÓN CONT.
TEMPORIZADOR
1. Presione Timer/ Clock una vez. La
pantalla dirá 0:00.
2. Gire el dial para introducir la
temperatura. No introduzca todavía el
tiempo de cocción.
3. Presione Start/+30sec/Select para
iniciar el temporizador.
El microondas emitirá un pitido cinco
veces cuando el temporizador termine.
BLOQUEO INFANTIL
1. Pulse Stop/ Clear ) y mantenga
presionado durante 3 segundos. Se
oirá un pitido largo que indica que el
bloqueo está activado. Verá el icono
de bloqueo en la pantalla LCD.
2. Para desbloquear, pulse y mantenga
presionado Stop/Clear durante 3
segundos. Sonará un pitido largo. El
microondas estará desbloqueado.
PÁGINA 22 • COLOCACIÓN Y USO
ESPAÑOL
Page 50

TÉCNICAS PARA COCINAR
Con el microondas puede cocinar
más rápido y sencillo que en la estufa
convencional. Para obtener mejores
resultados, aplique las siguientes
técnicas:
AGITE
Mueva los alimentos guisados y
vegetales mientras se cocinan, para
distribuir el calor de manera uniforme.
Los alimentos en los extremos del
recipiente absorben más energía y se
calientan más rápido, de modo que debe
moverlos de afuera hacia el centro. El
horno hará una pausa automáticamente
cuando abra la puerta para agitar o
mover los alimentos.
DISTRIBUYA
Coloque los alimentos que tienen
formas irregulares, como el caso de
piezas de pollo o chuletas, con los lados
más gruesos y carnosos hacia la orilla
de la base de vidrio giratoria, en donde
recibirán más energía del microondas.
Para evitar el calentamiento excesivo,
coloque las áreas delicadas, como las
puntas de espárragos, hacia el centro de
la base de vidrio giratoria.
PROTEGA
Puede proteger algunos alimentos
con tiras delgadas de papel aluminio,
para evitar que se cocinen en exceso.
Las áreas que necesitan protegerse
incluyen las puntas de las alitas de aves,
los extremos de las piernas de aves y
las puntas de los platos cuadrados para
hornear. Use únicamente cantidades
pequeñas de papel aluminio. Las
piezas grandes pueden dañar su horno.
Coloque las tiras lo más lisas según
lo permita el alimento, evitando que
se hagan pliegues en la medida de lo
posible.
VOLTEE
Debe voltear los alimentos a la mitad del
tiempo de cocción para exponer todas
sus partes a la energía del microondas.
Esto es especialmente importante con
las piezas grandes. Puede proteger las
piezas que se van a asar.
DEJE REPOSAR
Los alimentos cocinados en
el microondas acumulan calor
internamente y siguen cocinándose
por algunos minutos después de que se
detiene el calentamiento. Mantenga en
reposo los alimentos para completar la
cocción, especialmente los alimentos
como pasteles y vegetales completos.
Las piezas asadas necesitan este
tiempo para completar su cocción en
el centro, a fin de no cocer en exceso
las áreas exteriores. Todos los líquidos,
como las sopas o los chocolates
calientes, deben agitarse o moverse
a la mitad del tiempo de su cocción
y cuando ésta se haya completado.
Mantenga en reposo los líquidos
por un momento antes de servirlos.
Cuando caliente alimentos para bebés,
muévalos bien al retirarlos y pruebe la
temperatura antes de servirlos.
AGREGUE AGUA
Las moléculas de agua atraen la
energía de microondas. Los alimentos
que no tienen un contenido uniforme
de humedad deben cubrirse o dejar
reposar, de modo que el calor se
disperse de manera uniforme. Agregue
una cantidad pequeña de agua para
ayudar a la cocción de los alimentos
secos.
ESPAÑOL
PÁGINA 23 • COLOCACIÓN Y USO
Page 51

LIMPIEZA Y CUIDADO
1. Mantenga limpio el interior del
horno. Cuando salpique la comida
o los líquidos derramados se
adhieran a la pared del horno, limpie
con un paño húmedo. Puede usar
detergente suave si el horno está
muy sucio. Evite el uso de limpiadores
atomizados u otros limpiadores
fuertes, ya que pueden manchar,
rayar o deslustrar la superficie de la
puerta.
2. Cuando limpie las superficies,
como el marco de la puerta, use
únicamente jabón suave no abrasivo
o detergentes suaves aplicados con
una esponja o paño suave.
3. Apague el horno y desenchufe el
cable de suministro eléctrico del
tomacorriente de pared, antes de la
limpieza.
4. Las superficies exteriores deben
limpiarse con un paño húmedo. Para
evitar daños a las partes internas del
horno que se accionan, no deje que
se filtre agua por las aberturas de
ventilación.
5. Limpie la ventana por ambos lados
con un paño húmedo para retirar
cualquier salpicado o derrame.
6. No permita que se moje el panel de
control. Limpie con un paño húmedo
y suave. Cuando limpie el panel de
control, deje abierta la puerta del
horno para evitar que el horno se
encienda accidentalmente.
7. Si se acumula vapor dentro o
alrededor de la parte exterior de la
puerta del horno, limpie con un paño
suave. Esto puede ocurrir cuando el
horno de microondas funciona bajo
condiciones de mucha humedad. Esto
es normal en dichas condiciones.
8. Es posible que sea necesario retirar la
base de vidrio para realizar la limpieza.
Lave la base giratoria con agua tibia
jabonosa o en el lavavajillas.
9. El anillo giratorio y la base del
horno deben limpiarse de manera
regular. La superficie del fondo del
horno simplemente límpiela con un
detergente suave. El anillo giratorio
puede lavarse en agua jabonosa o en
el lavavajillas. Cuando retire el anillo
giratorio de la base del interior del
horno para su limpieza, asegúrese
de volverlo a colocar en la posición
apropiada.
10. Para eliminar los olores de su horno
mezcle una taza de agua con el
jugo y la cáscara de un limón en
un recipiente hondo y caliente en
el microondas por cinco minutos.
Limpie perfectamente y seque con
un paño suave.
11. Cuando se funda la lámpara del
horno, consulte a su distribuidor
para su reemplazo.
12. Si el cable de suministro eléctrico
se ensucia, desenchufe y limpie
con un paño húmedo. Asegúrese
de que seque perfectamente
antes de volverlo a enchufar en el
tomacorriente.
13. No deseche este electrodoméstico
en la basura convencional.
Debe desecharlo a través de
las instalaciones de desechos
adecuadas ofrecidas por el
municipio.
ESPAÑOL
PÁGINA 24 • LIMPIEZA Y CUIDADO
Page 52

ANTES DE LLAMAR A SERVICIO TÉCNICO
SI EL HORNO NO FUNCIONA:
A. Revise que el horno esté enchufado de manera segura. Si no lo está, retire la
clavija del tomacorriente, espere 10 segundos y enchufe de nuevo de manera
segura.
B. Revise si hay algún fusible quemado o se ha accionado el interruptor principal de
carga. Si parecen funcionar adecuadamente, pruebe el tomacorriente con otro
aparato.
C. Revise para asegurarse de que el panel de control se encuentra programado
correctamente y que se ha ajustado el temporizador.
D. Revise para asegurarse de que se ha cerrado herméticamente la puerta con el
sistema de bloqueo de seguridad. De lo contrario, la energía del microondas no
fluirá dentro del horno.
SI NINGUNA DE LAS ACCIONES ANTERIORES RESUELVE EL PROBLEMA,
PÓNGASE EN CONTACTO CON UN TÉCNICO CALIFICADO. NO INTENTE
AJUSTAR O REPARAR EL HORNO USTED MISMO.
SERVICIO AL CLIENTE
IMPORTANTE
NO DEVUELVA ESTE PRODUCTO A LA TIENDA
Si tiene algún problema con este producto, comuníquese con el
“Centro de satisfacción del cliente” de Haier al 1-877-337-3639.
ES NECESARIO TENER EL COMPROBANTE DE COMPRA
FECHADO, EL NÚMERO DE MODELO Y DE SERIE PARA RECIBIR EL
SERVICIO DE GARANTÍA.
CUSTOMER
SERVICE
SERVICIO
AL CLIENTE
Hotline 24/7
1-877-337-3639
ESPAÑOL
PÁGINA 25 • SOLUCIÓN DE PROBLEMAS Y GARANTÍA
Page 53

SOLUCIÓN DE PROBLEMAS
Consulte el problema que tiene en la siguiente tabla y pruebe las soluciones para cada uno de
ellos. Si el horno de microondas sigue sin funcionar correctamente, comuníquese al centro
de servicio al cliente de Haier o al centro de servicio autorizado más cercano. Los clientes
nunca deben intentar solucionar los problemas en los componentes internos. Los hornos
de microondas tienen voltajes peligrosos (5,000 voltios) incluso cuando se haya cortado el
suministro eléctrico. Únicamente un técnico certificado debe intentar reparar el microondas.
PROBLEMA POSIBLE CAUSA SOLUCIÓN POSIBLE
El horno no
enciende.
Arcos de voltaje
o chispas.
Los alimentos
no se cuecen de
modo uniforme.
Overcooked
foods
Alimentos que
no se cuecen lo
suficiente.
No descongela
correctamente.
A. El cable de suministro eléctrico
del horno no está enchufado.
B. La puerta está abierta.
C. Está establecido un modo de
funcionamiento incorrecto.
A. Se utilizaron materiales que no
deben usarse en el horno de
microondas, como metal.
B. El horno se hizo funcionar vacío.
C. Hay restos de alimentos
derramados en la cavidad.
A. Se utilizaron materiales que no
deben usarse en el horno de
microondas.
B. El alimento no está
descongelado por completo.
C. El tiempo de cocción y/o la
potencia no son adecuados.
D. El alimento no se ha volteado ni
agitado.
El tiempo de cocción y la potencia
no son adecuados. Emplee el
tiempo de cocción y/o la potencia
correctos.
A. Se utilizaron materiales que no
deben usarse en el horno de
microondas.
B. El alimento no está
descongelado por completo.
C. Los orificios de ventilación del
horno están obstruidos.
D. El tiempo de cocción y/o la
potencia no son adecuados.
A. Se utilizaron materiales que no
deben usarse en el horno de
microondas.
B. El tiempo de cocción y/o la
potencia no son adecuados.
C. El alimento no se ha volteado ni
agitado.
A. Enchúfelo en el tomacorriente.
B. Cierre la puerta e intente de
nuevo.
C. Consulte las instrucciones.
A. Emplee sólo artículos de cocina
aptos para microondas.
B. No ponga en funcionamiento el
horno cuando esté vacío.
C. Limpie el interior del horno con
una toalla húmeda.
A. Emplee sólo artículos de cocina
aptos para microondas.
B. Descongele el alimento por
completo.
C. Emplee el tiempo de cocción
y/o la potencia correctos.
D. Voltee o agite el alimento.
Emplee el tiempo de cocción y la
potencia correctos.
A. Emplee sólo artículos de cocina
aptos para microondas.
B. Descongele el alimento por
completo.
C. Compruebe que los orificios de
ventilación del horno no estén
obstruidos.
D. Emplee el tiempo de cocción y
la potencia correctos.
A. Emplee sólo artículos de cocina
aptos para microondas.
B. Emplee el tiempo de cocción y
la potencia correctos.
C. Voltee o agite el alimento.
ESPAÑOL
PÁGINA 26 • SOLUCIÓN DE PROBLEMAS Y GARANTÍA
Page 54

GARANTÍA LIMITADA
¿Qué cubre y por cuánto tiempo?
Esta garantía cubre todos los defectos de
fabricación o de materiales durante un período
de: 12 meses en mano de obra
Periodo de 12 meses para partes (únicamente
las piezas funcionales), dos años para el tubo
magnetrón del microondas (únicamente esa
pieza).
La garantía entra en vigor en la fecha de compra
del artículo. El cliente debe presentar a Haier
el comprobante de compra y la factura original
fechadas, la marca, el modelo y el número de
serie para su verificación, antes de realizar
cualquier servicio de garantía. Haier America
puede ofrecer el servicio en el taller para
productos seleccionados, si así lo decide.
EXCEPCIONES:
Garantía del producto para uso comercial o de
renta.
90 días para mano de obra y 90 días para partes.
No se aplica ninguna otra garantía.
¿Qué cubre?
1. Las partes mecánicas y eléctricas del aparato
cuyo objetivo es poner en funcionamiento
este aparato tienen cobertura por un período
de 12 meses o lo indicado más arriba.
Esto incluye todas las partes, excepto la
terminación, el acabado y el vidrio.
2. La garantía limitada no cubre ningún crédito
o reembolso por ninguna pérdida o lesión
provocada por el producto o por defectos del
producto, que incluyen entre otros, daños
incidentales o derivados.
3. En el caso de falla del tubo magnetrón
(para las microondas) debido a defectos en
materiales o mano de obra, dicha parte será
reemplazada.
¿Qué se hará?
1. Haier reparará o reemplazará, a su criterio,
cualquier parte mecánica o eléctrica que
resulte estar defectuosa por uso normal
durante el período de garantía especificado.
TODO EL SERVICIO DE GARANTÍA DEBERÁ
SER PRESTADO ÚNICAMENTE POR NUESTROS
CENTROS DE SERVICIO DE FÁBRICA O POR
UN TÉCNICO AUTORIZADO DE SERVICIO AL
CLIENTE DE HAIER.
Si se determina que no corresponde hacer
una reparación o que las partes de repuesto
no están disponibles para hacerla, Haier le
ESPAÑOL
PÁGINA 27 • SOLUCIÓN DE PROBLEMAS Y GARANTÍA
cambiará el producto por uno arreglado o uno
nuevo igual o similar al original, según lo que
determine.
2. No se le cobrará al comprador las partes de
repuesto funcionales y la mano de obra de
ningún artículo cubierto durante el período
inicial de 12 meses o según se indique arriba.
3. ESTA GARANTÍA CUBRE APARATOS DENTRO
DE ESTADOS UNIDOS CONTINENTAL,
PUERTO RICO Y CANADÁ. NO CUBRE LO
SIGUIENTE:
Daños por instalación inadecuada. Daños
producidos durante el envío. Defectos
distintos a los de fabricación. Daño por uso
incorrecto, maltrato, accidente, alteración,
falta de cuidado y mantenimiento adecuados,
corrientes o voltajes incorrectos, o desastres
naturales. Daño por uso distinto al doméstico.
Daño por un servicio brindado por alguien
distinto a un distribuidor o centro de servicio
autorizado. Acabados decorativos, vidrios
o bombillas reemplazables. Costos de
transporte y envío. Mano de obra (después de
los primeros 12 meses). Crédito o reembolso
de productos 30 días después de la fecha de
compra. Pérdida en alimentos por productos
echados a perder debido al resultado directo
de una falla mecánica del producto o cualquier
demora en ofrecer el servicio, la reparación o
el cambio. Esta garantía limitada no se aplicará
en productos reconstruidos o en unidades
compradas como saldos o de segunda mano.
ESTA GARANTÍA LIMITADA SE OTORGA EN
LUGAR DE CUALQUIER OTRA GARANTÍA
EXPRESA O INCLUSO LAS GARANTÍAS DE
COMERCIALIZACIÓN E IDONEIDAD PARA UN
FIN EN PARTICULAR. La solución ofrecida en
esta garantía es exclusiva y se otorga en lugar
de cualquier otra solución. Esta garantía no
cubre daños incidentales o indirectos, de modo
que es posible que las limitaciones anteriores
no apliquen en su caso. Algunos estados no
permiten limitaciones sobre la duración de una
garantía implícita, de modo que es posible que
las limitaciones anteriores no apliquen en su
caso. Esta garantía le otorga derechos legales
específicos; usted puede tener otros derechos,
que varían en cada estado.
Haier America
New York, NY 10018
Page 55

Page 56

www.HaierAmerica.com
Model # HMC1285SESS
Issued Date: March 2012
120 V, 60 Hz
Made in China
Hecho en China
Printed in China
Haier America
New York, NY 10018
©2012 Haier America Trading, LLC.
 Loading...