

Haier HLTD7 Instruction Manual

Instruction Manual
7〞LCD TV & DVD PLAYER COMBO
MODEL NO.: HLTD7
BEFORE USING THIS PRODUCT, READ, UNDERSTAND,
AND FOLLOW THESE INSTRUCTIONS.
Save this booklet for future reference.
1
IMPORTANT INSTRUCTIONS
SAFETY INSTRUCTIONS
CAUTION: TO REDUCE THE RISK OF ELECTRIC SHOCK.
DO NOT REMOVE COVER (OR BACK).
NO USER SERVICEABLE PARTS INSIDE.
USE THE RECOMMENDED ACCESSORIES ONLY.
REFER SERVICING TO QUALIFIED SERVICE PERSONNEL.
The graphic symbols on the back cover of the set mean the following:
The lighting flash with arrowhead symbol within an equilateral triangle is
intended to alert the user to the presence of uninsulated dangerous voltage.
Within the product's enclosure, there may be full of sufficient magnitude to
constitute a risk of electric shock to persons.
The exclamation point within an equilateral triangle is intended to alert the
user to the presence of important operating and maintenance (servicing)
instructions in the literature accompanying the appliance.
WARNING:
- TO AVOID THE RISK OF FIRE OR ELECTRIC SHOCK, DO NOT EXPOSE THIS
PLAYER RAIN OR MOISTURE. AND DO NOT CLOSE TO FIRE, HEAT SOURCES,
- KEEP GOOD VENTILATION OF THE PRODUCT AND AC ADAPTER.
- DISCONNECT FROM POWER SOURCE DURING LIGHTNING STORM, OUT FOR
LONG TIME OR DOING KINDS OF CONNECTIONS.
- HAVE THE PRODUCT UNPLUGGED FROM THE POWER SOURCE BEFORE
CLEANING RELOCATING OR SERVICING.
- THE MAINS PLUG IS USED AS DISCONNECT DEVICE, THE DISCONNECT
DEVICE SHALL REMAIN READILY OPERABLE.
LASER SAFETY
This set employs an optical laser beam system in the CD mechanism designed
with built-in safeguards. Do not attempt to disassemble. Exposure to this
invisible laser light beam may be harmful to the human eye. This is a Class-1
laser product. Use of controls, adjustments or procedures other than those
specified herein may result in hazardous laser light beam exposure. This
compact disc player should not be adjusted or repaired by anyone except
qualified service personnel. The laser mechanism in the set corresponds to the
stylus (needle) of a record player. Although this product uses a laser pick-up
lens, it is completely safe when operated according to directions.

2
PRECAUTIONS
- TO PROLONG USE TIME, PLEASE MAKE SURE THE INTERVAL OF SWITCHING ON AND
OFF IS NOT LESS THAN 5 SECONDS.
- PROTECT THE POWER CORD FROM BEING WALKED ON OR PINCHED,
PARTICULARLY AT PLUGS, CONVENIENCE RECEPTACLES, AND THE POINT WHERE
THEY EXIT THE PRODUCT.
USING OF POWER:
- DO NOT CONNECT TO POWER OVER THE SAID VOLTAGE, USE THE CORRECT
VOLTAGE AND CURRENT MARKED ON THE PRODUCT ELECTRICAL RATINGS LABEL.
ELECTRIC POWER OVERLOAD WILL CAUSE FIRE OR ELECTRIC SHOCK.
- DO NOT PULL CABLES, SHOULD HOLD PLUG WHEN UNPLUGING FROM THE POWER
SOCKET.
- UNPLUG AC CABLE FROM POWER SOCKET IF YOU ARE NOT USING THE UNIT FOR
LONG TIME.
BATTERY USAGE AND HANDLING:
- KEEP BATTERY AWAY FROM CHILDREN AND PETS.
- REMOVE THE BATTERY FROM THE REMOTE CONTROL WHEN THE PRODUCT WILL
NOT BE USED FOR AN EXTENDED PERIOD.
- NEVER THROW BATTERY INTO A FIRE. DO NOT EXPOSE BATTERY TO FIRE OR
OTHER HEAT SOURCES.
FEATURES
7" TFT DISPLAY
This player has a built-in 7" TFT display window, to provide clear vision and low radiation.
AUTO TV SCANNING FUNCTION
BUILT-IN LITHIUM BATTERY
MEMORY FUNCTION
SUPPORT VIDEO/AUDIO INPUT
MULTI-SUBTITLES FUNCTION (OSD)
Subtitles may be displayed in one of a multi-language depending on the software and telecast.
FULL FUNCTION REMOTE CONTROL
ON SCREEN MENU
TILT STAND

3
USB/ CARD READER FUNCTION
This player can play USB/SD/MMC/MS card containing files in DVD/MP3/MP4/JPEG/CD
format.
(NOTE: The USB port of this unit cannot be connected with the removable HDD.)
SLIDE SHOW IN 17 MODES
MULTI TV SYSTEM SUPPORT
The player can play discs with signal system of PAL and NTSC.
GRAPHICAL USER INTERFACE SCREEN
Simply by pressing the OSD button on the remote control, information on the player and disc
can be displayed on the screen for easy identification, the player's operations and settings can
be performed by operating the remote control while monitoring screen.
MULTI-AUDIO FUNCTION
The audio soundtrack can be heard in up to 8 languages. (The number of audio sound
languages depends on the software and the transmission.)
MULTI-SUBTITLES FUNCTION
Subtitles may be displayed in one of a maximum of 32 languages depending on the software.
PARENTAL LOCK FUNCTION
This prevents children from playing unsuitable channels.
DISC FORMATS SUPPORTED BY PLAYER
The player can play back discs bearing any of the following marks:
ACCESSORIES INCLUDED
All the pictures in the instruction manual are just for your reference, specification should refer to
actual accessories.

4
TABLE OF CONTENTS
GETTING STARTED:
SAFETY INSTRUCTIONS......................................................................................1-2
FEATURES.............................................................................................................2-3
ACCESSORIES…………………………….................................................................3
PARTS AND CONTROLS......................................................................................5-7
MAIN UNIT..............................................................................................................5-6
REMOTE CONTROL..............................................................................................6-7
BASIC CONNECTION…………………...................................................................7-9
REMOTE CONTROL PREPARATION……………………........................................10
OPERATIONS:
DVD.....................................................................................................................11-19
TV........................................................................................................................20-27
FOR REFERENCE:
SPECIFICATIONS...................................................................................................28
MAINTENANCE.......................................................................................................29
TROUBLESHOOTING........................................................................................29-30
REGION CODE SETTING........................................................................................31

5
PARTS AND CONTROLS
MAIN UNIT
FRONT VIEW SIDE VIEW
1. TFT DISPLAY WINDOW
2. BUILT-IN SPEAKERS
3.
/SWITCH BUTTON-To switch the mode among TV/ DVD/AV IN mode, or press and hold it
to set the unit to STANDBY/ON mode.
4.
BUTTON-To start or pause playing the disc.
5. CH-∨BUTTON-To move down in menu mode or skip to the previous channel.
6. CH+∧BUTTON-To Move up in menu mode or skip to the next channel.
7. MENU/OK BUTTON-Press it to confirm an operation, or press and hold it to enter DVD main
menu page (for DVD mode) or press and hold it to enter TV menu page (for TV mode).
8.
< BUTTON-To move left in menu mode.
9.
> BUTTON-To move right in menu mode.
10. VOL- BUTTON-Press it to decrease the volume.
11. VOL+ BUTTON-Press it to increase the volume.
12. Remote control sensor, standby and battery charge indicator.
13. External antenna jack
14. USB port
15. CARD slot
16. POWER switch
17. DC IN 9-12V input jack
18. Earphone jack
19. AV in/out jack-To connect with other
equipment, and use it as a signal source
or monitor.
Note: Press and hold the MENU/OK button to enter into Menu setup page in TV mode or
display DVD menu in DVD mode.
NOTE: Press “PUSH” will open the disc
port, press the cover again to close it.
BOTTOM VIEW

6
BACK VIEW
NOTE: You must connect external antenna to the unit before TV receiver is operation.
REMOTE CONTROL
1. STANDBY-To set the unit in standby mode or switch the unit on.
2. USB/CARD/DVD BUTTON-To switch the mode from
USB/CARD/DISC mode.
3. NUMERIC BUTTONS-To input the numeric information,
such as channel number and so on.
4. 10+ BUTTON-Program and numeric button.
5. FF button-Press this button to play the disc forward at
speeds: x2,x4,x8,x20 (in DVD mode).
6. FR button-Press this button to play the disc backward at
speeds:x2,x4,x8,x20 (in DVD mode).
7. TITLE button-Press this button to return to title menu (for
DVD).
8. AUDIO-To select the audio mode (in DVD mode).
9. DVD MENU button-Press this button to enter DVD main
menu (in DVD mode).
10. SUBTITLE button-Press this button to change and play
subtitle language (for DVD only).
11. TV MENU button-Press this button to enter TV main
menu (in TV mode).
12. CC-To set the caption mode (in TV mode).
13. EPG-Display the program information of current day or
latter days (in TV Mode).
14. EXIT-To exit the menu page (in TV mode).
15. INFO-To display current program information, such as
channel number, soundtrack mode, subtitle language and so on (in TV mode).
16. CH+-To select next channel (in TV mode).
17. CH--To select previous channel (in TV mode).
18. SWITCH button-To switch the mode among TV/DVD/AV IN mode.
19. N/P button-Press this button to select NTSC or PAL system (for DVD only).
20. OSD button-Press OSD button continuously during playback, the screen will display the
playing information, such as elapsed time, remaining time and so on (in DVD mode).
21. GO TO button-Press this button to set the player to play disc starting at a certain point.
22. STOP button-Press this button to halt playing.
20. Stand Holder
7
23. PLAY/PAUSE button-Press this button to start or pause playing the disc.
24. PREV button-Press this button to play the previous chapter (for DVD) or track (for CD).
25. NEXT button-Press this button to play the next chapter (for DVD) or track (for CD).
26. A-B button-Press this button to repeat playing sections between two specific points (A-B).
27. REPEAT button-Press this button to repeat playing one chapter or one title or a whole disc
(for DVD) or repeat playing the current track or the whole tracks (for CD).
28. ZOOM button-Press this button to enlarge picture size, max. to X 4 or to shrink picture size,
min. to X1/4.
29. PROGRAM button-Press this button to setup the memory order of chapter or title (for DVD)
or tracks (for CD).
30. SETUP button-Press this button to enter initial settings menu (in DVD mode).
31. OK button-Press this button to confirm what you have selected.
32. Navigation buttons-Press this button to move up, down, left or right.
33. MUTE-To mute the sound.
34. VOLUME- button-Press this button to decrease the volume.
35. VOLUME+ button-Press this button to increase the volume.
BASIC CONNECTION
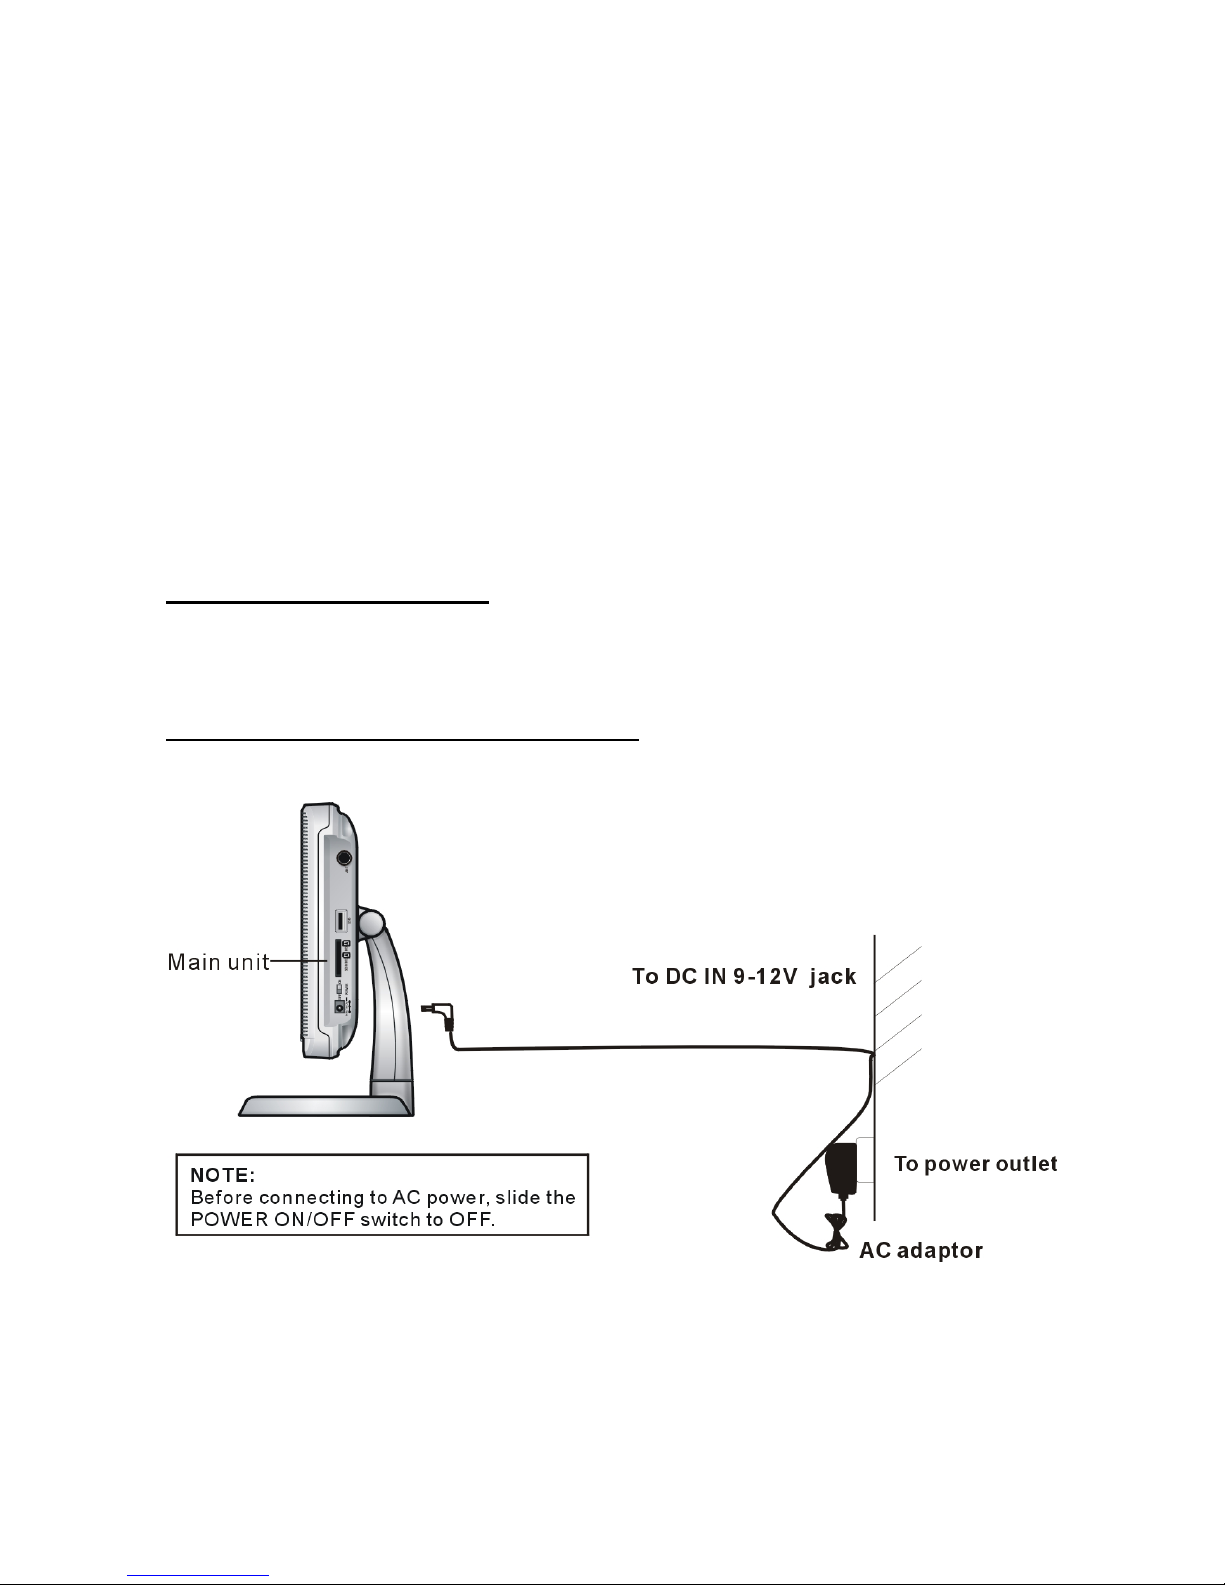
z Ensure all the cables are disconnected from the main unit before connecting to AC power
source by AC power adaptor.
z Read through the instructions before connecting other equipment.
1. CONNECTING TO AC POWER SOURCE

8
Rechargeable Battery Use
The player is with a built-in rechargeable battery.
1. Charge the battery
- Connect the adaptor to the DC 9-12V IN jack, then set the unit in POWER ON mode (THE
PLAYING MODE) for fully charge.
- Set in POWER ON mode but press the STANDBY button (THE STANDBY MODE) or set in
POWER OFF mode for fully charge.
The indicator is red during charging; it gets green when charging is completed.
2. Time to recharge the battery
Recharge and playback time depends on battery pack capacity and the temperature condition.
Generally speaking, the battery needs to be charged about 5 hours in POWER OFF mode and
about 7 hours in POWER ON mode.
3. Using and Maintaining Rechargeable Battery
- The normal working condition temperature is: 0 ~ 45°C
- Always unplug AC/DC power supply for the unit whenever not playing.
NOTE: A new battery pack which has not been used or one which has not been used for more
than a month, may appear to be not recharged enough, this is due to the characteristic of this
battery and is not a malfunction. In this case, recharge it two or three times before the first use,
and it needs more than 8 hours to recharge battery. Noises may be generated during
recharging. In this case, use a more distant power socket. Do not recharge or discharge battery
near a heating element such as a heater or direct sunlight.
2. CONNECT EXTERNAL ANTENNA TO UNIT
Install external antenna into antenna jack for best picture.
Ensure that this player and other equipment to be connected are set to the standby mode or off
and disconnect the AC adaptor before commencing connection.
Do not block ventilation holes of equipment and arrange them so that air can circulate freely.
Read through the instructions before connecting other equipment.
Ensure that you observe the color coding when connecting audio and video cables.
Note:
During DVD play, the TV volume may be at a lower level than during TV broadcasts, etc.
If this is the case, adjust the volume to the desired level. If the DVD/CD player is connected to
the TV through a video cassette recorder, the picture may not be played back normally as some
DVDs. If this is the case, do not connect the player via the VCR.
9
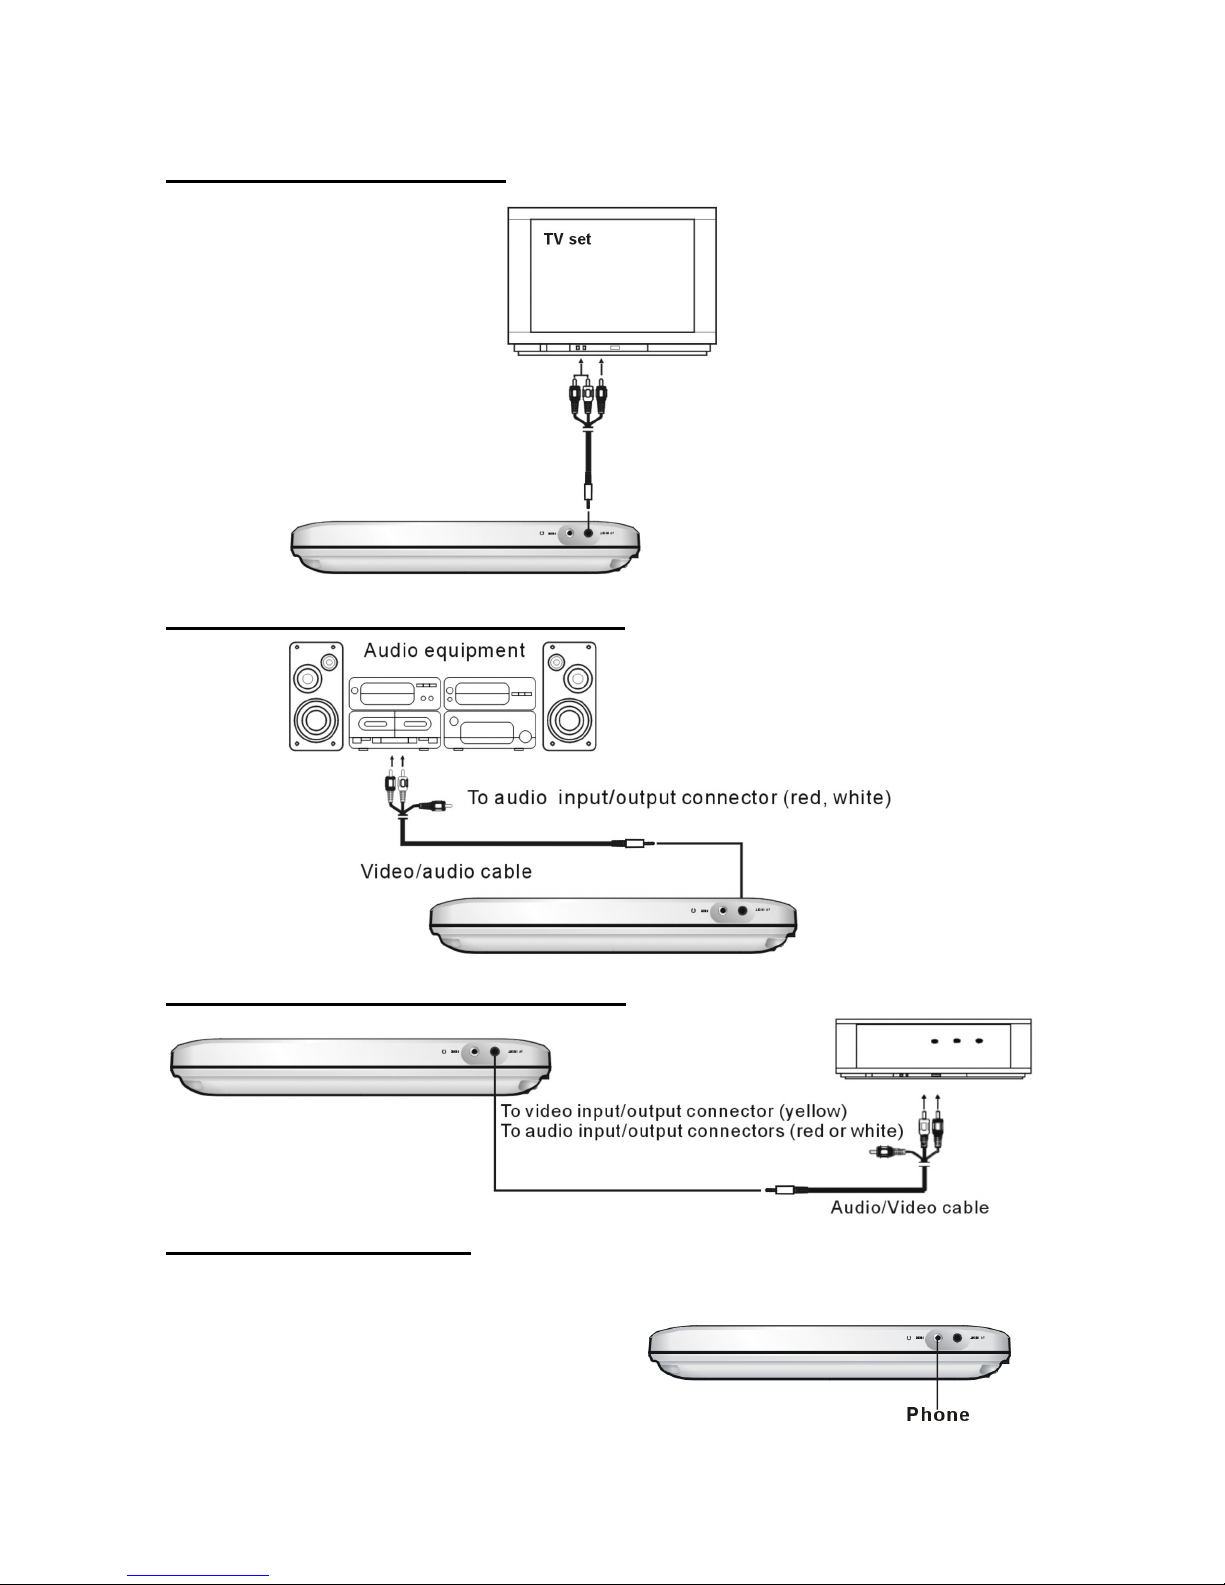
3. CONNECTING TO A TV SET
4. CONNECTING TO AUDIO EQUIPMENT
5. Connecting to external signal sources
6. CONNECT HEADPHONE
1. Connect the headphone.
Adjust the volume to minimize the volume by your remote control.
Connect the headphone to phone jack.
2. Adjust the volume to the level that you want.
To video input/output connector (yellow)
To audio input/output connectors (red, white)
Video/audio cable
 Loading...