

Page 1

Installation and User Manual
Instructions d’installation et
Guide de l’utilisateur
Instrucciones de instalación y
Manual del usuario
Top-Load Clothes Washer
Laveuse à chargement par le haut
Lavadora de ropa con carga superior
HLPW028AXW
Designed for
High-Eciency;
use HE detergent.
Conçue pour
haute ecacité;
utiliser un
détergent HE.
Diseñada para un
alta eciencia; use
detergente HE
(Alta eciencia).
Part # 0030811644
Page 2

Page 3

TABLE OF CONTENTS
WASHER SAFETY ................................................................................................2
PARTS AND FEATURES .......................................................................................5
INSTALLATION REQUIREMENTS ......................................................................... 6
Tools Needed ................................................................................................................. 6
Parts Supplied ................................................................................................................ 6
Location Requirements .................................................................................................6
Drain System Requirements ......................................................................................... 7
Electrical Requirements ................................................................................................8
Grounding instructions .................................................................................................9
INSTALLATION INSTRUCTIONS ........................................................................ 10
Step 1 - Unpack the Washer ........................................................................................ 10
Step 2 - Install Bottom Cover ......................................................................................11
Step 3 - Connect and Secure the Drain Hose ............................................................13
Step 4 - Connect the Water Hoses ............................................................................. 14
Step 5 - Level the Washer ........................................................................................... 15
Step 6 - Complete Installation ....................................................................................16
CONTROL PANEL AND FEATURES .................................................................... 17
WASHER USE ....................................................................................................20
Step 1 - Prepare and Sort Laundry .............................................................................. 20
Step 2 - Add Fabric Care Products .............................................................................. 20
Step 3 - Load the Washer ............................................................................................ 21
Step 4 - Start the Washer ............................................................................................ 21
WASHER CARE .................................................................................................. 22
Cleaning .......................................................................................................................22
Vacationing Precautions .............................................................................................23
Moving or Storage Preparation ................................................................................... 23
Reinstalling/Using Washer Again ................................................................................24
TROUBLESHOOTING ........................................................................................ 25
LIMITED WARRANTY ........................................................................................28
RECORD KEEPING
Thank you for purchasing this Haier
product. This user manual will help you
get the best performance from your
new washer.
For future reference, record the model
and serial number located on back of
the washer, and the date of purchase.
Staple your proof of purchase to this
manual to aid in obtaining warranty
service if needed.
___________________________________
Model number
___________________________________
Serial number
___________________________________
Date of purchase
1
Page 4

WASHER SAFETY
Your safety and the safety of others are very important.
We have provided many important safety messages in this manual and
on your appliance. Always read and obey all safety messages.
This is the safety alert symbol.
This symbol alerts you to potential hazards that can
kill or hurt you and others. All safety messages will
follow the safety alert symbol and either the word
“DANGER,” “WARNING” or “CAUTION.”
These words mean:
An imminently hazardous situation. You
DANGER
WARNING
CAUTION
All safety messages will tell you what the potential hazard is, tell you
how to reduce the chance of injury, and tell you what can happen if the
instructions are not followed.
could be killed or seriously injured if you
don’t immediately follow instructions.
A potentially hazardous situation
which, if not avoided, could result in
death or serious bodily injury.
A potentially hazardous situation
which, if not avoided, may result in
moderate or minor injury.
2
Page 5

IMPORTANT SAFETY
INSTRUCTIONS
WARNING: To reduce the risk of re, electrical shock, injury to persons,
or damage when using the washer, follow basic precautions, including
the following:
Keep the area around
•
your appliance free from
combustible materials such as
lint, paper, rags or chemicals.
Close supervision is
•
necessary if this appliance is
used by or near children. Do
not allow children to play on,
with, or inside this appliance.
Do not place articles that
•
have been previously cleaned
in, washed in, soaked in, or
spotted with gasoline, drycleaning solvents or other
ammable or explosive
substances in the wash water.
These substances give o
vapors that could ignite or
explode.
Do not add gasoline, dry-
•
cleaning solvents, or other
ammable or explosive
substances to the wash
water. These substances give
o vapors that could ignite or
explode.
Do not reach into the
•
appliance if the wash basket,
tub or agitator is moving.
Do not tamper with the
•
controls.
To minimize the possibility
•
of electric shock, unplug this
appliance from the power
supply before attempting any
maintenance or cleaning.
NOTE: Turning power o does
NOT disconnect the appliance
from the power supply.
Do not attempt to service,
•
repair or replace any part
of the appliance unless
specically recommended
in this user manual or in
published repair instructions
that you understand and have
the skills to carry out.
Before discarding or removing
•
from service, remove the
washer door or lid.
Read all of the instructions
•
before using this appliance.
Use this appliance only for
•
its intended purpose as
described in this user manual.
Do not use the washer for
•
commercial clothes washing.
3
Page 6

IMPORTANT SAFETY
WARNING
INSTRUCTIONS
Under certain conditions,
•
hydrogen gas may be
produced in a hot-water
system that has not
been used for 2 weeks or
more. HYDROGEN GAS IS
EXPLOSIVE. If the hot water
system has not been used for
such a period, before using
a washing machine, turn on
all hot-water faucets and
let the water ow from each
for several minutes. This will
release any accumulated
hydrogen gas. As the gas is
ammable, do not smoke or
use an open ame during this
time.
READ AND SAVE THESE
INSTRUCTIONS
This appliance must be
•
properly installed and
located in accordance with
the installation instructions
before it is used.
Do not store or install this
•
appliance where it will be
exposed to temperatures
below freezing or exposed
to weather, which can cause
damage to the appliance.
The appliance must be
•
properly grounded to conform
with all electrical codes and
ordinances. See “Electrical
Requirements” section.
Suffocation Hazard
Before you throw away your old appliance, remove the door or lid so
that children cannot hide or get trapped inside your old appliance.
Failure to follow these instructions can result in death or brain damage.
State of California Proposition 65 Warnings:
WARNING: This product contains one or more chemicals known to the
State of California to cause cancer.
WARNING: This product contains one or more chemicals known to the
State of California to cause birth defects or other reproductive harm.
4
Page 7

PARTS AND FEATURES
A
F
B
C
D
G
E
M
L
N
O
P
K
J
I
H
a Top Lid
b Control Panel
c Cabinet
d Cabinet Handle
e Leveling Feet (2)
f Liquid Bleach Dispenser
g Drain Port
h Power Cord (120 Volt/ 60 Hz)
i Access Panel
j Cold Water Inlet Valve
k Hot Water Inlet Valve
l Wash Basket
m Powdered Detergent Dispenser
n Outer Tub Cover
o Balance Ring
p Lint Filter
5
Page 8

INSTALLATION REQUIREMENTS
TOOLS NEEDED
Pliers
•
Wrench
•
Flat-blade Screwdriver
•
Measuring Tape
•
Carpenter’s Level
•
Phillips Screwdriver
•
PARTS SUPPLIED
Drain Hose Clamp
•
Drain Hose Hook
•
Drain Hose
•
Water Hoses (2)
•
(at washers pre-installed)
User Manual
•
Bottom Cover
•
(with screw)
LOCATION REQUIREMENTS
The washer must be installed on a solid oor to minimize vibration during the
•
spin cycle. A concrete oor is best.
The oor should be level with maximum slope of 1" (25 mm) under entire washer.
•
A suitable location is protected from direct sunlight and heat sources such as
•
radiators, baseboard heaters, or cooking appliances.
Do not install on carpeting.
•
The location must have a grounded electrical outlet located within 4 ft. (1.2 m) of
•
power cord on the back of the washer.
Hot and cold water faucets must be present within 3 ft. (0.9 m) of the hot and
•
cold connections on the washer.
A water heater must supply hot water with a temperature of at least 120°F
•
(49°C).
The water pressure should be between 20 and 100 psi (138 and 690 kPa).
•
IMPORTANT: Do not install or operate the washer where it will be exposed to
temperatures below 32°F (0°C). Water remaining in the washer will freeze and cause
damage to the washer.
6
Page 9

WASHER DIMENSIONS
(55.0 cm)
(95.6 cm)
(99 cm – 153cm
39" – 48"
(99 cm – 122cm)
37⅝
"
22¹⁄₁₆"
(56.0 cm)
21²⅓₂"
DRAIN SYSTEM REQUIREMENTS
WALL OR FLOOR STANDPIPE
The height of the standpipe must be between 39" (99 cm) and 60" (153 cm) from the
bottom of the washer. The minimum diameter of the standpipe must be 2" (5 cm).
Wall Floor
LAUNDRY TUB
The laundry tub must have a minimum
capacity of 20 gal. (76 L). The height of the
laundry tub must be at least 39" (99 cm)
and no more than 48" (122 cm).
39" – 60"
)
7
Page 10

ELECTRICAL REQUIREMENTS
WARNING
WARNING
Electrical Shock Hazard
The washer must be connected to a properly grounded 120 volt, 60 Hz.,
AC only, 15- or 20-amp, fused electrical supply. A time-delay fuse or
circuit breaker is recommended.
Failure to do so could result in death, fire or electric shock.
If you are in doubt the electric supply provided meets the above requirements,
•
contact a licensed electrician.
Electrical Shock Hazard
Plug into a grounded 3 prong outlet.
Do not remove the ground prong from the power cord plug.
Do not use an adapter.
Do not use an extension cord.
Failure to do so can result in death, fire or electrical shock.
A 120 volt, 60 Hz., AC only, 15- or 20-amp, fused electrical supply is required.
•
A time-delay fuse or circuit breaker is recommended. It is recommended that a
separate circuit breaker serving only this appliance be provided.
This washer is equipped with a power supply cord having a 3 prong grounding
•
plug.
To minimize possible shock hazard, the cord must be plugged into a mating,
•
3prong, grounding-type outlet, grounded in accordance with local codes and
ordinances. If a mating outlet is not available, it is the personal responsibility and
obligation of the customer to have the properly grounded outlet installed by a
qualied electrician.
8
Page 11
If codes permit and a separate ground wire is used, it is recommended that a
•
qualied electrician determine that the ground path is adequate.
Do not ground to a gas pipe.
•
Check with a qualied electrician if you are not sure the washer is properly
•
grounded.
Do not have a fuse in the neutral or ground circuit.
•
GROUNDING INSTRUCTIONS
For a grounded, cord-connected
washer:
The washer must be grounded.
In the event of a malfunction
or breakdown, grounding will
reduce the risk of electric shock
by providing a path of least
resistance for electric current.
The washer is equipped with
a cord having an equipmentgrounding conductor and a
grounding plug. The plug must
be plugged into an appropriate
outlet that is properly installed
and grounded in accordance with
all local codes and ordinances.
WARNING: Improper connection
of the equipment-grounding
conductor can result in a risk of
electric shock.
Check with a qualied electrician
or serviceman if you are in doubt
whether the washer is properly
grounded.
Do not modify the plug provided
with the washer; if it will not t
the outlet, have a proper outlet
installed by a qualied electrician.
For a permanently connected
washer:
The washer must be connected
to a grounded metal, permanent
wiring system, or an equipmentgrounding conductor must be run
with the circuit conductors and
connected to the equipmentgrounding terminal or lead on the
washer.
9
Page 12

INSTALLATION INSTRUCTIONS
WARNING
We recommend that your new washer be installed by a qualied appliance
technician. If you feel that you have the skills to install the washer, please read the
installation instructions carefully before installing.
IMPORTANT:
If, after completing these steps, you are unsure that the washer is properly
•
installed, contact a qualied appliance technician.
If your washer was just delivered and the outside temperature was below
•
freezing, do not operate until the washer warms up to room temperature.
STEP 1 - UNPACK THE WASHER
WARNING
Suffocation Hazard
To avoid danger of suffocation, keep plastic bag and other packing
material away from babies and children. Do not use this bag in cribs,
carriages and playpens. The plastic bag could block nose and mouth
and prevent breathing. This bag is not a toy.
Failure to follow these instructions can result in death or brain damage.
Excessive Weight Hazard
Use two or more people to move and install washer.
Failure to do so can result in back or other injury.
1. Remove all packing materials. This includes the foam base, molded plastic
support and all adhesive tape holding the washer accessories inside and outside.
IMPORTANT: Failure to remove the packing base will cause the washer to not
operate properly and will void your warranty.
Open the lid to access the wash basket brace. Pull up on the basket brace to
•
remove.
NOTE: Save the wash basket brace to use when moving the washer in the
future.
10
Page 13

a
a Wash Basket Brace
b
a
Using two or more people, lift the washer o of the packing base and the
•
molded plastic support.
NOTE: It is possible for the plastic support, under the U bracket, to remain
attached to the bottom of the washer. Make sure it is removed with the foam
base.
a Plastic
Support
b Foam
Base
2. Inspect the washer, and remove any remnants of packaging, tape or printed
materials before using the washer.
3. Properly dispose of /recycle all packing material.
STEP 2 - INSTALL BOTTOM COVER
WARNING
Electrical Shock Hazard
Install bottom cover.
Lock all four casters prior to operating washer.
Failure to do so can result in death, electric shock or personal injury.
11
Page 14

WARNING
Electrical Shock Hazard
Disconnect power before servicing.
Replace all parts and panels before operating.
Failure to do so can result in death or electrical shock.
1. Lay folded blankets or towels on the oor to create an incline.
2. Using two or more people, lay the washer onto its side so that the top of the
washer is higher than the base, and the drain outlet is facing upward.
a
b
a Drain Outlet
b Top of Washer
3. With the side of the bottom cover that is marked FRONT/UP toward the interior
and front of the washer, align the edges of the cover with the track in the bottom
of the washer.
4. From the front of the washer, slide the bottom cover fully into the track making
sure the edges of the cover are behind the tabs.
NOTE: When the cover is completely inserted into the track behind the tabs, the
hole for the screw will be ush and aligned with the hole in the cabinet bottom.
12
Page 15

a
c
b
c
a Bottom Cover
b Screw Hole
c Tabs
5. Using the screw (provided), fasten the bottom cover to the cabinet base.
6. Using two or more people, stand the washer upright.
STEP 3 - CONNECT AND SECURE THE DRAIN HOSE
1. Enlarge the opening by squeezing the
ends of the drain hose clamp together.
Slide the clamp over the end of the drain
hose, and onto the exible section of the
hose.
2. Fit the end of the drain hose over the
plastic drain port extending from the
washer.
3. Squeeze the ends of the clamp to enlarge
the opening and slide the clamp over the
connection of the drain hose and drain
port. Release the clamp to tighten.
4. Put the drain hose hook end in a drain pipe or laundry tub.
5. Secure the drain hose in place by fastening it to a water hose, the standpipe, or a
leg on the laundry tub. See “Drain System Requirements” for illustrations.
13
Page 16

STEP 4 - CONNECT THE WATER HOSES
a
a
Depending on your model, the water hoses provided will be either Style 1 or Style 2.
Follow the instructions specic to the style of water hoses provided.
IMPORTANT: Only use new hoses when installing the washer. The water hoses must
have a coarse thread connectors on one end (to connect to the household water
supply), and ne thread connectors on the other end (to connect to the washing
machine).
NOTE: Periodically inspect hoses for cracks, cuts, leaks or wear. Replace with new
hoses every 5 years.
1. Check that a at washer is present and rmly in place in each end of the water
inlet hoses. Flat washers are pre-installed at the factory.
Style 1 Style 2
A
a Washer
2. Thread the inlet hoses onto the water faucets by hand until rmly hand
tightened.
IMPORTANT: To avoid damage to the hose couplings, do not overtighten.
NOTE: To avoid damage to the faucets do not use plumber’s tape or sealants on
the valve threads.
a Gray End Only
3. Thread the white end of the inlet hoses by hand onto the inlet valves marked “H”
(hot) and “C” (cold) on the back of the washer until snug.
IMPORTANT:
Do not connect the gray end of the inlet hose to the washer. You will damage
•
the threads and it will leak.
To avoid damage to the hose couplings, do not over tighten.
•
14
Page 17
Style 1 - Using pliers, tighten the connection an additional two-thirds turn.
Style 2 - Do not use pliers to tighten the connection.
NOTE: To avoid damage to the washer inlet valves, do not use plumber’s tape or
sealants on the valve threads.
Style 1 Style 2
a a
a White End Only
4. Turn on the hot and cold water faucets and check for leaks. If there is any leaking,
check steps 1 through 3 again.
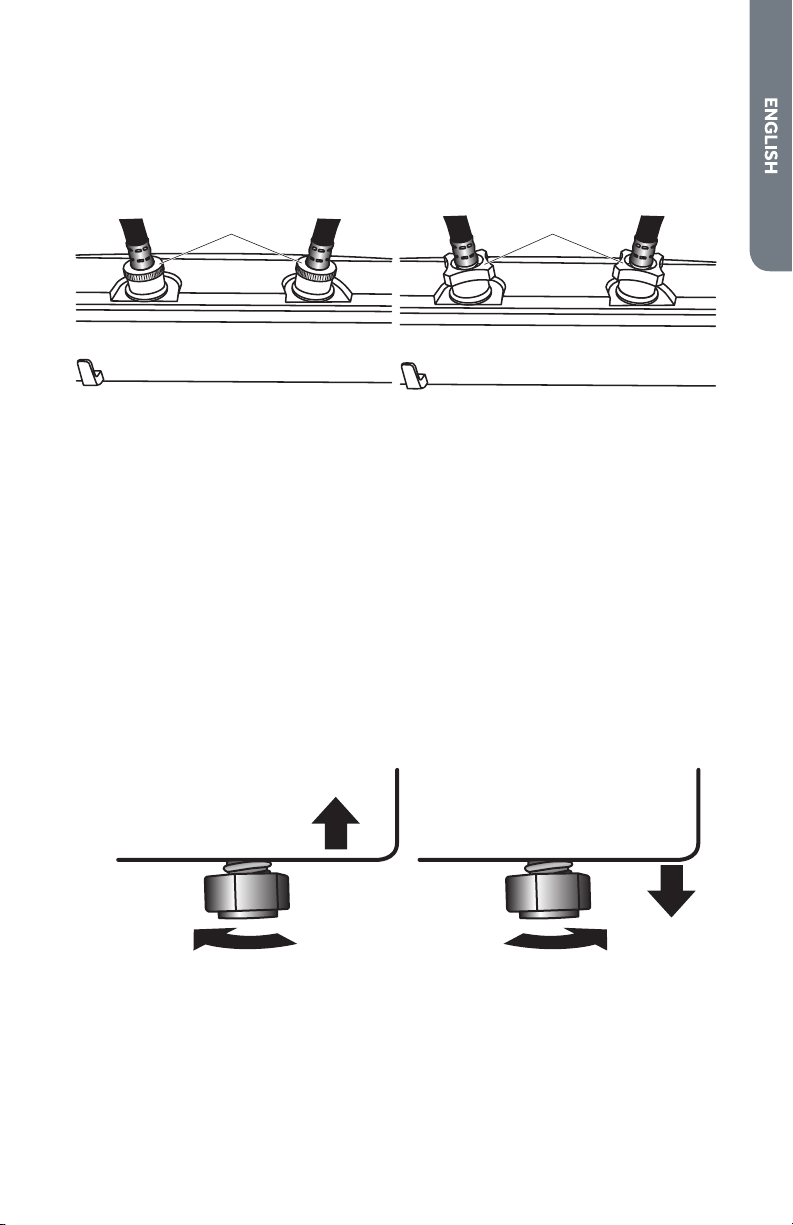
STEP 5 - LEVEL THE WASHER
IMPORTANT: Proper leveling of the washer will help reduce noise and vibration.
1. Place washer in its nal location. Check that the water and drain lines are not
strained or pinched. Make sure that all four feet are rmly in contact with the
oor and that the washer rests solidly in position.
2. Using a carpenter’s level, check to make sure the washer is level from side to
side and from front to back.
3. If the washer is not level, adjust the leveling feet. Turn clockwise to extend (raise
the washer) or counterclockwise to retract (lower the washer).
Raise Lower
15
Page 18

STEP 6 - COMPLETE INSTALLATION
WARNING
Electrical Shock Hazard
Plug into a grounded 3 prong outlet.
Do not remove the ground prong from the power cord plug.
Do not use an adapter.
Do not use an extension cord.
Failure to do so can result in death, fire or electrical shock.
1. Plug the washer into a grounded 3 prong outlet.
2. Check that water faucets are turned on.
3. Dispose of/recycle all packaging materials.
4. Run a normal wash cycle using detergent to test and
clean the washer. See the ”Operating Instructions”
section.
16
Page 19

CONTROL PANEL AND FEATURES
E F
CONTROL PANEL
A B C D G H
WASH CYCLE BUTTON
Use this button to select the desired cycle for your wash load.
•
The standard default settings of each cycle will be displayed; the default
•
settings can be changed by using the Setting buttons - Wash Temp, Soil
Level, and Water Level.
There are 8 cycles to choose from:
•
Heavy Duty - Use this cycle for heavily soiled durable garments. This cycle
can also be used for towels, sports gear, children’s clothes, etc.
Whites - Use this hot water cycle for white and light colored clothing that is
susceptible to transfer of dye.
Perm Press - Use this cycle for light to normally soiled garments.
Normal - Use this cycle for normally soiled cottons and mixed fabric loads.
Delicate - Use this cycle to wash lightly soiled garments and delicate clothes
that need gentle washing.
Quick - Use this cycle to wash small, lightly soiled loads that are needed in a
hurry.
Rinse & Spin - Use this cycle for removing excess detergent and refreshing
clean garments.
Spin Only - Use this cycle to extract water from sink washed or clean wet
garments.
SETTING BUTTONS
Wash Temp Button
Use this button to select a wash temperature; all rinses use cold water. For
•
best results follow your garment label instructions and use the warmest
water temperature that is safe for your fabric.
Not all selections are available for all cycles.
•
17
Page 20

Soil Level Button
Use this button to select the soil level that is most appropriate for your load.
•
Based on the soil level, the wash time will increase or decrease by 4-8 minute
increments in the Estimated Time Remaining Display.
There are 3 soil levels to choose from - Heavy, Normal, Light
•
Water Level Button
Use this button to select an appropriate water level for your load. Small is the
•
lowest water level and Super is the highest.
DELAY START BUTTON
Press this button to delay the start of your wash cycle between 1 - 24 hours
•
in one hour increments.
Use this button to select a delayed start of the washer. The number of hours
•
will be shown in the Estimated Time Remaining Display. Each press of the
Delay Start Button will increase the time by 1 hour.
One button press after 24 will cancel the Delay Start feature. You can also
•
cancel the Delay Start feature by turning o power to the washer with the
Power Button.
The Start/Pause Button must be selected to begin the countdown.
•
EXTRA RINSE BUTTON
Press to add an extra rinse to your wash cycle.
•
NOTE: Some cycles have this option as a default. See the Cycle Guide for
details.
ESTIMATED TIME REMAINING DISPLAY
The Estimated Time Remaining Display shows the estimated cycle time in
•
minutes.
When the Delay Start option is being used, the Estimated Time Remaining
•
Display will show the delay time in hours.
CYCLE STATUS INDICATORS
The Cycle Status lights indicate the stages of the selected cycle.
•
START/PAUSE BUTTON
Press this button to start a selected cycle or to pause an operating cycle.
•
NOTE: After starting the wash cycle, you must pause the operating cycle to
change the Wash Temp, Soil Level and Water Level settings.
POWER BUTTON
IMPORTANT: Switching o power with the power button does not disconnect
the appliance from the electrical supply.
Press the power button to turn on the washer.
•
NOTE: If the washer is turned on, but START is not pressed, the power will
automatically turn o after 5 minutes.
18
Page 21
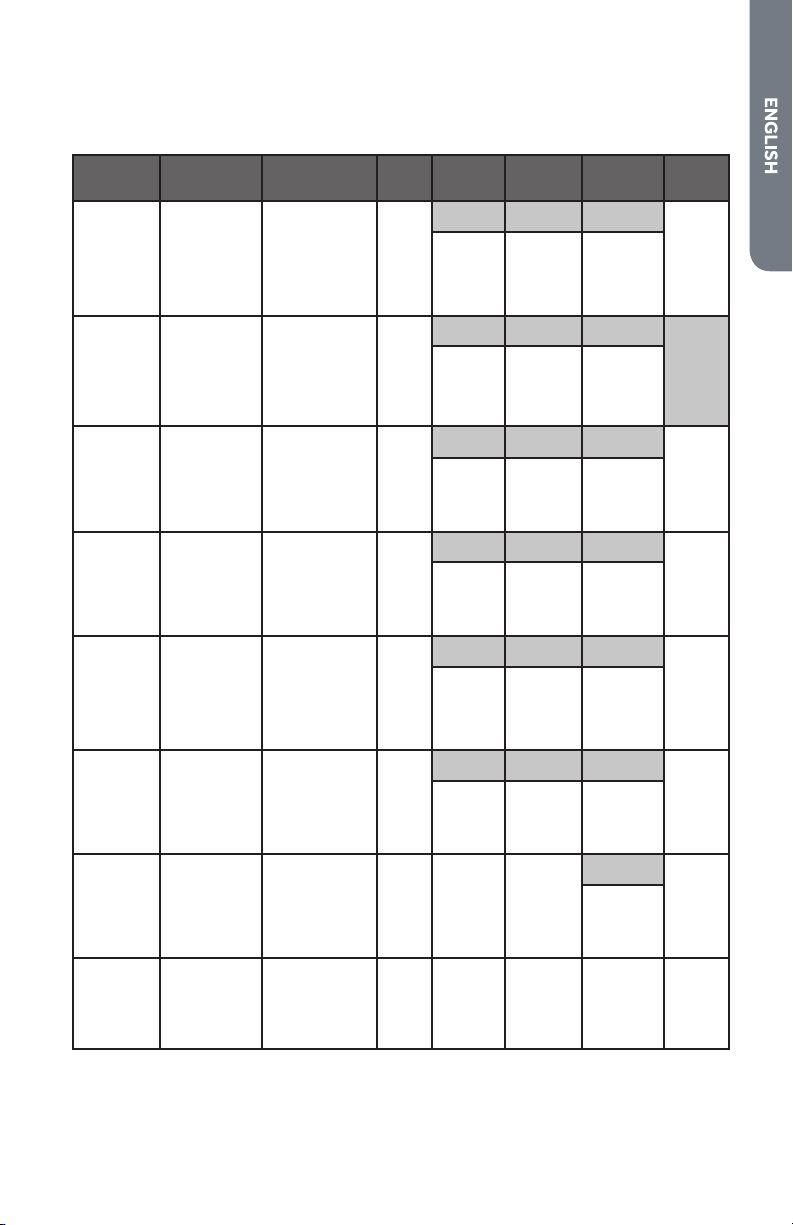
CYCLE GUIDE
NOTE: To protect your wash load, all options and settings are not available for all
cycles. The shaded boxes indicate the default settings for each cycle.
CYCLE
Heavy
Duty
Whites
FABRIC
TYPE
Heavily
soiled,
durable
colorfast
fabrics
White
garments
WASH
PROCESS
12 Min Soak
25 Min Wash
Rinse
Spin
12 Min Soak
25 Min Wash
Rinse
Spin
EST
WASH
TIME
1:08
1:15
TEMP
Warm Normal Medium
Hot
Cold
Hot Normal Medium
Warm
Cold
LEVEL
Heavy
Heavy
SOIL
Light
Light
WATER
LEVEL
Super
Large
Small
Super
Large
Small
EXTRA
RINSE
•
•
Perm
Press
Normal
Delicate
Quick
Rinse &
Spin
Spin
Only
Wrinkle-
free and
synthetics
Cottons,
linens and
mixed
garments
Lingerie,
sheer
fabrics
with lace
trim
Cottons,
linens and
mixed
garments
Unsoiled
garments
Clean
soaking
wet
garments
16 Min Wash
Rinse
Spin
16 Min Wash
Spray Rinse
Spin
10 Min Wash
Rinse
Spin
9 Min Wash
Rinse
Spin
Rinse
Spin
Spin :06 n/a n/a n/a
Warm Normal Medium
:35
Cold
Warm Normal Medium
:40
:29
:23
:17
Hot
Cold
Warm Normal Medium
Cold
Warm Normal Medium
Hot
Cold
Cold
only
Heavy
Light
Heavy
Light
Heavy
Light
Heavy
Light
n/a
Super
Large
Small
Super
Large
Small
Super
Large
Small
Super
Large
Small
Medium
Super
Large
Small
•
•
•
•
•
Extra Rinse will add about 7 minutes.
•
19
Page 22

WASHER USE
STEP 1 - PREPARE AND SORT LAUNDRY
PREPARE LAUNDRY
Check garment labels for manufacturer’s washing instructions.
•
Empty pockets and turn them inside out.
•
Remove loose items (pins, bobby pins, coins, rings, earrings, napkins, etc.) from
•
clothes to prevent scratching of the wash basket or clogging the drain pump.
Turn down cus and remove any lint or dirt.
•
Tie strings and sashes so they don’t tangle.
•
Close zippers, snaps and hooks to avoid snagging.
•
Pretreat all stains and heavily soiled areas.
•
Turn synthetic and wool knits inside out to avoid pilling.
•
SORT LAUNDRY
Sort laundry by the type of wash cycle required (water temperature and wash
•
action).
Separate light colors from dark colors and colorfast items from non-colorfast
•
items.
Separate heavy duty fabrics from light weight fabrics.
•
Separate fabrics that attract lint from fabrics that give o lint.
•
Separate bulky items such as blankets or pillows.
•
STEP 2 - ADD FABRIC CARE PRODUCTS
ADD DETERGENT
Use only High Eciency detergent. HE detergents are specically
•
formulated with ingredients to avoid problems caused by too
many soap suds. Excess suds will prevent the complete rinsing of
detergent residue from clothes.
If you select the Quick cycle, it is recommended that you use a liquid laundry
•
detergent to achieve optimum results. Powdered detergent may not dissolve
fast enough to clean well in this cycle.
Determine the amount of detergent. Follow the detergent use instructions on
•
the container.
NOTE: The proper amount of detergent depends on the size of the load, the soil
level of the clothes, and the softness of the water being supplied to the washer.
20
Page 23

Liquid Detergent
1. Fill washer with a small amount of water and add liquid detergent.
NOTE: For best results, add the detergent to the wash basket before loading
with laundry.
2. Run washer for 30 seconds to dissolve detergent completely.
Powdered Detergent
1. Pour measured powdered detergent
directly into the detergent dispenser.
ADD BLEACH (IF DESIRED)
Pour measured liquid chlorine bleach into the
•
liquid chlorine bleach dispenser.
NOTE: Use only liquid bleach in this dispenser.
IMPORTANT: Be careful not to spill undiluted
bleach onto the washer cabinet or your
clothes. Since it is a strong chemical, it may
damage clothes or the nish of the washer.
Follow manufacturer’s directions on garment
•
label for recommended use of liquid or
powder bleach.
STEP 3 - LOAD THE WASHER
1. Load garments loosely and evenly around the wash basket.
2. Do not place clothes directly over the center of the pulsator.
3. Close the washer lid.
NOTES:
Do not overload or stu items into the wash basket. Overloading may reduce
•
wash eciency, cause excess wear and possibly cause creasing or wrinkling of
the load.
The washer will not pulsate or spin with the lid open.
•
STEP 4 - START THE WASHER
1. Press the POWER button to turn the washer on.
2. Select a wash cycle.
3. Modify the default settings and options if desired.
4. Press the START/PAUSE button to start the wash cycle.
21
Page 24

WASHER CARE
WARNING
Electrical Shock Hazard
Disconnect power before cleaning.
Failure to do so can result in death or electrical shock.
Unplug or disconnect power.
•
CLEANING
GENERAL
Only use a damp or sudsy cloth for cleaning the control panel.
•
If you spill liquid/powdered softener, bleach or detergent on the cabinet, wipe
•
the cabinet immediately to avoid damage to the nish.
Do not use abrasive cleansers, harsh chemicals, ammonia, chlorine bleach,
•
concentrated detergent, or solvents to clean the washer. These chemicals may
dissolve, damage, or discolor the washer.
After washing clothes, leave the lid open so that moisture inside the machine
•
can evaporate and to prevent the growth of mold or mildew.
DETERGENT DISPENSER
1. Pull the dispenser drawer out to the stop and lift up slightly to remove.
2. Rinse the dispenser with warm water and dry it thoroughly with a soft cloth.
3. Insert the drawer at a slightly downward angle and push it back into place.
LINT FILTER
1. Push down on the tab at the top of the lter to release
the lter from the wash basket.
2. Turn the lter over so the back side of the lter is facing
upward.
3. While holding the lter rmly with one hand, lift up on
the bottom of the lter to separate the front of the lter
from the back, so you can access the lter screen.
4. Clean the lter screen and replace the back of the lter.
5. Slide the lter into the wash basket and rmly press it into place.
22
Page 25

IMPORTANT: Both lint lters must be in place during the wash cycles. Clean the lint
screens after each wash load.
Plug in or reconnect power.
•
VACATIONING PRECAUTIONS
Unplug or disconnect power.
•
Turn o both the cold water and hot water supply faucets. This will eliminate the
•
potential for damage to your home if a water hose ruptures or leaks.
Dry the wash basket.
•
Leave the lid open so that moisture inside the machine can evaporate and to
•
prevent the growth of mold or mildew.
MOVING OR STORAGE PREPARATION
In addition to performing the “Vacationing Precautions,” complete the following
additional steps.
Unplug or disconnect power.
•
Disconnect the water hoses and the drain hose and place them into the wash
•
basket.
Turn the leveling feet so that they are fully retracted into the washer cabinet.
•
If moving the washer, place the wash basket brace from the original packing
•
materials back into the top of the washer opening. Use masking tape to secure
the washer lid.
Move and store your washer in an upright position only.
•
Do not store your washer in a cold environment where temperatures fall below
•
freezing; store at room temperature.
23
Page 26

REINSTALLING/USING WASHER AGAIN
WARNING
Electrical Shock Hazard
Plug into a grounded 3 prong outlet.
Do not remove the ground prong from the power cord plug.
Do not use an adapter.
Do not use an extension cord.
Failure to do so can result in death, fire or electrical shock.
To reinstall washer after non-use, vacation, winter storage or moving:
1. Refer to Installation Instructions to locate, level, and connect washer.
2. Before using again, run washer through the following recommended procedure:
To use washer again:
1. Flush water pipes and hoses. Reconnect water inlet hoses. Turn on both water
faucets.
2. Plug in washer or reconnect power.
3. Run washer through Wash cycle to clean washer and remove antifreeze, if used.
NOTE: Use only HE High Eciency detergent. Use half the manufacturer’s
recommended amount for a medium-size load.
24
Page 27

4.
TROUBLESHOOTING
First try the solutions suggested here to possibly avoid the cost of a service call.
OPERATION
PROBLEM POSSIBLE CAUSE(S) SOLUTION
Washer does not
run
Washer lid will
not open
WATER
PROBLEM POSSIBLE CAUSE(S) SOLUTION
Water ow is
slow or lling
takes a long time
Water
temperature is
too warm or cold
Water leaks
There is no electrical power
going to the washer.
Circuit breaker tripped or
fuse blown
The washer is overloaded
or the wash load is not
balanced.
The Delicate cycle was
selected.
The washer lid is open. Close the washer lid.
Washer lid is locked. Press Start/Pause to stop
Water inlet faucets are not
fully turned on.
Water ll hose is kinked. Make sure the water hoses are
Water heater temperature
is not set correctly.
Water inlet hoses are not
connected correctly.
Water hose connections
are not tight.
Drain hose connection is
not secure or the hose is
not properly positioned in
the drain.
Undetermined water leaks Call a qualied plumber.
Plug the power cord into a
grounded 3 prong outlet.
Reset/Turn on circuit breaker or
replace fuse.
Laundry may need to be removed
or redistributed to re-balance the
load.
The washer pauses during some
cycles for the laundry to soak.
When the soak time ends, the
washer will restart automatically.
your washer. It may take a few
moments for the lid lock to
disengage.
Make sure that the water faucets
are fully turned on.
not tangled, kinked, or pinched.
Hot water needs to be at a
temperature of at least 120ºF
-140ºF (49ºC - 60ºC).
Make sure the inlet hoses are
properly connected (hot to hot
and cold to cold).
Make sure the inlet hose
connections at the faucets and
washer are tight.
Make sure the drain hose
connection at the washer is
secure and that the drain hose is
properly positioned at the drain
location.
25
Page 28

PROBLEM POSSIBLE CAUSE(S) SOLUTION
Water will not
drain from
washer
Drain hose is not properly
connected to the washer.
Drain hose is not
positioned properly.
Sink or drainpipe is
clogged.
Reconnect drain hose to the
washer.
In order to drain properly, the top
of drain outlet must be at least
39” (99 cm) above the oor.
Remove blockages from the sink
or drainpipe.
NOISE
PROBLEM POSSIBLE CAUSE(S) SOLUTION
Thumping Sound Wash load may be
Rattling or
Clanking
Squealing Washer may be
Vibration Washer may not be level. Check that all 4 feet are resting
unbalanced.
Foreign objects may be in
the washer.
overloaded.
Pause the washer and
redistribute items in the wash
basket.
Stop the washer and check for
keys or coins.
Stop the washer and remove
part of the wash load.
rmly on the oor and that the
washer is level.
26
Page 29

CLOTHING
PROBLEM POSSIBLE CAUSE(S) SOLUTION
Wrinkling
Detergent
residue
Clothing are gray
or yellowed
Clothing is torn
or snagged
Bleach Stains
NOTE: Bleach
stains may
appear as color
loss spots
Clothing
appearing older
and worn
Improper wash load
sorting, overloading or
washing at the wrong
temperature.
Detergent may not
completely dissolve in
extremely cold water.
Wash load not separated
by color.
Did not use enough
detergent or the soil
level of the wash load
requires a warmer wash
temperature.
Wash load is not prepared
for laundering.
Laundry has direct contact
with bleach.
Using the wrong
wash cycle or water
temperature.
Avoid overloading and do not
mix heavy clothing with light or
delicate items.
Select a warm water wash
temperature and make sure the
hot water heater is providing
hot water; at least 120°F (49°C).
Separate darks from lights and
whites to avoid the transfer of
dyes.
Large and heavily soiled laundry
may need more detergent
and hotter wash water. Refer
to detergent manufacturer’s
directions for recommended
usage.
Tie strings and sashes. Empty
pockets, fasten belts, and close
zippers, metal snaps or hook
fasteners before loading.
Do not pour or splash bleach
directly on clothing. If you are
using the dispenser and still
notice stains, try using diluted
bleach.
Follow clothing manufacturer’s
instructions for garment care.
FOR MORE HELP, VISIT HAIER.COM OR CALL THE CONSUMER
HELP LINE AT 1-877-377-3639.
27
Page 30

LIMITED WARRANTY
IN HOME SERVICE
FULL ONE YEAR WARRANTY
For 12 months from the date of original retail
purchase, Haier will repair or replace any part
free of charge including labor that fails due to
a defect in materials or workmanship.
Haier may replace or repair at their sole
discretion any part, sub system including the
entire product.
Product must be accessible, without
encumbrance and installed properly to
receive for warranty repair service.
LIMITED WARRANTY
After one year from the original retail
purchase date, Haier will provide a part at
no cost, as indicated below, to replace said
part as a result of a defect in materials or
workmanship. Haier is solely responsible for
the cost of the part. All other costs such as
labor, trip charge, etc are the responsibility of
the owner.
Second through Fifth Year
Haier will provide the outer washtub and
related outer tub assembly parts should the
part fail to hold water.
Second through Seventh Year
Haier will provide the inner stainless steel
wash basket if defective in material or
workmanship.
NOTE: This warranty commences on the
date the item was purchased, and the original
purchase receipt must be presented to the
authorized service representative before
warranty repairs are rendered.
Exceptions: Commercial Use Warranty
90 days labor from date of original purchase
90 days parts from date of original
purchase
No other warranty applies.
FOR WARRANTY SERVICE
Contact your nearest authorized service
center. All service must be performed by
a Haier authorized service center. For the
name and telephone number of the nearest
authorized service center, please call
1-877-337-3639.
Before calling please have available the
following information:
Model number and serial number of your
appliance. The name and address of the
dealer you purchased the unit from and the
date of purchase.
28
A clear description of the problem.
A proof of purchase (sales receipt).
This warranty covers appliances within
the continental United States, Puerto Rico
and Canada. What is not covered by this
warranty:
Replacement or repair of household fuses,
circuit breakers, wiring or plumbing.
A product whose original serial number has
been removed or altered.
Any service charges not specically identied
as normal such as normal service area or
hours.
Damage to clothing.
Damage incurred in shipping.
Damage caused by improper installation or
maintenance.
Damage from misuse, abuse accident, re,
ood, or acts of nature.
Damage from service other than an
authorized Haier dealer or service center.
Damage from incorrect electrical current,
voltage or supply.
Damage resulting from any product
modication, alteration or adjustment not
authorized by Haier.
Adjustment of consumer operated controls
as identied in the owner’s manual.
Hoses, knobs, lint trays and all attachments,
accessories and disposable parts.
Labor, service transportation, and shipping
charges for the removal and replacement of
defective parts beyond the initial 12-month
period.
Damage from other than normal household
use.
Any transportation and shipping charges.
THIS LIMITED WARRANTY IS GIVEN
IN LIEU OF ALL OTHER WARRANTIES,
EXPRESSED OR, INCLUDING THE
WARRANTIES OF MERCHANTABILITY AND
FITNESS FOR A PARTICULAR PURPOSE
The remedy provided in this warranty is
exclusive and is granted in lieu of all other
remedies.
This warranty does not cover incidental
or consequential damages, so the above
limitations may not apply to you. Some
states do not allow limitations on how long
an implied warranty lasts, so the above
limitations may not apply to you.
This warranty gives you specic legal rights,
and you may have other rights, which vary
from state to state.
Haier America
New York, NY 10018
Page 31

TABLE DES MATIÈRES
SÉCURITÉ DE LA LAVEUSE ...............................................................................30
PIÈCES ET CARACTÉRISTIQUES ....................................................................... 33
EXIGENCES D’INSTALLATION ........................................................................... 34
Outils nécessaires .......................................................................................................34
Pièces fournies .............................................................................................................34
Critères d’emplacement .............................................................................................34
Critères du système de vidange ................................................................................. 35
Spécications électriques ........................................................................................... 36
Instructions de liaison à la terre ..................................................................................38
INSTRUCTIONS D’INSTALLATION .................................................................... 38
Étape 1 - Déballer la laveuse .......................................................................................39
Étape 2 - Installation du couvercle inférieur ............................................................... 41
Étape 3 - Raccordement et immobilisation du tuyau de vidange .............................. 43
Étape 4 - Raccordement des tuyaux d’admission d’eau ............................................ 43
Étape 5 - Nivellement de la laveuse ............................................................................45
Étape 6 - Fin de l’installation .......................................................................................45
TABLEAU DE COMMANDE ET FONCTIONS ....................................................... 46
UTILISER LA LAVEUSE ...................................................................................... 50
Étape 1 - Préparation et tri du linge ............................................................................ 50
Étape 2 - Ajout de produits de soin des tissus ...........................................................51
Étape 3 - Chargement de la laveuse ...........................................................................52
Étape 4 - Mise en marche de la laveuse ......................................................................52
GUIDE D’ENTRETIEN ET DE NETTOYAGE .......................................................... 52
Nettoyage et entretien ................................................................................................52
Précautions à prendre avant un départ ...................................................................... 53
Préparation avant un déménagement ou un entreposage ....................................... 54
Réinstallation/réutilisation de la laveuse....................................................................54
DÉPANNAGE ..................................................................................................... 55
GARANTIE LIMITÉE ........................................................................................... 58
DOCUMENTS À CONSERVER
Merci d’avoir acheté ce produit Haier.
Ce manuel d’utilisation vous aidera
à obtenir la meilleure performance
possible de votre nouvelle laveuse.
Pour référence ultérieure, inscrire le
numéro de plaque signalétique situé
au dos de la laveuse, ainsi que la date
d’achat.
Pour faciliter l’obtention d’un service
sous garantie, agrafer la preuve de la
date d’achat à ce manuel.
___________________________________
Numéro de modèle
___________________________________
Numéro de série
___________________________________
Date d’achat
29
Page 32

SÉCURITÉ DE LA LAVEUSE
Votre sécurité et celle des autres est très importante.
Nous donnons de nombreux messages de sécurité importants dans ce
manuel et sur votre appareil ménager. Assurez-vous de toujours lire
tous les messages de sécurité et de vous y conformer.
Voici le symbole d’alerte de sécurité.
Ce symbole d’alerte de sécurité vous signale les
dangers potentiels de décès et de blessures graves à
vous et à d’autres. Tous les messages de sécurité
suivront le symbole d’alerte de sécurité et le mot
“DANGER”, “AVERTISSEMENT” ou “ATTENTION”.
Ces mots signifient :
Une situation de danger
DANGER
AVERTISSEMENT
ATTENTION
Tous les messages de sécurité vous diront quel est le danger potentiel
et comment réduire le risque de blessure et ce qui peut se produire en
cas de non-respect des instructions.
imminent. Vous courez le risque
d’un décès ou de blessures
graves si vous ne suivez pas
immédiatement les instructions.
Une situation potentiellement
dangereuse qui, si vous ne
l’évitez pas, peut provoquer la
mort ou des blessures graves.
Une situation potentiellement
dangereuse qui, si vous ne
l’évitez pas, peut entraîner des
blessures légères à modérées.
30
Page 33

IMPORTANTES INSTRUCTIONS
DE SÉCURITÉ
AVERTISSEMENT : An de réduire le risque d’incendie, de choc électrique ou
de blessures lors de l’utilisation de la laveuse, il convient d’observer certaines
précautions fondamentales, notamment :
L’espace autour de l’appareil
•
doit être libre de toute
matière combustible comme
de la charpie, du papier, des
chions ou des produits
chimiques.
Une surveillance attentive
•
s’impose lorsque cet appareil
ménager est utilisé par ou à
proximité d’enfants. Ne pas
laisser des enfants jouer avec
l’appareil, ni jouer dessus ou à
l’intérieur.
Ne pas placer dans l’eau
•
de lavage des articles
précédemment nettoyés,
lavés, trempés ou tachés
avec de l’essence, des
solvants pour nettoyage à
sec ou d’autres substances
inammables ou explosives.
Ces substances dégagent
des vapeurs qui pourraient
s’enammer ou exploser.
Ne pas ajouter d’essence, de
•
solvants pour nettoyage à
sec ou d’autres substances
inammables ou explosives
à l’eau de lavage. Ces
substances dégagent des
vapeurs qui pourraient
s’enammer ou exploser.
Ne pas accéder à l’intérieur
•
de l’appareil si le panier de
lavage, la cuve ou l’agitateur
est en mouvement.
Ne pas eectuer
•
d’intervention non autorisée
sur les commandes.
An de réduire le risque de
•
choc électrique, débrancher
cet appareil de l’alimentation
électrique avant d’eectuer
un dépannage ou un
nettoyage.
REMARQUE : La mise hors
tension ne déconnecte PAS
de déconnecter l’appareil de
l’alimentation électrique.
Ne pas réparer ou remplacer
•
une quelconque pièce de
l’appareil ou eectuer une
opération d’entretien qui
ne soit pas expressément
recommandé(e) dans ce
manuel d’utilisation ou dans
les instructions de réparation
fournies et que vous
compreniez et soyez capable
d’exécuter ces instructions.
Retirer la porte ou le
•
couvercle de la laveuse avant
de la jeter ou de la rendre
inutilisable.
Lire toutes les instructions
•
avant d’utiliser cet appareil.
Utiliser cet appareil
•
uniquement dans le but
auquel il est destiné et tel que
décrit dans le présent manuel
d’utilisation.
Ne pas utiliser la laveuse pour
•
le nettoyage de vêtements
dans un cadre commercial.
31
Page 34

IMPORTANTES INSTRUCTIONS
AVERTISSEMENT
DE SÉCURITÉ
Dans certaines conditions,
•
un système d’eau chaude
qui n’a pas été utilisé depuis
2 semaines ou plus peut
produire de l’hydrogène.
L’HYDROGÈNE EST UN GAZ
EXPLOSIF. Si le système d’eau
chaude est resté inutilisé
pendant une telle période,
ouvrir tous les robinets d’eau
chaude et laisser l’eau s’y
écouler pendant plusieurs
minutes avant d’utiliser une
laveuse. Ceci libérera toute
accumulation d’hydrogène. Le
gaz est inammable : ne pas
fumer ou utiliser une amme
nue durant cette période.
Avant d’être utilisé,
•
cet appareil doit être
correctement installé et placé
dans la pièce, conformément
aux instructions d’installation.
Ne pas entreposer ou
•
installer cet appareil dans
un endroit où il sera exposé
aux intempéries ou à des
températures inférieures
au point de congélation;
cela pourrait endommager
l’appareil.
L’appareil doit être
•
correctement relié à la
terre, conformément à tous
les critères des codes et
règlements locaux régissant
les installations électriques.
Voir la section “Spécications
électriques”.
LIRE ET CONSERVER CES
INSTRUCTIONS
Risque de suffoquer
Avant de jeter votre ancien appareil, retirer la porte ou le couvercle de
façon à ce que les enfants ne puissent pas se cacher ou être coincés
dans l’ancien appareil.
Le non-respect de cette instruction peut causer un décès ou des
lésions cérébrales.
32
Page 35

PIÈCES ET CARACTÉRISTIQUES
A
F
B
C
D
G
E
M
L
N
O
P
K
J
I
H
a Couvercle supérieur
b Tableau de commande
c Caisse
d Poignée de la caisse
e Pieds de nivellement (2)
f Distributeur d’eau de Javel
g Orice de vidange
h Cordon d’alimentation électrique
(120 V/60 Hz)
i Panneau d’accès
j Tuyau d’arrivée d’eau froide
k Tuyau d’arrivée d’eau chaude
l Panier de lavage
m Distributeur de détergent en poudre
n Cerclage de cuve externe
o Anneau d’équilibrage
p Filtre à charpie
33
Page 36

EXIGENCES D’INSTALLATION
OUTILS NÉCESSAIRES
Pince
•
Clé
•
Tournevis à lame plate
•
Mètre ruban
•
Niveau
•
Tournevis Phillips
•
PIÈCES FOURNIES
Bride pour tuyau de
•
vidange
Crochet de tuyau de
•
vidange
Tuyau de vidange
•
Tuyaux d’admission d’eau (2)
•
(rondelles plates préinstallées)
Manuel d’utilisation
•
Couvercle
•
inférieur (avec
vis)
CRITÈRES D’EMPLACEMENT
La laveuse doit être installée sur un plancher résistant pour réduire les vibrations
•
durant le programme d’essorage. Un plancher en béton est idéal.
Le plancher doit être de niveau avec une pente maximale de 1” (25 mm) sous
•
l’ensemble de la laveuse.
L’appareil doit être placé dans un emplacement protégé de la lumière directe du
•
soleil et de sources de chaleur comme des radiateurs, des plinthes électriques
ou des appareils de cuisson.
Ne pas installer sur de la moquette.
•
L’emplacement d’installation doit comporter une prise électrique reliée à la
•
terre et située à 4 pi (1,2 m) maximum du cordon d’alimentation à l’arrière de la
laveuse.
Deux robinets d’eau chaude et d’eau froide doivent se situer à 3 pi (0,9 m)
•
maximum des raccordements d’eau chaude et d’eau froide de la laveuse.
Un chaue-eau doit fournir une température d’eau chaude d’au moins 120°F
•
(49°C).
La pression de l’eau doit être comprise entre 20 à 100 lb/po2 (138 et 690 kPa).
•
IMPORTANT : Ne pas installer ou faire fonctionner la laveuse dans un endroit où elle
sera exposée à des températures inférieures à 32°F (0°C). De l’eau restée dans la
laveuse gèlera et endommagera la laveuse.
34
Page 37

DIMENSIONS DE LA LAVEUSE
(99 cm – 153cm
37⅝
(95,6 cm)
"
22¹⁄₁₆
(56,0 cm)
"
21²⅓₂"
(55,0 cm)
CRITÈRES DU SYSTÈME DE VIDANGE
TUYAU RIGIDE DE REJET À L’ÉGOUT AU MUR OU AU PLANCHER
La hauteur du tuyau rigide de rejet à l’égout doit être comprise entre 39" (99 cm)
et 60" (153 cm) à partir du bas de la laveuse. Le diamètre du tuyau rigide de rejet à
l’égout doit être de 2" (5 cm) minimum.
Mur Plancher
39" – 60"
)
35
Page 38

ÉVIER DE BUANDERIE
39" – 48"
(99 cm – 122cm)
AVERTISSEMENT
L’évier de buanderie doit avoir une
capacité minimale de 20 gal. (76 L). La
hauteur de l’évier de buanderie doit être
de 39" (99 cm) minimum et de 48"
(122 cm) maximum.
SPÉCIFICATIONS ÉLECTRIQUES
Risque de choc électrique
La laveuse doit être branchée à une prise secteur correctement mise à
la terre de 120 volts, 60 Hz, CA uniquement, protégée par fusible de
15 ou 20 ampères. Il est recommandé d’utiliser un disjoncteur ou un
fusible temporisé.
Le non-respect de ces instructions peut causer un décès, un incendie
ou un choc électrique.
Si l’alimentation électrique fournie ne répond pas aux critères ci-dessus,
•
contacter un électricien agréé.
36
Page 39

Risque de choc électrique
AVERTISSEMENT
Brancher sur une prise à 3 alvéoles reliée à la terre.
Ne pas enlever la broche de liaison à la terre du cordon d'alimentation.
Ne pas utiliser un adaptateur.
Ne pas utiliser un câble de rallonge.
Le non-respect de cette instruction pourrait causer un décès, un
incendie ou un choc électrique.
Une alimentation de 120 volts, 60 Hz, CA seulement, protégée par fusible de
•
15 ou 20 A est requise. Il est recommandé d’utiliser un fusible ou disjoncteur
temporisé. Il est recommandé de raccorder l’appareil sur un circuit distinct
exclusif à cet appareil.
Cette laveuse comporte un cordon d’alimentation électrique terminé par une
•
prise à 3 broches avec che de terre.
Pour minimiser les risques de choc électrique, on doit brancher le cordon à une
•
prise électrique de conguration correspondante à 3 alvéoles, reliée à la terre et
installée conformément aux codes et règlements locaux. En l’absence de prise
de courant correspondante disponible, le client a la responsabilité et l’obligation
de faire installer par un électricien qualié une prise électrique correctement
reliée à la terre.
Si les codes le permettent et si l’on utilise un conducteur distinct de liaison à la
•
terre, il est recommandé de faire vérier la qualité de la liaison à la terre par un
électricien qualié.
Ne pas établir la liaison à la terre sur une conduite de gaz.
•
En cas de doute quant à la qualité de la liaison à la terre de la laveuse, consulter
•
un électricien qualié.
Ne pas installer de fusible dans le circuit de neutre ou de terre.
•
37
Page 40

INSTRUCTIONS DE LIAISON À LA TERRE
Pour une laveuse reliée à la terre
et connectée par un cordon :
La laveuse doit être
reliée à la terre. En cas de
dysfonctionnement ou de panne,
la liaison à la terre réduit le risque
de choc électrique en orant au
courant électrique un chemin de
fuite de moindre résistance. La
laveuse est dotée d’un cordon
électrique comportant un
conducteur de mise à la terre
de l’appareil et une prise avec
liaison à la terre. La prise doit
être branchée à un réceptacle
approprié, correctement installé
et relié à la terre conformément
à tous les codes et règlements
locaux.
AVERTISSEMENT : Un
raccordement inapproprié du
conducteur de mise à la terre de
l’appareil peut causer un risque
de choc électrique.
Vérier auprès d’un électricien
ou technicien qualié en cas de
doute quant à la qualité de la
liaison à la terre de la laveuse.
Ne pas modier la prise fournie
avec la laveuse; si elle ne
correspond pas au réceptacle,
faire installer un réceptacle
approprié par un électricien
qualié.
Pour une laveuse raccordée en
permanence :
Cette laveuse doit être
raccordée à un circuit métallique
permanent relié à la terre, ou bien
un conducteur de mise à la terre
de l’appareil doit être déroulé le
long des conducteurs du circuit
et raccordé à la borne ou au
conducteur de mise à la terre de
la laveuse.
INSTRUCTIONS D’INSTALLATION
Nous recommandons que l’installation de votre nouvelle laveuse soit réalisée par
un technicien d’appareils électroménagers agréé. Si vous pensez être capable
d’installer la laveuse, lire attentivement les instructions d’installation avant de
procéder à l’installation.
IMPORTANT :
Si vous n’êtes pas certain que la laveuse est correctement installée après avoir
•
eectué ces étapes, contacter un technicien d’appareils électroménagers
qualié.
Si la laveuse vient juste de vous être livrée et que la température extérieure
•
est inférieure au point de congélation, ne pas faire fonctionner la laveuse avant
qu’elle n’ait atteint la température ambiante.
38
Page 41

ÉTAPE 1 - DÉBALLER LA LAVEUSE
AVERTISSEMENT
Risque de suffoquer
Afin d’éviter tout risque d’étouffement, conserver le sac en plastique et
autres matériaux d’emballage hors de portée des bébés et des enfants.
Ne pas utiliser ce sac dans des berceaux, poussettes ou parcs pour
enfants. Le sac en plastique peut bloquer les orifices du nez et de la
bouche et empêcher la respiration. Ce sac n’est pas un jouet.
Le non-respect de cette instruction peut causer un décès ou des
lésions cérébrales.
AVERTISSEMENT
Risque du poids excessif
Utiliser deux ou plus de personnes pour déplacer et installer la laveuse.
Le non-respect de cette instruction peut causer un décès ou une
blessure corporelle.
1. Enlever tous les matériaux d’emballage. Cela comprend : la base en polystyrène,
le support en plastique moulé et tous les adhésifs qui maintiennent les
accessoires pour laveuse en place, à l’intérieur comme à l’extérieur.
IMPORTANT: Ne pas retirer la base de l’emballage peut nuire au bon
fonctionnement de la laveuse et annulera la garantie.
Ouvrir le couvercle supérieur pour retirer la pièce de xation du panier de
•
lavage. Tirer sur la pièce de xation pour la retirer.
REMARQUE : Conserver la pièce de xation du panier de lavage pour pouvoir
la réutiliser en cas de déplacement ultérieur de la laveuse.
39
Page 42

a
a Pièce de xation du
b
a
panier de lavage
À l’aide de deux personnes ou plus, soulever la laveuse pour la dégager de la
•
base de l’emballage et du support en plastique moulé.
REMARQUE : Il est possible que le support en plastique, situé sous le
support en U, reste attaché au bas de la laveuse. S’assurer de le retirer avec
la base en polystyrène.
a Support
en
plastique
b Base en
polystyrène
2. Inspecter la laveuse et retirer tout lm protecteur, ruban adhésif ou emballage
restant sur l’appareil avant de l’utiliser.
3. Jeter/recycler tous les matériaux d’emballage de manière appropriée.
40
Page 43

ÉTAPE 2 - INSTALLATION DU COUVERCLE INFÉRIEUR
AVERTISSEMENT
Risque de choc électrique
Installer le couvercle inférieur.
Verrouiller les quatre roulettes avant de mettre la laveuse en marche.
Le non-respect de cette instruction peut causer un décès, un choc
électrique ou des blessures graves.
AVERTISSEMENT
Risque de choc électrique
Déconnecter la source de courant électrique avant l'entretien.
Replacer tous les panneaux avant de faire la remise en marche.
Le non-respect de ces instructions peut causer un décès ou un choc
électrique.
1. Étaler des couvertures ou des serviettes pliées sur le sol pour créer une
inclinaison.
2. À l’aide de deux personnes au minimum, coucher la laveuse sur le côté de
manière à ce que le sommet de la laveuse soit plus élevé que son socle, et que
l’orice de sortie de vidange soit orienté vers le haut.
41
Page 44

a
a
b
c
b
a Orice de sortie
de vidange
b Dessus de la
laveuse
3. Le côté du couvercle inférieur portant l’inscription FRONT/UP (avant/haut)
orienté vers l’intérieur et l’avant de la laveuse, aligner les bords du couvercle
avec les marques au bas de la laveuse.
4. Depuis l’avant de la laveuse, faire complètement glisser le couvercle dans les
rails en s’assurant que les bords du couvercle se trouvent derrière les onglets.
REMARQUE : Lorsque le couvercle est entièrement engagé dans les rails
derrière les onglets, le trou des vis sera en aeurement et aligné avec les trous
au bas de la caisse.
c
a Couvercle inférieur
b Trou de vis
c Onglets
5. Fixer le couvercle inférieur sur le socle de la caisse à l’aide de la vis fournie.
6. À l’aide de deux personnes au minimum, mettre la laveuse en position verticale.
42
Page 45

ÉTAPE 3 - RACCORDEMENT ET IMMOBILISATION DU
a
TUYAU DE VIDANGE
1. Élargir l’ouverture en serrant les
extrémités de la bride du tuyau de vidange
l’une contre l’autre. Faire glisser la bride
sur l’extrémité du tuyau de vidange, sur la
partie exible du tuyau.
2. Placer l’extrémité du tuyau de vidange
sur l’orice de vidange en plastique qui
dépasse de la laveuse.
3. Appuyer sur les extrémités de la bride
pour élargir l’ouverture et faire glisser la
bride sur la connexion du tuyau de vidange
et de l’orice de vidange. Relâcher la bride
pour serrer.
4. Placer l’extrémité crochetée du tuyau de vidange dans le conduit d’évacuation
ou l’évier de buanderie.
5. Fixer le tuyau de vidange à un tuyau d’eau, au tuyau rigide de rejet à l’égout ou à
l’un des pieds de l’évier de buanderie pour le maintenir en place. Voir “Critères
du système de vidange” pour des illustrations.
ÉTAPE 4 - RACCORDEMENT DES TUYAUX
D’ADMISSION D’EAU
Selon le modèle, les tuyaux exibles d’arrivée d’eau sont de Style 1 ou de Style 2.
Suivre les instructions correspondant au style des tuyaux exibles fournis.
IMPORTANT : Utiliser uniquement un tuyau neuf pour installer la laveuse. Les
tuyaux exibles d’arrivée d’eau doivent posséder des raccords letés à gros pas à
une extrémité (pour raccorder l’arrivée d’eau du domicile), et des raccords letés à
pas n à l’autre extrémité (pour raccorder la laveuse).
REMARQUE : Inspecter périodiquement les tuyaux pour pouvoir détecter toute
coupure, usure ou fuite éventuelle. Remplacer les tuyaux et installer des tuyaux
neufs tous les 5 ans environ.
1. Vérier qu’une nouvelle rondelle plate est bien installée dans chaque extrémité
des tuyaux d’arrivée d’eau. Des rondelles plates ont été préinstallées à l’usine.
Style 1 Style 2
A
a Rondelle
2. Enler à la main l’extrémité blanche du robinet d’arrivée d’eau sur la valve
d’arrivée d’eau à l’arrière de la laveuse jusqu’à ce fermement serrés à la main.
43
Page 46

IMPORTANT : Pour éviter d’endommager les raccords de tuyau, ne pas serrer
a
excessivement.
REMARQUE : An d’éviter d’endommager les robinets, ne pas utiliser de ruban
adhésif pour tuyauteries ou de produits d’étanchéité sur le letage des valves.
a Extrémité grise
uniquement
3. Enler à la main l’autre extrémité des robinets d’arrivée d’eau sur les valves
d’arrivée d’eau portant les mentions “H” (eau chaude) et “C” (eau froide) à
l’arrière de la laveuse jusqu’à ce qu’ils soient serrés.
IMPORTANT :
Ne pas raccorder l’extrémité grise du tuyau exible d’arrivée à la laveuse,
•
sans quoi des fuites apparaîtront du fait du letage endommagé.
Pour éviter d’endommager le raccord de tuyau, ne pas serrer
•
excessivement.
Style 1 - Serrer le raccord de deux tiers de tour supplémentaires avec une pince.
Style 2 - Ne pas serrer le raccord avec une pince.
REMARQUE : An d’éviter d’endommager les valves d’arrivée d’eau de la
laveuse, ne pas utiliser de ruban adhésif pour tuyauteries ou de produits
d’étanchéité sur le letage des valves.
Style 1 Style 2
a a
a Extrémité blanche uniquement
4. Ouvrir les robinets d’eau chaude et d’eau froide et vérier l’absence de fuites. En
cas de fuite, vérier que les étapes 1 à 3 ont bien été suivies.
44
Page 47

ÉTAPE 5 - NIVELLEMENT DE LA LAVEUSE
AVERTISSEMENT
IMPORTANT : Un bon aplomb de la laveuse permet de réduire les vibrations et bruits
éventuels.
1. Placer la laveuse à son emplacement nal. Vérier que les canalisations d’eau
et de vidange de la laveuse ne sont pas tendues ou écrasées. Vérier que les
quatre pieds sont en contact ferme avec le plancher et que la laveuse repose
solidement dessus.
2. Avec un niveau, vérier que la laveuse est d’aplomb transversalement et d’avant
en arrière.
3. Si la laveuse n’est pas d’aplomb, ajuster les pieds de nivellement. Tourner les
pieds dans le sens horaire pour les déployer (et relever la laveuse) ou antihoraire
pour les rétracter (et abaisser la laveuse).
Relever Abaisser
ÉTAPE 6 - FIN DE L’INSTALLATION
Risque de choc électrique
Brancher sur une prise à 3 alvéoles reliée à la terre.
Ne pas enlever la broche de liaison à la terre du cordon d'alimentation.
Ne pas utiliser un adaptateur.
Ne pas utiliser un câble de rallonge.
Le non-respect de cette instruction pourrait causer un décès, un
incendie ou un choc électrique.
45
Page 48

1. Brancher la laveuse dans une prise de courant à 3 alvéoles,
E F
reliée à la terre.
2. Vérier que les robinets d’arrivée d’eau sont ouverts.
3. Éliminer/recycler tous les matériaux d’emballage.
4. Eectuer un programme de lavage normal avec un
détergent pour tester et nettoyer la laveuse. Voir la
section “Instructions d’utilisation”.
TABLEAU DE COMMANDE ET FONCTIONS
TABLEAU DE COMMANDE
A B C D G H
BOUTON WASH CYCLE (PROGRAMME DE LAVAGE)
Utiliser ce bouton pour sélectionner le programme désiré pour votre charge
•
de lavage.
Les réglages par défaut correspondant à chaque programme s’achent; les
•
réglages par défaut peuvent être modiés en utilisant les boutons de réglage
– Wash Temp (température de lavage), Soil Level (niveau de saleté) et Water
Level (niveau d’eau).
L’utilisateur peut choisir parmi 8 programmes:
•
Heavy Duty (service intense) – Utiliser ce programme pour les vêtements
résistants très sales. On peut utiliser ce programme pour les serviettes, les
équipements de sport, les vêtements d’enfants, etc.
Whites (blancs) – Utiliser ce programme à eau chaude pour les articles
blancs ou de couleur claire susceptibles de déteindre.
Perm Press (pressage permanent) – Utiliser ce programme pour les
vêtements présentant un degré de saleté léger ou normal.
Normal – Utiliser ce programme pour les articles en coton et les charges de
tissus mixtes présentant un degré de saleté normal.
Delicate (articles délicats) – Utiliser ce programme pour laver les articles
peu sales et les vêtements délicats nécessitant un lavage en douceur.
46
Page 49

Quick (rapide) – Utiliser ce programme pour laver de petites charges peu
sales dont on a besoin rapidement.
Rinse & Spin (rinçage et essorage) – Utiliser ce programme pour éliminer
l’excès de détergent et rafraîchir des vêtements propres.
Spin Only (essorage uniquement) – Utiliser ce programme pour éliminer
l’eau restée dans des vêtements lavés à la main ou qui sont propres et
mouillés.
BOUTONS DE RÉGLAGE
Bouton Wash Temp (température de lavage)
Utiliser ce bouton pour choisir une température de lavage; tous les rinçages
•
utilisent de l’eau froide. Pour des résultats optimaux, suivre les instructions
gurant sur l’étiquette des vêtements et utiliser la température d’eau de
lavage la plus élevée possible ne présentant pas de danger pour le tissu.
Les options ne sont pas toutes disponibles pour tous les programmes.
•
Bouton Soil Level (niveau de saleté)
Utiliser ce bouton pour sélectionner le niveau de saleté qui correspond
•
le mieux à la charge. En fonction du niveau de saleté, la durée de lavage
augmentera ou diminuera par tranches de 4 à 8 minutes sur l’achage de
durée résiduelle estimée.
On peut choisir parmi 3 niveaux de saleté– Heavy (très sale), Normal, Light
•
(peu sale)
Bouton Water Level (niveau d’eau)
Utiliser ce bouton pour choisir le niveau d’eau adapté à la charge. Small (bas)
•
est le niveau d’eau le plus faible et Super est le plus élevé.
BOUTON DELAY START (MISE EN MARCHE DIFFÉRÉE)
Appuyer sur ce bouton pour diérer le démarrage de votre programme de
•
lavage de 1 à 24 heures par tranches d’une heure.
Utiliser ce bouton pour choisir un départ diéré de la laveuse. Le nombre
•
d’heures de décalage sera aché sur l’achage de durée résiduelle estimée.
Chaque pression sur le bouton Delay Start (mise en marche diérée)
diérera la mise en marche d’une heure supplémentaire.
Pour annuler la fonction de mise en marche diérée, appuyer une fois de plus
•
sur le bouton lorsque l’achage indique 24. L’utilisateur peut également
annuler la fonction mise en marche diérée en mettant hors tension la
laveuse au moyen du bouton Power (mise sous tension).
Il faut appuyer sur le bouton Start/Pause (mise en marche/pause) pour
•
lancer le compte à rebours.
BOUTON EXTRA RINSE (RINÇAGE SUPPLÉMENTAIRE)
Appuyer sur ce bouton pour ajouter un rinçage supplémentaire au
•
programme de lavage.
REMARQUE : Avec certains programmes, cette option est activée par
défaut. Voir le Guide des programmes pour plus de détails.
47
Page 50

AFFICHAGE DE DURÉE RÉSIDUELLE ESTIMÉE
L’achage de durée résiduelle estimée indique la durée de programme
•
estimée en minutes.
Quand l’option Delay Start (mise en marche diérée) est utilisée, l’achage
•
de durée résiduelle estimée indiquera la durée du délai choisi en heures.
TÉMOINS LUMINEUX DE PROGRAMME
Les témoins lumineux de programme indiquent les étapes du programme
•
sélectionné.
BOUTON START/PAUSE (MISE EN MARCHE/PAUSE)
Appuyer sur ce bouton pour démarrer un programme sélectionné ou
•
suspendre un programme en cours.
REMARQUE: Une fois un programme de lavage lancé, le programme en
cours doit être suspendu si l’on souhaite modier les réglages Wash Temp
(température de lavage), Soil Level (niveau de saleté) et Water Level (niveau
d’eau).
BOUTON POWER (MISE SOUS TENSION)
IMPORTANT: Éteindre l’appareil en utilisant le bouton Power (mise sous tension)
ne débranche pas l’appareil de l’alimentation électrique.
Appuyer sur ce bouton pour mettre sous tension la laveuse.
•
REMARQUE : Si la laveuse est sous tension et que l’on n’appuie pas sur le bouton
START (mise en marche), elle s’éteint automatiquement au bout de 5 minutes.
GUIDE DES PROGRAMMES
REMARQUE: Pour protéger la charge de lavage, tous les options et réglages ne sont
pas disponibles pour tous les programmes. Les cases grisées indiquent les réglages
par défaut correspondant à chaque programme.
PRO-
GRAMME
Heavy
Duty
(service
intense)
48
TYPE DE
TISSU
Tissus
résistants
grand
teint très
sales
PRO-
CESSUS
DE
LAVAGE
12min de
trempage
25min de
lavage
Rinçage
Essorage
DURÉE
ESTI-
MÉE
1:08
TEMPÉRATURE
DE
LAVAGE
Warm
(tiède)
Hot
(chaud)
Cold
(froid)
NIVEAU
DE
SALETÉ
Normal
Heavy
(très
sale)
Light
(peu
sale)
NIVEAU
D’EAU
Medium
(moyen)
Super
Large
(élevé)
Small
(bas)
RINÇAGE
SUPPLÉ-
MENTAIRE
•
Page 51

PRO-
GRAMME
Whites
(blancs)
Perm
Press
(pressage
perma-
nent)
Normal
Delicate
(articles
délicats)
Quick
(rapide)
TYPE DE
TISSU
Vêtements
blancs
Tissus
infrois-
sables et
synthé-
tiques
Articles
en coton,
linge de
maison et
charges
mixtes
Lingerie,
tissus
trans-
parents
avec
orne-
ments en
dentelle
Articles
en coton,
linge de
maison et
charges
mixtes
PRO-
CESSUS
DE
LAVAGE
12min de
trempage
25min de
lavage
Rinçage
Essorage
16min de
lavage
Rinçage
Essorage
16min de
lavage
Rinçage
par
vapori-
sation
Essorage
10min de
lavage
Rinçage
Essorage
9min de
lavage
Rinçage
Essorage
DURÉE
ESTI-
MÉE
1:15
:35
:40
:29
:23
TEMPÉRATURE
DE
LAVAGE
Hot
(chaud)
Warm
(tiède)
Cold
(froid)
Warm
(tiède)
Cold
(froid)
Warm
(tiède)
Hot
(chaud)
Cold
(froid)
Warm
(tiède)
Cold
(froid)
Warm
(tiède)
Hot
(chaud)
Cold
(froid)
NIVEAU
DE
SALETÉ
Normal
Heavy
(très
sale)
Light
Normal
Heavy
(très
sale)
Light
(peu
sale)
Normal
Heavy
(très
sale)
Light
(peu
sale)
Normal
Heavy
(très
sale)
Light
(peu
sale)
Normal
Heavy
(très
sale)
Light
(peu
sale)
NIVEAU
D’EAU
Medium
(moyen)
Super
Large
(élevé)
Small
(bas)
Medium
(moyen)
Super
Large
(élevé)
Small
(bas)
Medium
(moyen)
Super
Large
(élevé)
Small
(bas)
Medium
(moyen)
Super
Large
(élevé)
Small
(bas)
Medium
(moyen)
Super
Large
(élevé)
Small
(bas)
RINÇAGE
SUPPLÉ-
MENTAIRE
•
•
•
•
•
49
Page 52

PRO-
GRAMME
Rinse
& Spin
(rinçage
et
essorage)
Spin Only
(esso-
rage
seulement)
Le rinçage supplémentaire allonge le programme d’environ 7 minutes
•
TYPE DE
TISSU
Vête-
ments
propres
Vête-
ments
propres
encore
mouillés
PRO-
CESSUS
DE
LAVAGE
Rinçage
Essorage
Essorage
DURÉE
ESTI-
TEMPÉRATURE
MÉE
LAVAGE
Cold
:17
:06 n/a n/a n/a
(froid)
seule-
ment
DE
NIVEAU
DE
SALETÉ
n/a
NIVEAU
D’EAU
Medium
(moyen)
Super
Large
(élevé)
Small
(bas)
.
UTILISER LA LAVEUSE
ÉTAPE 1 - PRÉPARATION ET TRI DU LINGE
PRÉPARATION DU LINGE
Consulter les étiquettes de vêtement du fabricant pour les instructions de
•
lavage.
Vider les poches et les retourner.
•
Retirer tout objet pouvant culbuter (épingles, pinces à cheveux, pièces de
•
monnaie, bagues, boucles d’oreilles, mouchoirs en papier, etc.) des vêtements
pour éviter d’éraer le panier de lavage ou d’obstruer la pompe de vidange.
Déplier les revers et enlever la charpie ou la poussière.
•
Attacher les ceintures et les cordons pour qu’ils ne s’emmêlent pas.
•
Fermer les fermetures à glissière, les boutons pression et les crochets an qu’ils
•
ne s’accrochent pas à d’autres articles.
Prétraiter toutes les taches et zones très sales.
•
Retourner les tricots synthétiques et les lainages pour éviter le boulochage.
•
RINÇAGE
SUPPLÉ-
MENTAIRE
•
TRI DU LINGE
Trier le linge en fonction du type de programme de lavage nécessaire
•
(température de l’eau et action de lavage).
Séparer les couleurs foncées des couleurs claires et les articles grand teint des
•
articles qui déteignent.
Séparer les tissus lourds et les tissus légers.
•
Séparer les tissus qui retiennent la charpie de ceux qui la forment.
•
Séparer les articles volumineux tels que les couvertures ou les oreillers.
•
50
Page 53

ÉTAPE 2 - AJOUT DE PRODUITS DE SOIN DES TISSUS
AJOUT DE DÉTERGENT
Utiliser uniquement un détergent Haute ecacité. Les détergents
•
HE sont spécialement formulés avec des composants qui évitent
les problèmes causés par une production excessive de mousse. Une
production excessive de mousse empêchera l’élimination complète
du détergent des vêtements.
Si on choisit le programme Quick (rapide), il est recommandé d’utiliser un
•
détergent de lessive liquide pour obtenir des résultats optimaux. Un détergent
en poudre peut ne pas se dissoudre assez rapidement pour bien nettoyer avec
ce programme.
Déterminer la quantité de détergent. Suivre les instructions d’utilisation du
•
détergent gurant sur le récipient.
REMARQUE: La quantité de détergent nécessaire dépend du volume de la charge,
du niveau de saleté des vêtements et de la dureté de l’eau qui alimente la laveuse.
Détergent liquide
1. Verser une petite quantité d’eau dans la laveuse et ajouter le détergent liquide.
REMARQUE : Pour de meilleurs résultats, ajouter le détergent dans le panier de
lavage avant d’y placer la charge de linge.
2. Faire fonctionner la laveuse pendant 30 secondes pour dissoudre complètement
le détergent.
Détergent en poudre
1. Verser le détergent en poudre
directement dans le distributeur
prévu à cet eet.
AJOUT D’AGENT DE BLANCHIMENT (SI DÉSIRÉ)
Verser la mesure d’eau de Javel dans le
•
distributeur d’eau de Javel.
REMARQUE : Utiliser uniquement de l’agent
de blanchiment liquide dans ce distributeur.
IMPORTANT : Veiller à ne pas renverser
d’agent de blanchiment non dilué sur la caisse
de la laveuse ou sur les vêtements. Un agent
de blanchiment est un produit chimique
puissant qui peut endommager les vêtements
ou le revêtement de la laveuse.
Suivre les directives du fabricant sur les étiquettes de soin du tissu concernant
•
les modalités d’utilisation recommandées pour un agent de blanchiment liquide
ou en poudre.
51
Page 54

ÉTAPE 3 - CHARGEMENT DE LA LAVEUSE
AVERTISSEMENT
1. Charger les vêtements sans les tasser et de façon uniforme le long de la paroi du
panier de lavage.
2. Ne pas placer les vêtements directement sur le centre du pulsateur.
3. Rabattre le couvercle de la laveuse.
REMARQUES :
Ne pas surcharger les articles ni les tasser dans le panier de lavage. La surcharge
•
peut réduire l’ecacité du lavage, causer une usure excessive et dans certains
cas, entraîner la formation de plis ou le froissement de la charge.
La laveuse n’eectue ni agitation, ni essorage lorsque le couvercle est ouvert.
•
ÉTAPE 4 - MISE EN MARCHE DE LA LAVEUSE
1. Appuyer sur le bouton POWER (mise sous tension) pour mettre la laveuse sous
tension.
2. Sélectionner un programme de lavage.
3. Si désiré, modier les réglages par défauts et options.
4. Appuyer sur le bouton START/PAUSE (mise en marche/pause) pour démarrer le
programme de lavage.
GUIDE D’ENTRETIEN ET DE NETTOYAGE
Risque de choc électrique
Déconnecter la source de courant électrique avant le nettoyage.
Le non-respect de cette instruction peut causer un décès ou un choc
électrique.
Débrancher ou déconnecter la source de courant électrique.
•
NETTOYAGE ET ENTRETIEN
GÉNÉRAL
Utiliser uniquement un chion mouillé ou trempé d’eau savonneuse pour
•
nettoyer le tableau de commande.
52
Page 55

Si l’on renverse de l’assouplissant pour tissu, de l’agent de blanchiment ou du
•
détergent liquide/en poudre sur la caisse, essuyer immédiatement la caisse pour
éviter d’endommager le revêtement.
Ne pas utiliser de nettoyants abrasifs, de produits chimiques puissants,
•
d’ammoniaque, d’agent de blanchiment au chlore, de détergent concentré ou de
solvants pour nettoyer la laveuse. Ces produits chimiques peuvent dissoudre,
endommager ou décolorer la laveuse.
Après avoir lavé des vêtements, laisser le couvercle ouvert pour que l’humidité
•
à l’intérieur de la machine puisse s’évaporer et pour empêcher l’apparition de
moisissure.
DISTRIBUTEUR DE DÉTERGENT
1. Tirer le tiroir du distributeur jusqu’à la butée et le soulever légèrement pour le
retirer.
2. Rincer le distributeur à l’eau tiède et le sécher parfaitement avec un chion
doux.
3. Insérer le tiroir en l’inclinant légèrement vers le bas et le remettre en place.
FILTRE À CHARPIE
1. Appuyer sur l’onglet de la partie supérieure du ltre pour
dégager le ltre du panier de lavage.
2. Faire pivoter le ltre sur lui-même an que la partie
arrière du ltre soit orientée vers le haut.
3. Tout en tenant le ltre fermement d’une main, soulever
la base du ltre pour séparer l’avant de l’arrière du ltre,
an de pouvoir accéder au tamis du ltre.
4. Nettoyer le tamis du ltre et replacer l’arrière du ltre.
5. Faire glisser le ltre dans le panier de lavage et appuyer
fermement pour le remettre en place.
IMPORTANT: Les deux ltres à charpie doivent être en place pendant les
programmes de lavage. Nettoyer les tamis de ltre après chaque charge de lavage.
Brancher l’appareil ou reconnecter la source de courant électrique.
•
PRÉCAUTIONS À PRENDRE AVANT UN DÉPART
Fermer les robinets d’alimentation en eau. Ceci permettra d’éviter
•
d’endommager votre domicile en cas de rupture ou de fuite des tuyaux.
Débrancher la laveuse de la prise de courant électrique.
•
Sécher le panier de lavage.
•
Laisser le couvercle ouvert pour que l’humidité à l’intérieur de la machine puisse
•
s’évaporer et pour empêcher l’apparition de moisissure.
53
Page 56

PRÉPARATION AVANT UN DÉMÉNAGEMENT OU UN
AVERTISSEMENT
ENTREPOSAGE
Eectuer les étapes suivantes en complément des “Précautions à prendre avant un
départ”.
Débrancher ou déconnecter la source de courant électrique.
•
Déconnecter les tuyaux d’arrivée d’eau et le tuyau de vidange et les placer dans
•
le panier de lavage.
Tourner les pieds de nivellement de façon à ce qu’ils soient complètement
•
rétractés dans la caisse de la laveuse.
Si l’on doit déplacer la laveuse, replacer la pièce de protection du panier de
•
lavage des matériaux d’emballage d’origine dans le sommet de l’ouverture de la
laveuse. Utiliser du ruban de masquage pour xer le couvercle de la laveuse.
Déplacer et entreposer la laveuse uniquement en position verticale.
•
Ne pas entreposer la laveuse dans un environnement froid où la température
•
descendra en dessous du point de congélation; l’entreposer à température
ambiante.
RÉINSTALLATION/RÉUTILISATION DE LA LAVEUSE
Risque de choc électrique
Brancher sur une prise à 3 alvéoles reliée à la terre.
Ne pas enlever la broche de liaison à la terre du cordon d'alimentation.
Ne pas utiliser un adaptateur.
Ne pas utiliser un câble de rallonge.
Le non-respect de cette instruction pourrait causer un décès, un
incendie ou un choc électrique.
Pour réinstaller la laveuse en cas de non-utilisation, d’entreposage pour l’hiver,
de déménagement ou en période de vacances :
1. Consulter les instructions d’installation pour choisir l’emplacement, régler
l’aplomb de la laveuse et la raccorder.
2. Avant de réutiliser la laveuse, exécuter la procédure recommandée suivante :
Remise en marche de la laveuse :
1. Vidanger les canalisations d’eau et les tuyaux. Reconnecter les tuyaux d’arrivée
d’eau. Ouvrir les deux robinets d’eau.
2. Brancher la laveuse ou reconnecter la source de courant électrique.
54
Page 57

3. Faire exécuter à la laveuse le programme Wash (lavage) pour nettoyer la laveuse
et éliminer l’antigel, le cas échéant.
REMARQUE : Utiliser uniquement du détergent HE Haute ecacité. Utiliser la
moitié de la quantité recommandée par le fabricant pour une charge de taille
moyenne.
DÉPANNAGE
Essayez tout d’abord les solutions suggerees ici et evitez les couts pour le service
de reparation.
FONCTIONNEMENT
PROBLÈME CAUSE(S) POSSIBLE(S) SOLUTION
La laveuse ne
fonctionne pas
Le couvercle de
la laveuse ne
s’ouvre pas
La laveuse n’est pas
alimentée.
Le disjoncteur s’est
enclenché ou le fusible est
grillé.
La laveuse est surchargée
ou la charge à laver n’est
pas équilibrée.
Le programme Delicate
(délicat) a été sélectionné.
Le couvercle de la laveuse
est ouvert.
Le couvercle de la laveuse
est verrouillé.
Brancher le cordon
d’alimentation dans une prise à
3alvéoles reliée à la terre.
Réenclencher le disjoncteur ou
remplacer le fusible.
Il est peut-être nécessaire
de retirer le linge ou de le
redistribuer pour ré-équilibrer la
charge.
La laveuse s’interrompt pendant
certains programmes pour
laisser tremper le linge. Une
fois la période de trempage
écoulée, la laveuse se remet
automatiquement en marche.
Fermer le couvercle de la laveuse.
Appuyer sur Start/Pause (mise en
marche/pause) pour interrompre
la laveuse. Le verrou du couvercle
peut mettre un moment pour se
désengager.
EAU
PROBLÈME CAUSE(S) POSSIBLE(S) SOLUTION
Le débit est
lent ou le
remplissage
prend du temps
Les robinets
d’alimentation en eau ne
sont pas complètement
ouverts.
Le tuyau de remplissage
d’eau est déformé.
S’assurer que les robinets sont
complètement ouverts.
S’assurer que les tuyaux ne sont
ni emmêlés, ni écrasés, ni tordus.
55
Page 58

PROBLÈME CAUSE(S) POSSIBLE(S) SOLUTION
La température
de l’eau est trop
chaude ou trop
froide
Fuites d’eau
L’eau ne se vide
pas de la laveuse
La température du
chaue-eau n’a pas été
réglée correctement.
Les tuyaux d’arrivée d’eau
n’ont pas été raccordés
correctement.
Les raccords du tuyau de
remplissage d’eau ne sont
pas serrés
Le raccord du tuyau de
vidange n’est pas xé en
place ou le tuyau n’est pas
correctement positionné
sur l’orice de vidange.
Fuites d’eau
indéterminées
Le tuyau d’évacuation
n’est pas correctement
raccordé à la laveuse.
Le tuyau de vidange
n’est pas positionné
correctement.
L’évier ou le conduit
d’évacuation est obstrué.
L’eau chaude doit être réglée
à une température d’au moins
120ºF - 140ºF (49ºC - 60ºC).
Vérier que les tuyaux d’arrivée
d’eau sont correctement
raccordés (eau chaude avec eau
chaude et eau froide avec eau
froide).
Vérier que les raccords du
tuyau d’arrivée d’eau au niveau
du robinet et de la laveuse sont
bien serrés.
Vérier que le raccordement du
tuyau de vidange à la laveuse est
solide et que le tuyau de vidange
est correctement placé au
niveau de l’évacuation.
Contacter un plombier qualié.
Raccorder le tuyau de vidange à
la laveuse.
Pour que la vidange puisse
s’eectuer correctement, le
sommet de l’orice d’évacuation
doit se trouver à au moins 39”
(99 cm) au-dessus du plancher.
Retirer ce qui bloque l’évier ou le
conduit d’évacuation.
BRUIT
PROBLÈME CAUSE(S) POSSIBLE(S) SOLUTION
Bruit saccadé La charge de lavage est
Cliquetis ou sons
métalliques
Grincement La laveuse est peut-être
Vibration La laveuse n’est peut-être
peut-être déséquilibrée.
Des objets étrangers se
trouvent peut-être dans la
laveuse.
surchargée.
pas d’aplomb.
56
Suspendre le programme de
la laveuse et ré-agencer les
articles dans le panier de lavage.
Interrompre la laveuse et
chercher des clés ou des pièces
de monnaie.
Arrêter la laveuse et retirer une
partie de la charge de lavage.
Vérier que les 4 pieds sont en
contact ferme avec le plancher
et que la laveuse est d’aplomb.
Page 59

VÊTEMENTS
PROBLÈME CAUSE(S) POSSIBLE(S) SOLUTION
Froissement
Résidus de
détergent
Les vêtements
ressortent
grisâtres ou
jaunis
Les vêtements
sont déchirés ou
accrochés
Taches de
décoloration
REMARQUE :
Des taches de
décoloration
peuvent prendre
la forme de
taches de couleur
plus claire.
Vêtements
d’apparence
vieille et usée
La charge de lavage
n’a pas été triée
correctement, est trop
importante ou n’a pas
été lavée à la bonne
température.
Il est possible que le
détergent ne se dissolve
pas complètement dans
une eau de lavage très
froide.
La charge de lavage n’a
pas été triée selon les
couleurs.
Quantité de détergent
utilisé insusante,
ou niveau de saleté
de la charge de lavage
nécessitant une
température de lavage
plus chaude.
La charge de lavage n’a
pas été préparée pour la
lessive.
La lessive est en contact
direct avec l’agent de
blanchiment.
Mauvais programme
de lavage ou mauvaise
température de lavage.
Éviter de surcharger la
laveuse et ne pas mélanger
de vêtements lourds avec des
articles légers ou délicats.
Choisir une eau de lavage
tiède et vérier que l’eau
chaude provenant du chaue-
eau du domicile atteint une
température d’au moins 120°F
(49ºC).
Séparer les couleurs foncées
des couleurs claires et articles
blancs an d’éviter tout
transfert de teinture.
Les articles de grande taille ou
très sales peuvent nécessiter
plus de détergent et une eau
de lavage plus chaude. Suivre
les instructions du fabricant
concernant les modalités
d’utilisation recommandées
pour le détergent.
Nouer les celles et les
ceintures. Vider les poches,
fermer les ceintures et
fermetures à glissière, les
bouton-pression métalliques
et agrafes avant de charger les
vêtements.
Ne pas verser ni projeter ou
faire éclabousser de l’agent de
blanchiment directement sur
les vêtements. Si l’on utilise
le distributeur et que l’on
remarque tout de même des
taches, essayer d’utiliser de
l’agent de blanchiment dilué.
Suivre les instructions du
fabricant concernant l’entretien
des vêtements.
POUR OBTENIR DE L’AIDE SUPPLÉMENTAIRE, VISITER HAIER.
COM OU CONTACTER LA LIGNE D’ASSISTANCE À LA CLIENTÈLE
AU 1-877-377-3639.
57
Page 60

GARANTIE LIMITÉE
SERVICE À DOMICILE
GARANTIE COMPLÈTE DE UN AN
Pendant 12 mois à compter de la date d’achat
d’origine, Haier réparera ou remplacera
gratuitement n’importe quelle pièce (main-
d’œuvre comprise) comportant un défaut de
matériau ou de fabrication.
Haier peut choisir à sa seule discrétion de
remplacer ou réparer des pièces, des soussystèmes ou le produit tout entier.
Le produit doit être accessible, dégagé et
installé correctement pour bénécier du
service de réparation sous garantie.
GARANTIE LIMITÉE
Au-delà d’un an après la date d’achat
d’origine, Haier fournira gratuitement une
pièce (tel qu’indiqué ci-dessous) pour
remplacer ladite pièce suite à un défaut de
matériau ou de fabrication. Haier assume
l’entière responsabilité du coût de cette
pièce. Tout autre coût, tels les frais de maind’œuvre, de déplacement, etc, sont à la
charge du propriétaire.
De la deuxième à la cinquième année
Dans l’éventualité où une pièce venait à ne pas
retenir l’eau, Haier fournira la cuve de lavage
externe et les pièces d’assemblage de cuve
externe associées.
De la deuxième à la septième année
Haier fournira le panier de lavage en acier
inoxydable si celui-ci présente un défaut de
matériau ou de fabrication.
REMARQUE : Cette garantie prend eet à
la date à laquelle l’article a été acheté et le
reçu de l’achat d’origine doit être présenté au
représentant de dépannage autorisé avant
qu’une quelconque réparation sous garantie
ne soit eectuée.
Exceptions : Garantie pour usage de location
90 jours sur la main-d’œuvre à compter de la
date d’achat d’origine
90 jours sur les pièces à compter de la date
d’achat d’origine
Aucune autre garantie ne s’applique.
SERVICE AU TITRE DE LA GARANTIE
Contacter le centre de dépannage autorisé
le plus proche. Tout dépannage doit être
eectué par un centre de dépannage autorisé
Haier. Pour le nom et le numéro de téléphone
du centre de dépannage autorisé le plus
proche de votre domicile, composer le
1-877-337-3639.
Avant d’appeler le centre, veuillez garder à
disposition les renseignements suivants :
Numéros de plaque signalétique de l’appareil.
Le nom et l’adresse du revendeur auprès
duquel vous avez acheté l’appareil, ainsi que la
date d’achat.
Une description claire du problème rencontré.
Une preuve d’achat (reçu de vente).
58
Cette garantie est valable pour le service
des appareils domestiques aux États-Unis
contigus et au Canada et lorsque le service
est disponible, en Alaska, à Hawaï et Porto
Rico.
Cette garantie ne couvre pas :
Le remplacement ou la réparation des fusibles,
disjoncteurs, du câblage ou du circuit de
plomberie du domicile.
Un produit dont le numéro de série d’origine a
été enlevé ou modié.
Tous frais de dépannage non identiés comme
étant normaux tel un dépannage dans une
zone ou une tranche horaire normale.
Vêtements endommagés.
Les dommages liés à l’expédition.
Les dommages liés à une installation ou un
entretien inadapté.
Les dommages causés par l’un des éléments
suivants : Mauvaise utilisation, utilisation
abusive, accident, incendie ou catastrophe
naturelle.
Les dommages résultant d’un dépannage
fourni par une entité autre qu’un revendeur ou
centre de dépannage autorisé Haier.
Les dommages causés par un courant, une
tension ou une alimentation électrique
incorrects.
Les dommages résultant d’une quelconque
modication ou altération du produit ou d’un
ajustement non autorisé par Haier.
Un ajustement des commandes utilisées par le
consommateur tel qu’identié dans le manuel
de l’utilisateur.
Les tuyaux, boutons, plateaux à charpie et tout
accessoire ou pièce jetable.
Les frais de main-d’œuvre, transport pour
dépannage et d’expédition pour le retrait et
le remplacement de pièces défectueuses audelà de la période de 12 mois.
Les dommages liés à une utilisation autre
qu’une utilisation domestique normale.
Tout frais de transport et d’expédition.
CETTE GARANTIE LIMITÉE REMPLACE TOUTE
AUTRE GARANTIE EXPRESSE OU IMPLICITE,
Y COMPRIS, MAIS PAS SEULEMENT, LES
GARANTIES IMPLICITES, Y COMPRIS LES
GARANTIES DE QUALITÉ MARCHANDE OU
D’APTITUDE À UN USAGE PARTICULIER
Le recours oert dans cette garantie est
exclusif et se substitue à toute autre garantie.
Cette garantie ne couvre pas les dommages
fortuits ou indirects; aussi les limitations
décrites ci-dessus peuvent ne pas s’appliquer
à votre cas. Certains États ne permettent
pas de limitation sur la durée d’une garantie
implicite, aussi les limitations décrites ci-
dessus peuvent ne pas s’appliquer à votre cas.
Cette garantie vous confère des droits
juridiques spéciques. Vous pouvez
également jouir d’autres droits qui peuvent
varier d’un État à l’autre.
Haier America
Wayne, NJ 07470
Page 61

ÍNDICE
SEGURIDAD DE LA LAVADORA .........................................................................60
PIEZAS Y CARACTERÍSTICAS ...........................................................................63
REQUISITOS DE INSTALACIÓN .........................................................................64
Herramientas necesarias ............................................................................................64
Piezas suministradas ...................................................................................................64
Requisitos de ubicación ...............................................................................................64
Requisitos del sistema de desagüe .............................................................................65
Requisitos eléctricos ................................................................................................... 66
Instrucciones de puesta a tierra .................................................................................68
INSTRUCCIONES DE INSTALACIÓN .................................................................. 69
Paso 1 - Desempaque de la lavadora ..........................................................................69
Paso 2 - Instalación de la cubierta de la parte inferior ...............................................71
Paso 3 - Conecte y asegure la manguera de desagüe ...............................................73
Paso 4 - Conecte las mangueras de agua ...................................................................73
Paso 5 - Nivele la lavadora ...........................................................................................75
Paso 6 - Complete la instalación .................................................................................75
PANEL DE CONTROL Y CARACTERÍSTICAS ......................................................76
USO DE LA LAVADORA ..................................................................................... 80
Paso 1 - Prepare y separe las prendas ........................................................................ 80
Paso 2 - Agregue los productos para el cuidado de las telas ..................................... 81
Paso 3 - Cargue la lavadora .........................................................................................82
Paso 4 - Ponga la lavadora en marcha .........................................................................82
GUÍA PARA EL CUIDADO Y LA LIMPIEZA ........................................................... 82
Limpieza y mantenimiento .......................................................................................... 83
Precauciones al irse de vacaciones .............................................................................83
Preparación para la mudanza o el almacenaje ............................................................ 84
Cómo volver a instalar o usar la lavadora nuevamente .............................................84
SOLUCIÓN DE PROBLEMAS .............................................................................. 85
GARANTÍA LIMITADA ........................................................................................ 88
INFORMACIÓN A TENER EN CUENTA
Le agradecemos la compra de este
producto de marca Haier. Este manual
para el usuario le ayudará a obtener
el mejor funcionamiento de su nueva
lavadora.
Para referencia futura, anote el número
de modelo y de serie, que están
situados en la parte posterior de la
lavadora, y la fecha de compra.
Engrape la prueba de compra de este
manual para asistirle cuando necesite
obtener servicio bajo la garantía.
___________________________________
Número de modelo
___________________________________
Número de serie
___________________________________
Fecha de compra
59
Page 62

SEGURIDAD DE LA LAVADORA
Su seguridad y la seguridad de los demás es muy importante.
Hemos incluido muchos mensajes importantes de seguridad en este
manual y en su electrodoméstico. Lea y obedezca siempre todos los
mensajes de seguridad.
Este es el símbolo de advertencia de seguridad.
Este símbolo le llama la atención sobre peligros
potenciales que pueden ocasionar la muerte o una
lesión a usted y a los demás. Todos los mensajes de
seguridad irán a continuación del símbolo de
advertencia de seguridad y de la palabra “PELIGRO”,
“ADVERTENCIA” o “PRECAUCIÓN”.
Estas palabras significan:
Se trata de una situación de
PELIGRO
ADVERTENCIA
PRECAUCIÓN
Todos los mensajes de seguridad le dirán el peligro potencial, le dirán
cómo reducir las posibilidades de sufrir una lesión y lo que puede
suceder si no se siguen las instrucciones.
peligro inminente. Si no sigue las
instrucciones de inmediato,
usted puede morir o sufrir una
lesión grave.
Se trata de una situación
posiblemente peligrosa que, de
no evitarse, podría causar la
muerte o una lesión grave.
Se trata de una situación
posiblemente peligrosa que, de
no evitarse, podría causar
lesiones moderadas o leves.
60
Page 63

INSTRUCCIONES IMPORTANTES
DE SEGURIDAD
ADVERTENCIA: Para reducir el riesgo de incendio, choque eléctrico, lesiones a
personas o daños al utilizar la lavadora, siga precauciones básicas, incluyendo
las siguientes:
Mantenga el área alrededor
•
del aparato libre de materiales
combustibles, tales como
pelusa, papel, trapos o
productos químicos.
Es necesario supervisar
•
cuidadosamente a los niños
si los mismos usan el aparato
o cuando éste se use cerca
de ellos. No permita que los
niños jueguen con o sobre
este aparato ni en el interior
del mismo.
No coloque artículos que
•
hayan sido previamente
limpiados, lavados, puestos
en remojo o manchados
con gasolina, disolventes
de limpieza en seco u otras
sustancias inamables o
explosivas en el agua de
lavado. Estas sustancias
despiden vapores que pueden
encenderse o causar una
explosión.
No agregue gasolina,
•
solventes para limpiar en seco
u otras sustancias inamables
o explosivas al agua de
lavado. Estas sustancias
despiden vapores que pueden
encenderse o causar una
explosión.
No introduzca las manos en
•
el aparato si la canasta de
lavado, la tina o el agitador se
está moviendo
No trate de forzar los
•
controles.
Para reducir al mínimo la
•
posibilidad de un choque
eléctrico, desenchufe este
aparato del suministro de
energía antes de intentar
realizar el mantenimiento o la
limpieza.
NOTA: Apagar el poder NO
desconectará el aparato del
suministro de energía.
No intente proveer servicio,
•
reparación ni reemplazar
ninguna parte del aparato
a menos que esto se
recomiende especícamente
en este manual o en
instrucciones de reparación
publicadas para el usuario que
usted comprenda y si cuenta
con la experiencia necesaria
para llevar a cabo dicha
reparación.
Antes de desechar la lavadora
•
o de retirarla del servicio,
quítele la puerta o la tapa.
Lea todas las instrucciones
•
antes de usar este aparato.
Use este aparato solamente
•
para el propósito que fue
diseñado, como se describe
en este manual para el
usuario.
No use la lavadora con
•
propósitos de lavandería
comercial.
61
Page 64

INSTRUCCIONES IMPORTANTES
ADVERTENCIA
DE SEGURIDAD
Bajo ciertas condiciones,
•
puede generarse gas
hidrógeno en un sistema de
agua caliente que no se haya
usado por dos semanas o
un período mayor. EL GAS
HIDRÓGENO ES EXPLOSIVO.
Si no se ha usado el sistema
de agua caliente durante
dicho período, antes de usar
una máquina de lavar, abra
todos los grifos de agua
caliente y deje que corra el
agua de cada uno por varios
minutos. Esto liberará todo
el gas hidrógeno que se
haya acumulado. Debido a la
inamabilidad de dicho gas,
no fume ni use una llama
abierta durante este lapso.
Antes de usarse este aparato,
•
deberá ser debidamente
instalado y ubicado de
acuerdo a las instrucciones de
instalación.
No guarde este aparato ni
•
lo instale en donde se verá
expuesto a temperaturas
por debajo del punto de
congelación ni expuesto a
las inclemencias del tiempo,
ya que esto puede ocasionar
daños al mismo.
El aparato deberá ser
•
conectado a tierra como
es debido, para que cumpla
con todos los códigos y
ordenanzas eléctricos.
Vea la sección “Requisitos
eléctricos”.
LEA Y GUARDE ESTAS
INSTRUCCIONES
Peligro de asfixia
Antes de deshacerse de su viejo aparato, quítele la puerta o la tapa,
para que los niños no puedan esconderse ni quedar atrapados dentro
del mismo.
No seguir esta instrucción puede ocasionar la muerte o daño al
cerebro.
62
Page 65

PIEZAS Y CARACTERÍSTICAS
A
F
B
C
D
G
E
M
L
N
O
P
K
J
I
H
a Tapa superior
b Panel de control
c Carcasa
d Manija del armario
e Patas niveladoras (2)
f Depósito del blanqueador líquido
g Conducto de desagüe
h Cable eléctrico (120 voltios / 60 Hz)
i Panel de acceso
j Válvula de entrada de agua fría
k Válvula de entrada de agua caliente
l Canasta de lavado
m Depósito de detergente en polvo
n Cubierta exterior de la tina
o Aro de balance
p Filtro de pelusa
63
Page 66

REQUISITOS DE INSTALACIÓN
HERRAMIENTAS NECESARIAS
Alicates
•
Llave de tuercas
•
Destornillador de hoja plana
•
Cinta de medir
•
Nivel de carpintero
•
Destornillador phillips
•
PIEZAS SUMINISTRADAS
Abrazadera de la
•
manguera de desagüe
Gancho de la manguera
•
de desagüe
Manguera de desagüe
•
Mangueras de agua (2)
•
(con arandelas planas
instaladas previamente)
Manual para el usuario
•
Cubierta inferior
•
(con tornillo)
REQUISITOS DE UBICACIÓN
La lavadora deberá ser instalada sobre un piso sólido, para reducir al mínimo la
•
vibración durante el ciclo de exprimido. El piso de hormigón es el mejor.
El piso deberá estar nivelado y con un declive máximo de 1" (25 mm) debajo de
•
toda la lavadora.
Un lugar apropiado, protegido de la luz directa del sol y de fuentes de calor, tales
•
como radiadores, zócalos radiantes o aparatos de cocción.
No la instale sobre una alfombra.
•
El lugar deberá tener un contacto eléctrico conectado a tierra, ubicado a menos
•
de 4 pies (1,2 m) del cable eléctrico, en la parte posterior de la lavadora.
Los grifos de agua fría y caliente deberán estar a menos de 3 pies (0,9 m) de las
•
conexiones de agua fría y caliente en la lavadora.
Un calentador de agua deberá proveer agua caliente a una temperatura de por lo
•
menos 120 °F (49 °C).
La presión de agua deberá estar entre 20 y 100 lb/pulg² (138 y 690 kPa).
•
IMPORTANTE: No instale ni ponga a funcionar esta lavadora donde estará expuesta
a temperaturas por debajo de 32 °F (0 °C). El agua que quede en la lavadora se
congelará y ocasionará daños a la misma.
64
Page 67

DIMENSIONES DE LA LAVADORA
(55,0 cm)
(95,6 cm)
(99 cm – 153cm
37⅝
"
22¹⁄₁₆"
(56,0 cm)
21²⅓₂"
REQUISITOS DEL SISTEMA DE DESAGÜE
TUBO VERTICAL DE PARED O POR EL PISO
La altura del tubo vertical deberá ser entre 39" (99 cm) y 60" (153 cm) desde la base
de la lavadora. El tubo vertical deberá tener un diámetro mínimo de 2" (5 cm).
Pared Piso
39" – 60"
)
65
Page 68

TINA DE LAVADERO
39" – 48"
(99 cm – 122cm)
ADVERTENCIA
La tina de lavadero necesita una capacidad
mínima de 20 gal (76 L). La tina de lavadero
deberá tener una altura de por lo menos
39" (99 cm) y no más de 48" (122 cm).
REQUISITOS ELÉCTRICOS
Peligro de Choque Eléctrico
La lavadora deberá ser enchufada en un contacto eléctrico
debidamente puesto a tierra, de 120 voltios,
60 Hz, CA solamente, de 15 ó 20 amperios, con fusibles. Se recomienda
un fusible retardador o un cortacircuitos.
No seguir estas instrucciones puede ocasionar la muerte, incendio o
choque eléctrico.
Si el suministro eléctrico provisto no satisface los requisitos mencionados
•
anteriormente, póngase en contacto con un electricista competente autorizado.
66
Page 69

ADVERTENCIA
Peligro de Choque Eléctrico
Conecte a un contacto de pared de conexión a tierra de 3 terminales.
No quite el terminal de conexión a tierra del cable de alimentación.
No use un adaptador.
No use un cable eléctrico de extensión.
No seguir estas instrucciones puede ocasionar la muerte, incendio o
choque eléctrico.
Se necesita un suministro eléctrico de 120 voltios, 60 hertzios, CA solamente,
•
de 15 o 20 amperios y protegido con fusibles. Se recomienda un fusible
retardador o un cortacircuitos. Asimismo se recomienda usar un cortacircuitos
independiente que preste servicio únicamente a este aparato.
Esta lavadora viene equipada con un cable de suministro eléctrico dotado de un
•
enchufe de 3 terminales con conexión a tierra.
Para reducir al mínimo el peligro de posibles choques eléctricos, el cable debe
•
estar enchufado en un tomacorriente apropiado de pared de 3 terminales,
con conexión a tierra de acuerdo con los códigos y ordenanzas locales. Si no
hay disponible un tomacorriente equivalente, es responsabilidad y obligación
personal del cliente tener un tomacorriente apropiado con conexión a tierra
instalado por un electricista competente.
Si los códigos lo permiten y se emplea un alambre de conexión a tierra separado,
•
se recomienda que un electricista competente determine si la trayectoria de
conexión a tierra es adecuada.
No conecte a tierra a un tubo de gas.
•
Si no está seguro de que la conexión a tierra de la lavadora sea la adecuada,
•
verifíquela con un electricista competente.
No coloque un fusible en el circuito neutro o de puesta a tierra.
•
67
Page 70

INSTRUCCIONES DE PUESTA A TIERRA
Para la conexión de una lavadora
mediante cable eléctrico
conectado a tierra:
La lavadora debe estar
conectada a tierra. En el caso
de funcionamiento defectuoso
o avería, la conexión a tierra
reducirá el riesgo de choque
eléctrico al proporcionar
una vía de menor resistencia
para la corriente eléctrica.
La lavadora usa un cable que
cuenta con un conductor para
la conexión a tierra del equipo y
un enchufe de conexión a tierra.
El enchufe debe conectarse
en un contacto apropiado, que
esté debidamente instalado y
conectado a tierra de acuerdo
con todos los códigos y
ordenanzas locales.
ADVERTENCIA: La conexión
inadecuada del conductor a tierra
para el equipo puede resultar en
un riesgo de choque eléctrico.
Si no está seguro de que la
conexión a tierra de la lavadora
sea la adecuada, verifíquela
con un electricista o técnico de
servicio competente.
No modique el enchufe provisto
con la lavadora; si no encaja en
el tomacorriente, consulte con
un electricista competente para
instalar un contacto adecuado.
Para la conexión permanente de
una lavadora:
La lavadora debe estar
conectada a un sistema de
cableado de metal permanente,
conectado a tierra, o se debe
tender un conducto para la
conexión a tierra del equipo con
los conductores de circuito y
conectado al terminal del equipo
o al conductor de suministro de la
lavadora.
68
Page 71

INSTRUCCIONES DE INSTALACIÓN
ADVERTENCIA
ADVERTENCIA
Se recomienda que un técnico de aparatos competente instale su nueva lavadora.
Si le parece que tiene la habilidad para instalar la lavadora, lea las instrucciones de
instalación cuidadosamente antes de hacerlo.
IMPORTANT:
Si después de seguir estos pasos no está seguro de haber instalado la lavadora
•
adecuadamente, póngase en contacto con un técnico de aparatos competente.
Si recién le han entregado la lavadora y la temperatura del exterior estaba por
•
debajo del punto de congelación, no ponga a funcionar la lavadora hasta que
alcance la temperatura ambiente.
PASO 1 - DESEMPAQUE DE LA LAVADORA
Peligro de asfixia
Para evitar el peligro de asfixia, mantenga la bolsa de plástico y otros
materiales de envío lejos del alcance de los bebés y los niños. No use
esta bolsa en cunas, cochecitos ni corrales. La bolsa de plástico podría
bloquear la nariz y la boca, impidiendo la respiración. Esta bolsa no es
un juguete.
No seguir esta instrucción puede ocasionar la muerte o daño al
cerebro.
Peligro de Peso Excesivo
Use dos o más personas para mover e instalar la lavadora.
No seguir esta instrucción puede ocasionar una lesión en la espalda u
otro tipo de lesiones.
1. Quite todos los materiales de embalaje. Esto incluye: la base de espuma,
soporte de plástico moldeado y toda la cinta adhesiva que mantiene sujetos los
accesorios del interior y el exterior de la lavadora.
69
Page 72

IMPORTANTE: Si no quita la base del embalaje, la lavadora no funcionará
a
b
a
correctamente y se anulará la garantía.
Abra la tapa para acceder al soporte de la canasta de lavado. Jale hacia arriba
•
del soporte de la canasta para quitarla.
NOTA: Guarde el soporte de la canasta de lavado para usarlo cuando mueva
la lavadora en el futuro.
a Soporte de la
canasta de lavado
Con la ayuda de dos o más personas, levante la lavadora para quitarla de la
•
base del embalaje y del soporte de plástico moldeado.
NOTA: Es posible que el soporte de plástico, debajo del soporte en forma de
U, permanezca sujeto a la base de la lavadora. Asegúrese de que se quite con
la base de espuma.
a Soporte
de
plástico
b Base de
espuma
2. Inspeccione la lavadora y quite los restos de materiales de embalaje, cinta o
material impreso antes de usar la lavadora.
3. Deshágase apropiadamente de todos los materiales de embalaje o recíclelos.
70
Page 73

PASO 2 - INSTALACIÓN DE LA CUBIERTA DE LA PARTE
INFERIOR
ADVERTENCIA
Peligro de choque eléctrico
Instale la cubierta de la base.
Trabe las cuatro ruedecillas antes de poner en funcionamiento la
lavadora.
No seguir esta instrucción puede ocasionar la muerte, choque eléctrico
o lesiones físicas.
ADVERTENCIA
Peligro de Choque Eléctrico
Desconecte el suministro de energía antes de dar mantenimiento.
Vuelva a colocar todos los paneles antes de hacer funcionar.
No seguir estas instrucciones puede ocasionar la muerte o choque
eléctrico.
1. Disponga las mantas o toallas dobladas en el piso para crear una pendiente.
2. Con la ayuda de dos o más personas, coloque la lavadora sobre su lateral de
modo que la parte superior de la lavadora esté más arriba que la base y la salida
del desagüe quede mirando hacia arriba.
71
Page 74

a
a
b
c
b
a Salida del desagüe
b Parte superior de
la lavadora
3. Con el lado de la cubierta de la parte inferior marcado con la leyenda FRONT/UP
(Frente/Arriba) hacia el interior y el frente de la lavadora, alinee los bordes de la
cubierta con la guía en la parte inferior de la lavadora.
4. Desde el frente de la lavadora, deslice la cubierta de la parte inferior totalmente
en la guía asegurándose de que los bordes de la cubierta estén detrás de las
lengüetas.
NOTA: Cuando la cubierta está totalmente insertada dentro de la guía detrás de
las lengüetas, el oricio para el tornillo estará nivelado y alineado con el oricio
dentro de la parte inferior del armario.
c
a Cubierta de la parte
inferior
b Oricio del tornillo
c Lengüetas
5. Con el tornillo (provisto), sujete la cubierta de la parte inferior a la base del
armario.
6. Con la ayuda de dos o más personas, coloque la lavadora en posición vertical.
72
Page 75

PASO 3 - CONECTE Y ASEGURE LA MANGUERA DE
a
DESAGÜE
1. Agrande la abertura apretando a la vez los
extremos de la abrazadera de la manguera
de desagüe. Deslice la abrazadera sobre
el extremo de la manguera de desagüe y
sobre la sección exible de la manguera.
2. Haga encajar el extremo de la manguera
de desagüe sobre el puerto de desagüe de
plástico de la lavadora.
3. Apriete los extremos de la abrazadera
para agrandar las aberturas y deslice
la abrazadera sobre la conexión de la
manguera de desagüe y el puerto de
desagüe. Suelte la abrazadera para
ajustar.
4. Coloque el extremo del gancho de la manguera de desagüe en un tubo o tina de
lavadero.
5. Asegure la manguera de desagüe en su lugar sujetándola a una manguera de
agua, al tubo vertical o a la pata de la tina de lavadero. Consulte “Requisitos para
el sistema de desagüe” para ver las imágenes.
PASO 4 - CONECTE LAS MANGUERAS DE AGUA
Según el modelo, las mangueras de agua provistas serán de Estilo 1 o Estilo 2. Siga
las instrucciones especícas para el estilo de mangueras de agua provistas.
IMPORTANTE: Utilice solamente mangueras nuevas cuando instale la lavadora.
Las mangueras de agua deben tener conectores de rosca gruesa en un extremo
(para conectar al suministro de agua del hogar) y conectores de rosca na en el otro
extremo (para conectar a la máquina de lavar).
NOTA: Inspeccione periódicamente las mangueras para ver si tienen rajaduras,
cortes, fugas o desgaste. Reemplácelas con mangueras nuevas cada 5 años.
1. Cerciórese de que cada extremo de las mangueras de entrada de agua tenga una
arandela plana colocada rmemente en su lugar. Las arandelas planas han sido
instaladas previamente de fábrica.
Estilo 1 Estilo 2
A
a Arandela
73
Page 76

2. Enrosque a mano el extremo blanco de la manguera de entrada en la válvula de
a
entrada en la parte posterior de la lavadora, hasta que quede rmemente mano
se tensó.
IMPORTANTE: Para evitar daños en los acoplamientos de las mangueras, no los
apriete en exceso.
NOTA: Para evitar daños en los grifos, no use cinta de plomero ni ningún tipo de
sellador en las roscas de las válvulas.
a Solo el extremo gris
3. Enrosque a mano el otro extremo de las mangueras de entrada sobre las válvulas
de entrada marcadas con una “H” (para agua caliente) y una “C” (para agua fría)
en la parte posterior de la lavadora, hasta que queden apretadas.
IMPORTANTE:
No conecte el extremo gris de la manguera de entrada a la lavadora. Dañará
•
las roscas y ltrarán.
Para evitar daños en el acoplamiento de la manguera, no lo apriete en
•
exceso.
Estilo 1 -Con las pinzas, apriete la conexión dos tercios de vuelta adicional.
Estilo 2 - No use pinzas para apretar la conexión.
NOTA: Para evitar daños en la válvula de entrada de la lavadora, no use cinta de
plomero ni selladores en las roscas de la válvula.
Estilo 1 Estilo 2
a a
a Solo el extremo blanco
4. Abra los grifos de agua fría y caliente y revise si hay fugas. Si hay alguna fuga,
revise nuevamente los pasos 1 al 3.
74
Page 77

PASO 5 - NIVELE LA LAVADORA
IMPORTANTE: La nivelación apropiada de su lavadora ayudará a reducir el ruido y la
vibración.
1. Coloque la lavadora en su ubicación nal. Cerciórese de que las líneas de agua y
de desagüe no estén tirantes ni pinchadas. Cerciórese de que las cuatro patas
estén en contacto rme con el piso y que la lavadora descanse rmemente en su
posición.
2. Con un nivel de carpintero, cerciórese de que la lavadora esté nivelada de lado a
lado y de frente hacia atrás.
3. Si la lavadora no está nivelada, regule las patas niveladoras. Gírelas hacia la
derecha para extender (levantar la lavadora) o hacia la izquierda para retraer
(bajar la lavadora).
Levantar Bajar
PASO 6 - COMPLETE LA INSTALACIÓN
ADVERTENCIA
Peligro de Choque Eléctrico
Conecte a un contacto de pared de conexión a tierra de 3 terminales.
No quite el terminal de conexión a tierra del cable de alimentación.
No use un adaptador.
No use un cable eléctrico de extensión.
No seguir estas instrucciones puede ocasionar la muerte, incendio o
choque eléctrico.
75
Page 78

1. Enchufe la lavadora en un contacto de pared de conexión a
E F
tierra de 3 terminales.
2. Verique que los grifos de agua estén abiertos.
3. Deshágase de todos los materiales de embalaje o
recíclelos.
4. Ponga a funcionar un ciclo de lavado normal con
detergente, para probar y limpiar la lavadora. Consulte la
sección “Instrucciones para el funcionamiento”.
PANEL DE CONTROL Y CARACTERÍSTICAS
PANEL DE CONTROL
A B C D G H
BOTÓN WASH CYCLE (CICLO DE LAVADO)
Use este botón para seleccionar el ciclo deseado para su carga de lavado.
•
Los ajustes prejados estándares de cada ciclo aparecerán en pantalla; los
•
ajustes prejados pueden cambiarse con los botones de ajuste: Wash Temp
(Temperatura de lavado), Soil Level (Nivel de suciedad) y Water Level (Nivel
de agua).
Hay 8 ciclos automáticos para elegir:
•
Heavy Duty (Intenso) - Use este ciclo para prendas durables con suciedad
profunda. Este ciclo también puede usarse para toallas, artículos deportivos,
ropa de niños, etc.
Whites (Ropa blanca) - Use este ciclo de agua caliente para prendas blancas
y de colores claros que pueden teñirse.
Perm Press (Planchado permanente) - Use este ciclo para prendas con
suciedad de ligera a normal.
Normal - Use este ciclo para las prendas de algodón y cargas de telas mixtas
con suciedad normal.
76
Page 79

Delicate (Ropa delicada) - Use este ciclo para lavar prendas con suciedad
ligera y ropa delicada que necesite un lavado delicado.
Quick (Rápido) - Use este ciclo para lavar cargas pequeñas de prendas con
suciedad ligera que necesite de prisa.
Rinse & Spin (Enjuague y exprimido) - Use este ciclo para quitar el exceso
de detergente y revitalizar las prendas limpias.
Spin Only (Sólo exprimido) - Use este ciclo para extraer agua de la tina o de
las prendas limpias que estén mojadas.
BOTONES DE AJUSTE
Botón Wash Temp (Temperatura de lavado)
Use este botón para seleccionar una temperatura de lavado; todos los
•
enjuagues se realizan con agua fría. Para obtener mejores resultados, siga
las instrucciones de la etiqueta de las prendas y use la temperatura del agua
más caliente que la tela pueda resistir.
No todas las selecciones están disponibles con todos los ciclos.
•
Botón Soil Level (Nivel de suciedad)
Use este botón para seleccionar el nivel de suciedad más apropiado para
•
la carga. Según el nivel de suciedad, el tiempo de lavado aumentará o
disminuirá en incrementos de 4 a 8 minutos en la pantalla de Estimated Time
Remaining (Tiempo estimado restante).
Hay 3 niveles de suciedad para elegir - Intenso, Normal, Ligero
•
Botón Water Level (Nivel de agua)
Use este botón para seleccionar un nivel de agua adecuado para la carga. El
•
ajuste Small (Pequeño) es el nivel más bajo de agua; el ajuste Super (Súper)
es el más alto.
BOTÓN DELAY START (INICIO DIFERIDO)
Presione este botón para retrasar el inicio del ciclo de lavado entre 1 a
•
24horas en incrementos de una hora.
Use este botón para seleccionar un inicio diferido de la lavadora. La cantidad
•
de horas se mostrará en la pantalla Estimated Time Remaining (Tiempo
estimado restante). Cada vez que presione el botón Delay Start (Inicio
diferido), el tiempo se incrementará en 1 hora.
Si presiona el botón después de 24, cancelará la función de inicio diferido.
•
También puede cancelar la función de Delay Start (Inicio diferido) si
desconecta la energía de la lavadora con el botón Power (Encendido
Se debe seleccionar el botón Start/Pause (Inicio/Pausa) para comenzar la
•
cuenta regresiva.
BOTÓN EXTRA RINSE (ENJUAGUE ADICIONAL)
Presione para agregar un enjuague adicional a su ciclo de lavado.
•
NOTA: Algunos ciclos tienen esta opción por defecto. Consulte la Guía de
ciclos para obtener detalles.
77
Page 80

PANTALLA ESTIMATED TIME REMAINING (TIEMPO ESTIMADO
RESTANTE)
La pantalla Estimated Time Remaining (Tiempo estimado restante) muestra
•
el tiempo estimado del ciclo en minutos.
Cuando se usa la opción Delay Start (Inicio diferido), la pantalla Estimated
•
Time Remaining (Tiempo estimado restante) mostrará el tiempo de retraso
en horas.
INDICADORES DEL ESTADO DEL CICLO
Las luces del estado del ciclo indica las etapas del ciclo seleccionado.
•
BOTÓN START/PAUSE (INICIO/PAUSA)
Presione este botón para poner en marcha un ciclo seleccionado o hacer una
•
pausa en un ciclo que esté en marcha.
NOTA: Luego de iniciar el ciclo de lavado, deberá hacer una pausa en el ciclo
que esté en marcha para cambiar los ajustes de Wash Temp (Temperatura de
lavado), Soil Level (Nivel de suciedad) y Water Level (Nivel de agua).
BOTÓN POWER (ENCENDIDO)
IMPORTANTE: El apagado de la unidad con el botón Power (Encendido) no
desconecta el aparato del suministro eléctrico.
Presione el botón Power (Encendido) para encender la lavadora.
•
NOTA: Si la lavadora está encendida, pero no se presiona START (Inicio), se
apagará automáticamente después de 5 minutos.
GUÍA DE CICLOS
NOTA: Para proteger su carga de lavado, no todas las opciones y ajustes estarán
disponibles para todos los ciclos. Las cajas sombreadas indican los ajustes por
defecto para cada ciclo.
CICLO
Heavy
Duty
(Intenso)
78
TIPO DE
TELA
Telas
durables
que no
destiñen,
con
suciedad
profunda
PROCESO
DE
LAVADO
Remojo de
12 minutos
Lavado de
25 minutos
Rinse
(Enjuague)
Spin
(Expri-
mido)
TIEM-
PO
EST.
1:08
WASH
TEMP
(TEMP. DE
LAVADO)
Warm
(Tibia)
Hot (Ca-
liente)
Cold (Fría)
SOIL
LEVEL
(NIVEL
DE
SUCIE-
DAD)
Normal
Heavy
(In-
tenso)
Light
(Ligero)
WATER
LEVEL
(NIVEL DE
AGUA)
Medium
(Media)
Super
(Súper)
Large
(Grande)
Small (Pe-
queño)
EXTRA
RINSE
(ENJUA-
CIONAL)
GUE
ADI-
•
Page 81

CICLO
Whites
(Ropa
blanca)
TIPO DE
TELA
Prendas
blancas
PROCESO
DE
LAVADO
Remojo de
12 minutos
Lavado de
25 minutos
Rinse
(Enjuague)
Spin
(Expri-
mido)
TIEM-
PO
EST.
1:15
WASH
TEMP
(TEMP. DE
LAVADO)
Hot (Ca-
liente)
Warm
(Tibia)
Cold (Fría)
SOIL
LEVEL
(NIVEL
DE
SUCIE-
DAD)
Normal
Heavy
(In-
tenso)
Light
(Ligero)
WATER
LEVEL
(NIVEL DE
AGUA)
Medium
(Media)
Super
(Súper)
Large
(Grande)
Small (Pe-
queño)
EXTRA
RINSE
(ENJUA-
GUE
ADI-
CIONAL)
•
Perm
Press
(Planchado
perma-
nente)
Normal
Delicate
(Ropa
delicada)
Quick
(Rápido)
Telas
antia-
rrugas y
sinté-
ticas
Telas de
algodón,
lino y
prendas
mez-
cladas
Prendas
de
lencería,
telas
nas con
encaje
Telas de
algodón,
lino y
prendas
mez-
cladas
Lavado de
16 minutos
Rinse
(Enjuague)
Spin
(Expri-
mido)
Lavado de
16 minutos
Enjuague
por
rociado
Spin
(Expri-
mido)
Lavado de
10 minutos
Rinse
(Enjuague)
Spin
(Expri-
mido)
Lavado de
9 minutos
Rinse
(Enjuague)
Spin
(Expri-
mido)
:35
:40
:29
:23
Warm
(Tibia)
Cold (Fría)
Warm
(Tibia)
Hot (Ca-
liente)
Cold (Fría)
Warm
(Tibia)
Cold (Fría)
Warm
(Tibia)
Hot (Ca-
liente)
Cold (Fría)
Normal
Heavy
(In-
tenso)
Light
(Ligero)
Normal
Heavy
(In-
tenso)
Light
(Ligero)
Normal
Heavy
(In-
tenso)
Light
(Ligero)
Normal
Heavy
(In-
tenso)
Light
(Ligero)
Medium
(Media)
Super
(Súper)
Large
(Grande)
Small (Pe-
queño)
Medium
(Media)
Super
(Súper)
Large
(Grande)
Small (Pe-
queño)
Medium
(Media)
Super
(Súper)
Large
(Grande)
Small (Pe-
queño)
Medium
(Media)
Super
(Súper)
Large
(Grande)
Small (Pe-
queño)
•
•
•
•
79
Page 82

CICLO
Rinse
& Spin
(Enjua-
gue y
expri-
mido)
Spin
Only
(Sólo
expri-
mido)
TIPO DE
TELA
Prendas
limpias
Prendas
limpias
mojadas
PROCESO
DE
LAVADO
Rinse
(Enjuague)
Spin
(Expri-
mido)
Spin
(Expri-
mido)
TIEM-
PO
EST.
:17 Sólo fría n/a
:06 n/a n/a n/a
WASH
TEMP
(TEMP. DE
LAVADO)
SOIL
LEVEL
(NIVEL
DE
SUCIE-
DAD)
WATER
LEVEL
(NIVEL DE
AGUA)
Medium
(Media)
Super
(Súper)
Large
(Grande)
Small (Pe-
queño)
EXTRA
RINSE
(ENJUA-
GUE
ADI-
CIONAL)
•
La función Extra Rinse (Enjuague adicional) agregará aproximadamente 7 minutos
•
.
USO DE LA LAVADORA
PASO 1 - PREPARE Y SEPARE LAS PRENDAS
PREPARE LAS PRENDAS
Revise las etiquetas de las prendas para ver las instrucciones de lavado.
•
Vacíe los bolsillos y vuélvalos al revés.
•
Quite los artículos sueltos (alleres, horquillas, monedas, anillos, aretes,
•
servilletas, etc.) de las prendas para evitar que rayen la canasta de lavado u
obstruyan la bomba de desagüe.
Dé vuelta los puños y quite la pelusa o la suciedad.
•
Ate los cordones y fajas de modo que no se enreden.
•
Cierre los zípers, broches de presión y corchetes para evitar que se enganchen.
•
Trate previamente todas las manchas y las áreas con suciedad profunda.
•
Vuelva al revés las prendas sintéticas y los tejidos de lana para evitar que se
•
llenen de motitas.
SEPARE LAS PRENDAS
Separe la ropa según el ciclo de lavado necesario (temperatura del agua y acción
•
de lavado).
Separe los colores claros de los colores oscuros, los artículos que no destiñen de
•
los que sí destiñen.
Separe las telas pesadas de las telas ligeras.
•
Separe las telas que atraen pelusa de las telas que sueltan pelusa.
•
Separe artículos voluminosos como frazadas o almohadas.
•
80
Page 83

PASO 2 - AGREGUE LOS PRODUCTOS PARA EL
CUIDADO DE LAS TELAS
AGREGUE DETERGENTE
Use solamente un detergente de alta eciencia. Los detergentes
•
HE (Alta eciencia) han sido especialmente formulados con
ingredientes que evitan los problemas ocasionados por el exceso
de espuma del jabón. El exceso de espuma impedirá el enjuague
completo de los restos de detergente de las prendas.
Si selecciona el ciclo Quick (Rápido), se recomienda que use detergente de
•
lavandería líquido para alcanzar resultados óptimos. El detergente en polvo
puede que no se disuelva lo sucientemente rápido para limpiar bien en este
ciclo.
Determine la cantidad de detergente. Siga las instrucciones de uso del
•
detergente que aparecen en el recipiente.
NOTA: La cantidad adecuada de detergente depende del tamaño de la carga, el nivel
de suciedad de las prendas y el grado de agua blanda que se suministre a la lavadora.
Detergente líquido
1. Llene la lavadora con una pequeña cantidad de agua y agregue detergente
líquido.
NOTA: Para mejores resultados, agregue detergente a la canasta de lavado
antes de cargar la ropa.
2. Ponga a funcionar durante 30 segundos para disolver completamente el
detergente.
Detergente en polvo
1. Vierta la cantidad medida de
detergente en polvo en el depósito de
detergente.
AGREGUE BLANQUEADOR (SI LO DESEA)
Vierta una medida de blanqueador líquido con
•
cloro en el depósito de blanqueador líquido
con cloro.
NOTA: Use solamente blanqueador líquido en
este depósito.
IMPORTANTE: Tenga cuidado de no derramar
el blanqueador sobre la carcasa de la lavadora
ni sobre la ropa. Debido a que es un producto
químico poderoso, puede dañar la ropa o el
acabado de la lavadora.
Siga las instrucciones del fabricante en la etiqueta de las prendas sobre el uso
•
recomendado de blanqueador líquido o en polvo.
81
Page 84

PASO 3 - CARGUE LA LAVADORA
1. Cargue las prendas de modo ojo y uniforme alrededor de la canasta de lavado.
2. No cargue las prendas directamente sobre el centro del pulsador.
3. Cierre la tapa de la lavadora.
NOTAS:
No cargue en exceso ni apriete los artículos para que quepan en la canasta de
•
lavado. Sobrecargar la lavadora puede reducir la eciencia de lavado, causar
desgaste excesivo y posiblemente, ocasionar pliegues o arrugas en la carga.
La lavadora no agitará ni exprimirá con la tapa abierta.
•
PASO 4 - PONGA LA LAVADORA EN MARCHA
1. Toque el botón POWER (Encendido) para encender la lavadora.
2. Seleccione un ciclo de lavado.
3. Modique los ajustes y las opciones por defecto, si lo desea.
4. Presione el botón de INICIO/PAUSA para comenzar con el ciclo de lavado.
GUÍA PARA EL CUIDADO Y LA LIMPIEZA
ADVERTENCIA
Peligro de choque eléctrico
Desconecte el suministro de energía antes de limpiarlo.
No seguir esta instrucción puede ocasionar la muerte o choque
eléctrico.
Desenchufe o desconecte el suministro de energía.
•
82
Page 85

LIMPIEZA Y MANTENIMIENTO
GENERAL
Utilice solamente un paño húmedo o jabonoso para limpiar el panel de control.
•
Si derrama suavizante, blanqueador o detergente líquido o en polvo sobre la
•
carcasa, límpiela inmediatamente con un paño húmedo para evitar daños en el
acabado.
No use productos de limpieza abrasivos, productos químicos irritantes,
•
amoníaco, blanqueador con cloro, detergente concentrado o solventes para
limpiar la lavadora. Estos productos químicos pueden disolver, dañar o decolorar
la lavadora.
Luego de lavar la ropa, deje la puerta abierta para que se evapore la humedad del
•
interior de la máquina y así evitar que se forme moho.
DEPÓSITO DE DETERGENTE
1. Jale la gaveta de depósito hacia afuera hasta que se detenga y levántela
ligeramente para quitarla.
2. Enjuague el depósito con agua tibia y séquelo completamente con un paño
suave.
3. Inserte la gaveta en un ángulo ligeramente inclinado hacia abajo y empújelo
hacia atrás para colocarlo en su lugar.
FILTRO DE PELUSA
1. Empuje hacia abajo la lengüeta de la parte superior del
ltro para liberarlo de la canasta de lavado.
2. Gire el ltro hacia arriba para que el lado posterior del
mismo quede mirando hacia arriba.
3. Mientras sostiene rmemente el ltro con una mano,
levante de la parte inferior del ltro para separar el frente
del ltro de la parte de atrás para que pueda acceder a la
malla del ltro.
4. Limpie la malla del ltro y vuelva a colocar la parte de
atrás del ltro.
5. Deslice el ltro dentro de la canasta de lavado y presiónelo con rmeza para
colocarlo en su lugar.
IMPORTANT: Ambos ltros de pelusa deben estar en su lugar durante los ciclos de
lavado. Limpie los ltros de pelusa después de cada carga de lavado.
Enchufe o vuelva a conectar el suministro de energía.
•
PRECAUCIONES AL IRSE DE VACACIONES
Cierre los grifos de suministro de agua. Esto eliminará la posibilidad de daños a
•
su hogar si hay una ruptura o fugas en la manguera.
Desenchufe la lavadora del contacto eléctrico.
•
Seque la canasta de lavado.
•
Deje la puerta abierta para que se evapore la humedad del interior de la máquina
•
y así evitar que se forme moho.
83
Page 86

PREPARACIÓN PARA LA MUDANZA O EL ALMACENAJE
ADVERTENCIA
Aparte de seguir las “Precauciones al irse de vacaciones”, complete los pasos
adicionales indicados a continuación.
Desenchufe o desconecte el suministro de energía.
•
Desconecte las mangueras de agua y la manguera de desagüe; colóquelas en la
•
canasta de lavado.
Gire las patas niveladoras para que queden replegadas completamente dentro
•
de la carcasa de la lavadora.
Si va a mover la lavadora, coloque el soporte de la canasta de lavado de los
•
materiales originales de envío nuevamente en el interior de la parte superior
de la abertura de la lavadora. Asegure la tapa de la lavadora con cinta adhesiva
protectora.
Mueva la lavadora y guárdela solamente en la posición vertical.
•
No guarde la lavadora en un ambiente frío en donde las temperaturas estarán
•
por debajo del punto de congelación; guárdela a temperatura ambiente.
CÓMO VOLVER A INSTALAR O USAR LA LAVADORA
NUEVAMENTE
Peligro de Choque Eléctrico
Conecte a un contacto de pared de conexión a tierra de 3 terminales.
No quite el terminal de conexión a tierra del cable de alimentación.
No use un adaptador.
No use un cable eléctrico de extensión.
No seguir estas instrucciones puede ocasionar la muerte, incendio o
choque eléctrico.
Para volver a instalar la lavadora después de periodos de desuso, vacaciones,
almacenamiento durante el invierno o mudanza:
1. Consulte las Instrucciones de instalación para ubicar, nivelar y conectar la
lavadora.
2. Antes de usar la lavadora nuevamente, póngala a funcionar siguiendo el
procedimiento recomendado a continuación:
84
Page 87

Para volver a usar la lavadora:
1. Deje correr el agua por los tubos y las mangueras. Vuelva a conectar las
mangueras de entrada de agua. Abra ambos grifos de agua.
2. Enchufe la lavadora o vuelva a conectar el suministro de energía.
3. Ponga a funcionar la lavadora en Wash Cycle (Ciclo de lavado) para limpiarla y
quitar el anticongelante, en caso de haberlo usado.
NOTA: Use solamente un detergente de alto rendimiento (HE). Use la mitad de la
cantidad recomendada por el fabricante para una carga mediana.
SOLUCIÓN DE PROBLEMAS
Pruebe las soluciones sugeridas aquí y posiblemente se evite el gasto de una
visita de servicio técnico.
FUNCIONAMIENTO
PROBLEMA POSIBLE(S) CAUSA(S) SOLUCIÓN
La lavadora no
funciona
La tapa de la
lavadora no se
abre
No está conectado el
suministro eléctrico a la
lavadora.
Se disparó el cortacircuitos
o se quemó un fusible
La lavadora está
sobrecargada o la carga de
lavado no está equilibrada.
Se seleccionó el ciclo
Delicate (Ropa delicada).
La tapa de la lavadora está
abierta.
La tapa de la lavadora está
bloqueada.
Conecte el cable eléctrico a un
tomacorriente de pared de 3
terminales con conexión a tierra.
Reemplace/encienda el
cortacircuitos o cambie el fusible.
Es posible que haya que quitar o
redistribuir la ropa para volver a
equilibrar la carga.
La lavadora hace pausas en
algunos ciclos para que se
remoje la ropa. La lavadora
volverá a ponerse en marcha
automáticamente cuando se
termine el tiempo de remojo.
Cierre la tapa de la lavadora.
Presione Start/Pause (Inicio/
Pausa) para detener la lavadora.
Puede tardar algunos segundos
en desbloquearse la puerta.
AGUA
PROBLEMA POSIBLE(S) CAUSA(S) SOLUCIÓN
El ujo de agua
está lento o el
llenado demora
mucho tiempo
Los grifos de entrada de
agua no están abiertos por
completo.
La manguera de llenado de
agua está retorcida.
Asegúrese de que los grifos
de agua estén abiertos por
completo.
Asegúrese de que las mangueras
de agua no estén enredadas,
retorcidas ni aplastadas.
85
Page 88

PROBLEMA POSIBLE(S) CAUSA(S) SOLUCIÓN
La temperatura
del agua está
demasiado
caliente o fría
Fugas de agua
La lavadora no
desagua
La temperatura del
calentador de agua no está
ajustada correctamente.
Las mangueras de
entrada de agua no
están conectadas
correctamente.
Las conexiones de las
mangueras de agua no
están ajustadas.
La conexión de la
manguera de desagüe
no está rme o la
manguera no está ubicada
correctamente en el
desagüe.
Fugas de agua no
determinadas
La manguera de desagüe
no está conectada
correctamente a la
lavadora.
La manguera de
desagüe no está ubicada
correctamente.
El fregadero o el tubo de
desagüe están obstruidos.
El agua caliente deberá estar a
una temperatura de por lo menos
120 °F a 140 °F (49 °C a 60 °C).
Asegúrese de que las mangueras
de entrada estén conectadas
como es debido (caliente con
caliente, fría con fría).
Asegúrese de que estén
ajustadas las conexiones de las
mangueras de entrada en los
grifos y la lavadora.
Asegúrese de que la conexión
de la manguera de desagüe
en la lavadora esté rme y que
la manguera de desagüe esté
colocada correctamente en la
ubicación del desagüe.
Llame a un plomero competente.
Vuelva a conectar la manguera
de desagüe a la lavadora.
Para que funcione como es
debido, la parte superior de la
salida de desagüe deberá estar
por lo menos 39” (99 cm) por
encima del piso.
Destape el fregadero o el tubo
de desagüe.
RUIDO
PROBLEMA POSIBLE(S) CAUSA(S) SOLUCIÓN
Sonido de
golpeteo
Sonido metálico
o de traqueteo
Chirrido La lavadora puede estar
Vibración Es posible que la lavadora
86
Es posible que la carga de
ropa no esté equilibrada.
Es posible que haya
objetos extraños en la
lavadora.
sobrecargada.
no esté nivelada.
Haga una pausa en la lavadora y
vuelva a distribuir las prendas en
la canasta de lavado.
Detenga la lavadora y
compruebe que no haya
monedas ni llaves.
Detenga la lavadora y quite una
parte de la carga de lavado.
Verique que las 4 patas estén
rmemente apoyadas en el piso
y que la lavadora esté nivelada.
Page 89

ROPA
PROBLEMA POSIBLE(S) CAUSA(S) SOLUCIÓN
Arrugas
Restos de
detergente
Las prendas
se han puesto
grisáceas o
amarillentas
Ropa rota o
enganchada
Manchas de
blanqueador
NOTA: Es posible
que las manchas
de blanqueador
luzcan como
puntos
decolorados
La ropa parece
más vieja y
gastada
Separación incorrecta
de la carga de lavado,
sobrecarga o lavado a la
temperatura equivocada.
Es posible que el
detergente no se disuelva
por completo en el agua
extremadamente fría.
No se separó la carga de
lavado por color.
No usó suciente
detergente o el nivel
de suciedad de la carga
de lavado requiere una
temperatura de lavado
más elevada.
No se preparó la carga de
lavado.
La ropa tiene contacto
directo con el
blanqueador.
Se está usando un ciclo
de lavado incorrecto o
la temperatura de agua
equivocada.
Evite sobrecargar la lavadora y
no mezcle la ropa pesada con
prendas ligeras o delicadas.
Seleccione una temperatura
tibia de lavado y asegúrese
de que el calentador de agua
suministre agua caliente a por lo
menos 120 °F (49 °C).
Separe los colores oscuros de
los claros y blancos para evitar
que se tiñan.
Es posible que las cargas
grandes y con mucha suciedad
necesiten más detergente y
agua más caliente. Consulte las
instrucciones del fabricante del
detergente para conocer el uso
recomendado.
Ate los cordones y fajas.
Vacíe los bolsillos, cierre las
cremalleras, sujete las correas
y cierre los ganchos de metal o
sujetadores con gancho antes
de cargar.
No vierta ni salpique el
blanqueador directamente
sobre la ropa. Si usa el depósito
y aún ve manchas, pruebe
usando blanqueador diluido.
Siga las instrucciones de
cuidado del fabricante de la
prenda.
SI NECESITA MÁS AYUDA, VISITE HAIER.COM O COMUNÍQUESE
CON LA LÍNEA DE AYUDA AL CONSUMIDOR LLAMANDO AL
1-877-377-3639.
87
Page 90

GARANTÍA LIMITADA
SERVICIO EN EL HOGAR
GARANTÍA COMPLETA POR UN AÑO
Durante 12 meses a partir de la fecha de
compra original en la tienda, Haier reparará o
reemplazará cualquier pieza del aparato sin
costo, incluyendo la mano de obra, si la misma
falla debido a defectos en los materiales o en la
mano de obra.
Haier puede reemplazar o reparar, a su sola
discreción, cualquier pieza, subsistema, incluso
el producto entero.
El producto debe ser accesible, sin
inconvenientes, e instalarse de forma adecuada
para recibir el servicio técnico de reparación por
parte de la garantía.
GARANTÍA LIMITADA
Después de un año a partir de la fecha de compra
original en la tienda, Haier proveerá una pieza
sin costo, como se indica a continuación, para
reemplazar la pieza mencionada como resultado
de defectos en los materiales o en la mano de
obra. Haier se hará responsable solamente por
el costo de la pieza. Cualquier otro costo tales
como la mano de obra, los cargos por viaje, etc.,
serán responsabilidad del propietario.
Del segundo al quinto año
Haier proveerá la tina exterior de lavado y las
piezas de ensamblaje relacionadas con la misma
si ésta no logra contener el agua.
Del segundo al séptimo año
Haier proveerá la canasta interior de lavado de
acero inoxidable si presentara defectos en los
materiales o en la mano de obra.
NOTA: Esta garantía comienza en la fecha de
compra de este producto, y el recibo original
deberá presentarse al representante autorizado
de servicio antes de hacerse las reparaciones
bajo la garantía.
Excepciones: Garantía bajo uso de alquiler
90 días en la mano de obra a partir de la fecha
de compra original
90 días en las piezas a partir de la fecha de
compra original
No es aplicable ninguna otra garantía.
PARA OBTENER SERVICIO BAJO
LA GARANTÍA
Póngase en contacto con el centro de servicio
autorizado más cercano a su localidad. Todo
servicio deberá ser realizado por un centro de
servicio autorizado por Haier. Para obtener el
nombre y el número de teléfono del centro de
servicio autorizado más cercano, llame al 1-877337-3639.
Antes de llamar, tenga a mano la siguiente
información:
Número de modelo y de serie del aparato. El
nombre y la dirección del distribuidor en donde
compró la unidad y la fecha de compra.
Una descripción clara del problema.
Un comprobante de compra (recibo de compra).
88
Esta garantía cubre servicios para
electrodomésticos dentro de los Estados
Unidos continental y Canadá y donde esté
disponible en Alaska, Hawaii y Puerto Rico.
Lo que no está cubierto bajo esta garantía:
Reemplazo o reparación de fusibles domésticos,
cortacircuitos, cableado o plomería.
Un producto cuyo número de serie original haya
sido removido o alterado.
Cualquier cargo por servicio que no haya sido
identicado especícamente como servicio
normal, como puede ser el área o las horas de
servicio.
Daños a la ropa.
Daños ocurridos durante el transporte.
Daños ocasionados por la instalación o el
mantenimiento inadecuados.
Daños por el uso incorrecto, abuso, accidente,
incendio, inundación o fenómenos de la
naturaleza.
Daños debidos al servicio efectuado por
un distribuidor o centro de servicio que sea
diferente del autorizado por Haier.
Daños ocasionados por la corriente, el voltaje o
el suministro eléctrico incorrectos.
Daños que resulten de cualquier modicación
hecha en el producto, alteración o ajustes no
autorizados por Haier.
Ajuste de los controles manejados por el cliente
según han sido identicados en el manual del
propietario.
Mangueras, perillas, bandejas de pelusa y todos
los otros aditamentos, accesorios y piezas
desechables.
Cargos por mano de obra, transporte para el
servicio y envío para la remoción y el reemplazo
de las piezas defectuosas que se efectúen
después del período inicial de 12 meses.
Daños ocasionados por un uso diferente al
doméstico normal.
Cualquier gasto de transporte y de envío.
ESTA GARANTÍA LIMITADA REEMPLAZA
TODAS LAS OTRAS GARANTÍAS,
EXPRESAS O IMPLÍCITAS QUE INCLUYAN,
ENTRE OTRAS, LAS GARANTÍAS DE
COMERCIABILIDAD O DE CAPACIDAD
PARA UN PROPÓSITO EN PARTICULAR
El recurso provisto en esta garantía es exclusivo
y está otorgado en lugar de cualquier otro
recurso.
Esta garantía no cubre daños incidentales o
consecuentes, de modo que las limitaciones
indicadas anteriormente pueden no aplicarse
en su caso. Algunos estados no permiten las
limitaciones acerca de cuánto tiempo dura una
garantía implícita, de modo que las limitaciones
arriba indicadas quizás no le correspondan.
Esta garantía le otorga derechos legales
especícos, y es posible que usted tenga otros
derechos, los cuales varían de un estado a otro.
Haier America
Wayne, NJ 07470
Page 91

Page 92

IMPORTANT
Do Not Return This Product To The Store
If you have a problem with this product, please contact the
“Haier Customer Satisfaction Center” at
1-877-337-3639.
DATED PROOF OF PURCHASE, MODEL #, AND SERIAL #
REQUIRED FOR WARRANTY SERVICE
IMPORTANT
Ne pas Réexpédier ce Produit au Magasin
Pour tout problème concernant ce produit, veuillez contacter
le service des consommateurs “Haier Customer Satisfaction Center” au
1-877-337-3639.
UNE PREUVE D’ACHAT DATEE EST REQUISE POUR BENEFICIER DE LA GARANTIE.
IMPORTANTE
No regrese este producto a la tienda
Si tiene algún problema con este producto, por favor contacte el
“Centro de Servicio al Consumidor de Haier” al
1-877-337-3639 (Válido solo en E.U.A).
NECESITA UNA PRUEBA DE COMPRA FECHADA, NÚMERO DE MODELO
Y DE SERIE PARA EL SERVICIO DE LA GARANTÍA
Made in China
Fabriqué en Chine
Hecho en China
Haier America
Wayne, NJ 07470
HLPW028AXW
Issued: July 2015 Printed in China Part # 0030811644
 Loading...