

Haier HLM-32B Instruction Manual
INSTRUCTION
INSTRUCTION
INSTRUCTION
INSTRUCTION MANUAL
MANUAL
MANUAL
MANUAL
WATER
WATER
WATER
WATER DISPENSER
DISPENSER
DISPENSER
DISPENSER
H
LM
H
LM
H
H LM
LM -32B
-32B
-32B
-32B
PRODUCT
PRODUCT
PRODUCT
PRODUCT AND
AND
AND
AND DESCRIPTION
DESCRIPTION
DESCRIPTION
DESCRIPTION
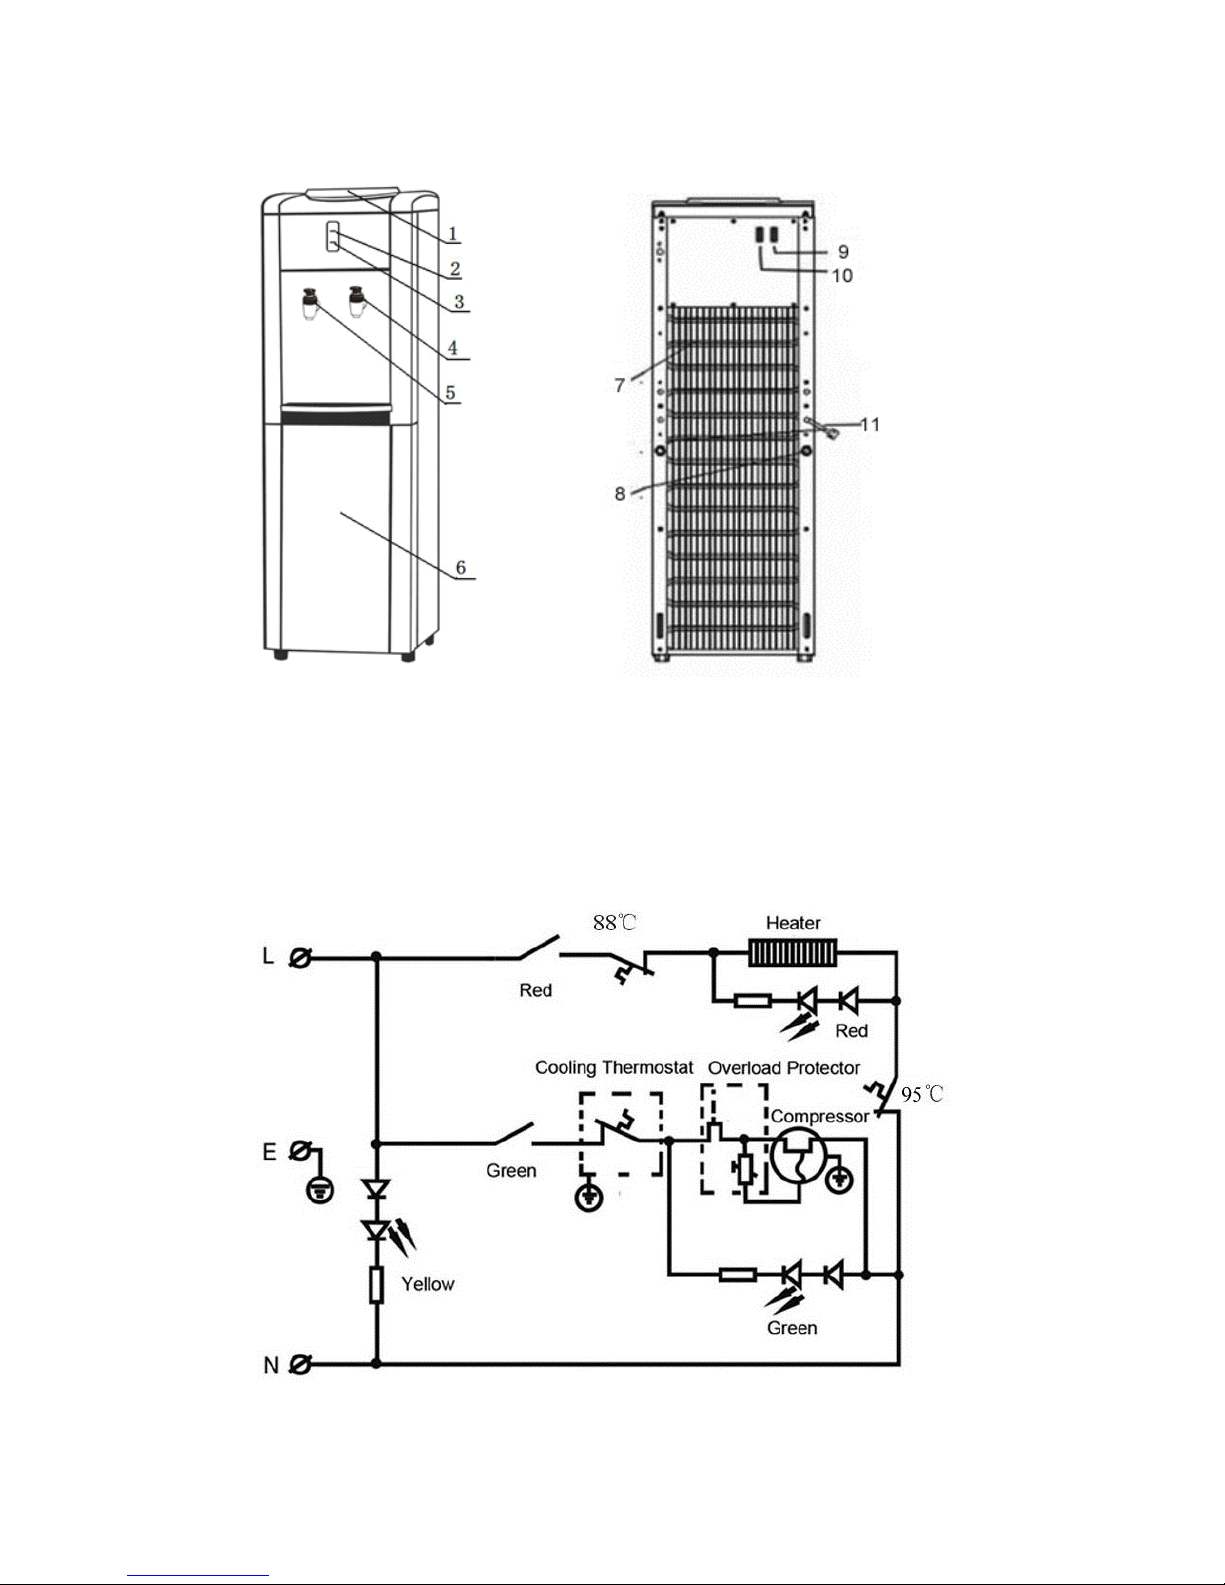
1. top cover 5 . hot water faucet 9 . heating switch
2. heating indicator 6 . storage compartment 1 0 . cooling switch
3. cooling indicator 7 . condenser
4. cold water faucet 8 . drain valve
WIRING
WIRING
WIRING
WIRING DIAGRAM
DIAGRAM
DIAGRAM
DIAGRAM
1
1 . power supply cord

Important
Important
Important
Important Safety
WARNING
� Read all instructions before using the water dispenser.
� Never clean parts with flammable fluids. The fumes can create a fire hazard or
explosion.
� Do not store or use gasoline or any other flammable vapors and liquids in the vicinity of
this or any other water dispenser. The fumes can create a fire hazard of explosion.
To
reduce the risk of fire, electrical shock or injury when using your
appliance, please follow these basic instructions.
Safety
Safety
Safety Instructions
Instructions
Instructions
Instructions
INSTALLATION
INSTALLATION
INSTALLATION
INSTALLATION GUIDELINES
� Remove the exterior and interior packing.
� Place your appliance on a floor that is strong enough to support the dispenser when
it is fully loaded. The unit is provided with four plastic feet. If it does not sit level on
the floor, adjust the front feet to level the unit well to the floor.
� Locate the appliance away from direct sunlight and sources of heat (stove, heater,
radiator, etc.). Direct sunlight may affect the acrylic coating and heat sources may
increase electrical consumption. Extreme cold ambient temperatures may also
cause the appliance not to perform properly.
� Allow 2 inches of space between the water dispenser and the wall, which allows for
proper air circulation to cool the compressor.
� Plug the appliance into an exclusive properly installed-grounded wall outlet. Do not
cut or remove the third (ground) prong from the power cord under any circumstances.
Any questions concerning power and/or grounding should be directed toward a
certified electrician or an authorized products service center.
� This water dispenser is not recommended for outdoor usage.
� Do not locate the dispenser in the area where the temperature may fall below
freezing point (0 ℃ or 32 ℉ ).
� Keep area around dispenser free of dust and dirt.
� Keep the reserve supply of water bottles away from excessive heat and light.
GUIDELINES
GUIDELINES
GUIDELINES
PRE-OPERATION
PRE-OPERATION
PRE-OPERATION
PRE-OPERATION INSTRUCTIONS
� Before connecting the appliance to the power source. Let it stand upright for
approximately 2 hours. This will reduce the possibility of a malfunction in the cooling
system from handling during transportation.
� Check and make sure the backside hot water drainage hole cap is not leaked or
broken.
� The water dispenser is pre-cleaned at the factory but the reservoir and water lines
must be flushed with fresh water before use as follows:
� Keep the unit unplugged.
� Fill water tank with tap water full to capacity. Wait for 5 minutes until water settles.
� Push the hot water faucet until water comes out, then stop the faucet.
� Plug the dispenser into the electrical outlet. We are ready to complete the first cycle.
In order to do that, wait for the hot water to reach temperature in approximately 10
minutes, and then wait for the cold water to reach temperature in other 40 minutes
approximately.
� Unplug the dispenser from the electrical outlet. Proceed to drain the water from the
faucets one at a time until no more water remains. (Note:
INSTRUCTIONS
INSTRUCTIONS
INSTRUCTIONS
To
facilitate this operation,
 Loading...