

Haier HLC26R1, HLC32R1, HL32R1, HLC32R1a Owner's Manual

Please READ this manual carefully before
operating your TV, and retain it for future
reference.
TFT-LCD TV/DVD Combo
OWNER S MANUAL'
MODEL :S
R
HLC32R1
HLC26R1

2 TV LCD-TFT
Warning
RISK ELECTRIC SHOCK
DO NOT OPEN
CAUTION
!
CAUTION: TO REDUCE THE RISK OF ELECTRIC SHOCK,
DO NOT REMOVE COVER (OR BACK).
NO USER SERVICEABLE PARTS INSIDE.
REFER SERVICING TO QUALIFIED SERVICE
PERSONNEL.
The lightning flash with arrowhead symbol, within an
equilateral triangle is intended to alert the user to the
presence of uninsulated dangerous voltage within the
product’s enclosure that may be of sufficient magnitude
to constitute a risk of electric shock.
The exclamation point within an equilateral triangle is
intended to alert the user to the presence of important
operating and maintenance (servicing) instructions in
the literature accompanying the appliance.
!
WARNING: TO PREVENT FIRE OR SHOCK HAZARD, DO NOT EXPOSE THIS APPLIANCE TO
RAIN OR MOISTURE.
CAUTION: TO PREVENT ELECTRIC SHOCK DO NOT USE THIS POLARIZED PLUG WITH AN
EXTENSION CORD, RECEPTACLE OR OTHER OUTLET UNLESS THE BLADES
CAN BE FULLY INSERTED TO PREVENT BLADE EXPOSURE.
CAUTION: These servicing instructions are for use by qualified service personnel only. To reduce the risk of electric
shock, do not perform any servicing other than that contained in the operating instructions unless you are qualified
to do so.
Important Safety Instructions
1) Read these instructions.
2) Keep these instructions.
3) Heed all warnings.
4) Follow all instructions.
5) Do not use this apparatus near water.
6) Clean only with dry cloth.
7) Do not block any ventilation openings. Install in accordance with the manufacturer's instructions.
8) Do not install near any heat sources such as radiators, heat registers, stoves, or other apparatus (including
amplifiers) that produce heat.
9) Do not defeat the safety purpose of the polarized or grounding-type plug. A polarized plug has two blades with
one wider than the other. A grounding type plug has two blades and a third grounding prong. The wide blade or the
third prong are provided for your safety. If the provided plug does not fit into your outlet, consult an electrician for
replacement of the obsolete outlet.
10) Protect the power cord from being walked on or pinched particularly at plugs, convenience receptacles, and the
point where they exit from the apparatus.
11) Only use attachments/accessories specified by the manufacturer.
12) Use only with the cart, stand, tripod, bracket, or table specified by the manufacturer,
or sold with the apparatus. When a cart is used, use caution when moving the cart/
Apparatus combination to avoid injury from tip-over.
13) Unplug this apparatus during lightning storms or when unused for long periods of time.
14) Refer all servicing to qualified service personnel. Servicing is required when the apparatus has been damaged
in any way, such as power-supply cord or plug is damaged, liquid has been spilled or objects have fallen into the
apparatus, the apparatus has been exposed to rain or moisture, does not operate normally, or has been dropped.
15)The apparatus shall not be exposed to dripping or splashing and that no objects filled with liquids, such as vases,
shall be placed on the apparatus.
16)The mains plug or appliance inlet is used as the disconnect device, remain it readily operable during the
apparatus normal use.
Class I apparatus shall be connected to a mains socket outlet with a protective earthing connection.
Class I apparatus shall be connected to a mains socket outlet with a protective earthing connection.
LASER SAFETY: This unit employs a laser. Only a qualified service person should remove the cover or attempt
to service this device, due to possible eye injury.
CAUTION: USE OF ANY CONTROLS, ADJUSTMENTS, OR PROCEDURES OTHER THAN THOSE SPECIFIED
HEREIN MAY RESULT IN HAZARDOUS RADIATION EXPOSURE.
CAUTION: VISIBLE AND INVISIBLE LASER RADIATION WHEN OPEN AND INTERLOCK DEFEATED.
DO NOT STARE INTO BEAM.
LOCATION: INSIDE, NEAR THE DECK MECHANISM.

Owner s Manual 3
Safety Instructions
This equipment has been tested and found to comply with the limits for a Class B digital device, pursuant to Part 15 of the
FCC Rule. These limits are designed to provide reasonable protection against harmful interference in a residential
installation. This equipment generates, use and can radiate radio frequency energy and, if not installed and used in
accordance with the instructions, may cause harmful interference to radio communications. However there is no
guarantee that interference will not occur in particular installation. If this equipment does cause harmful interference
to radio or television reception, which can be determined by turning the equipment off and on, the user is encourage to
try to correct the interference by one or more of the following measures:
*Reorient or relocate the receiving antenna.
*Increase the separation between the equipment and receiver.
*Connect the equipment into an outlet on a circuit different from that to which the receiver is connected.
*Consult the dealer or an experienced radio/TV technician for help.
This device compiles with Part 15 of the FCC Rules. Operation is subject to the following two conditions:
(1) This device may be not cause harmful interference.
(2) this device must accept any interference received, including interference that may cause undesired
operation.
FCC CAUTION:
To assure continued compliance and possible undesirable interference, the provided ferrite cores must be
used when connecting this LCD display to video equipment; and maintain at least 40cm spacing to other
peripheral device.
CANADIAN NOTICE:
This Class B digital apparatus compiles with Canadian ICES-003.
FCC STATEMENT
Energy Star compliant
By being Energy Star compliant you are assured that your Haier model is helping the environment by using less
energy while saving you money. ENERGY STAR is a joint program of the U.S. Environmental Protection Agency and
the U.S. Department of Energy promoting energy efficiency.

SAVE THESE INSTRUCTIONS
Thank you for purchasing the Haier product. This easy-to-use manual will guide you in getting the best use of your
product. Remember to record the model and serial number. They are on label in back of the unit.
Model number
serial number
Date of purchase
Staple your receipt to your manual.You will need it to obtain warranty service.
4 TV LCD-TFT
Safety Instructions

Introduction
Owner s Manual 5
Contents
War ni ng . . . . . . . . .. .. ......... . . . . . . . . . . . . . . . . . . . . .
Safety Instructions . . . . . . . . . . . . . . . . . . . . . . . . . . . .
Introduction
Controls . . . . . . . . . . . . . . . . . . . . . . . . . . . . . . ...........
Connection Options . . . . . . . . . . . . . . . . . . . . . .........
Remote control . ............ . . . . . . . . .........
Installation
Accessories . . . . . . . . . . . . . . . . . . . . . . . . . . . . ........
Antenna Connection . . . . . . . . . . ..........................
Connecting a VCR. . . . . . . . . . . . . . . . . . . . . ...........
External A/V Source Setup . . . . .. . . . . ..................
Connecting a DVD player . . . . . ...... . . . . . . . . . . . . .
Connecting a DTV(digital TV) ..............................
Connecting digital audio output . . . . . . . . . . . . . . . . .
Connecting a computer. . . . . . . . . . . . . . . . . . . . . . . .
Monitor Out Setup. . . . . . . . . . . . . . . . . . . . .. .. .. .. .. .. .
HDMI and DVI input. . . . . . . . . . . . . . . . . . . . . . . . . . . .
Cable sample......................................................
Connecting Headphones . . . . . . . . . . . . . . . . . . . .....
Power source................ . . . . . . . . . . . . . . . . . . . . . .
Removing the table stand and installing a
wall mount bracket
. . . . . . . . . . . . . . . . . . . . . . . . . . . .
Operation
Switching On/Off the TV set . . . . . ... . . . . . . . . . . ....
Choose the Menu Language . . . . ..... ....................
Choose the input source......................................
Channel Menu
Channel Scan............... . . . . . . . . . . . . . . . . . . . . . . .
Channel Skip....... . . . . . . . . . . . . . . . . . . . . . . . . . . . .
Select the desired program. . . . . . . . . . . . . . . . . . . . .
Select the desired sound. . . . . . . . . . . . . . . . . . .. . . .
Mute. . . . . . . . . . . . . . . . . . . . . . . . . . . . . . . . . . . . . . .
Video Menu
How to select picture mode..................................
How to customize your own picture status .............
Set. . . . . . . . . . . . . . . . . . . . . . . . . . . . . . . . . . . .
.
. . . .........
PC
2
3
6
7
8
9
9
10
11
11
12
12
13
14
14
15
16
16
17
18
18
18
19
19
20
20
20
21
21
22
Audio Menu
How to select audio mode....................................
.
How to customize your own audio status ...............
SAP Broadcasts Setup........................................
.
Function Menu
Menu Language...................................................
OSD Timeout.......................................................
OSD Transparency...............................................
Screen Mode.......................................................
Blue Screen.........................................................
DPMS.................................................................
Time zone setting.................................................
Date /Time setting................................................
Sleep Timer setting..............................................
DTV Caption Style................................................
Lock Menu
Parental Control rating and categories...................
Lock setup...........................................................
Other Functions
Brief Info. . . . . . . . . . . . . . . . . . . . . . . . . . . . . ............
Using the Guide. . . . . . . . . . . . . . . . . . . . . . . ............
Quick program view..............................................
CC (Closed Caption Display) . . . . . . . . . . . . . ... . .. .
USB Input............................................................
DVD Operation
Basic Playback....................................................
Advanced Playback..............................................
Special Function Playback....................................
DVD System Setup...............................................
Playable Discs.....................................................
Discs Protection and DVD Characteristics..............
Maintenance . . .... .. . . . . . . . . . . . . . . . . . . . . . . . . . .
Product Specification . . . . . . . . . . . . . . . . . . . . . . .
Troubleshooting . . . . . . . . . . . . . . . . . . . . . . . . . . . . .
Warranty ............................................................
23
23
23
31
24
24
24
24
25
25
25
25
26
26
27
28
30
30
31
32
34
34
35
35
36
37
38
39
40
41

TV Side panel controls and connections
This is a simplified representation of the TV front panel, side panel control buttons and side inputs.
Introduction
6 TV LCD-TFT
Controls
1.MENU: Menu display. Press to access the on-screen menu display
2.INPUT: Press to access the input source mode. Press repeatedly to change the source to the one you want to
watch. In the MENU screen, the INPUT button serves as the ENTER button.
3.VOL +/-: Press to adjust the volume. In the MENU screen, these buttons serve as left/right buttons.
4.CH +/- : Press to scan through channels. To scan quickly through channels, press and hold down
either +/- . In the MENU screen, these buttons serve as up/down buttons.
5.POWER: Press to turn on and off the TV.
6.USB input: Connect a USB flash drive to view JPEG images or listen to MP3 songs.
7.Av2 AUDIO IN: Connect the audio L/R cables from the video signal source to these jacks.
8.AV2 VIDEO IN: Connect the composite video cable from an external signal source to this jack.
9.Headphone jack : Headphone audio output terminal.
10.HDMI IN: Connect a HDMI device to receive digital audio and uncompressed digital video signals.
11. Remote Sensor Receivers IR signals from the remote control.
Do not put anything near the sensor ,which may block the remote control signal.
L-AUDIO-R
L-AUDIO-R
HDMI4 INHDMI3 IN USB
VIDEO2 IN
VIDEO
VIDEO
MENU INPUT VOL+ VOL- CH+ CH- POWER
STOP
Press to stop the DVD .
PLAY/PAUSE
Press to play the DVD program , and press again to pause the DVD program.
OPEN/CLOSE:
Press to open the disc tray, and press again to close the tray.
PREV
Press to play the previous program.
NEXT
Press to play the next program.
disc
disc
DVD panel controls
LabelTowards Back
Insert DVD with label towards
back(Silver "shiny" side
facing towards you.)
DVD slot load

Back panel connections
Introduction
Owner s Manual 7
Connection Options
2
1
1
Y
Pb
Pr
L
R
L L
R R
VIDEO
VIDEO
S-VIDEO
S-VIDEO
VGA
VGA
VGA AUDIO
VGA AUDIO
AUDIO
AUDIO
AUDIO
AUDIO
L
R
DVI AUDIO
DVI AUDIO
AUDIO
2
L
R
AUDIO
AUDIO
COMPONENT IN
COMPONENT IN
VIDEO IN
VIDEO IN
1
AUDIO OUT
AUDIO OUT
VGA IN
VGA IN
HDMI IN
ANT IN
ANT IN
OPTICAL OUT
OPTICAL OUT
1. Digital Audio Output: Connect various types of digital audio equipment.
NOTE: In standby mode, these ports will not work.
2. DVI Audio In: When using a DVI to HDMI adapter, connect the audio signal to these jacks.
3. Antenna Input: Connect cable or antenna signals to the TV, either directly or through your cable box.
4. HDMI In: Connect a HDMI device to receive digital audio and uncompressed digital video.
5.VGA Audio In: Connect the audio L/R cables from a computer to this jack.
6.VGA Video In: Connect a video cable from a computer to this jack.
7. VIDEO In: Connect the video signal from a video device to this jack.
8. Component Video In: Connect a component video device to these jacks.
9. AUDIO In: Connect the audio L/R cables from the video signal source to these jacks.
10. S-VIDEO In: Connect the S-Video cable from an external signal source to this jacks.
11. COMPONENT AUDIO In: Connect the audio L/R cables from the component video signal source to these jacks.
12. AUDIO In: Connect the audio L/R cables from the S-Video signal source to these jacks.
13. AUDIO Out: Connect the audio L/R cables to your audio equipment.

Introduction
Remote control
8 TV LCD-TFT
1.Power Press to turn on and off the TV
2.USB Press to switch input source to USB in
3.GUIDE Display the guide when you are watching analog or digital
channels
4.CCD(closed caption) closed caption option
5.PICTURE Press repeatedly to cycle through the available picture modes.
6.AUDIO Press to cycle through different sound settings
7.INPUT Show the input source
8.MUTE Switches the sound on or off
9.VOLUME UP/DOWN Press to adjust the volume
10.MENU Press to open the on-screen menu
11.Thumbstick(Up/Down/Left/Right)
Allows you to navigate the on-screen menus and adjust the system settings
to your preference.
12.SLEEP button Press to display the sleep timer option
13.DVD/USB PLAY/PAUSE
14.DVD Open/close
15.DVD/USB FAST FORWARD
16.DVD/USB FAST REVERSE
17.DVD CALL
18.DVD MENU
19.DVD SEARCH
20.DVD ANGLE
21.DVD Mode
22.CH.LIST Open the channel list in TV
23.MTS/SAP Select MONO, STEREO, SAP in NTSC system
24.FAVORITE Open the favourite channel list in TV
25.ARC Select the aspect ratio
26.Number buttons Press to change a channel
27. button Press to select digital channels. For example, to enter
“54-3”, press “54”, “ ” and “3”
28.RECALL Press to jump back and forth between two channels
29.CHANNEL UP/DOWN Press to scan between the last two channels,
press and hold down either +/-
30.EXIT Clears all on-screen displays and returns to TV viewing from any
menu
31.ENTER Accesses the highlighted item in the on-screen menu
32.DISPLAY Press to display the TV status information on the top of the
TV screen
33.DVD/USB STOP
34.DVD/USB REPEAT
35.DVD/USB Previous Chapter
36.DVD/USB Next Chapter
37.DVD AUDIO Mode
38.DVD SETUP
39.DVD PROGRAM
40.DVD SUBTITLE
Select a
OPEN/CLOSE
PLAY/PAUSE
REV
D.MENU
SEARCH
D.CALL
ANGLE
D.AUDIO
SUBTITLE
ENTER
STOP REPEAT
PREV NEXT
SETUP
PROGRAM
USB
GUIDE
INPUT
MUTE
VOL CH
MENU
SLEEP DISPLAY
EXIT
RECALL
PICTURE AUDIO ARC FAVORITE
CCD MTS/SAP CH.LIST
DVD
18
19
20
21
22
23
24
25
26
27
28
29
30
31
32
33
34
35
36
37
38
39
40
1
2
3
4
5
6
7
8
9
10
11
12
13
14
15
16
17
The remote control cannot be operated unless the batteries are properly loaded.
When using the remote control, aim it at the remote sensor on the TV.

ANT IN
ANT IN
ANT IN
ANT IN
Over-the-air TV reception quality will depend on your antenna type, antenna location and antenna positioning.
External Equipment Connections
Antenna Connection
Multi-family Dwellings/Apartments
(Connect to wall antenna socket)
Wall Antenna
Socket
Single-family Dwellings /Houses
(Connect to wall jack for outdoor antenna)
Outdoor
Antenna
VHF Antenna
UHF Antenna
Turn clockwise to tighten
RF Coaxial Wire (75 ohm)
Bronze Wire
Be careful not to bend the bronze wire
when connecting the antenna.
Bronze Wire
To improve the picture quality in a poor signal area,
please purchase a signal amplifier and install properly.
If the antenna needs to be split for two TV`s, install a
2-Way Signal Splitter in the connections.
To install the antenna properly please contact a
professional in your area.
Installation
Accessories
Remote control Owner`s manual Alkaline battery(AAA) 2
Owner s Manual 9
Please READthis manual carefully before
operatingyour TV, and retain it for future
reference.
TFT-LCD TV
OWNER S MANUAL'
MODEL:S
HL26K
HL32K
R
PLAY/PAUSE
REV
REPEAT
GUIDE
MTS/SAP
CCD ARC
FREEZE
ENTER
STOPUSB REC
PREV NEXT
CH.LIST
FAVORITE
TV
STB
INPUT
MUTE
VOL CH
MENU
SLEEP DISPLAY
EXIT
RECALL
PICTURE AUDIO PC HDMI
CABLE VCR AUD
DVD

2
1
1
Y
Pb
Pr
L
R
L L
R R
VIDEO
VIDEO
S-VIDEO
S-VIDEO
VGA
VGA AUDIO
VGA AUDIO
AUDIO
AUDIO
AUDIO
L
R
DVI AUDIO
DVI AUDIO
AUDIO
AUDIO
2
L
R
AUDIO
AUDIO
COMPONENT IN
COMPONENT IN
VIDEO IN
VIDEO IN
1
AUDIO OUT
AUDIO OUT
VGA IN
VGA IN
HDMI IN
ANT IN
ANT IN
OPTICAL OUT
OPTICAL OUT
Installation
10 TV LCD-TFT
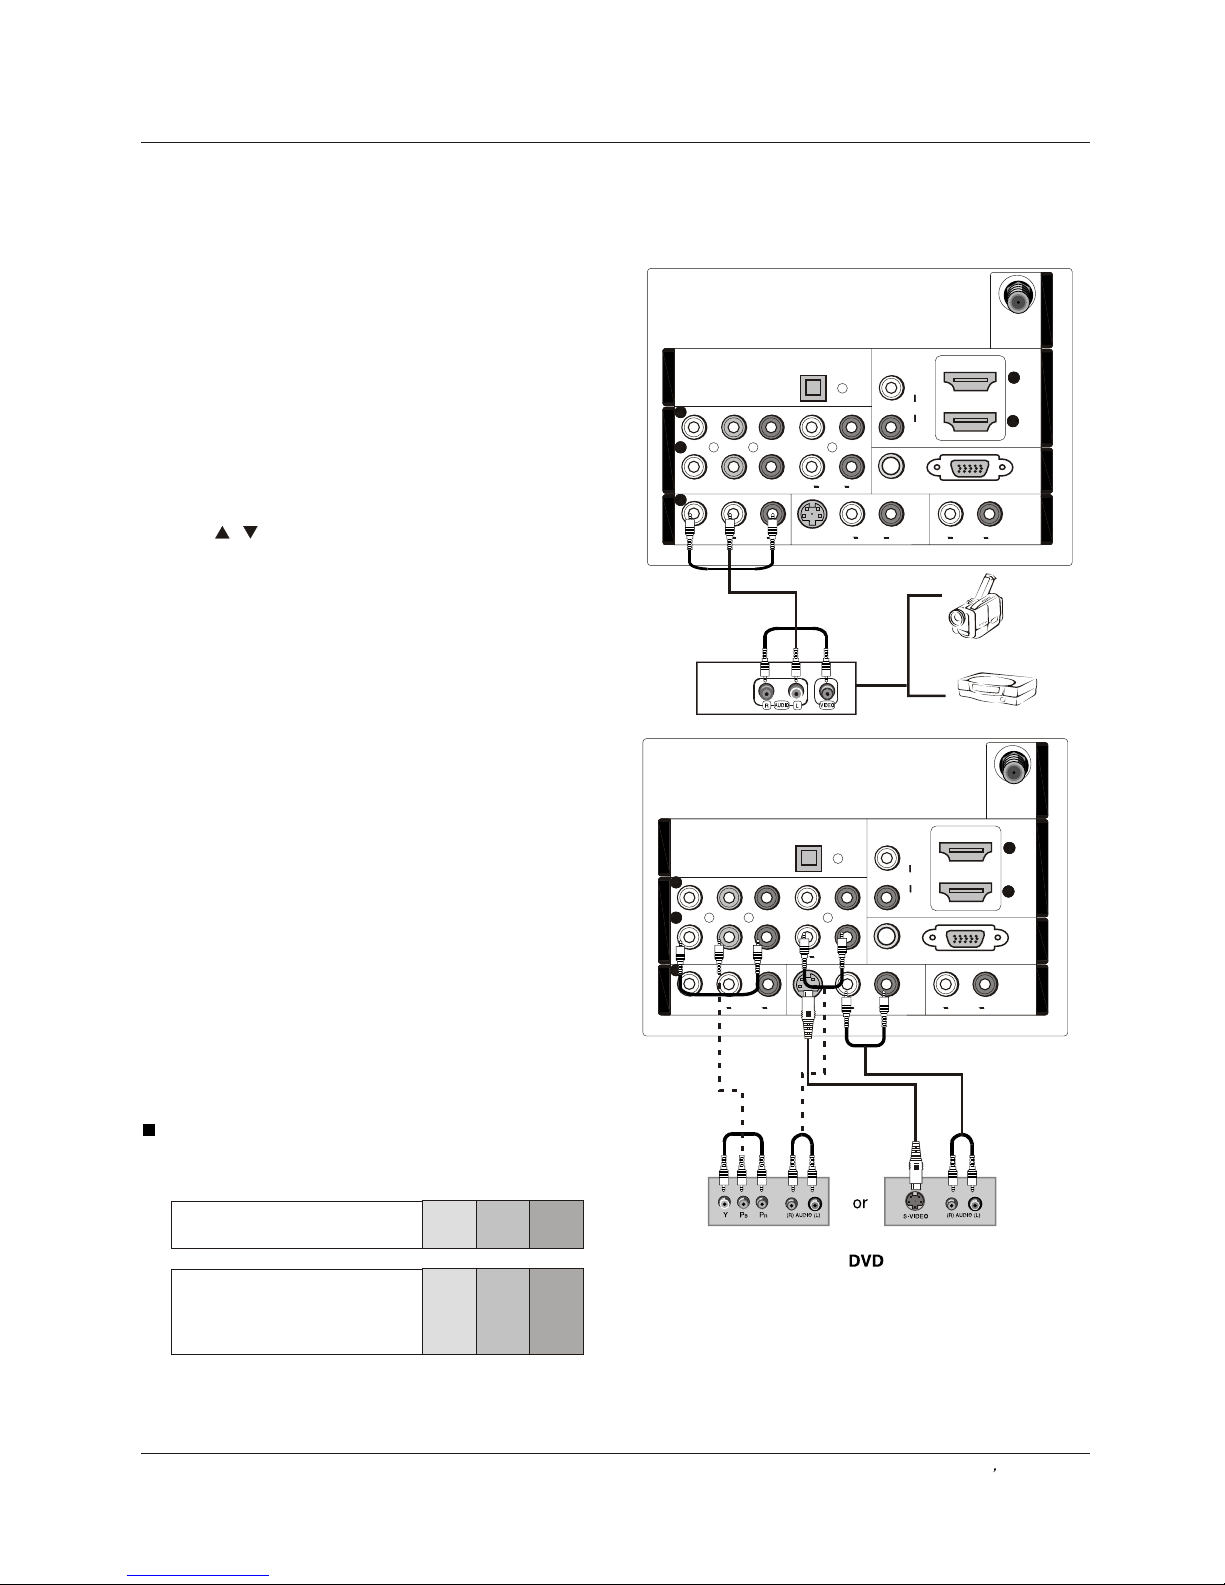
Connecting a VCR
NOTE: All cables shown are not included with the TV.
There are several ways to connect your television,
depending on the components you want to connect and
the quality of the signal you want to achieve. The
following are examples of some different ways to connect
your TV with different input sources.
External Equipment Connections
Choose Your Connection
To avoid picture noise (interference), leave an adequate
distance between the VCR and TV.
Connection Option 1
Set VCR output switch to channel 3 or 4 and then tune
the TV to the same channel number.
Connection Option 2
1. Connect the audio and video cables from the VCR's
output jacks to the TV input jacks, as shown in the figure.
When connecting the TV to VCR, match the jack colors
(Video = yellow, Audio Left = white, and Audio Right = red).
If you connect a S-VIDEO output from VCR to the
S-VIDEO input, the picture quality is improved;
compared to connecting a regular VCR to the Video input.
2. Insert a video tape into the VCR and press PLAY on
the VCR. (Refer to the VCR owner`s manual.)
3. Select the input source with using the
INPUT button on the remote control, and
then press / button to select the source,
press ENTER button to confirm.
2
1
1
Y
Pb
Pr
Pr
L
R
L L
R R
VIDEO
VIDEO
S-VIDEO
S-VIDEO
VGA
VGA AUDIO
VGA AUDIO
AUDIO
AUDIO AUDIO
L
R
DVI AUDIO
DVI AUDIO
AUDIO
AUDIO
2
L
R
AUDIO
AUDIO
COMPONENT IN
COMPONENT IN
VIDEO IN
VIDEO IN
1
AUDIO OUT
AUDIO OUT
VGA IN
VGA IN
HDMI IN
HDMI IN
ANT IN
ANT IN
OPTICAL OUT
OPTICAL OUT
2
1
1
Y
Pb
Pr
Pr
L
R
L L
R RVIDEO
S-VIDEO
S-VIDEO
VGA
VGA
VGA AUDIO
VGA AUDIO
AUDIO
AUDIO
AUDIO
AUDIO
L
R
DVI AUDIO
DVI AUDIO
AUDIO
AUDIO
2
L
R
AUDIO
AUDIO
COMPONENT IN
COMPONENT IN
VIDEO IN
VIDEO IN
1
AUDIO OUT
AUDIO OUT
VGA IN
VGA IN
HDMI IN
HDMI IN
ANT IN
ANT IN
OPTICAL OUT
OPTICAL OUT
How to connect
1. Connect the DVD video outputs (COMPONENT) to
the Y Pb Pr jacks on the TV and connect the DVD audio
outputs to the YPbPr Audio IN jacks on the TV, as
shown in the figure.
2. If your DVD only has an S-VIDEO output jack,
connect this to the S-VIDEO input on the TV. as shown
in the figure.
Note
If your DVD player does not have component video
output, use S-Video.
How to use
1. Turn on the DVD player, insert a DVD .
2. Use INPUT button on the remote control to select
component mode.
3. Press PLAY button on external equipment for
program play.
4. Refer to the DVD player's manual for operating
instructions.
disc
External Equipment Connections
How to connect
Connect the audio and video cables from the external
equipment's output jacks to the TV input jacks, as shown
in the figure.
When connecting the TV to external equipment, match the
jack colors (Video = yellow, Audio Left = white, and Audio
Right = red).
How to use
1. Select the input source with using the INPUT button on
the remote control.
2. Press / button to select the desired source.
3. Press ENTER button to confirm.
4. Operate the corresponding external equipment.
Video Game Set
Camcorder
Component Input ports
To get better picture quality, connect a DVD player to the
component input ports as shown below.
Installation
Component ports
on the TV
Video output ports
on DVD player
Y Pb Pr
Y Pb Pr
Y B-Y R-Y
Y Cb Cr
Y P P
BR
External A/V Source Setup
Connecting a DVD player
Owner s Manual 11

2
1
1
Y
Pb
Pr
L
R
L L
R R
VIDEO
VIDEO
S-VIDEO
S-VIDEO
VGA
VGA AUDIO
VGA AUDIO
AUDIO
AUDIO
AUDIO
AUDIO
L
R
DVI AUDIO
DVI AUDIO
AUDIO
2
L
R
AUDIO
COMPONENT IN
COMPONENT IN
VIDEO IN
VIDEO IN
1
AUDIO OUT
AUDIO OUT
VGA IN
VGA IN
HDMI IN
HDMI IN
ANT IN
ANT IN
OPTICAL OUT
OPTICAL OUT
2
1
1
Y
Pb
Pb
Pr
L
R
L L
R RVIDEO
S-VIDEO
S-VIDEO
VGA
VGA AUDIO
VGA AUDIO
AUDIO
AUDIO
AUDIO
L
R
DVI AUDIO
DVI AUDIO
AUDIO
AUDIO
2
L
R
AUDIO
AUDIO
COMPONENT IN
COMPONENT IN
VIDEO IN
VIDEO IN
1
AUDIO OUT
AUDIO OUT
VGA IN
VGA IN
HDMI IN
HDMI IN
ANT IN
OPTICAL OUT
OPTICAL OUT
Digital Set-top Box
This TV can receive Digital Over-the-air/Cable signals without an external digital set-top box. However, if you do receive
Digital signals from a digital set-top box or other digital external device, refer to the figure as shown below.
This TV supports HDCP (High-bandwidth Digital Contents Protection) protocol for Digital Contents (480p,720p,1080i).
How to connect
Use the TV`s COMPONENT , VGA or HDMI
jack for video connections, depending on
your set-top box connector. Then, make
the corresponding audio connections.
How to use
1. Turn on the digital set-top box. (Refer to the
owner`s manual for the digital set-top box.)
2. Use INPUT on the remote control to select
COMPONENT , VGA or HDMI source.
Send the TV`s audio to external audio equipment (stereo
system) via the Digital Audio Output (Optical) port.
How to connect
1. Connect one end of an optical cable to the TV Digital
Audio(Optical) Output port.
2. Connect the other end of the optical cable to the digital
audio (optical) input on the audio equipment.
See the external audio equipment instruction manual for
operation.
Note
When connecting with external audio equipments, such
as amplifers or speakers, please turn the TV speakers off.
Connecting a digital audio output
External Equipment Connections
Connecting a DTV(digital TV)
Installation
Signal
480i
480p
720p
1080i
1080p
COMPONENT
HDMI
Yes
Yes
Yes
Yes
Yes
Yes
Yes
Yes
Yes
Yes
HDMI
12 TV LCD-TFT
Caution: Do not look into the optical output
port. Looking at the laser beam may damage
your vision.
!

2
1
1
Y
Pb
Pr
L
R
L L
R RVIDEO
S-VIDEO
S-VIDEO
VGA
VGA AUDIO
VGA AUDIO
AUDIO
AUDIO
AUDIO
L
R
DVI AUDIO
DVI AUDIO
AUDIO
AUDIO
2
L
R
AUDIO
AUDIO
COMPONENT IN
COMPONENT IN
VIDEO IN
VIDEO IN
1
AUDIO OUT
AUDIO OUT
VGA IN
VGA IN
HDMI IN
ANT IN
ANT IN
OPTICAL OUT
OPTICAL OUT
How to connect
1. To get the best picture quality, adjust the VGA graphics card to 1024x768 .
2. Use the TV`s VGA or DVI (Digital Visual Interface)Audio IN port for audio connections, depending on your computer
connector.
If the graphic card on the computer does not output analog and digital RGB simultaneously, connect only one of
either VGA IN or HDMI IN to display the VGA on the TV.
If the graphic card on the computer does output analog and digital RGB simultaneously, set the TV to either VGA or
HDMI ; (the other mode is set to Plug and Play automatically by the TV.)
3. Then, make the corresponding audio connection. If using a sound card, adjust the VGA sound as required.
How to use
1. Turn on the computer and the TV.
2. Use INPUT on the remote control to select VGA or HDMI source.
3. Check the image on your TV. There may be noise associated with the resolution, vertical pattern, contrast or
brightness in VGA mode. If noise is present, change the VGA mode to another resolution, change the refresh rate to
another rate or adjust the brightness and contrast on the menu until the picture is clear. If the refresh rate of the VGA
graphic card can not be changed, change the VGA graphic card or consult the manufacturer of the VGA graphic card.
Note
1.Use a DVI cable.
2.Avoid keeping a fixed image on the TV's screen for a long period of time. The fixed image may become permanently
imprinted on the screen.
3. The synchronization input form for Horizontal and Vertical frequencies is separate.
Resolution
Frame
frequency
(Hz)
VGA
SVGA
XGA
640x480
60Hz
800x600
60Hz
1024x768
60Hz
Mode
Resolution
External Equipment Connections
Installation
75Hz
Connecting a computer
Owner s Manual 13
75Hz

When the source device(DVD player or Set Top Box) supports HDMI
How To Connect
1. Connect the source device to HDMI port of this TV with an HDMI cable(not supplied with this product).
2. No separated audio connection is necessary.
How To Use
If the source device supports Auto HDMI function, the output resolution of the source device will be automatically
set to 1280x720p.
If the source device does not support Auto HDMI, you need to set the output resolution appropriately.
To get the best picture quality, adjust the output resolution of the source device to 1280x720p.
Select HDMI input source in input source option of Select Main source menu.
When the source device(DVD player or Set Top Box) supports DVI
How To Connect
1. Connect the source device to HDMI port of this TV with a HDMI-to-DVI cable(not supplied with this product).
2. A separated audio connection is necessary.
3. If the source device has an analog audio output connector, connect the source device audio output to DVI Audio
In port located on the left side of HDMI port.
How To Use
If the source device supports Auto DVI function, the output resolution of the source device will be automatically
set to 1280x720p.
If the source device does not support Auto DVI, you need to set the output resolution appropriately.
To get the best picture quality, adjust the output resolution of the source device to 1280x720p.
Press the INPUT button to select HDMI input source in input source option of Select Main source menu.
Installation
HDMI and DVI input
14 TV LCD-TFT
External Equipment Connections

HDMI Cable
(not supplied with the product)
HDMI to DVI Cable
(not supplied with the product)
Analog Audio Cable
(Stereo to RCA type)
(not supplied with the product)
Installation
Cable sample
Owner s Manual 15

HDMI4 INHDMI3 IN
TO USE AC POWER SOURCE
Use the AC polarized line cord provided for
operation on AC. Insert the AC cord plug into
a standard polarized AC outlet.
Note
Never connect the AC line cord plug to other
than the specified voltage. Use the
attached power cord only.
If the polarized AC cord does not fit into a nonpolarized AC outlet, do not attempt to file or cut
the blade. It is the user`s responsibility to have
an electrician replace the obsolete outlet.
If you cause a static discharge when touching
the unit and the unit fails to function, simply
unplug the unit from the AC outlet and plug it
back in. The unit should return to normal operation.
Polarized AC Cord Plug
AC Outlet
Wider Hole
and Blade
You can connect a set of headphones to your set if you wish to watch a
TV programme without disturbing the other people in the room.
Connecting Headphones
Note
Prolonged use of headphones at a high volume
may damage your hearing.
You will not receive sound from the speakers
when you connect headphones to the system.
Plug a set of headphones into the 3.5mm
mini-jack socket on the side panel of the set.
Installation
External Equipment Connections
16 TV LCD-TFT
Power source

Installation
Owner s Manual 17
Removing the table stand and installing a
wall mount bracket
Remove 4X M4 screws securing the
stand to the TV, then remove the stand.
Remove 5X M4 screws securing the
stand to the TV, then remove the stand.
Use 4X M6 screws to secure the wall
bracket (not supplied) to the back of your TV.
Use 4X M6 screws to secure the wall
bracket (not supplied) to the back of your TV.
HLC26R1
HLC32R1

Choose the Menu Language
When you start using your set for the first time, you must
select the language which will be used for displaying menus
and indications.
In the manual, the OSD (on screen display) may be
different from your TV`s, because it is just an example to
help you with the TV operation.
There are several options you might need to set up in order
for your TV to work properly. Read the instructions that
follow.
Initial Setup: Set according to the screen display.
Note
If the TV in power on , the screen show information
according the type of input signal . the information will
disappear. If there is no signal , No Signal will display
on the screen.
1. Choose TV Input and then pressMENU button.
2. Press / button to selectFunction menu.
3. Press or ENTER button and then use / button to select
Language.
4. Press button to select language.
English Spanish or French
/
1 First, connect power cord correctly.
2 Select the viewing source by using INPUT button on
the remote control.
3 When finished using the TV, press POWER button on
the remote control. The TV reverts to standby mode.
4 If you intend to be away on vacation, disconnect the
power plug from the wall power outlet.
.
.
.
.
Change the picture source so you can watch your TV,
VCR, DVD, Cable , or any other devices that are
connected to your TV.
1. Press INPUT button to enter the Select Source menu
and then use / button to select the desired items
(TV, Video1, Video2, S-Video,Component1, Component2,
PC, HDMI1,HDMI2,HDMI3,HDMI4, ).
2. Press ENTER button to confirm .
DVD
Operation
Select Source
TV
Video1
Video2
S-Video
Component1
Component2
PC
HDMI1
HDMI2
HDMI3
HDMI4
DVD
Operation
Switching On/Off the TV set
Choose the Input source
18 TV LCD-TFT
Video
Audio
Channel
Lock
Function
Function
Language English
OSD Timeout Short
OSD Transparency Middle
Screen Mode Normal
Blue Screen On
DPMS On
Time Setup
Closed Caption
Default
Select
/
Back
EXIT

This TV set has two methods to set channels, which are
respectively Channel Scan, Channel Skip.
In this section, how to use the remote control to set
channel is explained. You can also use buttons on the TV to
set channel.
Note
The Channel menu will be only operated in normal TV mode.
Channel menu
Operation
Owner s Manual 19
1. Press MENU button and then use / button to select
Channel menu.
2. Press /ENTER button to select Tuner.
3. Press button to select Cable or Antenna mode.
4. Press / button to selectChannel Scan.
5. Press /ENTER button to start searching.
6. To cancel searching, press EXIT button.
/
Note
When Antenna is selected, the TV will detect antenna
signals and will search for antenna TV (NTSC and
ATSC) channels available in your local area.
When Cable is selected, the TV will detect cable
company supplied signals and will search for cable TV
(NTSC, QAM modulated) channels available in your
Area.
Channel Scan
Status: Antenna
Analog Channels: 19
Digital Channels: 0
64%
Scanning
Video
Video
Audio
Audio
Channel
Channel
Lock
Lock
Function
Function
Channel
Channel Scan
Tuner Antenna
Channel Scan
Channel Skip
Channel Label
Select
/
BackScan
EXIT
ENTER
Cancel
EXIT
Channel Skip
1. Press MENU button and then use / button to select
Channel menu.
2. Press / ENTER button and then use / button to
select Channel Skip.
3. Press / button to select a channel, then press ENTER
button to toggle between and .
A skip channel is skipped when using / button to
browse the channels. A skip channel can be watch
by key-in the channel number or select by list.
Default un-scanned analog channels are skip.
Channel with a check icon is a skipped channel.
1
2
3
4
5
5-1
6
7
8
9
10
Analog
Analog
Analog
Analog
Analog
Digital KPIX-DT
Analog
Analog
Analog
Analog
Analog
Video
Video
Audio
Audio
Channel
Channel
Lock
Lock
Function
Function
Channel Skip
Channel Label Set
Select
/
/
BackSet
EXIT
ENTER
Channel Label
Allows you to name the channel that is selected.
Press /ENTER button to enter the submenu.
Then press / to select Channel Index and Channel
Label and / to select the position of the item that you
want to change, afterward press INPUT to input the
numbers and symbols and ENTER button to confirm.
Channel Index
Channel Label
Select
Back
EXIT
1

Operation
20 TV LCD-TFT
1
Also can enter channel number directly,eg:2-0.
.
Note
If skip is ON on one channel, press CH+/- button, the
channel will not appear.
2.
Using CH+/- buttons.
Press CH+ button to select a channel number in
number increasing direction.
Press CH- button to select a channel number in
number decreasing direction.
Select the desired sound
Press VOL-/+ buttons on the remote or the front of the
TV set to adjust the volume level. The range is 0~100.
When the volume buttons are pressed the volume level
is displayed automatically on the TV screen.
Mute
1 Press MUTE button on the remote control and
type face will display on the screen. At this time, the
sound of the TV set is turned off.
2 If you want to recover the sound, press MUTE
button again or directly press VOL+ button.
.
.
Volume
Select the desired program

Operation
Owner s Manual 21
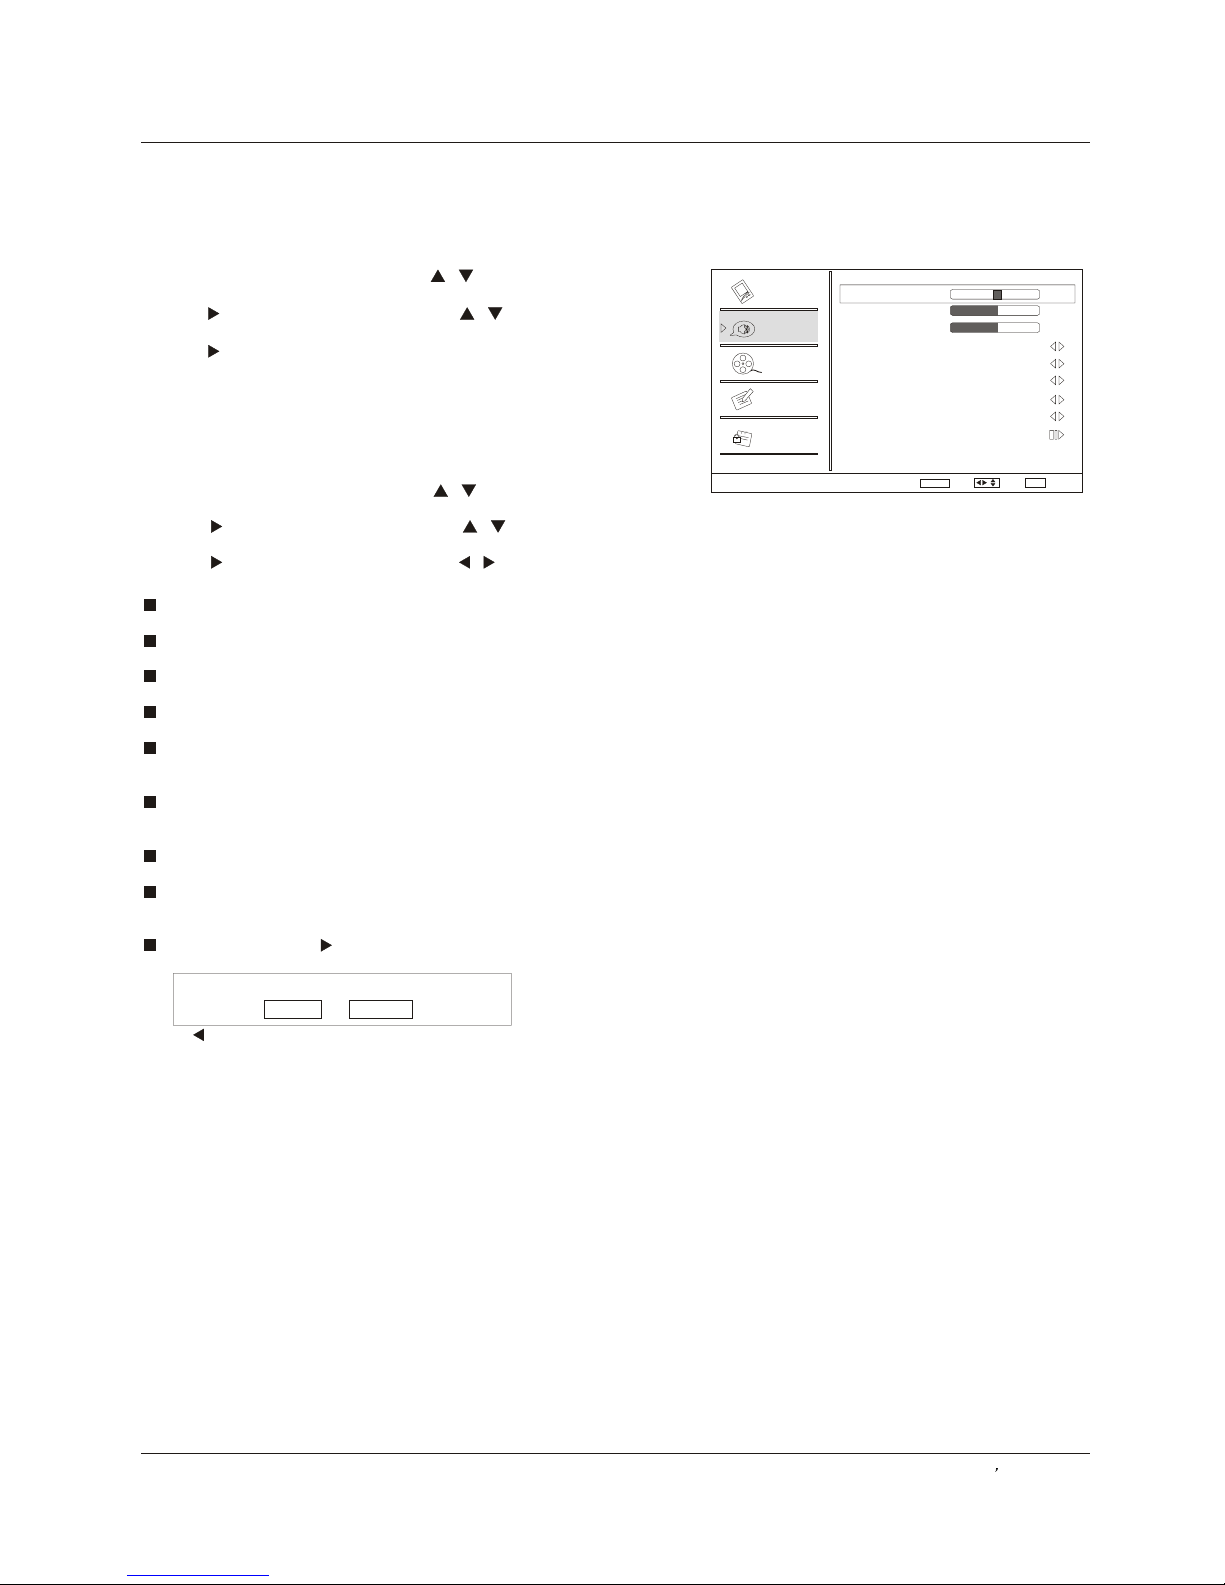
Mode
Select the mode of picture( ).
Brightness
This will adjust the light output of the complete picture,
which will mainly affect the darker areas of the picture.
Contrast
This will adjust the intensity of bright parts in the picture
but keep the dark parts unchanged.
Color
This will adjust the saturation level of the colors to suit
your personal preference.
Tint
Allows you to select the color mix (Tint) of the picture.
Sharpness
This will adjust the sharpness of fine details in the picture.
Standard/ Vivid/ Custom/ Mild
Note
The picture options can only be adjusted in
the CUSTOM mode. The other picture modes
are preset.
1 Press MENU button and then use / button to select
Video menu.
2 Press button and then use / button to
select the desired items.
3 Press / button and then use / button to
adjust the setting.
.
./ENTER
. ENTER
How to customize your own picture
status
Video menu
The TV menu gives you an overview of the menus you can select.
Note
Depending on the input signal, one or more menu items may not be selectable.
The picture mode provides the pre-defined images settings:
Standard, Vivid, Custom and Mild .
1. Press MENU button and then use / button to select
Video menu.
2. Press /ENTER button and then use / button to
select Mode.
3. Press / button to select the option Standard, Vivid,
Custom and Mild.
You can also press PICTURE button on the remote control
to select the option .Standard, Vivid, Custom and Mild
How to select picture mode
Video
Audio
Channel
Lock
Function
Video
Mode Custom
Brightness
Contrast
Color
Tint
Sharpness
Color Temperature
Advanced Video
59
59
59
7
58
Select
/
Back
EXIT

Operation
22 TFT-LCD TV
DNR
To adjust reduce the appearance of digitizing error by the compression:
Off, Weak, Medium, Strong, Auto.
Black Level Extender
To adjust the ability in the black areas detail of the picture: On and Off.
White Peak Limiter
To adjust the ability in the white areas detail of the picture: On and Off.
CTI
To adjust the picture for color errors: Off, Weak, Medium and Strong.
Flesh Tone
To adjust the flesh color: On and Off.
Adaptive Luma Control
To adjust changes in the luminance of the picture: On and Off.
Video menu
When you select the PC input, this function is used.
Adjustment for screen Position, Clock, Phase, Setting
Display adjust menu by pressing INPUT button then use
/ button to select the source of PC item.
Auto sync: Automatically adjust display of the picture
(Only available in PC source).
Position : Adjust the screen position.
Phase : Adjust the phase of Pixel clock.
Clock : Adjust the clock of input signal.
1. Press MENU button and then use / button to select
Video menu.
2. Press /ENTER button and then use / button to
select PC.
3. Press /ENTER button and then use / button to
adjust the setting.
PC Set
Video
Video
Audio
Audio
Lock
Lock
Function
Function
Video
PC
Mode Custom
Brightness
Contrast
Color Temperature
Advanced Video
PC
59
59
Select
/
Back
EXIT
Select
/
BackEnter
EXIT
59
59
59
59
Auto Sync
H Position
V Position
Phase
Clock
Medium
On
On
Medium
On
On
Video
Audio
Channel
Lock
Function
Advanced Video
Select
/
Back
EXIT
DNR
Black Level Extender
White Peak Limiter
CTI
Flesh Tone
Adaptive Luma Control
Color temperature
This will increase or decrease Warm (red) and Cool (blue)
colors to suit personal preferences.
Select Cool to give the white colors a blue tint, Standard
to give the white colors a neutral tint, Warm to give the
white colors a red tint.
Advanced Video
To adjust the picture in advanced: DNR, Black Level Extender,
White Peak Limiter, CTI, Flech Tone, Adaptive Luma Control.
ENTER
Operation
Owner s Manual 23
SAP Broadcasts Setup
This TV can receive MTS stereo programs and SAP (Secondary
Audio Program) that accompanies the stereo program; if the
station transmits an additional sound signal as well as the
original one.
When having selected SAP button on the remote control, this TV
can only receive the signal when the TV station transmits the
proper signals.
Mono sound is automatically received if the broadcast is only in
Mono; even though Stereo or SAP has been selected.
Select Mono if you want to listen to mono sound during stereo/
SAP broadcasting. Stereo or SAP can be received in a Analog
channel.
1. Use SAP button to select your desired MTS mode in a analog
signal.
Each time you press SAP button, Mono, Stereo or SAP appear.
If other languages are available on the digital signal, select
them with the SAP button.
2. Press EXIT button to save and return to TV viewing.
Audio menu
Balance
Adjust to emphasize left or right speaker balance.
Bass
Adjust to increase or decrease lower-pitched sounds.
Treble
Adjust to increase or decrease higher-pitched sounds.
SRS TS XT
To turn the simulated surround sound on and off.
Mode
To adjust the audio mode: Off, Concert, Living Room, Hall,
Bathroom, Cave, Arena and Church.
Equalizer
To adjust the equalizer: Off, Rock, Pop, Live, Dance,
Techno, Classic and Soft.
SPDIF Type
To Adjust the SPDIF output: Off, Dolby Digital and PCM.
AVL(Automatic Volume Control)
This will reduces the differences in volume level among
broadcasters.
Audio Only Press / ENTER button to confirm, the following
display will appear on the screen.
Press to select OK , then press OK to confirm. The TV screen will
be black and no picture , but the sound is still normal.
You can press POWER button to reveal the picture on the screen.
How to select audio mode
Video
Audio
Channel
Lock
Function
Audio
Balance
Bass
Treble
SRS TS XT On
Mode Off
Equalizer Off
SPDIF Type PCM
AVL Off
Audio Only
0
59
59
Select
/
BackAdjust
EXIT
1. Press MENU button and then use / button to selectAudio
menu.
2. Press / ENTER button and then use / button to select
Mode.
3. Press /ENTER button to select the option Off, Concert, Living
Room, Hall, Bathroom, Cave, Arena and Church.
You can also press AUDIO button on the remote control to select
the Audio Mode Off, Rock, Pop, Live, Dance, Techno, Classic and
Soft.
How to Customize your own audio status
1 Press MENU button and then use / button to selectAudio
menu.
2 Press button and then use / button to select
desired items.
3 Press / button and then use / button to adjust the
setting.
.
./ENTER
. ENTER
ENTER
If enter Audio Only mode, press “POWER” to exit!
OK Cancel

Operation
24 TV LCD-TFT
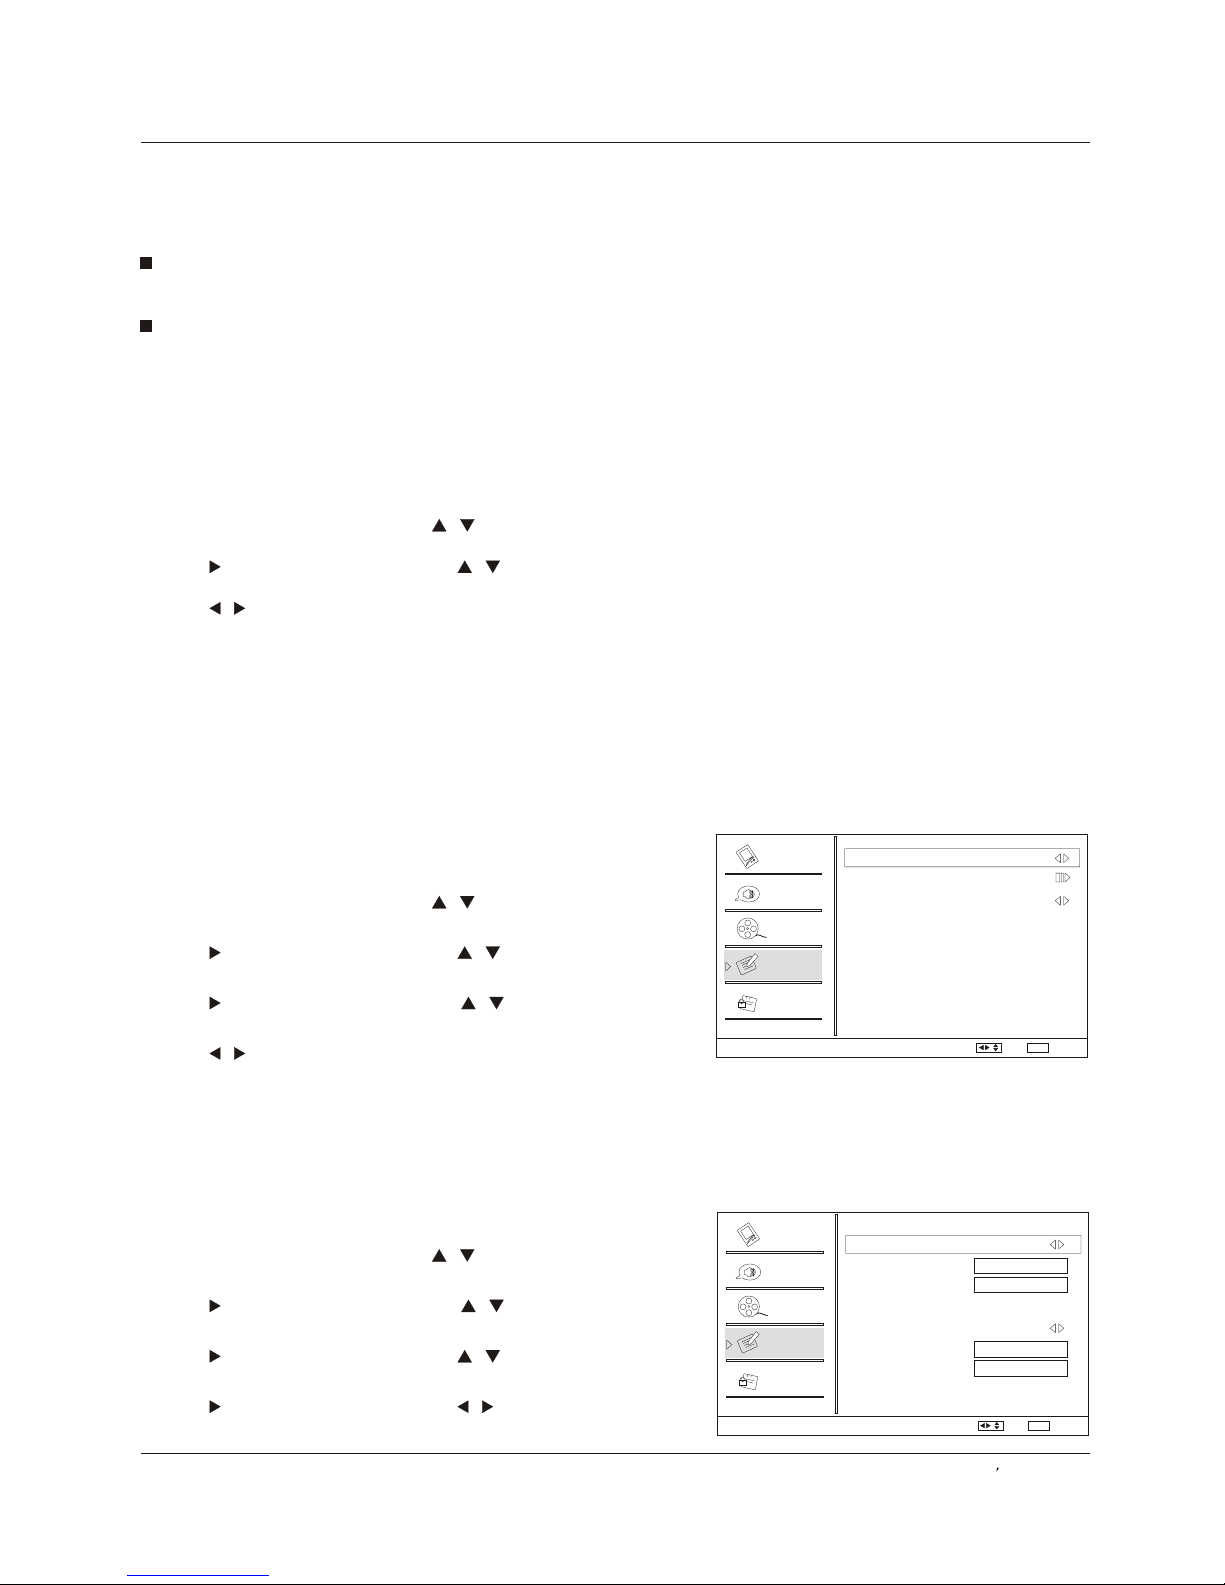
Function menu
1. Press MENU button and then use / button to select
Function menu.
2. Press /ENTER button and then use / button to
select Screen Mode.
3. Press / button to select Normal, or
Cinema.
Wide, Zoom
Video
Audio
Channel
Lock
Function
Function
Language English
OSD Timeout Short
OSD Transparency Middle
Screen Mode Normal
Blue Screen On
DPMS On
Time Setup
Closed Caption
Default
Select
/
Back
EXIT
Screen Mode
Lets you choose the way an analog picture with a 4:3 aspect
ratio is displayed on your TV with a 16:9 ratio picture format.
Note
If a fixed image is displayed on the screen for a long time,
the image may become permanently burned on the screen
and remain visible.
OSD Timeout
1. Press MENU button and then use / button to
select Function menu.
2. Press /ENTER button and then use / button to
select OSD Timeout.
3. Press / button to select Short, Middle or Long.
(Short is for 5 seconds; Middle is for 10 seconds;
Long is for 15seconds)
OSD Transparency
1. Press MENU button and then use / button to select
the Function menu.
2. Press or ENTER button and then use / button to
select OSD transparency.
3. Press / button to select Low ,Middle or High.
1 Press MENU button and then use / button to select
Function menu.
2 Press / button and then use / button to
select Language.
3 Press button to select language.
English Spanish or French
.
. ENTER
. /
Menu Language
When you start using your set for the first time, you must
select the language which will be used for displaying menus
and indications.
Video
Audio
Channel
Lock
Function
Function
Language English
OSD Timeout Short
OSD Transparency Middle
Screen Mode Normal
Blue Screen On
DPMS On
Time Setup
Closed Caption
Default
Select
/
Back
EXIT
Normal
Choose normal when you want to view the picture with
4:3 mode .
Zoom
Choose Zoom when you want to view the picture without
any alteration. However, the top and bottom portions
of the picture will be cropped.
Operation
Owner s Manual 25
Function menu
1 Press MENU button and then use / button to
select Function menu.
2 Press button and then use / button to
select Time Setup.
3 Press / button and then use / button to
select
.
./ENTER
. ENTER
Date/Time.
4. Press /ENTER button and then use / button to
select On or Off.
Date /Time setting
Setting the clock is necessary in order to use the various
timer features of the TV. Also, you can check the time
while watching the TV.
Auto On
Date
Time
Timer Off
On Time
Off Time
2008/01/01
11:54 AM
11:54 AM
12:00 AM
Video
Audio
Channel
Lock
Function
Date/Time
Select
/
Back
EXIT
Time zone setting
1 Press MENU button and then use / button to
select Function menu.
2 Press / button and then use / button to
select Time Setup.
3 Press button and then use / button to
select Time Zone.
4 Press button to select your viewing area time zone:
Eastern, Central, Mountain, Pacific, Alaska or Hawaii .
.
. ENTER
./ENTER
. /
This function allows you to select your local time zone.
Broadcasted time information will correct the clock display
for your local time.
Video
Audio
Channel
Lock
Function
Time Setup
Time Zone Pacific
Date/Time
Sleep Timer Off
Select
/
Back
EXIT
Blue Screen
1. Press MENU button and then use / button to select
Function menu.
2. Press /ENTER button and then use / button to
select Blue Screen.
3. Press / button to select On or Off.
DPMS
PC Power Management. To set On, the set will be in
standby mode automatically if no signal in 2 minutes; if
signal input, the set will be on again automatically.
Note: DPMS is useful only in VGA source.
Wide
Choose wide when you want to adjust the picture
horizontally, in a linear proportion to fill the entire screen.
Cinema
For letterbox pictures, bars may appear on the top and
bottom on some programs.
ARC
the desired picture format: Normal, Zoom, Wide or
Cinema.
You can also press button on the remote control to
select

Operation
26 TV LCD-TFT
Style
Select this option to select the font style of caption display
according to your own preference.
Press / button to select Default or Custom.
Size
Select this option to select the size of caption display
according to your own preference.
Press / button to select Small, Normal or Large.
Text color
Select this option to select the text color or the opacity of
the text box of caption display according to your own
preference.
Select a color and one of the opacity options.
Text Opacity
Specify the opacity for the text color.
BG Color
Select a background color.
BG Opacity
Select the opacity for the background color.
Window Color
Select a window color.
Window Opacity
Select the opacity for the window color.
Video
Video
Audio
Audio
Channel
Channel
Lock
Lock
Function
Function
Closed Caption
DTV Caption Style
NTSC Caption Off
DTV Caption Off
DTV Caption Style
Style
Size
Text Color
Text Opacity
BG Color
BG Opacity
Window Color
Window Opacity
Select
/
Back
EXIT
Custom
Normal
Black
Solid
Black
Solid
White
Solid
Function menu
This allows you to modify how digital captions are displayed
on your TV. Select from the following options to change the
visual characteristics of your TV`s digital captioning.
Customize the DTV/CADTV captions that appear on your
screen.
1 Press MENU button and then use / button to select
Function menu.
2 Press button and then use / button to
select Closed Caption .
3 Press button and then use / button to
select DTV Caption Style.
4 Press button and then use / button to
select the Style, Size, etc., press / button to customize
to your preference.
.
./ENTER
./ENTER
. / ENTER
DTV Caption Style (In DTV mode)
Video
Audio
Channel
Lock
Function
Function
Language English
OSD Timeout Short
OSD Transparency Middle
Screen Mode Normal
Blue Screen On
DPMS On
Time Setup
Closed Caption
Default
Select
/
BackEnter
EXIT
Select
/
BackEnter
EXIT
The sleep timer automatically shuts off the TV after a
preset time (from 5 to 240 minutes).
Function
Press button and then use / button to
select Time Setup
You can SLEEP button to select quickly the
sleep timer.
1. Press MENU button and then use / button to
select menu.
2. /ENTER
3. Press /ENTER button and then use / button to
select Sleep Timer.
4. Press / button to select the number of minutes.
Select Off,5Min,10Min, 15Min, 30Min, 45Min,60Min,
90Min, 120Min, 180Minor 240Min.
The time begins to count down from the number of
minutes selected.
5. To cancel the set sleep timer: Press button to select
Off.
also press
Sleep Timer setting
Video
Audio
Channel
Lock
Function
Time Setup
Time Zone Pacific
Date/Time
Sleep Timer Off
Select
/
Back
EXIT
ENTER
ENTER

Operation
Owner s Manual 27
Parental Control can be used to block specific channels, ratings and other viewing sources.
The parental control function is used to block program viewing based on the ratings sent by the broadcasting station.
The default setting is to allow all programs to be viewed. Viewing can be blocked by choosing the type of the program
and the categories.
Parental Control rating and categories
Rating guidelines are provided by broadcasting stations. Most television programs and television movies can be
blocked by TV Rating or Individual Categories. Movies that have been shown at the theaters or direct-to-video
movies use the Movie Rating System (MPAA) only.
Ratings for Television programs :
TV-Y (All children)
TV-Y7 (Children 7 years older)
TV-G (General audience)
TV-PG (Parental guidance suggested)
TV-14 (Parents strongly cautioned)
TV-MA (Mature audience only)
Ratings for Movies previously shown in theaters:
MPAA Rating :
G (General audience)
PG (Parental guidance suggested)
PG-13 (Parents strongly cautioned)
R (Restricted)
NC-17 (No one 17 and under admitted)
X (Adult only)
If you set PG-13 : G and PG movies will be available , PG-13, R, NC-17 and X will be blocked.
CA Eng Rating
C Children
C8+ Children eight years and older
G General Programming, suitable for all audiences
PG Parental Guidance
14+ Viewers 14 years and older
18+ Adult Programming
CA Fren Rating
G General
8 ans+ Not recommended for young children
13 ans+ Programming may not be suitable for children under the age of 13
16 ans+ Programming is not suitable for children under the age of 16
18 ans+ Programming restricted to adults
Parental Guide
Lock Menu
(applies to TV-Y, TV-Y7,TV-G,TV-PG,TV-14, TV-MA)
(applies to TV-PG, TV-14)
(applies to TV-PG, TV-14, TV-MA)
(applies to TV-PG, TV-14, TV-MA)
(applies to TV-PG, TV-14, TV-MA)
(applies to TV-Y7)
TV Rating :
A (Age)
D (Dialogue - sexual dialogue)
L (Language - adult language)
S (Sex - sexual situations)
V (Violence)
FV (Fantasy Violence)

Operation
28 TV LCD-TFT
1. Press / button to select Lock item.
2. Press / button to select On or Off.
Note
If the Parental Lock is setting as Off, the change of the
Parental Guide , MPAA Rating ,CA Eng Rating and CA
Fren Rating will be no useful.
Parental
Lock Menu
Parental Lock
Note
The Parental control will automatically block certain
categories that are more restrictive . For example, if
you block TV-Y category, then all the categories in
the young adult group will be blocked (TV-Y, TV-Y7,
TV-G, TV-PG, TV-14 and TV-MA).
The sub-ratings (D, L, S, V, FV) work together similarly.
Parental Guide
1. Press MENU button and then use / button to select
Lock menu.
2. Press /ENTER button and then use / button to
select Channel Block.
3. Press / button to select the item, Press ENTER
button to set.
Channel Block
1. Press MENU button and then use / button to select
Lock menu. Then, press button.
The TV is set up with the initial password 0-0-0-0 and
security default password is 9-4-4-3.
2. Use / button to select the desired items, and press
ENTER button to enter the next menu. Once the option
is selected, change the settings to your preference.
/ENTER
/
Set up blocking schemes to block specific channels, ratings,
and external viewing sources.
A password is required to gain access to this menu.
Lock setup
Password
Change the password by inputting a new password twice.
How to set the D, L, S, V and FV sub-ratings.
First, press / button select one of these Ratings:
TV-Y, TV-Y7, TV-G, TV-PG,TV-14, or TV-MA , and press
/ button.
Channel Block
Program Block
Password
Clean All
Parental Lock On
Parental Guide
MPAA Rating
CA Eng Rating
CA Fren Rating
Digital Rating
Block Unrated On
2
3
4
5
6
7
8
9
10
11
12
Analog
Analog
Analog
Analog
Analog
Analog
Analog
Analog
Analog
Analog
Analog
Select
/
Set
Video
Video
Video
Video
Audio
Audio
Audio
Audio
Channel
Channel
Channel
Channel
Lock
Lock
Lock
Lock
Function
Function
Function
Function
Lock
Channel Block
Lock
Program Block
Enter Password
Back
Back
EXIT
EXIT
Select
/
Enter
Back
EXIT
Select
/
Enter
Back
EXIT
ENTER
ENTER
ENTER

Select
/
Set
Back
EXIT
Select
/
Set
Back
EXIT
Select
/
Set
Back
EXIT
Select
/
Set
Back
EXIT
Operation
Owner s Manual 29
Canadian French Language Rating
Canadian English Language Rating
CA Eng Rating
CA Fren Rating
1. Press / button to select CA Eng Rating item.
2. Press /ENTER button and then use / button to
select the rating.
3. Press ENTER button to confirm.
1 Press / button to selectCA Fren Rating item.
2 Press / button and then use / button to
select the rating.
3 Press button to confirm.
.
. ENTER
. ENTER
Lock Menu
MPAA Rating
Blocks movies according to the movie ratings limits
specified, so children cannot view certain movies. You
can set the ratings limit by blocking out all the movies with
the ratings above a specified level. Keep in mind that the
movie ratings limit only applies to movies shown on TV,
not TV programs, such as soap operas.
1. Press / button to select MPAA Rating item.
2. Press /ENTER button and then use / button to
select the rating.
3. Press ENTER button to set block or unblock.
A symbol will be displayed for each sub-rating.
While is selected, press button to go to a sub
rating. To select a different Rating, press / buttons
and then repeat the process.
Note
The V-chip will automatically block certain categories
that are More restrictive .For example, if you block
sub-rating in TV-PG, then the sub-ratings in
TV-14 and TV-MA will automatically be blocked.
ENTER
Lock setup
Allowed Rating Blocked Rating
G
8 ans+
13 +
16 +
18 +
ans
ans
ans
Allowed Rating Blocked Rating
C
C8+
G
PG
14+
18+
Allowed Rating Blocked Rating
G
PG
PG-13
R
NC-17
X
Allowed Rating Blocked Rating
A D L S V FV
TV-Y
TV-Y7
TV-G
TV-PG
TV-14
TV-MA
Video
Video
Video
Video
Audio
Audio
Audio
Audio
Channel
Channel
Channel
Channel
Lock
Lock
Lock
Lock
Function
Function
Function
Function
Parental Guide
CA Fren Rating
CA Eng Rating
MPAA Rating
ENTER
ENTER
ENTER
ENTER

Operation
30 TV LCD-TFT
Brief Info shows the present screen information.
Press DISPLAYbutton to show the Brief Info on the screen.
Press DISPLAYbutton or EXIT button to exit.
Brief Info
Other Functions
Function:
Show the present screen information.
Press button or EXIT button to exit.
A: Video resolution
B: Program name
C: Program rating categories
D: program show time
E: Program title
F: Channel Lable
G:Tuner mode
H:Program details
DISPLAY
Using the Guide
The guide allows you to select the channels from a channel
list.
The guide allows provides information about the current
program being shown on each channel(if information is
available from the station).
Note
Program information in the guide is provided by the
broadcasters. As a result, it may sometimes include only
the channel number, without a program title or description.
A: Program title
B: program options
C: program show time
D: Program details
E: Program rating categories
 Loading...