

Page 1
Haier
HL19R1/H L19K1/H LC 19R1/H LC 19K1/H L22R1/H L22K1/H LC22R1
HLC22K1/HL22F1
LCD TV& LCDTV/DVD Combo
USER MANUAL
Please read this manual carefully
before using this TV set and keep it
for future reference.
Page 2
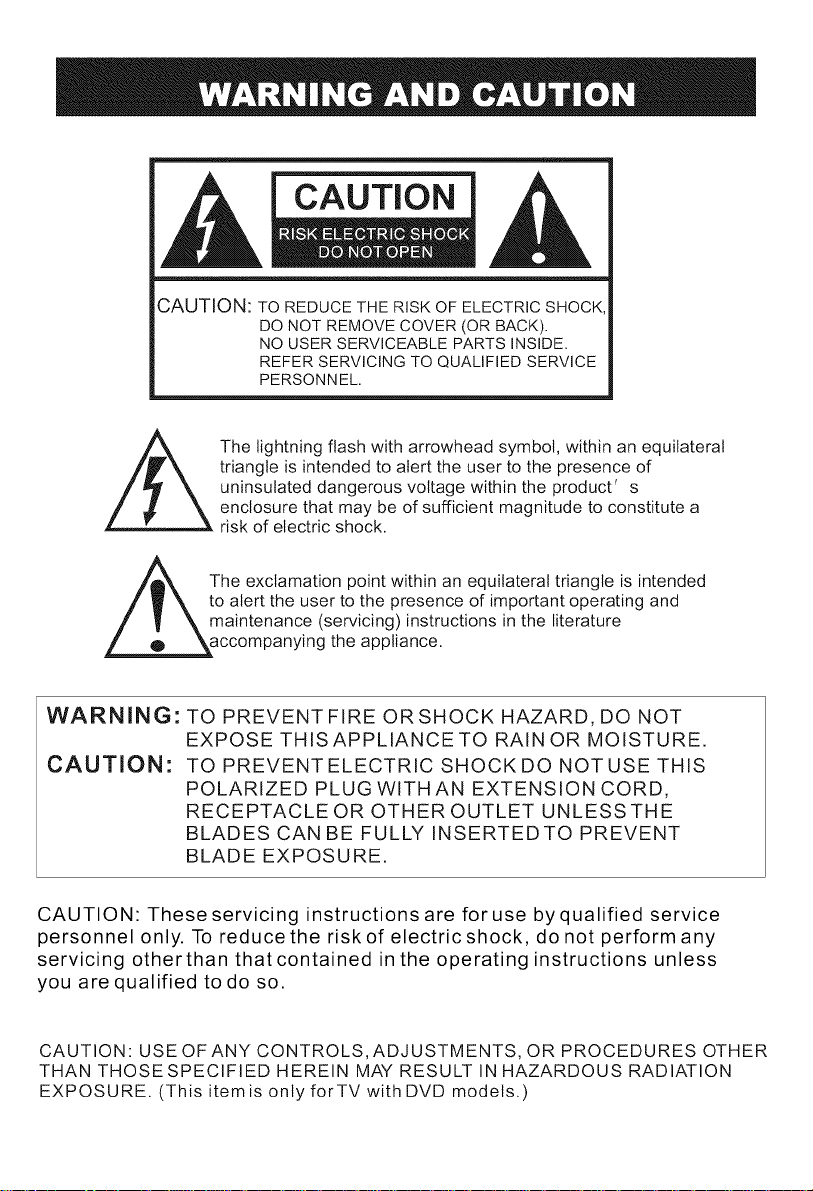
CAUTION:TO REDUCE THE RISK OF ELECTRIC SHOCK
DO NOT REMOVE COVER (OR BACK),
NO USER SERVICEABLE PARTS INSIDE,
REFER SERVICING TO QUALIFIED SERVICE
PERSONNEL,
The lightning flash with arrowhead symbol, within an equilateral
triangle is intended to alert the user to the presence of
uninsulated dangerous voltage within the product' s
enclosure that may be of sufficient magnitude to constitute a
risk of electric shock.
The exclamation point within an equilateral triangle is intended
to alert the user to the presence of important operating and
maintenance (servicing) instructions in the literature
ying the appliance.
WARNING: TO PREVENT FIRE ORSHOCK HAZARD, DO NOT
EXPOSE THISAPPLIANCETO RAINOR MOISTURE.
CAUTION: TO PREVENTELECTRIC SHOCKDO NOTUSE THIS
POLARIZED PLUG WITH AN EXTENSION CORD,
RECEPTACLE OR OTHER OUTLET UNLESS THE
BLADES CAN BE FULLY INSERTEDTO PREVENT
BLADE EXPOSURE.
CAUTION: These servicing instructions are for use by qualified service
personnel only, To reduce the risk of electric shock, do not perform any
servicing otherthan that contained in the operating instructions unless
you are qualified to do so,
CAUTION: USE OF ANY CONTROLS, ADJUSTMENTS, OR PROCEDURES OTHER
THAN THOSESPECIFIED HEREIN MAY RESULT IN HAZARDOUS RADIATION
EXPOSURE. (This itemis only forTV with DVD models.)
Page 3
important Safety instructions
1) Read these instructions.
2) Keep these instructions.
3) Heed allwarnings.
4) Follow altinstructions.
5) Do not use this apparatus near water.
6) Clean only with dry cloth.
7) Do not block any ventilation openings. Install in accordance with the
manufacturer's instructions.
8) Do notinstall near anyheat sources suchas radiators, heatregisters, stoves,
or other apparatus(including amplifiers) thatproduce heat.
9) Protect the power cordfrom being watkedon or pinched particularly at plugs,
convenience receptacles, andthe point wherethey exit fromthe apparatus.
10) Only use attachments/accessories specified by the manufacturer.
11)Use only with the cart, stand, tripod, bracket, or table specified by the
manufacturer, or sold with the apparatus. When a cart is used, use caution when
moving the cart/apparatus combination to avoid injury from tip-over.
12) Unplug this apparatus during lightning storms or when unused for long
periods of time.
13) Refer all servicing to qualified service personnel. Servicing is required when
the apparatus has been damaged in any way, such as power-supply cord or plug
is damaged, liquid has been spilled or objects have fallen into the apparatus, the
apparatus has been exposed to rain or moisture, does not operate normally, or
has been dropped.
14)The apparatus shall not be exposed to dripping or splashing and that no
objects filled withliquids, such asvases, shall beplaced on the apparatus.
15)The mains plug orapptiance inlet is used as the disconnect device, remain it
readily operable during the apparatus normal use.
_t7
Page 4

PRECAUTIONS
FCC WARNING-This equipment may
generate or use radio frequency
energy,Changes or modifications to this
equipment may cause harmful
interference unless the modifications are
expressly approved in the instruction
manual.The user could lose the authority
to operate this equipment if an
unauthorized change or modification is
made.
LASER SAFETY
This unit employs a laser.Only a qualified
service person should remove the cover
or attempt to service this device,due to
possible eye injury.
Energy Star compliant
By being Energy Star compliant you are assured that your Haier model is helping the
environment by using tess energy while saving you money. ENERGY STAR is a joint
program of the U,S. Environmental Protection Agency and the U.S. Department of
Energy promoting energy efficiency.
CAUTION:USE OF CONTROLS OR
ADJUSTMENTS OR PERFORMANCE
OF PROCEDURES OTHER THAN
THOSE SPECIFIED HEREIN MAY
RESULT IN HAZARDOUS RADIATION
EXPOSURE.
CAUTION:VISIBLE AND INVISIBLE
LASER RADIATION WHEN OPEN AND
INTERLOCK DEFEATED.DO NOT
STARE INTO BEAM.
LOCATION:INSIDE,NEAR THE DECK
MECHANISM.
Page 5
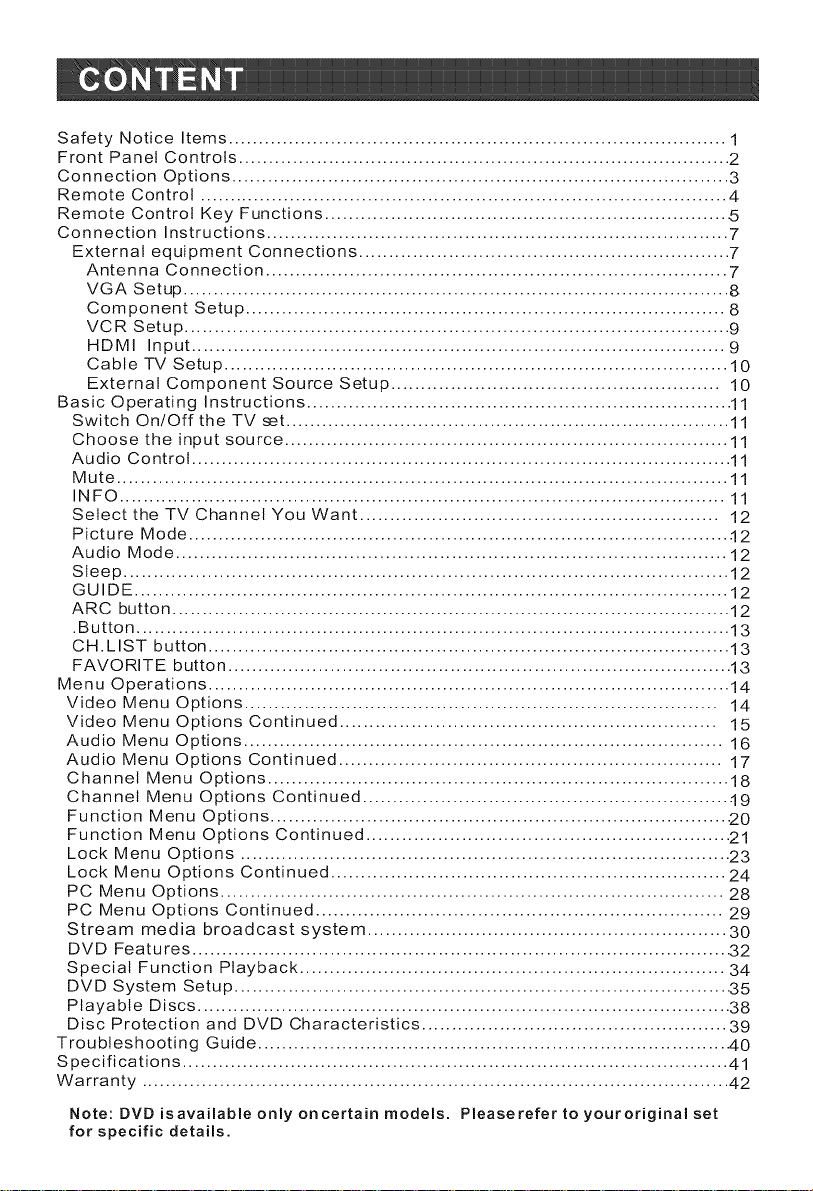
Safety Notice Items ................................................................................... 1
Front Panel Controls .................................................................................. 2
Connection Options ................................................................................... 3
Remote Control ........................................................................................ 4
Remote Control Key Functions ................................................................... 5
Connection Instructions ............................................................................. 7
External equipment Connections .............................................................. 7
Antenna Connection ............................................................................. 7
VGA Setup ........................................................................................... 8
Component Setup ................................................................................ 8
VCR Setup ........................................................................................... 9
HDMI Input ......................................................................................... 9
Cable TV Setup .................................................................................... 10
External Component Source Setup ....................................................... 10
Basic Operating Instructions ....................................................................... 11
Switch On/Off the TV set .......................................................................... 11
Choose the input source .......................................................................... 11
Audio Control .......................................................................................... 11
Mute ...................................................................................................... 11
INFO ..................................................................................................... 11
Select the TV Channel You Want ............................................................ 12
Picture Mode .......................................................................................... 12
Audio Mode ............................................................................................ 12
Sleep ..................................................................................................... 12
GUIDE ................................................................................................... 12
ARC button ............................................................................................. 12
.Button ................................................................................................... 13
CH.LIST button ....................................................................................... 13
FAVORITE button .................................................................................... 13
Menu Operations ....................................................................................... 14
Video Menu Options ............................................................................... 14
Video Menu Options Continued ............................................................... 15
Audio Menu Options ................................................................................ 16
Audio Menu Options Continued ................................................................ 17
Channel Menu Options ............................................................................. 18
Channel Menu Options Continued ............................................................. 19
Function Menu Options ............................................................................ .20
Function Menu Options Continued ............................................................. 21
Lock Menu Options .................................................................................. 23
Lock Menu Options Continued .................................................................. 24
PC Menu Options .................................................................................... 28
PC Menu Options Continued .................................................................... 29
Stream media broadcast system ............................................................ 30
DVD Features .......................................................................................... 32
Special Function Playback ....................................................................... 34
DVD System Setup ................................................................................... 35
Playable Discs ......................................................................................... 38
Disc Protection and DVD Characteristics ................................................... 39
Troubleshooting Guide ............................................................................... 40
Specifications ........................................................................................... 41
Warranty .................................................................................................. 42
Note:DVDieavailableonlyoncertainmodels. Pleaserefertoyouroriginalset
for specific details.
Page 6
Incorrect usage may cause fire orelectric shock. To prevent this, please do as
required when you are installing, using and cleaning this machine. To ensure
your safety and extend thelife-span of LCD-TV, please read the following items
carefully before using:
Please read and understand all the instructions before operation;
Please keep this manual for later use;
Please comply strictly with the warning instructions on the machine and
in this book;
Please complywith the instructions provided;
Please do not use additional devices that are not recommended by
manufacturer:
Before operation, please make sure that the operating voltage of your unit is
correct;
Do not placethe unit on unstable, dusty and humid places;
Never put theunit in directsunlight or nearheat sources;
Allow enough space for proper ventilation;
Please keep water away from the LCD-TV. If water comes in contact with the
LCD-TV, disconnect the power cord from the power source, then wipe the set
with adry soft cloth;
Do not remove the back cover. If service is needed, please contact an
Authorized service technician.
@
Page 7
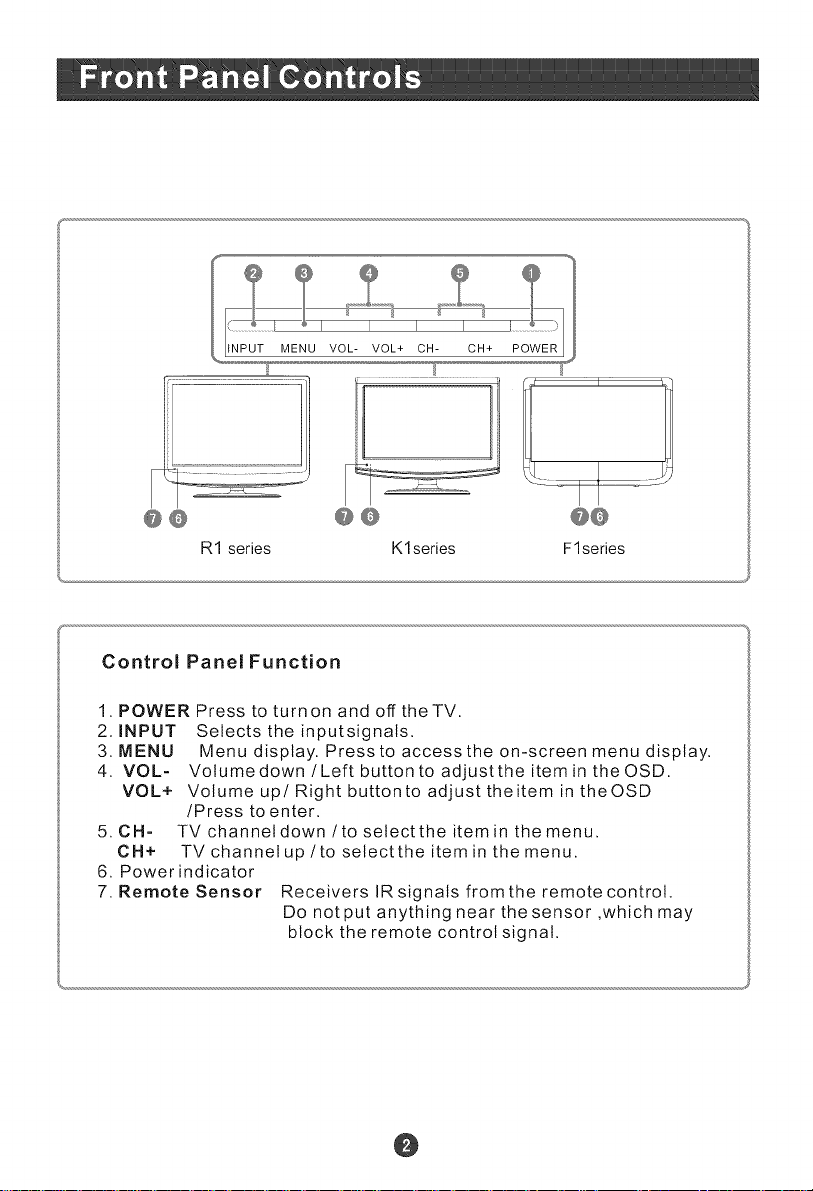
@@ @@
R1 series K1series F1series
Control Panel Function
1. POWER Press to turnon and off theTV.
2. INPUT Selects theinputsignals.
3. MENU Menu display. Press to access the on-screen menu display.
4. VOL- Volume down/LeftbuttontoadjusttheitemintheOSD.
VOL+ Volume up/RightbuttontoadjusttheitemintheOSD
/Press to enter.
5. CH- TV channel down/to select the item in the menu.
CH+ TV channel up / to select the item in the menu.
6. Power indicator
7. Remote Sensor Receivers IR signats from the remote controt.
Do not put anything near the sensor ,which may
block the remote control signal.
J
@
Page 8
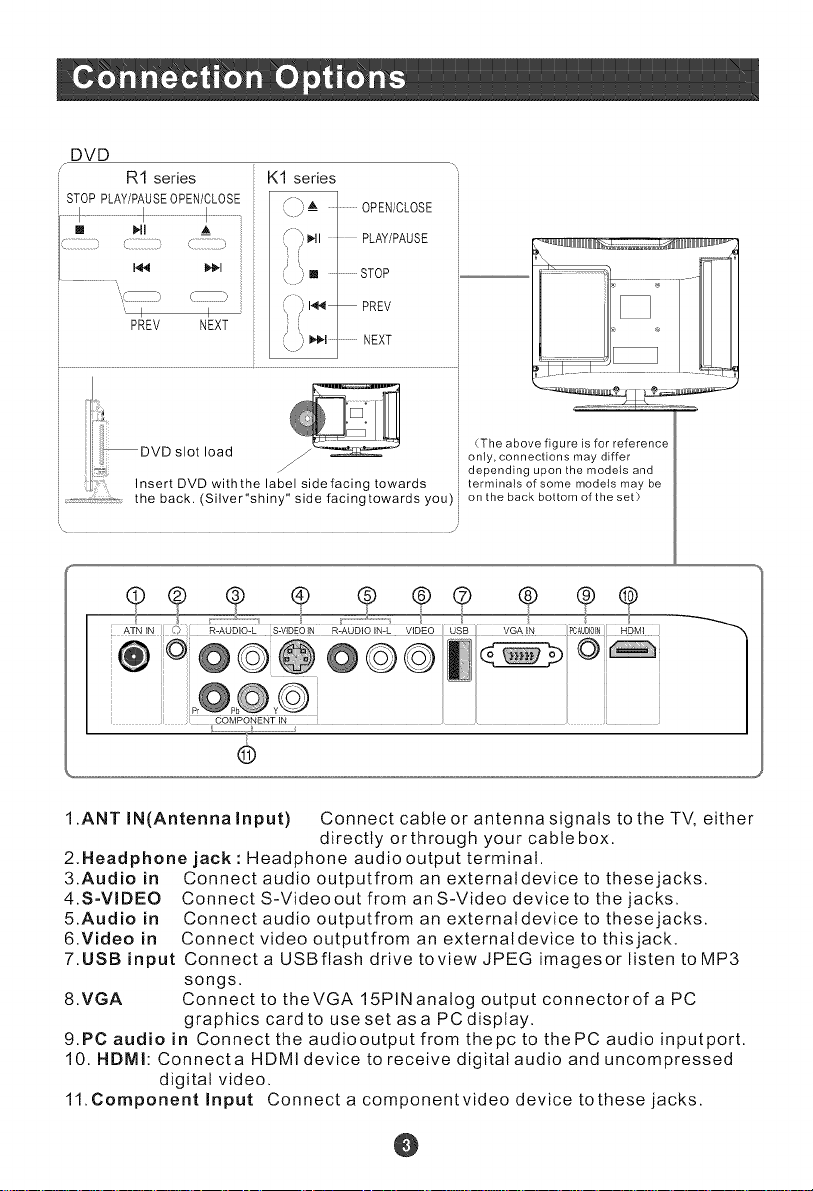
DVD
/
l 1.,t_ i_1 ii ;,:,_
R1 series
STOPPLAY/PAUSEOPEN/CLOSE J _ A
I I t '_-
[] Ill A i
....,_ 3 _ : _ _-,
_'i-i _. il _ _ill
I I i ,,
PREV NEXT
K1 series
\ J
.............OPEN/CLOSE
PLAY/PAUSE
STOP
PREV
NEXT
DVD slot load
i:':i¢:i_nsert DVD with the labe_sl side facing towards
i _:_,_:_o_,_,. the back. (Silver"shiny" side facingtowards you)
(The above figure is for reference
only, connections may differ
depending upon the models and
terminals of some models may be
on the back bottom of the set3
®
1.ANT IN(Antenna input) Connect cable or antenna signals to the TV, either
directly or through your cablebox.
2.Headphone jack : Headphone audio output terminal.
3.Audio in Connect audio outputfrom an externaldevice to thesejacks.
4.S-VIDEO Connect S-Video out from an S-Video device to the jacks.
5.Audio in Connect audio outputfrom an externaldevice to thesejacks.
6.Video in Connect video outputfrom an externaldevice to thisjack.
7.USB input Connect a USBflash drive toview JPEG imagesor listen to MP3
8.VGA Connect to theVGA 15PINanalog output connectorof a PC
9.PC audio in Connect the audiooutput from thepc to thePC audio inputport.
10. NDMI: Connecta HDMI device to receive digital audio and uncompressed
11. Component lnput Connectacomponentvideodevicetothesejacks.
songs.
graphics card to use set asa PC display.
digital video.
@
Page 9
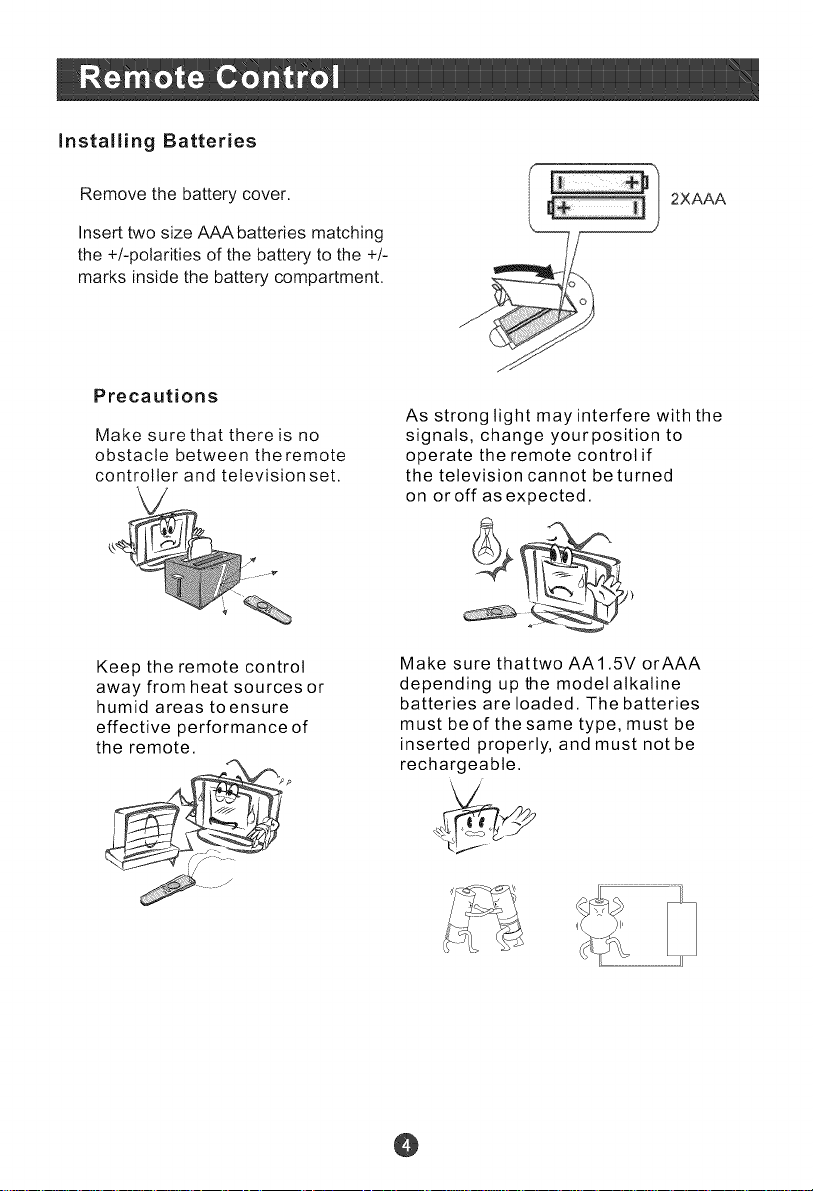
Installing Batteries
Remove the battery cover.
Insert two size AAA batteries matching
the +/-polarities of the battery to the +/-
marks inside the battery compartment.
Precautions
Make sure that there is no
obstacle between theremote
controller and television set.
Keep the remote control
away from heat sources or
humid areas toensure
effective performance of
the remote.
2XAAA
As strong light may interfere with the
signals, change yourposition to
operate the remote control if
the television cannot be turned
on oroff as expected.
Make sure thattwo AA1.5V orAAA
depending up the model alkaline
batteries are loaded. The batteries
must be of the same type, must be
inserted properly, and must not be
rechargeable.
@
Page 10
When using the remote control, aim it
towards the remotesensor on theTV
(_ ............
Q ................
Q ..........
(_ .....
(_ ...........................
..............
Q
).........
(_ ............................
DMENU DCALL DAUD_O SETUP
SEARCH ANGLE SUBTITLE PROGRAM
..........................
(For TV with DVD}
1.Press to turn on and offthe TV
2.Press to switch input source to USB in
&Display the guide when you are watching analog or
digital channels
4.Select a closed caption option
5.Press repeatedly to cycle through the available picture
modes
6.Press to cycle through different sound settings
7.Show the input source
8.Switches the TV sound on or off
9.Press to adjust the volume
10.Press to open the on-screen menu_EFT__:j. r-_ ( (_RIGHT
11 .Thumbstick(Up/Down/Left/Right) DOWN
Allows you to navigate the on-screen menus
and adjust the system settings to your preference.
12.Press to display the sleep timer option
13.DVD PLAY/PAUSE
14.DVD Open/close
15.DVD FAST FORWARD
16.DVD FAST REVERSE
17.DVD CALL
18.DVD MENU
19.DVD SEARCH
2O.DVD ANGLE
21 .Press to switch input source to DVD in
22.Open the channel list in TV
23.Select MONO, STEREO, SAP in NTSC system
24.Open the favourite channel list in TV
25.Press to change the aspect ratio
26.Press to change a channel
27.Press to select digital channels. For example, to enter
"54-3", press "54", " • " and "3"
28.Press to jump back and forth between two channels
29.Press to scan through channels. To scan quickly
between the last two channels, press and hold down
either +/-.
3O.Exit On Screen Display
31 .Accesses the highlighted item in the on-screen menu
32.Press to display the TV status information on the top
of the TV screen
33.DVD STOP
34.DVD REPEAT
35.DVD Previous Chapter
36.DVD Next Chapter
37.DVD AUDIO Mode
38.DVD SETUP
39.DVD PROGRAM
4O.DVD SUBTITLE
@
Page 11
When using the remote control, aim it
towards the remotesensor on theTV
m
Q .....
USB PLAYJPAUSE STOP REPEAT
REV FWD PREV NEXT
(For TV without DVD)
............Q
--@
• @
1.Press repeatedly to cycle through the available
picture modes
2.Press to change the aspect ratio
3.Select a closed caption option
4.Show the input source
5.Press to open the on-screen menu
6.Volume/Channel Selection
7.Exit On Screen Display
8.Press to switch input source to USB in
9.DVD PLAY/PAUSE
1O.DVD fast reverse
11 .DVD fast forward
12.Press to display the TV status information on the top
of the TV screen
13.Shows program schedule in TV
14.Press to turn on and off the TV
15.Press to cycle through different sound settings
16.Press to display the sleep timer option
17.Select MONO, STEREO, SAP in NTSC system
18.Press to change a channel
19.Press to select digital channels. For example, to
enter "54-3", press "54", ". " and "3".
20.Switches the TV sound on or off
21 .Accesses the highlighted item in the on-screen menu
22.Press to jump back and forth between two channels
23.DVD REPEAT
24.DVD STOP
25.DVD Next Chapter
26.DVD Previous Chapter
27.Open the channel list in TV
28.Open the favorite channel list in TV
@
Page 12
External Equipment Connections
Over-the-air TV reception wilt depend on your antenna type, antenna location
and antenna positioning.
Multi-family Dwellings/Apartments
(Connect to wallantenna socket) _1__
n_ .... __:Z:i::wire (75 B_0t_'_e"_:" ""-_]/
VHF anten
Turn clockwise to tighten. /
UHF antenn_
I
outdoor
antenna
Single-family Dwellings/Houses
(Connect to wall jack for outdoor antenna)
NOTE: Cables shownare not includedwith the TV
Be careful notto bend the bronze
wire when connecting the antenna.
. .... J
• To improve picture quality in a poor
signal area, purchase and install a
signal amplifier.
• If the antenna needs to be split fortwo
Tvs, install a "2-Way Signal Splitter"
in the connections.
• If the antenna is not installed properly,
contact yourdealer for assistance.
@
Page 13
f
i VGA Setup
You can use yourLCD-TV as amonitor for your personal computer using a VGA
cable (not supplied).
Connection and use steps:
1.Read the userguide supplied with
your computerand ensure that it has
a VGAconnector;
2.Make sure that the power of the LCD
-TV and the PC are off;
3.Connect a Dtype 15-pin PC interface
cable (not supplied) to the PC video
interface connector on the PC. Then
connect the other end to the PC video
interface connector on the back of the ,_,,_
LCD-TV.Tighten the screwson the PC _:_
connectors once they are firmly
connected;
4.Turn on the power ofthe LCD-TV first,
and then turn on the power of the PC;
5.Press INPUTbutton to setthe video inputmode of the LCD-TV to PC;
Once the input for PC is selected and if you see no image press function
F8 on you pc.
6.Check the image on your TV. There may be noise associated with the resolution,
vertical pattern, contrast or brightness in PC mode. If noise is present, change
the PC mode to another resolution, change the refresh rate to another rate or
adjust the brightness and contrast on the menu until the picture is clear. If the
refresh rate of the PC graphic card can not be changed, change the PC graphic
card or consult the manufacturer of the PC graphic card.
Resolution
Mode
VGA
SVGA
XGA
Resolution
Line frequency(KHz) Frame frequency(Hz)
640x480 31.5
800x600 37.9
1024x768 48.4
60
60
6O
Note: All above listed are subject to VESAcriteria.
f-
Component Setup _
How to connect
Connect the DVD video outputs (Y, PB, PR)
to the Component(Y, Pb, Pr) IN jacks on
the TVand connect theDVD audio outputs
to the AUDIO IN jacks on the TV,as shown
in the figure.
NOTE: If your DVD player doesnot have
component video output, use S-Video.
How to use
1. Turn on the DVD player, insert a DVD.
2. Use INPUT button on theremote
control to selectthe proper input. ,,_
Page 14
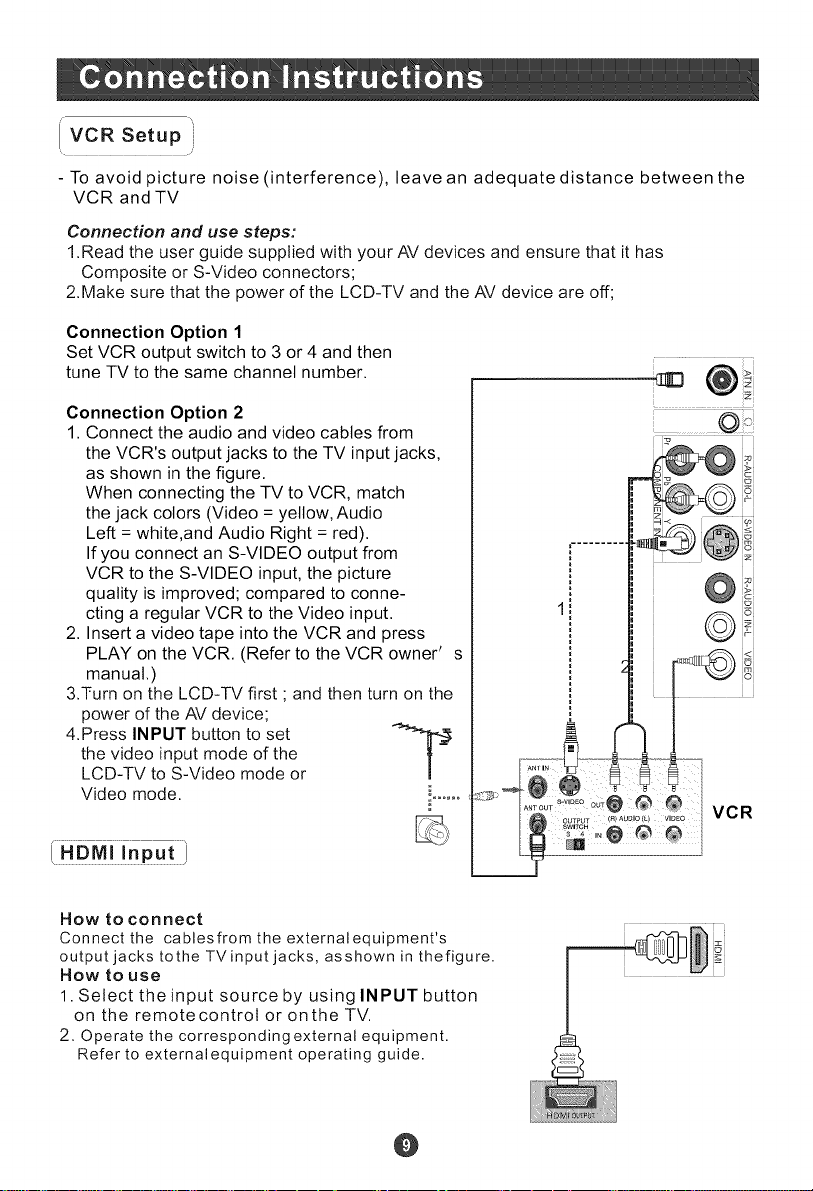
i_VCR Setup
- To avoid picture noise (interference), leave an adequate distance between the
VCR and TV
Connection and use steps:
1.Read the user guide supplied with your AV devices and ensure that it has
Composite or S-Video connectors;
2.Make sure that the power of the LCD-TV and the AV device are off;
Connection Option 1
Set VCR output switch to 3 or 4 and then
tune TV to the same channel number.
Connection Option 2
1. Connect the audio and video cables from
the VCR's output jacks to the TV input jacks,
as shown in the figure.
When connecting the TV to VCR, match
the jack colors (Video = yellow, Audio
Left = white,and Audio Right = red).
If you connect an S-VIDEO output from
VCR to the S-VIDEO input, the picture
quality is improved; compared to conne-
cting a regular VCR to the Video input.
2. Insert a video tape into the VCR and press
PLAY on the VCR. (Refer to the VCR owner' s
manual.)
3.Turn on the LCD-TV first " and then turn on the
power of the AV device;
4.Press INPUT button to set
the video input mode of the
LCD-TV to S-Video mode or
Video mode.
j
T--
HDMM!nPUt.......
How to connect
Connect the cablesfromtheexternalequipment's
output jacks tothe TVinput jacks, asshown in thefigure.
How to use
1. Select the input source by using INPUT button
on the remotecontrot or onthe TV.
2. Operate the corresponding external equipment.
Refer to external equipment operating guide.
@
Page 15
( ..........................................................................................
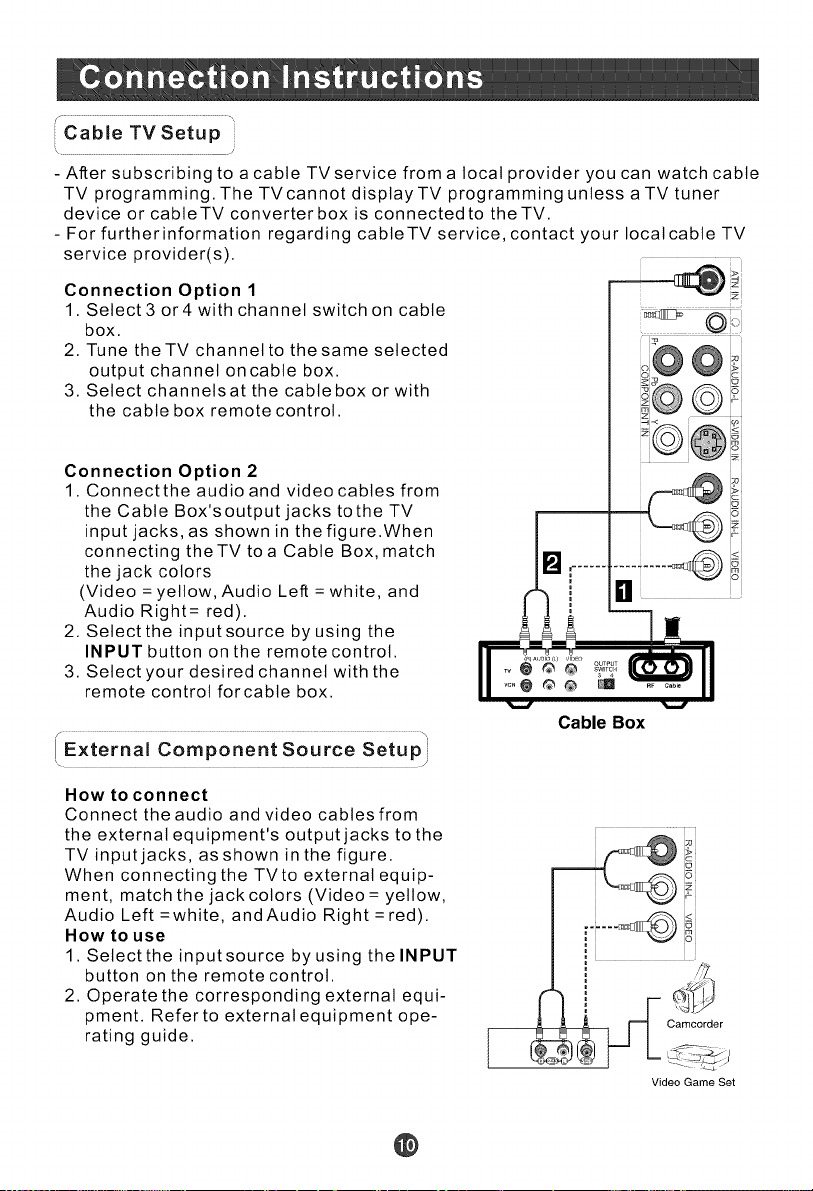
Cable TV Setup
- After subscribing to a cable TV service from a local provider you can watch cable
TV programming. The TVcannot displayTV programming unless a TV tuner
device or cabteTV converter box is connected to theTV.
- For furtherinformation regarding cabteTV service, contact your local cable TV
service provider(s).
Connection Option 1
1. Select 3 or4 with channel switch on cable
box.
2. Tune theTV channel to the same selected
output channel oncabte box.
3. Select channetsat the cabtebox or with
the cable box remote control.
Connection Option 2
1. Connectthe audio and video cables from
the Cable Box'soutput jacks tothe TV
input jacks, as shown in the figure.When
connecting theTV toa Cable Box, match
the jack colors
(Video = yellow, Audio Left = white, and
Audio Right= red).
2. Selectthe input source by using the
INPUT button on the remote control.
3. Setect your desired channel with the
remote control forcable box.
/- .................................................................................................................................................................................\
I External Component Source Setup i
,\
Cable Box
How to connect
Connect the audio and video cables from
the external equipment's output jacks to the
TV input jacks, as shown in the figure.
When connecting the TVto external equip-
ment, match the jack colors (Video = yellow,
Audio Left =white, andAudio Right =red).
How to use
1. Select the inputsource by using the INPUT
button on the remote control.
2. Operate the corresponding external equi-
pment. Referto external equipment ope-
Carncorder
rating guide.
@
Video Game Set
Page 16

heTVset.
When the POWER ((D) button is pressed and the LCD-TV is turned on, the
indicatorlightonthefrontoftheLCD-TVchangesfromredtogreen. When the
LCD-TV is turned off using the power button, the LCD-TVwitl go into standby
mode and the indicator light turns red(or turns dark).
NOTE: The color of the indicator light maydiffer based upon the model purchased.
IChoose the input source
Change the picture source so you can watch your TV, VCR, DVD, Cable,
or any otherdevices that are connected to yourTV.
1. Press INPUT button to enterthe Select Source menu and then use
INPUT button to select the desired items ( TV, Video, S-Video, Component
DVD, PC, HDMI) .
2. Press ENTER button to confirm.
Audio Control]
J
1.Press VOL+ button to increase the volume. Anumber will appear
on screen indicating the volume level.
2.Press VOL= button to decrease the volume. A number will appear
On screen indicating the volume level.
.............................m
Mute l
2
1.Press MUTE button to mute the sound temporarily. A mute icon
Appears on the screen.
2.Press MUTE button orVOL+ again to restore the sound.
The mute icon disappears.
INFO
Press INFO button to display current program information.
@
Page 17

You can use thenumber buttons and o button on theremote control todirectty
select TVchannels and press ENTER to confirm.
And you can press the buttons(OH+lOll-) on the remote control oron the panel to
make a selection.
Picture Mode
Press PICTURE button on the remote control for menu display. Fordesired mode
as follows:
Mild_ Standard_Vivid_Custom
Audio Mode
Press AUDIO button on the remote control for menu display. Fordesired mode
as follows:
Off_ Concert_Living Room_ Hall_Bathroom_ Cave_ Arena_ Church
Sleep
Press SLEEP button toset thetime : Off-5 Min-10 Min-15Min-30 Min- 45Min
-60 Min-90 Min-120Min-180 Min-240Min
This function allows you to turn off the televisionaftera pre-selected
number of minutes
f
i_.GUIDE(only available indigital signal)
Press GUIDE button in digital channels to display Guide menu .(This menu is
just foryou to see the information and can not be changed)
Press CH+/CH-to select information foryou to look over.
ARC button
Press to select the aspect ratio among Normal, Wide, Zoom and Cinema.
(Display mode maydiffer from different inputs)
@
Page 18

• button
Press to select additional channels (digital and analog) being broadcast by the
same station. For example, toselectdigitatchannel"11.1" press"11" then
press "O" and "1".
CH.LIST button
Press to disptaythe channel list. Press VOL+/VOL- to turn to the next or previous
page, press CH+/CH- to select the item and Enter button to select the channel you
desired.
Adding favorite channels
Press FAVORITE under one channel. The favorite channel list opens.
Press CH+ or CH-to select ablank box, then press Enter to confirm.
The channel willbe added tothe favorites channeltist.
Press Enter again, the channelwitt be removedfrom the favoriteschannel list.
Tuning toa favorite channel
Press FAVORITE. The favorite channel listopens.
Press CH+ or CH-to select thechannel and pressEnter to confirm° .
YourLCD TVautomaticatly tunes to the channel you selected.
@
Page 19

* In this manual,the OSD (OnScreen Display) maybe differ fromyour TV
These are examplesto illustrate theTV's operation.
Press Input toselect the inputsource. The menufor each sourcemay be
different.
1. Press MENU button to display the main menu, and A/Vto selectthe main
menu function.
2. PressI_/ENTER button to enterthe sub menuand ,_/Vto go upand down to
select the desired option.
3. PressI_/ENTER button to confirm and4/_to make changes to the
parameters.
4. Press EXIT button to return to the main menu.
5. Press MENU button to exit the menu screen.
Video Menu Options
Picture quality can be adjusted for any input separately.
The picture quatityon the screencan be adjustedas follows:
1. Press MENU button andA/Y until the following menu appears on the
screen.
2. Press!_/ENTER button to enter the menu function and A/Vto scroll up
and down to select the desired function.
3.Press _/ENTER button to confirm and 41/1_increase and decrease
the level toadjust the selected option to your preference .
4. Repeat step 2and step 3 until desired picture quality has been achieved.
Mode Custom _
/'7 -_,
_:._ Audio
'_)_ Channel
Function
_<'_ Lock
Video _ Adjust_ Selecl_Back
Note:
1,The options maybe differentbecause of theinputs,
2,Symbols on top of the menu in this manual may differfrom the actual set display,
3,The picture optionscan be changedonly in Custommode, the othermodes
are fixed,
Brightness _ ............................_ 50
Contrast _ ...........i_ 50
Color _ .............................50
Tint [.........................._ .............................i 0
Sharpness _ : 50
Color Temperature [_[]_
Advanced Video [_
@
Page 20

Function:
Mode: Select the type of picture which best corresponds to your viewing
requirements by selecting Picture Mode in Video menu. You may select the
picture mode directly by pressing the PICTURE button on the remote control.
Brightness Press,&/Y button andI_/ENTER to confirm, then press 4/l_to
adjust the brightness of the picture.
Contrast PressA/V button andI_/ENTER to confirm, then press 4/l_to
adjust the contrast of the picture.
Color: Press,A/Y button andS/ENTER to confirm, then press41/l_ to adjust
color saturation.
Tint :Adjust the toneof the picture.
Sharpness : Adjust the amount ofthe detail enhancement, the image
sharpness rises as the number increases (By increasing the level, it wilt show
cleaner and clearerimages and bydecreasing the level, it will makethe picture
smoother).
Color Temperature: This witl increase ordecrease Warm (red) and Cool (blue)
colors to suit personal preferences.Select Cool to give the white colors ablue tint,
Standard to give thewhite colors aneutral tint, Warm to give the white colors
a red tint. Custom to allow you change the color manually.
Contrast, Brightness, Sharpness, ColorTemperatureand Tintcan only beadjusted when
Mode in Custom mode.
Advanced Video:To adjust the picture in advanced level:
DNR: Digital Noise Reduction. To adjust to reduce the appearance of digitizing
error caused bythe compression:Medium,Strong,Auto,Offand weak.
Black Level Extender: To adjust theability in theblack areas detailof the
picture:On and Off.
White Peak Lirniter: To adjust theability in thewhite areas detailof the
picture:On and Off.
CTI: ColorTransient Intensity.Toadjust the picturefor color errors:Medium,Strong,
Off and weak.
Flesh Tone:Toadjust the flashcolors:On and Off:.
Adaptive Luma Control: To adjust changesin the luminanceof the picture:Onand Off
@
Page 21

r ..... ,
Audio Menu Options
Sound can beadjusted for anyinput as follows:
1. PressMENUbuttonandA/Y
until the following menu appears on the
screen.
_ Video
_Z:_,'-_.._ Channel
_ Function
_"-i Lock
_ j
Audio _ Adjust_ Selecl_Baok
Balance _ 0 ]
Bass _ 50
Treble 50
Sound Surround On
Mode Off _
Equalizer Off _
AVL Off _
Audio Only [_
You can adjust sound options to the levels you prefer.
2. Pressl)/ENTERbuttontoentertheAudio menuandA/Ytogoupand
down to select the desired option.
3.PressI_/ENTER button to confirmand 4/1_ increase and decrease
the level toadjust the selected option to yourpreference.
4. Repeat step 2and step 3 until desired audio quality has been achieved.
Function :
Balance: PressA/Vbuttonandl_/ENTERtoconfirm, then press_/!_toadjust
the audio outputbetween left and right speakers.
Bass: PressA/Y button andI_/ENTER to confirm, then press41/1_ to increase
or decrease the level of the lower-pitched sounds.
Treble: PressA/V button andI_/ENTER to confirm, then press4/l_to increase
or decrease the level of the higher-pitched sounds
Surround: To turn thesimulated surround soundon and off.
Mode : PressI_/ENTER to select thetype of soundwhich best correspondsto
your lightning requirements by selecting Mode in Audiomenu.
Equalizer: To adjust the equalizer: Off, Rock, Pop, Live, Dance, Techno, Classic
and Soft.
@
Page 22

Audio Menu Options Continued
AVL: This willreducesthedifferencesinvotumelevelamong broadcasters.
Audio Only: PressI_/ENTER button to confirm, the following displaywitl appear
on the screen:
If enterAudio Only mode, press "POWER" to exit!
Press 4to select OK, then press OK to confirm. The TVscreen wilt
be black and no picture, but the sound is still normal.
You can press POWER button to reveal the picture on the screen.
SAP Broadcasts Setup:
This TVcan receive MTSstereo programs andSAP
(Secondary Audio Program) that accompaniesthe stereo program;
if the station transmits an additional sound signal as well as the original one.
When having selected SAP button on the remote control, thisTV can only
receive the signalwhen theTV station transmits the propersignats.
Mono sound is automatically received if the broadcast is only in Mono; even
though Stereo or SAP has been selected.
Select Mono ifyou want tolisten to monosound during stereo/SAP
broadcasting.
Stereo orSAP can be received in a Analog channel.
1. Use the SAP button to select yourdesired MTS mode in a analog signal.
Each time you press the SAP button, Mono, Stereoor SAP appear.
If other languages are available on the digital signal, select them with the
SAP button.
2. Press EXIT button to save and return to TVviewing.
@
Page 23

Channel Menu Options i
Note: Channel menuwill appear inmain menu onlyin TVmode.
1. Press MENU button and A/Y until the following menu appears on the screen.
_ Video
Audio
Function
Tuner Antenna
Channel Scan D[b
Channel Skip D[b
Channel Label D[]_
__--yLock
Channel _ Se_ecl_Back
2. PressI_/ENTER button to enter the Channel menu and A/Tto go up and
down to select the desired option.
3. Press I_/ENTER button to confirm and _11/ !_ increase and decrease the level to
adjust the selected option to your preference .
4. Repeat step 2and step 3 until desired quality has been achieved .
Function:
Tuner: PressI_/ENTER button to selectAntenna or Cable.
Channel Scan: PressI_/ENTER button to startto scan, press EXIT to cancel
_ Video
S_9 Audio
Status: Scanning... Antenna
Analog Channels: 4
Digital Channels: 3
Function
!,y'"j Lock
Channel Scan _c_,o_
140%
All channels nowavailable will beautomatically preset in order .After the search
has finished, thefirst program numberwill display onthe screen. This search
automatically adds onlythe active channelsin your areato the TV's memory. It
deletes any channels on which there is no broadcast ora poorsignat. The
channels found are automatically saved.
@
Page 24

......Chart, MenuOP!iansCO,t!,uedi
Channel Skip:Pressl_/ENTERbuttontoenterthesubmenu, then press
A/Y to select thechannet number (eg.2)and press ENTER to confirm, a mark
will be displayin the paneas follows andthis channel witlbe skipped nexttime
you pressA/T but you can press digits button to select the channel. If you want
to resume the channel, press ENTER button again.
_ Video
_:.!_/, Audio
Function
_("i Lock
Channel Skip _s_ _S_o_B_ok
2 Analog [] I
3Analog []
4 Analog []
5Analog []
5-1 Digital []
6 Analog []
7 Analog
8 Analog []
9 Analog []
10Analog []
Channel Label: Allows you to name the channel that is selected.
Press _/ENTER button to enter thesubmenu.
_ Video
_ Audio
Function
Lock
Channel Label Set _s_o_ _B_ok
Channel Index _ I
Channel Label
Then press,&/Y to select Channel Index and Channel Labeland _/_-to
select the position of the item that you wantto change, afterward press INPUT
to input the numbers andsymbols and ENTER button to confirm.
@
Page 25

Function Menu Optionsi
%
J
1. Press MENU button andA./Y until the following menu appears on the
screen.
'_ Video
[_) Audio
_._ Channel
"i Lock
_ x
Function _ s_o__Back
Language English 4b
OSD Timeout Short 4
OSD Transparency Middle 4b
Screen Mode Full screen 4b
Blue Screen On q
DPMS On 4b
Time Setup D[b
Closed Caption D[b
Default D[]_
2. PressI_/ENTER button to enter the Function menu and A,/Yto go up and
down to select the desired option.
3.PressI_/ENTER button to confirm and _/1_ increase and decrease
the level toadjust the selected option to yourpreference.
4. Repeat step 2and step 3 until desired quality has been achieved .
Function:
Language: Press4/l_button to select languageof the OSD.
OSD Timeout: Press4/l_to select Middle, Short and Long to change the
time ofthe OSD display.
OSD Transparency: Press4/_,.to select among Low, High and Middle
to change thetransparency of theOSD. To select Low, the OSDis opacity.
Screen Mode: Press4/l_to select among Full Screen, Normal, Wide,
Zoom and Cinema to change the display mode. (display mode may differfrom
different inputs)
Blue Screen: Press4/t_to select On ,the screen wilt be in blue after
3 seconds if there is no signal.
DPMS: PC Power Management. To set On, the set will be in standby mode
automatically if no signal in 2 minutes; ifsignal input, the set will be on again
automatically.
Time Setup: PressI_/ENTER to enterthe submenu.
Time Zone: Press_/l_to select the appropriate time zone.
@
Page 26

Function Menu Options Continued
,,_ Video Time Zone
_#'_ Audio
/'_5_,
_:'_#_Channel
_"_ Lock
Time Setup _ s_o__Baok
Date/Time [_[b
Sleep Timer Off 4
Central
Bate/Time: Press_,/ENTER to enterthe submenu.
Video
>._'_ Audio
i_ Channel
#_i Lock
Date/Time
Auto Off
Date
Time
Timer On
On Time 00:00:00
Off Time 00:00:00
Sele_Back
Auto: Press4/_,to select On or Off .When Auto mode on, the time can not be
adjusted. Select Off ,you can operate to set the time manually.
Bate: Press_l/l_to select the position and digits button to set the date.
Time: Press _/l_to select the position and digits button to set the time.
Timer: Press_/_'to select On or Off. To select Off, the time can not be adjusted.
On Time/OffTime: Press 4/l_to select the position and digitsbutton to
set the time.
Closed Caption: PressI_/ENTER to enterthe submenu.
_<_/-_-Video
J_
_ Audio
r ....
'_-_L Channel
_'_ 7 Lock
Closed Caption
NTSC Caption Off _
DTV Caption Off _
DTV Caption Style D[]b
Page 27

Function Menu Options Continued
..........................................................................................................................................................................J
NTSC Caption: Press A / V to select the Closed Caption options. It helps the
hearing impaired with the broadcast program, as well as helping children
learn how to read. A built in decoder displays the audio portion of a program as text
on the screen when this option is selected.
CCI: When CClis displayed on TV means CCmode is turned on.
CC2 to CC4: For other modes of video related broadcast information.
Text1: For program guide and other information displayed by broadcasters.
(This blocks a large portion of the picture on yourscreen).
Text2 to Text4 :For other modes of information displayed by broadcasters.
(This blocks a large portionof the picture on yourscreen).
IMPORTANT: Closed captioning availability entirelydepends on broadcasters
supplying the signal. Therefore, closed captioning might not always be
available and language availability will differ by broadcast.
Note: Select CCf for full translation of the primary language such as English in
your area. Select CC2 forsecondary language translation such as French or
any other language that maybe broadcast in your area,
DTV Caption: Press _ / I_ to select Servicel/Service2/Service3/Service4/
Service5/Service6/Off.
DTV Caption Style: Press I_/ENTER to enter the submenu.
_ Video
s _
_@j Audio
_ov_> Channel
x c'_
¢'_"i' Lock
Style Custom 4b
Size Large 4F
Text Color White 4_
Text Opacity Solid _
BG Color Black _>
BG Opacity Solid _
Window Color Black
Window Opacity Solid _
DTV Caption Style _s_o_ _B_ok
Style: Press _/1_ to select one of Defaultand Custom. When you select
default, the others are disable and can not be adjusted. When you adjust the
following system,A markof "ABC" in a pane will beon the right of theOSD to
display the effect.
Size: Press 4/I_ to select the size of caption display according to your own
preference.
Text Color. Press _ / I_ to select the text color or the opacity of the text box of
caption display according to your own preference.
Select a color and one of the opacity options.
Text Opacity: Press 41/I, to specify the opacityfor the text color.
BG Color: Press _1/ I_ to select a background color.
@
Page 28

Function Menu Options Continued
BG Opacity: Press _ / I_to select the opacityfor the background color.
Window Color: Press 4 / I_ to select according your own preference
Window Opacity: Press 4 / I_ to select the edge color according your own
preference.
Default: PressI_/ENTER to enter the submenu.
Are you sure?
Press 4 / _"to select OK or Cancel then OK to confirm. If OK, the parameter
will return to the factory set.
Lock Menu Options
1. Press MENU button andA/V until the following menu appears on the
screen.
Enter PasswordVideo
_t_ Audio
_:_'-_...Channel
_ Function
Lock _Baok
2. Press_,/ENTER to enterand then press digits button to input the digits( The
initial password is 0000. If you forget your password, you can always input 9443
to regain control_. The menu wilt displayas follows:
Channel Block D[]_Video
Program Block D_
__'_ Audio Password D[]_
_<_._ Channel
_ Function
Lock _ E_,__ s_ _ s_ok
Clean All D[]_
@
Page 29

Lock Menu Options Continued
Channel Block: PressI_/ENTER to enter thesubmenu as follows.
Video
_,&_), Audio
_:?[_.._Channel
_ Function
Channel Lock _s_ _Selecl _Back
10-1 Digital WCAU-DT [] 1
11 Analog []
11-1 Digital MBC DTV []
12 Analog []
13 Analog []
14 Analog []
14-1 Digital ATSCq
14-2 Digital ATSC_2 []
14-3 Digital ATSC-3 []
15 Analog []
Press A/Yto select the channel you wantto lock, then press ENTER to confirm.
The channel istocked and alock mark appearsin the pane. If you want to unlock
the channel, repeatthe operation aboveagain. Then press EXIT to exit step by
step.
Program Block: Press_/ENTER to enter thesubmenu as follows.
_ Video
, Audio
;_'_ Channel
=
Function
Program Block _ s_o1_Back
Parental Lock On _> J
Parental Guide [_Bb
MPAA Rating [_B_
CA Eng Rating [_[]_>
CA Fren Rating [_[]_
Block Unrated On _
q
Parental Lock: Press 41/ l_ to select On or Off. Used to lock all the system
following .To set Off, the system following can not be available.
Parental Guide: PressI_/ENTER to enter thesubmenu as follows.
Press A/Y/_l/t, to select the item you wantto lock.
Then press ENTER to confirm to lock and press again to resume it.
Parental Guide Technology:
The "P.L. Technology" allows youto use U.S. and Canadian Movies andTV
PROGRAMS Guide ratings to block certain types of TV programs and movies.
To clearly understand TVprogram rating codes, read the following information:
@
Page 30

_ Video
is_P Audio
!_%.._Channel
_ Function
Parental Guide _ s_ s_o__B_ok
A D LSVFV
TV-Y []
TV-Y7 [] []
TV-G []
TV-PG [] [] [][][]
TVd4 [] [] [][]_
TV_MA [][] []
[] Allowed Rating[] Blocked Rating
U.S. TV Program Ratings
TV-Y: For all children- these types of rated programs are designed for a very young
audience, including children from ages 2-6.
TV-Y7: Directed towards olderchildren - this type of rated programs may include
comedic violence of mild physical, or may frighten children under the age of 7.
TV-G: General audience - these types of rated programs contains little or no
violence, no strong language, and little or no sexual dialogueand situations.
TV-PG:Parental Guidance Suggested-this type of rated programs may contain
limited violence, some suggestive sexual dialogue and situations, and rare
language.
TV-14: Parents strongly cautioned-these types of rated programs may contain sexual
content, strong language and more intense violence.
TV-MA:Mature audience only these types of rated programs may contain sexual
violence, explicit sexual content and profane language.
(A)All: Blocks all available sub_ratings.
(D)Dialogue: This type of rated programs contain dialogue withsexual content.
(L)Languag: This type of rated programs contain offensive language.
(S)Sex: This type of rated programs contain sex.
(V)Viotence: This type of rated programs contain violence.
(FV)Fantasy Violence : This type of rated programs contain Fantasy and cartoon
violence.
@
Page 31

Lock Menu Options Continued
L
MPAARating: PressI_/ENTERto enter thesubmenu as follows.
Press A/Y to select the item you wantto lock. Then press ENTER to confirm
to lock and press again to resume it.
Video G []
_, Audio PGd3 []
/._}h • R []
_j_.. Channel NCd7 []
Function
...................................................................•Allowed Rating[]Btocked Rating
MPAA Rati ng _ s_ s_o__ B_ok
PG []
x []
To understand clearly about movie rating codes, read the following list:
U.S. Movie Rating Chart
G: GeneratAudience-this type of movie rating means all ages admitted to see
the movie.
PG: Parental guidance suggested. Some material may not be suitable for children.
PG-13:Parents Strongly Cautioned -this type of movie rating means some material
may not be appropriate for children under13.
R:Restricted- This type of movie rating means children under 17 of age require
to be with parentor guardian.
NC-17:This type of movie rating means no one 17 and under admitted.
X: This type of movie rating means adults only.
CA Eng Rating: Press I_/ENTER to enter the submenu asfotlows.
Press A/Y to select the item you want to lock. Then press ENTER to confirm to
lock and press again to resume it.
@
Page 32

Lock Menu Options Continued
_,_/._ Video c []
_p:_p Audio G []
fO\
',£_,__:.._Channel 14+ []
Function
CA Eng Rating _ s_ s_ _B_ok
C8+ []
PG []
18+ []
[] Allowed Rating[] Blocked Rating
To clearly understand Canadian program rating codes, read the following list:
Canadian English Rating Chart
C: This type ofprogramming is intended for children under age 8. There is no
offensive language, nudity orsexual content.
C8+:These types of rated programs are generally considered acceptable for children
8 years and over. There is no profanity, nudityor sexual content.
G: These types of rated programs are generally suitabtefor all audiences.
PG: Parental Guidance Suggested -in these types of rated programs, some material
may not be suitable for children.
14+: In these types of rated programs, some content may not be suitable forviewers
under the age of 14.Parents are strongly cautioned not to have their children
view 14+ rated programs bypre-teens and early teens.
18+: Adults Only-these types of rated programs are only for adult viewers only.
CA Fren Rating: Press _/ENTERto enter the submenu asfotlows.
Press A / 'V' to select the item you want to lock. Then press ENTER to confirm to
lock and press again to resume it.
_ Video
y_, Audio
;%'_L._Channel
_ Function
...................................................................•Allowed Rating[Blocked Rating
CA Fren Rating _ s_s_o_ _B_ok
G []
8 ans+ []
13 ans+ []
16 ans+ []
18 ans+ []
@
Page 33

Lock Menu Options Continued
Canadian French Rating Chart
G:These types of rated programs are generally suitable for all audiences.
8 ans+: Children 8 yearsand above (French)
13 ans+: 13 years old and above(French)
16 ans+: 16 years old and above(French)
18 ans+: Adults Only-these types of rated programs are only for adult viewers only.
Blocked Unrated: Press 4/1_ to select On or Off.
Used to lock all the channel not rated.
Password: Press I_/ENTER to enter the submenu, press digits button to input
the number of 0-9 twice in the New Password and Confirm Password. Then you
can change the password when you input the same number twice.
Clean All: Press _/ENTER to enter the submenu:
Are you sure?
Press 4/_to select OK or Cancel then OK to confirm. If OK, the parameter wilt
return to the factory set.
Note: if there is any lock mark on the top of the set such as channel lock, parental
lock and so on, you can press OK to resume it .( Press OK to display password
menu and input your password.)
PC Menu Options
1. Press MENU button and A/Y button to select Video menu in PC mode.
2. PressI_/ENTER button to enter the Video menu and A/Yto go up
and down to select the desired option .
J
@
Page 34

PC Menu Options Continued
3.Press I_/ENTER button to confirm and 4/l_increase and decrease
the level toadjust the selected option to yourpreference .
4. Repeat step 2and step 3 until desired quality has been achieved .
Mode Custom 4
rightness _ ...........................i 50
.,;p/, Audio
Function
_:"_ Lock
Vid eo _ Adjust _ S elecl _ Back
ontrast _ 50
Color Temperature [_Bb
Advanced Video [_Bb
PC DB_
PC: PressA/V button to select and _/ENTER to confirm, the PC menu as below:
Auto Sync [_D>
H Position _ .............................50
_, Audio
_ Function
K'_ Lock
V Position _::::::::::::J 50
Phase _ ] 50
Clock 50
PC _ Adjus! _ S elecl _ Back
Auto Sync: PressA/Y button and then press I_to auto adjust that automatically
adjusts the available options for the best viewing configuration.
H Position: Press A/Y button and then press4/l_ to adjustthe horizontal
position of the picture.
V Postion: PressA/T button and then press 4/l_to adjust the vertical position
of the picture.
Phase: PressA/Yand then press 4/l_to adjust the phase of the picture.
Clock: PressA/V button and then press4/l_to adjust the clock of the picture.
@
Page 35

1.Supporting media and file format:
Digital pictures (.JPG) and digital
music (.MP3)fites
Due to differences in the file code and
file mode, Itis possible thatsome
files cannot be read.
2. Before starting operation, verify
USB storage device is of FAT32and
FAT file system format. At present,
this television doesnot support NTFS
and the file systems of otherformat.
3.External card readersupports most
digital cards available in the market.
Readable digital cards are classified
according to the property of card
readers and can be connected to
mobile hard disks (working voltage
5.0V, working current notover 500mA).
4.The television operation may be
halted due to excessive rate of
information code errors. In such case,
restart the system. Please note -
there are many nonstandard USB
mobile devices inthe market. Ifa
nonstandard device is used then an
identification problem may occur.
2. Press 4!t_ button to select Picture
folder. Press ENTER to enter.
3. Press A/V/4/_" button to select
desired picture, and then press
ENTER button to enterthe play
interface.
Q
1.Play mode: None/Dissolve/Wipe right/Wipeleft/
2.Play time: Short/Medium/Long;
3.File name 4.Pause/Play
5. Duration/Rotate 6.Effect
7,tnfomation
Wipe up/Wipe down/Boxin/Box out
4.Press the button on the remote control
to select theadjusted item, press
ENTER button to confirm.
f
To play pictures
1.Press USB buttonon the remoteto
enter stream media system.
The system start up takes about 3
seconds. Then insert the USBdrive
in the USBinput.
2.Stop;
3.Repeat;
4.No available:
5.No available;
1.Play or pause;
6.Play previous picture;
7.Play next picture.
\ J
5.Press EXITbutton to return tothe
previous menu.
Press USB buttonto exit the USB
mode.
Note: you mayplaythepicturesamongselected.
@
Page 36

To play music
1.Press 4/f_ button to selectMusic
folder. Press ENTER to enter.
2.Press AIV/411_ button to select
desired music, and then press ENTER
button to enter the play interface.
3.Press the button on the remote control
to select the adjusted item, press
ENTER button to confirm.
2.Stop;
1.Play or pause;
3.Repeat
4.Fast reverse;
6.Play previous music;
5.Fast forward;
7.Play next music.
1.Press 4/1_ button to selectMusic
folder. Press ENTERto enter.
2. Press A / Y/_I / I_button to select
desired music, and then press ENTER
button to enter the play interface.
3.Press USB button toturn tothe main
menu. Andthen press4/_ button to
select Picture option.
Press ENTER to enter.
4.Press EXITbutton to return tothe
previous menu.
Press USB buttonto exit the USB
mode.
Note_ You may play themusic among selected,
To play pictures and music
together
Insert USBdrive with musicand picture
files in to the USB input and select the
pictures to be played. Then setectthe
Music folderand choosethe MP3files
to be played. Then select the Music
folder and choose the MP3 files to be
played. Please note as some files must
be read while music is being played,
the speed of picture operation response
might be affected.
4.Press A/V/4/I_ button to select
desired picture, andthen press
ENTER button to enterthe play
interface.
5.Press USB button to exit USB mode.
Note: Do notremoveUSBdevicefromtheTVuntil
you have exitedthe USB modeotherwise
you may damagethe USB device.
@
Page 37

Basic Playback
\ /
® Press DVD button on the remote control
to enter the DVD status.
® Note: Do not insert a disc until the DVD input states
open
1.Place the DVD in the disc slot. The disc will be
loaded automatically after one to two seconds
then the DVD player reads the DVD and displays
the opening menu (If there is no disc placed in
DVD mode, OPEN will display on the screen all
the times)
® Do not place a disc that is unplayable in this
DVD player.
® Some discs donot start automatically. Press
PLAY/PAUSE to start playback.
2. Some discs may start playback with a menu. Use
the cursor buttons on the remote control to select
menu options and press PLAY/PAUSE to start. You
may also press the digit buttons to select a menu
option directly. Many DVDs will not allow this during
start-up.
1. Press PLAY/PAUSE to pause playback (still mode).
The sound will be muted during still mode.
2. Press PLAY/PAUSE to resume normal playback.
1. Press STOP button to go to stop mode, the TV
screen will show the start logo. With some discs,
such as DVD or CDs, the player can resume
playback from the point where it was stopped.
2. Press PLAY/PAUSE to resume playback from the
location where the playback was stopped.
3. Press STOP twice to stop completely.
During Playing, pressing the PREV buttonwill
restart the lastchapter and skipchapters
backwards with eachsubsequent press untilthe
start of thedisc is reached.
Each press of NEXT button during playing will
skip the currentchapter and playthe next one.
1. Press FWD to fast forward through the disc.
Each time the FWD button is pressed, the
fast forward motion speed changes.
2. Press PLAY/PAUSE to resume normal playback.
3. Press REV to fast reverse through the disc.
Each time the REV button is pressed, the
fast reverse motion speed changes.
4. Press PLAY/PAUSE to resume normal playback.
1. When paused, press PLAY/PAUSE continuous
to single step forward to the next frame in the
video.
2. Press PLAY/PAUSE to resume normal playback.
@
Page 38

Advanced Playback
IMPORTANT NOTE:
ALL DESCRIBED FUNCTIONS AFOR DVD DISCS. IF YOU PLAY OTHER DISC
FORMATSTHE OPERATION ANDON SCREEN DISPLAY WILLBE DIFFERENT.
Press " SUBTITLE ", the screen will display "SUBTI-
TLE 01/XX XXXXX", "01" indicates the ordinal
number of this language; "XX" indicates total number
of language; "XXXXXX" indicates the language of
country. (The number of language depends on disc.)
This function can select up to 32 languages display-
ed on screen.
Press " REPEAT" and Chapter repeat will be
displayed on screen, the second press will display
Title repeat, the third press will display All repeat,
the fourth press will cancel this function.
When playing discs, press "PROGRAM" to enter
program mode. Press the digit buttons to select the
program number that you want. When finished move
the cursor to select "START". Press PLAY/PAUSE
to confirm. This will start the program playback.
Press "SEARCH" once to display the search
menu. Press the button again to select. Press
the program number buttons to input the item
you require. Press PLAY/PAUSE to confirm.
___:_ Pressthiskeycanchangethemodeofaudio.
When enjoying sports, concert or theatre, press this such as: Audio 1/2:AC 3 2 CH English
key to watch same actions in different angles. (Valid Audio 2/2: AC 3 5.1 CH English
for discs possessing this function. Using a disc Press this button to cycle between Mono Left, Mono
recorded in multi-angle you can view the scene from Right, Mix-Mono and Stereo.
different angles,for example,front, side, whole view Note: When press this button continuously, you must
and exterior scene), allow a 3 second interval between selections.
Press this key to display the root menu, select
items according to your preference. (This
function will work on a DVD with a multi-layer
menu,)
Pressing this key will cycle through "Title Elapsed",
"Title Remain", "Chapter Elapsed", "Chapter Remain"
and "Display off ".
@
Page 39

When a disc containing standard JPEG picture files is inserted into the player, a
navigation menuwill be displayed automatically. Use theUP and DOWN cursor
buttons to select a file then press PLAY/PAUSE. The slide show will commence.
Press PREV or NEXT to move between pictures. Press pause to stop on the
current picture. Press PLAY/PAUSE to resume normal playing.
A JPEGdisc contains JPEG (.jpg)format picture information that can bedecoded
by a micro-computer software and displayed through the video output interface or on
the television screen.
This function has many applications. For example one can save files from a scanner
or digital camera in the JPEG format, record these on a CD-Rdisc and present them
to an audience through this player.
The JPEG format is a convienient method to store images in a small amount of
memory space, and is ideal forarchiving information.
SCREEN SAVER FUNCTION
This unit employs a screen savermode to helpprotect the tubeduring static video pictures. Thiscan
be turned offon the GENERALSETUP PAGE.
@
Page 40

DVD System Setup ....................................................................................................
General Setup Process
1.Press the setup button, the
general set up page will be
displayed press twice the
preference page will be displayed
2.PressA/Yto select, the
item, then press_ to enterthe
submenu.
3.PressA/Ytoselect then
press PAUSE to confirm.
4.Press SETUPrepeatedly to
exit the set-upmenus.
NOTE: Preference page wilt be
displayed when there is no DVDin
the unit. Toaccess this page, press
SETUP button twice.
General Setup Page
ASPECT RATIO DESCRiPTiON
When using theDVD with the internal mY,
select 4= 3/LB.
The /bllowing iq/brmation applie_" only
when the DTDoutput is connected to an
external TT.
®4:3/PS (PS = Pan and Scan)
You may select if you have a normal aspect
ratio (4:3) TV, although the NORMAL/LB
(letter box) is a more common choice. In PS
mode, widescreen material will fill the screen, but at the expense of chopping
off extreme left and right edges of the original film picture. For this feature to
work, the disc must be specially coded. Such discs are uncommon.
• 4:3/LB (LB = Letter Box)
You may select this if you have a normal aspect ratio (4:3) T_ Widescreen
material will be shown in pure unaltered form, allowing the entire picture area
of the original film to be viewed without any side cropping. Black bars will
appear above and below the picture.
t16:9
You may select this if you have a widescreen (16:9) T_ Back bars may still
appear above and below the picture even if using a widescreen TV. This is
because some film directors prefer to use ultra widescreen aspect ratios e.g.
2.35:1. This will normally be indicated on the DVD packaging.
@
Page 41

DVD System Setup
General Setup Page
ANGLE MARK: Users can select a particular
camera angle w.hen playing a DVD which offers
multiple angles.
This item allows you to set Angle Mark ON or OFR
On Screen Display (OSD)Language: Users
can select on-screen display language.
CAPTION: This function allows you to display or
hide the caption.
SCREEN SAVER: If the screen saver is on, then
there wilt be an animated picture of DVD on the
screen whenever the DVD player is idle for more
than 3 minutes.
@
Page 42

DVD System Setup
Preference Page
The PreferencePageisonlyavailablewhenthere isnodisc
inthe player.
PARENTAL: The parental
control function works in
conjunction with the
different censorship classes
assigned to DVDs. These
classes help to control the
types of DVDs that the family
watches, There are up to 8
censorship classes for DVDs.
Note:
1 To change this setting you must enter your password.
(Initial password is 1234)
2 When set to OFF, all discs may be viewed.
PASSWORD CHANGE:
You can change your password
by entering 4 digits. You must
confirm the 4 digits before the
new password can be accepted.
NOTE:
If you forget your password
or a password is accidentally
set enter 1369 as the password
This will enable you to regain
control.
DEFAULT: Resets all settings
(except password and parental
lock status) for this DVD player
back to the manufacturers
original settings. Press ENTER
to perform the reset.
Note:
Some functions may not be available depending on the
type of disc.
@
Page 43

The following discs can be played:
DISCS CONTENTS DiMENSiON
DVD VIDEO (moving picture) 12cm
AUDIO CD Audio 12cm
HDCD Audio 12cm
JPEG Video(picture) 12cm
KODAK CD Video(picture) 12cm
CD=R (moving picture) 12cm
CD-RW (moving picture)
CD÷G Audio(picture) 12cm
LABEL
VIDEO
DIGITAL AUDIO
IH3CD]®
Kodak
PICTURE CD
COMPATIBLE
CD,R
CD-RW
CD+G
Audio +Video
Audio or Video
Audio or Video 12cm
•You cannot play discs other than those listed above.
•You cannot play non-standardized discs, even if they may be labelled as above.
°The performance of CD-R or CD-RW disc depends on the way the disc was burned. In
a few cases, their performance may not be consistant or may not even operate at all.
This DVD Player is designed and manufactured according to the Region
Management Information that is recorded on a DVD disc. If the Region number
described on theDVD disc doesnot correspond tothe Region numberof this DVD
Player, thisDVD player will not play thatdisc.
This Region number ofthis DVD Player is. I_)t
@
Page 44

[] Do not touch the playback side of the disc.
[] Do not attach paper or tape to disc.
o@
layback side
[] Do not store discs in a place subject to direct
sunlight or near heat source.
[] Do not store discs in place subject to moisture
and dust such as a bathroom or near a humidifier.
[] Store discs vertically in a case, Stacking or
placing object on discs outside of their case may
cause warping.
Fingerprints and dust on the disc cause picture
and sound deterioration, Wipe the disc from the
centre outwards with a soft cloth. Always keep
the disc clean.
o
If you cannot wipe off the dust with a soft cloth,
wipe the disc lightly with a slightly moistened soft
cloth and finish with a dry cloth.
Do not use any type of solvent such as thinner,
benzine, commemially available cleaners or anti_
static spray for vinyl Lps. It may damage the disc.
Compare DVD disc with other discs:
DVD LD SVCD VCD CD
Encode Digita_/MPEG I1" Analog Digita_ Digital/ Digita_
method MPEG I
Single- Double Single- Double- J
Capacity single- single double- double-
P}aying Time minutes minutes minutes minutes double-side 45 minutes 74 minutes 74 minutes
Disc diameter 12cm 30cm/20cm 12cm 12cm 12cm
Horizontal More than 500 }ine No more than No more than No more that
resolution 430 line 350 line 250 line J"
Picture /l-
proportion Multiple kinds One kind One kind One kind ./JJ
Subtitle 32 kinds at most 4 kinds /z jjJJ_
Language 8 kinds at most at most 2 kinds 2 kinds
Sound qua}ity 6, 20, 24bit 16bit 16bit 16bit 16bit
side -side side side /
_ayer -layer _ayer _ayer /
4.7G 8.5G 9.4G 17G
133 242 266 484 60 minutes
48KHz, 96KHz/ 44.1KHz/ 44.1KHz/ 44.1KHz/ 44.1KHz/
Normally, DVD discs are divided into titles, and the
titles are sub-divided into chapters. Audio CD are
divided into tracks.
Each title, chapter, or track is assigned a number,
which is called title number, chapter number or track
number respectively.
There may be discs that do not have these number.
/
650MB 650MB 650MB
/
/
/
/
Single-side
120 minutes
J
j-
16 kinds //
4 kinds 4 kinds
./-" sJ
@
Page 45

° To assist in location possible faults use help guide below.
Troubleshooting
No picture, no sound
Blank screen
No sound
Poorsound
Nopictureinsome
channel
No cotorfor some channel
program (btackand white)
Spots with some or
all pictures
Abnormalfunctioning
Verify ifthe television isproperly plugged in.
Verify if the television is properly supplied with power.
Verify thatelectricity is available.
Verify if correct signals are input.
Press INPUT button to changesignal input toTV input.
Restart the televisionof power supplyis interrupted.
Press MUTE button and verifyif Mute modeis on.
Switch to anotherchannel and verifyif the sameproblem
happens,
Press VOL+ button to seeif the problemcan be solved,
Verify ifsound system isfunctional. Refer tochapter on
adjusting.
Verify if correct channel isselected.
Adjust the antenna.
Verify ifthe same problemexists in otherchannels.
Check picture andsound systems.
Refer to relative instructions in theManual for color
adjust.
Verify ifthe antenna iscorrectly connected.
Verify ifthe antenna isin good condition.
Make fine adjustmentof channel.
Disconnect the televisionfrom power supplyand, 10
seconds later, reconnect to the power supply.
If the problemstill exists, contactan authorized
service depot fortechnical assistance.
Note:
1.If the fault can not be repaired using the above guide consult with your local authorized
service center.
2.The TV set must only be repaired by a qualified registered service person. Never attempt to
remove the backcover as theTV set has dangerous voltageslevels inside thatmay be
fatal or causefire.
@
Page 46

ModeR 19" without DVD 19" with DVD
Picture, sound
system NTSC, ATSC, Clear QAIVl
Audio output _3.0W+3.0W
E×ternal input port YPbPr input Antenna input HDMI input USB input
Power requirements ~120V 60Hz
Power consumption 60W 80W
Temperature Storage:-15°(2 ~+45°C
Humidity Storage: 5% ~ 90%
Accessories Batteries
AV input PC input S-VIDEO input PC audio input
Working:+5°C~+35°C
Working:20% ~ 80%
Remote control
User manual
Warranty card
NOTE
Design and specifications are subject to change without notice.
Dimensions quoted in this manual are approximate.
@
Page 47

This Haler brand product, when shipped in its
originalpaekaging, will be free from defective
workmanship and materials, and Haier agrees
that it will, at its option, either repair the defect or
replace the defective product with a new or
reomanufactured equivalent at no charge to the
purchaser, for parts or labor for the periods set
forth below.
This warranty does not apply to the appearance
of the product or the exterior of the product,
which has been damaged or defaced, altered or
modified in design or construction. It does not
apply to the additional excluded items set forth
below.
The warranty commences on the date the item
was purchased and the original purchase receipt
must be presented to the authorized service
center before warranty repairs are rendered.
The warranties described herein shall be the sole
and exclusive warranties granted by Haier and
shall be the sole and exclusive remedy available
to the purchaser. Correction of defects in the
manner and for the period of time described
herein shah constitute complete fulfillment of
obligations and responsibilities of Haier to the
purchaser with respect to the product and shall
constitute full satisfaction of aJJclaims, whether
based on contract, negligence, strict liability or
otherwise. Jn no event shah Haler be liable, or in
any way responsible, for any damages or defects
in the product which were caused by repairs or
attempted repairs performed by anyone other
than an authorized service center or dealer, nor
shah Haler be liable, or in any way responsible,
for incidental or consequential economic or
property damage. Some states do not allow the
exclusion of incidental or consequential damages,
so the above exclusion may not apply to you.
The limited warranty described herein is in
addition to whatever implied warranties may be
granted to purchasers by Jaw.ALL IMPLIED
WARRANTIES INCLUDING THE WARRANTIESOF
MERCHANTABILKY AND FKNESS FOR USE ARE
LIMITED TO THE PERIOD(s) FROM THE DATEOF
PURCHASE. Some states do not allow limitations
on how long an implied warranty lasts, so the
above limitation may not apply to you.
Neither the sales personnel of the seller nor any
other person is authorized to make any
warranties other than those described herein, or
to extend the duration of any warranties beyond
the time period described herein on behalf of
Haier.
THIS WARRANTY GIVES YOU SPECIFIC LEGAL
RIGHTS. YOU MAY ALSO HAVE OTHER RIGHTS
WHICH VARY FROM STATETO STATE.
Warranty period for this product: 90 days labor
and one year parts,
Additional items excluded from warranty
coverage: non-rechargeable batteries.
What to do to obtain service or to obtain product
literature, accessories, supplies or customer
assistance: Simply caJJ1-877-337-3639.
Be sure to have proof of purchase.
@
Page 48

Haier °
VO.1
0090507193
 Loading...