

Page 1

Automatic Drum Washing Machine
+.,0(
+.,0(
+.,0(
Operation Manual
+.,0(
Table of Contents
Before using the appliance
Name of parts...inside front cover
Matters needing attention......1-3
Installation.............................4-5
Function ...............................6-7
How to operate the wasing machine
Program description table........8
Preparation .............................9
Washing Procedure ..........10-11
Maintenance
Maintenance ..........................12
Troubleshooting Guide ..........13
Technical Specifications ........14
Wiring Circuit .........................15
Page 2
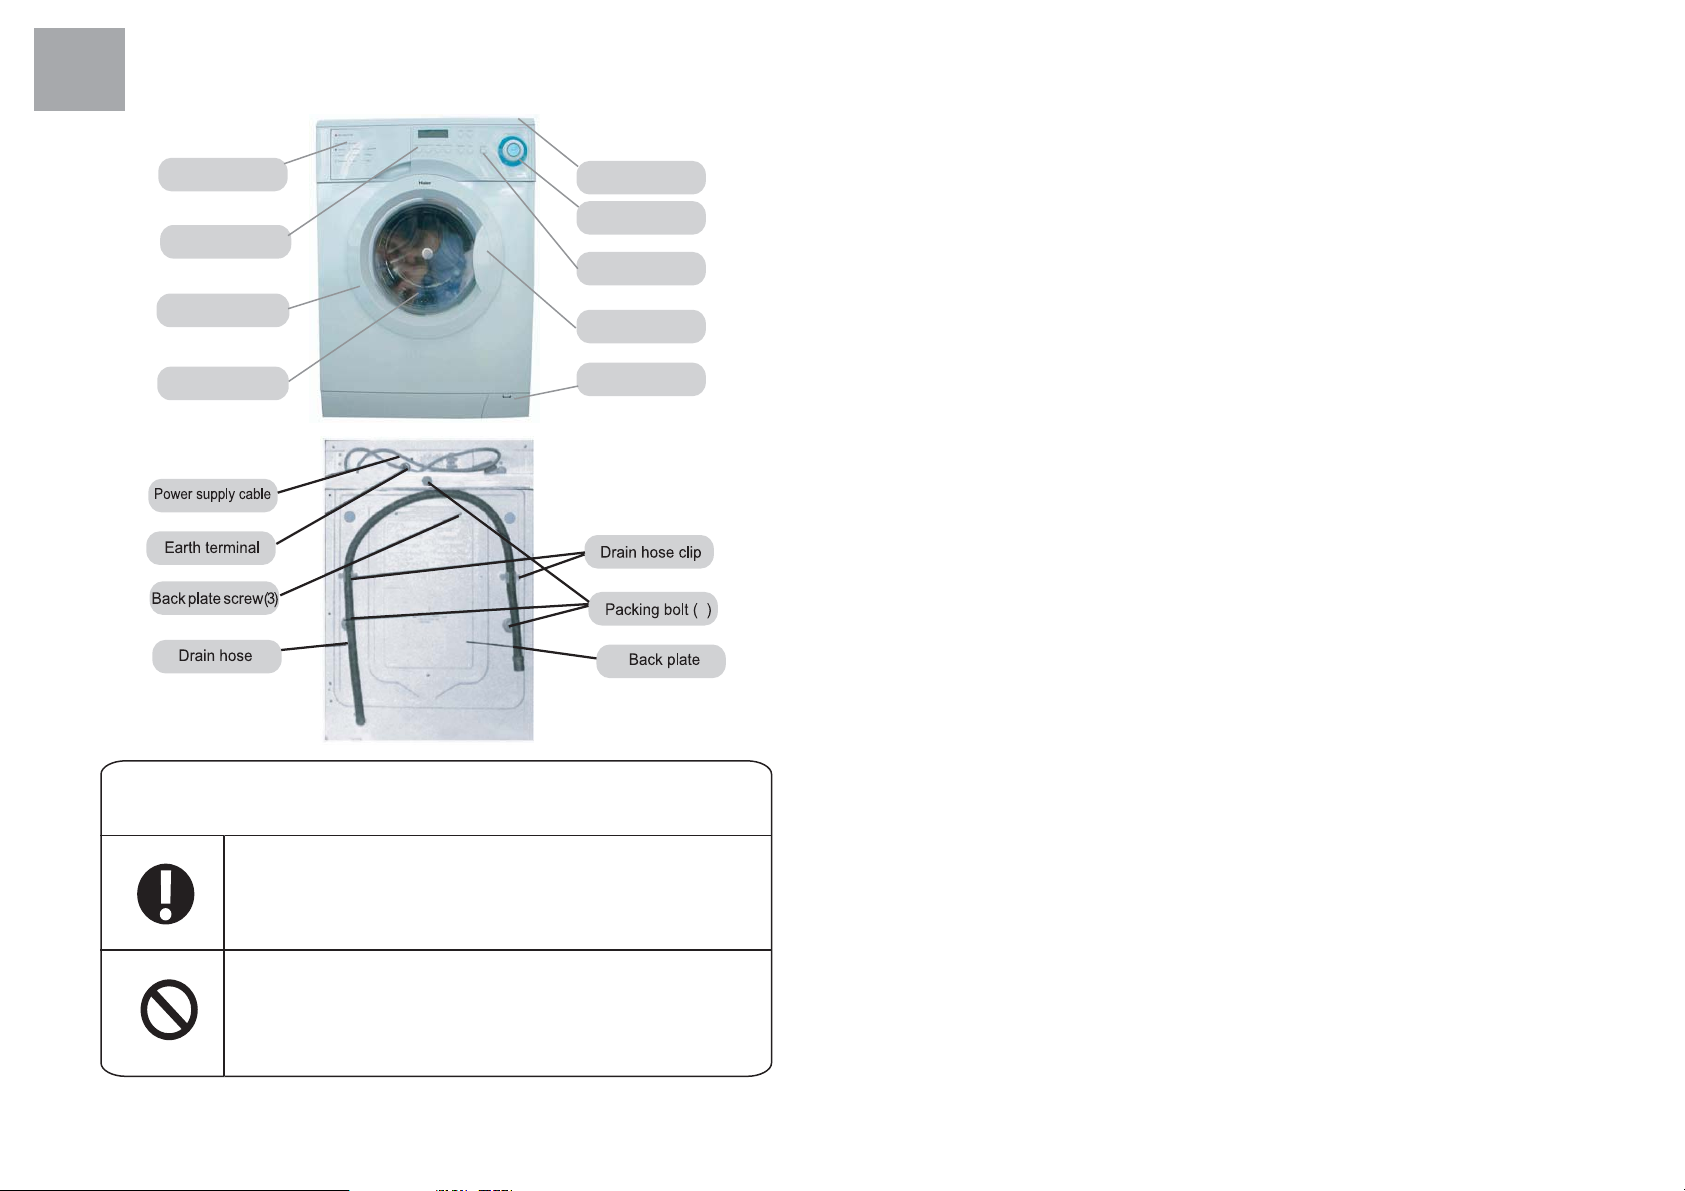
Name of Parts
Detergent dispenser
Function selector
Door
Porthole
Top
Program selector
ON/OFF button
Handle
Bottom plaque
3
Caution and Warning symbols
For you safely,any instructions in this manual with this
"Warning"sign must be followed strictly.
For your safety and to prevent damage to the washing
machine,any instructions in this manual with this "Stop"
sign must be followed strictly.
This diagram may be slightly different from the layout of the washing
machine you have just purchased due to techincal improvements
Page 3
Matters Needing Attention
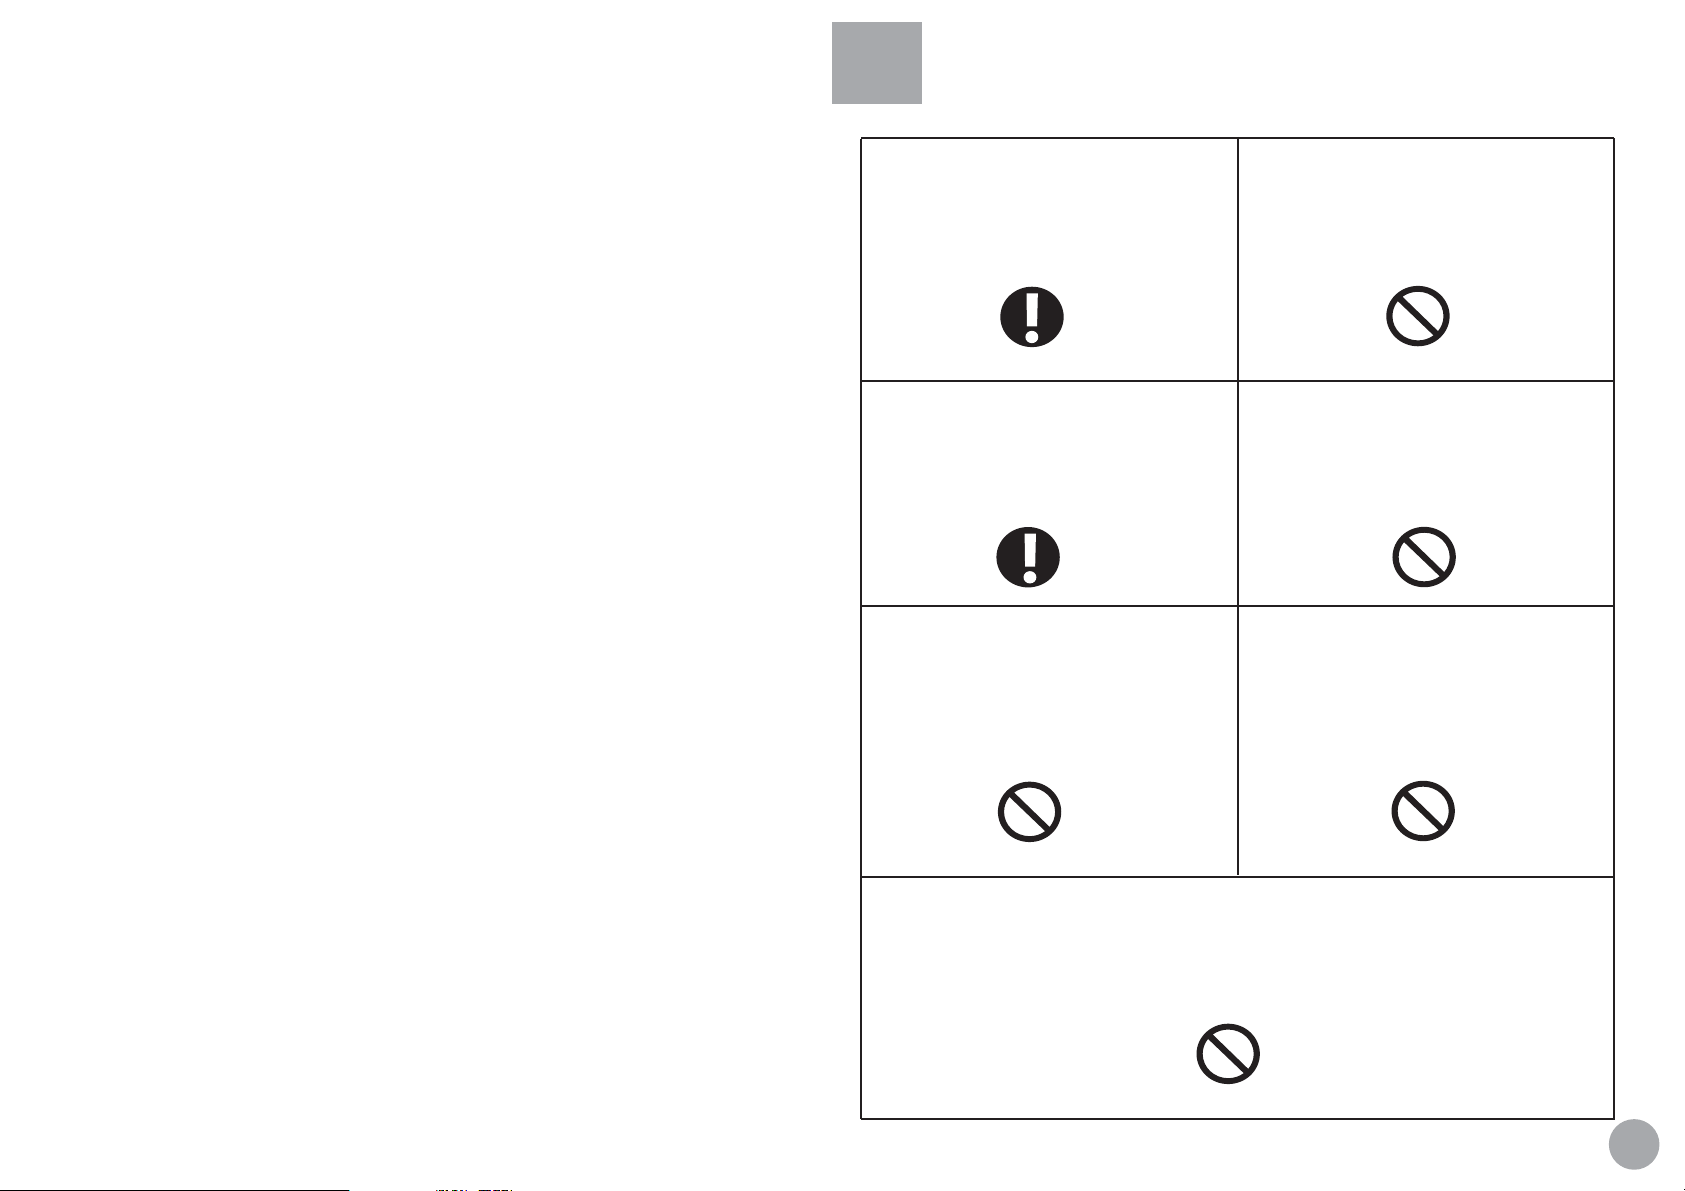
ƽ Safety
.A separate earthed socket is required
for the power supply. The washing
machine must be positioned so that
the plug is accessible.
3.Fuses in the power circuit should be rated
for 15A. If the supply cord is damaged, it
must be replaced by the manufacturer, its
service agent or similarly qualified persons
in order to avoid a hazard.
2. Hold the plug and not the electric cable when
unplugging the washing machine.
4. Do not touch or use the washing machine
bare footed or when the hands or feet are
wet.
5.Do not use flammable detergent or dry
cleaning agent; do not use flammable
spray in close vicinity to the washing
machine; do not remove or insert the
plug in the presence of flammable gas.
Keep children away from the packing materials after unpacked.
6. The door of the washing machine will
become hot during the heating process.
Avoid contact with the door during the
heating process. For safety , keep children
away from the washing machine.
Page 4
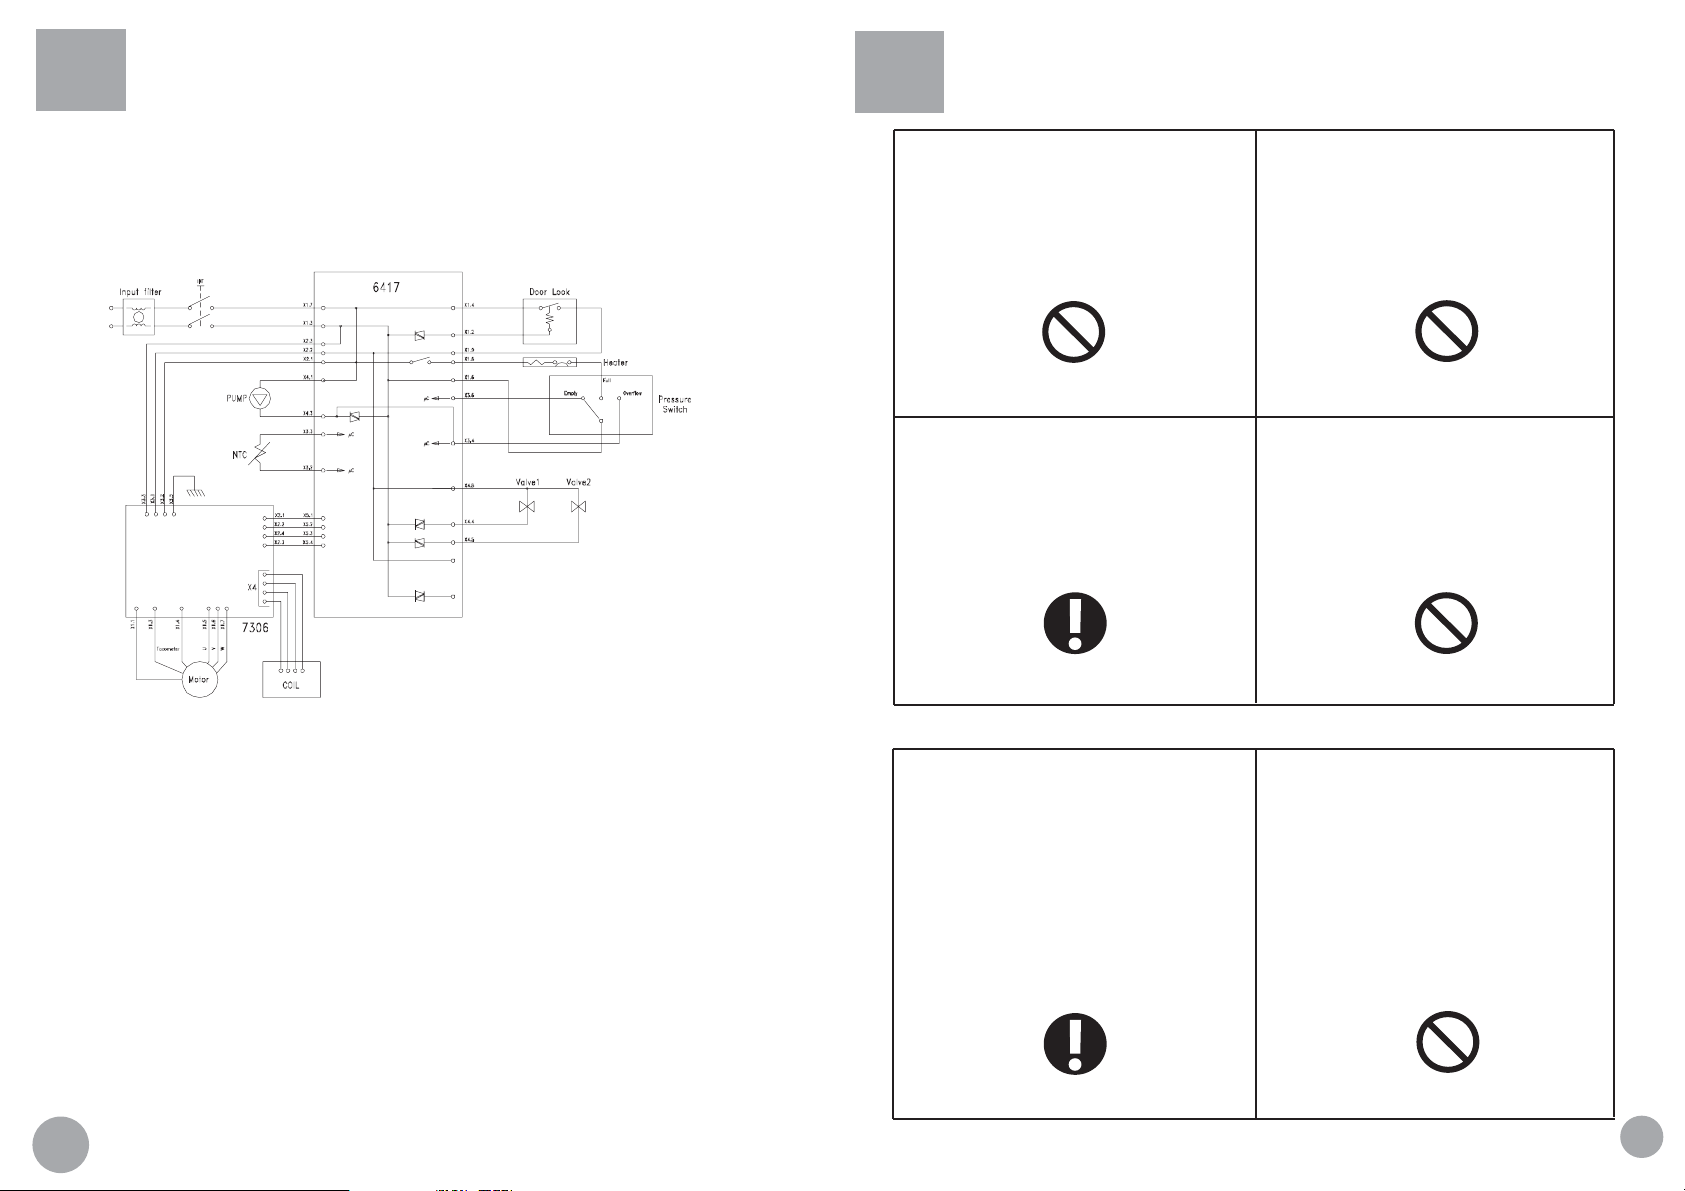
Wiring Circuit
Matters Needing Attention
HK1407I/ME HK1207I/ME HK1007I/ME HK807I/ME
8.The washing machine should not be installed
outdoors or in a damp place. In the event of water
leakage or splashes allow the machine to dry
naturally.
10.Keep away from heat sources and direct sunlight
to prevent plastic and rubber components from
aging.
During Use
9. The carpet must not obstruct the ventilation
openings in the base of the washing machine.
11.During installation, ensure that the electric
cable is not trapped by the washing machine
and avoid damage to the electric cable.
15
1. Before use, check the joints of the filling hose,
the tap and the drainage hose for possible
problems from water pressure fluctuations.
If joints are loose or there is leakage, turn
off the tap and repair. Do not use the washing
machine until the hoses are properly fixed.
2.
Keep the door slightly open when the washing
machine is not in use to prevent formation of
odors; do not cover the washing machine with
plastic cover so that inside dampness cannot
be kept in.
2
Page 5
Matters Needing Attention
Technical Specifications
3. Do not place heavy , heating source or wet articles
on the top of the washing machine.
5. Before washing, do up zippers, buttons and clothes
straps and put small articles, such as socks, laces
or bras, into a washing bag or a pillow.
4. Do not hot wash foam rubber or sponge-like
materials.
6. Do not open the detergent distribution drawer
during the wash cycle..
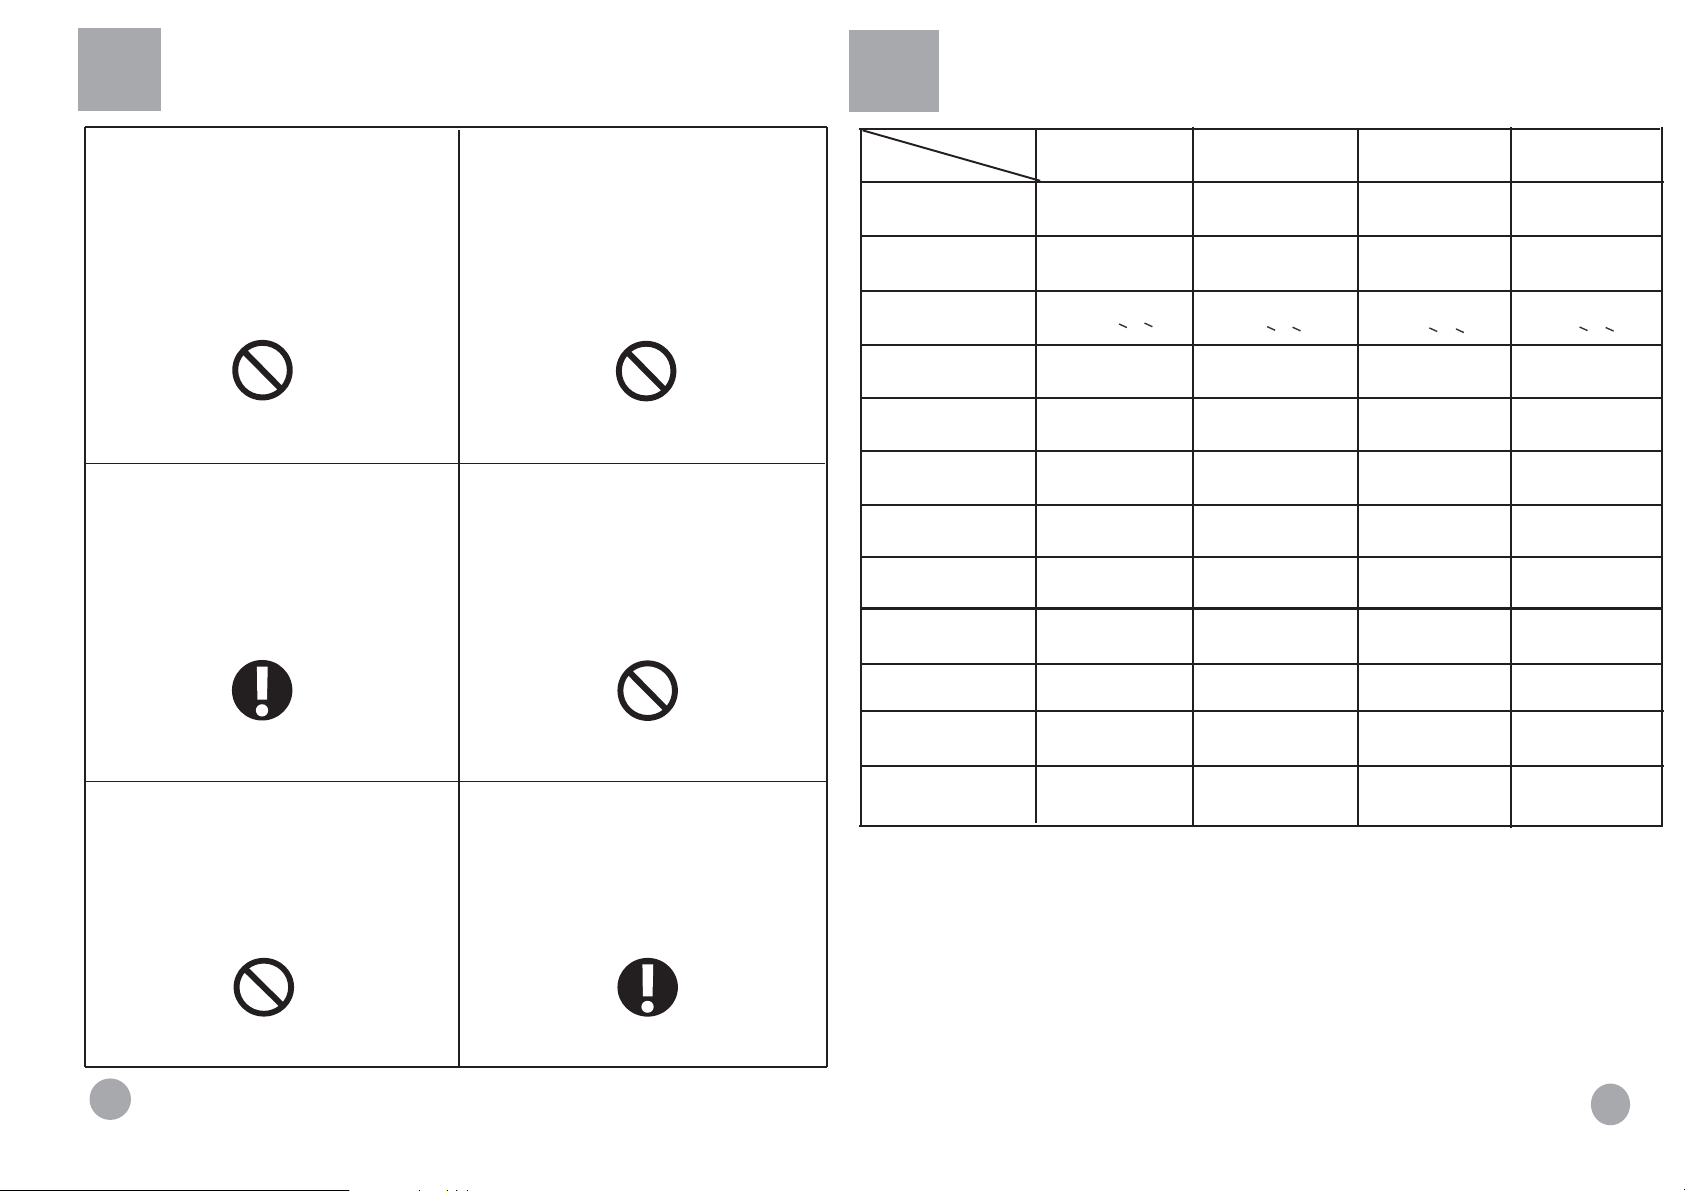
Model
Power supply
Power(Max)
Water pressure (MPa)
Washing power(W)
Spinning power(W)
Max. wash load (kg)
Spinning speed (MAX) (r/min)
Wash program
Heating power (W)
Weight (kg)
HK1407I/ME
220V-230V~(50Hz)
2000
<
<
0.05 P 1
200
600
7
1400
9
1800
72
HK1207I/ME
220V-230V~(50Hz)
2000
<
0.05 P 1
<
200
550
7
1200
9
1800
72
HK1007I/ME
220V-230V~(50Hz)
2000
<
0.05 P 1
<
200
500
7
1000
9
1800
72
HK807I/ME
220V-230V~(50Hz)
2000
<
0.05 P 1
<
200
450
7
800
9
1800
72
7. The door is fitted with a self-lock device and will not
open until 2~3 minutes after the washing machine
stops. Do not force the door open. Do not open the
door if water level can reach the porthole.
8. After each wash program, turn off the tap to prevent
leakage; and unplug the washing machine and
wipe clean the lower part of the porthole.
Anti-Electric Shock
Anti-Water Class
I
IPX4
I
IPX4
I
IPX4
I
IPX4
Page 6
Troubleshooting
The following circumstances do not constitute problems. Do not contact the maintenance service
until the
The washing machine fails to operate
Washing machine cannot be filled
with water
problem has been confirmed.
Problem Possible cause
Poor connection to power supply
Power failure
Door is not properly closed
Machine has not been switched on
Water tap is not turned on(It will show E5)
Water pressure is less than 0.05Mpa
The inlet hose is kinked
Water supply failure
The program dial is not properly set
The door is not properly closed
The inlet hose filter is blocked
(It will show E1)
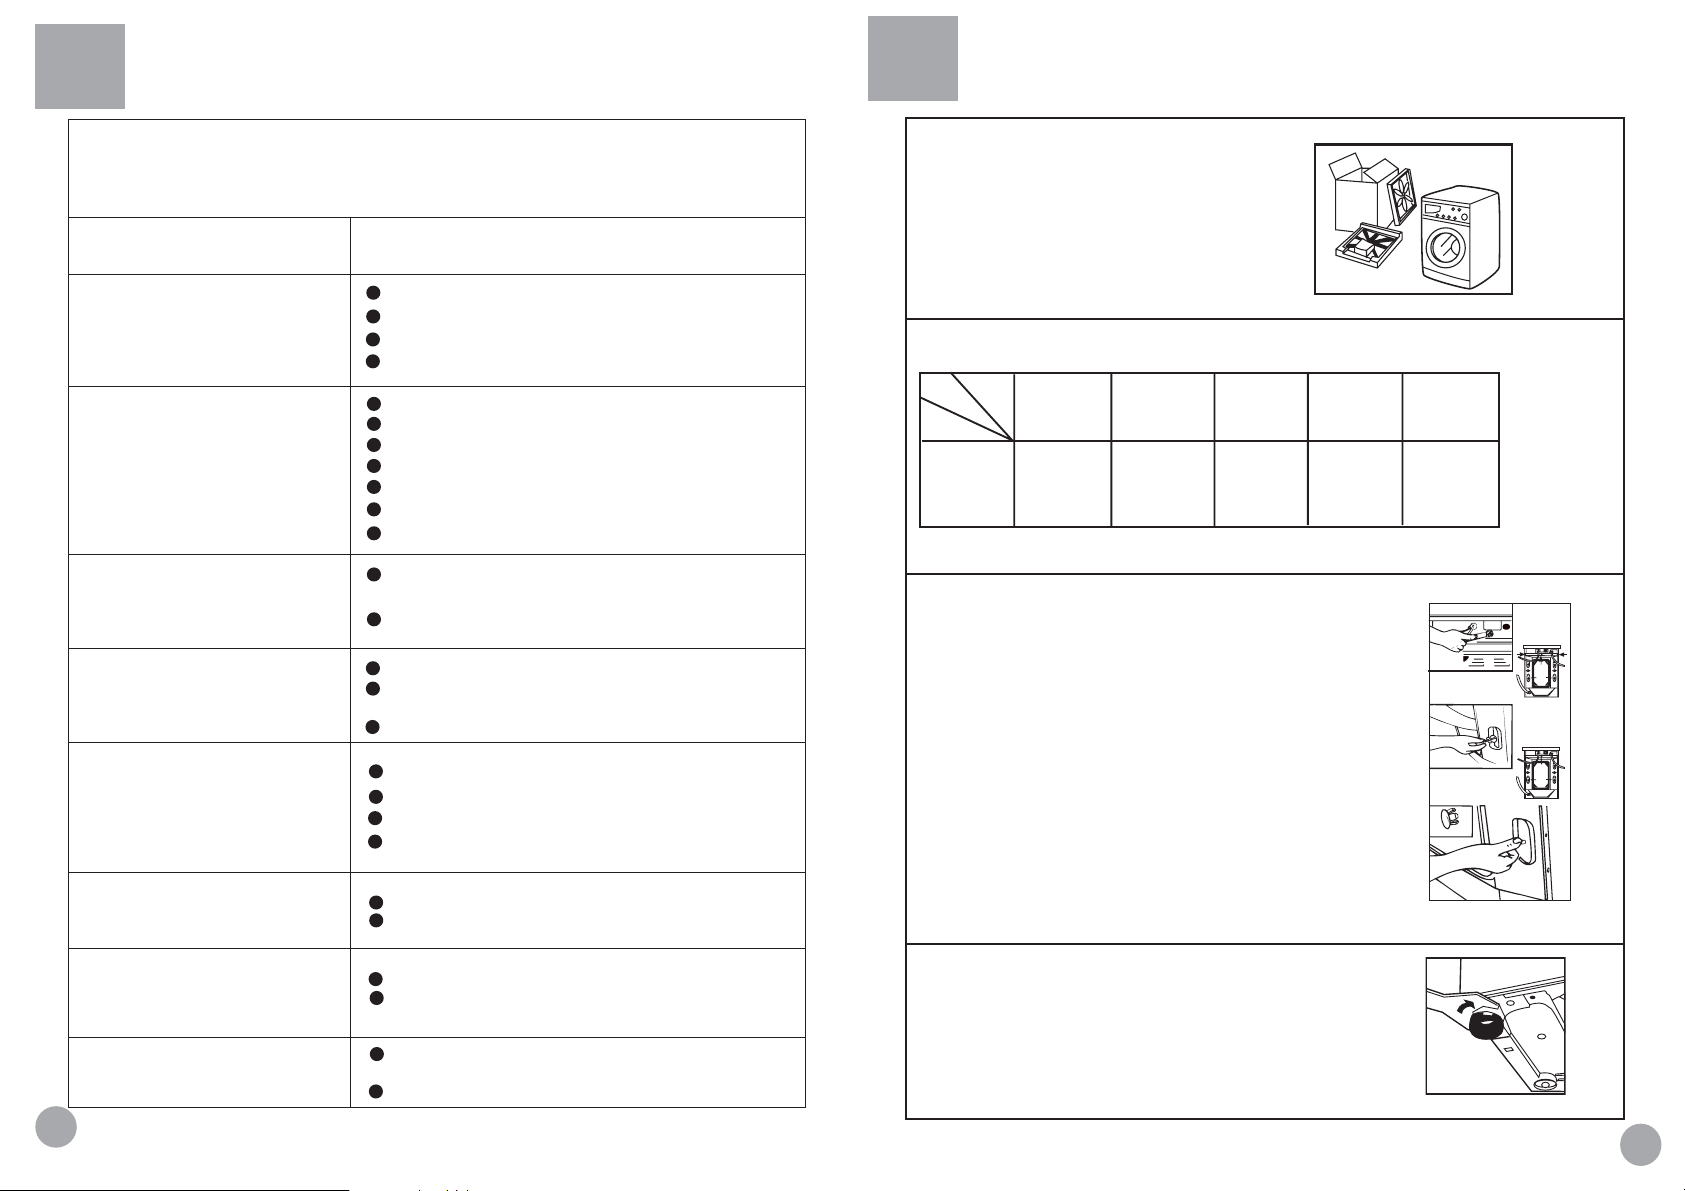
Installation
Remove all the packing materials (including the
ƽ
foam base)to prevent vibration during use, as
shown in Fig.1.Upon opening of the package,
water drops may be seen on the plastic bag and
the porthole. This is normal phenomenon resulting
from water test in the factory.
ƽ
Check attachments and materials with reference to the following
Name
Qty
Model
HK1407I/ME
HK1207I/ME
HK1007I/ME
HK807I/ME
Operation
manual
1
Quality
certificate
1
Water
hose
1
Drainage
holder
1
Plastic
plugs
3
Fig
.1
The machine is draining while is
being filled
Drainage failure
Strong vibration during spin drying
Operation stops before completion
of a wash cycle
Operation stops for a period of time
Excessivefoaminthedrum,which
is spilled to the distribution drawer
13
The height of the drainage hose is below 80cm (it
should be within 80-100cm)
The drainage hose end is in water
Drainage hose is blocked (It will show E2)
Drainage hose end is exceed 100cm above the floor
level
The filter is blocked
Not all packing bolts have been removed
Washingmachineislocatedonanunevensurface
Machine load is over 6kg.
Not all foam packing has been removed from the motor
Waterorelectricityfailure
Washing machine is in soak cycle
Washing machine is in soak cycle
Washing machine gives an error message.
The detergent is not a low-foaming type or for manual
wash
Excessive use of detergent
ƽ
Dismantle the packing bolts as shown in Fig. 2.
The packing bolts are designed for clamping anti-vibration components
inside of the washing machine during the transportation process.
Before use:
1. Remove the back plate;
2. Remove the three packing bolts on the back plate and take out the
rubber hose;
3. Replace the back plate;
4. Fill the holes left by the packing bolts with plastic plugs.
(Attention: The packing bolts and rubber hose should be kept in a safe
place for later use)
Adjusting the washing machine
ƽ
There are adjustable feet under the bottom of the washing machine. Before
use, the washing machine should be adjusted, as shown in Fig. 3, so that it
is level.
Fig.2
Fig.3
4
Page 7
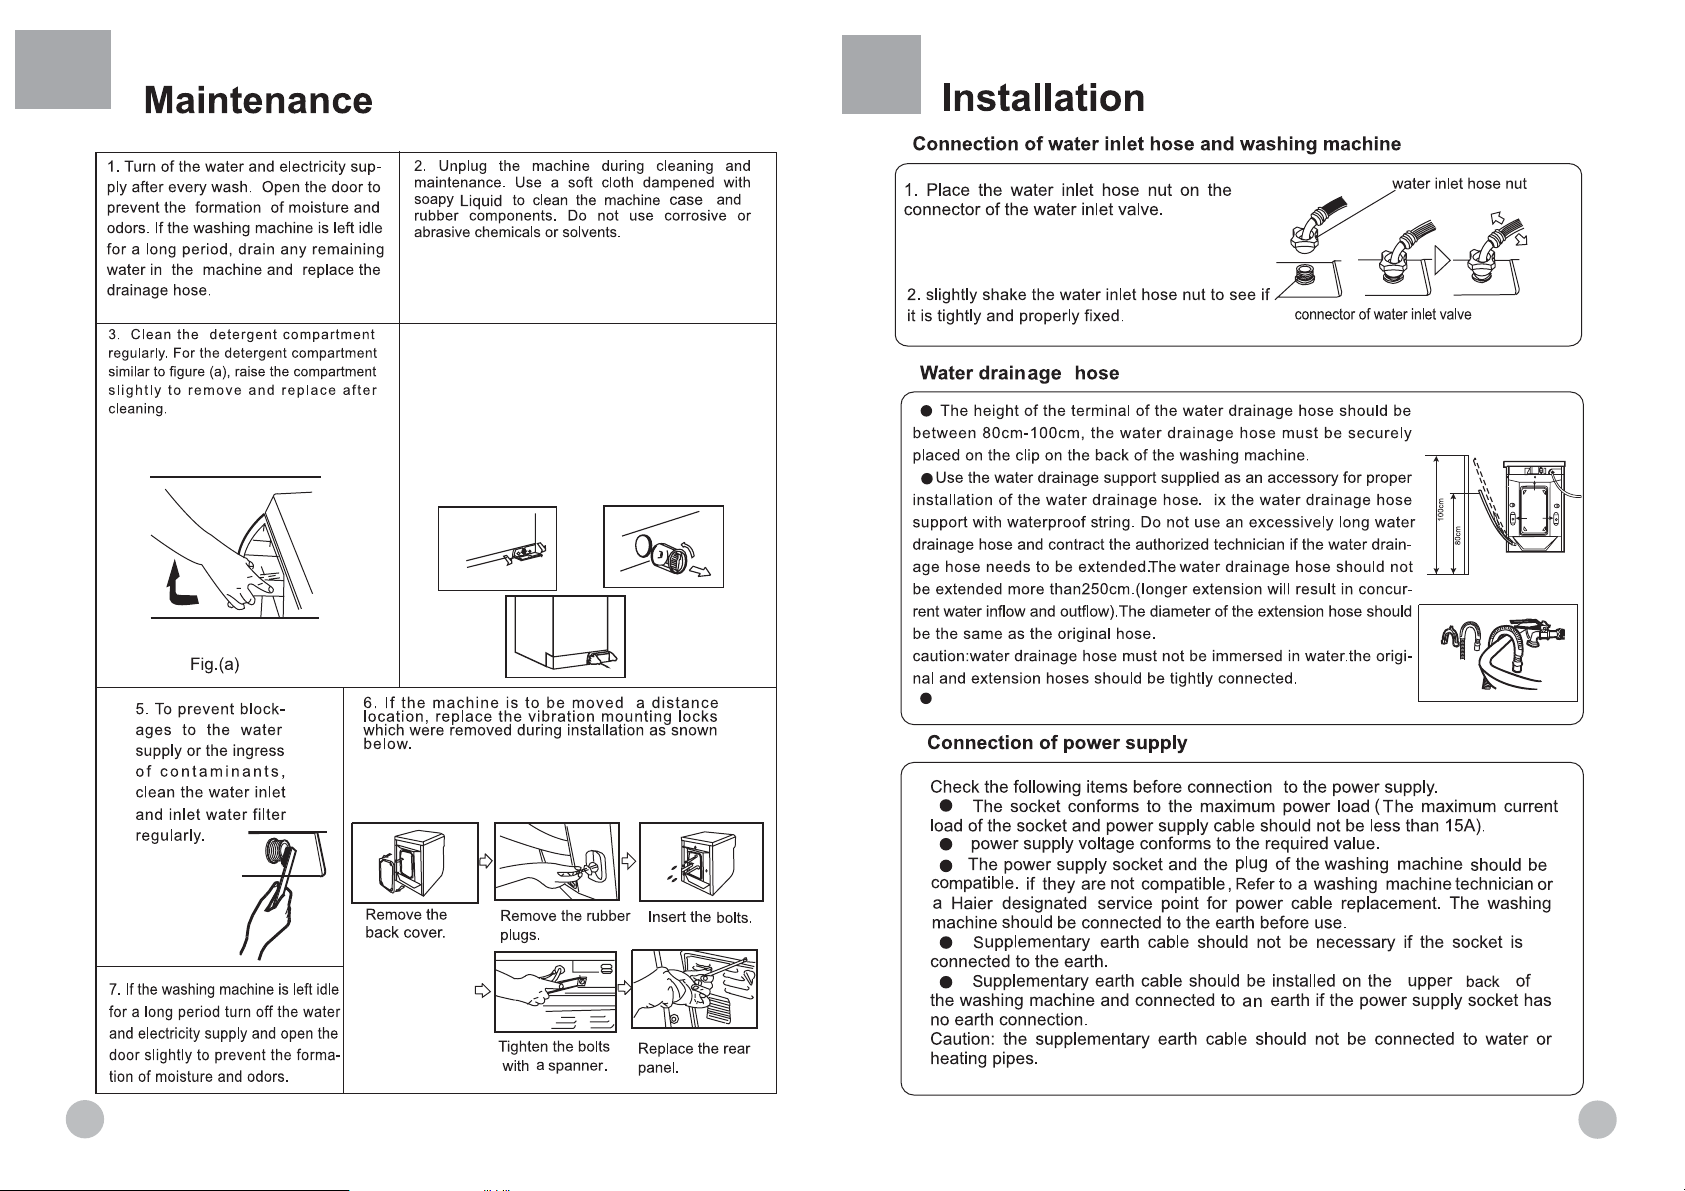
4. Clean the filter Cleaning methods (once a month)
1) Push out the outer cover (Fig. 1);
2) Screw out filter by turning counterclockwise (Fig. 2);
3) Flash clean with running water;
4) Replace the filter by turning clockwise and remount the
cover.
Caution: The filter must be in place, or it may lead to
leakage.
F
12
Fig1
Fig3
Fig2
The appliance is to be connected to the water mains using new hose-sets
and that old hose-sets should not be reused
.
5
Page 8
Operational Functions
Hints for Saving Energy
.
1407 I
Easy lroning
TimerDelay
Prewash
Extra Rinse
Tamp
Super Wash
Normal
Intensive
ON/OFF
Time
Rinse
Spin
Coloured
Synthetic
Delicate
Wool
Quick
Speed
/
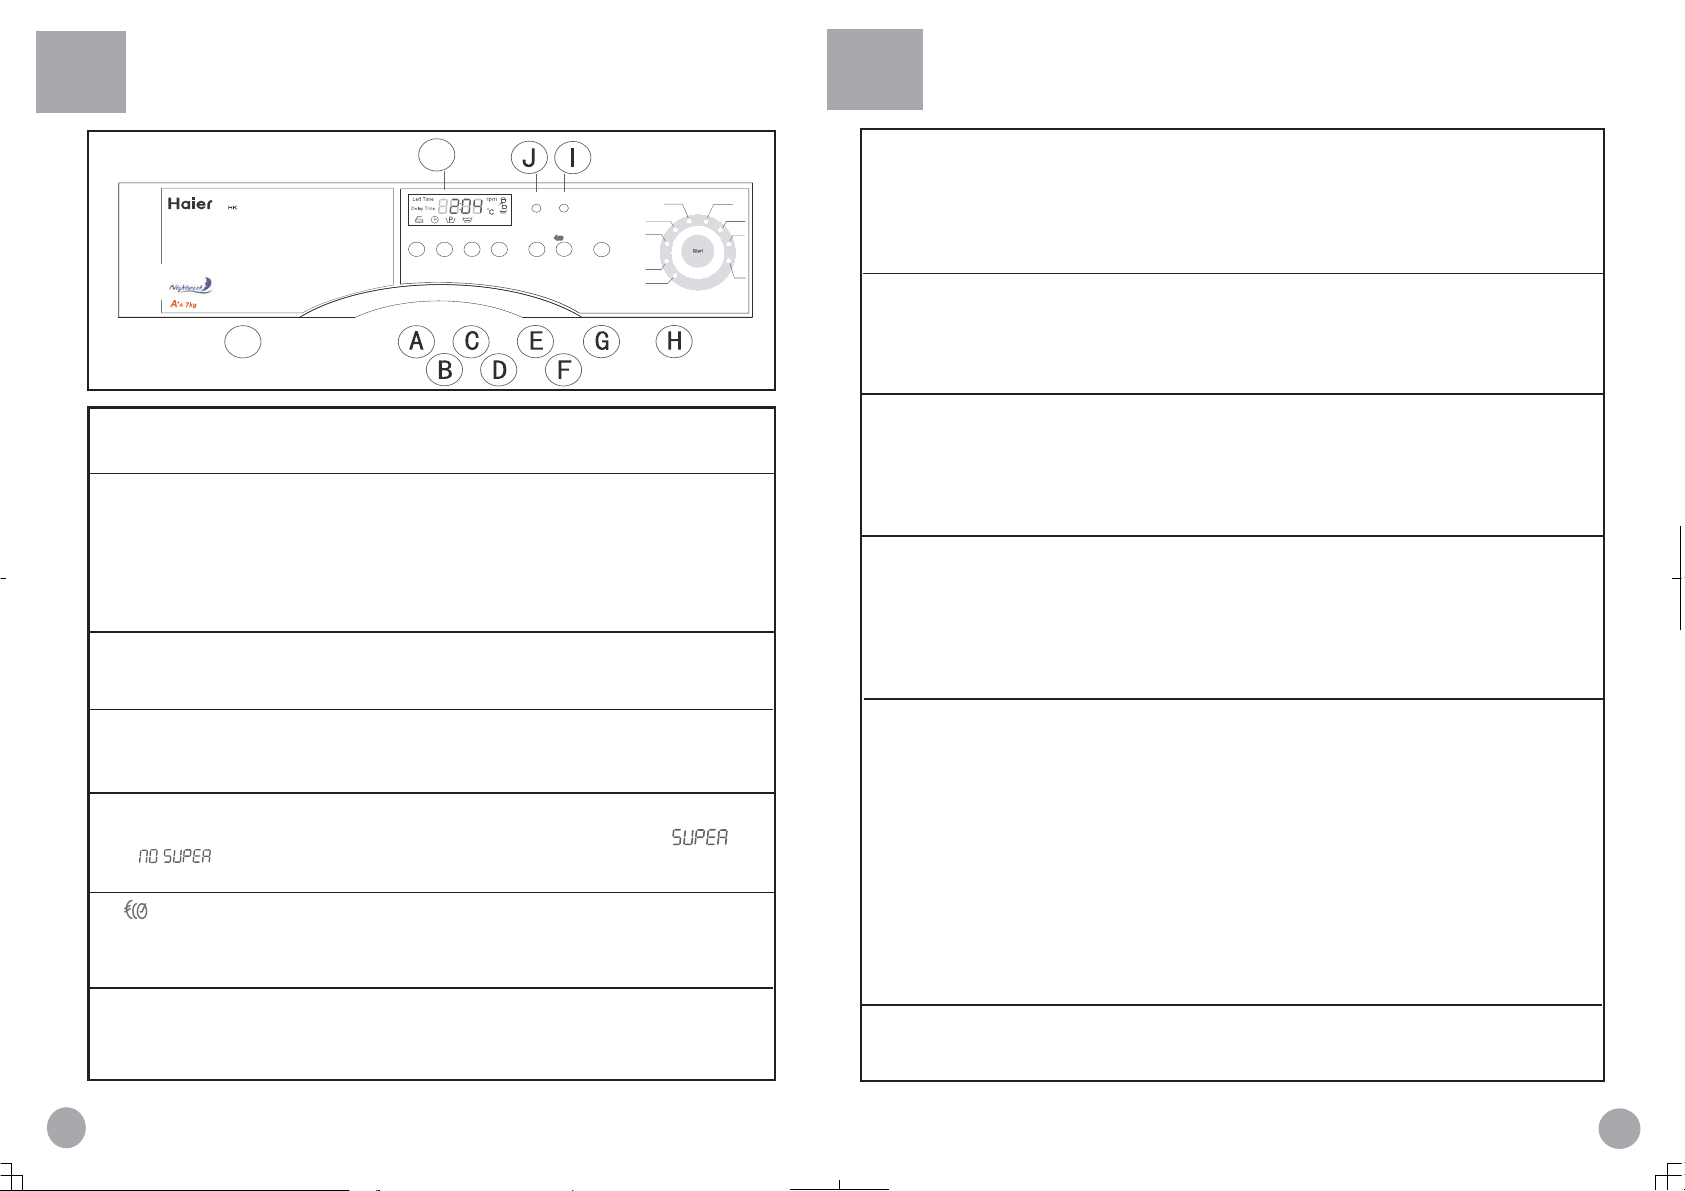
$Ironing-free button
Press this button, the laundry will be fluffed up at the end of the spinning cycle to
reduce wrinkles.
B:Delay button
Press the Delay button before the program is started if necessary. Press of the Delay button
one time, the delay time will increase one hour (the regulating range is from the current setting
to 24 hours). After the delay time is changed, press the Start button to activate the delay
function.
Note: The delay time must be longer than the program time; otherwise, the washing machine
will start the wash program directly.
C:Pre-wash button
Press this button, the washing machine will automatically start a prewash cycle during
execution of a washing program.
D: Extra rinsing button
Press this button, the washing machine will run an additional rinsing cycle to further clean your
clothes.
E: Super wash button
Press this button,the display will be on when choosing super wash button. The " "
and " " will display circularly. The sign of super wash will be off when the super wash
system finished.
Tim e
F: button
Press this button, 3 load levels of "ϔϔϔϔ" (0-2kg), "ѠѠѠѠ" (2-4kg) and "ϝϝϝϝ"
(4-7Hkg) will appear on the screen for manual selection before water is filled. After the load is
set, the water content will be automatically adjusted.
4. Setting washing temperature
Press the temperature button until "_ _ C" is displayed if heating is not needed; otherwise, select
an appropriate temperature as required (refer to the "Guide to Operational Program Selection").
o
5. Function selecting button
Select functions as required (refer to the "Operational Functions" section).
6. Washing
Press the Start / Pause button, the indicator at the upper left corner of the button will blink
and the washing machine starts operation.
7. Finish
The washing machine will stop operation automatically when a wash cycle ends. The "End" sign will
appear. Open the door and take out the laundry. Then turn off the tap and unplug the power cable.
ƽ
Hints for saving energy
During operation
1. Collect clothes for one full wash load.
2. Do not overload the washing machine.
3. Pre-wash heavily soiled clothes.
4. Reduce the amount of detergent or choose standard or delicate wash
programs for slightly soiled clothes.
5. Choose a proper washing temperature. Only exceed 60
soiled clothes.
6. Do not use more detergent than required.
7. Softening agent makes clothes feel softer and easier to iron.
ć
for heavily
G: Power button
Press this button to switch on the washing machine; press it again to switch the machine off.
To cancle a wash program during a wash cycle,please switch the machine off.
Nightwash,low noise,ensure you sweet sleep!
ƽ
Page 9
Washing Procedure
Functions
1. Loading
Open the door, put in the laundry piece by piece. Close the door tightly.
Notes:
1) When f irst usi ng the washi ng machine,let it run unloaded for one program to
prevent the laundry from being tainted by oil or dirty water from the washing machine.
2) Do not overload the washing machine.
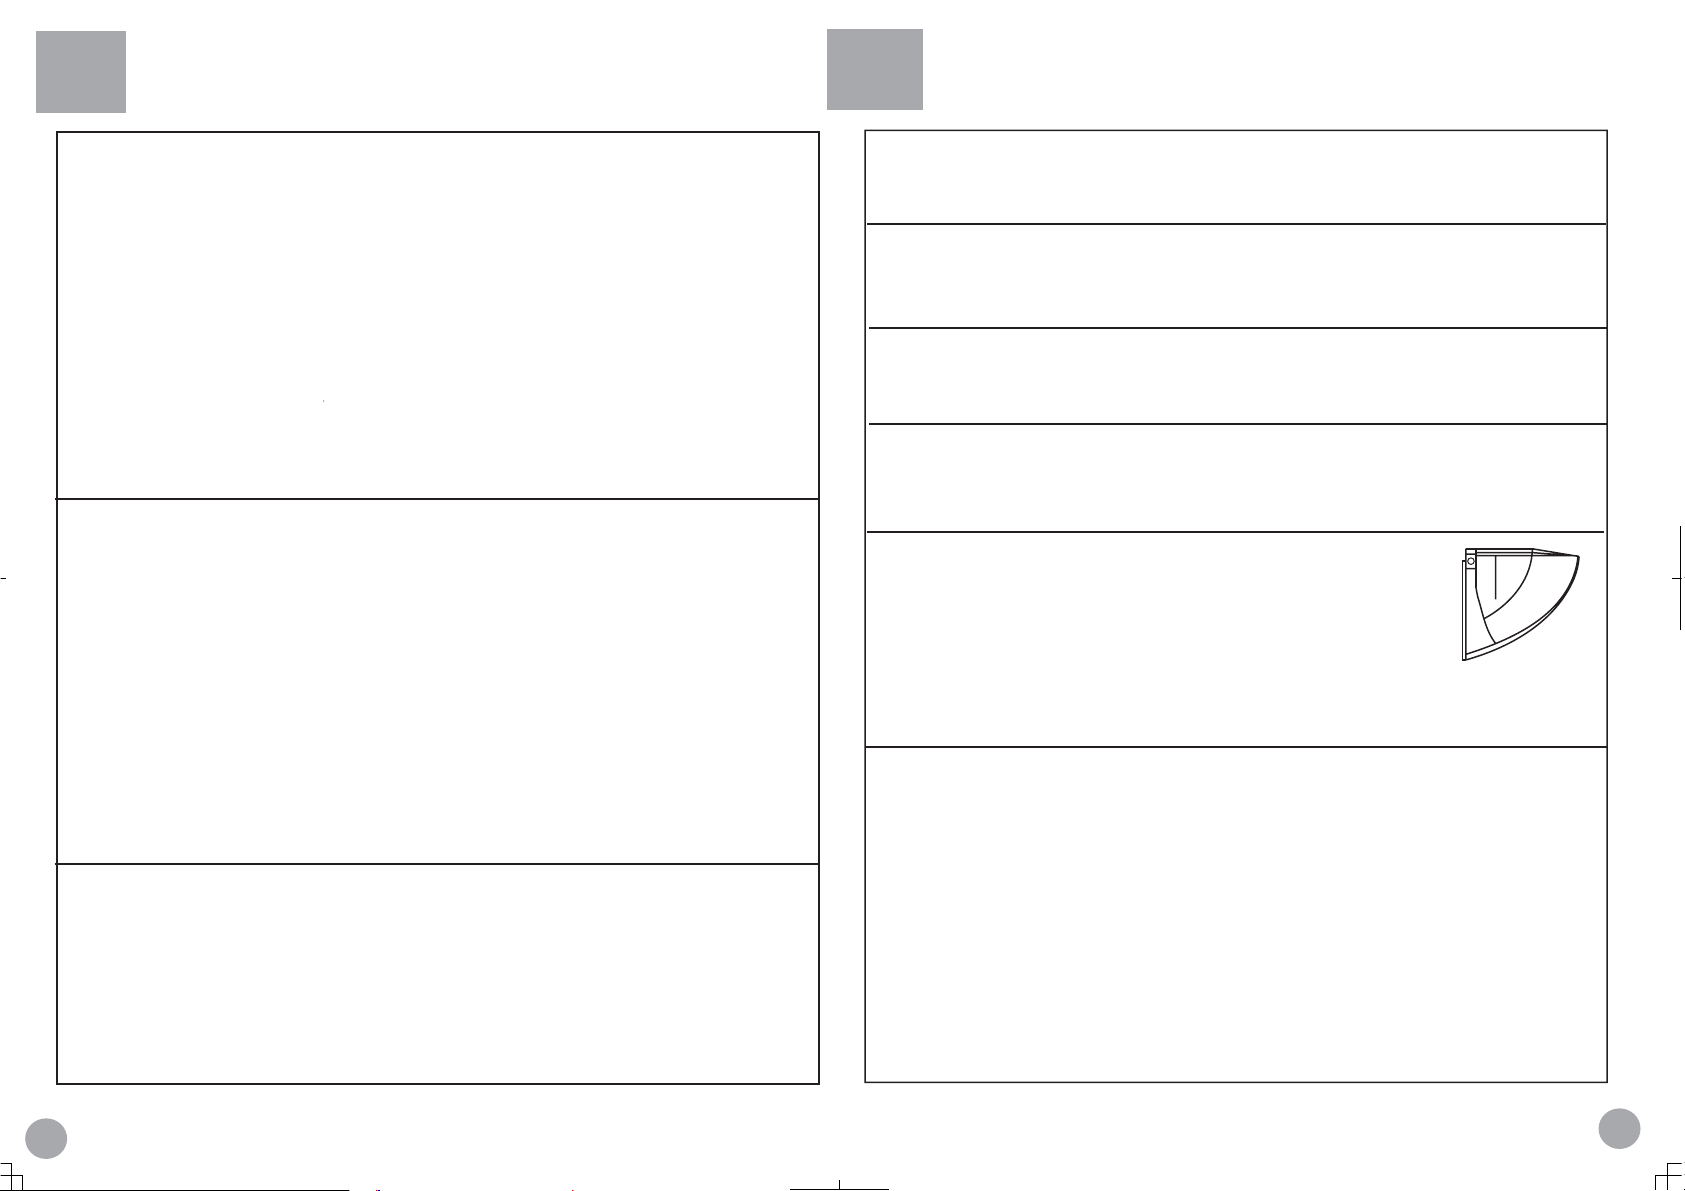
2. Adding detergent
Slide out the detergent drawer and put the required detergent and
softening agent into the corresponding boxes. Push back the drawer gently.
Caution:
1) For pre-washing program, detergent should be added to both
compartments 1 and 2. Compartment 2 allows only solid detergents.
For other programs, do not add detergent to compartment 1.
2) Do not overuse softener; otherwise, it will damage the artificial
fibers. Refer to the instructions during use.
3. Selecting washing program
To get the best washing effect, an appropriate washing program should be selected
according to the laundry type.
Note: The above operations refer to conditions without power-off memory. Or the washing
machine will continue operation from where the program was broken. To clear memory,
press the Start/Pause button. Turn off the power for a few seconds and turn on again, all
the settings will be renewed.
H: Wash programming knob and start button
By turning the knob clockwise or counterclockwise, the required program can be selected;
press the start button to start a program; press it again to pause
I: Speed button
Press this button to set a required spinning speed, which covers 0 rpm to 1400 rpm.
(0-1400rpm for HK1407I/ME 0-1200rpm for HK1207I/ME
0-1000rpm for HK1007I/ME 0-800rpm for HK807I/ME)
J : Temperature button
Press this button to set a required temperature. The selectable temperature range is
0-90§. (Some programs have temperature limits. Refer to the programming guide)
K: Display
Remaining time, set temperature, spinning speed, other function information, and error messages
are displayed. Refer to the Display Description
/Detergent distribution drawer
There are instructions on the handle of the distribution drawer. Swing
out the drawer, three compartments can be seen.
Compartment 1: Pre-washing detergent. If pre-wash is not selected, do
not add detergent.
Compartment 2: Detergent for all washing programs. Detergent must be
added whetherpre-wash is selected or not.
Compartment 3: Softening agent, conditioning agent, perfume, etc
B+D: combination for keyboard lock
After a program is started, press the delay button and the at the same
time for 3 seconds, the keyboard will be locked and "SAFE ON" will appear on the screen.
Press the two buttons again for 3 seconds, the keyboard will be unlocked and "SAFE OFF"
will be displayed. This function is used to protect the washing machine from being disturbed
during operation, such as accidental press of buttons or turning of knobs by children, as this
may affect or suspend the operation of a program. Note: If this function is activated during
a washing cycle, be sure to inactivate it at the end of the cycle when the "End" sign is
displayed.
Caution: If the keyboard lock is not activated, press the Start/Pause button and then cut off
the power, the suspended program will be canceled after power is resumed. Now turn the
program knob to reselect.
Extra Rinse
Page 10
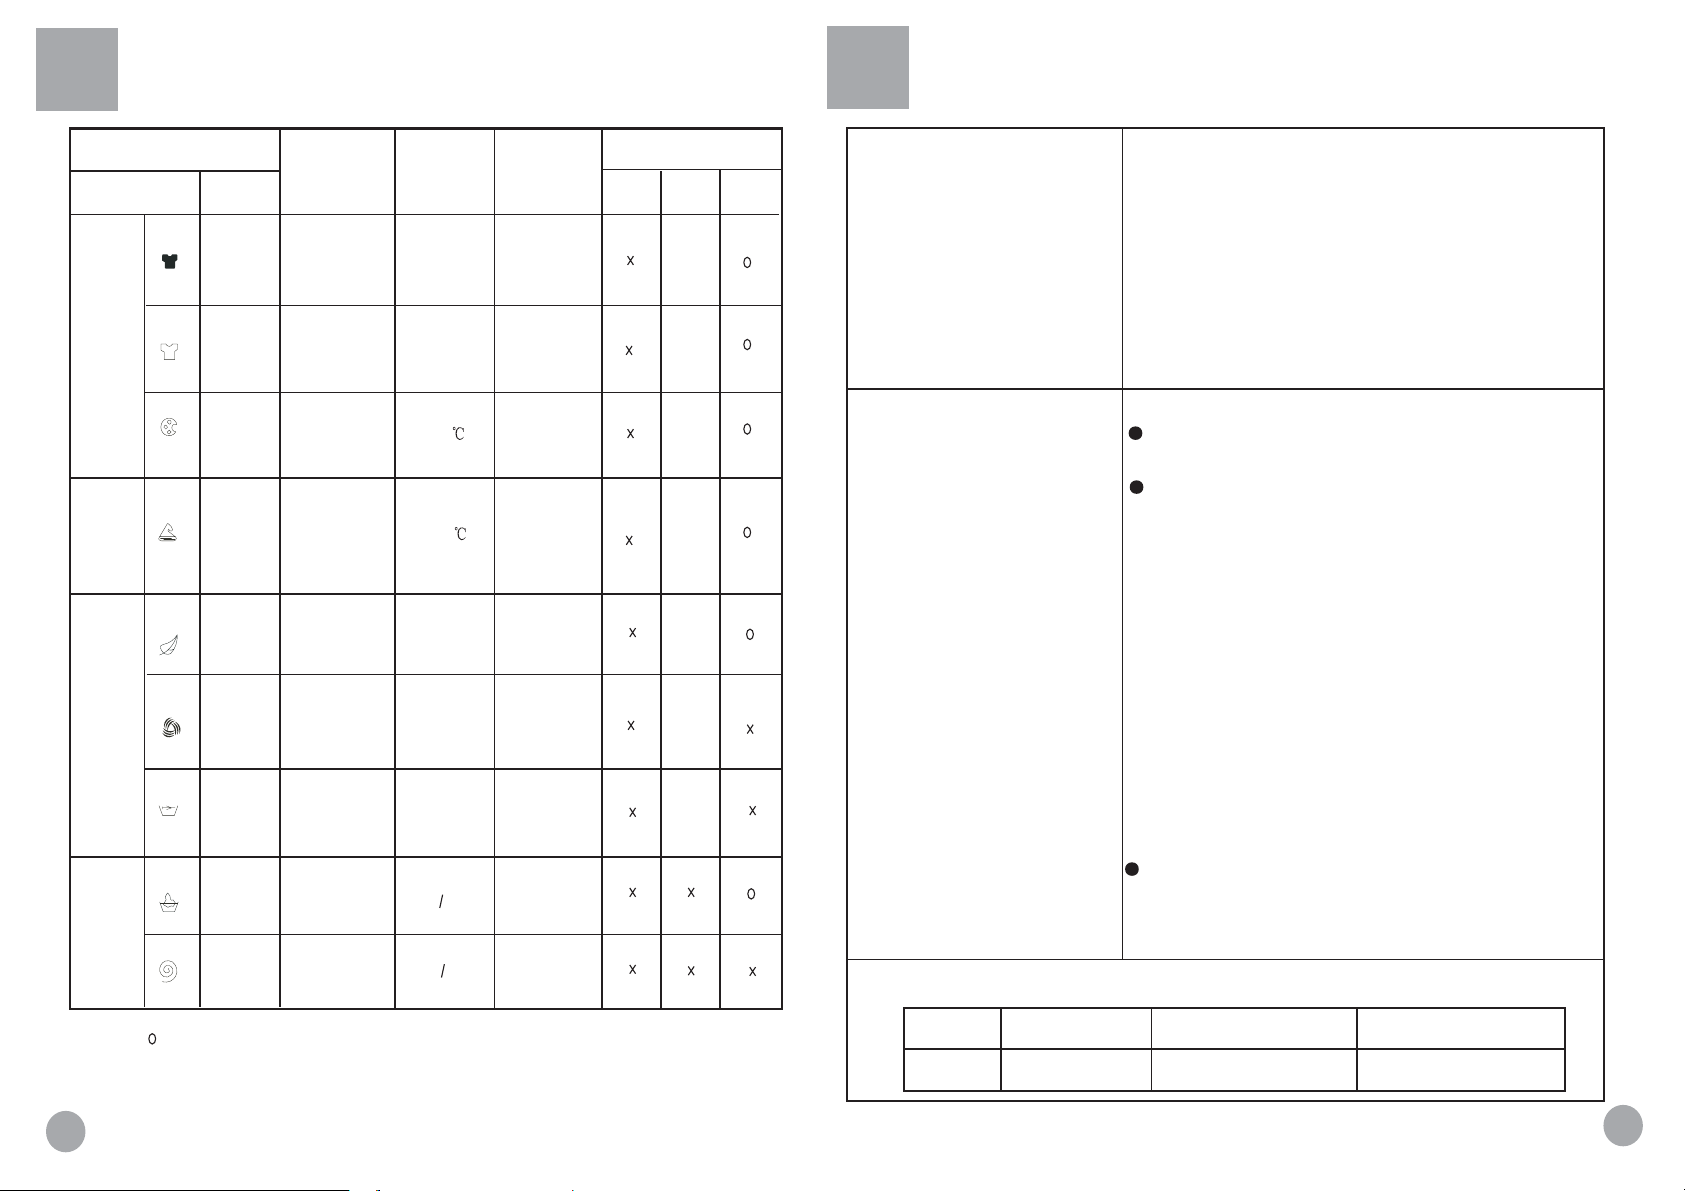
Program Description Table
Preparation
Mode Selection
Button Position Program
Intense
Cotton
Synthetic
Normal
Delicate
Normal
wash
Cashmere
Delicate
/Super
Quick
Wool
Wash
Super
quick wash
Single
Wash
Program
Rinse
Spin dry
Recommended
Laundry
Heavy and
thick fabrics
White fabrics
Fast-color and
medium soil
fabrics
Fast-color
and heavysoil fabrics
Wool and silk
Wool
Medium-soil
cotton &
synthetics
Selectable
Temperature
ć
0-90
ć
0-90
0-60
0-60
ć
0-40
ć
0-40
ć
0-40
Program Time
(At Default
Temperature)
2:25
2:06
1:40
1:42
1:11
1:15
0:29
0:42
0:13
1
Detergent
2
ƾ
ƾ
ƾ
ƾ
ƾ
ƾ
ƾ
3
1.Power supply
Plug in the power supply 220-230V~50HZ
4.Detergent selection
Only special low foam detergent should
be used in automatic drum washing
mashine,form blended or wool fabrics
special deter-gent should ne used.dry
clearning solvent should not be used
such as trichhloroethy-lene or alike
(caution :load the required amount of
detergent only).
2.Water supply
Turn on the tap ensure that the water in clear.
Caution:Before staring the washing machine turn on the water
faucet to ensure the water faucet and the water inlet hose are
connected correctly and do not leak
3.Laundry treatment
Sort out clothes according to type and extent of dirt.There are
three types of clothes:cotton,synthetical and woolen (silk) fabrics.
Separate white clothes from colored.If whites and coloreds
are combimed for one load,make sure the coloreds are colorfast
-Clothing with frayed edges or yams should be put in a wash
bag or special bag before washing
-repair damged clothing,lose buttons or damaged zips
and hooks before washing.
-Bed sheets and table ware should be loosely loaded and not
folded.
This washing mashine is for househould use and designed
for mechanically washable clothes.When washing,separate
unwashable clothes with reference to clothes labels.
5.Wash Load
Note :" " indicates that softener or bleacher can be added if needed;
" ƾ " indicates that detergent must be added;
" X " indicates that detergent must not be added.
Type
Max Load
non-fade cottens
Delicate fabrics
7kg 4kg 2kg
Woolen fabrics
 Loading...