

Haier HI50IB20SS Installation
Installation and User Manual
Instructions d’installation et
Guide de l’utilisateur
Instrucciones de instalación y
Manual del usuario
Automatic Undercounter Ice Machine
Machine à glaçons automatique sous plan
de travail
Máquina de Hielo Automatic Para Debajo
de la Encimera
HI50IB
49-60811 01-18 GEA

2
49-60811

TABLE OF CONTENTS
ICE MACHINE SAFETY ......................................................4
PARTS AND FEATURES ...................................................... 6
INSTALLATION REQUIREMENTS .............................................7
Location Requirements .....................................................7
Installation Clearances ......................................................8
Water Supply Requirements .................................................8
Connecting Electricity ...................................................... 9
INSTALLATION INSTRUCTIONS ............................................10
Unpacking .................................................................10
Reversing the Door Swing (Optional) ........................................10
Connect the Water ........................................................ 11
Connect the Electrical Supply ..............................................14
Install the Ice Machine ......................................................14
Leveling the Ice Machine ...................................................15
ICE MACHINE USE . . . . . . . . . . . . . . . . . . . . . . . . . . . . . . . . . . . . . . . . . . . . . . . . . . . . . . . . . 16
Operation .................................................................16
Ice Making Cycles ..........................................................17
Controls. ..................................................................18
ICE MACHINE CARE .......................................................20
Cleaning ...................................................................20
Vacation and Moving .......................................................24
Reinstalling/Using Ice Machine Again .......................................24
TROUBLESHOOTING ...................................................... 25
LIMITED WARRANTY ......................................................27
ENGLISH
RECORD KEEPING ........................................................2 8
49-60811
3
ENGLISH
ICE MACHINE SAFETY
IMPORTANT SAFETY INSTRUCTIONS
WARNING
machine, follow basic precautions, including the following:
Ŷ Use this appliance only for its intended purpose as described in this
user manual.
Ŷ This appliance must be properly installed in accordance with the
installation instructions before it is used. See grounding instructions in
the installation section.
Ŷ Plug into a grounded 3 prong outlet.
Ŷ Do not remove ground prong.
Ŷ Do not use an adapter or extension cord.
Ŷ Do not repair or replace any part of the appliance unless specifically
recommended in the manual. All other servicing should be referred to a
qualified technician.
Ŷ Disconnect power before servicing.
Ŷ Replace all parts and panels before operating.
Ŷ Use nonflammable cleaner.
Ŷ Do not store or use gasoline or other flammable vapors and liquids in
the vicinity of this or any other appliance.
Ŷ Do not store explosive substances such as aerosol cans with a
flammable propellant in this appliance.
Ŷ Before discarding or removing from service, remove the door. This will
reduce the possibility of danger to children.
Ŷ To avoid serious injury or death, children should not stand on, or play in
or with the appliance.
Ŷ Children and persons with reduced physical, sensory or mental
capabilities or lack of experience and knowledge can use this appliance
only if they are supervised or have been given instructions on safe use
and understand the hazards involved.
Ŷ This appliance is intended to be used in household and similar
applications such as: staff kitchen areas in shops, offices and other
working environments; farm houses; by clients in hotels, motels, bed
& breakfast and other residential environments; catering and similar
non-retail applications.
To reduce the risk of fire, explosion, electrical shock,
injury to persons, or damage when using the ice
CAUTION
To reduce the risk of injury when using your ice machine,
follow these basic safety precautions.
Ŷ Keep fingers out of the “pinch point” areas; clearances between the
door and cabinet are necessarily small. Be careful closing door when
children are in the area.
Ŷ Do not touch the cold surfaces in the ice machine when hands are damp or
wet, skin may stick to these extremely cold surfaces.
4
49-60811
ICE MACHINE SAFETY
STATE OF CALIFORNIA PROPOSITION 65 WARNINGS:
WARNING
the State of California to cause cancer and birth defects or other
reproductive harm.
This product contains one or more chemicals known to
PROPER DISPOSAL OF YOUR OLD APPLIANCE
WARNING
Failure to follow these disposal instructions can result in death or
serious injury.
IMPORTANT: Child entrapment and suffocation are not problems of the
past. Junked or abandoned appliances are still dangerous even if they
will sit for “just a few days.” If you are getting rid of your old appliance,
please follow the instructions below to help prevent accidents.
Before You Throw Away Your Old Appliance:
Ŷ Take off the door.
Ŷ Leave the shelves in place so that children may not easily climb inside.
Refrigerant and Foam Disposal:
Dispose of appliance in accordance with Federal and Local Regulations.
Flammable insulation material used requires special disposal
procedures. Contact your local authorities for the environmentally safe
disposal of your appliance.
SUFFOCATION AND ENTRAPMENT HAZARD
ENGLISH
49-60811
READ AND SAVE THESE INSTRUCTIONS
5
ENGLISH
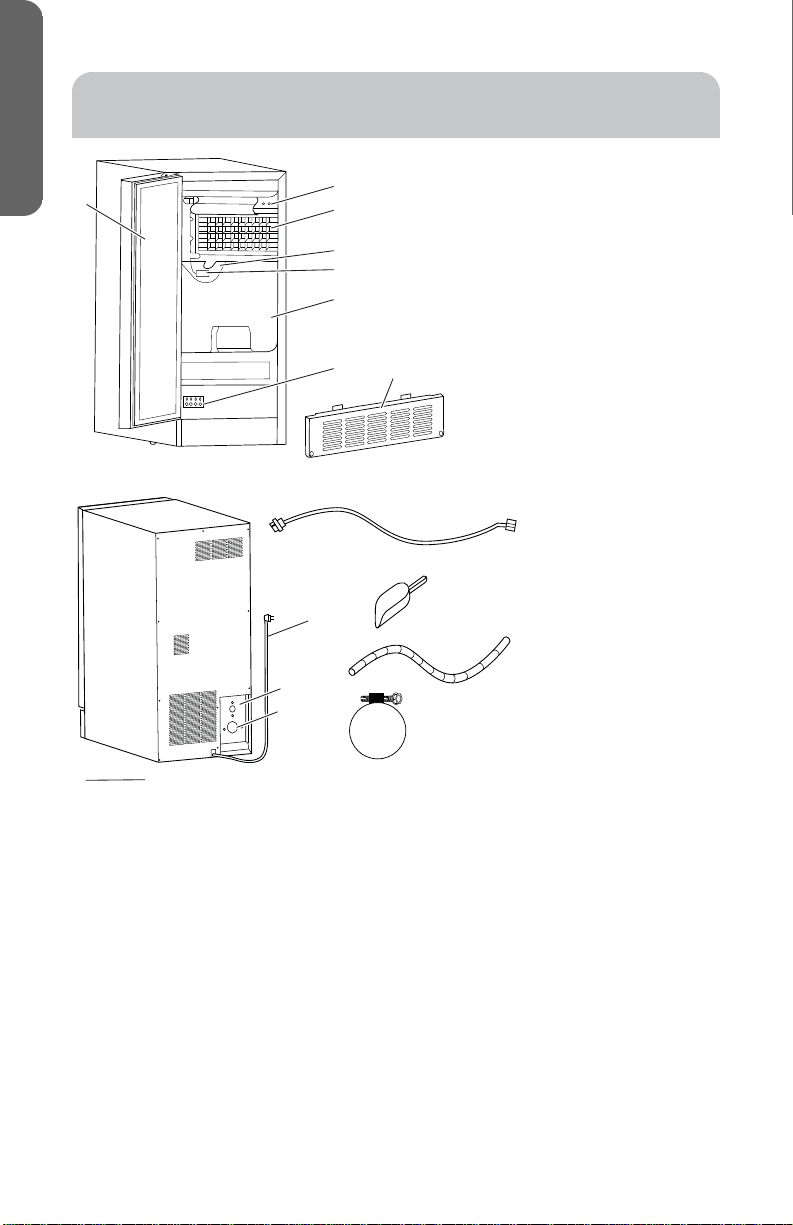
PARTS AND FEATURES
A
B
C
A. Door
B. Water Distribution Tube
D
E
F
C. Evaporator (ice mold)
D. Water Trough
E. Float
F. Ice Bucket
G
H
G. Control Panel
H. Front Louver Panel
I. Feet (not shown)
J. Water Supply Hose
J
K. Power Cord
L. Water Inlet
N
K
O
L
M
P
M. Drain Outlet
N. Ice Scoop
O. Drain Hose
P. Drain Hose Clamp
I
6
49-60811
INSTALLATION REQUIREMENTS
LOCATION REQUIREMENTS
WARNING
Explosion and Fire Hazard
Keep flammable materials and vapors, such as gasoline, away from
appliance.
Failure to do so can result in death, explosion or fire.
To ensure proper ventilation for your ice machine, the front of the unit must
be completely unobstructed.
When installing the ice machine under a counter, follow the recommended
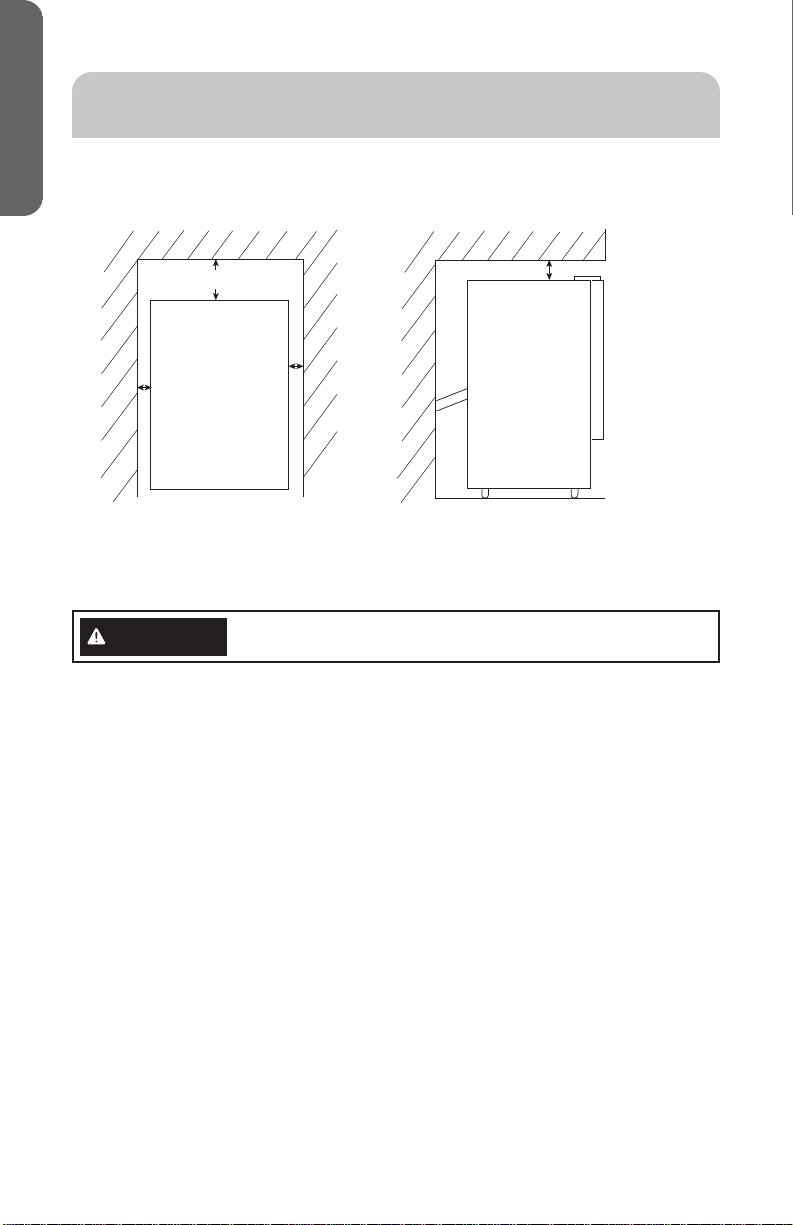
spacing dimensions shown in the “Installation Clearances” section. Allow
at least 3-7/8” (9.8 cm) clearance at rear, and 3/8” (1.0 cm) at top and 3/16”
(0.5 cm) at sides for proper air circulation.
The installation should allow the ice machine to be pulled forward for
servicing, if necessary.
Choose a well ventilated area with normal operating temperatures above
50°F (10°C) and below 100°F (38°C). Normal operating water temperature
should be between 41°F (5°C) and 90°F (32°C). Operation of the ice machine
for extended periods outside of these normal temperature ranges may
affect production capacity.
The ice machine should not be located next to ovens, grills or other high
heat sources.
The ice machine MUST be installed in an area protected from the elements,
such as wind, rain, water spray or drips.
The ice machine should be located on a firm and level surface. It is
important for the ice machine to be leveled in order to work properly. If
needed, you can adjust the height of the ice machine by turning the feet.
See the “Leveling the Ice machine” section.
• Do not install the ice machine where the temperature will go below
50°F (10°C) because it will not run often enough to maintain proper
temperatures.
• Do not install the ice machine where the temperature will go above
100°F (38°C) because it will not perform properly.
• Install it on a floor strong enough to support it fully loaded.
• Do not install the ice machine in a location exposed to water (rain,
etc.) or direct sunlight.
49-60811
ENGLISH
7
ENGLISH
INSTALLATION REQUIREMENTS
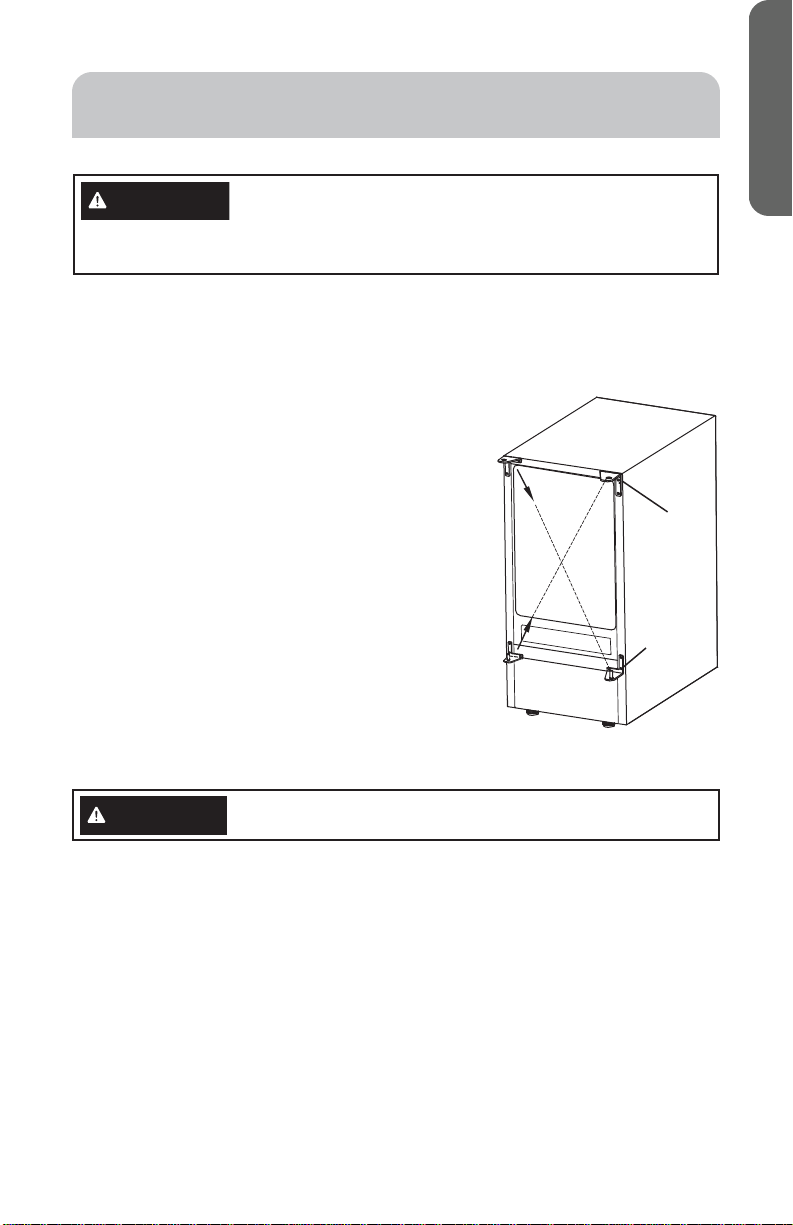
INSTALLATION CLEARANCES
Top View
#s¤)($æð¥
Rear of Unit
A\5:
(0.48 cm)
A\5:
(0.48 cm)
Side Side
Front of Unit
Side View
Front
Edge
q (0.953 cm)
Top of Unit
WATER SUPPLY REQUIREMENTS
WARNING
Installation of the ice machine requires a cold water supply inlet of ¼”
¤&#%рр¥цтйчжтууихчшемскъмчлдцлшч¡тģщдпщи
The ice machine requires a continuous water supply with a minimum
pressure of 15 psig (103 KPa) and a static pressure not to exceed 80 psig
(552 kPa). The temperature of the water feeding into the ice machine should
be between 41°F (5°C) and 90°F (32°C) for proper operation.
ТчмццчхтскпьхижтррисзизчлдчдъдчихĤпчихеишцизКĤпчихмймчмцтйчли
proper type, can remove taste and odors as well as particles. Some water is
very hard, and softened water may result in white, mushy cubes that stick
together. Deionized water is not recommended.
Connect to potable water supply only.
8
49-60811
INSTALLATION REQUIREMENTS
CONNECTING ELECTRICITY
WARNING
Plug into a grounded 3-prong outlet.
Do not remove the ground prong.
Do not use an adapter.
Do not use an extension cord.
Failure to follow these instructions can result in death, fire, or electrical
shock.
Do not, under any circumstances, cut or remove the third (ground)
prong from the power cord. For personal safety, this appliance must
be properly grounded.
The power cord of this appliance is equipped with a 3-prong (grounding)
plug which mates with a standard 3-prong (grounding) wall outlet to
minimize the possibility of electric shock hazard from this appliance.
Have the wall outlet and circuit checked by a qualified electrician to make
sure the outlet is properly grounded.
Where a standard 2-prong wall outlet is encountered, it is your personal
responsibility and obligation to have it replaced with a properly grounded
3-prong wall outlet.
The ice machine should always be plugged into its own individual
electrical outlet which has a voltage rating that matches the rating plate.
A 115 Volt AC, 60 Hz, 15- or 20-amp fused, grounded electrical supply
is required. This provides the best performance and also prevents
overloading house wiring circuits which could cause a fire hazard from
overheated wires.
Never unplug your ice machine by pulling on the power cord. Always grip
plug firmly and pull straight out from the outlet.
Immediately discontinue use of a damaged supply cord. If the supply
cord is damaged, it must be replaced by a qualified service professional
with an authorized service part from the manufacturer.
When moving the ice machine away from the wall, be careful not to roll
over or damage the power cord.
The ice machine must be installed with electrical and water connections
in accordance with all state and local codes.
A wall outlet directly behind the ice machine will make installation easier.
ELECTRICAL SHOCK HAZARD
ENGLISH
49-60811
9
ENGLISH
UNPACKING
INSTALLATION INSTRUCTIONS
WARNING
Excessive Weight Hazard
Use two or more people to move and install ice machine.
Failure to do so can result in death or personal injury.
1. Remove packaging materials.
IMPORTANT: Do not remove any permanent instruction labels or the data
label on your ice machine.
2. Remove tape and glue from your ice machine before using.
• To remove any remaining tape or glue, rub the area briskly with your
thumb. Tape or glue residue can also be easily removed by rubbing a
small amount of liquid dish soap over the adhesive with your fingers.
Wipe with warm water and dry.
• Do not use sharp instruments, rubbing alcohol, flammable fluids, or
abrasive cleaners to remove tape or glue. These products can damage
the surface of your ice machine.
3. After you remove all of the packaging materials, clean the inside of your
ice machine before using it. See “Cleaning.”
4. Properly dispose of/recycle all packing material.
REVERSING THE DOOR SWING (Optional)
WARNING
to follow these instructions, leaving off parts, or overtightening screws,
can lead to the door falling off and result in injury and property damage.
Tools Needed:
• Flathead Screwdriver • Phillips Screwdriver
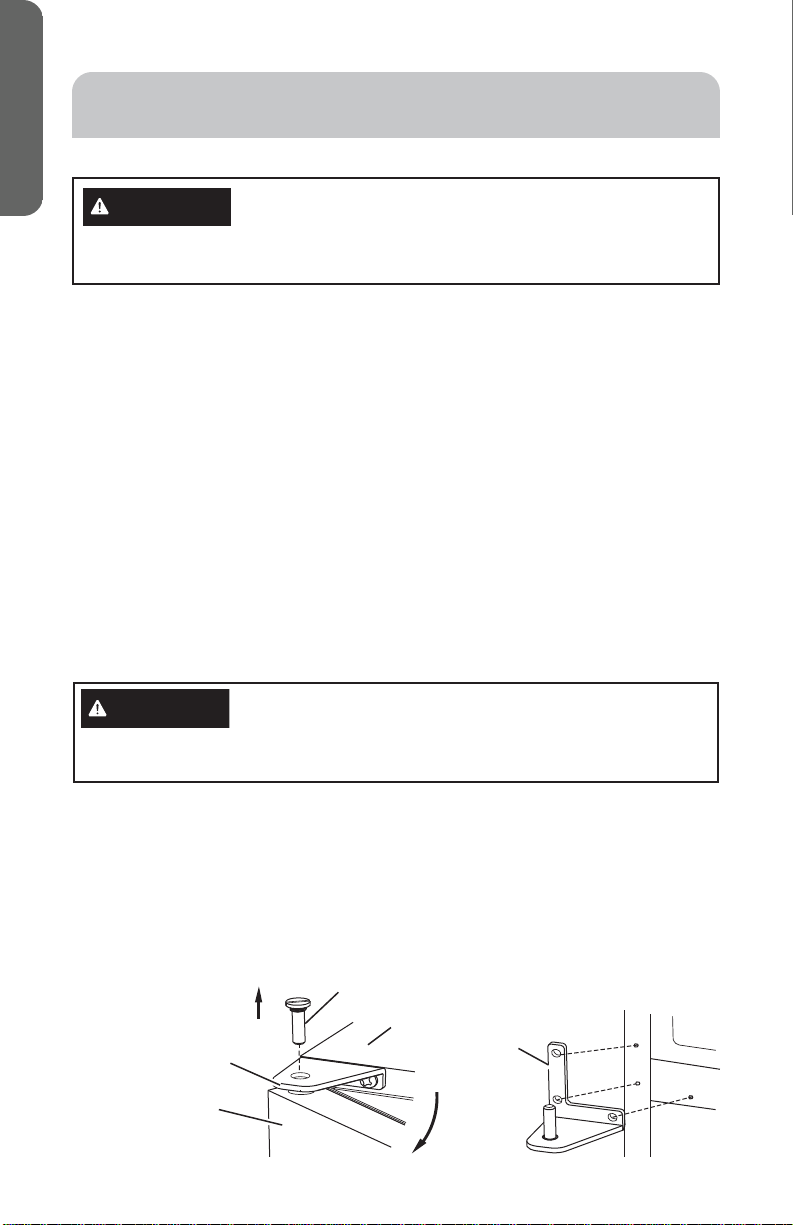
To remove the door:
1. Unplug the ice machine or disconnect power.
2. Using a flathead screwdriver, remove the hinge pin from Hinge 1, and set
it aside.
3. Open the door about 20°, and then lift the door off Hinge 2, and set the
door aside.
Follow all steps when reversing the door swing. Failure
Hinge Pin
Cabinet
Hinge 1
Door
10
Hinge 2
49-60811
INSTALLATION INSTRUCTIONS
REVERSING THE DOOR SWING (Optional) (Cont.)
WARNING
to follow these instructions, leaving off parts, or overtightening screws,
can lead to the door falling off and result in injury and property damage.
To reverse the door:
1. Using a flathead screwdriver, remove the covers from the screw holes on
the side opposite the door hinges, top and bottom. Set aside.
2. Replace the hinge pin on Hinge 1 and tighten it firmly.
3. Remove the screws fastening Hinge 1 to the
cabinet and reinstall it on the opposite side of
the cabinet at the bottom.
4. Remove the screws fastening Hinge 2 to the
cabinet and reinstall it on the opposite side of
the cabinet at the top.
5. Using a flathead screwdriver, remove the hinge
pin from Hinge 2, and set it aside.
6. Rotate the door so that the handle is opposite
the hinge side and set the door onto the
bottom hinge pin.
7. Completely tighten the bottom hinge.
8. Insert the hole covers into the holes where the
screw were originally located.
Follow all steps when reversing the door swing. Failure
Hinge 2
Hinge 1
ENGLISH
CONNECT THE WATER
WARNING
The water supply should be ready at the point of installation. The water
supply pressure should be a minimum of 15 psig (103 KPa) with a static
pressure not more than 80 psig (552 KPa). (A wall outlet directly behind the
ice machine w3ill make installation easier.)
IMPORTANT:
• All installations must be in accordance with local plumbing code
requirements. Professional installation is recommended.
• Make certain the hoses are not pinched or kinked or damaged during
installation.
• Check for leaks after connection.
49-60811
Connect to potable water supply only.
11

ENGLISH
INSTALLATION INSTRUCTIONS
CONNECT THE WATER (Cont.)
Tools Needed:
• ½” Open-end Wrench
• Phillips Screwdriver
• Adjustable Pliers
CONNECT THE WATER LINE
1. Turn off the main water supply. Turn on the nearest faucet long enough to
clear line of water.
2. Find a ½” to ¾” vertical cold water pipe near the installation location. The
water supply hose is provided with the ice machine.
3. A shut-off valve must be installed to the main water supply. If the water
pipe has a plain piece of copper tubing, attach a ¼” outside diameter
(O.D.) compression union to the tubing and remove the nut.
4. Connect the nut from the water supply hose to the tap, and connect the
other end to the water inlet. Tighten firmly by hand, and then using a
wrench tighten an additional half turn.
5. Turn on main water supply and tap.
6. Check for water supply connection leaks. Tighten every connection
(including connection at the water inlet).
IMPORTANT: When you connect the water supply hose and the drain hose,
note the “Water inlet” and “Drain outlet” marked on the ice machine.
CONNECT THE DRAIN
You must connect the drain line before using the ice machine.
NOTE: If there is a drain line near the ice machine, the best choice is to drain
water to the drain line through the drain water hose provided with the ice
machine.
1. Locate the floor drain near the ice machine. The distance should be less
than 5 feet since the length of the long drain water hose provided with
the ice machine is about 5 feet.
2. Find the drain outlet on the back of ice machine. Connect the drain hose
to the ice machine drain outlet, tighten drain hose clamp, and insert the
other end of the hose into the drain line.
12
49-60811

INSTALLATION INSTRUCTIONS
CONNECT THE WATER (Cont.)
NOTE: Do not allow the drain hose to hang or loop higher than the floor
of the ice storage bin.
• All horizontal runs of drain lines must have a fall of ¼” per foot. An
air gap will likely be required between the ice machine drain hose and
the drain/waste receptacle. A standpipe with a trap below it would be
acceptable for the drain/waste receptacle.
• If a floor or other gravity drain below the level of the ice machine drain
outlet is not available, the use of an aftermarket sealed ice machine
drain pump kit will be required.
NOTES:
• Connect drain pump to your plumbing drain in accordance with all
state and local codes and ordinances.
• Drain pump must be a sealed design to prevent water overflow
during power outages.
• Minimum rated pumping rate of drain pump should be 0.5 gal./
minute (1.9 L/minute).
• Follow all installation instructions, provided with the drain pump kit.
• Drain pump should be located on a surface that is at the same level
as the surface underneath the ice machine. The top of the drain
pump reservoir must be no higher than the floor of the ice machine
storage bin.
• Do not allow the hose from the ice machine to the drain pump to
hang or loop higher than the floor of the ice storage bin.
• The end of the drain pump vent hose should be within 8” (20 cm) of
the top of the ice machine.
• Plumbing drain should be no more than 10 ft (3 m) above the outlet
of the drain pump.
• Do not connect the outlet hose of the drain pump to a closed pipe
system to keep drain water from backing up into the ice machine.
3. Pour 1 gallon of water into the ice storage bin to check for leaks in the
drainage system. Tighten any connections that leak.
ENGLISH
49-60811
13
ENGLISH
INSTALLATION INSTRUCTIONS
CONNECT THE ELECTRICAL SUPPLY
WARNING
Electrical Shock Hazard
Plug into a grounded 3 prong outlet.
Do not remove the ground prong from the power cord plug.
Do not use an adapter.
Do not use an extension cord.
Failure to do so can result in death, fire or electrical shock.
Ŷ Plug into a grounded 3 prong outlet.
INSTALL THE ICE MACHINE
This ice machine can be installed, as Free-Standing, or be Enclosed (as
under the counter top), or Built-in (sealed to the floor). In any case, there
must be adequate air space around the unit for ventilation. See “Installation
Clearances” in the “Location Requirements” section.
FREE-STANDING INSTALLATION
This ice machine may be installed in any location provided there is access
to an electrical supply, water supply and drain. You must follow the stated
instructions for Electrical Requirements, Water supply and proper drainage,
and Leveling the ice machine.
ENCLOSED INSTALLATION
An enclosed installation will allow you to install the ice machine under a
counter top or in a kitchen cabinet provided the required clearance space
around the ice machine is respected. See “Location Requirements.” This
installation has the same requirements as a free-standing installation.
14
49-60811

INSTALLATION INSTRUCTIONS
INSTALL THE ICE MACHINE (Cont.)
BUILT-IN INSTALLATION
If this method of installation is chosen, it will still be necessary to allow
adequate ventilation space around the ice machine.
1. Place ice machine in front of installation location. Place the ice machine
flat on the floor or on a platform depending on your installation
requirements.
2. The water supply line must be plumbed before connecting to the ice
machine.
3. Turn on main water supply and tap.
4. Check for water supply connection leaks. Tighten every connection
(including connection at the water inlet).
5. Suitable drain line must be connected for this installation.
6. If the electrical outlet for the ice machine is within the cabinet opening,
plug in the ice machine.
7. Push the ice machine into position.
IMPORTANT: Be sure to check that water supply and drain hoses cannot
get pinched or kinked or damaged before ice machine moves into its final
position.
ENGLISH
LEVELING THE ICE MACHINE
The rolling casters on the bottom of the ice machine allow it to be moved
easily to clean and sanitize the floor underneath.
The ice machine must be level to work properly. If the ice machine is not
level the water will not flow properly through the evaporator (ice mold). The
ice production will be less than normal, and may be noisy.
The ice machine can be raised or lowered by rotating the plastic feet around
each of the four rolling casters on the bottom of the ice machine.
If you find that the surface is not level, rotate the feet until the ice machine
becomes level. You may need to make several adjustments to level it.
Place a carpenter’s level on top of the ice machine to see if the ice machine
is level from front to back and side to side.
Adjust the height of the casters as follows:
To Lower - Turn the leveling feet to the right.
To Raise - Turn the leveling feet to the left.
IMPORTANT: When the ice machine is ready to be installed in a cabinet or
directly on the floor, you must lock the casters after leveling. If the floor is
level, just turn the two front feet to touch the floor.
49-60811
15
ENGLISH
ICE MACHINE USE
OPERATION
1. The operating procedure is completely automatic.
2. When the ice storage bin is full of ice cubes, the machine stops making ice
automatically. It starts making ice again after ice cubes are removed.
3. The different colors of the LED display indicate various work modes.
4. A sensitive probe and accurate timer enhance the performance of the ice
machine.
5. A compressor protection system is built in.
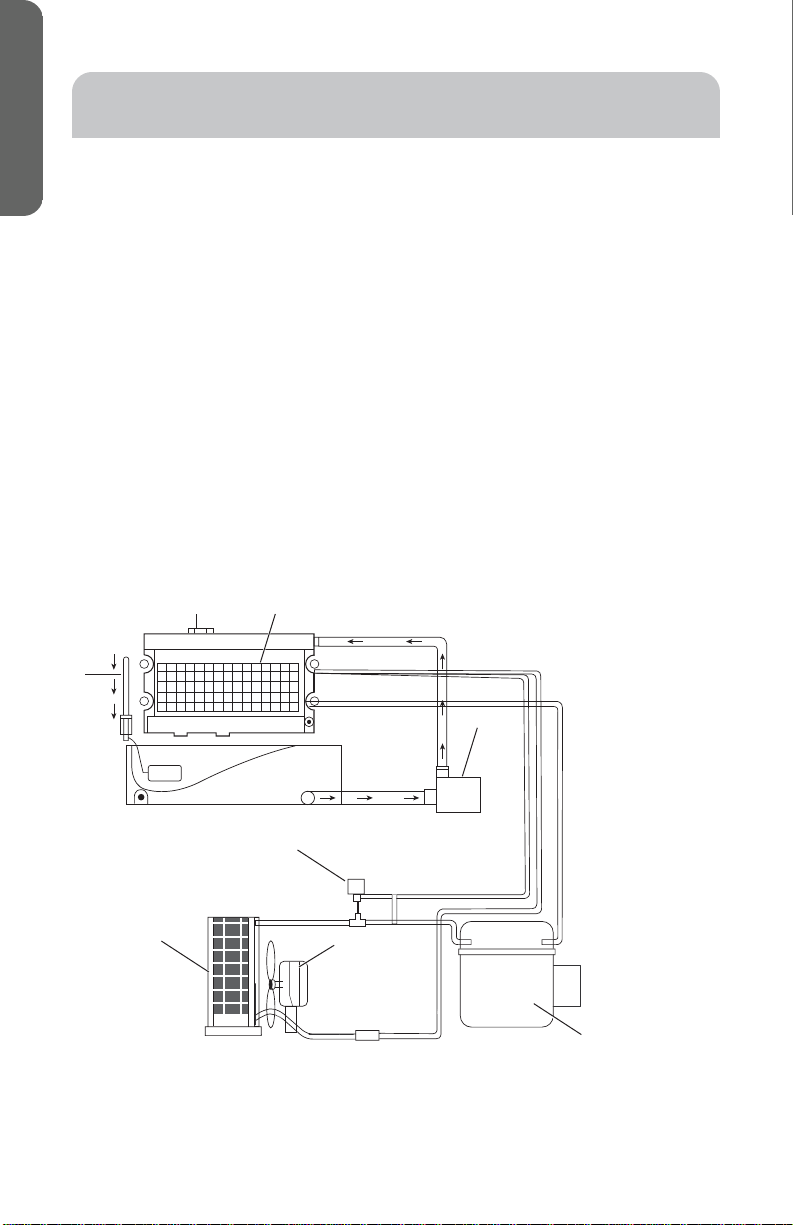
HOW THE ICE MACHINE USES THE WATER
The ice machine begins with a fixed charge of water that is contained in the
water trough. As the water flows to the freezing evaporator surface, the
portion of water that does not contain mineral impurities freezes and sticks
to the ice cube molds. The water containing impurities falls back into the
water trough. During the ice making process, fresh water enters into the
water trough continuously as the water in the trough freezes continuously
in the evaporator.
B
C
A
D
H
F
16
G
A. Water Inlet
B. Water Distribution
Tube
C. Evaporator
D. Water Pump
E. Compressor
F. Condenser
G. Fan Motor
H. Hot Gas Valve
E
49-60811

ICE MACHINE USE
OPERATION (Cont.)
1. Turn on the water tap, let the water trough fill.
2. Press the ON/ OFF button on the control panel. The ice machine will start
working automatically.
3. After 3 minutes, the machine will automatically go to the ice-making
stage, and the sound of water flowing will be heard.
4. When the batch of ice has been fully formed, ice will automatically be
harvested to the ice storage bin.
5. When the ice storage bin is full, the sheet of cubes will not fall completely
and will hold the bin-full probe open. The machine stops making ice
automatically.
6. The unit will start making ice again after the ice cubes are removed. Then
the bin-full probe swings back to operating position.
IMPORTANT:
• Although the ice machine has been tested and cleaned at the factory,
due to longterm transit and storage, discard the first few batches of ice
produced.
• Do not turn the water supply tap off when the ice machine is working.
• Do not touch evaporator when unit is running!
• Except to take ice from the unit, keep the door closed to reduce melting
and insure proper ice formation.
ENGLISH
ICE MAKING CYCLES
There are two distinct cycles: Ice Freeze and Harvest. The freeze cycle
happens when water flows to the evaporator surface. The harvest cycle is
when the ice is released and water enters the machine. A complete cycle
takes about 20 minutes, but it depends on temperature and operating
conditions.
Ice Freeze Cycle
During the freeze cycle the compressor is pumping refrigerant, the fan
motor is blowing air, and the water pump is circulating water. When the
batch of ice has been fully formed, the ice machine stops the freeze cycle
and the harvest cycle begins.
Harvest Cycle
During the harvest cycle the compressor is still operating, but the water
pump has stopped. The hot gas valve opens, diverting hot refrigerant gas
into the evaporator. The hot refrigerant gas warms the evaporator, causing
the cubes to slide as a unit off the evaporator and into the storage bin. The
freeze cycle will restart when all the cubes have been harvested.
49-60811
17

ENGLISH
CONTROLS
ICE MACHINE USE
ICE
ON/OFF CLEAN ADJUST MODE
BIN FULLHARVEST
Bin Full (Red) LED indicator light
When Bin Full is lit, the ice storage bin is full of ice or something is blocking
the bin-full probe. The ice machine will stop working. When ice cubes are
removed from the ice storage bin, freeing the bin-full probe, the red LED will
flash for 3 minutes, and then the ice machine will restart and return to the
ice making mode.
Ice Making (Green) LED indicator light
When Ice Making is lit, the unit is working in the ice making mode controlled
by a temperature probe on the evaporator. When the green LED flashes, the
unit is working in the ice making mode controlled by a fixed timer.
Ice Harvest (Yellow) LED indicator light
When this is lit, the unit is working in the ice harvest mode controlled by the
ice-full probe.
Mode button: Mainly for Service
The MODE button is used to change between the Ice Making Mode and Ice
Harvest Mode. The operating mode can be determined from the status of
the green (Ice Making), and yellow (Ice Harvest) LEDs.
Press and release the MODE button to force the ice machine to switch from
the current state.
Adjust button
When this is pressed and held for longer than 3 seconds, the unit will enter
the Ice Size Adjustment mode. The mode can be judged from the status of
the yellow LEDs.
To adjust the ice size:
The ADJUST button is used to enter the Ice Size Adjustment mode. The
HARVEST LED must be lit solid before attempting to adjust ice size. Press
and hold the ADJUST button until the yellow HARVEST LED begins blinking.
This usually occurs after 3 seconds. Once the yellow LED starts to blink,
release the button. The yellow LED blinks continuously while in the Ice Size
Adjustment mode.
18
49-60811

ICE MACHINE USE
CONTROLS (Cont.)
To decrease the cube size, press the CLEAN button. The ICE green LED
lamp will blink momentarily each time the CLEAN button is pressed. The
green LED will remain illuminated when the smallest size cube is achieved.
To increase the cube size, press the MODE button. The BIN FULL red LED
lamp will blink momentarily each time the MODE button is pressed. The red
LED will remain illuminated when the largest size cube is achieved.
NOTES:
• When adjusting the ice cube size, if the ICE, HARVEST and BIN FULL LEDs
all start blinking at the same time, this indicates that the ice cube size is
set to medium. Medium is the original factory setting.
• Ice Size Adjustment mode cannot be entered if the ice machine is in the
Clean or Bin Full mode.
• After 10 seconds without any operation, the ice machine will return to the
previous mode.
ENGLISH
49-60811
19

ENGLISH
ICE MACHINE CARE
CLEANING
WARNING
Electrical Shock Hazard
Unplug your appliance or disconnect power before cleaning.
Failure to do so can result in death, electric shock or personal injury.
IMPORTANT: If the ice machine is left unused for a long time, before the
next use it must be thoroughly cleaned. Follow carefully any instructions
provided for cleaning or use of sanitizing solutions. Do not leave any
solution inside the ice machine after cleaning.
• Periodic cleaning and proper maintenance will ensure efficiency, top
performance, and long life. The maintenance intervals listed are based on
normal conditions. You may want to shorten the intervals if you have pets,
or there are other special considerations.
• Do not place or store any items other than ice in the ice storage bin. Wine
and beer bottles are not only unsanitary, but the labels may slip off and
plug up the drain.
EXTERIOR CLEANING
Painted metal: Wash painted metal exteriors with a clean, soft cloth or
sponge and a mild detergent in warm water. Rinse surfaces with clean,
warm water and dry immediately to avoid water spots. Do not use abrasive
cleaners on enamel surfaces as they may scratch the finish.
Stainless steel: Stainless steel is corrosion resistant and not corrosionproof. To help avoid corrosion of your stainless steel, wash stainless steel
surfaces with a clean, soft cloth or sponge and a mild detergent in warm
water. Rinse surfaces with clean, warm water and dry immediately to avoid
water spots. Do not use abrasive or harsh cleaners. Do not use chlorine
bleach on stainless steel surfaces.
NOTE: When cleaning stainless steel, always wipe in the direction of the
grain to avoid cross-grain scratching.
20
49-60811
ICE MACHINE CARE
CLEANING (Cont.)
INTERIOR CLEANING
IMPORTANT: Do not use solvent –based cleaning agents or abrasives on
the interior. These cleaners may transmit taste to the ice cubes and damage
or discolor the interior.
The ice storage bin should be sanitized occasionally. Clean the water trough
before using the ice machine for the first time and before using after the ice
machine has been turned off for an extended period of time.
It is usually convenient to sanitize the trough after the ice making system
has been cleaned, and the ice storage bin is empty.
1. Unplug the ice machine or disconnect power.
2. Open the door and take out the removable ice storage bin. With a clean
cloth, wipe down the interior of unit and ice bin with a sanitizing solution
made of 1 ounce of household bleach or chlorine and 2 gallons of hot
(95ºF – 115ºF) water.
NOTE: The ice scoop should be washed regularly. Wash it just like any
other food container.
3. Rinse thoroughly with clear water.
4. Put the ice storage bin inside the ice machine.
5. Reconnect power to the ice machine.
ENGLISH
CONDENSER CLEANING
A dirty or clogged condenser prevents proper airflow, reduces ice making
capacity, and causes higher than recommended operating temperatures
that may lead to component failure. Clean the condenser at least once
every six months.
WARNING
Electrical Shock Hazard
Disconnect power before cleaning.
Replace all panels before operating.
Failure to do so can result in death or electrical shock.
49-60811
21

ENGLISH
ICE MACHINE CARE
CLEANING (Cont.)
CONDENSER CLEANING (Cont.)
1. Unplug the ice machine or disconnect
power.
2. Use a Phillips screwdriver to remove the
lower front louver.
3. Remove dirt and lint from the condenser
and the unit compartment with the brush
attachment of a vacuum cleaner.
4. Reassemble the lower front louver.
5. Plug in the ice machine or reconnect
power.
WATER DISTRIBUTION TUBE CLEANING
When you find the ice cubes are incompletely formed or the output is low,
the water distribution tube may be blocked. Turn off the power button,
use a Phillips screwdriver to remove the two screws from the cover of the
distribution tube located at the top of the evaporator, gently take out the
water distribution tube, locate the holes in the distribution tube and use a
pointed object such as a toothpick to dredge the holes. Then put the water
distribution tube and cover back to its original position. If the tube is badly
blocked, clean it as follows:
1. Shut off the water supply.
2. Disconnect the water hose from the distribution tube.
3. Use a Phillips screwdriver to remove the two distribution tube cover
screws at the top of the evaporator, and gently remove the distribution
tube.
4. With a brush, clean the tube with a diluted solution of warm water and a
mild detergent such as dishwashing liquid. After removing the dirt and lint
from the surface, rinse the tube with clean water.
5. Replace the distribution tube and cover.
6. Reconnect the water supply.
22
49-60811

ICE MACHINE CARE
CLEANING (Cont.)
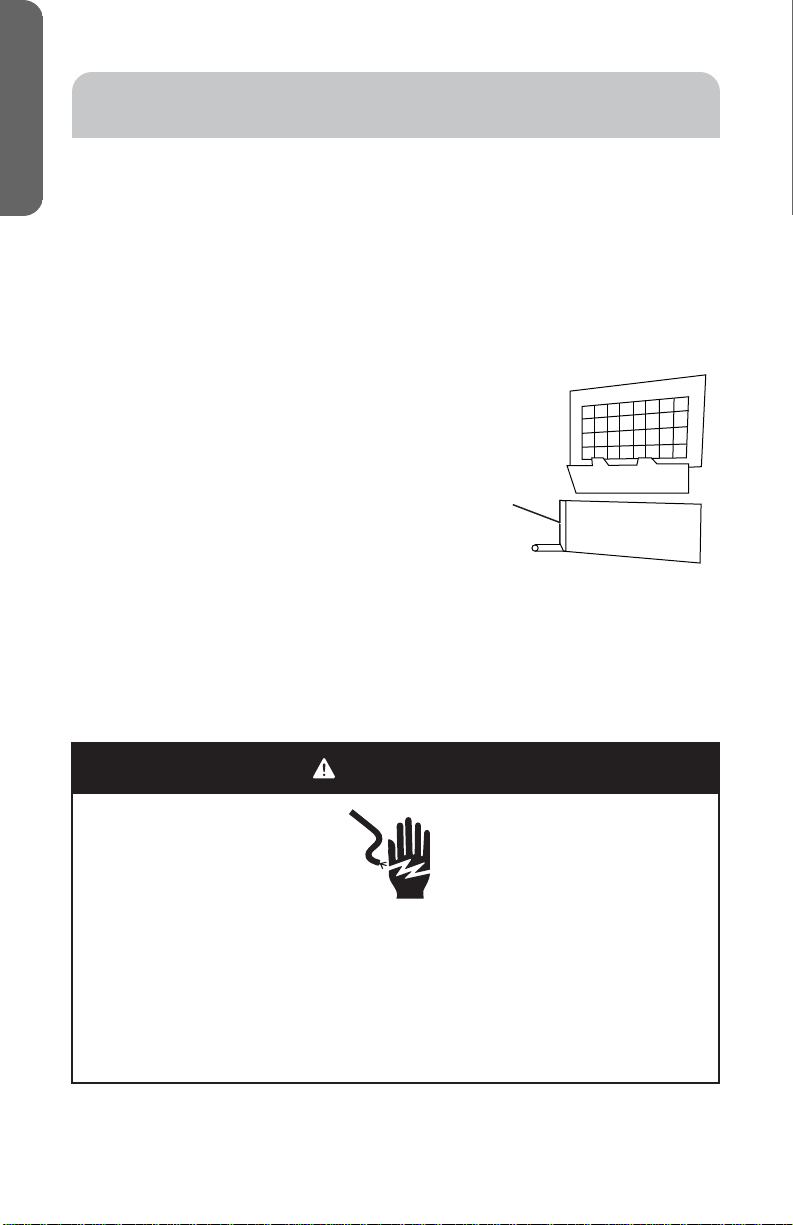
ICE-MAKING SYSTEM CLEANING
Minerals that are removed from the water during the freezing cycle will
eventually form a hard, scaly deposit in the water system. Cleaning the
system regularly helps remove the mineral scale buildup. How often to clean
the system depends upon how hard your water is or how effective your
filtration may be. With hard water of 15 to 20 grains/gal. (4 to 5 grains/ liter),
you may need to clean the system as often as once every 6 months.
NOTE: Use a commercially available nickel-safe Ice Machine Cleaner
solution to remove scale deposits. Read and follow all handling information
on the cleaner bottle before completing the following steps:
1. Make sure that all the ice is off the evaporator. If ice is being formed,
wait until the cycle is completed, then press the machine’s ON/OFF
switch on the control panel.
2 Remove all ice from the storage bin.
3. Keep the ice machine connected to the water supply. Pour 8 oz. of a
nickel-safe Ice Machine Cleaner solution into the water trough. Then
press the ON/ OFF switch and the CLEAN button, initiating the wash
cycle. The machine will run in the Automatic Clean Mode.
4. Allow 30 minutes for proper cleaning. After cleaning, press the ON/OFF
switch again. Use a drainage tube on the front of the water trough to
drain off the waste water to a convenient container.
NOTE: Don’t drain off the waste water to the inside of the cabinet.
5. Repeat steps 3 and 4 (without Ice Machine Cleaning Solution) three
times to rinse the ice making system thoroughly.
NOTE: Ice Machine Cleaner Solution in the water bin during the rinse is
not needed.
6. Prepare a sanitizing solution made of 1 ounce of household bleach and
2 gallons of hot water (95ºF to 115ºF). Wipe the entire bin inside and
outside, covering the entire surface of the walls.
7. Fill a spray bottle with the sanitizing solution and spray all corners and
edges, making sure to cover all surfaces with the solution.
8. Allow the solution to be in contact for at least 3 minutes, then dry.
9 Repeat steps 1 to 5 with the sanitizing solution of step 6 replacing the
Nickel Safe ice machine cleaner solution and filling the water trough to
its maximum level.
10. Repeat step 5 to rinse the ice making system one more time
11. Press the ON/OFF button again. The machine will return to the regular
ice making mode. Discard the first batch of ice.
ENGLISH
49-60811
23
ENGLISH
ICE MACHINE CARE
VACATION AND MOVING
If the ice machine will not be used for a long time, or is to be moved to
another place, it will be necessary to drain the system of water.
1. Unplug the ice machine or disconnect power.
2. Shut off the water supply at the main water source.
3. Disconnect the water supply line from the water inlet.
4. Take out the ice storage bin to remove any remaining ice and water. Dry
the bin.
5. Pull the drainage tube from the water trough
to drain off all water.
6. Leave the door open to allow for air
circulation and to prevent mold and mildew.
7. Leave water supply line and power cord
disconnected until ready to reuse.
8. If the ice machine location requires a drain
pump, disconnect drain pump power cord
and remove the remaining water (empty the tank).
REINSTALLING/USING ICE MACHINE AGAIN
To Reinstall ice machine after non-use, vacation, winter storage or
moving:
1. See “Installation Instructions” to locate, level and connect ice machine.
2. Clean ice machine. See “Cleaning.”
Drainage
Tube
WARNING
Electrical Shock Hazard
Plug into a grounded 3 prong outlet.
Do not remove the ground prong from the power cord plug.
Do not use an adapter.
Do not use an extension cord.
Failure to do so can result in death, fire or electrical shock.
3. Plug into a grounded 3 prong outlet.
4. Discard the first few batches of ice produced.
24
49-60811
 Loading...