

Page 1

Î
МЪМуФЭЬ МК
СЙТЫО Н УЯТЛЯФù
д»¿-» ÎÛßÜ ¬¸·- ³¿²«¿´ ½¿®»º«´´§ ¾»º±®»
±°»®¿¬·²¹ §±«® ÌÊô ¿²¼ ®»¬¿·² ·¬ º±® º«¬«®»
®»º»®»²½»ò
Page 2

É¿®²·²¹
ЭЯЛМЧСТ
ОЧНХ ЫФЫЭМОЧЭ НШСЭХ
ЬС ТСМ
ÑÐÛÒ
ÿ
̸» ´·¹¸¬²·²¹ º´¿-¸ ©·¬¸ ¿®®±©¸»¿¼ -§³¾±´ô ©·¬¸·² ¿²
»¯«·´¿¬»®¿´ ¬®·¿²¹´» ·- ·²¬»²¼»¼ ¬± ¿´»®¬ ¬¸» «-»® ¬± ¬¸»
°®»-»²½» ±º «²·²-«´¿¬»¼ ¼¿²¹»®±«- ª±´¬¿¹» ©·¬¸·² ¬¸»
°®±¼«½¬Ž- »²½´±-«®» ¬¸¿¬ ³¿§ ¾» ±º -«ºº·½·»²¬ ³¿¹²·¬«¼»
¬± ½±²-
¬·¬«¬» ¿
®·-µ ±º »´»½¬®·½ -
¸±½µò
ЭЯЛМЧСТж МС ОЫЬЛЭЫ МШЫ ОЧНХ СЪ ЫФЫЭМОЧЭ НШСЭХф
ЬС ТСМ ОЫУСКЫ ЭСКЫО шСО ЮЯЭХчт
ТС ЛНЫО НЫОКЧЭЫЯЮФЫ РЯОМН ЧТНЧЬЫт
ОЫЪЫО НЫОКЧЭЧТЩ МС ПЛЯФЧЪЧЫЬ НЫОКЧЭЫ
РЫОНСТТЫФт
ÿ
̸» »¨½´¿³¿¬·±² °±·²¬ ©·¬¸·² ¿² »¯«·´¿¬»®¿´ ¬®·¿²¹´» ·-
·²¬»²¼»¼ ¬± ¿´»®¬ ¬¸» «-»® ¬± ¬¸» °®»-»²½» ±º ·³°±®¬¿²¬
±°»®¿¬·²¹ ¿²¼ ³¿·²¬»²¿²½» ø-»®ª·½·²¹÷ ·²-¬®«½¬·±²- ·²
¬¸» ´·¬»®¿¬«®» ¿½½±³°¿²§·²¹ ¬¸» ¿°°´·¿²½»ò
ЙЯОТЧТЩж МС РОЫКЫТМ ЪЧОЫ С О НШСЭХ ШЯ ЖЯОЬ ф ЬС ТСМ ЫИРСНЫ МШ ЧН ЯРРФЧЯТЭЫ МС
ОЯЧТ СО УСЧНМ ЛОЫт
ЭЯЛМЧСТж МС РОЫКЫ ТМ ЫФЫ ЭМОЧЭ НШСЭХ ЬС ТСМ ЛНЫ МШЧН РСФЯОЧЖЫЬ РФЛ Щ ЙЧМШ ЯТ
ЫИМЫ ТНЧСТ ЭСОЬф ОЫЭ ЫРМЯ ЭФЫ СО СМ ШЫО СЛМФ ЫМ ЛТФЫНН МШЫ ЮФЯЬЫН
ЭЯТ Ю Ы ЪЛ ФФЗ ЧТНЫОМЫ Ь МС РОЫКЫТМ ЮФЯЬЫ ЫИРСНЛОЫт
ЭЯЛМЧС Тж М¸» - » -»®ª ·½·²¹ ·²-¬ ® «½¬· ±²- ¿®» º±® «-» ¾§ ¯«¿ ´·º·»¼ -»®ª·½» °»® -±²²» ´ ±²´§т М± ®»¼«½ » ¬¸»
®·-µ ±º »´»½¬®· ½ -¸±½ µф ¼± ²±¬ °»®º±®³ ¿²§ -»®ª ·½·²¹ ±¬¸»® ¬¸¿² ¬¸¿ ¬ ½±²¬¿· ²»¼ ·² ¬¸» ±°»®¿ ¬·²¹ ·²-¬®«½ ¬·±² «² ´»-- §±« ¿®» ¯«¿´·º ·»¼ ¬± ¼± -±т
׳°±®¬¿²¬ Í¿º»¬§ ײ-¬®«½¬·±²-
ï÷ λ¿¼ ¬¸» -» ·²-¬® «½¬·±²- ò
î÷ Õ»»° ¬¸» -» ·²-¬® «½¬ ·±²- ò
í÷ Ø»»¼ ¿´´ ©¿®² ·²¹ - ò
ì÷ Ú±´ ´±© ¿ ´´ ·²-¬® «½¬ ·±²- ò
ë÷ ܱ ²±¬ « -» ¬¸·- ¿°°¿ ®¿¬«- ²»¿® © ¿¬»®ò
ê÷ Ý´» ¿² ±²´§ ©·¬¸ ¼®§ ½´± ¬¸ò
é÷ ܱ ²±¬ ¾´±½µ ¿ ²§ ª»²¬· ´¿¬· ±² ±°»²· ²¹- ò ײ- ¬¿´´ ·² ¿½½±® ¼¿² ½ » ©·¬¸ ¬¸ » ³¿² «º¿½ ¬«® » ®ù- ·²-¬®«½ ¬·±² -ò
è÷ ܱ ²±¬ · ²-¬ ¿ ´´ ²»¿® ¿²§ ¸»¿ ¬ -±«®½» - -« ½¸ ¿ - ®¿ ¼·¿¬±®- ô ¸»¿ ¬ ®»¹·- ¬»® -ô -¬ ±ª»- ô ±® ±¬¸»® ¿°°¿ ®¿¬ « - ø· ²½´ « ¼·²¹
¿³ °´· º·»® -÷ ¬¸ ¿¬ ° ®±¼« ½» ¸» ¿¬ò
ç÷ Ю±¬»½¬ ¬¸ » °±© » ® ½±®¼ º®±³ ¾»·²¹ © ¿´µ» ¼ ±² ±® °·²½ ¸»¼ ° ¿®¬·½«´ ¿®´§ ¿¬ °´« ¹-ô ½±²ª »²·» ²½» ®»½» °¬¿½ ´»- ô ¿² ¼ ¬¸»
°± ·²¬ ©¸»® » ¬¸» § »¨·¬ º® ±³ ¬¸» ¿ °°¿® ¿¬«-ò
ïð ÷ Ѳ´§ «- » ¿¬¬ ¿½¸ ³»²¬ -ñ¿½ ½»- -±®·»- - °»½· º·»¼ ¾§ ¬¸» ³¿ ²«º¿ ½¬«®»®ò
ïï ÷ Ë-» ± ²´§ © ·¬¸ ¬¸» ½ ¿®¬ ô -¬ ¿²¼ ô ¬®· °±¼ô ¾® ¿½µ»¬ô ± ® ¬¿ ¾´» -°»½·º·» ¼ ¾§ ¬¸» ³ ¿²«º ¿½¬« ®»® ô
±® -±´ ¼ ©·¬ ¸ ¬¸» ¿°° ¿®¿¬ «-ò ɸ»² ¿ ½¿® ¬ ·- «-»¼ô «-» ½ ¿«¬ ·±² ©¸»² ³ ±ª· ²¹ ¬¸ » ½¿® ¬ñ
ß° °¿® ¿¬«- ½±³¾ ·²¿ ¬ ·±² ¬± ¿ ª±· ¼ ·² ¶«® § º®± ³ ¬·°ó± ª»® ò
ïî ÷ ˲° ´«¹ ¬¸ ·- ¿° °¿®¿ ¬«- ¼«® ·²¹ ´ ·¹¸ ¬²·² ¹ -¬±®³ - ±® ©¸» ² «²« -»¼ º±® ´±²¹ °»®·±¼ - ±º ¬·³ »ò
ïí ÷ λº»® ¿´´ -»® ª ·½· ²¹ ¬± ¯«¿ ´·º ·»¼ -»® ª·½» °»®-±²² »´ò Í»® ª ·½· ²¹ ·- ®» ¯«· ®»¼ © ¸»² ¬¸» ¿ °°¿®¿¬« - ¸¿ - ¾» » ² ¼¿³¿¹ »¼
·² ¿²§ ©¿ §ô -«½¸ ¿- °±©» ®ó-« °°´ § ½±® ¼ ±® °´« ¹ ·- ¼¿³¿¹»¼ô ´· ¯«· ¼ ¸¿- ¾»» ² -° ·´´» ¼ ±® ±¾¶»½¬- ¸¿ ª» º¿ ´´»² ·² ¬ ± ¬¸ »
¿° °¿® ¿ ¬«- ô ¬¸» ¿° °¿®¿ ¬«- ¸¿- ¾»»² »¨°± -»¼ ¬± ® ¿·² ±® ³±·- ¬«®» ô ¼± »- ² ± ¬ ±°»®¿¬» ² ±®³¿ ´´§ô ± ® ¸¿ - ¾» » ² ¼®±°° »¼ò
ïì ÷̸ » ¿°°¿ ®¿¬ «- -¸ ¿´´ ²±¬ ¾» »¨°± -»¼ ¬± ¼®·°°· ²¹ ±® -°´¿ -¸·² ¹ ¿²¼ ¬¸¿¬ ²± ±¾ ¶»½¬- º·´´»¼ ©·¬¸ ´·¯« ·¼-ô -«½ ¸ ¿- ª¿ -»- ô
-¸¿´´ ¾» °´ ¿½» ¼ ±² ¬ ¸» ¿° °¿®¿ ¬«-ò
ïë ÷̸ » ³¿· ²- °´«¹ ±® ¿°°´· ¿²½ » ·²´ »¬ ·- «- »¼ ¿- ¬¸ » ¼· -½± ²²»½ ¬ ¼»ª ·½»ô ®» ³¿·² ·¬ ®»¿ ¼·´§ ±°»®¿¾´ » ¼« ®·²¹ ¬¸»
¿° °¿® ¿ ¬«- ²±®³ ¿´
«- »ò
Page 3

ЭСТМЫТМ
ײ ¬®± ¼«½¬ ·±²
ÌÊ ½±³°±²» ²¬-
О» ³±¬ » Э±² ¬®±´ ттттттт ттт тттт тттт ттт ттт тттт тттт ттт ттттттт тттт ттт тттт ттт тттт ттттттт ттт тттт тттт ттт ттт тттт тттт ттт ттт тттт ттт тттт ттттттт ттт тттт тттт
Э± ²²» ½¬·± ² Ч²- ¬®« ½ ¬·± ²-тт ттт ттт тттт тттт ттт ттттттт тттт ттт тттт ттт тттт ттттттт ттт тттт ттттттт ттт тттт тттт ттт ттт тттт тттт ттт ттттттт ттт тттт тттт ттт тт
ß½ ½»- -±®· »-
Ы¨ ¬»® ² ¿´ » ¯«·° ³»²¬ Э±²² »½¬· ±²- тттт ттт ттт тттт тттт ттт ттттттт тттт ттт тттт ттт тттт ттттттт ттт тттт тттт ттт ттт тттт тттт ттт ттт тттт тттт ттт ттттт
Я² ¬»²² ¿ Э±² ²»½¬·±² т ттт ттт тттт тттт ттт ттттттт ттт тттт тттт ттт ттт тттт тттт ттт ттт тттт тттт ттт ттттттт тттт ттт тттт ттт тттт ттттттт ттт тттт тттт ттт ттт
ÊÝ Î ½±²²»½ ¬·±²
Ы¨ ¬»®² ¿´ ЯК Н± «®½» Н »¬« °ттт ттт ттттттт тттт ттт тттт ттт тттт ттттттт ттт ттттттт тттт ттт ттттттт тттт ттттттт ттт тттт ттттттт ттт тттт тттт ттт ттт тттт
ÜÊ Ü ½±²²»½ ¬·±²
ÜÌ Ê ½± ²²»½¬·±²
Ü·¹·¬ ¿´ ß«¼ ·± Ñ«¬°« ¬
ÊÙ ß
ØÜ Ó × ×² ттттт ттт тттт тттт ттт ттт тттт тттт ттт ттттттт тттт ттт тттт ттт тттт ттттттт ттт тттт тттт ттт ттт тттт тттт ттт ттт тттт тттт ттт ттттттт ттт тттт тттт ттт
Ý¿ ¾´» -¿³° ´»
λ ³ ±ª· ²¹ ¬¸ » ¬¿¾´ » -¬¿ ²¼ ¿²¼ ·² -¬¿´´·² ¹ ¿ ©¿´´ ³±« ²¬ ¾® ¿½µ »¬
Ю¿ -·½ С°»® ¿¬·² ¹ Ч²-¬®« ½¬·± ²-т тттт ттттттт ттт тттт тттт ттт ттт тттт тттт ттт ттт тттт тттт ттт ттттттт тттт ттт тттт ттт тттт ттттттт ттт ттттттт тттт ттт тттт тт
Ì« ®²· ²¹ ±² §±«® Ì Ê º±® ¬ ¸ » º·®- ¬ ¬·³ »
Н© ·¬½ ¸ ·²¹ ¬ ¸» МК С ² ±® Сººт тттт ттт ттт тттт тттт ттт ттттттт тттт ттт тттт ттт тттт ттттттт ттт ттттттт тттт ттт тттт ттт тттт ттттттт ттт тттт ттттттт ттт тт
У« ¬»тт ттт ттттттт тттт ттт тттт ттт тттт ттттттт ттт тттт тттт ттт ттт тттт тттт ттт ттт тттт тттт ттт ттттттт тттт ттт тттт ттт ттт тттт тттт ттт ттттттт тттт ттт тттт ттт тттт тт
Н´ »»° ¾ «¬¬±²тт ттттттт тттт ттт тттт ттт тттт ттттттт ттт тттт тттт ттт ттт тттт ттт тттт ттттттт ттт тттт ттттттт ттт тттт тттт ттт ттт тттт тттт ттт ттттттт тттт ттт тттт т
уЮ «¬¬± ²тттттт ттт тттт ттттттт ттт тттт тттт ттт ттт тттт ттт тттт ттттттт ттт тттт тттт ттт ттт тттт тттт ттт ттттттт тттт ттт ттттттт тттт ттт тттт ттт тттт ттттттт ттт тттт т
ЭШ тФЧН М ¾«¬¬±² тттт ттт тттт ттт тттт ттттттт ттт тттт тттт ттт ттт тттт тттт ттт ттт тттт тттт ттт ттттттт тттт ттт тттт ттт тттт ттттттт ттт ттттттт тттт ттт тттт ттт тт
ЪЯКтФЧН М ¾«¬ ¬±² тттт ттттттт ттт тттт тттт ттт ттт тттт тттт ттт ттттттт тттт ттт ттттттт тттт ттттттт ттт ттт тттт тттт ттт ттттттт тттт ттт тттт ттт тттт ттттттт ттт тт
Íß Ð Þ®± ¿¼½¿-¬- Í» ¬«°
ЯО Э ¾«¬ ¬±²тттт тттт ттт ттттттт тттт ттт ттттттт тттт ттт тттт ттт тттт ттттттт ттт тттт тттт ттт ттт тттт тттт ттт ттттттт тттт ттт тттт ттт ттт тттт тттт ттт ттт тттт тттт
У» ²« С° »®¿¬·±² -тт тттт тттт ттт ттт тттт тттт ттт ттттттт тттт ттт тттт ттт тттт ттттттт ттт тттт тттт ттт ттт тттт тттт ттт ттт тттт ттт тттт ттттттт ттт тттт тттт ттт ттт
Р· ½¬«®» У» ² « С°¬·±² -ттт ттт ттттттт тттт ттт тттт ттт тттт ттттттт ттт тттт тттт ттт ттт тттт тттт ттт ттт тттт ттт тттт ттттттт ттт тттт тттт ттт ттт тттт тттт ттт т
Ш±© ¬± ½ «-¬± ³·¦» §±« ® ±©² °·½¬«®» -¬¿ ¬ «-т ттт тттт тттт ттт ттттттт тттт ттт тттт ттт тттт ттттттт ттт тттт тттт ттт ттт тттт тттт ттт ттттттт ттт
Я« ¼·± У »²« С°¬·±²-тттт тттт ттт ттт тттт тттт ттт ттттттт ттт тттт тттт ттт ттт тттт тттт ттт ттттттт тттт ттт тттт ттт тттт ттттттт ттт тттт тттт ттт ттт тттт тттт т
Ш±© ¬± Э «-¬± ³·¦» §±« ® ±©² ¿«¼· ± -¬¿¬«- ттттттт ттт тттт тттт ттт ттт тттт тттт ттт ттттттт тттт ттт тттт ттт тттт ттттттт ттт тттт ттттттт ттт ттт
Э¸ ¿²²» ´- У»²« С° ¬·± ²-тт ттт ттттттт тттт ттт тттт ттт тттт ттттттт ттт тттт тттт ттт ттт тттт тттт ттт ттт тттт тттт ттт ттттттт тттт ттт тттт ттт ттт тттт тттт тт
ß« ¬±³¿¬·½ ¿´´§ -½¿ ² ²·² ¹ º± ® ½¸ ¿²²» ´-
ß¼ ¼·²¹ ±®
Í» ¬¬· ²¹ «° ¿ º¿ª±®·¬» ½¸ ¿²²» ´ ´· -¬
ß¼ ¼·²¹ ±® ½¸¿² ¹·²¹ ¿ ½¸ ¿²² »´ ´¿ ¾»´
ݸ »½µ ·²¹ ¬ ¸» ÜÌ Ê -·¹ ²¿´ - ¬®»² ¹¬¸
Ì« ®²·² ¹ ±² ß«¬± Æ ±±³
Н» ¬¬· ²¹- У »²« С °¬·± ²-ттттт ттт тттт тттт ттт ттт тттт тттт ттт ттт тттт тттт ттт ттттттт ттт тттт тттт ттт ттт тттт тттт ттт ттттттт тттт ттт тттт ттт тттт ттттттт т
Ý´±-» ¼ Ý¿° ¬·±²т тттт ттт тттт ттттттт ттт тттт тттт ттт ттт тттт тттт ттт ттттттт тттт ттт тттт ттт тттт ттттттт ттт тттт тттт ттт ттт тттт тттт ттт ттт тттт ттт тттт тт
ß¼ ¶«-¬·²¹ ¬·³ » -»¬¬·² ¹-
Í» ¬¬·² ¹ ¬¸ » -´»»° ¬·³» ®
ß¼ ¶«-¬·²¹ ³»²« -»¬ ¬·² ¹-
Ô¿ ¾»´ ·²¹ ¿ ² ·²° «¬ -±«®½»
ݱ³°«¬ »® ±® Í» ¬¬· ²¹Ó¿ ·²¬ »²¿² ½»
Р®±¼« ½ ¬ Н° »½·º ·½¿¬·±² тттт ттт ттт тттт тттт ттт ттттттт тттт ттт тттт ттт тттт ттттттт ттт ттттттт тттт ттт ттттттт тттт ттттттт ттт тттт ттттттт ттт тттт тттт ттт ттт
М®±«¾ ´»-¸ ±±¬ ·²¹ттттт ттт тттт тттт ттт ттт тттт ттт тттт ттттттт ттт тттт тттт ттт ттт тттт тттт ттт ттт тттт тттт ттт ттттттт тттт ттт тттт ттт тттт ттттттт ттт тттт тттт
ттттт ттт тттт тттт ттт ттт тттт тттт ттт ттттттт тттт ттт тттт ттт тттт ттттттт ттт тттт тттт ттт ттт тттт тттт ттт ттт тттт тттт ттт ттттттт ттт тттт тттт тт
ттттт ттт тттт тттт ттт ттт тттт тттт ттт ттттттт тттт ттт тттт ттт тттт ттттттт ттт тттт тттт ттт ттт тттт тттт ттт ттт тттт тттт ттт ттттттт ттт тттт тттт ттт
ттттт ттт тттт тттт ттт ттт тттт тттт ттт ттттттт тттт ттт тттт ттт тттт ттттттт ттт тттт тттт ттт ттт тттт тттт ттт ттт тттт тттт ттт ттттттт ттт тттт т
ттттт ттт тттт тттт ттт ттт тттт тттт ттт ттттттт тттт ттт тттт ттт тттт ттттттт ттт тттт тттт ттт ттт тттт тттт ттт ттт тттт тттт ттт ттттттт ттт тттт т
ттттт ттт тттт тттт ттт ттт тттт тттт ттт ттттттт тттт ттт тттт ттт тттт ттттттт ттт тттт тттт ттт ттт тттт тттт ттт ттт тттт тттт ттт ттттттт ттт тттт т
Э± ²²» ½¬·± ²ттт ттт ттттттт тттт ттт тттт ттт тттт ттттттт ттт тттт ттттттт ттт тттт тттт ттт ттт тттт ттт тттт ттттттт ттт тттт тттт ттт ттт тттт тттт ттт тттттт
°« ¬
-µ ·°° ·²¹ ½ ¸¿²² »´-
ݱ ³°± ² »²¬ ттттт ттт тттт тттт ттт ттт тттт тттт ттт ттттттт тттт ттт тттт ттт тттт ттттттт ттт тттт тттт ттт ттт тттт тттт ттт ттт т
ттттт ттт тттт тттт ттт ттт тттт тттт ттт ттттттт тттт ттт тттт ттт тттт ттттттт ттт тттт тттт ттт ттт тттт тттт ттт ттт тттт тттт ттт ттттттт ттт тттт тттт ттт ттт
ттттт ттт тттт тттт ттт ттт тттт тттт ттт ттттттт тттт ттт тттт ттт тттт ттттттт ттт тттт тттт ттт ттт тттт тттт ттт ттт тттт тттт ттт ттттттт тт
ттттт ттт тттт тттт ттт ттт тттт тттт ттт ттттттт тттт ттт тттт ттт тттт ттттттт ттт тттт тттт ттт ттт тттт тттт ттт ттт тттт тттт ттт ттттттт ттт тттт тттт
ттттт ттт тттт тттт ттт ттт тттт тттт ттт ттттттт тттт ттт тттт ттт ттт
ттттт ттт тттт тттт ттт ттт тттт тттт ттт ттттттт тттт ттт тттт ттт тттт ттттттт ттт тттт тттт ттт ттт тттт тттт ттт ттт
ттттт ттт тттт тттт ттт ттт тттт тттт ттт ттттттт тттт ттт тттт ттт тттт ттттттт ттт тттт тттт ттт ттт тттт тттт ттт ттт тттт тттт ттт ттттттт т
ттттт ттт тттт тттт ттт ттт тттт тттт ттт ттттттт тттт ттт тттт ттт тттт ттттттт ттт тттт тттт ттт ттт тттт тттт ттт
ттттт ттт тттт тттт ттт ттт тттт тттт ттт ттттттт тттт ттт тттт ттт тттт ттттттт ттт тттт тттт ттт ттт тттт тттт ттт ттт тттт тттт т
ттттт ттт тттт тттт ттт ттт тттт тттт ттт ттттттт тттт ттт тттт ттт тттт ттттттт ттт тттт тттт ттт ттт тттт тттт ттт ттт ттт
ттттт ттт тттт тттт ттт ттт тттт тттт ттт ттттттт тттт ттт тттт ттт тттт ттттттт ттт тттт тттт ттт ттт тттт тттт ттт тт
ттттт ттт тттт тттт ттт ттт тттт тттт ттт ттттттт тттт ттт тттт ттт тттт ттттттт ттт тттт тттт ттт ттт тттт тттт ттт ттт т
ттттт ттт тттт тттт ттт ттт тттт тттт ттт ттттттт тттт ттт тттт ттт тттт ттттттт ттт тттт тттт ттт ттт тттт тттт ттт ттт тттт тттт ттт ттттттт
ттттт ттт тттт тттт ттт ттт тттт тттт ттт ттттттт тттт ттт тттт ттт тттт ттттттт ттт тттт тттт ттт ттт тттт тттт ттт ттт тттт тттт ттт тттттт
ттттт ттт тттт тттт ттт ттт тттт тттт ттт ттттттт тттт ттт тттт ттт тттт ттттттт ттт тттт тттт ттт ттт тттт тттт ттт ттт тттт тттт ттт тттттт
ттттт ттт тттт тттт ттт ттт тттт тттт ттт ттттттт тттт ттт тттт ттт тттт ттттттт ттт тттт тттт ттт ттт тттт тттт ттт ттт тттт тттт ттт тттт
ттттт ттт тттт тттт ттт ттт тттт тттт ттт ттттттт тттт ттт тттт ттт тттт ттттттт ттт тттт тттт ттт ттт тттт тттт ттт ттт тттт тттт ттт ттт
ï
î
í
í
í
í
ì
ë
ë
ê
ê
é
è
è
è
ç
ç
ïð
ïð
ïï
ïï
ïï
ïï
ïï
ïï
ïï
ïï
ïî
ïî
ïî
ïí
ïí
ïì
ïì
ïì
ïë
ïë
ïê
ïê
ïé
ïé
ïé
ïè
ïè
ïç
ïç
îð
îï
îî
Page 4

T
V component
s
Front and side panels
EN U INPU T VO L+ VO L- CH+ CH- POWE
M
R
1. POW ER: P res s to tur n on and off the TV.
2. MEN U : Menu di s pla y.
3. INP UT: P res s to a cce ss the input so urc e mode . In the MENU/ INP U T scr een , th ese b utt ons se rve a s O K but tons .
4. VOL +/- : Pres s to ad jus t the volume .In t he MENU s cre en, t hes e butto ns serve as left /right bu tto ns.
5. CH+ /- : Pres s to sca n thro ugh c han nels . To sc an quickly through ch anne ls, pr ess and hold down eith er + /- . In the
MENU screen , these butto ns serve as u p/d own button s.
6. Power indicat or
7. Remote Sens or: Rece ive s IR sig nals fr om t h e remote co ntr ol. Do not put an yth ing near the s enso r, which ma y
block th e remot e cont rol sig nal .
Back
DC IN
Y Pb Pr
IN
COMPONENT
VIDEO
AV IN
L -AUDIO- R
L -AUDIO- R
DIGITAL OUT
USB
(COAXIAL)
PC/DVI
AUDIO IN
L R
HDMI IN
PC IN
ANT IN
1.DC IN:Direct current input.
2.Headphone jack:Headphone audio output terminal.
3.USB input:Connect a USB flash drive to view MPEG2 videos, JPEG images or listen to MP3 songs.
4.Digital Out:Connect various types of digital audio equipment.
5.HDMI In:Connect a HDMI device to receive digital audio and uncompressed digital video.
6.VIDEO In:Connect the video signal from a video device to this jack.
7.Component Input:Connect a component video device to these jacks.
8.AUDIO In:Connect the audio L/R cables from the video signal source to these jacks.
9.AUDIO In:Connect the audio L/R cables from the video signal source to these jacks.
10.PC Audio In:Connect the audio L/R cables from a computer to this jack.
11.AUDIO OUT:Connect the audio L/R cables to your audio equipment.
12.PC Video In:Connect a video cable from a computer to this jack.
13.Antenna Input:Connect cable or antenna signals to the TV
, either directly or through your cable box.
1
Page 5

λ³±¬» ݱ²¬®±´
̸ » ®» ³ ±¬» ½±²¬ ®±´ ½¿²²±¬ ¾» ± °»® ¿¬»¼ «²´»-- ¬ ¸» ¾¿ ¬¬» ® ·»- ¿®» ° ®±°»®´§ ´±¿¼ »¼ò
ɸ»² «-·²¹ ¬¸» ®»³±¬» ½± ²¬®± ´ô ¿·³ ·¬ ¿¬ ¬¸ » ®»³ ±¬» ½ ±²¬ ®±´ - »²- ± ® ±² ¬¸» ÌÊò
Ú«²½¬·±² ·²¬®±¼«½¬·±²
ײ ¬®± ¼«½¬ ·±²
ï
î
í
ì
ïî
ïí
ïì
ïò Ю» -- ¬± ¬«®² ±² ¿²¼ ±ºº ¬ ¸» ÌÊò
îò Ю» -- ®» °»¿¬»¼´ § ¬± ½§½´» ¬¸®±«¹¸ ¬¸» ¿ª¿· ´¿¾´» °· ½¬«® » ³±¼ »-ò
íò Ю» -- ¬± ½¸ ¿²¹» ¬¸» ¿-° »½¬ ®¿¬· ±ò
ìò Í»´ »½¬ ¿ ½´ ±-» ¼ ½¿° ¬ ·±² ±°¬ ·±²ò
ëò ͸± © ¬¸» ·² °«¬ - ±«® ½ »ò
ïë
êò Ю» -- ¬± ±° »² ¬¸ » ±² ó-½ ®»»² ³»²« ò
éò
Ю»-- ÝØõ ±® ÝØ ó ¬± ¹± ¬± ¬¸ » ²»¨¬ ± ® °®»ª· ±«- ½¸¿² ²»´ ·² ¬¸»
½¸¿²² »´ ´· -¬ò
ë
ïê
Ю»-- ÊÑÔõ ±® Ê ÑÔó ¬± ·²½® »¿-» ±® ¼ »½® »¿-» ¬¸ » ª±´ «³»ò
èò Û¨· ¬ Ѳ ͽ® »»² Ü ·-°´¿§ò
ê
é
è
ç
ïé
çò
²± ¿ª¿·´¿¾ ´»ò
ïð òЮ »-- ¬ ± ¼·-°´¿ § ¬¸» ÌÊ -¬¿ ¬ «- · ²º± ® ³¿¬ ·±² ± ² ¬¸» ¬±° ±º ¬¸» ÌÊ
ïè
ïç
-½®»» ²т
пп тН¸ ±©- °®±¹®¿ ³ -½¸ »¼«´» ·² МКт
по тР® »-- ¬ ± ½§½´» ¬¸®±«¹¸ ¼·ºº»® »²¬ -±«² ¼ -»¬¬·² ¹-т
пн тР® »-- ¬ ± ¼·-°´ ¿§ ¬¸» -´»» ° ¬·³ »® ±°¬·± ²т
пм тН» ´»½¬ УСТ С ф НМЫОЫ Сф НЯ Р ·² ТМ НЭ -§ -¬»³т
пл тР® »-- ¬ ± ½¸¿²¹ » ¿ ½¸¿² ²»´т
ïð
ïï
îð
îï
ïê òЮ »-- ¬ ± -»´»½¬ ¼· ¹·¬¿ ´ ½¸ ¿²²» ´-ò Ú±® »¨ ¿³° ´ »ô ¬ ± »²¬ »® •ëìóí Œô
°®»-- •ëìŒ ô •ó Œ ¿²¼ •íŒò
ïé òÍ© ·¬½¸ »- ¬¸» ÌÊ -± «²¼ ± ² ±® ± ººò
ïè ò
Ю»-- ¬± ½±²º· ®³ - »´»½ ¬·± ²- ·² ¿² ±²ó-½®» »² ³» ²« ±® ¬± ±°»²
¿ - «¾³»²«ò
ïç òЮ »-- ¬ ± ¹± ¬± ¬¸» ´¿-¬ ª·»©»¼ ½¸¿² ²»´ò
îð òÑ° »² ¬¸ » ½¸¿ ²²» ´ ´·- ¬ ·² ÌÊò
îï òÑ° »² ¬¸ » º¿ ª ±®· ¬» ½¸ ¿²²»´ ´· -¬ ·² ÌÊò
î
Page 6

ݱ²²»½¬·±² ײ-¬®«½¬·±²-
ß½½»--±®·»-
МЪМуФ ЭЬ МК
СЙТЫ О Н УЯТЛЯФù
д»¿-» ÎÛ ßÜ ¬¸·- ³ ¿²«¿´ ½ ¿®»º« ´´§ ¾»º ±®»
±°»®¿¬·² ¹ §±«® Ì Êô¿ ²¼ ®»¬¿ ·² ·¬ º± ® º«¬« ®»
®»º»®»²½ »ò
ײ -¬¿ ´´¿¬ ·±²
λ ³±¬ » ½±² ¬®±´
Ñ©²»®À- ³¿²«¿´
ß´µ¿´·²» ¾ ¿¬¬» ®§ø ßßß÷ î
Û¨¬»®²¿´ Û¯«·°³»²¬ ݱ²²»½¬·±²ß²¬»²²¿ ݱ²²»½¬·±²
Ù» ²»®¿´´§ -°»¿µ·² ¹ô ¬± »² ¶±§ ¿ ½´ »¿®» ® °·½¬« ®»ô © » ®»½±³ ³»²¼ ¬¸¿¬ §±« «-» ¿ ÝßÌÊ -§-¬»³ ±® ¿ ²
±« ¬¼±±® ¿² ¬»²² ¿ òòѪ »®ó ¬¸»ó ¿·® Ì Ê ®»½» °¬·± ² ¯«¿ ´·¬ § ©· ´´ ¼»°»² ¼ ±² §±« ® ¿² ¬»² ²¿ ¬§°»ô ¿²¬ »²²¿
´± ½¿¬ ·±² ¿ ²¼ ¿²¬»²²¿ °±-· ¬·±² ·²¹
Ó« ´¬·óº¿³ ·´§ Ü©»´ ´·² ¹-ñß °¿®¬ ³»² ¬ øÝ ±²² »½¬ ¬ ± ©¿´ ´ ¿²¬»²²¿ -± ½µ»¬ ÷
É¿´´ ß²¬»²²¿
ͱ ½µ» ¬
Þ®±²¦ » É·® »
ÎÚ Ý±¿¨·¿´ É·®» øéë ± ¸³÷
ÊØ Ú ß²¬» ²²¿
ËØÚ ß²¬»²²¿
Í·²¹´ »óº¿ ³·´ § Ü©» ´´·² ¹- ñر« -»øÝ ±²² »½¬ ¬ ± ©¿´´ ¶ ¿½µ º±® ±«¬¼ ±±® ¿²¬»²²¿ ÷
Ñ« ¬¼± ±®
ß² ¬»² ²¿
Ì« ®² ½ ´ ±½µ ©·-» ¬± ¬· ¹¸¬» ²
Þ®±²¦ » É·® »
Þ» ½¿®»º«´ ²±¬ ¬± ¾»² ¼ ¬¸» ¾®± ²¦» © ·®»
©¸ »² ½ ± ²²» ½¬·² ¹ ¬¸ » ¿²¬»²² ¿ò
̱ ·³°®± ª» ¬¸» °·½¬« ®» ¯«¿´·¬§ · ² ¿ °±±® -· ¹²¿´ ¿®»¿ ô
°´ »¿- » °«® ½¸¿-» ¿ -·¹² ¿´ ¿³°´ ·º·»® ¿² ¼ ·² -¬¿´´ °® ±°»® ´§ò
׺ ¬¸» ¿²¬» ²²¿ ²»»¼- ¬± ¾ » -°´ ·¬ º±® ¬© ± ÌÊÀ -ô ·²-¬¿ ´´
¿ îóÉ ¿ § Í· ¹²¿´ Í°´· ¬¬» ® ·² ¬¸ » ½±² ²»½ ¬·±² -ò
̱ ·²-¬¿ ´´ ¬ ¸» ¿²¬»²² ¿ °®± °»® ´§ °´ »¿- » ½±²¬¿½¬ ¿
°®±º» --·± ²¿´ ·² §±«® ¿ ®»¿ ò
í
Page 7

Connection Instructions
NOTE: Al l ca ble s shown are no t in clu ded wit h the TV.
Choose Your Connection
Th ere ar e sever al ways to co nnect your tele vis ion , depen ding on the com pon ents you w ant to conne ct
and the q uali ty of the sig nal yo u wa nt to a chie ve. Th e foll owi n g are exa m ple s of some dif fer e nt w ays
to co nne ct your TV w ith dif fer ent i npu t sour ces .
VCR connection
To avo id picture no ise (in ter ference ), leav e an ade qua te distanc e betwe en the VCR and TV.
Co nne ction Opti on 1
Se t VCR output s w itch to chann el 3 or 4 an d
then t une the TV to th e same c hannel numb er.
Insta lla tion
Co nne ction Opti on 2
1. Co nne ct the a udi o an d video ca bles fr om the
VC R's ou tpu t ja cks to the T V in put ja cks , as
shown in th e fi gur e.
When c onne cti ng the TV t o VCR, match t he
ja ck c olors (Vid eo = yellow , Au dio Left = white,
and Audio Right = re d).
If you conn ect an S -VID EO o utp ut from VCR t o
the S-VI DEO i npu t, the picture qua lit y is
impro ved ; co mpared to c onne cting a reg ular
VC R to the Vid eo inpu t.
2. Inser t a vide o tape int o the V CR and press
PL AY on the VCR . (Refe r to th e VCR owne r`s
ma nua l.)
3. Se lec t the inpu t source with usi ng t h e
INPUT b utt on on the remo te cont rol , and
then p res s CH +/- butt on t o se lect the sour ce,
press th e OK but ton to conf irm.
External A/V Source Setup
Ho w to conn ect
Co nne ct t he audi o and vide o ca ble s from the exte rna l
equip ment 's o utp ut jack s to the TV inpu t jacks, as show n
in the figu re. When co nnec tin g the TV to ext erna l equi pmen t,
ma tch th e ja ck c olors (Vid eo = yellow , Audio Left = whi te,
and Audi o Right = re d).
VIDEO
L -AUDIO- R
AV IN
VIDEO
L -AUDIO- R
AV IN
L R
L R
VC
ANT IN
R
Ho w to use
1. Se lec t the inpu t source with us ing IN PUT bu tto n on
the remo te cont rol.
2. Press CH+/- bu tton to se lect the desi red s ource.
3. Press OK button to confirm.
4. Op era te the corr esp onding e xter nal eq uipm ent .
4
Page 8
Connection Instructions
Component Setup
Ho w to conn ect
1. Co nne ct t he DVD vide o o utputs (CO MPON ENT) to
the Y P b Pr jacks on the T V and co nne c t the D VD aud io
outpu ts t o the Y Pb Pr Audio IN jack s o n the TV, as
shown in th e figu re.
2. If your DVD only has an S-VIDEO out put jack,
conne ct this to the S -VI DEO i nput on the TV. as sho wn
in the figure.
Ho w to use
1. Turn on the D VD play er, in sert a DVD.
2. Use INP U T but ton on the rem o te c ont rol to sel ect
mo de.
Pb Pr
3. Pres s Play b utt on on exte rna l equip men t for pro gram
pl ay.
4. Refe r to the DVD playe r's ma nual for ope rating
in str uct ion s .
Co mpo nent Input po rts
To get bett er pict ure qua lit y, con nect a DVD play er to the
compo nent input ports a s shown be low.
Y
Y Pb Pr L -AUDIO- R
IN
COMPONENT
Co mpo nent ports
on th e TV
Video ou tpu t ports
on DV D player
Insta lla tion
Y Pb Pr
Y Pb Pr
Y B-Y R-Y
Y Cb Cr
Y P P
B R
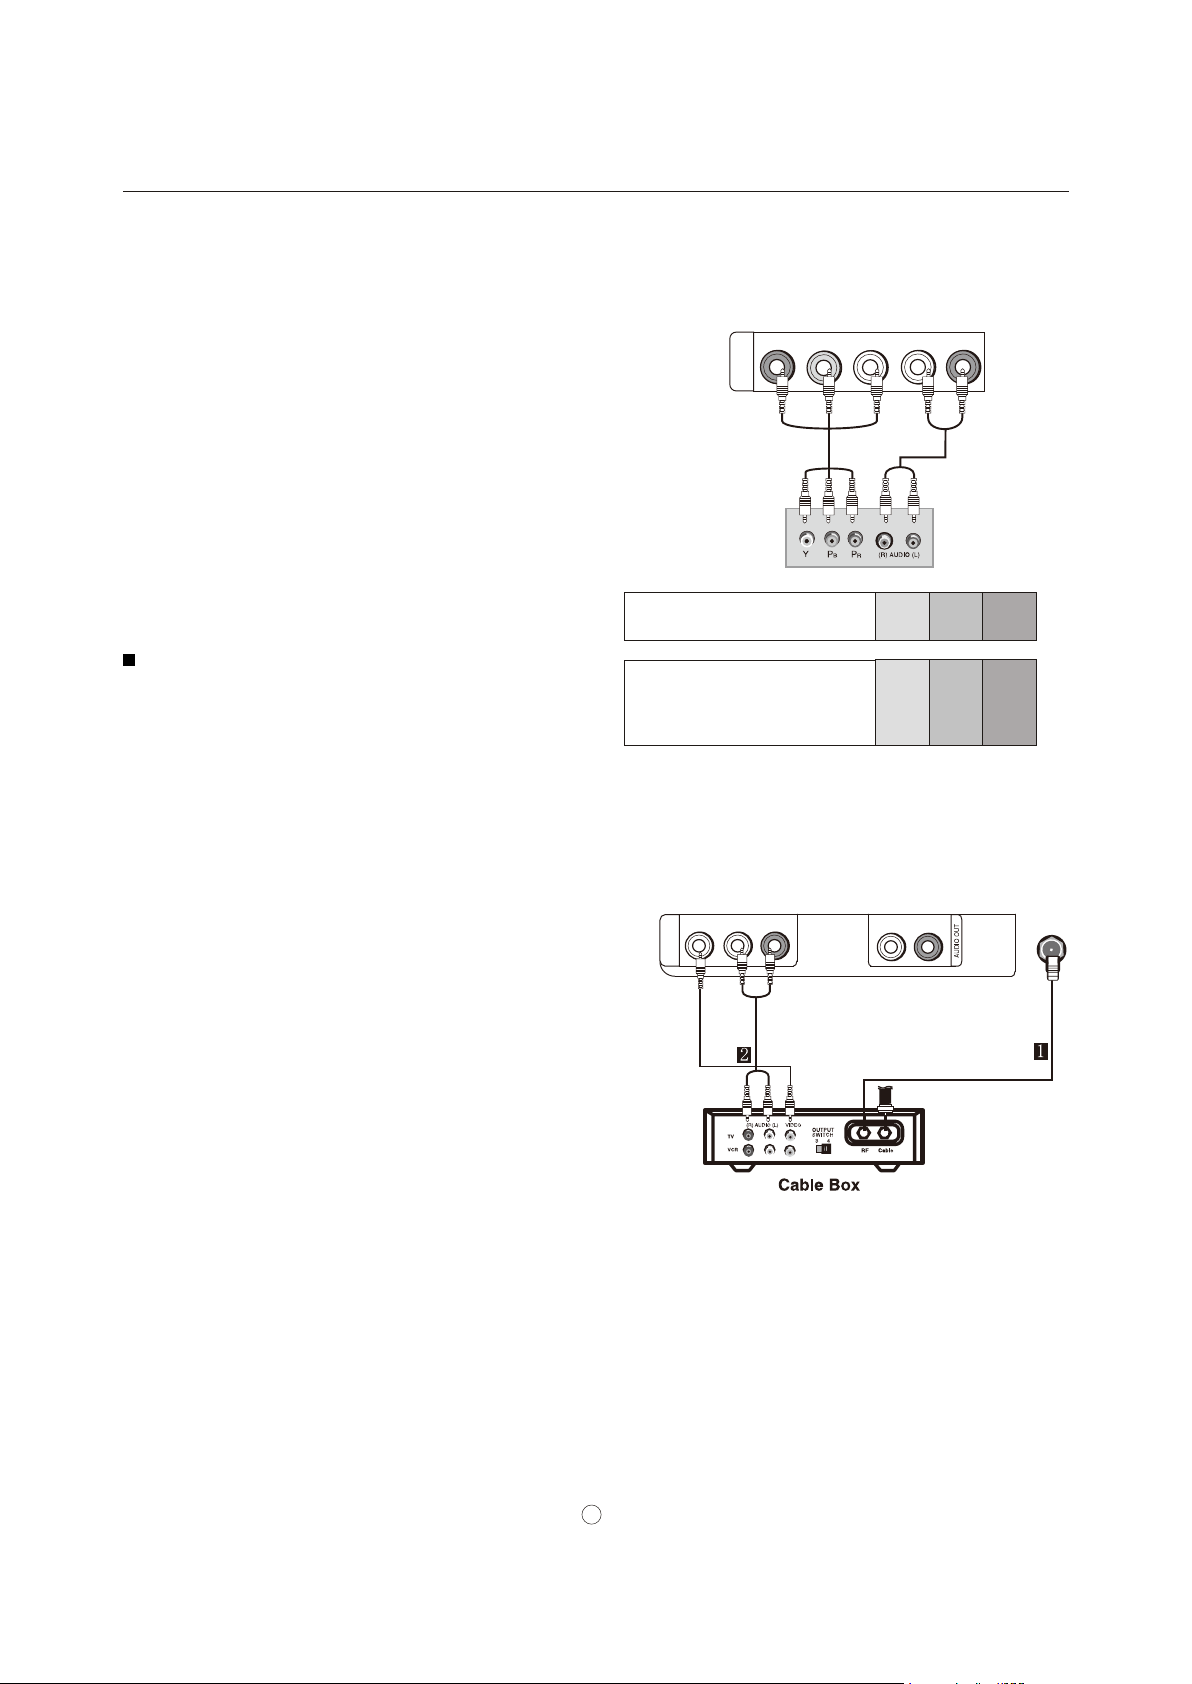
Cable TV Setup
After su bscr ibi ng to a cabl e TV service fr om a local prov ide r
you can watc h cable TV pr ogr a mmi ng. The TV cann ot
di spl ay TV pro grammin g unles s a T V tun er device or cable
TV conve rter bo x is conn ect e d to the TV.
Fo r furt her inform a tio n rega rdin g ca ble TV se rvi ce, c ont a ct
your l ocal ca ble TV service pr ovi der( s).
Co nne ction Option 1
1. S ele ct 3 or 4 wit h chan nel switch on cabl e box.
2. Tun e the TV chan nel to the sam e selec ted out put
chann el o n ca ble box.
3.Sel ect chan nel s at th e ca ble bo x or wi th the c abl e box
remot e contr ol.
Co nne ction Option 1
1. C onn ect the audi o and vide o cabl es from th e Cable
Bo x's ou tpu t ja cks t o the TV inp ut jack s, as show n in the
figur e. W hen c onn ecti ng the TV to a Cab le Box, matc h the
ja ck c olors (Vide o = yel low , Au dio Left = wh ite, and Audi o
Right = r ed).
2. S ele ct the inp ut source by usin g the INP UT bu tton on th e
remot e contr ol o r on the TV.
3.Sel ect your de sired channe l with the rem ote c ont rol for
cable bo x.
VIDEO
L -AUDIO- R
AV IN
L R
ANT IN
5
Page 9

Insta lla tion
Connection Instructions
Connecting a computer
Ho w to con nec t
1. To get the best picture qu alit y, adj u st the PC gra phi cs card to 10 24
2. Us e the TV`s VGA or DVI (D igi tal Visual Interfac e)Au dio IN port fo r vi deo connec tio ns, d epe ndin g on your
VG A conne ctor.
If th e grap hic card on t he PC does no t outpu t analo g and digital RGB si mult ane ousl y, con nec t only one of
ei the r VGA r H DMI /DVI IN to d isplay t he PC on the TV.
IN o
If the grap hic card on the PC d oes o utp ut analog and digital RGB s imul tan eously, se t the TV to eit he VGA
DV I; ( the o the r mod e is set to Plu g and Play a utom ati cally by the TV.)
HDMI/
3. Th en,mak e the corr esp onding aud io c onn ection. If using a s oun d card, adj ust the PC sound a s requi red .
Ho w to use
1. Tu rn on t he PC and the TV.
2. Turn on the dis play by pr ess ingthe POWER but ton on the TV's re mot e c ont rol.
3. Use I NPUT onth e remot e contro l to s elec t PC or HDM I s ource.
4. Ch eck the im age on you r TV. Th ere ma y be noise ass oci a ted wi th the res olu tion , vert ica l pa ttern, con trast or
brigh tne ss in PC mod e. I f noise is present , chan g e the PC mo de to a nother r eso luti on, chan ge the r efr esh rat e to
anoth er rate or adju st the brig htn ess and c ontr ast on the m e nu u nti l the pi ctu re is clea r. I f the refre sh rat e of t he
PC graph ic card can no t be ch ang ed, chan ge the P C graph ic c ard or consult th e ma nuf act u rer of the PC g raph ic
card.
No te
1.Use a H DMI to DVI cable .
2.Avo id keep ing a f ixe d im age on the TV' s scre en for a long peri od of time. Th e f ixed image may bec ome
perma nently i mpri nte d on th e screen.
3. Th e sync hron iza tio n in put fo rmfo r Ho riz ontal andVe rti cal fr eque nci esis separa te.
x768 .
r or
Re sol uti o n
Mo de
Re sol ution
Frame
fr equ ency
(Hz)
VGA
SVGA
XGA
640x480
1280x768
800x600
1024x768
60Hz
60Hz
75Hz
60Hz
75Hz
HDMI Input
Ho w To Co nne ct
Co nne ct the cab les from th e exter nal equ ipme nt' s outp u t
ja cks to th e TV input ja cks, as sh own in the figure.
Ho w To Us e
1.
Se lec t the inpu t source by using IN PUT bu tto n on th e
remot e contr ol o r on the TV.
2.Ope rat e the corr esp onding extern al e quip men t.
Re fer to ex tern al e quip men t op era tin g gu ide.
PC/DVI AUDIO IN
PC IN
DIGITAL OUT
(COAXIAL)
PC/DVI AUDIO IN
HDMI IN
HDM
PC IN
I
6
Page 10

Op era tio n
Basic Operating Instructions
In the manual, the OS D (on screen di splay) m ay be differ e nt fro m your TV `s, bec aus e it is j ust an example to help
you with th e TV opera tio n.
Th ere ar e sever al opt ions yo u might need to se t up i n orde r for yo ur TV to work prop erly. Read the inst ruc tion s that
follow.
Turning on your TV for the first time
To tur n on and configure yo ur TV:
1 Ma ke sure that you hav e inse rted the ba tter ies in the r emote cont rol, conn ect ed t he ante nna to t he TV, an d
co nne cted th e AC po wer.
2 Pres s POWER , the n wait seve ral se cond s. T he power ind icator L ED turns blue and the TV turn s on.
No te
If th e TV in powe r on , the scre en show informa tion ac cor ding th e type of input si gnal . the inf orm atio n will disa ppe ar.
If there is no sign al , NO SIGN AL wi ll disp lay on th e sc ree n .
3 Se lec t the s igna l sou rce for y our TV cha nge the pict ure sour ce so you can watc h your TV, cabl e TV, VCR ,
DV D, or a ny other devi ces th a t are co nne cted to you r TV.
1. Press INP UT to ope n the signal sour ce menu and t hen press CH+ / - but ton t o selec t the s
Co mpo nent , , HDM I, USB .PC
2. Pr ess VOL+/O K b utt on to conf irm .
4 Selec t the T V sig nal s ource for you r TV an d auto scan fo r cha nnels
ource TV, Compo site ,
1. P ress M ENU ,then pr ess VOL +/- to s elect CHA N NEL S m enu.
2. P ress C H-/OK, th e CHAN NEL S m enu open s.
3. Press CH+ /- to sel ect th e A uto Channe ls Search . Pr ess
VOL+/ OK the Auto Channe ls S earch me nu o pen s.
4. Press CH+ /- to sel ect Antenn a or Cab le , th en pres s OK.
A che ckm a rk a ppea rs in the cir cle next to your cho ice.
O
K
Press CH +/- to sele ct START, the n press VOL+ /OK . The T V
autom ati call y scans an d me morizes al l the acti ve, availa ble
chann els in your area.
5 S et t he v olu me of your TV b y pres sing VO L+ or VOL- .
6 C hoo se the Menu Langu age
1. C hoo se the TV sour ce and the n press ME NU but ton.
2. P res s VOL+ /- to se lect S ETTINGS m e nu.
3. P res s CH-/ OK, then press CH+/- to se lect the
Se tti ngs
4. P res s VOL+ /OK, th e opens .
.
Me nu Settin gs
Me nu
5. P res s CH+/ - to sel ect lang uag e yo u want.
K
O
Yo u can se lect En gli sh
Ko rea
7 Select the cha nnel yo u want by p res sing CH +/CH- to go to the next or previ ous c hann el, or dire ctl y by
press ing the n umb e r butto ns.
Page 11

Þ¿-·½ Ñ°»®¿¬·²¹ ײ-¬®«½¬·±²-
Í©·¬½¸·²¹ ¬¸» ÌÊ Ñ² ±® Ѻº
ï Ú· ®-¬ô ½±²²»½¬ °± ©»® ½ ±®¼ ½±® ®»½¬´§ò
î Ю »-- ° ±©»® ¾« ¬¬±²ò DZ«® ÌÊ ¬« ®²- ±²ò
í Ю »-- ¿ ¹¿· ² ¬± ¬«®² ± ºº §±« ® ÌÊò ɸ»² §±« ¬«® ² ±ºº §±«® ÌÊô ·¬ ¹± »- ·² ¬± -¬¿²¼ ¾§ ³± ¼»ò
É¿®²·²¹æ É ¸»² §±«® ÌÊ ·- ·² -¬¿ ²¼¾§ ³ ±¼» ô ·¬ ·- -¬· ´´ ®» ½»· ª ·²¹ °±© »®ò ̱ ½±³ °´»¬ »´§ ¼·- ½±²² »½¬ ° ±©» ®ô «²°´ «¹ ¬¸»
°± ©»® ½±®¼ ò
Ò± ¬»æ ׺ §±«® ÌÊ ¼±»- ²±¬ ® »½» · ª» ¿² ·²° «¬ -· ¹²¿ ´ º±® -»ª»®¿´ ³ ·²« ¬»-ô ·¬ ¿ «¬±³¿¬· ½ ¿´´ § ¹±» - ·²¬± -¬ ¿²¼¾ § ³± ¼ »ò
Ó«¬»
ïò Ю» -- ÓËÌ Û ¾«¬¬ ±² ¬± ³«¬ » ¬¸» -± «²¼ ¬ »³°± ®¿® ·´§ò ß ³«¬» · ½±² ¿°°»¿®- ±² ¬¸» - ½®»» ²ò
îò Ю» -- ÓËÌ Û ¾«¬¬ ±² ±® ÊÑ Ôõ ¿¹¿ · ² ¬± ®»- ¬±®» ¬¸» -±« ²¼ò
̸ » ³«¬ » ·½±² ¼·- ¿ °°» ¿®-ò
Í´»»° ¾«¬¬±²
Ю»-- Í Ô ÛÛÐ ¾«¬¬±² ¬± -»¬ ¬¸» ¬·³ » æ Ѻºó ë ³·²óïð ³· ²óïë ³·²óíð ³·²ó ìë³· ²óêð ³·² óçð ³·²óïîð ³·²ó ïèð ³·²óîìð ³·²ò
̸ ·- º »¿¬« ®» ¿´ ´±© - §±« ¬± ¬« ®² ±ºº ¬¸ » ¬»´»ª·-· ±² ¿º¬»® ¿ °®» ó-»´ »½¬ »¼ ²« ³¾»® ±º ³·²«¬»-
ó Þ«¬¬±²
Ю»-- ¬ ± -»´» ½¬ ¿¼¼·¬· ±²¿ ´ ½¸¿ ²²»´ - ø¼· ¹·¬ ¿´ ¿² ¼ ¿²¿ ´±¹ ÷ ¾»· ²¹ ¾® ±¿¼ ½ ¿-¬ ¾§ ¬¸ » -¿³» -¬¿¬· ±²ò Ú±® »¨¿³ °´»ô ¬± - »´»½ ¬
¼· ¹·¬ ¿´ ½¸ ¿²² »´ •ïïóï Œô °® »-- •ïïŒô ¬¸ »² °®»-- • ó Œ ¿²¼ • ïŒò
ЭШтФЧНМ ¾«¬¬±²
Ю»-- ¬± ¼· -°´¿§ ¬¸» °®± ¹®¿ ³ ´·-¬ò Ю»-- ÝØõñ ó ¬± -»´» ½¬ ¬¸ » ·¬» ³ ¿²¼ ÑÕ ¾ «¬¬±² ¬± -»´ »½¬ ¬¸» ½¸¿²²»´ §±« ¼»- ·®»¼ ò
ЪЯКСОЧМЫ ¾«¬¬±²
ß¼ ¼·²¹ º¿ª ±®·¬» ½¸ ¿²² »´Ð®»--
ÝØ ò Ô× Í Ìт М ¸» ½¸¿² ²»´ ´·-¬ ±° »²-т Р®»-- ЭШхсу ¬± -»´» ½¬ ¿ ½¸¿²²»´ т
Р®»-- Ú ßÊÑ Î×Ì Û ¬± ¿¼ ¼ ¬¸» ½¸¿² ²»´ ¬ ± ¬¸ » º¿ª ±®·¬ »- ½¸¿²² »´ ´·-¬ò
̱ ®»³ ±ª» ¿ º¿ª± ®·¬» ½¸¿ ²²»´ ô ±°» ² ¬¸» ½¸¿ ²²»´ ´·- ¬ô -» ´»½¬ ¬¸» ½¸¿² ²»´ § ±« ©¿²¬ ¬± ®»³ ±ª»ô ¬¸»² °®» -- ЪЯКСОЧ МЫт
Ì« ²·²¹ ¬± ¿ º ¿ª± ®·¬» ½¸¿ ²²»´
Ю»-- Ú ßÊÑ Î×Ì Û Ì¸» º ¿ª±®·¬» ½¸ ¿²² »´ ´· -¬ ±° »²-ò
Ю»-- ÝØõñ ó ¬± -»´ »½¬ ¬¸» ½¸¿² ²»´ò
DZ «® ÔÝÜ ÌÊ ¿«¬±³¿¬·½¿ ´´§ ¬«²»- ¬± ¬¸» ½¸¿ ²²»´ §±« -»´ »½¬ » ¼ò
ÍßÐ Þ®±¿¼½¿-¬- Í»¬«°
̸ ·- Ì Ê ½¿² ®» ½»·ª » ÓÌÍ -¬» ®»± ° ®±¹®¿³- ¿²¼ ÍßÐ øÍ »½±² ¼¿® § ß«¼·± Ю± ¹®¿³ ÷ ¬¸¿ ¬ ¿½ ½±³° ¿²·» - ¬¸» -¬» ®»±
°®±¹®¿³å · º ¬¸» -¬ ¿¬·± ² ¬®¿ ²-³ ·¬- ¿² ¿¼ ¼·¬· ±²¿´ -±« ² ¼ -·¹²¿´ ¿- ©» ´´ ¿- ¬¸» ±®·¹·²¿ ´ ±²» ò
ɸ»² ¸¿ª·² ¹ -»´ »½¬ » ¼ ÍßÐ ¾«¬ ¬±² ±² ¬ ¸» ® »³±¬ » ½±² ¬®± ´ô ¬¸ ·- ÌÊ ½ ¿² ±² ´§ ®»½»· ª» ¬¸ » -·¹²¿´ ©¸»² ¬ ¸» ÌÊ - ¬¿¬·±²
¬® ¿²- ³·¬- ¬¸» °®± °»® - ·¹²¿´-ò
Ó± ²± -±«²¼ ·- ¿ «¬± ³ ¿¬·½¿´´§ ®»½» · ª»¼ ·º ¬¸» ¾®±¿¼ ½¿-¬ ·- ±²´§ ·² Ó±²± å »ª »² ¬ ¸±«¹ ¸ ͬ »®» ± ±® ÍßÐ ¸ ¿- ¾»» ² -»´ »½¬ » ¼ò
Í» ´»½¬ Ó±² ± ·º §± « ©¿ ²¬ ¬± ´·-¬»² ¬ ± ³±² ± -±« ²¼ ¼« ®·² ¹ -¬» ®»±ñ ÍßÐ ¾®±¿ ¼½¿-¬·² ¹ò
ͬ»®» ± ±® ÍßÐ ½ ¿² ¾» ® »½»· ª»¼ ·² ¿ ß²¿ ´±¹ ½¸¿ ²²» ´ ò
ïò Ë -» ÓÌÍ ñÍßÐ ¬± -» ´»½ ¬ §±«® ¼» -·®»¼ ÓÌ Í ³±¼ » ·² ¿ ¿²¿´±¹ - ·¹²¿ ´ò Û ¿½¸ ¬·³» § ±« °® »-- ÓÌÍñ ÍßÐô Ó±²± ô
ͬ»®»±ô ¼« ¿´ï ± ® ¼«¿´î ¿°° »¿® ò ׺ ±¬¸» ® ´¿²¹ «¿¹» - ¿®» ¿ª¿·´¿ ¾´» ± ² ¬¸» ¼·¹·¬¿ ´ -·¹²¿ ´ô - »´»½ ¬ ¬¸ »³ ©·¬¸ ¬¸»
УМНсНЯР ¾«¬ ¬±² ò
îò Ð ®»- - Û È×Ì ¬± -¿ ª» ¿²¼ ®» ¬«® ² ¬± ÌÊ ª·» ©·² ¹ ò
ßÎÝ ¾«¬¬±²
Í» ´»½¬- ¬¸ » ß-° »½¬ Î ¿¬·± ò Ç ±« ½¿² -»´» ½¬ Æ ±±³ô É·¼ »ô Ý·²» ³¿ ±® ²±®³ ¿´ò
Ʊ ±³ ݸ ±±-» Ʊ±³ ©¸ »² §± « ©¿²¬ ¬± ª·»© ¬¸» °·½¬« ®» ©· ¬¸±«¬ ¿² § ¿´¬ »®¿ ¬·±² ò ر © »ª» ®ô ¬¸» ¬±° ¿²¼ ¾±¬¬ ± ³
°± ®¬·± ²- ±º ¬¸ » °·½¬«® » ©· ´´ ¾» ½® ±°°»¼ò
É· ¼» ݸ ±±- » ©·¼ » © ¸ »² § ±« ©¿ ²¬ ¬± ¿¼¶«-¬ ¬¸» ° ·½¬ «®» ¸ ±®· ¦±²¬ ¿´´§ô ·² ¿ ´·²»¿ ® °® ±°±® ¬·±² ¬± º· ´´ ¬¸» » ²¬· ®» -½ ®»» ² ò
Ý·²»³ ¿ Ú±® ´»¬¬ »®¾± ¨ °·½¬«® »-ô ¾¿®- ³¿§ ¿ °°»¿ ® ±² ¬ ¸» ¬±° ¿ ²¼ ¾± ¬¬± ³ ±² -±³» °®±¹® ¿³-ò
Ò± ®³¿ ´ ݸ± ±-» ² ±®³¿ ´ ©¸»² §±« ©¿²¬ ¬ ± ª·»© ¬¸» °·½¬ «®» © ·¬¸ ±®· ¹·²¿´ ¿- ° »½¬ ®¿ ¬·± ± º ¬¸ » ·² °«¬ -·¹ ²¿´ò
è
Page 12

Menu Operations
In this m a nua l, th e OSD (On S cree n Disp l ay) may be dif fer fr om your T V .
Th ese are ex amp les to illu strate the TV 's o per ation.
Press IN PUT t o select th e input s ource. T he menu f or each so urc e may be di ffe rent .
1 Pr ess MENU b utto n to displ ay the main men u, and VOL+ /- to sel ect th e ma in menu .
2 Pr ess CH-/OK bu tton to en ter the men u and CH+/- to go up and down to se lect th e desi red o pti o n .
3 Pr ess VOL+ /OK butt on t o confi rm a nd VOL+/- to make ch ang es to the paramet ers.
4 Pr ess EXIT /ME NU but ton to exit the menu.
Picture Menu Options
Th e TV menu gi ves you an o verview of the me nus y ou can sel ect .
No te
De pen din g on th e input si gnal, one or m o re menu items may no t
be se lectabl e.
Ho w to cust omiz e you r own p ict u re statu s
1 Pr ess MENU ,the n press VO L+/- t o selec t PICTU RE men u.
2 Pr ess CH-/OK, then pr ess to se lec t an op tio n.
3 Pr ess , the m opens . then p res s to
adjus t the opti on.
VOL+/ OK enu VOL+/ -
CH+/-
O
K
Op era tio n
Mo de
Se lec t the p ictu re mode . You ca n sele ct Vivid /Standa rd/Ener gy Savings /Th eate r/S port s/C u stom.
You can al so pre ss PICTU R E on the rem ote cont rol to s elect the p ictu re Mode .
Br igh tne ss
Co ntr ast
Co lor
Tint
Sh arp ness
Ad van ced V ide o
• As pect Ra tio Se lect No rmal , Zoom , Wid e, C inem a
• Ov ers can Turn t his On to a djus t the picture’ s repr oduc tio n rate w hen receivi ng DVI s igna ls in V IDEO fo rma t .
Av ail ablewhen the s ignal uses EIA timing (48 0i/4 80p /720 p/1 080i ).
• Co lor Temperature Sele ct C ool ( inc reased blue ), N orma l, o r War m (inc rea sed red).
• Ba ckl ight Adju sts th e ov era ll bril lia nce o f the scre en.
• No ise Red uct ion Sel ect s the noise red uct ion m ode to reduc e pi ctu re noise (snow) . Choo se Off, Low, Mid dle o r
High.
• Ad vanced C ont rast Turn this On to optim ize th e picture disp lay fo r a more v ivid im age.
Re set to De fault Re
Ad jus ts t he brig htn ess .
Ad jus ts the c ont rast.
Ad jus ts t he color saturati on.
Ad jus ts the i mag e tin t.
Ad jus ts t he sharpne ss.
Lets y ou set the fol low i ng:
sets a ll picture set tin g s to facto ry def aul t .
9
Page 13

Op era tio n
Menu Operations
Audio Menu Options
How to Customize your own audio st atus
1 Pr ess MENU ,the n press VOL +/- to sele ct AUDIO menu.
2 Pr ess CH-/OK ,t hen p res s CH+/- t o selec t the desi red i tem s.
3 Pr ess VOL+ /OK , the n pr ess VOL +/- to ad just the setting .
4 Wh en you are sat isfied w ith y our choi ce, pre s s MENU
butto n to retur n to the previou s me nu or press EXIT butt on
to retur n to TV viewing.
O
K
Eq ual izer Mode
Se lec ts t he soun d mod e. Yo u ca n sele ct :
Stand ard, Th eat er (fo r mo vie s), Mus ic ( for mus ica l progr ams ), News (for ne ws prog rams), Cus tom for a c usto miz ed
sound mod e).
Yo u can al so pre ss AUDIO o ne or more ti mes to cycl e through t he avai lab le sound m ode s.
Eq ual izer Setti ng
Lets y ou set c ust om audi o se tti ngs whe n you sele ct Cust om
Ba lan ce
Th is w ill adju st the output of the ri g ht a nd left speaker s to obtain th e best ste reo rep rod ucti on f or your li ste nin g
posit ion
Digit al Audio/SP DIF
Th e TV can o utp ut Digi tal aud io via the opt ical c onne ctor to an exter nal amplifier o r recei ver .
Yo u can se lect RAW or PCM.
Au dio La ngua ge
Se lec ts an alte rna t e audi o la ngu age, if av ailable . You can s elect
Au to Vol ume Eq ual ize s the over all vol ume l eve ls f or all chan nels .
Re set Audi o S etti ng Re sets al l audi o set tin gs to fact ory defa ult .
(DTV chan nel s only)
Ko rea , English, Japan.
Page 14

Op era tio n
Menu Operations
Channels Menu Options
To sel ect the TV si gnal so urc e:
1 P res s INPUT ,the n pres s to sele ct T V opti on.
2 Pr ess O K, to sele ct t he TV signal sou rce .
VOL+/
Automatically scanning for channels
Au tom ati call y finds al l channe ls avai lab le thr o ugh ante nna o r cabl e inp uts , and stor es them i n memor y on the All
Ch ann el List .
1 Pr ess MENU , then press VOL +/- to s ele ct CHA NNELS menu .
2 Pr ess CH-/OK, then pr ess CH+/ - o ne o r more times t o se lect
th e Aut o Chann els S ear ch .
3 Pr ess VOL+ /OK . The Auto Ch anne ls Search opens .
4 Pr ess CH+/ - to s elec t Ante nna or C able , th en pres s O K.
A che ckm a rk a ppea rs in the cir cle next to your cho ice.
5 Pr ess CH+/ - to s elec t START, then pre ss VOL +/OK .
Th e TV auto matical ly s cans and me mor izes al l the acti ve,
avail abl e ch ann els in y our are a.
All avai lable chann els are automa tica lly pr eset in o rde r. Aft er
the sear ch is complete d, the fi rst cha nnel nu mber dis pla ys o n
the scre en. Th is sear ch a utom ati cally adds only the act ive
chann els i n your are a to the TV 's mem ory .
It de letes any c hann els on which the re is no broadcas t or a poor
si gna l. T he chan nel s foun d ar e autom ati call y saved .
6 To cance l searchin g, press E X IT bu tton .
CH+/-
me nu
O
K
O
K
Adding or skipping channels
Yo u can de lete ch ann els fro m the chan nel list so th at your T V
skips th e chann els when yo u press CH+/ -. You can stil l tune to
the hidd en channel by u sin g the number bu tto ns.
th e Add /Ski p Chann els opti on, yo ur LCD TV sca ns for cha nnel s
st art ing at 21.
1 Pr ess MENU , then press VOL +/- to s ele ct me nu.
2 Pr ess CH-/OK ,t hen p res s CH+/- one o r more times t o se lect
Ad d/S kip C hann els
the .
3 Pr ess he .
VOL+/ OK. T Ad d/S kip C hann els menu open s
4 Pr ess CH+/ -or V OL+/ - to high lig ht the cha nnel you want to
skip ( the defaul t is to show the ch annel), the n press
EN TER to remo ve the che ck m a rk fro m the chan nel.
No tes :
To ad d a chan nel that is being skipp ed, rep eat S tep s 1 t o 4 and
press ENTER to retu rn the che ckma rk to the chan nel.
5 To can cel s ear chi n g, p res s EXIT b utt on.
CHANN ELS
O
K
K
O
Page 15

Menu Operations
Channels Menu Options
Setting up a favorite channel list
Yo u can cr eat e a fav orite c han nel l ist so y ou can qui ckl y brows e
throu gh your fa vorite c hann els by p res sing FAVORI TE, then
selec ting a c han nel fro m the fav o rit e cha nnel list.
Op era tio n
1 Pr ess MENU , then press VOL +/- to sel ect menu.
CHANN ELS
2 Pr ess CH-/OK ,t hen p res s CH+/- o ne or more times t o se lect
th e Fav ori t e .
3 Pr ess he Fa vor ite .
VOL+/ OK. T me nu o pens
4 Pr ess CH+/ - to s elec t the chan nel you wa nt to add or rem o ve,
then p res s OK to add or remove the chan nel from the list .
5 P cl ose th e menu.
ress EX IT .
6 To sel e ct a ch ann el in you r favor ite s lis t, p ress FAV ORI TE on
the remo te cont rol , press CH+ /- to sel ect th e chann el.
Adding or changing a channel label
If a c han nel is n ot a lrea dy labeled, you c an label the c han nel to
ma ke i t easie r to ident ify . You can also rela bel a ch ann el that is
al rea dy l abeled.
1 Pr ess MENU , then press VOL +/- to sel ect menu.
2 Pr ess CH-/OK ,t hen p res s CH+/- o ne or more times t o se lect
the .
Ch ann el Labe ls
3 Pr ess he .
VOL+/ OK. T me nu o pens
Ch ann el Labe ls
4 Pr ess CH+/ - to s elec t the chan nel you wa nt to labe l,
press V OL+ / - to g o to th e chann el l a bel fi eld .
5 Pr ess CH+/ - to s elec t the num b er o r symbo l you wa nt,
then p res s VO L+ to g o to the next ch ara cter. You can use a s many
as te n char acte rs t o la bel a chann el.
6 Wh en you have finishe d ente r ing a lab el, press OK to
confi rm.
No tes :
To cha nge a ch ara cter, pr ess VOL +/- to go to th e ch ara cter yo u
wa nt t o chang e, the n press CH+/- to se lect a n ew char act e r.
Re pea t Steps 4 to 6 to la bel addi tio n al cha nne ls.
7 Pr ess MENU to exit to t he previou s me nu or EXIT to c lose th e
me nu.
CHANN ELS
O
K
O
K
2.0
K
O
Page 16

Menu Operations
Channels Menu Options
Checking the DTV signal strength
Yo u can ch eck the DTV s ignal s tren gth to d ete rmi n e if you ne ed t o
adjus t your antenn a or di gital cabl e in put. The sig nal s tre ngth, the
le ss l ike ly you are to e xpe rien ce pict ure deg rad ation.
1 Pr ess MENU , then press VOL +/- to s ele ct me nu.
2 Pr ess CH-/OK ,th en p res s CH+/- one o r more times t o se lect
the .
Ch ann el Stre ngt h
3 Pr ess he di spl ayi ng the
VOL+/ OK. T menu o pen s
Ch ann el Stre ngt h
si gna l stren gth of the cha nnel .
4 P cl ose th e me nu.
ress EX IT
CHANN ELS
Op era tio n
O
K
Settings Menu Options
Closed Caption
Lets y ou turn clos ed capt ion ing on or off. Also lets yo u set
cl ose d capti on o pti ons.
1 Pr ess MENU , then press VOL +/- to s ele ct me nu.
2 Pr ess CH-/OK ,th en p res s CH+/- on e or more times t o se lect
Close d Capti on
the .
Press he
3 .
VOL+/ OK. T Cl ose d Ca pti on menu op ens
Press CH+/- t o sele ct th e op tio n, press to
open t he sub- menu, then pre ss C H+/-to set up. O ptio ns include :
Ca pti on m
od e Sel ect CC Off , CC O n , or CC O n Mute .
An alo g Ca pti on F or a nal og prog ramm ing . Optio ns
in clu de: Au tom a tic , En gli sh , or Kore a .
Digit al Capt ion For di git al p rog r amm ing . Select
Au tom ati c , CS 1,C S 2, CS3, CS4 , Cs5 , or Cs6 .
Digit al CC Setting s To cha nge digital cl ose d ca pti on
settings. Op tio ns incl ude :
• St yle Sele ct e ithe r Au tom ati c or Cu sto m. When you
selec t auto m ati c, the o the r s are disa ble d and cann ot be
adjus ted .
• Si ze To sel ect th e size of t he capt ion dis pla yed .
• Te xt Color To sele ct the te xt color or th e opaci ty of t he
text b ox of capt ion dis pla y. Select a co lor a nd one o f the
opaci ty opti ons .
• Te xt Opac ity To s pec ify the op aci ty for the te x t color.
• Backgr ound Co lor To se lect a b ack grou nd colo r.
• Backgr ound Op aci ty To sel ect the opa cit y for the
backg roun d colo r.
4 Pr ess MENU t o retur n to the previou s me nu, or press EXIT t o
cl ose th e me nu.
Yo u can al so pre s s CCD to turn cl osed cap tion ing on or off.
SE TTI NGS
VOL+/ OK
K
O
K
O
13
Page 17

Menu Operations
Adjusting time settings
Lets y ou set the cl ock .
1 Pr ess MENU , then press VOL +/- to s ele ct SET TIN GS men u .
2 Pr ess CH-/OK ,th en p res s CH+/- on e or more tim es t o se lec t
th e Time .
3 Pr ess VOL+ /OK. T he T ime menu open s.
Press CH+ /- to ent er the o ption. O pti o ns inc lude :
Mo de Press V OL+/ OK t oopen the s ub- menu , the n
press CH+/- to sele ct Man u al or Aut o. To set the t ime
manua lly , sele c t Manu al. Whe n Au to i s se lec ted , the time i s
set auto matically and cannot be adjuste d.
Clock
Of f Time
On Ti me
Settings Menu Options
Op era tio n
O
K
O
K
Setting the sleep ti mer
Lets you set th e slee p timer.
Yo u can sp ecify the amou nt of time yo u wa nt you r TV to wait bef ore it
autom aticall y turns off.
1 Pr ess MENU , then press VOL +/- to s ele ct menu.
SE TTI NGS
2 Pr ess CH-/OK ,th en p res s CH+/- on e or more tim es to select
th e Time .
3 Pr ess he Time .
Press CH +/- to select S leep Ti mer , t hen pre ss .
VOL+/ OK. T menu o pens
VOL+/ OK
Th e Slee p Timer me nu opens.
4 Pr ess CH+/ - to s elec t the time in terval tha t yo u want you r
TV to re main on , then pre ss OK to co nfirm the s ett ing. A
check mar k ap pea r s next t o the setting yo u selected .
No te: To turn off the slee p time r , select O ff.
6 P res s EX IT to clo se the me nu.
No te: You c an a lso pre ss SLE EP on t he r emote control to
set the sle ep time r.
Adjusting menu settin gs
Lets you set men u lang uage an d men u trans parency.
1 Pr ess MENU b utt on, t hen press VO L+/- t o s ele ct
SE TTI NGS me nu.
2 Pr ess CH- /OK, then pr ess CH+/ - to s ele c t the
Se tti ngs
3 Press VOL +/OK , th e menu op ens .
.
Menu Se ttings
4 Press CH+ / - to se lec t la ngu age y ou want.
Op tio ns i nclu de:
Trans parency Pr ess V OL+ / -to adjust how tr ans pare nt
th e TV menu ap pears.
La ngu age Press V OL+ / OK to enter the sub-me nu,
th en p ress CH +/- t o s ele c t the men u la ngu age fro m
Ko rea
5 P close th e menu.
En gli sh .
ress EX IT
Menu
Language
5
10
15
30
45
60
90
120
180
240
O
K
K
O
Korean
K
O
14
Page 18

Menu Operations
Settings Menu Options
Labeling an input so urce
Lets y ou label a devic e conn ecte d to your TV ’s i nput jacks .
1 Press M ENU bu tton, then press VO L+/- t o sele ct
SE TTI NGS me nu.
2 Press C H-/OK, t hen pre ss CH+ /- to sel ect th e
3 Press V OL+ /OK, the me nu ope ns.
Input La bels
4 Press C H+/ - t o sele ct the o pti o n, the n press VOL +/- to
chang e the sett ing .
Op tio ns i nclu de:
Input To s elect the i nput to la bel.
La bel To s elect the l a bel . Opti ons i nclude:
• C ust om Select t his opt ion to inp ut y our own la bel.
• V CR
• D VD
• S et To p Bo x
• S ate lli t e
• C abl e Box
• G ame
• PC
Cu sto m To enter a cus t om l abe l. P ress VOL+ /- to
mo ve b etw een f ields and press CH+/- to se lect th e
numbe r of symbo l you wa nt ( up to ten ) to lab el the inp ut.
Press O K to confi rm.
Re set In put Labe ls To rese t al l input l abe ls to fac tory
defau lt.
5 Re peat Step 4 to enter addi tio n al l abels.
6 Press M ENU to re turn to th e previ ous m enu , or press EXIT to
cl ose th e me nu.
Input La bels
O
K
O
K
Computer or Settings
Component
Lets y ou adju st picture se tti ngs t o optim ize a co mputer d isplay.
1 Press M ENU bu tton, then press VO L+/- t o sele ct
SE TTI NGS me nu.
2 Press C H-/OK, t hen pre ss CH+ /- to sel ect th e C omp uter Se ttings .
3 Press V OL+ /OK, the Com pute r Sett ings me nu ope ns.
4 Press C H+/ - t o sel ect the o pti o n, the n press VOL +/O K to adjust.
Yo u can se lect:
Au to A dju st Au toma tic all y ad justs t h e ima ge s etting s ,
such a s posi tion and p has e
H-Pos ition Moves t he imag e right o r left
V-Pos ition M ove s the imag e up or down
Clock Adju st t he cloc k setting of the pict ure
Ph ase A dju sts the foc u s of stab le imag es
Re set Comput er S ett ings Rese ts c ompu ter se ttings to
facto ry d efault
Re set to De faul t Re
sets a ll picture sett ing s to facto ry default .
O
K
K
O
Page 19

Page 20

Page 21

To set up the USB
Press the USB button on the remote control to enter the USB
1
media mode.
Press the MENU button, and then use the / buttons to select
2
Settings.Press the ENTER button to enter.
3
Use the / buttons to select MP3 Sort, and then press the4
button to enter. Use the / buttons to select the way to sort the
MP3 songs. Press the ENTER button to confirm the selection.
Op era tio n
4
Use the / buttons to select JPEG Thumbnail Size, and then
press the button to enter. Use the / buttons to select
desired thumbnail size for JPEG Pictures. Press the ENTER
button to confirm the selection.
Note
Do not remove the USB device from the TV until you have exited
the USB mode otherwise you may damage the USB device.
OK EnterSelect
OK EnterSelect
Select EXIT
OK Enter
EXIT USB
EXIT USB
USB
18
Page 22

Op era tio n
Maintenance
Ea rly malfun cti ons c an be pre ven ted. Ca ref u l and regul ar c lean ing can e xten d the amou nt o f time y ou w ill hav e
your n ew TV. Be sure to tu rn the p ower off and unp lug the powe r cord before yo u be gin any cle aning.
Cleaning the Screen
1. He re` s a great way to keep t he dust off you r screen f or a whi le. Wet a so ft c loth in a mixtur e of luke war m wa ter
and a little fabric so ften er o r dis h washing d ete r gen t. Wring the clo th until it`s almo st d ry, and then use it to
wipe t he scre en.
2. Ma ke s ure the ex cess wa ter is off the sc ree n, and then le t it air-dry be for e yo u turn on your TV.
Cleaning the Cabinet
To rem ove d irt or dust, wipe the cab inet wi th a soft, d ry, li nt- free cl oth . Please be sure not to us e a wet cloth.
Extended Absence
If you expe ct to leave your TV dorm ant for a long tim e (suc h as a va cati on) , it`s a go od i dea to u nplu g the powe r
cord t o prot e ct aga inst po ssi ble dam age from lightning or powe r surg es.
Product Specification
Re sol uti o n
Po wer req uir emen t
Co lor sy stem
Ex ter nal Ante nna Im p edance
Co lo
r
Op e ratinem p eratu re Rang
Op era ting Hu mid ity R ange
Ma xim um Elevati on
MODEL
Th e speci fic ati ons shown a bov e ma y be c han ged w ith out pri or notice for quality improve ment.
e
Dimen sen( WX X ) Unit::inch es/ m mD H
(I ncl uding sta nd
22.5X6.7X16.3 inches
5 7 2X 17 0 X4 13 mm
1920X 1080 (Do t)
220V~ , 60 H
NT SC ATSC
75 oh
16,77 0,0 00(2 56 step s of each R, G and B
32~10 4 F(0~4 0 C
Less than 80%
6561 f eet (200 0m
)
z
m
)
)
Weight(pounds/kg)
)
12.2/5.5
19
Page 23

Ì®±«¾ ´»-¸ ±±¬ ·²¹
Ì®±«¾´»-¸±±¬·²¹
Ú± ® ¬¸ » -¿µ » ±º ¬·³» ¿²¼ ½±-¬ ô ·¬ · - -¬® ±²¹ ´§ ®» ½±³³ »²¼» ¼ ¬¸ ¿¬ §±« ½¸» ½µ ±« ¬ ¬¸» °®± ¾´»³ ¾§ §± «®- »´º ¿ ½½± ® ¼·² ¹ ¬±
¬¸ » ·²-¬®« ½¬· ±²- ´ ·-¬» ¼ ¸»®»«²¼»® ¾»º± ®» ½± ²¬¿½ ¬·² ¹ ¬¸» ¿º¬» ®ó-¿ ´»- -»®ª ·½» º±® ¬ »½¸²·½¿ ´ ¿-- ·-¬¿²½» ò
Ê»®· º§ ·º ¬¸» ¬»´ » ª·- · ±² ·- °®±°» ®´§ °´« ¹ ¹»¼ò
Ò± °· ½ ¬«®» ô ²± -± «²¼
Þ´ ¿ ²µ -½® » »²
Ò± -± « ²¼
Ê»®· º§ ·º ¬¸» ¬»´ » ª·- · ±² ·- °®±°» ®´§ -«°° ´·»¼ °±© » ®ò
Ê»®· º§ ·º »´»½ ¬®·½· ¬§ ·- ¿ª¿ · ´¿¾´» ò
Ê»®· º§ ·º ½±®® »½¬ -·¹ ² ¿ ´- ¿®» ·² ° «¬ò
Ю » -- ×ÒÐË Ì ¾« ¬¬±² ¬± ½¸ ¿ ²¹» -·¹ ² ¿´ ·²°« ¬ ¬± ÌÊ · ²°«¬ò
λ- ¬¿®¬ ¬¸» ¬»´» ª ·-· ± ² ±º °±©»® -«° ° ´§ ·- ·²¬» ®®«°¬ » ¼ò
Ю »-- Ó«¬» ¾«¬ ¬±² ¿²¼ ª» ® ·º§ ·º Ó«¬ » ³ ± ¼ » ·- -»¬ò
Í© ·¬½¸ ¬± ±¬¸ » ® ½¸¿²² » ´ ¿²¼ ª»®·º § · º ¬¸» -¿³ » °®± ¾´»³
¸¿ ° °»²-ò
Ю »-- ÊÑÔõ ¾«¬ ¬±² ¬± -»» ·º ¬¸ » °® ± ¾´»³ ½¿² ¾» -±´ª » ¼ò
б ± ® -±«²¼
Ò± °· ½¬«®» ·² -± ³ »
½¸ ¿ ²²»´
Ò± ½± ´±® º±® -±³ »
½¸ ¿ ²²»´ °® ± ¹®¿³
ø¾ ´¿½µ ¿²¼ ©¸ · ¬»÷
Í° ± ¬- ©·¬¸ -± ³ » ±®
¿´ ´ °·½¬« ® » -
ر ®·¦±² ¬ ¿´ñª »®¬· ½ ¿´ ¾¿®±® °· ½¬«® » - ¸ ¿µ·² ¹
Ì»´» ª ·-·± ² ±« ¬ ±º ½±²¬® ± ´
Ò±¬»æ ܱ ²±¬ ´»¿ª» ¬¸» ¬»´»ª·-·±² ©·¬¸ -¬¿¬·½ °·½¬«®» ·² ¿² »¨¬»²¼»¼ °»®·±¼ ¿- ¬¸» ·³¿¹» ³¿§ ¾»½±³» °»®³¿²»²¬´§ ¾«®²»¼ò
Ò±¬»æ Ю±¼«½¬·±² ±º ¬¸» ÔÝÜ -½®»»² ®»¯«·®»- ¸·¹¸ ¿²¼ °®»½·-·±² ¬»½¸²±´±¹·»-ò ر©»ª»®ô ¬¸»®» ³·¹¸¬ ¾» -±³» ¼¿®µ ±® ¾®·¹¸¬
ш®»¼ф ¾´«» ±® ¹®»»²ч -°±¬-ф ±® -±³» ¿²±³¿´·-¬·½ -¬®·°»- ±® -°±¬-т М¸·- ·- ²±¬ ¼»º»½¬т Чº ¬¸» МК -»¬ ·- «-»¼ ·² ¿² ¿®»¿ офмрр
³»¬»®- ¿¾±ª» ¬¸» -»¿ ´»ª»´ ©¸»®» ¬¸» ¿·® °®»--«®» ·- ¾»´±© йлр¸°¿ф ¬¸» °·½¬«®» ±² ¬¸» ФЭЬ -½®»»² ³¿§ ¾» ¿ºº»½¬»¼ ¿²¼ ¿
³«ºº´»¼ -±«²¼ ³·¹¸¬ ¾» °®±¼«½»¼т М¸»-» °¸»²±³»²¿ ³·¹¸¬ ¸¿°°»² ·² ¬¸» ¿®»¿ пфлрр ³»¬»®- ¿¾±ª» ¬¸» -»¿ ´»ª»´т М¸·- ·®»-«´¬»¼ º®±³ ¼·ºº»®»²½» ¾»¬©»»² ¿·® °®»--«®»- ·²-·¼» ¿²¼ ±«¬-·¼» ¬¸» ¼·-°´¿§т М¸·- ·- ²±¬ ¿ ¼»º»½¬ ½±ª»®»¼ ¾§ ¬¸» ´·³·¬»¼
©¿®®¿²¬§т
Ê»®· º§ ·º -±«² ¼ -§ -¬»³ ·- º «²½¬· ±²¿´ò λ º»® ¬± ½¸¿ ° ¬»® ±²
¿¼ ¶ «-¬· ²¹ò
Ê»® · º§ ·º ½±® ® »½¬ ½¸¿² ² »´ ·- -»´ » ½¬»¼ ò
ß¼ ¶«-¬ ¬¸ » ¿² ¬»²²¿ ò
Ó¿ µ» ¿ ¼¶«- ¬ ³»²¬- ¾§ Ú·²» Ì«²» ¿²¼ Ó¿² « ¿´ ͽ¿²ò
Ê»®· º§ ·º ¬¸» -¿³ » °® ±¾´» ³ »¨·-¬ - ·² ±¬¸»® ½¸ ¿ ²²»´- ò
ݸ » ½µ ±«¬ ±º °·½ ¬ «®» ¿²¼ -± « ² ¼ -§-¬» ³ -ò
λ º»® ¬± ®»´¿ ¬·ª» ·² - ¬®« ½ ¬·±²- ·² ¬¸ » Ó¿ ²«¿´ º ±® ½± ´±®
¿¼ ¶«-¬ò
Ê»® · º§ ·º ¬¸» ¿²¬ »²²¿ ·- ½±® ®»½¬ ´ § ½ ± ²²»½ ¬ »¼ò
Ê»® · º§ ·º ¬¸» ¿²¬ »²²¿ ·- ·² ¹±± ¼ ½± ²¼·¬ ·±²ò
Ó¿ µ» º·²» ¿¼¶ « -¬³»² ¬ ±º ½¸¿²² » ´ò
ݸ » ½µ º±® ´±½ ¿ ´ ·²¬» ® º»®» ² ½» - «½¸ ¿- ¿² »´»½ ¬®·½ ¿ ´
¿° ° ´·¿² ½ » ± ® °±©»® ¬±±
Ü·- ½±²² » ½ ¬ ¬¸» ¬»´» ª·-· ± ² º®±³ °±©» ® -« °°´§ ¿²¼ô ïð
-» ½ ±²¼- ´¿¬ »®ô ½±²²» ½ ¬ ¬ ¸» ¬»´» ª ·-·± ² ¬± ¬¸» °±©»® -« ° °´§ò
׺ ¬¸» °®± ¾ ´»³ -¬·´ ´ » ¨·-¬ - ô ½±²¬¿ ½¬ ¿«¬¸± ®·¦»¼ ¿º ¬»®ó- ¿´»-
-» ® ª·½ » º± ® ¬»½¸²· ½¿´ ¿-- · -¬¿²½ »
´ò
ò
20
Page 24

 Loading...