

Page 1
HDY-C70/HDY-C70 ME
Page 2
Page 3

Page 4
Page 5
Page 6
Page 7

B
C
D
Page 8

Page 9

Page 10

launaMnoitarepO
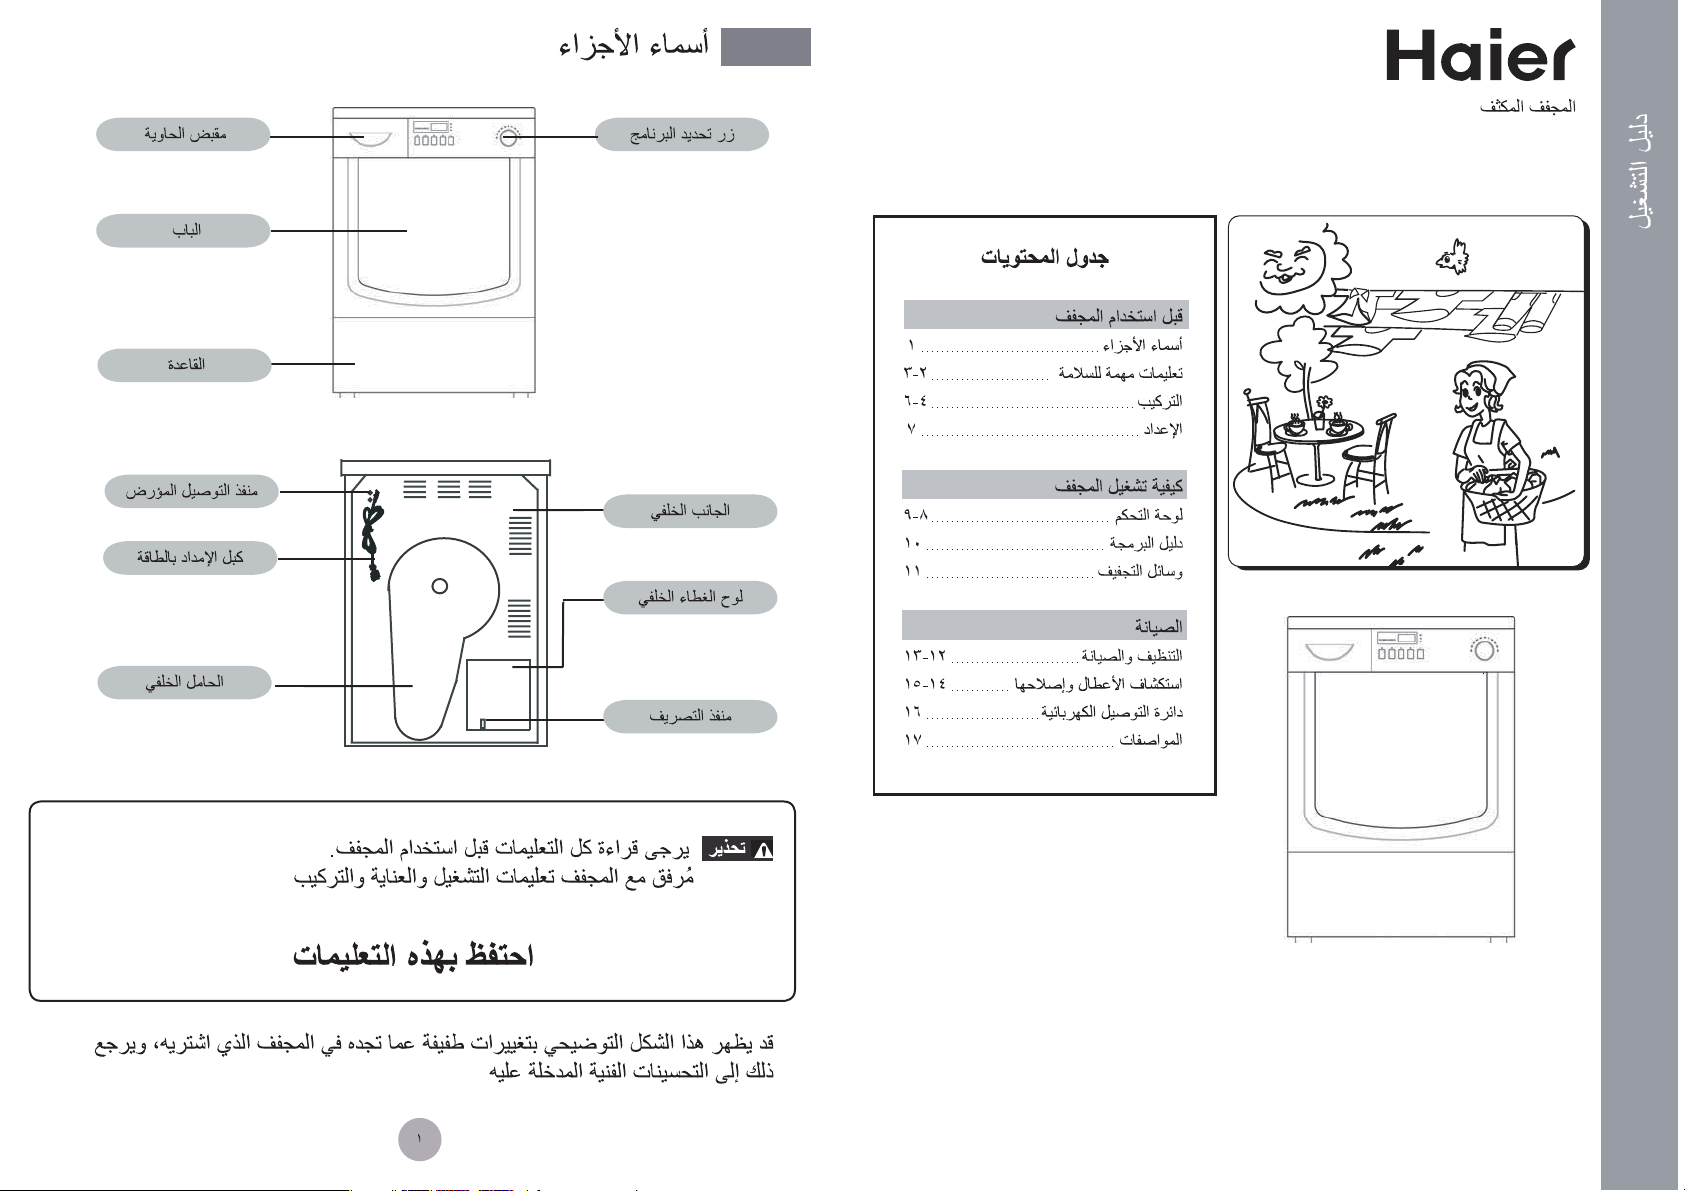
Name of parts
HDY-C70/HDY-C70 ME
Table of Contents
Before using the dryer
Name of parts....................................1
Important Safety Instructions
Installation.....................................4-6
Preparation ......................................7
How to operate the dryer
Control panel.................................8-9
Programming guide.........................10
Drying methods ...............................11
Maintenance
Cleaning and maintenance .......12-13
Trouble shooting .......................14-15
Wiring circuit ..................................16
Specifications .................................17
.....2-3
Container handle
Door
Plinth
Earth terminal
Power supply cable
Rear footplate
Program selector
Back plate
Back cover board
Drainage outlet
Warning
Read all instructions before using dryer.
Dryers are provided with operating,care and installation instructions
SA VE THESE INSTRUCTIONS
This diagram may be slightly different from the layout of the machine you have just
purchased due to techincal improvements
1
Page 11

Important safety instructions
Important safety instructions
To reduce the risk of fire, electrical shock, or injury to
persons when using this dryer, follow basic precautions,including
the following:
1.Read all instructions before using this dryer.
2.
Do not dry items that have been previously cleaned in,washed in, soaked in, or spotted
with gasoline, cleaning solvents, kerosene, waxes, etc.
with flammable substances in the dryer, such as petrol, cleaning solvents, cooking oil,
fat or hair lacquer.
give off vapors that could ignite or explode.
3.This appliance is not intended for use by persons (including children) with reduced
physical,sensory or mental capabilities, or lack of experie nce and knowledge,unless
they have been given supervision or instruction concerning use of the appliance by a
person responsible for their safety.Children should be supervised to ensure that they
to not play with the appliance.Do not allow children to play on or in the dryer.Close
supervision of children is necessary when the dryer is used near children.
4.
Before the dryer is removed from service or discarded, remove the dryer door to prevent
accidental entrapment.
5.To prevent injury, do not reach into the dryer if the drum is moving.Wait until the dryer
has stopped completely before reaching into the drum.
6.Do not install or store this appliance where it will be exposed to water and /or the weather.
7. Do not tamper with controls.
8. Do not repair or replace any part of the appliance or attempt any servicing unless specifically
recommended in the user-maintenance instructions or in published user-repair instructions
that you understand and have skills to carry out.
Do not dry items containing rubber, foam rubber, plastic or paper they can cause fire.
9.
10.Fabri c softeners,or similar products,should be used an specified by the fabri c softener
instructions.
11.Clean lint filter before or after each load.
12. This dryer must be properly installed in accordance with the installation instructions before
it is used .
13. To prevent shock hazard and assure stability during operation, the dryer must be installed
and electrically grounded by a qualified service person in accordance with local codes.
14. Always disconnect dryer from electrical supply before attempting any service.Disconnect
power cord by grasping the plug ,not the cord.
15. The dryer must only be used for its intended purpose
16. Do not sit on top of the dryer.
etc. Do not store these items on or near the
Do not place items contaminated
dryer. These substances
.
17.If the supply cord is damaged,it must be replaced by the manufacturer ,its service agent
or similarly qualified persons in order to avoid a hazard.
18.Do not operate the dryer if any parts are missing or broken.
19.Do not store or use gasoline or other flammable vapors and liquids in the vicinity of the
appliance.
20.Keep surrounding areas free from the accumulation of lint, dust and dirt.
21.Avoid fire hazard or electrical shock. Do not use an adaptor plug or extension
cord
or remove grounding prong from electrical power cord. Failure to follow this warning
cause serious injury, fire or death.
can
22.Do not dry unwashed items in the tumble dryer.
23.Items that have been soiled with substances such as cooking oil,acetone,alcohol,pe-
trol kerosene,spot removers,turpentine,waxes and wax removers should be washed
in hot water with an extra amount of detergent before being dried in the tumble dryer.
24.Items such as foam rubber(latex foam),shower caps,waterproof textiles,rubber backed
articles and clothes or pillows fitted with foam rubber pads should not be dried in the
tumble dryer.
25.
The final part of a tumble dryer cycle occurs without heat(cool down cycle)to ensure
that
the items are left at a temperature that ensures that the items will not be damaged.
WARNING:
are quickly removed and spread out so that the heat is dissipated.
Never stop a tumble dryer before the end of the drying cycle unless all items
Page 12

Installation Installation
Installation Installation
b
Dimensions
Dimensions
a = 855 mm
a = 855 mm
b = 620 mm
b = 620 mm
c = 595 mm
c = 595 mm
Weight = 43 kg
Weight = 43 kg
Packing accessories
Packing accessories
Checklist of the accessories and materials provided with the machine:
Checklist of the accessories and materials provided with the machine:
Owner's
Name
Name
Quantity
Quantity
To ensure the dryer operates normally, attention must be paid to the
To ensure the dryer operates normally, attention must be paid to the
following instructions;
following instructions;
Ƶ The dryer must be level when installed. Its bottom is equipped with
Ƶ The dryer must be level when installed. Its bottom is equipped with
adjustable feet. Adjust these 4 feets to level the unit before operation˗
adjustable feet. Adjust these 4 feets to level the unit before operation˗
Ƶ Check whether there is any damage to the dryer during transportation.
Ƶ Check whether there is any damage to the dryer during transportation.
Any damaged dryer must not be used. if the unit is damaged, contact
Any damaged dryer must not be used. if the unit is damaged, contact
your dryer supplier;
your dryer supplier;
Ƶ The dryer must be kept away from flammable substances˗
Ƶ The dryer must be kept away from flammable substances˗
Ƶ The surrounding environment must be dry and ventilated;
Ƶ The surrounding environment must be dry and ventilated;
ƵTo allow the dryer to perform better, the ambient temperature must not be
ƵTo allow the dryer to perform better, the ambient temperature must not be
lower than 10
lower than 10
Owner's
manual
manual
Certificate of
Certificate of
Conformity
Conformity
ć
nor higher than 35
ć
nor higher than 35
Drainpipe
Drainpipe
ć
ć
b
Reversible Door
Reversible Door
This unique feature allows you to install the dryer in the most convenient position
in you home
1. Unscrew the 4 hinge screws holding the door onto the machine and remove
a
a
c
c
1. Unscrew the 4 hinge screws holding the door onto the machine and remove
the door.
the door.
Unscrew the door and prise out the catch cover on the opposite side
Unscrew the door and prise out the catch cover on the opposite side
2.
2.
of the door and transpose them.
of the door and transpose them.
. Unscrew the door hinges and prise out the hinge covers on the opposite side
. Unscrew the door hinges and prise out the hinge covers on the opposite side
3
3
of the door and transpose them.
of the door and transpose them.
4. Remove the 4 blanking plugs from the screw holes on the machine and insert
4. Remove the 4 blanking plugs from the screw holes on the machine and insert
them in the holes on the other side.
them in the holes on the other side.
5. Refit the door on the opposite side of the machine.
5. Refit the door on the opposite side of the machine.
D
D
E
E
F
F
GH
GH
its opening direction
its opening direction
may be changed. The procedure is as follows:
may be changed. The procedure is as follows:
H
H
I
I
a-door hinge b-catch cover c-door
a-door hinge b-catch cover c-door
d-hinge cover e-door catch f-blanking plug
d-hinge cover e-door catch f-blanking plug
Page 13

Installation
Preparation
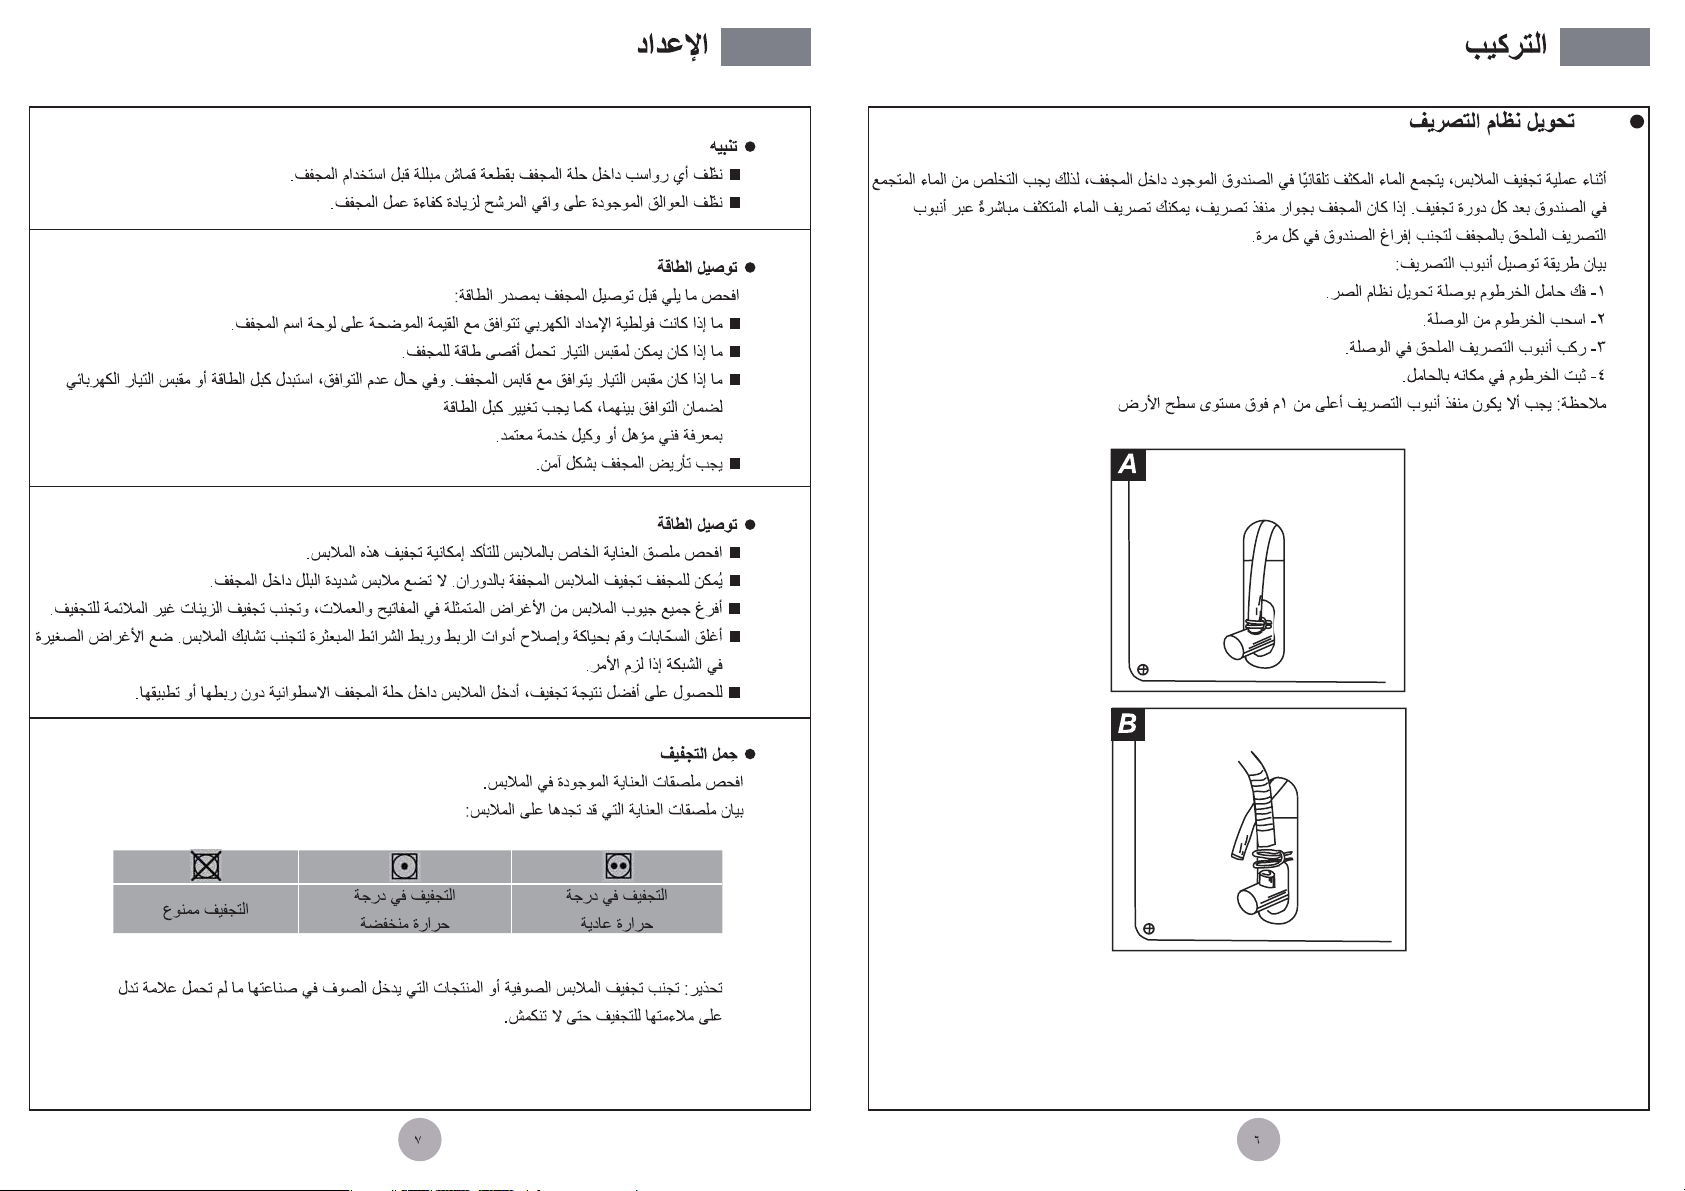
Drain switchover
During the drying of the laundry, the condensate water is automatically
collected in the box inside the machine, the water needs to
be removed from the box after every drying cycle. If your
dryer is in the vicinity of a drain, you may allow the condensed
water to discharge directly into the drain through the drainpipe
provided to avoid emptying the box every time.
The method to connect the drainpipe is as follows:
1. Loosen the hose clip with the drain switchover joint;
2. Pull the hose off the joint;
3. Install the accessory drainpipe on the joint;
4. Fix the hose in place with the clip;
Note: The outlet of the drainpipe must not be higher than 1.0 m above
the floor
Attention
ƵBefore use, clean any deposits from inside the drum of the dryer with
a wet towel;
Ƶ Clean debris on the filter screen to increase the drying efficiency.
Turning on power
Before turning on the power for the dryer, check:
Ƶ
Whether the supply voltage is in accordance with the value indicated on the
nameplate;
hether the supply receptacle can withstand the maximum power load to
ƵW
Ƶ
the dryer;
ƵWhether the supply receptacle is in accordance with the plug of the dryer.
Ƶ
If not, replace the power supply cable or receptacle to make them accord
with each other; The replacement of the power supply cable must be
done by a qualified professional or our authorized service agent;
ƵThe dryer must be grounded securely.
Treatment of laundry to dry
Ƶ
Check the care label inside the garments to ensure the items can be dried.
ƵThe dryer can only dry the laundry that has been spun dry. Do not put too
wet laundry into the machine;
ƵEmpty all pockets of the laundry with items such as keys and coins and
remove the adornment that is not suitable to be dried;
ƵPull up zippers, sew and mend up loosened fasteners and tie up
dispersed ribbons to prevent the laundry from being entangled. If
necessary, put small items into a net.
Ƶ
To achieve a better drying result, load garment loosely into drum.
Load to dry
Check care labels inside the garments.
CARE LABELS YOU MAY FIND ON YOUR FABRICS:
Dry at normal
temperature
Warning: Do not tumble dry woollen or wool mixture articles unless the article
is labelled to be suitable due to a possibility of shrinkage.
Dry at
reduced temperature
Do not
tumble dry
Page 14

Control panel Control panel
+
*
'()
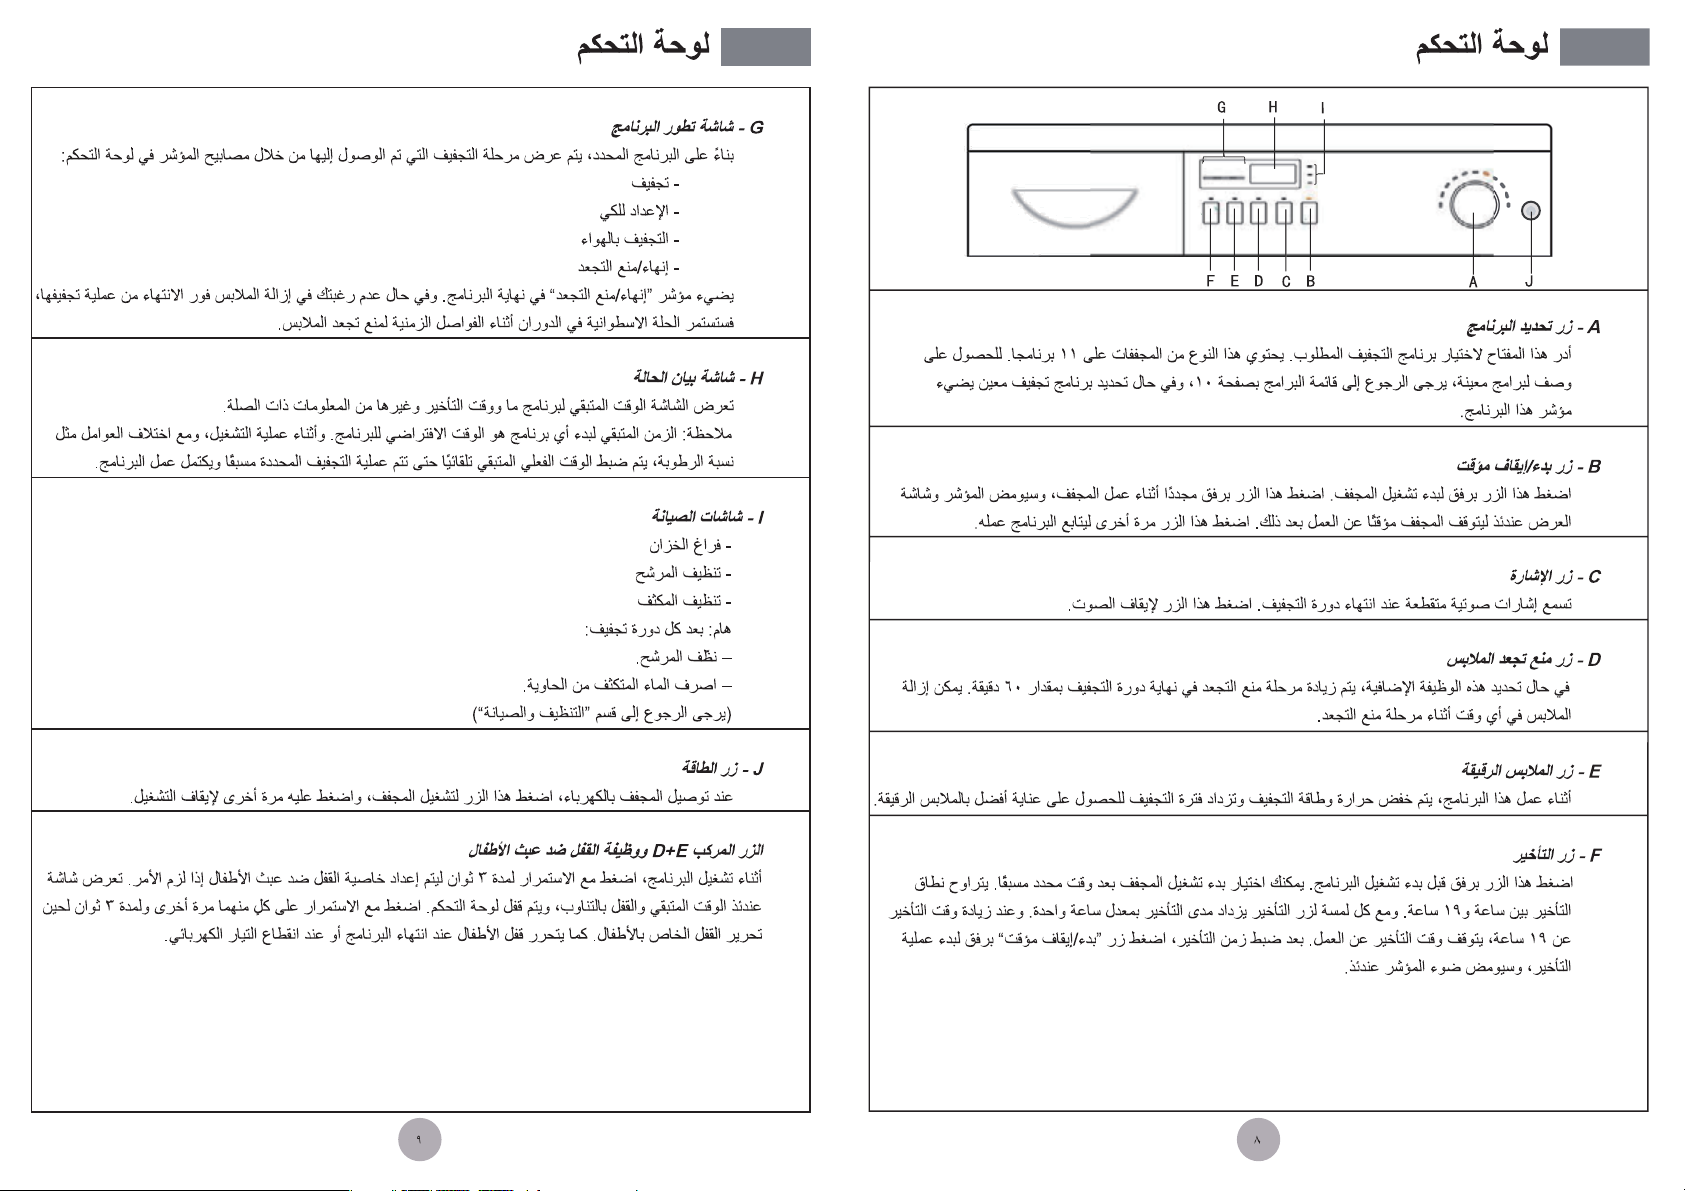
A - Program selector
Turn this knob to choose the drying program you desire. This type of dryer
has 11 program options . For description of specific programs, refer to the list of
programs on Page 10. When the drying program is selected,the relevant indicator
light is on.
B - Start/Pause button
Gently touch this button to start the dryer. Gently touch this button again
during the operation of the dryer and the indicator light and display screen will
flash and the machine will be paused .Press the button again and the program
will continue .
,
%
&
-
$
G - Programme progress display
Depending on the programme selected, the drying stage reached is
shown by the indicator lamps on the control panel:
- Drying
- Ready to iron
- Airing
- End/Anti-crease
At the end of a programme,the End/Anti-crease indicator lamp comes on.
The drum will continue to rotate at intervals to prevent laundry creasing, if you
do not wish to remove it immediately.
H - LED screen
The screen displays the remaining time for a program, the delay time and
other related information.
Note: The remaining time to start a program is the default time for the
program. During operation, with variation of factors such as
content. The actual remaining time will be automatically adjusted
drying result has been achieved and the program is complete.
the moisture
until the preset
C - Signal button
When the drying cycle has finished, an intermittent acoustic signal will
sound.Touch this button,the buzzer will be canceled.
D- Anti-crease button
If this additional function is selected, the anti-crease phase at the end of
the drying cycle is lengthened by 60 minutes. The laundry can be removed
at any time during the anti-crease phase.
E - Delicate button
During this program, the drying temperature and power will decrease and
the
drying time will increase to take better care of the delicate laundry.
F- Delay button
Gently touch this button before the program starts. You may choose to start
the dryer after a preset time. The delay range is between 1 and 19 hours.
Every touch of the delay button will increment by one hour. When you pass 19
hours, the delay time will turn off. After a delay time is set, gently touch the
Start/Pause button to the start the delay operation and the indicator light will
flash.
I - Maintenance displays
- Empty tank
- Clean filter
- Clean condenser
Important: After each drying cycleˈ
– Clean the filter˗
– Drain the condensed water container˗
(See section “Cleaning and maintenance”)
J -Power button
D+E composite button and child lock function
During a program, press and hold down both buttons for 3 seconds to
set up the child lock function if necessary. At this time, The display screen
shows the remaining time and the lock alternatively, and the control panel will
lock. Press and hold down both buttons for 3 seconds once again and the child
lock will release.When the program ends or during a power failure the child lock
will release.
in
Page 15

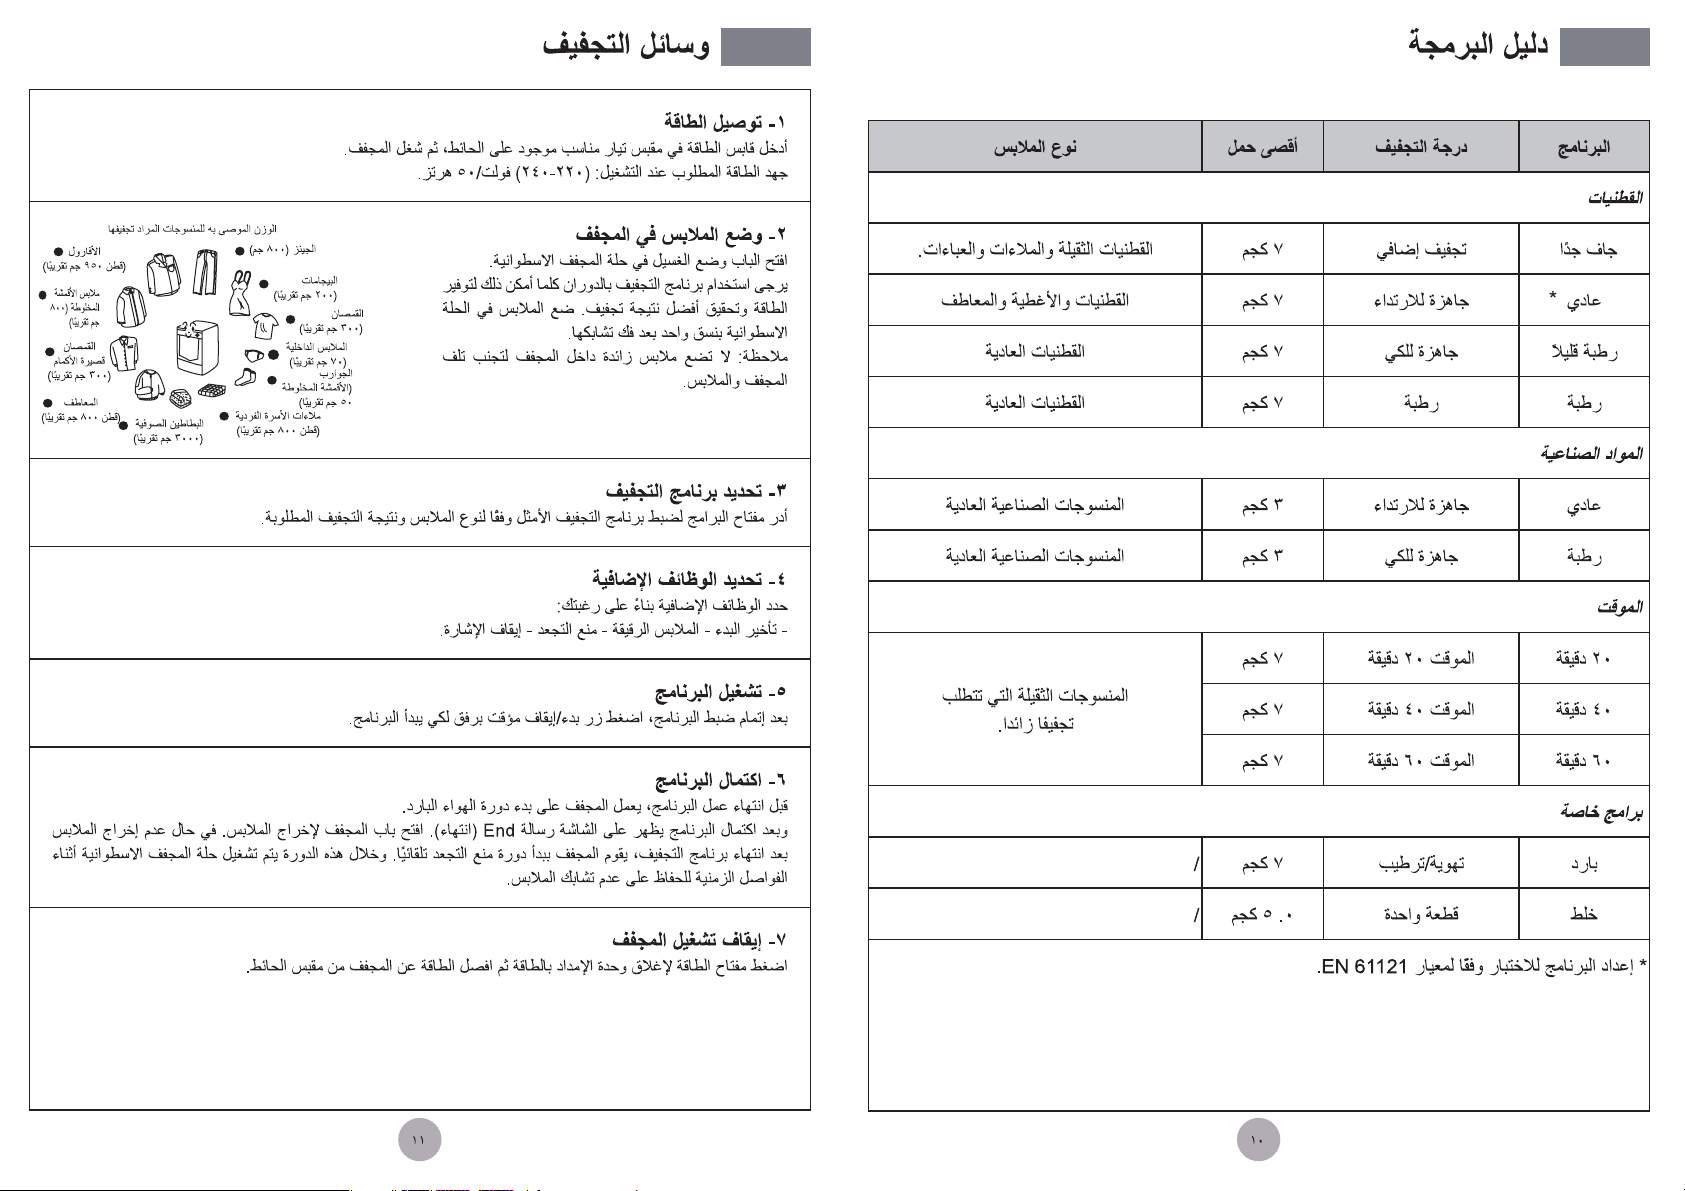
Programming guide
Drying methods
Program
Degree of drying
COTTON
Very dry
Normal
Slightly
damp
*
Extra dry
Ready to wear
Ready to iron
Damp
SYNTHETIC
Normal
Damp
Ready to wear
Ready to iron
TIMER
20 min
40 min
60 min
Timer 20 min
Timer 40 min
Timer 60 min
SPECIAL PROGRAMS
Cool
Mix
Refresh/Airing
One piece
Damp
Max. load
7 kg
7 kg
7 kg
7 kg
3 kg
3 kg
7 kg
7 kg
7 kg
7 kg
0.5 kg
Type of Laundry
Heavy cotton fabrics, sheets,
gowns.
Cotton fabrics, sheets, coats
Ordinary cotton fabrics
Ordinary cotton fabrics
Ordinary synthetic fabrics
Ordinary synthetic fabrics
Heavy fabrics, needing
further drying.
/
/
1.Turning on power
Insert the power plug into an appropriate wall socket and turn on the power.
.
Operating power supply: (220-240)V/50Hz.
2. Laundry loading
Open the door and place the
laundry into the drum of the dryer
To save energy and achieve a better
drying result, please spin the laundry as
dry as possible. Place the laundry evenly
into the drum after shaking them loose.
Note: Do not put excess laundry into
the dryer to avoid damage to the dryer
and laundry.
Reference weight of fabrics for drying
ƽ
Overalls
.
(cotton appr 950g)
ƽ Blended fabric
clothes
(appr 800g)
ƽ
T-shirt
(appr 300g)
Jackets (cotton
ƽ
appr 800g)
ƽ
Woolen blankets
(appr 3000g)
ƽ
Jeans
Pajamas
ƽ
(appr 200g)
ƽ Shirts
(appr 300g)
Underwear
ƽ
( appr 70g)
Socks
ƽ
(blended fabrics
appr 50g)
Single bed sheets
ƽ
(cotton appr 800g)
g
3. Setting drying program
Turn the program knob to set an optimal drying program according to the
laundry type and the drying result required.
4. Selecting additional functions
According to your desire, select from the additional functions:
- Start Delay,- Delicate,- Anti-crease,- Signal Off.
5. Program operation
After a program is set, gently touch the Start/Pause button to start the
program
6. Program completion
Before the drying program ends, the dryer will enter the cold air cycle.
After the program is complete, the display screen will display "End." Open
the door to remove the laundry.If the laundry is not removed after the drying
program is complete,the dryer will start the anti-crease protection cycle
automatically.In the ant
i-crease protection cycle, the dryer's drum will run at
.
a set interval to keep your laundry loose.
* Programme setting for testing in accordance with EN 61121.
7. Turning off the dryer
Press the power keystroke to switch off the power supply and turn off the
at the wall socket.
dryer
Page 16

Cleaning and maintenance
Cleaning and maintenance
1Cleaning the surface
Wipe the body of the dryer and the control panel with a damp cloth.
Remember not use any organic solvent or corrosive agent to avoid
damage to the machine.
2. Cleaning the filter screen
To ensure a good ventilation during drying,
the filter screen must be cleaned after every
drying program is complete.
Open the door and remove the filter screen
from the machine. Open the screen and clean
off the dust on the screen with a damp cloth or a
soft brush.
3. Emptying the water collection container
During operation , steam
and is collected in the
must
be emptied after the program is complete.
-Hold the handle and pull the container outwards to
remove it. Keep it level to prevent the water
from overflowing;
-Pour away water. Note: the
water can not be used for drink or for food
processing;
-Put the
not
when the containeris full. The indicator light comes
on while the container is emptied and the dryer will
stop. It will not restart until the container is emptied.
4.Cleaning the condenser
The condenser must be cleaned monthly.
Switch off the power supply before cleaning.
-Hold the protrusions on both sides of the
lower decor panel and open it.
container back in place.If the container has
been emptied, the dryer will sound an alarm
cleaning, put the screen back in place.
After
condenses into
container
.
The
container
water
A
-Using a coin or other tool, push the slides on the cover to the position
as shown in the figure and then remove the cover;
-Turn the condenser's handle 90 degrees in the direction as shown in
the figure;
-Remove the condenser from the dryer;
-Clean the condenser with a brush or flush with a water jet;
Note: Do not use a sharp tool in cleaning the heat exchanger, because
it may damage its sealing performance;
-Put the condenser back in place and lock up the cover;
-Put the lower decor panel back in place.
B
5. Cleaning the drum
After the dryer has operated for
a time, fabric caring agents or
calcium contained in the water will
form an almost invisible layer on
the inside of the drum.
This makes the dryer not able to
reliably and accurately identify the
dryness of the laundr
of the drum, especially the stainless
steel pieces on the blades must be
cleaned regularly with a wet cloth.
y. So the inside
C
D
Page 17

Trouble shooting Trouble shooting
The following must be confirmed before calling for service:
Problem
The dryer does not
switch on
The dryer does not
switch on and the
screen displays "End"
The drying result is
not up to standard
and the drying cycle
takes too long.
● Is the power supply plugged in and switched on.
● Plug another appliance into the wall socket to
test if there is power.
● Check if a drying program has been set;
● the Start/Pause button has been pressed;
● The water collection box is full;
●
Is the door closed tightly;
●
The loaded laundry has reached the requirements
for the drying setting.
●
Is there a load in the drum.
●Have you selected the correct drying option;
●Has the filter screen been cleaned ;
●Is the condenser blocked;
● Does the amount of the loaded laundry
exceed the rated load;
● Has the loaded laundry been spun dry;
●Is the vent duct blocked;
● Does the surface of the inside of the drum
have a deposit layer forming, if so clean the
drum interior;
Possible Cause
Prompt and Alarm Information
In case of an improper operation or problem with the machine when it
operates, the code corresponding to the problem will be displayed on the
screen:
Code Category
Trouble code
E2
E5
Trouble code
Trouble code
E6
There is no change in
the temperatures of
the laundry in the tub
The thermal sensor
open-circuited or short
circuited
Cause
Drain pump fails
Solutions
Contact a professional
serviceman
Contact a professional
serviceman
Contact a professional
serviceman
The remaining time
display is halted, or the
remaining time displayed
is skipping
The remaining time will be adjusted and corrected
continuously and automatically based on the
following factors:
●Type of laundry;
●Loaded amount;
●The moist degree of laundry;
●Ambient temperature;
The automatic adjustment is a normal operation.
Page 18

Wiring circuit
Specifications
Item
Item
Type
T
HDY-C70/HDY-C70 ME
K1
NTC
NTC
PCB1
PCB1
L
L
FA-Electromagnetic interference inhibitor
FA-Electromagnetic interference inhibitor
R1ˉHeating1
R1ˉHeating1
T1ˉ Thermal cut-out
T1ˉ Thermal cut-out
PSˉDrainage pump
PSˉDrainage pump
R2ˉHeating2
R2ˉHeating2
H
H
K2
K2
PCB2
PCB2
R1 R2
R1 R2
P
P
M
M
S
S
T2ˉThermostat
T2ˉThermostat
Mˉ Motor
Mˉ Motor
K3NK3
K3NK3
FA
FA
T1
T1
T2
T2
Lˉ Lamp
Lˉ Lamp
NTCˉTemperature sensor
NTCˉTemperature senso
Hˉ Humidity sensor
Hˉ Humidity sensor
Power supply
G
G
L
L
Maximum operating current(A)
Rated load(kg)
Drying program
Maximum power(W)
Dimensions(H×D×W)mm
Waterproof level
(220-240)V/50Hz
12
7
11
2800
855h620h595
hh
IPX4
K1ˉ Door switch
K1ˉ Door switch
PCB1ǃPCB2ˉPrinted circuit board
PCB1ǃPCB2ˉPrinted circuit board
K2ˉ Level switch
K2ˉ Level switch
K3ˉ Power switch
K3ˉ Power switch
 Loading...