

Haier HDW6WH Owner's Manual
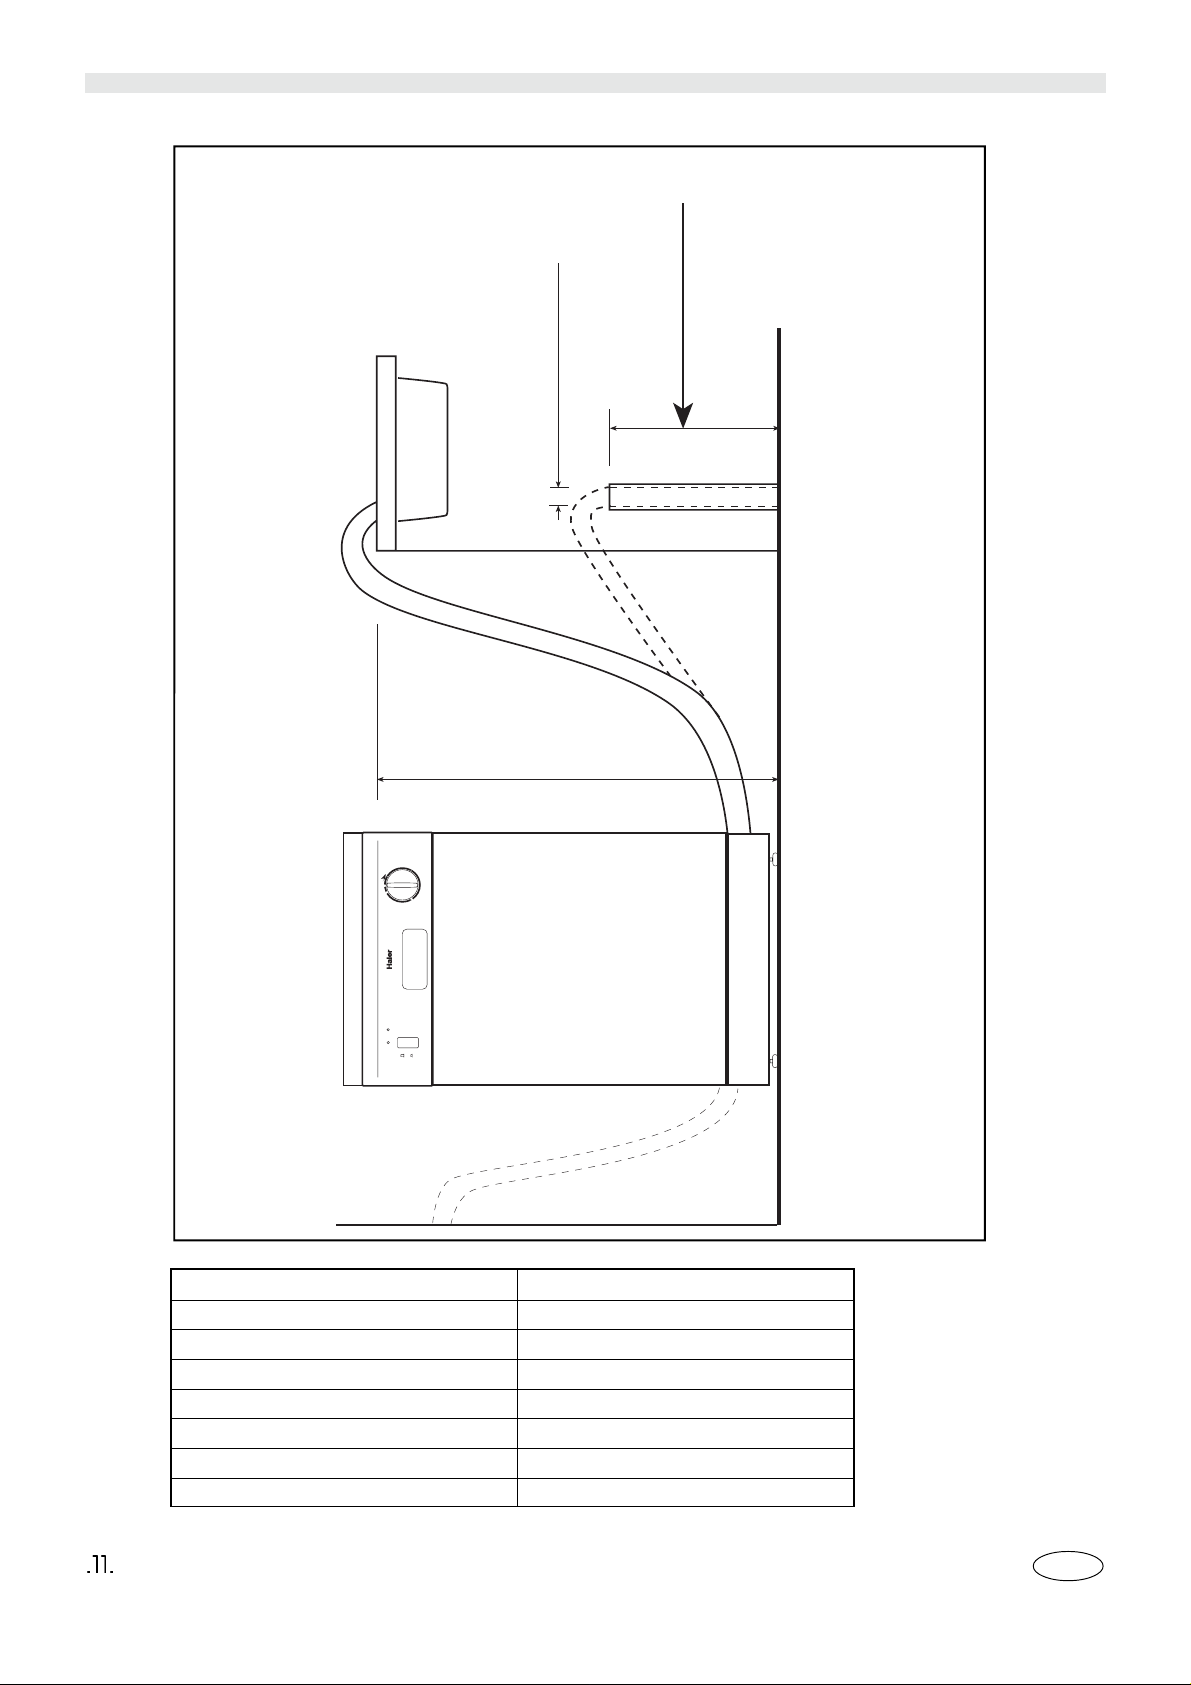
Min.height of drainp
40cm
Max.height of
drainpipe:80cm
Min.Dimension
of sewage pipe:4cm
HDW6WH
Heating
indicatorlight
OFF
ON
1¡¢Intensive
2¡¢Normal
3¡¢Rinse
4¡¢Glass
5¡¢Soak
1
2
3
4
5
Installation instructions
Width
Depth
Height 80 cm
Capacity 6 standard place settings
Mains water pressure
Power voltage 220-240V~ 50Hz
Total absorber power
Technical Characteristics
45 cm
50 cm
0.03-0.6 MPa
1650W
GB

Installation
In order to function correctly the dishwasher must be properly
installed. Specifications for the water intake and waste-water
drainage, as well as electrical connections, must fulfil the criteria that are set out in the following paragraphs and the installation instructions.
When installing the dishwasher, carry out tasks in the following order:
- Check contents of delivery upon receipt,
- Site dishwasher,
- Connect drainage hose,
- Connect inlet hose to water supply,
- Connect dishwasher to power supply.
Checking contents of delivery
All functions of your dishwasher have been thoroughly tested
in the factory. Water marks may have been left on the dishwasher as a result. They disappear as soon as the appliance
is used for the first time.
Siting the dishwasher
Dimensions associated with siting the dishwasher are contained in the installation instructions. Ensure that the appliance is completely level by adjusting the feet. Make sure that
it is standing on a firm surface.
Drainage connection
See the installation instructions for details of procedure to be
followed.
If necessary, fit a siphon trap (U-bend) with a connecting piece
for the drainage hose. Connect the drainage hose to the trap
using the enclosed parts.
Fresh-water connection
Connect the hose to a water tap using the enclosed parts and
in accordance with the installation instructions.
Water pressure:
Minimum 0.03MPa, maximum 0.6MPa.
If the water pressure is higher, install a pressure reducing valve.
Water temperature
We recommend that you use cold water.
If you do use hot water, the temperature should not exceed
60
Electrical connection
This appliance should only be connected to a 220V-240V~
source via a properly installed earth socket. See rating plate
for size of required fuse.
Disconnecting the dishwasher
Here too, it is important that tasks are carried out in the correct
sequence:
always switch off the appliance from the mains power supply
first of all.
Pull plug out of wall socket.
Turn off water supply.
Disconnect drain and water inlet hoses. Remove screws in
underside of work surface. Detach plinth, if fitted.
Pull out appliance and carefully withdraw hoses at the same
time.
Protection from freezing
temperature
If the appliance is installed in a location where there is a risk
of freezing temperature (e.g. in a holiday home), all water must
be completely drained out of the interior .
Turn OFF the tap, disconnect the supply hose and allow to
drain.
Height adjusting
- The appliance has adjustable feet and can fit in with kitchen
cabinets at a height of 800mm or 850mm.
- The original height of the appliance is 850mm. You can
adjust the height as follows.
- Screw the feet in to reduce the height.
Screw the feet out to increase the height.
- The top panel can be removed to reduce the height by a
further 30mm if required.
GB

Troubleshooting
White stains are left on crockery, glasses have a
milky appearance
- Not enough detergent was added to input compartment.
- Amount of rinse-aid was set too low.
- If you used a phosphate-free detergent, try a detergent con taining phosphates and compare results.
Dishes, cutlery, etc. have not been dried
- Selected programme did not include drying function.
- Amount of rinse-aid was set too low.
- Items were removed from dishwasher too soon.
Glasses have a dull appearance
- Amount of rinse-aid was set too low.
Items were removed from dishwasher too soon.
Tea stains or traces of lipstick
have not been completely removed.
- Detergent does not have a sufficient bleaching effect.
- Washing temperature was set too low.
Traces of rust on cutlery
- Cutlery is not sufficiently rustproof.
Glasses become clouded and discoloured; coating
cannot be wiped off
- Unsuitable detergent was used.
- Glasses are not dishwasher-proof.
Smears left behind on glasses and cutlery; glasses
have acquired a metallic appearance
- Amount of rinse-aid set too high.
Other information
Notes on disposal of your old appliance
Old appliances still have some residual value. An environmental method of disposal will ensure that valuable raw materials can be recovered and used again.
When an appliance has reached the end of its working life,
unplug it from the mains. Cut through the mains cable and
dispose of it together with the plug.
Destroy the door locking mechanism. This will ensure that children at play cannot become locked inside.
Your new appliance was protected by suitable packaging while
it was on its way to you. All materials used for this purpose are
environment-friendly and can be recycled. Please make a
contribution to protecting the environment by disposing of the
packaging. There is a risk of suffocation by the cardboard
boxes and the plastic wrapping.
GB

Troubleshooting
Resolving minor problems yourself
Experience has shown that you can resolve most problems
that arise during normal daily usage yourself, without having
to call out a service engineer. Not only does this save costs,
but it also means that the appliance is available for use again
that much sooner. The following list of common occurrences
and their remedies should help you identify the causes of most
problems.
Problem...
...When the appliance is switched on
Appliance does not start up
- Fault with fuse in mains power supply.
- Plug not inserted into wall socket.
- Appliance door not closed properly.
- Water tap not turned on.
- Blocked strainer in water inlet hose.
Caution
Do not forget that repairs should only be carried
out by a qualified specialist. Improper repairs can
lead to considerable equipment damage as well
as danger to the user.
...During washing
Unusual amount of foam is created
- Normal washing up liquid has been used in the rinse-aid
container.
Appliance stops suddenly while washing is taking
place.
- Power supply failure.
- Water supply has been interrupted.
Whistling sound can be heard while washing is taking place
- Whistling sound is caused by the seal on pump. This is not
a fault but if it continues all the time, arrange for a service
engineer to replace the seal.
Knocking sound can be heard while washing is taking place
- A spray arm is knocking against the dishes inside the
appliance.
Rattling sound can be heard while washing is taking place
- Crockey has not been stacked properly inside the appliance.
Knocking sound coming from inlet valves.
- This is caused by the water pipes in the house
and is not a fault with the dishwasher.
Lower spray arms rotates with difficulty
- Spray arm is blocked by small items or food remains.
Lid in detergent compartment cannot be closed
- Detergent compartment has been overfilled.
- Mechanism is clogged with remnants of detergent.
Remnants of detergent stuck inside dispenser
- Compartment was damp when it was filled up with
detergent.
Compartment must be dry before detergent is added.
Water remains inside appliance after programme has
ended.
- Blockage or kink in drainage hose.
- Pump is jammed.
...With the dishes, cultery, etc.
Remnants of food are stuck to the dishes, cutlery,
etc.
- Dishwasher was not loaded properly.
Jets of water could not reach all parts of the dishes, etc.
- Too many items in the rack.
- Items in the rack were touching each other.
- Not enough detergent was added to dispenser.
- Selected wash programme was not intensive enough.
- Rotation of spray arm was obstructed by dish, etc.
- Nozzles in spray arm are blocked by remnants of food.
- Coarse or fine filter or microfilter is blocked.
- Filters have been incorrectly fitted.
- Waste-water pump is jammed.
Plastic items are discoloured
- Not enough detergent was added to dispenser.
- Detergent has insufficient bleaching properties. Use a
detergent containing a chemical bleaching agent.
GB
 Loading...