

Page 1

GB
User manual
Heat-Pump-Dryer
HD80-26A
Page 2

Thank you
GB GB
Table of contents
2 3
WARNING!
Risk of injury or suocation!
Disconnect the appliance from the mains supply. Cut o the mains cable and dispose
of it. Remove the door catch to prevent children and pets to get closed in the appliance.
Legend
Warning! – Important safety information
General information and tips
Environmental information
Disposal
To protect the environment, please dispose of the
packaging materials in an environmentally friendly
manner.
Do not dispose appliances marked with this symbol
with the household waste. Return the product to your
local recycling facility or contact your municipal oce.
The heat exchanger of the dryer contains the greenhouse gas HFKW-134a. This must be disposed of
properly.
Thank you for purchasing a Haier Product.
Please read these instructions carefully before using this appliance. The instructions contain important information which will help you get the best out of the appliance and ensure
safe and proper installation, use and maintenance.
Keep this manual in a convenient place so you can always refer to it for the safe and proper
use of the appliance.
If you sell the appliance, give it away, or leave it behind when you move house, make sure
you also pass this manual so that the new owner can become familiar with the appliance
and safety warnings.
Safety ........................................................................................................................................................4
Intended use ............................................................................................................................................ 7
Product description ...............................................................................................................................8
Control panel ...........................................................................................................................................9
Special features ....................................................................................................................................14
Programmes..........................................................................................................................................15
Consumption ........................................................................................................................................16
Suggestions and tips ...........................................................................................................................17
Daily use ..................................................................................................................................................19
Care and cleaning .................................................................................................................................23
Troubleshooting ...................................................................................................................................27
Installation ..............................................................................................................................................30
Accessories ...........................................................................................................................................31
Technical data .......................................................................................................................................32
Customer Service ................................................................................................................................34
Page 3

Safety
GB GB
Safety
Before switching on the appliance for the rst time
do...
▶ make sure there is no transport damage.
▶ make sure all packaging is removed and is kept out of children´s
reach.
▶ Ensure a location which allows opening the door fully. Do not in-
stall the tumble dryer behind a lockable door, a sliding door or a
door with hinges on the opposite side of the tumble dryer door as
this limits the full opening of the tumble dryer door.
▶ install the appliance in a well-ventilated, dry place.
▶ make sure that the electrical information on the rating plate
agrees with the power supply. If it does not, contact an electrician.
▶ use a separate earthed socket for the power supply which is easy
accessible.
Only for UK: The appliance’s power cable is tted with 3-cord
(grounding) plug that ts a standard 3-cord (grounded) socket.
Never cut o or dismount the third pin (grounding). After the appliance is installed, the plug should be accessible.
▶ install or use the appliance only where the temperature is above
5 °C.
do not …
x expose the appliance to any frost, heat or direct sunlight.
x install the appliance outdoors in a damp place, or in an area which
may be prone to water leaks such as under or near a sink unit. In
the event of a water leak cut power supply and allow the machine
to dry naturally.
x place the appliance directly on a carpet, or close to a wall or furni-
ture.
x use multi-plug adapters and extension cables.
x cover any ventilation openings in the base by a carpet or similar
object.
4 5
During daily use
do ...
▶ make sure that this appliance is only used by children from the
age of 8 as well as from persons with reduced physical, sensory or
mental capabilities, or lack of experience and knowledge, if they
are supervised or have been instructed how to use it in a safe way
and understand the hazards involved.
▶ keep away children under 3 years of age from the applinace unless
they are constantly supervised.
▶ make sure children are not playing with the appliance.
▶ make sure children are supervised if they carry out cleaning and
maintenance.
▶ make sure the room is dry and well ventilated. The ambient tem-
perature should be between 5 °C and 35 °C.
▶ make sure that the ventilation slots in the base are free to allow
sucient heat transfer from inside the appliance.
▶ keep the area around the tumble dryer free of dust and lint.
▶ only touch the mains plug with dry hands and do not touch or use
the appliance if you are barefoot or have wet or damp hands or
feet.
▶ make sure that there is only only laundry inside the appliance and
no pets or children before you use it.
▶ only dry textiles washed in water.
▶ make sure not to load more than nominal load.
▶ remove all items such as lighters and matches from pockets.
▶ use fabric softeners or similar products as specied by the
manufacturer´s packaging.
▶ clean the lint lter and the condenser lter after each programme
(see CARE AND CLEANING).
▶ switch o the appliance after each drying programme and before
undertaking any routine maintenance and disconnect the appliance from the electrical supply to save electricity and for safety.
▶ hold the plug, not the cable, when unplugging the appliance.
▶ replace a damaged supply cord only by the manufacturer, its ser-
vice agent or similarly qualied persons in order to avoid a hazard.
Page 4
Safety
GB GB
Intended use
6 7
During daily use do not …
x place heavy objects or sources of heat or damp on top of the ap-
pliance.
x use ore store any flammable sprays or flammable gas in close vi-
cinity to the appliance.
x dry following items in the appliance:
▶ Items which have been contaminated with inflammable sub-
stances such as cooking oil, acetone, alcohol, benzine, petrol,
kerosene, spot removers, turpentine, waxes, wax removers
or other chemicals. The fumes can cause a re or explosion.
These items must always be washed rst by hand in hot water with an extra amount of detergent and then be dried in the
open air before drying in the appliance.
▶ Items which contain padding or llings (e.g. pillows, jackets), as
the lling can get out with the risk of igniting in the dryer.
▶ Items which contain a large proportion of rubber, foam rubber
(latex foam) or rubber like materials such as shower caps, waterproof textiles, rubberised articles and items of clothing and
pillows with foam rubber lling
.
x touch the rear wall and the drum during operation; they are hot.
x drink the condended water.
x use the appliance without the lint lter or condensor lter in place
or with damaged lter.
x leave the appliance unattended during run time for some time. If
a long absence from the appliance is intended, the drying cycle
have to be interrupted by switching o the unit and unplugging the
mains.
x use industrial chemicals to clean the appliance.
x use water spray or steam to clean the appliance.
x try to repair the appliance by yourself. In case of repair please con-
tact our customer service.
Notice
The appliance contains the fluorinated greenhouse gas HFKW-134a (GWP:1430). This
gas is hermetically sealed.
Intended use
This appliance is intended for drying items which have been washed in a water solution and
are marked on the manufacturer‘s care label as being suitable for tumble drying.
It is designed exclusively for domestic use inside the house. It is not intended for commercial or industrial use. Changes or modications to the device are not allowed. Unintended
use may cause hazards and loss of of all warranty and liability claims.
Standards and directives
This product meets the requirements of all applicable EC directives with the corresponding harmonised standards, which provide for CE marking.
WARNING!
▶ Do not switch o the appliance except drying cycle is nished, un-
less all items are quickly removed and spread out that the heat can
be released
▶ Do make sure not to damage the electric cable and the plug. If
damaged have it replaced by an electrician.
Environmentally responsible use
▶ Thorough drainage: Spin the laundry with the maximum spin speed.
▶ Maximum load: Use the maximum lling amount according to the programme table,
but do not overload the dryer. To take advantage of the maximum load, the laundry
which should be dried „READY to STORE“, can be rst dried easily with „READY to
IRON“. At the programme end remove the laundry which should be ironed and dry the
remaining laundry then to end.
▶ Loosen up the laundry: Shake out the laundry before putting them into the dryer.
▶ Avoid excess drying: An excessive drying should be avoided. Select the right pro-
gram and the appropriate dry level.
▶ Softener unnecessary: Do not use softener when washing, because the laundry will
become fluy and soft in the dryer
▶ Cleaning of the lint lters: Clean the lint lters after each cycle.
▶ Ventilation: Make sure the appliance is properly ventilated (see INSTALL ATION).
▶ Condensed water reuse: The collected condensed water can be used for the steam
iron. Before it should be poured through a ne sieve or coee lter paper. Smallest
parts will be retained by the lter.
Page 5

Product description
GB GB
Control panel
8 9
VORDERANSICHT
1
2
3
4
6
5
10
97
8
10
Fig.1: appliance front
Fig.2: appliance backside
Fig.3: Accessories
Fig.4: control panel
This drawing may be slightly dierent from the layout of the drying machine you have just
purchased.
1 Water tank
2 Rating plate
3 Service flap
4 Control panel
5 Door
6 Ventilation slots
7 Power cord
8 Back cover
9 Drainage outlet
10 Adjustable feet
Dryer rack
User manual
Warrant card
Accessories
Check the accessories and literature in accordance with this list.:
Drain hose (op-
tional)
Energy lable
1-Child lock indicator
This option blocks all panel elements against activation. After switching on the dryer press simultaneously
“Function“+“Selection“ for about 3 seconds (g. 5); the
child lock indicator lights up. For unlocking please press
again the two buttons.
The icon flashes if a button will be pressed or the programme selector will be twisted, when the child lock is
activated. The change is not running.
Timer
Timer Temp.Dry LevelSelectionFunction
功能 选择 烘干等级 温度 时间
时间
+
+
emo
Function Zeitvorwahl
ECO
Level Option
Selection
5
1 Child-lock indicator
2 Maintenance indicators
3 Memory mode indicator
4 Display
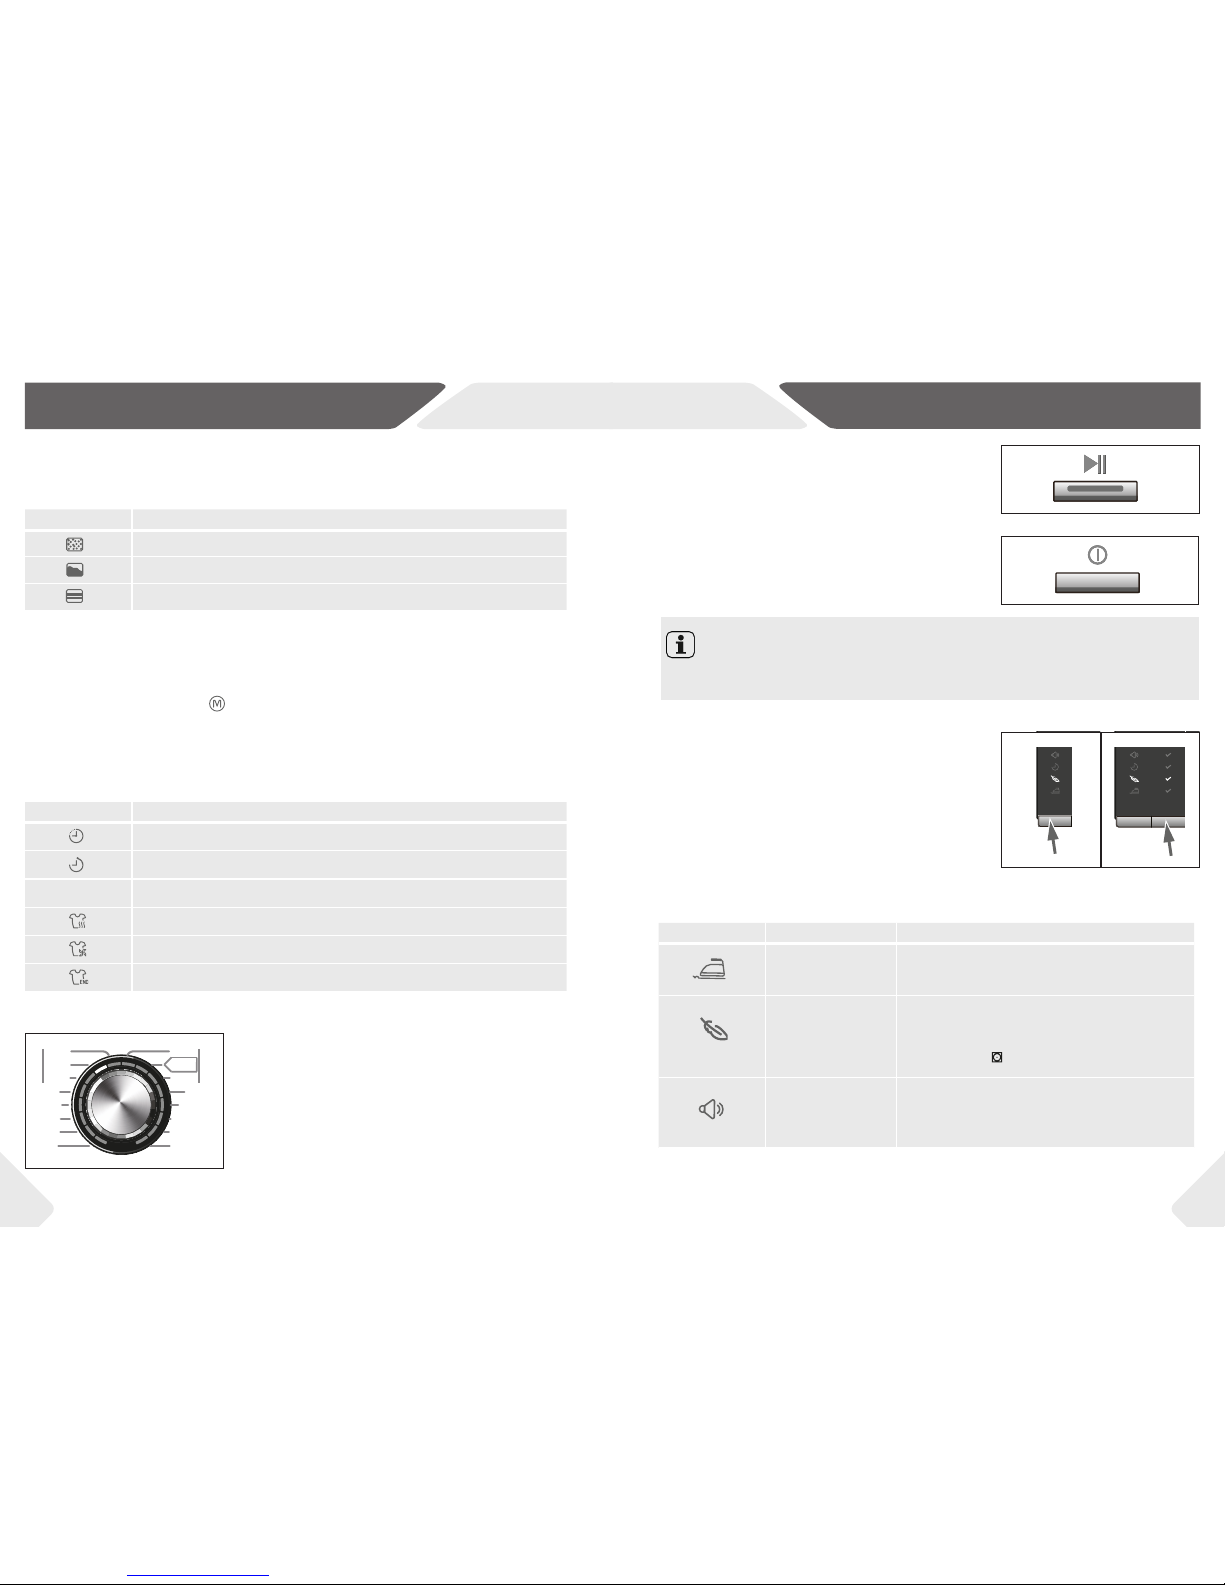
5 Programme selector
6 Start/Pause button
7 On/O button
8 Function button
9 Selection button
10 Dry Level button
11 Mode button
12 Timer button
13 Memo button
Notice
▶ When the cycle ends or the power supply is interrupted, the function will not be can-
celled automatically.
▶ We recommend to switch on this function if there are children in the household.
▶ The On/O button can be activated during function child lock is selected..
+
+
emo
ECO
Timer ModeDry LevelSelection
Function
Extra Dry
Wool
Shoe
Sport Microfiber
Baby
Garment
Towel
Mix
Duvet
Ready to
Store
Ready to
Iron
Synthetic
Extra Dry
Cotton
Ready to
Iron
Ready to
Store
Ultra Care
Underwear
7
6
2
4
5
1
9
10
1
1
12 13
3
8
Notice
The buttons 8-13 on the control panel are sensor keys, which already respond when
lightly touched with the nger.
Page 6
Control panel
GB GB
Control panel
10 11
2-Maintenance indicators
The indicators light up in order to remind that the lter must be cleaned and the water
tank must be emptied (see CARE AND CLEANING).
Meaning of icons:
illuminated LED Meaning
Clean the lint lter in the lling opening.
Empty the water tank or check it for correct positioning.
Clean the condensor lter in the base.
If the indicators of cleaning lters light up during the cycle, the drum lamp lights up too.
Please clean the lters.
Additionally see CARE AND CLEANING.
3-Memory mode indicator
If this indicator lights up, the memory mode is set or activated. (see MEMO button)
4-Display
The display shows following information:
illuminated LED Meaning
Remaining programme cycle time in hours + minutes, e.g. 1:59
Remaining time in hours of a delayed programme starts, e.g. 13:00
F4 Error codes (see TROUBLESSHOOTING)
Programme cycle drying
Programme cycle cooling
End of Programme
By turning the knob one of 16 programmes can be selected (g. 6). The default settings will be displayed.
6
Extra Dry
Wool
Shoe
Sport Microfiber
Baby
Garment
Towel
Mix
Duvet
Ready to
Store
Ready to
Iron
Synthetic
Extra Dry
Cotton
Ready to
Iron
Ready to
Store
Ultra Care
Underwear
Symbol Function Meaning of symbols
Anti crease function
Anti-crease function at the end of programme increases by 60 minutes.
Delicate function
Function for delicate fabrics like synthetics, acryl etc.
It lowers the temperature and lengthens the drying
cycle time. always this function should be used for
fabrics with icon
on the laundry lable.
Signal function
An acoustic signal occurs when you press a button or
turn the programme knob. In addition the signal ap-
pears in case of failures.
7-On/O button
Touch this button to switch on or switch o the appliance (g. 8). For switch o press the button for at least
2 seconds.
8
6- Start/Pause button
Press this button gently (g. 7) to start or interrupt the
currently displayed programme. During operation its
LED is shining, or if interrupted blinking.
7
5-Programme selector
8 and 9-Function and Selection button
These buttons allow to select various functions to the
programme.
1. Touch sequentially Function button (g. 9) until
the required symbol is flashing in the display.
2. Touch Selection button (g. 10) for activating the
choosen function- corresponding icon lights up.
Additional a checkmark is set in column Selection.
3. Use the same method continue to select other
function as you need.
TimerTimer Temp.Dry LevelSelectionFunction
功能 选择 烘干等级 温度 时间 时间
+
+
emo
Function Zeitvorwahl
ECO
Level Option
Auswahl
1.
TimerTimer Temp.Dry LevelSelectionFunction
功能 选择 烘干等级 温度 时间 时间
+
+
emo
Function Zeitvorwahl
ECO
Level Option
Selection
2.
9
10
Notice
After each switch-on, the appliance suggests the economical programme “CottonReady to store“ for drying normal wet cotton laundry.
Page 7

Control panel
GB GB
Control panel
12 13
Notice
Depending on the programme, dierent functions are combined. The display shows
only those functions that are compatible with the selected programme.
The additional function must be selected before starting the programme.
Meaning of the symbols:
Illuminated LED Dry level Meaning
Extra dry
Dry level for thick or multi-layered textiles, which are to be
dried out.
Ready to wear
Dry level for linen, which should not be ironed, and which
you want to placed immediately into the cabinet (such as
towels, non-iron synthetic fabrics etc.).
Ready to iron
Light to medium weight fabric, which should be ironed
with the iron/ironing machine.
The selected dry level determines the residual moisture content of dried laundry. The
lower the desired residual moisture content, the longer the drying time.
The residual moisture content of dried laundry depends on several factors like e.g loading, textile art, room temperature etc.
Symbol Function Meaning of symbols
Delay function
Programme starts later.
1. Choose a programme.
2. Activate delay function.
3. Turn the knob to the right to set time after
which the programme should be nished.
(in 1 intervals up to 19 hours).
4. Press „Start/Pause“ button.
With this button (g. 11), the desired dryness level can
be selected for some programs. Press sequentially the
Dry Level button until the desired symbol flashes on
the display
12-Timer button
With this button programme TIME can be selected.
1. Press the TIMER button (g. 13) for activation programme TIME. The default time is 20 min.
2. By turning the program knob afterwards the time
can be increased or decreased with steps of 10
minutes. The shortest time is 10 min and the longest time is 02h:30 min.
3. Start the programme by pressing the „Start/
Pause“ button
Timer
Timer
时间
时间
+
+
Timer
1.
Extra Dry
Wool
Shoe
Sport Microfiber
Baby
Garment
Towel
Mix
Duvet
Ready to
Store
Ready to
Iron
Synthetic
Extra Dry
Cotton
Ready to
Iron
Ready to
Store
Ultra Care
Underwear
2.
14
13
11-Option button
This button (g. 12) allows to select various options for
some programmes.
The symbols mean:
TimerTimer Temp.Dry LevelSelectionFunction
+
+
emo
ECO
Level Option
12
Illuminated LED Term Meaning
ECO
ECO To save enery.
Short
For drying in a shorter time at a higher level of energy
consumption.
Balance
A balance of drying time and enery consumption between
and ECO.
Cool air Cool air, for airing of dry, worn cloths.
Notice
The “ Delay function” can not be memoried.
13-Memo button
A program with all of its settings can be saved for reuse
by touching this button (g. 15).
1. Set the programme with all desired functions.
2. Press the button „Memo“ for 2 sec. The indicator
lights up.
When you want to use the stored cycle you just only
touch the „Memo“ button. The indicator lights up and
the stored cycle is activated.
Timer
+
+
emo
15
10-Dry Level button
TimerTimer
Temp.Dry LevelSelection
选择 烘干等级 温度
时间 时间
+
+
emo
ECO
Dry Level Option
Auswahl
11
Page 8

Special features
GB GB
Programmes
14 15
To use the dryer rack
1. Open the dryer door.
2. Make sure the drum is empty.
3. Make sure the dryer rack is not
damaged.
4. Put the dryer rack into the drum
(g. 16). Make sure the rack is
correctly inserted at all 3 points of
attachment (Pos. no. 1 and 4)
5. Loosely insert the laundry items
on the rack.
6. For sport shoes: Pull out the
tongue and remove laces and in-
soles.
7. Select programme WOOL, SHOE
or ULTRA CARE.
Dryer rack
The dryer rack is designed for use with items which are not recommended for tumble drying such as delicate fabrics such as lingerie. Wool textiles can be refreshed. Harmful movements of the bres will be avoided because the basket is xed in the drum and will not
rotate.
Also the rack allows to dry sport shoes made of plastic/synthetic leather and textile, which
would damage the drum without using the rack.
1+ 4 Fixing point
2 drum opening
3 dryer rack
5 lint lter
1)
Dry level:
Extra Dry, Ready to Store, Ready to Iron
2)
For this program the rack must be used.
3) This program has reversing function specially for big load.
CAUTION!
▶ Do not use this dryer rack when there are other clothes in the dryer.
▶ During drying, please make sure the items are placed on the rack with no risk of en-
tangling the baffles while the drum is rotating.
▶ The dryer rack must be used with the WOOL, SHOE and ULTRA CARE cycle.
▶ Maximum weight of wet items: 1.5 kg or one pair of shoes.
16
Programme
Max.
load
in kg
Laundry Dry level
1)
Cotton
Extra Dry
8.0
Cotton
Laundry of varying thickness and multi-layered
garments, such as bathrobes, however no
shirts
Ready to Store 8.0
Cotton
Terry towels, shirts
Ready to Iron
8.0
Cotton
Bed linen, table linen, kitchen towels, which
should still be ironed..
Mix
4.0
Mixed loading of textiles made of cotton and
synthetics
Duvet
1.0
Textiles and quilted pillows and duvets with
down lling
-
Microber
2.0
Functional clothing made of microbre
Underwear
2.0
Underwear made of cotton
Ultra Care
2)
1.0
Delicate, lingerie, chion textiles
-
Baby Garment 4.0
Baby garment made of cotton
Shoe
2)
1 Paar
Shoes made of fabrics such as. sports shoes,
sneaker
-
Sport
2.0
Light sportswear, such as tracksuits
Towel
3)
4.0
Towels, bathrobes
Wool
2)
1.0
For refreshing of wool textiles after air drying.
The wool is soft and comfortable to wear
no drying
only refresh-
ing
Synthetic
Extra Dry
4.0
Easy care textiles
made of synthetic or mixed bres (non-iron),
e.g. bed and table linen, shirts
Ready to Store
4.0
Easy care textiles
made of synthetic or mixed bres, e.g. bed and
table linen, sweater
Ready to Iron
4.0
Easy care textiles
made of temperature-sensitive textiles which
should be ironed.
Time-prgramme
(TIMER)
4.0
All kind of garments (except for wool and silk),
which should be individually dried,
-
Page 9

Consumption
GB GB
Suggestions and tips
16 17
The indicated consumption values may accordingly dier to local conditions.
Programme Spin speed
in rpm *
Restidual
moisture
in %
Time
in h:min
Energy
consumption
in kWh
Cotton 8 kg with activated option „ECO“
Extra Dry
1400 approx. 50 3:10 1.20
1000 approx. 60 3:44 1.56
Ready to Store
1400 approx. 50 2:50 1.04
1000 approx. 60 3:18 1.33
Ready to Iron
1400 approx. 50 2:15 0.81
1000 approx. 60 2:36 1.05
Synthetic/ easy care textiles 4 kg with activated option „ECO“
Extra Dry
1200 approx. 40 1:34 0.57
800 approx. 50 1:57 0.72
Ready to Store
1200 approx. 40 1:24 0.46
800 approx. 50 1:35 0.60
Ready to Iron
1200 approx. 40 1:07 0.41
800 approx. 50 1:21 0.49
*
* Standard programme for the energy labelling according to 392/2012 EU: Cotton Ready to Store
+ option “ECO”.
This programme is suitable for drying normal wet cotton laundry and it is the most ecient pro-
gramme in terms of energy consumption for cotton The actual energy consumption per cycle depends on the type of use of the appliance.
Starched laundry
Starched laundry leaves a lm of starch in the drum and is not suitable for the dryer.
Softener
Do not use softener when washing, because the laundry will become soft and fluy in the
dryer.
Soft care cloths
The use of “soft care cloths” can lead to a coating at the lint lters. This can cause a blockage of the lters. In such cases, we recommend either to abstain from adding soft care
cloths or to choose a dierent brand. In any case note the manufacturer’s instructions.
Small amounts of lling
In a quantity of less than 1.0 kg, a TIME-programme should be selected because the automatic scanning of the dry level can be captured only still inaccurate.
Open door
The door should be left ajar during the non-use, so that the door seal indenitely remains
in eect.
Drum interior light
When the appliance is switched on, always the drum interior light lights when door is open
Service ap
Make sure that the service flap is always closed during operation.
Anti crease protection
If at the end of the program the laundry is not removed, the drum moves from time to time
to prevent creasing. The anti crease protection phase is approx. 60 minutes. If the anticrease function has been chosen the period extended to 120 minutes.
Laundry which should be ironed
...should be dried with level READY to IRON . This facilitates ironing by hand or using
the machine.
Remaining time
The display refers to the maximum load of the selected program and is based on a laundry
composition according to standard. The program duration is influenced by the following
factors: the type of fabric, the lling quantity, absorptive capacity, the desired dry level, as
well as the spin speed of the washing machine. These factors are registered by the electronics during the programme and the remaining time will be corrected accordingly.
Extra large pieces
tend to wind up. If therefore the desired dry level could not be reached, loosen up the laundry and dry again with the time programme (TIMER).
Page 10

Suggestions and tips
GB GB
Daily use
18 19
Especially delicate fabrics
Textiles which can easily shrink or lose their shape, as well as e.g. silk stockings, lingerie
etc. should not be put in the dryer. Put delicate garments inside a laundry bag and avoid
overdrying them.
Jersey and knitwear
should be dried at READY to IRON to avoid shrinkage. A subsequent stretch or pull into
form should be performed.
Flu
The amount of lint in the lint lters is not attributable to the wash stress in the dryer; rather,
it is extracted bers from the wearing and washing. During drying on the line, the flu will
be carried away by the wind. By using a tumble dryer the flu will be collected in the lters.
Preparing the laundry
▶ Sort clothes according to fabric(cotton, synthet-
ics, wool etc.) desired dry level and equal residual
moisture (g. 21).
▶ Follow the instructions on the laundry label and
dry only machine-dryable garments.
Preparing the appliance
1. Connect the appliance to a power supply (220V
to 240V~/50Hz) (g. 17) Please refer also to section INSTALL ATION.
2. Make sure:
▶ the water tank is empty and properly installed.
(g. 18).
▶ the lint lter is clean and properly installed. (g.
19).
▶ the condenser lter is clean and properly in-
stalled.(g. 20).
17
18
20
19
17
20
CAUTION!
Non-textile, as well as small, loose or sharp-edged items may cause malfunctions and
damage of clothes and appliance.
▶ Empty pockets of all sharp or flammable objects (coins, keys, paper tissues, lighters,
matches etc.) and remove harder decorative objects (brooches etc.) (g. 22).
* In addition choose
Delicate function
** Air-dried wool fabrics can be erected in programme WOOL again
Symbol Meaning Symbol Meaning
Dry at normal temperature (full
power); E.g. for cotton linen
Line drying
Flat drying
Dry with low temperature; for easy-
care linen *
Drip flat drying
Iron at 110 °C
Do not tumble dry. E.g. wool and
textiles containing wool, silk **
Iron at 150°C
Iron at 200°C
Do not iron
21 22
Page 11

Daily use
GB GB
Daily use
20 21
Tips:
▶ Separate white clothes from coloured ones.
▶ Unfold large items such as bed sheets, table cloths, etc.
▶ Bed linen and pillowcases should be button, so that small parts cannot collect inside.
▶ Close zippers and hooks, and tie loose belts without metal parts, apron strings etc.
together.
▶ Place small items such as socks, belts, bras, etc. in a wash bag
▶ Make sure all buttons are sewn on tightly
▶ Sew or remove loose metal parts of garments, such as e.g. metal buttons, bow of
bras before inserting. Otherwise such parts can cause noise and damage the drum.
▶ Do not over-dry easy-care linen. Risk of the crease. Allow nal drying at the air.
▶ Knitwear (e.g. T-shirts, underwear) sometimes run up during drying. Only use dry level
READY to IRON
and drag in the form afterwards.
▶ For pre-dried, multi-layered garments or for nal drying the time-programme
(TIMER) should be chosen.
Loading the appliance
▶ Loosen up and insert presorted laundry.
▶ Don‘t overload.
▶ Close the door carefully. Make sure that no pieces of laundry are pinched.
Removing and adding laundry
WARNING!
Never turn the dryer o before the end of the drying cycle unless all items are quickly
removed and spread out that the heat can be released.
To remove or add laundry the program can be interrupted at any time:
▶ Open the door. The cycle interrupts.
Be careful when removing or adding the laundry! The Interior of the drum or the laundry itself may be hot, so that there is danger of burns
▶ To continue the program, press the “Start/Pause” button after closing the door.
Switch on the appliance
Press the „on/o“- button to switch on the appliance.
(g.: 23).
Additional settings
Choose additional settings (g.: 25); see section
CONTROL PANEL.
26
TimerTimer Temp.Dry LevelSelectionFunction
功能 选择 烘干等级 温度 时间 时间
+
+
emo
Function Zeitvorwahl
ECO
Level Option
Auswahl
25
Select a programme
To get the best drying results, select a programme
which ts the dry level and sort of laundry type.
Turn the programme knob to select the right programme (g.: 24). The default settings light up in the
display. If there are options available, the option proposed by the appliance will be displayed by a flashing
symbol. The display shows the time until the end of the
programme.
Start programme
Touch “Start/Pause“ button to start (g.: 26).
Appliance operates according to present settings.
Changes are only possible by cancelling the programme.
Interrupt/ change/ cancel a programme
To interrupt a running programme press “Start/Pause“.
The LED of this button is flashing.
Changes or setting a new programme are now possible. Press the button “Start/Pause“
again to continiue the programme with the new settings.
Hold the button „On/O“ for two seconds in order to cancel the programme.
23
24
Extra Dry
Wool
Shoe
Sport Microfiber
Baby
Garment
Towel
Mix
Duvet
Ready to
Store
Ready to
Iron
Synthetic
Extra Dry
Cotton
Ready to
Iron
Ready to
Store
Ultra Care
Underwear
Notice
▶ After each switch-on, the appliance suggests the economical programme “Cotton-
Ready to store“ for drying normal wet cotton laundry.
▶ The displayes remaining time is a default value, this time will be re-calculated de-
pending on additional program settings and the moisture content of the laundry. See
SUGGESTIONS AND TIPS.
Page 12

Daily use
GB GB
Care and cleaning
22 23
Empty the water tank
During operation, steam condenses to water which is collected in the water tank. The tank
must be emptied after each drying cycle. The flashing LED will remind you.
If the tank will not emptied:
▶ the lamp
will flash during the programme.
▶ an acoustic signal will sound.
▶ the programme will automatically interrupted; the laundry remains wet.
▶ the „Start/Pause“ button must be pressed after the tank was emptied in order to con-
tinue the programme.
WARNING!
Do not use the water for any kind of drinking or food processing.
CAUTION!
Following maintenance activities must be carried out after each drying cycle.
▶ Empty the water tank
▶ Clean the lint lter
▶ Clean the condenser lter
1. Pull out the water tank from its housing. Hold the
tank horizontally (g.: 34).
2. Empty the water tank into a sink (g.: 35).
3. Reinstall the water tank to the tumble dryer. (g.:
36).
The tank can also be emptied during program. To continue the program the “Start/Pause” button has to be
pressed after the tank has been reinstalled.
The symbol
only switches o after the appliance
was turned o.
34 35
36
Notice
The condensed water can also be derived by a drain hose (enclosed or as an optional
accessory available at the customer service). The tank needs no longer be emptied (see
section ACCESSORY).
After drying
The tumble dryer stops operation automatically when a dry cycle is complete.. The display
shows END.
27 28
Notice
The last part of the drying cycle occurs without heat (cool down cycle) to ensure remaining the garments at a temperature which does not damage them.
1. Press “On/O“ button to switch o the appliance.
(g.: 27).
2. Remove laundry as soon as possible to go easy
on it and to prevent more wrinkling (g.: 28). If the
laundry is not removed the anti-crease program
starts automatically. In anti-crease phase, the
drum will rotate 30 sec. in each 5.5 minutes, the
total phase time will last for 1 hour.
3. Unplug the power cord
(g.: 29).
4. Empty the water tank
(g.: 30).
5. Clean the lint lter in the lling opening (g.: 31).
6. Clean the condenser lter
(g.: 32).
7. Open the door to prevent formation of moisture
and odours. Let it open while not used (
g.: 33).
29 30
31 32
33
Standby mode / power- saving mode
The switched on appliance will go into standby-mode if it will not be activated within 5
minutes before starting the program or at the end of program. This saves energy. To interrupt the standby-mode push the “On/O button.
Page 13

Care and cleaning
GB GB
Care and cleaning
24 25
Fiber abrasion results because of wearing and washing
the laundry. These bers (flu) will be collected during
the drying process in the lint lter. The lint lter in the
lling opening must be cleaned after each drying cycle
to ensure proper air circulation. The shining LED
will remind you.
1. Re move the lint lter from the drum (g.: 37).
2. Open the lint lter (g.: 38 and 39) and remove all
lint residuals. By using a damp cloth or moistened
hand the flu will be remove easily
Detergent residue may be form coating at the flu
lter. In this case, the lter must be cleaned with
warm water and a soft brush.
3. Reinstall the cleaned lint lter in the tumble dryer
(g.: 40). The symbol
only switches o after the
appliance was turned o.
4. Occasionally the flu around the housing of the
lter as well as on the seal should be removed (g.:
41).
WARNING!
Do not operate the dryer without or with damaged lint or condenser lter.
The tumble dryer is equipped with a lter system to
protect the heat pump from dirt. This is located in the
base of the appliance. Gradually also at this place larger
amounts of flu will be accumulated and may aect
the proper function of the appliance. .
If the maintenance indicator
flashes, the condenser
lter must be cleaned.
1. Open the Service door (g.: 42).
2. Open the four levers (g.: 43).
3. Pull out the condenser lter from its housing (g.:
44).
4. Remove the rear lter screen (g.: 45/46).
5. Clean the condenser lter from any residuals with
a damp cloth or moistened hand. If the lter is very
dirty, it can be cleaned under running water.
6. Reinstall the rear lter to the condenser lter (g.:
47).
7. To reinstall the condenser lter, follow the above
steps 3 to 1 in reverse order. The symbol
only
switches o after the appliance was turned o.
42 43
44
45
46 47
37 38
39
40
41
Clean the machine
▶ Use a soft cloth with soap liquid to clean the ma-
chine case and rubber components (g.: 51).
▶ Do not use organic chemicals or corrosive sol-
vents.
Notice
During the drying, moisture may accumulate between windows and seal. It does not affect the function of the dryer.
Clean the front of the heat exchanger
Approximately all 10 drying cycles the front of the
heat exchanger should be cleaned from flu by using
a sponge or vacuum cleaner (g.: 48/49). Please use
household gloves. The flu can remove easiely when
they have been sprayed with water previously.
On this occasion the ventillation slots should be vacuumed also (g.: 50)
48 49
50
WARNING!
Unplug the machine during cleaning and maintenance.
Clean the drum
▶ After some operation time, fabric care agents or
calcium contained in the water can form an almost
invisible lm on the inside of the drum. Use a damp
cloth and some detergent to remove it (g.: 52). Do
not use any organic solvent or corrosive agent to
avoid damage to the appliance.
▶ Remove metal parts such as needles, coins, etc.
from the drum which were accidentally dried with
the laundry, because it can cause rusting.
▶ For removing rust stains, use a non-chloride clean-
er. Note the safety instructions of the cleaning
agent manufacturer!
▶ Do not use any hard objects or steel wool for clean-
ing.
52
51
Clean the lint lter
Clean the condenser lter
Page 14

Care and cleaning
GB GB
Troubleshooting
All other Alarmcodes:
1. Note Alarmcode
2. Contact Service ; refer to CUSTOMER SERVICE.
26 27
Long periods of disuse
If the appliance is not in use for a long time :
1. Empty the tank.
2. Set any programme.
3. Start the programme. The residual water will be pumped into the tank.
4. Stop the programme after some minutes or wait until programme nished automatically. Empty the tank again.
5. Pull out the electrical plug.
6. Open the door to prevent formation of moisture and odours. Let door open while not
used.
Before next usage check carefully the power cord.
Troublesshooting without display-codes
Problem Possible cause Possible solution
Tumble dryer fails to
operate
• Programme is not yet started?
• Delay function is activated?
• Door is not properly closed?
• Machine has not been switched
on?
• „Start/Pause“ button was pressed?
• Appliance is connected to the
power supply?
• The water tank is full or not properly installed?
• Child lock is activated?
• Check programme and start it.
• Cancel the delay start.
• Close the door properly.
• Switch the machine on.
• Press „Start/Pause“ button.
• Check power supply.
• Empty the water and install
it properly; press the „Start/
Pause“-button.
• Deactivate child lock.
Many occuring problems could be solved by yourself without specic expertise. In case
of a problem please check all shown possibilities and follow below instructions before you
contact an after sales service. See CUSTOMER SERVICE.
Display-codes
Code Cause Solution
E6
Filters are clogged. Clean lters.
E7
Under voltage or over voltage fault.
Check the voltage of power supply.
E8
Over load warning. • Check the voltage of power supply
• reduce the load and restart the programme.
F2
The water tank is full. • Empty the tank.
Lo
Ambient temperature is too low. Only use the dryer at ambient temperatures
higher than 5 °C.
Should the error codes reappear even after the taken measures, switch o the appliance,
disconnect the power supply and contact the customer service.
WARNING!
▶ Before maintenance, deactivate the appliance and disconnect the mains plug from
the mains socket.
▶ Electrical equipment should be serviced only by qualied electrical experts, because
improper repairs can cause considerable consequential damages.
▶ A damaged power cable should only be replaced by the manufacturer, its service
agent or similarly qualied persons in order to avoid a hazard.
Page 15

Troubleshooting
GB GB
Troubleshooting
28 29
Problem Possible cause Possible solution
Appliance fails to op-
erate and the display
shows End.
• The laundry has reached the dry
level dened by the programme?
• There is no laundry in the drum?
• Check the program setting and
post-dry if necessary.
• Check the drum.
The drying results
are not satisfactory. .
• The program setting is not correct?
• The correct dry level was chosen?
• The lter is dirty?
• The condenser lter is dirty?
• The heat exchanger is clogged?
• The ventilation slots are clogged?
• The tumble dryer is overloaded?
• There is a coating on the inner
surface of the drum?
• The laundry was too wet?
• Dirt is on the moisture sensor in
the drum?
• Warm laundry feels more moist
than it really is.
• Check the program setting.
• Check the dry level.
• Clean the lint lter.
• Clean the condenser lter
• Clean the heat exchanger.
• Clean the ventilation slots.
• Reduce the amount of laundry.
• Clean the inner surface of the
drum with a cloth soaked in vinegar.
• Spin the laundry properly before
drying.
• Clean the front surface of the
drum with a cloth soaked in vinegar.
• Spread out laundry that the heat
can escape. .
Drying time is too
long.*
• The condenser lter is dirty?
• The tumble dryer is overloaded?
• The laundry was too wet?
• Ambient temperature is too low?
• Clean the condenser lter
• Reduce the amount of laundry
• Spin the laundry properly before
drying.
• Pay attention to the installation
instructions. and increase the
ambient temperature, if possible.
Drying time is too
short..
• The load was too small?
• The laundry was too dry?
• For single items or small amount
of laundry the TIME programme
should be selected.
• Select the TIME programme or a
higher dry level.
Creasing at the
laundry.
• The tumble dryer is overloaded?
• The right programme was selected?
• Reduce the amount of laundry.
• Remove laundry immediately after programme end, hang them
up and pull them into shape.
• Select and adjust the programme
according to the fabric type.
Door does not close.
• Laundry is clamped between door
and gasket?
• Insert laundry correctly.
* The drying cycle is automatically cancelled after 5 hours.
Problem Possible cause Possible solution
Remaining time on
the display stops or
skips.
• The remaining time will be adjusted
continuously based upon the following factors:
- Type of laundry.
- Loaded amount.
- Moisture degree of the laundry.
- Ambient temperature.
• The automatic adjustment is a
normal operation.
The drum interior light does not
work..
• Appliance is connected to the
power supply?
• The appliance has been switched
on?
• The light bulb is still functional?
• Check power supply
• Switch the machine on.
• Contact the customer service to
replace the lamp.
Strong rumbling
noise
• The dryer rack is not properly installed.
• Correct the seat of the dryer rack.
In case of power failure
In case of power failure, the current programme is stored only for a short time. Usually, a
restart of the program is required.
WARNING!
Quickly remove all items and spread them out that the heat can be released.
Page 16

Installation
GB GB
Accessories
30 31
Preparation
▶ Remove all packaging material. While opening the package, water drops may be
seen. This normal phenomenon results from water tests in the factory.
▶ Remove all packaging material including the polystyrene base.
Notice
Dispose of the packaging in an environmentally friendly manner. For information refering current disposal routes, consult your retailer or the local authorities.
The appliance should be placed on a flat and solid surface. Set the feet to the desired level (g.: 53).
1. The dimensions of the recess should at least
agree with the dimensions in the gure 54.
2. Put the appliance adjacent to the slot. Make sure
that all connections are easily accessible and func-
tional.
3. Adjust accurately all feet to get a rm level position.
4. Install the appliance prudently into the recess.
5. Pay attention to sucient ventilation.
Before each connection check if:
▶ power supply, socket and fusing are appropriate
to the rating plate.
▶
the power socket is earthed and no multi-plug
or extension.
▶
the power plug and socket are strictly according.
▶
Only UK: The UK plug meets BS1363A standard
Put the plug into the socket. (g.: 55).
WARNING!
If the supply cord is damaged, it must be replaced by the service agent (see warranty
card) in order to avoid a hazard!
Transport and waiting time
Transport the appliance in horizontal position only. To the maintenance-free lubrication
oil is located in the capsule of the compressor. This oil can get through the closed pipe
system during slanting transport. Before connecting the appliance to the power supply
you have to wait 2 hours so that the oil runs back into the capsule.
Connection of a drain hose
With the drain hose (included or optional available at
the customer service) the condensed water can be redirected to the drain (sink, trap or gully) . The draining
of the water tank is eliminated. Nevertheless the tank
must be installed in the control panel correctly.
1. Draw the drainpipe from the joint at the back of
the appliance.
2. Connect the accessory drain hose to the discon-
nected drainpipe. Make sure both tubes are rmly
xed.
3. The outlet of the drain hose must not be higher
than 1.0 m above the floor. If necessary the hose
can be shortened.
4. Secure the drain hose against slipping.
56 57
58 59
CAUTION!
▶ Use only the accessory hose set for the connection.
▶ The drain hose is never to be crushed, kinked, or twisted
▶ The drain hose is not to be extended.
▶ Secure the drain hose against slipping. Otherwise the hose can slide o and running
condensed water may cause damage.
Wash-dryer stack
The arrangement to a space saving wash-dryer stack
is possible. Not every washing machine is suitable for
this purpose. Information, as well as the corresponding
mounting kit are available at the customer service.
The mounting instructions supplied with the kit care-
fully inform about the installation steps.
60
Aligning the appliance
53
Installation under worktop
54
Electrical connection
55
Page 17

Technical data
GB GB
Technical data
32 33
Dimensions - HxDxW in mm 845 x 650 x 595
Power supply (refer to rating plate) - voltage / current / input
220-240 V~50 Hz/ 4 A/
800 W
Permissible ambient temperature 5°C to 35°C
Fluorinated greenhouse gas
Volume
GWP
Tonne(s) of CO
2
equivalent
HFKW-134a
0.63 kg
1430
0.9
Additional dataProductche (acc. to EU 392/2012)
Trade mark Haier
Model identier HD80-26A
Rated capacity (kg) 8
Kind of tumble drier Condenser
Energy eciency class A+++
Weighted Annual Energy Consumption (AE
c
in kWh/year)
1)
160
Tumble dryer with or without automatic with automatic
Energy consumption of the standard cotton programme
3)
at full load
(kWh/cycle)
1.33
Energy consumption of the standard cotton programme
3)
at partial
load (kWh/cycle)
0.74
Power consumption of the o-mode (W) 0.2
Power consumption of the left-on mode (W) 0.2
Duration of the „left-on mode“ (mi n)
2)
40
Standard drying programme
3)
Cotton Ready to Store +
option „ECO“
Weighted programme time of the standard drying programme
3)
at full and partial load (min)
153
Programme time of the standard cotton programme
3)
at full load
(min)
198
Programme time of the standard cotton programme
3)
at partial
load (min)
119
Condensation eciency class
4)
B
Weighted condensation eciency for the standard cotton programme 3)at full and partial load (%)
84
Average condensation eciency of the standard cotton programme
3)
at full load
84
Average condensation eciency of the standard cotton programme
3)
at partial load
84
Weighted sound power level of the standard cotton programme
3)
at full load (dB)
67
Built-in or freestanding Freestanding/ built under
1)
Based on 160 drying cycles of the standard cotton programme at full and partial load, and the
consumption of the low-power modes. Actual energy consumption per cycle will depend on how
the appliance is used
2)
In case there is a power management system
3)
This programme used at full and partial load is the standard drying programme to which the in-
formation in the label and the che relates to. This is the programme suitable for drying normal
wet cotton laundry and it is the most ecient programme in terms of energy consumption for
cotton.
4)
Class G is the least ecient and Class A is the most ecient.
Page 18

Customer service
GB GB
Customer service
We recommend our Haier Customer Service and the use of original spare parts.
If you have a problem with your appliance, please rst check section TROUBLESHOOT-
ING.
If you cannot nd a solution there, please contact
▶ your local dealer or
▶ our European Call Service-Center (see listed phone numbers below) or
▶ the Service & Support area at www.haier.com where you can activate the service
claim and also nd FAQs.
To contact our Service, ensure that you have the following data available.
The information can be found on the rating plate.
Model _____________
Serial No. _____________
Also check the Warranty Card supplied with the product in case of warranty.
European Call Service-Center
Country* Phone number Costs
Haier Italy (IT)
199 100 912
Haier Spain (ES)
902 509 123
Haier Germany (DE)
0180 5 39 39 99
• 14 Ct/Min Landline
• max 42 Ct/Min Mobile
Haier Austria (AT)
0820 001 205
• 14,53 Ct/Min Landline
• max 20 Ct/Min all others
Haier United Kingdom (UK)
0333 003 8122
Haier France (FR)
0980 406 409
* For other countries please refer to www.haier.com
34 35
Page 19

HD80 26A GB V05_072015
 Loading...