

Page 1
Guide de l’utilisateur
30” Built-in Oven
Four à convection simple de 30”
Horno de convección simple de 30”
User Manual
Manual del usuario
HCW3460AES
Page 2

Page 3

TABLE OF CONTENTS
OVEN SAFETY INSTRUCTIONS ........................................................................... 2
FEATURES OF YOUR OVEN .................................................................................6
GENERAL OVEN INFORMATION .......................................................................... 7
GENERAL OVEN TIPS .......................................................................................... 8
ELECTRONIC CONTROL ...................................................................................10
COOKING WITH THE CONVECTION OVEN .......................................................12
OVEN MODES ................................................................................................... 13
COOKING FUNCTIONS ..................................................................................... 14
QUICK TIPS ....................................................................................................... 15
SETTING AN OVEN FUNCTION MANUALLY ...................................................... 16
CONVECTION BAKE TIPS AND TECHNIQUES ................................................... 18
BAKE TIPS AND TECHNIQUES ..........................................................................20
CONVECTION BROIL TIPS AND TECHNIQUES .................................................. 21
BROIL TIPS AND TECHNIQUES .........................................................................22
CONVECTION ROAST TECHNIQUES ................................................................. 24
OVEN CARE AND CLEANING ............................................................................ 26
SETTING THE SELF-CLEANING MODE ............................................................. 28
GENERAL OVEN CARE ...................................................................................... 29
OVEN FINISHES / CLEANING METHODS ...........................................................30
OVEN DOOR REMOVAL .................................................................................... 31
REPLACING AN OVEN LIGHT ............................................................................ 32
TROUBLESHOOTING ........................................................................................ 34
LIMITED WARRANTY ........................................................................................37
RECORD KEEPING
Thank you for purchasing this Haier
product. This user manual will help you
get the best performance from your
new oven.
For future reference, record the model
and serial number located on the inside
frame of the oven, and the date of
purchase.
Staple your proof of purchase to this
manual to aid in obtaining warranty
service if needed.
___________________________________
Model number
___________________________________
Serial number
___________________________________
Date of purchase
1
Page 4
OVEN SAFETY INSTRUCTIONS
WARNING
Your safety and the safety of others are very important.
We have provided many important safety messages in this manual and
on your appliance. Always read and obey all safety messages.
DANGER
WARNING
CAUTION
All safety messages will tell you what the potential hazard is, tell you
how to reduce the chance of injury, and tell you what can happen if the
instructions are not followed.
This is the safety alert symbol.
This symbol alerts you to potential hazards that can
kill or hurt you and others. All safety messages will
follow the safety alert symbol and either the word
“DANGER,” “WARNING” or “CAUTION.”
These words mean:
An imminently hazardous situation. You
could be killed or seriously injured if you
don’t immediately follow instructions.
A potentially hazardous situation
which, if not avoided, could result in
death or serious bodily injury.
A potentially hazardous situation
which, if not avoided, may result in
moderate or minor injury.
The California Safe Drinking Water and Toxic Enforcement Act requires
the Governor of California to publish a list of substances known to the
State of California to cause cancer, birth defects, or other reproductive
harm, and requires businesses to warn of potential exposure to such
substances.
This product contains a chemical known to the State of California to
cause cancer, birth defects, or other reproductive harm. This appliance
can cause low-level exposure to some of the substances listed,
including benzene, formaldehyde, carbon monoxide, toluene, and soot.
2
Page 5
WARNINGS FOR ELECTRIC INSTALLATION
WARNING
Electrical Shock Hazard
Installation and service must be performed by a qualified installer or
service agency.
The models may be powered at 240V or 208V.
Always disconnect the power before servicing this unit.
This appliance must be properly grounded.
Failure to do so could result in death or serious injury.
IMPORTANT SAFETY
INSTRUCTIONS
WARNING: To reduce the risk of re, elecrical shock, injury to persons,
or damage when using the oven, follow basic precautions, including the
following:
Proper Installation
This appliance must be
•
properly installed and
electrically grounded by a
qualied technician. Connect
only to properly grounded
outlet. See “Grounding
Instructions” found in the
Installation Instructions.
This appliance should
•
be serviced only by a
qualied service technician.
Contact the nearest
authorized service center
for examination, repair or
adjustment.
Do not repair or replace
•
any part of the oven unless
specically recommended.
Refer service to an authorized
servicer.
Do not operate this appliance
•
if it is not working properly or
if it has been damaged, until
an authorized servicer has
examined it.
Install or locate this appliance
•
only in accordance with the
Installation Instructions.
Use this oven only as intended
•
by the manufacturer. If you
have any questions, contact
the manufacturer.
3
Page 6
IMPORTANT SAFETY
INSTRUCTIONS
Do not cover or block any
•
openings on this appliance.
Use this appliance only for
•
its intended use as described
in this manual. Do not use
corrosive chemicals, vapors,
or nonfood products in this
appliance. This type of oven is
specically designed to heat
or cook. It is not designed
for industrial or laboratory
use. The use of corrosive
chemicals in heating or
cleaning will damage the
appliance.
To reduce the risk of re in the
oven cavity:
Do not store ammable
•
materials in or near the oven.
Do not use water on a grease
•
re. Smother re or use a
dry chemical or foam-type
extinguisher.
It is highly recommended that
•
a re extinguisher be readily
available and highly visible
next to any cooking appliance.
Do not overcook food.
•
Carefully attend oven if paper,
plastic or other combustible
materials are placed inside
the oven.
Do not use the cavity for
•
storage purposes. Do not
leave paper products, cooking
utensils or food in the cavity
when not being used.
If materials inside the oven
•
should ignite, keep oven door
closed. Turn oven o and
disconnect the circuit at the
circuit breaker box.
Be sure the blower fan runs
•
whenever the oven is in
operation. If the fan does not
operate, do not use the oven.
Call an authorized service
center.
Never use the oven to warm
•
or heat a room.
Personal Safety
Do not allow children to use
•
this appliance unless closely
supervised by an adult.
Children and pets should not
be left alone or unattended in
the area where the appliance
is in use. Never allow children
to sit or stand on any part of
the oven.
Do not store items of interest
•
to children above the oven.
If children should climb onto
the appliance to reach these
items, they could be seriously
injured.
For personal safety, wear
•
proper clothing. Loose tting
or garments with hanging
sleeves should never be worn
while using this appliance.
Tie long hair so that it doesn’t
•
hang loose.
Do not touch heating
•
elements or interior surfaces
of oven.
The heating elements may be
•
hot even though they are dark
in color. Interior surfaces of
an oven become hot enough
to cause burns.
4
Page 7
IMPORTANT SAFETY
INSTRUCTIONS
During and after use, do not
•
touch or let clothing or other
ammable materials contact
the heating elements or the
interior surfaces of the oven
until they have had sucient
time to cool.
The trim on the top and sides
•
of the oven door may become
hot enough to cause burns.
Use care when opening the
•
door. Open the door slightly
to let hot air or steam escape
before removing or replacing
food.
Do not heat unopened
•
food containers. Build-up
of pressure may cause the
container to burst and cause
injury.
Always place oven racks in
•
desired location while oven is
cool. If a rack must be moved
while oven is hot, do not let
potholder contact the hot
heating elements.
Use only dry potholders.
•
Moist or damp potholders
on hot surfaces may result in
burns from steam. Do not let
potholder touch hot heating
elements. Do not use a towel
or other bulky cloth.
Safety for the Self-cleaning
Oven:
Before self-cleaning the oven,
•
remove the broiler pan, oven
racks (only when not made of
porcelain), other utensils and
excess soft spillage.
Conrm that the door locks
•
and will not open once both
selectors are in CLEAN
position and the door lock
icon appears. If the door
does not lock, turn the cook
mode selector to OFF and
do not run Self-Clean. Call an
authorized servicer.
Do not clean the door gasket.
•
It is essential for a good seal.
Care should be taken not to
rub, damage, move or remove
the door gasket.
Do not use commercial
•
oven cleaners or oven liner
protective coatings of any
kind in or around any part of
the oven.
Clean only oven parts listed in
•
this manual.
Other surfaces of the
•
appliance may become hot
enough to cause burns among these surfaces are for
example: oven vent openings
and surfaces near these
openings, oven doors, and
windows of oven doors.
READ AND SAVE THESE
INSTRUCTIONS
5
Page 8
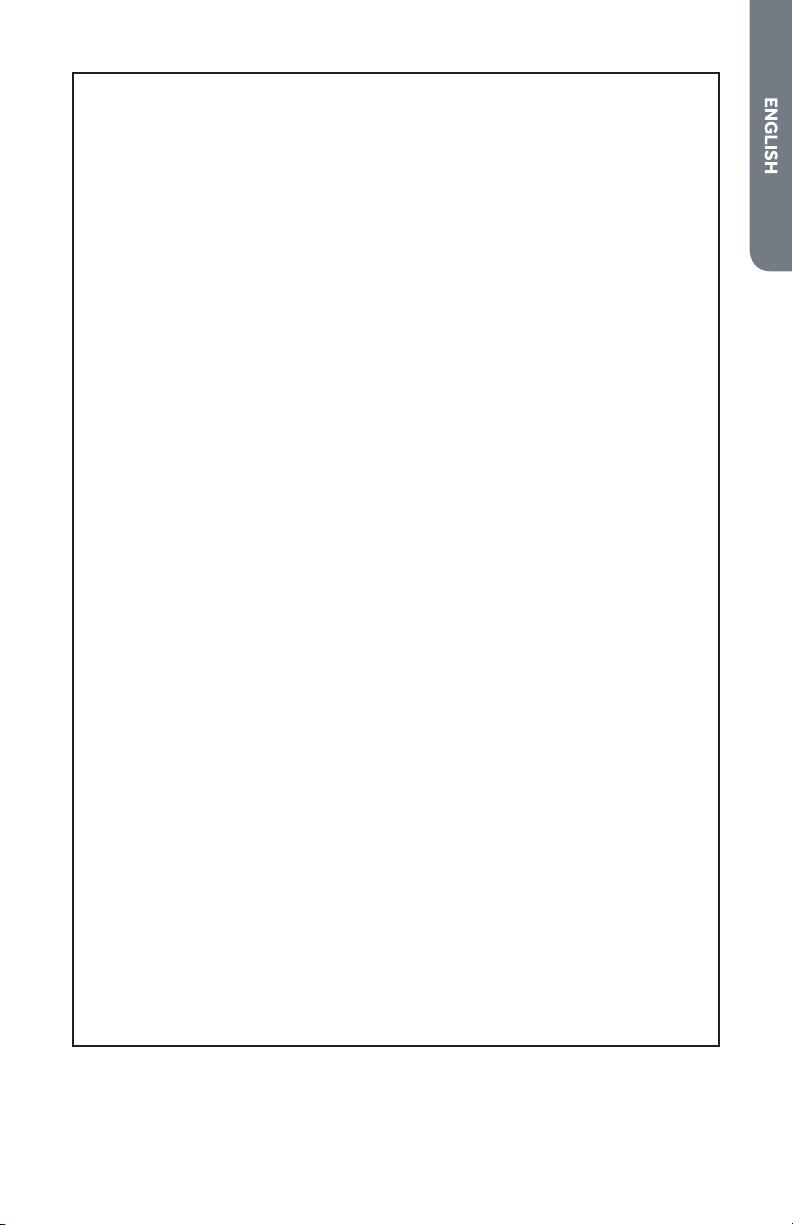
FEATURES OF YOUR OVEN
i
h
g
a b c
f e
a Cooling Vents
b Broil Element
c Control Panel
d Halogen Light
e Convection Fan and Element
f Bottom Element (not visible)
g Model and Serial # Plate
j
k
d
l
m
h Meat Probe (if present)
i Door Gasket
j Oven Rack Back
k Oven Rack Front
l Broiler Pan Racks
m Broiler Pan
6
Page 9
GENERAL OVEN INFORMATION
WARNING
Fire Hazard
Remove all packing and foreign materials from the oven. Any material
of this sort left inside may melt or burn when the appliance is used.
Failure to do so can result in death or fire.
240 V VS. 208 V CONNECTION
Most oven installations will have a 240 V connection. If your oven is installed with
208 V, the preheat time may be slightly longer than with 240 V. The oven is designed
to assure the same clean time at 208 V.
HEATING FIRST TIME
Heat the empty appliance to the maximum temperature in order to remove any
manufacturing residues, which could aect the food with unpleasant odors.
HIGH ALTITUDE BAKING
When cooking at high altitude, recipes and cooking time will vary from the standard.
POWER FAILURE
After the power returns to the oven, the clock displays the time 12.00.
E - ERROR NUMBER CODES
If E codes are displayed when the electronic control detects a problem in the oven or
in the electronics.
SQUEAK NOISE
You may hear a squeak from the oven due to heat warping, but this is not a
malfunction.
FLASHING SYMBOLS OR NUMBERS
Signal an incomplete action that is in progress (locking the door, preheat, etc.).
BEEPS
Signal that the set temperature has been reached. Beeps also signal the end of a
function or an oven fault.
7
Page 10

CONVECTION FAN
The convection fan operates during any Convection Mode and Defrost Mode.
COMPONENT COOLING FAN
Activates during any cooking or Self-Cleaning mode to cool inner components and
outer door surfaces. This air is exhausted through the vent located above the oven
door. It continues to run until components have cooled suciently. The cooling
fan operates at double speed (or RPMs) in self-cleaning and whenever the internal
components’ temperature becomes high.
USING OVEN LIGHTS
When the oven is in use, oven lights turn on automatically when a mode is
•
started. Oven lights will turn o automatically when nished and the oven mode
is cancelled.
The lights do not operate in the Self-Cleaning Mode.
•
“Light” knob to activate the lights in the oven
•
FAHRENHEIT AND CELSIUS
The temperature is preset in Fahrenheit, however it can be changed to Celsius.
GENERAL OVEN TIPS
DEFAULT SETTINGS
The Cooking Modes automatically select a suitable temperature. These can be
changed when a dierent one is needed.
OVEN CONDENSATION AND TEMPERATURE
It is normal for a certain amount of moisture to evaporate from the food during
•
any cooking process. The amount depends on the moisture content of the food.
The moisture may condense on any surface cooler than the inside of the oven,
such as the control panel.
Your new oven has an electronic temperature sensor that allows maintaining
•
an accurate temperature. Your previous oven may have had a mechanical
thermostat that drifted gradually over time to a higher temperature. It is normal
that you may need to adjust your favorite recipes when cooking in a new oven.
OPERATIONAL SUGGESTIONS
Use the Cooking Charts as a guide.
•
Do not set pans or any weight on the open oven door.
•
Use the interior oven lights to view the food through the oven door window
•
rather than opening the door frequently.
8
Page 11

UTENSILS
Glass baking dishes absorb heat. Reduce oven temperature 25 °F (15 °C) when
•
baking in glass.
Use pans that give the desired browning. The type of nish on the pan will help
•
determine the amount of browning that will occur.
Shiny, smooth metal or light non-stick /anodized pans reect heat, resulting
•
lighter more delicate browning. Cakes and cookies require this type of utensil.
Dark, rough or dull pans will absorb heat resulting in a browner, crisper crust. Use
•
this type for pies.
For brown, crisp crusts, use dark non-stick/anodized or dark, dull metal utensils
•
or glass bake ware. Insulated baking pans may increase the length of cooking
time.
Do not cook with the empty Broiler Pan in the oven, as this could change cooking
•
performance. Store the Broiler Pan outside of the oven.
OVEN RACKS
6
5
4
3
2
1
The oven has rack guides at six levels as shown in the illustrations.
•
Rack positions are numbered from the bottom rack guide (#1) to the top (#6).
•
Check Cooking Charts for best rack positions to use when cooking.
•
Each level guide consists of paired supports formed in the walls on each side of
•
the oven cavity.
Always be sure to position the oven racks before turning on the oven. Make sure
•
that the racks are level once they are in position.
Please refer to illustration on “Features of Your Oven” if there is any question as to
which side is the front or top of the rack.
The racks are designed to stop when pulled forward to their limit.
•
IMPORTANT: Never use aluminum foil to cover the oven racks or to line the oven. It
can cause damage to the oven liner if heat is trapped under the foil.
IMPORTANT: Make sure you do not force it to avoid damage to the enamel.
9
Page 12
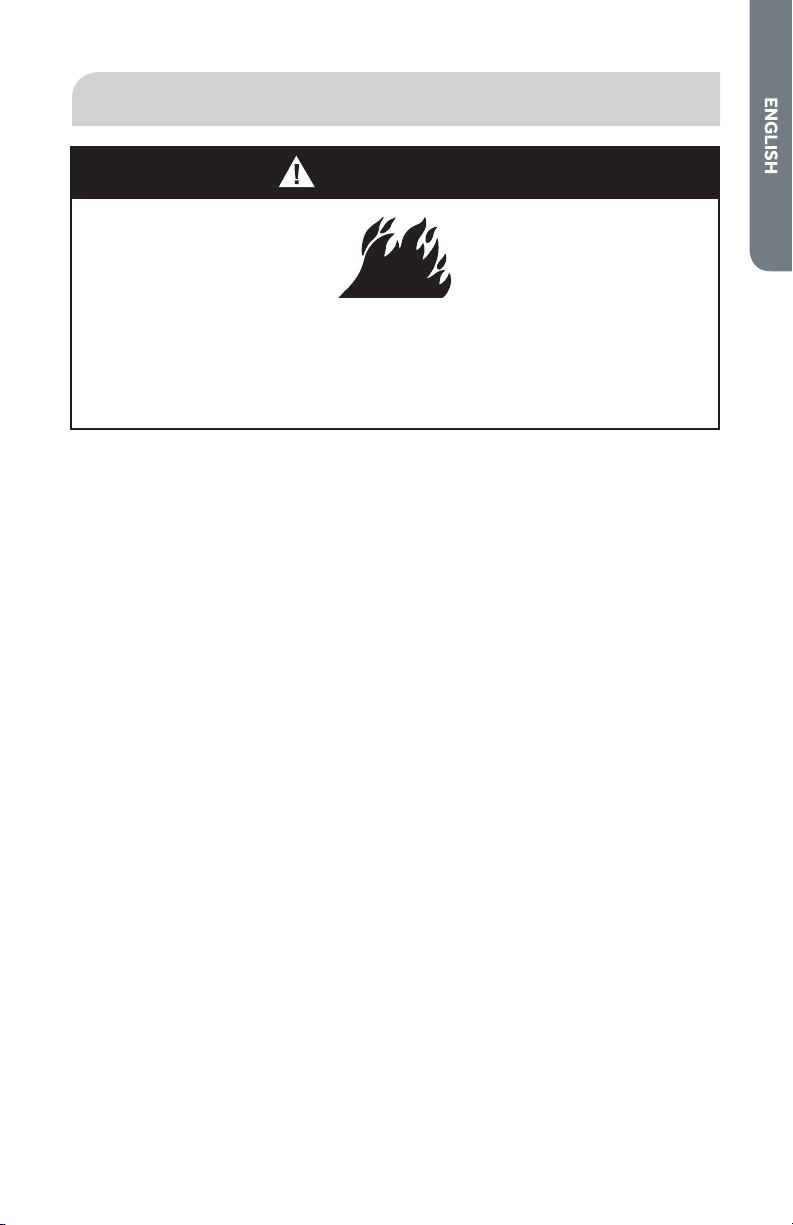
To remove oven rack from the oven:
1. Pull rack forward.
2. Lift rack up at front and then remove it.
To replace an oven rack:
1. Place rear of rack between rack level guides
2. While lifting front of rack, slide rack in all the way while lowering the front.
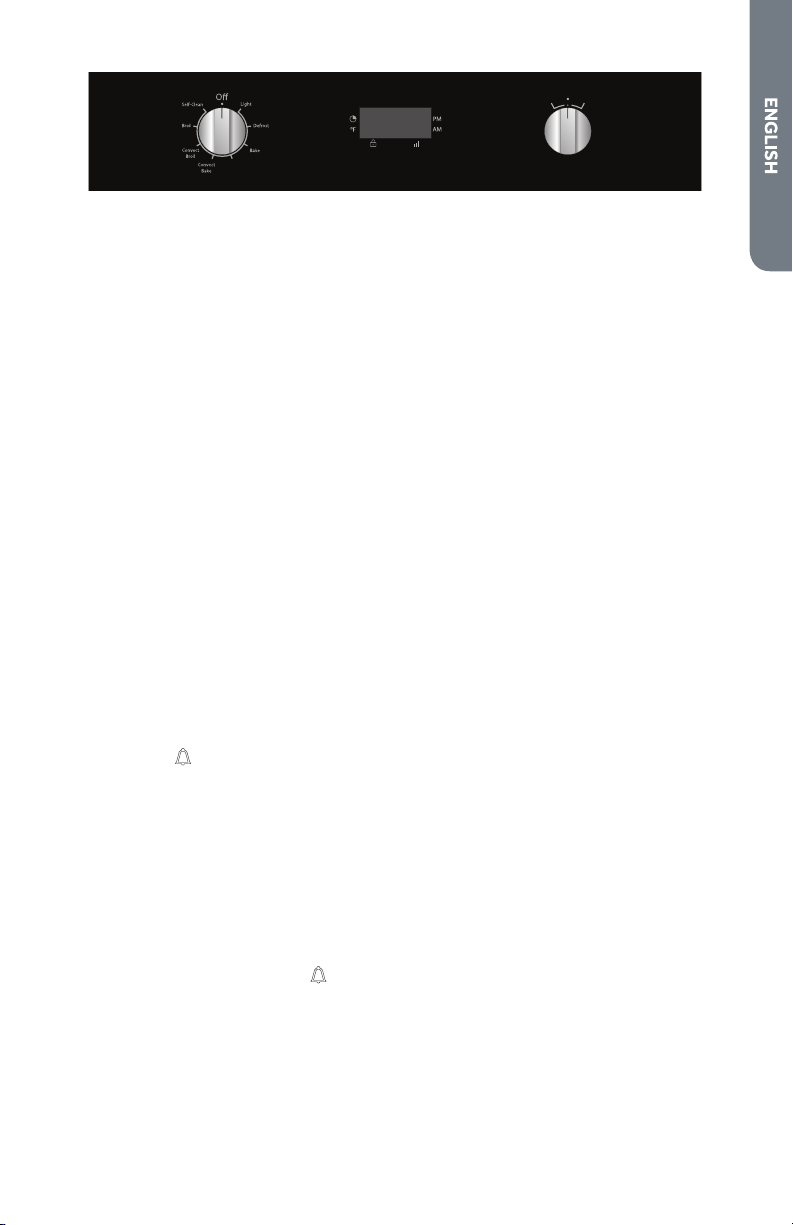
ELECTRONIC CONTROL
CONTROL PANEL DESCRIPTION
The oven control panel is made with one display and two knobs.
Time & Temperature display.
•
Time & Temperature knob (Push and/or Turn)
•
Mode (oven functions) knob.
•
The push & turn knob is mainly for clock or temperature setting and automatic time
functions programming. Select the desired item by pushing the knob.
10
Page 13
+
-
Convect
Roast
THE OVEN CLOCK
IMPORTANT: Following initial installation and power failures, the time-of-day
(12:00 a.m.) will blink to alert you to set the correct time of day. The oven will not
operate until the time-of-day has been set.
SETTING THE TIME OF DAY
Push in on the Time/Temp knob to toggle between the time-of-day and the timer,
and to view the set times.
1. Turn the Oven Mode knob to the OFF position.
2. Turn the -/+ knob to the left or right, the time display starts to ash.
NOTE: Hours and minutes are set separately.
3. Turn the knob again, until just the hour digits start to ash.
4. Adjust the ashing hour numerals by turning the -/+ knob to the left or right.
5. Push in on the -/+ knob once to set the hours and the minute numerals will begin
to ash.
6. Adjust the ashing minute numerals by turning the -/+ knob to the left or right.
After a few seconds both the hour and minute numerals will start ashing.
7. Wait another 10 seconds until the new time of day is steady. The time is now set.
SETTING THE TIMER
NOTES:
The display will show the time-of-day (default), until you push the knob to select
•
the timer .
The timer can be set for an amount of time from 0 to 240 minutes.
•
The default time is 30 minutes.
•
The oven timer may be used to time other activities even when the oven is
•
turned o.
To Adjust the Timer:
1. Push in on the knob to select the timer.
2. Turn the knob right or left to select the time.
3. When the time expires, the
ashes and the timer sounds with two short beeps
repeated every 3 seconds.
4. Push in on the knob to stop the timer alarm.
11
Page 14

TIMER ALARM
To adjust the volume of the timer alarm:
1. Turn the Oven Mode knob to Light.
2. Turn the Time/Temp knob to the left to select between 3 available volumes.
NOTE: The timer alarm will sound two short beeps every 3 seconds at the
selected volume level until the alarm is either turned o or times out.
TEMPERATURE UNIT MEASUREMENT
To select Fahrenheit or Celsius press +/- knob twice, when the display shows F or C
turn +/- knob to change the unit on measurement, press again +/- knob to conrm.
COOKING WITH THE CONVECTION OVEN
In a conventional oven, the heat sources cycle on and o to maintain an average
temperature in the oven cavity.
As the temperature gradually rises and falls, gentle air currents are produced within
the oven. This natural convection tends to be inecient because the currents are
irregular and slow. In this convection system the heat is “conveyed” by a fan that
provides continuous circulation of the hot air. This European Convection system
provides state-of-the-art engineering and advanced design to create the nest
convection oven. In standard convection ovens, a fan simply circulates the hot air
around the food. The system is characterized by the combination of an additional
heating element located around the convection fan and the venting panel that
distributes heated air in three dimensions: along the sides, the top, and the full
depth of the oven cavity. This European Convection system aids in maintaining a
more even oven temperature throughout the oven cavity.
The circulating air aids in speeding up the baking process and cooks the food more
evenly. By controlling the movement of heated air, convection cooking produces
evenly browned foods that are crispy on the outside yet moist inside. Convection
cooking works best for breads and pastries as well as meats and poultry. Air-
leavened foods like Angel food cakes, soués, and cream pus rise higher than in
a conventional oven. Meats stay juicy and tender while the outside is avorful and
crisp.
By using European Convection, foods can be cooked at a lower temperature and
cooking times can be shorter.
When using this mode, the standard oven temperature should be lowered by 25 °F
(15 °C). Foods requiring less cooking time should be checked slightly earlier than
normal. For best results, foods should be cooked uncovered, in low-sided pans
to take advantage of the forced air circulation. When using the Convection Roast
mode, the standard oven temperature does not need to be reduced.
ADVANTAGES OF CONVECTION COOKING
Baking on multiple racks at the same time is possible with even results.
•
Multiple-rack baking saves time.
•
Prepare whole meals at once with no avor transfer
•
Requires no specialized bakeware.
•
Dehydrates herbs, fruits and vegetables
•
Saves time and energy.
•
Convection broiling allows for extraordinary grilling with thicker cuts of food.
•
12
Page 15
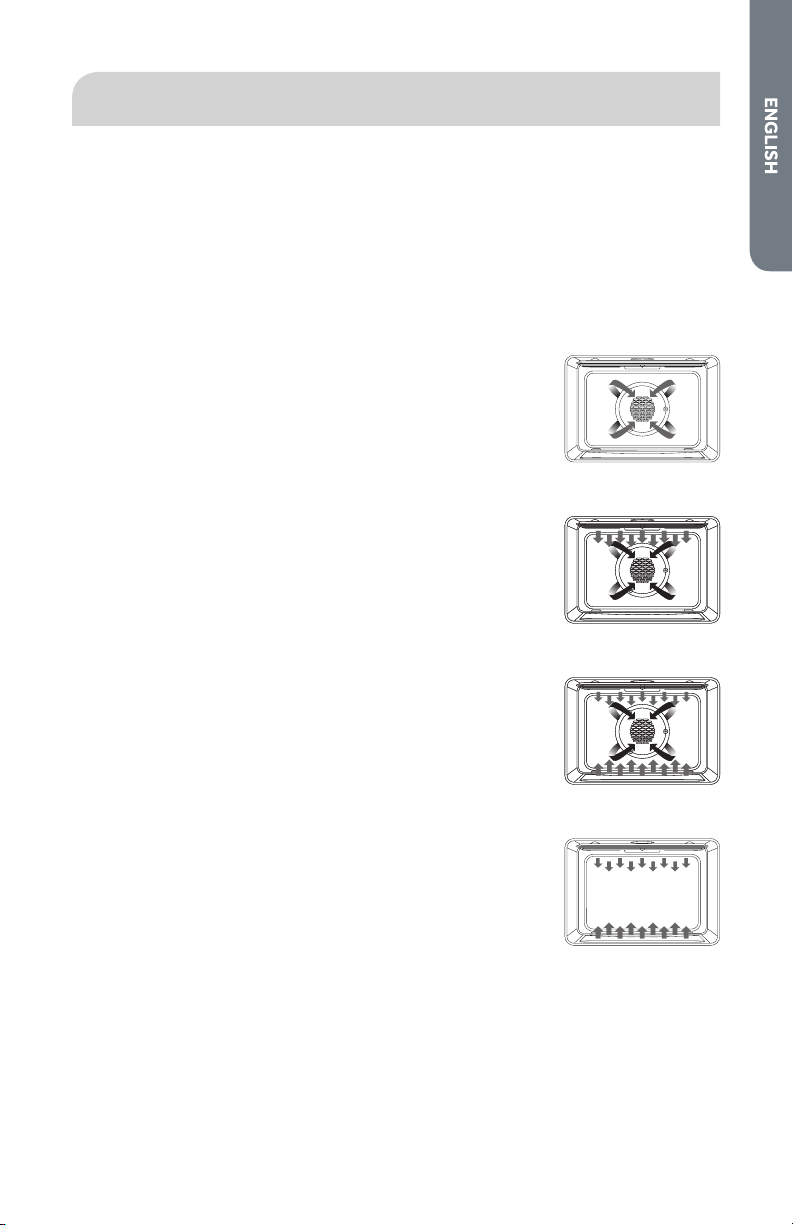
OVEN MODES
The following illustrations give an overview of what happens in the oven with each
mode setting. The arrows represent the location of the heat sources during each
modes. The lower heating element is concealed under the oven oor.
The maximum time the oven will remain on is 11 hours and 59 minutes. After this
amount of time has elapsed, “END” will appear in the display.
Adjust the time by turning the +/- knob to add more time.
•
Turn the Oven Mode knob to select the desired oven function.
•
CONVECTION BAKE (CONV BAKE)
Set temperature: from 120 °F (50 °C) to 480 °F (250 °C)
(preset position 375 °F [190 °C])
Convection Bake cooks with heat from ring elements behind
the back wall of the oven. The heat is circulated throughout
the oven by the convection fan.
CONVECTION BROIL (CONV BROIL)
Set temperature: from 120 °F (50 °C) to 485 °F (250 °C)
(preset position 445 °F [230 °C])
Convection Broil combines the intense heat from the upper
element with the heat circulated by the convection fan.
CONVECTION ROAST (CONV ROAST)
Set temperature: from 120 °F (50 °C) to 480 °F (250 °C)
(preset position 375 °F [190 °C])
Convection Roast uses the upper and lower elements and
convection fan.
BAKE (BAKE)
Set temperature: from 120 °F (50 °C) to 485 °F (250 °C)
(preset position 410 °F [210 °C])
Bake cooks with heated air. Both the upper and lower
elements cycle to maintain the oven temperature.
13
Page 16
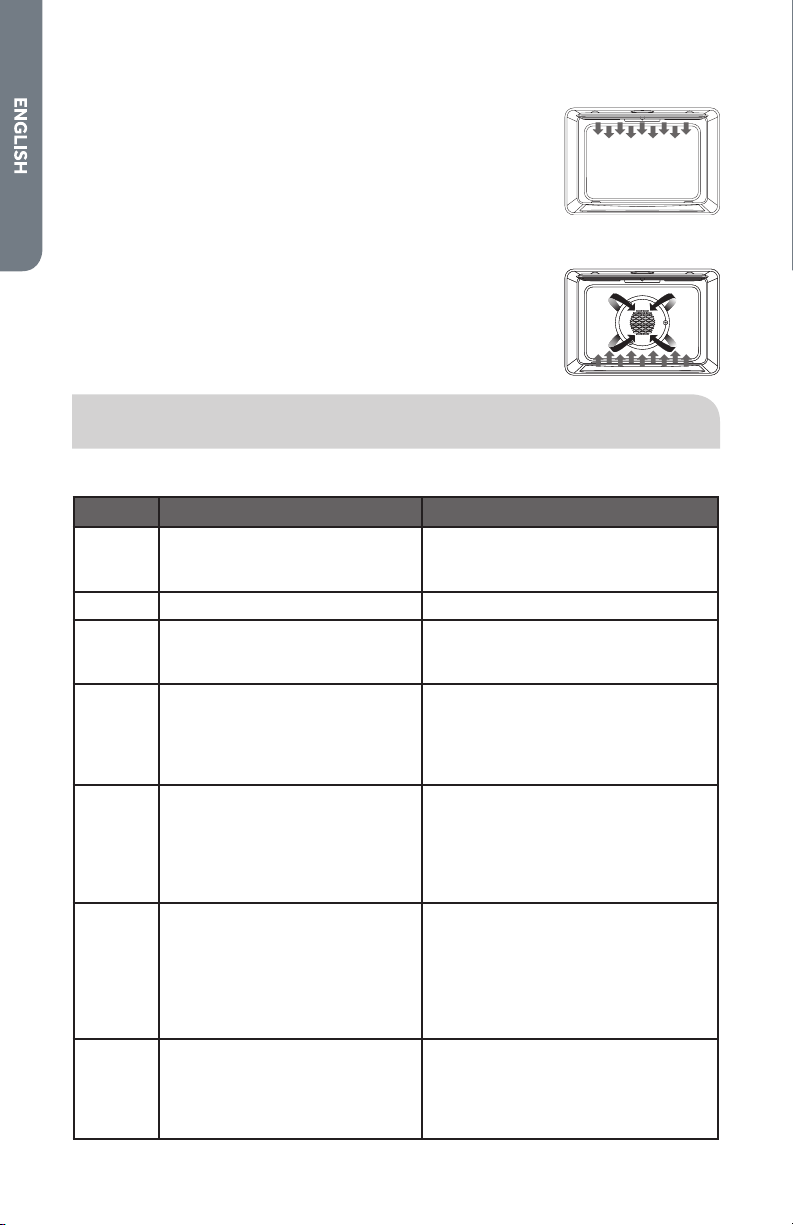
BROIL (BROIL)
Set temperature: from 120°F (50°C) to 485°F (250°C)
(preset position 445°F [230°C])
Broiling uses intense heat radiated from the upper element.
DEFROST (CONV)
Does not used any heating element, only the convection fan is
used to defrost foods.
COOKING FUNCTIONS
Turn the Oven Mode knob to select the desired oven function.
Control Mode Description Used for:
OFF
Light
Defrost
Bake
Convect
Roast
Convect
Bake
Convect
Broil
All the cooking modes are OFF
and the oven heating elements
are OFF.
The light is on only. N/A
In this mode only the internal
oven convection fan is ON i.e.
there is no oven heating.
In this mode both upper (top)
and lower (bottom) oven
heating elements are used to
heat the oven air. However, no
fan is used to circulate the heat.
The Convection Roast mode
uses the upper (top) oven
heating element, the lower
(bottom) heating element and
the convection fan inside the
oven.
The Convection Bake mode
uses the circular or third
heating element hidden behind
the bae at the back wall of
the oven. The heat is circulated
throughout the oven by the
oven convection fan.
Suitable for preparing a
complete dinner (small
portions). Mixing of avors
is avoided and an important
energy savings is obtained.
N/A
This mode is used to defrost deep
frozen food.
This is the traditional mode of
cooking on one shelf. Therefore only
one rack can be used when selecting
the Bake mode. Ideal for Appetizers,
Biscuits, Coee Cakes and Cookies.
Ideal for the roasting of whole
chickens or turkey and pizza. It can
also be used for baking/cooking
Appetizers, Biscuits, Coee Cakes
and Cookies on one or more levels.
Consequently dierent foods can be
cooked simultaneously (maximum
three levels) and is suitable for
preparing a complete dinner (small
portions). Mixing of avors is
avoided and an important energy
saving is obtained.
Ideal for steak, hamburgers, chicken
quarters or chicken breasts.
14
Page 17

Broil
Self
Clean
The Grill mode uses intense
heat radiated from the upper
(top) heating element.
The standard time is 1.30 h and
can be changed.
Ideal for preparing toast, browning
and grilling.
Self-cleaning mode. Here the
oven is automatically cleaned by
burning-o cooking residue at high
temperature (about 460 °C) from 1h
to 3h. During the self-cleaning cycle
all fumes produced are ltered and
then expelled to ambient.
QUICK TIPS
CONVECTION COOKING
ABOUT CONVECTION COOKING
Standard cooking modes (Bake, Broil, etc.) use heat radiated from one or more
elements to cook food. Convection modes use both heat from the elements and
fans in the back of the oven to continuously circulate the heated air throughout the
oven.
ADVANTAGES OF CONVECTION COOKING
Even baking, browning and crisping.
•
Juices and avors are sealed in.
•
Foods requiring heated air to rise such as cream pus, soués, meringues and
•
breads are higher and lighter.
Multiple rack cooking.
•
No special bake ware required.
•
Saves time and energy.
•
15
Page 18
DO NOT use Convection Bake for meats. Use Convection Roast instead.
Mode Use this mode for: For Best results Quick Cooking Tip
Convection
Bake
Convection
Broil
Convection
Roast
Large quantities
•
of food on
multiple racks.
Pastries, breads,
•
snack, foods
and appetizers.
Thicker, tender,
•
cuts of meat,
poultry and sh.
DO NOT use
•
this mode for
browning breads
or casseroles.
Large, tender
•
cuts of meat
and poultry
such as roast or
whole chicken.
Use low-sided,
•
uncovered
pans.
Center baking
•
sheets side
to side on the
oven rack.
Meats should
•
be at least 1”
thick.
DO NOT cover
•
meat or use
cooking bags
Refer to
•
Convection
Roast Chart in
this Manual for
cooking times
Reduce recipe
•
temperature by
25°F (15 °C).
Check food for
•
doneness early:
If recipe calls for
Check food
1 - 15 min. - 3 min.
early
6 - 30 min. - 5 min.
early
31 min.-1hr. - 10 min.
early
No conversion
•
from standard
Broil is necessary.
Refer to
•
Convection Broil
Chart in this
Manual for cooking
times.
Do NOT
•
change recipe
temperature
SETTING AN OVEN FUNCTION MANUALLY
Turn the mode knob into the desired position, the clock display shows On for a few
seconds. The oven will work for a maximum time (12hours). Depending on the oven
model, the number and type of available functions can be dierent. If the clock
display function is active the symbol appears (it doesn’t appear in light position).
Turn the Temp & Time selector and set the desired oven temperature. The control
oers a PRESET temperature per every cooking mode or a full range between
MIN and MAX to be adjusted by hand. Check the value on the display after having
selected the temperature.
The temperature appears on the clock display when the Time & Temp selector is
pushed or when a new function has just been selected.
16
Page 19

As soon as the oven starts, the preheat LED (indicated by the bars) on the bottom
of the clock display starts ashing and becomes steadily on when the preheat ends
with a beep.
Turn the mode selector to ZERO (OFF) position to stop any activity, the display will
show OFF for a few seconds.
SETTING AN AUTOMATIC OVEN FUNCTION
WARNING
Food Poisoning Hazard
Do not let food sit in oven more than one hour before or after cooking.
Doing so can result in food poisoning or sickness.
After selecting an Oven Mode, you can program the oven for Timed cooking. The
Timed cooking program will remain set even if you change the Oven Mode with the
exception of the Self-Clean mode.
The following possibilities are available:
1. Timed cooking setting the cooking time (duration).
2. Timed cooking setting the end of cooking time (stop time).
3. Delayed cooking setting duration and stop time.
Push the knob to toggle between cooking duration (cook time) and end of cooking
time (stop time): the words “dur” or “End” are displayed respectively.
Turn the knob left/right to adjust the duration or the stop time when the proper
word is displayed:
1. When “dur” is displayed, the control shows 30 minutes as the default cooking
duration. Turn the knob left/right to set the desired cooking time in a range
between 0 and 240 minutes. The display will ash “dur” and its value alternately
for a few seconds then it will show the time-of-day, the pot symbol and the
“A” letter to indicate that a timed cooking is active. The end of cooking time is
updated automatically.
2. When the word End is displayed, the control shows the current time as the initial
stop time. To set the desired end-of-cooking time:
Turn the +/- knob left/right and the hours will ash.
•
Adjust the hours by turning the knob left/right.
•
Push in on the knob to toggle back and forth between hours and minutes or
•
wait a few seconds until the minutes ash.
Adjust the minutes by turning the knob left/right.
•
Wait until the new End of Cooking time value stops ashing.
•
The display will ash End and its value alternately for a few seconds, and then it
will show the time of day, the
cooking is active. The cooking duration is updated automatically.
symbol and the “A” letter to indicate that a timed
17
Page 20

3. Follow the instructions for setting the cooking duration (Number 1), and then
push the knob until End appears. The control shows the “current time + cooking
time” as the initial stop time. It is not possible to lower the end of cooking time
below this value. To set the desired actual End-of-Cooking time:
Turn the +/- knob left/right and the hours will ash.
•
Adjust the hours by turning the knob left/right.
•
Push in on the knob to toggle back and forth between hours and minutes or
•
wait a few seconds until the minutes ash.
Adjust the minutes by turning the knob left/right.
•
Wait until the new End-of-Cooking time value stops ashing.
•
The display will ash End and its value alternately for a few seconds then it will
show the time of day and the “A” letter to indicate that a delayed cooking has been
programmed. As soon as the delay time expires, the oven turns on and heats for the
programmed cooking time. The
At the end of any timed activity the control turns o the oven, the timer alarm
sounds (two short beeps repeated every 3 seconds), for a maximum time and makes
the time related icons
alarm and reset the display.
Turn the Oven Mode knob to the OFF position before reusing the oven.
ash on the display. Push the knob to turn o the timer
symbol is displayed.
CONVECTION BAKE TIPS AND TECHNIQUES
Reduce recipe baking temperatures by 25°F (15°C).
For best results, foods should be cooked uncovered, in low-sided pans to take
•
advantage of the forced air circulation. Use shiny aluminum pans for best results
unless otherwise specied.
Heatproof glass or ceramic can be used. Reduce temperature by another 25 °F
•
(15 °C) when using heatproof glass dishes for a total reduction of 50 °F (30 °C).
Dark metal pans may be used. Note that food may brown faster when using dark
•
metal bake ware.
The number of racks used is determined by the height of the food to be cooked.
•
Baked items, for the most part, cook extremely well in convection. Do not try to
•
convert recipes such as custards, quiches, pumpkin pie, or cheesecakes, which
do not benet from the convection-heating process. Use the regular Bake mode
for these foods.
Multiple rack cooking for oven meals is done on rack positions 1, 2, 3, 4 and 5. All
•
ve racks can be used for cookies, biscuits and appetizers.
2 rack baking: Use positions 1 and 3.
•
3 rack baking: Use positions 2, 3 and 4 or 1, 3 and 5.
•
18
Page 21
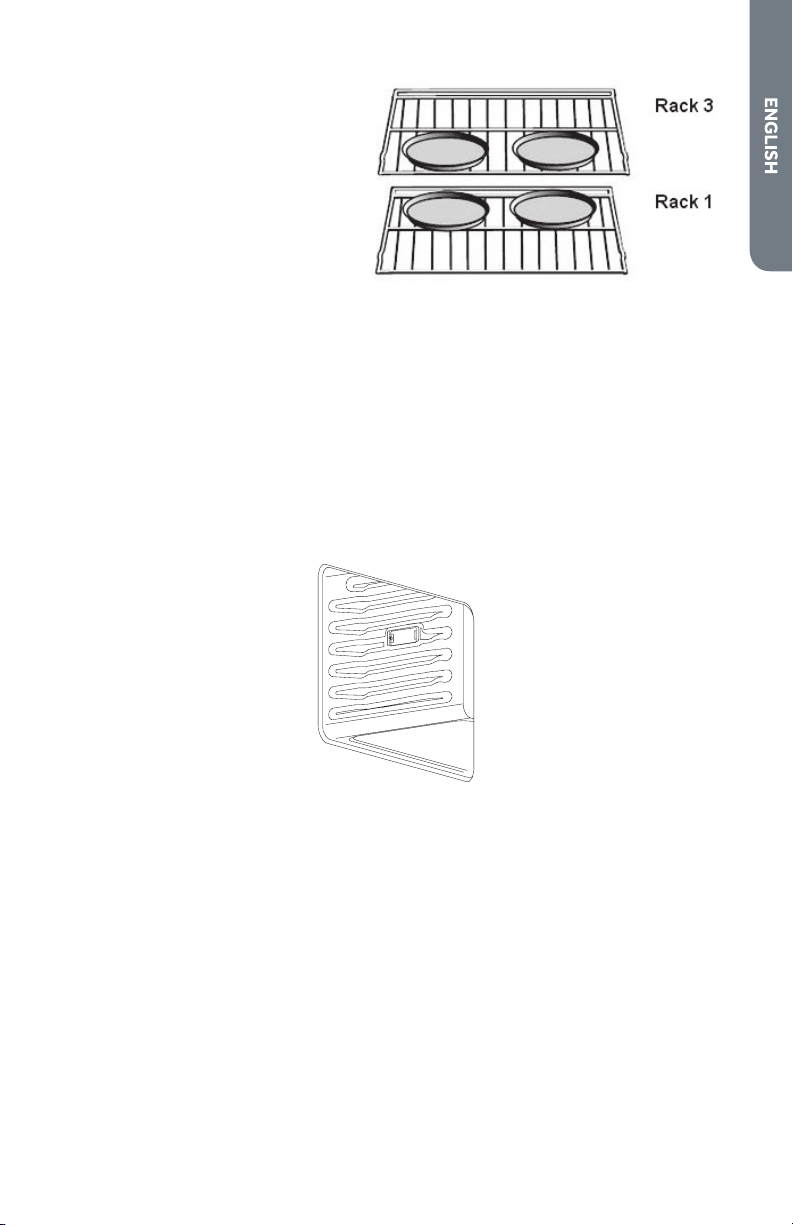
When baking four cake layers
•
at the same time, stagger
pans so that one pan is not
directly above another. For
best results, place cakes on
front of upper rack and back
of lower rack (See graphic at
right). Allow 1” - 1½” (2.5 -
3cm) air space around pans.
Converting your own recipe can be easy. Choose a recipe that will work well in
•
convection.
Reduce the temperature and cooking time if necessary. It may take some trial
•
and error to achieve a perfect result. Keep track of your technique for the next
time you want to prepare the recipe using convection.
See Troubleshooting for tips to Solving Baking and Roasting Problems.
•
FOODS RECOMMENDED FOR CONVECTION BAKE MODE:
Appetizers Biscuits Coee Cakes, Cookies (2 to 4 racks) Yeast Breads, Cream Pus,
Popovers, Casseroles, and One-dish Entrées, Oven Meals (rack positions 1, 2, 3),
Air-leavened Foods (Souées, Meringue-Topped Desserts, Angel Food Cakes,
Chion Cakes)
6
5
4
3
2
1
QUICK AND EASY RECIPE TIPS
Converting from standard BAKE to CONVECTION BAKE:
Reduce the temperature by 25 °F (15 °C).
•
Use the same baking time as Bake mode if under 10 to 15 minutes.
•
Foods with a baking time of less than 30 minutes should be checked for
•
doneness 5 minutes earlier than in standard bake recipes.
If food is baked for more than 40 to 45 minutes, bake time should be reduced by
•
25%.
19
Page 22
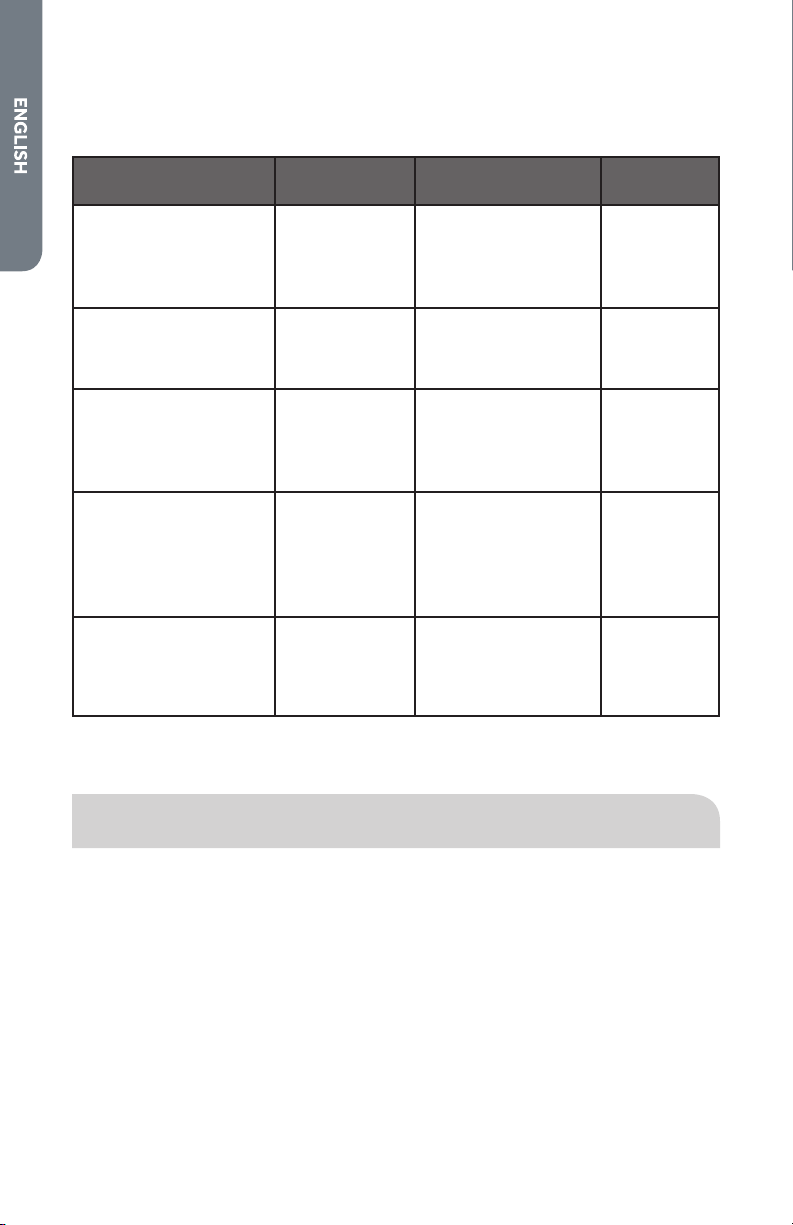
CONVECTION BAKE CHART
Reduce standard recipe temperature by 25 °F (15 °C) for Convection Bake.
•
Temperatures have been reduced in this chart.
•
FOOD ITEM
Cake
Cupcakes
Bundt Cake
Angel Food
Pie
2 crust, fresh, 9”
2 crust, frozen fruit, 9”
Cookies
Sugar
Chocolate Chip
Brownies
Breads
Yeast bread loaf, 9x5
Yeast rolls
Biscuits
Muns
Pizza (Multiple rack
cooking)
Frozen
Fresh
The TEMP and TIME in the chart above are for the 240 V setting.
This chart is a guide. Follow recipe or package directions and adjust temperatures /
time appropriately.
RACK
POSITION
2
1
1
2
2
2
2
2
2
2
2
2
1 and 3
1 and 3
TEMP. °F ( °C)
(PREHEATED OVEN)
325 (165)
325 (165)
325 (165)
350-400 (175-205)
350 (175)
325-350 (165-175)
325-350 (165-175)
325 (165)
350 (175)
350-375 (175-190)
375 (190)
400 (205)
375-425 (190-220)
375-425 (190-220)
TIME (Min.)
16-20
37-43
25-35
35-45
68-78
8-12
10-15
25-30
15-22
10-15
6-10
13-16
12-18
8-14
BAKE TIPS AND TECHNIQUES
Baking is cooking with heated air. Both upper and lower elements in the oven are
used to heat the air but no fan is used to circulate the heat.
Follow the recipe or convenience food directions for baking temperature, time and
rack position. Baking time will vary with the temperature of ingredients and the size,
shape and nish of the baking utensil.
GENERAL GUIDELINES
For best results, bake food on a single rack with at least 1” - 1½” (2,5 - 3cm)
•
space between utensils and oven walls.
Use one rack when selecting the Bake Mode.
•
Check for doneness at the minimum time.
•
Use metal bake ware (with or without a non-stick nish), heatproof glass, glass-
•
ceramic, pottery or other utensils suitable for the oven.
20
Page 23
When using heatproof glass, reduce temperature by 25 °F (15 °C) from
•
recommended temperature.
Use baking sheets with or without sides or jelly roll pans.
•
Dark metal pans or nonstick coatings will cook faster with more browning.
•
Insulated bake ware will slightly lengthen the cooking time for most foods.
Do not use aluminum foil or disposable aluminum trays to line any part of the
•
oven. Foil is an excellent heat insulator and heat will be trapped beneath it. This
will alter the cooking performance and can damage the nish of the oven.
Avoid using the opened oven door as a shelf to place pans.
•
See Troubleshooting for tips to Solving Baking and Roasting Problems.
•
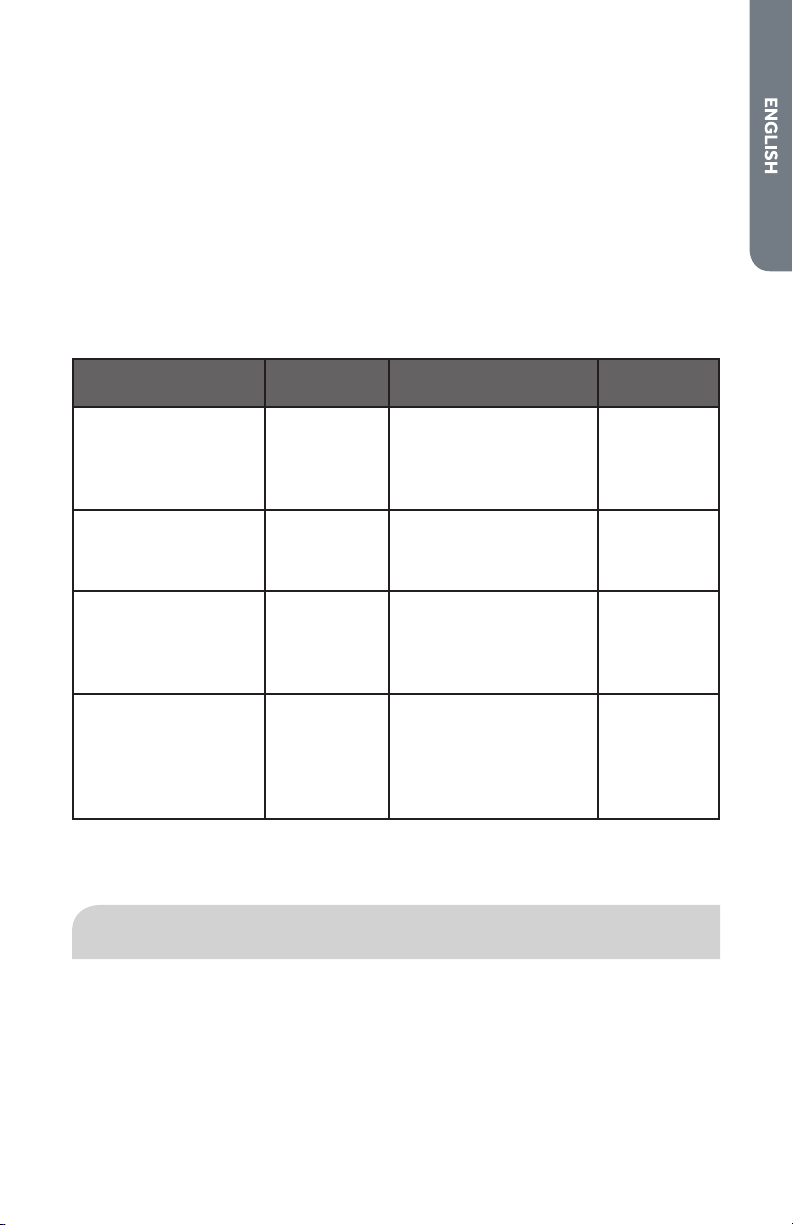
BAKE CHART
FOOD ITEM
Cake
Cupcakes
Bundt Cake
Angel Food
Pie
2 crust, fresh, 9”
2 crust, frozen fruit, 9”
Cookies
Sugar
Chocolate Chip
Brownies
Breads
Yeast bread loaf, 9x5
Yeast rolls
Biscuits
Muns
The TEMP and TIME in the chart above are for the 240 V setting.
This chart is a guide. Follow recipe or package directions and adjust temperatures /
time appropriately.
RACK
POSITION
2
1
1
2
2
2
2
2
2
2
2
2
TEMP. °F ( °C)
(PREHEATED OVEN)
350 (175)
350 (175)
350 (175)
375-400 (190-205)
375 (190)
350-375 (175-190)
350-375 (175-190)
350 (175)
375 (190)
375-400 (190-205)
375-400 (190-205)
425 (220)
TIME (Min.)
19-22
40-45
35-39
45-50
68-78
8-10
8-13
29-36
18-22
12-15
7-9
15-19
CONVECTION BROIL TIPS AND TECHNIQUES
Place rack in the required position needed before turning on the oven.
•
Use Convection Broil mode with the oven door closed.
•
Do not preheat oven. (This means, “PREHEAT” indication automatically appears
•
when the Convection Broil mode is selected, so place food inside the oven
before selecting the Cooking mode)
Use the 2-piece broil pan. (Without the 2-piece pan there may be a risk of re
•
with drip of the fat from the meat).
Turn meats once halfway through the cooking time (see Convection Broil Chart).
•
21
Page 24
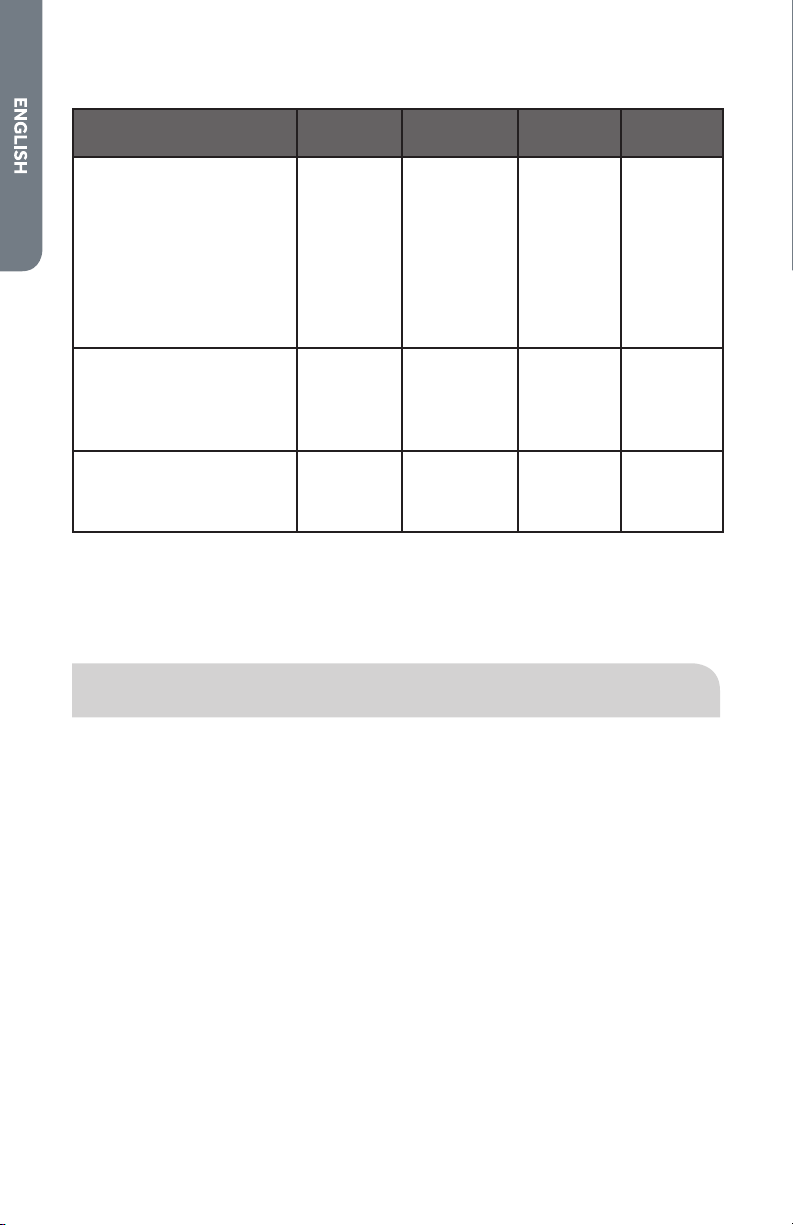
CONVECTION BROIL CHART
FOOD AND THICKNESS
Beef
Steak (1” or more)
Medium rare
Medium
Well
Hamburgers (1” or more)
Medium
Well
Poultry
Chicken Quarters
Chicken Halves
Chicken Breasts
Pork
Pork Chops (1” or more)
Sausage - fresh
The TEMP. and TIME in the chart above are for the 240 V setting.
* Broiling and convection broiling times are approximate and may vary slightly.
Cooking times are indicative and also depend on the thickness and the starting
temperature of the meat before cooking.
RACK
POSITION
4
4
4
4
4
4
3
4
4
4
OVEN TEMP
°F (°C)
450 (230)
450 (230)
450 (230)
550 (290)
550 (290)
450 (230)
450 (230)
450 (230)
450 (230)
450 (230)
TIME SIDE
1 (Min.)*
10-12
15-17
16-18
9-11
11-13
18-20
25-27
14-16
13-15
4-6
TIME SIDE
2 (Min.)*
10-12
13-15
13-15
5-8
8-10
13-15
15-18
10-14
12-14
3-5
BROIL TIPS AND TECHNIQUES
Place rack in the required position needed before turning on the oven.
•
Use Broil mode with the oven door closed.
•
Preheat oven for 5 minutes before use.
•
Use the 2-piece broil pan. (Without using a 2-piece pan may have risk of re with
•
drip of the fat from the meat.
Turn meats once halfway through the cooking time (see Broil Chart).
•
22
Page 25
BROIL CHART
Food and
Thickness
Beef
Steak (1” or more)
Medium rare
Medium
Well
Hamburgers (1” or
more)
Medium
Well
Poultry
Breast (bone-in)
Thigh (very well
done)
Pork
Pork Chops (1”)
Sausage - fresh
Ham Slice (½”)
Seafood
Fish Filets, 1”
Buttered
Lamb
Chops (1”)
Medium Rare
Medium
Well
Bread
Garlic Bread, 1”
slices
Garlic Bread, 1”
slices
The BROIL SETTING and TIME in the chart above are for the 240 V setting.
* Broiling and convection broiling times are approximate and may vary slightly.
Cooking times are approximate and also depend on the thickness and the starting
temperature of the meat before cooking.
Rack
Position
5
5
5
4
4
4
4
5
5
5
4 L 4 10-14 N/A
5
5
5
4
3
Broil
Setting
L 5
L 5
L 5
L 5
L 5
L 4
L 3
L 5
L 5
L 5
L 5
L 5
L 5
L 5
L 5
Time Side 1
(Min.)*
5-7
6-8
8-10
8-13
10-15
10-12
28-30
7-9
5-7
4-6
5-7
6-8
7-9
2-3
4-6
Time Side 2
(Min.)*
4-6
5-7
7-9
11
8-12
8-10
13-15
5-7
3-5
3-5
4-6
4-6
5-7
N/A
23
Page 26
Food Service Temperature Guidelines from FSIS (USDA food Safety &
WARNING
Inspection Service)
140 °F
(60 °C)
145 °F
(63 °C)
160 °F
(71 °C)
165 °F
(74 °C)
NOTE: Eggs (alone, not used in a recipe) – cook until yolk & white are rm
Ham, precooked (to Reheat) 165 °F
Fresh beef, Veal, Lamb (medium
rare)
Ground Meat & Meat mixtures
(Beef, Pork, Veal, Lamb)
Fresh beef, Veal, Lamb (medium) Poultry breast
Fresh Pork (medium) Fresh Pork (well done)
Fresh Ham (raw) 180 °F
Egg Dishes Poultry (thighs and
Ground Meat & Meat mixtures
(Turkey, Chicken)
(74 °C)
170 °F
(77 °C)
(82 °C)
Stung (cooked alone or
in bird)
Leftovers & Casseroles
Fresh beef, Veal, Lamb
(well done)
Chicken and Turkey
(Whole)
wings)
Duck and Goose
CONVECTION ROAST TECHNIQUES
Do not preheat for Convection Roast. (This mean, “PREHEAT” indication is
•
automatically appear when the Convection Roast mode is selected, but place
food inside the oven before selecting the Cooking mode.)
Roast in a low-sided, uncovered pan.
•
When roasting whole chickens or turkey, tuck wings behind back and loosely tie
•
legs with kitchen string.
Use the 2-piece broil pan for roasting uncovered. (Without the 2-piece pan, may
•
have risk of re with the drip of the fat from the meat.)
Burn Hazard
Use an oven mitt to remove temperature probe.
Do not touch broil element.
Failure to do so can result in burns.
Use the probe or a meat thermometer to determine the doneness by checking
•
internal temperature (see Convection Roast Chart).
24
Page 27

Double-check the internal temperature of meat or poultry by inserting meat
•
thermometer into another position.
Large poultry may also need to be covered with foil (and pan roasted) during a
•
portion of the roasting time to prevent over-browning.
The minimum safe internal temperature for stung in poultry is 165°F (74°C).
•
After removing the item from the oven, cover loosely with foil for 10 to 15
•
minutes before carving, if necessary, to increase the nal foodstu temperature
by 5° to 10 °F (3° to 6° C).
See Troubleshooting for tips to Solving Baking and Roasting Problems.
•
QUICK AND EASY RECIPE TIPS
Converting from standard bake to convection roast:
Temperature does not have to be lowered.
•
Roasts, large cuts of meat and poultry generally take 10-20% less cooking time.
•
Check doneness early.
Casseroles or pot roasts that are baked covered in CONVECTION ROAST will
•
cook in about the same amount of time.
CONVECTION ROAST CHART
MEATS
Beef
Rib Roast
Rib Eye
Roast,
(boneless)
Rump, Eye,
Tip, Sirloin
(boneless)
Tenderloin
Roast
Pork
Loin Roast
(boneless or
bone-in)
Shoulder
WEIGHT
lb (kg)
4-6 (2-3) 2
4-6 (2-3) 2 325 (165) 18-22
3-6 (1,5-3) 2 325 (165) 18-22
2-3 (1-1,5) 2 425 (220) 15-20 145 (63) medium
5-8 (2,5-4)
3-6 (1,5-3)
RACK
POSITION
2
2
OVEN
TEMP °F
(°C)
325 (165) 18-22
350 (175)
350 (175)
TIME
(Min.
per lb)
20-25
20-25
20-25
18-22
20-25
INTERNAL TEMP.
°F (°C)
145 (63) medium
rare
160 (71) medium
145 (63) medium
rare
160 (71) medium
145 (63) medium
rare
160 (71) medium
rare
160 (71) medium
160 (71) medium
25
Page 28

Poultry
Chicken
whole, not
stued
Turkey, not
stued
Turkey, not
stued
Turkey, not
stued
Turkey Breast
Cornish Hen
Lamb
Half Leg
Whole Leg
The TEMP and TIME in the chart above are for the 240 V setting.
Cooking times are indicative and also depend on the thickness and the starting
temperature of the meat before cooking.
3-4 (1,5-2)
12-15
(6-7,5)
16-20
(8-10)
21-25
(10,512,5)
3-8 (1,5-4)
1 - 1½
(0,5-0,75)
3-4 (1,5-2)
6-8 (3-4)
2
1
1
1
1
2
2
1
375 (190)
325 (165)
325 (165)
325 (165)
325 (165)
350 (175)
325 (165)
325 (165)
20-23
10-14
9-11
6-10
15-20
45-75
total
20-27
25-32
20-27
25-32
180 (82)
180 (82)
180 (82)
180 (82)
170 (77)
180 (82)
160 (71) medium
170 (77) well
160 (71) medium
170 (77) well
OVEN CARE AND CLEANING
SELF-CLEANING THE OVEN
WARNING
Burn Hazard
Do not touch the oven during the Self-Cleaning cycle.
Keep children away from oven during Self-Cleaning cycle.
Failure to do so can result in burns.
This oven features a Self-Cleaning function that eliminates the dicult and time
consuming manual scrubbing of the oven interior. During Self-Cleaning, the oven
uses a very high temperature (approx. 860 °F/460 °C) to burn away food soil and
grease.
26
Page 29

It is common to see smoke and/or an occasional ame-up during the Self-
•
Cleaning cycle, depending on the content and amount of soil remaining in the
oven. If a ame persists, turn o the oven and allow it to cool before opening the
door to wipe up the excessive food soil.
The door latch is automatically activated after selecting the Self-Cleaning cycle.
•
The Lock icon will appear in the display. This ensures that the door cannot be
opened while the oven interior is at clean temperatures.
The oven light does not operate during this mode.
•
During Self-Cleaning, the kitchen should be well ventilated to help eliminate
•
odors associated with Self- Cleaning. Odors will lessen with use.
1h:30 is the preset length of cleaning.
•
The mode automatically stops at the end of the clean hours.
•
When the oven heat drops to a safe temperature, the automatic door lock will
•
release and the door can be opened.
PREPARING THE OVEN FOR SELF-CLEANING
1. Remove all utensils and bake ware.
2. Remove non-porcelain oven racks.
IMPORTANT: If chromed racks are left in the oven during the Self-Cleaning cycle,
they will permanently lose the shiny nish and change to a dull, dark nish. See
Cleaning Chart for proper care.
3. Wipe up any soft soil spills and grease with paper towels. Excess grease will
cause ames and smoke inside the oven during Self-Cleaning.
4. Review illustration below. Some areas of the oven must be cleaned by hand
before the cycle begins. They do not get hot enough during the cleaning cycle
for soil to burn away. Use a soapy sponge, plastic scrubber, or a detergent-lled
S.O.S. pad. Hand-clean the oven door edge, oven front frame and up to 1½“ (2 3 cm) inside the frame with detergent and hot water. Do not rub the oven gasket.
Clean the oven door window by hand. Rinse all areas thoroughly then dry.
5. Be sure oven interior lights are turned o and the light bulbs and lens covers are
in place.
27
Page 30

SETTING THE SELF-CLEANING MODE
Before using the Self-Cleaning Mode please read the Oven Care and Cleaning page
carefully and follow the Preparing the Oven for Self-Cleaning rst.
SELF-CLEAN
Turn the mode knob in the proper position then press the +/- knob to start a
cleaning cycle.
The oven self-cleaning time can be set using the timed cooking instructions to delay
the self-cleaning cycle.
The maximum allowed clean time is 3 hours, the minimum is 1 hour. The default
time is 1h:30min, the clock display shows P1:30. At the end of the self-cleaning
activity the display shows P--- steady and A ashing. The icons will disappear from
the display when the mode selector is turned to the OFF position. The door remains
locked until the oven temperature drops below the safety threshold, at this time the
control unlocks the door.
The cooling fan starts as soon as the self-clean is selected and turns to its
higher speed when the internal components get hot. The oven temperature is
automatically set to 460°F (238°C) in order to perfectly clean the cavity.
The control also locks the door immediately for your safety because the oven
temperature will become extremely hot. The Lock icon LED shows the status of the
door lock at any time:
Door unlocked, lock LED o.
•
Door locked, lock LED always on.
•
Latch moving, transition in progress, lock LED ashing.
•
To reuse the oven after self-cleaning, turn the oven mode knob to the OFF position.
28
Page 31

GENERAL OVEN CARE
HOW TO USE THE CLEANING CHART
1. Locate the number of the part to be cleaned in the illustration below.
2. Find the part name in the Cleaning Chart.
3. Match the letter with the cleaning method on following chart.
CLEANING CHART
Cleaning Method
Part
1 Control Panel C-G 10 Interior Oven
2 Door Cooling
Vent
3 Side Trim D 12 Oven Cavity E
4 Bottom Trim D 13 Door Gasket B
5 Door Frame E 14 Oven Cooling
6 Door Handle G 15 Oven Rack A
7 Interior Door
Windows
8 Door Front C&G 17 Broiler Pan E
9 End Caps D
Please refer to the following chart for Cleaning Method.
Stainless Steel
Oven
E 11 Oven Front Frame E
F 16 Broiler Pan Rack E
Part
Door
Vents
Cleaning Method
Stainless Steel
Oven
E
D
29
Page 32

OVEN FINISHES / CLEANING METHODS
The entire oven can be safely cleaned with a soapy sponge, rinsed and dried. If
stubborn soil remains, follow the recommended cleaning methods below.
Always use the mildest cleaner that will do the job.
•
Rub metal nishes in the direction of the grain.
•
Use clean, soft cloths, sponges or paper towels.
•
Rinse thoroughly with a minimum of water so it does not drip into door slots.
•
Dry to avoid water marks.
•
The cleaners listed below indicate types of products to use and are not being
endorsed. Use all products according to package directions.
Part Cleaning Method
A Chrome
Plated
B Fiberglass
Knit
C Glass Spray Windex
D Painted Clean with hot sudsy water or apply Fantastik
E Porcelain Immediately wipe up acidic spills like fruit juice, milk and tomatoes
F Reective
Glass
G Stainless Always wipe or rub with grain. Clean with a soapy sponge then rinse
Wash with hot sudsy water. Rinse thoroughly and dry. Or, gently rub
with Soft Scrub
®
, Bon-Ami®, Comet®, Ajax®, Brillo® or S.O.S.® pads
as directed.
®
Easy O
or Dow® Oven Cleaners (cold oven formula) can be used,
but may cause darkening and discoloration.
Racks may be cleaned in the oven during the Self-Cleaning mode.
However, chromed racks will lose their shiny nish and permanently
change to a metallic gray.
DO NOT HAND CLEAN GASKET.
®
or Glass Plus® onto a cloth rst, then wipe to clean.
Use Fantastik® or Formula 409® to remove grease spatters.
®
or Formula 409®
rst to a clean sponge or paper towel and wipe clean. Avoid using
powdered cleansers and steel wool pads.
with a dry towel. Do not use a moistened sponge/towel on hot
porcelain. When cool, clean with hot sudsy water or apply Bon-
®
or Soft Scrub® to a damp sponge. Rinse and dry. For stubborn
Ami
stains, gently use Brillo® or S.O.S.® pads. It is normal for porcelain to
craze (ne lines) with age due to exposure from heat and food soil.
Clean with hot sudsy water and sponge or plastic scrubber. Rub
stubborn stains with vinegar, Windex
®
, ammonia or Bon-Ami® DO
NOT USE HARSH ABRASIVES.
®
and dry. Or, wipe with Fantastik
or Formula 409® sprayed onto a
paper towel. Protect and polish with Stainless Steel Magic® and a
soft cloth. Remove water spots with a cloth dampened with white
vinegar. Use Zud®, Cameo®, Bar Keeper’s Friend® or RevereWare
Stainless Steel Cleaner®, to remove heat discoloration.
30
Page 33

OVEN DOOR REMOVAL
a
a
a
b
c
d
TO REMOVE DOOR
IMPORTANT:
Make sure oven is cool and power to the oven has been turned o before
•
removing the door.
The oven door is heavy and fragile. Use both hands to remove the oven door.
•
The door front is glass. Handle carefully to avoid breakage.
Grasp only the sides of the oven door. Do not grasp the handle as it may swing in
•
your hand and cause damage or injury.
1. Open the door completely.
2. Lift up the hinge bracket.
a Hinge Bracket
3. Hold the door rmly on both sides using both hands and close the door.
4. Hold rmly; the door is heavy.
5. Place the door in a convenient location.
TO REPLACE DOOR
1. Insert the upper arms of both hinges into the slots. The recesses must hook on
the lips.
a Upper Arm
b Recess
c Slots
d Lip
31
Page 34

2. Move the hinge brackets back down into position.
WARNING
3. Close and open the door slowly to assure that it is correctly and securely in place.
REPLACING AN OVEN LIGHT
Electrical Shock Hazard
Make sure the oven and lights are cool and power to the oven has been
turned off before replacing the light bulb(s).
The lenses must be in place when using the oven. The lenses serve to
protect the light bulb from breaking.
The lenses are made of glass. Handle carefully to avoid breakage.
Failure to do so could result in death, electric shock, cuts or burns.
Oven is equipped with two or three halogen lights located in the side walls of the
•
oven.
The lights are switched on when the door is opened or when the oven is in a
•
cooking cycle.
The oven lights are not illuminated during Self-Cleaning.
•
Each light assembly consists of a removable lens, a light bulb as well as a light
•
socket housing that is xed in place.
Light bulb replacement is considered to be a routine maintenance item.
•
TO REPLACE A LIGHT BULB
Halogen bulb type: 120 V, 25 W (G9).
1. Make sure oven is turned o and cool.
2. Disconnect power at the main power supply (fuse or breaker box).
3. Open the snap-on lens by carefully inserting the tip of a screwdriver under
the metal holder of the lens next to a screw head. Refer to the graphic for
the location to insert the screwdriver tip and a direction to move the driver.
Unscrewing the screw is not necessary.
32
Page 35

a
a b
a Removable Lens
4. Remove the light bulb from its socket by pulling it.
a Light Bulb
b Removable Lens
5. Replace the bulb with a new one. Avoid touching the bulb with ngers, as oils
from hands can damage the bulb when it becomes hot.
NOTE: The bulb is halogen: use a bulb of the same type, checking Voltage and
Wattage.
6. Replace the lens.
7. Turn on power at the main power supply (fuse or breaker box).
33
Page 36

TROUBLESHOOTING
SOLVING BAKING AND ROASTING PROBLEMS
With either Bake or Convection Bake and Convection Roast poor results can occur
for many reasons other than a malfunction of the oven. Check the chart below for
causes of the most common problems. Since the size, shape and material of baking
utensils directly aect the baking results, the best solution may be to replace old
baking utensils that have darkened and warped with age and use. Check the Baking
Charts.
Baking and Roasting Problem Cause
Food browns unevenly
Food too brown on bottom
Food is dry or has shrunk
excessively
Food is baking or roasting too
slowly
Piecrusts do not brown on
bottom or crust is soggy
Cakes pale, at and may not
be done inside
Oven not preheated
•
Aluminum foil on oven rack or oven bottom
•
Baking utensil too large for recipe
•
Pans touching each other or oven walls
•
Oven not preheated
•
Using glass, dull or darkened metal pans
•
Incorrect rack position
•
Pans touching each other or oven walls
•
Oven temperature too high
•
Baking time too long
•
Oven door opened frequently
•
Pan size too large
•
Oven temperature too low
•
Oven not preheated
•
Oven door opened frequently
•
Tightly sealed with aluminum foil
•
Pan size too small
•
Baking time not long enough
•
Using shiny steel pans
•
Incorrect rack position
•
Oven temperature is too low
•
Oven temperature too low
•
Incorrect baking time
•
Cake tested too soon
•
Oven door opened too often
•
Pan size may be too large
•
34
Page 37

Cakes high in middle with
crack on top
Piecrust edges too brown
Oven temperature too high
•
Baking time too long
•
Pans touching each other or oven walls
•
Incorrect rack position
•
Pan size too small
•
Oven temperature too high
•
Edges of crust too thin
•
SOLVING OPERATIONAL PROBLEMS
Before calling for service, check the following to avoid unnecessary service charges.
Oven Problem Problem Solving Steps
E008 Error appears in
the display window.
Other E Error appears
in the display window.
The oven display
stays OFF
Cooling fan continues
to run after oven is
turned o
Oven door is locked
and will not release,
even after cooling
Oven is not heating Check the circuit breaker or fuse box to your house.
Oven is not cooking
evenly
Oven temperature is
too hot or too cold
Oven light is not
working properly
Oven light stays on
A problem with latch mechanism occurred. Remove
power and turn it back on again after a few seconds. The
oven should run a latch auto–test. If condition persists,
note the code number and call an authorized service
center.
Remove power and turn it back on again after a few
seconds. If condition persists, note the code number and
call an authorized service center.
Turn o power at the main power supply (fuse or breaker
box). Turn breaker back on. If condition persists, call an
authorized service center.
The fan turns o automatically when the electronic
components have cooled suciently.
Turn the oven o at the circuit breaker and wait a few
seconds. Turn breaker back on. The oven should reset
itself and will be operable.
Make sure there is proper electrical power to the oven.
Make sure the oven temperature has been selected.
Check oven calibration. Adjust calibration if necessary
(see To Set Temperature). Refer to cook charts for
recommended rack position. Always reduce recipe
temperature by 25 °F (15 °C) when baking with
Convention Bake mode.
The oven thermostat needs adjustment. See Calibrating
Oven Temperature.
Replace or reinsert the light bulb if loose or defective.
Touching the bulb with ngers may cause the bulb to
burn out.
Check for obstruction in oven door. Check to see if hinge
is bent or door switch broken.
35
Page 38

Cannot remove lens
cover on light
Oven will not Self-
Clean properly
Clock and timer are
not working properly
Excessive moisture
There may be a soil build-up around the lens cover. Wipe
lens cover area with a clean dry towel prior to attempting
to remove the lens cover.
Allow the oven to cool before running Self-Cleaning.
Always wipe out loose soils or heavy spillover before
running Self-Cleaning. If oven is badly soiled, set oven for
a four-hour Self-Cleaning. See Preparing the Oven for
Self-Cleaning.
Make sure there is proper electrical power to the oven.
See the Clock and Timer section.
When using bake mode, preheat the oven rst.
Convection Bake and Convection Roast will eliminate
any moisture in oven (this is one of the advantages of
convection).
Porcelain chips
When oven racks are removed and replaced, always tilt
racks upward and do not force them to avoid chipping the
porcelain.
FOR MORE HELP, VISIT HAIER.COM OR CALL THE CUSTOMER
SATISFACTION CENTER HELP LINE AT 1-877-377-3639.
36
Page 39

LIMITED WARRANTY
IN-HOME SERVICE
FULL TWO YEAR WARRANTY
For 24 months from the date of original retail
purchase, Haier will repair or replace any part
free of charge including labor that fails due to
a defect in materials or workmanship.
Haier may replace or repair at their sole
discretion any part, sub system including the
entire product.
Product must be accessible, without
encumbrance and installed properly to
receive for warranty repair service.
LIMITED WARRANTY
NOTE: This warranty commences on the
date the item was purchased, and the original
purchase receipt must be presented to the
authorized service representative before
warranty repairs are rendered.
Exceptions: Commercial Use Warranty
90 days labor from date of original purchase
90 days parts from date of original
purchase
No other warranty applies.
FOR WARRANTY SERVICE
All service must be performed by a Haier
authorized service center. For the name and
telephone number of the nearest authorized
service center, please call 1-877-337-3639.
Before calling please have available the
following information:
Model number and serial number of your
appliance. The name and address of the
dealer you purchased the unit from and the
date of purchase.
A clear description of the problem.
A proof of purchase (sales receipt).
This warranty covers home appliance
services within the contiguous United
States and Canada and where available in
Alaska, Hawaii and Puerto Rico.
What is not covered by this warranty:
Replacement or repair of household fuses,
circuit breakers, wiring or plumbing.
A product whose original serial number has
been removed or altered.
Any service charges not specically identied
as normal such as normal service area or
hours.
Replacement of light bulbs.
Damage to clothing.
Damage incurred in shipping.
Damage caused by improper installation or
maintenance.
Damage from misuse, abuse accident, re,
ood, or acts of nature.
Damage from service other than an
authorized Haier dealer or service center.
Damage from incorrect electrical current,
voltage or supply.
Damage resulting from any product
modication, alteration or adjustment not
authorized by Haier.
Adjustment of consumer operated controls
as identied in the owner’s manual.
Hoses, knobs, lint trays and all attachments,
accessories and disposable parts.
Labor, service transportation, and shipping
charges for the removal and replacement of
defective parts beyond the initial 24-month
period.
Damage from other than normal household
use.
Any transportation and shipping charges.
THIS LIMITED WARRANTY IS GIVEN
IN LIEU OF ALL OTHER WARRANTIES,
EXPRESS ED OR IMPLIED, INCLUDING BUT
NOT LIMITED TO, THE WARRANTIES OF
MERCHANTABILITY AND FITNESS FOR A
PARTICULAR PURPOSE
The remedy provided in this warranty is
exclusive and is granted in lieu of all other
remedies.
This warranty does not cover incidental
or consequential damages, so the above
limitations may not apply to you. Some
states do not allow limitations on how long
an implied warranty lasts, so the above
limitations may not apply to you.
This warranty gives you specic legal rights,
and you may have other rights, which vary
from state to state.
Haier America
Wayne, NJ 07470
37
Page 40

ÍNDICE
SEGURIDAD DEL HORNO .................................................................................. 79
CARACTERÍSTICAS DE SU HORNO ................................................................... 84
GENERALIDADES DEL HORNO .........................................................................85
CONSEJOS GENERALES PARA EL HORNO ........................................................86
CONTROL ELECTRÓNICO ................................................................................. 89
COCINAR CON HORNOS DE CONVECCIÓN ......................................................90
MODOS DEL HORNO ........................................................................................91
FUNCIONES DE COCINA ................................................................................... 93
BREVES CONSEJOS .......................................................................................... 94
ADJUSTE MANUAL DEL FUNCIONAMIENTO DEL HORNO .................................96
CONSEJOS Y TÉNICAS DE HORNEADO PO CONVECCIÓN ............................... 98
CONSEJOS Y TÉCNICAS DE HORNEADO ........................................................101
CONSEJOS Y TÉCNICAS DEL ASADO POR CONVECCIÓN ..............................102
CONSEJOS Y TÉCNICAS DEL ASADO .............................................................103
CONSEJOS Y TÉCNICAS DE GRILL CONVECCIÓN .......................................... 105
CUIDADO Y LIMPIEZA DEL HORNO................................................................. 107
CONFIGURACIÓN DEL MODO DE AUTOLIMPIEZA .......................................... 108
CUIDADO GENERAL DEL HORNO ................................................................... 109
ACABADOS DEL HORNO/MÉTODOS DE LIMPIEZA ......................................... 110
QUITAR LA PUERTA DEL HORNO .................................................................... 112
CAMBIAR UNA LÁMPARA DEL HORNO ........................................................... 113
SOLUCIÓN DE PROBLEMAS ............................................................................ 115
GARANTÍA LIMITADA ...................................................................................... 118
INFORMACIÓN A TENER EN CUENTA
Le agradecemos la compra de este
producto de marca Haier. Este manual
para el usuario le ayudará a obtener
el mejor funcionamiento de su nueva
horno.
Para referencia futura, anote el número
de modelo y de serie en el cuadro
interior del horno, y la fecha de compra.
Engrape la prueba de compra a este
manual para asistirle cuando necesite
obtener servicio bajo la garantía.
78
___________________________________
Número de modelo
___________________________________
Número de serie
___________________________________
Fecha de compra
Page 41

SEGURIDAD DEL HORNO
Su seguridad y la seguridad de los demás es muy importante.
Hemos incluido muchos mensajes importantes de seguridad en este
manual y en su electrodoméstico. Lea y obedezca siempre todos los
mensajes de seguridad.
Este es el símbolo de advertencia de seguridad.
Este símbolo le llama la atención sobre peligros
potenciales que pueden ocasionar la muerte o una
lesión a usted y a los demás. Todos los mensajes de
seguridad irán a continuación del símbolo de
advertencia de seguridad y de la palabra “PELIGRO,”
“ADVERTENCIA” o “PRECAUCIÓN.”
Estas palabras significan:
Se trata de una situación de
PELIGRO
ADVERTENCIA
PRECAUCIÓN
Todos los mensajes de seguridad le dirán el peligro potencial, le dirán
cómo reducir las posibilidades de sufrir una lesión y lo que puede
suceder si no se siguen las instrucciones.
peligro inminente. Si no sigue las
instrucciones de inmediato,
usted puede morir o sufrir una
lesión grave.
Se trata de una situación
posiblemente peligrosa que, de
no evitarse, podría causar la
muerte o una lesión grave.
Se trata de una situación
posiblemente peligrosa que, de
no evitarse, podría causar
lesiones moderadas o leves.
79
Page 42

La ley de Agua potable y sustancias tóxicas de California obliga al
ADVERTENCIA
ADVERTENCIA
Gobernador de California a publicar una lista de sustancias químicas
conocidas en el Estado de California como causantes de cáncer,
malformaciones congénitas u otros daños reproductivos y además,
obliga a las empresas a advertir a las personas si creen que van a estar
expuestas a tales sustancias químicas.
Este producto contiene una sustancia química que figura en la lista de
sustancias peligrosas del Estado estadounidense de California y que se
conoce como causante de cáncer, malformaciones congénitas u otros
daños reproductivos. Este electrodoméstico puede provocar una baja
exposición a algunas de las sustancias de la lista, incluidos el benceno,
el formaldehído, el monóxido de carbono, el tolueno y el hollín.
ADVERTENCIAS PARA LA INSTALACIÓN ELÉCTRICA
Peligro de choque eléctrico
La instalación y el servicio deberán llevarse a cabo por parte de un
instalador competente o una agencia de servicio.
Los modelos funcionan a 240 V o 208 V de potencia.
Siempre desconecte el suministro de energía antes de darle servicio a
la unidad.
Este aparato debe estar correctamente conectado a tierra.
No seguir esta instrucción puede ocasionar la muerte o lesiones
graves.
80
Page 43

INSTRUCCIONES IMPORTANTES
DE SEGURIDAD
ADVERTENCIA: Para reducir el riesgo de incendio, choque eléctrico,
lesiones a personas o daños al utilizar el horno, siga precauciones
básicas, incluyendo las siguientes:
Instalación correcta
La instalación y conexión a
•
tierra del aparato deben ser
efectuadas adecuadamente
por un técnico competente.
Conéctelo solamente a
un contacto debidamente
conectado a tierra. Vea
“Instrucciones para la
conexión a tierra” en las
Instrucciones de instalación.
Este aparato solo debe ser
•
reparado por un técnico
de servicio competente.
Comuníquese con el centro
de servicio autorizado más
cercano para su examen,
reparación o ajuste.
No repare ni reemplace
•
ninguna pieza del horno,
salvo que se recomiende
especícamente. Hágalo
reparar por un técnico de
servicio autorizado.
No encienda el aparato si
•
no funciona correctamente
o está dañado, hasta que lo
revise un técnico de servicio
autorizado.
Instale o coloque este
•
aparato sólo conforme a las
Instrucciones de instalación.
Este horno debe usarse
•
conforme al n para el cual
fue diseñado. En caso de
preguntas, póngase en
contacto con el fabricante.
No cubra ni bloquee ninguna
•
abertura de este aparato.
Use este aparato sólo
•
para lo que fue diseñado,
como se describe en este
manual. No use en este
aparato productos químicos
corrosivos, vapores o
productos no alimenticios.
Este tipo de horno ha sido
especícamente diseñado
para calentar o cocinar. No
se ha diseñado para uso
industrial o de laboratorio. El
uso de sustancias químicas
corrosivas para calentar
o limpiar pueden dañar el
aparato.
Para reducir el riesgo de
incendio en la cavidad del horno:
No almacene materiales
•
inamables dentro o cerca del
horno.
No use agua para extinguir
•
un incendio provocado por
grasa. Extinga el incendio o
use un extinguidor de tipo
espuma o químico seco.
Recomendamos
•
especialmente tener a mano
un extinguidor de incendios
en un lugar altamente visible
cerca de cualquier aparato de
cocción.
No cocine en exceso los
•
alimentos. Vigile muy bien
el horno si se coloca papel,
plástico o cualquier material
combustible dentro de este.
81
Page 44

INSTRUCCIONES IMPORTANTES
DE SEGURIDAD
No use la cavidad para
•
almacenamiento. No deje
productos de papel, utensilios
de cocina ni alimentos en la
cavidad cuando no la utiliza.
Si se encienden los materiales
•
dentro del horno, mantenga
la puerta cerrada. Apague el
horno y desconecte el circuito
en la caja de cortacircuitos.
Cerciórese de que el
•
ventilador del soplador se
enciende cuando el horno
está en funcionamiento. Si el
ventilador no funciona, no use
el horno. Llame a un centro de
servicio autorizado.
Nunca use el horno para
•
calentar o entibiar la
habitación. Esto podría dañar
las piezas del horno.
Seguridad personal
No permita que los niños
•
utilicen este aparato, salvo
que fueran supervisados
de cerca por un adulto. No
se debe dejar a los niños
o mascotas solos o sin
supervisión en el área donde
el aparato está en uso. Nunca
permita que los niños se
sienten o se paren en ninguna
parte del horno.
No almacene artículos que
•
interesen a los niños sobre el
horno. Si los niños se trepan
al aparato para alcanzar algún
objeto, podrían sufrir una
lesión grave.
Para su seguridad personal,
•
use prendas de vestir
adecuadas. Nunca debe
ponerse ropa holgada o con
mangas colgando mientras
esté usando el aparato.
Recoja el cabello largo para
•
que no quede suelto.
No toque los elementos
•
calefactores ni las supercies
interiores del horno.
Los elementos calefactores
•
podrían estar calientes aún
si están de color oscuro.
Las supercies interiores
de un horno se calientan lo
suciente como para causar
quemaduras.
Durante y después del uso,
•
no toque ni deje que la ropa u
otros materiales inamables
toquen los elementos
calefactores ni las supercies
interiores del horno hasta
que haya transcurrido tiempo
suciente para que se enfríen.
El borde superior y los
•
laterales de la puerta del
horno pueden calentarse
demasiado y ocasionar
quemaduras.
Tenga cuidado al abrir
•
la puerta. Debe abrirla
suavemente para dejar que
salga el aire caliente o el vapor
antes de quitar o volver a
colocar alimentos.
No ponga a calentar
•
recipientes de alimentos
cerrados. La acumulación de
presión puede hacer que el
recipiente explote y ocasione
lesiones.
82
Page 45

INSTRUCCIONES IMPORTANTES
DE SEGURIDAD
Siempre coloque las parrillas
•
del horno en el lugar deseado
mientras el horno esté frío.
Si se debe mover la parrilla
mientras el horno está
caliente, no permita que la
agarradera de ollas entre en
contacto con el elemento
calefactor caliente.
Use solo agarraderas de
•
ollas secas. Las agarraderas
de ollas húmedas o
mojadas en las supercies
calientes pueden ocasionar
quemaduras por vapor. No
deje que la agarradera de
ollas toque los elementos
calefactores calientes. No
use una toalla ni otros paños
voluminosos.
Seguridad para el horno
autolimpiante:
Antes de comenzar con
•
la autolimpieza del horno,
saque la charola para asar,
las parrillas del horno (solo si
no son de porcelana), otros
utensilios y el exceso de
derrames ligeros.
Conrme que la puerta se
•
traba y no se abre cuando
ambos selectores se
encuentran en la posición
CLEAN (Limpiar) y aparece el
icono de bloqueo de puerta.
Si la puerta no se traba,
gire el selector de modo de
cocción a la posición OFF
(Apagado) y no efectúe SelfClean (Autolimpieza). Llame al
servicio técnico.
No limpie la junta de la puerta.
•
Es esencial para que quede
bien sellada. Deberá tener
cuidado de no frotar, dañar ni
mover o quitar la junta de la
puerta.
No deberá usarse ningún
•
limpiador para horno
comercial ni revestimiento
protector para hornos de
ninguna clase dentro ni
alrededor de ninguna parte
del horno.
Limpie solo las piezas
•
enumeradas en este manual.
Otras supercies del
•
aparato pueden calentarse
lo suciente como para
causar quemaduras, entre
esas supercies están
(identicación de supercies,
por ejemplo, los oricios de
ventilación del horno y las
supercies cercanas a esos
oricios, las puertas del horno
y las ventanas de las puertas
del horno).
LEA Y GUARDE ESTAS
INSTRUCCIONES
83
Page 46

CARACTERÍSTICAS DE SU HORNO
i
h
g
a b c
f e
a Aberturas de enfriamiento del horno
b Elemento para asar
c Panel de control
d Lámparas halógenas
e Ventiladores de convección y elementos
(no visible)
f Elemento de horneado (no visible)
g Placa con # de serie y modelo
j
k
d
l
m
h Sonda carne (si existe)
i Empaque de la puerta
j Fondo
k Frente
l Bandeja de parrilla
m Bandeja de asado
84
Page 47

GENERALIDADES DEL HORNO
ADVERTENCIA
Peligro de incendio
Retire todo el embalaje y el material no perteneciente al horno.
Cualquier material de este tipo que se deje en el interior podría fundirse
o arder al utilizar el electrodoméstico.
No seguir esta instrucción puede ocasionar la muerte o incendio.
CONEXIÓN DE 240 V CONTRA 208 V
La mayoría de instalaciones para hornos dispondrán de una conexión de 240 V. Si su
horno está instalado con 208 V, el precalentado puede ser ligeramente más largo
que con un voltaje de 240 V. El horno está diseñado para asegurar el mismo tiempo
de limpieza a 208 V.
HORNEADO A GRAN ALTITUD
Cuando se hornea a gran altitud, las recetas y el tiempo de cocción varían con
respecto a los estándares.
ERROR DE APAGÓN
Cuando vuelva la corriente, la pantalla del reloj marcará las 12.00.
CÓDIGOS DE NÚMEROS ERROR E
Si estos códigos aparecen en la pantalla cuando el control electrónico detecta algún
problema en el horno o en la parte electrônica.
CHIRRIDO
Es posible que se oiga un ruido proveniente del electrodoméstico al utilizar el
hrono debido a la deformación por el calor; no se trata de ningún problema de
funcionamiento.
SÍMBOLOS PARPADEANTES O NÚMEROS
Indican una acción incompleta que está en curso (bloqueo de la puerta,
precalentamiento, etc.).
PITIDOS
Señal que indica que se ha alcanzado la temperatura programada. Los pitidos
también senalan el nal de una función o un error del horno.
85
Page 48

VENTILADOR DE CONVECCIÓN
El ventilador de convección trabaja durante cualquier modo de convección o
deshidratado.
VENTILADOR DE REFRIGERACIÓN DE LOS COMPONENTES
Se activa durante todos los modos de cocción y la Autolimpieza para refrigerar los
componentes internosy la supercie de la puerta exterior. El aire se expulsa a traés
de las aberturas colocadas por encima de la puerta del horno. Sigue funcionando
hasta que los componentes se han enfriado lo suciente. El ventilador de
refrigeración va al doble de velocidad (o de RPM) en el modo la Autolimpieza y cada
vez que los componentes internos aumentan su temperatura.
USO DE LAS LÁMPARAS DEL HORNO
Cuando el horno está en función, las lámparas del horno se encienden
•
automáticamente cuando inicia el modo. Las lámparas del horno se apagan
austomátcamente al nalizar y cuando el modo del horno se anula.
Las lámparas no funcionan en el modo de la Autolimpieza.
•
El interruptor (LIGHT) activa las luces del horno.
•
FAHRENHEIT Y CELSIUS
La temperatura se muestra en grados Fahrenheit, pero se puede cambiar a grados
Celsius.
CONSEJOS GENERALES PARA EL HORNO
AJUSTES POR DEFECTO
Los modos de cocción seleccionan automáticamente una temperatura adecuada.
Estas se pueden cambiar cuando se necesita una temperatura diferente.
CONDENSACIÓN Y TEMPERATURA DEL HORNO
Es normal que una cierta cantidad de humedad se evapore de los alimentos
•
durante el proceso de cocción. La cantidad depende del contenido de humedad
que contienen los alimentos. La humedad se puede condensar sobre cualquier
supercie más fría que el interior del horno, como el panel de control.
Su nuevo horno dispone de un sensor electrónico de temperatura que permite
•
mantener una temperatura exacta. Quizás su horno anterior disponía de un
termostato mecánico que se desviaba gradualmente al cabo del tiempo a una
temperatura más alta. Es normal que deba adaptar sus recetas preferidas al
cocinar en un horno nuevo.
SUGERENCIAS PARA EL USO
Utilice las tablas de cocción como guía.
•
No coloque recipientes ni peso alguno sobre la puerta abierta del horno.
•
Utilice la iluminación interior del horno para ver los alimentos a través de la
•
ventana de la puerta del horno, en lugar de abrir la puerta constantemente.
86
Page 49

UTENSILIOS
Los platos de vidrio para cocción absorben el calor. Reduzca la temperatura del
•
horno en 25 °F (15 °C) cuando cocine en vidrio.
Utilice recipientes que le permitan dorar los alimentos como desee. El tipo de
•
acabado de los recipientes determinará cuánto conseguirá dorar los alimentos.
Los recipientes brillantes, de metal liso o con un ligero tratamiento
•
antiadherente I anodizados reejan el calor, lo que permite conseguir un dorado
más suave y delicado. Los pasteles y galletas requieren este tipo de utensilios.
Los recipientes oscuros, rugosos o mates absorberán el calor y, por tanto, lo
•
que permite conseguir una corteza más dorada y crujiente. Use este tipo para
pasteles.
Para conseguir una corteza dorada y crujiente, utilice utensilios oscuros
•
antiadherentes / anodizados, utensilios oscuros mate o recipientes de vidrio
para cocción.
No cocine con la bandeja de asado vacía dentro del horno, ya que podría alterar
•
las condiciones de cocción. Guarde la bandeja de asado fuera del horno.
REJILLAS DEL HORNO
6
5
4
3
2
1
El horno tiene guías para las rejillas en seis niveles, tal como se muestra en la
•
ilustración.
Las posiciones de las rejillas están numeradas desde la guía de la rejilla inferior
•
(#1) a la superior (#6).
Consulte las tablas de cocinar para determinar las mejores posiciones de la
•
rejilla para usar cuando se cocina.
Cada guía de nivel consiste en un par de soportes forma-dos en las paredes de
•
cada lado del interior del horno.
Asegúrese siempre de que las rejillas del horno se encuentran en la posición
•
correcta antes de encender el horno. Asegúrese de que las rejillas estén
niveladas una vez colocadas en posición.
Si tiene dudas, como por ejemplo, qué lado es la parte frontal o la parte
superior de la rejilla, tome como referncia Características de su horno.
Las rejillas están diseñadas para pararse cuando se tiran hacia atrás hasta
•
el tope.
87
Page 50

IMPORTANTE: Nunca utilice papel de aluminio para tapar las rejillas del horno o para
forrar el horno. El calor atrapado por debajo del papel de aluminio puede dañar el
revestimiento del horno.
IMPORTANTE: Asegúrese de que no la ha forzado para evitar daños al esmalte.
Para sacar las rejillas del horno:
1. Agarre la rejilla y empújela hacia adelante
2. Incline la parte frontal de la rejilla hacia arriba y sáquela
Para meter una rejilla del horno:
1. Coloque la parte de atrás de la rejilla entre las guías de nivel de rejilla
2. Mientras inclina la parte frontal de la rejilla hacia arriba, deslice la rejilla a lo largo
de la vía mientras baja la parte fronta.
88
Page 51

CONTROL ELECTRÓNICO
DESCRIPCIÓN DEL PANEL DE MANDOS
El panel de mandos del horno está compuesto por un display y dos botones.
Display de tiempo y temperatura
•
Botón tiempo + temperatura (Push & Turn)
•
Botón modo (funciones del horno)
•
El botón Push & Turn sirve principalmente para el ajuste del reloj y de la temperatura
y para la programación de las funciones de tiempo automáticas. Seleccione el
parámetro deseado pulsando el botón.
+
-
Convect
Roast
EL RELOJ DEL HORNO
IMPORTANTE: Después de la instalación inicial y cortes de energía, la hora del día
(12:00 a.m.) parpadeará para avisarle que je la hora del día correcta. El horno no
funcionará hasta que se haya jado la hora del día.
CONFIGURACIÓN DE LA HORA DEL DÍA
Empuje hacia adentro la perilla Time/Temp (Tiempo/Temperatura) para alternar
entre la hora del día y el temporizador, y para ver los horarios jados.
1. Gire la perilla del modo de horno hacia la posición OFF (Apagado).
2. Gire la perilla -/+ hacia la izquierda o derecha; el indicador de tiempo comienza a
destellar.
NOTA: Las horas y los minutos se jan por separado.
3. Gire la perilla de nuevo, hasta que los dígitos de las horas comiencen a destellar.
4. Ajuste los números de las horas que destellan girando la perilla -/+ hacia la
izquierda o derecha.
5. Empuje hacia adentro la perilla -/+ una vez para jar las horas y los números de
los minutos comenzarán a destellar.
6. Ajuste los números de los minutos que destellan girando la perilla -/+ hacia la
izquierda o derecha. Después de unos segundos, los números de la hora y de los
minutos comenzarán a destellar.
7. Espere otros 10 segundos hasta que la nueva hora del día quede ja. La hora está
jada ahora.
89
Page 52

CONFIGURACIÓN DEL TEMPORIZADOR
NOTAS:
La pantalla mostrará la hora del día (prejada), hasta que presione la perilla para
•
seleccionar el temporizador (ícono gráco del temporizador).
El temporizador se puede jar para una cantidad de tiempo de 0 a 240 minutos.
•
El tiempo prejado es de 30 minutos.
•
El temporizador del horno se puede utilizar para tomar el tiempo de otras
•
actividades, incluso cuando el horno está apagado.
Para ajustar el temporizador:
1. Empuje hacia adentro la perilla para seleccionar el temporizador.
2. Gire la perilla hacia la derecha o izquierda para seleccionar la hora.
3. Cuando pase el tiempo,
que se repetirán cada 3 segundos.
4. Empuje hacia adentro la perilla para detener la alarma del temporizador.
destellará y el temporizador emitirá dos pitidos cortos
VOLUMEN DE LA ALARMA DEL TEMPORIZADOR
Para ajustar el volumen de la alarma del temporizador:
1. Gire la perilla del modo de horno hacia Light (Luz).
2. Gire la perilla Time/Temp (Tiempo/Temperatura) hacia la izquierda para
seleccionar entre 3 volúmenes disponibles.
NOTA: La alarma del temporizador emitirá dos pitidos cortos cada 3 segundos
en el nivel de volumen seleccionado hasta que la alarma se apague o se
desconecte.
UNIDAD DE MEDIDA DE LA TEMPERATURA
Para seleccionar grados centígrados o Fahrenheit, presionar dos veces la perilla +/-;
cuando en la pantalla se observa el símbolo F o C, girar la perilla +/- para cambiar la
unidad de medida y presionar la perilla +/- para conrmar.
COCINAR CON HORNOS DE CONVECCIÓN
En un horno convencional, las fuentes de calor se encienden y se apagan para
mantener una temperatura media en la cavidad del horno.
Debido a que la temperatura aumenta y disminuye gradualmente, se producen
ligeras corrientes de aire en el interior del horno. Esta convección natural tiende
a ser inecaz, ya que las corrientes son irregulares y lentas. En este sistema de
convección, el calor se “transmite” mediante un ventilador que proporciona
circulación continua de aire caliente. Este sistema de convección europeo
proporciona una ingeniería de vanguardia y un diseño avanzadopara crear el más
sosticado horno de convección. En los normos de convessión estánder, un
ventilador simplemente hace circular el aire caliente alrededor de los alimentos.
El sistema se caracteriza por la combinación de un elemento de calentamiento
adicional situado alrededor del ventilador de convección y el panel de ventilación
que distribuye el aire caliente en tres dimensiones: a lo largo de los laterales, la parte
superior y el fondo de la cavidad del horno. Este sistema de convección europeo
ayuda a que la temperatura del horno se mantenga más uniforme a lo largo de la
cavidad del horno.
90
Page 53

El aire circulante ayuda a agilizar el proceso de cocción y cocina los alimentos de
forma más uniforme. Al controlar el movimiento de aire caliente, la cocción por
convección produce alimentos uniformemente dorados que están crujientes en su
exterior, aunque jugosos en su interior. La cocción por convección funciona mejor
para pan y pastas, así como para la carne y aves. Los alimentos que se elevan con
aire, como los bollos de crema, los sués y los merengues suben más que en un
homo convencional. Las cames quedan jugosas y tiernas a la vez que en su exterior
están sabrosas y crujientes.
Al utilizar el sistema de convección europeo, es posible cocinar los alimentos a más
baja temperatura y reducir los tiempos de cocción.
Al utilizar este modo, la temperatura estándar del horno deberá reducirse en 25 °F
(15 °C). Los alimentos que necesiten menos tiempo de cocción deberán controlarse
un poco antes de lo normal. Para conseguir los mejores resultados, los alimentos
deben cocinarse destapados y en recipientes con bordes bajos para aprovechar
la circulación forzada de aire. Al utilizar el modo de asado por convección, no es
necesario reducir la temperatura estándar del horno.
VENTAJAS DE COCINAR POR CONVECCIÓN
Es posible cocinar al mismo tiempo con múltiples rejillas sin transferir el sabor
•
con buenos resultados.
Cocinar con múltiples rejillas ahorra tiempo.
•
Prepara comidas completas de una sola vez sin transferir los sabores.
•
No precisa moldes para horneados especiales.
•
Verduras deshidratadas, frutas y vegetales.
•
Ahorra tiempo y energía.
•
El asado por convección permite el asado a la parilla extraordinario con cortes
•
más gruesos del alimento.
MODOS DEL HORNO
Las siguientes ilustraciones dan una vista general de lo que sucede en el horno
en cada modo de ajuste. Las echas representan la posición de la fuente de calor
durante cada uno de lost modos. Los elementos inferiores están ocultos bajo
el piso inferior.
El tiempo máximo para que el horno permanezca encendido es de 11 horas y 59
minutos. Una vez transcurrido este período de tiempo, “END” (Fin) aparecerá en la
pantalla.
Ajuste la hora girando la perilla +/- para agregar más tiempo.
•
Gire la perilla del modo de horno para seleccionar la función del horno deseada.
•
CONV BAKE (HORNEADO POR CONVECCIÓN)
Temperatura establecida: de 120 °F (50 °C) a 480 °F (250 °C
(posición preestablecida en 375 °F (190 °C)
El horneado por convección cocina con aire que proviene de
tercer elementos que se encuentra detrás de la pared trasera
del homo. Este calo circula a través del homo por medio de un
ventilador de convección.
91
Page 54

CONV BROIL (ASADO POR CONVECCIÓN)
Temperatura establecida: de 120 °F (50 °C) a 485 °F (250 °C)
(posición preestablecida en 445 °F (230 °C)
El Asado por convección combina el calor intenso del
elemento superior con el aire que circula por medio del
ventilador de convección.
CONV ROAST (GRILL POR CONVECCIÓN)
Temperatura establecida: de 120 °F (50 °C) a 480 °F (250 °C)
(posición preestablecida en 375 °F (190 °C)
El Grill por Convección usa el calor de los elementos
superiores e inferiores, así como el calor del ventilador de
convección.
BAKE (HORNEADO)
Temperatura establecida: de 120 °F (50 °C) a 485 °F (250 °C)
(posición preestablecida en 410 °F (210 °C)
En el horneado se cocinar con aire caliente. Tanto el elemento
superior como el inferior se encienden en ciclos para
mantener la temperatura del horno.
ASADO (BROIL)
Temperatura establecida: de 120 °F (50 °C) a 485 °F (250 °C)
(posición preestablecida en 445 °F (230 °C)
El Asado usa el calor intenso que radia el elemento superior.
DESCONGELADO (CONV)
En Defrost no se utiliza ningún elemento de calentamiento,
sino que para descongelar los alimentos se emplea
únicamente el Ventilador de convección.
92
Page 55

FUNCIONES DE COCINA
Gire la perilla del modo de horno para seleccionar la función del horno deseada.
Control Descripción de la función Se utiliza para…
OFF
Light (La luz)
Defrost
(Descongelar)
Bake
(Horneado)
Convect Roast
(Asado de
convección)
Convect Bake
(Horneado de
convección)
Convect
Broil (Grill de
convección)
Broil (Grill)
Todos las funciones de
cocción están apagadas (en
OFF) y las resistencias están
apagadas (en OFF).
Solo la luz del horno está en
funcionamiento.
En esta función solo el
ventilador interno de
convección está encendido
(en ON), por ej.: el horno no se
calienta.
En la función de horneado las
dos resistencias del horno
superior e inferior se utilizan
para calentar el aire del horno.
El ventilador no se utiliza para
hacer circular el calor.
La función de asado de
convección usa la resistencia
superior (arriba), la resistencia
inferior (abajo) y el ventilador
de convección del horno.
La función de horneado de
convección usa la resistencia
circular o la resistencia oculta
tras el deector en la pared
trasera del horno. El calor
circula por todo el horno
por medio del ventilador de
convección.
La función de grill de
convección combina el calor
intenso de la resistencia
superior (arriba) con el aire
que circula por medio del
ventilador de convección.
La función grill utiliza el
calor intenso que radia la
resistencia superior (arriba).
N/A
N/A
Esta función se utiliza para
descongelar alimentos
congelados.
Esta es la manera tradicional de
cocina sobre una bandeja. Por lo
tanto, se tiene que usar una sola
bandeja cuando se selecciona la
función de hor-neado. Ideal para
aperitivos, galletas, pastas de
café y cookies.
Ideal para asar pollos o pavos
enteros y pizzas. También
se puede usar para hornear
aperitivos, galletas, tartas de
café y cookies en uno o varios
niveles.
Por consiguiente, es posible
cocinar varios alimentos a la
vez (al máximo tres niveles) y
es apropiado para preparar una
comida completa (pequeñas
porciones). Se evitan las
mezclas de sabores y se obtiene
un importante ahorro de
energía.
Ideal para letes, hamburguesas,
cuartos o pechugas de pollo.
Ideal para preparar tostar, dorar
y gratinar.
93
Page 56

Self Clean
(Autolimpieza)
El tiempo estándar es de 1.30
h y se puede cambiar.
Función PYRO o de
autolimpieza. En esta
función el horno se limpia
automáticamente quemando
los residuos de cocción a alta
temperatura (alrededor de
460°C) durante un periodo que
va de 1 a 3 horas. Durante el
ciclo de autolimpieza todos
los humos que se producen se
ltran y luego se expulsan en el
medio ambiente.
BREVES CONSEJOS
COCINAR POR CONVECCIÓN
ACERCA DE LA COCINA POR CONVECCIÓN
Los modos de cocción estándar (horneado, asado, etc.) emplean el calor irradiado
desde uno o más elementos para cocinar los alimentos. Los modos de convección
emplean tanto el calor procedente de los elementos como los ventiladores de la
parte trasera del horno para que el aire calentado circule de forma continua por todo
el horno.
VENTAJAS DE COCINAR POR CONVECCIÓN
EIncluso horneando, alimentos dorados y crujientes.
•
Los jugos y aromas quedan sellados en el interior.
•
Los alimentos que suben mucho como los bollosde crema, los sués, merengues
•
y el pan se elevan más y son más ligeros.
Se puede cocinar con múltiples rejillas.
•
No se requieren recipientes especiales.
•
Ahorra tiempo y energía.
•
94
Page 57

NO utilice el horneado por convección para las carnes. En su lugar, utilice el grill
por convección.
Modo
Horneado
por
convección
Asado por
convección
Grill por
convección
Use este
tipo para
Grandes
•
cantidades
de alimentos
en múltiples
rejillas.
Pastelitos,
•
pan, galletas
saladas,
alimentos y
aperitivos.
Cortes más
•
gruesos y
tiernos de
carne, aves y
pescado.
NO utilice
•
este modo
para dorar
pan o guisos.
Cortes más
•
grandes y
tiernos de
carne y aves,
como pollo
asado o
entero.
Para obtener los
mejores resultados
Utilice recipientes
•
bajos y sin tapar.
Centre la bandeja
•
de horneado
entre lado y lado
de la rejilla del
horno.
Las carnes deben
•
tener un grosor
de al menos 1”.
NO cubra la carne
•
ni use bolsas para
cocinar.
Consulte la
•
Tabla de grill po
convección de
este manual
para conocer
los tiempos de
cocción.
Breves consejos
de cocina
Reduzca la
•
temperatura de
la receta en 25 °F
(15°C).
Controle si los
•
alimentos están
cocidos antes:
Si en la receta le
indica que controle los
alimentos
1-15 min.
3 min. antes
16-30 min.
5 min. antes
31 min.-1h.
10 min. antes
No es necesaria
•
ningun converseón
respecto al asado
estándar.
Consulte la
•
Tabla de asado
por convección
de este manual
para conocer los
tiempos de cocción.
NO modique la
•
temperatura de
la receta.
95
Page 58

ADJUSTE MANUAL DEL FUNCIONAMIENTO DEL HORNO
ADVERTENCIA
Girar el botón de modo a la posición deseada; en el reloj aparece On durante unos
segundos. El horno puede funcionar hasta 12 horas al máximo. Según el modelo
de horno, las funciones a disposición pueden variar en cuanto a número y tipo. Si en
visualización reloj está activa la función aparece el (es decir, no en las posición luz).
Girar el selector Temperatura+Tiempo y ajustar la temperatura del homo deseada.
El sistema prevé una temperatura preajustada (PRESET) para cada modo de
horneado o una gama completa entire MÍN. y MÁX. que se ajusta manualmente.
Comprobar el valor visualizado después de seleccionar la temperatura.
La temeratura aparece en el display del reloj después de haberse pulsado el selector
Tiempo+Temperatura, o bien justo despu´s de seleccionar una nueva función.
Tan pronto como el horno arranca, el indicador luminoso de precalentamiento
(indicado por barras) dabajo del display del reloj se pone a parpadear; pasa a luz ja
cuando naliza el precalentamiento. Emitiendo una señal acústica.
Girar el selector de modo a la posición CERO (OFF) para detener todas las
actividades; aparece durante unos segundos la indicación OFF.
AJUSTE DEL FUNCIONAMIENTO AUTOMTICO DEL HORNO
Peligro de intoxicación por alimentos
No deje sus alimentos en el horno por más de una hora antes o después
de su cocción.
No seguir esta instrucción puede ocasionar intoxicación alimentaria o
enfermedad.
Después de seleccionar el modo de horno, puede programar el horno para la cocción
programada. El programa de cocción programada permanecerá jado incluso si
cambia el modo de horno, con excepción del modo Self-Clean (Autolimpieza).
Las posibilidades a disposición son las siguientes:
1. Horneado temporizado con ajuste del tiempo de horneado (duración).
2. Horneado temporizado con ajuste del n de tiempo de horneado (hora de
apagado).
3. Horneado retardado con ajuste de la duración y de la hora de apagado.
Pulsar el botón para conmutar entre la modalidad duración de horneado (tiempo de
horneado) y la modalidad nal del tiempo de horneado (hora de apagado). Aparecen
visualizadas respectivamente las palabras “dur” o “End”.
Girar el botón a la izquierda o a la derecha para editar el valor de duración o la hora de
apagado cuando está visualizada la palabra correspondiente.
96
Page 59

1. Cuando está visualizada la palabra dur, el sistema muestra como duración de
horneado el valor 30’. Girar el botón a la izquierda o a la derecha para ajustar la
duración de horneado deseada en un rango comprendido entre 0 y 240 minutos.
Aparecerán unos segundos parpadeando y alternándose la palabra dur y su
valor; a continuación aparecerán la hora, el símbolo de la cacerola y la letra
que indica que está activo un horneado temporizado. El nal de la duración de
horneado queda actualizado automáticamente.
2. Cuando aparece la palabra End, el sistema muestra la hora actual como hora de
apagado inicial. Para ajustar la hora de n de homeado deseada en un rango de
24 oras:
Girar el botón a la izquierda/derecha, las horas parpadean.
•
Girar el botón a la derecha/izquierda para modicar el valor parpadeante de
•
las horas.
Apretar el botón para moverse entre las horas y los minutos o esperar unos
•
segundos hasta que los minutos parpadeen.
Girar hacia la izquierda/derecha para modicar el valor parpadeante de los
•
minutos.
Esperar hasta que el nuevo valor de n de tiempo de horneado deje de
•
parpadear.
Aparecerán unos segundos parpadeando y alternándose la palabra End y su valor;
a continuación aparecerán la hora, el símbolo
activo un horneado temporizado. La duración de horneado queda actualizado
automáticamente.
3. Repetir las mismas operaciones que en el punto 1 y a continuación apretar el
botón hasta que aparezca la palabra End. El sistema muestra como hora de
apagado inicial el valor “hora actual+duración de horneado”. No se puede reducir
el n de la duración de horneado por debajo de este valor. Para ajustar la hora de
n de horneado deseada en un rango de 24 horas:
Girar el botón a la izquierda/derecha, las horas parpadean.
•
Girar el botón a la derecha/izquierda para modicar el valor parpadeante de
•
las horas.
Apretar el botón para moverse entre las horas y los minutos o esperar unos
•
segundos hasta que los minutos parpadeen.
Girar el botón hacia la derecha/izquierda para modicar el valor parpadeante
•
del los minutos.
Esperar hasta que el nuevo valor de n de tiempo de horneado deje de
•
parpadear.
Aparecerán unos segundos parpadeando y alternándose la palabra End y su valor ;
a continuación aparecerán la hora y la letra que indica que está activo un horneado
retardado. Tan pronto como naliza el tiempo de retardo, el horno se pone en
marcha y trabajará durante el tiempo de horneado programado. El display muestra
el símbolo
Al terminar cualquier actividad temporizada, el sistema de mando apaga el horno,
el avisador acústico emite una secuencia de aviso (dos bip cortos repetidos a
intervalos de 3 segundos) para llamar la atención del usuario y los iconos relativos al
tiempo
el mensaje de aviso.
Girar el selector de modo a la posición CERO (OFF) antes de utilizar nuevamente el
horno.
.
parpadean. Apretar el botón para apagar el avisador acústico y reconocer
y la letra “A” que indica que está
97
Page 60

CONSEJOS Y TÉNICAS DE HORNEADO PO CONVECCIÓN
Reduzca las temperaturas del horneado de las recetas en 25 °F (15 °C).
Para obtener mejores resultados, se recomienda poner los alimentos en
•
bandejas planas, no tapadas para beneciarse de la circulación del aire forzado.
Utilice moldes de aluminio brillante para obtener los mejores resultados si no se
especica nada más.
Se puede utilice vidrio refractario o cerámica. Reduzca la temperatura en otros
•
25 °F (15 °C) cuando utiliza platos de vidrio refractario, con una reducción total de
50 °F (30 °C).
Se pueden usar moldes de metales oscuros. Tenga presente que los alimentos
•
se dorarán más rápidamente si usa recipientes de metal oscuro.
El número de rejillas utilizadas lo determina la altura del alimento que tienen que
•
cocinar.
La mayoría de los elementos horneados, se cocinan fantásticamente bien
•
por convección. No intente convertir recetas como natillas, quiches, tartas
de calabaza ni pasteles de queso, donde el proceso de calentamiento por
convección no es el adecuado. Con estos alimentos, utilice el modo de horneado
normal.
Cocinar con múltiples rejillas para comidas realizadas al horno se debe a la
•
posición de las rejillas 1, 2, 3, 4 y 5. Se pueden utilizar todas las rejillas, para las
galletas, bollos y galletitas saladas.
Con 2 rejillas de horneado. Use las posiciones 1 y 3.
•
Con 3 rejillas de horneado. Use las posiciones 2, 3 y 4 o 1, 3 and 5.
•
Cuando hornea cuatro
•
capas con pasteles al mismo
tiempo, coloque los moldes
de tal modo que ningún molde
quede directamente encima
de otro. Para lograr mejores
resultados, coloque los
moldes en la parte frontal de
rejilla superior y en el fondo de
la rejilla inferior (vea la gura a
la derecha). Permita 1” - 1½”
(2.5 - 3cm) de espacio libre
alrededor de los moldes.
Rejilla 3
Rejilla 1
Transformar su propia receta puede ser fácil. Elija una receta que funcione bien
•
en el modo de convección.
98
Page 61

Reduzca la temperatura y el tiempo de cocción si fuera necesario. Puede ser
•
necesaria alguna prueba y error para obtener un resultado perfecto. Conserve
los resultados de su técnica para la próxima vez que quiera preparar la misma
receta utilizando el sistema por convección.
Consulte Solución de problemas para obtener sugerencias para la resolución de
•
hornear y asar problemas.
ALIMENTOS RECOMENDADOS PARA MODO DE HORNEADO POR
CONVECCIÓN:
Galletitas saladas y hojaldres, tortas para el café, Pasteles (de 2 a 4 rejillas) Masa
de levadura, Bollos de crema, Popovers, Guisos y entrantes, Comidas preparadas
al horno (posición de las rejillas 1, 2, 3), Alimentos que se elevan con aire (Sués,
Merengues, Postres recubiertos con merengues, Bizcocho Angel, Bizcochos)
6
5
4
3
2
1
CONSEJOS PARA RECETAR RÁPIDAS Y FÁCILES
Para transformar el HORNEADO estándar en HORNEADO POR CONVECCIÓN:
Reduzca la temperatura en 25 °F (15 °C).
•
Use el mismo tiempo de horneado que para el modo de Horneado si es por
•
debajo de los 10 a 15 minutos.
Los alimentos con un tiempo de horneado inferior a 30 minutos deberían
•
controlarse para ver si están bien cocidos 5 minutos antes de lo que indican las
recetas de horneado estándar.
Si los alimentos se hornean durante más de 40 a 45 minutos, el tiempo de
•
horneado se debería reducir un 25%.
99
Page 62

TABLA DE HORNEADO POR CONVECCIÓN
Reduzca la temperatura de la receta estándar en 25° F (15° C) para el horneado
•
por convección.
La temperaturas se han reducido en esta tabla.
•
ALIMENTO
Pastel
Glaseado
Pastel
Bizcochos
Pay
2 cortezas, fresco 9”
2 cortezas. fruta congel. 9”
Galletas
Azúcar
Colócate chip
Brownies
Panes
Pan de levadura, 9x5 Rollos
de levadura
Bollo, Panecillo
Molletes
Pizza (Cocción con varias
rejillas)
Congelada
Fresca
POSICIÓN
DE REJILLA
2
1
1
2
2
2
2
2
2
2
2
2
1 y 3
1 y 3
TEMP. °F ( °C)
(HORNO
PRECALENTADO)
325 (165)
325 (165)
325 (165)
350-400 (175-205)
350 (175)
325-350 (165-175)
325-350 (165-175)
325 (165)
350 (175)
350-375 (175-190)
375 (190)
400 (205)
375-425 (190-220)
375-425 (190-220)
TIEMPO
(Min.)
16-20
37-43
25-35
35-45
68-78
8-12
10-15
25-30
15-22
10-15
6-10
13-16
12-18
8-14
La TEMP. (temperatura) y el TIEMPO de la tabla anterior son los calculados para
una corriente de 240 V. Esta tabla sirve solamente de guía. Siga la receta o las
instrucciones en el paquete y ajuste la temperatura / tiempo de forma apropiada.
100
Page 63

CONSEJOS Y TÉCNICAS DE HORNEADO
Hornear es cocinar con aire caliente. Tanto el elemento superior como el inferior del
horno se encienden para calentar el aire pero no se utiliza el ventilador para hacer
circular el horneado.
Siga la receta o las orientaciones de los alimentos convenientes para la temperatura
de horneado, el tiempo y la posición de las rejillas. El tiempo de horneado cambiará
con la temperatura de los ingredientes y con las dimensiones, la forma y el acabado
del molde de horneado.
DIRECTRICES GENERALES
Para obtener los mejores resultados hornee los alimentos en una única
•
rejilla con al menos 1” - 1½” (2,5 – 3 cm) espacio entre los moldes y las paredes
del horno.
Use una rejilla cuando selecciona el modo de horneado.
•
Controle para que estén cocidos en el menor tiempo.
•
Use moldes del metal (con o sin acabado antiadherente), vidrio refractario,
•
vitrocerámica, cerámica u otros utensilios adecuados para el horno.
Cuando use vidrio refractario, reduzca la temperatura en 25 °F (15 °C) con
•
respecto a la temperatura recomendada.
Use bandejas de horneado con o sin lados o moldes de charlotas.
•
Las cazuelas de metal oscuro o con recubrimiento antiadherente cuecen más
•
rápidamente y los alimentos se doran más. Los moldes aislantes alargarán
ligeramente el tiempo de cocción para la mayoría de los alimentos.
No utilice hojas de aluminio o bandejas de aluminio desechables para cubrir
•
cualquier parte del horno. Las hojas son un excelente aislante de calor y el calor
quedará atrapado por debajo. Esto alterará el rendimiento de la cocción y podrá
dañar el acabado del horno.
Evite el uso de las puertas abiertas para apoyar las cazuelas.
•
Consulte Solución de problemas para obtener sugerencias para la resolución de
•
hornear y asar problemas.
TABLA DE COCCIÓN POR HORNEADO
ALIMENTO
Pastel
Glaseado
Pastel
Bizcochos
Pay
2 cortezas, fresco 9”
2 cortezas. fruta congel. 9”
POSICIÓN DE
REJILLA
2
1
1
2
2
TEMP. °F ( °C) (HORNO
PRECALENTADO)
350 (175)
350 (175)
350 (175)
375-400 (190-205)
375 (190)
TIEMPO
(Min.)
19-22
40-45
35-39
45-50
68-78
101
Page 64

Galletas
Azúcar
Colócate chip
Brownies
Panes
Pan de levadura, 9x5
Rollos de levadura
Bollo
Panecillo Molletes
La TEMP. y el TIEMPO de la tabla anterior son los calculados para una corriente de
240 V.
Esta tabla sirve solamente de guía. Siga la receta o las instrucciones en el paquete y
ajuste la temperatura / tiempo de forma apropiada.
2
2
2
2
2
2
2
350-375 (175-190)
350-375 (175-190)
350 (175)
375 (190)
375-400 (190-205)
375-400 (190-205)
425 (220)
8-10
8-13
29-36
18-22
12-15
7-9
15-19
CONSEJOS Y TÉCNICAS DEL ASADO POR CONVECCIÓN
Coloque la rejilla en la posición requerida antes de encender el horno.
•
Use el modo de Asado por Convección con la puerta del horno cerrada.
•
No precaliente el horno (Esto signica que la indicación “PREHEAT” apareceré
•
automáticamente cuando se seleccione el modo Asado de convección, pero
coloque la comida dentro del horno antes de seleccionar el modo de cocinado.)
Use un recipiente de 2 piezas. (Si no utiliza dos piezas se puede producir un
•
fuego a partir de la grasa quepueda gotear de la carne.)
Voltee la carne una vez a mitad del tiempo de cocción recomendado (vea la tabla
•
de asado por convección).
TABLA DE ASADO POR CONVECCIÓN
ALIMIENTO Y GROSOR
Carne de res
Filete (1” o más)
Vuelta y Vuelta
Medio
Bien Cocido
Hamburguesas (1” o más)
Medio
Bien Cocido
Aves
Cuartod de Pollo
Pollo en dos mitades
Pechuga de Pollo
102
POSICIÓN
DE
REJILLA
4
4
4
4
4
4
3
4
POSICIÓN
DE ASADO
°F ( °C)
450 (230)
450 (230)
450 (230)
550 (290)
550 (290)
450 (230)
450 (230)
450 (230)
TIEMPO
LADO 1
(Min.)*
10-12
15-17
16-18
9-11
11-13
18-20
25-27
14-16
TIEMPO
LADO 2
(Min.)*
10-12
13-15
13-15
5-8
8-10
13-15
15-18
10-14
Page 65

Puerco
Chuletas (1¼” o más)
Salchicha - fresca
La TEMP. y el TIEMPO de la tabla anterior son los calculados para una corriente de
240 V.
* Los tiempos del Asado y Asado por Convección son aproximados y pueden variar
ligeramente.
Los tiempos de cocción son indicativos y dependen también del grosor de la carne y
de la temperatura inicial antes de cocinarse.
4
4
450 (230)
450 (230)
13-15
4-6
12-14
3-5
CONSEJOS Y TÉCNICAS DEL ASADO
Coloque la rejilla en la posición requerida antes de encender el horno.
•
Use el modo de Asado con la puerta del horno cerrada.
•
Precalentar el horno durante 5 minutos antes de usarlo.
•
Use un recipiente de 2 piezas. (Si no utiliza dos piezas se puede producir un
•
fuego a partir de la grasa que pueda gotear de la carne.)
Voltee la carne una vez a mitad del tiempo de cocción recomendado (vea la tabla
•
de asado)
TABLA DE ASADO
ALIMENTO Y
GROSOR
Carne de res
Filete (1” o más)
Vuelta y Vuelta
Medio
Bien Cocido
Hamburguesas
(1” o más)
Medio
Bien Cocido
Aves
Pechuga (con
hueso)
Muslo
(muy bien cocido)
POSICIÓN
DE
REJILLA
5
5
5
4
4
4
4
POSICIÓN
DE
ASADO
L 5
L 5
L 5
L 5
L 5
L 4
L 3
TIEMPO
LADO 1
(Min.)*
5-7
6-8
8-10
8-13
10-15
10-12
28-30
TIEMPO
LADO 2
(Min.)*
4-6
5-7
7-9
11
8-12
8-10
13-15
103
Page 66

Puerco
Chuletas (1”)
Salchicha - fresca
Rebanada de Jamón
(½”)
Mariscos
Filetes de Pescado,
1” Con mantequilla
Cordero
Chuletas (1”)
Vuelta y Vuelta
Medio
Bien Cocido
Pan
Pan, rebanadas
de 1”
Pan de ajo,
rebanadas de 1”
La POSICÍON DE ASADO y el TIEMPO de la tabla anterior son los calculados para
una corriente de 240 V.
* Los tiempos del Asado y Asado por Convección son aproximados y pueden variar
ligeramente.
Los tiempos de cocción son indicativos y dependen también delgrosor de la came y
de la temperatura inicial antes de cocinarse.
5
5
5
4 L 4 10-14 N/A
5
5
5
4
3
L 5
L 5
L 5
L5
L 5
L 5
L 5
L 5
7-9
5-7
4-6
5-7
6-8
7-9
2-3
4-6
5-7
3-5
3-5
4-6
4-6
5-7
N/A
Pautas e seguir para la temperatura de alimentos de FSIS (Servicio de
Inspección y Seguridad de Alimentos USDA)
140 °F
(60 °C)
145 °F
(63 °C)
160 °F
(71 °C)
165 °F
(74 °C)
NOTA: Huevos (solos, no utilizados en una receta) – cocer hasta que la yema y la
clara estén duras.
Jamón, precocido (para
recalentar)
Carne fresca de res, ternera,
cordero (vuelta y vuelta)
Carne molida y mezclas de carne
(res, puerco, ternera, cordero)
Carne fresca de res, ternera,
cordero (medio)
Carne fresca de puerco (medio) Carne fresca de puerco
Jamón fresco (crudo) 180 °F
Platillos con huevos Carne de aves (muslos y
Carne molida y mezclas de carne
(pavo, pollo)
165 °F
(74 °C)
170 °F
(77 °C)
(82 °C)
Relleno (cocido solo o en
el ave)
Sobras y guisados
Carne fresca de res,
ternera, cordero (bien
cocida)
Pechuga de pollo (aves)
(bien cocida)
Pollo y jamón (entero)
alas)
Pato y ganso
104
Page 67

CONSEJOS Y TÉCNICAS DE GRILL CONVECCIÓN
No precalentar para el asado por convección. (Esto signica que la indicación
•
“PREHEAT” aparecerá automáticamente cuando se seleccione el modo Grill por
convección, pero coloque la comida dentro del horno antes de seleccionar el
modo de cocción.)
Cocine con grill en una bandeja baja y sin tapar.
•
Cuando se gratinan pollos y pavos enteros, suba las alas hacia atrás y ate fuerte
•
las patas con cuerda de cocina.
Use el recipiente para asar a la parrilla de 2 piezas para gratinar descubierto. (Si
•
no utiliza dos piezas se puede producir un fuego a partir de la grasa que pueda
gotear de la carne.)
ADVERTENCIA
Peligro de quemaduras
Use un guante de horno para quitar la sonda de temperatura.
No toque el elemento para asar.
No seguir esta instrucción puede ocasionar quemaduras.
Use una sonda o un termómetro de carne para determinar la cocción al
•
comprobar la temperatura del interior (véase la Tabla de grill por convección).
Controle el interior de la temperatura de la carne ave introduciendo un
•
termómetro de carne en otra posición.
También podria ser necesario cubrir las grandes aves con papel de aluminio (y
•
la fuente de asar) durante una porción del tiempo de asado para evitar que se
doren en exceso.
La temperatura mínima interna que es segura para el relleno en las aves es 74 °C
•
(165 °F).
Demasiada fuerza con papel de aluminio durante 10 o 15 minutos antes de cortar
•
en el caso de que fuera necesario aumentar la temperatura nal de los alimentos
de 5° a 10°F (3° a 6°C).
Consulte Solución de problemas para obtener sugerencias para la resolución de
•
hornear y asar problemas.
CONSEJOS PARA RECETAS RÁPIDAS Y FÁCILES
Convierta el HORNEADO estándar en GRILL POR CONVECCIÓN:
No hay que reucir la temperatura.
•
Los asados, los grandes cortes de carne y de ave en general requieren un 10-20%
•
menos de tiempo de cocción. Controle si los alimentos están cocidos antes.
Los guisos y los asados a la cazuela se hornean cubiertos en el modo de GRILL
•
POR CONVECCIÓN y cuecen aproximadamente en el mismo tiempo.
105
Page 68

TABLA DE GRILL POR CONVECCIÓN
CARNES
Beef
Costillas
Ojo de bife
(sin hueso)
Churrasco,
lomo (sin
hueso)
Lomo de
ternera
asado
Puerco
Lomo asado
(con o sin
hueso)
Hombro
Aves
Pollo Entero
sin relleno
Pavo sin
ralleno
Pavo sin
ralleno
Pavo sin
ralleno
Pechuga
Pavo
Codorniz
Cordero
Media Pierna
Pierna Entera
La TEMP. y el TIEMPO de la tabla anterior son los calculados para una corriente de
240 V.
Los tiempos de cocción son indicativos y dependen también del grosor de la carne y
de la temperatura inicial antes de cocinarse.
PESO
lb (kg)
4-6 (2-3) 2
4-6 (2-3) 2 325 (165) 18-22
3-6 (1,5-3) 2 325 (165) 18-22
2-3 (1-1,5) 2 425 (220) 15-20 145 (63) vuelta y
5-8 (2,5-4)
3-6 (1,5-3)
3-4 (1,5-2)
12-15
(6-7,5)
16-20
(8-10)
21-25
(10,512,5)
3-8 (1,5-4)
1 - 1½
(0,5-0,75)
3-4 (1,5-2)
6-8 (3-4)
POSICIÓN
DE
REJILLA
2
2
2
1
1
1
1
2
2
1
TEMP.
HORNO
°F ( °C)
325 (165) 18-22
350 (175)
350 (175)
375 (190)
325 (165)
325 (165)
325 (165)
325 (165)
350 (175)
325 (165)
325 (165)
TIEMPO
(Min.
per lb)
20-25
20-25
20-25
18-22
20-25
20-23
10-14
9-11
6-10
15-20
45-75
total
20-27
25-32
20-27
25-32
TEMPERATURA
INTERNA °F (°C)
145 (63) vuelta y
vuelta
160 (71) medio
145 (63) vuelta y
vuelta
160 (71) medio
145 (63) vuelta y
vuelta
160 (71) medio
vuelta
160 (71) medio
160 (71) medio
180 (82)
180 (82)
180 (82)
180 (82)
170 (77)
180 (82)
160 (71) medio
170 (77) bien
cocido
160 (71) medio
170 (77) bien
cocido
106
Page 69

CUIDADO Y LIMPIEZA DEL HORNO
ADVERTENCIA
AUTOLIMPIEZA DEL HORNO
Peligro de quemaduras
No toque el horno durante el ciclo de autolimpieza.
Mantenga a los niños alejados del horno durante el ciclo de
autolimpieza.
No seguir esta instrucción puede ocasionar quemaduras.
Este horno se caracteriza por una función de Autolimpieza pirolitica que elimina
l dicultad y ell tiempo utilizado en una limpieza manual del interior del horno.
Durante la Autolimpieza el horno usa una temperatura muy alta (approx.
860°F/460°C) para eliminar los residuos de comida y grasa.
Es normal ver humo y/o una llama ocasional durante el ciclo de Autolimpieza,
•
dependiendo del contenido y de la cantidad de suciedad que queda en el horno.
Si la llama persiste, apague el horno y permita que se enfríe antes de abrir la
puerta para limpiar los residuos de comida con un trapo.
El pestillo de la puerta se activa automáticamente tras seleccionar el ciclo de
•
Autolimpieza. El icono de bloqueo aparecerá en la pantalla. Esto asegura que
la puerta no se pueda abrir mientras el interior del horno se encuentra en la
temperatura de limpieza.
La lámpara del horno no funciona durante este modo.
•
Durante la Autolimpieza es preciso ventilar bien la cocina para ayudar a eliminar
•
los olores asociados con la Autolimpieza. Los olores disminuirán con el uso.
El tiempo de Autolimpleza presente dura 1h:30.
•
El modo se para automáticamente al nal de las horas de limpleza.
•
Cuando el calor del horno baja a una temperatura segura, se libere el bloqueo
•
automático de la puerta y esta se puede abrir.
ANTES DE LA AUTOLIMPIEZA
1. Retire todos los utensilios y recipientes.
2. Retire las rejillas del horno.
IMPORTANTE: Si se dejan las rejillas en el horno durante la Autolimpieza perdeán su
acabado brillante y dejarán de deslizarse suavemente sobre las guias de las rejillas.
Vea la Tabla de limpieza para un cuidado apropiado.
107
Page 70

3. Limpie cualquier resto y la grasa con toallas de papel. El exceso de grasa
Limpe a mano el
ár
fuer
No limpie el
empaque a mano
Limpie a mano la
z
fuer
distancia de 1” (2 cm)
ente
provocaría llamas y humos dentro del horno durante la Autolimpieza.
4. Repase la gura de aquí. Algunas zonas del horno se tienen limpiar a mano antes
de iniciar este ciclo. No se calientan lo suciente durante el ciclo de limpieza
para quemar los residuos. Use una esponja jabonosa, un raspador de plástico o
una esponjilla con detergente S.O.S.
®
. Limpie a mano el borde de la puerta, el
marco delantero y superior hasta 1½ “(2-3 cm) pulgadas por el interior del marco
con detergente y agua caliente. No frote el empaque. Limpie a mano la ventana
de la puerta del horno. Enjuague a fondo todas las zonas y luego séquelas.
5. Asegúrese de que las lámparas del interior estén apagadas y que las bombillas y
la cubierta estén sus lugares.
ea del marco
a del empaque
Limpie a mano a una
de las guías de las
rejillas hasta el fr
del interir del horno
Antes de utilizar el modo de Autolimpieza, lea atentamente la sección Cuidado y
limpieza del horno y siga antes las instrucciones ques se muestran en la sección
Antes de la Autolimpieza.
AUTOLIMPIEZA
Girar la perilla hacia la posición correspondiente, después presionar el botón =/para iniciar el ciclo de limpieza.
El tiempo de autolimpieza del horno se puede jar con las instrucciones de cocción
programada para retrasar el ciclo de autolimpieza.
El tiempo máximo de limpieza permitido es de 3 horas; el mínimo es de 1 hora. El
tiempo prejado es de 1h:30 min; la pantalla del reloj muestra P1:30. Al nal de la
actividad de autolimpieza, la pantalla muestra P--- constante y A que destella. Los
íconos desaparecerán de la pantalla cuando el selector de modo se coloque en la
posición OFF (Apagado). La puerta permanece bloqueada hasta que la temperatura
del horno alcance un valor por debajo del umbral de seguridad; en ese momento, el
control desbloquea la puerta.
El ventilador de enfriamiento comienza a funcionar apenas se selecciona
autolimpieza y vuelve a su velocidad más alta cuando se calientan los componentes
internos. La temperatura del horno se ja automáticamente en 460 °F (238 °C) a n
de limpiar perfectamente la cavidad.
108
ona de la puerta
a del empaque
Limpie a mano la
ventana la puerta
CONFIGURACIÓN DEL MODO DE AUTOLIMPIEZA
Page 71

El control también bloquea la puerta de inmediato para su seguridad debido a que
la temperatura del horno será demasiado caliente. El LED del ícono de bloqueo
muestra el estado del mecanismo del seguro en cualquier momento.
Puerta desbloqueada, LED de bloqueo apagado.
•
Puerta bloqueada, LED de bloqueo siempre encendido.
•
El seguro se mueve, transición en curso, el LED de bloqueo destella.
•
Para volver a utilizar el horno después de la autolimpieza, gire la perilla del modo de
horno hacia la posición OFF (Apagado).
CUIDADO GENERAL DEL HORNO
CÔMO USAR LA TABLA DE LIMPIEZA
1. Localice el número de la parte que tiene que limpiar en la gura de esta página.
2. Busque el nombre de cada parte en la Tabla de limpieza
3. Haga coincidir la letra con el método de limpieza Phe de la página siguiente.
109
Page 72

TABLA DE LIMPIEZA
Método de
Parte
1 Panel de control C- G 10 Puerta del horno
2 Aberturas de
refrigeración de la puerta
3 Moldura lateral D 12 Cavidad del horno E
4 Moldura de fondo D 13 Empaque de la
5 Marco de la puerta E 14 Aberturas de
6 Agarradera de la puerta G 15 Rejilla del horno A
7 lnterior de la ventana de
Ia puerta
8 Frente de la puerta C&G 17 Recipiente para
9 Tapa terminal D
Para el método de limpieza consulte la página siguiente.
limpieza
Horno de Acero
Inoxidable
interior
E 11 Marco delantero
del horno
puerta
refrigeración del
horno
F 16 Rejilla para
recipientes para
asado
asado
Parte
Método de
Horno de Acero
Inoxidable
limpieza
E
E
B
D
E
E
ACABADOS DEL HORNO/MÉTODOS DE LIMPIEZA
El horno completo se tiene que limpiar de manera segura con una esponja jabonosa,
enjuagar y secar. Si no se consiguen eliminar residuos persistentes, siga los
métodos de limpieza que se muestran aqui abajo.
Use siempre el limpiador más suave para hacer el trabajo.
•
Frote el acabado del metal en la dirección del granulado.
•
Use trapos limpios y suaves, esponjas o toallas de papel.
•
Enjuague a fondo con el mínimo de agua posible para que no gotee agua en el
•
interior de las ranuras.
Seque para evitar que se formen alones.
•
110
Page 73

Los limpiadores que se enumeran aquí abajo indican el tipo de productos que
hay que usar y no se recomiendan. Use todos los productos según las instrucciones
del paquete.
Parte Método de limpieza
A Cromo
placado
Lave con agua jabonosa caliente. O frote suavemente con
esponjillas con Soft Scrub
®
, Bon-Ami®, Comet®, Ajax®, Brillo® o
S.O.S® directamente. Se puede usar los limpiadores de horno Easy
O® o Dow® (fórmula de horno en frío), pero podrían provocar
oscurecimientos y decoloración.
Se pueden limpiar las rejillas en el horno durante el modo de
Autolimpieza, pero perderán su acabado brillante y cambiar
permanentemente a un gris metálico.
B Fibra de
NO LIMPIE EL EMPAQUE A MANO.
vidrio
®
C Cristal Eche Spary Windex
o Glass Plus en una tela primero, y luego
límpielo. Use Fantastik® o Formula 409® para quitar salpicaduras
grasientas.
®
D Pintura Limpie con agua jabonosa caliente o aplique Fantastik
o Formula
409® primero a una esponja limpia o una toalla de papel y limpie.
Evite el uso de limpiadores en polvo y esponjillas de bra metálica y
detergentes para hornos.
E Porcelana Limpie de inmediato derrames ácidos como jugos de fruta,
leche y jitomate con una toalla seca. No use una esponja/toalla
húmeda sobre porcelana caliente. Cuando ya está fría, limpie con
agua jabonosa caliente o aplique Bon-Ami
®
Soft Scrub® a una
esponja húmeda. Enjuague y seque. Para manchas resistentes,
use suavemente esponjillas con Brillo® o S.O.S.®. Es normal que
la porcelana se agriete (lineas nas) con el tiempo debido a la
exposición al calor y a los residuos de comida.
F Cristal
reectante
Limpie con agua caliente jabonosa y una esponja o un estropajo de
plástico. Para las manchas de agua, use vinagre, Windex
®
, amoniaco
o Bon-Ami®. NO USE ABRASIVOS DUROS
G Acero
inoxidable
Siempre limpie con el grano. Limpie con una esponja jabonosa
luego enjuague y seque o limpie con Fantastik
®
o Formula 409
aplicado a una toalla de papel. Proteja y limpie con Stainless Steel
Magic® y un trapo suave. Quite
las manchas de agua con un trapo humedecido con vinagre blanco.
Use Bar Keeper’s Friend
®
para quitar la decoloración térmica.
®
111
Page 74

QUITAR LA PUERTA DEL HORNO
a
a
PARA QUITAR LA PUERTA
IMPORTANTE:
Asegúrese de que el horno esté frío y de que se haya apagado la corriente antes
•
de quitarla puerta.
La puerta del horno es pesada y frágil. Use ambas manos para quitar la puerta.
•
La parte frontal de la puerta es de vidrio. Maneje con cuidado para evitar que se
rompa.
Agarre solo los costados de la puerta del horno. No use la agarradera ya que
•
podría girar en su mano y causar daños o heridas.
1. Abra completamente la puerta.
2. Levante el soporte de la bisagra.
a Soporte de la bisagra
3. Sujete la puerta con rmeza en ambos lados con las dos manos y cierre la puerta.
4. Sujete con rmeza; la puerta es pesada.
5. Coloque la puerta en un lugar adecuado.
112
Page 75

PARA VOLVER A COLOCAR LA PUERTA
a
b
c
d
1. Introduzca los brazos superiores de ambas bisagras en las ranuras. Las
hendiduras deben quedar enganchadas en los bordes.
a Brazos superiores
b Ranuras
2. Mueva el soporte de la bisagra hacia atrás y abajo hasta su posición.
3. Cierre y abra lentamente la puerta para asegurarse de que se ha colocado de
forma correcta y rme.
c Hendiduras
d Bordes
CAMBIAR UNA LÁMPARA DEL HORNO
ADVERTENCIA
Peligro de choque eléctrico
Asegúrese de que el horno y las lámparas estén frías y la corriente está
apagada antes de remplazar la(s) bombilla(s).
Las lentes tienen que estar montadas cuando se usa el horno. Las
lentes sirven para evitar que se rompan las bombillas.
Las lentes son de vidrio. Manéjelas con cuidado para evitar que se
rompan.
No seguir esta instrucción puede resultar en choques eléctricos,
cortaduras, quemaduras o la muerte.
Todos los hornos están equipados con luces halógenas ubicadas las paredes
•
laterales del horno.
Las luces se enciende cuando las puertas se abren o cuando se encuentra en el
•
ciclo de cocción.
113
Page 76

Las lámparas del horno no están encendidas durante la AUTOLIMPIEZA.
a b
•
Cada lámpara consiste en unas lentes removibles, una bombilla y un casquillo
•
que está jado en su lugar.
La sustitución de la bombilla se considera un mantenimiento de rutina.
•
PARA REMPLAZAR LA BOMBILLA
Tipo de bombilla halógena: 120 V, 25 W (G9).
1. Asegúrese de que el horno esté apagado y frío.
2. Apague la corriente general (caja de fusibles o cortocircuito).
3. Abra el chasquido-adelante la lente pegando una punta de chófer de tornillo
cuidadosamente bajo el poseedor de metal de la lente al lado de una cabeza del
tornillo. Reérase a la ilustración para la situación para insertar la punta de chófer
de tornillo y una dirección para mover al chófer. Destornillando el tornillo no es
necesario.
a
a Las lentes
4. Extraiga la bombilla de su casquillo.
a La bombilla
b Lentes removibles
5. Sustituya la bombilla con otra. Evite tocar la bombilla con los dedos, porque la
grasa de las manos podría dañar la bombilla cuando se calienta.
114
Page 77

NOTA: La bombilla es halógena: utilice una del mismo tipo y compruebe los
voltios y vatios.
6. Enrosque las lentes.
7. Restablezca la corriente general (caja de fusibles o cortocircuito).
SOLUCIÓN DE PROBLEMAS
RESOLUCIÓN DE LOS PROBLEMAS DE HORNEADO
Tanto con el Horneado como con el Horneado de convección, los resultados
escasos pueden ocurrir por muchas razones además de por un mal funcionamiento
del horno. Controle la tabla para las causas de los problemas más comunes. Debido
a que el tamaño, la forma y el material de los utensilios de hornear tienen un efecto
directo sobre los resultados del horneado, la mejor solución podría ser remplazar
los viejos utensilios de hornear que se han oscurecido y deformado con el tiempo y
el uso. Revise también la tabla de Horneado de la posición de la rejilla y el tiempo de
hornear.
Problema de horneado Causa
Los alimentos se doran poco
uniformes
Los alimentos quedan muy
Los alimentos quedan muy
secos o muy encogidos
Los alimentos se hornean o
asan muy lentamente
El horno no está precalentado
•
Papel de aluminio en la rejilla o fondo del
•
horno
Utensilios de hornear son demasiado
•
grandes
Los moldes tienen contacto o tocan la
•
pared
El horno no está precalentado
•
Se usa un molde de vidrio, mate o de metal
•
oscuro
Posición incorrecta de la rejilla
•
Los moldes tienen contacto o tocan la
•
pared
Temperatura del horno muy alta
•
Tiempo de hornear muy largo
•
Se abrió la puerta del horno
•
frecuentemente
El molde es demasiado grande
•
Temperatura del horno muy baja
•
El horno no está precalentado
•
Se abrió la puerta del horno
•
frecuentemente
Muy sellado con papel de aluminio
•
El molde es demasiado pequeño
•
115
Page 78

Las costras de pays no se doran
en el fondo o quedan muy
empapadas.
Los pasteles no se doran y
quedan planos, tal vez sin
terminar por adentro
Los pasteles quedan elevados
en el centro con grietas en la
parte superior
Los bordes de la costra de pays
quedan muy dorados
Tiempo de hornear insuciente
•
Se usan moldes de acero brillosos
•
Posición incorrecta de la rejilla
•
Temperatura del horno muy baja
•
Temperatura del horno muy baja
•
Tiempo de hornear incorrecto
•
Se probó el pastel antes de tiempo
•
Se abrió la puerta del horno
•
frecuentemente
El molde es demasiado grande
•
Temperatura del horno muy alta
•
Tiempo de hornear muy largo
•
Los moldes tienen contacto o tocan la
•
pared
Posición incorrecta de la rejilla
•
Pan size too small
•
El molde es demasiado pequeño
•
Temperatura del horno muy alta
•
Los bordes de la costra son muy delgados
•
RESOLUCIÓN DE LOS PROBLEMAS DE
FUNCIONAMIENTO
Antes de llamar y solicitar el servicio, controle lo siguiente para evitar cargas de servicio
innecesarias.
Oven Problem Problem Solving Steps
E008 aparecen en la
pantalla.
Otro error_E aparece
en la pantalla
La pantalla del horno
se quedaapagado
El ventilador de
enfriamiento sigue
funcionando después
de apagar el horno
Ocurrió un problema con el bloqueo. Apague la corriente
y vuelva a encenderla después de unos segundos. El
horno debe realizar una autoprueba de bloqueo. Si la
condición sigue igual, anote el número del código y llame
a un centro de servicio autorizado.
Apague la corriente y vuelva a encenderla después de
unos segundos. El horno debe realizar una autoprueba de
bloqueo. Si la condición sigue igual, anote el número del
código y llame a un centro de servicio autorizado.
Apague la corriente general (caja de fusibles o
cortocircuito). Vuelva a conectar el circuito. Si la
condición sigue igual, llame el centro de servicio
autorizado.
El ventilador se apaga automáticamente cuando
los componentes electrónicos se hayan enfriado
sucientemente.
116
Page 79

La puerta del horno
está cerrada y no se
abre, aún estando fría
El horno no calienta Revise el cortacircuito o la caja de fusibles en su casa.
El horno no cocina de
un modo uniforme
La temperatura del
horno está muy alta o
muy baja
Las luces del horno
no funcionan
correctamente
La luz del horno se
queda encendida
No se puede quitar la
cubierta del lente
El horno no se
autolimpia bien
El reloj y cronómetro
no funcionan bien
Apague el horno en el cortacircuito y espere unos
segundos. Vuelva a conectar el circuito. El horno debe
reiniciarse y se podrá operar.
Asegúrese de que hay una alimentación eléctrica
correcta para el horno. Asegúrese de haber seleccionado
la temperatura del horno.
Revise la calibración del horno. Ajuste la calibración si
es necesario (vea Compensación de la Temperatura
del Horno). Consulte las tablas de cocinar para las
posiciones recomendadas de rejillas. Siempre reduzca la
temperatura de recetas 25 °F (15 °C) cuando hornea con
el modo de horneado de convección.
Se debe ajustar el termostato del horno. Vea Calibrar la
Temperatura del Horno.
Reemplace o reinserte el foco si está ojo o defectuoso.
La bombilla se puede quemar si lo toca con los dedos.
Compruebe si hay obstrucciones en la puerta del horno.
Compruebe si la bisagra está doblada o el cerrojo de la
puerta está roto.
Puede haber sólidos acumulados alrededor de la
cubierta. Limpie el área del lente con una toalla seca y
limpia antes de tratar de quitar la cubierta de la lente.
Permita que el horno se enfríe antes de ejecutar la
autolimpieza. Siempre elimine suciedades sueltas o
derrames pesados antes de la autolimpieza. Si el horno
está muy sucio, congure una autolimpieza de cuatro
horas. Vea Autolimpieza del Horno.
Asegúrese de que la corriente eléctrica sea correcta para
el horno. Vea las secciones sobre Reloj y Temporizador.
Hay mucha humedad Cuando utiliza el modo de hornear debe precalentar
el horno. El horneado de convección elimina cualquier
humedad en el horno (esta es una de las ventajas de la
convección).
Astillas de porcelana
Al quitar y reemplazar las rejillas del horno, siempre debe
inclinarlas hacia arriba y no forzarlas para evitar astillar la
porcelana.
SI NECESITA MÁS AYUDA, VISITE HAIER.COM O COMUNÍQUESE
CON LA LÍNEA DE AYUDA AL CONSUMIDOR LLAMANDO AL
1‑877‑377‑3639.
117
Page 80

GARANTÍA LIMITADA
SERVICIO EN EL HOGAR
GARANTÍA COMPLETA POR DOS
AÑOS
Durante 24 meses a partir de la fecha de
compra original en la tienda, Haier reparará o
reemplazará cualquier pieza del aparato sin
costo, incluyendo la mano de obra, si la misma
falla debido a defectos en los materiales o en
la mano de obra.
Haier puede reemplazar o reparar, a su sola
discreción, cualquier pieza, subsistema,
incluso el producto entero.
El producto debe ser accesible, sin
inconvenientes, e instalarse de forma
adecuada para recibir el servicio técnico de
reparación por parte de la garantía.
GARANTÍA LIMITADA
NOTA: Esta garantía comienza en la fecha
de compra de este producto, y el recibo
original deberá presentarse al representante
autorizado de servicio antes de hacerse las
reparaciones bajo la garantía.
Excepciones: Garantía uso comercial
90 días en la mano de obra a partir de la
fecha de compra original
90 días en las piezas a partir de la fecha de
compra original
No es aplicable ninguna otra garantía.
PARA OBTENER SERVICIO BAJO
LA GARANTÍA
Póngase en contacto con el centro de servicio
autorizado más cercano a su localidad. Todo
servicio deberá ser realizado por un centro de
servicio autorizado por Haier. Para obtener
el nombre y el número de teléfono del centro
de servicio autorizado más cercano, llame al
1-877-337-3639.
Antes de llamar, tenga a mano la siguiente
información:
Número de modelo y de serie del aparato.
El nombre y la dirección del distribuidor en
donde compró la unidad y la fecha de compra.
Una descripción clara del problema.
Un comprobante de compra (recibo de
compra).
Esta garantía cubre servicios para
electrodomésticos dentro de los Estados
Unidos continental y Canadá y donde esté
disponible en Alaska, Hawaii y Puerto Rico.
Lo que no está cubierto bajo esta garantía:
Reemplazo o reparación de fusibles
domésticos, cortacircuitos, cableado o
plomería.
Un producto cuyo número de serie original
haya sido removido o alterado.
118
Cualquier cargo por servicio que no haya sido
identicado especícamente como servicio
normal, como puede ser el área o las horas de
servicio.
Reemplazo de los focos.
Daños a la ropa.
Daños ocurridos durante el transporte.
Daños ocasionados por la instalación o el
mantenimiento inadecuados.
Daños por el uso incorrecto, abuso, accidente,
incendio, inundación o fenómenos de la
naturaleza.
Daños debidos al servicio efectuado por
un distribuidor o centro de servicio que sea
diferente del autorizado por Haier.
Daños ocasionados por la corriente, el voltaje
o el suministro eléctrico incorrectos.
Daños que resulten de cualquier modicación
hecha en el producto, alteración o ajustes no
autorizados por Haier.
Ajuste de los controles manejados por el
cliente según han sido identicados en el
manual del propietario.
Mangueras, perillas, bandejas de pelusa y
todos los otros aditamentos, accesorios y
piezas desechables.
Cargos por mano de obra, transporte para
el servicio y envío para la remoción y el
reemplazo de las piezas defectuosas que se
efectúen después del período inicial de 24
meses.
Daños ocasionados por un uso diferente al
doméstico normal.
Cualquier gasto de transporte y de envío.
ESTA GARANTÍA LIMITADA REEMPLAZA
TODAS LAS OTRAS GARANTÍAS,
EXPRESAS O IMPLÍCITAS QUE INCLUYAN,
ENTRE OTRAS, LAS GARANTÍAS DE
COMERCIABILIDAD O DE CAPACIDAD
PARA UN PROPÓSITO EN PARTICULAR
El recurso provisto en esta garantía es
exclusivo y está otorgado en lugar de
cualquier otro recurso.
Esta garantía no cubre daños incidentales o
consecuentes, de modo que las limitaciones
indicadas anteriormente pueden no aplicarse
en su caso. Algunos estados no permiten
las limitaciones acerca de cuánto tiempo
dura una garantía implícita, de modo que
las limitaciones arriba indicadas quizás no le
correspondan.
Esta garantía le otorga derechos legales
especícos, y es posible que usted tenga
otros derechos, los cuales varían de un estado
a otro.
Haier America
Wayne, NJ 07470
Page 81

Page 82

Page 83

Page 84

IMPORTANT
Do Not Return This Product To The Store
If you have a problem with this product, please contact the
“Haier Customer Satisfaction Center” at
DATED PROOF OF PURCHASE, MODEL #, AND SERIAL #
REQUIRED FOR WARRANTY SERVICE
1-877-337-3639.
IMPORTANT
Ne pas Réexpédier ce Produit au Magasin
Pour tout problème concernant ce produit, veuillez contacter
le service des consommateurs “Haier Customer Satisfaction Center” au
1-877-337-3639.
UNE PREUVE D’ACHAT DATEE EST REQUISE POUR BENEFICIER DE LA GARANTIE.
IMPORTANTE
No regrese este producto a la tienda
Si tiene algún problema con este producto, por favor contacte el
“Centro de Servicio al Consumidor de Haier” al
1-877-337-3639 (Válido solo en E.U.A).
NECESITA UNA PRUEBA DE DE COMPRA FECHADA, NÚMERO DE MODELO
Y DE SERIE PARA EL SERVICIO DE LA GARANTÍA
Made in Italy
Fabriqué en Italie
Hecho en Italia
Haier America
HCW3460AES
Issued: May 2015 Printed in Italy Part # 00XXXXXXXXX
Wayne, NJ 07470
 Loading...