

Page 1
Dishwasher
EDW125X1
EDW125WH1
User Guide and Installation Instructions
Code: 0120504920B
Page 2

Contents
Safety and warnings............................................................................................................................2
Introducing your dishwasher................................................................................................................3
Detergent and rinse aid .......................................................................................................................5
Loading the dishwasher.......................................................................................................................6
Using the dishwasher ..........................................................................................................................8
Wash cycle table .................................................................................................................................9
Energy-saving and environmental tips...............................................................................................10
Maintaining your dishwasher..............................................................................................................10
Cleaning and special maintenance ....................................................................................................11
Troubleshooting.................................................................................................................................12
Installation.........................................................................................................................................13
Manufacturer’s Warranty....................................................................................................................16
Customer Care ..................................................................................................................................17
Page 3

Safety and warnings
Carefully read this guide, as it provides essential information for the sa fe a nd pr oper ins tallatio n, use
and maintenance of this dishwasher.
This appliance complies w ith the following EEC Directives:
73/23/EEC of 19/02/73 (Low Voltage) and subsequ ent modifications;
89/336/EEC of 03/05/89 (Electromagnetic Compatibility) and subsequent
modifications.
Carefully remove and disp ose of the pa cking materia l.
Check to make sure that the appliance is not damaged. If in doubt, contact the reta iler it was
purchased from.
This dishwasher is designed for washing household dishes and cooking utensils.
Do not install th is applianc e o utdoors , even if a roo f covers the ar ea.
Do not lean or sit on the door when it is open, as it may overturn the dishwasher.
The door sho uld no t be left in the open pos ition as th is presents a tripping hazar d.
Do not touch the hea ting e lement dur ing or after a wash cyc le .
If the appliance malfunctions, tur n off the water supply to the applia nce and disconnect the plug
from the wall socket and refer to "Troubleshooting ". If you cannot s olve the problem, con tact a n
authorised service centre.
Only selecte d service cen tres/ag en ts are au thorised to make repa irs.
If the supply cord is damaged, it must be replaced by the manufacturer, a service agent or
similarly qualified persons in order to avoid a hazard.
The appliance is not in tended for use by young children or in firm persons unless they ha ve been
adequately supervised by a responsible person to en sure that the y can use the applia nce sa fely.
Young children should be supervise d to ensure tha t they do not play with the appliance.
Dishwasher detergen ts are s trong ly alka line. The y can be e xtreme l y dangero us if swallowe d.
Avoid contact with the skin and eyes and keep childre n aw ay from the dishwasher when the d oor
is open. Check that the detergent receptacle is empty after completion of the wash cycle.
Do not use ex tension cord s or multiple s ockets .
The plug must be accessible after installation.
During insta llation the pow er cord must not be ben t or flat tened e xcessive ly.
If the appliance is not operating properly, disconnec t the appliance from the power supply.
To maintain the EFFICIENCY and SAFETY of this appliance:
Only call an author ised ser vice cen tre.
Always use original spare parts
2
Page 4
Introducing your dishwasher
Specifications
Width 60 cm
Depth 60 cm
Height 85 cm
Capacity 12 standard place settings
Mains water pressure 0.03 - 0.6 MPa
Power voltage 220-240 V~ 50 Hz
Total absorbed power 2100 W
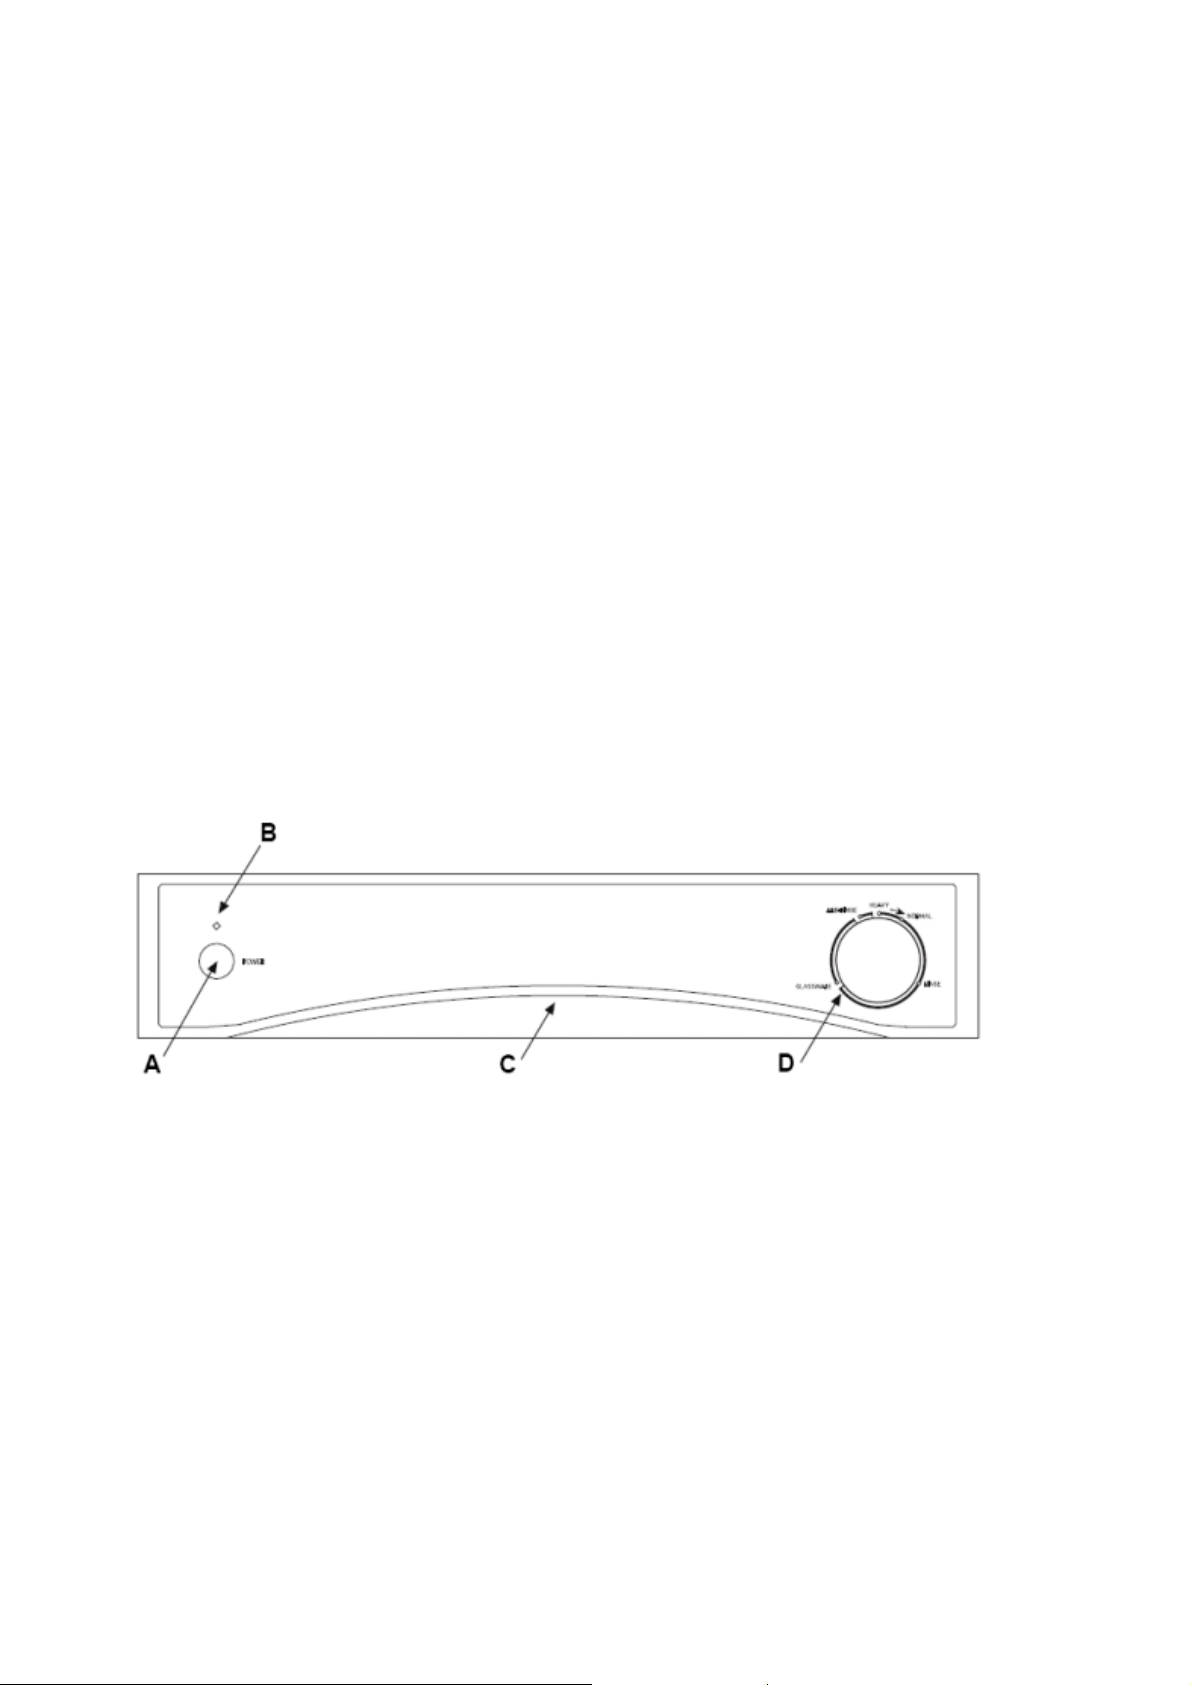
Control panel
A Power button C Handle for opening door
B Power light D Dial for selecting cycle
3
Page 5
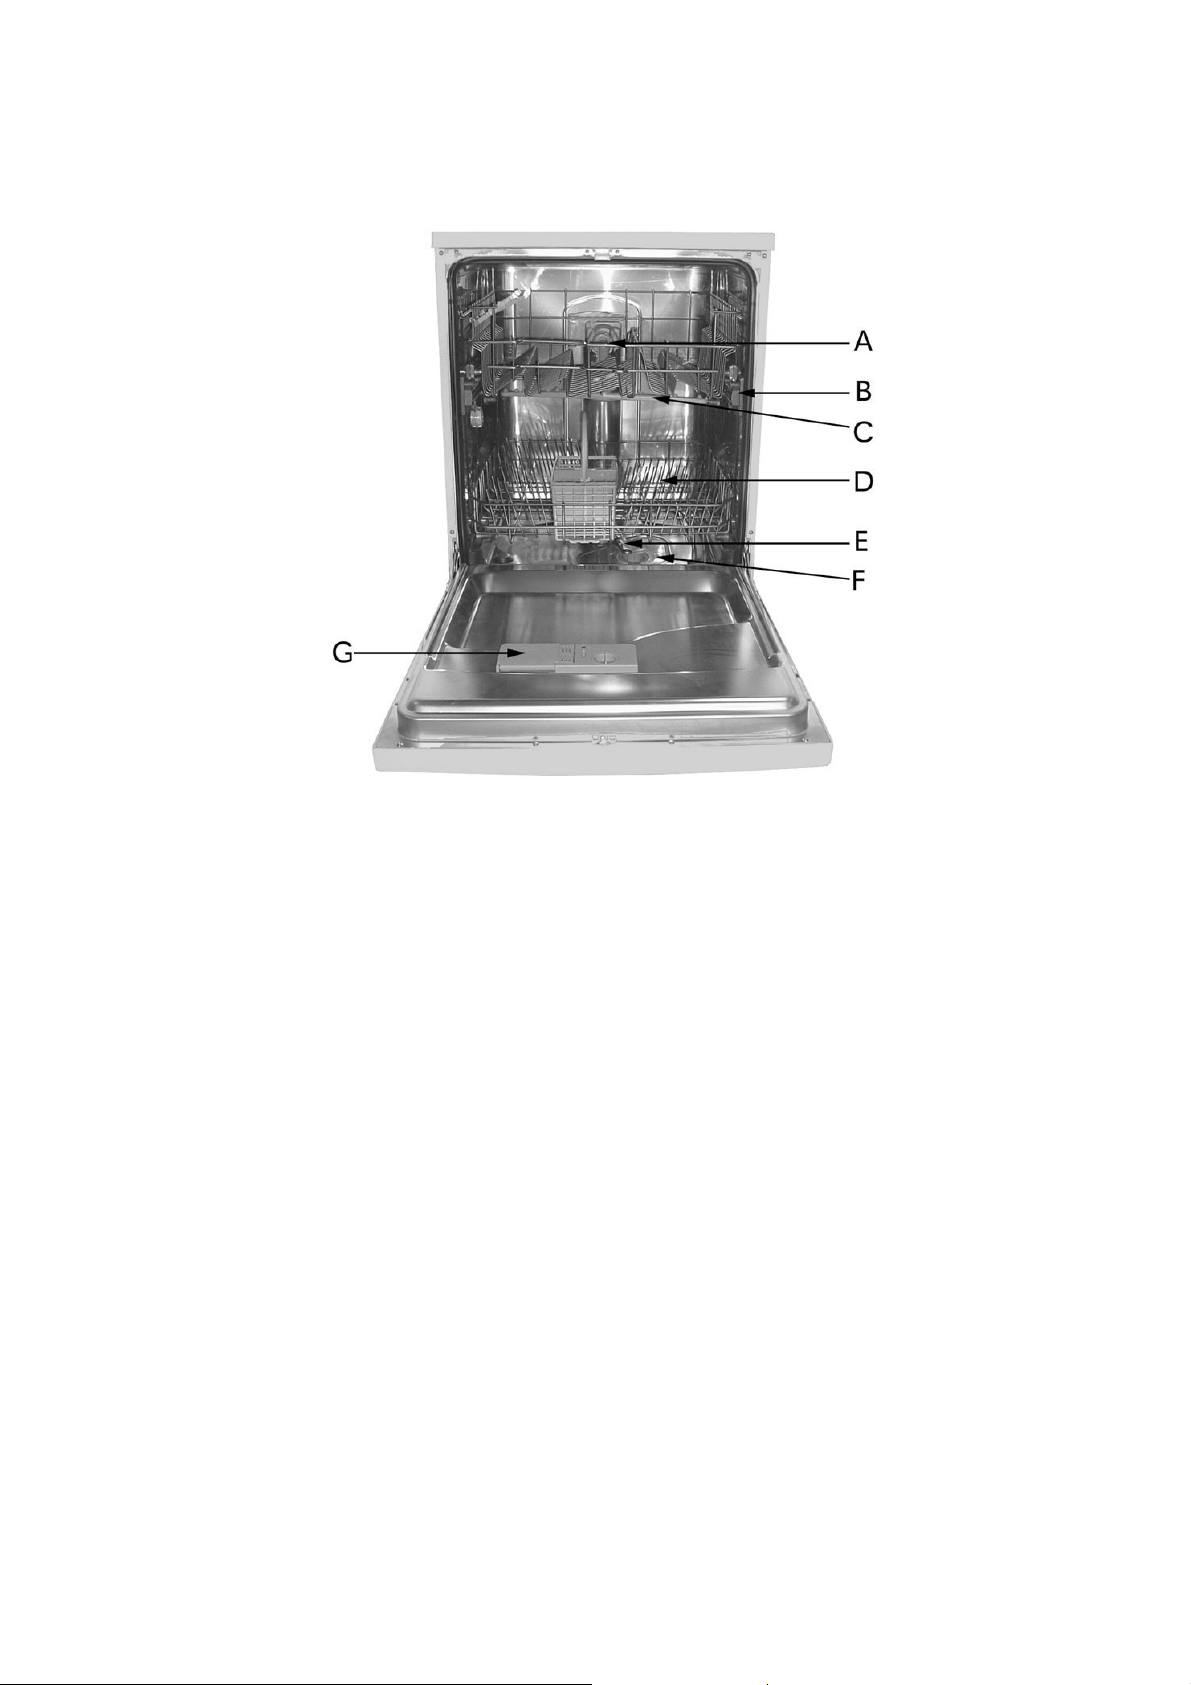
Interior view
A Upper rack E Bottom spray arm
B Rack height adjuster F Washing filter
C Top spray arm G Detergent and rinse aid dispenser
D Lower rack
4
Page 6
Detergent and rinse aid
Detergent
Use detergent specifically intended for dishwashers. Refill the dispenser before each wash cycle
according to the "Wash cycle table." The detergent dispenser is on the inside panel of the door.
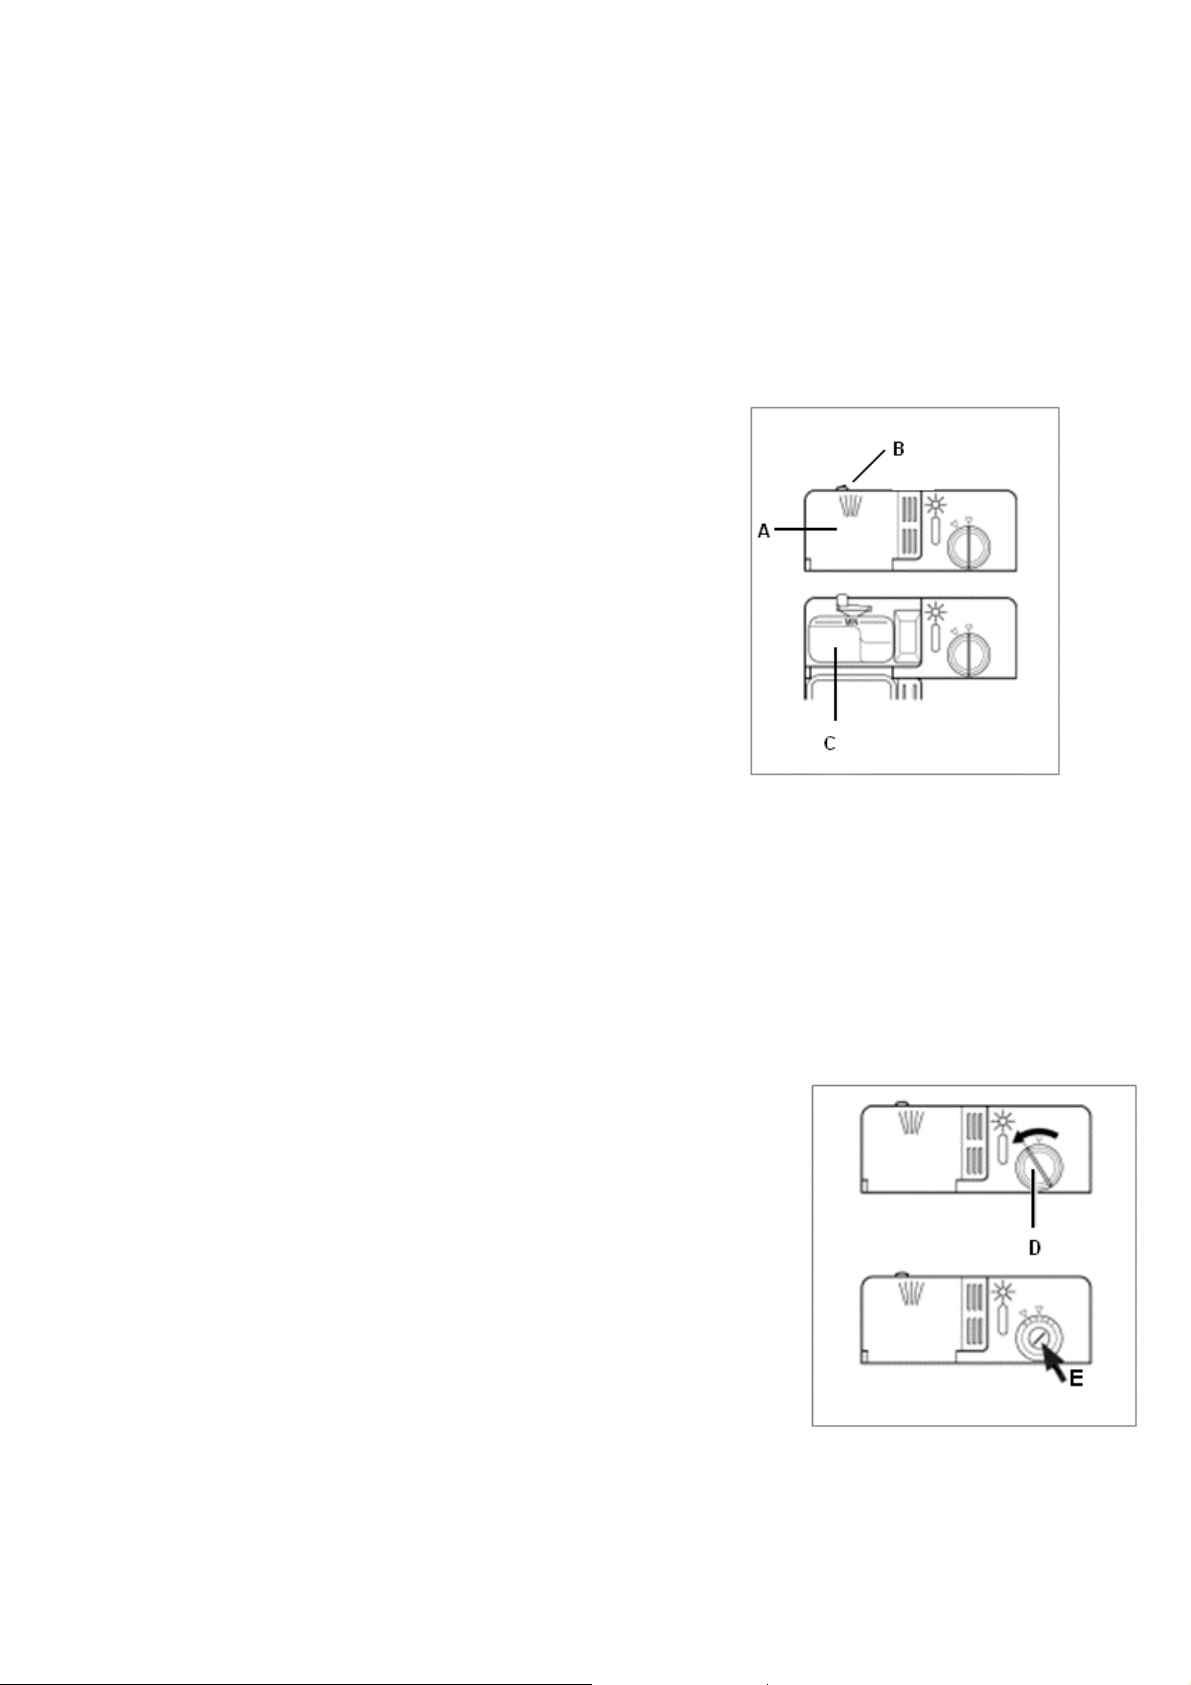
Loading the detergent
To open the cover “A” on the dispenser, press the button "B".
Pour the detergent into the dispenser "C" (which has a pre-wash
and a main wash compartment). After the detergent has been
placed in the dispenser, close the cover and press down until it
clicks in place.
NOTE: Remove excess detergent from the edges of the
dispenser before closing the lid.
WARNING
Dishwasher detergents are strongly alkaline. T hey can b e
extremely dangerous if sw allow ed. Avoid c ontact with the skin and eyes and keep children
away from the dishwasher when t he door is ope n. Check that the deter gent d ispense r is empty
after completion of the wash cycle.
Rinse aid
This product makes dishes sparkle and helps them to dry w ithout spotting. The d ispenser is lo cated
on the inside panel of the door and should be filled after every 80 wash cycles (or when the Rinse aid
indicator light comes on for models wi th this fea ture).
Loading the rinse aid
To open the dispenser, turn the cap "D" in an a nticlockwise d irec tion
and pour in the rinse aid, making sure not to o verfill. The amoun t of
rinse aid can be changed by turning the dosage adjuster "E", beneath
the cap, with a screwdriver. There are 6 different settings.
Important: Proper dosage of the rinse aid impr oves dr ying. If drops of
water remain on the dishes or spotting occurs, turn th e dosage
adjuster to a higher setting. If the dishes have white streaks, turn the
dosage adjuster to a lower setting.
5
Page 7

Loading the dishwasher
Before placing the dishes in the dishwasher, remove the larger food particles to prevent the filter from
becoming clogged.
If the pots and pans have baked- on food tha t is e xtre mely hard to r emove, soak them befor e washing.
This eliminates the need for extra wash cycles .
Pull out the racks to load the dishwasher.
Lower rack Upper rack
Load for 12 standard settings
The lower rack
Place the most difficult-to-c lean items on the lower ra ck: po ts, pans , lids , ser ving dishes an d bowls.
It is best to place serving dishes and lids on the sides of the racks in order to avoid blocking the
rotation of the top spr ay ar m.
Pots, serving bowls, etc. must always be placed face down.
The upper rack
The upper rack is designed to ho ld mor e d elicate and lighter d ishes , such as g lasses, c up s and
saucers, plates and small bowls.
Position the dishes so they are not moved by the spray of the water.
6
Page 8

Adjusting the upper rack
To adjust the height of the upper rack , rotate th e caps loca ted on the
end of the rack guide rails to the s ide , remove the rac k comple te ly
and refit using the alternate set o f wheels (see F ig. A) . Adjus t the
upper rack to the higher level to allow more height in the lower rack
for large items
.
Cutlery basket
Cutlery and small kitchen utensils are best placed in the cu tlery
basket (Fig B).
Mix spoons, knives and forks within each section to stop th em
nesting together to ensure the water circulates freely.
Knives and other utensils with sharp points must b e loaded in the
basket with their points down or placed in a hor izontal pos ition .
Fig A. Adjusting the upper rack
Fig B. Cutlery basket
7
Page 9

Using the dishwasher
Starting a wash cycle
Make sure that the applian ce is plugg ed in an d sw itched on .
Make sure that the water s upply is turne d on .
Load the de tergent (see "Dete rgent and rinse aid") .
Turn the dial locate d on th e righ t of the contro l p anel in a clockwise d irection until it po in ts to the
number or symbol of the cycle required (see "Wash c ycle table ").
Press the Power button. The Power light will turn on and the was h c ycle will begin.
If you forget to load some of the di shes
The wash cycle can be paused by pressing the Power button. You can then load additional dishes
and turn the appliance back on. The cyc le will con tinue fr om where it left o ff.
At the end of the wash cycle
When the dial stops turning and is pointing to a STOP mark
(see Fig C) the cycle has finished. Turn the appliance off using
the Power button and turn off th e w ater supply. Ope n the
dishwasher door slightly to improve drying perfor man ce.
Wait a few minute before u nloa ding the dishwasher to avo id
handling the dishes and utensils while they are still hot and
therefore more likely to break. They will also dry be tter.
Fig C. Stop marks
Cancelling or changing a wash cycle setting
You can only change cycle that is under way if it has b een run ning for o n ly a s hort time. Otherwise, the
detergent may have already been used and the app liance may ha ve a lready dra ined the wash wa ter.
If this is the case, the dete rgent d ispenser mus t be refilled (See “Detergent and rinse aid”).
Press the Power button, and the light will turn off. Rotate the dial in a clockwise direction to the
desired cycle setting. Turn the dishwash er back on u sing the Power button.
8
Page 10

Wash cycle table
Cycle Types of load Description of
cycle
Heavy Very dirty dishes,
pots and pans.
(Not to be used
with delicate
items.)
Normal
(AS/NZS 2007)
Normal load of
dirty dishes, pots
and pans.
Standard daily
cycle.
Cold pre-wash
Cold rinse
Extended 50°C
wash
Hot rinse
Drying
Cold rinse
Extended 50°C
wash
Hot rinse
Drying
Detergent (in
dispenser/inside
door)
30 g ___
25 g / 5 g 5
Rinse aid
setting
Rinse For dishes that
only require a
rinse and dry.
Glassware Economic cycle
for delicate
items. Run
immediately after
dishes are used.
Pre-Rinse Pre-rinse of
dishes while
waiting for a full
load.
Hot rinse
Drying
Wash at 50°C
Hot rinse
Drying
Short cold rinse
to prevent food
residue from
drying on the
dishes.
___ ___
15 g ___
___ ___
9
Page 11

Energy-saving and environmental tips
Run the d ishwasher when it is fu lly load ed to save on energ y.
Rather than r un a full c ycle for a half loa d, run the pr e -r i nse cycle, which w ill prevent odo urs from
forming and food from caking onto the dishes.
Choose the r ight wash cyc le: th e choice o f cyc le dep ends on the type of d ishware, cookware and
utensils being washed and how dir ty they are.
Use the right amoun t of de tergent: if yo u use too much detergen t, the result will not b e cleane r
dishes, but, rather, a greater negative impact on the e nvironment.
Maintaining your dishwasher
After every wash, turn off the water su pply to the app liance and le ave the door slightly ajar s o
that moisture and odours are not trapped inside.
Before cleaning or performing main tenance, always remove the plug from the socket.
Do not use solvents or abrasive cleaning products to clean the exterior and rubber parts o f
the dishwasher. Use only a cloth and warm soapy water.
To remove spots or stains from the surface of the in terior, use a clo th damp ened with wa ter and a
little white vinegar, or a cleaning product made specifically for dishwashers.
If you ha ve to move th e dishw asher, try to keep it in the vertical position. If absolutely
necessary, it can be laid on its back.
Do not lay the dishwasher on its right-hand side
Never lift the dishwasher by the door handle
Cleanin g the door seals . One of the reasons that odours for m in the dishwasher is that food gets
trapped in these seals. Periodic cleaning with a spon ge w ill prevent this .
When you g o on holiday it is recommended that you run a wash cycle with the dishwasher
empty and then remove the plug from the socke t, turn off the wa ter supply a nd leave th e door of
the appliance slightly ajar. This will help the door seals last longer and prevent odours from
forming.
10
Page 12

A
B
A
Cleaning and special maintenance
Cleaning the filter assembly
For the best performance and results, keep the filter assembly clean.
The filter removes food pa rtic les from th e wash water , allow ing the
water to be recirculated during the cycle . For this re a son, it is a go od
idea to remove any food particles trapped in the filter after each wash
cycle by rinsing the semi-circular filter and cup ("A") under run ning
water.
Fig D. Filter assembly
To remove the filter assembly, pull the handle up. Clean the entire
filter assembly (made up of the semicirc ular filter "A" and th e fine
filter "B" in Fig. E) at least once a month , using a soft brush. To
reassemble, insert the entire assembl y into the dishw asher, loc ate i t
correctly in its seat and press downwards.
Do not use the dishwasher without the filters. Improp er rep lacemen t
B
of the filters may reduce the dishwasher’s performance.
Fig E. Semicircular and fine filters
Cleaning the spray arms
Food particles may become encrusted on the spra y a rms and bloc k th e hole s ( s e e "Interior view”,
letters C and E). Check the spray arms pe riodically and clean them when n eeded. To clean the spra y
arms, remove them by unscrewing them from the bearings, run them under clean running water, and
refit them. Ensure the lower spray arm is correctly locked in to place, a nd the up per arm is screwed in
tightly.
Cleaning the water inlet filter
The water inlet filter is in the in let hose where it screw s on to the tap. To clean th e water inlet filter ,
turn off the water tap, unscrew the hose, remove th e filter an d clea n it carefully u nder running wate r .
Then refit the filter and tighten th e hose back into position on th e tap.
11
Page 13

Troubleshooting
If the dishwasher does not function or d oes not func tion corr ectly, c heck the following be fore c alling
for assistance.
Problem Check
The dishwasher does not start. Is the plug pushed into the socket correctly?
Is the power on in the house?
Is the door closed properly?
Is the Power switch "ON"?
Is the water supply turned on?
The dishwasher does not fill with water. Is the water turned on and is the hose connected
properly?
Is the water supply to the house turned on and
does it have sufficient pressure?
Is the water supply hose crimped or ben t?
Is the filter for the water supply hose clogged?
The dishwasher does not drain. Is the drain hose kinked or bent?
The dishes are not clean. Is the drain hose kinked or bent?
Has the detergent been dispensed?
Are the spray arm holes blocked?
Are the spray arms rotating?
Have the dishes been loaded correctly?
Lime deposits or a white film form on the d ishes. Is the rinse aid dosage correct?
If, despite all these checks, the dishwasher still does not function and/or the problem persists, contact
your nearest authorised service centre and provide them with the following information :
1. The nature o f the problem.
2. The model number (Mod...) and the serial number (S/N...), found on the side of the inner par t of
the door.
12
Page 14

Installation
1. Position the dishwasher in the desired location. The dishwasher is equipped with water supply
and drain hoses that can be positioned to the righ t or le ft, to allow correct ins tallation.
2. Level the dis hwasher by s crewing the fe et in or out. T he d ishwasher shou ld no t be inclined more
than 2 degrees, to ensure proper performance.
3. Connect the dishwasher to the water mains us ing the sup pl ied new hose se ts. Do not use old
hose sets.
Cold water connection
Connect the cold water supply hose to a thread ed ¾” bs p
connector and make sure that it is faste ned tightly (see Fig. F).
If the water pipes are new or have n ot been used for an
extended period of time, let the water ru n first, un til it is clear
and free of impurities. Otherwise the water inlet filter may get
blocked.
Fig F. Connecting the water supply hose
Hot water connection
The dishwasher must not be connected to an under sink high pressure “pus h through” type hot
water system as damage to the system may result.
The dishwasher can also be connected to the ho use' s hot water su pply follow ing the same
procedure as for the cold water connection .
This will reduce the wash cycle ti me by about 15 minutes, and the wash efficiency will be slightly
reduced.
o
Do not connect to a hot w ater system that excee d s a t emperature of 6 0
4. Connect the drain hose
The recommended method of installation is shown in Diagrams 1, 2 a nd 3 . The diagrams are
designed to eliminate problems that occur with combined sink – dishwasher waste systems.
The standpipe must have a minimum diameter of 38 mm and s tand 750 mm above the floor . A
drain hose support is provided to hold the drain hose in place in the s tandpipe (s ee Diagrams 1
and 2).
It is not recommended that the drain hose or dra in p ipe be connected d irec tly to a waste dispos al
C.
unit (see Diagram 2).
13
Page 15

When connecting the drain hose to a sink trap with a drain hose spigot, it is important that the
drain hose is supported to the height of the bench (see Diagram 3). Ensure the drain spigot has a
minimum hole size of 15 mm and that it has been drilled ou t.
5. Connect the electricity.
Ensure the voltage and frequency in the home corres pond to those on the ratin g pla te o f the
appliance (located on the side of the s tainless steel in ner door) a nd the elec tr ical s ystem can
cope with the maximum voltage on the rating plate. If the above conditions are met, insert the
plug into an earthed electrical socket.
Do NOT use adaptors or extension le ads.
14
Page 16

Minimum cabinet clearances
Note: ensure that any bare wood surrounding the d is hwasher is se aled w ith a n oil- ba s ed paint or
moisture-proof polyurethane, to prevent possib le ste am da mage .
15
Page 17

Manufacturer’s Warranty
You automatically receive a 2 year Manufacturer’s Warranty with the purchase of this Product
covering parts and labour for servicing within the cou ntr y of purcha se.
Fisher & Paykel undertakes to:
Repair or, at its option, replace without cost to the owner either for material or labour any part of the
Product, the serial number of which appears on the Product, which is found to be defective within
TWO YEARS of the date of purchase.
This warranty DOES NOT cover
A Service calls to which are not related to any defect in the Produc t. The cost of a se rvice call will
be charged if the problem is not found to be a Pr oduct fa ult. For e xample :
1. Correcting the installation of th e product.
2. Instructing you how to use the product.
3. Replacing house fuses or correcting house wiring or p lumbing.
4. Correcting fault(s) caused by the user .
5. Noise or vibration that is considered normal, e.g. drain/fan sounds, regeneration noises or user
warning beeps.
6. Correcting damage caused by pests, e.g . ra ts, c o ckroaches e tc.
B Defects caused by factors other than:
1. Normal domestic use or
2. Use in accordance with the Product’s User G uide.
C Defects to the Product caused by accident, neglect, misuse or Act of God.
D The cost of repairs carried out by non-authorised repairers or the c ost o f correcting such
unauthorised repairs.
E Normal recommended maintenance as set out in the Product’s User Guide.
F Repairs when the applianc e has been d ismantled , re paired or ser viced by o ther tha n an
AUTHORISED CUSTOMER SERVICE CENTRE or the selling dealer.
G Pick-up and delivery.
H Transportation or tra vellin g cos ts in volved in the rep air when the pr oduct is ins tal led ou tside the
AUTHORISED CUSTOMER SERVICE CENTRE’S normal service area.
Service under this manufacturer’s warranty must be p rovided b y an Authorised Service Age n t (r e fer to
the Service Contacts section at the star t of this book) . Such service shall be pro vided during n ormal
business hours. This warranty certificate should be shown when making any cla im.
Note This Warranty is an extra benefit a nd does not affect your legal rights, and applies only to
product purchased in New Zealand and Australia .
Please keep this User Guide in a safe place.
Do not return to Fisher & Paykel.
16
Page 18

Customer Care
Check the things you can do yourself. Refer to your U ser Gu ide an d check :
1 your appliance is correctly installed
2 you are familiar with its normal operation
If after checking these points you still need assis tanc e please refer to the following:
If you need assistance...*
Call your Fisher & Paykel retailer who is trained to pr ovide in forma tion on your a ppliance , or if we can
be of any further help, please contac t o ur Customer Care Centre,
Toll Free - 0800 FP CARE or 0800 37 2 273 Fax: (09) 273 0656
Email: customer.care@fp.co.nz
Postal address: P.O.Box 58732, Greenmount, Auckland.
If you need service...*
Fisher & Paykel has a network of independent Fisher & Paykel Authorised Ser vice Cen tres whose
fully trained technicians can carry out any service nec essary on yo ur app liance. Your dea ler o r our
Customer Care Centre can recommend an Auth orised Ser vice Cen tre in your area.
*If you call or write, please provide: name, address, model number , s er ial number, date of p ur chase
and a description of the problem. This information is needed in order to better respond to your request
for assistance.
17
Page 19

Copyright © Fisher & Paykel 2006. All rights rese rved .
The product specifications in this bookle t appl y to the
specific products and models described at th e d ate of
issue. Under our policy of continuous product
improvement, these specifications may change at any
time. You should therefore check with your Dealer to
ensure this booklet correctly describes the product
currently available.
www.fisherpaykel.com
NZ
Elba Dishwasher user guide
Published: 10/2006
Part No. 599349 A
18
 Loading...