

Haier D29FA11-AM, D32FA11-AM Owner's Manual

Please READ this manual carefully
before operating the unit, and keep
it for future reference.
COLOR TV RECEIVER
OWNER'S MANUAL
The Owner`s Manual for the Follow Models:
D29FA11-AM, D32FA11-AM
TV/AVTV/AV V-V- V+V+ CH-CH- CH+CH+ MENUMENU

* For your enjoyment of this TV set, please read this manual carefully and
keep it good for future reference.
Before Operation
Basic Operation
Technical Operation
Warning and cautions............................................................................................2
Installation..........................................................................................................3
Antenna connection...........................................................................................3
Preparation for the remote control........................................................................3
Position of Button and Plug-ins................................................................................4
Front and side panel ..........................................................................................4
Back panel.......................................................................................................4
Function button of the remote control........................................................................5
The screen display menu........................................................................................6
Switch on/off the TV set..........................................................................................7
Watching TV programs...........................................................................................8
Watching TV program.........................................................................................8
Program swap and auto scan functions..................................................................9
Tune.................................................................................................................10
Auto search....................................................................................................10
Search...........................................................................................................11
Fine tune and Program lock functions..................................................................12
Skip unnecessary channel.................................................................................13
Exchange programs.........................................................................................14
Picture adjusting...............................................................................................15
Select the picture modes and set the picture quality...........................................15
Filter function................................................................................................16
3A Optimize and 3DNR functions.....................................................................17
Comb filter and LayerEn./ Color En. Functions..................................................18
Sound adjusting................................................................................................19
Select the sound modes and set the sound quality.............................................19
Mute function.................................................................................................20
Timer set up function.........................................................................................21
Set current time and on/off time functions.........................................................21
Remind Program Function..............................................................................22
Set up function..................................................................................................23
Select the menu Language and Screen saver functions.....................................23
Select Switch on mode and HDM scan function.................................................24
Tilt function and setting Transparency menu.....................................................25
Setting the Lock.................................................................................................26
Change your password...................................................................................26
Setting the Lock.............................................................................................27
Others functions..................................................................................................28
Calendar, picture still and zoom functions.........................................................28
Setting and Using Favorite programs, Setting Sleep Timer ................................29
VGA input adjustment.......................................................................................30
External connections...........................................................................................31
Video/Audio output connection, VGA input...........................................................31
Video/Audio input connection.............................................................................32
Others
Trouble shooting.................................................................................................33
Specifications.....................................................................................................34

Warning and Cautions
1. When you clean the TV set, please
pull out the power plug from AC outlet.
Don't clean the cabinet and the
screen with benzene, petrol and other
chemicals.
4. Do not place the TV set near rain or
moisture as it may cause an electric
shock, or the TV set to catch fire. The
TV set must only
be used in dry in
door locations.
2. In order to prolong the using life of
the TV set, please place it in a well
ventilated location.
5. The back cover must only be
removed by a registered electrical
service person. Removing the back
cover may result in electric shock, fire
or damage to
the TV set.
3. Don't place the
TV set in direct
sunlight or near a
heat source.
6. If the TV set is not going to be used
for a long time, or there is a severe
thunder & Lighting storm, it is
recommended that the TV set be
disconnected from the AC power outlet
and the aerial plug removed.
Explanation on the display tube
Should the picture tube require cleaning, disconnect the power and use a dry
soft cotton cloth. Do not use any cleanser or abrasive cloths.
Installation
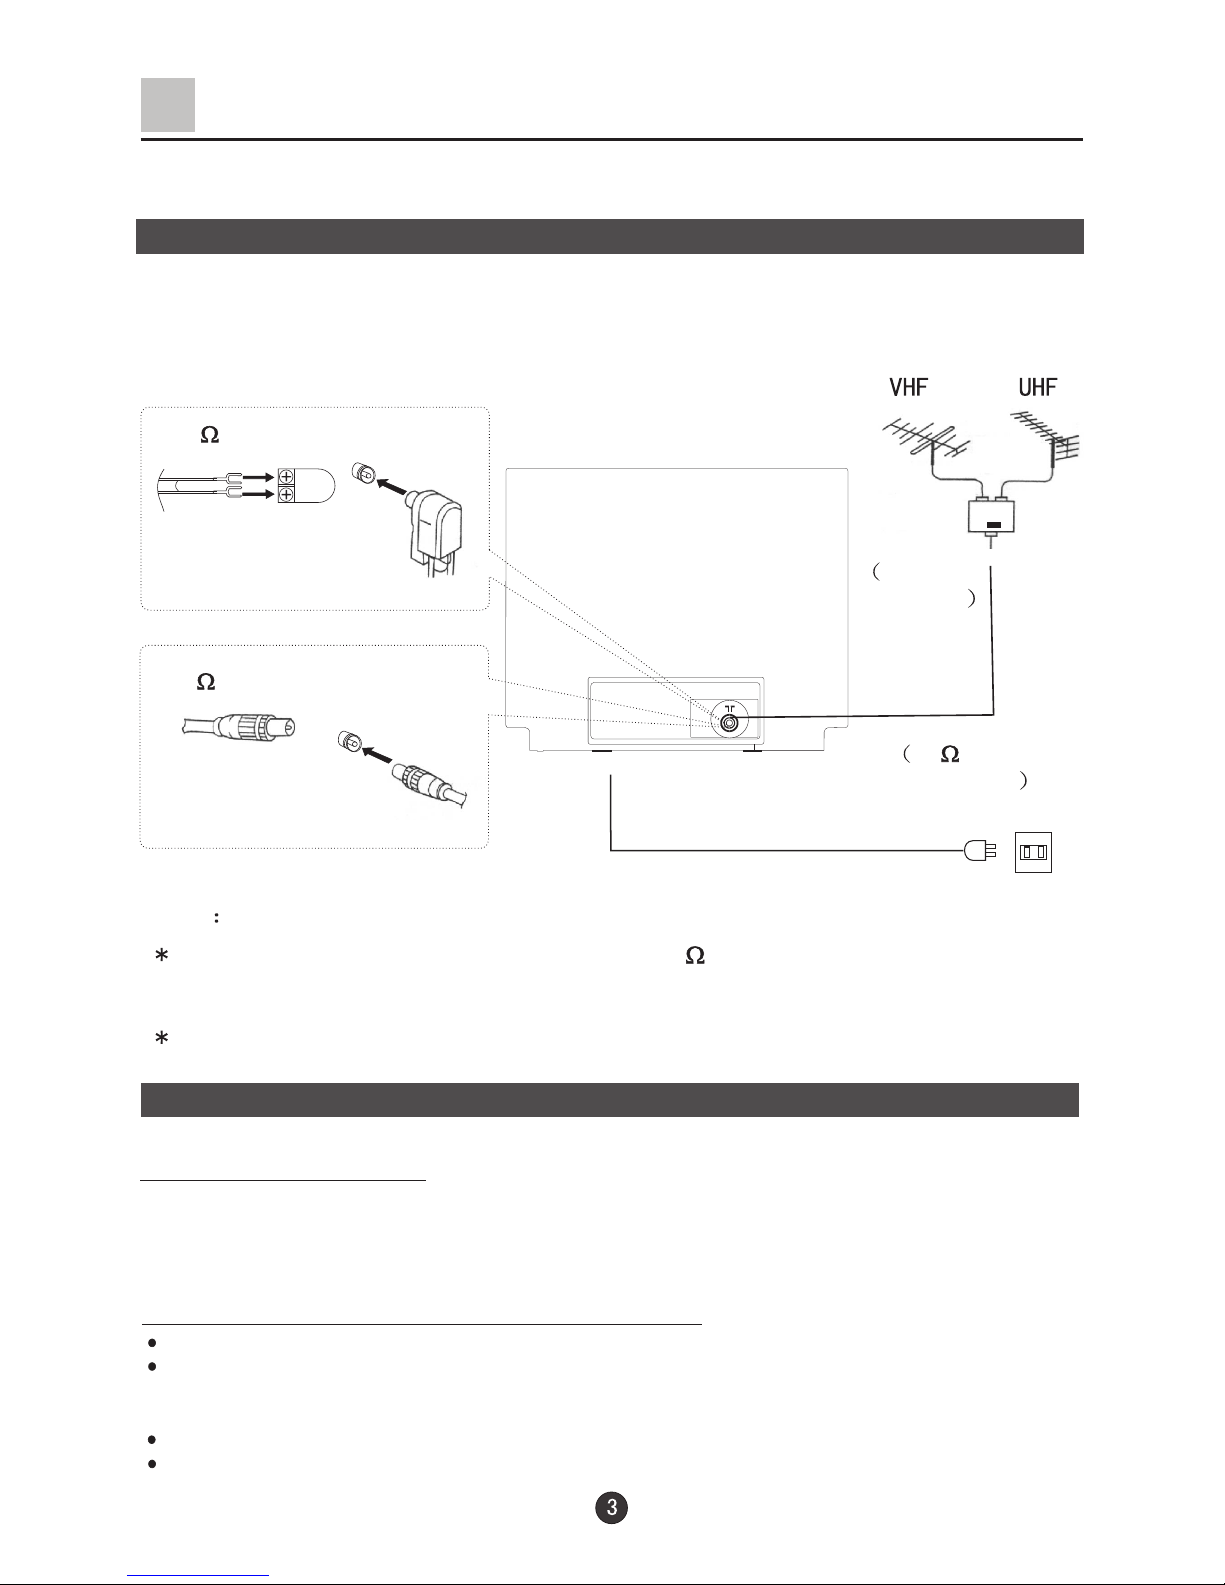
Antenna connection
General speaking, to enjoy a clearer picture, we recommend that you use a CATV
system or an outdoor antenna .In different places, the suitable antenna type and position
are different.
300 twin-lead cable
Antenna adapter
(additional purchase)
75 coaxial cable
Plug
(additional purchase)
Mixer
additional
purchase
Antenna input
75 standard
coaxial type
AC power socket
Note
It is recommended that you'd better use 75
Don't bind antenna cable and electric wire together.
coaxial cable to remove the
disturbance caused by airwave.
Preparation for the remote control
* the plug type may vary
depending on the model.
Battery installation
Take off the battery compartment cover. Place two AA batteries, make sure that battery
polarity matches with the +/- mark inside the battery compartment.
Operation notes for the remote control unit
Under normal conditions, the life time of batteries is one year.
If you don't intend to use the unit for a long period or the electricity of the batteries is
used up, remove the batteries to prevent batteries acid from leaking into the battery
compartment.
Avoid dropping the remote control and/or getting it wet.
Never place batteries in a fire.

Position of Buttons and Plug-ins
Note
S-video input terminal: Special video S-VIDEO AUDIO: L/MONO Track L/MONO ,R Track R
AV output terminals: VIDEO AUDIO L/MONO Track L/MONO ,R Track R
AV2 input terminals MONITOR : VIDEO AUDIO :L/MONO Track L/MONO ,R Track R
AV1 input terminals MONITOR :VIDEO AUDIO :L/MONO Track L/MONO ,R Track R
DVD component terminals:
Interleaved signal Y Cb Cr AUDIO L/MONO Track L/MONO ,R Track R
Progressive signal Y Pb Pr AUDIO L/MONO Track L/MONO ,R Track R
YUV input terminals: Y Pb Pr terminal AUDIO L/MONO Track L/MONO ,R Track R
Front and Side panel
Back panel
Note:
The cabinet and buttons of TV is
only for reference.
1.When using the S-VIDEO terminal, the AV1 terminal can not be connected
at the same time.
2.When the side AV is connected, please select the AV 2 terminal.
Infrared receiver
Power indicator
MENU
Channel position updown/
Volume up down/
TV/Video (input selector
TV/AVTV/AV V-V- V+V+ CH-CH- CH+CH+ MENUMENU
TV/AV V- V+ CH- CH+ MENU
VIDEO
AUDIO
R
L
Side AV terminal
Power switch
AV output terminals
Antenna input
VGA input terminal
AV2 input terminals
AV1 input terminals
YUV input terminals
S-video input terminal
YUV
VIDEO
AUDIO
VGA IN
Pr(cr)
Pb(cb)
AVOUT
L
R
AV2 IN AV1 IN
LRLRL
R
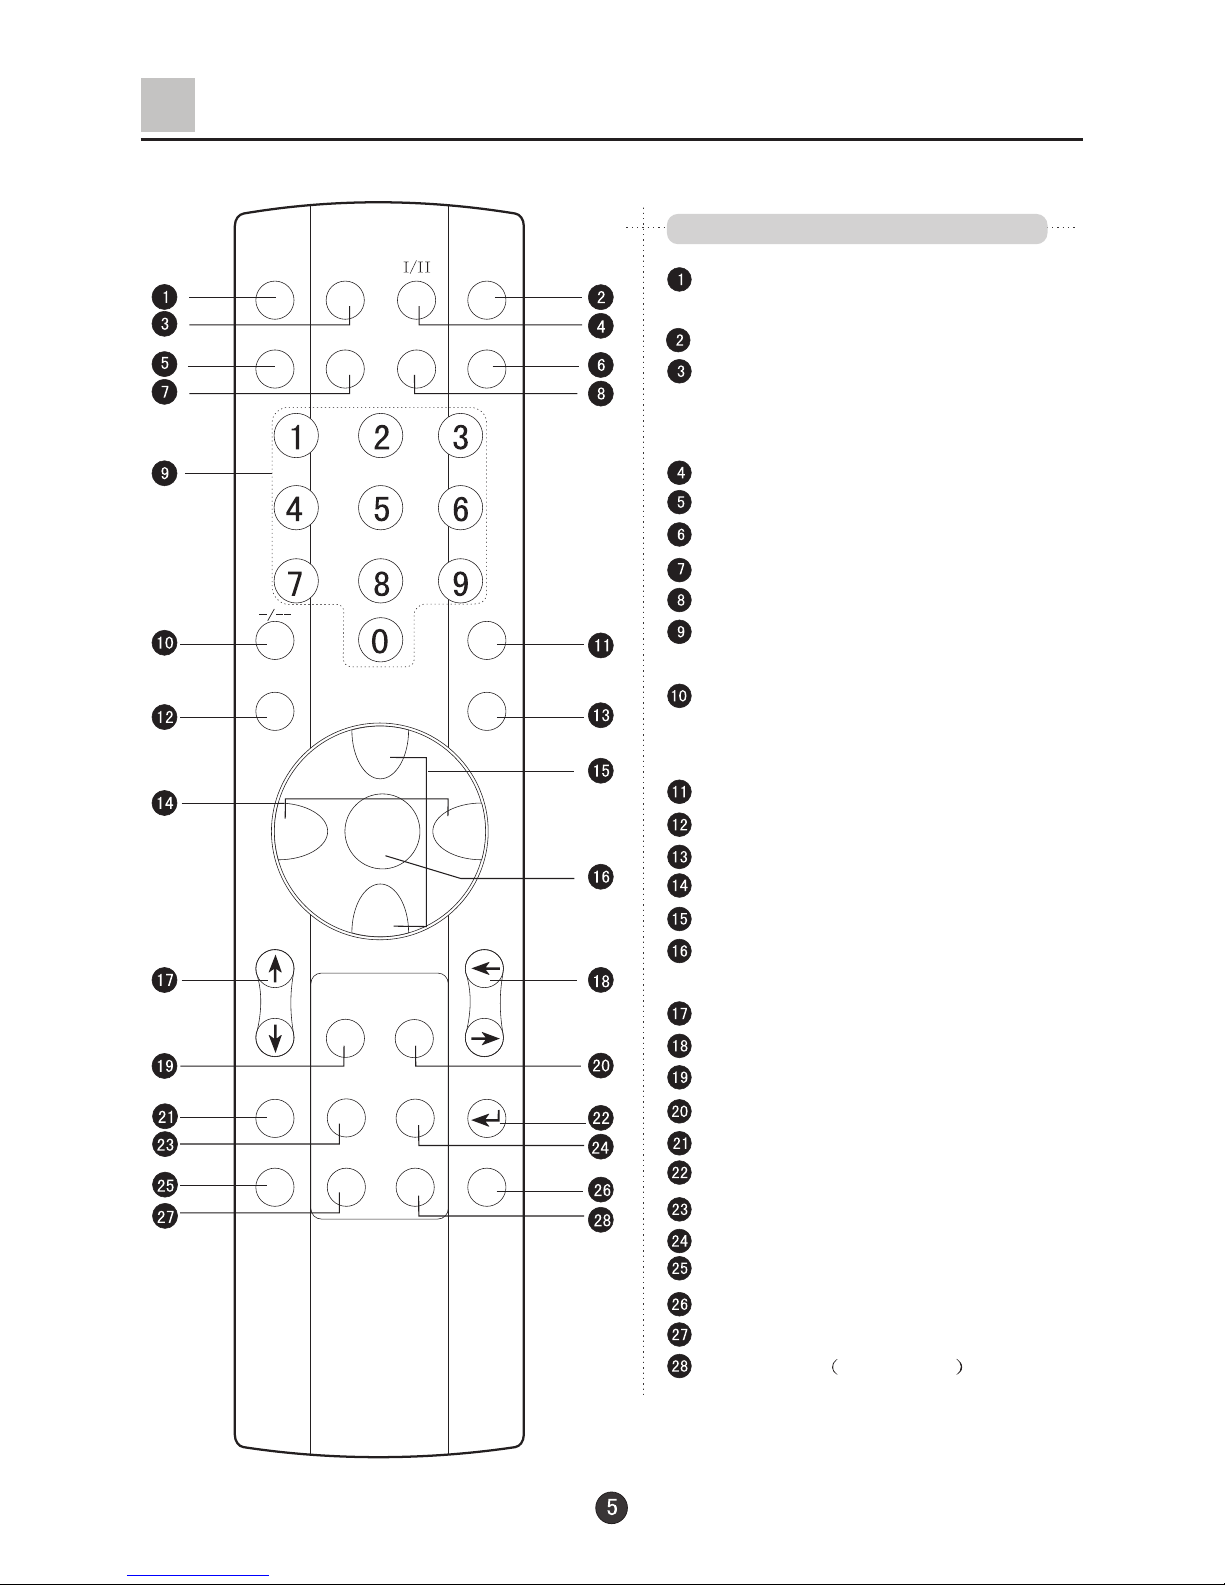
Mute button
To eliminate the sound of the programs
DC standby and power button
TV and AV exchange button
A changeover between TV and other
input signals like AV
I/II select button(No available)
Picture still button
Screen call/help button
HDM menu button
Program scan button
Direct select button
Select a TV channel directly
Digital selection button
Changeover from one digital, two
digital and three digital
Program swap button
Picture mode selection button
Sound mode selection button
Volume adjustment button
Program adjustment button
Menu call/select button
Select menu, call and exit
Picture menu call
Sound menu call
Favorite program button
Shuttle button(No available)
Function menu call
Q.SET button(No available)
Zoom select button
Time skip button (No available)
Time menu call button
Calendar/amusement function exit button
Hotel lock button
Digital album No available
ZOOM
CAL./EXIT
MUTE
TV/AV
POWER
HDM
SCAN
CALL/HELP
P.STD
S.STD
CH+
CH-
VOL- VOL+
MENU
PICTURE
FUNCTION
Q.SET
SHUTTLE
FAVORITE
SOUND
STILL
SWAP
T.SKIP
TIME
H.LOCK
D.ALBUM
Function Buttons of the Remote Control
Function buttons of the remote control

MENU
Lock Set
The Screen Display Menu
For your convenience of operation, here lists the screen display menus of this model
as your reference.
Note:
When the TV set is powered on, there might be different from what have been
illustrated above. Please do some adjustment as follows to meet your needs.
1. Press the MENU button, and then press CH+/- buttons to select the menu in the
main menu: PICTURE, SOUND, TUNE ,SETUP and TIMER. Of course, you may select
these menus directly by pressing the PICTURE, SOUND, TIME and FUNCTION buttons
on the remote control.
2. If it is not in sub-menu, press the VOL-/+ buttons to enter the sub-menu.
3. Then press the CH+/- to select the desired item, press the VOL-/+buttons to adjust
the numerical value. After that, press the MENU button to return the main menu.
4. If you want to exit the menu, press the MENU button repetitiously.
Picture menu
Sound menu
Tune menu Setup menu
Timer menu
H.lock menu
Picture Mode Standard
50
30
Brightness
Contrast
Color
Hue
Sharpness
Filter
Advance
50
50
0
Picture
Sound
Tune
Setup
Timer
Exchange
Program edit
Search
Auto Search
Quick Search
Change Password
New PWD --- Confirm PWD --- Confirm
Lock Off
Channel Lock Off
MENU
MENU
MENU
Picture
Sound
Tune
Setup
Timer
Picture
Sound
Tune
Setup
Timer
Language English
Screen Saver On
Curtain
Color Sys. PAL50
HDM scan 100Hz
Transparency On
Tilt 0
MENU
Picture
Sound
Tune
Setup
Timer
Picture
Sound
Tune
Setup
Timer
Sound Mode
Effect Mono
Treble 50
Bass 50
0
Standard
Balance

POWER
Switch on/ off the TV set
In the following, the methods of using power switch and remote control to switch on/off
power supply for the TV set will be explained.
Switch on/ off the TV set
Switch on/ off the TV set
1.Connect the power supply wire. Then press the power
switch button, the power indicator will light, in several
seconds the picture will display on the screen.
2. If the TV is in the state of standby, press the POWER
button or the CH+/- buttons on the remote control.
Note:
1. Press the CH+/- buttons which is on the TV set to get
out of the standby state when the remote control is not
in use.
2. Press the POWER button on the remote control
to the standby mode.
3. Press the power button on the TV set to
completely power off the TV.
4. To eliminate the magnetization completely, the
TV set degausses automatically. There is the
sound of PENG, it is natural.
Automatic stand by function
On the Screen Saver is On, if no signal has
been received, and after five minutes, it will stand
by automatically.
CH+
CH-
VOL- VOL+
MENU
Watching TV Programs
Watching TV programs
CH+
CH-
VOL- VOL+
MENU
CH+
CH-
VOL- VOL+
MENU
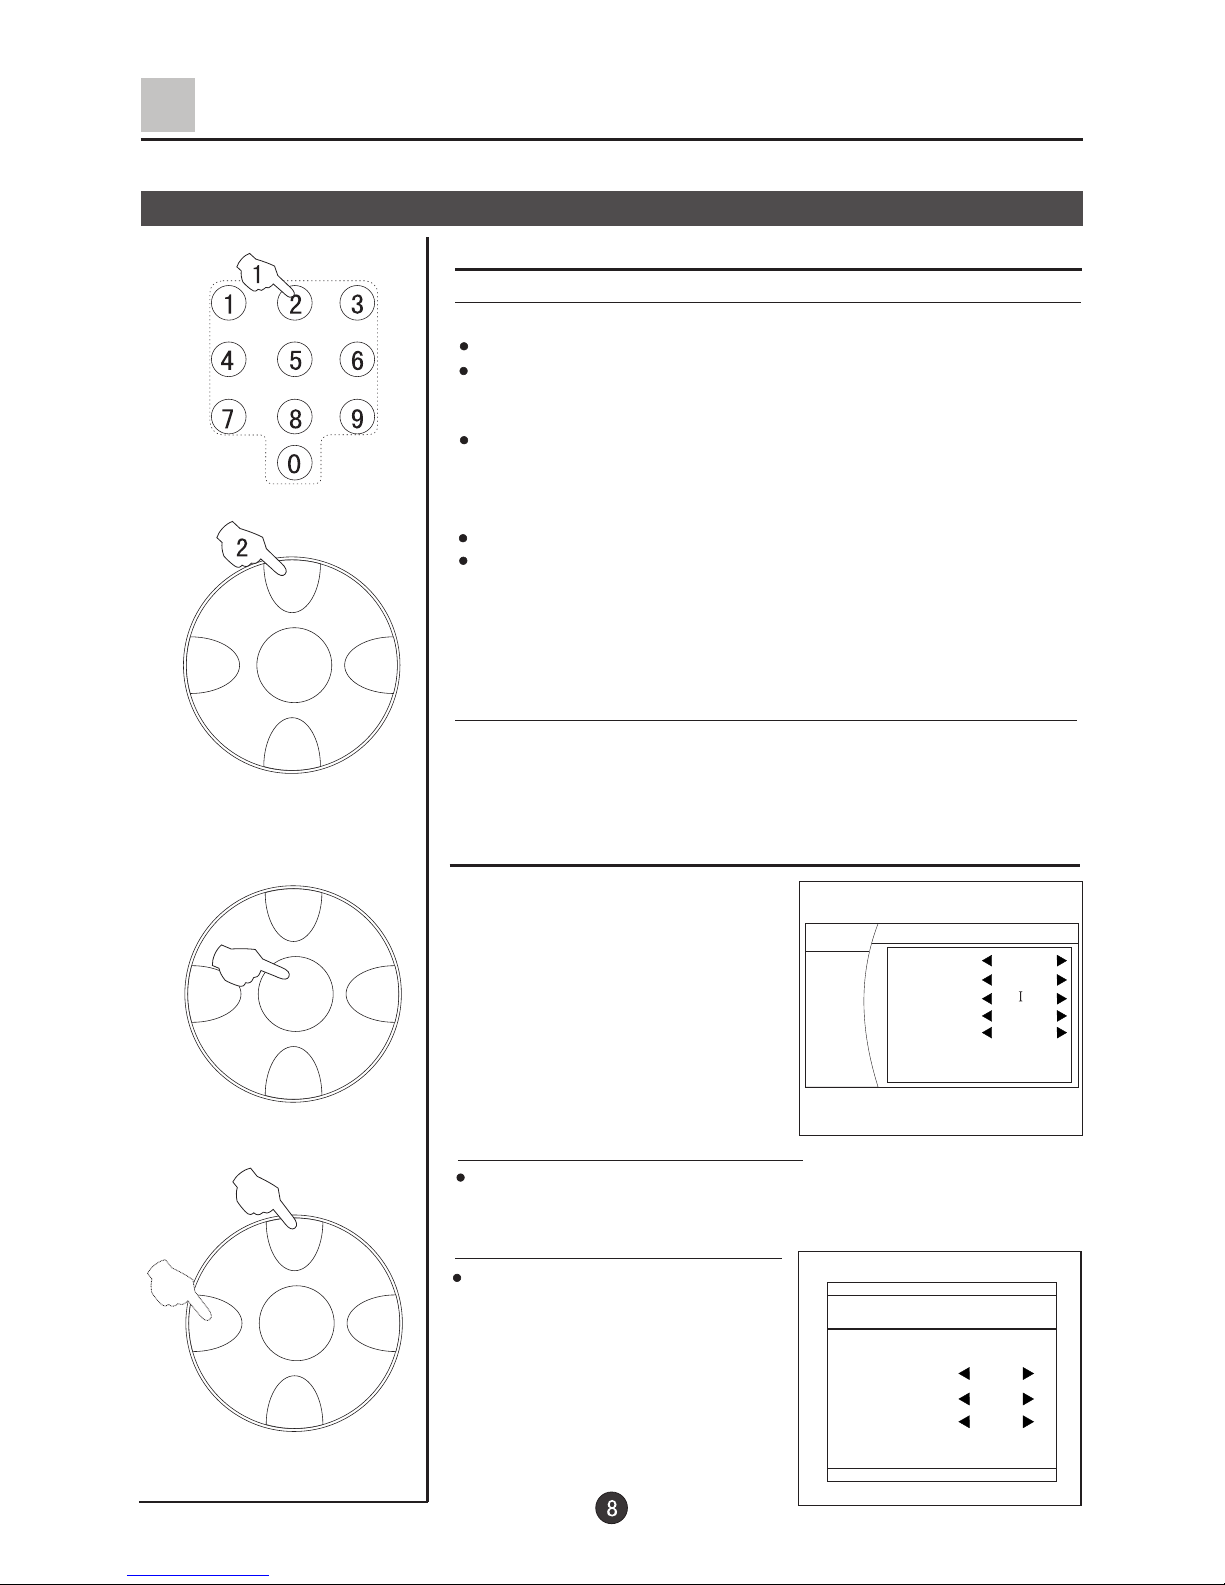
How to select the TV program
Select the desired program
1. Use the direct number selection button
2. Use the CH+/- buttons
Press the CH+ button to select the channel of the larger number.
Press the CH- button to select the channel of the smaller number.
Press the button from 0-9 to select a one-figure channel.
If you want to select a double figures channel, press the
figure-selection button and change it into two-figure mode, then
press the number of the channel.
If you want to select a three figures channel, press the figure-selection
button and change it into three-figure mode, then press the number
of the channel.
Select the desired sound
Press the VOL+/- buttons to adjust the volume to your need.
If the colour or sound of a certain channel is
abnormal
If the TV set you bought is
abnormal in colour or sound in a
certain channel, it might be
because the colour or sound
system has been set improperly.
You may follow the instruction
below to adjust it. Press the
MENU button, then press CH+/buttons to select function menu,
and you can see the form . Then
press VOL+ button to enter submenu.
If the colour of the picture is abnormal
Press the CH+/- buttons to move the indicator to "Color Sys.", and
press the VOL+/- buttons to select the proper color.
Refer the above steps to enter the
Program edit menu. Press the CH+/ buttons to move the indicator to
"Sound Sys.", and press the VOL+/ buttons to select the proper sound.
If the sound is abnormal
Program NO. 2
Skip Off
Lock Off
Sound Sys. DK
Fine tune <144.20MHz>
Program edit
Language English
Screen Saver On
Curtain
Color sys. PAL50
HDM scan 60P
Transparency On
Tilt 0
MENU
Picture
Sound
Tune
Setup
Timer

CH+
CH-
VOL- VOL+
MENU
SWAP
SCAN
Watching TV Programs (continued)
Swap function enables quick swap to the last watched program.
Program swap and auto scan functions
Program swap
1.
Suppose the channel number
you used just now is 8 and the
channel number you are using
is 18 (as shown in the figure).
2. If you want to return to the
last watched program channel
8, you can simply press the
SWAP button.
3. If you want to return to
channel 18, press the button
again. Through this function,
you can easily change
between the channel you are
using and the channel you
used last time.
Auto program scan
1. Press the SCAN button to
scan through all the memorized
TV channels.
2.When it is the program that
you desired, and press the
MENU button to confirm.
CH+
CH-
VOL- VOL+
MENU
VHF-L 188.16 MHz CH NO:4
Auto Search
Tune
The TV set has three methods to set the channels, which are Auto search, Search, Quick Search and Fine
tune.
In this section, how to use the remote control to set the channel is explained. You can also use the buttons
on the TV set to set channel.
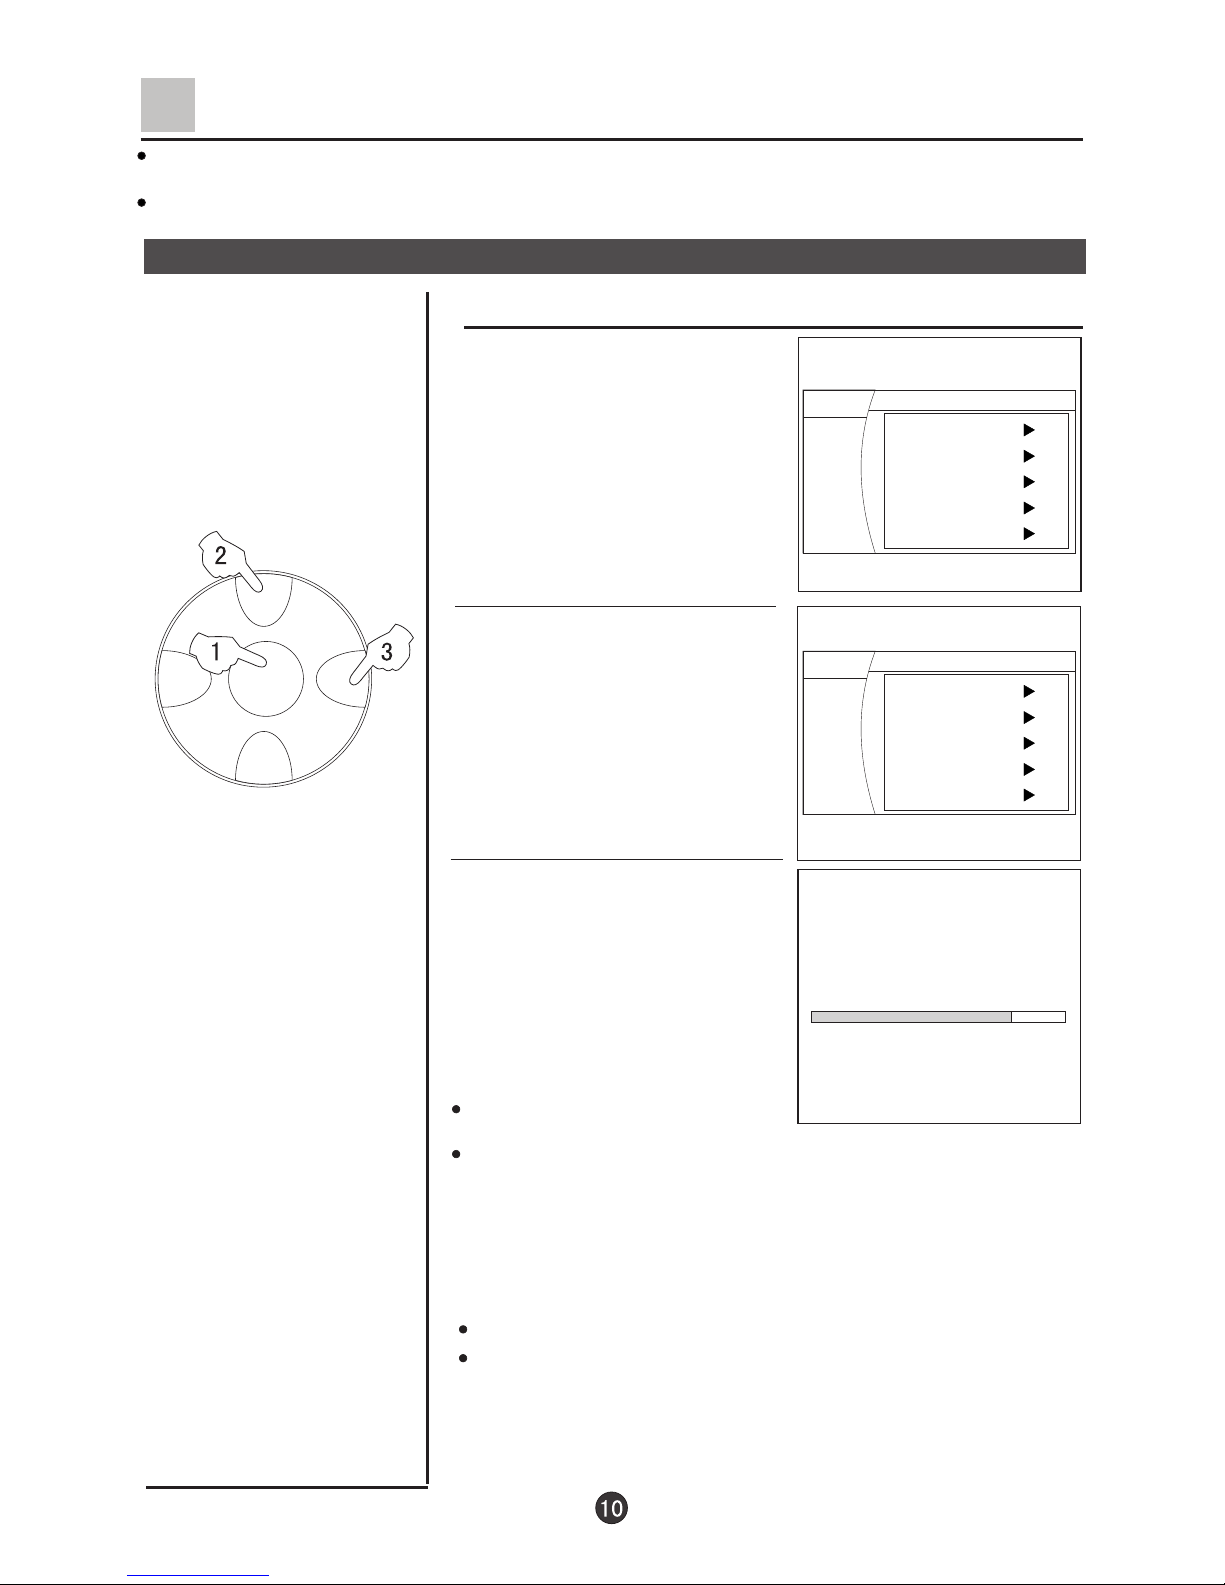
Auto search
1. Press the MENU button to display
the menu, then press CH+/-buttons
to select TUNE menu, press VOL+
button to enter.
2. Press the CH+/- buttons to move
the indicator to " Auto Search ".
3. Press the VOL+ button, and
"Auto Search" mode will work.
The TV set will search automatically
all available programs, after search
is finished, all available programs
will be stored in turn.
If you want to stop the search,
just press the MENU button.
The order of the automatic search is due to the frequency of
the program, generally speaking, it is used only the first time
you search the program, and after the order of the program
has been made, you don't have to use this function,
otherwise the order of the program will be mixed.
Auto search
After searching (Continued)
Press the CH+/- buttons to check channels.
If the colour or sound is abnormal in a certain channel, it may be
because that the colour or sound system has not been set
properly, then, you may adjust it to proper system (Refer to
page 8).
Exchange
Program edit
Search
Auto Search
Quick Search
MENU
Picture
Sound
Tune
Setup
Timer
Exchange
Program edit
Search
Auto Search
Quick Search
MENU
Picture
Sound
Tune
Setup
Timer
 Loading...