

Page 1

009050****
D29FV6H-A8
Colour Television
Operation Instructions
MAIN FUNCTION
◆218 Programs stored
◆Dynamic noise reduction
◆Multi-picture mode
◆Auto-correcting black balance
Page 2

CONTENTS
WARNING AND CAUTIONS
BASIC FEATURE
TECHNICAL SPECIFICATION
FUNCTION BUTTONS AND EXTERNAL SOCKETS
REMOTE CONTROLLER BOARD
OPERATING MENU
GENERAL OPERATION
TELETEXT FUNCTION
EXTERNAL CONNECTION
TROUBLESHOOTING GUIDE
1
2
2
3
5
6
11
13
15
16
Page 3
WARNING AND CAUTIONS
BASIC FEATURE
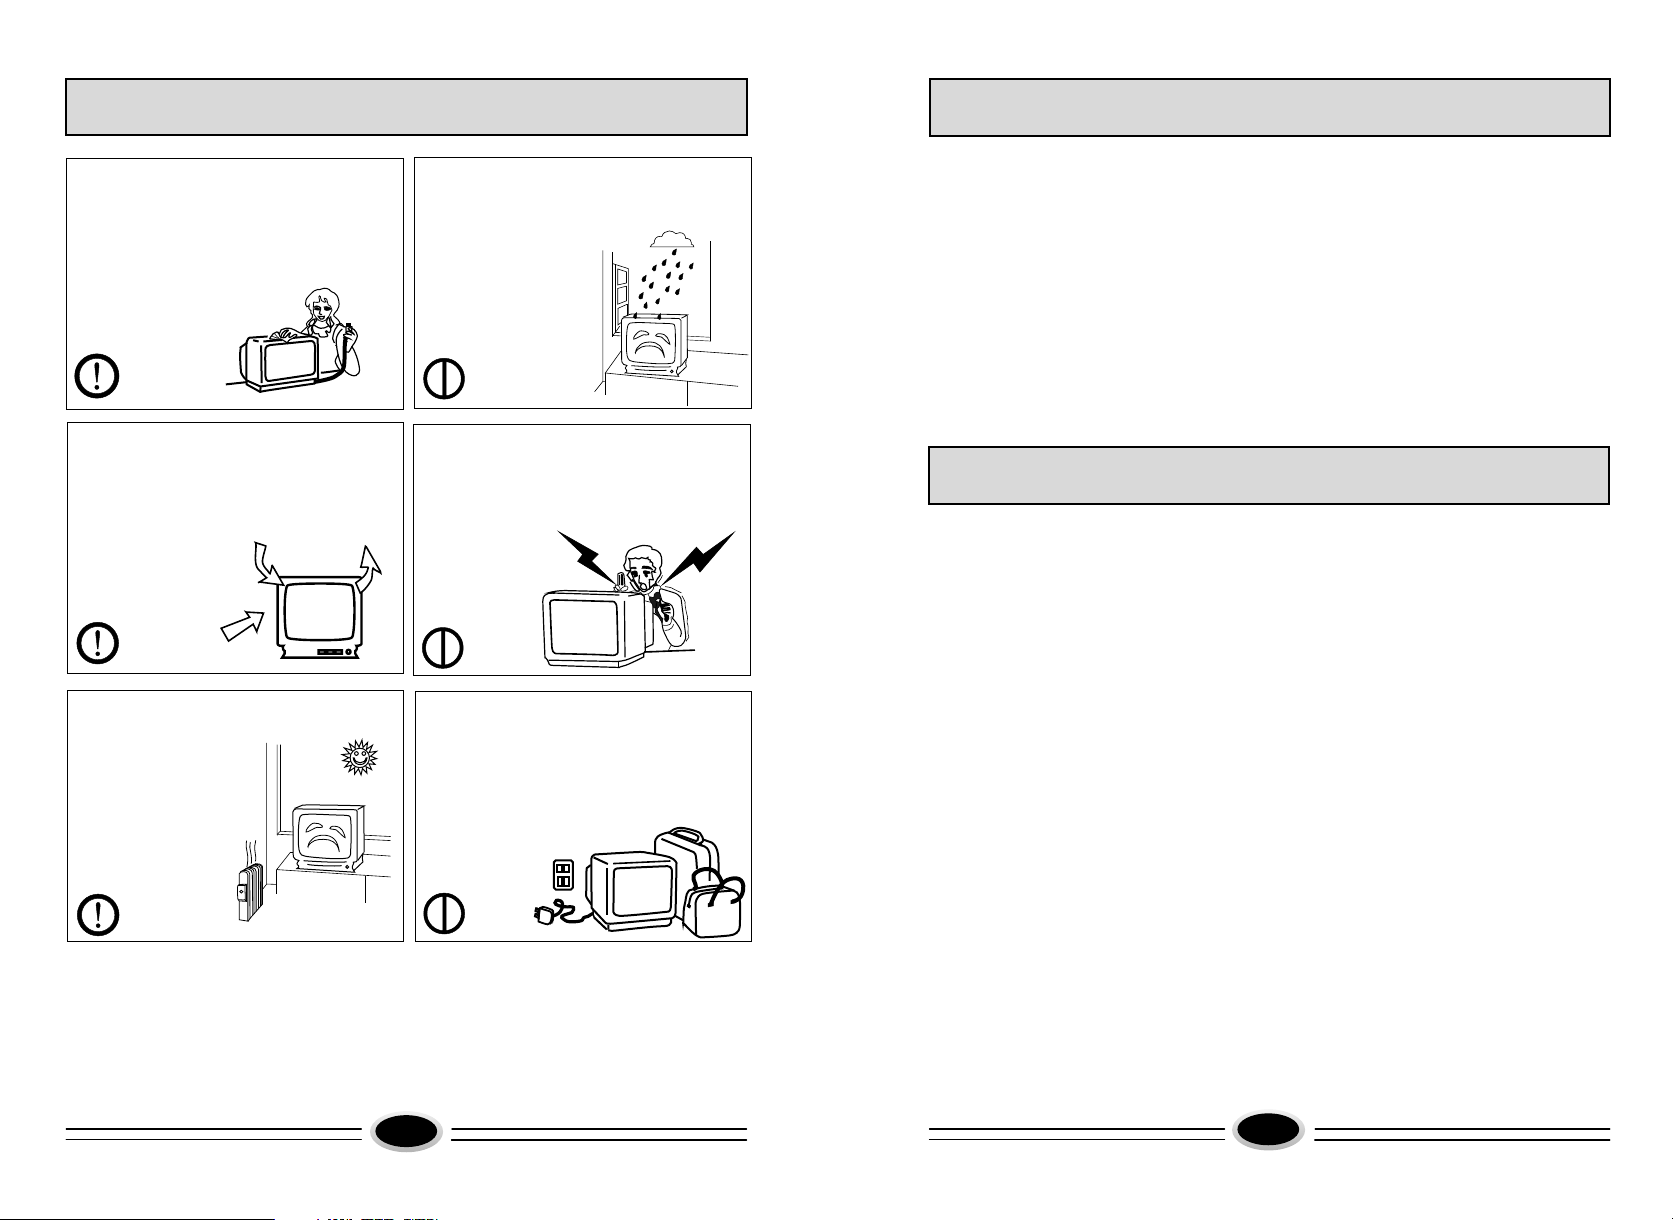
1. When you clean the TV set, please pull
out the power plug from AC outlet.
Or may result in electric shock, fire or
damage to the TV set. Don't clean the
cabinet and the screen with benzene,
petrol and other chemicals.
2. In order to prolong the using life of the
TV set, please place it in a well ventilated
location.
3. Don't place the TV
set in direct sunlight or
near heat source.
Explanation on the display tube
4. Do not place the TV set near rain
or moisture as it may cause an electric shock,
or the TV set to catch fire. The TV set
must only be used
in dry indoor
location.
5. The back cover must only be removed
by a registered electrical service person.
Removing the back cover may result in
electric shock, fire or damage to
the TV set.
6. If the TV set is not going to be used for
long time, or there is a severe thunder &
lightening storm, it is recommended that
the TV set be disconnected from the AC
power outlet and the aerial plug
removed.
●218 programs stored
●Auto-correcting black balance
●Multi-picture modes
●Audio/video input, S-Video input
TECHNICAL SPECIFICATION
POWER SUPPLY: See rating plate
TV SYSTEM: B/G
COLOUR SYSTEM: PAL NTSC3.58/4.43 (AV)
CRT: 29"
AERIAL INPUT IMPEDANCE: 75Ω unbalanced
VIDEO INPUT: 1.0VP-P(75Ω)
AUDIO INPUT: 436mVrms(40KΩ)
VIDEO OUTPUT: 1.0VP-P(75Ω)
AUDIO OUTPUT: 436mVrms(≥600Ω)
AUDIO MAX OUTPUT POWER: 5W+5W
POWER CONSUMPTION: See rating plate
NET WEIGHT(kg):
NET SIZE(mm): 762×506×612
Supplied accessories:
Infrared remote control handset 1
Battery(AA) 2
Operating instructions 1
Design and specifications are subject to change without notice.
49.5
Should the picture tube require cleaning, disconnect the power and use a dry
soft cotton cloth. Do not use any cleaner or abrasive cloth.
1
2
Page 4
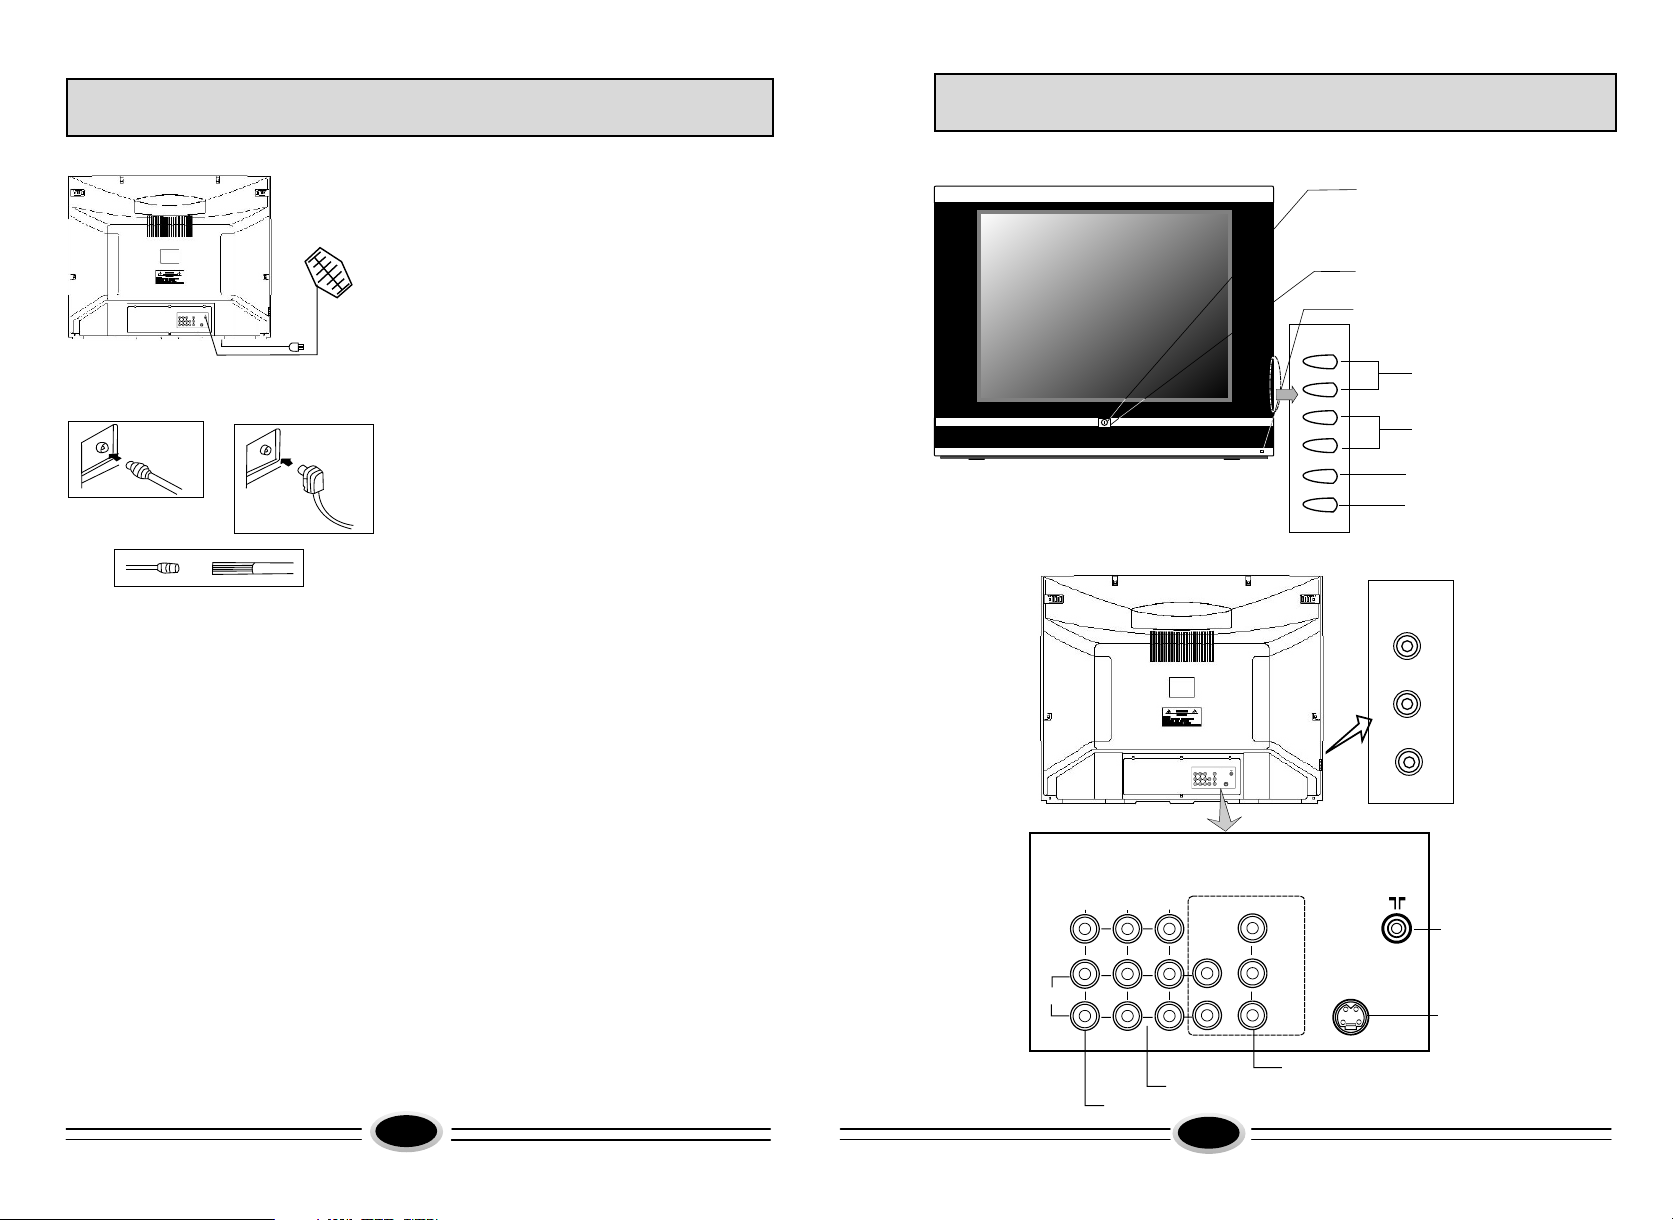
FUNCTION BUTTONS AND EXTERNAL SOCKETS
FUNCTION BUTTONS AND EXTERNAL SOCKETS
Antenna
VIDEO
R
AUDIO
L
Figure A Figure B
75-300
Antenna adapter
Antenna cable
with a plug
Figure C Figure D
Coaxial cable(75Ω) twin-lead cable(300Ω)
Antenna feeder
Antenna connection
Connect an antenna to the antenna socket on
the TV set, we recommend using a Cable TV
system for better picture and audio quality.
1.If you use a coaxial cable(75Ω),insert the
antenna plug (see figure C) into 75Ωsocket
(see figure A).
2.If you use a twin-lead cable(300Ω),please
shape the cable as figure D, and connect the
leads to antenna adapter and then insert the
antenna adapter into the 75Ωsocket (see
figure B).
Power source wire connection
Insert the power plug into AC outlet.
Install and replace batteries of the
remote control unit:
1.Place the remote control unit with the face
down, then open the battery cover of the
unit.
2.Place the two"AA"size batteries, matching
the + and - signs on each battery to the +
and -signs of the battery compartment.
3.Close the cover of the battery compartment.
NOTE:
(1)Don't drop or wet or dismantle the unit.
(2)If you don't intend to use the unit for a
long period or the electricity of the
batteries is used up, remove the batteries
to prevent batteries acid from leaking
into the battery compartment.
(3)Replace the two old batteries at the
same time.
(4)Don't use charge battery (Ni-cd )and
don't mix battery type.
(5)Don't throw your batteries into a fire.
Dispose of your batteries in a required
place.
1.Front panel
2. Back and side panels
AV OUT
V EOID
L
AUDIO
R
1
AV IN2AV IN
YCbCr
Power switch
Power indicator
Signal receiver
P+
P-
V+
V-
TV/AV
MENU
Channel position up/down
Volume up/ down
TV/AV switching
Menu
VIDEO
R
AUDIO
VIDEO
R
AUDIO
L
Y
Cb
Cr
S-VIDEO
L
Ant enna in put ter minal
S- VIDEO i npu t ter min al
3
Aud io,v ideo in put ter minal
YUV (DVD co mpone nt) inp ut term inal
Aud io,v ideo ou tput te rmina l
4
Page 5

REMOTE CONTROLLER BOARD
OPERATION MENU
FUNCTION DESCRIPTION
N
PROGRAM SCAN
STANDBY
SWAP PROGRAM BETWEEN THE PRESENT AND THE LAST
MUTE
T
E
O
M
ZOOM BUTTON
L
L
DISPLAY
TV/VIDEO SELECTION
VOLUME CONTROL
CHANNEL NUMBER UP/DOWN
PICTURE MENU
SOUND MENU
TIME MENU
FUNCTION MENU
ONE DIGIT SELECTION
ONE OR TWO OR THREE DIGITS PRE-SELECTION
MENU DISPLAY
INVALID BUTTON
I
T
I
I
NICAM BUTTON
PICTURE MODE SELECTION
TD
T
D
SOUND MODE SELECTION
TUNE MENU SELECTION
E
P
I R
MU
T
1
4
7
-/-
.
ST
C
T
U TI
O
S
MARK
S A
S
C
AN
E
S
W P
A
Z
3
6
9
I
- I
C
H
+
PP
.
M
E
NU
C H
-
N
F TU
OOM
CLAL
EI
X
T
T
V
I
/
AV
S
.SD
T
V +
O
L
E
N
O
TI N
C
2
5
8
0
-
DP
V
O
L
-
U
E
E U
M
D
N
C
SWAP
M
U
Z
O
C
A
TV/AV
-VOL+
-CH+
PICTURE
SOUND
TIME
FUNCTION
0-9
-/--
?
MENU
E
X
I-
P
S.
S
.
S
N
TU
INVALID BUTTON
TV/TELETEXT ENTERING/EXITING
??
TO REVEAL CONCEALED TELETEXT
TELETEXT ZOOM
TELETE XT PAGE HOLD
TELETE XT/TV MIX MODE
TV/TELETEXT ALTERATION
TIME DISPLAY(IN TV MODE)/SUBCODE SWITCH
NOTE:
INVALID BUTTON
The function of selecting menu button on the remote controller is
the same as that of program up/down button on the TV set.
The function of identifying menu button on the remote controller
is the same as that of volume up/down button on the TV set.
Picture adjustments
Menu
Press the MENU button to display the main menu.
1.
Press CH+/-button to select the , then
2. PICTURE
press VOL+/-button or press the button
on the remote control to enter the menu.
PICTURE
picture .
Picture
1.Contrast
Press the CH+/- button to select CONTRAST, then
press the VOL+/- button to adjust the contrast level.
2.Colour
Press the CH+/- button to select COLOUR, then press
the VOL+/- button to adjust the colour level.
3.Brightness
Press the CH+/- button to select BRIGHTNESS, then
press the VOL+/- button to adjust the brightness level.
4.Sharpness
Press the CH+/- button to select SHARPNESS, then
press the VOL+/- button to adjust the sharpness level.
Note: Do not turn the sharpness up to high if the reception
is poor or has lots of noise as it will enhance the
fine grain details.
5.Picture noise reduction
Press CH+/-button to select the PICTURE NR, then
press VOL+/-button to select LOW/MID/HIGH/OFF.
6.White temperature
Press the CH+/-button to select WHITE TEMP, then
press VOL+/-button to adjust the WHITE TEMP level.
Note: Tint is only used in the NTSC mode.
MENU
PICTURE
SOUND
FEATURE
SETUP
TUNE
V
V :FIX MENU:RETURN
PICTURE
CONTRAST 42
COLOUR 30
BRIGHTNESS 21
TINT
SHARPNESS 30
PICTURE NR LOW
WHITE TEMP 0
V
V :ADJUST MENU:RETURN
-
+
5
6
Page 6

OPERATION MENU
OPERATION MENU
MENU
PICTURE
SOUND
FEATURE
SETUP
TUNE
V
V :FIX MENU:RETURN
SOUND
TREBLE 30
BASS 30
DBE BASS MEDIUM
SURROUND OFF
V
V :ADJUST MENU:RETURN
-
Sound Adjustments
Menu
1.Press the MENU button to display the main menu.
2.Press CH+/-button to select the SOUND, then
press VOL+/-button or press the SOUND button
on the remote control to enter the sound menu.
Sound
1.Treble
Press the CH+/- button to select TREBLE, then
press the VOL+/- button to adjust the treble
level.
2.Bass
+
Press the CH+/- button to select BASS, then
press the VOL+/- button to adjust the bass level.
3.Dbe bass
Press the CH+/- button to select DBE BASS,
then press the VOL+/- button to select
MEDIUM/STRONG/OFF.
4.Surround
Press the CH+/- button to select SURROUND,
then press the VOL+/- button to turn this feature
on/off.
Feature Menu
Menu
1.Press the MENU button to display the main menu.
2.Press CH+/-button to select the FEATURE, then
press VOL+/-button or press the FUNCTION button
on the remote control to enter the feature menu.
Feature
Press the CH+/- button to select TIMER, then press
the VOL+/- button to enter the timer menu.
1.Timer
(1)Press the CH+/- button to select OFF TIMER, then
press the VOL+/- button to adjust the time.
(2)Press the CH+/- button to select ON TIMER, then
press the VOL+/- button to adjust the time.
MENU
PICTURE
SOUND
FEATURE
SETUP
TUNE
V
V :FIX MENU:RETURN
FEATURE
TIMER
CHILD LOCK
BLUE BACK ON
LANGUAGE ENGLISH
ROTATION 0
LTI OFF
SVM ON
V
V :ADJUST MENU:RETURN
TIMER
OFF TIMER --:-ON TIMER --:-POSITION CH 2
(3)Press the CH+/- button to select POSITION, then
press the VOL+/- button to select the TV channel
that the TV set will automatically turn on to.
Note: OFF TIMER will not work in the TV set if it
is disconnected from the power supply or in
standby but it works if it is turned on. ON
TIMER will work in the TV set if it is turned
on and in standby.
2.Child lock
(1)
Press the CH+/- button to select CHILD LOCK, then
press the VOL+/- button to enter the child lock menu.
Press the numeric button on the remote control to input
(2)
the password(the original password is 0000, the
V
V :ADJUST MENU:RETURN
FEATURE
TIMER
CHILD LOCK
BLUE BACK ON
LANGUAGE ENGLISH
ROTATION 0
LTI OFF
SVM ON
V
V :ADJUST MENU:RETURN
CHILD LOCK
PASSWORD ----
STATE
CHANGE PIN
available password is 3410.)
Press the CH+/- button to select STATE, then
(3)
press the VOL+/- button to turn this feature ON/OFF.
Press the CH+/- button to select CHANGE PIN, then
(4)
V
V :ADJUST MENU:RETURN
press the numeric button on the remote control to change the password.
Note: (1)when you enter the CHILD LOCK next time, you should input the new
password you set, or you can’t enter.
(2)when the CHILD LOCK is on, use remote control to turn off the TV set,
then using remote control to turn it on again, it will not curtain.
7
8
Page 7

OPERATION MENU
OPERATION MENU
FEATURE
TIMER
CHILD LOCK
BLUE BACK ON
LANGUAGE ENGLISH
ROTATION 0
LTI OFF
SVM ON
V
V :ADJUST MENU:RETURN
MENU
PICTURE
SOUND
FEATURE
SETUP
TUNE
V
V :FIX MENU:RETURN
SETUP
POSITION CH 5
COLOUR SYS. AUTO
SOUND SYS. B/G
SKIP OFF
FINE TUNE 155.75MHz
V
V :ADJUST MENU:RETURN
3.Blue back
Press the CH+/- button to select BLUE BACK, then
press the VOL+/- button to turn this feature on/off.
4.Language
Press the CH+/- button to select LANGUAGE, then
press the VOL+/- button to select the language you
need.
5.Rotation
Press the CH+/- button to select ROTATION, then
press the VOL+/- button to select the rotation you
need.
6.LTI
Press the CH+/- button to select LTI, then press the
VOL+/- button to turn this feature on/off.
7.SVM
Press the CH+/- button to select SVM, then press the
VOL+/- button to turn this feature on/off.
Setup Menu
Menu
1.Press the MENU button to display the main menu.
2.Press CH+/-button to select SETUP, then press
VOL+/-button to enter the setup menu.
Setup
1.Position
Press the CH+/- button to select POSITION, then
press the VOL+/- button to select the channel.
2.Colour system
Press the CH+/- button to select COLOUR SYS., then
press the VOL+/- button to select the colour system
you need.
3.Sound system
Press the CH+/- button to select SOUND SYS., then
press the VOL+/- button to select the sound system
you need.
4.Skip
Press the CH+/- button to select SKIP, then press the
VOL+/- button to turn this feature on/off.
5.Fine tune
Press the CH+/- button to select FINE TUNE,
then press the VOL+/- button to fine tune.
Tune Menu
Menu
1.Press the MENU button to display the main menu.
2.Press CH+/-button to select TUNE, then press
VOL+/-button or press the TUNE button
on the remote control to enter the TUNE menu.
Tune
Press the CH+/- button to select AUTO SEARCH,
then press the VOL+/- button to enter the auto search
menu.
1.Auto search
After entering the AUTO SEARCH menu, press VOL+/button to start searching automatically.
2.Manual search
(1)Press the CH+/- button to select BAND, then
press the VOL+/- button to select the item you need.
(2)Press the CH+/- button to select SOUND SYS., then
press the VOL+/- button to select the system you need.
(3)Press the CH+/- button to select POSITION, then
press the VOL+/- button to select the channel.
(4)Press the CH+/- button to select STATE then
press the VOL+/- button to start searching.
Note: the purple characters on the screen can not be
selected.
MENU
PICTURE
SOUND
FEATURE
SETUP
TUNE
V
V :FIX MENU:RETURN
TUNE
AUTO SEARCH
MANUAL SEARCH
V
V :ADJUST MENU:RETURN
AUTO SEARCH
FREQUENCY 155.70MHz
BAND VHF
SOUND SYS. B/G
POSITION CH 5
STATE STOP
MENU:RETURN
MANUAL SEARCH
FREQUENCY 155.70MHz
BAND VHF
SOUND SYS. B/G
POSITION CH 6
STATE STOP
V
V :ADJUST MENU:RETURN
9
10
Page 8

GENERAL OPERATION
GENERAL OPERATION
1.Channel Changing (218 possible channels)
Use either the CH+/- buttons on the remote controller or the front panel of the TV set
to change the channels. Or directly enter the channel number with the numeric button
on the remote controller.
To select channel numbers from 10 ~ 99, press [-/--] button twice and enter the two
digits channel number. To select channel numbers from 100 ~ 217, press [-/--] button
thrice and enter the 3 digits channel number.
2.Volume Adjustment
Press the VOL+/- buttons on the remote control or the front of the TV set to adjust the
volume level. The range is 0~60. When the volume buttons are pressed, the volume
level is displayed automatically on the TV screen.
3.Standby
Using the remote controller the TV set can be placed into standby mode. To turn
the TV set back on again, press standby button on the remote controller again. It will
take a few seconds before a picture will be displayed.
4.Mute
Press the MUTE button on the remote controller to mute the TV sets sound. Pressing
the MUTE button again will turn the sound back on again.
5.Preset Picture Modes
Our engineers have designed in 4 commonly used picture settings to allow fast
picture level selection depending on what type of TV program is showing. Each
mode is selected in turn by pressing the "P. STD" button on the remote controller.
The 4 modes are: STANDARD, DYNAMIC, MILD and CUSTOM.
7.Recall (on-screen display)
The CALL button on the remote controller allows the on screen menu to be
displayed, showing the channel numbers and colour system and sound system.
8.Program Scan (Automatically increments/scans the channels and displays
each channel for a short time.)
Press the SCAN button on the remote controller to turn on/off the scan feature.
9.Channel Swap (toggles between the last channel view and the current
channel)
Each time the SWAP button is pressed, the last channel view is displayed.
10.AV Input Selection
Each time the TV/AV button is pressed, the input selection will cycle among
TV- AV1- AV2- SAV- YCbCr.
Notes: I.AV1 & SAV share the same AV1 audio input.
Ⅱ.In AV modes the RECALL status display will only display the colour
system.
6.Preset Sound Modes
Our engineers have designed in 4 commonly used sound modes to allow the
best possible sound to be selected quickly. Each mode is selected in turn by
pressing the "S.STD" button on the remote controller.
The 4 modes are: NEUTRAL, MOVIE, MUSIC and MEMORY.
11
12
Page 9

TELETEXT FUNCTION (FAST TEXT)
1.TV/Teletext Button (Turns the Teletext feature On/Off) [ ]
Press the [ ] button on the remote control to turn teletext On/Off.
To select a teletext page either directly enter the page number using the numeric key
pad on the remote control or use the CH+/- buttons, or the coloured Fast Text buttons.
2.Mix Mode [ ]
While in Teletext mode press the [ ] and will show the teletext data superimposed on
top of the TV picture. Press the button again to revert back to Full text.
3.Cancel Mode [ ]
This feature allows the TV picture to be displayed while next page to be searched is
entered and found. Only the top teletext line is displayed until the page is found.
Press the [ ] button to hide the teletext information. Either press the [ ]
(Cancel button) or the [ ] (Text button) to exit the cancel display mode.
4.Hold [ ]
Pressing the [ ] button will stop the teletext page automatically updating.
This feature is very useful where there are several teletext pages on the same
page number.
TELETEXT FUNCTION (FAST TEXT)
8.Time [ ]
While in normal TV mode only, pressing the [ ] button will display the
teletext time in the top right hand corner for a few seconds. In teletext mode,
the button can be used as subcode switch.
9.Fast text coloured buttons
Fast text automatically displays the four most commonly used pages that the
broadcaster thinks that you may want to choose next. Press the same coloured
button on the remote as the coloured link at the bottom of the teletext page to
go directly to that page.
5.Size [ ]
Pressing the [ ] button changes between full screen top half bottom and
half full screen. This feature is very useful as it magnifies the image making
the characters easier to read.
6.Reveal [ ]
Pressing the [ ] button will reveal hidden text. This feature is used to
reveal information such as answers to teletext on-line interactive puzzles.
?
?
13
14
Page 10
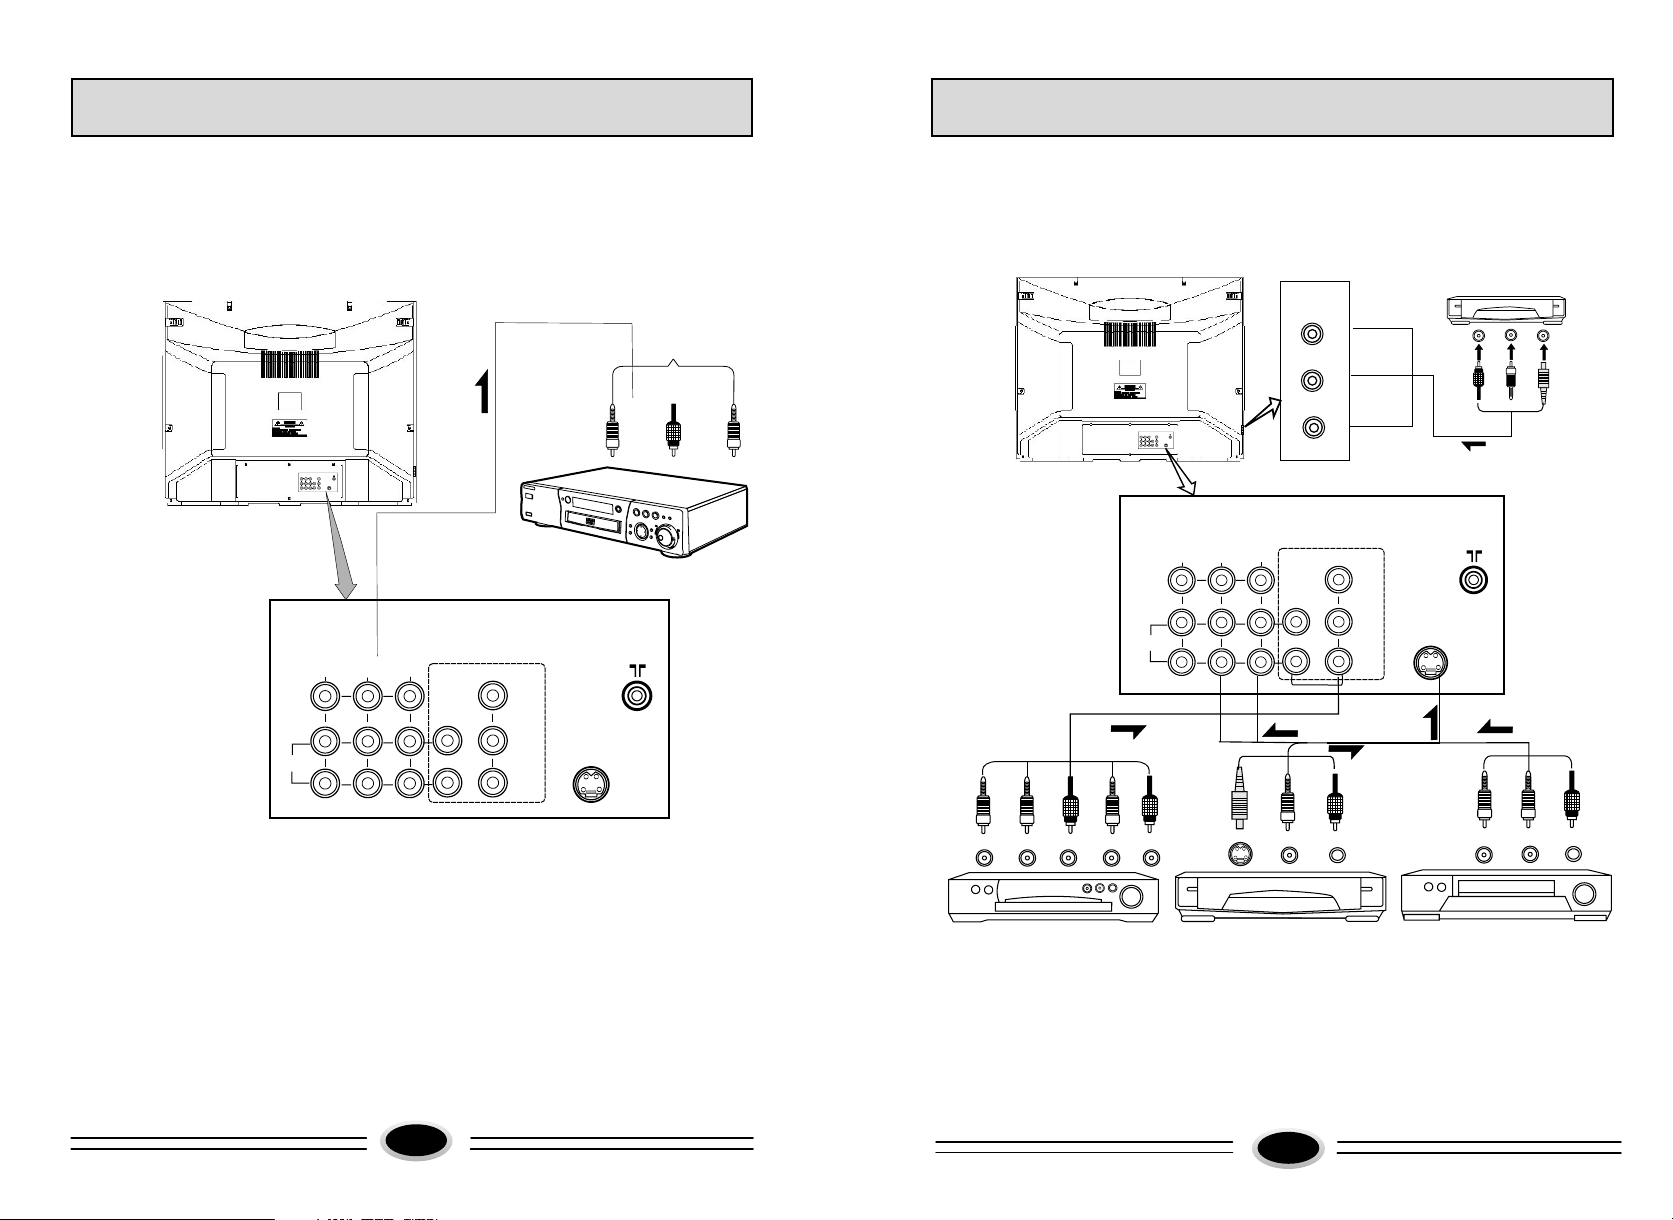
EXTERNAL CONNECTIONS
EXTERNAL CONNECTIONS
Connect video, audio output
You can use VCR to record the audio, video signal that output from TV set or use it as other
function.
To VIDEO,AUDIO input
t
n
i pu
-R
O
I
UD
A
To
V EOID
L
AUDIO
R
AV OUT
1
AV IN2AV IN
p
in ut
DEO
I
V
VIDEO
R
AUDIO
L
To
VCR and other equipment
YCbCr
Y
Cb
S-VIDEO
Cr
The Method to Connect Video and Audio Input
You can connect the DVD or VCR to the TV to enjoy a higher quality of picture effect. If
the Video equipment is with S-VIDEO output terminal, connect to the S-VIDEO input
terminal of this TV, If without, connect to the video input terminal. When the video
equipment is DVD, you can connect the YCbCr output of DVD to the YCbCr,input
of TV.So that you can enjoy high quality of DVD picture.
VIDEO
To VIDEO terminal
p
in ut
L
-
O
I
D
U
A
To
AV OUT
VIDEO
R
AUDIO
L
1
AV IN2AV IN
V EOID
L
AUDIO
R
)
Y
t
)
pu
t
u
Cr
t(
(
s o
u
p
es
n
ut
t
gh
D o
ri
b
V
D
To
ed
r
o
T
t
t
u
pu
)
t(Cb
tTo
u pu
o
D
b V
ue D
l
p
t
ut
u
o
L
R
-
O-
I
I
UD
A
o UD O o
To A
T
t
u
tp
utpu
O o tT
I
DE u
I
UDIO-L o
-V
A
S
o
o
T
To AUDIO-R terminal
R
AUDIO
To AUDIO-L terminal
L
YCbCr
Y
Cb
Cr
To AUDIO,VIDEO input
t
tTo UD
u pu
O R o
I
A -
S-VIDEO
DVD
t
t
u
pT A IO R o t
pu
ut
o
u
-
-
O L
I
D
UD
A
U
o
o
To AUDIO,VIDEO input
T
t
u
pu
t t
ut
ou
L o
O-
UDI
V O
o IDE p
T
To A
t
u
tp
ou
O
E
o VID
T
t
tTo UD
u pu
-
O R o
I
A
15
Note:
1.Side AV2 IN terminal and back AV2 terminal can share to use ,don't input signal at the
DVD
With S-VIDEO terminal VCR
Without S-VIDEO terminal VCR
same time.
2.Please select MONO sound mode (white Audio input terminal) when it is Mono audio input.
3.When DVD video broadcasts, connect to interlace DVD video signal(YUV)terminal
according to broadcaster equipment.
16
Page 11

TROUBLE SHOOTING GUIDE
The following problems are not always caused by hardware failure, please use
the follow trouble shooting guide before you call for service:
BREAKDOWN PHENOMENON
PICTURE
Picture with S now
Double or Triple Image
Disturb
SOUND
Noise
Normal
Noise
The direction and connection of the
antenna
Direction, station and connection
of the antenna
Interference from electric
appliance. Automobile、Motor,
Vehicle Fluorescence lamp etc.
CHECKING
Normal
?
??
No Picture
No Sound
No Sound
The power plug isn't plugged in AC
outlet. The main power isn't turned
on. The setting up of contrast, brightness and volume.
Adjust color control
Volume, Sound mute
No Color
Normal Volume
Adjust channel again
Scramble
Color Spot
Normal or Weak Volume
Normal Volume
Moving the TV set or using magnetic electric appliance near TV, Which will lead to color spot on screen. Please remove the electric appliance and cut
off power. After 120 minutes turn the TV on, the picture will be recovered.
Note:1.If the problem can not be fixed after you check above items. DO NOT attempt
to remove the back cover by yourself.
2.If the snapping sound from the cabinet of the TV set can be heard occasionally
because of temperature changing of environment, it is normal, you can use it
reassuringly.
17
 Loading...