

Page 1
COLOR TV RECEIVER
OWNER'S MANUAL
Please READ this manual carefully
before operating the unit, and keep
it for future reference.
The Owner`s Manual for the Follow Models:
D29FA9, D29FA9-A, D34FA9,
D34FA9-A
, D34FA9-AK
D29FA9-AK,
Page 2

* For your enjoyment of this TV set, please read this manual carefully and
keep it good for future reference.
CONTENTS
Before Operation
Warning and cautions............................................................................................2
Installation..........................................................................................................3
Antenna connection...........................................................................................3
Preparation for the remote control........................................................................3
Position of Button and Plug-ins................................................................................4
Front and side panel ..........................................................................................4
Back panel.......................................................................................................4
Function button of the remote control........................................................................5
The screen display menu........................................................................................6
Basic Operation
Switch on/off the TV set..........................................................................................7
Watching TV programs...........................................................................................8
Watching TV program.........................................................................................8
Program swap and auto scan functions..................................................................9
Tuning...............................................................................................................10
Auto search....................................................................................................10
Search...........................................................................................................11
Fine tune and Program lock functions..................................................................12
Skip unnecessary channel.................................................................................13
Exchange programs.........................................................................................14
Picture adjusting...............................................................................................15
Select the picture modes and set the picture quality...........................................15
Filter function................................................................................................16
3A Optimize and 3DNR functions.....................................................................17
Comb filter and LayerEn./ Color En. Functions..................................................18
Sound adjusting................................................................................................19
Select the sound modes and set the sound quality.............................................19
Equalizer and mute functions..........................................................................20
Time set up function...........................................................................................21
Set current time and on/off time functions.........................................................21
Remind Program Function..............................................................................22
Set up function..................................................................................................23
Select the menu Language and Screen saver functions.....................................23
Select Switch on mode and HDM scan function.................................................24
Tilt function and setting Transparency menu.....................................................25
Setting the Lock.................................................................................................26
Change your password...................................................................................26
Setting the Lock.............................................................................................27
Others functions..................................................................................................28
Calendar,picture still and zoom functions
Setting and Using Favorite programs, Setting Sleep Timer ................................29
VGA input adjustment.......................................................................................30
Multi-Media Player system.................................................................................31
Multi-Media Player Preparation........................................................................31
To operate the menu........................................................................................33
Multi-Media player..........................................................................................34
Copy file function............................................................................................38
Set up functions..............................................................................................39
Technical operation
External connections...........................................................................................40
Video/Audio output connection,VGA input............................................................40
Video/Audio input connection.............................................................................41
Others
Trouble shooting.................................................................................................42
Specifications.....................................................................................................43
.........................................................28
Page 3
Warning and Cautions
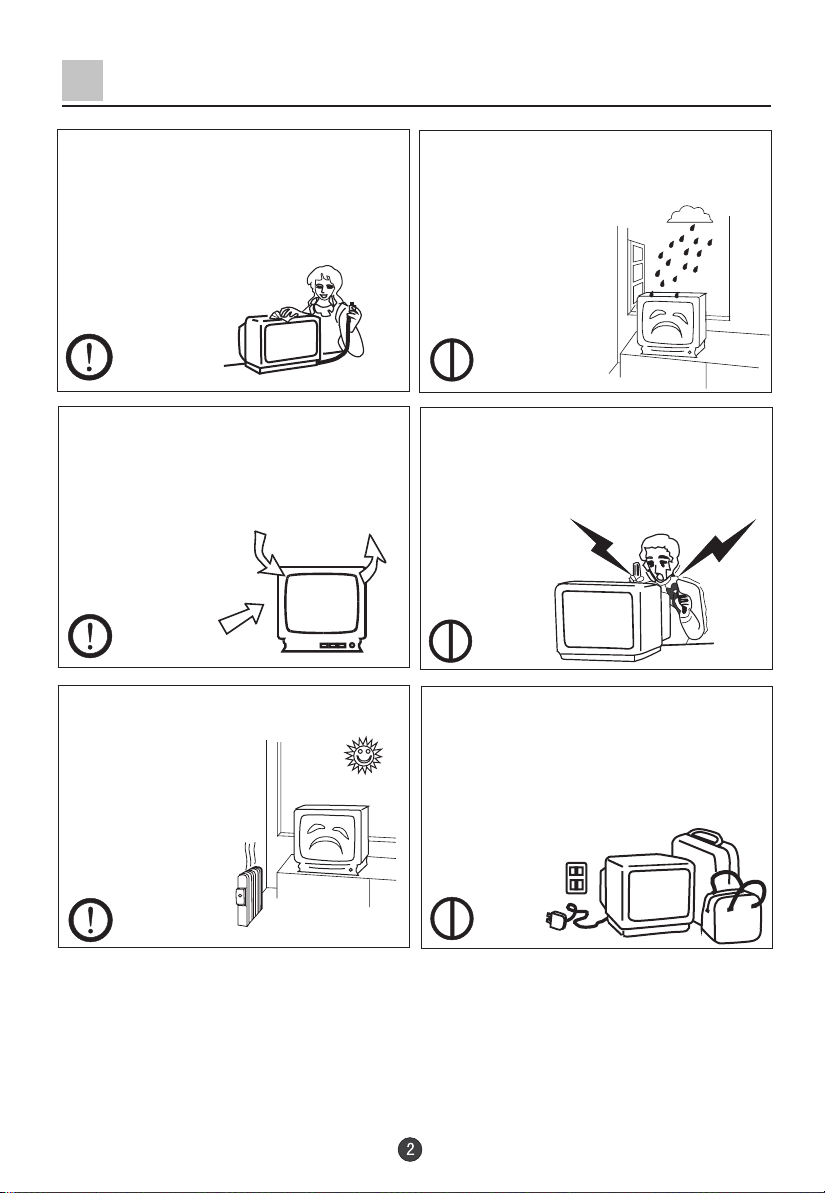
1. When you clean the TV set, please
pull out the power plug from AC outlet.
Don't clean the cabinet and the
screen with benzene, petrol and other
chemicals.
2. In order to prolong the using life of
the TV set, please place it in a well
ventilated location.
3. Don't place the
TV set in direct
sunlight or near a
heat source.
4. Do not place the TV set near rain or
moisture as it may cause an electric
shock, or the TV set to catch fire. The
TV set must only
be used in dry in
door locations.
5. The back cover must only be
removed by a registered electrical
service person. Removing the back
cover may result in electric shock, fire
or damage to
the TV set.
6. If the TV set is not going to be used
for a long time, or there is a severe
thunder & Lighting storm, it is
recommended that the TV set be
disconnected from the AC power outlet
and the aerial plug removed.
Explanation on the display tube
Should the picture tube require cleaning, disconnect the power and use a dry
soft cotton cloth. Do not use any cleanser or abrasive cloths.
Page 4
Installation
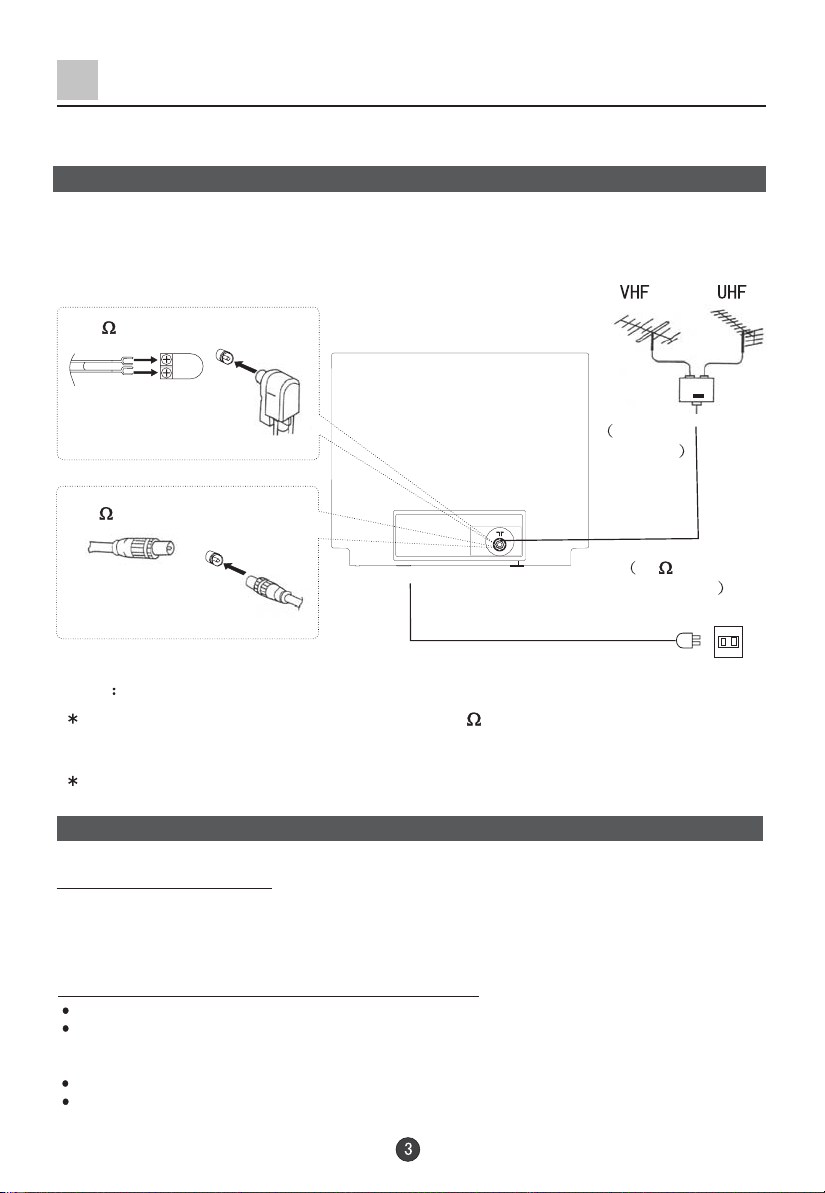
Antenna connection
General speaking, to enjoy a clearer picture, we recommend that you use a CATV
system or an outdoor antenna .In different places, the suitable antenna type and position
are different.
300 twin-lead cable
Antenna adapter
(additional purchase)
75 coaxial cable
Plug
(additional purchase)
Note
It is recommended that you'd better use 75
coaxial cable to remove the
Mixer
additional
purchase
Antenna input
75 standard
coaxial type
AC power socket
* the plug type may vary
depending on the model.
disturbance caused by airwave.
Don't bind antenna cable and electric wire together.
Preparation for the remote control
Battery installation
Take off the battery compartment cover. Place two AA batteries, make sure that battery
polarity matches with the +/- mark inside the battery compartment.
Operation notes for the remote control unit
Under normal conditions, the life time of batteries is one year.
If you don't intend to use the unit for a long period or the electricity of the batteries is
used up, remove the batteries to prevent batteries acid from leaking into the battery
compartment.
Never place batteries in a fire.
Avoid dropping the remote control and/or getting it wet.
Page 5
Position of Buttons and Plug-ins
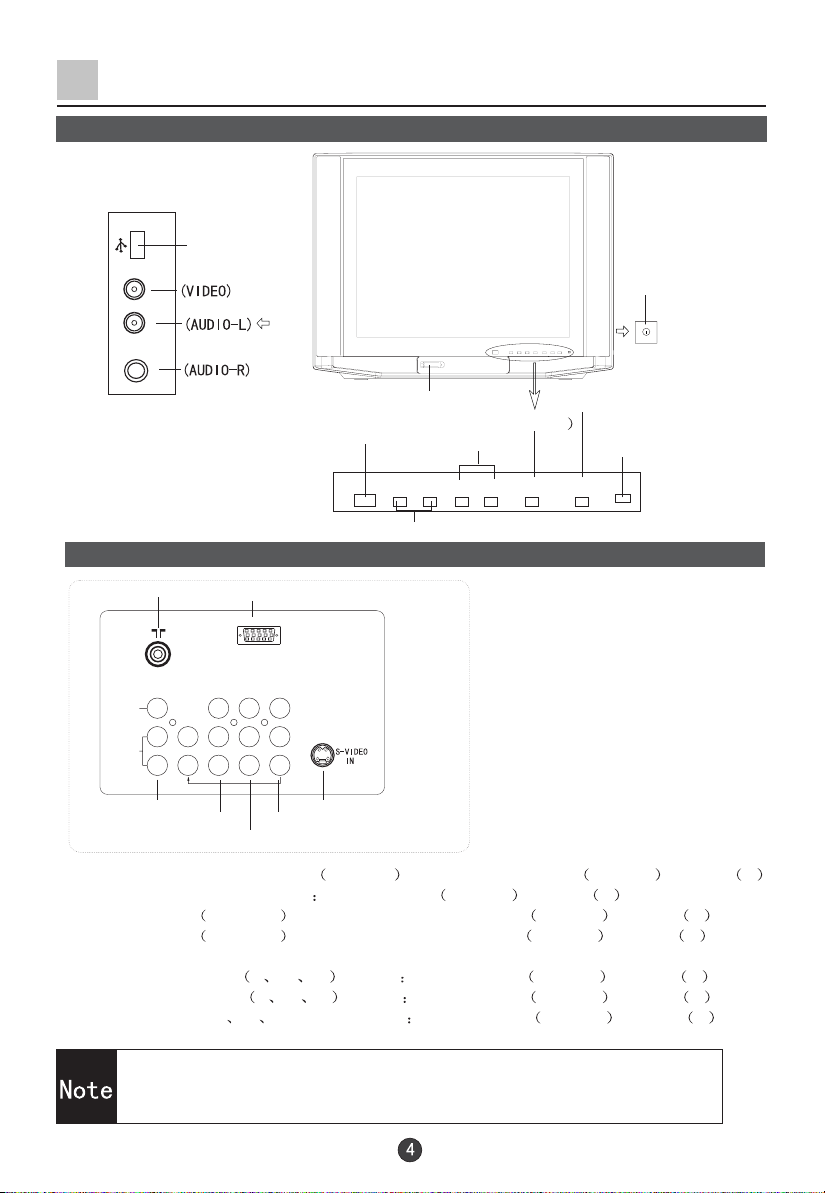
Front and Side panel
Side AV terminal
USB
USB Terminal
VIDEO
L
AUDIO
R
Cards Jack
Infrared receiver
Note:
The cabinet and buttons of TV is
only for reference.
TV/Video (input selector
Volume up/ down
+CH - + VOL -
Channel position up/down
Back panel
Antenna input
VGA input terminal
VGA IN
Power switch
MENU
Power indicator
TV/AV MENU
AVOU T
VIDEO
AUDIO
AV output terminals
AV2 input terminals
AV
L
LRLRL
R
AV1 input terminals
Pb(cb)
r(cr)
P
R
S-video input terminal
YUV input terminals
YUV
2IN AV1IN
S-video input terminal: Special video S-VIDEO AUDIO: L/MONO Track L/MONO ,R Track R
AV output terminals: VIDEO AUDIO L/MONO Track L/MONO ,R Track R
AV2 input terminals MONITOR : VIDEO AUDIO :L/MONO Track L/MONO ,R Track R
AV1 input terminals MONITOR :VIDEO AUDIO :L/MONO Track L/MONO ,R Track R
DVD component terminals:
Interleaved signal Y C
b Cr AUDIO L/MONO Track L/MONO ,R Track R
Progressive signal YPb Pr AUDIO L/MONO Track L/MONO ,R Track R
HDTV input terminals: YPb Pr terminal AUDIO L/MONO Track L/MONO ,R Track R
1.When the AV2 terminal, the side AV terminal can not be
connected at the same time
USB terminal or
.
2.When the side AV is connected, please select the AV 2 terminal.
Page 6
Function Buttons of the Remote Control
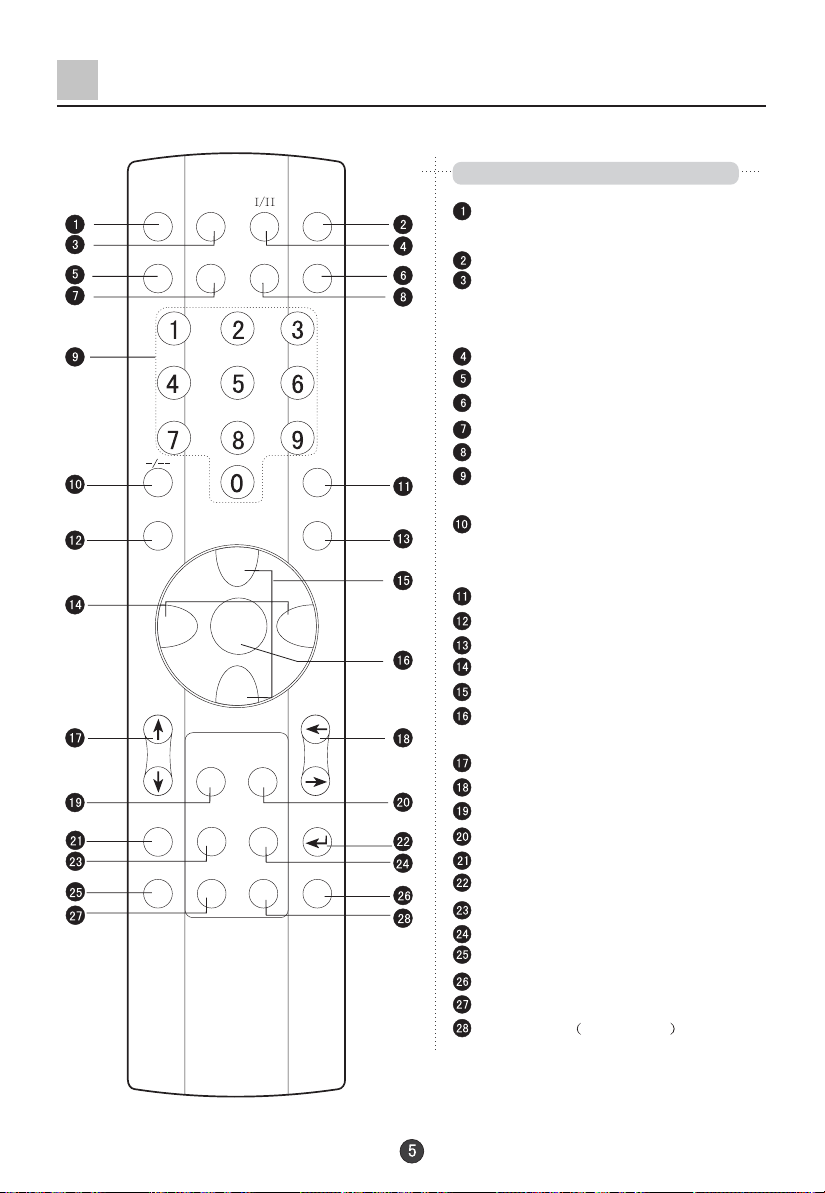
Function buttons of the remote control
SCAN
SHUTTLE
T.SKIP
D.ALBUM
POWER
CALL/HELP
SWAP
S.STD
SOUND
TUNE
CAL./EXIT
Mute button
To eliminate the sound of the programs
DC standby and power button
TV and AV exchange button
A changeover between TV and other
input signals like AV
I/II select button
Picture still button
Screen call/help button
HDM select button
Program scan button
select button
Direct
Select a TV channel directly
selection button
Digital
Changeover from one digital, two
digital and three digital
Program swap button
Picture mode selection button
Sound mode selection button
Volume adjustment button
adjustment button
Program
Menu call/select button
Select menu, call and exi
Picture menu call/game direction select
Sound menu call/game direction select
Favorite program button
Shuttle button
Function menu call/game menu select
Tune menu call/game confirm
Zoom select button
Time skip button
Time menu call button
Calendar/amusement function exit button
Hotel lock button
Digital album No available
TV/AV
MUTE
HDM
STILL
P.STD
CH+
VOL- VOL+
PICTURE
FUNCTION
TIME
MENU
CH-
FAVORITE
ZOOM
H.LOCK
Page 7
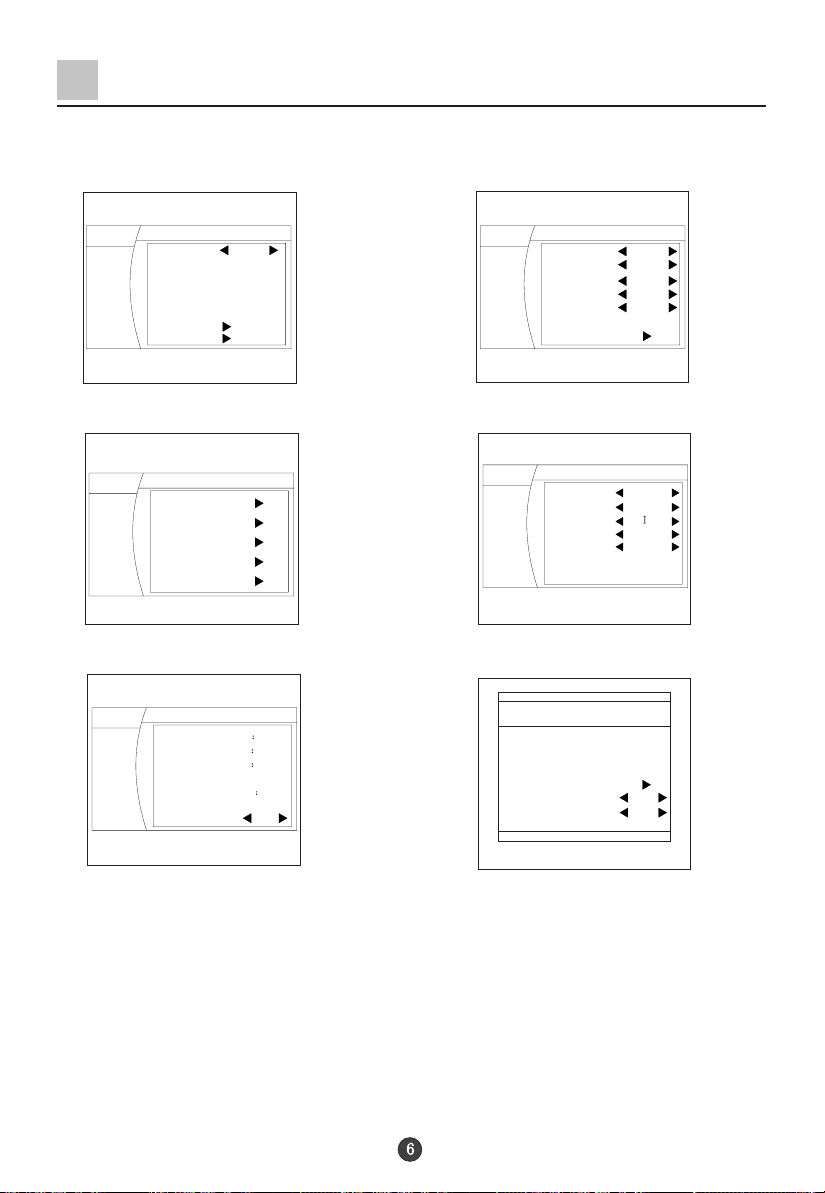
The Screen Display Menu
For your convenience of operation, here lists the screen display menus of this model
as your reference.
Picture menu
Sound menu
MENU
Picture
Sound
Tune
Setup
Timer
Picture Mode Standard
Brightness
Contrast
Color
Hue
Sharpness
Filter
Advance
50
50
50
0
30
MENU
Picture
Sound
Tune
Setup
Timer
Sound Mode
3D MONO Off
SRS Dialog
Trubass Off
Woofer
Balance
Equalizer
Tuning menu Setup menu
MENU
Picture
Sound
Tune
Setup
Timer
Exchange
Program edit
Search
Auto Search
Quick Search
Time menu
MENU
Picture
Sound
Tune
Setup
Timer
Current time
Off Time
On Time
On program
Remind time
Remind program
Sleep Time
12 27
-- --
-- --
-- --
10
---
Off
MENU
Language English
Picture
Screen Saver On
Sound
Curtain
Color sys. PAL50
Tune
HDM scan 100Hz
Setup
Transparency On
Tilt 0
Timer
H.lock menu
Lock Set
Change Password
New PWD --- Confirm PWD --- Confirm
Lock Off
Channel Lock Off
Standard
Off
Off
0
Note:
When the TV set is powered on, there might be different from what have been
illustrated above. Please do some adjustment as follows to meet your needs.
1. Press the MENU button, and then press CH+/- buttons to select the menu in the
main menu: PICTURE, SOUND, TUNE ,SETUP and TIMER. Off course, you may
select these menus directly by pressing the PICTURE, SOUND, TIME and FUNCTION
buttons on the remote control.
2. If it is not in sub-menu, press the VOL-/+ buttons to enter the sub-menu.
3. Then press the CH+/- to select the desired item, press the VOL-/+buttons to adjust
the numerical value. After that, press the MENU button to return the main menu.
4. If you want exit the menu, press the MENU button repetitiously.
Page 8
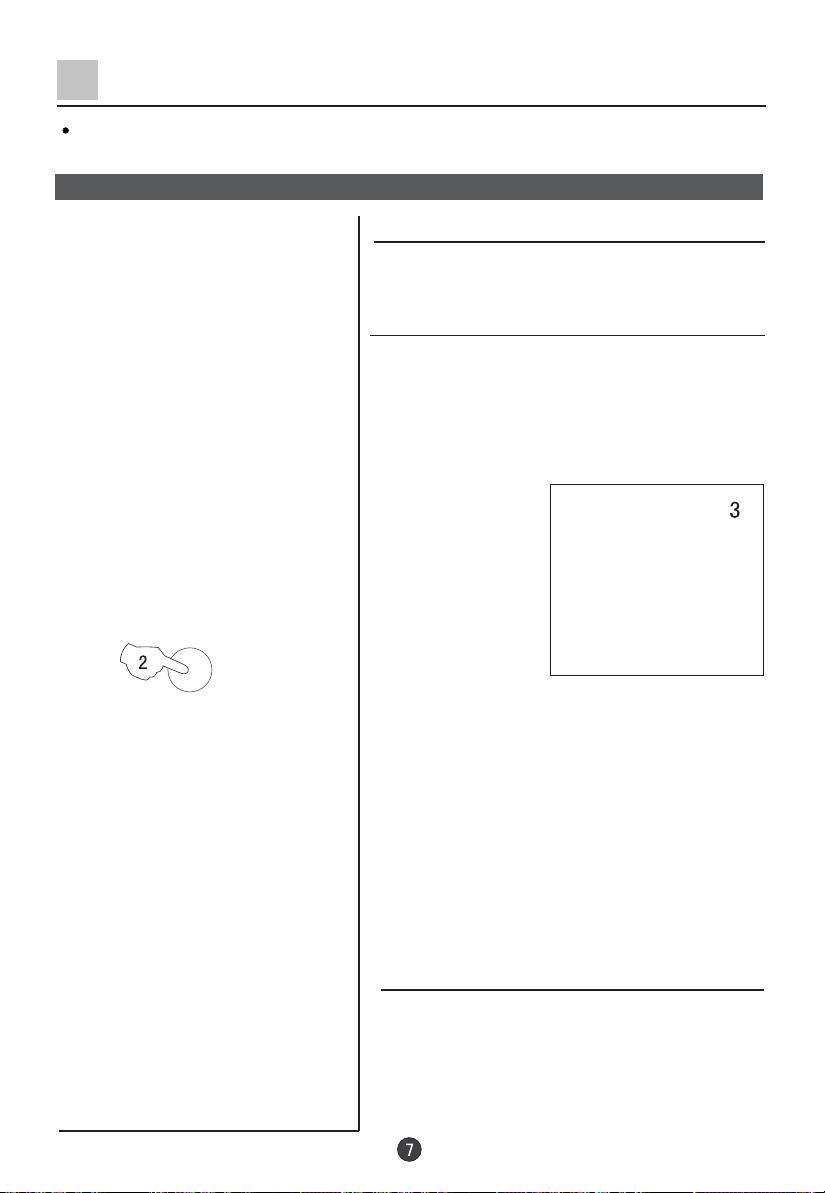
Switch on/ off the TV set
In the following, the methods of using power switch and remote control to switch on/off
power supply for the TV set will be explained.
Switch on/ off the TV set
Switch on/ off the TV set
1.Connect the power supply wire. Then press the power
switch button, the power indicator will light, in several
seconds the picture will display on the screen.
2. If the TV is in the state of standby, press the POWER
button or the CH+/- buttons on the remote control.
Note:
1. Press the P+/- buttons which is on the TV set to get
out of the standby state when the remote control is not
in use.
POWER
2. Press the POWER button on the remote control
to the standby mode.
3. Press the power button on the TV set to
completely power off the TV.
4. To eliminate the magnetization completely, the
TV set degausses automatically. There is the
sound of PENG, it is natural.
Automatic stand by function
If no signal has been received, and after five
minutes, it will stand by automatically.
Page 9
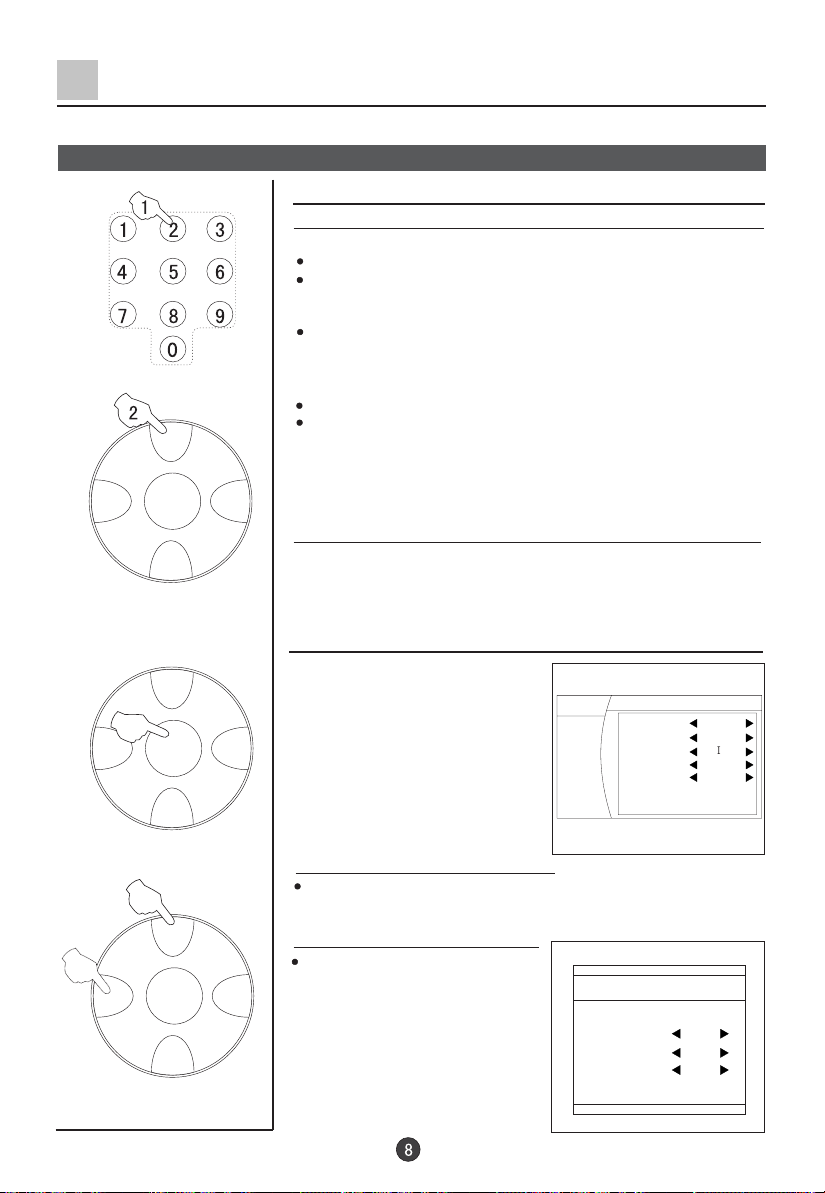
Watching TV Programs
Watching TV programs
How to select the TV program
Select the desired program
1. Use the direct number selection button
Press the button from 0-9 to select a one-figure channel.
If you want to select a double figures channel, press the
figure-selection button and change it into two-figure mode, then
press the number of the channel.
If you want to select a three figures channel, press the figure-selection
button and change it into three-figure mode, then press the number
of the channel.
2. Use the CH+/- buttons
Press the CH+ button to select the channel of the larger number.
CH+
Press the CH- button to select the channel of the smaller number.
VOL- VOL+
VOL- VOL+
VOL- VOL+
MENU
CH-
CH+
MENU
CH-
CH+
MENU
CH-
Select the desired sound
Press the VOL+/- buttons to adjust the volume to your need.
If the colour or sound of a certain channel is
abnormal
If the TV set you bought is
abnormal in colour or sound in a
certain channel, it might be
because the colour or sound
system has been set improperly.
You may follow the instruction
below to adjust it. Press the
MENU button, then press CH+/buttons to select function menu,
and you can see the form . Then
press VOL+ button to enter submenu.
If the colour of the picture is abnormal
Press the CH+/- buttons to move the indicator to "Color Sys.", and
press the VOL+/- buttons to select the proper color.
If the sound is abnormal
Refer the above steps to enter the
Program edit menu. Press the CH+/ buttons to move the indicator to
"
Sound Sys.", and press the VOL+/-
buttons to select the proper sound.
MENU
Picture
Sound
Tune
Setup
Timer
Language English
Screen Saver On
Curtain
Color sys. PAL50
HDM scan 60Hz
Transparency On
Tilt 0
Program edit
Program NO. 2
Skip Off
Lock Off
Sound Sys. DK
Fine tune <144.20MHz>
Page 10
Watching TV Programs (continued)
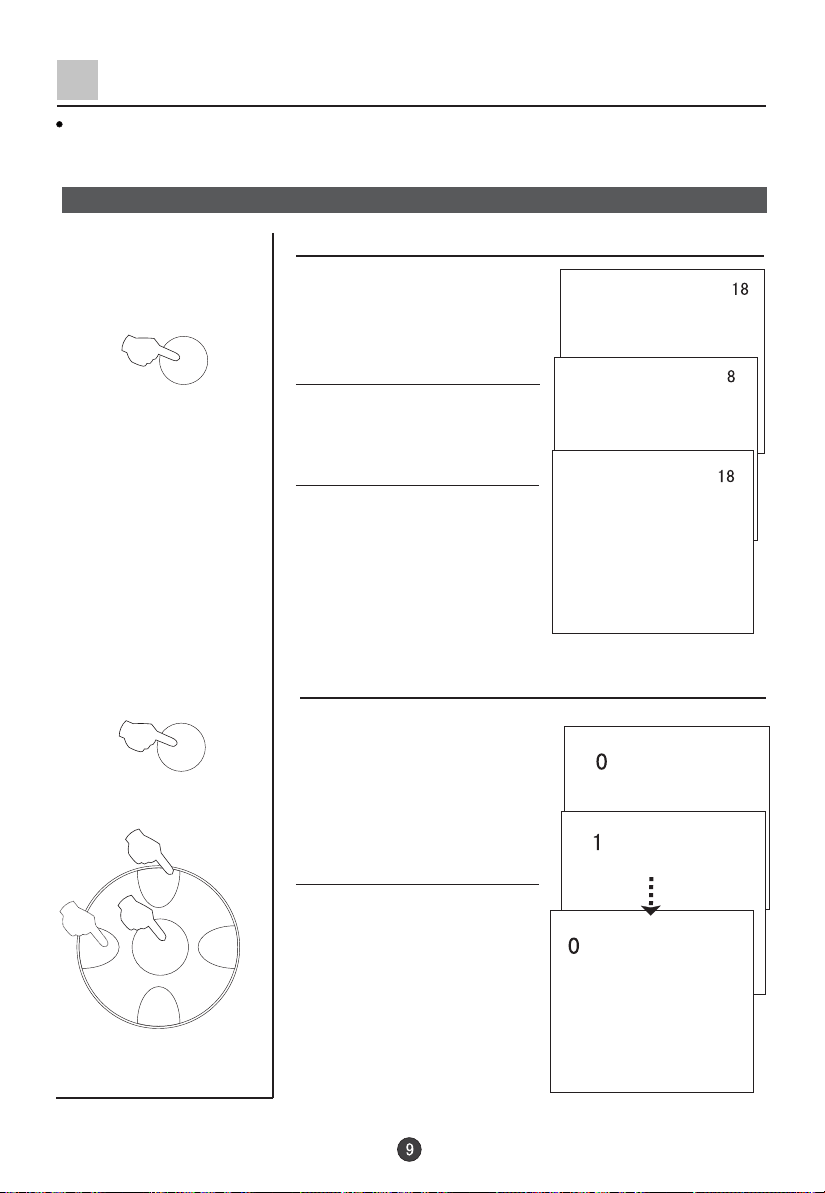
Swap function enables quick swap to the last watched program.
Program swap and auto scan functions
Program swap
1. Suppose the channel number
you used just now is 8 and the
SWAP
channel number you are using
is 18 (as shown in the figure).
2. If you want to return to the
last watched program channel
8, you can simply press the
SWAP button.
3. If you want to return to
channel 18, press the button
again. Through this function,
you can easily change
between the channel you are
using and the channel you
used last time.
SCAN
CH+
VOL- VOL+
MENU
CH-
Auto program scan
1. Press the SCAN button to
scan through all the memorized
TV channels.
2.When it is the program that
you desired, and press the
MENU button to confirm.
Page 11
Tuning
The TV set has three methods to set the channels, which are Auto search, Search and Fine tune.
In this section, how to use the remote control to set the channel is explained. You can also use the buttons
on the TV set to set channel.
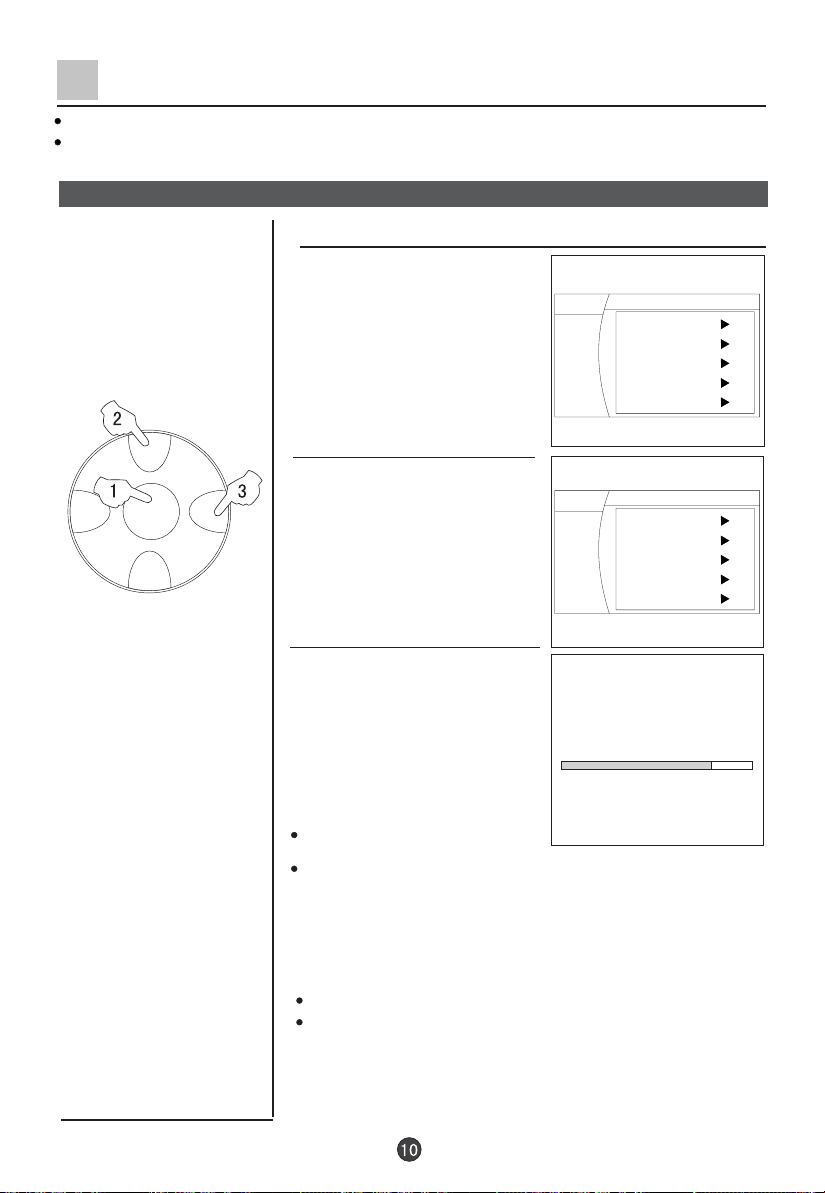
Auto search
Auto search
1. Press the MENU button to display
CH+
VOL- VOL+
MENU
CH-
the menu, then press CH+/-buttons
to select TUNE menu, press VOL+
button to enter.
2. Press the CH+/- buttons to move
the indicator to " Auto Search ".
MENU
Picture
Sound
Tune
Setup
Timer
MENU
Picture
Sound
Tune
Setup
Timer
Exchange
Program edit
Search
Auto Search
Quick Search
Exchange
Program edit
Search
Auto Search
Quick Search
3. Press the VOL+ button, and
"Auto Search" mode will work.
The TV set will search automatically
all available programs, after search
Auto Search
VHF-L 188.16 MHz CH NO:4
is finished, all available programs
will be stored in turn.
If you want to stop the search,
just press the MENU button.
The order of the automatic search is due to the frequency of
the program, generally speaking, it is used only the first time
you search the program, and after the order of the program
has been made, you don't have to use this function,
otherwise the order of the program will be mixed.
After searching (Continued)
Press the CH+/- buttons to check channels.
If the colour or sound is abnormal in a certain channel, it may be
because that the colour or sound system has not been set
properly, then, you may adjust it to proper system (Refer to
page 8).
Page 12
Tuning (Continued)
Search
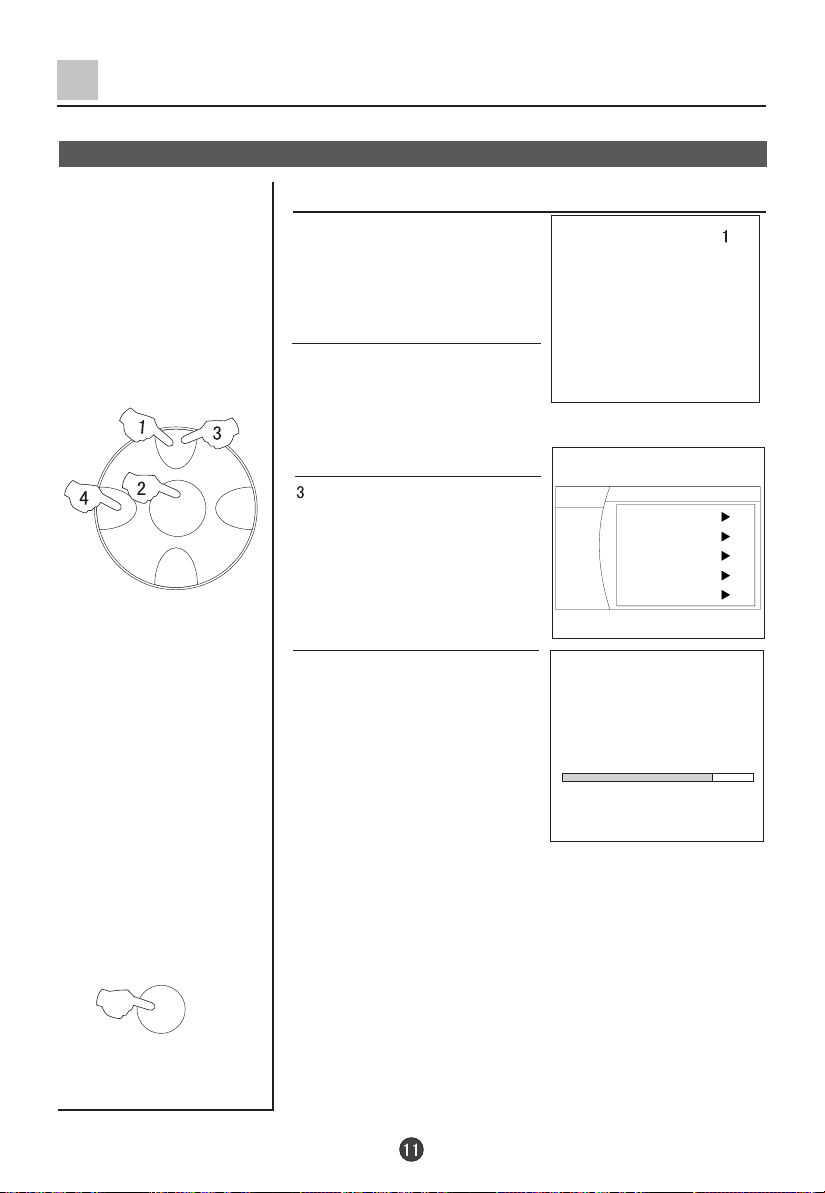
Search
1. Press the CH+/- buttons or Direct
select button to select the desired
channel number.
2. Press the MENU button to display
the menu, then press CH+/-buttons
to select TUNE menu, press VOL+
CH+
button to enter.
VOL- VOL+
MENU
CH-
CALL/HELP
. Press the CH+/- buttons to
move the indicator to "Search",
and then press the VOL+ button
to enter the SEARCH menu.
MENU
Picture
Sound
Tune
Setup
Timer
Exchange
Program edit
Search
Auto Search
Quick Search
4. Press the VOL+ or VOL- buttons,
the TV set will begin to search up or
down, when the TV set has searched
a program, the TV set will stop
searching. If the program is not the
Search
VHF-L 188.16 MHz CH NO:4
one you need, you can press the
button again, let the TV set continue
to search until it has searched the TV
signal you need.
Note:
Usually, five seconds after the channel has been changed, the channel
number will disappear automatically. If you want to know which channel
you are watching, just press the CALL/HELP button once.
Page 13
Tuning (Continued)
Fine Tune and Program Lock functions
Fine Tune
If the picture and/or sound are poor, try using the FINE
TUNE feature. Do not use this feature unless reception
is poor.
1. Press the CH+/- buttons or Direct
CH+
VOL- VOL+
MENU
CH-
CH+
VOL- VOL+
MENU
CH-
select button to select the desired
channel number. ( For example, the
channel 1.)
2. Press the MENU button to display
the menu, then press CH+/-buttons
to select TUNE menu, press VOL+
button to enter.
3. Press the CH+/- buttons to
move the indicator to " Program
edit ", then press the VOL+ button
to sub-menu.
4. Press the CH+/- buttons to
move the indicator to " Fine Tune ".
5. Press the VOL+ button to enter
the Fine Tune Menu, and then
VOL- button to search downwards
or the VOL+ button to search
upwards
TV signal you need.
until it has searched the
the
MENU
Picture
Sound
Tune
Setup
Timer
Exchange
Program edit
Search
Auto Search
Quick Search
Program edit
Program NO. 2
Skip Off
Lock Off
Sound Sys. DK
Fine tune <144.20MHz>
CH+
VOL- VOL+
MENU
CH-
Program Lock buttons
If the program Lock and the program Lock of the Lock
Set are ON, the screen is black and LOCK will shown.
The program is locked.
1.Repeat the steps 1-4 of Fine
Tune to select the Lock item.
. Press the VOL+ button to turn
the Lock function to "On ".
. Press the H.Lock button to turn
the Program Lock function to "On "
(Refer to page 27),then the screen
is black. After setting the Program Lock to On, the Lock of the
Program Edit menu will fail.
Program edit
Program NO. 2
Skip Off
Lock Off
Sound Sys. DK
Fine tune <144.20MHz>
Page 14
Tuning (Continued)
Skip unnecessary channel
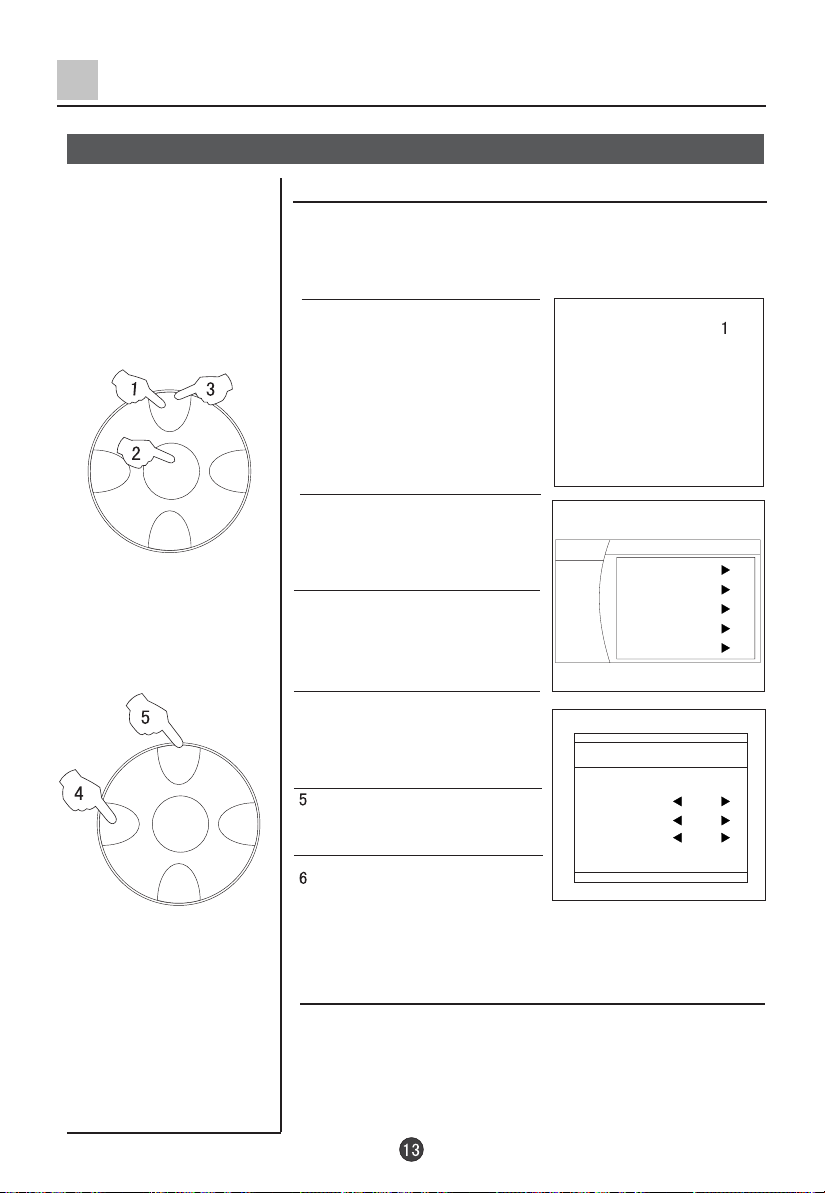
Skip unnecessary channel
The Program skip feature enables you to skip/hide programs
that you do not wish to be displayed when using the CH+/buttons. These channels will still be displayed by directly
using the channel number buttons on the remote control.
1. Press the CH+/- buttons or Direct
select button to select the desired
channel number. ( For example, the
channel 1.)
CH+
VOL- VOL+
MENU
CH-
CH+
VOL- VOL+
MENU
CH-
2. Press the MENU button to display
the menu, then press CH+/-buttons
to select TUNE menu, press VOL+
button to enter.
3. Press the CH+/- buttons to
move the indicator to " Program
edit ", then press the VOL+ button
MENU
Picture
Sound
Tune
Setup
Timer
Exchange
Program edit
Search
Auto Search
Quick Search
to sub-menu.
4. Press the CH+/- buttons to
move the indicator to " Skip ".
. Press the VOL-/+ buttons to
turn the Skip function to "ON ".
. Press the MENU button to exit
the menu display.
Program edit
Program NO. 2
Skip Off
Lock Off
Sound Sys. DK
Fine tune <144.20MHz>
If you want to recover the skipped channel
1. Use the Channel Selection buttons to select the number of the
channel to be recovered.
2. Repeat those steps just now.
3. Press the VOL+/- buttons to turn the SKIP function OFF.
Page 15
Tuning (Continued)
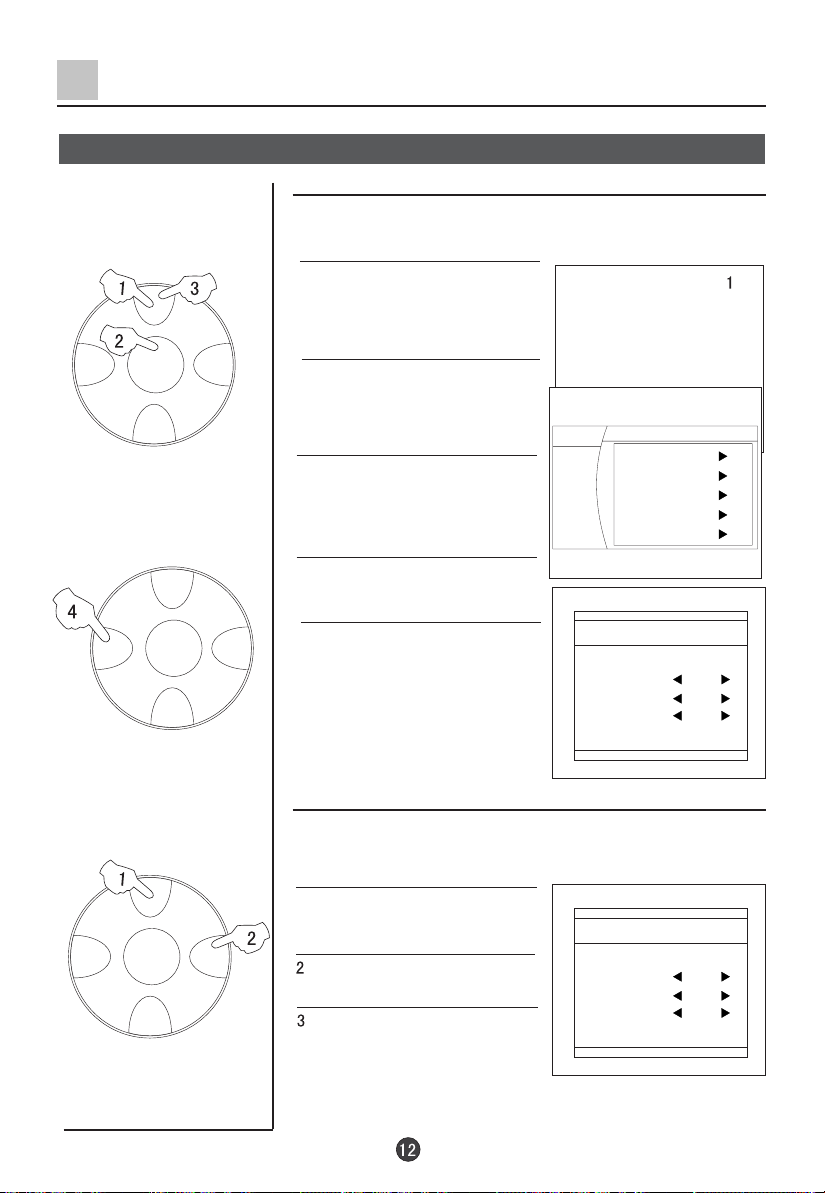
Exchange Programs
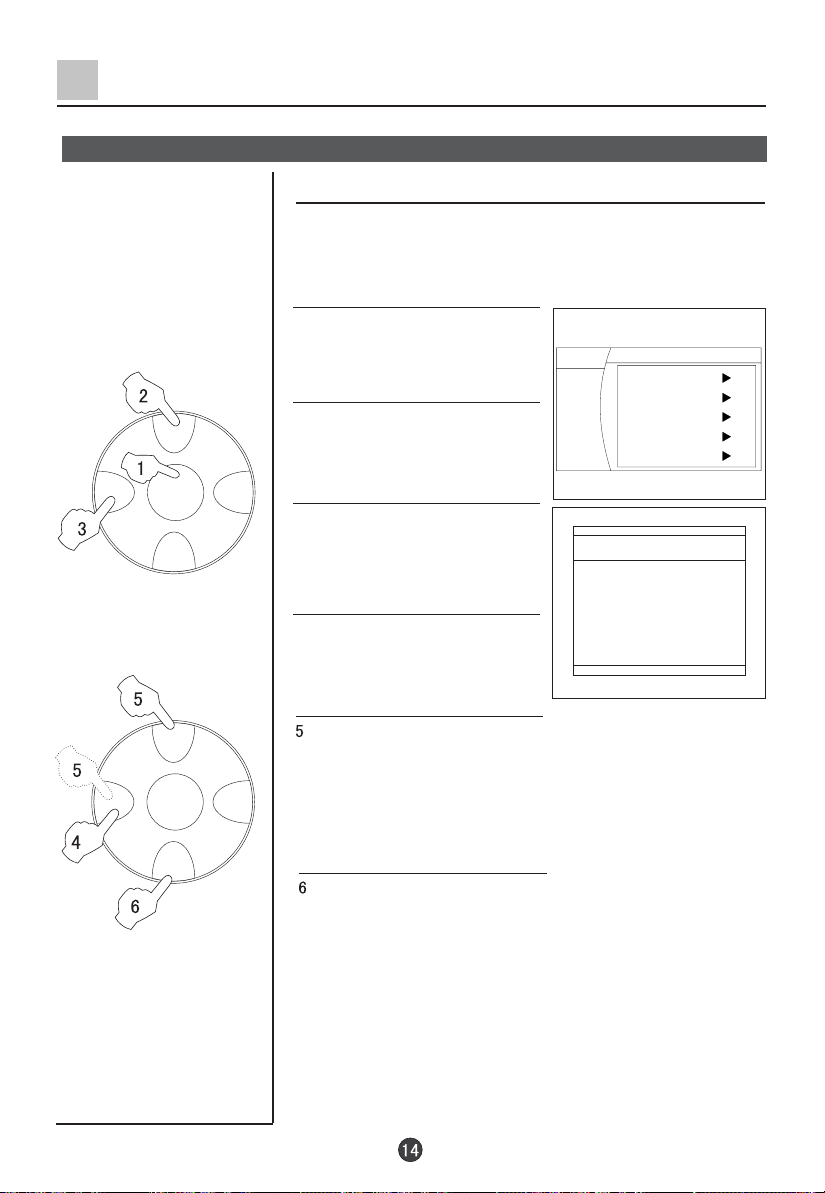
Exchange Programs
This feature enables TV programmes that may be on a wrong program
number to be moved to another number.
This feature is very useful when Automatic Search Tuning has been used
because programmes are stored in the order they are found, which is usually
not the desired order.
When organising, it is best to start from the lowest programme number first.
1. Press the MENU button to display
the menu, then press CH+/-buttons
to select TUNE menu, press VOL+
button to enter.
CH+
VOL- VOL+
MENU
CH-
2. Press the CH+/- buttons to
move the indicator to " Exchange ".
3. Press the VOL+ button to
sub-menu.
4. Press the VOL-/+ buttons to set
the Current Program to 3.
MENU
Picture
Sound
Tune
Setup
Timer
Exchange
Program edit
Search
Auto Search
Quick Search
Exchange
Current Program 3
Exchange Program 9
Exchange
CH+
VOL- VOL+
MENU
CH-
. Press the CH+/- buttons to move the indicator to " Exchange
Program ", then press the VOL-/+ buttons to set the Exchange
Program to 9.
. Press the CH+/- buttons to move the indicator to " Exchange ",
press the VOL-/+ buttons to confirm.
Page 16

Picture Adjusting
Select the picture modes and set the picture quality
How to select the picture modes
P.STD
You can quickly select the desired picture mode from four
preset modes and one customized mode.
Press the P.STD button to select the desired picture quality.
PICTURE
CH+
MODE
Standard
Soft
User
Listen
Rich
PICTURE QUALITY
Medium color and brightness
Low color and brightness
Set by yourself
(
No pictures)
Bright color
Set the picture quality
When the Picture Mode is User mode, you can set the picture
quality
1. Press the PICTURE button, the
Picture menu will appear on the
screen.
. Press the CH+/- buttons to
move the indicator to the desired
option (For example, Contrast), then
press VOL-/+ buttons to set the
desired quality. Press the PICTURE
button to exit the Picture menu.
MENU
Picture
Sound
Tune
Setup
Timer
Picture Mode Standard
Brightness
Contrast
Color
Hue
Sharpness
Filter
Advance
50
50
50
0
30
VOL- VOL+
MENU
CH-
Option
Brightness
Contrast
Color
Sharpness
Press VOL- button
Dark
Weak
Light
Soft
Press VOL+ button
Bright
Strong
Thick
Sharp
Tip: HUE option is available only in N color system.
Page 17

Picture Adjusting (Continued)
Filter Function
Filter Function
PICTURE
CH+
VOL- VOL+
MENU
1. Press the PICTURE button, the
Picture menu will appear on the
screen.
. Press the CH+/- buttons to move
the indicator to "Filter".
. Press the VOL+ button to
the Filter sub-menu.
MENU
Picture
Sound
Tune
Setup
Timer
Filter Mode Standard
Exchange
Program edit
Search
Auto Search
Quick Search
CH-
. Press the CH+/- buttons to select
the desired option, then press
VOL-/+ buttons to adjust the value.
Press MENU button to exit the sub-menu.
Page 18

Picture Adjusting (Continued)
3A Optimize and 3DNR Functions
3A Optimize Function
1. Press the PICTURE button, the
PICTURE
Picture menu will appear on the
screen.
. Press the CH+/- buttons to move
the indicator to "Advance", then
press the VOL+ button to sub-
menu.
MENU
Picture
Sound
Tune
Setup
Timer
Picture Mode Standard
Brightness
Contrast
Color
Hue
Sharpness
Filter
Advance
50
50
50
0
30
CH+
VOL- VOL+
MENU
CH-
PICTURE
CH+
VOL- VOL+
MENU
CH-
. Press the CH+/- buttons to move
the indicator to "3A Optimize".
. Press the VOL-/+ buttons to
select "On", "Off" or "Window".
3DNR Function
1. Press the PICTURE button, the
Picture menu will appear on the
screen.
. Press the CH+/- buttons to move
the indicator to "Advance", then
press the VOL+ button to sub-
menu.
. Press the CH+/- buttons to move
the indicator to "3DNR".
. Press the VOL-/+ buttons to
select the desired item.
MENU
Picture
Sound
Tune
Setup
Timer
MENU
Picture
Sound
Tune
Setup
Timer
MENU
Picture
Sound
Tune
Setup
Timer
3A Optimize On
Comb filter Off
3DNR Off
Layer en. Off
Color en. Off
Picture Mode Standard
Brightness
Contrast
Color
Hue
Sharpness
Filter
Advance
50
50
50
0
30
3A Optimize On
Comb filter Off
3DNR Off
Layer en. Off
Color en. Off
Page 19

Picture Adjusting (Continued)
Comb filter and Layer En./Color En. Functions
Comb filter Function
PICTURE
CH+
VOL- VOL+
MENU
CH-
PICTURE
1. Press the PICTURE button, the
Picture menu will appear on the
screen.
. Press the CH+/- buttons to move
the indicator to "Advance", then
press the VOL+ button to sub-
menu.
. Press the CH+/- buttons to move
the indicator to "Comb filter".
. Press the VOL+/- buttons to select
"On".
MENU
Picture
Sound
Tune
Setup
Timer
MENU
Picture
Sound
Tune
Setup
Timer
Layer En./Color En. Functions
1. Press the PICTURE button, the
Picture menu will appear on the
screen.
. Press the CH+/- buttons to move
the indicator to "Advance", then
press the VOL+ button to sub-
menu.
MENU
Picture
Sound
Tune
Setup
Timer
Picture Mode Standard
Brightness
Contrast
Color
Hue
Sharpness
Filter
Advance
50
50
50
0
30
3A Optimize On
Comb filter Off
3DNR Off
Layer en. Off
Color en. Off
Picture Mode Standard
Brightness
Contrast
Color
Hue
Sharpness
Filter
Advance
50
50
50
0
30
CH+
VOL- VOL+
MENU
CH-
. Press the CH+/- buttons to move
the indicator to "Layer en." Or
"Color en.".
. Press the VOL+/- buttons to select
"On".
MENU
Picture
Sound
Tune
Setup
Timer
3A Optimize On
Comb filter Off
3DNR Off
Layer en. Off
Color en. Off
Page 20

Sound Adjusting
Select the sound modes and set the sound quality
How to select the sound modes
You can quickly select the desired sound mode from three
S.STD
preset modes and one customized mode.
Press the S.STD button to select the desired picture quality.
Four kinds of sound modes can be selected in turn.
SOUND
CH+
VOL- VOL+
MENU
TV Mode
Standard
News
User
Music
Sound quality
Standard
Speech
You can set it by yourself
Musical
Set the sound quality
When the Personal mode is selected, you can customize the
sound quality.
1. Press the SOUND button, the
Sound menu will appear on the
screen.
. Press the CH+/- buttons to move
the indicator to the desired option,
then press VOL-/+ buttons to set the
desired quality. Press the SOUND
button to exit the Sound menu.
Adjusting the Balance item
Option
BALANCE
Press VOL- button Press VOL+ button
R track down
MENU
Picture
Sound
Tune
Setup
Timer
L track down
Sound Mode
3D MONO Off
SRS Dialog
Trubass Off
Woofer
Balance
Equalizer
Standard
Off
Off
0
CH-
Adjusting the Special items
Option
3D MONO
SRS Dialog
Trubass
Woofer
Setting "On"
3D dynamic surround
SRS Dialog
Enhance bass
Enhance woofer
Page 21
Sound Adjusting (Continued)
Equalizer and Mute functions
SOUND
CH+
VOL- VOL+
VOL- VOL+
MENU
CH-
CH+
MENU
CH-
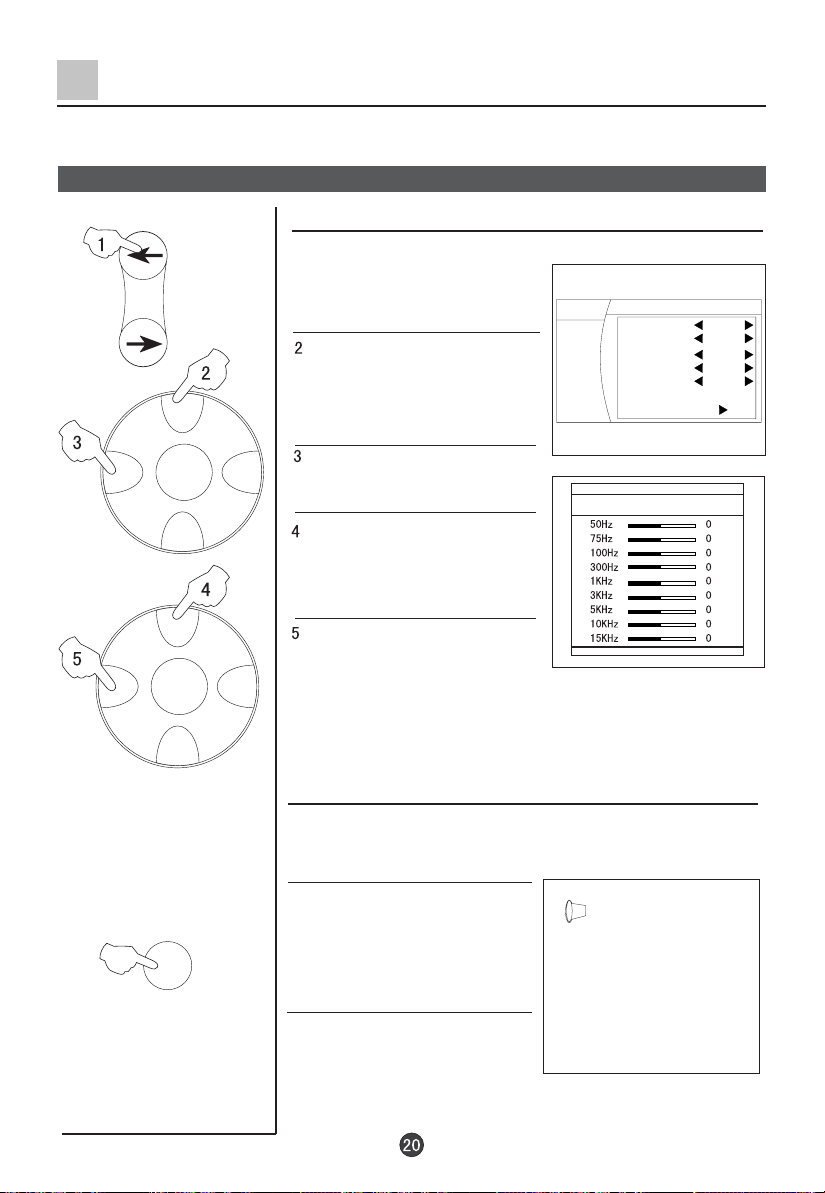
Equalizer function
1. Press the SOUND button, the
Sound menu will appear on the
screen.
. Press the CH+/- buttons to move
the indicator to "Equalizer".
. Press the VOL+ button to sub-
menu.
. Press the VOL-/+ buttons to
select the desired item.
. Press the VOL+/- buttons to
adjusting.
MENU
Picture
Sound
Tune
Setup
Timer
Sound Mode
3D MONO Off
SRS Dialog
Trubass Off
Woofer
Balance
Equalizer
Equalizer
Standard
Off
Off
0
Tip: The Equalizer can be adjusting only for the
personal mode.
How to use the Mute function
When you want to listen to the sound nearby, or when you are
answering the telephone, or talking with your friends, you may use
the mute function.
MUTE
1. Press the MUTE button once, a
sign of mute will appear on the
screen, the sound will be eliminated
completely .
2. Press the volume button or
press the MUTE button again,
and the sound will be recovered.
X
Page 22

Time Set Up Function
This model has time set function such as On/Off Time, Sleep and Remind Time, etc.
The unit of the TIME menu is minute.
Set current time and On/Off Time functions
Set current time
When this function is used, please first check whether the
clock is in accordance with your local time; if not, you can
TIME
CH+
VOL- VOL+
MENU
CH-
follow the instructions to adjust it.
1. Press the TIME button, the Time
menu will appear on the screen.
. Press the CH+/- buttons to move
the indicator to " Current Time ".
Tips:
The available option is green.
Press the VOL-/+ buttons to
MENU
Picture
Sound
Tune
Setup
Timer
Current time
Off Time
On Time
On program
Remind time
Remind program
Sleep Time
12 27
select the desired item.
Press the CH+/- buttons to
adjust the value.
After setting the Current time, press MENU button to confirm.
-- --
-- --
-- --
10
---
Off
On/Off Time function
TIME
CH+
VOL- VOL+
MENU
The TV set can be powered on/off at a preset time and it can
start with a program you have preset.
Here take On Time function for example. The Off Time function
is same with it.
1. Press the TIME button, the Time
menu will appear on the screen.
. Press the CH+/- buttons to move
the indicator to " On Time ".
Tips:
The available option is green.
Press the VOL-/+ buttons to select
the desired item.
Press the CH+/- buttons to adjust the value.
After setting the Current time, press MENU button to confirm.
MENU
Picture
Sound
Tune
Setup
Timer
Current time
Off Time
On Time
On program
Remind time
Remind program
Sleep Time
12 27
-- --
18 00
-- --
10
---
Off
CH-
Note:
This function will only be
available when the TV set
is in the mode of standby.
. Press the CH+/- buttons to move
the indicator to " On Program ", then
press the VOL-/+ buttons to adjust
(For example, 10).
4. Repeat step 1-2 to turn OFF
TIME.(take 23:00 as an example)
MENU
Picture
Sound
Tune
Setup
Timer
Current time
Off Time
On Time
On program
Remind time
Remind program
Sleep Time
12 27
23 00
18 00
-- --
10
---
Off
Page 23

Time Set Up Function (Continued)
Remind Program Function
Remind Program Function
With Remind Program function, the TV set can automatically
change a preset program in a preset time .
TIME
CH+
VOL- VOL+
MENU
CH-
1. Press the TIME button, the
Time menu will appear on the
screen.
MENU
Picture
Sound
Tune
Setup
Timer
Current time
Off Time
On Time
On program
Remind time
Remind program
Sleep Time
12 27
23 00
18 00
-- --
Off
10
---
. Press the CH+/- buttons to move
the indicator to " Remind Time ".
Tips:
The available option is green.
Press the VOL-/+ buttons to
select the desired item.
MENU
Picture
Sound
Tune
Setup
Timer
Current time
Off Time
On Time
On program
Remind time
Remind program
Sleep Time
12 27
23 00
18 00
19 00
Off
10
---
Press the CH+/- buttons to
adjust the value.
After setting the Current time, press MENU button to confirm.
. Press the CH+/- buttons to move
the indicator to " Remind Program ",
then press the VOL-/+ buttons to
adjust (For example, 18).
MENU
Picture
Sound
Tune
Setup
Timer
Current time
Off Time
On Time
On program
Remind time
Remind program
Sleep Time
12 27
23 00
18 00
19 00
10
18
Off
CALL/HELP
TIP:
The unit of the TIMER menu is minute.
Screen Display
Press CALL/HELP button to call
the screen display, such as
channel number, colour system,
sound system.
3
PAL 50
DK
Page 24

Set Up Function
Select the menu Language and Screen Saver function
How to select the menu Language
You may choose Chinese or English.
FUNCTION
CH+
VOL- VOL+
MENU
CH-
FUNCTION
CH+
VOL- VOL+
MENU
1. Press the FUNCTION button,
the Function menu will appear on
the screen.
. Press the CH+/- buttons to move
the indicator to " Language ", then
MENU
Picture
Sound
Tune
Setup
Timer
Language English
Screen Saver On
Curtain
Color sys. PAL50
HDM scan 100Hz
Transparency On
Tilt 0
press the VOL+ button to select the
desired language, then the OSD
language of the TV set turn to the
OSD language selected.
How to start screen saver function
When the SCREEN SAVER is ON, If no signal has been received,
and after five minutes, it will stand by automatically.
1. Press the FUNCTION button,
the Function menu will appear on
the screen.
. Press the CH+/- buttons to move
the indicator to " Screen Saver ".
MENU
Picture
Sound
Tune
Setup
Timer
Language English
Screen Saver On
Curtain
Color sys. PAL50
HDM scan 100Hz
Transparency On
Tilt 0
CH-
. Press the VOL+ button to turn
the function ON.
Page 25
Set Up Function (Continued)
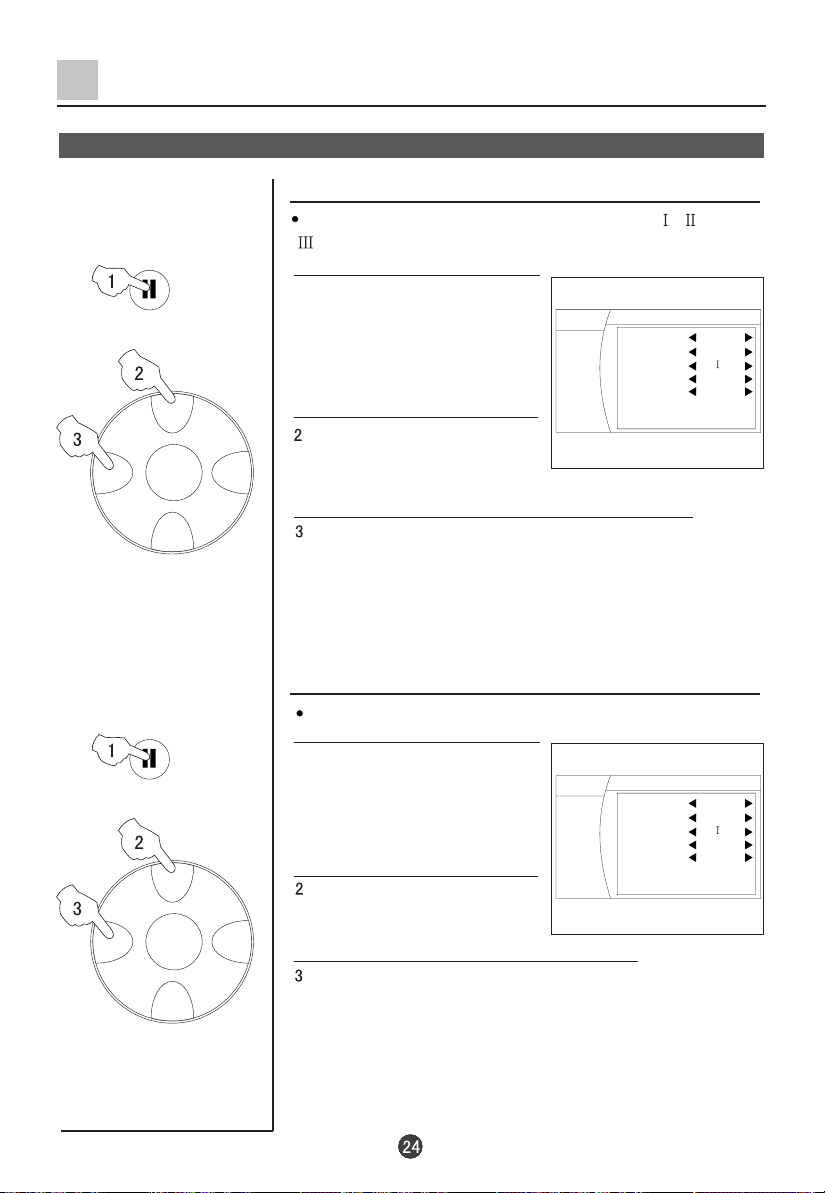
Select Switch on mode and HDM scan function
Select Switch on mode
There are some kind of Switch on mode, such as , ,
FUNCTION
CH+
VOL- VOL+
MENU
, etc. You can choose one you need.
1. Press the FUNCTION button,
the Function menu will appear on
the screen.
. Press the CH+/- buttons to move
the indicator to " Curtain ".
MENU
Picture
Sound
Tune
Setup
Timer
Language English
Screen Saver On
Curtain
Color sys. PAL50
HDM scan 100Hz
Transparency On
Tilt 0
CH-
FUNCTION
CH+
VOL- VOL+
MENU
CH-
. Press the VOL+ button to select the
desired Switch on mode.
HDM Scan function
The HDM scan includes Pixel,75Hz,100Hz and 60P, etc.
1. Press the FUNCTION button,
the Function menu will appear on
the screen.
. Press the CH+/- buttons to move
the indicator to " HDM scan ".
. Press the VOL-/+ buttons set the desired scan.
MENU
Picture
Sound
Tune
Setup
Timer
Language English
Screen Saver On
Curtain
Color sys. PAL50
HDM scan 100Hz
Transparency On
Tilt 0
Page 26

Set Up Function (Continued)
Tilt function and setting Transparency Menu
Tilt function
When the TV set is affected by the geomagnetism so
FUNCTION
CH+
VOL- VOL+
MENU
that the whole picture turn tilt, you can use the function.
1. Press the FUNCTION button,
the Function menu will appear on
the screen.
. Press the CH+/- buttons to move
the indicator to " Tilt ".
MENU
Picture
Sound
Tune
Setup
Timer
Language English
Screen Saver On
Curtain
Color sys. PAL50
HDM scan 100Hz
Transparency On
Tilt 0
CH-
FUNCTION
CH+
VOL- VOL+
MENU
CH-
. Press the VOL-/+ buttons to adjust.
Setting Transparency Menu
When the function is ON, the menu display is
ransparent .
t
1. Press the FUNCTION button,
the Function menu will appear on
the screen.
. Press the CH+/- buttons to move
the indicator to " Transparency ".
. Press the VOL+ button to turn
the function ON.
MENU
Picture
Sound
Tune
Setup
Timer
Language English
Screen Saver On
Curtain
Color sys. PAL50
HDM scan 100Hz
Transparency On
Tilt 0
Page 27

Setting the Lock
This TV set provides you with the LOCK function, you can choose it due to your
need to protect your TV set.
Change your password
Change your password
This TV set can set a four digit password, the original
one is 0000, if you want to reset it, please follow the
H.LOCK
CH+
instructions below.
1. Press the H.LOCK button,
then press the Digital number
button to input the password,
screen will show as the form
on the right.
Password ----
VOL- VOL+
MENU
CH-
. Press the CH+/- buttons to move
the indicator to " New PWD",
and then press the Digital number
button to input the password.
Lock Set
Change Password
New PWD --- Confirm PWD --- Confirm
Lock Off
Channel Lock Off
. Press the CH+/- buttons to move
the indicator to " Confirm PWD",
and then press the Digital number
button to input the password again.
. Press the CH+/- buttons to move
the indicator to " Confirm", and then
press the VOL+ to confirm. If it is
Lock Set
Change Password
New PWD --- Confirm PWD --- Confirm
Lock Off
Channel Lock Off
correct, then the screen displays
change successfully.
5. If the confirmed password is not accordance with the
new password, then the screen will display failure.
Tip:
After changing the password, you must memorize the
new password for fear you can not use the function.
Page 28

Setting the Lock (Continued)
Setting the Lock
Setting the Lock
There are Child Lock and Program lock setting, you
can set it due to your need.
H.LOCK
CH+
1.Press the H.LOCK button,
the screen will show as the
form on the right.
Password ----
VOL- VOL+
MENU
CH-
2.Press the Direct-digit
Choosing button 0 for four
times( or input the password
you set) to enter the Lock
Menu.
Lock Set
Change Password
New PWD --- Confirm PWD --- Confirm
Lock Off
Channel Lock Off
3.Press the CH+/- buttons to
move the indicator to "Lock",
then press the VOL+ button to
turn the function ON or OFF.
Description of each lock function
1.When the LOCK is set ON, if the buttons on the TV are
pressed, the screen will indicate that the TV set is in the
status of Lock, and the buttons won't work.
2.The Channel Lock allows the TV to always be on the same
channel when you turn it on.
3. If you forget your password or a password is accidentally set
enter 9443 as the password. This will enable you to regain
control.
Page 29

Others Functions
Calendar, Picture Still and Zoom functions
Calendar function
CAL./EXIT
CH+
VOL- VOL+
MENU
CH-
STILL
Note: The calendar can not renew automatically.
1. Press the CAL./EXIT button,
the Calendar menu will appear on
the screen.
. Press the VOL-/+ buttons to move
the indicator to the year / the month,
and then press the CH+- buttons to
adjust the year and the month, to
demand the desired date.
Sun Mon Tue Wed Thu Fri Sat
Picture Still function
When you watching TV, press
the STILL button to still the
picture. Press the STILL button
or any others to resume the
playing.
Still
ZOOM
Zoom function
When you watching TV, press
the ZOOM button to change the
picture scale.
Zoom NORMAL
Page 30

Others Functions (Continued)
Setting and Using Favorite programs, Setting Sleep Timer
Setting Favorite programs
After setting the Favorite function, you can select the
FAVORITE
CH+
programs that you favorite.
1. Press the FAVORITE button
twice, then the screen displays
the Favorite menu.
2. Press the CH+/- buttons to move
the indicator to "NO.1 ".
Favorite
No . Program
1 2
2 3
3 4
4 5
5 6
6 7
7 8
8
Current Program 2
VOL- VOL+
MENU
CH-
FAVORITE
TIME
CH+
VOL- VOL+
MENU
3. Press the VOL-/+ buttons to
turn the Prog NO.1 to 9.
(Suppose the channel 9 is one your
favorite program.)
4. Repeat above steps to set
other program or preset the
Favorite
No . Program
1 2
2 3
3 4
4 5
5 6
6 7
7 8
8
Current Program 2
programs.
Using Favorite function
Press the FAVORITE button continuously, you can select
the favorite programs that are set.
Setting Sleep Timer
1. Press the TIME button, the
Time menu will appear on the
screen.
. Press the CH+/- buttons to move
the indicator to " Sleep Time".
MENU
Picture
Sound
Tune
Setup
Timer
Current time
Off Time
On Time
On program
Remind time
Remind program
Sleep Time
12 27
-- --
-- --
-- --
10
---
Off
CH-
. Press the VOL+ button to turn the time or Off.
Page 31

Others Functions (Continued)
VGA input adjustment
Setting the PC software
1.First, click on Settings on the Windows start
menu and click on "Control Panel".
2.Double click on the Display icon.
3.Click on the Settings tab on the display
dialog-box.
4.Adjust the resolution to 640X480 pixels
5.Click the Advanced button and click the Monitor
tab on the dialog-box. Set the vertical-frequency
to 60Hz and then click the OK button.
6. Connect the PC to the TV set by the VGA terminal.
VGA input adjustment
TV/AV
1. Press the TV/AV button,
then press CH+/-buttons to
select the PC input mode.
Press the VOL-/+ buttons to
confirm.
CH+
VOL- VOL+
MENU
CH-
. Press the MENU button to move
the indicator to " Advan", and press
VOL+ button to enter the sub-menu.
3.Press the CH+/- buttons to move
the indicator to the desired options,
then press the VOL+/- buttons to
adjust the effect of the screen .
MENU
Picture
Sound
Advan
Setup
Timer
H-Position 0
V-Position 0
H-Range 0
PCC 0
KEY 0
TCC 0
BCC 0
Page 32

Multi-Media Player System
Multi-media player preparation
1. Supported equipment
1)Equipment supporting Mass Storage agreements include USB, mobile hard disk, card
reader, some MP3 and digital camera.
2)Equipment supporting PTP agreements include some digital cameras.
2. 1 Supporting media:
picture, music, MPEG4, MPEG2 and MPEG1;
Supporting file formats
*.Avi, *.DIVX, *.MPEG,*.DAT, *.MP3, *.WHA, *.JPG and *.JPEG. Due to particularity of file
code and file format, It is possible that some files may not be read.
2 If Pic & Music mode is activated, relative media file format will include JPEG and MP3 files.
After Picture is selected, MP3 files set for play will open both music and picture files for sync
play performance. As some files are read while music is being played, the response of picture
operation response might be affected.
3.Before starting to operation, verify USB storage device is of FAT32 and FAT file system
format. At present, this television does not support NTFS and the file systems of other format.
4.Many movie files use suffix of AVI and MPG. However, many kinds of format are used for
internal files. This television can only play some AVI and MPG files of this format. Those files
with suffix of dat are not movie files, expect data files used by computers, and cannot be played
for movies.
5.External card reader supports most digital cards available in the market. Readable digital
cards are classified according to the property of card readers and can be connected to mobile
hard disks (working voltage 5.0V, working current not over 500mA).
6. Sometimes the television operation may be halted due to excessive rate of information code
errors. In such case, restart the system. Because there are many non-standard USB mobile
devices in the market. If this kind of USB mobile devices are used in the Multi-media play
system, the problem of identification failure might occur. The same problem may also happen
with computers, not televisions.
7.It is suggested that the external devices with USB2.0 interface be used to improve velocity of
information reading and continuity of information playing.
USB setup
1.Insert USB in the USB slots at the right side the TV.
2.Insert it to be clicked in.
3.Press USB button on the remote controller to enter the Multi-media system.
CARD setup
This TV is Compatible with the card of SD/MMC/CF/MS/SM format.
How to use
1.Jack of card Instructions
Jack of SM card
Jacks of SD MMC MS card
Jack 1
Jack 2
Note
1.Please note chooses uses the digital memory card with you corresponds the receptacle.
2.Card reader in 1 cannot simultaneously insert two kind of cards in the graphical representation
position
Jack of CFcard
Page 33

Multi-Media Player System (Continued)
Multi-media player preparation
2.Insert the card as right direction. As following Card in
common use
1 CF card
jack
2 MMC card
jack jack
3 MS card
TV/AV
CH+
VOL- VOL+
MENU
CH-
128MB
MEMORY STICK
COMPACT FLASH
DIGITAL MEMORY CARD
128
4 SM card
MB
MULTIMEDIA
CARD
128
5SD
MB
jack jack
SD
128MB
ID
Note:
1.the card insertion time, after the flows media system starts 2s , insert
the card to numerical code card reader , do not bring card to start flow
media system. 2. After card insertion, indicator light will shines, and
enters glitters condition, after period of time , indicator light enters
constant bright condition, indicates already distinguishes finished, this
time carries on play operation and so on. 3. In the market ,the digital
card type are very many, please uses standard product of the standard
factory , meets reads takes difficult or reads speed limits, please replaces
the digital card.
To start the media play
1.Press the TV/AV button on the remote control to enter the menu
option. Press the CH+/- buttons to select USB, and then press VOL+
button to confirm.
2.After entering the stream media player, press buttons
to select desired options.
3. Press the button to enter
desired option.
4. Before watching TV program, you
must return the main menu. Repeat
the step 1 to select the TV option, and
then press VOL+ button to confirm.
TIP: If there are no operation one minute later, the TV will enter the
saver automatically, at the time, press any button of USB system to
exit the saver menu.
128MB
Press ENTER key to play this devices
AAA Multimedia Player
Card
USB
File copy
SETUP
Remove USB
Page 34

Multi-Media Player System (Continued)
To operate the menu
To operate the menu
1. Press the or button to
select the item with up or down.
Press ENTER key to play this devices
2.Press the or button to select the desired item of
sub-menu with left or right.
3 Press the button to ensure the desired option, to
enter the sub-menu, to resume the speed of standard.
4. Press the or button to operate play quickly or
slowly. Press the button to circumrotate the picture
also.
AAA Multimedia Player
Card
USB
File copy
SETUP
Remove USB
ZOOM
CALL/HELP
CAL./EXIT
5.Press the button to pause the player, and press
again to resume it.
6.Press the ZOOM button to enlarge the picture, and
press or buttons to enjoy the detail.
/
/
7.Press the CALL/HELP button to call or exit the menu
display. And press the CALL/HELP button to call or exit
the menu display during operating file copy.
8.Press the CAL./EXIT button to return to previous menu
and stop player, press CAL./EXIT button repeatedly to
return to main menu.
Page 35

Multi-Media Player System (Continued)
Multi-Media Player
To select stream media broadcast system
1.Press the or button to
select "card"or "USB". (The
device be inserted and
identified).
2. Press the button to
enter selected option.
Press ENTER key to play this devices
To play picture
1. Press the or button to
select Picture item.
2. Press the button to enter
the menu of play.
TIP:
The menu displaying is different
for the files in your input devices.
3. Press the or button to
select the desired picture, and
then press the button to enter
the play menu.
4. On the menu of play, press the
or button to select the speed
of play.(Normal, slow or fast).
CAL./EXIT
ZOOM
CALL/HELP
5. After disappear the menu play,
press the or button to swap
the picture of next and previous.
Press CAL./EXIT button to return.
To enjoy the picture detail
1. After selecting the picture to play, press the ZOOM
button to select desired scale.
2. Press the CALL/HELP button to exit the display, and
then press the or , or button to move and enjoy
the picture detail.
0016.JPG
Slideshow speed standard
AAA Multimedia Player
Card
USB
File copy
SETUP
Remove USB
AAA Multimedia Player
AAA Multimedia Player
F-007 .JPG
F-008 .JPG
F-009 .JPG
F-010 .JPG
F-011 .JPG
F-012 .JPG
JPEG
Play
Picture
Movie
Music
Music andPIC
IMAGE
To make the picture overturn
Press the button to make overturn 90 with right once.
Press the button to resume the program playing.
0
Page 36

Multi-Media Player System (Continued)
Multi-Media Player
To enjoy music
1. Press the or button to
select the Music option.
2. Press the button to enter
the menu of play.
3. Press the or button to
select the desired music, and
then press the button to play.
Note: the play file menu are
different with your USB device.
AAA Multimedia Player
Picture
Movie
Music
Music andPIC
AAA Multimedia Player
The day went away .MP3
CAL./EXIT
4. When playing music, press
the or button to select play
mode, (play mode: standard,
program, Random, Disc
Repeat, Folder Repeat, File
Repeat) and press the
button to confirm.
5. Press the CAL./EXIT button
to exit the playing.
The day you went away.MP3
Play mode standard
The day went .MP3
Soft .MP3
01 07 / 04 20
Soft .MP3
The day went .MP3
Done
Page 37

Multi-Media Player System (Continued)
Multi-Media Player
To play Movie
1. Press the or button to
select the Movie option.
AAA Multimedia Player
Picture
Movie
Music
Music andPIC
CAL./EXIT
CALL/HELP
2. Press the button to enter
the menu of play.
3. Press the or button to
select the desired movie, and
then press the button to play.
4. On the menu of play, press the
or button to select in turn:
File-Play Back Control-Auto
channel-Play Mode
5. Press the or button to set
speed, press button to resume
to standard mode.
6. Press the or button to
select the next movie or previous.
7. Press the CAL./EXIT button
repeatedly to return.
AAA Multimedia Player
E08-8SOBTILES-1
Page 38

Multi-Media Player System (Continued)
Multi-Media Player
To select the Music and PIC item
1. Press the or button to
select the Music and PIC
option.
AAA Multimedia Player
Picture
Movie
Music
Music andPIC
CAL./EXIT
2. Press the button to enter
the menu of play.
Note: the play file menu are
different with your USB device.
3. Press the or button to
select desired file, and press
the button to confirm it.
AAA Multimedia Player
F-007 .JPG
F-008 .JPG
F-009 .JPG
F-010 .JPG
F-011 .JPG
F-012 .JPG
JPEG
MP3
The day you went away .MP3
0016.JPG
Play mode standard
Play
00 01:43
IMAGE
(Press the button to cancel).
Repeat step 2 to select more
files, and press the button
to enter play menu.
TIPS:
On the playing, press the or button to change the
pictures, press the or button to change the musics.
4. On the menu of play, press the or button to select
the speed of play.(Normal, slow or fast).
TIP:
On the playing, press the button to pause the picture.
5. Press repeatedly CAL./EXIT button to return.
Note:
On the music and picture, the playing music is *.mp3 format.
Page 39

Multi-Media Player System (Continued)
Copy file function
Copy file function
1. Press the or button to
select the File copy option.
Press ENTER key to enter COPY menu
AAA Multimedia Player
Card
USB
File copy
SETUP
Remove USB
CALL/HELP
2. Press the button to enter
the copy menu.
Select source Port:
Card
USB
3. Press the button to enter
the file menu, and press the
or button to select "Card"
or "USB".
4. Press the CALL/HELP button
to call the menu, and then press
the button to select the file,
/
press the button.
Root
F-007 .JPG
F-008 .JPG
F-009 .JPG
F-010 .JPG
F-011 .JPG
F-012 .JPG
Root
F-007 .JPG
F-008 .JPG
F-009 .JPG
F-010 .JPG
F-011 .JPG
F-012 .JPG
COPY
PASTE
5. Press the CAL./EXIT button to exit the "Select source
Port:" displaying menu, and then press the button to
/
select USB or CARD.
6. Press the button to enter the CARD or USB, to select
the file folder. Press the CALL/HELP button to call the menu,
and select the desired files. Press the button to confirm.
Page 40

Multi-Media Player System (Continued)
Set up Functions
To select language
1. Press the or button to
select the Setup option.
2. Press the button to enter
the Setup menu. Press the
button again to enter the
Language option.
AAA Multimedia Player
Card
USB
File copy
SETUP
Remove USB
Press ENTER button to SETUP menu
AAA Multimedia Player
3. Press the or button to
select desired language, and
press the button to confirm.
To display the version
1. Repeat steps 1-2, and then
press the or button to
select version.
2. Press the button to
display the version number.
Removing USB device
1. Press the or button to
select the Remove USB option.
2. Press the button to
confirm.
Languages
Version
AAA Multimedia Player
V2.1.04254
AAA Multimedia Player
Card
USB
File copy
SETUP
Remove USB
Press ENTER key to remove USB devices
3.Remove the memory card/USB device.
4.If to remove the card device, press the CAL./EXIT
button to return to the main menu, and remove the card.
Page 41

External connections
In the following, the methods of connecting the video/audio system and PC for the TV
set will be explained.
Video/Audio Output Connection, VGA Input
VIDEO
AUDIO
AVOU T
L
R
VCR Etc.
VGA IN
2IN AV1IN
AV
LRLRL
To Audio/Video input
YUV
Pb(cb)
P
r(cr)
R
PC
To VGA input
To Video input
Page 42

External connections (Continued)
In the following, the methods of connecting the video/audio system and other sets for
the TV set will be explained.
Video/Audio Input Connection
VCD
Side AV
To Video Terminal
To Audio-L Terminal
To Video Output
ToAudio Left Output
ToAudio Right Output
To Audio/Video Input
AVOU T
VIDEO
AUDIO
(Y)
(Cr)
(Cb)
L
R
To Audio-R Terminal
2IN AV1IN
AV
LRLRL
YUV
Pb(cb)
r(cr)
P
R
TO AUDIO/VIDEO INPUT
DVD
TO AUDIO LEFT OUTPUT
TO AUDIO RIGHT OUTPUT
TO S-VIDEO OUTPUT
TO AUDIO LEFT OUTPUT
TO AUDIO RIGHT OUTPUT
VCR(S-VIDEO TERMINAL)
TO VIDEO OUTPUT
TO AUDIO LEFT OUTPUT
TO AUDIO RIGHT OUTPUT
VCR (WITHOUT S-VIDEO TERMINAL)
Page 43

Trouble shooting
To assist in location possible faults use help guide below.
BREAKDOWN PHENOMENON
PICTURE
Picture with snow
Double or Triple Image
Disturb
No Picture No sound
No colour Normal volume
SOUND
Noise
Normal
Noise
No soundNormal
CHECKING
The aerial direction and connection
This is called ghosting which can be minimized with
an outside aerial, and good quality cable and
terminations. Altering the aerial direction can also
minimize this effect.
Electrical interference which can be caused by cars,
motorbikes etc, Fluorescent lamps and dirty
insulators on overhead power cables.
Volume Sound mute
Ensure that the power supply is connected to
the TV set and turned on. Also ensure that the
brightness and contrast are not turned down.
Adjust colour control
Adjust channel again
Scramble
Colour Spot
Normal or Weak Volume
Normal volume
Colour Purity fault which can be caused by moving the
TV set, placing magnets near the TV screen or turning
on/off house hold appliances such as vacuum cleaners
near the TV set. Turn the TV off with the mains power
switch for 15 minutes. When the power is turn on again
the TV set will automatically degauss the picture. In
server cases leave the TV set turned off over night.
Note:
1.If the fault can not be repaired using the above guide consult with your local authorized service
center.
2. The cabinet may produce the occasional "snapping sound" This is normal and caused by the
materials in the cabinet expanding with room temperature changes.
Page 44

Specifications
Design and specifications are subject to change without notice.
[The specifications of different models]different
Model
D29FA9
D29FA9-A
D29FA9-AK
D34FA9
D34FA9-A
D34FA9-AK
Dimensions (mm)
817 W x 616 H x 515 D
920 W x 695 H x 530 D
[The same specifications of different models]
Power consumption
Color system
Sound system
Sound output
Accessories
PAL,SECAM, AV NTSC 3.58, 4.43
B/G,D/K,I,M
8W+8W & 10W
Remote controller X1
Owner's manual X1
Battery(AA) X2
[Power supply input list]
Country or Area
Saudi Arabia
Mongolia, Moldova, Cyprus, Russia,
Turkmenstan, Ukraine, Latvia, Bulgiria
Jordan, Oman, UAE, Pakistan, Lebann,
India, Yemen, Kuwait, Bahrain
Indonisia
Philippine
New Zealand, Australia,Malaysia
Power supply input
~160V-250V, 50Hz/60Hz
~150V-250V, 50Hz
~160V-250V, 50Hz/60Hz
~150V-240V, 50Hz
~150V-240V, 50Hz/60Hz
~220V-240V, 50Hz
Hong Kong, Algeria, Nepal, Turkey
The actual voltage and frenquency of the TV set is for the country or area. different
~220V, 50Hz
Page 45

01
0090506995
 Loading...