

Page 1

1
14
27
BH2004D
Page 2

Before Operation
Warning and cautions..............................................................................2
Installation................................................................................................4
Antenna Connection
................................................................................4
Preparation of the remote control............................................................4
MENU functions
Video set up............................................................................................5
Audio set up............................................................................................5
Timer set up............................................................................................6
Function
Channel
Calendar
set up......................................................................................6
set up......................................................................................7
.................................................................................................9
V-CHIP set up........................................................................................9
Others
Troubleshooting guide
Warranty ............................................................................................... 12
..........................................................................11
Specifications ........................................................................................13
EnglishEnglish
1
Page 3
EnglishEnglish
English
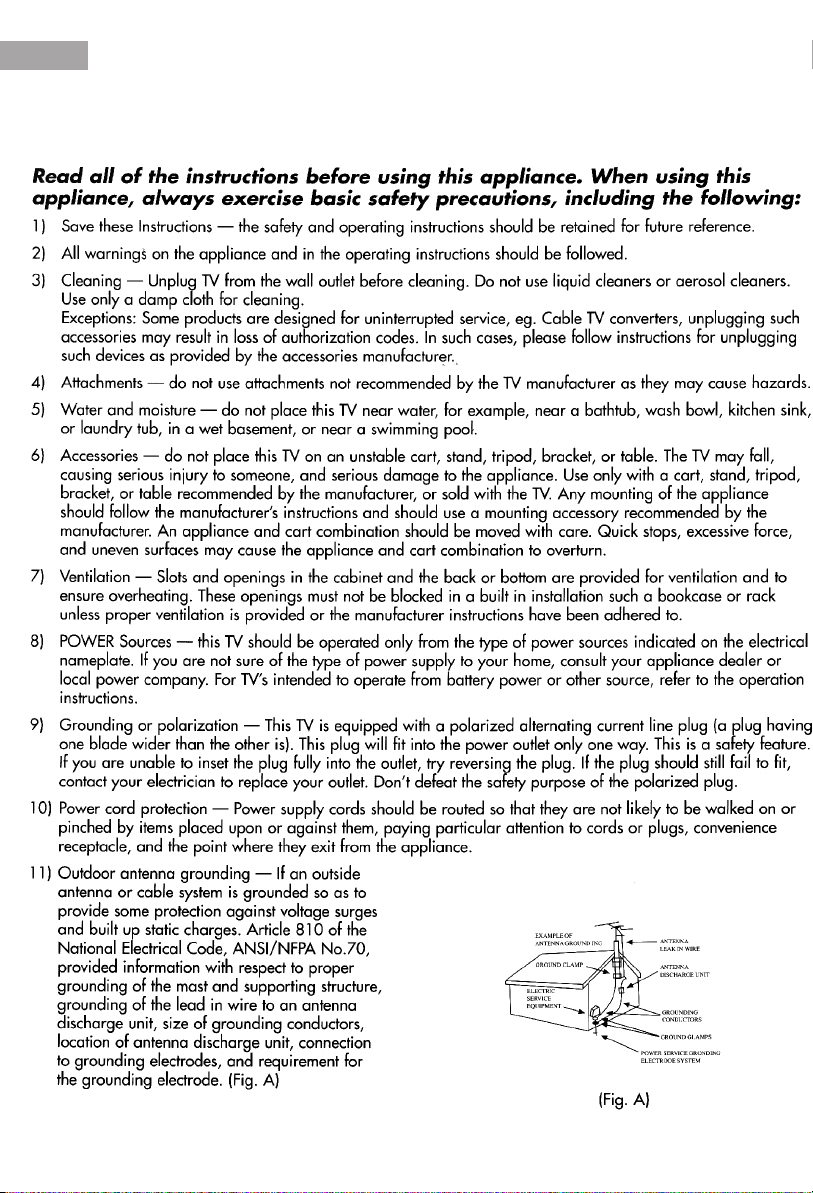
IMPORTANT SAFETY INSTRUCTIONS
2
Page 4

EnglishEnglish
20) Read these instructions.
21) Keep these instructions.
22) Heed all warnings.
23) Follow all instructions.
24) Do not use this apparatus near water.
25) Clean only with a dry cloth.
26) Do not block any ventilation openings. Install in accordance with the manufacturer's instructions.
27) Do not install near any hear sources such as radiators, heat registers, stoves, or other apparatus
(including amplifiers) that produce heat.
28) Do not defeat the safety purposes of the polarized or grounding type plug. A polarized plug has two
blades with one wider than the other. A grounding type plug has two blades and a third grounding prong.
The wide blade or the third prong is provided for your safety. When the provided plug does not fit into your
outlet, consult an electrician for replacement of the obsolete outlet.
29) Protect the power cord from being walked on or pinched particularly at plugs, convenience
receptacles, and the point where they exit from the apparatus.
30) Only use the attachments/accessories specified by the manufacturer.
31) Unplug this apparatus during lightning storms or when unused for long periods of time.
32) Refer all servicing to qualified service personnel. Servicing is required when the apparatus has
been damaged in any way, such as power supply cord or plug is damaged, liquid has been spilled or
objects have fallen into the apparatus, the apparatus has been exposed to rain or moisture, does not
operate normally, or has been dropped.
3
35
Page 5

EnglishEnglish
For Future Reference Please
SAVE THESE INSTRUCTIONS
Model number
Staple your receipt to your manual. You will need it to obtain warranty service.
English
Serial number
Date of purchase
Remote Control Functions
1. : Power on/off
MENU CH+
MENU CH+
VOL-
VOL-
4
1
2
CH-
3
1
2
5
4
6
5
4
8
7
RECALL
9
8
0
7
RECALL
TV/AV
RATING
6
8
11 12
0
P.STD SLEEP
TV/AV
CCD
MUTE
DISPLAY
EXIT
P.STD
1. : Power on/off
2. MENU: Access/Exit Main M
2. MENU: Access/Exit Main M
12
VOL+
3. CH+/-: Select next higher or lower channel
3. CH+/-: Select next higher or lower channel
VOL+
CH-
3
4. VOL+/-: Increase or decrease sound
4. VOL+/-: Increase or decrease sound
3
5. CHANNEL NUMBER BUTTON: Direct channel
5. CHANNEL NUMBER BUTTON: Direct channel
6
tuning (TV channel 02-69, CATV channel 01-125.)
tuning (TV channel 02-69, CATV channel 01-125.)
9
5
DISPLAY
6. RECALL: Return to previous channel
6. RECALL: Return to previous channel
-/--
MUTE
7. -/--:
7. -/--: Digital Selector
7
8. TV/AV: TV/AV selection
8. TV/AV: TV/AV selection
9
10
9. CCD CCD selection
9. CCD CCD selection
10. MUTE: Press key to Activate/deactivate Mute Function
10. MUTE: Press key to Activate/deactivate Mute Function
13
11. P.STD:
11. P.STD: Picture Preference Select Button
12. DISPLAY: Display receiving channel
12. DISPLAY: Display receiving channel
13.EXIT
13.EXIT Exit TV Menu
Front
Earphone
AUDIO
EARPHONE
VIDEO
1 2 3 4 5 7 9 10 116 8
4
MENU
POWER:power on/off
POWER Indicator
V
O
L
U
M
E
C
H
A
N
N
E
L
POW
E
R
Page 6

EnglishEnglish
Information to user:This television receiver is equipped with close caption decoder and
parental blocking technology as required by the FCC.
Menu Functions
Video Set Up:
Pressing MENU button once will bring the Picture Set Up menu on the TV.
The following is shown on your TV screen:
Follow the procedure below to adjust the
picture quality of your choice:
1.Press the CH(+) and CH(-) button to go
up and down the menu.
2.Press the VOL(+) and VOL(-) button to
increase and decrease the level to your
preference for each item.
Adjustment of Picture Quality:
To adjust the picture quality from the factory preset read the following:
Picture: By increasing the level. It will adjust white areas of picture and by decreasing the level ,
it will adjust black areas of picture.
Brightness: By increasing the level, it will add more light to dark parts of the picture and by
decreasing the level,it will add more dark to light parts of the picture.
Color: By increasing the level. It will adjust the low and the high level of the picture.
Sharpness: By increasing the level, it will show cleaner and clearer images and by decreasing
the level, it will make picture smoother.
Color Temp : By pressing the VOL(+/-) buttons to select the three setting A)Neutral, B)Warm,C)Cool.
Hue: You can adjust the tint of the picture by going into picture set up menu. By decreasing the
level, it will give red tint to skin color and by increasing the color it will give green tint to
skin color.
Video
Picture 70
Brightness 32
Color 50
Sharpness 40
Hue 50
Color Temp. Neutral
Audio Set Up:
By pressing MENU button ,and then pressing VOL(-/+) button it will bring you to Audio
Set Up display. You will see the following menu on your TV screen:
Follow the procedure below to adjust the
sound quality:
Press VOL (+) button to increase and VOL (-)
button to decrease the level to your preference.
Audio
Volume 45
5
5
Page 7

EnglishEnglish
Timer Set Up:
By pressing MENU button ,and then pressing VOL(-/+) button it will bring you to Timer
Set Up display. You will see the following menu on your TV screen:
Follow the procedure below to select one of
the above options:
1.Press the CH(+) and CH(-) button to go up
and down the menu.
2.Press VOL (+) button or VOL (-) button to
select your preference.
Press CH( +/-) buttons to scroll to Clock, then press VOL (-/+) buttons to set
Clock:
Timer
Clock 17:18
Time-On 18:00
Ch. Select 1
Time-Off --:-Sleep Time 0
Remind Time --:-Ch. Switch 1
the hour after setting the hour press CH( +/-) buttons to go to minute mode and
set by using VOL(+/-) buttons.
Time-On:
Press CH( +/-) buttons to scroll to Clock, then press VOL (-/+) buttons to
set the hour after setting the hour press CH( +/-) buttons to go to minute mode
and set by using VOL(+/-) buttons.
Ch. Select: This exclusive feature switches you to your favorite channel at the
appropriate set time. Press VOL(+) and VOL(-) buttons to select the channel.
Time-Off :
Press CH( +/-) buttons to scroll to Clock, then press VOL (-/+) buttons to
set the hour after setting the hour press CH( +/-) buttons to go to minute mode
and et by using VOL(+/-) buttons.
Sleep Time: This feature allows you to turn off television in pre-selected minutes (180,
170,160, ........,10 and 0).
Remind time:
Press CH( +/-) buttons to scroll to Clock, then press VOL (-/+) buttons
to set the hour after setting the hour press CH( +/-) buttons to go to minute mode
and set by using VOL(+/-) buttons.
Ch. Switch: This feature lets you store your favorite channel. Once you store the
channel number in this function, when the set time is up, it will switch over
to the set channel. This feature is used with the Exchange feature. Press
VOL(+) or VOL(-) button to select the channel.
Function Set Up:
By pressing the MENU button, and then pressing VOL-/+ button will bring you to
Function Set Up menu. You will see the following menu on your screen:
Follow the procedure below to select one of
the above options:
Setup
1.Press the CH(+) and CH(-) button to go up
and down the menu.
2.Press the VOL(+) and VOL(-) button to
increase and decrease the level to your
preference for each item.
Language English
Background on
Black Stretch on
VNR on
Fade off
AVL off
C. Caption off
Demo Mode
6
Page 8

Language: Use VOL(+/-) to select the OSD in either English, French or Spanish.
Background: Press the VOL (+/-) buttons to select between Background ON or Background
OFF. When the Background ON function is chosen, a moving"NO SIGNAL" sign will
be displayed if there is no input signal to the set.
Black Stretch: Press VOL (+/-) buttons to turn the Black Stretch feature on or off. When the
Black Stretch function is on the screen automatically increases the contrast range.
VNR: Press VOL (+/-) buttons to turn the VNR function on or off. VNR is a term for Video
Noise Reduction, a built-in device on the set that reduces video noise interference
so the viewer is assured a clear picture.
C.Caption: Press VOL (+/-) buttons to select the Closed Caption options. Closed
Captioning helps the hearing impaired with the broadcast program, as well as helping
children learn how to read. A built in decoder displays the audio portion of a program
as text on the screen when this option is selected.
OFF: When OFF is displayed on TV means C.Caption is turned off.
CC1: When Cc1displays on TV means C.Caption is turned on.
CC2 to CC4: For other modes of video related broadcast information.
T1: For program guide and other information displayed by broadcasters.
(This blocks a large portion of the picture on your screen).
T2 to T4 :For other modes of information displayed by broadcasters.
(This blocks a large portion of the picture on your screen).
Note: Select CC1 for full translation of the primary language such as English in your
area. Select Cc2 for secondary language translation such as Spanish or any other
language that may be broadcast in your area.
Fade: The FADE control allows for the picture tube to warm up and gently turn on,
which can help prolong the life of the picture tube.
Automatic Volume Level control reduces the effect of large volume changes. For instance,
when advertisements come on.
Demo mode: This will display the main functions of the TV set.
EnglishEnglish
Channel set up:
By pressing MENU button ,and then pressing VOL-/+ button it will bring you to
Channel Set Up. You will see the following display on TV screen.
Follow the procedure below to select above
options:
1.Press the CH(+) and CH(-) button to go up
and down the menu.
2.Press VOL (+) button or VOL (-) button to
select your preference.
Channel System: Press the VOL(-/+) buttons to select the correct channel system.
In general, you can set it as "AUTO" AUTO,NTSC and NTSC443 will
display in turn
Antenna: Press VOL (+) button or VOL(-) button to select TV or CATV.
Skip :Press VOL(+) button or VOL(-) button to add or delete the channel from the
stored memory.
Current Ch. : Press VOL(+) button to go up and VOL (-) button to go down to set the
channel position. The display will show the current playing channel.
Channel
Channel System Auto
Antenna TV
Skip off
Current Ch. 2
Fine
Auto Program
7
Page 9

EnglishEnglish
Channel Coverage by Antenna:
Antenna Type Channel Range
VHF 2-13
UHF 14-69
CATV 1-125
Fine: If the picture and/or sound are poor, try using the FINE TUNE feature.
Do not use this feature unless reception is poor. Press VOL (+/-) to start the Fine
Tune function.
Auto Program: Press VOL (+) button or VOL (-) button to auto program in channels.
This search automatically adds only the active channels in your area to the TV's
memory. It deletes any channels on which there is no broadcast or a poor signal.
Note: The Auto Search function will scan the channels on the selected antenna
input. If the TV is connected to cable, please select Cable under Antenna.
Calendar:
Your TV has been designed with a calendar. By pressing MENU button ,and then
pressing VOL-/+ button it will bring you to Calendar. You will see the following
display on TV screen.
Follow the procedure below to adjust the Calendar :
1. +/- buttons Press the CH to select the year
item, the month item or the date item.
2. Press the VOL-/+buttons to change
calendar setup (1901.1.1-2099.12.31).
3. Press EXIT button to exit the calendar mode.
Calendar
2001 11 14
OCT
OCT
OCT
V-CHIP Set UP:
Press the MENU Button on your remote control to go to Password menu, then input
the password (0000). It will bring Parental Lock set up display on the screen. You
will see the following menu on your screen:
Passsword
Password ----
Parental Lock
Parental Lock off
TV Rating
MPAA Rating
Lock Menu
Change Password
This function enables you to block certain TV channels in accordance to the V-CHIP
requirement established by the FCC.
8
Page 10

To set the V-CHIP function:
Select the TV Rating option. You will see the TV Rating menu on your TV screen:
EnglishEnglish
1.Press CH(+/-) button to go up and down
the menu.
2. Press VOL(+/-) button to go into TV
Rating and Movie Rating menus.
3.Press MENU button to set the Parent
lock ON and Parent lock OFF.
When TV rating is selected, you will see
the following rating table on your TV screen.
Rating FV
TV-Y
U
U
TR-Y7
U
TV-G
U
TV-PG
U
TV-14
U
TV-MA
D L S V
>
U
U U U U
U U U U
U U U
Note: When Parental Lock "ON" is selected, you will see "B" instead of "U' .When
Parental lock "OFF" is selected, you will see "U" instead of" B".
When Movie rating is selected, you will see the following rating table on your TV screen.
MPAA Rating
G U
PG U
PG-B U
R U
NC-17 U
X U
Note: When Parental lock "ON" is selected, you will see "B" instead of "U". When
Parental lock "OFF" is selected, you will see "U" instead of "B".
PARENT LOCK OFF means the lock function is turned off . If the PARENT LOCK
is in "OFF" mode then V-CHIP function will not be active to accept the V-CHIP
signal.
PARENT LOCK ON means the lock function is turned on. If the lock is in the "ON"
mode then V-CHIP function is activated to accept the V-CHIP signal.
Password
The "Default Password" preset by the manufacturer is "0000" . If you want to change
the preset password to your own password, just choose any four digits that can be
easily remembered and set. Once you set password for a particular channel, that
channel will be blocked. This channel can only be accessed with the password.
LOCK Menu
AV LOCK:When it is set ON,you can not use the AV.
PROGRAM LOCK:When it is set ON,the current channel is locked,you can not see
the program of this channel.
9
Page 11

EnglishEnglish
V-Chip Technology:
The "V-Chip Technology" allow you to use U.S. And Canada Movies and TV
PROGRAMS Guide ratings to block certain types of TV programs and movies.
To understand clearly about TV programs rating codes, read the following list:
U.S. TV Program Ratings
NR: Not Rated-this means that programs are not rated or rating does not apply.
TV-Y:For all children-this type of rated programs are designed for a very young audience,
including children from ages 2-6.
TV-Y7:Directed for older children - this type of rated programs may include comedic violence
of mild physical, or may frighten children under the age of 7.
TV-G:General Audience-this type of rated programs contains little or no violence, no strong
language, and little or no sexual dialogue and situations.
TV-PG:Parental Guidance Suggested-this type of rated programs may contain limited violence,
some suggestive sexual dialogue and situations, and rare language.
TV-14:Parents strongly cautioned-this type of rated programs may contain sexual content,
strong language and more intense violence.
TV-MA:Mature audience only-this type of rated programs may contain sexual violence,
explicit sexual content and profane language.
FV: This type of rated programs contain Fantasy and cartoon violence.
Violence: This type of rated programs contain violence.
S: This type of rated programs contain sex.
L: This type of rated programs contain offensive language.
D: This type of rated programs contain dialogue with sexual content.
To understand clearly about movies rating codes, read the following list:
U.S. Movies Rating Chart
NR: This means movie is not rated yet. It is pending government rating approval.
G:General Audience-this type of movie rating means all ages admitted to see the movie.
PG-13:Parents Strongly Cautioned - this type of movie rating means some material
may not be appropriate for children under13.
R:Restricted- This type of movie rating means children under 17 of age requires to
be with parent or guardian.
NC-17:This type of movie rating means no one 17 and under admitted.
X:This type of movie rating means adults only.
To understand clearly about Canadian programs rating codes, read the following list:
Canadian English Rating Chart
E:Exempt - this type of rated programs contain news, sports, documentaries, talk
shows, music videos, and variety of other programs.
C:This type of rated programs are intended for children under age 8. There is no
offensive language, nudity or sexual content.
C8+:This type of rated programs generally considered acceptable for children 8
years and over. There is no profanity, nudity or sexual content.
G: This type of rated programs generally suitable for all audiences.
PG: Parental Guidance Suggested -in this type of rated programs, some material
may not be suitable for children.
14+:In this type of rated programs, some content may not be suitable for viewers
under the age of 14.Parents are strongly cautioned not to have their children
view 14+ rated programs by pre-teens and early teens.
18:Adults Only-this type of rated programs are only for adult viewers only.
10
Page 12

EnglishEnglish
11
Page 13

EnglishEnglish
English
Warranty Information
12
Page 14

BH2004DBH2004D
EnglishEnglish
Espanol
~
VHF: 2-13
22
43
Included : Accessories
UHF: 14-69 CATV: 1-125
19.9 X18.7 X17.8 19.9 X18.7 X17.8
lbs.
AA
13
 Loading...