

Page 1

Page 2
Page 3
Page 4
1
Page 5
2
Page 6

3
Page 7

4
Page 8
5
Page 9
6
Page 10
7
Page 11

8
Page 12
9
Page 13
1
Contents Page
1
safety information and advice................................................................................................. 1
2
Drection for use..................................................................................................................…
3
Indicator-lights..............................................................................................................……… 2
4
Warning buzzer...........................................................................................……………………
5
Start-up............................................................................................................……………….. 3
6
Freezing/storage of fresh food...........................................................................……………… 3
7
Maximum stacking height..................................................................................……………… 3
8
Storage time......................................................................................................……………… 4
9
Cleaning and maintenance .....................................................................................……………4
10
Defrosting.........................................................................................................……………….. 4
11
Interior light ..................................................................................................……………….. 5
12
Resolving faults on your own.............................................................................……………… 5
13
After-sales service …………………………………………………………………………………... 5
14
Guarantee ……………………………………………………………………………………………. 6
15
Troubleshooting guide (what is when....).........................................................………….......... 6
Storage Table............................................................................................................………… 7
Components............................................................................................................................. 7
Operating panel....................................................................................................................... 7
Please read these instructions for use attentively to get a good and fast understanding of your new appliance. Underline
any parts you consider particularly important to you. Look after this document so that you may consult it in future or pass
it on to any future owners.
You have purchased a good appliance which will serve you for many years if it is used and maintained correctly.
The illustration (FIG.) are on the last pages of this user manual.
The performance data on the rating plate refer to ambient temperature within the range of +10°C to 43°C.
Please ensure that all packaging materials are removed prior to installation and kept out of children’s reach.
The freezer is supported by a number of materials to prevent damage during transit. Id the freezer is damaged in any
way please contact the place of purchase.
Packaging materials should be disposed of in the correct manner ensuring that it is kept our of children’s reach.
Safety information and advice: Installation
The mains electricity supply must conform to the rating plate as shown on the appliance
The freezer must not be connected to the electricity supply during the installation process.
A dedicated socket with reliable grounding must be provided for the freezer. The freezer’s power cable is fitted with a 3
cord (grounding) plug that fits a 3 cord (grounding) plug socket.
Ensure that the domestic wiring is properly earthed
If the power cable is damaged in any way do not connect to the power supply. The cable must only be replaced by
either the manufacturer or the authorised service agent.
The freezer is operated through a 220-240VAC/50Hz power supply. Abnormal voltage fluctuation may cause the
freezer to: not start/operate; damage the temperature control; damage the compressor; make a noise when the
compressor is operating. To eliminate abnormal voltage fluctuation an automatic regulator should be installed and used
in conjunction with this appliance.
The appliance cannot be installed outdoors, in a damp area or where it may be splashed by water.
The freezer should be installed in a dry well ventilated room.
The appliance must be kept away from direct heat sources and direct sunlight.
Take care not to roll over the power cord when moving the freezer.
The freezer should be placed horizontally on a level, flat and solid surface.
The ventilation openings should be kept free from obstruction.
Refrigerant gas can be harmful, and you should wash them in cold water and call/consult an eye specialist immediately
Ensure that the power cord is not trapped by the freezer or anything else.
Always ensure that the power supply is switched off prior to conducting any maintenance or cleaning on the freezer.
Ensure that he plug is easily accessible after it has been installed.
The use of adapters, multiple connectors and/or extension cables is not recommended.
It is recommended that the freezer be left on and empty for approximalty 2 hours after installation, so that the refrigerant circuit has time to stabilise.
Safety Information and advice
Un packing the freezer
Page 14

2
English
2 Directions for use
In the following, you will find all the important
information for the use of your appliance.
The instructions for use apply to several models, which
Safety Information and advice: Cleaning your freezer
is why details of the information may differ according to
the type of the appliance.
Instruction for use
Always ensure that the power supply is turned off
and the unit is un-plugged from the mains, prior to
cleaning your freezer.
To unsure the electrical insulation, do use spray’s or
splash water over the unit when cleaning it.
Bottled beers and beverages should not be stored in
the freezer
Do not use abrasive cleaning products on your
freezer.
Safety Information and advice: Disposal of the freezer
To avoid accidental entrapment all, all doors, locks,
handles,gaskets, cables and plugs should be removed
and disposed of in the correct manner the door must be
inactive when disposing of the unit.
To switch on:
Turn the control to the right
adjust the temperature to the level you require, between:
-
Min.
(slight cooling) and
-
max
. (lowest temperature)
Temperature settings must be in accordance to:
-
ambient temperature of the appliance
-
quantity of stored foodstuff
-
frequency of opening
We recommend a medium setting.
You will soon learn which is the most suitable setting for
your requirements.
3 Indicator-lights
(FIG.4)
If your appliance is equipped with indicator-lights, the
following guide explains what is meant by each light up:
-
green =
CONTROL
The appliance is under current
and
operating
The
green
control light
must always be on
when the
appliance is connected to the mains and switched on. It
is very important to pay attention to this, because in the
event of a power failure, the red and yellow lights stop
operating and do no longer provide a warning.
-
- red =
ALARM
Interior temperature too high
If the red indicator-light goes on, there may be several
reasons for this, namely:
First start-up of appliance
Restart after defrosting
Filling freezer with fresh food
In these cases it is normal that the red indicator-light
goes on. It goes off automatically when the interior
temperature reaches approximately –15°C.
Switch on the SUPER FREEZE SWITCH (if equipped
with)
(FIG.4)
.
(switch off again not more than 24 hours
later or when the red light has gone off).
If the red control light stays on after 12 to
24 hours, there may be serious problems.
Consult the Troubleshooting guide .
-
yellow =
SUPER FREEZE SWITCH is on and the
thermostat function is disabled.
The compressor continues cooling until the SUPER
FREEZE switch is turned off again.
4 Warning Buzzer (Acoustic alarm)
If your appliance is supplied with a buzzer, it will sound
FREEZER SWITCH.
The appliance should only be opened after the red
light has gone out
when the red indicator-light goes on. The buzzer is
silenced automatically when you turn on the SUPER
Safety Information and advice: Using your freezer.
• The appliance cannot be installed outdoors or in a damp
area.Leave at least 10cm between the freezer and
surroundings for ventilation and heat elimination.
Leave enough space over the freezer for opening the door
and loading the food. Freezer might not operate consistently
(possibility of defrosting of contents or temperature becoming
too warm in the frozen food compartment) when sited for
an extended period of time below +10 CDŽ
• The appliance must be kept away from direct heat
sources and direct
• The internal cavity of the freezer should be dry/dried prior
to use.
• The refrigerant is highly flammable and should not be
tampered with. The manufacturer approved service agent
onlyshould execute any mechanical works on the freezer.
• Do not use any electrical, sharp or mechanical objects to
assist in defrosting the defrosting process, unless supplied
or approved by the manufacturer or approved service centre.
• Do not use electrical appliances in the freezer.
• Bottled beers and beverages should not be stored in the
freezer
• Do not allow children or infirm persons to operate the
freezer without adult supervision.
• Children should be supervised to ensure that they do not
play with the appliance.
• The freezer should only be opened using the handles.
• The door is fitted with a vacuum seal that will release the
door for re-opening after about 1-2 minutes. Do not force
the door open as this can damage the seal.
• It is advised that the technical details found on the rating
plate be recorded for reference.
• To prevent the temperature setting dial from being
accidentally modified the control has been designed to be
resistant to turning. The side of a coin in the slot enable the
dial to be turned easily.
• It is not advisable to touch the inner walls of the freezer
with damp or wet hands as this may cause an injury.
Temperature selection
(Thermostat)(FIG.4)
Page 15
3
5 Start-up
1. Fully unpack the appliance.
2. Remove the polystyrene parts in the compressor
chamber (if supplied).
3. Remove documents and any accessories from the
inside of the appliance.
4. Clean the interior with lukewarm water, and dry
thoroughly with a cloth.
5. Close the appliance.
6. Insert the plug in the socket
7. Switch on the appliance by turning the temperature
control
(FIG.4)
to the right (For the time being, turn
the controller fully to the right to Max position).
(green and red lights go on).
8. If equipped with a SUPER FREEZE SWITCH, turn
it on
(
yellow light goes on too).
9. Do not open the appliance any more for about 4
hours or as long as the red light is on, to
allow the temperature in the inner compartment to
drop to the necessary level.
10. You can now fill the appliance with any amount of
deep frozen food (purchased ready frozen goods).
(Consult the following chapter “Maximum stacking
height”).
11. Turn off the SUPER FREEZE SWITCH again after
24 hours at the latest.
12. If you wish to freeze fresh, unfrozen food, go on to
the following section “
Freezing/storage of fresh
food”.
Important!
When storing ready frozen food, you must observe the
manufacturer’s instructions on the food packaging.
6 Freezing/storage of fresh food
Storing food in the freezer
Hot food should be cooled down to room temperature prior to placing it in the freezer.
Smaller portions food portions will freeze and defrost faster. The recommend portion size is approximately 2.5kg
Food should be stored in air tight, sealed containers,
food storage bags prior to freezing . Ensure that the
storage containers are dry to prevent the sticking
together.
It is advisable to write the date and time limit of food
being stored on the container to avoid expiration of
the food.
Only de-frost the required amount of food, as frozen
food should not be re-frozen once thawed.
Food is better to be encapsulated before storied in
the freezer to avoid water loss and odor taint.
Warning: Acid, alkali and salt etc., could erode the
internal surface of the freezer. Do not place the food
having these substances (e.g. sea fish) directly on
the internal surface. Salt water in the freezer should
be cleaned in time.
Do not exceed the storage time(s) recommended by
the food manufacturers for any kind of food and
particularly for commercially quick-frozen food in the
freezer.
English
Instruction for use
Then continue as follows
a) We recommend you place fresh foods in the prefreezing compartment at the side
(I)
(not all models are
equipped) or on the bottom of the freezer. This is the
coldest part.
Avoid placing fresh foods directly in contact with deep
frozen food. Deep frozen food could defrost and may
not outlast the foreseen storage time.
.
c) If available, switch on the SUPER FREEZE
b) The capacity of the freezer,as shown on the rating
plate,shoud not be exceeded
SWITCH
(FIG.4)
(not absolutely necessary when
filling in already frozen (e.g. deep-frozen food)
items.
d) After 24 hours, move deep-frozen goods from the
freezer bottom or the pre-freeze shelf to a hung
basket
(K),
so that the pre-freeze shelf or freezer
bottom are available for freezing additional fresh
foods.
e) Turn off the SUPER FREEZE SWITCH (yellow
light goes off).
f) Set the temperature control to one of the
appliance’s relevant filling capacities (
see
“Maximum stacking height”).
g) Keep the temperature in the storage shelf (E)
under control, preferably by placing a thermometer
with a scale range of up to –26°C.
The storage
temperature must always be at least -18°C.
Refilling of fresh food (not frozen)
Make sure that you re-fill fresh food, in quantities
adequate to the freezing capacity (XXkg/24h) earliest
24 hours after the previous filling.
Super switch should be turned on at least 24hours
in advance when a mass of hot load released,
then it should be switch off.
(do not exceed maximum stacking height)
7 Maximum stacking height
To ensure correct storage of frozen food, never fill the
storage shelf
(E)
up to the edge. Always allow space
between the lid and the frozen foods.
The largest capacity can reach to the part under the lid.
Set the temperature control
(FIG.4)
strictly according to
the filling capacity.
To save energy when operating in normal ambient
temperature (+18 to + 22°C), we recommend the
following settings for the temperature control:
Capacity
Stacking mark Setting
pos.
Full upper 12,00 h
Half full medium 10.00 h
1/4 or less lower 08.00 h
Useful tip for food storage
Page 16

English
Instruction for use
4
8 Storage time
The storage time for purchased deep-frozen products
varies and depends on the type of product and its
packaging. Therefore, strictly observe the producer’s
instructions on the packaging.
For fresh food that you like to deep freeze, consult the
storage table
at the back of this user manual.
After being defrosted, food must be consumed
immediately but latest within the next 24 hours.
9 Cleaning and maintenance
For the upkeep of the external appearance of your
appliance, now and again clean with furniture polish or
other enamel protecting product (never, on any
account, use it in the inside. Clean the seal
(B)
with
warm water now and again without using any cleaning
product.
If your appliance has a condenser
(R)
in the rear inside,
from time to time remove dirt and dust. Dust and dirt
impede the release of heat from the inner compartment
and considerably increases consumption of energy.
For best results, use a light brush or duster to remove
dust from the condenser on the rear wall.
If you leave your appliance out of use for an extended
period (e.g. when on holidays), leave it open to prevent
odours building up inside. For appliances with locks:
when the chest lid is open, always set the lock in
“closed” position and keep the key well away from small
children to prevent accidents.
Care is required with regard to frozen food in storage
in the event of an extended non-running of the freezer
(interruption of power supply or failure of the refrigerating
system). A rise in temperature of the frozen food could
shorten the storage life.
When
ice and frost layers
form on the inner walls up
to a certain thickness, they act as an insulation element
and prevent the coldness being released from the inner
walls. They must be removed from time to time.
To remove ice from the inner walls, use a plastic or
wood scraper without sharp edges.
Cover the frozen food with a cloth which aids to collect
the scraped ice and enables a simple removal.
10 Defrosting
Under normal conditions (3 to 4 openings per day) the
freezer must be defrosted once or twice a year (more
often in other cases).
Proceed as follows:
1.
Make absolutely sure that you remove the plug
from the power socket.
2. Dry your hands thoroughly to prevent skin damage
by contact with ice (it is advisable to use gloves).
3. Remove all frozen food from the freezer,
roll it
firmly in newspaper
, put it into the container,
place the container in a cool, dry room.
4. Lift the divider
(H)
(not all models are equipped)
upwards out of the guide-rail of the freezer.
5.
Use the divider (so far as provided) as a defrosting
dish and push it on the side under the freezer –
where the defrosting water drain-plug is located.
7. As previously described, scrape the thickest ice
carefully from the freezer inside and put it into the
kitchen sink. for defrosting.
large pot of warm (not too hot) water in the freezer
10. Wipe the freezer with an absorbent cloth
thoroughly dry and allow to air for about 3 to 4
minutes.
11. Replace the drain-plug (if provided)
12. Empty the dry defrosting water dish (if provided)
and slide it into the guide rails of the freezer.
13. Close the freezer door,replace the plug in the
cosket and turn the freezer on.
14. Set the temperature control (FIG.1) to maximum
setting (green and red lamps go on) and switch
on the SUPER FREEZE SWITCH(FIG.4)(if
provided)(yellow lamp lights additionally).
To prevent frozen food from defrosting, carry out steps
from 1 to 17 within max. two hours.
In this courseˈa rise in temperature of the frozen food
would shorten the storage life.
8. If necessary, speed up defrosting by placing a
9. Thoroughly clean the inside(compartment).rinse it
with warm water.
15. Now re-fill the frozen food – the oldest items at the
top.
16. When the red light goes off, reset the temperature
control to a as per the filling capacity suitable
storage temperature.
17. Switch off the SUPER FREEZER SWITCH (if
provided) after about 8 to 12 hours or, latest
after 24 hours (the yellow light goes off).
6. If applicable to the freezer you have purchased,
pull out the plug for the drainage hose loacted at
the bottom of the freezer. If you do not have a
drainage hose then you must wipe away the
excess water with a sponge.
Page 17

English
Instruction for use
5
11 Interior light
(not provided in all models)
A switch is built into appliances equipped with lighting.
When the appliance is opened the light goes on
automatically and switches off automatically when
closed.
The lamp is protected with a transparent cover.
Strictly use
15 W max
. replacement bulbs.
12 Resolving faults on your own
Attention
The compressor
(M)
(also known as motor) must not
operate continuously.
It is controlled by the thermostat which you set with the
temperature control
(FIG.4)
.Itswitcheson
automatically when the set temperature in the storage
compartment exceeds and switches off automatically
when the correct temperature is reached again.
Calling the Customers Support Service
Therefore first check under
“Trouble shooting”
13 After-sales service
Consult the enclosed guarantee card or the separately
enclosed after-sales centres list, to see which company
is responsible for servicing your appliance. If several
after-sales centres are mentioned on the list, select the
nearest one to you.
If no after-sales service centres list is enclosed with
your appliance, contact your dealer.
If you suspect any fault, before contacting the approved
after-sales service directly or via your dealer, make sure
you have observed all instructions and advice in this
user manual.
High quality manufacturing processes and use of latest
cooling and freezing technology will principally ensure
trouble-free function of your appliance.
To replace the light bulb,first remove the two shadefastening screws,then unscrew the troubled bulb by
turning counterclock wise and replace with a new one of
the same specification,and then remount the shade and
fasten it up with the screws.
Repairs by the approved after-sales service,centre/agent of
faults that have occurred because of non-adherence to the
information and advice given in this manual,will be charged to
the customer and are not covered by your dealer’s guarantee.
Call the approved after-sales service only, if after analysis of possible trouble/fault factors you cannot find any
cause for the defect or do not have the means to
eliminate the trouble.
In unheated rooms and in cold weather condition
condensation can build up on the outer walls of the
appliance. This does not mean trouble and disappears
when the weather becomes warmer.
Noise can be heard from all compressor – cooling
system when the compressor is switched on. This noise
is produced when the motor in the compressor operates
and also by refrigerant flowing in the cooling system
circuit. These noises are normal and do not indicate
any functional trouble.
Page 18
6
In order to receive immediate help, make sure you have
ready the following essential data to identify your
appliance:
Brand of appliance
Model / Type
Kind of trouble
Date of purchase
Purchased from whom?
14 Guarantee
Please note the general guarantee terms and the
guarantee period are stated in the attached guarantee
card.
If the appliance documentation does not include a
guarantee card, please contact your dealer.
15 Trouble shooting
a) No function (appliance not running)
Attention!
b) Appliance not cooling sufficiently
Freezing process too long
Compressor operating too often
Possible causes/Remedies:
Is the plug in good condition and is it properly
plugged into the socket?
Is the socket under current?
The lid of the appliance does not close properly.
The seal does not firmly press.
Test: place a piece of writing paper between the seal
and the edge of the chest, and close the lid. It should
be difficult to pull out the paper from any side. If you
can pull out the paper without any resistance from one
ore more sides, notify your approved after-sales service
centre.
Heavy ice formation on the inner walls.
(see “cleaning and maintenance”)
The appliance is exposed to direct sunlight or is
installed near a heat source (oven, radiator, etc.)
Protect the appliance against direct sunlight; check the
distance to the heat source; place isolating (see “
Installation (Choice of position for installation”)
The filling of food does not correspond with the
excess freezing capacity of your appliance (see
rating plate: XXkg/24h), or you did fill in too warm
food
(see:
” Refilling of fresh food”
).
The manufacturer works constantly at the further
development of all products. Please therefore bear this
in mind as the form, set up and technology are subject
to change, without prior notice.
English
Instruction for use
In the event of problems or of a power failure, the
insulation of the appliance walls provides 10 to 12
hours storage time after the beginning of such failures.
If the power failure or fault should contiue over the
10-12hr period, it is advisable to remove food and
place within another freezer
The freezer may not have permitted its stnading idle perid
as stated in the start up sention on the manual.This may be
resolved by: turning off the freezer and un-plugging it.Lift
the unit up and the replace it back down and allow to stand
for 2 hours before tunring it back on.Do not open the freezer
durring this 2 hour period and for a further 12 hour period
thereafter.
Page 19
2-3 4 6 8 10-12
Mincemeat > Polyethylene freezer bag >
z
Sausages > Polyethylene freezer bag >
z
Small fish > Polyethylene freezer bag >
z
Heart / liver > Polyethylene freezer bag >
z
Ice cream > Plastic container >
z
Fruit > Plastic container >
z
Cheese > Polyethylene freezer bag >
z
Bread > Polyethylene freezer bag >
z
Large fish > Polyethylene freezer bag >
z
Cake / biscuits > Glass container >
z
Pork > Aluminium foil >
z
Beef > Aluminium foil >
z
Rabbit > Aluminium foil >
z
Lamb > Aluminium foil >
z
Mushrooms > Polyethylene freezer bag >
z
Asparagus > Polyethylene freezer bag >
z
Vegetables (cut) > Polyethylene freezer bag >
z
Strawberries > Polyethylene freezer bag >
z
Flans > Aluminium foil >
z
Chicken > Aluminium foil >
z
Turkey > Aluminium foil >
z
Duck > Aluminium foil >
z
Goose > Aluminium foil >
z
Cauliflower > Polyethylene freezer bag >
z
Beans > Polyethylene freezer bag >
z
Pepperoni > Polyethylene freezer bag >
z
Preserves > Glass container >
z
Preserved fruit > Glass container >
z
Ice lollies > Aluminium foil >
z
approx. storage time in months
English
Fresh food Suitable packaging
STORAGE TABLE
GB
7
Page 20

English
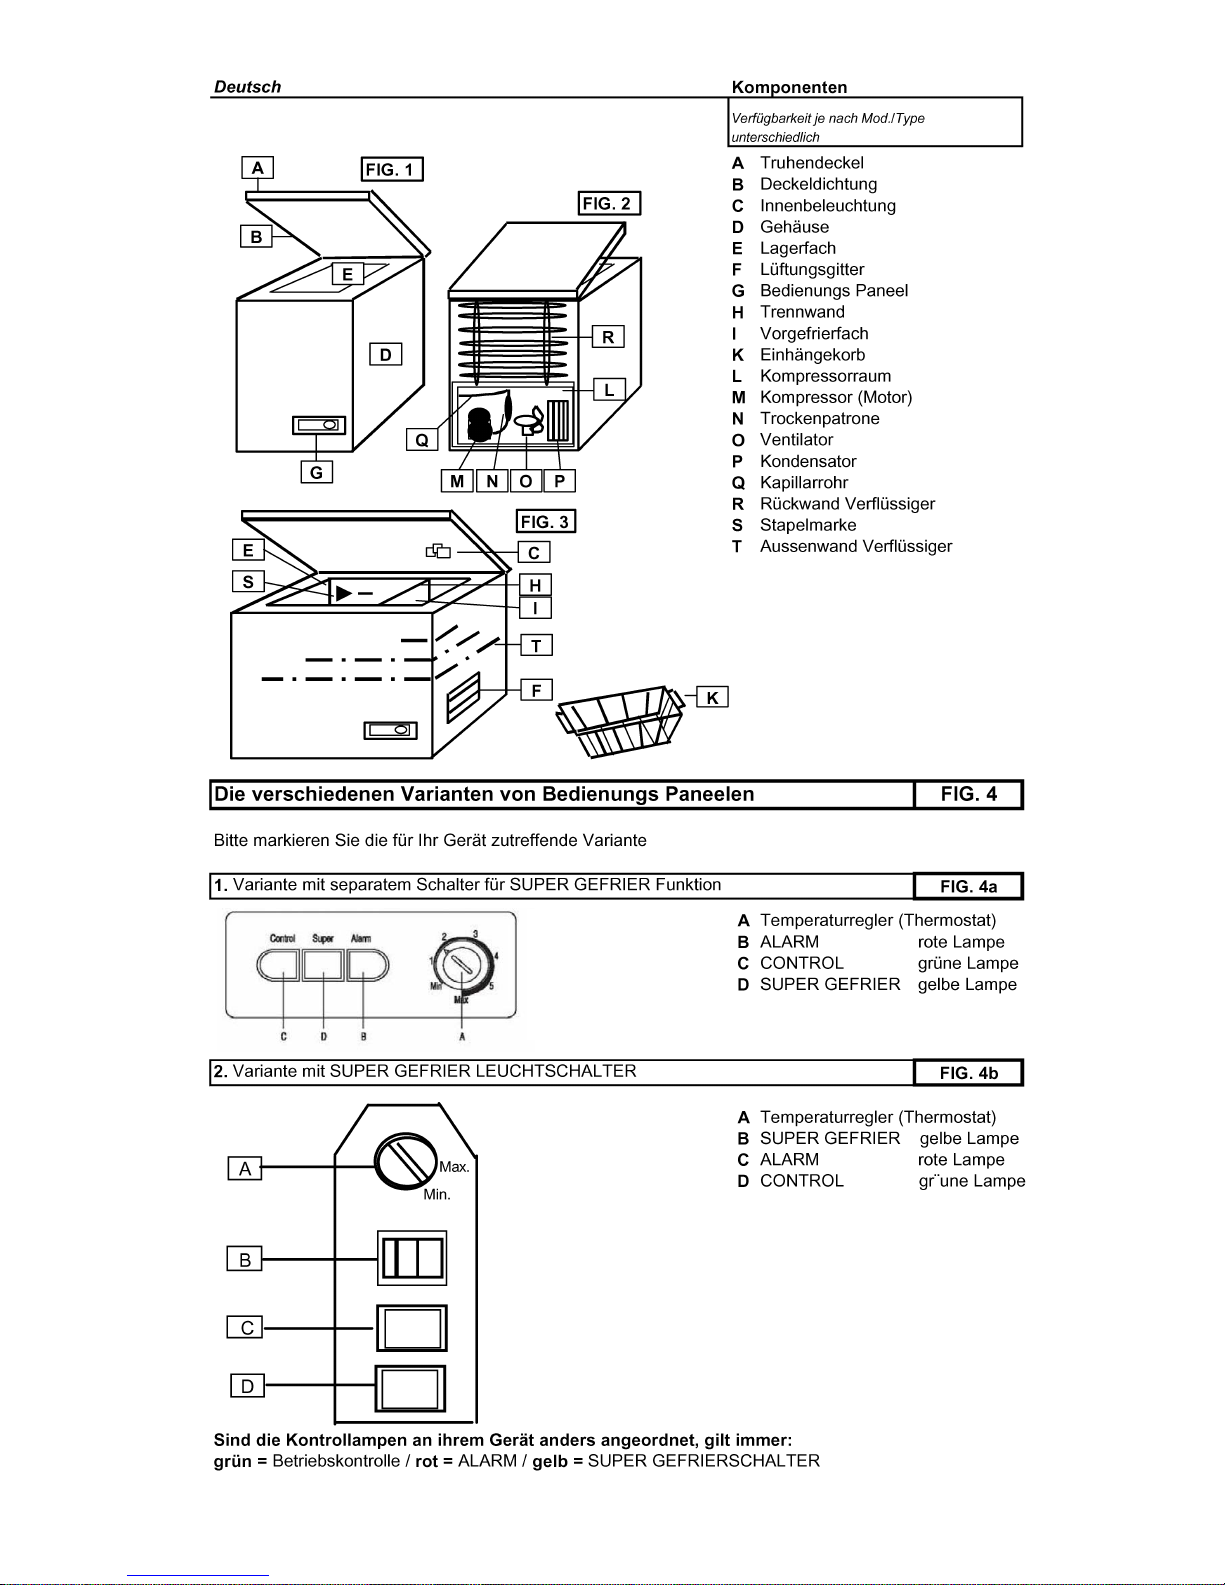
Components
Availability depending on Mod./Type
A
Chest lid
B
Lid seal
C
Interior light
D
Housing
E
Storage shelf
F
Ventilation grille
G
Control panel
H
Divider
I
Pre-freeze shelf
K
Hanging basket
L
Compressor chamber
M
Compressor (motor)
N
Drying filter
O
Fan
P
Condenser
Q
Capillary tube
R
Rear-wall condenser
S
Stacking mark
T
Outer-wall condenser
4.GIFsnoisrevlenaplortnoC
Please underline the appropriate version for your appliance
1st vers a4.GIFnoitcnufEZEERFREPUSrofhctiwsetarapeshtiwnoi
A
Temperature control (Thermostat)
B
ALARM red light
C
CONTROL green light
D
SUPER FREEZE yellow light
E
SUPER SWITCH separate
2 b4.GIFHCTIWSTHGILEZEERFREPUShtiwnoisrev
dn
A
Temperature control (Thermostat)
B
SUPER FREEZE yellow light
C
ALARM red light
D
CONTROL green light
If the indicator-lights on your appliance are laid out in a different way, the following always apply:
green = appliance operating; red = ALARM; yellow = SUPER FREEZE ON
L
M N O P
Q
R
A
B
D
E
G
K
C
E
S
T
F
H
I
FIG. 3
FIG. 2
FIG. 1
A
E
Min. Max..
B
D C
A
Min.
Max..
C
B
C
D
Page 21

1
Page 22

Mode d’emploi
Vous trouverez ci-dessous toutes les indications
importantes se rapportant à l’utilisation de l’appareil.
Les instructions du mode d’emploi concernent divers
modèles. C’est pourquoi des différences de détails
peuvent exister selon le type d’appareil.
1 Choix de l’emplacement d’installation
Éviter absolument les températures élevées et les rayons
du soleil. Nous vous conseillons d’installer votre appareil
dans un endroit frais, bien aéré et sec. L’installer à
proximité d’une source de chaleur (chauffage, four, etc.)
est absolument déconseillé (cela provoque une
surcharge du compresseur entraînant une consommation
d’énergie sensiblement plus élevée).
Si vous ne pouvez le placer autrement qu’à proximité
d’une source de chaleur, nous vous conseillons de fixer
une plaque isolante adéquate entre l’appareil et la source
de chaleur (ne pas utiliser de plaques en amiante) ou de
respecter les distances minimales suivantes :
À la cuisinière à gaz ou électrique
3 cm
Au radiateur du chauffage ou du four
5 cm
À la paroi, un meuble ou un autre
2 cm
réfrigérateur
Ne jamais obstruer la grille d’aération
Les congélateurs horizontaux de grandes taille sont
équipés d’une grille d’aération
(F)
dans la position
latérale inférieure. Les congélateurs peuvent être placés
directement contre une paroi ou un meuble, mais pas du
côté de la grille d’aération.
Congélateurs sans grille d’aération
Respecter une distance suffisante entre l’arrière du
congélateur et la paroi, de sorte que l’air chauffé
s’échappe librement.
L’appareil doit être posé horizontalement sur un sol plat.
Ce n’est qu’ainsi que l’on pourra garantir une circulation
adéquate du réfrigérant et donc le fonctionnement
optimal de l’appareil.
ATTENTION !
Laisser reposer l’appareil à sa place d’installation
définitive au moins 2 heures avant de le brancher,
afin que le circuit de réfrigération se stabilise et
d’éviter d’éventuels problèmes de fonctionnement.
L’odeur dégagée par tous les appareils neufs s’élimine
facilement.
Pour cela, lavez soigneusement l’intérieur de l’appareil à
l’eau tiède additionnée de
vinaigre
.
Ne pas utiliser de produits corrosifs, de détergents
agressifs, en poudre ou à base de carbonate ou
bicarbonate de sodium.
Avant de brancher l’appareil, le compartiment interne doit
être absolument sec, notamment dans les coins.
Avertissements concernant la sécurité
Suivant sa composition, le réfrigérant s’avère facilement
inflammable. Le circuit du réfrigérant est étanche et sa
densité
a été vérifiée à plusieurs reprises.
Les interventions effectuées par un personnel non
qualifié comportent un sérieux danger d’incendie.
S’abstenir de toute contrainte mécanique sur le système
réfrigérant, notamment les composants ci-dessous
accessibles dans le compartiment du compresseur
(L)
:
Arrière du condensateur (R)
Compresseur (P)
(
moteur)
Tube capillaire (Q)
Filtre de séchage (N)
Les interventions sur le système réfrigérant doivent être
faites uniquement par du personnel qualifié agréé.
ATTENTION !
Les projections de réfrigérant peuvent causer des
dommages aux yeux.
Si les yeux devaient être atteints par du réfrigérant, les
laver immédiatement à l’eau courante et consulter
immédiatement un oculiste
2 Plaquette d’homologation
La plaquette d’homologation mentionnant les données
techniques est fixée dans le logement
(D)
à l’arrière de
l’appareil.
Copier les données techniques
C’est ici qu’il faut recopier les données techniques de la
plaquette d’homologation pour en disposer à tout
moment sans devoir déplacer l’appareil.
Modèle/Type n° …………………………………
Capacité nette....................................litres
Tension de service .............................V 50 Hz
Puissance maximum (W)...................Watt
Fusible
(A)
.........................................ampère
Consommation énergétique................kWh/24h
Capacité de congélation.....................kg/24h
3 Connexion électrique
Votre appareil doit être branché exclusivement à une
prise munie d’une mise à la terre, installée
convenablement par un électricien agréé.
Avant d’enfoncer la fiche de l’appareil dans la prise,
vérifier impérativement que la tension (V) reportée sur la
plaquette d’homologation de l’appareil correspond à celle
de votre réseau électrique.
Dans le cas contraire, consulter immédiatement le
service après-vente compétent ou le revendeur agréé
et s’abstenir absolument de brancher l’appareil sur le
réseau.
4
Régulateur de température (thermostat)
(FIG. 4)
Pour que le réglage de la température ne puisse être
changé par mégarde, le régulateur a été spécialement
conçu pour être difficilement commutable. Pour le régler,
nous vous conseillons d’utiliser une pièce de monnaie ou
un tournevis.
Connexion
: tourner le régulateur vers la droite>.
Suivant les besoins, régler la température entre :
-
minimum
(réfrigération minimum).
-
maximum
(température la plus basse).
Le réglage de la température doit être proportionnel :
-
À la température à l’emplacement de l’appareil ;
-
À la quantité d’aliments mis dans l’appareil ;
2
Page 23

-
À la fréquence d’ouverture de l’appareil.
Nous vous conseillons de choisir une température
moyenne.
Vous pourrez rapidement, par une observation précise,
établir vous-même le meilleur réglage correspondant à
vos besoins.
5 Voyants lumineux
(FIG. 4)
Si votre appareil est équipé de voyants lumineux, voici
leur signification :
-
vert
= CONTROL (contrôle)
L’appareil est relié au secteur et
fonctionne.
Le voyant
vert
doit toujours être allumé lorsque l’appareil
est raccordé à l’alimentation électrique et qu’il est
branché. Ce voyant est particulièrement important,
puisqu’en cas de chutes de tension, les voyants rouge
et jaune ne fonctionnent plus et ne peuvent donc rien
signaler.
-
rouge
= ALARM (alarme)
Température intérieure trop élevée
Si le voyant rouge reste allumé, ce peut être pour
diverses raisons :
Première mise en fonction de l’appareil ;
Remise en fonction après le dégivrage ;
Introduction d’aliments frais.
Dans ces cas, si le voyant rouge reste allumé, c’est
normal. Le voyant s’éteindra automatiquement
lorsque la température intérieure atteint environ –15°C.
Si l’appareil en est équipé, enclencher l’interrupteur de
SUPER-CONGÉLATION
(FIG. 4).
(Le déconnecter au
maximum après 24 heures ou une fois le voyant rouge
éteint).
Dans tous les cas, n’ouvrir si possible l’appareil qu’une
fois le voyant rouge éteint.
Cependant, si le voyant rouge reste encore allumé après
12-24 heures, il est possible qu’une vraie panne se soit
produite.
Se rapporter pour cela au chapitre :
«
Détection des pannes/causes/remèdes »
à la fin de ce
mode d’emploi.
-
jaune
=INTERRUPTEUR DE SUPER-
-
CONGÉLATION
Lorsque qu’il est enclenché, le thermostat
est mis hors fonction.
Le compresseur produit sa fonction de refroidissement
jusqu’à ce que l’interrupteur de SUPER-CONGÉLATION
soit à nouveau déclenché.
6 Alarme sonore
Si l’appareil en est équipé, une alarme sonore se fait
entendre en plus du voyant rouge qui s’allume. Elle se
déconnecte automatiquement une fois l’interrupteur de
SUPER-CONGÉLATION enclenché.
7 Mise en fonction de l’appareil
1. Déballer complètement l’appareil.
2. Enlever les parties en polystyrène du compartiment
du compresseur (si c’est le cas).
3. Sortir toute la documentation du compartiment
interne de l’appareil, ainsi que les accessoires
éventuellement présents.
4. Nettoyer le compartiment interne à l’eau tiède
additionnée de vinaigre et essuyer soigneusement
avec un chiffon.
5. Fermer l’appareil.
6. Mettre la fiche dans la prise.
7. Brancher l’appareil en tournant le régulateur de
température sur la droite
(FIG. 4)
(tourner d’abord le
régulateur à l’extrême droite en position maximale).
(Les voyants vert et rouge s’allument)
.
8. S’il y en a un, enclencher l’interrupteur de
SUPER-CONGÉLATION
(
le voyant jaune
s’allume
)
.
9. Ne pas ouvrir l’appareil pendant environ 4 heures ou
jusqu’à ce que le voyant rouge soit éteint, pour que
le compartiment interne soit suffisamment refroidi.
10. Vous pouvez maintenant remplir le congélateur
d’aliments déjà congelés à –18 °C (aliments achetés
congelés). (Voir chapitre « Hauteur maximum
d’empilage »).
11. Au plus tard après 24 heures, déconnectez à
nouveau l’interrupteur de SUPER-CONGÉLATION.
12. Si vous souhaitez congeler des aliments frais, pas
encore congelés, procédez comme indiqué au
chapitre «
Congélation/conservation des aliments
frais ».
Attention !
Ne pas congeler de bouteilles contenant des boissons.
Le liquide se dilate durant la congélation et la bouteille
pourrait éclater.
Ne jamais conserver de récipients contenant des
substances explosives (allume-gaz, essence, éther etc.)
dans le compartiment de l’appareil.
En cas de conservation de produits congelés, suivre
absolument les instructions du fabricant figurant sur leur
emballage.
Glaces et glaçons ne doivent être consommés congelés
que quelques minutes après avoir été sortis de l’appareil,
pour éviter de se blesser les lèvres et la langue (brûlure
de la peau). Pour la même raison, éviter de toucher les
parois internes glacées avec les mains mouillées. Nous
vous conseillons de consommer immédiatement les
produits décongelés ou à moitié
décongelés. La re congélation est en principe
déconseillée.
8 Congélation / Conservation des aliments frais
Presque tous les produits frais peuvent être congelés et
conservés dans votre appareil. C’est pourquoi nous
avons indiqué un tableau des produits les plus
fréquemment congelés en indiquant les durées de
conservation possibles et le matériau d’emballage
préférable (voir «
Tableau de conservation »
dans les
présentes instructions de ce mode d’emploi)
Avant de les mettre dans l’appareil,
marquer
les
emballages des divers produits frais, car en cas d’emploi
de sachets plastique transparents les aliments congelés
sont difficilement reconnaissables.
À ce propos, nous vous conseillons d’utiliser les
étiquettes pour produits congelés que l’on trouve dans le
commerce.
Envelopper les produits frais dans des sachets adéquats,
en les divisant en portions que vous avez l’habitude
d’utiliser, pour éviter de décongeler de grosses quantités
que vous ne consommeriez pas en une journée.
Identifier les portions en marquant au moins les
informations suivantes :
Nom du produit (par exemple : filet de bœuf) ;
3
Page 24

Poids de la portion ;
Quantité (
nombre de pièces) ;
Date de congélation ;
Date de consommation (voir «
Tableau de
conservation »
).
Puis procéder comme suit :
a) Placer si possible les aliments frais dans le
compartiment de pré-congélation latéral (1) (pas sur
tous les modèles) ou au fond du congélateur où
règne la température la plus basse.
À ce propos, éviter tout contact en plaçant les aliments
frais et ceux déjà congelés, sinon ils pourraient se
décongeler et la durée de conservation prévue ne serait
plus valable.
b) Dans les 24 heures, mettre les produits de manière à
n’atteindre que la quantité d’aliments frais adéquate
à la capacité de congélation de votre appareil. Se
reporter aux données mentionnées sur la plaquette
d’homologation
(xx kg/24h
).
c) S’il y en a un, enclencher l’interrupteur de SUPER-
CONGELATION
(FIG. 4)
(pas obligatoire si l’on
introduit des aliments déjà congelés (par exemple :
produits congelés).
d) 24 heures plus tard, retirer les produits congelés du
fond du congélateur ou du compartiment de précongélation et les mettre dans un panier
(K)
, de
sorte que le compartiment de pré-congélation ou le
fond du congélateur servent à congeler d’autres
aliments frais.
e) Déconnecter l’interrupteur de SUPER-
CONGELATION (le voyant jaune s’éteint).
f) Régler le régulateur de température selon le degré
de remplissage de l’appareil (voir «
Hauteur
maximale d’empilage »
).
g) Surveiller si possible la température du
compartiment de conservation
(E)
au moyen d’un
thermomètre mesurant les températures jusqu’à –
26°C.
La température de conservation doit toujours
être au minimum de –18 °C.
Remplissage d’aliments frais
(non congelés)
Veiller à ce qu’au plus tôt 24 heures après avoir mis des
aliments frais, l’on puisse ajouter la quantité adéquate à
la capacité de congélation (xx kg/24h) de votre appareil.
(
Ne pas dépasser la hauteur d’empilage maximum
).
9 Hauteur maximale d’empilage
Pour garantir une conservation optimale des produits
congelés, nous vous recommandons de ne jamais
remplir le compartiment de congélation
(E)
jusqu’à la
ligne supérieure. Toujours prévoir un certain espace
entre le couvercle et les produits congelés.
Régler toujours le régulateur de température
(FIG. 4)
selon la quantité remplie.
À température ambiante normale (entre +18 °C et + 22
°C), nous vous recommandons de placer le régulateur
de la température dans les positions ci-dessous pour
économiser l’énergie :
Capacité
Marque d’empilage Position
Plein Dessus Sur 12h.
À moitié plein Milieu Sur 10h.
Un quart plein, ou
moins
Bas Sur 8h.
10 Durée de conservation
La durée de conservation des produits pré-congelés
diffère beaucoup selon le type d’aliment et sa
composition. À ce propos, respecter les instructions du
producteur se trouvant sur l’emballage du produit.
Quant aux aliments frais que vous congelez vousmêmes, respectez les indications du
tableau de
conservation
dans ce mode d’emploi.
Il faut consommer immédiatement les produits déjà
décongelés une fois.
Consommer les produits décongelés dans les 24 heures.
11 Mesures de sécurité et conseils
À chaque nettoyage ou dégivrage, débrancher votre
appareil.
Ne pas ouvrir le couvercle du congélateur juste
après l’avoir fermé, et ne pas l’ouvrir trop fortement.
Un éventuel vide sur la garniture
(B)
disparaît après
1-2 minutes, le couvercle peut ainsi être ouvert à
nouveau normalement.
Laisser refroidir les aliments cuisinés à la
température ambiante, pour éviter la formation de
condensation et de glace dans l’appareil.
Laisser le couvercle du congélateur ouvert le moins
longtemps possible, pour ne pas gaspiller de
courant et éviter la formation de glace superflue
dans l’appareil.
Au cas où le voyant rouge s’allumerait de façon
inattendue
ou plus longtemps que d’habitude, n’ouvrez en
aucun cas l’appareil, mais prenez les mesures
nécessaires (voir chapitre «
Détection des
pannes/causes/remèdes »
).
Ne jamais employer de tournevis ou à autres outils
métalliques pour enlever la couche de glace. Les
parois intérieures sont très sensibles et ne
supportent pas le contact avec des objets pointus.
Se servir exclusivement de grattoirs en plastique ou
en bois non pointus.
12 Nettoyage et entretien
Pour conserver à votre appareil un aspect soigné même
à l’extérieur, utilisez de temps en temps un produit à polir
les meubles ou un produit pour objets vernis (ne jamais
s’en servir à l’intérieur du
congélateur). Nettoyer de temps en temps le joint
(B)
à
l’eau chaude sans utiliser de détergent.
Si votre appareil est muni d’un condensateur sur la paroi
derrière
(R)
, en enlever de temps en temps la saleté et la
poussière qui pourraient empêcher l’évacuation de la
chaleur du compartiment interne et augmenter
sensiblement la consommation d’énergie. Nous vous
recommandons d’utiliser une brosse souple ou un balai
pour nettoyer le condensateur.
En cas de mise hors service de l’appareil pendant une
longue durée (vacances, etc.), le laisser ouvert pour
éviter la formation de mauvaises odeurs à l’intérieur.
Pour les appareils à serrure : mettre la serrure sur
« fermé » et maintenir le couvercle du congélateur levé.
Garder la clé hors de portée des enfants pour éviter tout
accident durant leurs jeux.
4
Page 25

5
Page 26

6
Page 27

2-3 4 6 8 10-12
Viande hachée >
Sachet de congélation en polyéthylène
>
z
Saucisses >
Sachet de congélation en polyéthylène
>
z
Petits poissons >
Sachet de congélation en polyéthylène
>
z
Coeur / foie >
Sachet de congélation en polyéthylène
>
z
Crème glacée > Récipient en plastique > z
Fruits > Récipient en plastique >
z
Fromage >
Sachet de congélation en polyéthylène
>
z
Pain >
Sachet de congélation en polyéthylène
>
z
Gros poissons >
Sachet de congélation en polyéthylène
> z
Gâteau / biscuits > Récipient en verre >
z
Porc > Papier d'aluminium >
z
Boeuf > Papier d'aluminium >
z
Lièvre > Papier d'aluminium >
z
Agneau > Papier d'aluminium >
z
Champignons >
Sachet de congélation en polyéthylène
>
z
Asperges >
Sachet de congélation en polyéthylène
>
z
Légumes (coupés) >
Sachet de congélation en polyéthylène
>
z
Fraises >
Sachet de congélation en polyéthylène
>
z
Tartes > Papier d'aluminium >
z
Poulet > Papier d'aluminium >
z
Dindonneau > Papier d'aluminium >
z
Canard > Papier d'aluminium >
z
Oie > Papier d'aluminium >
z
Chou-fleur >
Sachet de congélation en polyéthylène
>
z
Haricots >
Sachet de congélation en polyéthylène
>
z
Peperoni >
Sachet de congélation en polyéthylène
>
z
Conserves > Récipient en verre >
z
Fruits en conserve > Récipient en verre >
z
Esquimaux > Papier d'aluminium >
z
Durée appr. de conservation (mois)
Français
Aliments frais Emballage approprié
TABLEAU DE CONSERVATION
F
7
Page 28

Français
Composants
Les c ompos ants illustrés peuvent ou
non être installés , selon les modèles .
A
Couvercleducongélateur
B
Garniture du couvercle
C
Eclairage intérieur
D
Boîtier
E
Compartiment de conservation
F
Grille de ventilation
G
Panneau de commande
H
Clois on
I
Compartiment de pré-congélation
K
Panier
L
Compartiment du compresseur
M
Compresseur (moteur)
N
Filtre de séchage
O
Ventilateur
P
Condensateur
Q
Tube capillaire
R
Arrière condensateur
S
Marque d’empilage
T
Paroi externe du condensateur
Variantes dans les panneaux de commande
FIG.4
Prière De marquer les variantes c oncernant votre appareil.
1ère variante avec interrupteur séparé pour fonction super-congélatio a4.GIFn
A
Régulateur de température (thermostat)
B
eguortnayoVMRALA
C
CONTROL (en marche) Voyant
vert
D
Indicateur de super-congélation Voyant jaune
E
Interrupteur de super-congélation s éparé
b4.GIFnoitalégnoc-repusedruetpurretnicevaetnairave2
A
Régulateur de température (thermostat
B
Interrupteur de super-congelation Voyant jaune
C
eguortnayoV
MRALA
D
CONTROL (en marche) Voyant vert
Si les voyants sont disposés autrement sur votre appareil, ce qui suit reste valable :
voyant v ert = contrôle du fonctionnement / voyant rouge = alarme / voyant jaune = fonct ion de super-congélation
L
M N O P
Q
R
A
B
D
E
G
K
C
E
S
T
F
H
I
FIG. 3
FIG. 2
FIG. 1
A
E
Min. Max.
B
D C
D
A
Min.
Max.
C
B
8
Page 29

1
Page 30

Istruzioni per l’uso
Qui di seguito troverete tutte le indicazioni importanti ai
fini dell’utilizzo dell’apparecchio.
Le presenti istruzioni per l’uso sono valide per vari
apparecchi e quindi possono emergere differenze di
particolari a seconda del tipo e modello di apparecchio
acquistato.
1 Installazione (Scelta del luogo)
Evitare assolutamente temperature ambiente elevate e
l’irraggiamento solare diretto.
Il luogo ideale per l’installazione del Vostro apparecchio è
un locale fresco, ben aerato e secco. L’installazione nelle
immediate vicinanze di una fonte di calore
(riscaldamento, forno, ecc.) è molto sfavorevole
(sovraccarico del compressore e conseguentemente
consumo energetico notevolmente maggiore).
Se non è possibile trovare un luogo d’installazione
diverso da quello in prossimità di una fonte di calore, si
consiglia di sistemare una piastra isolante idonea tra
l’apparecchio e la fonte di calore (non utilizzare piastre in
amianto) oppure di mantenere almeno le seguenti
distanze:
dalla cucina a gas o elettrica
3 cm
dal radiatore del riscaldamento o
dal forno, ecc.
5cm
dalla parete, mobile o altro apparecchio
2 cm
Non ostruire mai la griglia di ventilazione
I congelatori orizzontali di grandi dimensioni dispongono
di una griglia di ventilazione
(F)
nella posizione laterale
inferiore. I congelatori possono essere sistemati con
griglia di ventilazione rivolta verso il lato opposto alla
parete o al mobile contro i quali sono direttamente ubicati.
Congelatori senza griglia di ventilazione
Mantenere una distanza sufficiente tra il retro del
congelatore e la parete, in modo che l’aria riscaldata
possa fuoriuscire senza impedimenti.
L’apparecchio deve essere ubicato orizzontalmente su di
un fondo livellato. Solo in questo modo è possibile
garantire una circolazione priva di ostacoli del gas
refrigerante e, conseguentemente, il funzionamento
ottimale dell’apparecchio.
ATTENZIONE!
Lasciare l’apparecchio nella posizione d’installazione
finale per almeno 2 ore prima di collegarlo, in modo
che il gas refrigerante in circolo si stabilizzi e per
evitare possibili anomalie di funzionamento.
L’odore emanato da tutti gli apparecchi nuovi viene
eliminato facilmente.
A questo scopo, lavare a fondo l’interno dell’apparecchio
con acqua tiepida addizionata di
aceto
.
Non utilizzare detersivi o altri detergenti aggressivi,
granulosi o contenente carbonato di sodio.
Prima del collegamento dell’apparecchio, il vano interno
deve essere completamento secco, soprattutto negli
angoli.
Avvertenze di sicurezza
A seconda della composizione del gas refrigerante,
questo risulta essere facilmente infiammabile. Il circuito
refrigerante è chiuso in maniera ermetica e la sua densità
è stata sottoposta a più prove.
Eventuali interventi non eseguiti a regola d’arte possono
comportare il serio pericolo di incendio. Astenersi da
qualsiasi azione meccanica esercitata sul sistema
refrigerante, in particolare sui seguenti componenti
accessibili nel vano compressore
(L)
.
Condensatore retro (R) o condensatore esterno
Compressore (P)
(motore)
Tubo capillare (Q)
Filtro di essiccazione (N)
Gli interventi sul sistema refrigerante sono ammessi solo
da parte di manodopera qualificata e autorizzata.
ATTENZIONE!
Gli spruzzi di gas refrigerante possono causare danni agli
occhi.
Nel caso in cui gli occhi vengano a contatto col gas
refrigerante, sciacquarli immediatamente sotto l’acqua
corrente e rivolgersi direttamente ad un medico oculista.
2 Targhetta matricola
La targhetta matricola che riporta i dati tecnici è ubicata
sull’alloggiamento
(D)
sul retro dell’apparecchio.
Annotazione dei dati tecnici
Ricopiate qui i dati tecnici della targhetta matricola in
modo che siano disponibili in qualsiasi momento senza
dover spostare l’apparecchio.
Modello/Tipo n. ………………………………….
Capacità netta............................................litri
Tensione d’esercizio..................................V 50 Hz
Valore di collegamento (W)........................Watt
Fusibile
(A)
.................................................ampere
Consumo energetico..................................kWh/24h
Capacità di congelamento..........................kg/24h
3 Collegamento elettrico
Il Vostro apparecchio può essere collegato
esclusivamente ad una presa con messa a terra installata
a regola d’arte da parte di manodopera specializzata e
autorizzata.
Prima di inserire la spina dell’apparecchio nella presa,
assicurateVi assolutamente che la tensione (V) riportata
sulla targhetta matricola dell’apparecchio corrisponda alla
tensione di rete della Vostra abitazione.
In caso contrario, contattate immediatamente il servizio di
assistenza clienti competente o il Vostro rivenditore e non
collegate l’apparecchio alla rete per nessuna ragione.
4 Selezione della
temperatura
(Termostato (FIG. 4)
Affinché l’impostazione del regolatore della temperatura
non possa essere variata inavvertitamente, il regolatore è
stato appositamente concepito in modo che sia
commutabile difficilmente. Per la regolazione si consiglia
di utilizzare una moneta o un cacciavite.
Inserimento:
ruotare il regolatore verso destra.
A seconda delle necessità, impostare la temperatura tra:
-
Min.
(refrigerazione minima) e
2
Page 31

-
Max.
(temperatura più bassa).
L’impostazione della temperatura deve essere
commisurata:
-
alla temperatura dell’ambiente in cui è ubicato
l’apparecchio;
-
alla quantità di alimenti contenuti nell’apparecchio;
-
alla frequenza di apertura dell’apparecchio.
Si consiglia di impostare una temperatura media. In breve
tempo, riuscirete a stabilire con cura l’impostazione
migliore per il Vostro fabbisogno attraverso
un’osservazione precisa.
5 Spie luminose
(FIG. 4)
Se il Vostro apparecchio dispone di spie luminose, queste
avranno i seguenti significati a seconda dell’illuminazione:
-
spia verde
= CONTROL (controllo)
L’apparecchio è collegato all’alimentazione elettrica
ed è
in funzione
.
La spia
verde deve essere sempre accesa
se
l’apparecchio è collegato all’alimentazione elettrica ed è
inserito. La presenza di questa condizione è di
particolare importanza in quanto in caso di cadute di
tensione la spia rossa e la spia gialla perdono la loro
funzione e non possono segnalarVi nulla.
-
rossa
= ALARM (allarme)
Temperatura interna troppo elevata
L’illuminazione della spia rossa può essere provocata da
diverse condizioni, vale a dire:
prima messa in funzione dell’apparecchio;
rimessa in funzione dopo lo sbrinamento;
inserimento di alimenti freschi.
In tali casi, l’illuminazione della spia rossa è normale. La
spia si spegne automaticamente quando la temperatura
all’interno ha raggiunto ca. -15°C.
Inserire (se presente) l’interruttore di
SUPERCONGELAMENTO
(FIG. 4)
.
(Disinserirlo al
massimo dopo 24 ore o quando la spia rossa si è spenta)
In ogni caso, aprire l’apparecchio possibilmente solo
quando la spia rossa si è spenta.
Se tuttavia la spia rossa resta illuminata anche dopo 1224 ore, è possibile che sia presente un guasto vero e
proprio.
A questo scopo, fare riferimento al capitolo:
“Ricerca guasti/Cause/Rimedi”
all’interno delle presenti
-
gialla
= l’interruttore di SUPER-CONGELAMENTO è
inserito e la funzione del termostato è annullata.
Il compressore esercita la sua funzione di raffreddamento
fino a quando l’interruttore di SUPERCONGELAMENTO
viene di nuovo disinserito.
6 Allarme acustico
Nel caso in cui l’apparecchio ne sia dotato, insieme
all’illuminazione della spia rossa viene emesso un
segnale di allarme acustico. Questo si disinserisce
automaticamente se si inserisce l’interruttore di
SUPERCONGELAMENTO.
7 Messa in funzione dell’apparecchio
1. Rimuovere l’apparecchio dall’imballaggio..
2. Rimuovere le parti in polistirolo nel vano
compressore (se presenti).
3. Rimuovere dal vano interno dell’apparecchio tutta la
documentazione e gli accessori eventualmente
presenti.
4. Pulire il vano interno con acqua tiepida addizionata
di aceto ed asciugarlo a fondo con uno straccio.
5. Chiudere l’apparecchio.
6. Inserire la spina nella presa.
7. Mettere in funzione l’apparecchio ruotando verso
destra il regolatore della temperatura
(FIG. 4)
(inizialmente, ruotare completamente il regolatore
verso destra, nella posizione max.).
(La spia verde e la spia rossa si illuminano)
8. Laddove presente, inserire l’interruttore di
SUPERCONGELAMENTO (anche la spia gialla si
accende).
9.
Non aprire l’apparecchio per ca. 4 ore o fino a
quando la spia rossa non si è spenta in modo
che il vano interno possa creare il freddo
necessario.
10. A questo punto è possibile inserire gli alimenti a
congelazione rapida (alimenti comprati già
congelati). (A tale proposito si veda il
capitolo
“Altezza massima di caricamento
”).
11. Al più tardi dopo 24 ore disinserire nuovamente
l’interruttore
di SUPERCONGELAMENTO.
12. Se desiderate congelare alimenti freschi e quindi
non già congelati, procedere come indicato nel
capitolo
“Congelamento/Conservazione di alimenti
freschi”
.
Attenzione!
Non congelare bottiglie contenenti bevande. Il liquido si
dilata durante la fase di congelamento e la bottiglia può
scoppiare.
Non conservare mai recipienti contenenti sostanze
esplosive (accenditori a gas, benzina, etere o similari) nel
vano di congelamento dell’apparecchio.
In caso di conservazione di prodotti di congelazione
rapida occorre assolutamente seguire le istruzioni del
produttore riportate sulla confezione dell’alimento.
Gelati e ghiaccioli devono essere degustati allo stato
congelato solo pochi minuti dopo la rimozione
dall’apparecchio per evitare ferite alle labbra ed alla
lingua (abrasioni epidermiche). Per la stessa ragione,
evitare di toccare le pareti interne ghiacciate con le mani
bagnate.
Si consiglia di consumare immediatamente i prodotti
scongelati o semi-scongelati. In linea generale, se ne
sconsiglia il ri-congelamento.
8 Congelamento/Conservazione di alimenti freschi
Quasi tutti i prodotti freschi possono essere congelati e
conservati nel Vostro apparecchio.
Abbiamo pertanto creato una tabella dei prodotti che
vengono più frequentemente congelati dietro indicazione
dei possibili periodi di conservazione e del materiale di
avvolgimento da preferirsi (si veda
“Tabella di
conservazione”
all’interno delle presenti istruzioni per
l’uso).
Prima di inserirli nell’apparecchio,
identificare
i prodotti
freschi sulle relative confezioni, in quanto - in caso di
3
Page 32

impiego di sacchetti di plastica trasparente - gli alimenti
risultano difficilmente riconoscibili nello stato congelato.
A questo proposito, si consiglia di utilizzare le etichette
per prodotti congelati comunemente in commercio.
Avvolgere i prodotti freschi in confezioni idonee
suddividendoli nelle porzioni che siete soliti utilizzare per
evitare di scongelare grossi quantitativi che non
consumereste nemmeno in un’intera giornata.
Identificare le porzioni riportando almeno le seguenti
informazioni:
nome prodotto (ad es.: filetto di manzo);
peso della porzione;
quantità (numero di pezzi);
data di congelamento;
data di consumo (si veda la ‘
Tabella di
conservazione’
).
Successivamente, procedere come segue:
a) possibilmente, riporre gli alimenti freschi nel vano di
pre-congelamento laterale
(I)
(non presente in tutti i
modelli) o sul fondo del congelatore dove è presente
la temperatura più bassa.
A questo proposito, evitare contatti tra gli alimenti freschi
e quelli già congelati durante l’inserimento, altrimenti i
prodotti congelati potrebbero scongelarsi ed
Il periodo di conservazione previsto non sarebbe più
valido.
b) Entro 24 ore inserire i prodotti in modo da
raggiungere solo la quantità di alimenti freschi
adeguata per la capacità di congelamento del Vostro
apparecchio. Si vedano i dati riportati sulla targhetta
di omologazione
(XX kg/24h)
.
c) Se presente, inserire l’interruttore di
SUPERCONGELAMENTO
(FIG. 4)
(non
obbligatoriamente necessario se vengono inseriti
alimenti già congelati (ad es.: prodotti di congelazione
rapida]).
d) Dopo 24 ore rimuovere i prodotti congelati dal fondo
del congelatore o dal vano di pre-congelamento e
sistemarli in un cestello
(K)
in modo che il vano di
pre-congelamento o il fondo del congelatore possano
essere liberati per il congelamento di eventuali altri
alimenti freschi.
e) Disinserire l’interruttore di SUPER-
CONGELAMENTO (la spia gialla si spegne).
f) Impostare il regolatore della temperatura in una
posizione adeguata per il grado di riempimento
dell’apparecchio (si veda
“Altezza massima di
caricamento”
).
g) Possibilmente, tenere sotto controllo la temperatura
nel vano di conservazione
(E)
mediante l’inserimento
di un termometro che sia in grado di misurare
temperature fino a -26°C.
La temperatura di conservazione deve sempre
equivalere ad almeno -18°C.
Aggiunta di alimenti freschi
(alimenti non congelati)
Aggiungere alimenti freschi non congelati solo dopo
essersi assicurati che la presenza totale di alimenti
freschi nell’arco delle 24 ore, non superi mai la quantità
idonea per la capacità di congelamento (XX kg/24h) del
Vostro apparecchio.
(Non superare l’altezza massima di caricamento).
9 Altezza massima di caricamento
Per garantire una conservazione ottimale dei prodotti
congelati, si consiglia di non riempire mai il vano di
congelamento
(E)
fino al margine superiore. Tra il
coperchio ed i prodotti congelati deve essere sempre
presente un certo margine di distanza.
Impostare sempre il regolatore della temperatura
(FIG.4)
a seconda della quantità di riempimento.
In caso di temperatura ambiente normale (da +18°C
a +22°C) consigliamo inoltre di effettuare le seguenti
impostazioni del regolatore della temperatura al fine di
consentire un risparmio energetico:
Quantità di
riempimento
pieno
semipieno
1/4 o meno
Contrassegno di
caricamento
superiore
intermedio
inferiore
Impostazione
ore 12.00
ore 10.00
ore 8.00
10 Durata di conservazione
Il tempo di conservazione per i prodotti congelati pronti
varia notevolmente a seconda del tipo e del
confezionamento dell’alimento. A questo proposito,
seguire le istruzioni fornite dal produttore riportate sulla
confezione del prodotto.
Per gli alimenti freschi da Voi congelati, seguire le
indicazioni della
tabella di conservazione
all’interno
delle presenti istruzioni per l’uso.
I prodotti già scongelati devono essere consumati
immediatamente.
Consumare i prodotti scongelati nel giro di 24 ore.
11 Misure di sicurezza e indicazioni
Ad ogni intervento di pulizia o sbrinamento, staccare
la spina dalla presa di rete.
Non aprire il coperchio del congelatore
immediatamente dopo la chiusura e non aprirlo con
troppa forza. Il vuoto possibilmente presente sulla
guarnizione
(B)
scompare dopo 1-2 minuti in modo
che il coperchio possa essere di nuovo aperto
normalmente.
Lasciar raffreddare a temperatura ambiente gli
alimenti cucinati prima di richiudere il coperchio del
recipiente e riporli nell’apparecchio per evitare la
formazione di condensa e ghiaccio.
Lasciare sollevato il coperchio del congelatore per il
più breve tempo possibile per non sprecare corrente
e per evitare la formazione di ghiaccio superfluo
nell’apparecchio.
In caso di illuminazione improvvisa o più lunga del
normale della spia rossa, non aprire l’apparecchio per
nessuna ragione e adottare le misure idonee
(si veda il capitolo
“Ricerca guasti/ Cause/ Rimedi”,
all’interno delle presenti istruzioni per l’uso)).
Non utilizzare mai un cacciavite o altri utensili
in metallo durante la rimozione dello strato di
ghiaccio. Le pareti interne sono molto sensibili e non
sopportano il contatto con forme appuntite. Utilizzare
esclusivamente raschietti in materiale plastico o in
legno.
12 Pulizia e manutenzione
Per una cura delle parti esterne del Vostro apparecchio,
utilizzare saltuariamente un lucidante per mobili o un altro
detergente per oggetti laccati (da non utilizzarsi all’interno
per nessuna ragione). Di tanto in tanto, pulire la
guarnizione
(B)
con acqua calda senza utilizzare alcun detergente.
4
Page 33

5
Page 34

Il compressore
(M)
(motore del sistema refrigerante) non
deve funzionare ininterrottamente. Il compressore viene
comandato dal termostato che si utilizza per impostare la
temperatura con il relativo regolatore
(FIG. 4)
; si inserisce
automaticamente se la temperatura impostata nel vano di
conservazione viene superata e si disinserisce
automaticamente quando questa viene nuovamente
raggiunta.
Ogni sistema refrigerante a compressore produce una
certa rumorosità quando il compressore è in funzione.
Tale rumorosità è causata da un lato dal funzionamento
del motore e dall’altro dalla circolazione del gas
refrigerante nelle tubazioni del sistema refrigerante. Tali
rumori sono quindi normali e non sono indice di alcuna
anomalia di funzionamento.
Nei vani non riscaldati
in caso di rigide condizioni
climatiche, può accadere che sulle pareti esterne
dell’apparecchio venga a formarsi della condensa.
Ciò non indica alcun guasto ed è una condizione che si
ripristina da sola al ristabilirsi di condizioni climatiche più
miti.
Rivolgersi al servizio di assistenza clienti
solo quando non si è in grado di trovare la causa di un
possibile guasto anche dopo aver analizzato i possibili
fattori o se non disponete dei mezzi necessari per la
rimozione del guasto.
A questo proposito, si leggano assolutamente le istruzioni
di
“Ricerca guasti/Cause/Rimedi”.
16 Servizio di assistenza clienti
Nella cartolina di garanzia allegata o nell’elenco dei punti
di assistenza clienti allegato è riportato il nome della ditta
competente per il servizio di assistenza clienti del Vostro
apparecchio. Nel caso in cui siano indicati più punti di
assistenza, scegliete quello più vicino a Voi.
Nel caso in cui al Vostro apparecchio non sia allegato
alcun elenco dei punti di assistenza, rivolgeteVi al Vostro
rivenditore in caso di bisogno.
Per ottenere una pronta assistenza, si consiglia di tenere
a portata di mano i dati importanti per l’identificazione del
Vostro apparecchio al momento della chiamata:
marca dell’apparecchio;
modello / tipo;
genere di guasto;
data d’acquisto;
nome rivenditore.
17 Garanzia
Osservare le condizioni di garanzia generali e il periodo
di garanzia indicato sulla relativa scheda.
Nel caso in cui la documentazione del apparecchio non
contenga alcuna scheda di garanzia, rivolgersi al proprio
rivenditore.
18 Ricerca guasti/Cause/Rimedi
a) Nessun funzionamento (l’apparecchio non
funziona)
Attenzione!
In caso di guasti o di caduta di tensione, l’isolamento
delle pareti dell’apparecchio consente un tempo di
conservazione di 10-12 ore dall’insorgere dell’anomalia.
Negli apparecchi dotati di isolamenti maggiori, il tempo di
conservazione risulta prolungato. Richiedete al Vostro
6
rivenditore il tempo di conservazione del Vostro
apparecchio:
“Tempo di conservazione in caso di guasto”.
In caso di guasto duraturo, gli alimenti congelati
cominciano a scongelarsi nel congelatore. A questo
scopo, occorre adottare tempestivamente le misure
idonee per l’eliminazione del guasto
ed eventualmente sistemare gli alimenti congelati in un
altro congelatore (eventualmente dai vicini).
b) L’apparecchio non fa abbastanza freddo
Il processo di congelamento dura troppo
Il compressore entra in funzione troppo spesso
Cause e rimedi possibili:
Vi siete ricordati di lasciar l’apparecchio nel luogo
d’installazione definitivo per 2 ore prima di inserirlo
(per la stabilizzazione del circuito del refrigerante)? Si
veda: “Messa in funzione dell’apparecchio”.
In caso negativo: staccare la spina dalla presa con
congelatore chiuso e sollevare il congelatore da un lato
per breve tempo e riposarlo. Dopo 2 ore, reinserire la
spina nella presa. Durante questo tempo e fino a 12 ore
dopo o fino a quando la spia rossa non si è spenta, non
aprire più il congelatore.
La spina dell’apparecchio è in buono stato ed è
inserita correttamente nella presa?
E’ presente tensione nella presa di alimentazione?
(Eventualmente, controllare mediante il collegamento di
un altro apparecchio come un mixer manuale).
Il coperchio dell’apparecchio non si chiude
saldamente.
La guarnizione non viene premuta con forza.
Prova: sistemare un foglio di carta da scrivere tra la
guarnizione ed il congelatore e chiudere il coperchio. La
carta deve essere estratta tirando da tutti i lati con fatica.
Se la carta viene rimossa da uno o più punti senza
resistenza, informare il servizio di assistenza
Forte formazione di ghiaccio sulle pareti interne (si
veda: “Pulizia e manutenzione”)
L’apparecchio è stato esposto alla luce solare diretta
o è sistemato troppo vicino ad una fonte di calore
(forno, resistenza, ecc.).
Proteggere l’apparecchio dai raggi solari diretti /
Controllare la isolante tra l’apparecchio e la fonte di
calore
(si veda “
Scelta del luogo d’installazione
”).
Quantità di alimenti freschi inseriti non idonea per la
capacità di congelamento del Vostro apparecchio
(targhetta di matricola: XX kg/24h) o inserimento di
cibi ancora troppo caldi (si veda: “
Aggiunta di
alimenti freschi
”).
Il produttore lavora incessantemente per sviluppare
ulteriormente il proprio prodotto. Contando sulla vostra
comprensione, ci riserviamo la facoltà di apportare
modifiche di forma, equipaggiamento e tecnica di questo
apparecchio.
Page 35

2-3 4 6 8 10-12
Carne tritata > Sacchetto in polietilene >
z
Insaccati > Sacchetto in polietilene >
z
Piccoli pesci > Sacchetto in polietilene >
z
Cuore/fegato > Sacchetto in polietilene >
z
Gelati > Recipiente in plastica >
z
Frutta > Recipiente in plastica >
z
Formaggio > Sacchetto in polietilene >
z
Pane > Sacchetto in polietilene >
z
Pesci grossi > Sacchetto in polietilene >
z
Crostate/biscotti > Recipiente in vetro >
z
Carne di maiale > Foglio d'alluminio >
z
Carne di manzo > Foglio d'alluminio >
z
Coniglio > Foglio d'alluminio >
z
Carne d'agnello > Foglio d'alluminio >
z
Funghi > Sacchetto in polietilene >
z
Asparagi > Sacchetto in polietilene >
z
Verdure tagliate > Sacchetto in polietilene >
z
Fragole > Sacchetto in polietilene >
z
Torte > Foglio d'alluminio >
z
Pollo > Foglio d'alluminio >
z
Tacchino > Foglio d'alluminio >
z
Anitra > Foglio d'alluminio >
z
Oca > Foglio d'alluminio >
z
Cavolfiore > Sacchetto in polietilene >
z
Fagioli > Sacchetto in polietilene >
z
Peperoni > Sacchetto in polietilene >
z
Precotti > Recipiente in vetro > z
Frutta cotta > Recipiente in vetro >
z
Ghiaccioli > Foglio d'alluminio >
z
Tempo di conservazione ca.mesi
Italiano
Alimento fresco Imballo adatto
TABELLA DI CONSERVAZIONE I
7
Page 36

Italiano
Componenti
i c omponenti illus trati possono essere
o non essere presenti a seconda dei modelli
A
Coperchio congelatore
B
Guarnizione coperchio
C
Illuminazione interna
D
Alloggiamento
E
Vano di conservazione
F
Griglia di ventilazione
G
Pannello di comando
H
Divisoria
I
Vano di precongelamento
K
Cestello
L
Vano compressore
M
Compressore (motore)
N
Filtro di essiccazione
O
Ventilatore
P
Condensatore
Q
Tubo capillare
R
Condensatore retro
S
Contrassegno d’impilaggio
T
Condens atore parete esterna
Diverse varian 4.GIFodnamocidillennapiedit
Si prega di segnare le varianti pertinenti al Vostro apparecchio
1° variante con interruttore separato per f a4.GIFotnemalegnocrepusidenoiznu
A
Regolatore della temperatura (termostato)
B
ALARME Spia rossa
C
CONTROLLO (in funzione) Spia verde
D
SUPER GONGELAMENTO
Spia gialla
E
INTERRUTORE SUPER separato
2° variante con interruttore di supercongelament GIFo.4b
A
Regolatore della temperatura (termostato)
B
SUPER GONGELAMENTO Spia gialla
C
ALARME Spia rossa
D
CONTROLLO (in funzione) Spia verde
Se le spie sono disposte diversamente sul Vostro apparecchio vale sempre quanto segue:
spia verde = controllo del funzionamento / spia rossa = allarme / spia gialla = funzione di supercongelamento
L
M N O P
Q
R
A
B
D
E
G
K
C
E
S
T
F
H
I
FIG. 3
FIG. 2
FIG. 1
A
E
Min. Max.
B
D C
A
Min.
Max..
C
B
C
D
8
Page 37

1
Page 38

Instrucciones para el uso Congeladoe
Instrucciones para el uso
A continuación encontrará usted toda la información
importante para el uso del aparato.
Las presentes instrucciones para el uso son válidas para
la mayoría de los modelos, pero pueden existir pequeñas
diferencias según el tipo del que se trate.
1 Instalación (elección del lugar de emplazamiento)
Evite de manera absoluta altas temperaturas en la
habitación y el contacto directo con el sol. Recomendamos
que sitúe el aparato en una habitación fresca, bien
ventilada y seca. Es totalmente desaconsejable la
ubicación junto a una fuente de calor (radiador, horno,
etc.) (aumenta considerablemente la actividad del
compresor y, por tanto, el consumo de energía)
Si no tuviera otro sitio más que junto a una fuente de calor,
le recomendamos que coloque una placa de aislamiento
entre el aparato y la fuente de calor (evite el amianto), o
que mantenga las siguientes distancias:
De la cocina de gas o eléctrica
3.cm
Del horno o radiador
5 cm
De las paredes, muebles
u otros electrodomésticos
2 cm
No obstruir jamás la rejilla de ventilación
Los congeladores de grandes dimensiones están provistos
de una rejilla de ventilación
(F)
localizada en la parte
inferior de uno de los laterales. Los congeladores pueden
situarse contra una pared o mueble, siempre que estos no
coincidan con el lateral donde va la rejilla de ventilación.
Congeladores sin rejilla de ventilación
Deje suficiente espacio entre la parte posterior del
congelador y la pared, de modo que el aire caliente pueda
salir por detrás sin impedimentos.
El aparato debe colocarse horizontalmente y sobre un
suelo nivelado. Sólo así se podrá garantizar la libre
circulación dellíquido refrigerante, y el óptimo
funcionamiento del aparato.
¡ATENCIÓN!
Deje que el aparato repose en el lugar definitivo al
menos 2 horas antes de conectarlo, de modo que se
nivele el líquido refrigerante en circulación y no se
produzcan irregularidades en el funcionamiento.
El olor emanado por todos los aparatos nuevos puede ser
eliminado fácilmente.
Limpie el compartimento interior minuciosamente con una
mezcla de
agua tibia y vinagre
.
No utilice detergentes ni productos de limpieza
agresivos, granulados o que contengan sosa.
Antes de conectar el aparato, el compartimento interior
(sobre todo las esquinas) debe estar totalmente seco.
Aviso de peligro
Dada la composición del líquido refrigerante, éste puede
resultar ligeramente inflamable. La circulación
del líquido refrigerante está herméticamente cerrada y la
densidad ha sido sometida a sucesivas pruebas.
Una manipulación inadecuada conlleva peligro de
incendio. Absténgase de accionar los mecanismos del
sistema de congelación, sobre todo los siguientes
componentes del compartimento del compresor
(L)
.
Condensador posterior o exterior (R)
Compresor (P) (
motor
)
Tubo capilar (Q)
Filtro de desecación (N)
La manipulación del sistema de congelación sólo está
permitida a profesionales autorizados.
¡ATENCIÓN!
Las salpicaduras de líquido refrigerante pueden producir
lesiones oculares.
En caso de contacto de los ojos con el líquido refrigerante,
aclárelos inmediatamente con abundante agua y acuda
inmediatamente a un oftalmólogo.
2 Placa de características
La placa de características con los datos técnicos se
encuentra situada en la caja
(D)
, en la parte posterior del
aparato.
Anote los datos técnicos
Por favor, copie aquí los datos técnicos de la placa de
características para que no tenga que mover el aparato
cada vez que quiera disponer de ellos.
Modelo/Tipo N°
Capacidad Neta ....................... Litros
Voltaje...................................... V50 Hz
Potencia (W)............................ Vatios
Intensidad (A)........................... Amperios
Consumo de energía................ kWh/24h
Capacidad frigorífica ................ kg/24h
3 Conexión a la red eléctrica
Su aparato sólo debe ser conectado a un enchufe con
toma de tierra conforme a la normativa vigente, instalado
por un técnico autorizado.
Antes de conectar el enchufe del aparato, cerciórese por
completo de que el Voltaje (V) especificado en la placa de
características coincide con el de su domicilio.
Si no fuera así, informe a su servicio de asistencia al
cliente o vendedor correspondiente y no conecte en
absoluto el aparato a la red eléctrica.
4 Selección de temperatura
Regulador de temperatura (termostato) (FIG.4)
Para que la temperatura no pueda variarse
accidentalmente, se ha diseñado de modo que no se
cambie fácilmente. Para cambiarlo utilice mejor una
moneda o un destornillador.
Encendido
: gire el regulador a la derecha >.
Ajuste la temperatura según sea preciso:
-
Min. (refrigeración mínima) y
-
Max. (temperatura más baja)
La regulación de temperatura debe ajustarse según:
-
La temperatura del ambiente en el que se encuentra
ubicado el aparato
-
La cantidad de alimentos guardados en el aparato
-
La frecuencia de apertura del aparato
Le recomendamos una temperatura media.
En poco tiempo usted mismo comprobará la regulación
idónea según sus necesidades.
2
Page 39

Instrucciones para el uso Congeladoe
3
5 Luces indicadoras
(FIG.4)
Si su aparato dispone de luces indicadoras, el encendido
de las mismas tendrá el siguiente significado:
-
Verde
= CONTROL
El aparato está conectado a la red
eléctrica y en funcionamiento.
La luz verde de control debe estar encendida siempre (si
el aparato está conectado a la red y encendido). Es muy
importante prestar atención a esto, ya que las luces roja y
amarilla pierden su función con un corte eléctrico y no
pueden advertirle.
-
Rojo
= ALARMA
Temperatura interior demasiado alta
El encendido de la luz indicadora roja puede tener otros
significados, ej.:
Primera puesta en marcha del aparato
Puesta en marcha tras la descongelación
Introducción de alimentos frescos
En estos casos es normal que se encienda la luz
indicadora roja. Se apaga automáticamente cuando la
temperatura interna alcanza aprox. –15ºC.
Encienda (si lo hubiera) el pulsador de
SUPERCONGELACIÓN
(FIG.4)
(Apáguelo como máximo después de 24 horas o cuando la
luz roja se haya apagado).
Vuelva a abrir el aparato una vez que se haya apagado la
luz roja.
Si aún sigue encendida la luz transcurridas de 12 a 24
horas, es posible que exista alguna avería propiamente
dicha.Consultar el capítulo:
“Qué hacer si...”
al final de
estas
instrucciones.
Amarillo
= el INTERRUPTOR DE
SUPERCONGELACIÓN está encendido y la función del
termostato está anulada.
El compresor enfría permanentemente hasta que se
vuelve a apagar de nuevo el interruptor de
SUPERCONGELACIÓN.
6 Alarma acústica
Si su aparato dispone de ella, una alarma acústica suena
al mismo tiempo que está encendida la luz roja. Esta señal
se detiene automáticamente cuando se enciende el
interruptor de SUPERCONGELACIÓN.
7 Puesta en marcha del aparato
1. Desembale completamente el aparato.
2. Retire las partes de poliestireno que cubren el
compresor (si tuviera).
3. Retire la documentación y los accesorios existentes
del interior del aparato.
4. Limpie el compartimento interior con agua tibia con
vinagre y seque a fondo con un paño.
5. Cierre el aparato.
6. Conecte el enchufe a la red eléctrica.
7. Encienda el aparato girando el regulador de
temperatura
(FIG.4)
a la derecha (la primera vez
totalmente a la derecha, en la posición Max.)
(las luces verde y roja se encienden)
.
8. Si está disponible, encienda el interruptor de
SUPERCONGELACIÓN (
la luz amarilla también se
enciende
).
9. No abra el aparato hasta pasadas al menos 4 horas o
hasta que no se haya apagado la luz roja, así se
enfriará adecuadamente el compartimento interior.
10. Entonces puede llenarlo con la cantidad que desee de
alimentos de congelación rápida (artículos
comprados ya congelados). (Véase el siguiente
capítulo “
Capacidad Máxima
”).
11. Apague el interruptor de SUPERCONGELACIÓN
pasadas como máximo 24 horas.
12. Si desea congelar alimentos frescos y, por tanto, no
congelados aún, proceda según el capítulo:
“Congelación /conservación de alimentos frescos”
.
¡Atención!
No congele botellas con bebidas. Los líquidos aumentan
de volumen al congelarse y la botella puede estallar.
No deposite en el interior del aparato ningún recipiente
con materiales explosivos (encendedores de gas,
gasolina, éter o similares).
Cuando conserve productos de congelación rápida, lea
detenidamente las instrucciones del fabricante incluidas
en el envase del alimento.
Los helados y polos deben tomarse congelados, pero
minutos después de haberlos sacado del congelador, para
evitar así daños en los labios y lengua (desgarro de la
piel). Evite también, por la misma razón, el contacto de las
manos húmedas con las paredes interiores del
congelador. Consuma inmediatamente los productos que
estén casi, o totalmente, descongelados. Como regla
general, es conveniente que no los vuelva a congelar.
8 Congelación/conservación de alimentos frescos
Casi todos los productos frescos se pueden congelar y
conservar en su aparato. Para los productos más usuales,
hemos creado una tabla con las especificaciones del
tiempo de conservación y del material para envolver más
convenientes. (Véase
“Tabla de conservación”
al final de
estas instrucciones).
Antes de meterlos en su aparato,
ponga etiquetas
a los
productos frescos, ya que, envasados en bolsas
transparentes, no podrá identificarlos con claridad una vez
congelados.
Le recomendamos que utilice para ello las etiquetas
destinadas a tal fin, que puede encontrar en el mercado.
Envase los productos frescos en raciones adecuadas al
consumo de su hogar, para evitar así que se descongelen
grandes cantidades que no podrán consumirse en un solo
día.
Marque las porciones con, al menos, la siguiente
información:
Nombre del producto (ej. lomo de ternera)
Peso de la porción
Cantidad (
número de trozos
)
Fecha de congelación
Fecha de consumo (
véase Tabla de Conservación
)
A continuación proceda como sigue:
a) Es recomendable colocar los alimentos frescos en el
compartimento de pre-congelación situado en la
lateral
(I)
(no está disponible en todos los modelos) o
en el fondo del arcón. Ahí es donde se alcanza la
temperatura más baja.
Al introducir alimentos frescos, evite que estos entren en
contacto directo con los alimentos ya congelados; ya que
3
Page 40

Instrucciones para el uso Congeladoe
los productos congelados podrían descongelarse y el
periodo de conservación previsto ya no sería válido.
b) Llene el interior, tras las 24 horas correspondientes,
sólo con la cantidad de alimentos frescos según la
capacidad de congelación de su aparato.
c) Véanse los datos en la placa de características (XX
kg/24h).
d) Donde esté disponible, encienda el interruptor de
SUPERCONGELACIÓN (FIG.4), (no es
absolutamente necesario si se introducen
e) alimentos ya congelados, por ejemplo, artículos ultra-
congelados).
f) Pasadas 24 horas cambie los alimentos congelados
del fondo del arcón o del compartimento de precongelación al cesto (K) superior, para que así estos
espacios queden disponibles para la posible
congelación de otros alimentos frescos.
g) Desconecte el interruptor de SUPER CONGELACIÓN
(se apaga la luz amarilla).
h) Lleve el regulador de temperatura a la posición
adecuada según el grado de llenado del aparato
(véase
“Capacidad Máxima”
).
i) Si es posible, controle la temperatura del arcón de
conservación
(E)
por medio de un termómetro capaz
de medir la temperatura hasta –26° C.
La
temperatura de conservación mínima debe ser de
–18ºC permanentemente
.
Reposición de alimentos frescos
(Alimentos no congelados)
Asegúrese de que la reposición de alimentos frescos, en
cantidades adecuadas a la capacidad de su congelados
(XX kg/24h), sólo tiene lugar una vez transcurridas al
menos 24 horas desde el llenado anterior.
(No sobrepase la capacidad máxima
).
9 Capacidad Máxima
Para garantizar una conservación inmejorable de
productos congelados, no debe llenar nunca hasta arriba
el arcón de conservación
(E)
. Entre la puerta y el producto
congelado debe existir siempre un cierto margen de
distancia.
Fije el regulador de temperatura
(FIG.4)
en estricta
concordancia con la cantidad total de llenado.
Con una temperatura ambiente normal (desde +18º hasta
+22ºC), le recomendamos que para el ahorro de energía
ajuste como sigue el regulador de temperatura:
Cantidad
de llenado
Marca
cantidad
Ajuste
Lleno Superior dirección 12:00h
Medio Mitad dirección 10:00hh
1/4 o menos Inferior dirección 08:00h
10 Tiempo de conservación
El tiempo de conservación de los productos ultracongelados adquiridos varía notablemente en función del
tipo de producto y el envase.
Siga las instrucciones que aparecen en el envase del
producto correspondiente.
Para congelar alimentos frescos que desee congelar,
consulte la
tabla de conservación
al final de estas
instrucciones.
Una vez descongelado el producto, debe ser consumido
inmediatamente, a lo sumo dentro de un plazo de 24
horas.
11 Medidas de seguridad e indicaciones
Desconecte la clavija de conexión cada vez que vaya
a limpiar o descongelar.
Después de haber cerrado la puerta del arcón, no la
fuerce inmediatamente para abrirla. En la junta
(B)
se
forma un vacío que desaparece después de 1–2
minutos, pudiéndose abrir la puerta de nuevo
normalmente.
Antes de tapar o guardar productos cocinados, deje
enfriar el contenido del recipiente a temperatura
ambiente, para así evitar la condensación del
recipiente y la formación de hielo en el aparato.
Deje la puerta del congelador abierta el menor tiempo
posible, para así no derrochar energía y evitar una
excesiva formación de hielo dentro del aparato.
Si se enciende inesperadamente o durante un largo
tiempo la luz roja, no abra el congelador y tome
inmediatamente las medidas oportunas (véase
“Qué
hacer si...”
en la parte final de estas instrucciones
para el uso).
Nunca utilice un destornillador u otro tipo de
herramienta metálica para quitar el hielo. Las paredes
interiores son muy sensibles y no resisten bordes
afilados. Utilice sólo raspadores de plástico o de
madera sin bordes afilados.
12 Limpieza y mantenimiento
Para la limpieza exterior de su aparato utilice de vez en
cuando un abrillantador de muebles u otros detergentes
para objetos laqueados (nunca lo utilice en el interior).
Debe también de vez en cuando limpiar la junta
(B)
con
agua caliente y sin utilizar detergentes.
Si su aparato dispone de condensador posterior
(R)
,
límpielo de vez en cuando de pelusa y polvo. El polvo y la
pelusa impiden la salida de calor del compartimento
interior y aumentan el consumo de energía. Para quitar el
polvo del condensador posterior utilice mejor un cepillo
suave o un plumero.
Si va a dejar sin utilizar el aparato durante mucho tiempo
(ej. vacaciones), debe dejarlo abierto para evitar la
aparición de olores desagradables en el interior. En
aparatos con cerrojo, debe poner éste en la posición
“cerrado” con la puerta abierta y mantener la llave lejos del
alcance de los niños, para evitar accidentes durante sus
juegos.
La acumulación de
hielo y escarcha
que se forma en las
paredes interiores, produce aislamiento cuando es grande
e impide la emisión de frío desde las paredes interiores.
Retírelo periódicamente.
Para retirar la escarcha de las paredes interiores utilice un
rascador sin bordes afilados, de plástico o madera.
Coloque un trapo sobre los productos congelados para
posteriormente poder recoger el hielo raspado y retirarlo
con más facilidad.
13 Descongelación
Con un uso normal (abriendo 3-4 veces al día) se debe
descongelar el arcón unas dos veces al año (en caso de
mayor número de aperturas diarias, será necesario
descongelarlo más a menudo).
Aviso de peligro
4
Page 41

5
Page 42

Instrucciones para el uso Congeladoe
Marca del aparato
Modelo/Tipo
Tipo de avería
Fecha de compra
Nombre del establecimiento de venta
17 Garantía
En la tarjeta de garantía adjunta podrá consultar las
condiciones generales y el período de vigencia de la
garantía.
En caso de que la documentación del horno del aparato
no incluya dicha tarjeta, diríjase a su distribuidor.
18 Qué hacer si...
a) No funciona en absoluto (el aparato no marcha)
¡Atención!
En el caso de averías o corte de corriente, el aislamiento
de las paredes del aparato permite una conservación de
10 a 12 horas desde la aparición del problema.
Con otros aparatos con aislamiento más potente incluso
mucho más. Pregunte en su establecimiento el tiempo de
conservación de su aparato: “
Tiempo de conservación en
caso de avería
”
Con averías de larga duración, los productos congelados
del aparato empiezan a descongelarse. Por eso, tome a
tiempo las medidas oportunas para la reparación de la
avería y, si fuera necesario, guarde los productos
congelados en otro congelador (eventualmente en el de un
vecino).
b) El aparato no enfría lo suficiente
El proceso de congelación dura demasiado
El compresor se acciona demasiado a menudo
Posibles causas / remedios:
¿Dejó reposar el aparato en su lugar definitivo como
mínimo 2 horas antes de ponerlo en marcha?
(nivelación del líquido refrigerante). Véase: “
Puesta en
marcha del aparato
”.
Si no fue así
: con el arcón cerrado, desenchufe, vuelque
a un lado el arcón por poco tiempo y vuelva a colocarlo en
su posición normal. Después de 2 horas vuelva a conectar
el enchufe.No abra el arcón durante este tiempo y hasta
pasadas 12 horas,o bien cuando la luz roja se apague.
¿La clavija del aparato se encuentra en buen estado y
está bien conectada al enchufe?
¿Tiene el enchufe corriente?
(compruébelo eventualmente con un pequeño aparato
como una batidora, etc.)
La puerta del aparato no cierra bien.
La junta no hace presión.
Prueba: coloque una hoja de papel entre la junta y el
borde del arcón y cierre la puerta. Debe ser difícil sacar el
papel por cualquier lado. Si puede sacar el papel
sinninguna oposición, tirando de uno o varios lados,
informe a su servicio de asistencia al cliente.
Gran formación de hielo en las paredes interiores
(véase: “Limpieza y mantenimiento”)
El aparato está en contacto directo con la luz solar o
está muy cerca de una fuente de calor (horno,
calefacción, etc.).
Proteja el aparato del contacto directo de la luz solar /
manténgalo alejado de fuentes de calor / coloque una
placa de aislamiento entre el aparato y la fuente de calor.
(Véase “Instalación, elección del lugar de emplazamiento”)
La cantidad de alimentos frescos almacenados no se
corresponde con la capacidad de su aparato (placa de
características: XX kg/24h) o introduce los alimentos
demasiado calientes
(véase: “
Repósicion de alimentos frescos
”).
El fabricante trabaja continuamente en el desarrollo de
sus productos. Por ello, esperamos su comprensión al
reservarnos el derecho de modificaciones en forma,
equipamiento y técnica.
6
Page 43

Instrucciones para el uso Congeladoe
2-3 4 6 8 10-12
Carne picada > Bolsa polietileno congelación >
z
Embutidos > Bolsa polietileno congelación >
z
Pescado pequeño > Bolsa polietileno congelación >
z
Corazón / Hígado > Bolsa polietileno congelación >
z
Helado > Recipiente plástico >
z
Frutas > Recipiente plástico >
z
Queso > Bolsa polietileno congelación >
z
Pan > Bolsa polietileno congelación > z
Pescado grande > Bolsa polietileno congelación >
z
Pasteles/Galletas > Recipiente cristal >
z
Carne de cerdo > Papel de aluminio >
z
Carne de buey > Papel de aluminio >
z
Conejo > Papel de aluminio >
z
Cordero > Papel de aluminio >
z
Setas > Bolsa polietileno congelación >
z
Espárragos > Bolsa polietileno congelación >
z
Verduras (cortadas) > Bolsa polietileno congelación >
z
Fresones > Bolsa polietileno congelación >
z
Tortas > Papel de aluminio >
z
Pollo > Papel de aluminio >
z
Pavo > Papel de aluminio >
z
Pato > Papel de aluminio >
z
Ganso > Papel de aluminio >
z
Coliflor > Bolsa polietileno congelación >
z
Judías > Bolsa polietileno congelación >
z
Pimientos > Bolsa polietileno congelación > z
Conservas > Recipiente cristal >
z
Frutas confitadas > Recipiente cristal >
z
Polos > Papel de aluminio >
z
Tiempo almacen. aprox meses
Español
Alimentos fresco Embalaje apropiado
TABLA DE CONSERVACIÓN E
7
Page 44

eodalegnoCosulearapsenoiccurtsnI
Español
Componentes
Las partes ilust radas pueden v ariar
según cada modelo en particular
A
Puerta del cajón
B
Juntadelapuerta
C
Luz interior
D
Caja
E
Cajón de conservación
F
Rejilla de ventilación
G
Panel de control
H
Separador
I
Compartimento anterior
K
Cesta
L
Compartimento del compresor
M
Compresor (Motor)
N
Filtro de desecación
O
Ventilador
P
Condensador
Q
Tubo capilar
R
Condensador posterior
S
Marca de Capacidad
T
Condensador exterior
Di 5.GIFlortnocedselenapsoledsenoicairavsasrev
Por fav or marque para su aparato la variante correspondiente
1. Variante con interruptor separado para la función de SUPERCONGELACIÓN FIG. 4a
A
Regulador de temperatura (termostato)
B
ajorzulAMRALA
C
CONTROL (en uso) luz verde
D
Indicador de supercongelación luz amarilla
E
Interruptor de supercongelación aparte
2. Variante con interruptor de SUPERCON b4.GIFNÓICALEG
A
Regulador de temperatura (termostato)
B Interruptor de supercongelacion luz am arilla
C
ajorzulAMRALA
D
CONTROL (en uso) luz verde
Si las luces indicadoras de su aparato están en otro orden, hay que tener en cuenta lo siguiente
Verde = Control de uso / Roja = ALARMA / Amarillo = Función de SUPERCONGELACIÓN
L
M N O P
Q
R
A
B
D
E
G
K
C
E
S
T
F
H
I
FIG. 3
FIG. 2
FIG. 1
A
E
Min. Max.
B
D C
A
Min.
Max..
C
B
C
D
8
Page 45

1
Page 46

Português
Manual de instruções
Encontrará aqui todas as indicações importantes para
a utilização do aparelho.
O manual de instruções é válido para vários aparelhos,
pelo que existem desvios de pormenor de acordo com
o aparelho em questão.
1 Instalação (Escolha do local de instalação)
Evitar necessariamente temperaturas ambiente
elevadas e luz solar directa. Instale preferencialmente o
aparelho num local fresco, bem ventilado e seco. A
instalação do aparelho próximo de fontes de calor
(aquecimento, fogão, etc.) é inadequada (aumento do
desempenho do compressor e daí aumento
considerável do consumo de energia).
Caso não exista nenhuma outra alternativa senão
instalar o aparelho junto de uma fonte de calor,
aconselha-se a colocação de uma placa isoladora entre
o aparelho e a fonte de calor (não utilizar amianto), ou
pelo menos a manutenção das seguintes distâncias:
entre fogões a gás ou eléctricos
3cm
entre radiadores ou fogõespara
aquecimento, etc.
5 cm
entre paredes, móveis ou outros
aparelhos
2 cm
Não tapar nunca a grelha de ventilação
As arcas congeladores maiores estão equipadas com
grelhas de ventilação
(F)
na parte lateral, em baixo.
Estas arcas só podem ser directamente encostadas a
uma parede ou um móvel no lado oposto à localização
da grelha de ventilação.
Arcas sem grelha de ventilação
Deixar um espaço suficiente entre a parte traseira da
arca e a parede, para que o ar aquecido possa sair
sem problemas.
O aparelho deverá ser instalado na horizontal e estar
nivelado sobre uma superfície dura. Só assim se pode
garantir um circuito do fluido frigorígeno sem problemas
e o funcionamento correcto do aparelho.
ATENÇÃO!
Deixe repousar o aparelho no seu local definitivo
durante pelo menos duas horas antes de o ligar à
corrente, para que o circuito do fluido frigorígeno
fique depositado e para que não ocorram
nenhumas avarias.
O cheiro característico de todos os aparelhos novos
pode ser facilmente removido.
Para tal, lave cuidadosamente o interior do aparelho
com
água morna e vinagre
.
Não utilize detergentes da loiça, ou detergentes
fortes, abrasivos nem produtos que contenham
bicarbonatos.
Antes de ligar o aparelho o interior deverá estar seco,
principalmente nos cantos.
Manual de instruções
Indicações de perigos
Dependendo da sua composição, o fluido frigorígeno é
facilmente inflamável. O circuito do fluido frigorígeno
está hermeticamente fechado e foi várias vezes testado
em termos de estanqueidade.
Em caso de utilização inadequada existe grande perigo
de incêndio. Toda e qualquer acção mecânica no
sistema frigorífico, especialmente nas peças acessíveis
na câmara do compressor
(L),
deverá ser evitada.
Liquefactor do painel traseiro (R)
Compressor (P) (Motor)
Tubo capilar (Q)
Filtro de exsicação (N)
Quaisquer acções sobre o sistema de refrigeração são
permitidas apenas quando efectuadas por pessoal
especializado.
ATENÇÃO!
Salpicos do fluido frigorígeno podem provocar doenças
nos olhos. Em caso de contacto com o fluido
frigorígeno lavar imediatamente os olhos com água
corrente e contactar preferencialmente um
oftalmologista.
2 Placa de características
A placa de características (com os dados técnicos)
encontra-se na parte traseira do aparelho
(D)
.
Anotar os dados técnicos
Anote aqui os dados técnicos da placa de
características para que os possa consultar sem
problemas sempre que necessário, sem que para isso
tenha que mover o aparelho.
Modelo/tipo.................................................
Capacidade líquida.............................. litros
Tensão de serviço ...............................V 50 Hz
Potência máxima (W) .......................... Watt
Protecção fusível
(A)
........................... Amperes
Consumo de energia ........................... .kWh/24h
Capacidade de congelação ................. kg/24h
3 Ligação à rede eléctrica
O seu aparelho só poderá ser ligado a uma tomada
com
instalada por um técnico especializado.
ligação à terra, conforme as normas e que foi
Antes de ligar o aparelho à tomada, verifique se a
voltagem (V) indicada na placa de características do
seu aparelho está de acordo com a voltagem da sua
casa.
Se não for este o caso contacte imediatamente o
serviço de assistência técnica ou o vendedor, e não
ligue de modo algum o aparelho à corrente.
4 Selecção da temperatura
(Termóstato) (FIG.4)
Para que o regulador de temperatura não possa ser
desregulado involuntariamente o seu manuseio foi
propositadamente dificultado. Para mudar a sua
regulação utilize uma moeda ou uma chave de fendas.
2
Page 47

Português
Ligar:
Rodar o regulador para a direita > e ajustar a
temperatura ao nível pretendido, entre:
-
Min.
(pouca refrigeração) e
-
Máx.
(a mais baixa temperatura)
A regulação da temperatura tem de ser ajustada
conforme a:
-
Temperatura ambiente do aparelho
-
Quantidade de alimentos armazenados
-
Frequência de abertura da porta do aparelho
Aconselhamos uma regulação média.
Em breve saberá qual a regulação ideal para o tipo de
utilização que faz do seu aparelho.
5 Lâmpadas de controlo
(FIG.4
)
Se o seu aparelho estiver equipado com lâmpadas de
controlo, segue-se uma lista explicativa sobre a função
de cada uma delas:
-
verde
= CONTROL (controlo)
O aparelho está ligado à corrente e
em
funcionamento
A lâmpada de controlo verde tem de estar sempre
acesa quando o aparelho está ligado à corrente
eléctrica. É muito importante ter este facto em conta,
dado que quando a electricidade faltar, as lâmpadas
vermelha e amarela não funcionam, não podendo
assim servir de aviso.
-
vermelha
= ALARM (alarme)
A temperatura interna está
demasiado elevada
.
A lâmpada vermelha acende por vários motivos:
Primeiro funcionamento do aparelho
Colocação em funcionamento após des-
congelação
Abastecimento da arca com alimentos frescos
Nestes casos, o acender da lâmpada vermelha é
normal e apaga automaticamente quando a
temperatura interna atingir cerca de -15ºC.
Ligue (quando existente) o BOTÃO DE CONGELAÇÃO
RÁPIDA
(FIG.4)
. (
desligar o botão após 24 horas ou
quando a lâmpada vermelha apagar novamente
).
Abra o aparelho, se possível, apenas quando a
lâmpada vermelha apagar novamente.
Se a lâmpada continuar acesa 12 a 24 horas depois,
deverá contar com uma possível avaria.
Para tal consulte o capítulo:
“O que fazer quando..”
na parte final deste manual de
instruções.
-
amarela =
O BOTÃO DE REFRIGERAÇÃO
RÁPIDA está ligado e a função do
termóstato é suprimida.
O compressor refrigera em regime de funcionamento
permanente, até que o BOTÃO DE REFRIGERAÇÃO
RÁPIDA seja novamente desligado.
Manual de instruções
6 Alarme acústico
Quando a lâmpada vermelha acende é
simultaneamente accionado o alarme acústico, isto se
o seu aparelho estiver assim equipado. O alarme
desliga automaticamente quando ligar o BOTÃO DE
REFRIGERAÇÃO RÁPIDA.
7 Colocar em funcionamento
1. Desempacotar completamente o aparelho.
2. Tirar os elementos em esferovite da câmara do
compressor (quando existente).
3. Retirar a documentação e todos os acessórios
existentes do interior do aparelho.
4. Lavar o interior do aparelho com água morna e
vinagre, e secar cuidadosamente com um pano.
5. Fechar o aparelho.
6. Inserir a ficha na tomada.
7. Ligar o aparelho ao rodar o regulador do
termóstato
(FIG.4)
para a direita (rodar o regulador
primeiramente para a direita para a posição Máx.)
(
as lâmpadas verde e vermelha acendem
).
8. Quando existente, ligar o BOTÃO DE
CONGELAÇÃO RÁPIDA
(a lâmpada amarela
acende também).
9. Não abrir o aparelho durante cerca de 4 horas até
que a lâmpada vermelha apague, para que no
interior se possa repor o frio necessário.
10. Nesta altura é possível armazenar os produtos
com congelação rápida (já adquiridos como
produtos congelados), tendo em conta o capítulo
“Altura
máxima de empilhamento
”.
11. Desligar o BOTÃO DE CONGELAÇÃO RÁPIDA o
mais tardar 24 horas depois.
12. Se pretender congelar alimentos frescos, não
congelados, proceda como indicado no capítulo
“Congelação
/ armazenagem de alimentos
frescos
”.
Atenção !
Não congelar garrafas com bebidas. O líquido aumenta
de volume com a congelação e a garrafa pode
rebentar.
Não guarde nunca recipientes com substâncias
explosivas (isqueiros a gás, gasolina, éter ou
semelhante) na câmara de congelação do aparelho.
Ao armazenar produtos congelados devem ser
respeitadas as indicações do fabricante que se
encontram na embalagem do produto.
Gelo e gelados apenas deverão ser consumidos alguns
minutos após terem sido retirados do aparelho, de
modo a evitar ferimentos nos lábios e na língua. Pelo
mesmo motivo evite tocar nas paredes interiores
congeladas do aparelho com as mãos molhadas.
Consumir imediatamente os produtos ligeiramente ou
totalmente descongelados, dado que já não podem ser
novamente congelados.
8 Congelação / Armazenagem de alimentos
frescos
Praticamente todos os produtos frescos podem ser
congelados e armazenados no seu aparelho.
Elaboramos uma tabela com as indicações sobre os
possíveis tempos de congelação e o material de
embalagem indicado. (ver “
Tabela de armazenagem
”
na parte final deste manual de instruções).
3
Page 48

Português
Escreva
sempre os produtos que colocou na
embalagem para congelação, porque mesmo utilizando
sacos de congelação transparentes nem sempre se
consegue identificar completamente os alimentos em
estado congelado.
Sugerimos que utilize as etiquetas para congelação
existentes no mercado.
Embale os produtos frescos em quantidades de
acordo com o seu consumo, de modo a evitar que
sejam
descongeladas quantidades superiores ao consumo
diário da sua casa.
Escreva pelo menos as seguintes informações:
Nome do produto (por exemplo: bife de vaca)
Peso
Quantidade
(Nº de peças
)
Data de congelação
Data de consumo (
ver tabela de armazenagem
)
Prossiga como indicado a seguir:
a) Colocar alimentos frescos de preferência na
prateleira lateral de pré-congelação
(I)
(não
existente em todos os modelos) ou no fundo da
arca, onde a temperatura é mais baixa.
Evite que os alimentos frescos a congelar entrem em
contacto directo com alimentos já congelados. Os
produtos já congelados poderiam descongelar
ligeiramente, não podendo ser cumprido o tempo de
armazenagem.
b) Encha o seu aparelho num espaço de tempo de 24
horas apenas com as quantidades de alimentos
frescos de acordo com a capacidade de
congelação do seu aparelho.
Ver indicação na placa de características
(XX kg/24h)
c) Quando existente, ligue o BOTÃO DE
CONGELAÇÃO RÁPIDA (FIG.4). (Não é
necessário quando forem inseridos alimentos, por
exemplo, congelados).
d) 24 horas depois retire os alimentos já congelados
do fundo da arca ou da prateleira de précongelação e coloque-os num cesto amovível
(K),
de modo a que a prateleira de pré-congelação ou o
fundo da arca fiquem livres para a eventual
congelação de produtos frescos.
e) Desligar o BOTÃO DE CONGELAÇÃO RÁPIDA (a
lâmpada amarela apaga).
f) Regular o regulador de temperatura para uma
posição de acordo com o grau de enchimento do
aparelho (ver “
Altura máxima de empilhamento
”).
g) Controlar a temperatura na prateleira de
armazenamento
(E)
, de preferência introduzindo
um termómetro adequado à medição de
temperaturas até -26ºC.
A temperatura de
armazenamento deverá estar sempre no
mínimo em -18ºC.
Reabastecimento de alimentos frescos
(alimentos não congelados)
Tenha em atenção que apenas 24 horas após o
abastecimento de alimentos frescos é que poderá
reabastecer o seu aparelho com quantidades
adequadas (XX kg/24h) à capacidade de congelação
do mesmo.
(
Não ultrapassar a altura máxima de empilhamento
)
Manual de instruções
9 Altura máxima de empilhamento
Para garantir uma armazenagem adequada dos
produtos congelados, não deverá nunca encher o
compartimento
(E)
até em cima. Entre a tampa e o
produto congelado deverá haver sempre um pouco de
ar.
Regule impreterivelmente o regulador de temperatura
(FIG.4)
de acordo com a quantidade de enchimento.
Em caso de uma temperatura ambiente normal (+18ºC
até +22ºC) sugerimos as seguintes regulações do
regulador de temperatura, tendo também em conta o
aspecto da poupança de energia:
Quantidade de
enchimento
Marca de
empilhamento
Regulação
cheio superior 12.00h
meio cheio do meio 10.00h
1/4 e menos inferior 08.00h
10 Duração da armazenagem
O tempo de armazenagem para produtos congelados
difere de acordo com o tipo de composição do produto.
Tenha em conta as indicações dadas pelo fabricante
na embalagem do produto.
Para alimentos frescos que vai congelar, tenha em
conta a
tabela de armazenagem
no final deste manual
de instruções.
Os produtos já descongelados deverão ser
consumidos.
Os produtos descongelados deverão ser consumidos
num prazo de 24h.
11 Medidas de precaução e advertências
Retirar a ficha da tomada em cada limpeza ou
descongelação.
Não abrir imediatamente a tampa da arca logo
após tê-la fechado, nem utilize força. O vácuo que
se poderá formar na borracha
(B)
desaparece ao
fim de 1-2 minutos, de modo a permitir que a
tampa possa ser de novo aberta.
Os alimentos cozinhados inseridos em caixas com
tampa deverão ser previamente arrefecidos à
temperatura ambiente para evitar a condensação e
a formação de gelo.
Abrir a tampa da arca durante o menor tempo
possível, de modo a não despender energia e
evitar a formação excessiva de gelo no aparelho.
No caso da lâmpada vermelha acender durante
um período de tempo maior, não abrir de modo
algum o aparelho e tomar imediatamente as
medidas necessárias
(ver “O que fazer quando...”
na parte final deste manual de instruções).
Não utilize nunca uma chave de fendas ou outras
ferramentas de metal para retirar camadas de gelo.
As paredes internas do aparelho são bastante
sensíveis e não suportam arestas cortantes. Utilize
somente espátulas de plástico ou madeira sem
arestas cortantes.
4
Page 49

5
Page 50

Português
As reparações de avarias que ocorreram devido a má
utilização ou não seguimento de informações e
conselhos dados neste manual e efectuadas pelo
serviço de assistência técnica terão que ser custeadas
pelo cliente e não são abrangidas pela garantia.
Tenha em atenção:
O compressor
(M)
(também designado por refrigerador)
não tem que funcionar ininterruptamente.
Ele é comandado pelo termóstato que se utiliza para
regular a temperatura mediante o relativo
(FIG.4);
ligase automaticamente se a temperatura regulada na
câmara de armazenamento for ultrapassada e desligase também automaticamente quando a mesma for
alcançada.
Em todos os sistemas de refrigeração com compressor
surgem ruídos quando o compressor está ligado. Estes
ruídos são originados pelo motor em funcionamento no
compressor e pelo fluxo do fluido frigorígeno nos tubos
do sistema de refrigeração. Tais ruídos são normais e
não significam nenhuma falha de funcionamento.
Em divisões
não aquecidas e húmidas surge por
vezes a formação de água de condensação nas
paredes exteriores do aparelho. Isto não é sinónimo de
avaria e resolve-se por si só, quando o clima se tornar
mais ameno.
Contactar o serviço de assistência técnica
Contacte o serviço de assistência técnica apenas
quando
não encontrar uma causa possível da avaria
ou um meio para a resolver.
Ver primeiro em “O que fazer quando...”
16 Serviço após-venda
Consulte o documento de garantia em anexo ou a lista
de empresas que fazem o serviço de assistência
técnica, de modo a saber qual a empresa responsável
pela assistência do seu aparelho. Se existirem várias
empresas escolha a que estiver mais próxima da sua
residência.
Caso não tenha nenhuma lista de empresas que fazem
o serviço de assistência técnica, solicite-o, se
necessário, junto do seu vendedor.
Para obter rapidamente auxílio tenha consigo os dados
relevantes para a identificação do seu aparelho quando
efectuar
o telefonema:
Marca do aparelho
Modelo/Tipo
Tipo de avaria
Data da compra
Nome do vendedor
17 Garantia
Respeitar as condições de garantia gerais e o período
de garantia indicado na relativa ficha.
Se a documentação do aparelho não conter nenhuma
ficha de garantia, dirigir-se ao próprio vendedor.
O fabricante trabalha permanentemente no
melhoramento dos seus produtos. Por esse motivo,
pedimos que compreenda que reservamos o direito de
proceder a alterações na forma, no equipamento e nos
aspectos técnicos.
6
Manual de instruções
18 O que fazer quando........:
a) Nenhuma função (aparelho não funciona)>>
Atenção !
O isolamento das paredes do aparelho possibilita em
caso de avaria ou falha de energia, um tempo de
armazenamento de 10 a 12 horas após ocorrência da
mesma.
Em aparelhos com isolamento forte o período de tempo
é bastante superior. Consulte o seu vendedor sobre o
“
Tempo de armazenamento em caso de avaria
”
correspondente ao seu aparelho.
Em avarias de maior duração os produtos congelados
começam a descongelar, pelo que deverá tomar
rapidamente as respectivas medidas para resolução da
avaria ou, se necessário, mudar os produtos para outro
aparelho de refrigeração (possivelmente de um
vizinho).
b) O aparelho não congela o suficiente
O processo de refrigeração é demasiado longo
O compressor trabalha demasiadas vezes
Possíveis causas / Soluções:
Teve em conta o facto de deixar repousar o
aparelho no seu local definitivo, 2 horas antes de o
ligar. (Depositar o circuito do fluido frigorígeno) ver:
“Funcionamento do aparelho”.
Em caso negativo; Com a arca fechada retire a ficha
da tomada, levante a arca de lado durante pouco
tempo e pouse novamente. Duas horas depois coloque
a ficha novamente na tomada. Durante este tempo e
até 12 horas depois não abra arca até que a lâmpada
vermelha apague.
A ficha está funcional e correctamente inserida na
tomada
A tomada tem corrente?
(Verificar eventualmente com um pequeno
electrodoméstico como uma batedeira, etc.)
A tampa do aparelho não fecha correctamente
A borracha não é comprimida com força
Teste: coloque uma folha de papel entre a borracha e a
arca e feche a tampa. O papel apenas poderá ser
retirado de todos os lados com dificuldade. Se o papel
sair de um dos lados ou de vários com facilidade
contacte o serviço de assistência técnica.
Grande formação de gelo nas paredes interiores
(Ver “
Limpeza e tratamento
”)
O aparelho é atingido por luz solar directa ou
encontra-se perto de uma fonte de calor (fogão,
aquecedor, etc.)
Proteger o aparelho de luz solar directa / verificar a
distância entre o aparelho e a fonte de calor / colocar
uma placa de isolamento entre o aparelho e a fonte de
calor
A quantidade de produtos frescos armazenados
não é adequada à capacidade de refrigeração do
seu aparelho (placa de características: XX kg/24h)
ou foram armazenados alimentos demasiado
quentes. (ver
“Reabastecimento de alimentos
frescos”
)
Page 51

2-3 4 6 8 10-12
Carne picada > Saco de congelação de polietileno >
z
Charcutaria > Saco de congelação de polietileno >
z
Peixes pequenos > Saco de congelação de polietileno >
z
Coração / Fígado > Saco de congelação de polietileno >
z
Gelados > Recipiente de plástico >
z
Frutas > Recipiente de plástico >
z
Queijo > Saco de congelação de polietileno >
z
Pão > Saco de congelação de polietileno > z
Peixes grandes > Saco de congelação de polietileno >
z
Bolos / Biscoitos > Recipiente de vidro >
z
Carne de porco > Folha de alumínio >
z
Carne bovina > Folha de alumínio >
z
Coelho > Folha de alumínio >
z
Carne de carneiro > Folha de alumínio >
z
Cogumelos > Saco de congelação de polietileno >
z
Aspáragos > Saco de congelação de polietileno >
z
Legumes (cortados) > Saco de congelação de polietileno >
z
Morangos > Saco de congelação de polietileno >
z
Tortas > Folha de alumínio >
z
Frango > Folha de alumínio >
z
Perú > Folha de alumínio >
z
Pato > Folha de alumínio >
z
Ganso > Folha de alumínio >
z
Couve-flor > Saco de congelação de polietileno >
z
Feijão > Saco de congelação de polietileno >
z
Pimentos > Saco de congelação de polietileno >
z
Compotas > Recipiente de vidro >
z
Frutas cozidas > Recipiente de vidro >
z
Eislutscher > Folha de alumínio >
z
Tempo de conservação aprox. em meses
Português
Géneros alimentícios frescos
Embalagem adequada
TABELA DE CONSERVAÇÃO P
7
Page 52

Português
Componentes
As peças ex is tem individualmente
de acordo com o modelo
A
Tampa da arca
B
Vedação da tampa (borracha)
C
Luz interior
D
Caixa
E
Espaço de armazenagem
F
Grelha de ventilação
G
Painel de comandos
H
Separador
I
Prateleira de pré-congelação
K
Cesto amovível
L
Câmara do compressor
M
Compressor (Motor)
N
Filtro de exsicação
O
Ventilador
P
Condensador
Q
Tubo capilar
R
Liquefactor do painel traseiro
S
Marca de empilhamento
T
Liquefactor da parede exterior
As 4.GIFodnamocedsiéniapsodseõçairavsetnerefid
Por favor, marque a variante correspondente ao seu aparelho
1. Variante com botã a4.GIFodarapesmeadipároãçalegnocedoãçnufarapo
A
Regulador da temperatura (Termóstato
B
ALARME
vermelha
C
CONTROLO (a funcionar)
verde
D
INDICADOR DE CONGELAÇÃO RÁPIDA
amarela
E
BOTÃO DE CONGELAÇÃO RÁPIDA
Em separado
2. Variante com botão luminoso de congel b4.GIFadipároãça
A
Regulador da temperatura (Termóstato)
B
BOT.O DE CONGELA..O R¨¢PIDA amarela
C
ALARME
vermelha
D
CONTROLO (a funcionar) verde
Se as lâmpadas de controlo no seu aparelho estiverem dispos tas de forma diferente, é sempre válido:
verde = Controlo de funcionamento / vermelha = alarme / amarela = botão de congelação rápida
L
M N O P
Q
R
A
B
D
E
G
K
C
E
S
T
F
H
I
FIG. 3
FIG. 2
FIG. 1
A
E
Min. Max.
B
D C
A
Min.
Max..
C
B
C
D
8
Page 53

Page 54

Page 55

Page 56

Page 57

Page 58

Page 59

Page 60

Page 61

Page 62

Page 63

0070501447
 Loading...