

Haier ATB12AR, ATB10AR, ATB08AR User Manual

IMPORTANT
Do Not Return This Product To The Store
If you have a problem with this product, please contact the "Haier Customer
Satisfaction Center" at 1-877-337-3639.
DATED PROOF OF PURCHASE REQUIRED FOR WARRANTY SERVICE
IMPORTANT
Ne pas Réexpédier ce Produit au Magasin
Pour tout problème concernant ce produit, veuillez contacter le service des
consommateurs ‘Haier Customer Satisfaction Center’ au 1-877-337-3639.
UNE PREUVE D’ACHAT DATEE EST REQUISE POUR BENEFICIER DE LA GARANTIE.
AMANA
Top Mount No Frost
IMPORTANTE
No regrese este producto a la tienda
Si tiene algún problema con este producto, por favor contacte el "Centro de Servicio al
NECESITA UNA PRUEBA DE COMPRA FECHADA PARA EL SERVICIO DE LA GARANTIA
Consumidor de Haier" al 1-877-337-3639 (Válido solo en E.U.A).
115V, 60 Hz
AMANA
Haier America
New York, NY 10018
HTV15.16/HTE15.16
Issued: February-04
Printed in China
Part # RF-9999-142
de Montaje Superior Sin Escarcha
User Manual-
Guide de l’Utilisateur-
Manual del Usuario-
Refrigerator
Refrigerateur
sans gel monte de dessus
Refrigerador
Model #
ATB12AR
Modèle
Para Modelo de
ATB10AR
ATB08AR

English
Español
SAFETY PRECAUTIONS
Read all of the instructions before using this appliance. When
using this appliance, always exercise basic safety precautions,
including the following:
1) Use this appliance only for its intended purpose as described in this use
and care guide.
2) This refrigerator must be properly installed in accordance with the
installation instructions before it is used. See grounding instructions in
the installation section.
3) Never unplug your refrigerator by pulling on the power cord. Always
grasp the plug firmly and pull straight out from the outlet.
4) Repair or replace immediately, all electric service cords that have
become frayed or otherwise damaged. Do not use a cord that shows
cracks or abrasion damage along its length, the plug or the connector
end.
5) Unplug your refrigerator before cleaning or making any repairs.
Note:
certified technician or call our customer service number for assistance.
6) Do not use any electrical device or any sharp instrument in defrosting
your refrigerator.
7) If your old refrigerator is not being used, we recommend that you
remove the doors and leave the shelves in place. This will reduce the
possibility of danger to children.
8) After your refrigerator is in operation, do not touch the cold surfaces in
the freezer compartment, particularly when hands are damp or wet.
Skin may adhere to these extremely cold surfaces.
9) Do not refreeze foods, which have been thawed completely. The United
States Department of Agriculture in Home and Garden Bulletin No. 69
reads: “…You may safely refreeze frozen foods that have thawed if
they still contain ice crystals or if they are still cold-below 40˚F”.
“…Thawed ground meats, poultry, or fish that have any off-odor or offcolor should not be refrozen and should not be eaten. Thawed ice
cream should be discarded. If the odor or color of any food is poor or
questionable, discard it. The food may be dangerous to eat.”
“…Even partial thawing and re-freezing reduce the eating quality of
foods, particularly fruits, vegetables, and prepared foods. The eating
quality of red meats is affected less than that of many other foods. Use
refrozen foods as soon as possible, to save as much of its eating quality as you can.”
1
If for any reason this product requires service, please contact a
Garantía Limitado
¿Qué está cubierto y por
cuánto tiempo?
Esta garantía cubre cualquier defecto en
la manufactura o empleo de materiales
por un plazo de:
12 meses de mano de obra
12 meses en componentes
5 años en el sistema sellado
La garantía comienza en la fecha de
compra del artículo, y la factura original
de compra debe presentarse al centro
de servicio autorizado para poder
efectuar cualquier reparación que esté
bajo garantía.
EXCEPCIONES: Garantía por Uso
Comercial o Bajo Arrendamiento
90 meses en mano de obra
(únicamente en taller)
90 días en componentes
Ninguna otra garantía es válida
¿Qué está cubierto?
1. Los componentes mecánicos y
eléctricos que cumplen con alguna
función de este aparato durante un
plazo de 12 meses. Esto incluye
cualquier componente con excepción
de acabados y molduras.
2. Los componentes del sistema sellado,
como por ejemplo: compresor
hermético, condensador, y
evaporador, por defectos de
manufactura durante un plazo de 5
años a partir de la fecha de compra.
Cualesquier daños a tales
componentes causados por abuso
mecánico o manejo o transportación
inadecuada no serán cubiertos.
¿Qué se hará?
1. Repararemos o reemplazaremos, a
discreción nuestra, cualquier
componente mecánico o eléctrico que
se muestre defectuoso por uso normal
durante el plazo así especificado.
2. No habrá cargos para el comprador
por las partes y la mano de obra en
cualesquier artículos cubiertos
durante el periodo inicial de 12
meses. Al término de este periodo
solo las partes son cubiertas en la
garantía restante. La mano de obra
no está provista y debe ser cubierta
por el cliente.
3. Localice su centro de servicio
autorizado más cercano.
Para conocer el nombre del centro de
servicio más próximo a su domicilio,
por favor llame al 1-877-337-3639
(Válido solo en E.U.A).
ESTA GARANTIA CUBRE
APARATOS DENTRO DEL
TERRITORIO CONTINENTAL DE
LOS ESTADOS UNIDOS Y
CANADA. ESTA GARANTIA NO
CUBRE LO SIGUIENTE:
Daños por instalación inadecuada.
Daños por transportación.
Defectos que no sean por manufactura.
Daños por negligencia, abuso,
accidente, alteraci-ón, falta de cuidado
adecuado y de mantenimiento, o
conexión a tensión eléctrica incorrecta.
Daños que no sean por uso doméstico.
Daños por servicio que no sea
proporcionado a través de un
distribuidor o centro de servicio
autorizado. Molduras decorativas o
focos reemplazables.
Envío y transportación.
Mano de obra (después de los primeros
12 meses).
ESTA GARANTIA LIMITADA ES
PROVISTA EN SUSTITUCION A
CUALQUIER OTRA GARANTIA
EXPRESADA O QUE IMPLIQUE LAS
GARANTIAS MERCANTILES SUJETAS A
CIERTO PROPOSITO.
El amparo provisto por esta garantía es
de uso exclusivo y se otorga en
sustitución a cualquier otro amparo.
Esta garantía no cubre daños
incidentales o sus derivados, por lo que
las anteriores restricciones pueden serle
ajenas. En ciertos estados no se
permiten restricciones en lo que se
refiere a la duración implícita de una
garantía, por lo que las anteriores
restricciones pueden serle ajenas.
Esta garantía le otorga ciertos derechos
legales y es posible que usted goce de
otros derechos, los cuales varían de
estado a estado.
Haier America
New York, NY 10018
20

Español
English
El motor trabaja muy seguido
• Puede ser normal para mantener la temperatura en días cálidos y de humedad
• La puerta es abierta frecuentemente por un largo tiempo.
• Limpie el condensador (para los modelos que tienen el condensador a la vista)
• Controle las juntas de la puerta para que cierre correctamente.
• Controle si la puerta cierra completamente
Formación de vapor en el interior o exterior del refrigerador
• Es normal en días de mucha humedad
• La puerta es abierta con mucha frecuencia
• Controle las juntas de la puerta
El refrigerador tiene olor
• El interior del mismo necesita limpieza
• Comidas no envueltas o tapadas correctamente estan provocando olores.
La luz del refrigerador no funciona
• Controle la corriente
• Ajuste la lamparita al enchufe
• Reemplace en caso de que esté la lampara quemada
La puerta no cierra correctamente
• Nivele la unidad
• Re-alinee la unidad
• Controle que no haya bebidas bloqueando la puerta
10) This refrigerator should not be recessed or built-in an enclosed cabinet.
It is designed for freestanding installation only.
11) Do not operate your refrigerator in the presence of explosive fumes.
SAVE THESE INSTRUCTIONS
For Future Reference Please
DANGER
Risk of child entrapment. Before you throw away your old refriger-
ator or freezer, take off the doors. Leave the shelves in place so
that children may not easily climb inside.
Thank you for using our Haier
product. This easy-to-use manual will
guide you in getting the best use from
your refrigerator.
Remember to record the model and
serial number. They are on a label in
back of the refrigerator.
Model number
Serial number
Date of purchase
19
Staple your receipt to your manual.
You will need it to obtain warranty service.
2

English
Español
Table Of Contents
page
Safety Precautions ......................................................................1-2
Parts and Features......................................................................4-5
Installing Your Refrigerator ............................................................6
Unpacking Your Refrigerator ..............................................................................6
Leveling Your Refrigerator ..................................................................................6
Proper Air Circulation ........................................................................................6
Electrical Requirements........................................................................................6
Use of Extension Cords ......................................................................................6
Install Limitations ................................................................................................7
Door Alignment..................................................................................................7
Reversing the Door Swing ..................................................................................7
Dismantling........................................................................................................8
Reinstallation......................................................................................................8
Installing and Reversing Door Handles ................................................................9
Refrigerator Features and Use......................................................10
Adjustable Temperature dial ..............................................................................10
Freezer Temperature Control..............................................................................10
Refrigerator Interior Shelves ..............................................................................10
Utility Drawer and Cover ..................................................................................11
Crisper and Crisper Cover ................................................................................11
Crisper Humidity Control ..................................................................................12
Problemas Generales
El refrigerador no funciona
• Controle que la perilla de la temperatura no esté en OFF
• Controle que la unidad esté enchufada
• Controle que haya corriente en la toma.
• Espere unos 30-40 minutos hasta ver que el refrigerador comience a funcionar.
Puede requerir de un tiempo hasta que el compresor termine el ciclo para
comenzar a operar.
La temperatura de los alimentos parece cálida
• La puerta es abierta frecuentemente
• Permita tiempo a los alimentos colocados recientemente a alcanzar la temperatura establecida.
• Controle que la puerta cierre correctamente
• Limpie el condensador (para los modelos que tienen el condensador a la vista)
• Ajuste el control de temperatura a mayor nivel de frío.
La temperatura de los alimentos es demasiado fría
• Ajuste el nivel de temperatura a una posición más cálida y permita un tiempo
para que la misma se ajuste.
Proper Refrigerator Care and Cleaning ........................................16
Light Bulb Replacement ....................................................................................16
Power Interruptions ..........................................................................................17
Vacation and Moving Care ..............................................................................17
Troubleshooting ......................................................................17-18
Warranty Information ..................................................................19
3
18
Español
English
Interrupciones de energía
• Ocasionalmente pueden ocurrir cortes de energía debido a tormentas u otras
causas. Desenchufe cuando esto ocurra. Cuando la corriente se reestablezca
enchufe el cable nuevamente. Si el corte de corriente fuese por un período de
tiempo prolongado inspeccione y descarte los alimentos que se hayan descongelado en el freezer o refrigerador. Limpie por dentro del refrigerador antes de
volver a enchufar.
Vacaciones y cuidados en el traslado de la unidad
• En caso de que usted tome vacaciones o esté ausente, vacíe el refrigerador y
freezer, mueva el dial de temperatura a Off y limpie la unidad de acuerdo a las
instrucciones generales de limpieza. Deje la puerta abierta de modo que el aire
pueda circular. Cuando necesite trasladar la unidad siempre mueva verticalmente. No la mueva en forma horizontal, puede causar daños al sistema.
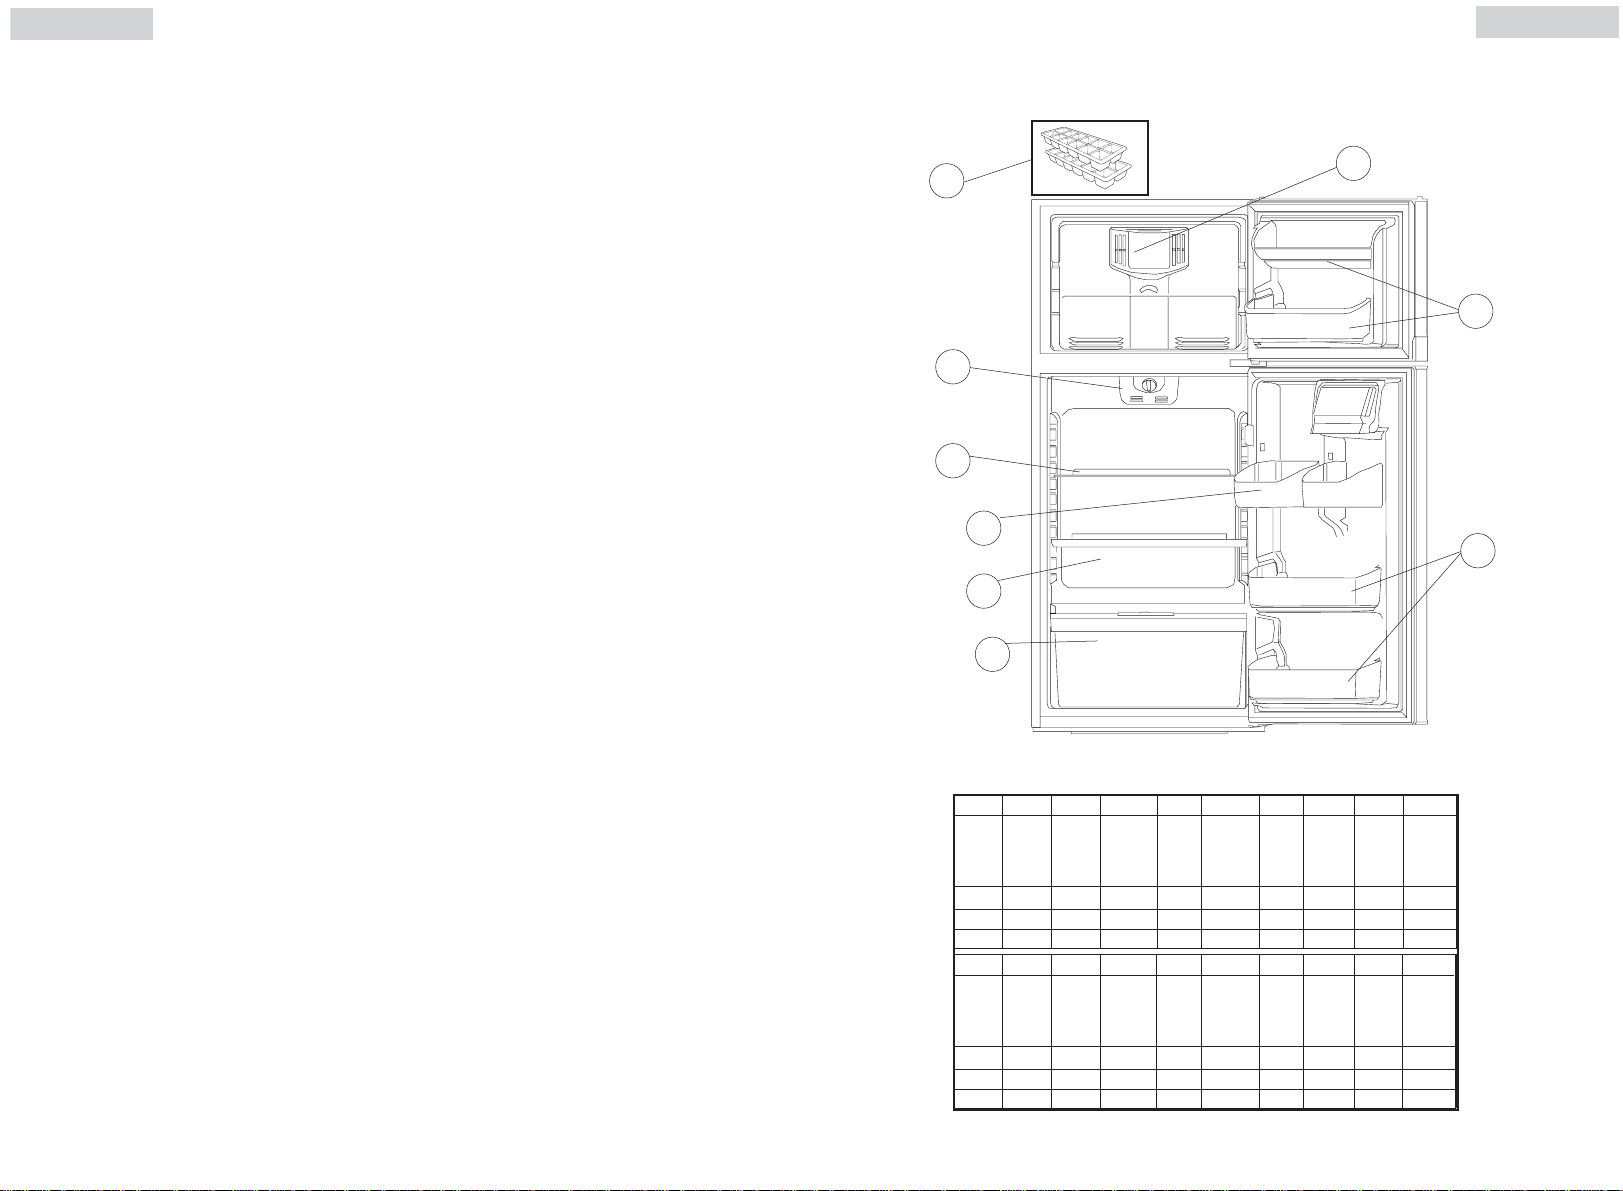
Parts and Features
10
1
8
2
3
4
7
5
6
17
ATB12
ATB10
ATB08
ATB12
ATB10
ATB08
fig. 1
12 3 45 6 78910
Ice
Adj.
Interior
Covered
Crisper
Cube
Temp.
Ref.
Trays
Control
& Light
2Yes 2 Opaque Glass 2 Opaque 2 2 Pocket Yes
2Yes 2 Opaque Glass 2 Opaque 3 2 Pocket Yes
2Yes 2 Opaque Glass 2 Opaque 3 2 Pocket Yes
12 3 45 6 78910
Ice
Adj.
Cube
Temp.
Trays
Control
& Light
2Yes 2 Opaque No Wire gate 2 2 Pocket Yes
2Yes 2 Opaque No Wire gate 3 2 Pocket Yes
2Yes 2 Opaque No Wire gate 3 2 Pocket Yes
Shelf
Interior
Ref.
Shelf
Dairy
Compar
tment
Covered
Dairy
Compar
tment
Cover
Crisper
Cover
Crisper Refr.
Crisper Refr.
Door
Shelves
Door
Shelves
Freezer
Door
Shelves
Freezer
Door
Shelves
Door
Handle
Door
Handle
Freezer
Temp.
Contro
Freezer
Temp.
Control
4
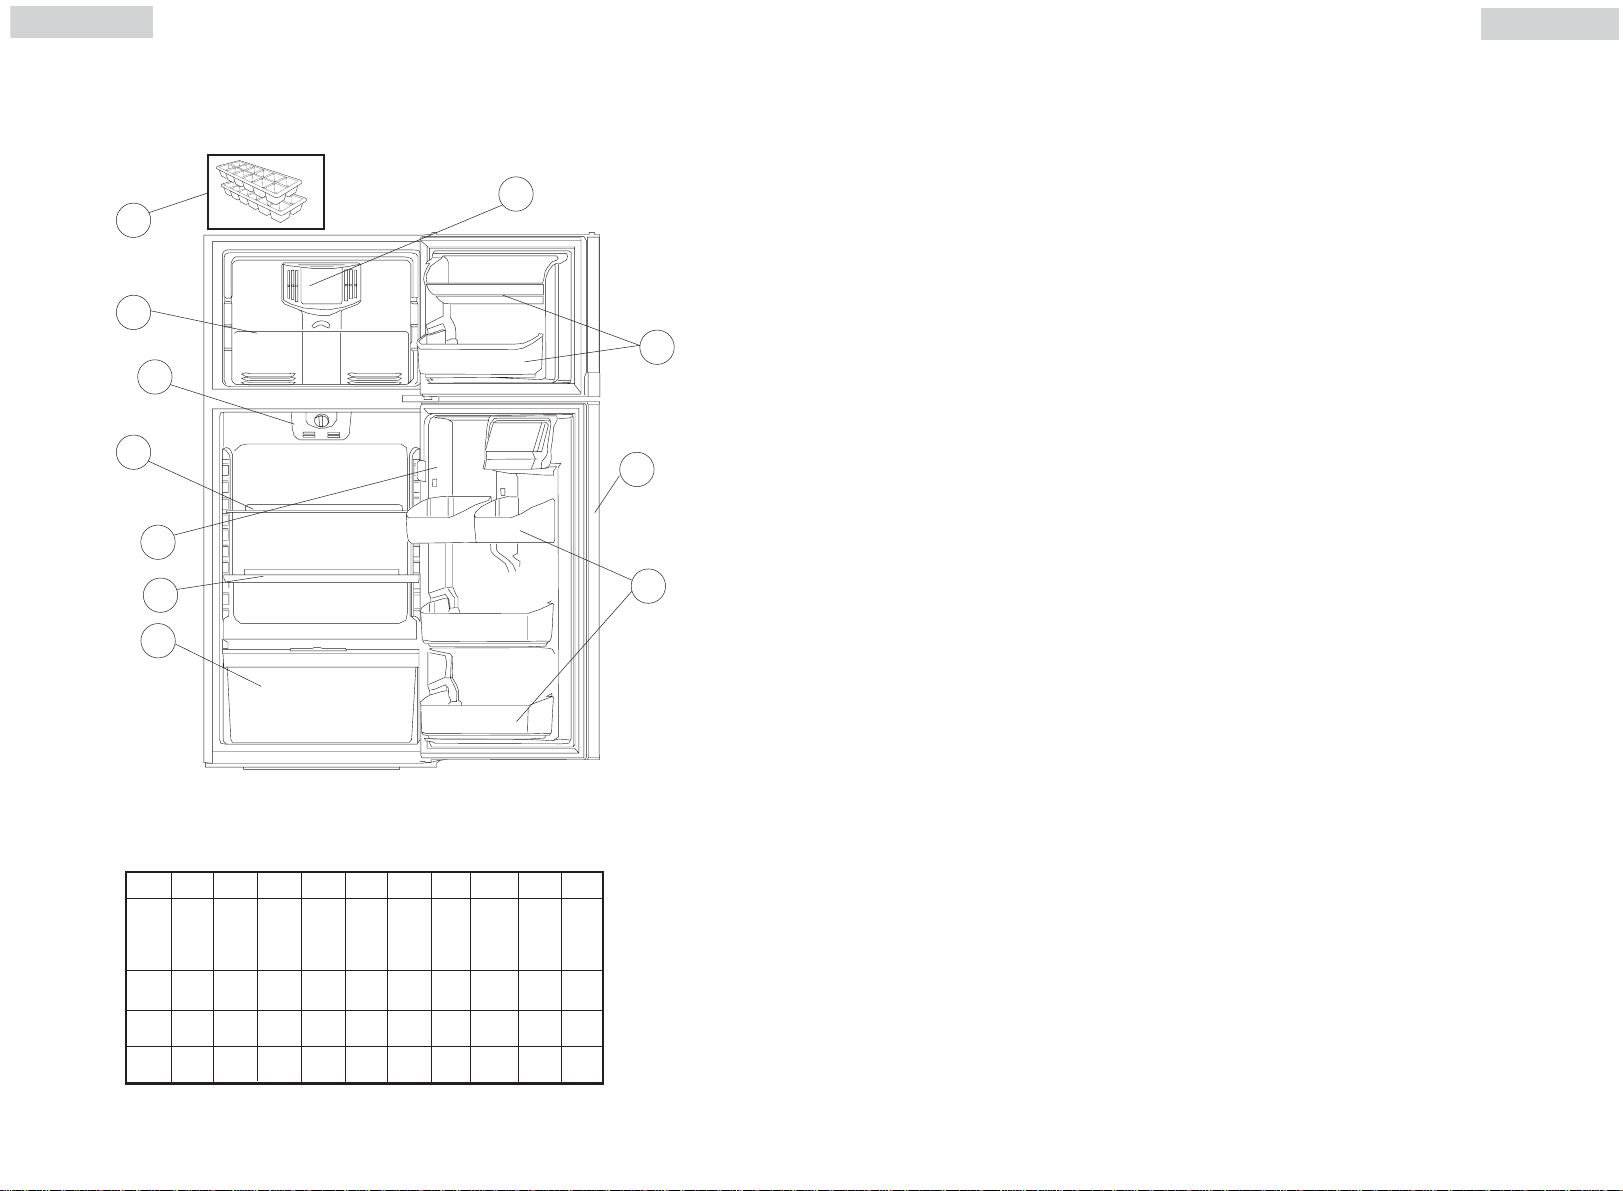
English
Español
Parts and Features
10
7
6
1
3
4
5
11
fig. 1
Cuidado y Mantenimiento Apropiado del
Refrigerador de Bebidas
Cuidado: Para evitar riesgos de un shock eléctrico desenchufe siempre la
unidad antes de limpiar. No ignore nunca esta advertencia.
Precaución: Antes de utilizar productos de limpieza siempre lea y siga las
instrucciones le fabricante para evitar lesiones y daños a la unidad.
General: • Prepare una solución de 3 o 4 cucharadas de bicarbonato de
sosa mezclado con agua tibia. Utilice una esponja o paño suave
humedecida con la solución anterior para repasar el refrigerador.
8
9
2
Juntas de la puerta:
Parte trasera del refrigerador:
• Lave com agua tibia y limpia y seque con un paño suave.
• No utilice químicos, abrasivos, amoníaco, cloro, detergentes concentrados, solventes o esponjas de metal. Algunos de estos materiales pueden dañar, corromper o decolorar se unidad.
• Limpie las juntas cada tres meses mínimo de acuerdo a las instrucciones generales de limpieza. Las juntas deben mantenerse limpias
para permitir un correcto sellado de puerta mientras esté cerrada.
• Puede pasarse en la junta un poco de vaselina para mantener las
juntas flexibles y asegurar el sellado completo.
• Recomendamos que limpie la parte tasera del refrigerador por
los menos 2 veces al año.
Nota: Algunos ambientes requieren de una limpieza
mas frecuente.
• Luego de desenchufar el refrigerador utilice una aspiradora o un
cepillo para la limpieza.
ATB12
ATB10
ATB08
5
1234567891011
Interior
Door
Dairy
Crisper
Refrig.
Shelves
Shelves
Refrig.
22Clear Glass 2 Clear Yes
23Clear Glass 2 Clear Yes
23Clear Glass 2 Clear Yes 1-Slide 2 Grip 2 Yes
Compa
rtment
Cover
Crisper Adj.
Freezer
Thermostat &
Light
Freezer
Shelf
Door
Handle
Shelves
1-Slide
2 Grip 2 Yes
Adjustable
1-Slide 2 Grip 2 Yes
Adjustable
Adjustable
Door
Ice
Cube
Tray
Freezer
Temp.
Control
Reemplazo de la lamparita:
1. Apague el refrigerador
2. Retire el estante superior
3. Permita que la lamparita se enfrie antes de cambiar
4. Para retirar la tapa de la lámpara sostenga del lado izquierdo y presione gentilmente del lado derecho hasta que la misma se suelte.
5. Retire la lampara desenroscando en dirección contraria a las agujas del reloj.
6. Siempre reemplace por una lamparita de 40 watts o de menor voltage.
7. Que la lampara nunca exceda los 40 watts
8. Coloque nuevamente la tapa.
9. Enchufe el refrigerador.
16

Español
English
Sonidos de la operación normal
• El aire proveniente del ventilador circulando en el interior para mantener la
temperatura seleccionada.
• Burbujeo, sonido de agua hirviendo, o pequeñas vibraciones que son el resultado de
la circulación del líquido refrigerante.
• Sonido crujiente durante el ciclo de descongelado
• Goteo de agua mientras que el ciclo de descongelado esta funcionando
• Golpeteo o crujido debido a la expansión o contracción de las bovinas durante el
ciclo de descongelado.
• El termostato hara un “click” cuando se encienda y apague.
Installing Your Refrigerator
Unpacking Your Refrigerator
1. Remove all packaging material. This includes the foam base and all adhesive
tape holding the refrigerator accessories inside and outside.
2. Inspect and remove any remains of packing, tape or printed materials before
connecting power to your refrigerator.
Leveling Your Refrigerator:
•Your refrigerator has two leveling legs which are located in the front corners of
your refrigerator. After properly placing your refrigerator in its final position,
you should level your refrigerator for horizontal standing.
• Leveling legs can be adjusted by turning them counterclockwise to raise your
refrigerator or by turning them clockwise to lower your refrigerator. The
refrigerator door will close easier when the leveling legs are raised.
Proper Air Circulation
•To assure your refrigerator works at the maximum efficiency it was designed
for, you should install it in a location where there is proper air circulation,
plumbing and electrical connections.
• The following are recommended clearances around the refrigerator:
Sides……………3/4" (19mm)
Top....................1" (25mm)
Back..................1" (25mm)
15
Electrical Requirement
• Make sure there is a suitable power outlet (115 volts, 15 amps outlet) with
proper grounding to power the refrigerator.
•Avoid the use of three plug adapters or cutting off the third grounding in order to
accommodate a two plug outlet. This is a dangerous practice since it provides no
effective grounding for the refrigerator and may result in shock hazard.
Use of Extension Cords
•Avoid the use of an extension cord because of potential safety hazards. If it is
necessary to use an extension cord, use only a 3-wire extension cord that has a
3-blade grounding plug and a 3-slot outlet that will accept the plug. The
marked rating of the extension cord must be equal to or greater than the
electrical rating of the appliance.
6

English
Install Limitations
•Do not install your refrigerator in any location not properly insulated or heated
e.g. garage etc. Your refrigerator was not designed to operate in temperature
settings below 55˚ Fahrenheit.
• Select a suitable location for the refrigerator on a hard even surface away from
direct sunlight or heat source e.g. radiators, baseboard heaters, cooking
appliances etc. Any floor unevenness should be corrected with the leveling legs
located on the front bottom corners of the refrigerator.
Español
Door Alignment
1. Remove hinge cover screw.
2. Remove top hinge cover.
3. Loosen the top hinge screws using a phillips head screwdriver.
4. Adust the door and then tighten the screws.
5. Replace the top hinge cover.
Reversing the Door Swing
Left/right door opening method:
This product provides the reversing of the left/right door opening. You can select
your preference of door opening by following the procedure to make the change.
fig. 1
hinge cover
(see fig. 1)
(see fig. 1 to fig. 4)
top hinge
Caracteristicas del Freezer
Ajustando o retirando el estante deslizable:
(ver fig. # 17) (HTE Series)
1. Sostenga el estante y deslice el mismo hacia delante hasta trabe.
2. Para colocar nuevamente el estante del freezer inserte y empuje el
mismo dentro de los soportes laterales izquierdos.
3. Para retirar simplemente levante y tire hacia fuera del compartimento
del freezer.
fig. 17
Creación de hielo: (series HTE solamente)
• Su refrigerador está equipado para la instalación de un kit para hacer
hielo si lo desea. Usted puede instalar un kit HAIER HI1MK. Para mayor
información llame al 1-800-461-8890/ 3100
7
14

Español
English
• La opción BAJO permite que la humedad se escape del comparitmento
para un almacenamiento optimo de frutas y vegetales con piel.
• La opción ALTO retiene parte de la humedad en el compartimento
para optimizar la guarda de vegetales y verduras frescas.
Low
High
fig. 14
ALTO /BAJO
Estantes de la Puerta del Refrigerador
Estante de la puerta: (ver fig. # 15)
Su unidad esta equipada con estantes para colocar botellas en la puerta.
Los mismos le permitirán el almacenaje de recipientes o botellas de
tamaño en galones.
Para retirar los estantes de la puerta: (ver fig. # 15)
1. Retire todos los elementos que se encuentren almacenados en el estante
2. Gentilmente tire hacia arriba de ambos laterales hasta que el estante
salga de los soportes y retire.
Para colocar los estantes: (ver fig. # 15)
1. Alinee los laterales del estante con los soportes de la puerta.
2. Cuidadosamente empuje hacia abajo hasta que el mismo trabe
seguramente en su lugar.
Estante de puerta superior
fig. 15
Estante de puerta inferior
Dismantling
1. Fix refrigerator and freezer door by sticking adhesive tape on both sides to hold
doors in place.
2. As shown in fig. 1, remove hinge top cover on the upper part of freezer door.
Then remove the two screws from the hinge. Take out the hinge by pulling it vertically, and keep it in a safe place.
3. Remove the adhesive tape on freezer door, lift and take the door down, and
carefully put it aside.
4. As shown in fig. 2, remove screws of the central hinge, lift and take down the
central hinge and pad, and keep them in a safe place.
5. Remove the adhesive tape on refrigerator door, lift and take down
refrigerator door, and carefully put it aside.
fig. 2
central hinge pad
central hinge axle
Reinstallation
1. As shown in fig 3 remove the door axle and
install on the opposite hole with washer pads
(2) in place. Now dismantle the lower hinge
and install the opposite side with the hinge
spacer and washer pads in place.
2. Install refrigerator door: make the left bottom
hole of the refrigerator compartment door fall
over the lower hinge axle, move the door back and forth to make it straight
and in alignment with central hinge. Install the central hinge again, turn the
hinge axle until it completely enters the door body, then fix it with screws.
3. Install freezer door: align left bottom hole of freezer door over the central
axle. Take hinge and adjust so that hinge axle can be installed in the upper
hole of the freezer door; adjust door to make it straight and level. Tighten
the screws of upper hinge.
4. Install top hinge cover on the left side.
fig. 4
central
hinge axle
13
central hinge pad
8
 Loading...