

Page 1

DOC022.52.80407
50 49
08/2013, Edition 1
User Manual
Page 2

Page 3

Table of Contents
Specifications..............................................................................................................3
General information..................................................................................................3
Safety information........................................................................................................3
Use of hazard information............................................................................................ 3
Precautionary labels....................................................................................................4
Product overview.......................................................................................................4
Meter compatibility....................................................................................................5
Preparation for use....................................................................................................5
Polarize the dissolved oxygen probe................................................................5
Calibration.....................................................................................................................5
Calibration notes..........................................................................................................5
Calibration procedure (pH and conductivity)................................................................ 6
Calibration procedure — DO probe, water-saturated (100%) air................................. 7
Adjust the calibration (manual calibration)...................................................................8
Sample requirements...............................................................................................9
Sample measurement...............................................................................................9
Measurement notes.....................................................................................................9
Measurement procedure............................................................................................ 10
Maintenance...............................................................................................................10
Replace the probes.................................................................................................... 10
Clean the probes.......................................................................................................11
Dissolved oxygen probe............................................................................................12
Clean the probe..................................................................................................12
Replace the membrane module.........................................................................12
Fill the membrane module..................................................................................12
Storage......................................................................................................................13
Rehydrate the pH probe............................................................................................13
Troubleshooting.......................................................................................................13
Troubleshooting notes...............................................................................................15
Examine the probes...................................................................................................15
Replacement parts and accessories...............................................................15
Index...............................................................................................................................17
1
Page 4

Table of Contents
2
Page 5
Specifications
Specifications are subject to change without notice.
Specification Description
Parameter pH, conductivity and dissolved oxygen (DO)
Measurement range pH: 0 to 14, Conductivity: 5 to 30,000 µS/cm, DO: 0.03 mg/L oxygen to
Temperature sensor Integrated into conductivity sensor
Sensor pH: glass membrane (standard), Conductivity: platinum (platinized),
Reference type (pH) Ag/AgCl
Junction type (pH) Porous pin
Electrolyte pH: Non-refillable gel, DO: Hach electrolyte solution 2759123
Storage solution pH: 3M KCl, Conductivity: distilled water, DO: dry
Number of poles (conductivity sensor) 2
Conductivity cell constant (cm-1) 1.0
Meter compatibility sensION+ MM156 / MM156 DL
Body material Multisensor body: PVC
Length 170 mm
Diameter 40 mm total diameter with 12 mm individual sensors (55 mm diameter
Cable 1.5 m
Connector MP8
1
For use with sensION+ MM156 / MM156 DL portable meters only
saturation, Temperature: 0 to 50 °C (32 to 122 °F)
DO: polarographic with replaceable membrane
Probes body: ABS
Protective shroud: Polycarbonate
with protective shroud installed)
1
General information
In no event will the manufacturer be liable for direct, indirect, special, incidental or consequential
damages resulting from any defect or omission in this manual. The manufacturer reserves the right to
make changes in this manual and the products it describes at any time, without notice or obligation.
Revised editions are found on the manufacturer’s website.
Safety information
Use of hazard information
D A N G E R
Indicates a potentially or imminently hazardous situation which, if not avoided, will result in death or serious injury.
Indicates a potentially or imminently hazardous situation which, if not avoided, could result in death or serious
injury.
Indicates a potentially hazardous situation that may result in minor or moderate injury.
W A R N I N G
C A U T I O N
English 3
Page 6
N O T I C E
Indicates a situation which, if not avoided, may cause damage to the instrument. Information that requires special
emphasis.
Precautionary labels
Read all labels and tags attached to the instrument. Personal injury or damage to the instrument
could occur if not observed. A symbol on the instrument is referenced in the manual with a
precautionary statement.
Electrical equipment marked with this symbol may not be disposed of in European public disposal
systems after 12 August of 2005. In conformity with European local and national regulations (EU
Directive 2002/96/EC), European electrical equipment users must now return old or end-of-life
equipment to the Producer for disposal at no charge to the user.
Note: For return for recycling, please contact the equipment producer or supplier for instructions on how to return endof-life equipment, producer-supplied electrical accessories, and all auxiliary items for proper disposal.
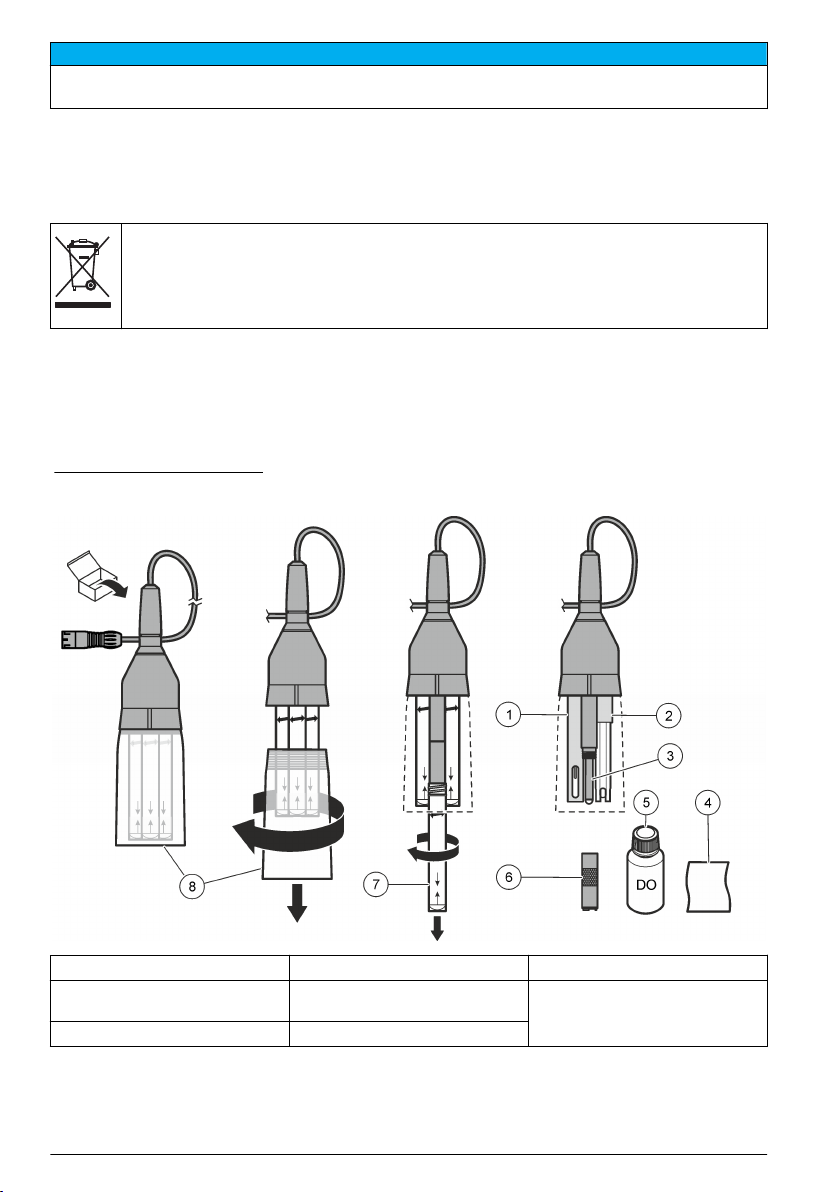
Product overview
The 50 49 multisensor is used for pH, conductivity and dissolved oxygen measurements in general
aqueous samples. The 50 49 multisensor has a built-in temperature sensor within the conductivity
probe. Refer to Figure 1. Refer to Sample requirements on page 9 for limitations on use.
The 50 49 multisensor is used with sensION+ meters. Refer to Meter compatibility on page 5.
Figure 1 Product overview
1 Conductivity probe 4 DO polishing cloth 7 Probe storage tube
2 pH probe 5 DO electrolyte (membrane filling
solution)
3 Dissolved oxygen probe 6 Membrane module (DO probe)
8 Protective shroud
4 English
Page 7

Meter compatibility
The 50 49 multisensor is compatible with the sensION+ handheld meter models: MM156 and
MM156 DL.
Preparation for use
C A U T I O N
Personal injury hazard. Broken glass can cause cuts. Use tools and personal protective equipment to
remove broken glass.
To prepare the probes for calibration or sample measurement:
1. Turn the protective shroud and remove from the multisensor.
2. Turn the probe storage tube(s) and remove from the probe(s). Keep the probe storage tube(s).
3. For conductivity probes: Before initial use, soak the probe sensor in ethanol for 15 seconds.
4. For dissolved oxygen probes: refer to Polarize the dissolved oxygen probe on page 5.
5. Rinse the probe(s) with deionized water. Blot dry with a lint-free cloth.
Polarize the dissolved oxygen probe
Before calibration or measurement of dissolved oxygen with the multisensor, polarize the dissolved
oxygen probe.
The dissolved oxygen probe must be polarized every time the multisensor is disconnected from the
meter or the batteries are removed from the meter. The probe is continuously polarized while it is
connected to the meter.
1. Fill the DO membrane module. Refer to Fill the membrane module on page 12
2. Install the membrane module.
3. Connect the multisensor to the meter. Set the meter to on.
4. Let the dissolved oxygen probe to polarize. Refer to Table 1 for the amount of time.
5. Enter the atmospheric pressure and salinity on the meter. Refer to the meter manual.
Table 1 Polarization times
Disconnect time Polarization time
Less than 5 minutes 10 minutes
5–15 minutes 45 minutes
More than 15 minutes 6 hours
Calibration
Before calibration:
Prepare the probe(s) for use. Refer to Preparation for use on page 5.
Prepare the meter. Refer to the meter manual.
Calibration notes
• For maximum accuracy, calibrate the probe at least once a day.
• Prepare fresh standard solutions for the calibration.
English
5
Page 8

• The calibration and sample measurement conditions must be as similar as possible (e.g., the
temperature of the solution, stir procedure, stir rate and position of the probe).
• The temperature sensor is within the conductivity probe. Calibration standards must be at same
temperature (ambient temperature is recommended).
• For pH calibration, at least 2 calibration points are necessary.
• For conductivity calibration, use 1-point calibration and select the standard nearest to the expected
measurement range. Refer to the meter manual for other conductivity calibration options.
• Calibration of conductivity cells is important as the conductivity cell constant can change with time.
The calibration identifies the actual cell constant versus the nominal value.
• Do not dilute conductivity standards or samples.
• For dissolved oxygen calibration, a water-saturated air calibration is recommended. Refer to
Calibration procedure — DO probe, water-saturated (100%) air on page 7.
• When the probe is submerged, make sure that there are no air bubbles under the probe sensor
tip(s). Gently shake the probe from side to side to remove any air bubbles.
• Make sure that the reference junction of the pH probe is fully immersed in the solution.
• If the stabilization is slow, shake the multisensor from side to side to stir the solution.
• Always hold the multisensor by the handle. Do not hold by the probe tubes to avoid the heating of
the solutions.
• If a calibration error occurs, refer to Troubleshooting on page 13.
Calibration procedure (pH and conductivity)
1. Connect the
multisensor to the
meter. Set the meter to
on.
Note: For dissolved
oxygen calibration, refer
to Calibration procedure
— DO probe, watersaturated (100%) air
on page 7.
6 English
2. Push Calibrate. The
parameter flashes on
the meter display. Use
the arrow keys to
change the parameter,
if applicable.
3. Push Calibrate to
select the parameter.
The standard flashes
on the meter display.
Use the arrow keys to
select the applicable
standard solution.
Note: pH buffers are
automatically
recognized.
4. Prepare the
standard solutions in
the probe storage
tubes. Add
approximately 6.4 mm
(¼ inch) of standard.
Page 9

5. Rinse the probe(s)
with deionized water.
Blot dry with a lint-free
cloth.
6. Put the storage tube
in the corresponding
sensor and turn to
tighten.
7. Push Calibrate to
measure the calibration
solution.
8. When the reading is
stable, the meter
prompts for the next
calibration point.
Repeat steps 4–7 for
additional standard
solutions. The
calibration is complete
when the last standard
solution is read. The
meter shows briefly the
message "CAL OK" if
the calibration is
accepted.
Calibration procedure — DO probe, water-saturated (100%) air
1. Set the meter to on.
If the dissolved oxygen
probe is not polarized,
polarize the probe, refer
to Polarize the
dissolved oxygen probe
on page 5.
2. Push Calibrate. The
parameter flashes on
the meter display. Use
the arrow keys to
change the parameter
to DO.
3. Push Calibrate
again to confirm the DO
parameter. "100.0%"
flashes on the meter
display.
Note: The probe can
also be calibrated at
zero oxygen standard.
Use the arrow keys to
select 0% on meter.
4. Rinse the probe(s)
with deionized water.
Blot dry with a lint-free
cloth.
English 7
Page 10

5. Add approximately
6.4 mm (¼ inch) of
deionized water to the
DO probe storage tube.
6. Invert and shake the
DO probe storage tube
to remove all water
droplets.
7. Immediately put the
DO probe in the storage
tube and turn to tighten.
8. Push Calibrate to
measure the calibration
solution. The calibration
is complete when the
reading is stable. The
meter shows briefly the
message CAL OK if
calibration is accepted.
Adjust the calibration (manual calibration)
A single custom standard value can be specified. Adjust the instrument to read a specified solution
value for pH, DO and conductivity. Use this procedure to calibrate the probe with a single standard
solution.
1. Connect the probe
to the meter. Set the
meter to on.
Note: For dissolved
oxygen calibration,
polarize the probe.
Refer to Polarize the
dissolved oxygen probe
on page 5.
5. Push Read. Wait
until the reading is
stable (stops flashes in
the display).
8 English
2. Rinse the probe with
deionized water. Blot
dry with a lint-free cloth.
6. Push Calibrate. The
parameter flashes on
the meter display. Use
the arrow keys to
change the parameter,
if applicable.
3. Prepare the
standard solution in the
storage tube. Add
approximately 6.4 mm
(¼ inch) of solution.
7. Push and hold
Calibrate, then push
Read. The measured
value flashes. Use the
arrow keys to change
the value.
4. Put the storage tube
in the corresponding
sensor and turn to
tighten.
8. Push Calibrate to
confirm the value. The
meter shows "OK".
Page 11

Sample requirements
The multisensor probes are not compatible with specific sample types. Probe damage can occur if
used in non-compatible samples.
• Samples should be aqueous. Measurements may be made in partially aqueous or some watermiscible solvents. The results must be interpreted with caution as the full pH scale is shifted when
the solvent system changes.
• The multisensor pH probe is not compatible with solutions that contain silver complexing or binding
agents such as TRIS, proteins and sulfides.
• Proteins can collect on the probe sensors. Make sure the probes stay clean when these types of
samples are measured.
• Do not use multisensor in solutions that are outside the specified temperature range. Refer to
Specifications on page 3.
Sample measurement
W A R N I N G
Chemical exposure hazard. Obey laboratory safety procedures and wear all of the personal protective
equipment appropriate to the chemicals that are handled. Refer to the current safety data sheets
(MSDS/SDS) for safety protocols.
N O T I C E
Do not immerse the multisensor if a probe is not connected. Damage to the mini-MP connector will occur.
Before measurement:
Prepare the probe(s) for use. Refer to Preparation for use on page 5.
Calibrate the probe(s). Refer to Calibration on page 5. The manufacturer recommends to calibrate at least once
a day for the best measurement accuracy.
Measurement notes
• The calibration and sample measurement conditions must be as similar as possible (e.g., the
temperature of the solution, stir procedure, stir rate and position of the probe).
• Do not dilute conductivity standards or samples.
• When the probe is submerged, make sure that there are no air bubbles under the probe tip. Gently
shake the probe from side to side to remove any air bubbles.
• Make sure that the reference junction on the pH probe is fully immersed in the solution.
• If necessary, turn the protective shroud and remove it from the probe. The manufacturer
recommends to measure with the protective shroud installed. The protective shroud prevents
damage to the sensors.
• Do not put the probe on the bottom or sides of the container.
• If the stabilization is slow, shake the multisensor from side to side in the solution.
• Do not use probes in areas where EMF is present (i.e., voltaic cells, thermoelectric devices,
electrical generators, resistors and transformers). For use in process units (i.e., spot checking),
make sure that the meter is grounded.
• If a measurement error occurs, refer to Troubleshooting on page 13.
English
9
Page 12

Measurement procedure
1. Connect the
multisensor to the
meter. Set the meter to
on.
Note: Before dissolved
oxygen measurement,
polarize the probe if the
probe is not polarized.
5. Put the protective
shroud on and turn to
tighten.
2. Turn the protective
shroud and remove it
from the multisensor.
6. Put the multisensor
in the sample and stir
with the probes or a stir
stand and stir bar.
3. Turn the probe
storage tubes and
remove the tubes from
the probes.
7. To measure bodies
of water, move the
multisensor up and
down approximately
7-15 cm (3–6 inches) to
circulate the sample
around the probe tips.
4. Rinse the probe(s)
with deionized water.
Blot dry with a lint-free
cloth.
8. Push Read.
9. Repeat steps 4–8 for
additional
measurements.
10. When the
measurements are
done, prepare the
probe for storage. Refer
to Storage
on page 13.
Maintenance
Replace the probes
Each probe of the multisensor has a unique mini-MP connector.
10
English
Page 13

Pull straight to remove or connect the probes. Do not turn the connector. Look to the color coding of
the probe and multisensor connectors. Use the white mark to position the probes in the multisensor
connectors. Refer to Figure 2 for more details.
Figure 2 Replace the probes
1 Blue connector: Dissolved
oxygen probe
2 Green connector: Conductivity
probe
3 Black connector: pH probe
Clean the probes
N O T I C E
Do not rub or touch the tip of the pH or dissolved oxygen sensors.
Clean the probe when there is contamination on the sensor. Symptoms of contamination are:
• Readings are not accurate or consistent.
• The stabilization time is slow.
• A calibration error occurs.
• Contamination is visible on the probe (i.e., dirt).
To clean the dissolved oxygen probe of the multisensor, refer to Dissolved oxygen probe
on page 12.
1. For general contaminants, rinse the probe with deionized water. Blot dry with a lint-free cloth.
2. For other contaminants:
a. Soak the pH and/or conductivity probes of the multisensor in the applicable cleaning agent.
Refer to Table 2.
b. Rinse or soak the sensors for 1 minute in deionized water. Blot dry with a lint-free cloth.
English
11
Page 14

Table 2 Cleaning agent
Contaminant Cleaning agent Soak time
Mineral deposits 0.1 N HCl 5 minutes (maximum)
Fats, grease and oils Warm, mild detergent solution 2 hours (maximum)
Dissolved oxygen probe
Clean the probe
N O T I C E
Use only deionized water and/or the polishing cloth to clean the anode and cathode.
1. Remove the membrane module from the probe:
a. Hold the probe so it is vertical with the tip down.
b. Gently turn the membrane module to remove it from the probe.
2. Soak the membrane module in a mild soap solution.
3. Rinse the membrane module fully with deionized water.
4. Invert the membrane module and shake vigorously to remove any water.
5. Rinse the probe with deionized water. Blot dry with a lint-free cloth.
6. Rub the anode with the polishing cloth supplied. The anode is the outer metallic stem of the probe
that is visible when the membrane module is removed. The polishing cloth removes deposits that
can decrease the probe performance.
7. Fill the membrane module 2/3 full with filling solution and assemble the probe. Refer to Fill the
membrane module on page 12.
Replace the membrane module
Carefully touch the membrane modules to prevent damage.
It is necessary to replace the membrane module periodically. Replace the membrane module when it
is damaged, the probe reading drifts or the probe has a slow response.
Fill the membrane module
Add filling solution to the membrane module if the level of filling solution in the membrane module is
less than 2/3 full.
N O T I C E
1. Remove the membrane module from the probe:
a. Hold the probe so it is vertical with the tip down.
b. Gently turn the membrane module to remove it from the probe.
2. Add filling solution to the membrane module until it is approximately 2/3 full.
3. Install the membrane module on the probe:
a. Carefully tilt the membrane module to remove the air bubbles in the filling solution.
b. Hold the probe with the tip down and slightly tilted.
c. Slowly put the membrane module on the probe. Some filling solution should come out of the
threads of the membrane module. Remove any filling solution on the surface of the probe.
4. If no filling solution comes out of the threads, air may be inside the membrane module cap. Add
more filling solution to the membrane module and repeat step 3.
12
English
Page 15

5. If the probe will be used immediately, polarize the probe. Refer to Polarize the dissolved oxygen
probe on page 5.
6. If the probe will not be used immediately, put the probe in storage. Refer to Storage
on page 13.
Figure 3 Fill the membrane module
1 Anode 2 Cathode 3 Membrane module
Storage
1. Fill the probe storage tube with storage solution to the mark. Refer to Specifications on page 3 for
the applicable storage solution.
2. Put the probe in the storage tube and turn to tighten.
Rehydrate the pH probe
N O T I C E
Do not clean the dissolved oxygen probe of the multisensor with HCl because damage to the membrane will
occur.
If the pH sensor of a probe becomes dry, rehydrate the probe. A dry pH probe will not operate
correctly.
1. Soak the dry probe in a dilute HCl solution for several hours.
2. Rinse the probe with deionized water. Blot dry with a lint-free cloth.
3. Calibrate the probe. Refer to Calibration procedure (pH and conductivity) on page 6.
Troubleshooting
Refer to the table that follows for common problem messages or symptoms, possible causes and
corrective actions.
English
13
Page 16

Error/Warning Description Solution
Measurement out of range
• Insert the probe into the applicable standard and read again.
• Clean the probes.
• Make sure that there are no air bubbles in the probe's sensors.
• Disconnect the multisensor and then connect the multisensor
again.
• Connect a different probe to make sure if problem is with probe
or meter.
E1 Unstable reading during a
stability measurement or
during calibration.
E2 Probe current: more than
upper limit during
measurement ≥ 250 nA.
pH probe sensitivity out of
range (accepted values
70–105%).
Conductivity calibration
error
E3 Conductivity calibration
error: cell constant is <
0.05 cm-1.
Offset out of range
(accepted values ±58 mV).
E4 Buffer solution not
recognized.
Make sure that the probes are properly immersed in the sample.
• Clean the pH probe and the membrane.
• Make sure that there are no air bubbles in the membrane.
• Make sure that the buffer that is used is specified in
configuration.
• Replace the buffer solution.
• Clean the pH probe.
• Insert the conductivity probe into the applicable standard and
read again.
• Clean the conductivity probe.
• Examine for damage at the conductivity probe sensor, replace
if necessary.
• Insert the conductivity probe into the applicable standard and
read again.
• Clean the conductivity probe.
• Examine for damage at the conductivity probe sensor, replace
if necessary.
• Clean the probe.
• Make sure that there are no air bubbles in the sensors.
• Connect a new probe.
• Clean the probe.
• Make sure that there are no air bubbles in the sensors.
• Make sure that the buffer that is used is specified in
configuration.
• Replace the buffer solution.
• Make sure of the temperature specification in configuration.
Salinity cannot be
calculated TC=0
E5 The standards used for
calibration are identical.
14 English
Change the TC (Temperature Coefficient). Introduce the TC value
at the meter setup to be able to calculate the salinity value. Refer
to meter manual.
• Make sure that the buffer that is used is specified in
configuration.
• Replace the buffer solution.
• Make sure of the temperature specification in configuration.
Page 17

Error/Warning Description Solution
E6 The calibration solutions
have different
temperatures.
ErA Salinity is set to automatic
and measured value >
50 g/L.
Make sure that the calibration solutions have the same
temperature.
Change the TC value from automatic to the correct value. Refer to
meter manual.
Troubleshooting notes
For the best performance, make sure to:
• Prepare the probe(s) for use before calibration or measurement.
• Obey the calibration and measurement notes.
• Obey the calibration and measurement procedures.
Troubleshooting notes:
• Magnetic stirrers may supply sufficient heat to change solution temperature. Put a piece of
insulating material between the stirrer and beaker.
• Protect the sensing element from direct light during measurement.
• Set the meter to off. Disconnect and then connect the probe again.
• Connect a different probe to identify if the problem is with the probe or the meter.
Refer to Troubleshooting on page 13 for calibration and measurement warnings and errors.
Examine the probes
Note: The lower the sample temperature or the larger the temperature difference between the samples, the longer
the stabilization time will be.
1. Examine the platinized layer of the conductivity probe. Replace the probe if the platinized layer
has been damaged and/or removed.
2. Clean the probes. Replace the DO probe membrane module if necessary.
3. If the DO probe fill solution is contaminated, drain and replace with fresh filling solution.
4. Rinse the pH probe reference junction diaphragm with deionized water. Then, shake the probe
downwards (like a thermometer) to remove any air bubbles in the bulb.
Replacement parts and accessories
Note: Product and Article numbers may vary for some selling regions. Contact the appropriate distributor or refer to
the company website for contact information.
Replacement parts
Description Item no.
pH electrode for 50 49 multisensor LZW9171.99
Conductivity cell for 50 49 multisensor LZW9172.99
DO sensor for 50 49 multisensor LZW9173.99
Handle for 50 49 multisensor LZW9179.99
English 15
Page 18

Accessories
Description Item no.
Set of 3 x 10 mL printed tubes for portable pH calibration LZW9137.97
Set of 3 x 10 mL printed tubes for portable conductivity calibration LZW9138.99
Electrode storage protector, polypropylene LZW9161.99
Electrode measurement protector, polypropylene LZW9162.99
Tube for DO probe calibration LZW5123.99
Service kit for DO probe (contains two membrane modules and DO filling solution) 5196800
16 English
Page 19

Page 20

HACH COMPANY World Headquarters
P.O. Box 389, Loveland, CO 80539-0389 U.S.A.
Tel. (970) 669-3050
(800) 227-4224 (U.S.A. only)
Fax (970) 669-2932
orders@hach.com
www.hach.com
©
Hach Company/Hach Lange GmbH, 2013.
All rights reserved.
HACH LANGE GMBH
Willstätterstraße 11
D-40549 Düsseldorf, Germany
Tel. +49 (0) 2 11 52 88-320
Fax +49 (0) 2 11 52 88-210
info@hach-lange.de
www.hach-lange.de
HACH LANGE Sàrl
6, route de Compois
1222 Vésenaz
SWITZERLAND
Tel. +41 22 594 6400
Fax +41 22 594 6499
 Loading...