

Page 1

REFO 3/REFO 3-D
Operating Instructions
BDA 280 Edition 2
Page 2

Operating Instructions REFO 3 / REFO 3-D
Contents
A PRODUCT DESCRIPTION
A1 Concise Operating Instructions.......................................2
A2 Introduction....................................................................... 3
A3 Scope of Delivery..............................................................3
A4 Product Version................................................................ 3
A5 Instrument Set-Up.............................................................4
B OPERATION
B1 Controls............................................................................. 5
B2 Initial Start-Up................................................................... 6
B3 Configuration.................................................................. 10
C APPLICATIONS
C1 Calibration....................................................................... 11
C2 Reference Standards...................................................... 11
C3 Gloss Measurement........................................................ 11
C4 Difference Gloss Measurement..................................... 12
C5 Three-Angle Measurement.............................................12
C6 Statistics ......................................................................... 13
C7 Continual Gloss Measurement (REFO 3-D only)......... 14
C8 Check Program for Standard......................................... 14
C9 Printer..............................................................................14
D TECHNICAL INFORMATION
D1 Service............................................................................. 16
D2 Error Messages............................................................... 16
D3 Service and Addresses .................................................. 16
D4 Interface .......................................................................... 17
D5 Maintenance of the Standard.........................................17
D6 Fact Sheet ....................................................................... 17
E APPENDIX
E1 Accessories and Spare Parts ........................................ 18
E2 Standards and Literature ............................................... 18
1
Page 3

Operating Instructions REFO 3 / REFO 3-D
A Product Description
A1 Concise Operating Instructions
Calibration:
1. Put REFO on the working standard (remove cloth!)
2. Press key Meas/ON
3. Wait for display ok
Gloss Measurement:
1. Turn on REFO with key Meas/ON
2. Use the program key to select program P1
3. Use the angle selector key to set the measuring angle
4. Place REFO on the sample to measure
5. Press key Meas/ON (measuring value is displayed)
Difference Gloss Measurement:
1. Turn on REFO with key Meas/ON
2. Use the program key to select program P2
3. Use the angle selector switch to set the measuring angle
4. Place REFO on the reference
5. Press key Meas/ON to measure the reference value
6. Put REFO on the sample to measure
7. Press key Meas/ON to measure the difference
Three-Angle Measurement:
1. Turn on REFO with key Meas/ON
2. Select program P3 with the program key
3. Use the angle selector key to choose the first viewing angle to display, if required
4. Place REFO on the sample to measure
5. Press key Meas/ON and wait for the measuring to be displayed
6. Call the other measuring values with the angle selector key
2
Page 4

Operating Instructions REFO 3 / REFO 3-D
Continual Measurement (only with REFO 3-D):
1. Turn on REFO with key Meas/ON
2. Select program P4 with the program key
3. Use the angle selector key to choose the first viewing angle to display, if required
4. Place REFO on the sample to measure
5. Start continual measurement by pressing Meas/ON key (3 measurements per
second)
6. Move the REFO over the measurement sample and read off the relevant measurement value
7. Press key Meas/ON to stop continual measurement
A2 Introduction
REFO 3-D is a portable three-angle reflectometer for all gloss measuring purposes in
production and in the lab. The instrument transfers the measurings through port RS
232C directly to a printer for thorough documentation. Along with the PC-software
REFO QC the system provides individual treatment of the measuring data and output
in detailed lists or telling graphical displays.
A3 Scope of Delivery
1. REFO 3-D or REFO 3
2. Standard A (Metal Standard at option) with certificate
3. Power pack / battery charger
4. Ni-Cd batteries
5. Operating Instructions BDA 280, Edition 2 (D/GB)
A4 Product Version
The reflectometer is delivered in four variants:
1. REFO 3-D (for 230V) LMV 138
2. REFO 3-D (for 115V) LMV 144
3. REFO 3 (for 230V) LMV 136
3
Page 5

Operating Instructions REFO 3 / REFO 3-D
4. REFO 3 (for 115V) LMV 142
The functions regarding double calibration and sample memory described in the operating instructions apply to instrumention version REFO 3-D exclusively.
A5 Instrument Set-Up
Unpack the instrument carefully and check the delivery for missing parts (delivery
note) or transport damages. Please keep the packing material for safe transport or
shipment of the instrument.
As REFO 3-D is a sophisticated optical measuring system, avoid the following under
all circumstances:
• Do not use the instrument in direct sunlight.
• Do not allow water of inflammable and metallic objects to enter the instrument.
• Do not use the instrument in excessively moist, dusty or vibrating surroundings.
• Do not open the instrument. There are not parts in the housing for the user to
check.
• If you have any questions or problems, please contact our service department.
4
Page 6
Operating Instructions REFO 3 / REFO 3-D
B Operation
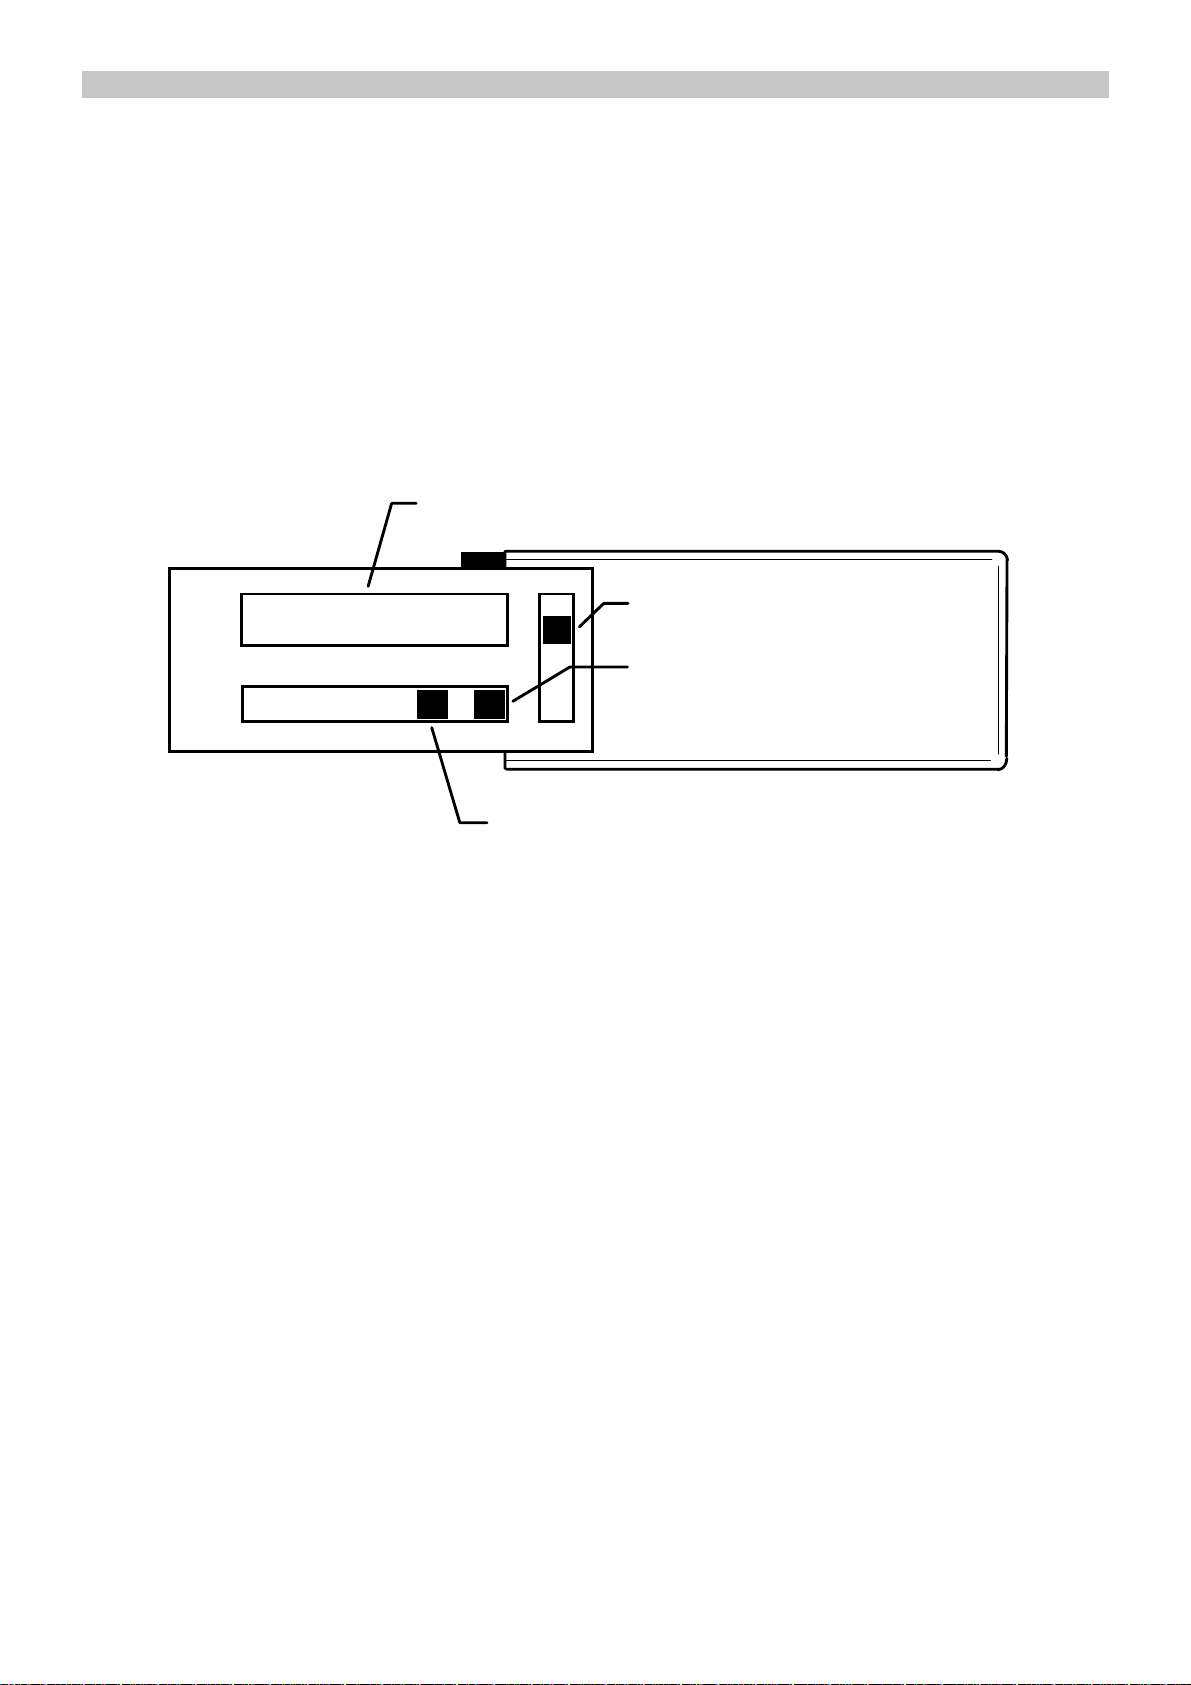
B1 Controls
REFO 3-D is operated with the three blue keys next to and below the display and the
large blue Meas/ON key on the instrument’s side.
Display
Angle selector key
Program key
Statistics key
Figure 1: REFO top view
Angle selector key: to select the viewing angle
Program key: to select the program
Statistics key: for statistical evaluation of set-off measurements
Meas/ON-key: to turn on REFO and trigger a measurement
The keys have special functions during the input of calibration and standard values,
during statistics mode and memory print.
5
Page 7

Operating Instructions REFO 3 / REFO 3-D
Meas./On-key
Figure 2: REFO side view
B2 Initial Start-Up
B2.1 Charging the batteries
The electrical power supply is provided by four Ni-Cd batteries, type LR6 AA Mignon.
They are located in the battery compartment at the rear of the instrument.
In order to charge the batteries
• plug the charger plug into the mains/charging socket
• connect the charger to the socket-outlet
The batteries are loaded automatically within 14 hours. You can continue measuring
during the charging procedure (but the charging period will be longer).
6
Page 8

Operating Instructions REFO 3 / REFO 3-D
mains / charging
socket
Figure 3: REFO rear view
Battery
Compartment
B2.2 Exchanging the batteries
Note: When exchanging the batteries, all stored measurings will be lost if the cover
of the battery compartment is lifted-off while the instrument is on. Therefore
wait for the automatical shut-down before exchanging the batteries.
To exchange the batteries:
• Lift-off the cover of the battery compartment (see fig. 3)
• Take-off all batteries
• Put fresh batteries into the compartment as shown in the sketch
• Snap the cover onto the battery compartment again.
•
B2.3 Entering standard number and calibration values
Standard number and calibration values need only be entered again if the standard is
changed. The 4-digit standard number and calibration values for 20°, 60° and 85°
are indicated on the rear of the standard they apply to.
1. Put REFO on the standard (remove cloth!)
2. Turn on REFO with key Meas/ON
3. Select program P3 with the program key
7
Page 9

Operating Instructions REFO 3 / REFO 3-D
4. Press key Meas/ON to calibrate REFO. It identifies M- or D-mode automatically
(not true for REFO 3)
St - Nr
D0379
+1
→
Angle Select
Program Key
Statistics Key
Figure 4: Entering the standard number
5. Enter the 4-digit standard number (current digit blinks). Press the statistics key
until the correct digit appears.
6. Press the program key to skip to the second digit
7. Press the statistics key until the correct digit appears.
8. Repeat the procedure for the 3rd and 4th digits.
When the fourth digit is entered, use the angle selector key to enter calibration va-
lues. Every calibration value consists of four digits (in D-mode with one place after
decimal point, in M-mode without decimal point).
e.g. 85° = 99.5
1st digit = 0
2nd digit = 9
3rd digit = 9
4th digit = 5
85°
099.5
+1
→
Angle Select
Program Key
Statistics Key
Figure 5: Entering the calibration values
1. To enter the calibration values for 20° press the statistics key until the correct
digit appears
8
Page 10

Operating Instructions REFO 3 / REFO 3-D
2. Press the program key to skip to the second digit
3. Press the statistics key until the correct digit appears.
4. Repeat the procedure for the 3rd and 4th digits.
5. Press the angle selector key to skip to calibration value 60°
6. Input procedure as explained above
7. Press the angle selector key to change to calibration value 85°
Input procedure as explained above
Press the angle selector key to finish your input
Now program P9 is finished automatically. The standard number is displayed during
the calibration procedure. The M- or D-mode is indicated by letter D or M. Both
standard numbers can be stored.
B2.4 Printer Connection
The optional printer (accessories, see chapter E.1) is connected as follows:
• Connect the interface cable to the printer
• Plug the other end of the interface cable in the RS 232 port and fix it by twisting
carefully
• Connect the power pack or the mains cable to the printer and connect to the
mains
RS 232 Port
Figure 6: RS 232 port
9
Page 11

Operating Instructions REFO 3 / REFO 3-D
B3 Configuration
B3.1 Program Selection
With the program key you can skip between the programs, i.e. every pressing the
program key switches to the next program. The following programs are at choice:
• P1 Single-angle measurement
• P2 Difference measurement
• P3 Three-angle measurement
• P7 Memory print (not for REFO 3)
• P8 Standard check program
• P9 Input of standard number and calibration values
The selected program is indicated on the display above the program key. Program
P7 can only be selected if a printer is connected. Programs P8 and P9 can only be
selected with the instrument placed on the standard.
B3.2 D- and M-Modes (for REFO 3-D only)
REFO 3-D has two working areas. D-mode is meant for DIN-measurements and Mmode for high-gloss measurements. REFO 3-D selects the correct mode automatically after calibration. In D-mode standard A is used for calibration, in M-mode the
metal standard is used. The current mode is indicated during the calibration by letter
D or M before the standard number.
10
Page 12

Operating Instructions REFO 3 / REFO 3-D
C Applications
C1 Calibration
It is recommended to calibrate at least once a day or after extended breaks. Before
starting to calibrate make sure that the standard is clean and the cloth removed.
The calibration is performed as follows:
• Put REFO on the standard
• Turn on REFO with key Meas/ON
• Press key Meas/ON
• During the calibration, the display reads *Cal* or M-Cal (for metal standard)
• Wait for ok display
Calibration is only possible with one of programs P1-P3 set. The system recognizes
D- or M-mode automatically and shows it on the display before the standard number.
C2 Reference Standards
The chosen reference standard is standard A according to DIN 67530/ISO 2813 or
the optional metal standard according to ISO 7668 for high-gloss measurements.
C3 Gloss Measurement
• Turn on REFO with key Meas/ON
• Use the program key to select program P1
• Use the angle selector key to select the viewing angle (the selected angle is
shown on the display)
• Place REFO on the sample to measure
• Press key Meas/ON
Now the measured value is shown on the display and stored automatically with consecutive numbering.
11
Page 13

Operating Instructions REFO 3 / REFO 3-D
C4 Difference Gloss Measurement
Difference measurement means measuring against a reference. The measured difference between reference and sample is the indicated measured value.
• Turn on REFO with key Meas/ON
• Use the program key to select program P2
• Use the angle selector key to select the viewing angle (the selected angle is in-
dicated on the display)
• Place REFO on the reference
• Press key Meas/ON to measure the reference. The reference measurement is
confirmed on the display with letter R next to the angle value
• Place REFO on the sample to measure
• Press key Meas/ON to measure the difference
Now the measured difference value is shown on the display and stored automatically
with consecutive numbering.
C5 Three-Angle Measurement
In three-angle measurements the sample is measured automatically at viewing
angles of 20°, 60° and 85°.
• Turn on REFO with key Meas/ON
• Use the program key to select program P3
• Use the angle selector key to select the first viewing angle
• Place REFO on the sample to measure
• Press key Meas/ON
• Wait for the measuring display
• Call the other measurings with the angle selector key
Now the measured value is shown on the display. All of the three measurings are
stored together under a number. A maximum of 200 three-angle measurements can
be stored.
12
Page 14

Operating Instructions REFO 3 / REFO 3-D
C6 Statistics
In all of the three programs P1, P2 and P3 you can acquire and evaluate entire setoff measurements with the following statistical values calculated:
• mean value
• standard deviation
• coefficient of variability
For statistical evaluation of a set-off measurement, procede as follows:
• Turn on REFO with key Meas/ON
• Use the program key to select program P1, P2 or P3
• Select the viewing angle for programs P1 and P2 with the angle selector key
(for program P3 the first viewing angle to be displayed)
• Press the statistics key
• Place REFO on the sample to measure
• Press key Meas/ON to trigger a set-off measurement. The number of measu-
rements is indicated on the display next to the sum symbol ***.
• With the program key you can clear the latest measurement. The display will
then indicate C... (Clear) and reduce the current number by one.
• Press the statistics key to finish the set-off measurement
• Display of the mean value (M)
• Press the statistics key to call the standard deviation (S)
• Press the statistics key to call the coefficient of variability (VK) (program P 2
does not determine VK!)
Press the statistics key once more to quit the statistics function.
In the difference measurement (P2) the statistics function can be used to determine
the mean value of a set-off measurement and use it for a reference.
13
Page 15

Operating Instructions REFO 3 / REFO 3-D
C7 Continual Gloss Measurement
(REFO 3-D only)
With the continual gloss measurement program, measurements are made automatically in 3 second intervals.
In this measurement mode it is not possible to transfer data through the interface or
the internal memory. This program function is enables the measurement of gloss
differences over a large surface with the reflectometer.
• Switch on REFO with the Meas/ON key
• Select program P4 with the program key
• Select measurement angle with the angle select key (the selected angle is
shown in the display)
• Place the REFO on the sample
• Press Meas/ON to start continual measurement
• Press Meas/ON again to end the measurement process
C8 Check Program for Standard
Check program P8 checks the function of REFO 3-D. The check is performed as
follows:
• Place REFO on the standard
• Turn on REFO with key Meas/ON
• Select program P8 with the program key
Now you can measure the standard. In addition to the ordinary single- and threeangle measurements, the statistics function can be used, too. If the measurings are
not identical with the calibration values, the calibration is bad.
C9 Printer
All measuring and calibration values can be documented with an optional printer.
There are two types of prints, i.e. protocol print and memory print (only REFO 3-D).
In the protocol print, all values are printed at once. In the memory print, however, the
entire memory is printed. The print-out shows the measurings, the number of the
measurement and the identification of the measuring values as per the following table:
14
Page 16

Operating Instructions REFO 3 / REFO 3-D
CAL: Calibrationvalues, standard number is printed, too
Nr.: ordinary single- or three-angle measurement
M: mean value
S: standard deviation
VK: coefficient of variability
Nr. R: reference value
Nr. d: difference measuring value
Nr. dM: difference measuring value for statistics function
dM: mean value of difference measurement
dS: standard deviation of difference measurement
Nr. RM: Nr. reference value for statistics function
RM: mean value of reference measurement
RS: standard deviation of reference measurement
RVK: coefficient of variability of reference measurement
C9.1 Protocol Print
For continuous printing of all values, procede as follows:
• Connect the printer properly (see chapter B2.4 and printer handbook)
• Measure
Note: If you want do not want toprint, unplug the printer cable from REFO 3-D.
C9.2 Memory Print (REFO 3-D only)
To print the complete memory, procede as follows:
• Connect the printer correctly (see chapter B2.4 and printer handbook)
• Select program P7 with the program key
• Press the angle selector key to start printing
The printing can be interrupted by pressing the angle selector key. The LF-key is the
line feed key.
15
Page 17

Operating Instructions REFO 3 / REFO 3-D
D Technical Information
D1 Service
Even a product such as the Dr. Lange REFO 3 will benefit from occasional care and
attention.
The outer casing can be cleaned using a dry cloth or mild household cleaner. Solvents such as benzine, acetone or similar substances must NOT be used. For
maintenance of the calibration standard refer to chapter D.5.
Cleaning of the optical parts should be carried out be our customer service. Further
serviceing need not be carried out.
D2 Error Messages
If your REFO-display shows one of these error messages please find out whether an
operator’s error has happened and repeat the measurement as described in the operating instructions.
If the same error message appears again, contact Dr. Lange service department immediately and state the error message.
Error messages:
M>Ref
ST20
St60
ST85
Lo.Ba
cause:
remedy:
cause:
remedy:
cause:
remedy:
signal high (e.g. too glossy)
calibrate REFO 3-D to metal standard
bad standard values
check calibration values with program P9 and inform service
department, if required.
batteries run-down
charge batteries or connect power pack
D3 Service and Addresses
For further information please contact your local service agent or one of the Dr. Lange branches:
Dr. Bruno Lange GmbH & Co. KG, Willstätterstraße 11
40549 Düsseldorf Tel.: (0211)5288136 Fax: (0211)5288106
Dr. Bruno Lange AG Zürcherstraße 35 CH-8604 Hegnau
Tel.: (01) 9456610 Fax: (01) 9456676
Dr. Bruno Lange Ges.m.b.H. Mühlweg 87a A-3101 St. Pölten
Tel.: (02742) 368540 Fax: (02742) 366448
16
Page 18

Operating Instructions REFO 3 / REFO 3-D
Dr. Lange Nederland B.V. Laan van Westroijen 2a NL-4003 AZ Tiel
Tel.: (0344) 631130 Fax: (0344) 631150
D4 Interface
REFO 3 / 3-D has a serial interface installed to send the display data to an external
device. Moreover, REFO 3 / 3-D is suitable for remote control with an external device. The serial interface features Baud rate = 2400 Bit/s
Format of a transferred string:
1 start bit 8 data bits 1 parity bit 2 stop bits
Further information on the transfer is given in our detailed description of the REFO 3 /
3-D interface which we will send you on request.
D5 Maintenance of the Standard
Poor accuracy or repeatability of measurings is often due to improper handling of the
working standards. Gloss being a surface property, utmost cleanliness is of vital importance. Even slight irregularities invisible to the naked eye may cause mismeasurements (nicotine, dust, fingerprints, scratches). The standards are possible to clean,
but very carefully not to damage them.
One way of cleaning them is to spray glass cleaning agent on the standard surface
and wipe it carefully with soft tissue clean and dry.
Attention:
Do not touch the standard surface with your fingers when cleaning it.
The calibration values of the standards remain valid for two years. After the expiry of
this term, changes may occur.
D6 Fact Sheet
Viewing geometries: 20°, 60°, 85°
Measuring surfaces: 20° approx. 9 x 9 mm
60° approx. 17 x 9 mm
85° approx. 100 x 10 mm
International
calibration standards:
Power supply: mains/batteries
Data output: RS 232 C
PC-Software: REFO QC
Dimensions: 200 x 56 x 80mm L/W/H
Weight: 750g
Warranty: 3 years
standard A, metal standard
17
Page 19

Operating Instructions REFO 3 / REFO 3-D
E Appendix
E1 Accessories and Spare Parts
Part order no.:
------------------------------------------------------------------
standard A LZM 151
metal standard LZM 155
power supply/charger (230V) XMU 408
power supply/charger (115V) XMU 409
Ni-Cd batteries (4 pcs., size AA) YAA 222
fogging frame LZM 089
vacuum plate BPP 050
vacuum pump EXP 012
PC-software REFO QC LZM 159
PC-connection cable LZP 680
printer LD 300
printer connection cable for article numbers
printer paper please call
E2 Standards and Literature
• DIN 67530 - Reflektometer als Hilfsmittel zur Glanzbeurteilung an ebenen Anstrich- und Kunststoff-Oberflächen
• International Standard ISO 7668 : „Anodized aluminium and aluminium alloys
- Measurement of specular reflectance and Specular gloss at angles of 20°,
45°, 60° or 85°“
• International Standard ISO 2813 : „ Paints and varnishes - Measurement of
specular gloss of non-metallic paint films at 20°, 60° and 85°“
• DIN 75201 Fogging test
18
• American National Standard ANSI/ASTM D 523-78 „ Standard Test Method
for Specular Gloss“
• National Bureau of Standards, 1975, NBS Technical Note 594 10. S.6
• Dr. W . Czepluch, Abhängigkeit der Reflektometer-Werte nach DIN 67530 von
den Toleranzen der Reflektometer nach DIN-Mitteilung 59, 1980
 Loading...