

Page 1

DOC027.98.00798
POCKET COLORIMETERTM II - LCK 310
Chlorine/Chlorine dioxide/Ozone
Chlor/Chlordioxid/Ozon
Chlore/Dioxyde de Chlore/Ozone
Cloro/Dióxido de cloro/Ozono
Cloro/Diossido di cloro/ozono
Chloor/chloordioxide/ozon
Fritt klor/ozon/klordioxid
APPLICATION INSTRUCTION
PROGRAMMIERANLEITUNG
INSTRUCTIONS DE FONCTIONNEMENT
INSTRUCCIONES DE APLICACIÓN
ISTRUZIONI APPLICATIVE
GEBRUIKSAANWIJZING
INSTRUKTIONSHANDBOK
March 2007, Edition 1
März 2007, Ausgabe 1
Mars 2007, édition 1
Marzo 2007, Edición 1
Marzo 2007, edizione 1
Maart 2007, Editie 1
Mars 2007, Utgåva 1
Page 2

DOC027.98.00798
POCKET COLORIMETERTM II - LCK 310
Chlorine/Chlorine dioxide/Ozone
Chlor/Chlordioxid/Ozon
Chlore/Dioxyde de Chlore/Ozone
Cloro/Dióxido de cloro/Ozono
Cloro/Diossido di cloro/ozono
Chloor/chloordioxide/ozon
Fritt klor/ozon/klordioxid
APPLICATION INSTRUCTION
PROGRAMMIERANLEITUNG
INSTRUCTIONS DE FONCTIONNEMENT
INSTRUCCIONES DE APLICACIÓN
ISTRUZIONI APPLICATIVE
GEBRUIKSAANWIJZING
INSTRUKTIONSHANDBOK
March 2007, Edition 1
März 2007, Ausgabe 1
Mars 2007, édition 1
Marzo 2007, Edición 1
Marzo 2007, edizione 1
Maart 2007, Editie 1
Mars 2007, Utgåva 1
© HACH LANGE, 2007. All rights reserved. Printed in Germany BB/CK
Page 3

2
Page 4

Table of contents
Section 1 General information ..................................................................... 17
1.1 Safety information ..................................................................................... 17
1.1.1 Use of hazard information ..............................................................17
1.2 General product information ..................................................................... 17
Section 2 Installation ......................................................................................19
2.1 Packing list ................................................................................................ 19
2.2 Insert the adapter ...................................................................................... 19
2.3 Replace the instrument cap ...................................................................... 19
Section 3 System start up .............................................................................21
3.1 Instrument keys and display ..................................................................... 21
3.1.1 Key-Functions ................................................................................. 21
3.2 Enter calibration data of LANGE Cuvette Tests ........................................ 21
3.2.1 Overview ......................................................................................... 21
3.2.2 Data table ....................................................................................... 22
3.3 Programming procedure ........................................................................... 22
3.3.1 LCK 310 Chlorine Cl
3.4 Check entered data .................................................................................. 24
3.5 Overwrite stored calibration data .............................................................. 24
3.5.1 Retrieve the factory calibration ....................................................... 24
Section 4 Operation ........................................................................................ 25
4.1 Analyse Chlorine/Chlorine dioxide/Ozone with LANGE Cuvette Tests ..... 25
4.2 Quality assurance ..................................................................................... 25
4.3 Evaluate LANGE Chlorine/Chlorine dioxide/Ozone Cuvette Tests .......... 25
Section 5 Replacement Parts and Accessories .................................... 27
5.1 Replacement Parts ................................................................................... 27
5.2 Accessories .............................................................................................. 27
Section 6 How to order .................................................................................. 29
2 ........................................................................................ 22
3
Page 5

4
Page 6

Inhalt
Abschnitt 1 Allgemeine Informationen ......................................................31
1.1 Sicherheitsinformationen .......................................................................... 31
1.1.1 Bedeutung der Hinweise ................................................................ 31
1.2 Allgemeine Produktinformationen ............................................................. 31
Abschnitt 2 Installation ................................................................................... 33
2.1 Verpackungsliste ...................................................................................... 33
2.2 Küvettenadapter einsetzen ....................................................................... 33
2.3 Austausch der Instrumentenkappe ........................................................... 33
Abschnitt 3 Inbetriebnahme ......................................................................... 35
3.1 Gerätetasten und Display .........................................................................35
3.1.1 Tasten-Funktionen .......................................................................... 35
3.2 Eingabe der Kalibrierdaten für LANGE Küvetten-Tests ............................ 36
3.2.1 Überblick ......................................................................................... 36
3.2.2 Datentabelle ...................................................................................36
3.3 Programmierung .......................................................................................36
3.3.1 LCK 310 Chlor Cl
3.4 Dateneingabe kontrollieren ....................................................................... 38
3.5 Überschreiben gespeicherter Kalibrierdaten .............................................38
3.5.1 Grundeinstellung wieder herstellen ................................................ 38
Abschnitt 4 Betrieb .......................................................................................... 39
4.1 Analyse von Chlor/Chlordioxid/Ozon mit LANGE Küvetten-Tests ............ 39
4.2 Qualitätssicherung ....................................................................................39
4.3 Auswertung der LANGE Chlor/Chlordioxid/Ozon Küvetten-Tests ........... 39
Abschnitt 5 Ersatzteile und Zubehör ......................................................... 41
5.1 Ersatzteile ................................................................................................. 41
5.2 Zubehör ....................................................................................................41
Abschnitt 6 Bestellhinweis ............................................................................ 43
2 .............................................................................................. 37
5
Page 7

6
Page 8

Sommaire
Section 1 Informations générales ...............................................................45
1.1 Consignes de sécurité .............................................................................. 45
1.1.1 Utilisation des informations relatives aux risques ........................... 45
1.2 Informations générales relatives au produit .............................................. 45
Section 2 Installation ......................................................................................47
2.1 Liste d’expédition ...................................................................................... 47
2.2 Insertion de l’adaptateur ........................................................................... 47
2.3 Réinstallation du capuchon de l’instrument ..............................................47
Section 3 Démarrage du système ..............................................................49
3.1 Écran et touches de l’instrument ............................................................... 49
3.1.1 Fonctions des touches .................................................................... 49
3.2 Saisie des données d'étalonnage des tests en cuve LANGE ................... 50
3.2.1 Vue d’ensemble ..............................................................................50
3.2.2 Tableau de données ....................................................................... 50
3.3 Procédure de programmation ................................................................... 50
3.3.1 LCK 310 Chlore Cl
3.4 Vérification des données saisies ............................................................... 52
3.5 Écrasement des données d'étalonnage stockées .................................... 52
3.5.1 Récupération de l'étalonnage usine ............................................... 52
Section 4 Fonctionnement ............................................................................ 53
4.1 Analyse Chlore/Dioxyde de Chlore/Ozone à l’aide
de tests en cuve LANGE ...................................................................... 53
4.2 Assurance qualité ..................................................................................... 53
4.3 Évaluation des tests en cuve Chlore/Dioxyde de Chlore/
Ozone LANGE .................................................................................... 53
Section 5 Pièces de remplacement et accessoires .............................. 55
5.1 Pièces de remplacement .......................................................................... 55
5.2 Accessoires .............................................................................................. 55
Section 6 Procédure de commande .......................................................... 57
2 ............................................................................................ 51
7
Page 9

8
Page 10

Índice de contenido
Sección 1 Información general ................................................................... 59
1.1 Indicaciones de seguridad ........................................................................ 59
1.1.1 Utilización de las indicaciones de peligro .......................................59
1.2 Información general del producto ............................................................. 59
Sección 2 Instalación .....................................................................................61
2.1 Lista de embalaje ......................................................................................61
2.2 Insertar el adaptador ................................................................................. 61
2.3 Reemplazar la tapa del instrumento ......................................................... 61
Sección 3 Arranque del sistema ................................................................. 63
3.1 Teclas y pantalla del instrumento ............................................................. 63
3.1.1 Funciones de tecla .........................................................................63
3.2 Introduzca los datos de calibración de la cubeta test de LANGE ............. 63
3.2.1 Vista general ................................................................................... 63
3.2.2 Tabla de datos ................................................................................ 64
3.3 Procedimientos de programación ............................................................. 64
3.3.1 LCK 310 Cloro Cl
3.4 Controlar los datos introducidos. .............................................................. 66
3.5 Sobreescribir los datos de calibración almacenados. ............................... 66
3.5.1 Recuperación de calibración por defecto ....................................... 66
Sección 4 Operación ...................................................................................... 67
4.1 Análisis de Cloro/Dióxido de cloro/Ozono con cubetas test de LANGE ...67
4.2 Aseguramiento de calidad ........................................................................ 67
4.3 Evaluación de Cloro/Dióxido de cloro/Ozono de
LANGE Cubetas test de cloro ............................................................. 67
Sección 5 Piezas de repuesto y accesorios ........................................... 69
5.1 Piezas de repuesto ................................................................................... 69
5.2 Accesorios ................................................................................................ 69
Sección 6 Cómo realizar pedidos ..............................................................71
2 .............................................................................................. 64
9
Page 11

10
Page 12

Indice
Capitolo 1 Informazioni generali ................................................................. 73
1.1 Istruzioni di sicurezza ................................................................................ 73
1.1.1 Utilizzo delle informazioni di sicurezza ........................................... 73
1.2 Informazioni generali sul prodotto ............................................................. 73
Capitolo 2 Installazione ................................................................................. 75
2.1 Distinta di imballaggio ............................................................................... 75
2.2 Inserimento dell’adattatore ........................................................................ 75
2.3 Inserimento del coperchio Hach Lange .................................................... 75
Capitolo 3 Messa in esercizio del sistema .............................................. 77
3.1 Tasti e display dello strumento ................................................................. 77
3.1.1 Funzioni dei tasti ............................................................................. 77
3.2 Inserimento dei dati di calibrazione dei test in cuvetta LANGE ................ 78
3.2.1 Panoramica strumentale ................................................................. 78
3.2.2 Tabella dati di calibrazione ............................................................. 78
3.3 Procedura di programmazione .................................................................. 78
3.3.1 LCK 310 cloro Cl
3.4 Controllo dei dati inseriti ............................................................................ 80
3.5 Come sovrascrivere i dati di calibrazione memorizzati ............................. 80
3.5.1 Come richiamare la calibrazione di fabbrica ...................................80
Capitolo 4 Esercizio ........................................................................................ 81
4.1 Analisi cloro/diossido di cloro/ozono con test in cuvetta LANGE .............. 81
4.2 Garanzia di qualità .................................................................................... 81
4.3 Test in cuvetta LANGE cloro/diossido di cloro/ozono .............................. 81
Capitolo 5 Parti di ricambio e accessori ................................................... 83
5.1 Parti di ricambio ........................................................................................ 83
5.2 Accessori ..................................................................................................83
Capitolo 6 Come ordinare ............................................................................. 85
2 ............................................................................................... 79
11
Page 13

12
Page 14

Inhoud
Deel 1 Algemene informatie ......................................................................... 87
1.1 Veiligheidsinformatie ................................................................................. 87
1.1.1 Gebruik van gevareninformatie ....................................................... 87
1.2 Algemene productinformatie .....................................................................87
Deel 2 Installatie ..............................................................................................89
2.1 Paklijst ......................................................................................................89
2.2 De adapter insteken ..................................................................................89
2.3 De kap van het instrument terug aanbrengen. .......................................... 89
Deel 3 Het systeem opstarten ..................................................................... 91
3.1 Instrumenttoetsen en display .................................................................... 91
3.1.1 Toets-functies .................................................................................91
3.2 De kalibratiedata van LANGE kuvettentesten invoeren ............................ 91
3.2.1 Overzicht ........................................................................................ 91
3.2.2 Datatabel ........................................................................................ 92
3.3 Programmeerprocedure ............................................................................ 92
3.3.1 LCK 310 Chloor Cl
3.4 De ingevoerde data controleren ................................................................ 94
3.5 Opgeslagen kalibratiedata overschrijven .................................................. 94
3.5.1 De fabriekskalibratie herstellen ....................................................... 94
Deel 4 Bedrijf ....................................................................................................95
4.1 Chloor met Lange kuvettentesten analyseren .......................................... 95
4.2 Kwaliteitsborging ....................................................................................... 95
4.3 LANGE Chloor/Chloordioxide/Ozon kuvettentest .................................... 95
Deel 5 Reservedelen en toebehoren ........................................................ 97
5.1 Reservedelen ............................................................................................ 97
5.2 Accessoires .............................................................................................. 97
Deel 6 Hoe een bestelling plaatsen ........................................................... 99
. ...................................................................... 92
2
13
Page 15

14
Page 16

Innehåll
Sektion 1 Allmän information .....................................................................101
1.1 Säkerhetsinformation ..............................................................................101
1.1.1 Så här används säkerhetsinformationen ...................................... 101
1.2 Allmän produktinformation ......................................................................101
Sektion 2 Installation ....................................................................................103
2.1 Packlista ................................................................................................. 103
2.2 Installera adaptern .................................................................................. 103
2.3 Byta ut instrumentlocket .......................................................................... 103
Sektion 3 Systemstart .................................................................................. 105
3.1 Instrumenttangenter och display ............................................................. 105
3.1.1 Funktionstangenter ....................................................................... 105
3.2 Mata in kalibreringsdata för LANGE kyvett-tester ................................... 105
3.2.1 Översikt ........................................................................................105
3.2.2 Datatabell ..................................................................................... 106
3.3 Programmeringsprocedur ....................................................................... 106
3.3.1 LCK 310 fritt klor Cl
3.4 Kontrollera indata ....................................................................................107
3.5 Skriv över sparade kalibreringsdata ........................................................108
3.5.1 Återgå till först fabrikskalibreringen ............................................... 108
Sektion 4 Användning .................................................................................. 109
4.1 Analysera fritt klor med LANGE kyvett-tester .........................................109
4.2 Kvalitetssäkring ....................................................................................... 109
4.3 Utvärdering LANGE fritt klor/klordioxid/ozon kyvett-tester ..................... 109
Sektion 5 Reservdelar och tillbehör ......................................................... 111
5.1 Reservdelar ............................................................................................ 111
5.2 Tillbehör .................................................................................................. 111
Sektion 6 Så här beställer man ................................................................. 113
2 ........................................................................................ 106
15
Page 17

16
Page 18

Section 1 General information
1.1 Safety information
Please read this entire application instruction and the POCKET COLORIMETERTM II
instruction manual before unpacking, setting up, or operating this equipment. Pay
attention to all danger and caution statements. Failure to do so could result in serious
injury to the operator or damage to the equipment.
To ensure that the protection provided by this equipment is not impaired, do not use
or install this equipment in any manner other than that specified in this manual.
1.1.1 Use of hazard information
DANGER
Indicates a potentially or imminently hazardous situation which, if not
avoided, could result in death or serious injury.
Important Note: Information that requires special emphasis.
Note: Information that supplements points in the main text.
1.2 General product information
This application instruction describes how to evaluate LANGE Cuvette Tests on a
single-wavelength POCKET COLORIMETER II.
17
Page 19

18
Page 20

Section 2 Installation
Important Note: This application instruction is only valid in conjunction with the
POCKET COLORIMETERTM II instruction manual and the applied LCK working
procedure. Please read this entire application instruction and the entire POCKET
COLORIMETER II instruction manual before unpacking, setting up or operating the
instrument.
2.1 Packing list
• POCKET COLORIMETER II 528 nm, Cat. No. 5870052
• Instrument cap with HACH LANGE label, Cat. No. LZV 759
• Cuvette adapter 1 cm, Cat. No. 5954600
• Application instruction DOC027.98.00798
2.2 Insert the adapter
Remove the instrument cap and carefully position the cuvette adapter into the cell
holder with the arrow pointing downward. Fix it by pressing it down.
2.3 Replace the instrument cap
Use the instrument cap with the HACH LANGE label when evaluating LANGE
cuvettes.
19
Page 21

20
Page 22
Section 3 System start up
1 adsorbance 2
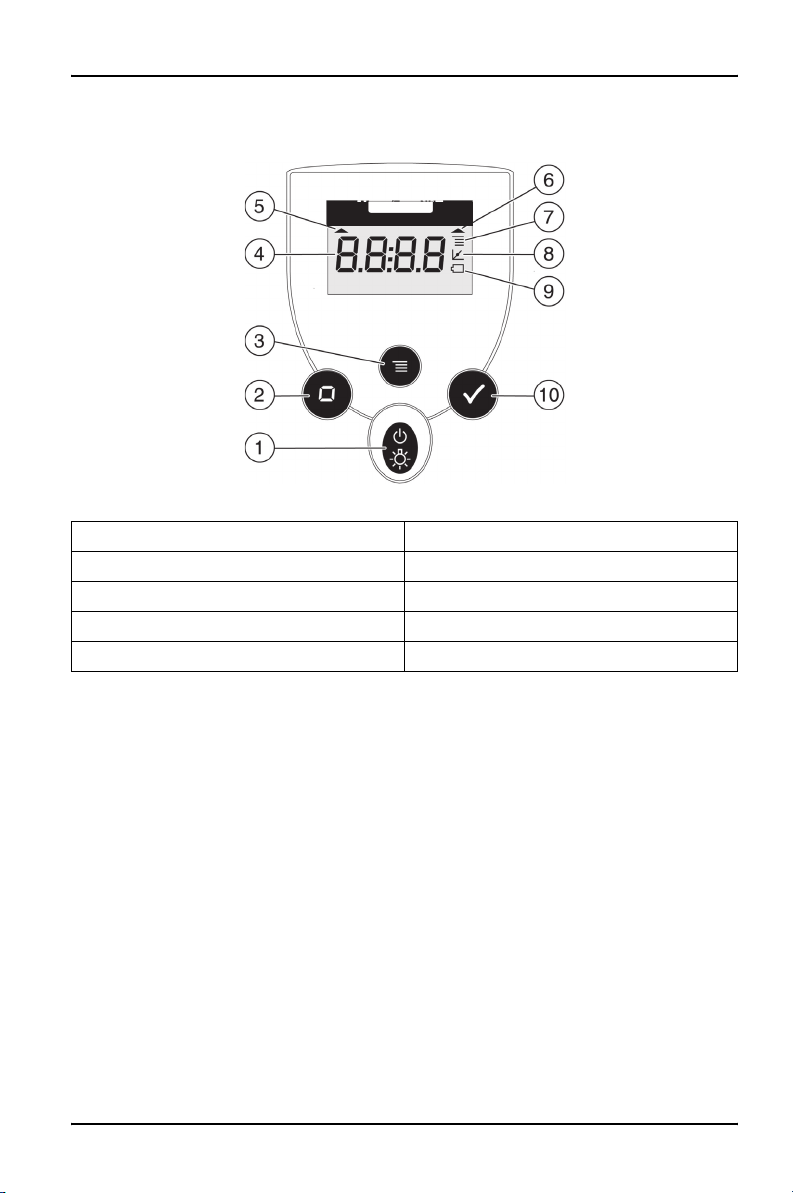
3.1 Instrument keys and display
528 nm
1 adsorbance 2
Figure 1 Instrument keys and display
1 POWER/BACKLIGHT 6 Measuring range indicator (2)
2 ZERO/SCROLL (BLUE key)7Menu indicator
3MENU 8Calibration adjusted indicator
4 Numeric display 9 Battery low indicator
5 Measuring range indicator (1) 10 READ/ENTER (GREEN key)
3.1.1 Key-Functions
ZERO/SCROLL (BLUE key) : In measurement mode, sets the instrument to zero. In
menu mode, scrolls through menu options. Also scrolls numbers when entering or
editing a value.
READ/ENTER (GREEN key) : In measurement mode, initializes sample
measurement. In menu mode, selects a menu option. When entering numbers,
moves one space to the right. Confirm the function when the entry is complete.
3.2 Enter calibration data of LANGE Cuvette Tests
3.2.1 Overview
Each POCKET COLORIMETER II has two channels in which measurements can be
made. Each channel (measuring range) will accept user-defined calibration data.
This application instruction contains the calibration data of the LANGE Cuvette Test
for Chlorine/Chlorine dioxide/Ozone:
21
Page 23

System start up
• LCK 310: 0.05-2 mg/l Cl2 or 0.09-3.8 mg/l ClO2 or 0.05-2 mg/l O
3
Select the calibration data of maximum two measuring ranges which will be the
suitable one.
Each programming procedure has only to be followed once prior to the first test
evaluation.
For detailed information please read the POCKET COLORIMETER II instruction
manual.
3.2.2 Data table
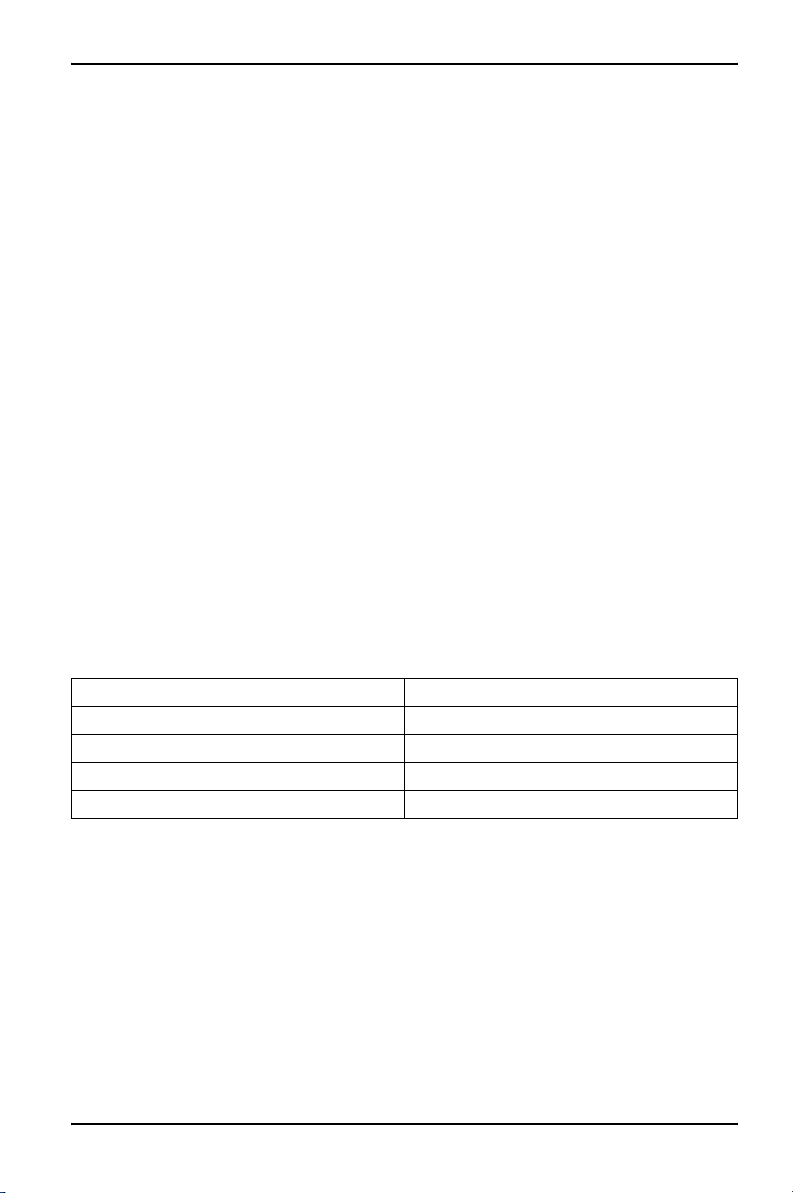
3.2.2.1 Evaluation as Chlorine Cl2, Chlorine dioxide ClO2 and Ozone O
Table 1 Evaluation as Chlorine Cl2, Chlorine dioxide ClO2 and Ozone O
RES (resolution)
S0 (standard 0)
A0 (absorbance 0)
S1 (standard 1)
A1 (absorbance 1)
LCK 310
Chlorine
--.-- --.-- --.--
00.05 00.09 00.05
0.015 0.015 0.025
02.00 03.80 02.00
0.580 0.600 0.900
LCK 310
Chlorine dioxide
LCK 310
Ozone
3
3
3.3 Programming procedure
Note: Each programming procedure has only to be followed once prior to the first test
evaluation.
Important Note: The following programming procedure is valid for the evaluation
form Chlorine Cl2. To evaluate as Chlorine dioxide ClO2 or Ozone O3 please choose
the data mentioned in table 3.2.2.1 Evaluation as Chlorine Cl2, Chlorine dioxide
ClO2 and Ozone O3.
Note: After programming the calibration data, it could be helpful to mark the channel(s) 1
and/or 2 accordingly with a label.
3.3.1 LCK 310 Chlorine Cl
1. Press POWER to switch on the instrument.
2. Press MENU. "SEL" is displayed. A flashing arrow indicates the current
measuring range (1 or 2).
3. Select measuring range 1 or 2 for LCK 310 (0.05-2 mg/l Cl
Note: Press GREEN key to toggle between measuring ranges.
22
2
).
2
Page 24
System start up
4. Press MENU for about five seconds until "USER" followed by "CAL" is
displayed.
5. Press BLUE key until "Edit" is displayed. Press GREEN key. " RES" is
displayed.
6. Press GREEN key. "-.---" is displayed.
7. Press BLUE key until "--.--" is displayed. Press GREEN key. "S0" is displayed.
8. Press GREEN key until "A0" is displayed.
9. Press GREEN key until "S1" is displayed.
10. Press GREEN key. Enter "02.00" by using BLUE key to change value and
GREEN key to move to the next space. Press GREEN key until "A1" is
displayed.
11. Press GREEN key. Enter "0.580" by using BLUE key to change value and
GREEN key to move to the next space. Press GREEN key until "Add" is
displayed.
12. Press MENU until "Edit" is displayed. Press GREEN key until „S0“ is displayed.
13. Press GREEN key. Enter "00.05" by using BLUE key to change value and
GREEN key to move to the next space. Press GREEN key until "A0" is
displayed.
14. Press GREEN key. Enter "0.015" by using BLUE key to change value and
GREEN key to move to the next space. Press GREEN key until „S1“ is
displayed.
15. Press MENU until "Edit" is displayed to check the entered data. Press GREEN
key. „RES“ is displayed.
16. Press BLUE key to scroll through the entries. Compare the entries with the data
shown in the table below.
Table 2 Calibration data of LCK 310
RES --.--
S0 0.05
A0 0.015
S1 2.00
A1 0.580
17. After comparing the entries press MENU two times to enter the measuring
mode. See
4.3 Evaluate LANGE Chlorine/Chlorine dioxide/Ozone Cuvette
Tests on page 25.
Note: In case of any mistake retrieve the factory calibration first. See 3.5.1 Retrieve the factory
calibration on page 24. After retrieving the factory calibration, start the programming procedure
again. If the instrument is shut-off or loses power during data entry, all edits will be lost.
Automatic shut-off is 60 minutes.
23
Page 25

System start up
3.4 Check entered data
To avoid erroneous measurements it is recommended to check the data after
completing the programme procedure.
1. Press MENU for about five seconds until "USER" followed by "CAL" is
displayed.
2. Press BLUE key to scroll to "Edit". Press GREEN key.
3. "RES" is displayed. Press BLUE key to scroll through the entries. Compare the
entries with the figures in the 3.2.2.1 Evaluation as Chlorine Cl2, Chlorine
dioxide ClO2 and Ozone O3 on page 22.
In case a value was not stored correctly, retrieve the factory calibration first. See 3.5.1
Retrieve the factory calibration. After retrieving the factory calibration, start the
programming procedure again.
3.5 Overwrite stored calibration data
With the POCKET COLORIMETER II it is possible to overwrite stored calibration
data. Before overwriting calibration data it is recommended to retrieve the factory
calibration first. After retrieving the factory calibration, you can program new
calibration data.
In case of any mistake retrieve the factory calibration first.
3.5.1 Retrieve the factory calibration
1. Press MENU. "SEL" is displayed. A flashing arrow indicates the current
measuring range (1 or 2). Press GREEN key to toggle between measuring
ranges. Select measuring range retrieving the factory calibration.
1. Press MENU for about five seconds until "USER" followed by "CAL" is
displayed.
2. Press BLUE key to scroll to "dFL". Press GREEN key.
24
Page 26

Section 4 Operation
4.1 Analyse Chlorine/Chlorine dioxide/Ozone with
LANGE Cuvette Tests
DANGER
Handling chemical samples, standards and reagents can be dangerous. Users
of this product are advised to familiarize themselves with safety procedures
and the correct use of chemicals, and to carefully read all relevant material
safety data sheets.
To analyse Chlorine, Chlorine dioxide or Ozone follow the working procedure
enclosed in the according Cuvette Test LCK 310.
4.2 Quality assurance
The measurement results must be subjected to plausibility checks (dilute and/or
spike the sample).
Regular checks with corresponding standard solutions (see Section 5 Replacement
Parts and Accessories on page 27) ensure that your measurement system is
functioning properly and is being correctly operated.
4.3 Evaluate LANGE Chlorine/Chlorine
dioxide/Ozone Cuvette Tests
Note: Make sure that the instrument is programmed with the corresponding calibration data,
see 3.4 Check entered data on page 24.
1. Press POWER to switch on the instrument.
2. Make sure that the correct measuring range is selected!
Otherwise press MENU. "SEL" is displayed. A flashing arrow indicates the
current measuring range (1 or 2). Press GREEN key to select measuring range.
Press MENU to get back to the measuring mode.
3. Insert the zero-solution into the cell holder equipped with the cuvette adapter
1cm.
Note: Make sure that the cuvette adapter is positioned correctly.
4. Place the instrument cap with the HACH LANGE label over the cell holder to
cover the cuvette.
5. Press BLUE key. "0.00" is displayed.
6. Remove the instrument cap and insert the sample cuvette.
7. Place the instrument cap over the cell holder to cover the cuvette.
8. Press GREEN key.
9. The result is displayed in mg/l Chlorine/Chlorine dioxide/Ozone.
Note: In case the Chlorine/Chlorine dioxide/Ozone concentration is out of the selected
measuring range the value for the lowest or highest concentration is displayed and
25
Page 27

Operation
flashes. Repeat the test using the appropriate LCK Cuvette Test measuring range or
dilute your sample.
Note: A new blank measurement should be performed prior to each individual test series.
26
Page 28
Section 5 Replacement Parts and
Accessories
5.1 Replacement Parts
Description Quantity Cat. Number
POCKET COLORIMETERTM II 528 nm 1 5870052
Instrument cap with HACH LANGE label 1 LZV 759
Cuvette adapter 1 cm 1 5954600
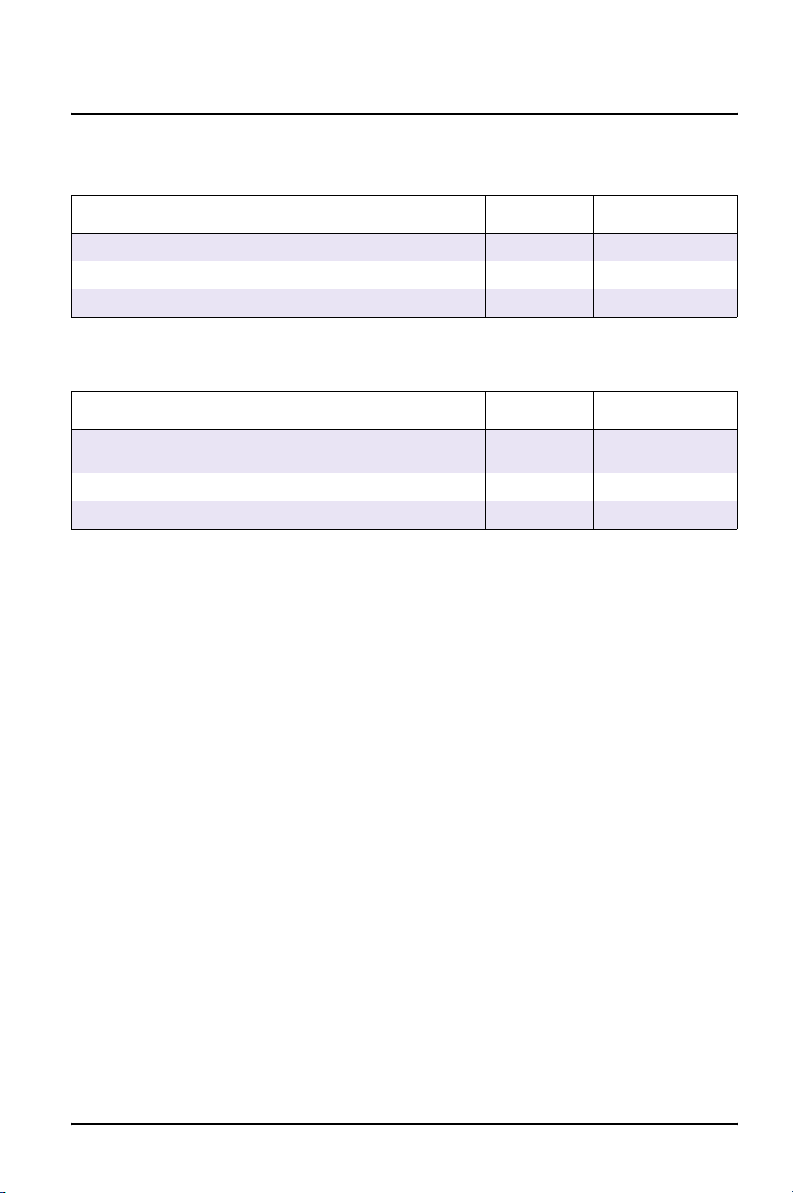
5.2 Accessories
Description Quantity Cat. Number
Chlorine/Chlorine dioxide/Ozone
Cuvette Test (0.05-2 mg/l Cl2)
Standard and Ring Test solution for LCK 310 1 LCA 310
Cuvette Stand for LANGE cuvettes 1 LYW 915
1 pk/38 pc LCK 310
27
Page 29

28
Page 30

Section 6 How to order
Orders/repair service
Please contact your representative:
HACH LANGE GMBH
Willstätterstraße 11
D-40549 Düsseldorf
Tel. +49 (0)2 11 52 88-0
Fax +49 (0)2 11 52 88-143
info@hach-lange.de
www.hach-lange.com
HACH LANGE LTD
Pacific Way
Salford
GB-Manchester, M50 1DL
Tel. +44 (0)161 872 14 87
Fax +44 (0)161 848 73 24
info@hach-lange.co.uk
www.hach-lange.co.uk
HACH LANGE LTD
Unit 1, Chestnut Road
Western Industrial Estate
IRL-Dublin 12
Tel. +353(0)1 46 02 5 22
Fax +353(0)1 4 50 93 37
info@hach-lange.ie
www.hach-lange.ie
Information Required
• Customer account number (if available) • Billing address
• Your name and phone number • Shipping address
• Purchase order number • Catalog number
• Brief description or model number • Quantity
29
Page 31

30
Page 32

Abschnitt 1 Allgemeine Informationen
1.1 Sicherheitsinformationen
Bevor das Gerät ausgepackt, aufgestellt oder in Betrieb genommen wird, empfehlen
wir dringend, die Bedienungsanleitung des POCKET COLORIMETER
zu lesen. Beachten Sie besonders alle mit GEFAHR und VORSICHT
überschriebenen Hinweise. Ein Versäumnis in dieser Richtung könnte zu einer
ernsthaften Verletzung des Benutzers oder Schäden am Gerät führen.
Damit die im Gerät vorgesehenen Schutzvorrichtungen nicht beeinträchtigt werden,
darf das Gerät auf keinen Fall anders installiert oder benutzt werden, als es in dieser
Bedienungsanleitung angegeben ist.
1.1.1 Bedeutung der Hinweise
GEFAHR
Weist auf eine potenzielle oder bevorstehende Gefahrensituation hin, deren
Nichtbeachtung zu ernsthaften Verletzungen oder sogar zum Tod führen kann.
Wichtiger Hinweis: Diese Information muss unbedingt beachtet werden.
Hinweis: Diese Informationen ergänzen Punkte im Haupttext.
1.2 Allgemeine Produktinformationen
Diese Programmieranleitung beschreibt die Auswertung von LANGE Küvetten-Tests
auf einem POCKET COLORIMETER II mit definierter Wellenlänge.
TM
II sorgfältig
31
Page 33

32
Page 34

Abschnitt 2 Installation
Wichtiger Hinweis: Diese Programmieranleitung ist nur in Verbindung mit der
Bedienungsanleitung des POCKET COLORIMETERTM II und den LCK
Arbeitsvorschriften gültig. Bevor das Gerät ausgepackt, aufgestellt oder in Betrieb
genommen wird, empfehlen wir dringend, diese Programmieranleitung und die
Bedienungsanleitung des POCKET COLORIMETER II sorgfältig zu lesen.
2.1 Verpackungsliste
• POCKET COLORIMETER II 528 nm, Kat. Nr. 5870052
• Instrumentenkappe mit HACH LANGE Logo, Kat. Nr. LZV 759
• Küvettenadapter 1 cm, Kat. Nr. 5954600
• Programmieranleitung DOC027.98.00798
2.2 Küvettenadapter einsetzen
Instrumentenkappe entfernen. Küvettenadapter vorsichtig mit der Pfeilmarkierung
nach vorne in den Küvettenhalter einsetzen und einrasten lassen.
2.3 Austausch der Instrumentenkappe
Zur Auswertung von LANGE Küvetten-Tests die Instrumentenkappe mit dem HACH
LANGE Logo verwenden.
33
Page 35

34
Page 36

Abschnitt 3 Inbetriebnahme
1 adsorbance 2
3.1 Gerätetasten und Display
528 nm
1 adsorbance 2
Abbildung 1 Gerätetasten und Display
1 POWER/BACKLIGHT
(Einschalten/Displaybeleuchtung)
2 ZERO/SCROLL (BLAUE Ta st e )
(Nulleinstellung/Blättern)
3MENU
(Auswahl des Betriebsmodus)
4 Numerische Anzeige 9 Batteriezustandsanzeige
5 Messbereichsanzeige (1) 10 READ/ENTER (GRÜNE Ta st e )
6 Messbereichsanzeige (2)
7 Menü-Anzeige
8 Anzeige „Kalibrierung anpassen“
(Mess- und Eingabe-Taste)
3.1.1 Tasten-Funktionen
ZERO/SCROLL (BLAUE Ta st e) : Im Messmodus setzt diese Taste das Gerät auf
Null zurück. Im Menümodus dient sie zum Durchblättern der Menüfunktionen. Bei der
Eingabe von Zahlenwerten lässt sich damit die Zahl um jeweils eins erhöhen.
READ/ENTER (GRÜNE Taste) : Im Messmodus wird mit dieser Taste eine Messung
ausgelöst. Im Menümodus dient sie zur Auswahl einer Menüfunktion. Bei der
Eingabe von Zahlenwerten setzt sie den Cursor um ein Feld nach rechts.
35
Page 37

Inbetriebnahme
3.2 Eingabe der Kalibrierdaten für LANGE
Küvetten-Tests
3.2.1 Überblick
Jedes POCKET COLORIMETER II hat zwei Kanäle mit denen Messungen
durchgeführt werden können. Jeder Kanal (Messbereich) kann mit
benutzerdefinierten Kalibierdaten programmiert werden.
Diese Programmieranleitung beinhaltet die Kalibrierdaten für den LANGE
Küvetten-Test zur Bestimmung von Chlor/Chlordioxid/Ozon:
• LCK 310: 0.05-2 mg/l Cl
Maximal zwei Kalibrierdatensätze mit den passenden Messbereichsgrenzen
auswählen.
Die Programmierung muss nur einmal vor der ersten Anwendung durchgeführt
werden.
Für genaue Informationen die Bedienungsanleitung des POCKET COLORIMETER II
lesen.
3.2.2 Datentabelle
oder 0.09-3.8 mg/l ClO2 oder 0.05-2 mg/l O
2
3
3.2.2.1 Auswertung als Chlor Cl2, Chlordioxid ClO2 und Ozon O
Tabelle 1 Auswertung als Chlor Cl2, Chlordioxid ClO2 und Ozon O
RES (Auflösung)
S0 (Standard 0)
A0 (Extinktion 0)
S1 (Standard 1)
A1 (Extinktion 1)
LCK 310
Chlor
--.-- --.-- --.--
00.05 00.09 00.05
0.015 0.015 0.025
02.00 03.80 02.00
0.580 0.600 0.900
LCK 310
Chlordioxid
3
LCK 310
Ozon
3
3.3 Programmierung
Hinweis: Die Programmierung muss nur einmal vor der ersten Anwendung durchgeführt
werden.
Wichtiger Hinweis: Die folgende Programmieranleitung ist für die Auswertung von
Chlor Cl2 gültig. Für die Auswertung als Chlordioxid ClO2 oder Ozon O3 die
entsprechenden Kalibrierdaten aus der Tabelle 3.2.2.1 Auswertung als Chlor Cl2,
Chlordioxid ClO2 und Ozon O3 verwenden.
Hinweis: Nach der Programmierung ist es hilfreich, mit einem Aufkleber Kanal 1 und 2 mit
dem entsprechenden Messbereich zu markieren.
36
Page 38

Inbetriebnahme
3.3.1 LCK 310 Chlor Cl
2
1. POWER drücken, um das Gerät einzuschalten.
2. MENU drücken. "SEL" wird angezeigt. Ein blinkender Pfeil zeigt den aktuellen
Kanal (1 oder 2) an.
3. Messbereich 1 oder 2 für LCK 310 (0.05-2 mg/l Cl2) auswählen.
Hinweis: GRÜNE Taste drücken, um zwischen den Messbereichen umzuschalten.
4. MENU für ca. fünf Sekunden drücken bis "USER", gefolgt von "CAL" angezeigt
wird.
5. BLAUE Taste drücken bis "Edit" angezeigt wird. GRÜNE Taste drücken. " RES"
wird angezeigt.
6. GRÜNE Taste drücken. "-.---" wird angezeigt.
7. BLAUE Taste drücken bis "--.--" angezeigt wird. GRÜNE Taste drücken. "S0"
wird angezeigt.
8. GRÜNE Taste drücken bis "A0" angezeigt wird.
9. GRÜNE Taste drücken bis "S1" angezeigt wird.
10. GRÜNE Taste drücken. "02.00" eingeben, indem mit BLAUER Taste der
Zahlenwert geändert wird und mit GRÜNER Taste der Cursor um eine Position
nach rechts verschoben wird. GRÜNE Taste drücken bis "A1" angezeigt wird.
11. GRÜNE Taste drücken. "0.580" eingeben, indem mit BLAUER Taste der
Zahlenwert geändert wird und mit GRÜNER Taste der Cursor um eine Position
nach rechts verschoben wird. GRÜNE Taste drücken bis "Add" angezeigt wird.
12. MENU drücken bis "Edit" angezeigt wird. GRÜNE Taste drücken bis "S0"
angezeigt wird.
13. GRÜNE Taste drücken. "00.05" eingeben, indem mit BLAUER Taste der
Zahlenwert geändert wird und mit GRÜNER Taste der Cursor um eine Position
nach rechts verschoben wird. GRÜNE Taste drücken bis "A0" angezeigt wird.
14. GRÜNE Taste drücken. "0.015" eingeben, indem mit BLAUER Taste der
Zahlenwert geändert wird und mit GRÜNER Taste der Cursor um eine Position
nach rechts verschoben wird. GRÜNE Taste drücken bis "S1" angezeigt wird.
15. Zur Kontrolle der Eingabe MENU drücken bis "Edit" angezeigt wird. GRÜNE
Taste drücken. "RES" wird angezeigt. Mit BLAUER Taste durch die Eingaben
blättern und die Displayanzeigen mit der folgenden Tabelle vergleichen..
Tabelle 2 Kalibrierdaten LCK 310
RES --.--
S0 0.05
A0 0.015
S1 2.00
A1 0.580
37
Page 39

Inbetriebnahme
16. Nach der Datenkontrolle MENU zweimal drücken um in den Messmodus zu
gelangen. Siehe 4.3 Auswertung der LANGE Chlor/Chlordioxid/Ozon
Küvetten-Tests auf Seite 39.
Hinweis: Im Falle eines Eingabefehlers, müssen alle Daten gelöscht werden (siehe 3.5.1
Grundeinstellung wieder herstellen auf Seite 38). Anschließend die Eingabe gemäß der
Programmieranleitung neu beginnen. Wenn sich das Gerät während der Eingabe ausschaltet,
gehen alle Eingaben verloren. Eine automatische Abschaltung erfolgt nach 60 Minuten.
3.4 Dateneingabe kontrollieren
Um fehlerhafte Messungen zu vermeiden, ist es unbedingt erforderlich, die
Dateneingabe zu kontrollieren, nachdem man die Programmierung durchgeführt hat.
1. MENU für ca. fünf Sekunden drücken bis "USER", gefolgt von "CAL" angezeigt
wird.
2. BLAUE Taste drücken bis "Edit" angezeigt wird. GRÜNE Taste drücken. " RES"
wird angezeigt.
3. Mit der BLAUEN Taste durch die Eingaben blättern und die Displayanzeigen
mit der Tabelle 3.2.2.1 Auswertung als Chlor Cl2, Chlordioxid ClO2 und Ozon
O3 auf Seite 36 vergleichen.
Falls ein Wert nicht richtig gespeichert wurde, müssen alle Daten gelöscht werden
(siehe 3.5.1 Grundeinstellung wieder herstellen). Anschließend die Eingabe gemäß
der Programmieranleitung neu beginnen.
3.5 Überschreiben gespeicherter Kalibrierdaten
Gespeicherte Kalibrierdaten können überschrieben werden. Zuvor ist es jedoch
notwendig, die Grundeinstellung wieder herzustellen. Danach können anhand der
Programmieranleitung neue Kalibrierdaten eingegeben werden.
Im Falle eines Eingabefehlers müssen alle Daten gelöscht und die Grundeinstellung
wieder hergestellt werden.
3.5.1 Grundeinstellung wieder herstellen
1. MENU drücken. "SEL" wird angezeigt. Ein blinkender Pfeil zeigt den aktuellen
Kanal (1 oder 2) an. GRÜNE
Kanal zu wählen.
2. MENU für ca. fünf Sekunden drücken bis "USER", gefolgt von "CAL" angezeigt
wird.
3. BLAUE Taste drücken bis "dFL" angezeigt wird. GRÜNE Taste drücken.
38
Taste drücken, um den zu überschreibenden
Page 40

Abschnitt 4 Betrieb
4.1 Analyse von Chlor/Chlordioxid/Ozon mit LANGE
Küvetten-Tests
Gefahr
Das Arbeiten mit chemischen Proben, Standards und Reagenzien ist mit
Gefahren verbunden. Es wird dem Anwender dieser Produkte empfohlen, sich
vor der Arbeit mit sicheren Verfahrensweisen und dem richtigen Gebrauch der
Chemikalien vertraut zu machen und alle entsprechenden
Sicherheitsdatenblätter aufmerksam zu lesen.
Für die Analyse von Chlor, Chlordioxid bzw. Ozon die beigepackte Arbeitsvorschrift
des entsprechenden Küvetten-Tests LCK 310 befolgen.
4.2 Qualitätssicherung
Die Messergebnisse müssen mit einer Plausibilitätskontrolle (Verdünnen und/oder
Aufstocken der Probe) überprüft werden.
Regelmäßige Überprüfungen mit entsprechenden Standardlösungen (siehe
Abschnitt 5 Ersatzteile und Zubehör auf Seite 41) stellen sicher, dass das
Messsystem präzise arbeitet und richtig bedient wird.
4.3 Auswertung der LANGE Chlor/Chlordioxid/Ozon
Küvetten-Tests
Hinweis: Überprüfung der Kalibrierdaten. Siehe 3.4 Dateneingabe kontrollieren auf Seite 38.
1. POWER drücken, um das Gerät einzuschalten.
2. Überprüfen, ob der richtige Messbereich gewählt wurde. Ansonsten MENU
drücken. "SEL" wird angezeigt. Ein blinkender Pfeil zeigt den aktuellen Kanal (1
oder 2) an. GRÜNE Taste drücken, um den gewünschten Kanal zu wählen.
MENU drücken und zum Messmodus zurück kehren.
3. Nulllösung in den Küvettenadapter 1 cm im Küvettenhalter einsetzen.
Hinweis: Den korrekten Sitz des Küvettenadapters im Küvettenhalter überprüfen.
4. Instrumentenkappe mit dem HACH LANGE Logo zur Abdeckung der Küvette
auf den Küvettenhalter setzen.
5. BLAUE Taste drücken. "0.00" wird angezeigt.
6. Instrumentenkappe und Nulllösung entfernen, Probenküvette einsetzen.
7. Zur Abdeckung der Küvette Instrumentenkappe auf den Küvettenhalter setzen.
8. GRÜNE Taste drücken.
9. Das Ergebnis wird in mg/l Chlor/Chlordioxid/Ozon angezeigt.
Hinweis: Wenn die Chlor/Chlordioxid/Ozon Konzentration außerhalb des gewählten
Messbereiches liegt, wird die obere bzw. untere Messbereichsgrenze angezeigt und
blinkt. Hier muss der Test in einem anderen Messbereich oder mit der verdünnten Probe
wiederholt werden.
Hinweis: Eine neue Nullmessung muss vor jeder neuen Testreihe durchgeführt werden.
39
Page 41

40
Page 42

Abschnitt 5 Ersatzteile und Zubehör
5.1 Ersatzteile
Beschreibung Anzahl Kat. Nummer
POCKET COLORIMETERTM II 528 nm 1 5870052
Instrumentenkappe mit HACH LANGE Logo 1 LZV 759
Küvettenadapter 1 cm 1 5954600
5.2 Zubehör
Beschreibung Anzahl Kat. Nummer
Chlor/Chlordioxid/Ozon Küvetten-Test (0.05-2 mg/l Cl2) 1 Pk/38 St LCK 310
Standard und Ringversuchslösung für LCK 310 1 LCA 310
Küvettenständer 1 LYW 915
41
Page 43

42
Page 44

Abschnitt 6 Bestellhinweis
Bestellungen/Reparaturservice
Bitte wenden Sie sich an Ihre zuständige Vertretung:
HACH LANGE GMBH
DR. BRUNO LANGE
DR. BRUNO LANGE AG
GES. MBH
Willstätterstraße 11
D-40549 Düsseldorf
Tel. +49 (0)2 11 52 88-0
Fax +49 (0)2 11 52 88-143
info@hach-lange.de
www.hach-lange.com
Industriestraße 12
A-3200 Obergrafendorf
Tel. +43 (0)27 47 74 12
Fax +43 (0)27 47 42 18
info@hach-lange.at
www.hach-lange.at
Juchstrasse 1
CH-8604 Hegnau
Tel. +41(0)44 9 45 66 10
Fax +41(0)44 9 45 66 76
info@hach-lange.ch
www.hach-lange.ch
Benötigte Angaben
• Nummer Ihres Kundenkontos (falls
bekannt bzw. vorhanden)
• Name und Tel.-Nr. des Anrufers • Lieferanschrift
• Nr. der Bestellung • Katalog-Nr.
• Kurzbeschreibung / Modell-Nr. des
Produkts / Serien-Nr.
• Rechnungsanschrift
• Menge
43
Page 45

44
Page 46

Section 1 Informations générales
1.1 Consignes de sécurité
Veuillez lire les présentes instructions de fonctionnement en intégralité, ainsi que le
manuel d’instructions de l’instrument POCKET COLORIMETER
déballer, d’installer ou d’utiliser l’équipement. Prenez en compte l’ensemble des
déclarations relatives à des dangers ou des avertissements, faute de quoi l’opérateur
risque d’être gravement blessé ou l’équipement risque d’être endommagé.
Afin de garantir que la protection proposée par le présent équipement n’est pas
réduite, n’utilisez et n’installez pas l'instrument d’une autre manière que celle
indiquée dans le présent manuel.
1.1.1 Utilisation des informations relatives aux risques
DANGER
Indique une situation potentiellement ou directement dangereuse qui, si elle
n’est pas évitée, peut entraîner des blessures graves, voire la mort.
Remarque importante : Informations qui nécessitent d’être mises en évidence
Remarque : Informations qui complètent des points du texte principal
1.2 Informations générales relatives au produit
Les présentes instructions de fonctionnement détaillent la procédure d’évaluation
des tests en cuve LANGE sur un instrument POCKET COLORIMETER II à longueur
d’onde unique.
TM
II avant de
45
Page 47

46
Page 48

Section 2 Installation
Remarque importante : Les présentes instructions de fonctionnement sont
uniquement valables en association avec le manuel d’instructions de l’instrument
POCKET COLORIMETERTM II et la procédure de travail LCK correspondante.
Veuillez lire les présentes instructions de fonctionnement, ainsi que le manuel
d’instructions de l’instrument POCKET COLORIMETER II avant de déballer,
d’installer ou d’utiliser l’instrument.
2.1 Liste d’expédition
• POCKET COLORIMETER II 528 nm, n° cat. 5870052
• Capuchon d’instrument portant la mention HACH LANGE, n° cat. LZV 759
• Adaptateur de cuve 1 cm, n° cat. 5954600
• Instructions de fonctionnement DOC027.98.00798
2.2 Insertion de l’adaptateur
Retirez le capuchon de l’instrument et positionnez délicatement l’adaptateur de cuve
sur le support de cellule, en orientant la flèche vers le bas. Fixez-le en appuyant.
2.3 Réinstallation du capuchon de l’instrument
Utilisez le capuchon d’instrument portant la mention HACH LANGE lors de
l’évaluation des cuve LANGE.
47
Page 49

48
Page 50

Section 3 Démarrage du système
1 adsorbance 2
3.1 Écran et touches de l’instrument
528 nm
1 adsorbance 2
Illustration 1 Écran et touches de l’instrument
1 ALIMENTATION/RETROÉCLAIRAGE 6 Indicateur de la plage de mesure
(2)
2 ZÉRO/DÉFILEMENT (touche
BLEUE)
3MENU 8Indicateur d’ajustement de
4 Écran numérique 9 Indicateur de niveau faible de la
5 Indicateur de la plage de mesure (1) 10 LECTURE/SAISIE (touche
7 Indicateur de menu
l'étalonnage
batterie
VERTE)
3.1.1 Fonctions des touches
ZÉRO/DÉFILEMENT (touche BLEUE) : en mode de mesure, permet de réinitialiser
l’instrument. En mode menu, permet de défiler parmi les options du menu. Permet
également de faire défiler les nombres lors de la saisie ou de la modification d’une
valeur.
LECTURE/SAISIE (touche VERTE) : en mode de mesure, initialise la mesure des
échantillons. En mode menu, permet de sélectionner une option de menu. Lors de la
saisie de nombres, permet de se déplacer d’un espace vers la droite. Confirmez la
fonction une fois la saisie terminée.
49
Page 51

Démarrage du système
3.2 Saisie des données d'étalonnage des tests en cuve
LANGE
3.2.1 Vue d’ensemble
Chaque instrument POCKET COLORIMETER II dispose de deux canaux au niveau
desquels les mesures peuvent être effectuées. Chaque canal (plage de mesure)
accepte les données d'étalonnage définies par l’utilisateur.
Les présentes instructions de fonctionnement incluent les données d'étalonnage des
tests en cuve LANGE pour Chlore/Dioxyde de Chlore/Ozone:
• LCK 310: 0.05-2 mg/l Cl
Sélectionnez les données d'étalonnage de deux plages de mesure adaptées (au
maximum).
Chaque procédure de programmation doit être effectuée avant la première
évaluation test.
Pour obtenir des informations détaillées, veuillez consulter le manuel d’instructions
de l’instrument POCKET COLORIMETER II.
3.2.2 Tableau de données
ou 0.09-3.8 mg/l ClO2 ou 0.05-2 mg/l O
2
3
3.2.2.1 Évaluation avec Chlore Cl2, Dioxyde de Chlore ClO2 et Ozone O
Table 1 Évaluation avec Chlore Cl2, Dioxyde de Chlore ClO2 et Ozone O
RES (résolution)
S0 (étalon 0)
A0 (absorbance 0)
S1 (étalon 1)
A1 (absorbance 1)
LCK 310
Chlore
--.-- --.-- --.--
00.05 00.09 00.05
0.015 0.015 0.025
02.00 03.80 02.00
0.580 0.600 0.900
LCK 310
Dioxyde de Chlore
LCK 310
Ozone
3
3
3.3 Procédure de programmation
Remarque : Chaque procédure de programmation doit être effectuée avant la première
évaluation test.
Remarque importante : Le procédure de programmation suivante s’applique à
l’évaluation de le chlore Cl2. Pour l’évaluation du Dioxyde de Chlore ClO2 ou Ozone
O3 veuillez sélectionner les données mentionnées dans le tableau 3.2.2.1
Évaluation avec Chlore Cl2, Dioxyde de Chlore ClO2 et Ozone O3.
Remarque : Une fois les données d'étalonnage programmées, il peut s’avérer utile de repérer
le ou les canaux 1 et/ou 2 à l’aide d’une étiquette.
50
Page 52

Démarrage du système
3.3.1 LCK 310 Chlore Cl
2
1. Appuyez sur POWER (ALIMENTATION) pour mettre l’instrument sous tension.
2. Appuyez sur MENU. La mention "SEL" apparaît. Une flèche clignotante indique
la plage de mesure sélectionnée (1 ou 2).
3. Sélectionnez la plage de mesure 1 ou 2 pour LCK 310 (0.05–2 mg/l Cl2).
Remarque : Appuyez sur la touche VERTE pour passer d’une plage de mesure à
l’autre.
4. Appuyez sur MENU pendant environ cinq secondes jusqu’à ce que la mention
"USER" (UTILISATEUR), suivie de la mention "CAL" s’affichent.
5. Appuyez sur la touche BLEUE jusqu’à ce que l’option "Edit" (Modifier) s’affiche.
Appuyez sur la touche VERTE. La mention "RES" s’affiche.
6. Appuyez sur la touche VERTE. La mention "-.---" s’affiche.
7. Appuyez sur la touche BLEUE jusqu’à ce que la mention "--.--" s’affiche.
Appuyez sur la touche VERTE. La mention "S0" s’affiche.
8. Appuyez sur la touche BLEUE jusqu’à ce que la mention "A0" s’affiche.
9. Appuyez sur la touche VERTE jusqu’à ce que la mention "S1" s’affiche.
10. Appuyez sur la touche VERTE. Saisissez "02.00" à l’aide de la touche BLEUE
pour modifier la valeur et de la touche VERTE pour passer à l’espace suivant.
Appuyez sur la touche VERTE jusqu’à ce que la mention "A1" s’affiche.
11. Appuyez sur la touche VERTE. Saisissez "0.580" à l’aide de la touche BLEUE
pour modifier la valeur et de la touche VERTE pour passer à l’espace suivant.
Appuyez sur la touche VERTE jusqu’à ce que l’option "Add" (Ajouter) s’affiche.
12. Appuyez sur la touche MENU jusqu’à ce que l’option "Edit" (Modifier) s’affiche.
Appuyez sur la touche VERTE jusqu’à ce que la mention "S0" s’affiche.
13. Appuyez sur la touche VERTE. Saisissez "00.05" à l’aide de la touche BLEUE
pour modifier la valeur et de la touche VERTE pour passer à l’espace suivant.
Appuyez sur la touche VERTE jusqu’à ce que la mention "A0" s’affiche.
14. Appuyez sur la touche VERTE. Saisissez "0.015" à l’aide de la touche BLEUE
pour modifier la valeur et de la touche VERTE pour passer à l’espace suivant.
Appuyez sur la touche VERTE jusqu’à ce que la mention "S1" s’affiche.
15. Appuyez sur la touche MENU jusqu’à ce que l’option "Edit" (Modifier) s’affiche.
Vérifiez ensuite les données saisies. Appuyez sur la touche VERTE. La
mention "RES" s’affiche.
16. Appuyez sur la touche BLEUE pour faire défiler les entrées. Comparez les
entrées avec les données affichées dans le tableau ci-dessous.
Table 2 Tableau de données LCK 310
RES --.--
S0 0.05
A0 0.015
S1 2.00
A1 0.580
51
Page 53

Démarrage du système
17. Une fois les entrées comparées, appuyez deux fois sur MENU pour activer le
mode de mesure. Reportez-vous à la section 4.3 Évaluation des tests en cuve
Chlore/Dioxyde de Chlore/Ozone LANGE à la page 53.
Remarque : En cas d’erreur, commencez par récupérer l'étalonnage usine. Reportez-vous à la
section 3.5.1 Récupération de l'étalonnage usine à la page 52. Une fois l'étalonnage usine
récupéré, recommencez la procédure de programmation. En cas de mise hors tension de
l’instrument ou de coupure d’électricité lors de la saisie des données, toutes les modifications
apportées seront perdues. L’instrument se met automatiquement hors tension au bout de 60
minutes.
3.4 Vérification des données saisies
Afin d’éviter toute mesure erronée, nous vous recommandons de vérifier les données
une fois la procédure de programmation terminée.
1. Appuyez sur MENU pendant environ cinq secondes jusqu’à ce que la mention
"USER" (UTILISATEUR), suivie de la mention "CAL" s’affichent.
2. Appuyez sur la touche BLEUE pour atteindre l’option "Edit" (Modifier). Appuyez
sur la touche VERTE.
3. La mention "RES" s’affiche. Appuyez sur la touche VERTE pour faire défiler les
entrées. Comparez les entrées avec les chiffres de la section 3.2.2.1 Évaluation
avec Chlore Cl2, Dioxyde de Chlore ClO2 et Ozone O3 à la page 50.
Si une valeur n’a pas été stockée correctement, commencez par récupérer
l'étalonnage usine. Reportez-vous à la section 3.5.1 Récupération de l'étalonnage
usine. Une fois l'étalonnage usine récupéré, recommencez la procédure de
programmation.
3.5 Écrasement des données d'étalonnage stockées
L’instrument POCKET COLORIMETER II permet d’écraser les données
d'étalonnage stockées. Avant d’écraser les données d'étalonnage, nous vous
recommandons de récupérer l'étalonnage usine. Une fois l'étalonnage usine
récupéré, vous pouvez programmer les données d'étalonnage.
En cas d’erreur, commencez par récupérer l'étalonnage usine.
3.5.1 Récupération de l'étalonnage usine
1. Appuyez sur MENU. La mention "SEL" apparaît. Une flèche clignotante indique
la plage de mesure sélectionnée (1 ou 2). Appuyez sur la touche VERTE pour
passer d’une plage de mesure à l’autre. Sélectionnez la plage de mesure pour
laquelle vous récupérez l'étalonnage usine.
1. Appuyez sur MENU pendant environ cinq secondes jusqu’à ce que la mention
"USER" (UTILISATEUR), suivie de la mention "CAL" s’affichent.
2. Appuyez sur la touche BLEUE pour afficher la mention "dFL". Appuyez sur la
touche VERTE.
52
Page 54

Section 4 Fonctionnement
4.1 Analyse Chlore/Dioxyde de Chlore/Ozone à l’aide
de tests en cuve LANGE
DANGER
La manipulation de réactifs, d’étalons et d’échantillons chimiques peut être
dangereuse. Nous recommandons aux utilisateurs du produit de se
familiariser avec les procédures de sécurité et l’utilisation correcte des
produits chimiques et de lire attentivement l’ensemble des feuilles de
données relatives à la sécurité des matériaux adaptées.
Pour analyser Chlore, Dioxyde de Chlore ou Ozone, suivez la procédure de travail
fournie avec le test en cuve LCK 310.
4.2 Assurance qualité
Les résultats des mesures doivent être soumis à des tests de plausibilité (dilution
et/ou étude en solution de l’échantillon).
Des vérifications régulières avec les solutions etalon correspondantes
(reportez-vous à la section Section 5 Pièces de remplacement et accessoires à la
page 55) permettent de garantir que le système de mesure fonctionne correctement
et est utilisé correctement.
4.3 Évaluation des tests en cuve Chlore/Dioxyde de
Chlore/Ozone LANGE
Remarque : Assurez-vous que l’instrument est programmé avec les données d'étalonnage
correspondantes (reportez-vous à la section 3.4 Vérification des données saisies à la page
52).
1. Appuyez sur POWER (ALIMENTATION) pour mettre l’instrument sous tension.
2. Assurez-vous que la plage de mesure correcte est sélectionnée !
Sinon, appuyez sur MENU. La mention "SEL" apparaît. Une flèche clignotante
indique la plage de mesure sélectionnée (1 ou 2). Appuyez sur la touche
VERTE pour sélectionner la plage de mesure. Appuyez sur MENU pour
retourner au mode de mesure.
3. Insérez la Solution zéro dans le support de cellule équipé de l’adaptateur de
cuve 1 cm.
Remarque : Assurez-vous que l’adaptateur de cuve est correctement positionné.
4. Placez le capuchon d’instrument portant la mention HACH LANGE sur le
support de cellule de manière à couvrir la cuve.
5. Appuyez sur la touche BLEUE. La mention "0.00" s’affiche.
6. Retirez le capuchon de l’instrument et insérez la cuve de l’échantillon.
7. Placez le capuchon de l’instrument sur le support de cellule de manière à
couvrir la cuve.
8. Appuyez sur la touche VERTE.
53
Page 55

Fonctionnement
9. Le résultat est affiché en mg/l Chlore/Dioxyde de Chlore/Ozone.
Remarque : Si la concentration Chlore/Dioxyde de Chlore/Ozonene correspond pas à la
plage de mesure sélectionnée, la valeur de la concentration la plus faible ou la plus
élevée s’affiche et clignote. Répétez le test à l’aide de la plage de mesure de test en cuve
LCK adaptée ou diluez l’échantillon.
Remarque : Il est nécessaire de procéder à une nouvelle mesure de blanc avant chaque série
de tests.
54
Page 56

Section 5 Pièces de remplacement et
accessoires
5.1 Pièces de remplacement
Description Quantité N° cat.
POCKET COLORIMETERTM II 528 nm 1 5870052
Capuchon d’instrument portant la mention HACH
LANGE
Adaptateur de cuve 1 cm 1 5954600
5.2 Accessoires
Description Quantité N° cat.
Test en cuve Chlore/Dioxyde de Chlore/Ozone (0.05–2
mg/l Cl
)
2
Solution de tests etalon et comparatifs pour LCK 310 1 LCA 310
Support pour cuve LANGE 1 LYW 915
1 LZV 759
1 carton/38
unités
LCK 310
55
Page 57

56
Page 58

Section 6 Procédure de commande
Commandes/réparations
Veuillez contacter votre représentant :
HACH LANGE FRANCE
HACH LANGE SA
DR. BRUNO LANGE AG
S.A.S.
33, Rue du Ballon
F-93165 Noisy Le Grand
Tél. +33 (0)1 48 15 68 70
Fax +33 (0)1 48 15 80 00
info@hach-lange.fr
www.hach-lange.fr
Motstraat 54
B-2800 Mechelen
Tél. +32 (0)15 42 35 00
Fax +32 (0)15 41 61 20
info@hach-lange.be
www.hach-lange.be
Juchstrasse 1
CH-8604 Hegnau
Tél. +41(0)44 9 45 66 10
Fax +41(0)44 9 45 66 76
info@hach-lange.ch
www.hach-lange.ch
Informations requises
• Numéro de compte client (le cas échéant) • Adresse de facturation
• Votre nom et votre numéro de téléphone • Adresse de livraison
• Numéro du bon de commande • Numéro du catalogue
• Brève description ou numéro du modèle • Quantité
57
Page 59

58
Page 60

Sección 1 Información general
1.1 Indicaciones de seguridad
Por favor, lea todas las instrucciones de aplicacíon y el manual de instrucciones del
POCKET COLORIMETER
u operación de este equipo. Observe todas las indicaciones de peligro y de
advertencia. La falta de observación puede causar graves accidentes al usuario o
daños en el equipo.
Para no perjudicar la protección provista por este equipo, debe instalarse y utilizarse
este analizador exclusivamente en el modo descrito en este manual.
1.1.1 Utilización de las indicaciones de peligro
PELIGRO
Indica una situación potencial o inminentemente peligrosa que podría causar
la muerte o un accidente serio en caso de no evitarse.
Nota importante: Información que requiere atención especial.
Observación: Información complementaria para indicaciones en el texto principal.
1.2 Información general del producto
Estas instrucciones de aplicación describen el método de evaluación de las cubetas
test de LANGE con un POCKET COLORIMETER II de una sola longitud de onda.
TM
II antes de proceder con el desembalaje, la colocación
59
Page 61

60
Page 62

Sección 2 Instalación
Nota importante: Estas instrucciones de aplicación se aplican exclusivamente en
conjunto con el manual de instrucciones del POCKET COLORIMETERTM II y el
procedimiento LCK aplicado. Por favor, lea todas las instrucciones de aplicación y el
manual de instrucciones del POCKET COLORIMETER II antes de proceder con el
desembalaje, la colocación u operación del instrumento.
2.1 Lista de embalaje
• POCKET COLORIMETER II 528 nm, Nro. de Cat. 5870052
• Tapa de instrumento con etiqueta HACH LANGE, Nro. de Cat. LZV 759
• Adaptador de cubeta 1 cm, Nro. de Cat. 5954600
• Instrucciones de aplicación DOC027.98.00798
2.2 Insertar el adaptador
Retirar la tapa del instrumento y posicionar cuidadosamente el adaptador de cubeta
en el alojamiento de cubetas con la flecha indicando hacia abajo. Fijar mediante
empuje hacia abajo.
2.3 Reemplazar la tapa del instrumento
Usar la tapa del instrumento con la etiqueta HACH LANGE en la evaluación de las
cubetas LANGE.
61
Page 63

62
Page 64

Sección 3 Arranque del sistema
1 adsorbance 2
3.1 Teclas y pantalla del instrumento
528 nm
1 adsorbance 2
Figura 1 Teclas y pantalla del instrumento
1 ENCENDIDO/LUZ 6 Indicador del rango de medición (2)
2 ZERO/SCROLL (tecla AZUL ) 7 Indicador de menú
3MENU 8Indicación de calibración ajustada
4 Pantalla numérica 9 Indicador de batería baja
5 Indicador del rango de medición (1) 10 LEER/INTRO (tecla VERDE )
3.1.1 Funciones de tecla
ZERO/SCROLL (tecla AZUL ): En el modo de medición, ajusta el instrumento a cero.
En el modo de menú, se desplaza por las opciones de menú. Se desplaza también
por los números al introducir o editar un valor.
LEER/INTRO (tecla VERDE ): En el modo de medición, inicia la medición de
muestra. En el modo de menú, selecciona una opción de menú. Al introducir
números, sirve para desplazar una posición hacia la derecha. Confirma la función
tras haber completado la entrada.
3.2 Introduzca los datos de calibración de la cubeta
test de LANGE
3.2.1 Vista general
Cada POCKET COLORIMETER II tiene dos canales con los cuales se pueden
realizar las mediciones. Cada canal (rango de medición) acepta los datos de
calibración definidos por el usuario.
63
Page 65

Arranque del sistema
Estas instrucciones de aplicación contienen los datos de calibración de las cubetas
test de LANGE para Cloro/Dióxido de cloro/Ozono:
• LCK 310: 0.05-2 mg/l Cl
ó 0.09-3.8 mg/l ClO2 ó 0.05–2 mg/l O
2
3
Seleccionar los datos de calibración de un máximo de dos rangos de medición que
serán los apropiados.
Cada procedimiento de programación debe realizarse sólo después de una primera
evaluación de ensayo.
Para mayor información, consulte el manual de instrucciones del POCKET
COLORIMETER II.
3.2.2 Tabla de datos
3.2.2.1 Evaluación como Cloro Cl2, Dióxido de cloro ClO2 u Ozono O
Tabla 1 Evaluación como Cloro Cl2, Dióxido de cloro ClO2 u Ozono O
RES (resolución)
S0 (estándar 0)
A0 (absorbancia 0)
S1 (estándar 1)
A1 (absorbancia 1)
LCK 310
Cloro
--.-- --.-- --.--
00.05 00.09 00.05
0.015 0.015 0.025
02.00 03.80 02.00
0.580 0.600 0.900
LCK 310
Dióxido de cloro
3
3
LCK 310
Ozono
3.3 Procedimientos de programación
Observación: Cada procedimiento de programación debe realizarse sólo después de una
primera evaluación de ensayo.
Nota importante: Los siguientes procedimientos de programación son válidos para
la evaluación de cloro Cl2. Para la evaluación como dióxido de cloro ClO2 u ozono
O3, seleccione los datos mencionados en la tabla 3.2.2.1 Evaluación como Cloro
Cl2, Dióxido de cloro ClO2 u Ozono O3.
Observación: Después de la programación de los datos de calibración, puede resultar útil
marcar el(los) canal(es) 1 y/o 2 con una etiqueta.
3.3.1 LCK 310 Cloro Cl
1. Pulse ENCENDIDO para activar el instrumento.
2. Pulse MENU. Se indica "SEL". Una flecha parpadeante indica el rango actual
de medición (1 ó 2).
3. Seleccionar el rango de medición 1 ó 2 para LCK 310 (0.05–2 mg/l Cl
Observación: Pulse la tecla VERDE para conmutar entre los rangos de medición.
2
).
2
64
Page 66

Arranque del sistema
4. Pulse MENU durante aprox. cinco segundos hasta que se indique "USER" y
luego "CAL".
5. Pulse AZUL hasta que se indique "Edit". Pulse la tecla VERDE. Se indica"
RES".
6. Pulse la tecla VERDE. Se indica "-.---".
7. Pulse la tecla AZUL hasta que se indique "--.--". Pulse la tecla VERDE. Se
indica "S0".
8. Pulse la tecla VERDE hasta que se indique "A0".
9. Pulse la tecla VERDE hasta que se indique "S1".
10. Pulse la tecla VERDE. Introducir "02.00" con la tecla AZUL para cambiar el
valor y la tecla VERDE para avanzar a la siguiente posición. Pulse la tecla
VERDE hasta que se indique "A1".
11. Pulse la tecla VERDE. Introducir "0.580" con la tecla AZUL para cambiar el
valor y la tecla VERDE para avanzar a la siguiente posición. Pulse la tecla
VERDE hasta que se indique "Add".
12. Pulse MENU hasta que se indique "Edit". Pulse la tecla VERDE hasta que se
indique "S0".
13. Pulse la tecla VERDE. Introducir "00.05" con la tecla AZUL para cambiar el
valor y la tecla VERDE para avanzar a la siguiente posición. Pulse la tecla
VERDE hasta que se indique "A0".
14. Pulse la tecla VERDE. Introducir "0.015" con la tecla AZUL para cambiar el
valor y la tecla VERDE para avanzar a la siguiente posición. Pulse la tecla
VERDE hasta que se indique "S1".
15. Pulse MENU hasta que se indique "Edit", para controlar los datos ingresados.
Pulse la tecla VERDE. Se indica "RES".
16. Pulse la tecla AZUL para desplazarse dentro de las entradas. Comparar las
entradas con los datos mostrados en la siguiente tabla.
Tabla 2 Tabla de datos LCK 310
RES --.--
S0 0.05
A0 0.015
S1 2.00
A1 0.580
17. Después de comparar las entradas, pulse dos veces MENU para regresar al
modo de medición. Vea 4.3 Evaluación de Cloro/Dióxido de cloro/Ozono de
LANGE Cubetas test de cloro en la página 67
Observación: En caso de algún error, debe recuperarse primero la calibración por defecto.
Vea 3.5.1 Recuperación de calibración por defecto en la página 66. Después de recuperar la
calibración por defecto, arranque nuevamente el procedimiento de programación. En caso que
el instrumento se apague o pierda energía durante la entrada de datos, se pierden todos los
datos editados. Se apaga automáticamente después de 60 minutos.
.
65
Page 67

Arranque del sistema
3.4 Controlar los datos introducidos.
Para evitar las mediciones erróneas, se recomienda controlar los datos después de
terminar el procedimiento de programa.
1. Pulse MENU durante aprox. cinco segundos hasta que se indique "USER" y
luego "CAL".
2. Pulse la tecla AZUL para desplazarse a "Edit". Pulse la tecla VERDE.
3. Se indica" RES". Pulse la tecla VERDE para desplazarse dentro de las
entradas. Comparar las entradas con los datos en Tabla 1 Evaluación como
Cloro Cl2, Dióxido de cloro ClO2 u Ozono O3 en la página 64.
En caso que algún valor no se haya almacenado correctamente, debe recuperarse
primero la calibración por defecto. Vea 3.5.1 Recuperación de calibración por
defecto. Después de recuperar la calibración por defecto, arranque nuevamente el
procedimiento de programación.
3.5 Sobreescribir los datos de calibración
almacenados.
Con el POCKET COLORIMETER II se pueden sobreescribir los datos de calibración
almacenados. Antes de sobreescribir los datos de calibración almacenados, se
recomienda recuperar primero la calibración por defecto. Después de la
recuperación de la calibración por defecto, se pueden programar los nuevos datos de
calibración.
En caso de algún error, debe recuperarse primero la calibración por defecto.
3.5.1 Recuperación de calibración por defecto
1. Pulse MENU. Se indica "SEL". Una flecha parpadeante indica el rango actual
de medición (1 ó 2). Pulse la tecla VERDE para conmutar entre los rangos de
medición. Seleccionar el rango de medición mediante recuperación de la
calibración por defecto.
1. Pulse MENU durante aprox. cinco segundos hasta que se indique "USER" y
luego "CAL".
2. Pulse la tecla AZUL para desplazarse a "dFL". Pulse la tecla VERDE.
66
Page 68

Sección 4 Operación
4.1 Análisis de Cloro/Dióxido de cloro/Ozono con
cubetas test de LANGE
PELIGRO
El manejo de muestras químicas, estándares y reactivos puede resultar
peligroso. Los usuarios de este producto deben familiarizarse con los
procedimientos de seguridad y el uso correcto de los agentes químicos, así
como leer atentamente todas las hojas de datos de seguridad de material
relevante.
Para el análisis de cloro, dióxido de cloro u ozono, siga el procedimiento de trabajo
indicado en el ensayo correspondiente de cubeta LCK 310.
4.2 Aseguramiento de calidad
Los resultados de medición están sujetos a controles de plausibilidad (diluir y/o
agregar a la muestra).
Controles periódicos con las soluciones estándares (véase Sección 5 Piezas de
repuesto y accesorios en la página 69) aseguran que su sistema de medición
funcione correctamente y se opere en forma apropiada.
4.3 Evaluación de Cloro/Dióxido de cloro/Ozono de
LANGE Cubetas test de cloro
Observación: Asegúrese que el instrumento esté correctamente programado con los datos
correspondientes de calibración, véase 3.4 Controlar los datos introducidos. en la página 66.
1. Pulse ENCENDIDO para activar el instrumento.
2. ¡Asegúrese que se haya seleccionado el rango correcto de medición!
O bien pulse MENU. Se indica "SEL". Una flecha parpadeante indica el rango
actual de medición (1 ó 2). Pulse la tecla VERDE para seleccionar el rango de
medición. Pulse MENU para retornar al menú de medición.
3. Inserte la Solución cero en el alojamiento de cubetas equipado con el
adaptador de cubeta de 1 cm.
Observación: Asegúrese que el adaptador de cubeta se haya posicionado
correctamente.
4. Coloque la tapa del instrumento con la etiqueta HACH LANGE sobre el
alojamiento de cubetas para cubrir la cubeta.
5. Pulse la tecla AZUL. Se indica "0.00".
6. Retire la tapa del instrumento e inserte la cubeta de muestra.
7. Coloque la tapa del instrumento sobre el alojamiento de cubetas para cubrir la
cubeta.
8. Pulse la tecla VERDE.
9. El resultado se indica en mg/l Cloro/Dióxido de cloro/Ozono.
Observación: En caso que la concentración de Cloro/Dióxido de cloro/Ozono esté fuera
del rango de medición seleccionado, se indica el valor para la concentración más baja o
67
Page 69

Operación
alta en forma parpadeante. Repita el ensayo usando el rango de medición apropiado
para el cubeta test LCK o bien proceda con la dilución de su muestra.
Observación: Se debe realizar una nueva medición de valor blanco antes de ejecutar las
series individuales de ensayo.
68
Page 70

Sección 5 Piezas de repuesto y accesorios
5.1 Piezas de repuesto
Descripción Cantidad Nro. de Cat.
POCKET COLORIMETERTM II 655 nm 1 5870065
Tapa de instrumento con etiqueta HACH LANGE 1 LZV 759
Adaptador de cubeta 1 cm 1 5954600
5.2 Accesorios
Descripción Cantidad Nro. de Cat.
Cubeta test de Cloro/Dióxido de cloro/Ozono (0.05–2
mg/l Cl
)
2
Estándar y solución Ring Test para LCK 310 1 LCA 310
Portacubetas para cubetas de LANGE 1 LYW 915
1 bolsa/38 uds. LCK 310
69
Page 71

70
Page 72

Sección 6 Cómo realizar pedidos
Pedidos / Servicio de reparación
Por favor, contacte a su representante:
HACH LANGE S.L.U.
C/ Larrauri, 1C- 2ª Planta
48160 Derio / Vizcaya
Tel. +34 94 657 33 88
Fax +34 94 657 33 97
info@hach-lange.es
www.hach-lange.es
HACH LANGE GMBH
Willstätterstraße 11
D-40549 Düsseldorf
Tel. +49 (0)2 11 52 88-0
Fax +49 (0)2 11 52 88-143
info@hach-lange.de
www.hach-lange.com
Información requerida
• Número de cuenta del cliente (en caso
de disponibilidad)
• Su nombre y número de teléfono • Dirección de suministro
• Número de orden de compra • Número de catálogo
• Breve descripción o número de modelo • Cantidad
• Dirección de facturación
71
Page 73

72
Page 74

Capitolo 1 Informazioni generali
1.1 Istruzioni di sicurezza
Si prega di leggere le istruzioni applicative e l’intero manuale POCKET
COLORIMETER
prega di prestare attenzione a tutte le indicazioni riguardanti rischi e agli avvertimenti.
L’inosservanza potrebbe comportare danni anche gravi agli operatori o
all’equipaggiamento.
Per garantire la funzionalità dei dispositivi di protezione, non utilizzare o installare
l’apparecchio diversamente da quanto specificato nel presente manuale.
1.1.1 Utilizzo delle informazioni di sicurezza
PERICOLO
Indica una situazione di pericolo possibile o imminente che, se non evitata,
potrebbe comportare ferite gravi, anche mortali.
Nota importante: Informazioni che vanno particolarmente evidenziate.
Nota: Informazioni che approfondiscono parti del testo.
1.2 Informazioni generali sul prodotto
Le presenti istruzioni descrivono come eseguire la lettura di test in cuvetta LANGE su
un POCKET COLORIMETER II a lunghezza d’onda singola.
TM
II prima di disimballare, installare o utilizzare lo strumento. Si
73
Page 75

74
Page 76

Capitolo 2 Installazione
Nota importante: Le presenti istruzioni applicative si intendono valide solo se
accompagnate dal manuale di istruzioni del POCKET COLORIMETERTM II e dalla
procedura operativa LCK. Si prega di leggere le istruzioni applicative e l’intero
manuale POCKET COLORIMETER II prima di disimballare, installare o utilizzare lo
strumento.
2.1 Distinta di imballaggio
• POCKET COLORIMETER II 528 nm, N°. cat. 5870052
• Coperchio dello strumento con etichetta HACH LANGE label, N°. cat. LZV 759
• Adattatore per cuvette da 1 cm, N°. cat. 5954600
• Istruzioni applicative DOC027.98.00798
2.2 Inserimento dell’adattatore
Togliere il coperchio dello strumento e posizionare con attenzione l’adattatore per le
cuvette nel supporto, con la freccia rivolta verso il basso. Fissarlo premendo verso il
basso.
2.3 Inserimento del coperchio Hach Lange
Quando si esegue la lettura delle cuvette, utilizzare il coperchio dello strumento con
la scritta HACH LANGE.
75
Page 77

76
Page 78

Capitolo 3 Messa in esercizio del sistema
1 adsorbance 2
3.1 Tasti e display dello strumento
528 nm
1 adsorbance 2
Figura 1 Tasti e display dello strumento
1 POWER/RETROILLUMINAZIONE 6 Indicatore del canale di
programmazione (2)
2 ZERO/SCROLL (tasto BLU ) 7 Indicatore del menu
3MENU 8Indicatore di calibrazione regolata
4 Display numerico 9 Indicatore di batteria scarica
5 Indicatore del canale di
programmazione (1)
10 LETTURA/ENTER (tasto VERDE)
3.1.1 Funzioni dei tasti
ZERO/SCROLL (tasto BLU ) : In modalità di analisi imposta lo strumento sullo zero.
In modalità Menu permette di selezionare le diverse opzioni di menu. Quando si
inserisce o si modifica un valore, permette di scorrere tra le cifre (0-9).
LETTURA/ENTER (tasto VERDE ) : In modalità di analisi, inizia la lettura del
campione. In modalità Menu seleziona un’opzione di menu. Quando si immettono
delle cifre, permette lo spostamento di uno spazio a destra. Quando l’immissione è
completa, permette di confermare il dato.
77
Page 79

Messa in esercizio del sistema
3.2 Inserimento dei dati di calibrazione dei test in
cuvetta LANGE
3.2.1 Panoramica strumentale
Ogni POCKET COLORIMETER II è dotato di due canali di programmazione per
memorizzare le curve di calibrazione. Ogni canale (intervallo di analisi) accetta dati di
calibrazione definiti dall’operatore.
Le presenti istruzioni applicative riportano i dati di calibrazione dei test in cuvetta
LANGE per cloro:
• LCK 310: 0.05-2 mg/l Cl
Selezionare i dati di calibrazione di al massimo due intervalli di analisi disponibili.
Ogni procedura di programmazione va eseguita una sola volta prima della prima
lettura del test.
Per informazioni dettagliate, si prega di fare riferimento al manuale di istruzioni del
POCKET COLORIMETER II.
3.2.2 Tabella dati di calibrazione
o 0.09-3.8 mg/l ClO2 o 0.05-2 mg/l O3
2
3.2.2.1 Analisi cloro Cl2, diossido di cloro ClO2 o ozono O
Tabella 1 Analisi cloro Cl2, diossido di cloro ClO2 o ozono O
RES (risoluzione)
S0 (standard 0)
A0 (assorbanza 0)
S1 (standard 1)
A1 (assorbanza 1)
LCK 310
cloro
--.-- --.-- --.--
00.05 00.09 00.05
0.015 0.015 0.025
02.00 03.80 02.00
0.580 0.600 0.900
LCK 310
diossido di cloro
3
3
LCK 310
ozono
3.3 Procedura di programmazione
Nota: Ogni procedura di programmazione va eseguita una sola volta prima della prima lettura
del test.
Nota importante: Le seguenti procedure di programmazione sono applicabili per la
lettura del cloro Cl2. Per la lettura del diossido di cloro ClO2 o ozono O3 si prega di
considerare i dati riportati nella tabella Tabella 1 Analisi cloro Cl2, diossido di cloro
ClO2 o ozono O3 a pagina 78.
Nota: Dopo la programmazione dei dati di calibrazione, potrebbe risultare opportuno
contrassegnare con un’etichetta il canale (i canali) 1 e/o 2.
78
Page 80

Messa in esercizio del sistema
3.3.1 LCK 310 cloro Cl
2
1. Premere POWER per accendere lo strumento.
2. Premere MENU. Sul display appare "SEL". Una freccia lampeggiante indica il
canale di programmazione in uso (1 o 2).
3. Selezionare canale di programmazione 1 o 2 per LCK 310 (0.05–2 mg/l Cl2).
Nota: Premere il tasto VERDE per passare tra i canali di programmazione.
4. Premere MENU per circa cinque secondi fino a quando appare sul display
"USER" seguito da "CAL".
5. Premere il tasto BLU fino a quando appare "Edit" (Modifica). Premere il tasto
VERDE. Sul display appare "RES".
6. Premere il tasto VERDE. Sul display appare "-.---".
7. Premere il tasto BLU fino a quando appare "--.--". Premere il tasto VERDE. Sul
display appare "S0".
8. Premere il tasto VERDE fino a quando appare sel display "A0".
9. Premere il tasto VERDE fino a quando appare "S1".
10. Premere il tasto VERDE. Inserire "02.00" utilizzando il tasto BLU per cambiare
il valore e il tasto VERDE per spostarsi alla cifra successiva. Premere il tasto
VERDE fino a quando appare "A1".
11. Premere il tasto VERDE. Inserire "0.580" utilizzando il tasto BLU per cambiare
il valore e il tasto VERDE per spostarsi alla cifra successiva. Premere il tasto
VERDE fino a quando appare "Add".
12. Premere il tasto BLU fino a quando appare "Edit" (Modifica). Premere il tasto
VERDE fino a quando appare sul display "S0"
13. Premere il tasto VERDE. Inserire "00.05" utilizzando il tasto BLU per cambiare
il valore e il tasto VERDE per spostarsi alla cifra successiva. Premere il tasto
VERDE fino a quando appare "A0".
14. Premere il tasto VERDE. Inserire "0.015" utilizzando il tasto BLU per cambiare
il valore e il tasto VERDE per spostarsi alla cifra suiccessiva. Premere il tasto
VERDE fino a quando appare "S1".
15. Premere il tasto MENU fino a quando appare "Edit" per controllare i dati
immessi. Premere il tasto VERDE. Sul display appare "RES".
16. Premere il tasto BLU per scorrere tra i dati. Paragonare i risultati con i dati
riportati nella seguente tabella.
Tabella 2 Tabella dati di calibrazione LCK 310
RES --.--
S0 0.05
A0 0.015
S1 2.00
A1 0.580
79
Page 81

Messa in esercizio del sistema
17. Dopo la visualizzazione dei dati, premere MENU due volte per memorizzare e
passare alla modalità di lettura. Vedi 4.3 Test in cuvetta LANGE cloro/diossido
di cloro/ozono a pagina 81.
Nota: In caso si faccia un qualsiasi errore, richiamare dapprima la calibrazione di fabbrica.
Vedi 3.5.1 Come richiamare la calibrazione di fabbrica a pagina 80. Dopo aver richiamato la
calibrazione di fabbrica, avviare nuovamente la procedura di programmazione. Se lo
strumento si spegne o l’alimentazione si scollega durante l’inserimento dei dati, tutte le
immissioni andranno perse. Il tempo di spegnimento automatico corrisponde a 60 minuti.
3.4 Controllo dei dati inseriti
Per evitare analisi errate, si raccomanda di controllare i dati dopo aver completato la
procedura di programmazione.
1. Premere MENU per circa cinque secondi fino a quando appare sul display
"USER" seguito da "CAL".
2. Premere il tasto BLU fino a quando appare "Edit" (Modifica). Premere il tasto
VERDE.
3. Sul display appare "RES". Premere il tasto VERDE per scorrere tra i dati.
Paragonare i risultati con quanto riportato in 3.2.2 Tabella dati di calibrazione a
pagina 78.
In caso un qualsiasi valore non sia correttamente memorizzato, richiamare dapprima
la calibrazione di fabbrica. Vedi 3.5.1 Come richiamare la calibrazione di fabbrica.
Dopo aver richiamato la calibrazione di fabbrica, avviare nuovamente la procedura di
programmazione.
3.5 Come sovrascrivere i dati di calibrazione
memorizzati
Il POCKET COLORIMETER II permette di sovrascrivere i dati di calibrazione
memorizzati. Prima di sovrascrivere i dati di calibrazione, si raccomanda di
richiamare dapprima la calibrazione di fabbrica. Dopo aver richiamato la calibrazione
di fabbrica, si possono inserire nuovi dati di calibrazione.
In caso si faccia un qualsiasi errore, richiamare dapprima la calibrazione di fabbrica.
3.5.1 Come richiamare la calibrazione di fabbrica
1. Premere MENU. Sul display appare "SEL". Una freccia lampeggiante indica il
canale di programmazione in uso (1 o 2). Premere il tasto VERDE per spostarsi
tra i canali di programmazione. Selezionare il canale di programmazione
richiamando la calibrazione di fabbrica
1. Premere MENU per circa cinque secondi a quando appare sul display "USER"
seguito da "CAL".
2. Premere il tasto BLU per scoirrere fino a "dFL". Premere il tasto VERDE.
80
Page 82

Capitolo 4 Esercizio
4.1 Analisi cloro/diossido di cloro/ozono con test in
cuvetta LANGE
PERICOLO
Maneggiare campioni di sostanze chimiche, standard e reagenti può
comportare alcuni rischi. Gli operatori che utilizzano il presente prodotto
devono tenere in considerazione le procedure di sicurezza vigenti e imparare
ad utilizzare correttamente sostanze chimiche, leggendo con attenzione tutte
le schede di sicurezza relative ai materiali interessati.
Per l’analisi di cloro, diossido di cloro o ozono, seguire la procedura operativa
riportata nel testa in cuvetta LCK 310.
4.2 Garanzia di qualità
I risultati delle analisi condotte con i test in cuvetta devono essere sottoposte a
controlli qualità, tramiter diluizioni o aggiunte standard.
Controlli eseguiti ad intervalli regolari con le relative soluzioni standard (vedi Capitolo
5 Parti di ricambio e accessori a pagina 83) garantiscono il corretto funzionamento
del proprio strumento e la qualità della procedura operativa.
4.3 Test in cuvetta LANGE cloro/diossido di
cloro/ozono
Nota: Controllare che lo strumento sia programmato con i dati di calibrazione corrispondenti,
vedi 3.4 Controllo dei dati inseriti a pagina 80.
1. Premere POWER per accendere lo strumento.
2. Assicurarsi di aver selezionato l'intervallo di analisi corretto prememorizzato su
uno dei due canali di programmazione.
In caso contrario, premere MENU. Sul display appare "SEL". Una freccia
lampeggiante indica canale di programmazione in uso (1 o 2). Premere il tasto
VERDE per il canale di programmazione corrispondente all'intervallo di analisi
desiderato. Premere MENU per tornare alla modalità di lettura.
3. Inserire la del bianco nel supporto, fornito di adattatore per cuvette da 1 cm.
Nota: Assicurarsi che l’adattatore per cuvette sia posizionato correttamente.
4. Posizionare il coperchio dello strumento con la scritta HACH LANGE sopra il
supporto, per coprire la cuvetta.
5. Premere il tasto BLU. Sul display apparirà "0.00".
6. Togliere il coperchio dello strumento e inserire la cuvetta con il campione.
7. Posizionare il coperchio dello strumento sopra il supporto, per coprire la
cuvetta.
8. Premere il tasto VERDE.
9. Il risultato verrà visualizzato in mg/l di cloro/diossido di cloro/ozono.
Nota: Nel caso in cui la concentrazione di di cloro/diossido di cloro/ozono non rientri
nell'intervallo di analisi selezionato, il valore di concentrazione massimo o minimo verrà
81
Page 83

Esercizio
visualizzato e lampeggerà. Ripetere il test usando il range di misurazione adatto al test in
cuvetta LCK, oppure diluire il campione.
Nota: Prima di ogni serie di letture, va eseguita una nuova lettura della cuvetta del bianco.
82
Page 84

Capitolo 5 Parti di ricambio e accessori
5.1 Parti di ricambio
Descrizione Quantità Cod. art.
POCKET COLORIMETERTM II 528 nm 1 5870052
Coperchio con etichetta HACH LANGE 1 LZV 759
Adattatore per cuvette da 1 cm 1 5954600
5.2 Accessori
Descrizione Quantità Cod. art.
Test in cuvette per cloro/diossido di cloro/ozono
(0.05-2 mg/l Cl
Soluzione standard e ring-test per LCK 310 1 LCA 310
Portacuvette per cuvette LANGE 1 LYW 915
)
2
1 conf./38 unità LCK 310
83
Page 85

84
Page 86

Capitolo 6 Come ordinare
Ordini/assistenza tecnica
Si prega di contattare il proprio rappresentante di zona:
HACH LANGE S.R.L.
Via Riccione, 14
I-20156 Milano
Tel. +39 02 39 23 14-1
Fax +39 02 39 23 14-39
info@hach-lange.it
www.hach-lange.it
DR. BRUNO LANGE AG
Juchstrasse 1
CH-8604 Hegnau
Tél. +41(0)44 9 45 66 10
Fax +41(0)44 9 45 66 76
info@hach-lange.ch
www.hach-lange.ch
HACH LANGE GMBH
Willstätterstraße 11
D-40549 Düsseldorf
Tel. +49 (0)2 11 52 88-0
Fax +49 (0)2 11 52 88-143
info@hach-lange.de
www.hach-lange.com
Informazioni richieste
• Codice cliente Hach Lange (se
disponibile)
• Nome e numero di telefono • Indirizzo per la spedizione
• Numero d’ordine • Codice articolo
• Numero matricola dello strumento • Quantità
• Indirizzo per la fatturazione
85
Page 87

86
Page 88

Deel 1 Algemene informatie
1.1 Veiligheidsinformatie
Lees de complete gebruikshandleiding en de POCKET COLORIMETERTM II
handleiding alvorens het systeem in gebruik te nemen. Let op alle
gevarenaanwijzingen. Indien u dit niet doet kan dit leiden tot ernstige letsels voor de
operator of tot beschadiging van de uitrusting.
Om te verzekeren dat de bij verstrekte bescherming niet in gedrang gebracht wordt,
mag deze uitrusting niet gebruikt of toegepast worden op een andere wijze dan in
deze handleiding gespecificeerd.
1.1.1 Gebruik van gevareninformatie
GEVAAR
Geeft een potentieel of direct gevaarlijke situatie aan die, indien niet
vermeden, de dood of ernstige letsels tot gevolg kan hebben.
Belangrijke opmerking: Informatie die inacht genomen moet worden.
Opmerking: Informatie die punten in de hoofdtekst aanvullen
1.2 Algemene productinformatie
Deze gebruikshandleiding beschrijft hoe LANGE kuvettentests op een POCKET
COLORIMETER II met enkelvoudige golflengte gemeten kunnen worden.
87
Page 89

88
Page 90

Deel 2 Installatie
Belangrijke opmerking: Deze gebruikshandleiding is alleen geldig in combinatie
met de POCKET COLORIMETERTM II handleiding en de toegepaste LCK
werkprocedures. Lees de complete gebruikshandleiding en de complete POCKET
COLORIMETER II bedrijfshandleiding volledig alvorens het instrument uit te
pakken, op te stellen of te bedrijven.
2.1 Paklijst
• POCKET COLORIMETER II 528 nm, Cat. Nr. 5870052
• Instrumentenkap met HACH LANGE label, Cat. Nr. LZV 759
• Kuvet adapter 1 cm, Cat. Nr. 5954600
• Gebruikshandleiding DOC027.98.00798
2.2 De adapter insteken
De kap van het instrument verwijderen en de kuvet adapter voorzichtig in de
celhouder plaatsen met de pijl naar beneden wijzend. Bevestigen door naar beneden
te drukken.
2.3 De kap van het instrument terug aanbrengen.
De kap van het instrument met het HACH LANGE label gebruiken wanneer LANGE
kuvetten gemeten worden.
89
Page 91

90
Page 92

Deel 3 Het systeem opstarten
1 adsorbance 2
3.1 Instrumenttoetsen en display
528 nm
1 adsorbance 2
Afbeelding 1 Instrumenttoetsen en display
1 AAN/BACKLIGHT 6 Meetbereikindicator (2)
2 NUL/SCROLL (BLAUWE toets)7 Menu-indicator
3MENU 8Voor de kalibratie ingestelde indicator
4 Numeriek display 9 Indicator dat de batterij leeg is
5 Meetbereikindicator (1) 10 LEZEN/INVOEREN (GROENE toets)
3.1.1 Toets-functies
NUL/SCROLL (BLAUWE toets): In de meetmodus het instrument op nul zetten. In
de menumodus door de menuopties bladeren. Ook door de nummers bladeren
wanneer een waarde ingevoerd of bewerkt wordt.
LEZEN/INVOEREN (GROENE toets): In de meetmodus, druk starten. In de
menumodus, een menuoptie selecteren. Wanneer nummers ingevoerd worden, een
plaats naar rechts verschuiven. Bevestig de invoer wanneer de waarde volledig
ingevoerd is.
3.2 De kalibratiedata van LANGE kuvettentesten
invoeren
3.2.1 Overzicht
Elke POCKET COLORIMETER II heeft twee kanalen waarin metingen gedaan
kunnen worden. Elk kanaal (meetbereik) zal gebruikersgedefinieerde kalibratiedata
accepteren.
91
Page 93

Het systeem opstarten
Deze gebruikshandleiding bevat de kalibratiedata van de LANGE kuvettentesten
voor Chloor:
• LCK 310: 0.05–2 mg/l Cl
or 0.09–3.8 mg/l ClO2 of 0.05–2 mg/l O
2
3
Selecteer de kalibratiedata van maximum twee meetbereiken die de passende zullen
zijn.
De programmering hoef slechts éénmalig uitgevoerd te worden.
Voor gedetailleerde informatie, zie de POCKET COLORIMETER II
bedieningshandleiding.
3.2.2 Datatabel
3.2.2.1 Uitwaardering als Chloor Cl2, Chloordioxide ClO2, Ozon O
Table 1 Uitwaardering als Chloor Cl
LCK 310
Chloor
RES (resolutie)
S0 (standaard 0)
A0 (absorbatie 0)
S1 (standaard 1)
A1 (absorbatie 1)
--.-- --.-- --.--
00.05 00.09 00.05
0.015 0.015 0.025
02.00 03.80 02.00
0.580 0.600 0.900
, Chloordioxide ClO2, Ozon O
2
LCK 310
Chloordioxide
3
3
LCK 310
Ozon
3.3 Programmeerprocedure
Opmerking: Elke programmeermodus moet slechts één keer gevolgd worden.
Belangrijke opmerking: De volgende programmeerprocedures zijn geldig voor de
meting van Chloor Cl2. Om uit te waarderen als Chloordioxide ClO2 of Ozon O3
moeten de data gekozen worden die vermeld zijn in de tabel Table 1 Uitwaardering
als Chloor Cl2, Chloordioxide ClO2, Ozon O3 op pagina 92.
Opmerking: Na de programmering van de kalibratiedata kan het nuttig zijn het/de kanaal(en)
1 en/of 2 met een label te markeren.
3.3.1 LCK 310 Chloor Cl2 .
1. Druk op AAN om het intrument in te schakelen.
2. Druk op MENU. "SEL" verschijnt in het display. Een knipperende pijl geeft het
actuele meetbereik aan (1 of 2).
3. Selecteer het meetbereik 1 of 2 voor LCK 310 (0.05–2 mg/l Cl
Opmerking: Druk op de GROENE toets om tussen de meetbereiken te springen.
4. Druk op MENU gedurende ongeveer vijf seconden tot "USER" verschijnt,
gevolgd door "CAL".
).
2
92
Page 94

Het systeem opstarten
5. Druk op de BLAUWE toets tot "Edit" weergegeven wordt. Druk op de GROENE
toets. "RES" verschijnt in het display.
6. Druk op de GROENE toets. "-.---" verschijnt in het display.
7. Druk op de BLAUWE toets tot "--.--" weergegeven wordt. Druk op de GROENE
toets. "S0” verschijnt in het display.
8. Druk op de GROENE toets tot "A0" weergegeven wordt.
9. Druk op de GROENE toets tot "S1" weergegeven wordt.
10. Druk op de GROENE toets. Geef "02.00" in met behulp van de BLAUWE toets
om de waarde te veranderen en op de GROENE toets om naar de volgende
plaats te gaan. Druk op de GROENE toets tot "A1" weergegeven wordt.
11. Druk op de GROENE toets. Geef "0.580" in met behulp van de BLAUWE toets
om de waarde te veranderen en op de GROENE toets om naar de volgende
plaats te gaan. Druk op de GROENE toets tot "Toevoegen" weergegeven wordt.
12. Druk op MENU tot "Edit" weergegeven wordt. Druk op de GROENE toets tot
„S0“ weergegeven wordt.
13. Druk op de GROENE toets. Geef "00.05" in met behulp van de BLAUWE toets
om de waarde te veranderen en op de GROENE toets om naar de volgende
plaats te gaan. Druk op de GROENE toets tot "A0" weergegeven wordt.
14. Druk op de GROENE toets. Geef "0.015" in met behulp van de BLAUWE toets
om de waarde te veranderen en op de GROENE toets om naar de volgende
plaats te gaan. Druk op de GROENE toets tot „S1“ weergegeven wordt.
15. Druk op MENU tot "Edit" verschijnt om de ingevoerde data te controleren. Druk
op de GROENE toets. "RES" verschijnt in het display.
16. Druk op de BLAUWE toets om door de ingevoerde waarden te bladeren.
Vergelijk de ingevoerde waarden met de data die in de tabel beneden getoond
worden.
Table 2 Datatabel LCK 310
RES --.--
S0 0.05
A0 0.015
S1 2.00
A1 0.580
17. Na de ingevoerde waarden vergeleken te hebben, druk twee keer op
MENU om
naar de meetmodus te gaan. Zie 4.3 LANGE Chloor/Chloordioxide/Ozon
kuvettentest op pagina 95.
Opmerking: In geval van een vergissing, eerst de fabriekskalibratie herstellen. Zie 3.5.1 De
fabriekskalibratie herstellen op pagina 94. Wanneer de fabriekskalibratie hersteld is, de
programmeerprocedure opnieuw starten. Wanneer het instrument uitgeschakeld is of
vermogen verliest tijdens de invoer van de data, gaan alle bewerkingen verloren.
Automatische uitschakeling na 60 minuten.
93
Page 95

Het systeem opstarten
3.4 De ingevoerde data controleren
Om foutieve metingen te vermijden raden wij u aan de data na elke
programmeerprocedure te controleren.
1. Druk op MENU gedurende ongeveer vijf seconden tot "USER" weergegeven
wordt, gevolgd door "CAL".
2. Druk op de BLAUWE toets om naar "Edit" te gaan. Druk op de GROENE toets.
3. "RES" verschijnt in het display. Druk op de GROENE toets om door de
ingevoerde waarden te bladeren. Vergelijk de ingevoerde waarden met de
cijfers in de 3.2.2.1 Uitwaardering als Chloor Cl2, Chloordioxide ClO2, Ozon O3
op pagina 92.
Indien een waarde niet correct opgeslagen werd, moet eerst de fabriekskalibratie
hersteld worden. Zie 3.5.1 De fabriekskalibratie herstellen. Wanneer de
fabriekskalibratie hersteld is, de programmeerprocedure opnieuw starten.
3.5 Opgeslagen kalibratiedata overschrijven
Met de POCKET COLORIMETER II is het mogelijk opgeslagen kalibratiedata te
overschrijven. Alvorens kalibratiedata te overschrijven raden wij u aan eerst de
fabriekskalibratie te herstellen. Wanneer de fabriekskalibratie hersteld is, kunt u
nieuwe kalibratiedata programmeren.
In geval van een vergissing, eerst de fabriekskalibratie herstellen.
3.5.1 De fabriekskalibratie herstellen
1. Druk op MENU. "SEL" verschijnt in het display. Een knipperende pijl geeft het
actuele meetbereik aan (1 of 2). Druk op de GROENE toets om tussen de
meetbereiken te springen. Selecteer het meetbereik door de fabriekskalibratie
te herstellen.
1. Druk op MENU gedurende ongeveer vijf seconden tot "USER" weergegeven
wordt, gevolgd door "CAL".
2. Druk op de BLAUWE toets om naar "dFL" te gaan. Druk op de GROENE toets.
94
Page 96

Deel 4 Bedrijf
4.1 Chloor met Lange kuvettentesten analyseren
GEVAAR
De omgang met chemische monsters, oplossingen en reagentia kan gevaarlijk
zijn. Gebruikers van dit product worden aanbevolen zichzelf vertrouwd te
maken met de veiligheidsprocedures en het correcte gebruik van chemische
producten, en om alle relevante materiaalveiligheidsinfobladen te lezen.
Om Chloor, Chloordioxide of ozon te analyseren moet de werkprocedure nageleefd
worden die met de betreffende kuvettentest LCK 310 geleverd wordt.
4.2 Kwaliteitsborging
De meetresultaten moeten onderworpen worden aan plausibiliteitscontroles (de
monsters verdunnen en/of mengen).
Regelmatige controles met passende standaard oplossingen (zie Deel 5
Reservedelen en toebehoren op pagina 97) verzekeren dat uw meetsysteem correct
functioneert en vakkundig bediend wordt.
4.3 LANGE Chloor/Chloordioxide/Ozon kuvettentest
Opmerking: Verzekeren dat het instrument geprogrammeerd is met de betreffende
kalibratiegegevens, zie 3.4 De ingevoerde data controleren op pagina 94.
1. Druk op AAN om het instrument in te schakelen.
2. Verzeker dat het correcte meetbereik geselecteerd is!
Druk anders op MENU. "SEL" verschijnt in het display. Een knipperende pijl
geeft het actuele meetbereik aan (1 of 2). Druk op de GROENE toets om het
meetbereik te selecteren. Druk op MENU om naar de meetmodus terug te
keren.
3. Steek de nulkuvet in de celhouder die met de kuvet adapter uitgerust is 1 cm.
Opmerking: Verzeker dat de kuvet adapter correct aangebracht is.
4. Plaats de instrumentenkap met het HACH LANGE label over de celhouder om
de kuvet te bedekken.
5. Druk op de BLAUWE toets. "0.00" wordt weergegeven.
6. Neem de instrumentenkap af en steek de monsterkuvet in.
7. Plaats de instrumentenkap over de celhouder om de kuvet te bedekken.
8. Druk op de GROENE toets.
9. Het resultaat wordt in mg/l Chloor/Chloordioxide/Ozon weergegeven.
Opmerking: Indien de Chloor/Chloordioxide/Ozon concentratie buiten het geselecteerde
meetbereikt ligt dan wordt de waarde voor de laagste en de hoogste concentratie
weergegeven en knippert. Herhaal de test met behulp van het passende LCK
kuvettentest meetbereik of verdun uw staal.
Opmerking: Een nieuwe blanco meting moet uitgevoerd worden voor elke individuele
testreeks.
95
Page 97

96
Page 98

Deel 5 Reservedelen en toebehoren
5.1 Reservedelen
Beschrijving Hoeveelheid Cat. nummer
POCKET COLORIMETERTM II 528 nm 1 5870052
Instrumentenkap met HACH LANGE label 1 LZV 759
Kuvet adapter 1 cm 1 5954600
5.2 Accessoires
Beschrijving Hoeveelheid Cat. nummer
Choor kuvettentest (0.05–2 mg/l Cl2) 1 pk/38 pc LCK 310
Addista oplossing voor LCK 310 1 LCA 310
Kuvettenrekje 1 LYW 915
97
Page 99

98
Page 100

Deel 6 Hoe een bestelling plaatsen
Bestellingen/reparatiedienst
Neem contact op met uw vertegenwoordigers:
DR. LANGE NEDERLAND B.V.
Laan van Westroijen 2a
NL-4003 AZ Tiel
Tel. +31(0)344 63 11 30
Fax +31(0)344 63 11 50
info@hach-lange.nl
www.hach-lange.nl
HACH LANGE NV
Motstraat 54
B-2800 Mechelen
Tel. +32 (0)15 42 35 00
Fax +32 (0)15 41 61 20
info@hach-lange.be
www.hach-lange.be
Vereiste informatie
• Klantnummer (indien beschikbaar) • Facturatieadres
• Uw naam en telefoonnummer • Afleveradres
• Adresgegevens • Catalogusnummer
• Korte beschrijving of artikelnummer • Hoeveelheid
99
 Loading...