

LUMIStox 300 Operating Manual
Dr. Bruno Lange GmbH
______________________________________________________________________________
LUMIStox 300
Manual
1
3
LUMIStox 300
DRL
ANGE
4
5
7 8
.
0
LUMIStox
2
6
9
C
January 1999
Version 3.02 and above
BDA 356
______________________________________________________________________________
Page: 1

LUMIStox 300 Operating Manual
Dr. Bruno Lange GmbH
______________________________________________________________________________
Dear Customer,
We are delighted that you have chosen the LUMIStox 300 measuring instrument by Dr.
Bruno Lange GmbH, and wish to thank you for the confidence you have shown in us.
This measuring instrument embodies the technology of the future. LUMIStox 300 is the
product of many years of experience in the field of analysis with the luminescent
bacteria test.
LUMIStox 300 was developed so that it could be operated simply and without any need
for considerable previous study. Nevertheless, you should read this operating manual
carefully before you use the instrument. This will help you to avoid operating errors and
misunderstandings.
If you have any questions that are not answered in this operating manual, please ring
our technical advice service in Düsseldorf:
Dr. Elmar Grabert Tel.: ++49/(0)211-5288-241
Margret Link Tel.: ++49/(0)211-5288-126
Fax: ++49/(0)211-5288-175
Your
Dr. Bruno Lange GmbH
D-40549 Düsseldorf, Germany
PS: Which language do you prefer?
The language presetting of LUMIStox 300 is German. To change the language please
follow the next steps:
1. Switch on the instrument as decribed in the manual.
2. Follow the description on page 7 to get the menu LU Opt Ende à
3. Press the key under <Opt>. You will get Farb 100 ß à
4. Press the key under <à> four times until you will reach Spra ß à
5. Press the key under <Spra> to get the language selection menu
D GB I E
6. Select your language by pressing the key under
D: German; GB: English; I: Italian; E: Spanish
7. After changing you will reach the main menu by pressing the key under <ß>.
We reserve the right to make any changes in the interests of improving the instrument.
______________________________________________________________________________
January 1999
with effect from Version 3.02
Page: 2

LUMIStox 300 Operating Manual
Dr. Bruno Lange GmbH
______________________________________________________________________________
CONTENTS
1 The LUMIStox 300 measuring instrument 3
1.1 Concept 3
1.2 Starting up 4
1.3 Additional information 5
1.4 Procedure in short 6
2 Operation of the LUMIStox 300 measuring instrument 7
2.1 Switching on 7
2.2 Explanation of the LUMIStox 300 menu guidance 8
2.3 Initial settings for luminescent bacteria tests for determining GL and EC 9
2.4 Screening 11
2.5 Determining the GL value 13
2.6 Determining the EC value 15
2.7 Determining chronic toxicity with LUMIS·24·tox 17
2.8 The LUMIStox luminescent bacteria test (LCK484) 20
2.9 The TOX cuvette test (LCK488) 21
2.10 Determining optical density (OD) 23
2.11 Determining relative light units (LU) 24
3 Options 25
3.1 Colour correction 26
3.2 Standardization of luminescence measurements relative to 100 27
3.3 Self-test 28
3.4 Setting the serial interface (V24) 29
3.5 Setting the print options 30
3.6 Setting the date and time 31
3.7 Setting the temperature of the measuring shaft 32
3.8 Setting the screen contrast 32
4 Appendix 33
4.1 Sample preparation for the luminescent bacteria test 33
4.2 Determining EC and GL values 34
4.2.1 Preparing a dilution series 34
4.2.2 Practical advice: The geometrical dilution series 35
4.2.3 Practical advice: Dilution series in conformity with DIN 38412 L34/341 36
4.3 Calculation of the GL value in conformity with DIN 34412/L34/341 37
4.4 Calculating the EC value 38
5 Printout 39
6 Error messages 40
7 Technical data 41
______________________________________________________________________________
Page: 3

LUMIStox 300 Operating Manual
Dr. Bruno Lange GmbH
______________________________________________________________________________
1 The LUMIStox 300 measuring instrument
1.1 Concept
The LUMIStox 300 is a measuring instrument that has been developed as a measuring
and evaluation unit for the luminescent bacteria test. In combination with the
LUMIStherm incubation block it conforms to the technical requirements of DIN 38412
L34 and L341 and the international standard ISO DIS 11348.
In addition the Dr. Lange luminescent bacteria tests for operational analysis LUMISmini
(LCK484) and TOX cuvette test (LCK488), as well as the luminescent bacteria test for
chronic toxicity, LUMIS·24·tox (LCK486), can be evaluated with this instrument.
The LUMIStox 300 combines computer technology with the technology of measuring
instruments (in this case a luminometer). Just like a computer, the LUMIStox 300 has
its own operating system. This is externally apparent from the built-in diskette drive. A
diskette, on which all the data and programs needed to operate the LUMIStox 300 are
stored, starts ("boots") the instrument just like a computer when it is switched on. Future
program extensions or updates can therefore simply be read into the instrument from a
new diskette.
The LUMIStox 300 has a built-in photometer function and an automatic measuring and
evaluation routine, which enable it to recognize colour effects in the luminescent
bacteria test and to take account of these in the test result. The photometer function
also allows the colour effect to be estimated in advance, and can be used to determine
the extinction (as OD - optical density) of bacteria suspensions for the purpose of
assessing growth inhibition in the luminescent bacteria test for chronic toxicity,
LUMIS·24·tox (LCK486).
The LUMIStox 300 has an automatic reference control system, with which it checks the
functioning of the whole measuring path before each luminescent bacteria test is
carried out.
______________________________________________________________________________
Page: 4
LUMIStox 300 Operating Manual
Dr. Bruno Lange GmbH
______________________________________________________________________________
3
4
1
7
1.2 Starting up
If necessary, connect the LUMIStox 300 to a printer through the 35-pin parallel (par)
interface, or with a computer through the 9-pin serial (ser) interface. Connect all the
devices to the mains power supply. Make sure that the LUMIStox 300 system diskette
is in the diskette drive.
Switch on the peripheral devices first, then the LUMIStox 300. In the same way as a
PC, the LUMIStox 300 starts up by displaying a series of messages on the screen.
Eventually <Temp: XY.Z °C Bitte warten> appears.
8
9
123
456
8
7
9
.
C
0
DRL
ANGE
LUMIStox
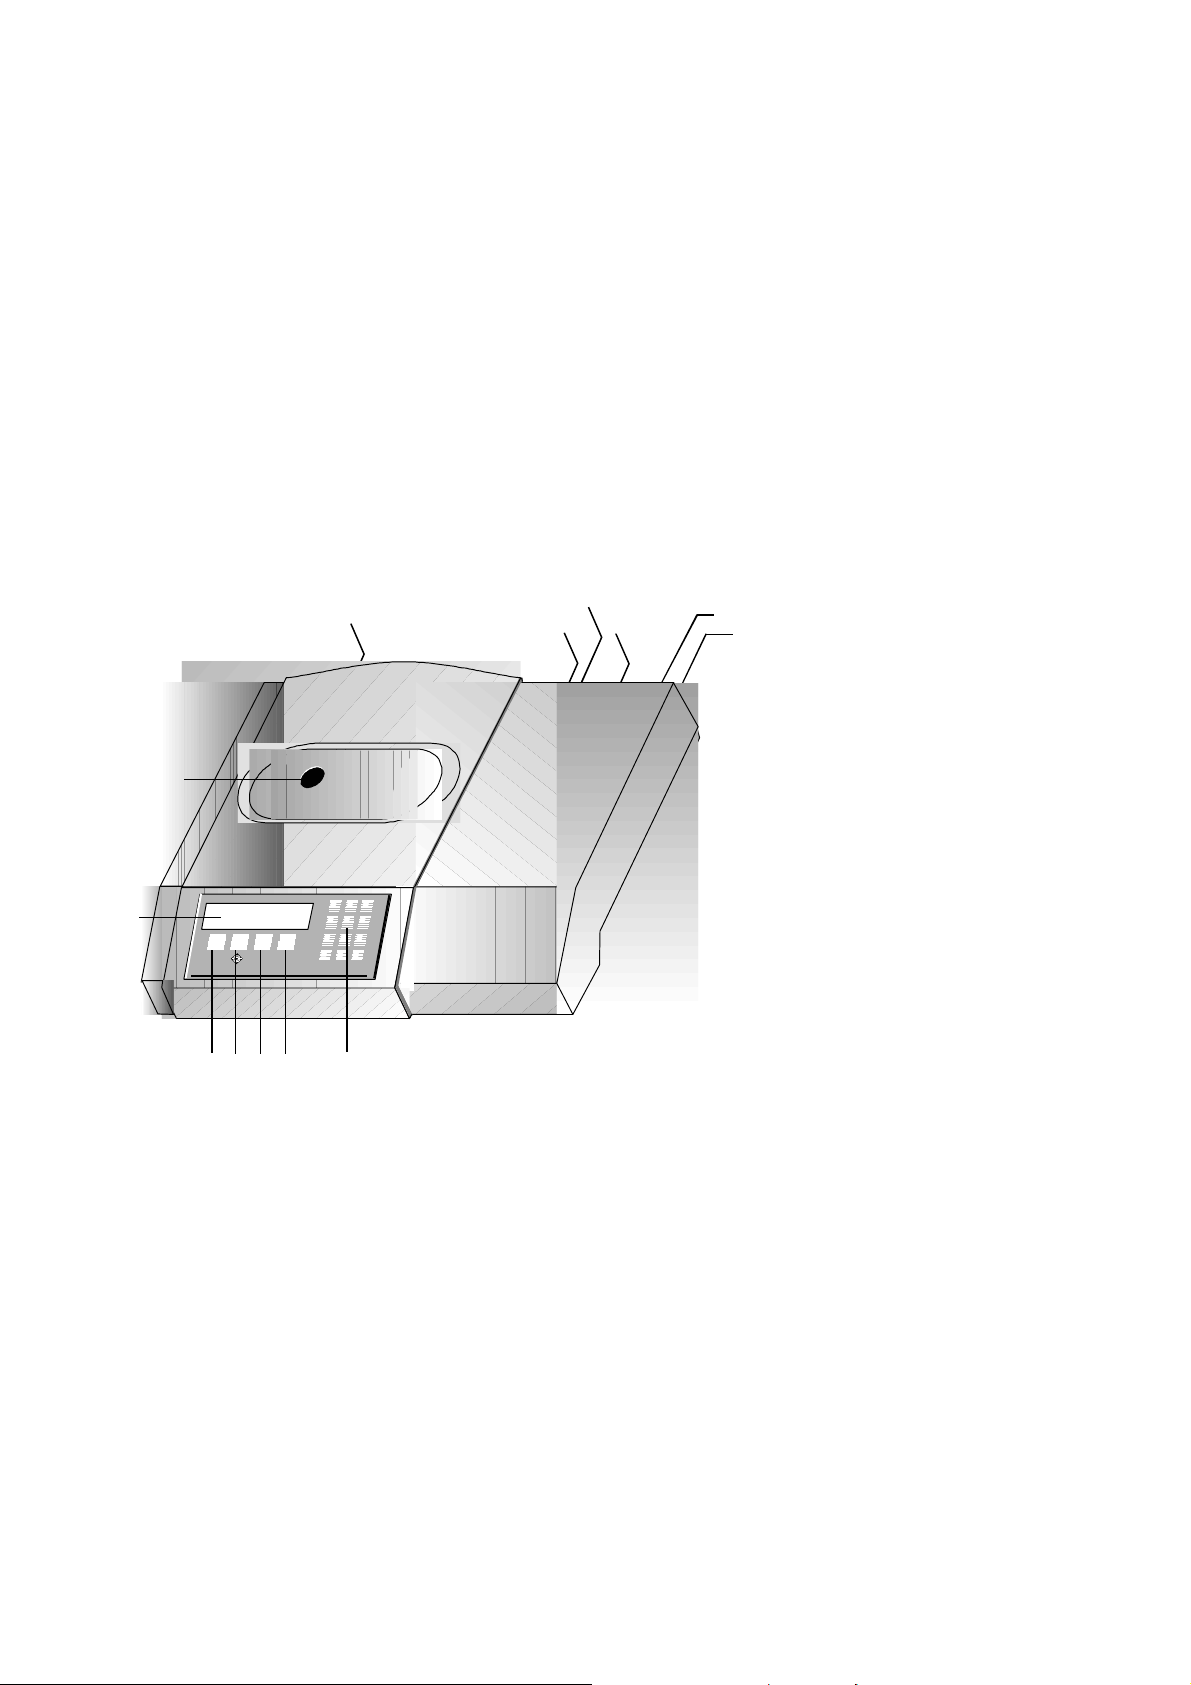
Layout of the LUMIStox 300
5
6
2
1 Mains power connection 6 25-pin parallel interface (par)
2 Main switch with cutout 7 3.5" diskette drive
3 Liquid crystal display 8 Nameplate
4 Numeric keyboard 9 Cuvette shaft
5 9-pin serial interface (ser) F1-F4 Function keys
______________________________________________________________________________
Page: 5
LUMIStox 300 Operating Manual
Dr. Bruno Lange GmbH
______________________________________________________________________________
min
1.3 Additional information
You should take account of the following advice to ensure that your LUMIStox 300
works correctly and reliably.
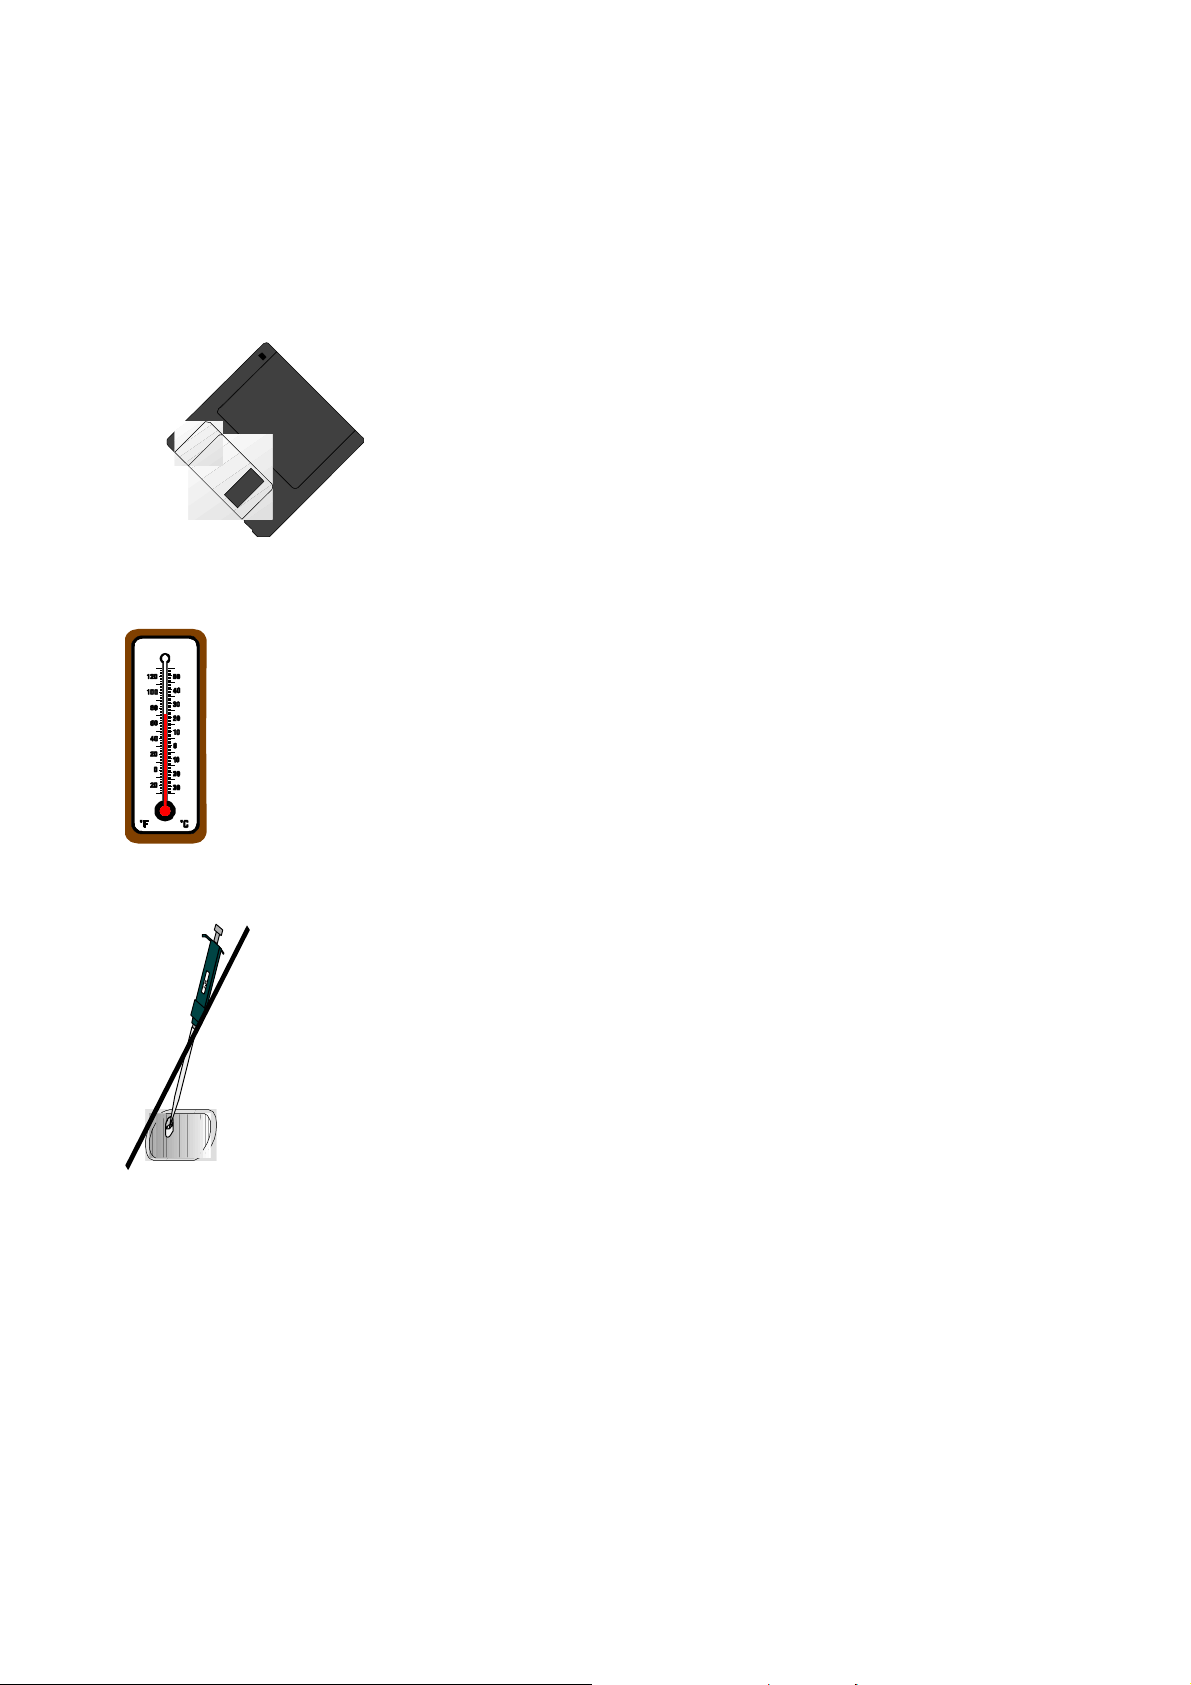
The system diskette must be inserted into the drive before
the instrument is switched on! Whenever the instrument
is moved, the diskette must first be removed from the
drive.
The LUMIStox 300 measuring instrument should not be
operated in an ambient temperature below 16°C or above 29°C,
otherwise problems may occur with the cooling of the
measuring shaft.
Do not operate the instrument in direct sunlight!
Soiling impairs the functioning of the cuvette lowering system. For
this reason, do not pipette reagents into measuring cuvettes in
the measuring shaft. The measuring shaft should also be closed
in the <exit > mode when the measurements have been
completed. When the LUMIStox 300 is in use, the measuring shaft
is automatically closed after a 10-minute idle period. It can be
opened again by pressing any key.
Before any measurements the LUMIStox 300 should have been
30
switched on for the least 30 minutes so that the photomultiplier
______________________________________________________________________________
and the cooled components are ready for operation.
Page: 6
LUMIStox 300 Operating Manual
Dr. Bruno Lange GmbH
______________________________________________________________________________
1.4 Procedure in short
1. Switch on printer and PC, if connected.
2. Insert system diskette in LUMIStox 300 diskette drive.
3. Switch on LUMIStox 300.
4. Switch on LUMIStherm incubation block.
5. Wait 30 minutes to allow instrument to thermostate.
6. During the thermostating period:
• Select the luminescent bacteria test and reactivate
the bacteria as described in the test instructions.
• Add 2 % sodium chloride to the sample and check the pH.
• If necessary, prepare a sample dilution series.
7. Switch on automatic colour correction if necessary.
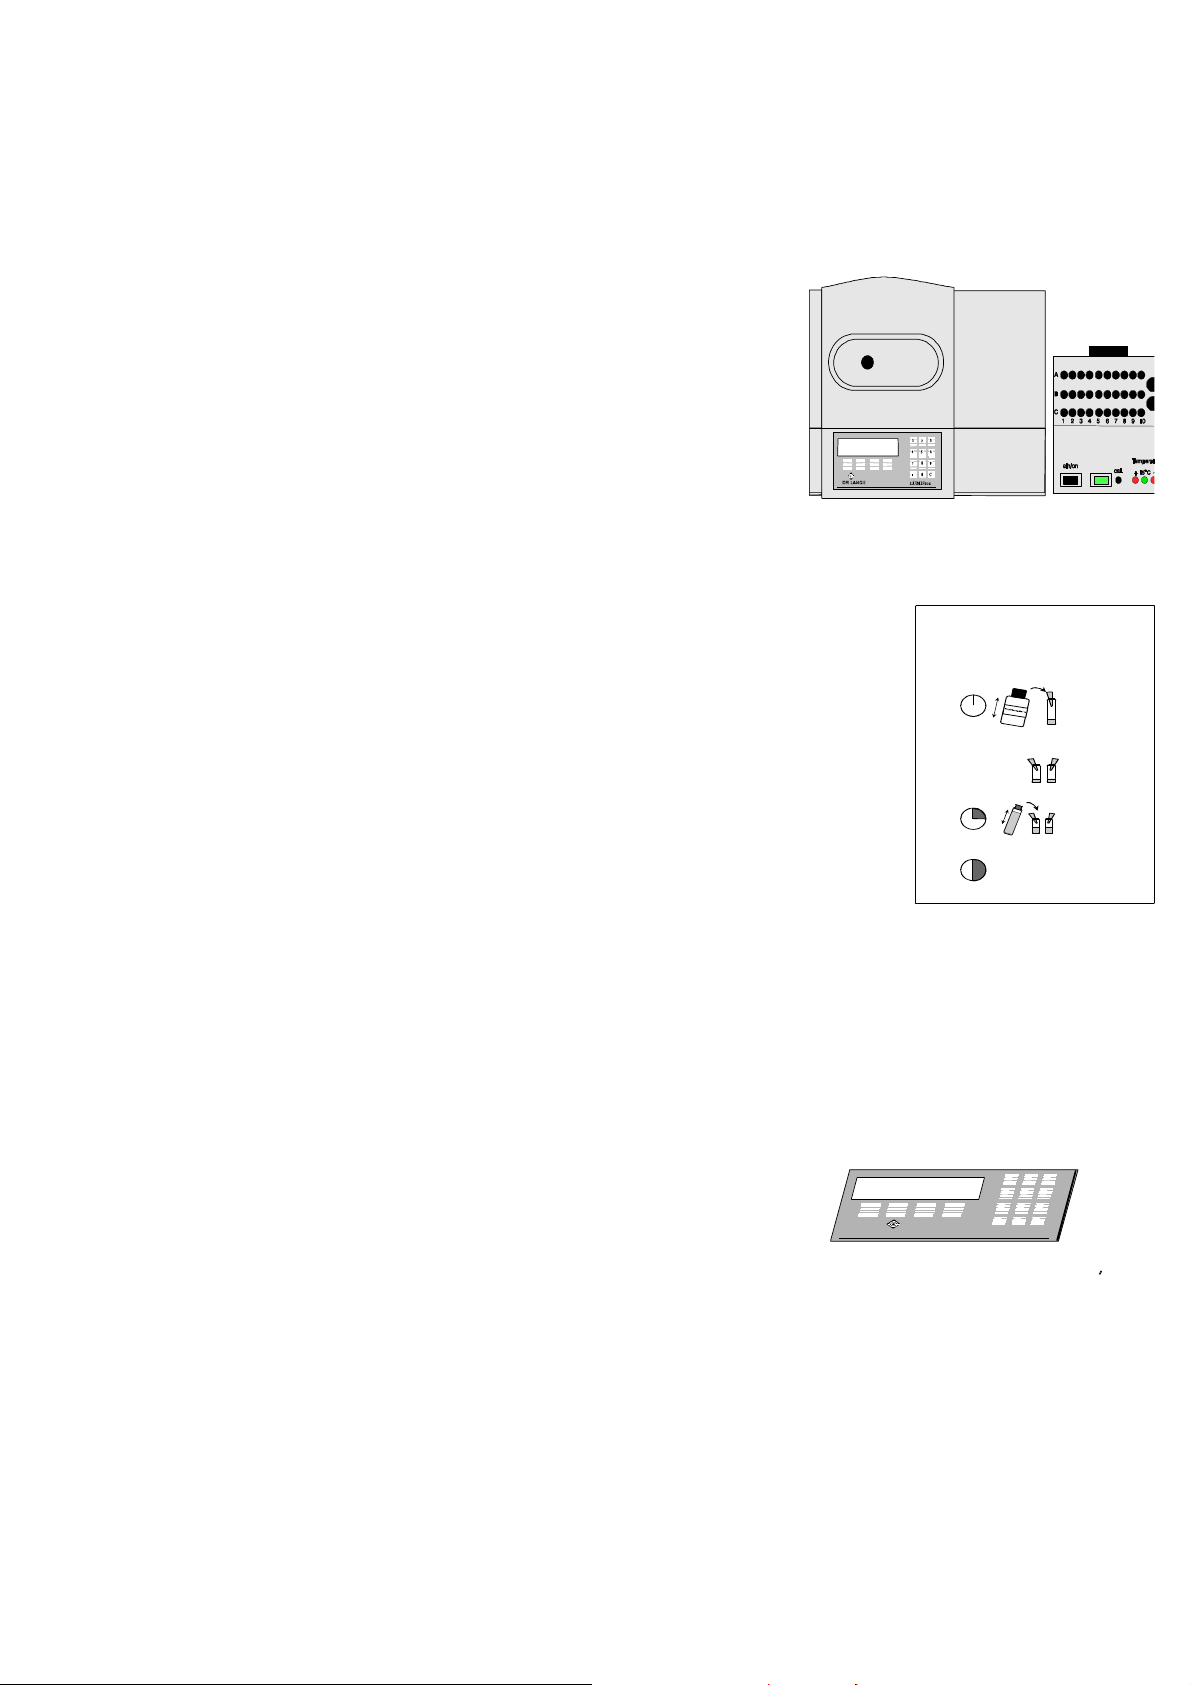
1.
LCK 484
1. Pro b e aufs alze n
2. Le uchtba kterie n rea ktivie ren
0
Minute n
3. Kont roll- und Probenlös ung(e n)
in Meß k üvett en geb en
2% NaCl Pr obe
Kontrolle Probe
4. Leu c htbak terie n in Meß küve tten ge ben
15
Minuten
5. Mes sen u n d Ergeb nis ab lesen
30
Minuten
Leuchtba kterien
Kontrolle Probe
8. Set the LUMIStox 300 to the required evaluation mode (GL or EC value) or to the
test that is to be carried out (e.g. LCK488).
9. Key the requested initial settings into the LUMIStox 300.
10. Carry out the test in line with the working procedure
and the LUMIStox 300 menu guidance.
M es s
DR L
A N G E
123
456
8
7
.
0
LUMIStox
9
C
11. Read the result.
12. Close the measuring compartment.
______________________________________________________________________________
1.
Page: 7
LUMIStox 300 Operating Manual
Dr. Bruno Lange GmbH
______________________________________________________________________________
2 Operation of the LUMIStox 300 measuring instrument
2.1 Switching on
After the LUMIStox 300 has been switched on, the following displays are shown:
LUMIStox 300
Version 2,21
Version
number
LUMIStox 300
13:40 14.02.97
temp.: 14.7°C
please wait
scrn EC GL test OD chroni LU opt exit
LSoft
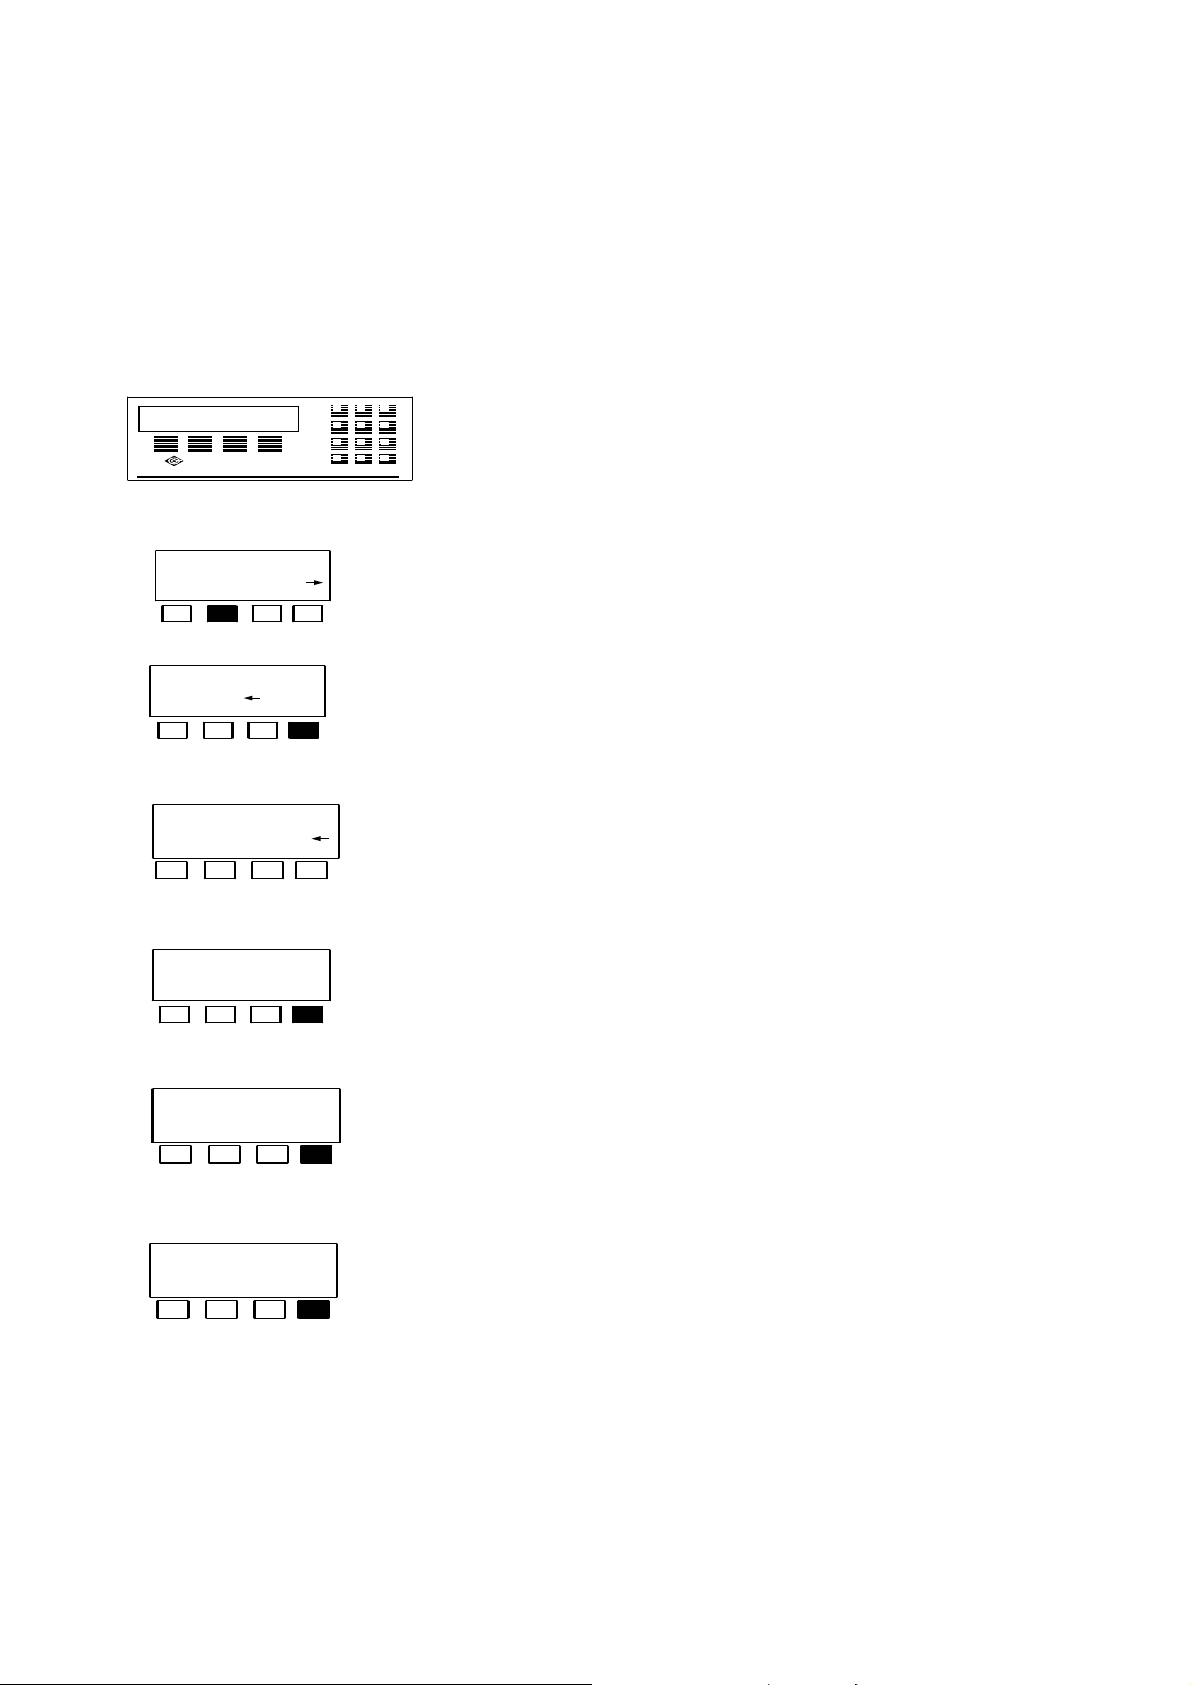
abbreviations in the main menus have the following meanings:
Scrn = Screening
EC = Determination of EC values
GL = Determination of GL in conformity with DIN 38412 L34/341
test = LUMISmini luminescent bacteria test and TOX cuvette test
OD = Determination of extinction at 485 nm
Chroni = Determination of chronic toxicity
Date and time
Instrument
being brought
to required
temperature
Main menu
levels
The
LU = Determination of relative luminescence
opt = Setting the instrument parameters
exit = Closing the measurement compartment
Lsoft = Working with the LUMISsoft Calculation software
→ = Go forward in this menu
← = Go back to previous menu
The operator action that must or can be carried out in connection with a given display is
indicated with the function keys under the display field. In this context
n = Press this function key
The reference check on the measurement path is carried out automatically after a
measurement program is selected.
______________________________________________________________________________
Page: 8
LUMIStox 300 Operating Manual
Dr. Bruno Lange GmbH
______________________________________________________________________________
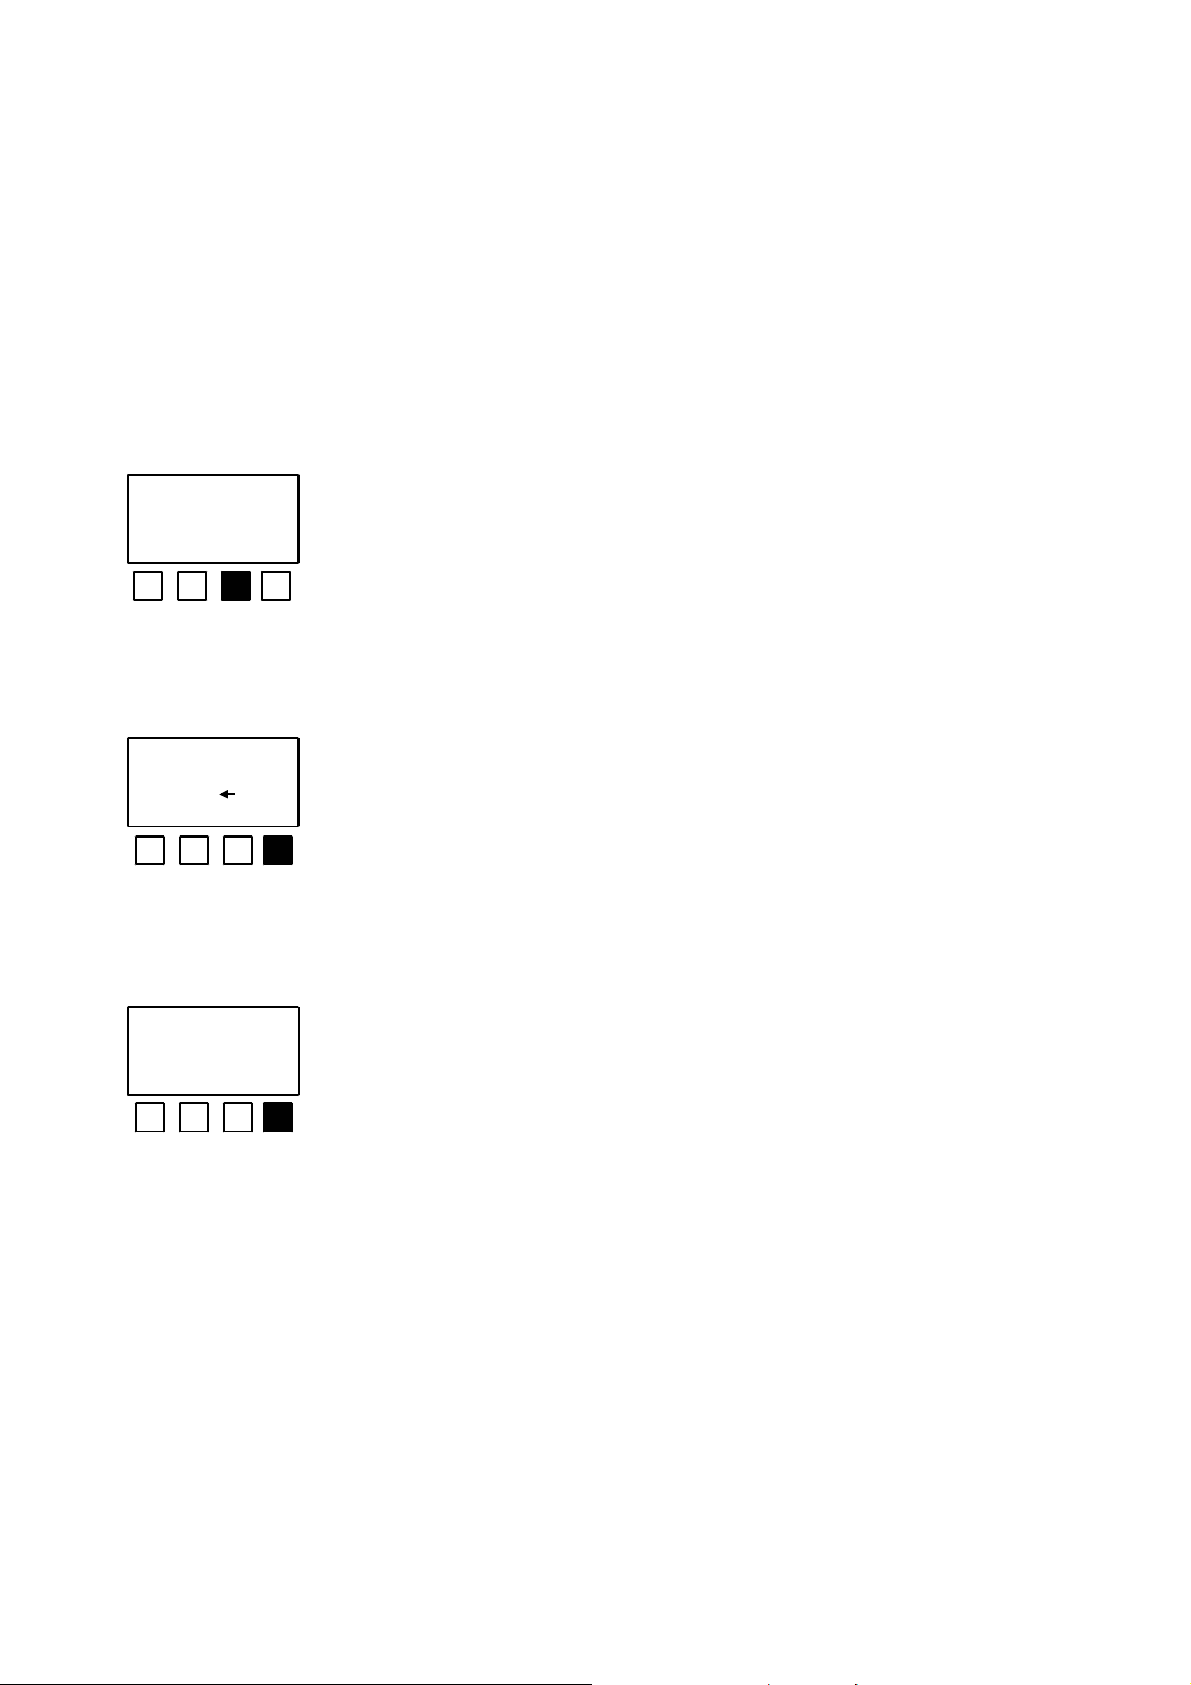
2.2 Explanation of the LUMIStox 300 menu guidance
Depending on the program and the requirements, the LUMIStox 300 offers the user a
variety of options for selecting and modifying programs and settings, which are listed
and whose operation is described here.
1
3
DR L
ANGE
2
4
5 6
8
7
0
.
LUMIStox
Entries are made with the function keys F1 to F4 below the
9
screen or with the numeric keyboard, for example:
C
The function key located below a required program is
s c r n E C G L
d i l u t i o n s t e p s
? 4 o k
c o l .c o r r . : v a r
p e r m o f f v a r
b i t / s = 9 6 0 0
+ - o k
d a t a b it s = 8
7 8 o k
pressed to load the program.
Numeric values can be changed with the help of the
numeric keyboard or confirmed by pressing the function
key located below <ok>.
The setting shown at the top right can be changed by
pressing the function key located below the required new
setting. The new setting must be confirmed by pressing the
function key located below <←>.
The setting at the top right can be changed by pressing the
function key located below <+> or <->. The new setting
must be confirmed by pressing the function key located
below <ok>.
r e f e r e n c e c h e c k
p l e a s e w a i t
______________________________________________________________________________
The setting can be changed by pressing the function key
located below the required setting. The new setting must be
confirmed by pressing the key located below <ok>.
Page: 9
LUMIStox 300 Operating Manual
Dr. Bruno Lange GmbH
______________________________________________________________________________
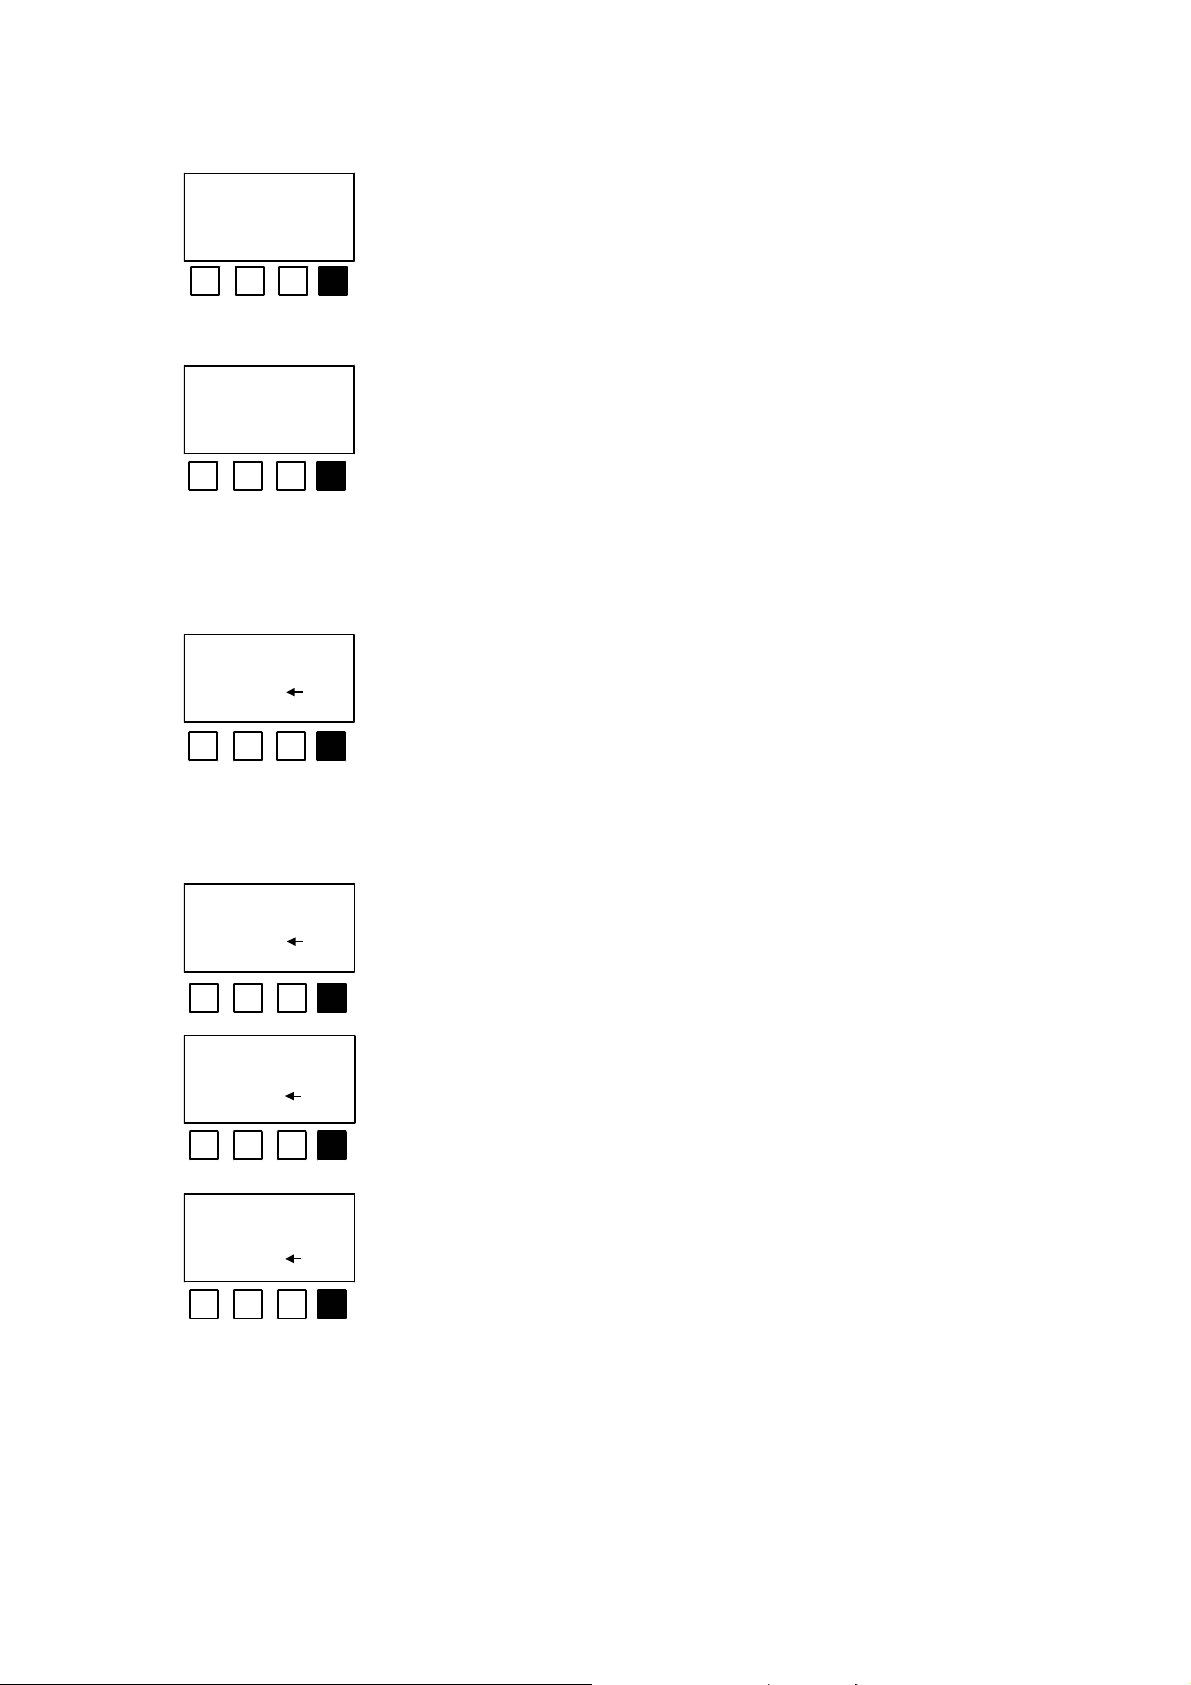
2.3 Initial settings for luminescent bacteria tests for determining GL
and EC
Initial settings have to be entered for the luminescent bacteria test to enable the GL or
EC value to be calculated. The necessary settings are requested by the LUMIStox 300
after the evaluation mode <GL> or <EC> has been selected. Their significance and the
method of entering them are explained below.
<N> indicates that all the current settings are to be adopted.
settings
change ? J N
dilution steps
? 4 ok
pre dilution: no
yes no ok
The LUMIStox 300 then switches to the start of the
measurement procedure. If <Y> is chosen, the following
settings are requested in sequence.
The length of the dilution series can be entered with the
numeric keyboard (at least 3 and no more than 9 dilution
stages) or the current setting can be confirmed with <ok>.
Preliminary dilution of a toxic sample is rejected with <no >.
The current setting is adopted with <ok>.
After confirmation with <yes >, the required preliminary dilution
Only preliminary dilutions from the dilution series referred to in the DIN standard
are therefore allowed for GL determinations.
______________________________________________________________________________
can be entered with the numeric keyboard
(not shown). It is taken into account in the EC or GL value.
Page: 10
LUMIStox 300 Operating Manual
Dr. Bruno Lange GmbH
______________________________________________________________________________
type of dil.:DIN
DIN 2 ok
unit: mg/l
mg/l g/l % ok
ini.conc. in mg/l
? 100.0 ok
<DIN> confirms the dilution series referred to in the DIN
standard, while <2> confirms the simple geometrical
series. <ok> indicates that the current setting should be
adopted.
The unit for the sample concentration is specified here.
For environmental samples of unknown composition, e.g.
waste water, <%> should be confirmed.
In this case the current setting can be adopted with <ok>
or a new value, corresponding to the concentration of the
original sample without preliminary dilution, can be
entered with the numeric keyboard. For example, for the
time of incub. 1
? 15 ok
time of incub. 2
? 30 ok
time of incub. 3
? 0 ok
analysis of waste water you can enter 100 here.
In this case <ok> indicates that the current setting should
be adopted. Otherwise a new value can be entered with
the numeric keyboard, e.g. 5, 15 and 30 minutes. If <0> is
entered as the incubation time 2, incubation time 3 is not
requested. Take account of the speed with which you
work and, depending on the length of the dilution series,
do not set incubation time 1 to too small a value.
______________________________________________________________________________
Page: 11

LUMIStox 300 Operating Manual
Dr. Bruno Lange GmbH
______________________________________________________________________________
2.4 Screening
Screening is the simpliest way of determining the toxicity of a sample. The result is
expressed as the percentage inhibition of the luminescence in the test solutions relative
to a control solution. With a LUMIStherm, double determinations of 9 samples or single
determinations of 14 samples can be carried out in one sequence.
Work steps:
1. Prepare sample(s).
2. Pipette 1.5 ml (for double determinations) or 1 ml (for single determinations) into
each measuring cuvette and bring to the correct temperature in the LUMIStherm.
3. Bring 1.5 ml or 1 ml of the control solution (2% NaCl solution) to the correct
temperature in position A1 of the LUMIStherm.
4. Reactivate the preserved bacteria by following the instructions in the package
circular.
5. Pipette 0.5 ml bacteria suspension into measuring cuvettes.
6. Quickly add 0.5 ml control solution or sample to the bacteria suspensions.
7. Wait for the incubation period, e.g. 5, 15 or 30 minutes, to elapse.
8. Select evaluation mode <scrn> on the LUMIStox 300.
9. Measure the control and test solutions and record or print the results.
______________________________________________________________________________
Page: 12
LUMIStox 300 Operating Manual
Dr. Bruno Lange GmbH
______________________________________________________________________________
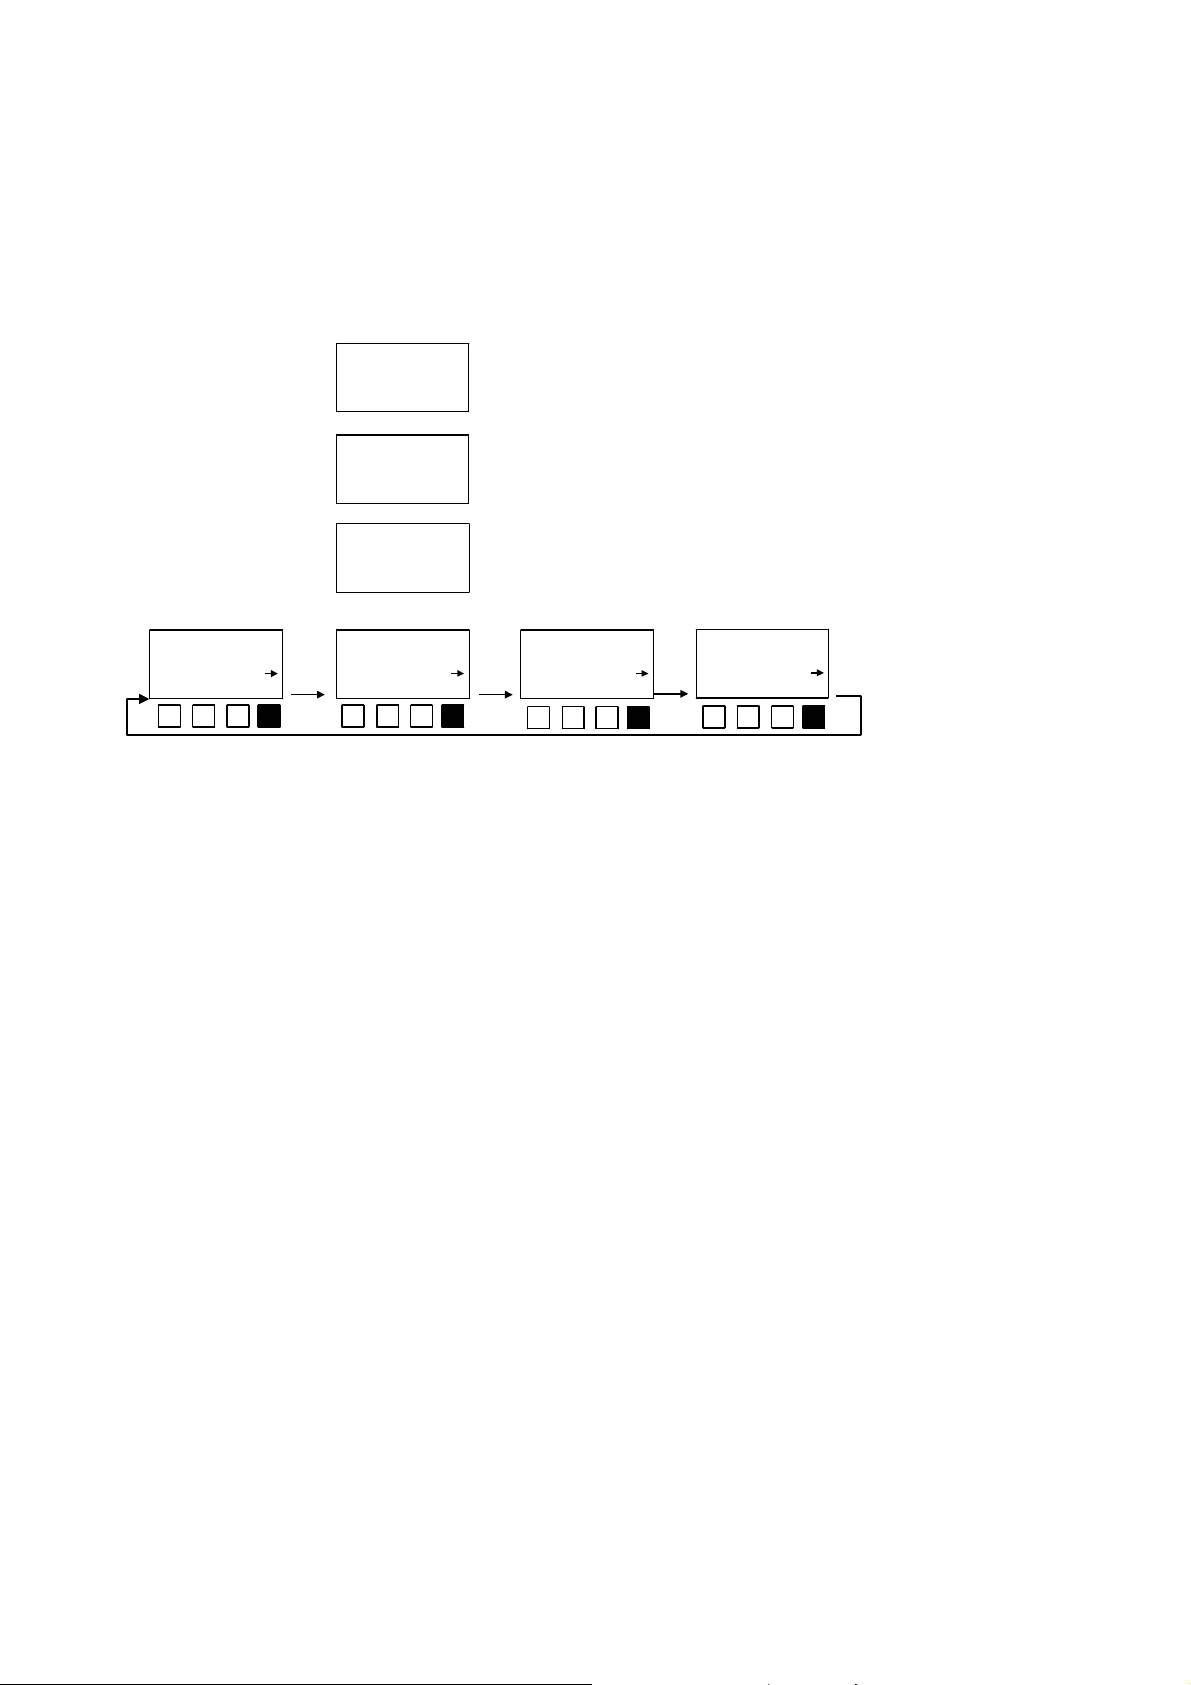
Sequence of operations on the measuring instrument
scrn EC GL
reference check
please wait
ref. cuvette
measure
ref. measured
measure
Select the evaluation mode <scrn>
Measure the control solution,
e.g. from position B1
Measure first test solution,
e.g. from position B2
Record or print the result;
25.3 % inhib.
measure
measure next test solution, etc.
______________________________________________________________________________
Page: 13

LUMIStox 300 Operating Manual
Dr. Bruno Lange GmbH
______________________________________________________________________________
2.5 Determining the GL value
The GL value, as referred to in DIN 38412 L34/341, gives the dilution level at which a
sample causes less than 20% inhibition in the luminescent bacteria test. DIN prescribes
the measurement of a sample dilution series by means of double determinations after
an incubation period of 30 minutes. The record printed by the LUMIStox (e.g. on a Dr.
Lange LD 500 printer) corresponds to the DIN documentation of a luminescent bacteria
test. With a LUMIStherm, the control solution and 9 samples (dilutions) can be
measured in one sequence in conformity with the DIN standard.
Incorrect individual measurements of initial or final luminescence can be annulled
immediately with <C> and carried out again.
Work steps:
1. Prepare and dilute the sample(s).
2. Pipette 1.5 ml into measuring cuvettes and bring to the correct temperature in row A
of the LUMIStherm. The highest sample concentration should be positioned on
the extreme right.
3. Bring 1.5 ml control solution (2% NaCl solution) to the correct temperature in
position A1 of the LUMIStherm.
4. Reactivate the preserved bacteria as described in the package circular.
5. Pipette 0.5 ml bacteria suspension into measuring cuvettes (2 per sample dilution)
and leave to stand for 15 minutes in rows B and C of the LUMIStherm to acquire
the correct temperature.
6. Select evaluation mode <GL> and the required luminescent bacteria test, e.g.
<480> for LCK480, on the LUMIStox 300.
7. If necessary enter the initial settings for the test into the LUMIStox 300.
8. Measure the initial luminescence of the bacteria at the specified time intervals.
9. Immediately after each measurement, pipette 0.5 ml control or sample dilution from
the corresponding position in row A into the bacteria suspension in row B or C.
10. Wait for the residual incubation time to elapse.
11. Measure the final luminescence of the control and test solutions at the specified
time intervals and record or print the results.
______________________________________________________________________________
Page: 14

LUMIStox 300 Operating Manual
Dr. Bruno Lange GmbH
______________________________________________________________________________
.
Sequence of operations on the measuring instrument:
scrn EC GL
settings
change ? Y N
dilution steps
? 4 ok
pre dilution.:no
yes no
type of dil.:DIN
DIN 2 ok
GL
480 490
time of incub. 1
time of incub. 2
482 492
reference check
please wait
? 30 ok
? 0 ok
GL
GL
491 4xx
.B1 measure
B1= 702.2 9
.C1 measure
.
.
.
inc. time left 1
00:10:04
:B1 measure
12
GL = 6
rslt
fk = 1,03
rslt
6
B1= 723.6 9
:C1 measure
.
.
Left and centre-left: Centre-right: Right:
Enter initial settings. Measuring the initial luminescence, Record or print
and addition of sample at specified results.
intervals. After the incubation period,
measurement of final luminescence
at specified time intervals.
______________________________________________________________________________
Page: 15

LUMIStox 300 Operating Manual
Dr. Bruno Lange GmbH
______________________________________________________________________________
2.6 Determining the EC value
The EC value is the concentration of a sample that causes 20% (EC20) or 50% (EC50)
inhibition in the luminescent bacteria test (EC = effective concentration). A dilution
series of no less than 3 and no more than 9 dilution levels, for double determinations, is
used to determine these values. The LUMIStox 300 can only calculate an EC value if
the value lies within the concentrations for which 10 to 90% inhibition are measured in
the test. A single luminescent bacteria test can be used to determine EC values for up
to three incubation periods, e.g. for 5, 15 and 30 minutes. The control solution and 9
samples (dilutions) can be measured with one LUMIStherm.
Incorrect individual measurements of initial or final luminescence can be annulled
immediately with <C> and carried out again.
Work steps
1. Prepare and dilute the sample(s).
2. Pipette 1.5 ml sample (dilution) into measuring cuvettes and bring to the correct
temperature in row A of the LUMIStherm. The highest sample concentration
should be positioned on the extreme right.
3. Bring 1.5 ml control solution (2% NaCl solution) to the correct temperature in
position A1 of the LUMIStherm.
4. Reactivate the preserved bacteria as described in the package circular.
5. Pipette 0.5 ml bacteria suspension into measuring cuvettes (2 per sample
dilution) and leave to stand for 15 minutes in rows B and C of the LUMIStherm to
acquire the correct temperature.
6. Select evaluation mode <EC> and the required luminescent bacteria test, e.g.
<480> for LCK480, on the LUMIStox 300.
7. Enter the initial settings for the test into the LUMIStox 300.
8. Measure the initial luminescence of the bacteria at the specified time intervals.
9. Immediately after each measurement, pipette 0.5 ml control solution or sample
dilution from the corresponding position in row A into the bacteria suspension in
row B or C. Wait for the residual incubation time to elapse.
10. Measure the final luminescence of the control and test solutions for each of the
specified time intervals.
11. Record or print the results.
______________________________________________________________________________
Page: 16

LUMIStox 300 Operating Manual
Dr. Bruno Lange GmbH
______________________________________________________________________________
Sequence of operations on the measuring instrument:
scrn EC GL
settings
change? Y N
dilution steps
? 4 ok
pre dilution : no
yes no ok
type of dil.:DIN
DIN 2 ok
EC 20/50
480 490
482 492
reference check
please wait
time of incub. 1
? 15 ok
time of incub. 2
? 30 ok
time of incub. 3
? 0 ok
EC 20/50
EC 20/50
491 4xx
.B1 measure
B1= 702.2 9
.C1 measure
.
.
.
inc. time left 1
00:10:04
.
.
.
:B1 measure
12
1EC50= 29.20 mg/l
rslt
1EC20= 11. 57 mg/l
rslt
1 fk = 1,03
rslt
6
2EC50= 29.20 mg/l
rslt
unit : mg/l
mg/l g/l % ok
ini.conc. in mg/l
? 100.0 ok
B1= 723.6 9
:C1 measure
.
.
.
2EC20= 11. 57 mg/l
rslt
2 fk = 1,03
rslt
Left and centre-left: Centre-right: Right:
Enter initial settings. Measuring the initial luminescence, Record or print
and addition of sample at specified results.
intervals. After the incubation period,
measurement of final luminescence
at specified time intervals.
______________________________________________________________________________
Page: 17

LUMIStox 300 Operating Manual
Dr. Bruno Lange GmbH
______________________________________________________________________________
2.7 Determining chronic toxicity with LUMIS·24·tox
In the context of the luminescent bacteria test, chronic toxicity is the long-term effect of
a sample on luminescent bacteria. The incubation period is therefore 24 hours. The
luminescent bacteria test for chronic toxicity, LUMIS·24·tox (LCK486), also involves the
calculation of an interim value after 30 minutes so that the user can also be provided
with the estimated acute toxicity of the same test solution.
The result of the luminescent bacteria test for chronic toxicity is expressed as a GL or
EC value.
In addition, the built-in photometer function of the LUMIStox 300 can be used to
determine the effect of the sample on the growth of the bacteria. This involves
measuring the optical density (OD) of the bacteria suspension before and after carrying
out the luminescent bacteria test for chronic toxicity with the LUMIStox 300.
Incorrect individual measurements of initial or final luminescence can be annulled
immediately with <C> and carried out again.
Work steps:
1. Prepare and dilute the sample(s).
2. Pipette 1.5 ml sample (dilution) into measuring cuvettes and bring to the correct
temperature in row A of the LUMIStherm. The highest sample concentration
should be positioned on the extreme right.
3. Bring 1.5 ml control solution (2% NaCl solution) to the correct temperature in
position A1 of the LUMIStherm.
4. Reactivate the preserved bacteria as described in the package circular.
5. Pipette 0.5 ml bacteria suspension into measuring cuvettes (2 per sample
dilution) and leave to stand for 15 minutes in rows B and C of the LUMIStherm to
acquire the correct temperature.
6. For the OD measurement, mix 1 ml bacteria suspension and 1 ml 2% NaCl
solution in a measuring cuvette.
7. Select evaluation mode <OD> on the LUMIStox 300 and measure and record (or
print) the OD of the bacteria suspension against 2% NaCl solution.
8. Select evaluation mode <chrn> on the LUMIStox 300.
______________________________________________________________________________
Page: 18

LUMIStox 300 Operating Manual
Dr. Bruno Lange GmbH
______________________________________________________________________________
9. Enter the initial test settings and the required type of result on the LUMIStox 300.
9. Measure the initial luminescence of the bacteria suspensions at the specified
time intervals.
10. Immediately after each measurement, pipette 0.5 ml control solution or sample
dilution from the corresponding position in row A into the bacteria suspension in
row B or C.
12. Wait for incubation period 1 (30 minutes for acute toxicity) to elapse.
13. Measure the interim luminescence of the control and test solutions at the
specified time intervals, and note or print the results.
14. Put the bacteria suspensions back into their positions in the LUMIStherm; do not
switch off the LUMIStherm.
15. Leave while incubation period 2 elapses (24 hours for chronic toxicity). During
this time the LUMIStox 300 can be used for other tests or switched off. In this
case stop the test with <←> and <→>.
16. Switch on LUMIStox 300 and select evaluation mode <chrn>. The residual
incubation time is displayed.
17. Measure the final luminescence of the control and test solutions at the specified
intervals and record or print the results.
18. Select evaluation mode <OD> on the LUMIStox 300. Measure the OD of the test
solutions against 2% NaCl solution and record the results.
______________________________________________________________________________
Page: 19

LUMIStox 300 Operating Manual
Dr. Bruno Lange GmbH
______________________________________________________________________________
Sequence of operations on the measuring instrument:
test O D chr oni
chronic. Tox.
EC G l
chronic. Tox. EC
486
settings
chang e? Y N
dilution steps
? 4 ok
pre dilution: yes
yes no ok
type of dil.: DIN
DIN 2 ok
unit: mg/l
mg /l g/l % o k
ini. conc. in mg/l
? 100.0 ok
time of incub. 1
? 30 ok
time of incub. 2
24 Std ok
reference check
please wait
.B 1 m easure
B1= 702.2 9
.C1 m easure
.
.
.
inc. time left 1
00:25:04
.
.
.
:B1 measu re
B1= 723.6 9
:C 1 measu re
.
.
.
12
1EC50= 29.20 m g/l
rslt
1EC20= 11.57 mg/l
rslt
1 fk = 1.12
rslt
.
.
.
inc. time left 2
23:015:02
.
.
6
.
2EC50=12.20 m g/l
rslt
2EC20= 6.57 mg/l
rslt
2 fk = 1,03
rslt
left: Centre-right: Right:
Enter initial settings. Measuring the initial luminescence, Record or print
______________________________________________________________________________
Left and centre-
and addition of sample at specified results.
intervals. After the incubation period,
measurement of final luminescence
at specified time intervals.
Page: 20

LUMIStox 300 Operating Manual
Dr. Bruno Lange GmbH
______________________________________________________________________________
2.8 The LUMIStox luminescent bacteria test (LCK484)
This test is a luminescent bacteria test for operational analysis. One package of
preserved luminescent bacteria enables up to 5 samples to be determined.
Work steps:
1. Prepare sample(s) and control solution (2% NaCl solution).
2. Reactivate preserved bacteria as described in package circular.
3. Pipette 0.5 ml bacteria suspension into measuring cuvettes (1 control and 1 test
solution per sample).
4. Quickly add 0.5 ml control solution or sample to the bacteria suspensions.
5. Wait for the incubation period of 15 minutes to elapse.
6. Select the evaluation mode <test> and the LUMISmini luminescent bacteria test
<484> for LCK484 on the LUMIStox 300.
7. Measure the control and test solutions and record or print the results.
Sequence of operations on the measuring instrument:
Select test
t e s t O D c h r o n i
t e s t
4 8 4 4 8 8
r e fe r e n c e c h e c k
p le a s e w a it
Measure the first 2% NaCl control solution
r e f. c u v e tt e
m e a s u r e
s a m p l e
m e a s u r e
Measure the first sample
3 2 % i n h ib .
______________________________________________________________________________
Record or print result, measure next control
solution and sample, etc.
Page: 21

LUMIStox 300 Operating Manual
Dr. Bruno Lange GmbH
______________________________________________________________________________
2.9 The TOX cuvette test (LCK488)
The TOX cuvette test is a luminescent bacteria test for operational analysis. One
package of preserved luminescent bacteria enables one sample to be determined.
Work steps:
1. Thaw blank solution (labelled “NULL”).
2. Prepare sample.
3. Reactivate preserved bacteria as described in package circular and add 0.4 ml to
the zero cuvette and the sample cuvette.
4. Select the evaluation mode <Test> and the TOX cuvette test <488> for LCK488
on the LUMIStox 300.
5. Measure the initial luminescence of the zero cuvette and the sample cuvette.
6. Quickly add 0.4 ml zero-solution or sample to the bacteria suspensions.
7. Wait for the incubation period of 15 minutes to elapse.
8. Measure the final luminescence of the “NULL” cuvette and sample cuvette.
9. Record or print the results.
______________________________________________________________________________
Page: 22

LUMIStox 300 Operating Manual
Dr. Bruno Lange GmbH
______________________________________________________________________________
Sequence of operations on the measuring instrument:
test OD Chroni
test
484 488
reference check
please wait
no. of samples
? 2 ok
time of incub.
? 15 ok
blank 1
sample 1
blank 2
sample 2
12
12
12
0
blank 1
fkt = 0,82 12
sample 1
60.7 % inhib 12
blank 2
fkt = 0,85 12
sample 2
2.5 % inhib.
______________________________________________________________________________
inc. time left
00:12:55
Page: 23

LUMIStox 300 Operating Manual
Dr. Bruno Lange GmbH
______________________________________________________________________________
2.10 Determining optical density (OD)
The LUMIStox 300 measuring instrument incorporates a photometer function for
determining the extinction of a sample as optical density (OD) at a wavelength of 485
nm. The photometer function checks whether preliminary dilution of a strongly coloured
sample is necessary, because the LUMIStox 300 can only carry out colour correction
up to an extinction of 1800 mE. It is also used to assess bacterial growth in the
luminescent bacteria test for chronic toxicity, LUMIS·24·tox (LCK486).
LUMIStox measuring cuvettes (LZP187) are used to carry out the measurements.
Work steps:
1. Add at least 1 ml water, 2% NaCl solution or any other blank solution to the blank
cuvette.
2. Add at least 1 ml sample to the sample cuvettes.
tes t O D c hro ni
refe re nc e ch eck
plea se w ait
blan k-c uve tte
blank
sa m ple
m ea sure
0.91 E
blank
Select program mode <OD> in the 2nd level
of the main menu.
Perform blank balancing of LUMIStox 300 with blank
cuvette.
Measure sample.
Record or print result.
______________________________________________________________________________
Page: 24

LUMIStox 300 Operating Manual
Dr. Bruno Lange GmbH
______________________________________________________________________________
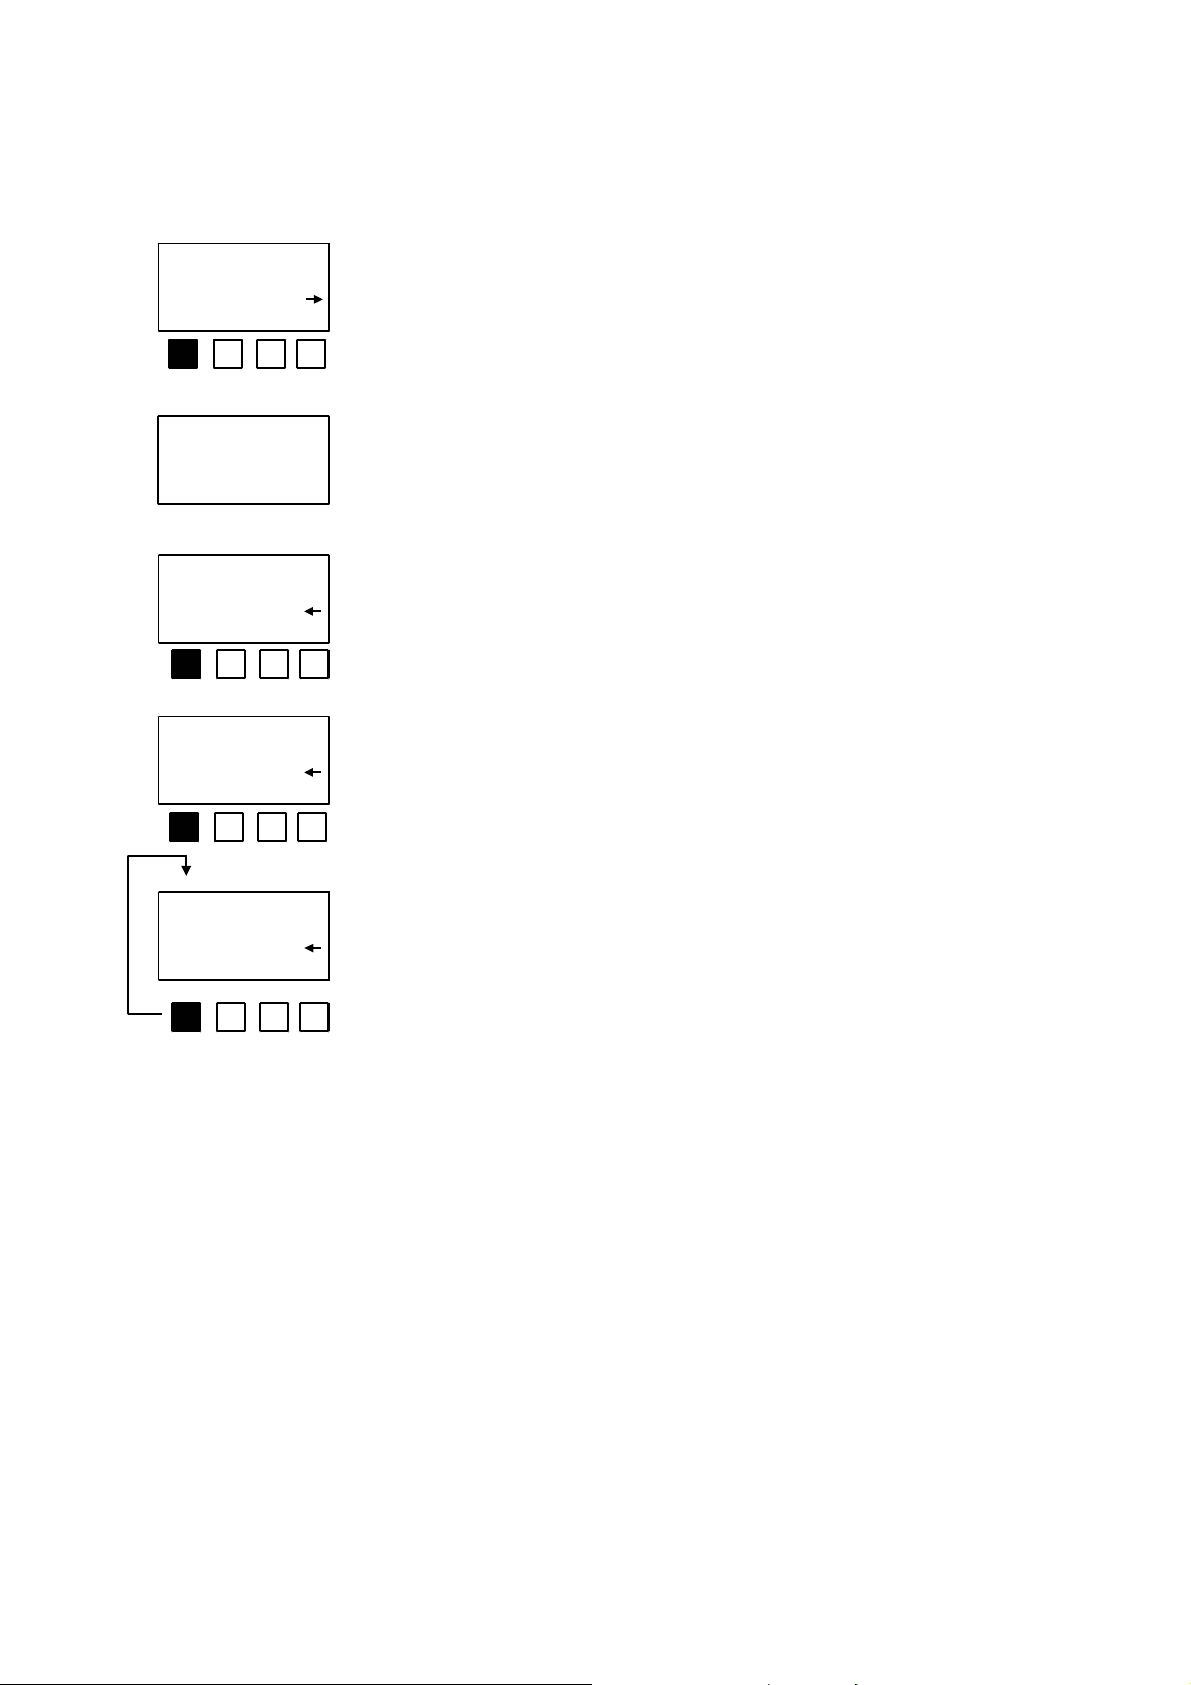
2.11 Determining relative light units (LU)
In this evaluation mode the LUMIStox 300 is used as a luminometer to determine the
luminescence of samples. The maximum emission of the sample must lie in the vicinity
of 480 nm.
This mode is also used when the data of the luminescent bacteria test have to be
transferred to a PC, e.g. for further processing with the Dr. Lange evaluation software
LUMISsoft.
Sequence:
Add sample to measuring cuvette.
LU opt exit
reference check
please wait
measure
872,96
measure
Select evaluation mode <LU> in the 3rd level of the
main menu.
Measure sample.
Relative luminescence is displayed.
______________________________________________________________________________
Page: 25

LUMIStox 300 Operating Manual
Dr. Bruno Lange GmbH
______________________________________________________________________________
3 Options
A variety of instrument functions and parameters can be set if <opt> is selected in the
3rd level of the main menu.
LU opt exit
options
col. relV test
options
V24 PRN time
options
temp cont srv
col.: Colour correction on/off
relV: Standardization of luminescence measurements relative to 100
test: Start instrument's program of internal checks
V24: Serial interface settings
PRN: Print options
time: Time and date
temp: Adjust measuring compartment thermostat and switch on/off
cont: Set display screen contrast
serv: Service program (for Dr. Lange service engineers)
______________________________________________________________________________
Page: 26

LUMIStox 300 Operating Manual
Dr. Bruno Lange GmbH
______________________________________________________________________________
3.1 Colour correction
Light-absorbent colorants in the sample can distort the results of the luminescent
bacteria test. The LUMIStox 300 has an automatic colour and turbidity compensation
feature. This means that the absorbed light can be automatically determined and
corrected with the built-in photometer function each time a measurement procedure is
carried out. The measurement takes a few seconds longer than usual. The colour
correction can be performed in the extinction range from 20 - 1800 mE.
Sequence:
The colour correction feature can be switched off, permanently switched on, or
switched on as required. In the latter case, each time a measurement program is
selected the user is asked whether the colour correction feature should be switched on.
options
col. relV test
col.corr.: off
perm off var
col.corr.: no
yes no ok
Program selection
Colour correction: Current setting
perm: Permanently switched off
aus: Switched off
var: Switched on as required
If <var> is set, this query appears each time a measurement
program is selected.
______________________________________________________________________________
Page: 27

LUMIStox 300 Operating Manual
Dr. Bruno Lange GmbH
______________________________________________________________________________
3.2 Standardization of luminescence measurements relative to 100
(relV)
If this option is selected, all values measured during the luminescent bacteria test (GL,
EC, LU, etc.) are standardized relative to the first measurement obtained in the test.
The first measurement is set to 100, and all subsequent measurements are calculated
and expressed relative to this measurement. This is the usual international convention
for the luminescent bacteria test, but poorly luminescent bacteria suspensions are not
recognized, e.g. after superimposition.
rel V: off
perm off var
measure
1245
measure
options
col. relV test
LU opt exit
reference check
please wait
rel V: perm
perm off var
measure
100
measure
Select option for standardization of
measured values relative to 100:
relV current standardization setting
perm: permanently switched on
off: switched off
var: switched on as required
Selection of the evaluation mode, here for
example <LU>, in the 3rd level of the main
menu.
left: display values of 4 suspensions of
measure
measure
measure
1456
987,7
579,3
______________________________________________________________________________
measure
measure
measure
116
78,8
46,2
luminescent bacteria without
standardization
right: display values of 4 suspensions of
luminescent bacteria with standardization
Page: 28

LUMIStox 300 Operating Manual
Dr. Bruno Lange GmbH
______________________________________________________________________________
3.3 Self-test (check)
When the instrument is switched on, and each time an evaluation mode is selected, the
LUMIStox 300 automatically performs a self-test.
In addition the correct functioning of the LUMIStox 300 can be checked with the options
shown below. The result of the check can be documented as a test report on a printer if
the final function to be checked is the printer connection, with <prn> (see below). Status
and error messages describe the current operational capability in accordance with ISO
9000 ff.
The self-check is no substitute for regular specialist maintenance of the instrument. You
should contact Dr. Lange Service in Germany (++49/(0)211-5288-0) for all matters
concerning maintenance and a maintenance contract.
options
col. relV test
test
mem disk time keyb LCD snd step PMT prn EEpr ser input
mem: Check memory (<ok> = okay; <default > = defective).
disk: Check diskette drive (<ok> = okay; <default > = defective).
time: Check clock.
keyb: The key that has just been pressed is shown on the display. The check can be
terminated by pressing the <F4> key.
LCD: A symmetrical pattern is displayed. Press any key to terminate this test.
Snd: An acoustic signal is confirmed by pressing any key.
step: Check the motor and the resetting of the measuring shaft.
PMT: Check the photomultiplier.
prn: Check the printer connection with printout.
EEPr: Check the EEPROM (<ok> = okay; <default > = defective).
Ser: Check the serial connection.
test
test test
input: Entry of instrument-specific factors by Dr. Lange Service.
______________________________________________________________________________
Page: 29

LUMIStox 300 Operating Manual
Dr. Bruno Lange GmbH
______________________________________________________________________________
3.4 Setting the serial interface (V24)
The serial interface is used to transfer data to a computer or a Dr. Lange printer (e.g.
LD500). The necessary interface parameters are already specified for the Dr. Lange
products and can be selected. This option allows other interface parameters to be set in
accordance with the specifications for the connected peripheral device (PC or printer).
Sequence:
options
V24 PRN time
protocol = free
+ - ok
protocol =LD2W
+ - ok
protocol = LSoft
+ - ok
bit/s = 9600
+ - ok
databits = 8
7 8 ok
stopbits = 1
1 1.5 2 ok
Select option <V24>;
scroll with + or - and confirm
required protocol with <ok>:
Protokol =free:
Select settings (bit/s,
databits, stopbits, parity,
handshake) in accordance with
the documentation of the
peripheral device, e.g. PC.
Protokol = LD2W:
for Dr. Lange printer, e.g. LD500,
too
protocol = no
+ - ok
parity = none
even odd no ok
Protokol = Lsoft
for Dr. Lange LUMISsoft
evaluation software
handshake = no
+ - ok
Protokol = no
Interface off
______________________________________________________________________________
Page: 30

LUMIStox 300 Operating Manual
Dr. Bruno Lange GmbH
______________________________________________________________________________
3.5 Setting the print options
The printer layout can be individually adjusted.
Sequence:
options
V24 PRN time
printer
head timemarg
with header ?
yes no
with date/time ?
yes no
left margin
? 2 ok
With header:
The printout can be with or without a header that conforms to GLP. A printout in
conformity with GLP must leave space for comments and, if a printer with single-sheet
feeding is connected, each test must be documented on its own page.
With date/time:
The time of the test is shown in the printout.
Left margin:
The left margin of the printout can be adjusted.
______________________________________________________________________________
Page: 31

LUMIStox 300 Operating Manual
Dr. Bruno Lange GmbH
______________________________________________________________________________
3.6 Setting the date and time
The LUMIStox 300 has a real-time clock. This option can be used to change the date
and time via the numeric keyboard. The entries must be as follows:
time:
as hh:mm:ss
where hh = hours, mm = minutes, ss = seconds
date:
as dd.mm.yy
where dd = day, mm = month, yy = year
Sequence:
Zeit: 13:57:41
: : ok
options
V24 PRN time
13:55 09.07.98
time date
Datum:05.02.97
. . ok
Select the option <time>.
The current time and date are
displayed.
Change the time and date via the
numeric keyboard
Confirm the input by pressing F4
(under <ok>)
______________________________________________________________________________
Page: 32

LUMIStox 300 Operating Manual
Dr. Bruno Lange GmbH
______________________________________________________________________________
3.7 Setting the temperature of the measuring shaft
Before the instrument leaves the factory the temperature control of the measuring shaft
is set to 15°C. The temperature control of the measuring shaft can be switched on or
off.
The temperature control can be adjusted. To do this, measure the measuring shaft
temperature with an accurate thermometer. (Introduce about 1 ml water into the
measuring cuvette and place the cuvette in the measuring shaft. Measure the water
temperature after the temperature adjustment.) In the adjustment program, enter the
measured temperature via <F1> or <F2> as the actual temperature. The program
calibrates the temperature control so as to reach the required temperature of 15°C.
3.8 Setting the screen contrast
The screen contrast can be individually adjusted.
Sequence:
options
temp cont srv
temp: 15.1°C on
just off
meas. :15.0°C
+ -
Kontrast
- +
Select the option <temp> or <cont>.
Left:
Switch the temperature control on
or off with F2.
Adjust the measuring shaft
temperature with F1.
right:
Set the screen contrast.
______________________________________________________________________________
Page: 33

LUMIStox 300 Operating Manual
Dr. Bruno Lange GmbH
______________________________________________________________________________
4 Appendix:
4.1 Sample preparation for the luminescent bacteria test
For reasons connected with the biology of the luminescent bacteria and the measuring
technology, the luminescent bacteria test requires a sample preparation step to be
carried out.
Adjusting the salt content of the sample to 2% NaCl
Luminescent bacteria are marine organisms and therefore have to be kept in an
environment with an adequate salt content. The salt content of the sample is therefore
increased to 2% by adding solid NaCl (p.a. quality).
For example, 2 g NaCl need to be dissolved in 100 ml sample, or 0.3 g NaCl in 15 ml
sample.
No salt should be added to samples that have a salt content of about 2 to 4%. The
luminescence of the bacteria is inhibited at salt concentrations of more 4%.
Setting the pH of the sample
DIN 38412 L 34/341 for the luminescent bacteria test requires the pH of wastewater
samples to be set to 7 to prevent any inhibition of luminescence due to differences in
pH. The pH is adjusted with NaOH or HCl in such a way as to cause the least possible
change in the sample concentration.
For example, 1 mol/l NaOH or HCl can be added.
It is not usual to adjust the pH when single substances are being studied.
Elution of solid samples
Solid samples (contaminated soil, earth, compost, sludge) can be studied with the
luminescent bacteria test by preparing an eluate to be used as the sample in the test.
Dr. Lange supplies the LUMISterra (LYW429) set for the preparation of solid samples
for the luminescent bacteria test.
______________________________________________________________________________
Page: 34

LUMIStox 300 Operating Manual
Dr. Bruno Lange GmbH
______________________________________________________________________________
4.2 Determining EC and GL values
4.2.1 Preparing a dilution series
Three or more dilution levels of a sample are needed to determine a GL or EC value
with the luminescent bacteria test. A distinction is made between two types of dilution
series.
Geometrical dilution series
The sample is diluted several times by a factor of 2. The following series of sample
dilutions is obtained:
undiluted sample 1:2 1:4 1:8 1:16 etc. diluted sample
During the luminescent bacteria test a volume of the sample is mixed with the same
volume of the suspension of luminescent bacteria. This further dilution of the above
sample dilutions results in the test dilution series:
1:2 1:4 1:8 1:16 1:32 etc. test dilutions
Dilution series referred to in DIN 38412 L34/341
A dilution series as referred to in DIN 38412 contains a combination of two geometrical
dilution series, one of them based on the undiluted sample and the other on a 1:1.5
dilution of the sample. This gives rise to the following series of sample dilutions:
undiluted sample 1:1.5 1:2 1:3 1:4 etc. diluted sample
During the luminescent bacteria test a volume of the sample is mixed with the same
volume of the suspension of luminescent bacteria. This results in a further dilution of
the above sample dilutions results to give the test dilution series. DIN 38412 refers to
the test dilutions of the sample as G-values:
______________________________________________________________________________
1:2 1:3 1:4 1:6 1:8 etc. G-values
Page: 35

LUMIStox 300 Operating Manual
Dr. Bruno Lange GmbH
______________________________________________________________________________
l
4.2.2 Practical advice: The geometrical dilution series:
Position the necessary number of LUMIStox measuring cuvettes in row A of the
LUMIStherm. A dilution series of the sample as described in the example below
requires 9 cuvettes for the sample dilutions and 1 cuvette for the control solution.
Pipette into the measuring cuvettes, in sequence:
1.
2.
3.
1,5 1,51,5 1,51,5 1,5 1,5 1,5 0,0
1,5
1,5
dilution: 1:
1,51,51,51,5
8163264128256
1,5
1,5 1,5
1,5
ml
124
2% NaCl solution
m
then prepared sample
ml
Use a pipette to transfer,
proceeding from left to right, 1.5
ml into the following cuvette. Mix
each sample dilution by drawing
it into the pipette two or three
times.
There is no need to change the
pipette tip.
The 2% NaCl control solution always stands in A1. The highest sample concentration, in this case the undiluted sample, is on the far right, in this case A10.
______________________________________________________________________________
Page: 36

LUMIStox 300 Operating Manual
Dr. Bruno Lange GmbH
______________________________________________________________________________
l
4.2.3 Practical advice: Dilution series in conformity with DIN 38412
L34/341
The preparation corresponds to that of the geometrical dilution series.
Pipette into the measuring
1.
2.
3.
4.
1,5 1,51,5 1,51,5 1,5 1,5 1,5 1,0 0,0
1,5 2,0 1,5
ml
ml
1,5
2
1
16
1,5
12
1,5
dilution: 1:
68
1,51,5
4
1,5
1,5
3
cuvettes, in sequence:
m
2% NaCl solution
ml
then prepared sample
Use a pipette to
transfer, proceeding
from left to right, 1.5 ml
into the following
cuvette. Mix each
sample dilution by
drawing it into the
pipette two or three
times.
There is no need to
change the pipette tip.
The 2% NaCl control
solution always stands in A1. The highest sample concentration, here the
undiluted sample, is on the far right, in this case A10.
NB: For a GL value in accordance with DIN, the preliminary dilutions of a toxic sample
must be carried out in accordance with the DIN dilution series. This means that a 1:8
preliminary dilution is allowed, but not 1:10. The accompanying Dr. Lange measuring
range table shows permissible preliminary dilutions of the original sample and the
resulting measurement ranges in the test.
______________________________________________________________________________
Page: 37

LUMIStox 300 Operating Manual
Dr. Bruno Lange GmbH
______________________________________________________________________________
4.3 Calculation of the GL value in conformity with DIN
Definitions:
Io: Luminescence of the bacteria suspensions before the sample is added
(initial luminescence)
It: Luminescence of the tests solutions after the incubation period t (final
luminescence after addition of the sample)
IoK, ItK: Initial and final luminescence of the control solutions (2% NaCl)
fK: Correction factor
Ic: Io of the test solutions, corrected by fK
%inhib.t: Percentage inhibition of the luminescence after the incubation period t
GL value: The factor of the test dilution (i.e. the G-value) with which %inhib.t <20 is
reached.
1. Calculating fK: fK = ItK/IoK
2. Calculating Ic: Ic = fK x Io
3. Calculating %inhib. t: %inhib.t = (Ic - It) x 100 / Ic
______________________________________________________________________________
Page: 38

LUMIStox 300 Operating Manual
Dr. Bruno Lange GmbH
______________________________________________________________________________
4.4 Calculating the EC value
Definitions:
Γ: Gamma value calculated from %Ht
Konz: Concentration of the sample in a test solution
EC50/20: Concentration of the sample in the test that causes 50% (20%) inhibition
4. Calculating gamma Γ = %inhib.t / (100 - %inhib.t)
5. Take the Γ-values as the y-coordinates (ordinates) and the associated
concentrations as the x-coordinates (abscissa) and plot them in a twodimensional logarithmic coordinate system (range of ordinates: -0.95 to +0.95).
6. The EC50 value is given by the point of intersection with the x-axis at Γ = 1.
7. The EC20 value is given by the point of intersection with the x-axis at Γ = 0.25.
______________________________________________________________________________
Page: 39

LUMIStox 300 Operating Manual
Dr. Bruno Lange GmbH
______________________________________________________________________________
5 Printout
An example of a printout of a GL determination with colour correction is shown here.
The listed values for Io and It are the uncorrected original values. The values for
percentage inhibition are colour corrected where necessary. If the system does not
detect any colour or turbidity in a dilution solution (extinction < 0.02), the original values
of It are used to calculate the percentage inhibition. Colour correction cannot be carried
out if the extinction is greater than 1.8.
GL - LCK480
LUMIStox 300 - Version 2.21
date: 25.03.97
timer: 13.58.50
operator:
sample:
bacteria:
comment:
color correctionmode
dilution steps: 4
typ of dilution: DIN
factor of dilution: 1
time of incubation 30 min
test G-value intensity inhib
B1 control 1179 1251 1.63
C1 control 1113 1220 -1.63
B2 6 1133 1120 0.121
C2 6 1199 1147 1.32
B3 4 1144 1043 2.46
C3 4 1155 1064 1.93
B4 3 1148 911.0 -1.87
C4 3 1121 879.5 0.78
B5 2 1127 760.4 -2.68
C5 2 1196 786.8 -4.64
fK = 1,08
GL = 2
Io It
______________________________________________________________________________
Page: 40

LUMIStox 300 Operating Manual
Dr. Bruno Lange GmbH
______________________________________________________________________________
6 Error messages
concerning the test:
Message Meaning Measure
EC20, EC50 not
calculated
GL not calculated All inhibition values were above 20% If necessary repeat the test with a
not calc. Colour correction could not be carried out
PMT too much light The photomultiplier received too much
The EC20 or EC50 value are not included
within the limits of the dilution series.
for the It values concerned because the
extinction was greater than 1.8.
light.
If necessary repeat the test with a
new dilution series to get values
“around” 20 resp. 50 % inhibition.
more diluted sample.
Repeat the test with a prediluted
sample.
Follow exactly the description of
reactivation and pipetting the
bacteria.
concerning the measuring instrument:
Message Meaning Measure
continue, or ESC to
enter EMB
LED check LED is not emitting light
The system diskette is not inserted, or
cannot be read.
Insert the diskette or change it.
Put the instrument “off” and, after
temp error Temperature outside the monitoring range.
menu error
test error
Err: 1001 – Err: 1010 Error in different hardware or software
Err: 1000 The instrument has lost the calibration data
Err: 1011 Error in software version
The system diskette is destroyed. Remove the diskette from the
parts
10 seconds, “on” again. If the error
still occurs you will have to inform
the DR LANGE service (telephone
numbers see p. 1)
instrument and insert the second
one, delivered with the instrument
Put the instrument “off” and, after
10 seconds, “on” again. If the error
still occurs you will have to inform
the DR LANGE service (telephone
numbers see p. 1)
Call the DR LANGE service to
install the necessary data again via
telephone.
______________________________________________________________________________
Page: 41

LUMIStox 300 Operating Manual
Dr. Bruno Lange GmbH
______________________________________________________________________________
7 Technical data
Storage temperature: -20 to +60°C
Operating temperature: 16 to 29°C
Relative humidity: <80% (non-condensing)
Operating voltage: 230 V +/-10%; 50 Hz
Power consumption: 48 VA
Dimensions (w x h x d) 435 x 140 x 375 mm
Weight: 7.75 kg
______________________________________________________________________________
Page: 42
 Loading...