

Page 1

DOC022.98.90390
LICO 620 / LICO 690
08/2012, Edition 1A
Základní uživatelská příručka cs
Basis Bedienungsanleitung de
Basic User Manual en
Manual básico del usuario es
Manuel d'utilisation de base fr
Manuale utente di base it
基本ユーザー マニュアル ja
기본 사용 설명서 ko
Basisgebruikershandleiding nl
Podstawowa instrukcja obsługi pl
Основное руководство пользователя ru
Základný návod na použitie sk
Osnovni uporabniški priročnik sl
Grundläggande bruksanvisning sv
Temel Kullanıcı Kılavuzu tr
基本用户手册 zh
Page 2

Čeština .................................................................................................................................................. 3
Deutsch ............................................................................................................................................... 23
English ................................................................................................................................................. 43
Español ................................................................................................................................................ 63
Français ............................................................................................................................................... 85
Italiano ............................................................................................................................................... 107
英語 .................................................................................................................................................... 129
한국어 ................................................................................................................................................ 149
Nederlands ........................................................................................................................................ 167
Polski ................................................................................................................................................. 189
Русский ............................................................................................................................................. 209
Slovenčina ......................................................................................................................................... 231
Slovenský jazyk ................................................................................................................................ 251
Svenska ............................................................................................................................................. 271
Türkçe ................................................................................................................................................ 291
英语 .................................................................................................................................................... 311
Page 3
Čeština
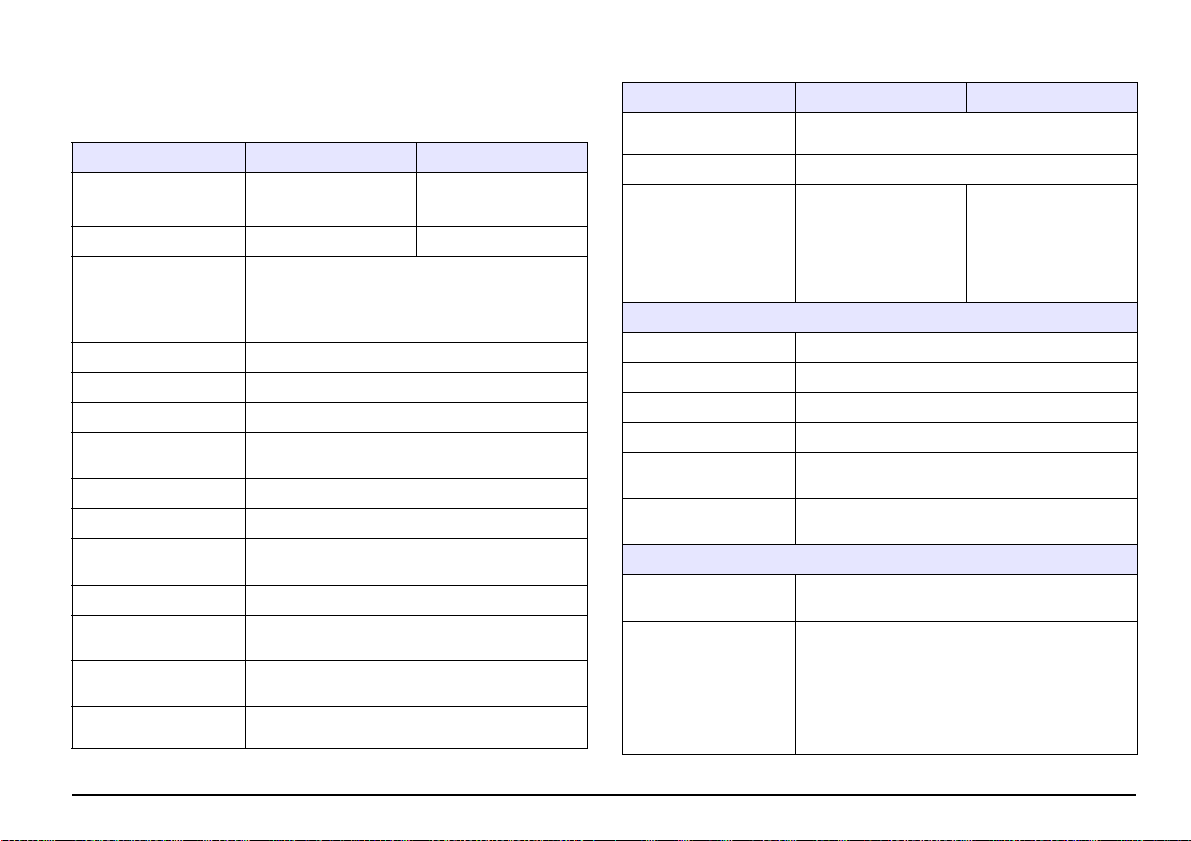
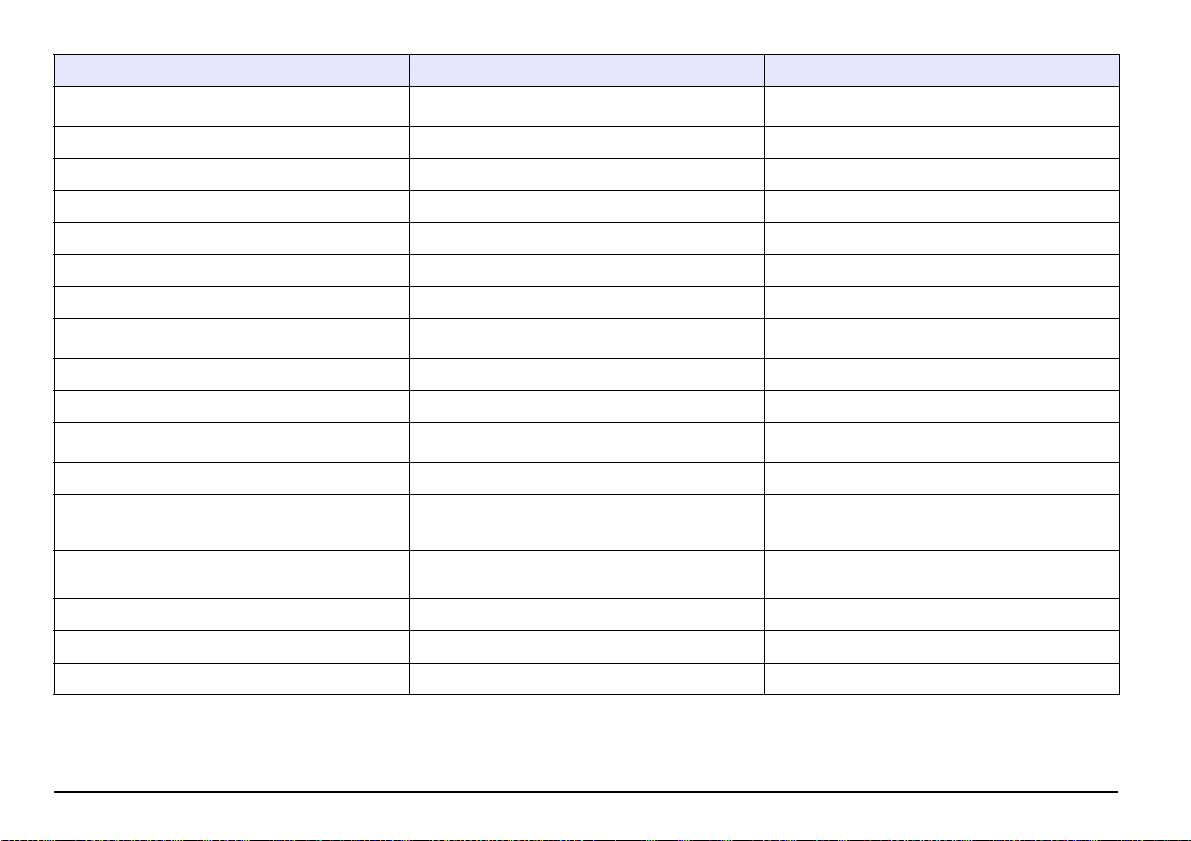
Specifikace
Technické údaje se mohou bez oznámení změnit!
Provozní charakteristiky LICO 690 LICO 620
Režim zobrazení
Měření barvy 26 poměrů barev 5 poměrů barev
Kolorimetrické
hodnocení
Zdrojová lampa Halogenová lampa
Rozsah vlnových délek: 320–1 100 nm
Přesnost vlnové délky ± 1,5 nm (rozsah vlnové délky 340–900 nm)
Reprodukovatelnost
vlnové délky
Rozlišení vlnové délky 1 nm
Kalibrace vlnové délky Automatická
Rozsah vlnové délky pro
měření barvy
Rychlost skenování ≥ 8 nm/s (v krocích po 1 nm)
Šířka spektrálního
pásma
Fotometrický měřicí
rozsah
Fotometrická přesnost
Měření barev, měření
rozdílu barev, absorbance
a koncentrace
Všechny vizuální poměry barev se vypočítávají pro
standardní světelnou tabulku C a 2° standardní
pozorovatele v souladu s normou DIN 5033.
Kolorimetrické hodnoty barev lze přepnout na světlo
typu A, C, D65 a 2° nebo 10° standardní pozorovatele
≤ 0,1 nm
380–720 nm, kroky po 10 nm
5 nm
± 3 Abs (rozsah vlnové délky 340–900 nm)
5 mAbs při 0,0–0,5 Abs,
1% při 0,50–2,0 Roz.
Měření barvy
Provozní charakteristiky LICO 690 LICO 620
Fotometrická linearita
Rozptýlené světlo < 0,1 % T při 340 nm s NaNO
Protokol dat
Fyzikální údaje a popis prostředí
Šířka 350 mm (13,78 palců)
Výška 151 mm (5,94 palců
Hloubka 255 mm (10,04 palce)
Hmotnost 4200 g (9,26 liber)
Požadavky na provozní
prostředí
Požadavky na
skladovací prostředí
Další technické údaje
Napájecí konektor přes
vnější napájení
Rozhraní
< 0,5 % až 2 Abs
≤ 1% při > 2 Abs s neutrálním sklem při 546 nm
2
3000měření barvy,
100 referenčních hodnot
barev,
1000 fotometrických
měření,
20 spektrálních skenů,
20 časových skenů
10–40 °C (50–104 °F), maximálně 80 % relativní
vlhkosti (bez tvorby kondenzátu)
-40–60 °C (-40–140 °F), maximálně 80 % relativní
vlhkosti (bez tvorby kondenzátu)
Vstup:100–240 V/47–63 Hz
Výstup: 15 V/40 VA
Používejte jen se stíněným kabelem o délce max.
3m.
2× USB typ A
1× USB typ B
Používejte jen stíněný kabel (např. STP, FTP, S/FTP)
o maximální délce 20 m:
1× Ethernet
400 měření barvy
Čeština 3
Page 4
Provozní charakteristiky LICO 690 LICO 620
Třída krytí skříně IP40 (kromě rozhraní a napájení)
Ochranná třída Třída I
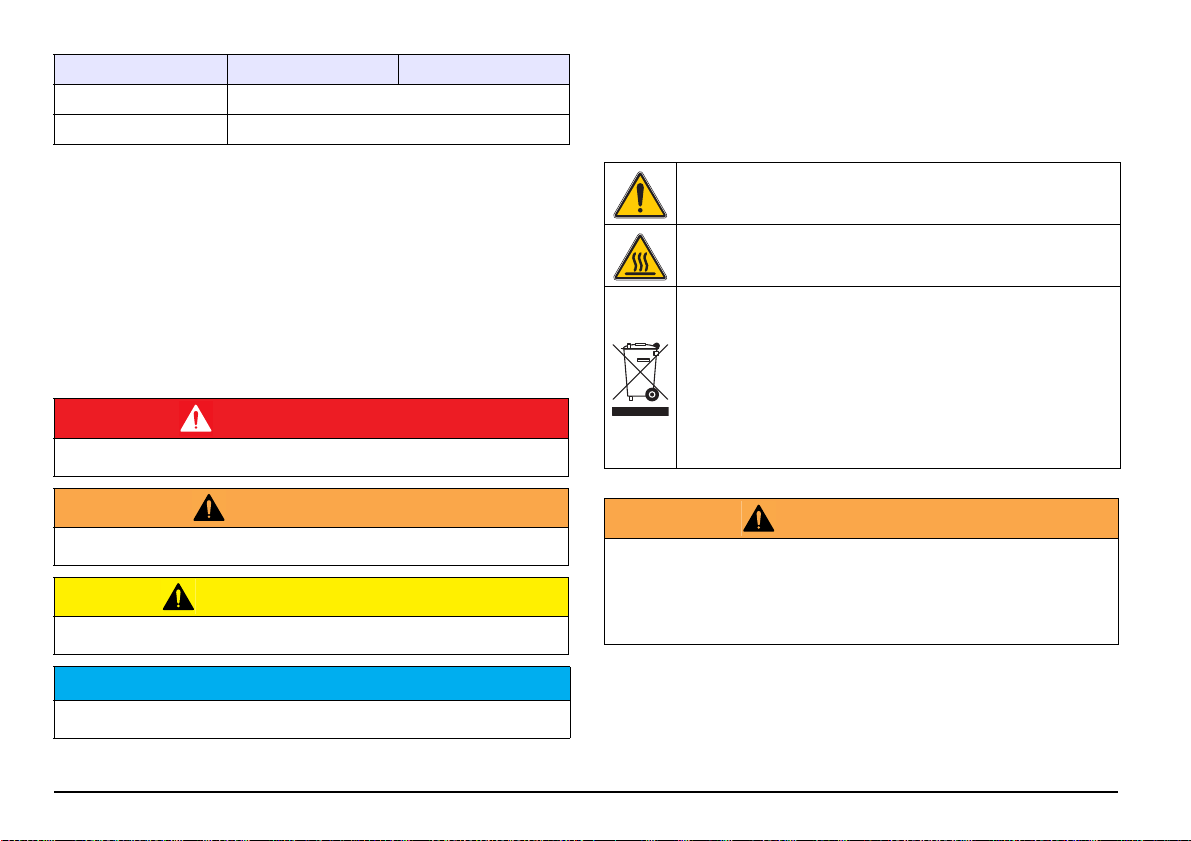
Štítky s bezpečnostními informacemi
Přečtěte si všechny štítky a etikety připojené k zařízení. Při nedodržení
těchto pokynů může dojít k poranění osob nebo poškození přístroje.
Pokud jde o symboly umístěné přímo na zařízení, naleznete
odpovídající varovná upozornění v návodu k použití.
Všeobecné informace
Bezpečnostní informace
Před vybalením, nastavením a uvedením zařízení do provozu si pečlivě
přečtěte celý návod k použití přístroje. Pozorně čtěte zejména všechny
informace týkající se nebezpečí a varování. Nedodržení tohoto kroku
může obsluze způsobit vážná zranění nebo vybavení poškodit.
Pokud přístroj nenainstalujete a nebudete používat v souladu s pokyny
uvedenými v tomto návodu k obsluze, může dojít k porušení ochrany
poskytované tímto přístrojem.
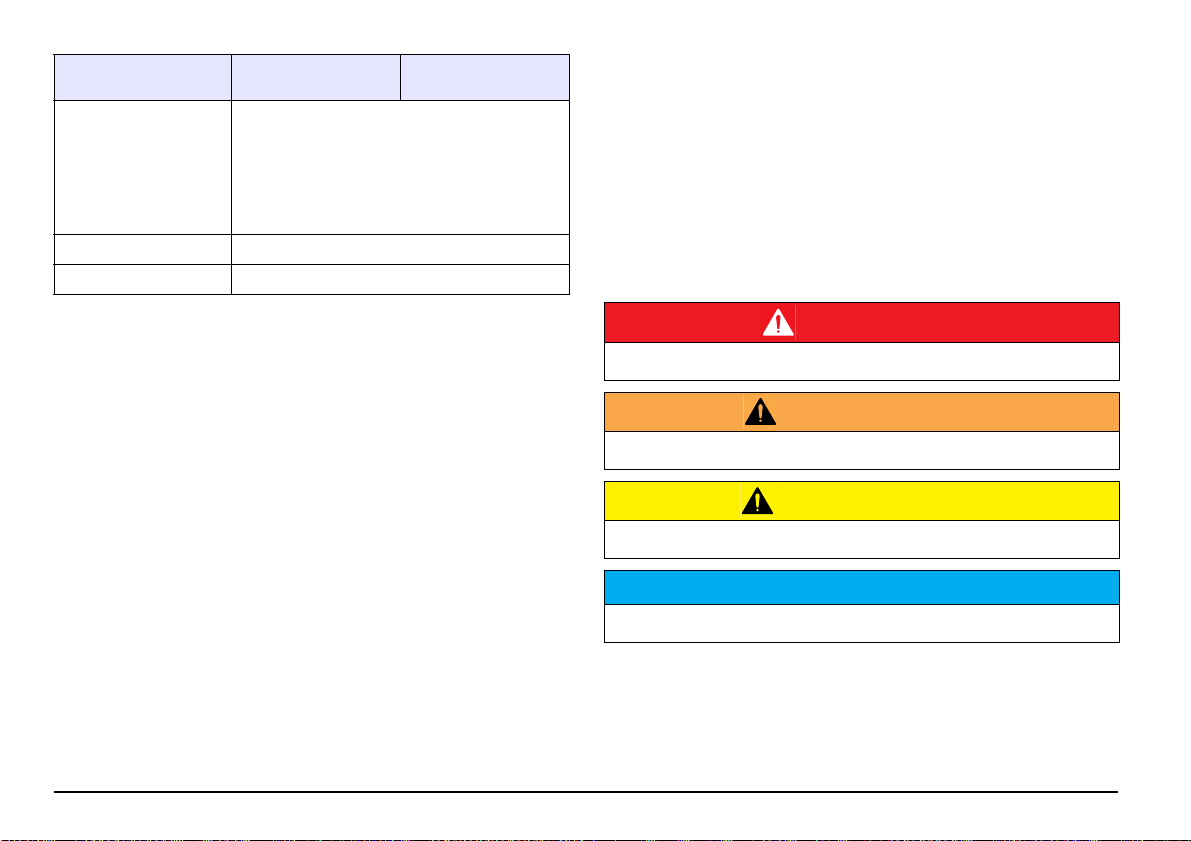
NEBEZPEČ Í
Označuje potenciálně nebezpečné situace, které v případě, že neprovedete
příslušná opatření, vedou k úmrtí nebo vážnému zranění.
VAROVÁNÍ
Označuje možnou nebo hrozící rizikovou situaci, jež může v případě, že jí
nezabráníte, vést k usmrcení nebo vážnému zranění.
UPOZORNĚ NÍ
Označuje možnou rizikovou situaci, jež může vést k drobnému nebo mírnému
zranění.
POZNÁMKA
Označuje situace, v nichž by mohlo dojít k poškození zařízení. Informace, které je
třeba zdůraznit.
Poznámka: Další doplňující informace pro uživatele.
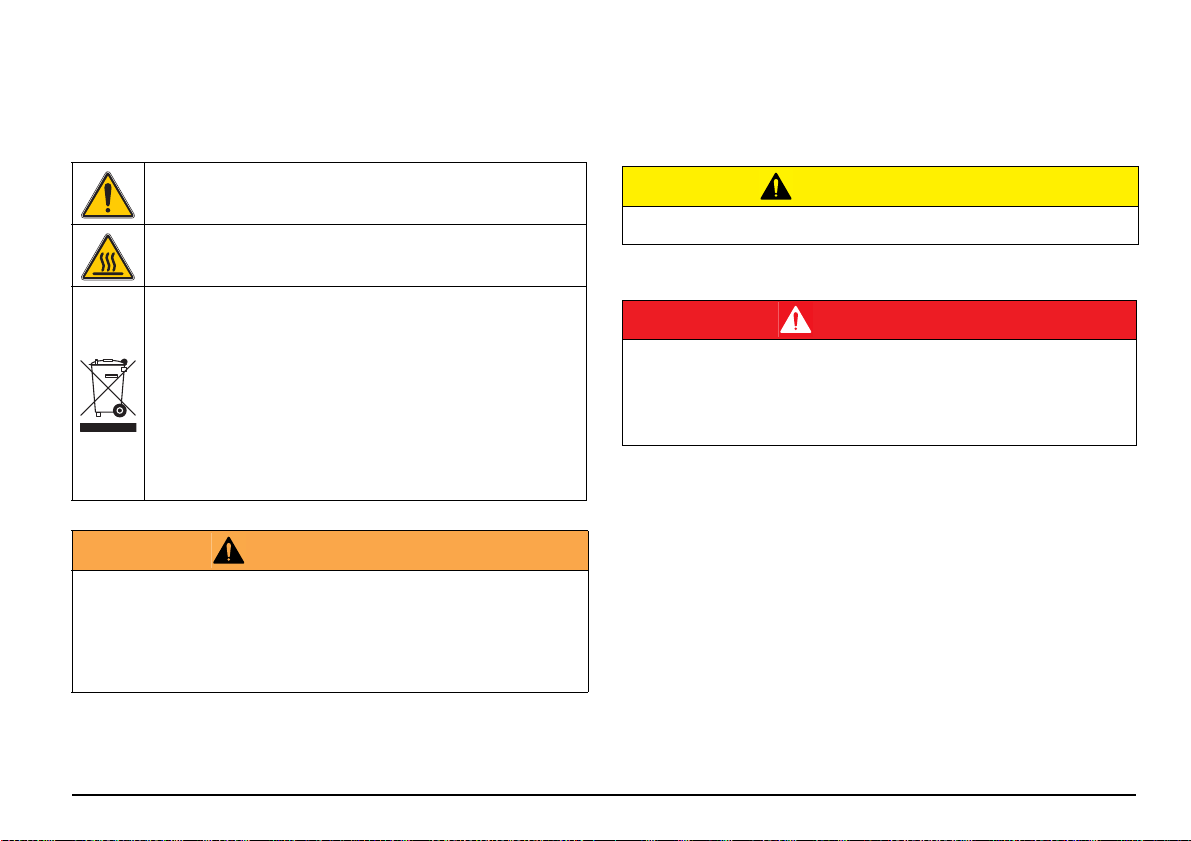
Tento symbol může být umístěn na zařízení a odkazuje na
upozornění týkající se obsluhy nebo bezpečnosti, jež jsou uvedena
v uživatelské příručce.
Tento symbol umístěný na zařízení označuje horké povrchy.
Elektrické zařízení označené tímto symbolem se po 12. srpnu 2005
nesmí likvidovat v evropských systémech domácího nebo veřejného
odpadu. V souladu s místními a vnitrostátními právními předpisy
(směrnice EU2002/96/ES) přebírá výrobce bezplatně odpovědnost za
likvidaci starých zařízení.
Poznámka: Pro vrácení nebo recyklaci kontaktujte prosím
výrobce nebo dodavatele zařízení, který vám poskytne
pokyny k tomu, jak vrátit vysloužilé zařízení, elektrické
příslušenství dodané výrobcem a všechny drobné předměty
k řádné likvidaci.
VAROVÁNÍ
Výrobce není odpovědný za žádné škody vzniklé v důsledku nesprávného použití
nebo využití tohoto výrobku, zejména za přímé, náhodné a následné škody, a
zcela odmítá odpovědnost za tyto škody v rozsahu povoleném platnými zákony.
Uživatel je výhradně zodpovědný za určení kritických rizik aplikace a za instalaci
odpovídajících mechanismů ochrany procesů během potenciální nesprávné
funkce zařízení.
Čeština 4
Page 5
Bezpečnost v okolí zdrojových lamp
Zdrojová lampa pracuje při vysokých teplotách.
Aby nedošlo k úrazu elektrickým proudem, před výměnou lampy odpojte
přístroj od zdroje napájení.
UPOZORNĚ NÍ
Riziko popálení. Před prováděním údržby nebo výměnou nechte lampu (lampy)
nejméně 30 minut vychladnout.
Chemická a biologická bezpečnost
Model LICO 690 se dodává s 26 výpočty hodnoty barev, zatímco model
LICO 620 se dodává s pěti výpočty hodnoty barev (barva jod, barva
Hazen, barva Gardner, barva Saybolt a čísla barev ASTM D 1500).
Model LICO 690 obsahuje kromě měření barvy následující programy a
provozní režimy: režim jedné vlnové délky, režim více vlnových délek,
skenování vlnové délky a režim skenování času. Digitální měření se
zobrazují v rozměrových jednotkách koncentrace, absorbance nebo
% transmitance, takže model LICO 690 je všestranným přístrojem
vhodným pro laboratorní analýzu.
Instalace
Možné nebezpečí při kontaktu s chemickými nebo biologickými látkami.
NEBEZPEČ Í
Manipulace s chemickými vzorky, standardy a reagenciemi může být
nebezpečná.
Seznamte se s nezbytnými bezpečnostními postupy a správnou manipulací
s chemikáliemi ještě předtím, než začnete pracovat, a prostudujte si a dodržujte
všechny relevantní bezpečnostní listy.
Běžný provoz tohoto zařízení může vyžadovat použití chemických látek
nebo biologicky nebezpečných vzorků.
• Před použitím je nutné dodržet všechny bezpečnostní informace
vytištěné na původních obalech roztoků a v bezpečnostním listu.
• Likvidujte všechny spotřebované roztoky v souladu s předpisy a
zákony v dané zemi.
• Zvolte takové ochranné pomůcky, které odpovídají koncentraci a
množství nebezpečného materiálu na příslušném pracovišti.
Přehled výrobku
Přístroje LICO 690 a LICO 620 jsou spektrální fotometry VIS
s rozsahem vlnových délek od 320 do 1 100 nm. Přístroje dokážou
provádět přesnou kolorimetrickou analýzu podle norem ISO/ASTM
prostřednictvím jediného měření a zobrazit výsledky ve formě klasických
barevných systémů, jako jsou například hodnoty barev jod, Hazen nebo
Gardner. Přístroje podporují více jazyků.
Elektrická a požární rizika.
VAROVÁNÍ
Používejte pouze dodané stolní napájení LZV844.
Úlohy popsané v této části příručky smějí provádět pouze kvalifikovaní odborní
pracovníci a musejí přitom dodržet platné místní bezpečnostní předpisy.
Rozbalení přístroje
Spřístroji LICO 690/620 se dodávají následující součásti:
• Spektrofotometr LICO 690/LICO 620
• Kryt proti prachu
• Kryt proti prachu na USB, standardně osazený
• Stolní zdroj napájení s napájecím kabelem
• Kyvetový adaptér Z, nainstalován v rámci standardu
• Základní návod k použití přístroje
• Disk CD-ROM s podrobnými pokyny k obsluze
Poznámka: Pokud některé položky chybí nebo jsou poškozené,
kontaktujte ihned výrobce nebo svého obchodního zástupce.
Čeština 5
Page 6
Provozní prostředí
Chcete-li zajistit normální fungování přístroje a jeho dlouhou životnost,
dodržujte následující body.
• Přístroj bezpečně umístěte na rovnou plochu a dbejte na to, aby
pod ním nebyly žádné předměty.
• Teplota prostředí musí být 10–40 °C (50–104 °F).
POZNÁMKA
Chraňte přístroj před působením extrémních teplot z topných těles a jiných zdrojů
tepla a před přímým slunečním zářením.
• Relativní vlhkost by měla být nižší než 80 %; na zařízení by se
neměla srážet vlhkost.
• Chcete-li předejít přehřátí elektrických součástí, ponechejte nad
horní částí a kolem všech postranních částí mezeru alespoň 15 cm
pro cirkulaci vzduchu.
• Zařízení nepoužívejte ani neskladujte na extrémně prašném,
vlhkém nebo mokrém místě.
• Udržujte povrch přístroje, kyvetový prostor a veškeré příslušenství
po celou dobu čisté a suché. Pokud došlo k postříkání nebo polití
přístroje, ihned odstraňte nastříkané nebo nalité materiály.
Čeština 6
Page 7

Pohled zpředu a zezadu
Obrázek 1 Pohled zpředu a zezadu
1 Port USB typu A 5 Ethernetový port
2 Kryt kyvetového prostoru 6 Port USB typu B
3 Dotykový displej 7 Port USB typu A
4 Tlačítko zapnutí/vypnutí 8 Přípojka pro stolní napájení
Čeština 7
Page 8
Připojení ke zdroji napájení
VAROVÁNÍ
Elektrická a požární rizika.
Používejte pouze dodané stolní napájení LZV844.
1. Připojte napájecí kabel ke stolnímu napájení.
2. Zastrčte kabel stolního napájení na zadní straně přístroje
(Obrázek 1).
3. Zasuňte zástrčku napájecího kabelu do elektrické sítě (100-240 V~/
47–63 Hz).
4. Zapnutím tlačítka napájení vedle displeje aktivujte napájení
(Obrázek 1).
Poznámka: Pokud přístroj nebudete po dlouhou dobu používat, odpojte
jej od napájení.
Poznámka: Ujistěte se, že je používaná elektrická zásuvka dobře
přístupná.
Rozhraní
Přístroje je standardně vybaven třemi porty USB a jedním Ethernetovým
portem. Nacházejí se na přední a zadní straně přístroje (Obrázek 1).
Porty USB typu A slouží ke komunikaci s tiskárnou, paměťovým
zařízením USB nebo klávesnicí. Paměťové zařízení USB se používá
k aktualizaci softwaru přístroje.
Port USB typu B slouží ke komunikaci s počítačem. Pro tento způsob
využití musí být v počítači nainstalován doplňkový software Hach Lange
Online Data.
Kpřipojení několika příslušenství současně lze použít rozbočovač USB.
Poznámka: Kabely USB nesmějí být delší než 3m.
Tyto porty USB umožňují exportovat data do tiskárny nebo počítače a
slouží také k aktualizaci softwaru. Ethernetový port podporuje přenos
dat v reálném čase v místních sítích, systémech LIMS nebo ovladačích
SC. Pro Ethernetový port používejte pouze stíněný kabel (např.STP,
FTP, S/FTP) o maximální délce 20 m.
Tabulka 1 Rozhraní
Rozhraní Popis
USB (typ A)
USB (typ B)
Ethernet
Tento port USB lze použít k připojení tiskárny, paměťového
zařízení USB nebo klávesnice.
Tento port USB je určen pouze pro propojení přístroje a počítače
(je-li nainstalován příslušený software).
Ethernetový port je určen pro přenos dat do počítače bez
instalovaného softwaru nebo v místní síti . Pro Ethernetový port
používejte pouze stíněný kabel (např. STP, FTP, S/FTP) o
maximální délce 20 m.
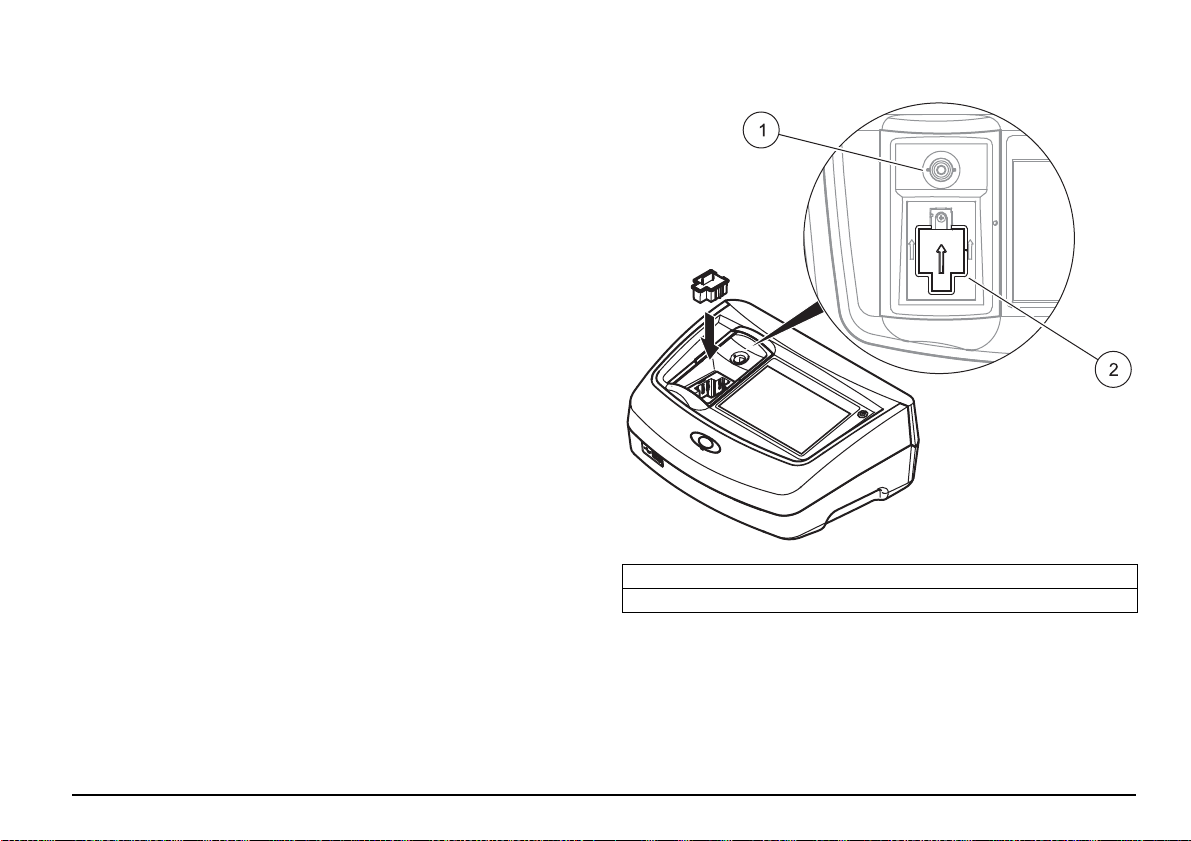
Kyvetové prostory a kyvetové adaptéry
Kyvetové prostory a adaptér
Otevřete kyvetové prostory posunutím kyvetového prostoru doleva.
Kryt se posune dolů na stranu vedle kyvetových prostorů.
Poznámka: Pokud jsou mezi jednotlivými použitími dlouhé intervaly,
zavřete kryt kyvetového prostoru, aby byla optika přístroje chráněna před
prachem a nečistotami.
Přístroj je vybaven dvěma kyvetovými prostory (Obrázek 2). K měření
lze použít pouze jeden typ kyvety současně.
Kyvetový prostor (1) pro:
• 11 mm kulaté kyvety
Poznámka: Vložte kyvetový adaptér Z do kyvetového prostoru (2).
Kyvetový prostor (2) pro:
V kyvetovém prostoru (2) lze použít následující typy kyvet:
• Bez kyvetového adaptéru v kyvetovém prostoru (2) můžete vkládat
50 mm kyvety.
• S kyvetovým adaptérem Z: 10 mm hranaté kyvety.
Poznámka: Tyto kyvety je nutné vkládat pomocí kyvetového
adaptéru Z.
Čeština 8
Page 9
Poznámka: Vpřípadě značné kontaminace můžete kyvetový prostor
vyměnit (2).
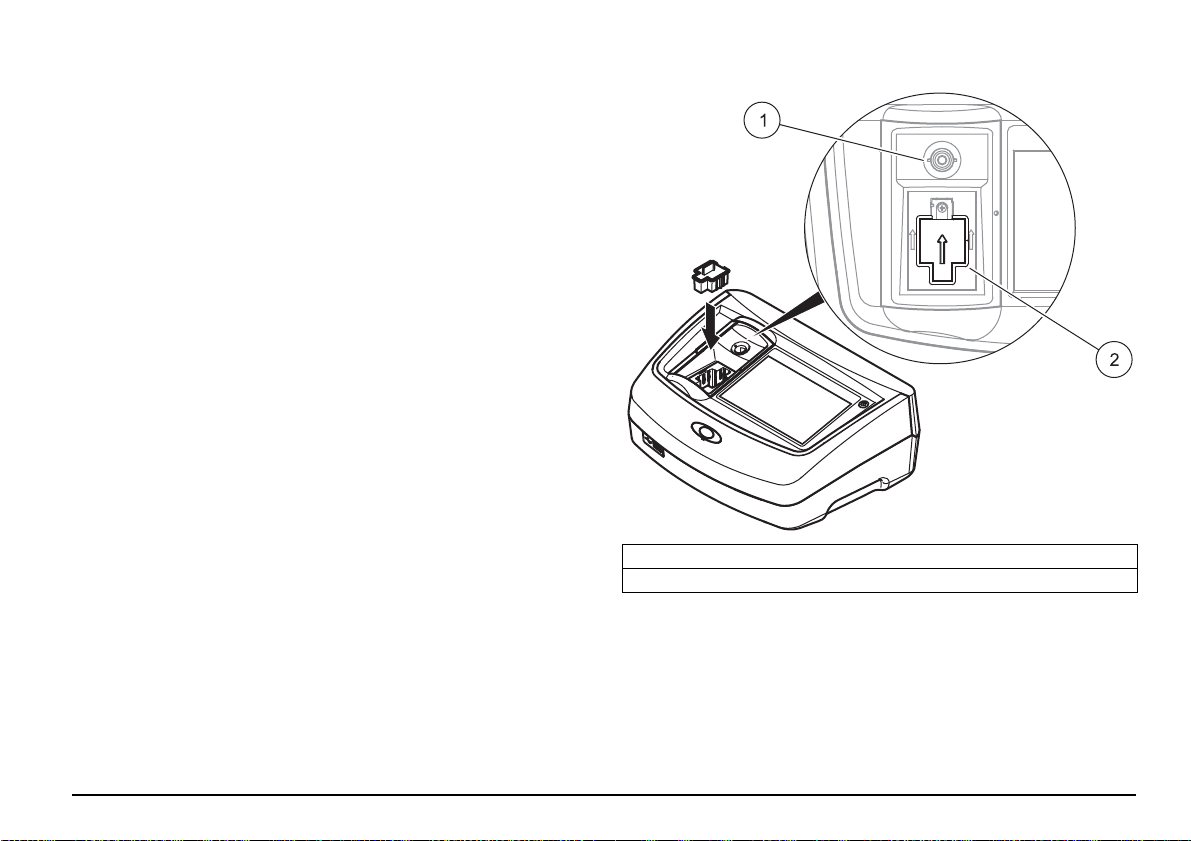
Instalace kyvetového adaptéru Z
1. Otevřete kyvetový prostor.
2. Vložte kyvetový adaptér Z do kyvetového prostoru (2) tak, aby
šipka na kyvetovém adaptéru ukazovala ke kyvetovému prostoru
(1) (Obrázek 2).
Poznámka: Šipka na kyvetovém adaptéru ukazuje směr dráhy
světelného paprsku.
Obrázek 2 Kyvetové prostory a kyvetový adaptér Z
1 Kyvetový prostor (1) pro kulaté kyvety
2 Kyvetový prostor (2) pro hranaté kyvety, instalovaný kyvetový adaptér Z
Čeština 9
Page 10
Spuštění
POZNÁMKA
Všechna zobrazení displeje v tomto návodu k použití odpovídají přístroji
LICO 690. Zobrazení na displeji přístroje LICO 620 se mohou lišit.
Zapněte přístroj, proces spouštění
1. Připojte napájecí kabel k elektrické síti.
2. Zapněte přístroj stisknutím tlačítka napájení vedle displeje.
3. Přístroj automaticky zahájí proces spouštění v délce přibližně
45 sekund. Na displeji se zobrazí logo výrobce. Na závěr
spouštěcího procesu zazní melodie.
Poznámka: Počkejte přibližně 20 sekund, než přístroj znovu zapnete,
aby se nepoškodily elektronické a mechanické části přístroje.
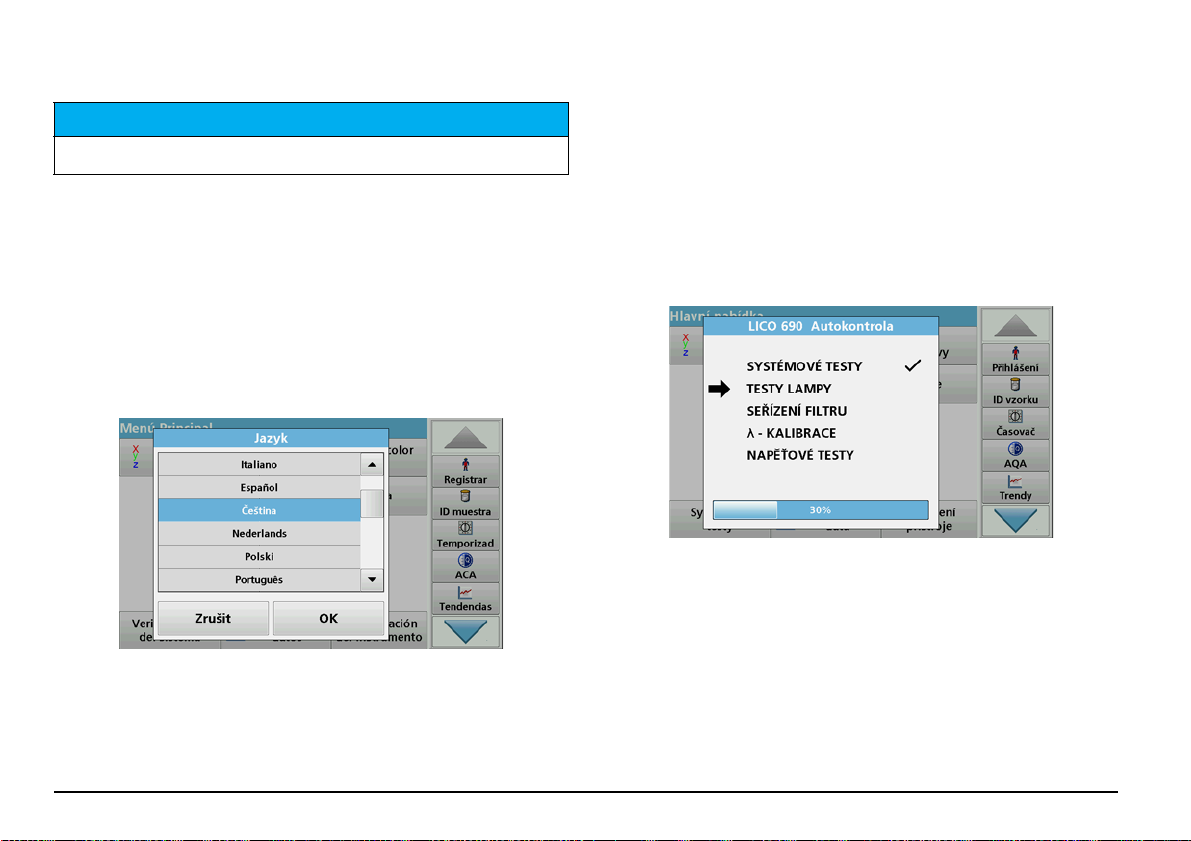
Výběr jazyka
Software podporuje více jazyků. Při prvním zapnutí přístroje se po
dokončení procesu spouštění automaticky zobrazí obrazovka volby
jazyka.
1. Vyberte požadovaný jazyk.
2. Stiskněte OK pro potvrzení zvoleného jazyka. Následně se
automaticky spustí autokontrola.
Změna nastavení jazyka
Přístroj pracuje ve vybraném jazyce, dokud se volba nezmění.
1. Zapněte přístroj.
2. Během spouštěcího procesu se dotkněte libovolného místa na
obrazovce, nevzdalujte prst, dokud se nezobrazí možnost volby
jazyka (přibližně 45 sekund).
3. Vyberte požadovaný jazyk.
4. Stiskněte OK pro potvrzení zvoleného jazyka. Následně se
automaticky spustí autokontrola.
Autokontrola
Při každém zapnutí napájení přístroje se spustí testovací program.
Během tohoto programu (přibl. 25 sekund) mohou být prováděny testy
systému, testy lamp, kalibrace filtru, kalibrace vlnové délky a testy
napětí. Každý správně proběhlý test se označí odpovídajícím
způsobem.
Poznámka: Chybové zprávy během testovacího programu naleznete
v části Řešení problémů.
Čeština 10
Page 11
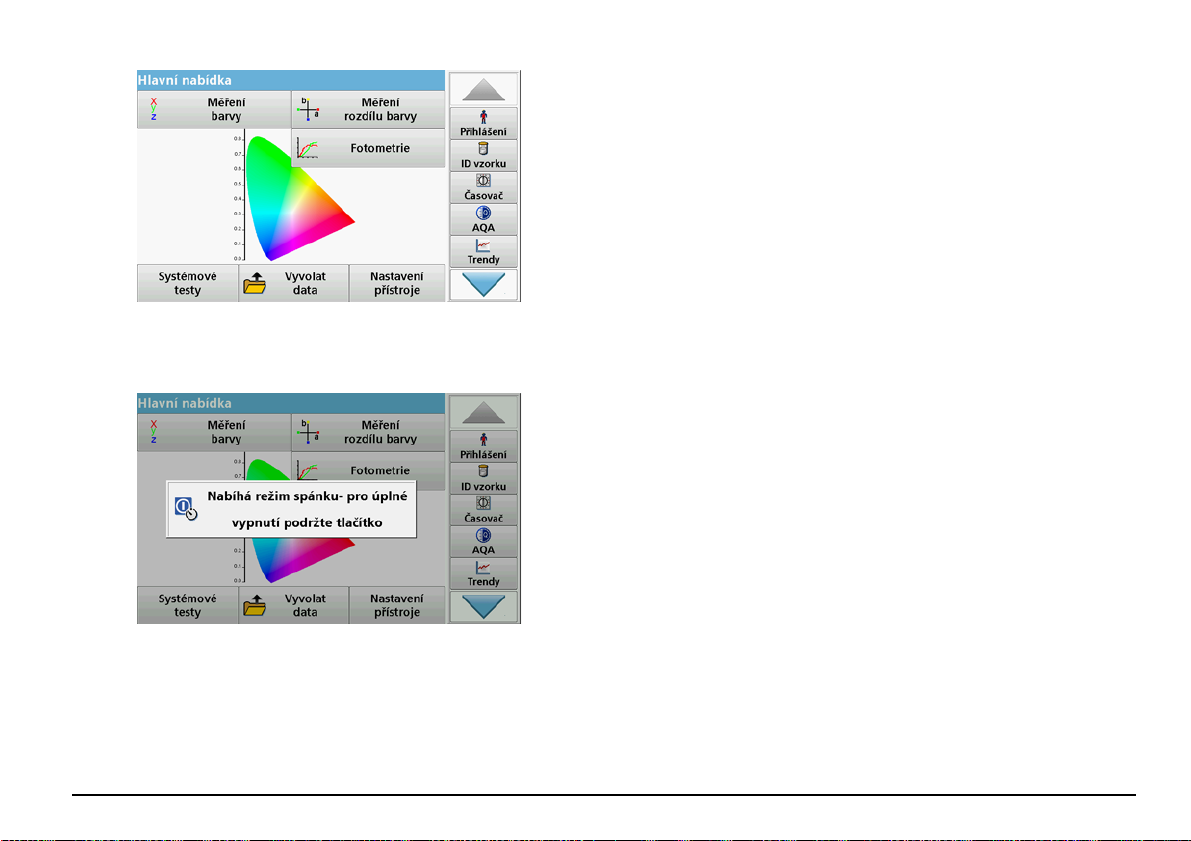
Po dokončení diagnostiky se zobrazí hlavní nabídka.
Režim spánku
Přístroj lze přepnout do režimu spánku.
1. Krátce stiskněte tlačítko napájení vedle displeje.
Zobrazí se zpráva "Režim spánku". Poté se displej automaticky
vypne.
2. Zapnete jej stisknutím tlačítka napájení vedle displeje.
Automaticky se spustí autokontrola.
Následně je přístroj připraven k použití.
Vypnutí přístroje
1. Stiskněte tlačítko napájení vedle displeje přibližně na 5 sekund.
Standardní programy
Přehled
Tipy pro použití dotykové obrazovky
Na dotyk reaguje celá plocha obrazovky. Chcete-li vybrat volbu,
klepněte nehtem, bříškem prstu, gumou nebo zvláštním stylusem.
Nedotýkejte se displeje ostrými předměty, například špičkou
kuličkového pera.
• Na povrch obrazovky nepokládejte žádné předměty, mohli byste ji
poškrábat!
• Tlačítka, slova nebo ikony vyberete dotykem.
• Chcete-li se v dlouhých seznamech rychle pohybovat směrem
nahoru nebo dolů, použijte posuvníky vpravo. Dotkněte se
posuvníku a posouváním se pohybujte v seznamu nahoru nebo
dolů.
• Jedním dotykem položku v seznamu zvýrazníte. Po úspěšném
výběru položky se její text zobrazí inverzně (světlý text na tmavém
pozadí).
Čeština 11
Page 12
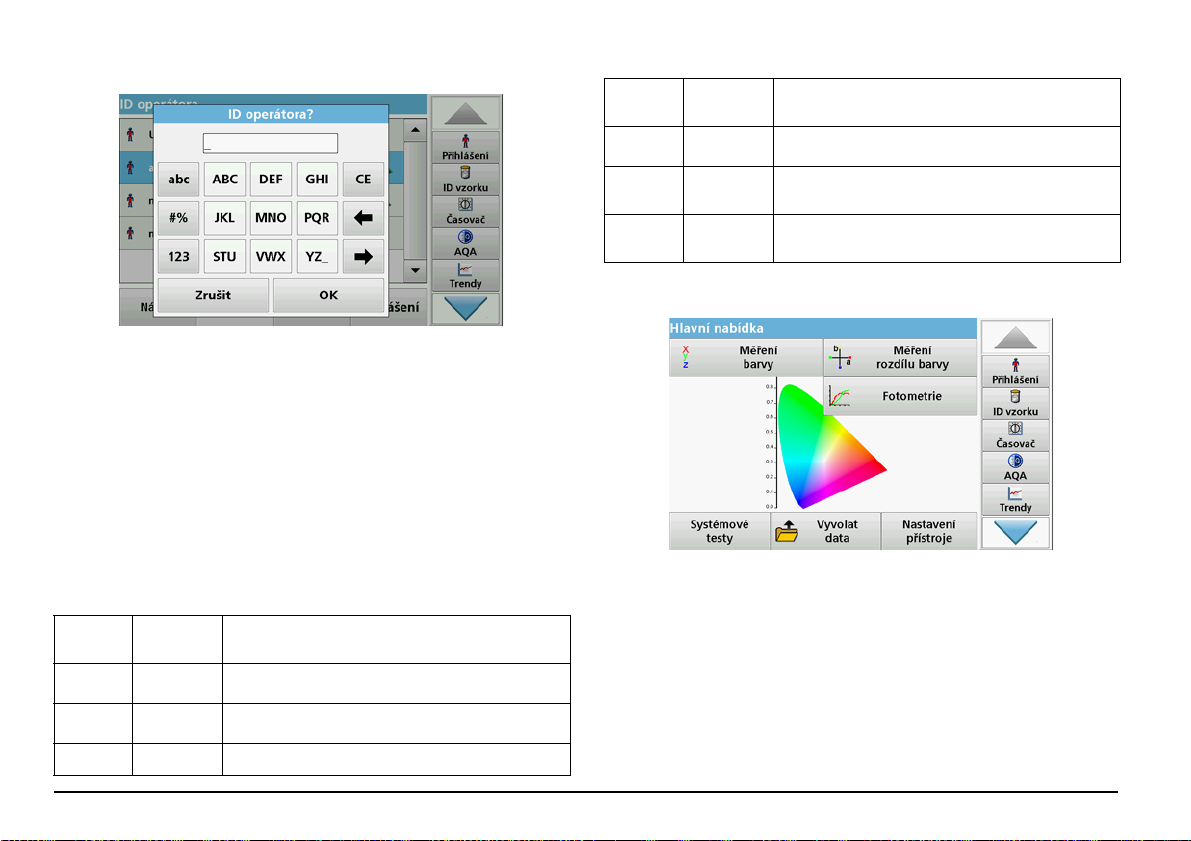
Používání alfanumerické klávesnice
Tento displej se používá pro zápis písmen, čísel a znaků dle potřeby při
programování přístroje. Nedostupné možnosti jsou zakázány (světle
šedá). Ikony v pravé a levé části obrazovky jsou popsány v části
Tabulka 2.
Klávesnice uprostřed se mění podle zvoleného režimu zadávání.
Opakovaně tiskněte tlačítko, dokud se na obrazovce nezobrazí
požadovaný znak. Mezeru lze zadat pomocí podtržítka na tlačítku YZ_.
Volbou položky Zrušit zrušíte zadání nebo volbou položky OK potvrdíte
zadání.
Poznámka: Můžete také použít USB klávesnici (s americkým
rozvržením klávesnice) nebo ruční USB skener čárového kódu.
Tabulka 2 Alfanumerická klávesnice
Ikona/
tlačítko
ABC/abc Abecední
# % Znaky
123 Numerická Pro zadávání obvyklých čísel..
Popis Funkce
Přepne režim zadávání znaků velkými a malými
písmeny.
Můžete zapisovat interpunkci, znaky a číselný horní
nebo dolní index..
Tabulka 2 Alfanumerická klávesnice
Ikona/
tlačítko
CE
Šipka
vlevo
Šipka
vpravo
Popis Funkce
Vymazání
zápisu
Zpět Smaže aktuální znak a vrátí se o jednu pozici zpět.
Další Přejde na další mezeru v zadání.
Vymažte záznam.
Hlavní nabídka
V nabídce „Hlavní nabídka“ lze vybírat různé režimy. Následující tabulka
obsahuje stručný popis jednotlivých možností nabídky.
Na pravé straně obrazovky je panel nástrojů. Stisknutím můžete
aktivovat různé funkce.
Odběr a příprava vzorků
Odeberte reprezentativní vzorek z produktu, který chcete měřit,
v souladu s normou DIN EN ISO 15528 (nebo ASTM D3925-02).
Pokud je materiál jakkoli zakalený, odstraňte zákal filtrací, odstředěním,
ohřevem, ultrazvukovým ošetřením nebo jinými vhodnými prostředky.
Čeština 12
Page 13
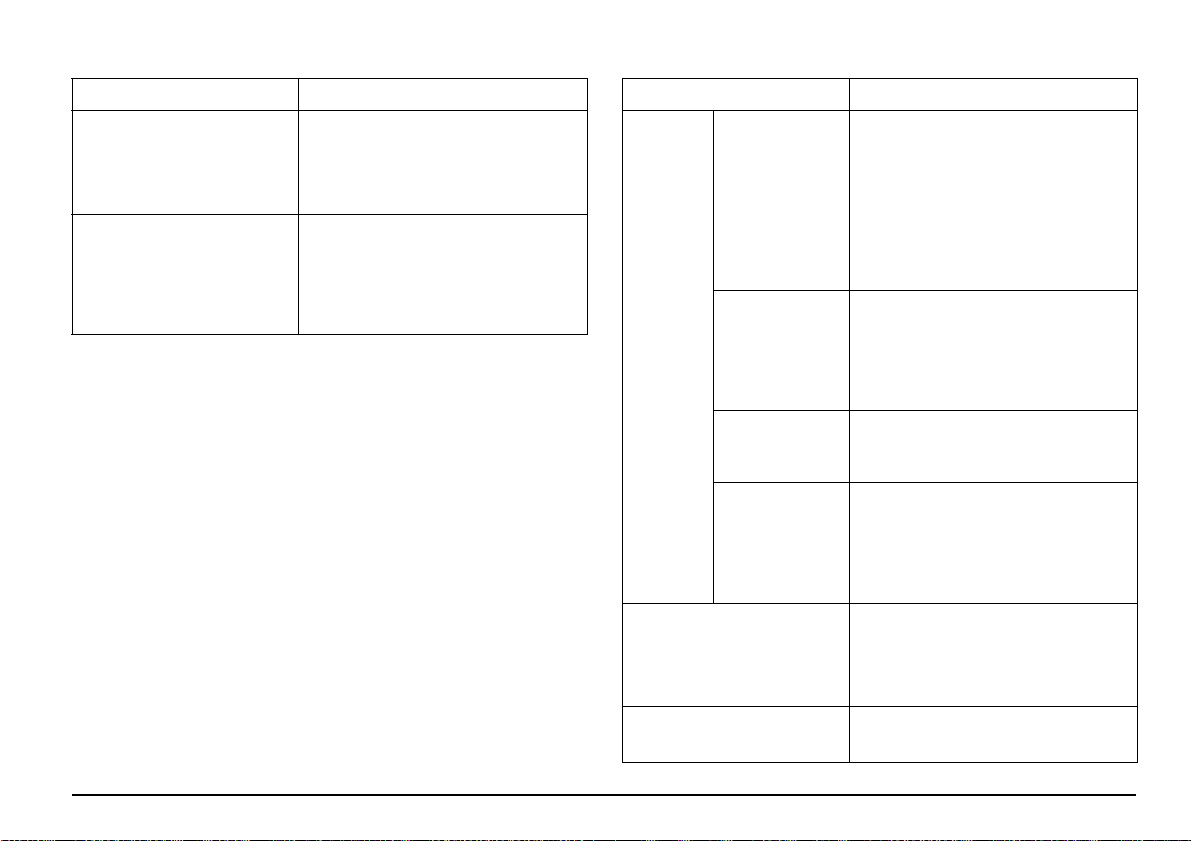
Tabulka 3 Možnosti hlavní nabídky
Možnost Funkce
REŽIM MĚŘENÍ BAREV slouží ke stanovení
hodnot barev, jako je například Hazen,
Měření barvy
Měření rozdílu barvy
(pouze přístroj LICO 690)
Gardner a Saybolt. Přístroj LICO 690 nabízí
také trojrozměrné, absolutní kolorimetrické
hodnoty, a také stupnice barev CIE L*a*b*,
Hunter Lab nebo Evropského lékopisu.
Režim MĚŘENÍ ROZDÍLU BARVY slouží ke
stanovení kvantitativního rozdílu barvy mezi
referencí (R) a vzorkem (P) v trojrozměrném
barevném prostoru (CIE L*a*b* nebo Hunter
Lab). V tomto režimu je k dispozici
doplňková referenční paměť až pro
100 referencí.
Tabulka 3 Možnosti hlavní nabídky
Možnost Funkce
Při jedné vlnové délce jsou měřeny:
Hodnoty absorbance: Měří se světlo
pohlcené vzorkem v jednotkách absorbance.
Jedna vlnová
délka
Fotometrie
(pouze
přístroj
LICO 690)
Systémové testy
Vyvolání dat z měření
Vícenásob. vlnová
délka
Časový průběh
Skenování vlnové
délky
Hodnoty transmitance (%): Transmitance
měří procento původního světla, které projde
vzorkem a dosáhne detektoru.
Hodnoty koncentrace: Umožňuje zadáním
koeficientu koncentrace převést naměřené
hodnoty absorbance na hodnoty
koncentrace.
V režimu více vlnových délek se při
maximálně čtyřech vlnových délkách měří
absorbance (Abs) nebo procentuální
hodnota transmitance (%T) a vypočítává
rozdíl absorbance a vztahy absorbance.
Umožňuje také jednoduchý převod na
koncentraci.
Časové skenování zaznamenává
absorbanci nebo procentuální míru
transmitace při zvolené vlnové délce v
definovaném časovém úseku.
Skenování vlnové délky zobrazuje, jak je
světlo ze vzorku absorbováno v
definovaném spektru vlnových délek. Tato
funkce se používá pro určení vlnové délky,
při které se naměří nejvyšší hodnota
absorbance. Průběh absorbance se bě
skenování zobrazuje graficky.
Nabídka „Systémové kontroly“ obsahuje
celou řadu možností, jako jsou například
informace o přístroji, optické kontroly, záloha
přístroje, servisní intervaly, aktualizace
přístroje, nastavení pro zajištění kvality
analýzy a historie lampy.
Uložená data lze načíst, filtrovat, odeslat do
tiskárny, na paměťovou kartu nebo do
počítače a lze je i odstranit.
hem
Čeština 13
Page 14
Tabulka 3 Možnosti hlavní nabídky
Možnost Funkce
Tato nabídka slouží ke konfiguraci
specifických uživatelských nastavení nebo
Nastavení přístroje
Vzorky s pevným podílem před měřením ohřejte, aby se pevné materiály
rozpustily v kapalině. Příprava nesmí ve vzorku způsobit žádné
chemické změny.
Dbejte na to, aby během měření nebyly ve vzorku žádné bublinky.
Měříte-li rozdíl barvy, jsou k dispozici tři typy kyvet, které se liší použitým
materiálem (sklo, PS a PMMA) a délkou optické dráhy (10 mm, 11 mm a
50 mm). Naplňte kyvetu přibližně 2 cm vzorku. Světlo prochází kyvetou
přibližně 0,5 cm až 1,5 cm nad dnem kyvety.
Program automaticky vypočítá hodnoty barvy jod, Hazen, Gardner,
Saybolt, Klett a ASTM D 1500 a zobrazí hodnoty barev. Bere se v úvahu
použitý typ kyvety.
Pro kulaté jednorázové skleněné kyvety 11 mm je k dispozici suchý
termostat. Suchý termostat ohřeje kyvetu na jakoukoli teplotu v rozsahu
mezi okolní teplotou a 150 °C (302 °F).
specifických nastavení procesu: ID obsluhy,
data a času, nastavení zabezpečení,
ukládání dat, zvuku, počítače a tiskárny a
správy napájení.
POZNÁMKA
Vzorky musí být čisté a nezkalené. Pokud má produkt formu pasty nebo pevné
látky a nelze jej změřit přímo, je nutné produkt před přenesením do kyvet nebo cel
na vzorky rozpustit. Dbejte na to, aby kyvety nebo cely na vzorky neobsahovaly
žádné vzduchové bubliny.
• Kyvetu nebo celu na vzorky vždy držte těsně pod horní částí, abyste
nezanechali žádné otisky prstů vzóně měření na kyvetě nebo cele
na vzorky. Pro vložení vzorků do kyvet nebo cel na vzorky
používejte vhodné pipety.
• Vzorky přidávejte do kyvet nebo cel na vzorky pomalu, aby se na
stěně kyvety nebo cely na vzorky a ve vzorku netvořily vzduchové
bubliny. Vzduchové bubliny způsobují falešné odečty.
• Pokud dojde k zachycení vzduchových bublin, odstraňte je
ohřevem, vakuově
prostředky.
• Než kyvety nebo cely na vzorky vložíte do kyvetového prostoru,
důkladně očistěte jejich vnější povrch.
, ultrazvukovým ošetřením nebo jinými vhodnými
POZNÁMKA
Před použitím jednorázových kyvet nebo cel na vzorky vyrobených z PS
(polystyrenu) nebo PMMA (polymetyl metakrylátu), ujistěte se, že nedojde ke
zničení kyvet nebo cel na vzorky působením vzorku. Jinak by se mohl poškodit
kyvetový prostor.
Měření barvy
Pro přesnost měření barvy je mimořádně důležitá správná příprava
vzorku. Abyste zajistili přesné měření, dodržujte následující pokyny
kpřípravě vzorku:
• Kyvety nebo cely na vzorky ihned po použití vyčistěte.
• Pro měření používejte opticky preferované vzorky. Ujistěte se, že
jsou kyvety nebo cely na vzorky čisté a nevykazují žádné známky
opalizace.
• Kapalinu lijte do kyvety pomalu, aby ve vzorku nevznikaly
vzduchové bubliny.
Čeština 14
Page 15
Režim měření barvy slouží ke stanovení absolutních hodnot barvy
ve stupnici barev Hazen, Gardner, CIE L*a*b* nebo Evropského
lékopisu.
Pro jednotlivé typy kyvet (kulatá kyveta 11 mm a hranaté kyvety 10 a
50 mm ) se používá samostatný záznam kalibračních dat.
Je možné kalibrovat přístroj pomocí jednoho, dvou nebo tří typů kyvet
nebo cel na vzorky a používat tyto různé typy kyvet nebo cel na vzorky
současně.
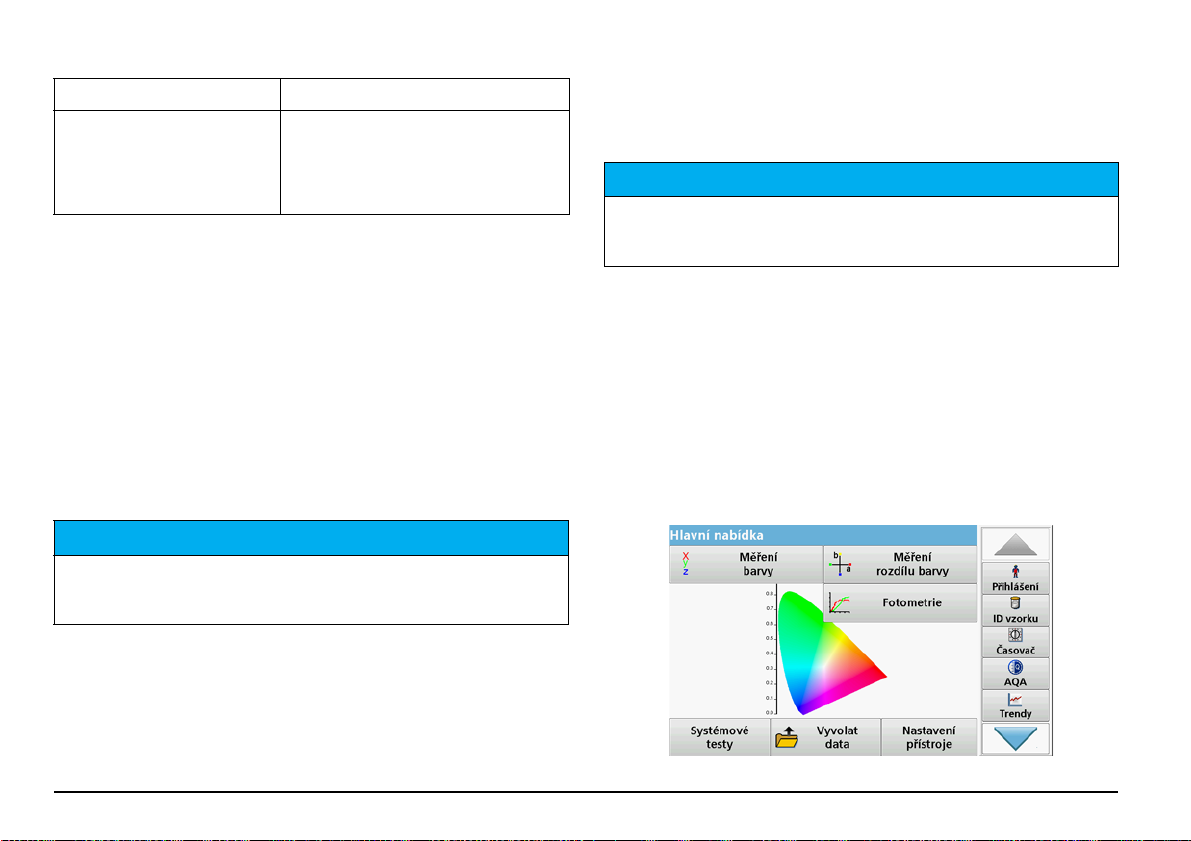
Chcete-li používat hranatou kyvetu 10 mm a 11 mm kulaté kyvety, je
nutné do kyvetového prostoru (2) vložit adaptér Z. Pro měření pomocí
50 mm hranatých kyvet je nutné adaptér vyjmout.
Provádění měření barvy
1. Stiskněte možnost Měření barvy.
2. Vložte kyvetu nebo celu na vzorky s destilovanou vodou za
provedení kalibrace.
Poznámka: Kalibraci vždy provádějte velmi pečlivě, protože nesprávná
kalibrace může vést k nepřesným výsledkům měření.
3. Kalibrace se spustí automaticky, jakmile přístroj detekuje kyvetu.
Typ použité kyvety nebo cely na vzorky a přesný postup kalibrace
se zobrazuje v samostatném okně.
Čeština 15
Page 16
4. Po kalibraci se vpravo nahoře zobrazí rozměr kyvety.
Poznámka: Po kalibraci můžete jako vzorek znovu změřit kyvetu
s destilovanou vodou.
Zobrazené naměřené hodnoty by se měly shodovat s ukazateli
nezbarvené barvy (např. Hazen = 0, Gardner = 0,0, CIE
L*a*b* = 100,0, 0,0, 0,0 apod.)
5. Vložte testovací kyvetu.
Automaticky se spustí měření.
Zobrazí se výsledek výpočtu barvy.
Poznámka: Pruh vpravo od výsledku zobrazuje poměr výsledku
k rozsahu měření.
6. Při dalším měření vyjměte kyvetu a vložte další kyvetu se vzorkem
nebo opětovným stisknutím možnosti Načítání znovu proveďte
měření stejného vzorku.
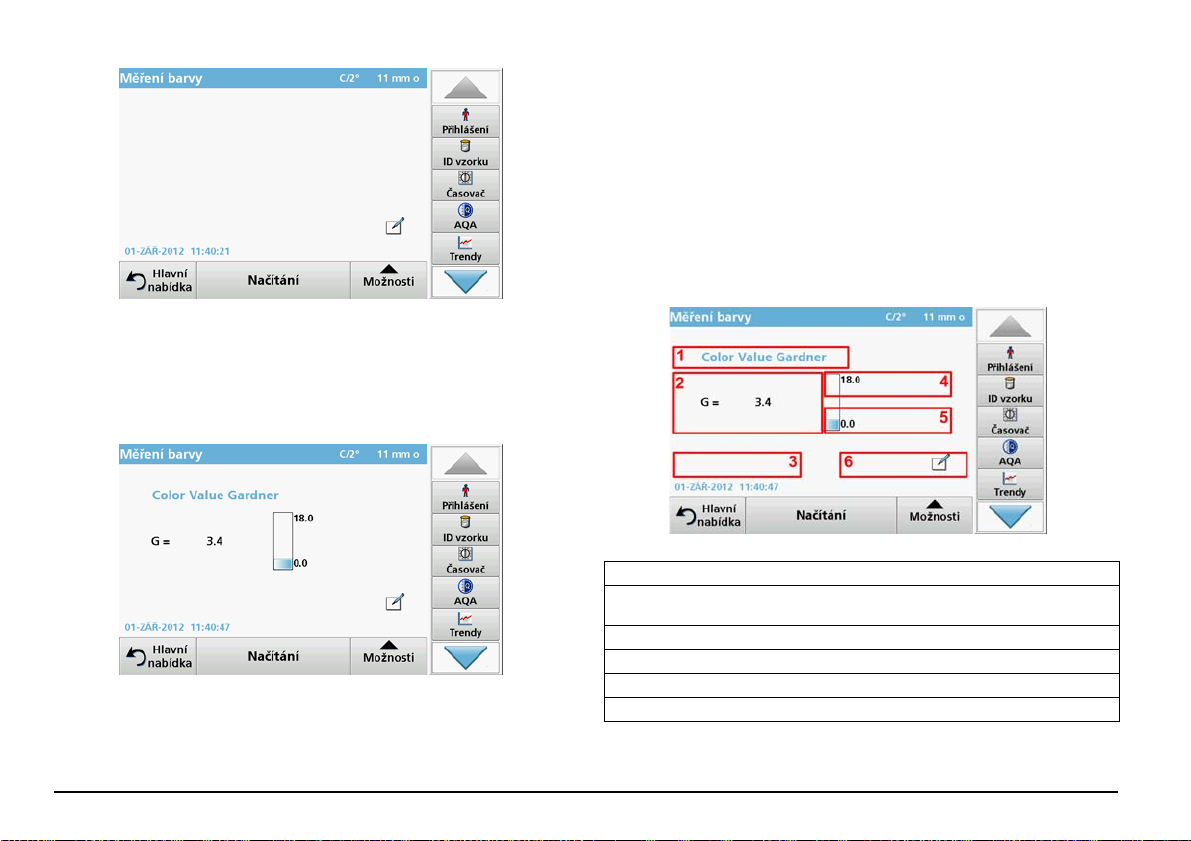
Oblasti citlivé na dotyk v režimu měření barvy
Vrežimu měření barvy jsou k dispozici oblasti citlivé na dotyk, které
zprostředkovávají přímý přístup k různým možnostem nabídky.
Obrázek 3 Oblasti citlivé na dotyk v režimu měření barvy
1 Otevřete nabídku Výběr hodnoty barvy a vyberte stupnici pro zobrazení.
2 Změňte stupnici barvy zobrazenou vedle systému barev, který je vybrán
v seznamu stupnic barev ID operátora.
3 Otevřením možnosti ID vzorku změňte nebo přidejte ID vzorku.
4 Změňte hodnotu Horní hranice stupnice barev.
5 Změňte hodnotu Dolní hranice stupnice barev.
6 Otevřením možnosti Komentáře můžete zadat komentář.
Nastavení možností parametrů
Stisknutím nabídky Možnosti nastavte parametr.
Čeština 16
Page 17
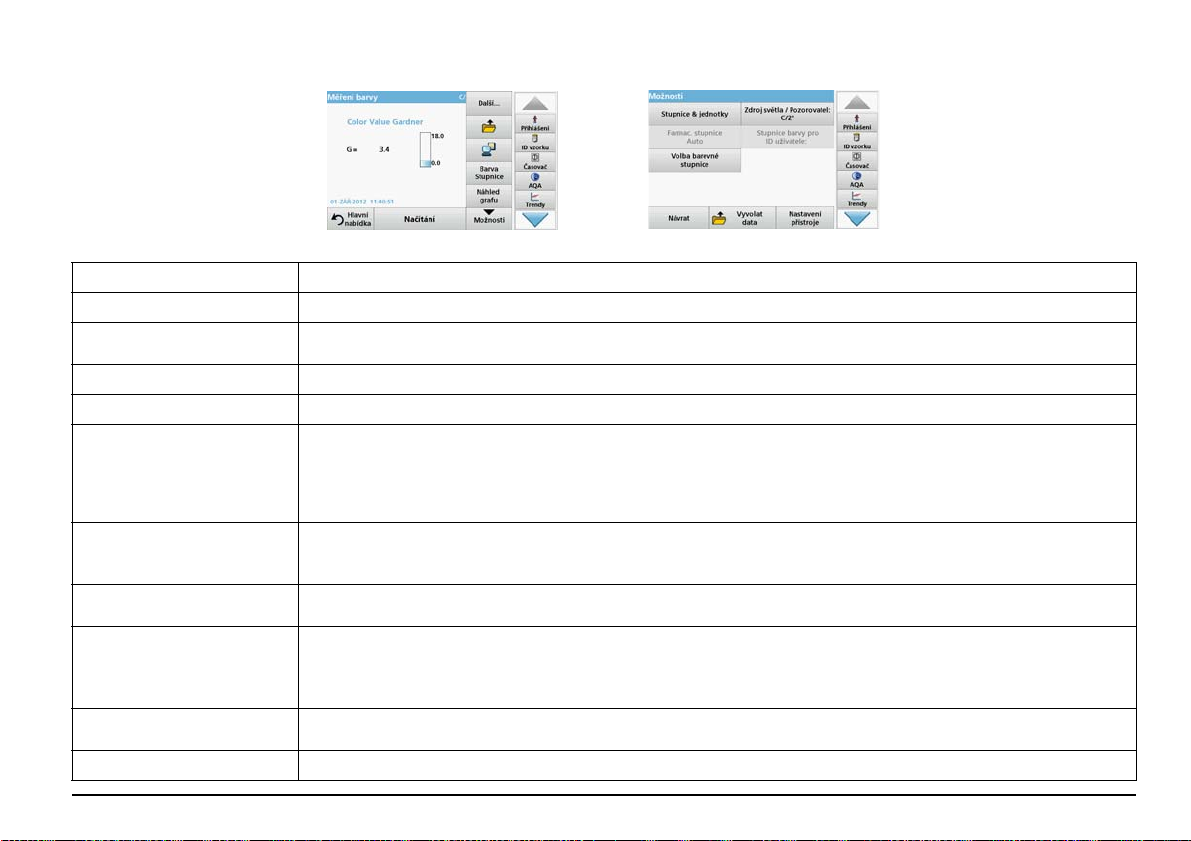
Tabulka 4 Možnosti měření barvy
Možnosti Popis
Další Další možnosti
Ikona uložení
Ikona Odeslat data Chcete-li odesílat data do počítače, do paměťového zařízení USB (USB A) nebo do sítě.
Stupnice barev Výběr stupnice barev
Náhled grafu
Náhled tabulky
Náhled hodnoty
Stupnice & jednotky
Ph.Eur.: Auto
Výběr stupnice barvy
Zdroj světla / Pozorovatel: C/2°
Stupnice barvy pro ID operátora Jednotlivý výběr stupnice barvy pro ID operátora.
Symbol: Uložit data, je-li zvoleno Nastavení přístroje > Nastavení protokolu dat > Autom.ukládání: Vypnuto .
Symbol: Vyvolat data, je-li zvoleno Nastavení přístroje > Nastavení protokolu dat > Autom.ukládání: Zapnuto .
NÁHLED GRAFU zobrazuje spektrální graf transmitance nebo graf absorbance.
Poznámka: Náhled grafu se aktivuje po první naměřené hodnotě.
NÁHLED TABULKY zobrazuje hodnoty spektrální transmitance T% od 380 nm do 720 nm.
NÁHLED HODNOTYzobrazuje výsledek posledního výpočtu barev.
JEDNOTKY: Slouží k výběru absorbance nebo transmitance.
STUPNICE: V automatickém režimu Stupnice se osa y automaticky upravuje, aby se zobrazoval celý sken.
Ruční režim Stupnice umožňuje zobrazit části skenu.
Evropský lékopis
Vyberte možnost AUTOMAT. nebo VYŽADOV. STUPNICE
Lze definovat 3 různé kombinace stupnice barev s až 3 různými stupnicemi barev pro zobrazení výsledku.
Výběr 1: Č. barvy Klett + Index žlutosti
Výběr 2: Č. barvy Klett + ADMI Barva + Index žlutosti
Výběr 3: Index žlutosti + jednotlivá transmitance
Zdroj světla: vyberte C, A nebo D65
Pozorovatel: 2° nebo 10°
Čeština 17
Page 18
Řešení problémů
Zobrazené chyby Definice Rozlišení
Při nahrávání dat přístroje se vyskytla chyba.
Při načítání z USB paměti se vyskytla chyba.
Při zápisu hodnot do USB paměti se vyskytla
chyba.
Zkontrolujte aktuální aktualizační soubor. Chyba během aktualizace. Zkontrolujte USB paměť.
Obraťte se na zákaznickou podporu. Chyba během aktualizace. Obraťte se na výrobce nebo národního zástupce.
Zkontrolujte konfiguraci sítě. Zkontrolujte nastavení sítě.
Zkontrolujte připojení. Zkontrolujte nastavení sítě.
Zavřete kryt. Uzavřete kryt kyvetového prostoru.
Vložte USB paměť. Vložte USB paměť do portu USB A na přístroji.
Zkontrolujte připojení a obraťte se na správce. Chyba nastavení sítě nebo FTP
Chybí soubor pro aktualizaci přístroje. Chyba během aktualizace. Zkontrolujte USB paměť
Soubor pro aktualizaci přístroje je vadný. Chyba během aktualizace. Uložte znovu aktualizační soubor a opakujte postup.
Doporučujeme provést úplnou kontrolu systému Selhala kontrola na prázdný kyvetový prostor.
Neplatné zadání! Heslo je nesprávné
Absorbance > 3,5! Naměřená absorbance překračuje hodnotu 3,5 Zřeďte vzorek a proveďte nové měření
Barva = *** Hodnota barvy mimo rozsah měření.
Chyba při volání místní adresy IP.
Nastavení sítě: klient DHCP nemá spojení se serverem
DHCP
Restartujte proces nebo se obraťte na výrobce či
národního zástupce.
Restartujte proces nebo se obraťte na výrobce či
národního zástupce.
Restartujte proces nebo se obraťte na výrobce či
národního zástupce.
Zkontrolujte nastavení sítě nebo se obraťte na výrobce
či národního zástupce.
.
Vypněte a potom znovu zapněte přístroj. Pokud test
systému není úspěšný, obraťte se na výrobce či
národního zástupce.
Zapomněli jste heslo?
Obraťte se na výrobce či národního zástupce.
Rozpusťte vzorek nebo vyberte vhodnou stupnici
barvy.
Zadejte znovu adresu IP.
Čeština 18
Page 19
Zobrazené chyby Definice Rozlišení
Chyba během nastavování výchozí brány.
Chyba během nastavování síťové jednotky! Chyba během nastavování sítě Zkontrolujte nastavení.
Chyba během nastavování masky podsítě.
Chyba při kopírování z USB paměti. Chyba během aktualizace
Chyba v FTP připojení. Chyba FTP Zkontrolujte, zda je přístroj připojen k síti.
Chyba
Testovací program byl zastaven!
Zkontrolujte lampu
Zavřete víčko.
Chyba [xx]
Chyba
Testovací program byl zastaven!
Vyjměte kyvetu
Zavřete víčko.
Chyba
Automatická kontrola zastavena.
Chyba hardwaru.
Chyba [x]
Chyba
Příliš silné okolní světlo!
Přemístěte přístroj do stínu
nebo zavřete víčko
Chybí backup přístroje! Zkontrolujte USB paměť.
Chybí platná data pro tyto parametry! Analýza dat není možná, chybí data měření Změňte výběr.
Nebyla nalezena žádná platná data! Nelze zobrazit data v protokolu dat Změňte výběr.
Chybí data měření!
Nastavení sítě: pro pevnou adresu IP nelze nastavit
výchozí bránu
Nastavení sítě: pro pevnou adresu IP nelze nastavit
masku podsítě
Testovací program se zastaví při spuštění přístroje
Testovací program se zastaví při spuštění př
Elektronická závada.
Čidla přístroje detekují silné okolní světlo.
Nastavení analýzy dat nelze konfigurovat bez dat
měření.
ístroje
Pokuste se znovu o připojení.
Zadejte znovu masku podsítě.
Restartujte proces nebo se obraťte na výrobce či
národního zástupce.
Lampu zkontrolujte a v případě potřeby ji vyměňte.
Zavřete víko.
Znovu zvolte položku Spustit znovu.
Odstraňte všechny kyvety/ampule z přihrádky pro
kyvety.
Stiskněte OK.
Obraťte se na výrobce či národního zástupce a udejte
číslo chyby.
Zeslabte okolní světlo. Nevystavujte přímému
slunečnímu záření.
Zavřete víko.
Změňte výběr.
Čeština 19
Page 20
Zobrazené chyby Definice Rozlišení
Nebyl dosažen kontrolní rozsah! Nebyly dosaženy limity analýzy dat
Kontrolní rozsah překročen! Byly překročeny limity analýzy dat Toto je varovné oznámení. Byl překročen ovládací limit.
Příliš vysoká koncentrace! Vypočítaná koncentrace je vyšší než hodnota 999 999 Zřeďte vzorek a proveďte nové měření
Možné interference: Kontrola interference Analýza je pravděpodobně chybná kvůli interferenci.
Možné interference z: Kontrola interference Analýza je pravděpodobně chybná kvůli interferenci.
Je nutné provést servisní prohlídku! Obraťte se na výrobce či národního zástupce.
Záporný výsledek! Vypočítaný výsledek má zápornou hodnotu. Zkontrolujte koncentraci vzorku
Síť je vypnutá.
Nelze navázat spojení se vzdáleným serverem. Chyba během nastavování sítě Zkontrolujte, zda je přístroj připojen k síti.
Nestálé světelné podmínky! Zamezte přímému slunečnímu záření v místě měření.
Vložte adaptér Z.
Nedostatek paměti pro aktualizaci . Chyba během aktualizace. Zvolte paměť o větší velikosti.
Chybná kontrola systému! Měření hodnot prázdného kyvetového prostoru selhalo
Teplota je příliš vysoká.
Měření nelze provést!
Aktualizační soubor je vadný. Chyba během aktualizace. Uložte znovu aktualizační soubor a opakujte postup.
USB paměť není připojena. Aktualizaci nelze provést. Zkontrolujte USB paměť.
Nelze navázat spojení s webovým serverem. Domovská stránka přístroje není k dispozici Pokuste se navázat spojení později.
Při přístupu na domovskou stránku prostřednictvím
postranní lišty je síť vypnutá
U měř
ení pomocí kulatých 11 mm kyvet je nutný
adaptér Z.
Toto je varovné oznámení. Nebylo dosaženo
nastaveného ovládacího limitu.
Aktivujte online připojení.
Vložte adaptér Z do kyvetového prostoru (2). Potvrďte
tlačítkem OK.
Vypněte a potom znovu zapněte přístroj. Pokud test
systému není úspěšný, obraťte se na výrobce či
národního zástupce.
vypněte přístroj a nechte jej několik minut vychladnout.
Podle potřeby jej přemístěte na chladnější místo.
Čeština 20
Page 21
Náhradní díly
Příslušenství
Popis Kat. č.
Certifikovaná sada filtrů pro automatické kontroly (ověřovací sada) – 4 přesné skleněné filtry s nominálními hodnotami LZM339
Sada certifikovaných testovacích roztoků „Addista-color“ tvořená 6 certifikovanými testovacími roztoky LZM282
11mm kulaté kyvety, skleněné, 560 ks LYY621
10mm hranaté kyvety, skleněné, 3 ks LZP045
10mm hranaté plastové kyvety, PS, 1 000 ks EBK019
50mm hranatá kyveta, skleněná, 1 ks LZP167
50mm hranaté kyvety, PMMA s krytem, 10 ks LZP341
50mm hranaté kyvety, PMMA, 50 ks LZM130
Ruční čtečka čárových kódů LZV566
Pamět’ové médium USB LZV568
Klávesnice USB (rozvržení kláves USA) LZV582
Software Hach Lange Online Data pro přímý přenos dat do aplikace MS Excel LZV799
Ochranný kryt na port USB LZV881
Prodlužovací kabel USB LZV567
Ethernetový kabel, stíněný, délka 2 m. LZV873
Kabel rozhraní USB – počítač LZV632
Čeština 21
Page 22

Čeština 22
Page 23
Deutsch
Technische Daten
Änderungen vorbehalten!
Leistungsspezifikationen
Anzeigemodus
Farbmessung 26 Farbzahlen 5 Farbzahlen
Farbmetrische
Auswertung
Lichtquelle Halogenlampe
Wellenlängen-Bereich 320–1100 nm
WellenlängenGenauigkeit
WellenlängenReproduzierbarkeit
Wellenlängen-Auflösung 1 nm
WellenlängenKalibrierung
Wellenlängenbereich für
Farbmessung
Scangeschwindigkeit ≥ 8 nm/sec (in 1-nm-Schritten)
Spektrale Bandbreite 5 nm
Photometrischer
Messbereich
LICO 690 LICO 620
Farbmessung, Messung
von Farbdifferenzen,
Extinktion und
Konzentration
Alle visuellen Farbzahlen sind für Normlichtart C und
2°-Normalbeobachter entsprechend DIN 5033
berechnet. Farbmetrische Farbzahlen sind
wahlweise umschaltbar auf Lichtart A, C, D65 und 2°
oder 10°-Normalbeobachter.
± 1,5 nm (Wellenlängenbereich 340–900 nm)
≤ 0,1 nm
automatisch
380–720 nm Schritte von 10 nm
± 3 Ext (Wellenlängenbereich 340–900 nm)
Farbmessung
Leistungsspezifikationen
Photometrische
Genauigkeit
Photometrische
Linearität
Streulicht < 0,1 % T bei 340 nm mit NaNO
Datenspeicher
Abmessungen des Messgeräts und Umweltbedingungen
Breite 350 mm (13,78 in)
Höhe 151 mm (5,94 in)
Tiefe 255 mm (10,04 in)
Masse 4200 g (9,26 lb)
Umgebungsbedingungen
(Betrieb)
Umgebungsbedingungen
(Lagerung)
Zusätzliche technische Daten
Netzanschluss durch
externes Netzteil
LICO 690 LICO 620
5 mExt bei 0,0–0,5 Ext,
1 % bei 0,50–2,0 Ext
< 0,5 % bis 2 Ext
≤1 % bei > 2 Ext mit Neutralglas bei 546 nm
3000 Farbmessungen,
100 Farbreferenzwerte,
1000 photometrische
Messungen,
20 Wellenlängen-Scans,
20 Zeit-Scans
10–40 °C (50–104 °F), max. 80 % relative Feuchte
(ohne Kondensatbildung)
–40–60 °C (–40–140 °F), max. 80 % relative Feuchte
(ohne Kondensatbildung)
Eingang:100–240 V/47–63 Hz
Ausgang: 15 V/40 VA
400 Farbmessungen
2
Deutsch 23
Page 24
Leistungsspezifikationen
Schnittstellen
Gehäuseschutzart IP40 (ausgenommen Schnittstellen und Netzteil)
Schutzklasse Klasse I
LICO 690 LICO 620
Nur abgeschirmte Kabel mit max. 3 m Länge
verwenden:
2× USB Typ A
1× USB Typ B
Nur abgeschirmte Kabel (z. B. STP, FTP, S/FTP) mit
max. 20 m Länge verwenden:
1× Ethernet
Allgemeine Informationen
Sicherheitshinweise
Lesen Sie die gesamte Bedienungsanleitung sorgfältig durch, bevor Sie
das Gerät auspacken, aufstellen und in Betrieb nehmen. Achten Sie auf
alle Gefahren- und Warnhinweise. Nichtbeachtung kann zu schweren
Verletzungen des Bedieners oder zu Beschädigungen am Gerät führen.
Um sicherzustellen, dass die Schutzvorrichtungen des Geräts nicht
beeinträchtigt werden, darf dieses Gerät auf keine andere als die in
dieser Bedienungsanleitung beschriebene Weise verwendet oder
installiert werden.
Deutsch 24
Zeigt eine potenziell oder unmittelbar gefährliche Situation an, die, wenn sie nicht
vermieden wird, zum Tod oder zu schweren Verletzungen führt.
WARNUNG
GEFAHR
Zeigt eine potenziell oder unmittelbar gefährliche Situation an, die, wenn sie nicht
vermieden wird, zum Tod oder zu schweren Verletzungen führen kann.
VORSICHT
Kennzeichnet eine mögliche Gefahrensituation, die geringfügige oder
mittelschwere Verletzungen zur Folge haben kann.
ACHTUNG
Kennzeichnet eine Situation, die, wenn sie nicht vermieden wird, zu Schäden am
Gerät führen kann. Informationen, die besonders hervorgehoben werden sollen.
Hinweis: Informationen, die Aspekte aus dem Haupttext ergänzen.
Page 25
Warnschilder
Beachten Sie alle Kennzeichen und Schilder, die am Gerät angebracht
sind. Nichtbeachtung kann Personenschäden oder Beschädigungen des
Geräts zur Folge haben. Für auf dem Gerät angebrachte Symbole
finden sich in der Betriebsanleitung entsprechende Warnhinweise.
Sicherheit der Lichtquellen
Die Lichtquelle wird bei hohen Temperaturen betrieben.
Um die Möglichkeit eines elektrischen Schlags zu vermeiden, trennen
Sie das Gerät von der Stromquelle, bevor die Lampe ausgetauscht wird.
Dieses Symbol kann am Gerät angebracht sein und verweist auf
Bedienungs- und/oder Sicherheitshinweise in der Betriebsanleitung.
Dieses Symbol auf dem Gerät ist ein Hinweis auf heiße Oberflächen.
Mit diesem Symbol gekennzeichnete elektrische Geräte dürfen ab
dem 12. August 2005 europaweit nicht mehr im unsortierten Hausoder Gewerbemüll entsorgt werden. Gemäß geltenden
Bestimmungen (EU-Direktive 2002/96/EG) müssen ab diesem
Zeitpunkt Verbraucher in der EU elektrische Altgeräte zur Entsorgung
an den Hersteller zurückgeben. Dies ist für den Verbraucher
kostenlos.
Hinweis: Wenden Sie sich an den Hersteller oder
Lieferanten, um zu erfahren, wie Sie ausgediente Geräte,
vom Hersteller geliefertes elektrisches Zubehör sowie alle
Hilfsartikel zur sachgemäßen Entsorgung oder
Wiederverwertung zurückgeben können.
WARNUNG
Der Hersteller ist nicht verantwortlich für Schäden, die durch falsche Anwendung
oder Missbrauch dieses Produkts entstehen und lehnt die Reguliererung solcher
Schäden, einschließlich direkter, indirekter und Folgeschäden, in vollem Umfang
nach dem anwendbaren Recht ab.
Der Nutzer ist allein verantwortlich für die Identifizierung kritischer Anwendungen
und Risiken und das Ergreifen geeigneter Maßnahmen, um Prozesse während
einer möglichen Fehlfunktion der Ausrüstung zu schützen.
VORSICHT
Verbrennungsgefahr. Lassen sie die Lampe(n) mindestens 30 Minuten lang
abkühlen, bevor sie gewartet/ausgetauscht werden.
Chemische und biologische Sicherheit
GEFAHR
Potenzielle Gefahren bei Kontakt mit chemischen/biologischen Stoffen.
Das Arbeiten mit chemischen Proben, Standards und Reagenzien ist mit
Gefahren verbunden.
Machen Sie sich vor der Arbeit mit den notwendigen Sicherheitsverfahren und
dem richtigen Umgang mit den Chemikalien vertraut und lesen und befolgen Sie
alle einschlägigen Sicherheitsdatenblätter.
Beim normalen Betrieb dieses Geräts kann die Nutzung von
gesundheitsgefährdenden Chemikalien oder biologisch schädlichen
Proben erforderlich sein.
• Beachten Sie vor dem Umgang mit diesen Stoffen alle, auf den
Gebinden der Originallösungen und im Sicherheitsdatenblatt
gedruckten Gefahrenhinweise und Sicherheitsinformationen.
• Entsorgen Sie sämtliche verbrauchte Lösungen in
Übereinstimmung mit den nationalen Vorschriften und Gesetzen.
• Wählen Sie die Art der Schutzausrüstung entsprechend der
Konzentration und Menge des gefährlichen Stoffs am jeweiligen
Arbeitsplatz.
Deutsch 25
Page 26
Produktüberblick
Die Geräte LICO 690 und LICO 620 sind VIS-Spektralphotometer mit
Wellenlängenbereichen von 320 bis 1100 nm. Die Geräte können eine
exakte farbmetrische Auswertung entsprechend den ISO/ASTMStandards mit nur einer einzigen Messung ausführen und das Ergebnis
in Form klassischer Farbsysteme wie Jod-, Hazen- oder GardnerFarbzahlen anzeigen. Die Geräte unterstützen mehrere Sprachen.
Das LICO 690 wird mit 26 Farbzahlberechnungen geliefert, beim
LICO 620 stehen fünf Farbzahlberechnungen zur Auswahl (Jod-, Hazenund Gardner-Farbzahl, Saybolt Farbzahl und ASTM D 1500
Farbzahlen).
Das LICO 690 enthält, zusätzlich zur Farbmessung, die folgenden
Programme und Betriebsarten: Einzel-Wellenlängen-Modus, MultiWellenlängen-Modus, Wellenlängen-Scan und Zeit-Scan-Modus. Die
digitalen Messungen werden in den Maßeinheiten Konzentration,
Extinktion oder %-Transmission angezeigt, das LICO 690 kann somit im
Labor universell für Analysen verwendet werden.
Installation
WARNUNG
Elektrische Gefahren und Brandgefahr.
Verwenden Sie nur das mitgelieferte Tisch-Netzteil LZV844.
Nur qualifiziertes Fachpersonal darf unter Einhaltung aller lokal gültigen
Sicherheitsvorschriften, die in diesem Abschnitt des Handbuchs beschriebenen
Arbeiten durchführen.
Auspacken des Geräts
Zum Lieferumfang des LICO 690/620 gehören folgende Komponenten:
• Spektralphotometer LICO 690 bzw. LICO 620
• Staubschutzhaube
• USB-Staubschutzkappe, serienmäßig eingesetzt
• Tisch-Netzteil mit Netzkabel
• Küvetten-Adapter Z, serienmäßig eingesetzt
• Basis-Bedienungsanleitung
• CD-ROM mit ausführlichen Bedienungsanleitungen
Hinweis: Sollte eines der aufgelisteten Teile fehlen oder defekt sein,
wenden Sie sich bitte sofort an den Hersteller oder die zuständige
Vertretung.
Betriebsumgebung
Beachten Sie folgende Punkte, damit das Gerät einwandfrei funktioniert
und somit eine lange Lebensdauer hat.
• Stellen Sie das Gerät sicher auf eine ebene Fläche. Schieben Sie
keine Gegenstände unter das Gerät.
• Die Umgebungstemperatur muss 10–40 °C (50–104 °F) betragen.
ACHTUNG
Schützen Sie das Gerät vor extremen Temperaturen durch Heizungen, direkte
Sonneneinstrahlung und andere Hitzequellen.
• Die relative Feuchte muss unter 80 % (ohne Kondensatbildung)
liegen.
• Halten Sie oberhalb und an allen Seiten des Geräts einen Abstand
von mindestens 15 cm (5,91 in.)ein, damit Luft zirkulieren kann und
eine Überhitzung der elektrischen Teile vermieden wird.
• Benutzen oder lagern Sie das Gerät nicht an extrem staubigen,
feuchten oder nassen Orten.
• Halten Sie die Oberfläche des Geräts, den Küvettenschacht und
sämtliches Zubehör jederzeit sauber und trocken. Entfernen Sie
Spritzer oder verschüttete Stoffe auf oder im Gerät unverzüglich.
Deutsch 26
Page 27

Vorder- und Rückansicht
Abbildung 1 Vorder- und Rückansicht
1 USB-Schnittstelle Typ A 5 Ethernet-Schnittstelle
2 Küvettenschacht-Abdeckung 6 USB-Schnittstelle Typ B
3 Touchscreen 7 USB-Schnittstelle Typ A
4 Ein/Aus-Schalter 8 Buchse für Tisch-Netzteil
Deutsch 27
Page 28
Spannungsversorgung/Stromanschluss
WARNUNG
Eletrische Gefahren und Brandgefahr.
Verwenden Sie nur das mitgelieferte Tisch-Netzteil LZV844.
1. Verbinden Sie das Netzkabel mit dem Tisch-Netzteil.
2. Stecken Sie das Kabel des Tisch-Netzteils in die Rückseite des
Geräts ein (Abbildung 1).
3. Stecken Sie den Stecker des Netzkabels in eine Netzsteckdose
(100–240 V~ / 47–63 Hz).
4. Schalten Sie den Netzschalter neben dem Bildschirm ein, um die
Stromversorgung einzuschalten (Abbildung 1).
Hinweis: Wenn Sie das Gerät längere Zeit nicht benutzen, trennen Sie
es von der Spannungsversorgung.
Hinweis: Stellen Sie sicher, dass die benutzte Steckdose frei zugänglich
ist.
Schnittstellen
Das Gerät verfügt serienmäßig über drei USB-Schnittstellen und
eine Ethernet-Schnittstelle, die sich auf der Vorder- und Rückseite des
Geräts befinden (Abbildung 1).
Die USB-A-Anschlüsse dienen zur Kommunikation mit einem Drucker,
USB-Speicher oder einer Tastatur. Ein USB-Speicher kann zur
Aktualisierung der Gerätesoftware verwendet werden.
Der USB-B-Anschluss dient zum Datenaustausch mit einem PC. Die
Datenübertragung auf einen PC ist nur mit der optionalen Software
Hach Lange Online Data möglich.
Über einen USB-Hub können auch verschiedene Zubehörgeräte
gleichzeitig angeschlossen werden.
Hinweis: USB-Kabel dürfen nicht länger als 3m sein.
Diese Schnittstellen dienen der Ausgabe von Daten und Grafiken auf
Druckern und PCs und der Aktualisierung der Gerätesoftware. Die
Ethernet-Schnittstelle unterstützt den Echtzeit-Datentransfer in lokalen
Netzwerken, an LIMS-Sytemen oder SC Controllern. Verwenden Sie für
die Ethernet-Schnittstelle nur abgeschirmte Kabel (z. B. STP, FTP, S/
FTP) mit max. 20 m Länge.
Tabelle 1 Schnittstellen
Schnittstellen Beschreibung
USB A
USB B
Ethernet
Diese USB-Schnittstelle ist für den Anschluss eines Druckers,
eines USB-Speichers oder einer Tastatur vorgesehen.
Diese USB-Schnittstelle ist nur für die Verbindung zwischen
dem Gerät und einem PC vorgesehen (mit Installation der
entsprechenden Software).
Die Ethernet-Schnittstelle ist zur Datenübertragung an einen PC
ohne installierte Software oder in ein lokales
Netzwerk vorgesehen. Verwenden Sie für die EthernetSchnittstelle nur abgeschirmte Kabel (z. B. STP, FTP, S/FTP)
mit max. 20 m Länge.
Küvettenschächte und Küvetten-Adapter
Küvettenschächte und -adapter
Öffnen Sie die Küvettenschächte, indem Sie die KüvettenschachtAbdeckung nach links schieben.
Die Abdeckung versenkt sich seitlich neben den Küvettenschächten.
Hinweis: Schließen Sie die Küvettenschacht-Abdeckung bei längeren
Benutzungspausen, um die Optik des Gerätes vor Staub und
Verunreinigungen zu schützen.
Das Gerät hat zwei Küvettenschächte (Abbildung 1). Es kann nur jeweils
ein Küvettentyp für eine Messung eingesetzt werden.
Küvettenschacht (1) für:
• 11 mm Rundküvetten
Hinweis: Setzen Sie in den Küvettenschacht (2) den KüvettenAdapter Z ein.
Deutsch 28
Page 29
Küvettenschacht (2) für:
Folgende Küvettentypen können in den Küvettenschacht (2) eingesetzt
werden.
• Ohne Küvetten-Adapter Z, direkt in den Küvettenschacht (2),
können Sie 50 mm Küvetten einsetzen.
• Mit Küvetten-Adapter Z: 10 mm Rechteckküvetten.
Hinweis: Diese Küvetten müssen mit Küvetten-Adapter Z
eingesetzt werden.
Hinweis: Bei starken Verunreinigungen können Sie den
Küvettenschacht (2) austauschen.
Installation des Küvetten-Adapter Z
1. Öffnen Sie den Küvettenschacht.
2. Setzen Sie den Küvetten-Adapter Z so in den Küvettenschacht (2)
ein, dass der Pfeil auf dem Küvetten-Adapter in Richtung des
Küvettenschachts (1) zeigt (Abbildung 2).
Hinweis: Der Pfeil auf dem Küvetten-Adapter zeigt die Richtung des
Strahlengangs an.
Abbildung 2 Küvettenschächte und Küvetten-Adapter Z
1 Küvettenschacht (1) für Rundküvetten
2 Küvettenschacht (2) für Rechteckküvetten, Küvetten-Adapter Z installiert
Deutsch 29
Page 30
Inbetriebnahme
ACHTUNG
Alle Bildschirm-Darstellungen in dieser Bedienungsanleitung entsprechen dem
LICO 690. Die Bildschirm-Darstellungen des LICO 620 können hiervon
abweichen.
Einschalten des Geräts, Boot-Vorgang
1. Verbinden Sie das Stromkabel mit einer Steckdose.
2. Schalten Sie das Gerät durch Betätigen des Netzschalters neben
dem Bildschirm ein.
3. Das Gerät startet automatisch für einen ca. 45 Sekunden
dauernden Boot-Vorgang. Der Bildschirm zeigt das Hersteller-Logo
an. Am Ende des Boot-Vorgangs ertönt eine Startmelodie.
Hinweis: Warten Sie vor jedem erneuten Einschalten ca. 20 Sekunden,
um die Elektronik und Mechanik des Geräts nicht zu beschädigen.
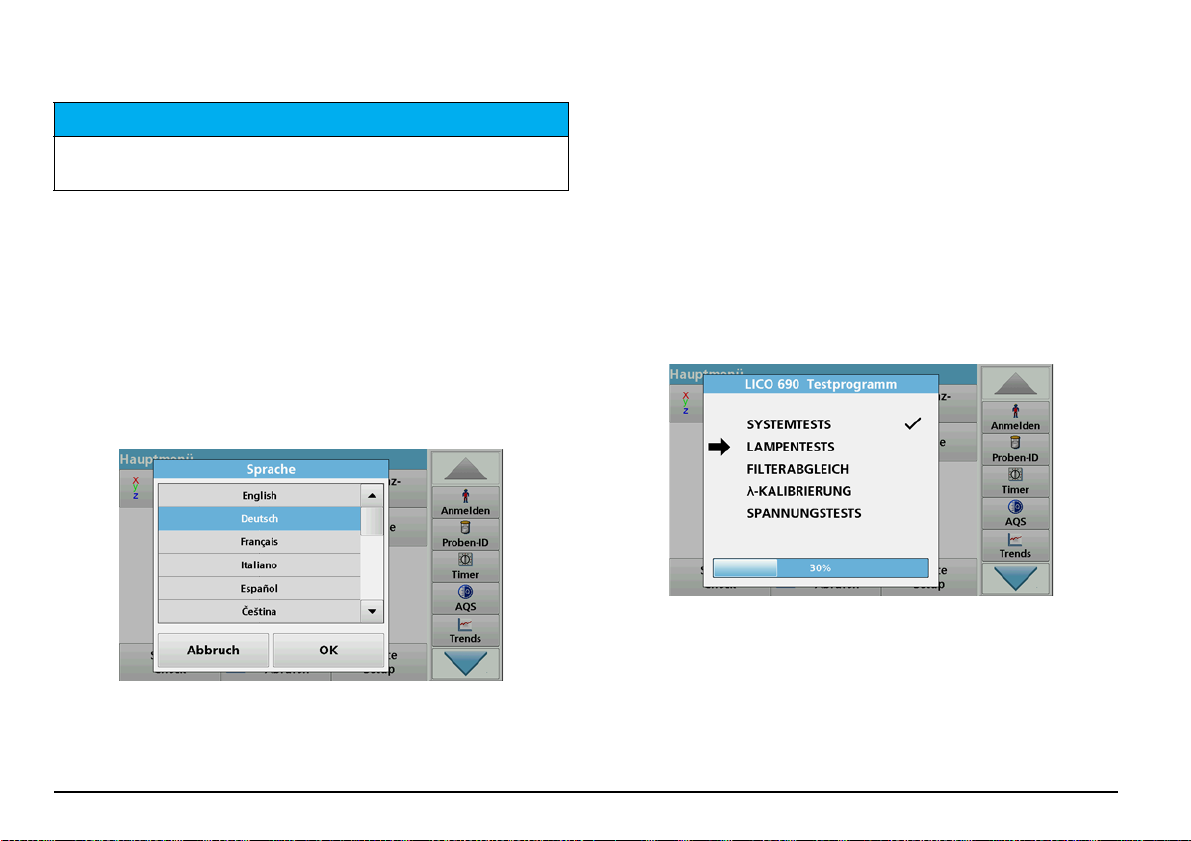
Sprachauswahl
Die Software unterstützt mehrere Sprachen. Wenn Sie das Gerät zum
ersten Mal einschalten, öffnet sich automatisch nach dem Boot-Vorgang
eine Liste zur Auswahl einer Sprache.
1. Wählen Sie die gewünschte Sprache.
2. Bestätigen Sie die Auswahl mit OK. Das Testprogramm startet
dann automatisch.
Änderung der Spracheinstellung
Das Gerät arbeitet in der gewählten Sprache, bis die Option geändert
wird.
1. Schalten Sie das Gerät ein.
2. Während des Boot-Vorgangs berühren Sie den Bildschirm an einer
beliebigen Stelle so lange (ca. 45 Sekunden), bis die Liste zur
Auswahl einer Sprache erscheint.
3. Wählen Sie die gewünschte Sprache.
4. Bestätigen Sie die Auswahl mit OK. Das Testprogramm startet
dann automatisch.
Testprogramm
Nach jedem Einschalten des Geräts beginnt ein Testprogramm.
Im Verlauf dieses Programms (ca. 25 Sekunden) werden Systemtests,
Lampentests, Filterabgleich, Wellenlängenkalibrierung und
Spannungstests durchgeführt. Auf dem Bildschirm wird jede überprüfte
Funktion entsprechend markiert.
Hinweis: Fehlermeldungen während des Testprogramms siehe Fehler-
bzw. Displaymeldungen.
Deutsch 30
Page 31

2. Zum Einschalten betätigen Sie den Netzschalter neben dem
Bildschirm.
Das Testprogramm startet automatisch.
Danach ist das Gerät betriebsbereit.
Ausschalten des Geräts
1. Betätigen Sie den Netzschalter neben dem Bildschirm für
ca. 5 Sekunden.
Standard Programme
Überblick
Nach Beendigung des Testprogramms wird das Hauptmenü angezeigt.
Stromsparmodus
Das Gerät kann in einen Stromsparmodus geschaltet werden.
1. Betätigen Sie kurz den Netzschalter neben dem Bildschirm.
Die Meldung „Stromsparmodus“ wird angezeigt. Anschließend
schaltet der Bildschirm automatisch ab.
Hinweise zur Verwendung des Touchscreens
Der gesamte Bildschirm reagiert auf Berührung. Treffen Sie durch
Antippen mit dem Fingernagel, der Fingerkuppe, einem Radiergummi
oder einem speziellen Taststift eine Auswahl. Berühren Sie den
Bildschirm nicht mit scharfen Gegenständen (z. B. einer
Kugelschreiberspitze).
• Stellen oder legen Sie keine Gegenstände auf dem Bildschirm ab,
da es sonst zerkratzt werden könnte.
• Berühren Sie Schaltflächen, Wörter oder Symbole, um sie
auszuwählen.
• Zum schnellen Blättern in langen Listen stehen Bildlaufleisten zur
Verfügung. Halten Sie die Bildlaufleiste gedrückt und blättern Sie
durch Auf- und Abwärtsbewegung durch die Liste.
• Durch Antippen eines Listeneintrags lässt sich dieser hervorheben.
Nach erfolgter Auswahl wird der Eintrag als inverser Text dargestellt
(heller Text auf dunklem Hintergrund).
Deutsch 31
Page 32

Benutzung des alphanumerischen Tastenfelds
Diese Anzeige dient zur Eingabe von Buchstaben, Zahlen und
Symbolen zur Programmierung des Geräts. Nicht verfügbare Optionen
sind deaktiviert (erscheinen in grau). Die Symbole links und rechts am
Bildschirm werden in Tabelle 2 beschrieben.
Die Bezeichnungen des mittleren Tastenfeldes ändern sich je nach
gewählter Eingabefunktion. Berühren Sie jede Taste so oft, bis das
gewünschte Zeichen auf dem Bildschirm erscheint. Ein Leerzeichen wird
als Unterstrich mit der Taste YZ_ eingegeben.
Mit Abbruch wird die Eingabe abgebrochen mit OK wird die Eingabe
bestätigt.
Tabelle 2 Alphanumerisches Tastenfeld
Symbol/Taste Beschreibung Funktion
ABC/abc Alphabetisch
# % Symbole
123 Numerisch Eingabe von normalen Zahlen.
CE Löschen Vorhandenen Eintrag löschen.
Schaltet bei der Eingabe von Buchstaben
zwischen Groß- und Kleinschreibung um.
Eingabe von Satzzeichen, Symbolen sowie
hoch und tief gestellten Zahlen.
Tabelle 2 Alphanumerisches Tastenfeld
Symbol/Taste Beschreibung Funktion
Pfeil links Rücktaste
Pfeil rechts Weiter
Löschen des aktuellen Zeichens und eine
Zeichenposition zurück gehen.
Navigiert zum nächsten Leerzeichen bei einer
Eingabe.
Hauptmenü
Über das Hauptmenü sind zahlreiche Programme wählbar. Jede
Menüoption wird in der nachstehenden Tabelle kurz beschrieben.
Rechts im Bildschirm finden Sie eine Werkzeug-Leiste. Durch Antippen
werden die verschiedenen Funktionen aktiviert.
Tabelle 3 Hauptmenüoptionen
Option Funktion
Der FARBMESSUNGSMODUS wird verwendet,
um Farbzahlen wie Hazen, Gardner und Saybolt
Farbmessung
zu bestimmen. Im LICO 690 stehen zusätzlich die
dreidimensionalen absoluten farbmetrischen
Werte wie die Farbskalen von CIE-L*a*b*, HunterLab oder des europäischen Arzneibuchs zur
Verfügung.
Deutsch 32
Page 33

Tabelle 3 Hauptmenüoptionen
Option Funktion
Der Modus zur FARBDIFFERENZMESSUNG
wird verwendet, um eine quantitative Farbdifferenz
Farbdifferenzmessung
(nur LICO 690)
EinzelWellenlänge
Photometrie
(nur
LICO 690)
MultiWellenlänge
Zeit-Scan
WellenlängenScan
zwischen einer Referenz (R) und einer Probe (P)
im dreidimensionalen Farbraum (CIE-L*a*b* oder
Hunter-Lab) zu bestimmen. In diesem Modus ist
ein zusätzlicher Referenzspeicher für bis zu 100
Referenzen verfügbar.
Messungen bei einer Wellenlänge sind:
Extinktionsmessung: Gemessen wird die von
der Probe absorbierte Lichtmenge in
Extinktionseinheiten.
Transmissionsmessung (%): Gemessen wird
der prozentuale Anteil des Lichts, das die Probe
durchdringt und den Detektor erreicht.
Konzentrationsmessung: Durch die Eingabe
eines Konzentrationsfaktors können die
Extinktionsmesswerte in Konzentrationswerte
umgerechnet werden.
Der Multi-Wellenlängen-Modus erlaubt
Messungen von Extinktion (Ext) oder Prozent
Transmission (%T) bei bis zu vier Wellenlängen
und erstellt Berechnungen für
Extinktionsdifferenzen und
Extinktionsverhältnisse. Einfache Umrechnungen
in Konzentrationen können ebenfalls erfolgen.
Der Zeit-Scan zeichnet Extinktion oder %
Transmission bei einer Wellenlänge über einen
festgelegten Zeitraum auf.
Ein Wellenlängen-Scan zeigt, wie das Licht über
ein definiertes Wellenlängenspektrum von einer
Probe absorbiert wird. Mit dieser Funktion kann
die Wellenlänge ermittelt werden, bei der der
maximale Extinktionswert gemessen werden
kann. Das Extinktionsverhalten wird während des
Scans grafisch dargestellt.
Tabelle 3 Hauptmenüoptionen
Option Funktion
Unter das Menü „System Check“ fallen eine Reihe
System Check
Messdaten Abrufen
Geräte Setup
von Optionen, wie Geräteinformationen, OptikPrüfungen, Geräte Backup, Servicezeiten, GeräteUpdate, Einstellungen zur Analytischen
Qualitätssicherung und Lampenbetriebszeiten.
Gespeicherte Daten können abgerufen, gefiltert,
an einen Drucker, Speicherstick oder PC gesendet
und gelöscht werden.
In diesem Menü werden anwenderspezifische
bzw. verfahrensspezifische Einstellungen
vorgenommen: Anwender-ID, Datum und Uhrzeit,
Sicherheitseinstellungen, gespeicherte Daten,
Ton, PC und Drucker und Energieverwaltung.
Probenahme und Vorbereitung von Proben
Entnehmen Sie eine repräsentative Probe von dem Produkt
entsprechend der DIN EN ISO 15528 (oder ASTM D3925-02).
Wenn das Material jegliche Zeichen von Trübheit aufweist, entfernen Sie
diese Trübung entweder durch Filtration, Zentrifugieren, Erhitzen,
Ultraschallbehandlung oder geeignete andere Mittel.
Erhitzen Sie teilweise feste Proben vor den Messungen, um das feste
Material in der Flüssigkeit aufzulösen. Die Vorbereitung darf keine
chemischen Änderungen in der Probe verursachen.
Stellen Sie sicher, dass während der Messung keine Blasen in der
Probe vorhanden sind.
Für die Farbmessung sind drei Küvetten-Typen verfügbar, die sich
hinsichtlich Material (Glas, PS und PMMA) und Schichtdicke (10 mm,
11 mm und 50 mm) unterscheiden. Befüllen Sie die Küvette ungefähr
2 cm hoch mit der Probe. Der Lichtstrahl durchläuft die Küvette ungefähr
0,5 cm bis 1,5 cm oberhalb des Bodens der Küvette.
Das Programm berechnet die Iod-, Hazen-, Gardner-, Saybolt-, Klettund ASTM D 1500-Farbzahlen automatisch und zeigt die Farbwerte an.
Dabei wird der verwendete Küvettentyp berücksichtigt.
Deutsch 33
Page 34

Ein Trockenthermostat ist für die runden Einweg-Glasküvetten mit
11 mm verfügbar. Der Trockenthermostat erhitzt die Küvetten auf eine
beliebige Temperatur zwischen Umgebungstemperatur und 150 °C
(302 °F).
ACHTUNG
Die Proben müssen klar und frei von Trübungen sein. Wenn Produkte, die als
Paste oder in fester Form vorliegen, nicht direkt gemessen werden können, muss
das Produkt geschmolzen werden, bevor es in die Küvetten überführt wird.
Vergewissern Sie sich, dass die Küvetten keinerlei Luftblasen enthalten.
• Halten Sie die Küvette immer am oberen Ende, um zu
gewährleisten, dass sich keine Fingerabdrücke im Messbereich der
Küvette befinden.
• Verwenden Sie geeignete Pipetten zur Befüllung der Küvetten.
• Befüllen Sie die Küvetten langsam mit der Probenflüssigkeit, um
sicherzustellen, dass sich keine Luftblasen an der Küvettenwand
und in der Probe bilden. Luftblasen haben fehlerhafte Messwerte
zur Folge.
• Wenn Luftblasen eingeschlossen werden, entfernen Sie diese
durch Hitze-, Vakuum- oder Ultraschallbehandlung bzw. andere
geeignete Mittel.
• Reinigen Sie die Außenseite der Küvetten gründlich, bevor Sie
diese in den Küvettenschacht einsetzen.
Farbmessung
Die ordnungsgemäße Vorbereitung der Proben ist äußerst wichtig für
eine genaue Farbmessung. Um sicherzustellen, dass eine genaue
Messung erfolgt, müssen Sie die folgenden Richtlinien für die
Vorbereitung von Proben heranziehen:
• Reinigen Sie die Glasküvetten stets sofort nach Verwendung.
• Verwenden Sie nur optisch geeignete Proben für die Messung.
Stellen Sie sicher, dass die Küvetten sauber sind und an keiner
Stelle undurchsichtig sind.
• Füllen Sie die Flüssigkeit langsam in die Küvette, um die
Entstehung von Luftblasen in der Probe zu verhindern.
ACHTUNG
Bevor Sie Einweg-Küvetten aus PS (Polystyrol) oder PMMA
(Polymethylmethacrylat) verwenden, müssen Sie sicherstellen, dass die Küvetten
nicht durch die Proben zerstört oder angelöst werden, was eine Beschädigung
des Küvettenschachts zur Folge hätte.
Deutsch 34
Der Farbmessungsmodus wird verwendet, um absolute Farbzahlen in
den Farbskalen gemäß Hazen, Gardner, CIE-L*a*b* oder europäischem
Arzneibuch zu bestimmen.
Für jeden Küvettentyp (11 mm Rundküvette und 10 und
50 mm Rechteckküvetten) wird ein unabhängiger
Kalibrierungsdatensatz verwendet.
Es ist möglich, das Gerät mit einem, zwei oder drei Küvettentypen zu
kalibrieren und diese unterschiedlichen Küvettentypen anschließend
abwechselnd zu verwenden.
Page 35

Für die Verwendung der 10 mm Rechteckküvette und
11 mm Rundküvetten ist es notwendig, den Adapter Z in den
Küvettenschacht (2) einzusetzen. Für Messungen mit
50 mm Rechteckküvetten müssen Sie den Adapter entfernen.
Durchführung einer Farbmessung
3. Die Kalibrierung beginnt automatisch, wenn das Gerät die Küvette
erkannt hat.
Der verwendete Küvettentyp und der genaue
Kalibrierungsfortschritt werden in einem separaten Fenster
angezeigt.
1. Tippen Sie auf Farbmessung.
2. Setzen Sie eine Küvette mit destilliertem Wasser ein, um die
Kalibrierung auszuführen.
Hinweis: Führen Sie die Kalibrierung immer sehr sorgfältig aus, da eine
fehlerhafte Kalibrierung zu ungenauen Ergebnissen führen kann.
4. Nach der Kalibrierung wird oben rechts die verwendete
Küvettengröße angezeigt.
Hinweis: Sie können nach der Kalibrierung die Küvette mit
destilliertem Wasser nochmals als Probe vermessen.
Die angezeigten Messwerte sollten mit den ungefärbten
Deutsch 35
Page 36

Farbmaßzahlen übereinstimmen (also Hazen = 0, Gardner = 0.0,
CIE-L*a*b* = 100.0, 0.0, 0.0, etc.)
5. Setzen Sie die Probenküvette ein.
Die Messung beginnt automatisch.
Das Ergebnis der Farbberechnung wird angezeigt.
Hinweis: Der Balken rechts neben dem Ergebnis, zeigt das
Ergebnis in Relation zum Messbereich an.
6. Entfernen Sie für die nächste Messung die Küvette und setzen Sie
die nächste Probenküvette ein, oder tippen Sie auf Messen, um
dieselbe Probe nochmals zu messen.
Berührungsempfindliche Bereiche im Messmodus
Im Messmodus gibt es berührungsempfindliche Bereiche, mit denen Sie
sofortigen Zugriff auf verschiedene Menüoptionen haben.
Abbildung 3 Berührungsempfindliche Bereiche im Messmodus
1 Öffnen Sie Farbskala wählen, und wählen Sie die Skala für die Anzeige
aus.
2 Ändern Sie die angezeigte Farbskala in das nächste Farbsystem, das in
der Liste mit Farbskalen für die jeweilige Anwender-ID für die Anzeige
ausgewählt wird.
3 Öffnen Sie Proben-ID, um die Proben-ID zu ändern oder hinzuzufügen.
4 Ändern Sie die Obergrenze des Farbbereichs.
5 Ändern Sie die Untergrenze des Farbbereichs.
6 Öffnen Sie Kommentar, um einen Kommentar hinzuzufügen.
Optionen zum Einrichten der Parameter
Tippen Sie auf Optionen, um den Parameter einzurichten.
Deutsch 36
Page 37

Abbildung 4 Optionen für Farbmessungen
Optionen Beschreibung
Weitere Weitere Optionen werden angezeigt.
Symbol Speichern
Symbol Daten senden Senden von Daten an einen Drucker, PC, USB-Speicher (USB A) oder Netzwerk.
Farbskala Auswählen der Farbskala
Kurve anzeigen
Tabelle anzeigen
Farbwerte anzeigen
Skalierung & Einheiten
Ph.Eur.: Auto
Farbzahlauswahl
Lichtart/Beobachter: C/2°
Farbskalen für Anwender-ID: Individuelle Auswahl der Farbskalen für die Anwender-ID.
Symbol: Messdaten speichern, wenn unter Geräte Setup > Datenspeicher Setup > Autom. Speicherung:Aus gewählt wurde.
Symbol: Messdaten Abrufen, wenn unter Geräte Setup > Datenspeicher Setup > Autom. Speicherung:Ein gewählt wurde.
KURVE ANZEIGEN zeigt die Spektralkurve der Transmissions- oder Extinktionskurve.
Hinweis: Kurve anzeigen wird nach dem ersten Messwert aktiviert.
TABELLE ANZEIGEN zeigt die spektralen Transmissionswerte T% von 380 nm bis 720 nm an.
FARBWERTE ANZEIGEN zeigt das Ergebnis der letzten Farbberechnung an.
EINHEITEN: Wählen Sie Extinktion oder Transmission.
SKALIERUNG: Im automatischen Skalierungsmodus wird die y-Achse automatisch angepasst, sodass der gesamte Scan angezeigt wird.
Im manuellen Skalierungsmodus kann dieser Bereich begrenzt werden, sodass nur ein bestimmter Ausschnitt des Scans angezeigt wird.
Europäisches Arzneibuch
Wählen Sie AUTO oder die GEWÜNSCHTE SKALA
Definition von 3 verschiedenen Farbzahlkombinationen mit bis zu 3 verschiedenen Farbzahlen zur Ergebnisanzeige.
Auswahl 1: Klett-Farbzahl + Yellowness-Index
Auswahl 2: Klett-Farbzahl + ADMI-Farbzahl + Yellowness-Index
Auswahl 3: Yellowness-Index + Einzel-Transmission
Lichtart: Wählen Sie C, A oder D65
Beobachter: 2° oder 10°
Deutsch 37
Page 38

Fehler- bzw. Displaymeldungen
Angezeigter Fehler Ursache Beseitigung
Beim Aufspielen der Gerätedaten ist ein Fehler
aufgetreten.
Beim Lesen vom USB-Speicher ist ein Fehler
aufgetreten.
Beim Schreiben auf den USB-Speicher ist ein
Fehler aufgetreten.
Bitte auf aktuelle Update-Datei prüfen. Fehler beim Update. Überprüfen Sie den USB-Speicher.
Bitte kontaktieren Sie den Kundendienst-Service. Fehler beim Update. Kontaktieren Sie den Hersteller oder Landesvertretung.
Bitte Netzwerkkonfiguration prüfen. Überprüfen Sie die Netzwerkkonfiguration.
Bitte prüfen Sie die Verbindung. Überprüfen Sie die Netzwerkkonfiguration.
Bitte Schieber schließen. Schließen Sie die Küvettenschacht-Abdeckung.
Bitte USB-Speicher einsetzen.
Bitte Verbindung prüfen und Administrator
kontaktieren.
Datei für das Geräteupdate fehlt. Fehler beim Update. Überprüfen Sie den USB-Speicher.
Datei für das Geräteupdate ist fehlerhaft. Fehler beim Update.
Es wird empfohlen eine Systemprüfung
durchzuführen.
Eingabe ungültig! Passwort falsch
Extinktion > 3.5! Die gemessene Extinktion ist größer als 3.5 Probe verdünnen und erneut vermessen
Farbe = *** Farbwert außerhalb Messbereich.
Network Setup oder FTP-Fehler
Überprüfung der Luftwerte fehlgeschlagen
Starten Sie den Vorgang erneut oder kontaktieren Sie
den Hersteller oder Landesvertretung.
Starten Sie den Vorgang erneut oder kontaktieren Sie
den Hersteller oder Landesvertretung.
Starten Sie den Vorgang erneut oder kontaktieren Sie
den Hersteller oder Landesvertretung.
Stecken Sie einen USB-Speicher in eine USB-ASchnittstelle am Gerät.
Überprüfen Sie die Netzwerkkonfiguration oder
kontaktieren Sie den Hersteller oder Landesvertretung.
Speichern Sie die Datei zum Update erneut und
wiederholen den Vorgang.
Schalten Sie das Gerät aus und erneut an. Ist die
Systemprüfung nicht erfolgreich kontaktieren Sie den
Hersteller oder Landesvertretung.
Haben Sie Ihr Passwort vergessen?
Kontaktieren Sie den Hersteller oder Landesvertretung.
Verdünnen Sie die Probe oder wählen Sie eine
geeignete Farbskala aus.
Deutsch 38
Page 39

Angezeigter Fehler Ursache Beseitigung
Fehler beim Abrufen der lokalen IP-Adresse.
Fehler beim Einrichten des Default-Gateway‘s.
Fehler beim Einrichten des Netzlaufwerkes! Fehler beim Network Setup Überprüfen Sie die Einstellungen.
Fehler beim Einrichten der Subnet-Mask.
Fehler beim Kopieren vom USB-Speicher. Fehler beim Update
Fehler in der FTP-Verbindung. FTP-Fehler
Fehler
Testprogramm gestoppt!
Bitte Lampe prüfen
Schließen Sie den Deckel.
Fehler [xx]
Fehler
Testprogramm gestoppt!
Bitte Küvette entnehmen!
Schließen Sie den Deckel.
Fehler
Testprogramm gestoppt!
Hardware-Fehler.
Fehler [x]
Fehler
Zu viel Umgebungslicht!
Gerät in den Schatten stellen
oder den Deckel schließen.
Kein Geräte Backup vorhanden! Überprüfen Sie den USB-Speicher.
Keine gültigen Daten für diesen Parameter! Datenanalyse nicht möglich, keine Messdaten Ändern Sie die Auswahl.
Network setup: DHCP-Client hat keine Verbindung zum
DHCP-Server
Network setup: default gateway bei fixed IP-Adresse
kann nicht gesetzt werden
Network setup: Subnetmask bei fixed IP - Adresse
kann nicht gesetzt werden
Testprogramm stoppt beim Starten des Geräts
Testprogramm stoppt beim Starten des Geräts
Elektronik defekt
Die Sensoren messen zu viel Umgebungslicht.
Geben Sie die IP-Adresse erneut ein.
Versuchen die Verbindung erneut herzustellen.
Geben Sie die Subnetmask erneut ein.
Starten Sie den Vorgang erneut oder kontaktieren den
Hersteller oder Landesvertretung.
Stellen Sie sicher, dass das Gerät mit dem Netzwerk
verbunden ist.
Lampe überprüfen und gegebenenfalls austauschen.
Deckel schließen.
Tippen Sie auf Neu starten.
Entfernen Sie die Küvetten/Probenküvetten aus dem
Küvettenschacht.
Bestätigen Sie mit OK.
Kontaktieren Sie den Hersteller oder Landesvertretung
und geben Sie die Fehlernummer an.
Umgebungslicht verringern. Direkte
Sonneneinstrahlung vermeiden.
Deckel schließen.
Deutsch 39
Page 40

Angezeigter Fehler Ursache Beseitigung
Keine gültigen Daten gefunden! Datenansicht in Datenspeicher nicht möglich Ändern Sie die Auswahl.
Keine Messdaten vorhanden!
Kontrollbereich unterschritten! Datenanalyse-Limits unterschritten
Kontrollbereich überschritten! Datenanalyse-Limits überschritten
Konzentration zu hoch! Die errechnete Konzentration ist größer als 999999 Probe verdünnen und erneut vermessen
Mögliche Störung durch: Interference Check
Mögliche Störung von: Interference Check
Nächster Service ist fällig!
Negatives Ergebnis! Das berechnete Ergebnis ist negativ Konzentration der Probe überprüfen
Netzwerk ausgeschaltet.
Remote Server nicht erreichbar. Fehler beim Network Setup
Schwankendes Umgebungslicht!
Setzen Sie Adapter Z ein.
Speicher für Update nicht ausreichend. Fehler beim Update. Wählen Sie einen Speicher mit größerer Kapazität.
Systemprüfung nicht in Ordnung! Messung der Luftwerte fehlgeschlagen
Temperatur zu hoch.
Messung nicht möglich!
Update-Datei ist fehlerhaft. Fehler beim Update.
Datenanalyse-Einstellungen nicht konfigurierbar ohne
Messdaten.
Network setup off, bei Zugriff auf Viper homepage via
Sidebar
Für Messungen mit 11 mm Rundküvetten ist der
Adapter Z erforderlich.
Ändern Sie die Auswahl.
Dies ist ein Warnhinweis. Sie haben Ihr gesetztes
Kontroll-Limit unterschritten.
Dies ist ein Warnhinweis. Sie haben Ihr gesetztes
Kontroll-Limit überschritten.
Aufgrund von Interferenzen ist die Analyse
möglicherweise fehlerhaft.
Aufgrund von Interferenzen ist die Analyse
möglicherweise fehlerhaft.
Kontaktieren Sie den Hersteller oder Landesvertretung
für eine Geräteinspektion.
Aktivieren Sie die Online-Verbindung.
Stellen Sie sicher, dass das Gerät mit dem Netzwerk
verbunden ist.
Vermeiden Sie direkte Sonneneinstrahlung am
Messplatz.
Setzen Sie den Adapter Z in Küvettenschacht (2) ein.
Bestätigen Sie mit OK.
Schalten Sie das Gerät aus und erneut an. Ist die
Systemprüfung nicht erfolgreich kontaktieren Sie den
Hersteller oder Landesvertretung.
Schalten Sie das Gerät zum Abkühlen einige Minuten
aus. Stellen Sie es ggfs. an einen kühleren Platz.
Speichern Sie die Datei zum Update erneut und
wiederholen den Vorgang.
Deutsch 40
Page 41

Angezeigter Fehler Ursache Beseitigung
USB-Speicher ist nicht verbunden. Update nicht möglich. Überprüfen Sie den USB-Speicher.
Web Server nicht erreichbar. Geräte Homepage nicht erreichbar
Versuchen Sie die Verbindung zu einem späteren
Zeitpunkt nochmal.
Deutsch 41
Page 42

Ersatzteile
Zubehör
Beschreibung Kat.- Nr.
Zertifizierter Testfiltersatz zur Eigenkontrolle (Prüffiltersatz) 4 Präzisionsglasfilter mit Nennwerten LZM339
Zertifizierter Prüflösungssatz „Addista-color“, bestehend aus 6 zertifizierten Prüflösungen LZM282
11 mm-Rundküvette, Glas, 560 Stück LYY621
10 mm-Rechteckküvetten, Glas, 3 Stück LZP045
10 mm-Rechteck-Kunststoffküvetten, PS, 1000 Stück EBK019
50 mm-Rechteckküvette, Glas, 1 Stück LZP167
50 mm-Rechteckküvette, PMMA mit Deckel, 10 Stück LZP341
50 mm-Rechteckküvette, PMMA, 50 Stück LZM130
Hand-Barcodescanner LZV566
USB-Speicherstick LZV568
USB-Tastatur (US-Tastaturlayout (QWERTY)) LZV582
Hach Lange Online Data zur direkten Datenübernahme in MS EXCEL LZV799
Schutzkappe für USB-Schnittstelle LZV881
USB Verlängerungskabel LZV567
Ethernet Kabel, abgeschirmt, 2 m (6,56 ft) Länge. LZV873
Schnittstellenkabel USB - Computer LZV632
Deutsch 42
Page 43

English
Specifications
These are subject to change without notice!
Performance
specifications
Display mode
Color measurement 26 color ratios 5 color ratios
Colorimetric evaluation
Source lamp Halogen lamp
Wavelength range 320–1100 nm
Wavelength Accuracy ± 1,5 nm (wavelength range 340–900 nm)
Wavelength
reproducibility
Wavelength resolution 1 nm
Wavelength calibration Automatic
Wavelength range for
color measurement
Scanning speed ≥ 8 nm/sec (in steps of 1 nm)
Spectral bandwidth 5 nm
Photometric measuring
range
Photometric accuracy
LICO 690 LICO 620
Color measurement, color
difference measurement,
absorbance and
concentration
All visual color ratios are calculated for standard light
chart C and 2° standard observers in accordance with
DIN 5033. Colorimetric color values can be switched
to light type A, C, D65 and 2° or 10° standard
observers.
≤ 0,1 nm
380–720 nm steps of 10 nm
± 3 Abs (wavelength range 340–900 nm)
5 mAbs at 0,0–0,5 Abs,
1 % at 0,50–2,0 Ext
Color measurement
Performance
specifications
Photometric linearity
Stray light < 0,1 % T at 340 nm with NaNO
Data log
Physical and environmental specifications
Width 350 mm (13,78 in)
Height 151 mm (5,94 in)
Depth 255 mm (10,04 in)
Earth 4200 g (9,26 lb)
Ambient operating
requirements
Ambient storage
requirements
Additional technical data
Power connector via
external power supply
Interfaces
LICO 690 LICO 620
< 0,5 % to 2 Abs
≤1 % at > 2 Abs with neutral glass at 546 nm
3000 color
measurements,
100 color reference
values,
1000 photometric
measurements,
20 wavelength scans, 20
time scans
10–40 °C (50–104 °F), maximum 80 % relative
humidity (without condensate formation)
–40–60 °C (–40–140 °F), maximum 80 % relative
humidity (without condensate formation)
Input: 100–240 V/47–63 Hz
Output: 15 V/40 VA
Use only shielded cable with maximum length of 3 m:
2× USB type A
1× USB type B
Use only shielded cable (for example STP, FTP, S/
FTP) with maximum length of 20 m:
1× Ethernet
400 color measurements
2
English 43
Page 44

Performance
specifications
Housing rating IP40 (excluding interfaces and power supply)
Protection class Class I
LICO 690 LICO 620
Precautionary labels
Read all labels and tags attached to the instrument. Personal injury or
damage to the instrument could occur if not observed. For symbols
attached to the device, corresponding warning notes are found in the
user manual.
General Information
Safety information
Read through the entire user manual carefully before you unpack the
device, set up and put into operation. Pay attention to all danger and
caution statements. Failure to do so could result in serious injury to the
operator or damage to the equipment.
To make sure that the protection provided by this instrument is not
impaired, do not use or install this instrument in any manner other than
that specified in these operating instructions.
DANGER
Indicates a potentially or imminently hazardous situation that, if not avoided,
results in death or serious injury.
WARNING
Indicates a potentially or imminently hazardous situation that, if not avoided, may
result in death or serious injury.
CAUTION
Indicates a potentially hazardous situation that may result in minor or moderate
injury.
NOTICE
Indicates a situation that, if it is not avoided, can lead to damage to the device.
Information that requires special emphasis.
Note: Information that supplements points in the main text.
This symbol may be attached to the device and references the
operation- and/or safety notes in the user manual.
This symbol on the device is an indication of hot surfaces.
Electrical equipment marked with this symbol may not be disposed of
in European domestic or public disposal systems after 12 August
2005. In conformity with European local and national regulations (EU
Directive 2002/96/EC), European electrical equipment users must
now return old or end-of life equipment to the manufacturer for
disposal at no charge to the user.
Note: For return for recycling, please contact the equipment
manufacturer or supplier for instructions on how to return
end-of-life equipment, manufacturer-supplied electrical
accessories, and all auxiliary items for proper disposal.
WARNING
The manufacturer is not responsible for any damages due to misapplication or
misuse of this product including, without limitation, direct, incidental and
consequential damages, and totally excludes such damages as permitted under
applicable laws.
The user is solely responsible to identify critical application risks and install
appropriate mechanisms to protect processes during a possible equipment
malfunction.
English 44
Page 45

Safety around source lamps
The source lamp is operated at high temperatures.
To prevent electric shock, disconnect the instrument from the power
source before replacing the lamp.
CAUTION
Burn hazard. Allow the lamp(s) to cool for at least 30 minutes before maintaining/
replacing them.
Chemical and biological safety
DANGER
Potential danger with contact with chemical/biological substances.
Working with chemical samples, standards and reagents can be dangerous.
Make yourself familiar with the necessary safety procedures and the correct
handling of the chemicals before use and read and follow all relevant safety data
sheets.
Normal operation of this device may require the use of chemicals or
samples that are biologically unsafe.
• Observe all cautionary information printed on the original solution
containers and safety data sheets prior to their use.
• Dispose of all consumed solutions in accordance with the local and
national regulations and laws.
• Select the type of protective equipment suitable to the concentration
and quantity of the dangerous material being used.
Overview of product
The LICO 690 and LICO 620 instruments are VIS spectral-photometers
with wavelength ranges from 320 to 1100 nm. The instruments can
perform a precise colorimetric analysis in accordance with ISO/ASTM
standards with a single measurement and display the result in the form
of classic color systems such as iodine, Hazen or Gardner color values.
The instruments support multiple languages.
The LICO 690 is supplied with 26 color value calculations, while the
LICO 620 is supplied with five color value calculations (Iodine color,
Hazen color, Gardner color, Saybolt color and ASTM D 1500 color
numbers).
The LICO 690 contains the following programs and operating modes in
addition to the color measurement: single wavelength mode, multiwavelength mode, wavelength scan and time scan mode. The digital
measurements are displayed in the dimensional units of concentration,
absorbance or % transmittance, making the LICO 690 universally
suitable for lab analysis.
Installation
WARNING
Electrical and fire hazards.
Only use the supplied benchtop power supply LZV844.
Only qualified experts may perform the tasks described in this section of the
manual, while adhering to all locally valid safety regulations.
English 45
Page 46

Unpacking the instrument
The following components are supplied as standard with the LICO 690/
620:
• LICO 690/LICO 620 spectrophotometer
• Dust cover
• USB dust cover, fitted as standard
• Table power supply with power cord
• Cuvette adapter Z, installed as standard
• Basic user manual
• CD-ROM with detailed operating instructions
Note: If any of these items are missing or damaged, please contact the
manufacturer or a sales representative immediately.
Operating environment
Observe the following points to allow the instrument to function normally
and give a long operating life.
• Position the instrument securely on a flat surface taking care to
remove any objects from under the device.
• The ambient temperature must be 10–40 °C (50–104 °F).
NOTICE
Protect the instrument from extreme temperatures from heaters, direct sunlight
and other heat sources.
• The relative humidity should be less than 80 %; moisture should not
condense on the instrument.
• Leave at least a 15 cm clearance at the top and on all sides for air
circulation to avoid overheating of electrical parts.
• Do not use or store the device in extremely dusty, humid or wet
places.
• Keep the surface of the instrument, the cell compartment and all
accessories clean and dry at all times. Immediately remove
splashes or spilt materials on or in the instrument.
English 46
Page 47

Front and back view
Figure 1 Front and back view
1 USB port type A 5 Ethernet port
2 Cuvette compartment cover 6 USB port type B
3 Touch screen 7 USB port type A
4 On/off switch 8 Connection for benchtop power supply
English 47
Page 48

Power connections
WARNING
Electrical and fire hazards.
Only use the supplied benchtop power supply LZV844.
1. Connect the power cable to the benchtop power supply.
2. Plug the benchtop power supply cable into the back of the
instrument (Figure 1).
3. Insert the power cable plug into a mains socket (100–240 V~/47–
63 Hz).
4. Turn on the power switch next to the screen to activate the power
supply (Figure 1).
Note: If you do not intend to use the instrument for a long period,
disconnect it from the power supply.
Note: Make sure the socket you are using is easily accessible.
Interfaces
The instrument has three USB ports and one Ethernet port as standard.
They are located on the front and rear of the instrument (Figure 1).
The USB type A ports are used for communications with a printer, USB
memory stick or keyboard. A USB memory stick can be used to update
the instrument software.
The USB type B port is used for communications with a PC. The
optional Hach Lange Online Data software must be installed on the PC
for this use.
A USB hub may be used to connect several accessories at a time.
Note: USB cables must not be longer than 3m.
These USB ports permit data to be exported to a printer or PC and also
allow the instrument software to be upgraded. The Ethernet port
supports real-time data transfer in local networks, LIMS systems or SC
controllers. Only use a shielded cable (e.g. STP, FTP, S/FTP) with a
maximum length of 20 m for the Ethernet port.
Table 1 Interfaces
Interfaces Description
USB (Type A)
USB (Type B)
Ethernet
This USB port can be used to connect a printer, a USB memory
stick or a keyboard.
This USB port is intended only for the connection between the
instrument and a PC (when the relevant software is installed).
The Ethernet port is intended for data transfer to a PC without
installed software or in a local network . Only use a shielded
cable (e.g. STP, FTP, S/FTP) with a maximum length of 20 m for
the Ethernet port.
Cuvette compartments and cuvette adapters
Cuvette compartments and adapter
Open the cuvette compartments by sliding the cuvette compartment
cover to the left.
The cover lowers to the side next to the cuvette compartments.
Note: If there are long intervals between uses, close the cuvette
compartment cover to protect the optics of the instrument from dust and
impurities.
The instrument has two cuvette compartments (Figure 2). Only one cell
type at a time can be used for a reading.
Cell compartment (1) for:
• 11 mm round cuvettes
Note: Insert cuvette adapter Z into the cuvette compartment (2).
Cell compartment (2) for:
The following cell types can be used in cell compartment (2).
• Without cuvette adapter Z in the cuvette compartment (2), you can
insert 50 mm cuvettes.
• With cuvette adapter Z: 10 mm square cuvettes.
Note: These cuvettes must be inserted with cuvette adapter Z.
English 48
Page 49

Note: In the event of severe contamination, you can replace the cuvette
compartment (2).
Installation of cuvette adapter Z
1. Open the cuvette compartment.
2. Insert cuvette adapter Z into the cuvette compartment (2) so that
the arrow on the cuvette adapter is pointing toward the cuvette
compartment (1) (Figure 2).
Note: The arrow on the cuvette adapter indicates the direction of the light
beam path.
Figure 2 Cuvette compartments and cuvette adapter Z
1 Cuvette compartment (1) for round cuvettes
2 Cuvette compartment (2) for square cuvettes, cuvette adapter Z installed
English 49
Page 50

Start Up
NOTICE
All screen displays in this operating manual correspond to the LICO 690. The
screen displays of the LICO 620 may differ.
Switch on the instrument, startup process
1. Connect the power cable to the mains outlet.
2. Switch on the instrument by pressing the power switch next to the
screen.
3. The instrument starts automatically with a startup process lasting
approximately 45 seconds. The screen displays the manufacturer's
logo. At the end of the startup process, a startup melody is heard.
Note: Wait approximately 20 seconds before switching on again so as
not to damage the electronics and mechanics of the instrument.
Language selection
The software supports multiple languages. The first time the instrument
is switched on, the language selection screen will be shown
automatically after the startup process.
1. Select the required language.
2. Press OK to confirm the language selection. The self-check will
then start automatically.
Change the language setting
The instrument functions in the selected language until the option is
changed.
1. Turn the instrument on.
2. During the startup process, touch any point on the screen and
maintain contact until the option for selecting a language is shown
(approximately 45 seconds).
3. Select the required language.
4. Press OK to confirm the language selection. The self-check will
then start automatically.
Self-check
Each time the instrument is powered up, a test program begins.
During the course of this program (approx. 25 seconds), system tests,
lamp tests, filter calibration, wavelength calibration and voltage tests can
be carried out. Each test that functions correctly is marked accordingly.
Note: For error messages during the test program, refer to
Troubleshooting.
English 50
Page 51

The Main Menu is displayed when diagnostics are completed.
Sleep mode
The instrument can be put into sleep mode.
1. Briefly press the power switch next to the screen.
The "Sleep mode" message is shown. The screen will then switch
off automatically.
2. To switch on, press the power switch next to the screen.
The self-check will start automatically.
After that, the instrument is ready to use.
Power off the instrument
1. Press the power switch next to the screen for approx. 5 seconds.
Standard programs
Overview
Tips for using the touch screen
The whole screen responds to touch. To choose an option, tap with a
fingernail, fingertip, an eraser or a specialised stylus. Do not touch the
screen with sharp objects, such as the tip of a ballpoint pen.
• Do not place anything on top of the screen, to prevent damage or
scratching on the screen.
• Press buttons, words or icons to select them.
• Use scroll bars to move up and down long lists very quickly. Press
and hold the scroll bar, then move up or down to move through the
list.
• Highlight an item from a list by pressing it once. When the item has
been successfully selected, it will be displayed as reversed text
(light text on a dark background).
Use of the alphanumeric keypad
English 51
Page 52

This display is used to enter letters, numbers and symbols as needed
when programming the instrument. Unavailable options are disabled
(grayed out). The icons on the right and left of the screen are described
in Table 2.
The central keypad changes to reflect the chosen entry mode. Press a
key repeatedly until the desired character appears on the screen. A
space can be entered by using the underscore on the YZ_ key.
Press Cancel to cancel an entry, or press OK to confirm an entry.
Note: It is also possible to use a USB keyboard (with US keyboard
layout) or a hand-held USB barcode scanner.
Table 2 Alphanumeric keypad
Icon / key Description Function
ABC/abc Alphabetic
# % Symbols
123 Numeric For entering regular numbers..
CE Clear Entry Clear the entry.
Left
Arrow
Right
Arrow
Back
Next Navigates to the next space in an entry.
Toggles the character input mode between upper and
lower case.
Punctuation, symbols and numerical sub- and
superscripts may be entered..
Deletes the current character and goes back one
position.
Main menu
A variety of modes may be selected from the Main Menu. The following
table briefly describes each menu option.
There is a toolbar on the right-hand side of the screen. Press to activate
the various functions.
Table 3 Main Menu options
Option Function
The COLOR MEASUREMENT MODE is
used to determine color values such as
Color measurement
Color difference measurement
(only LICO 690)
Hazen, Gardner and Saybolt. The LICO 690
also offers three-dimensional, absolute
colorimetric values, as well as the color
scales of CIE L*a*b*, Hunter Lab or the
European Pharmacopoeia.
The mode for COLOR DIFFERENCE
MEASUREMENT is used to determine a
quantitative color difference between a
reference (R) and a sample (P) in the threedimensional color space (CIE L*a*b* or
Hunter Lab). In this mode, an additional
reference memory for up to 100 references
is available.
English 52
Page 53

Table 3 Main Menu options
Option Function
Single wavelength readings are:
Absorbance readings: The light absorbed
by the sample is measured in absorbance
units.
Transmittance reading (%): Measures the
Single Wavelength
Photometry
(only
LICO 690)
System Checks
Recall measurement data
Multi Wavelength
Time course
Wavelength Scan
percent of the original light that passes
through the sample and reaches the
detector.
Concentration readings: A concentration
factor can be entered to enable the
measured absorbance values to be
converted into concentration values.
In the Multi Wavelength mode, absorbance
(Abs) or percentage transmittance (%T) is
measured at up to four wavelengths and
absorbance differences and absorbance
relationships are calculated. Simple
conversions into concentrations can also be
carried out.
The time scan records the absorbance or %
transmittance at a wavelength over a defined
time.
A wavelength scan shows how the light from
a sample is absorbed over a defined
wavelength spectrum. This function can be
used to determine the wavelength at which
the maximum absorbance value can be
measured. The absorbance behavior is
displayed graphically during the scan.
The "System Check" menu contains a
number of options, such as instrument
information, optical checks, instrument
backup, service times, instrument update,
settings for analytical quality assurance and
lamp history.
Saved data can be retrieved, filtered, sent to
a printer, memory stick or PC and deleted.
Table 3 Main Menu options
Option Function
This menu is used to configure user-specific
Instrument Setup
and/or process-specific settings: operator ID,
date and time, security settings, saved data,
sound, PC and printer and energy
management.
Take and prepare samples
Take a representative sample from the product you wish to measure in
accordance with DIN EN ISO 15528 (or ASTM D3925-02).
If the material shows any signs of turbidity, remove this turbidity by
filtration, centrifuging, heating, ultrasound treatment or other suitable
means.
Heat partly solid samples before measuring in order to dissolve the solid
material in the liquid. The preparation must not cause any chemical
changes in the sample.
Make sure that during the measurement there are no bubbles in the
sample.
For the color difference measurement, three cuvette types are available
that differ in terms of material (glass, PS and PMMA) and path length
(10 mm, 11 mm and 50 mm). Add approx. 2 cm of the sample to the
cuvette. The light beam passes through the cuvette approx. 0,5 cm to
1,5 cm above the bottom of the cuvette.
The program calculates the iodine, Hazen, Gardner, Saybolt, Klett and
ASTM D 1500 color values automatically and displays the color values.
The cuvette type being used is taken into consideration.
English 53
Page 54

A dry thermostat is available for the round disposable glass cuvettes
with 11 mm. The dry thermostat heats up the cuvette to any temperature
between ambient temperature and 150 °C (302 °F).
• Slowly add the liquid to the cuvette in order to prevent the formation
of air bubbles in the sample.
The samples must be clear and free of turbidity. If products in paste or solid form
cannot be measured directly, the product must be melted before being transferred
to the cuvettes/sample cells. Make sure the cuvettes/sample cells do not contain
any air bubbles.
• Always hold the cuvette/sample cell close to the top to make sure
that there are no fingerprints in the measurement zone of the
cuvette/sample cell. Use suitable transfer pipettes to introduce
samples into the cuvettes/sample cells.
• Slowly add samples to the cuvettes/sample cells to make sure air
bubbles do not form on the cuvette/sample cell wall and in the
sample. Air bubbles will cause false readings.
• If air bubbles are entrapped, remove them by heat, vacuum,
ultrasonic treatment or other suitable means.
• Clean the outside of the cuvettes/sample cells thoroughly before
inserting them in the cell compartment.
NOTICE
Before using disposable cuvettes/sample cells made of PS (Polystyrene) or
PMMA (Polymethyl methacrylate), be sure that the cuvettes/sample cells will not
be destroyed by samples, otherwise the cell compartment can be damaged.
Color measurement
Proper sample preparation is extremely important for accurate color
measurement. To make sure that an exact measurement is taken, refer
to the following sample preparation guidelines:
• Always clean the glass cuvettes/sample cells immediately after use.
• Only use optically preferred samples for measurement. Make sure
the cuvettes/sample cells are clean and show no signs of
opaqueness.
NOTICE
The color measurement mode is used to determine absolute color
values in the Hazen, Gardner, CIE L*a*b* or European Pharmacopoeia
color scales.
For each cuvette type (11 mm round cuvette and 10 and 50 mm square
cuvettes), an independent calibration data record is used.
It is possible to calibrate the instrument with one, two or three types of
cuvettes/sample cells and to use these different cuvette/sample cell
types in parallel.
English 54
Page 55

To use the 10 mm square cuvette and 11 mm round cuvettes, adapter Z
must be inserted into the cuvette compartment (2). For measurements
with 50 mm square cuvettes, you must remove the adapter.
Take a color measurement
3. The calibration starts automatically once the instrument has
detected the cuvette.
The type of cuvette/sample cell used and the exact progress of
calibration is shown in a separate window.
1. Press Color Measurement.
2. Insert a cuvette/sample cell with distilled water to calibrate.
Note: Always carry out the calibration very carefully, as a faulty
calibration can cause inaccurate results to be obtained.
4. After calibration, the cuvette size used is displayed in the top right.
Note: After calibration, you can measure the cuvette with distilled
water again as a sample.
The displayed measured values should match the uncolored color
indices (i.e. Hazen = 0, Gardner = 0.0, CIE L*a*b* = 100.0, 0.0, 0.0,
etc.)
English 55
Page 56

5. Insert the test cuvette.
The measurement starts automatically.
The result of the color calculation is displayed.
Note: The bar on the right next to the result shows the result relative
to the measurement range.
6. For the next measurement, remove the cuvette and insert the next
sample cuvette, or press Measure to measure the same sample
again.
Touch-sensitive areas in measurement mode
In measurement mode, there are touch-sensitive areas that give you
immediate access to various menu options.
Figure 3 Touch-sensitive areas in measurement mode
1 Open Select Color Scale, and select the scale for the display.
2 Change the displayed color scale to the next color system which is selected
in the Operator ID color scale list for display.
3 OpenSample ID to change or add the sample ID.
4 Change the Upper Limit of the color range.
5 Change the Lower Limit of the color range.
6 Open Comments to enter a comment.
Parameter setup options
Press Options to set up the parameter.
English 56
Page 57

Table 4 Color measurement options
Options Description
More For further Options
Save icon
Send Data icon To send data to a printer, computer or USB memory stick (USB A) or network.
Color Scale Select the color scale
View Graph
View Table
View Values
Scale & Units
Ph.Eur.: Auto
Color Scale Selection
Illuminant/Observer: C/2°
Color Scales for Operator ID Individual selection of the color scales for the operator ID.
Symbol: Store Data, if Instrument Setup > Data Log Setup > Auto Store: Off is selected.
Symbol: Recall Data, if Instrument Setup > Data Log Setup > Auto Store: On is selected.
VIEW GRAPH shows the spectral graph of the transmittance or absorbance graph.
Note: View Graph is activated after the first measured value.
VIEW TABLE displays the spectral transmittance values T% from 380 nm to 720 nm.
VIEW VALUESdisplays the result of the last color calculation.
UNITS: Select absorbance or transmittance.
SCALE: In the automatic Scale mode, the y-axis is automatically adjusted so that the total scan is displayed.
The manual Scale mode allows sections of the scan to be displayed.
European Pharmacopoeia
Select AUTO or the REQUIRED SCALE
Define 3 different color scale combinations with up to 3 different color scales for the result display.
Selection 1: Klett Color No. + Yellowness Index
Selection 2: Klett Color No. + ADMI Color No. + Yellowness Index
Selection 3: Yellowness Index + individual transmittance
Illuminant: Select C, A or D65
Observer: 2° or 10°
English 57
Page 58

Troubleshooting
Error displayed Definition Resolution
An error occurred when uploading the instrument
data.
An error occurred when reading from the USB
memory stick.
An error occurred when writing to the USB memory
stick.
Please check on the current update file. Error during update. Check the USB memory stick.
Please contact Customer Service. Error during update. Contact the manufacturer or national agent.
Please check network configuration. Check the network setup. .
Please check the connection. Check the network setup. .
Please close the cover. Close the cuvette compartment cover.
Please insert the USB memory stick.
Please check the connection and contact the
administrator.
File for instrument update missing. Error during update. Check the USB memory stick.
File for instrument update is faulty. Error during update. Save the update file again and repeat the procedure.
It’s recommended to execute a Full System Check Check of the air values failed
Entry invalid! Password incorrect
Absorbance > 3.5! The measured absorbance exceeds 3.5 Dilute sample and measure again
Color = *** Color value outside measurement range. Dilute the sample or select appropriate color scale.
Network setup or FTP error
Restart the process or contact the manufacturer or
national agent.
Restart the process or contact the manufacturer or
national agent.
Restart the process or contact the manufacturer or
national agent.
Insert a USB memory stick into a USB A port on the
instrument.
Check the network setup or contact the manufacturer
or national agent.
Switch the instrument off and then back on again. If the
system test is unsuccessful, contact the manufacturer
or national agent.
Forgotten your password?
Contact the manufacturer or national agent
English 58
Page 59

Error displayed Definition Resolution
Error when calling up the local IP address.
Error during default gateway setup.
Error during network drive setup! Error during network setup Check the settings.
Error during subnet mask setup.
Error copying from USB memory stick. Error during update
Error in FTP connection. FTP error
Fault
Test program stopped!
Please check lamp
Close the lid.
Error [xx]
Fault
Test program stopped!
Please remove the cuvette
Close the lid.
Error
Selfcheck stopped.
Hardware error.
Error [x]
Error
Too much ambient light!
Move instrument into shade
or close the lid
No instrument backup present! Check the USB memory stick.
No valid data for these parameters! Data analysis not possible, no measurement data Change the selection.
Network setup: DHCP client has no connection to the
DHCP server
Network setup: default gateway cannot be set for fixed
IP address
Network setup: Subnet mask cannot be set for fixed IP
address
Test program stops when the instrument is started
Test program stops when the instrument is started
Electronic defect
The instrument sensors detects too much ambient light.
Enter the IP address again.
Try to create the connection again.
Enter the subnet mask again.
Restart the process or contact the manufacturer or
national agent.
Make sure that the instrument is connected to the
network.
Check the lamp and replace it if necessary.
Close lid.
Press Start Again.
Remove the cuvette/sample cell from the cell
compartment.
Press OK.
Contact the manufacturer or national agent and specify
the error number.
Decrease ambient light. Avoid direct sunlight.
Close lid.
English 59
Page 60

Error displayed Definition Resolution
No valid data found! Data cannot be viewed in the data log Change the selection.
No measurement data present!
Control range not reached! Data analysis limits not reached
Control range exceeded! Data analysis limits exceeded.
Concentration too high! Calculated concentration is higher than 999999 Dilute sample and measure again
Possible interference by: Interference Check
Possible interference from: Interference Check
Next service is due!
Negative result! The calculated result is negative Check concentration of sample
Network switched off.
Remote server cannot be reached. Error during network setup
Unstable lighting conditions! Avoid direct sunlight at the measuring location.
Please insert adapter Z.
Insufficient memory for update . Error during update. Select a memory with more space.
System check incorrect! Measurement of air values failed
Temperature too high.
Measurement not possible!
Data analysis settings cannot be configured without
measurement data.
Network setup off, when access to homepage via
sidebar
For measurements with 11 mm round cuvettes, adapter
Z is required.
Change the selection.
This is a warning notice. The control limit set was not
reached.
This is a warning notice. The control limit was
exceeded.
The analysis is possibly erroneous due to
interferences.
The analysis is possibly erroneous due to
interferences.
Contact the manufacturer or national agent for an
instrument service.
Activate the online connection.
Make sure that the instrument is connected to the
network.
Insert adapter Z into cell compartment (2). Confirm with
OK.
Switch the instrument off and then back on again. If the
system test is unsuccessful, contact the manufacturer
or the national agent.
Switch of the instrument and allow it to cool for a few
minutes. If necessary, move it to a cooler place.
English 60
Page 61

Error displayed Definition Resolution
Update file is faulty. Error during update. Save the update file again and repeat the procedure.
USB memory stick is not connected. Update not possible. Check the USB memory stick.
Web server cannot be reached. Instruments homepage not available Try the connection again later.
Replacement Parts
Accessories
Description Cat. No.
Certified test filter set for self-checks (Verification Kit) 4 precision glass filters with nominal values LZM339
"Addista-color" certified testing solution set consisting of 6 certified test solutions LZM282
11 mm round cuvettes, glass, 560 units LYY621
10 mm square cuvettes, glass, 3 units LZP045
10 mm square plastic cuvettes, PS, 1000 units EBK019
50 mm square cuvette, glass, 1 unit LZP167
50 mm square cuvettes, PMMA with cover, 10 units LZP341
50 mm square cuvettes, PMMA, 50 units LZM130
Hand barcode scanner LZV566
USB-Memory Stick LZV568
USB keypad (US keypad layout) LZV582
Hach Lange Online Data for direct data transfer to MS Excel LZV799
Protective cap for USB port LZV881
USB extension cord LZV567
Ethernet cable, shielded, 2 m in length. LZV873
Interface cable USB - computer LZV632
English 61
Page 62

English 62
Page 63

Español
Especificaciones
Las especificaciones se encuentran sujetas a cambio sin previo aviso.
Especificaciones de
funcionamiento
Modo de pantalla
Medición de color 26 ratios de color 5 ratios de color
Evaluación colorimétrica
Fuente de luz Lámpara halógena
Rango de longitud de
onda
Exactitud de longitud de
onda
Reproducibilidad de
longitud de onda
Resolución de longitud
de onda
Calibración de longitud
de onda
Rango de longitud de
onda para la medición
de color
Velocidad de barrido ≥ 8 nm/seg (en fases de 1 nm)
LICO 690 LICO 620
Medición de color,
medición de diferencia de
color, absorbancia y
concentración
Todos los ratios visuales de color están calculados
para el gráfico de luz estándar C y para observadores
del 2º estándar en conformidad con DIN 5033. Los
valores colorimétricos del color se pueden cambiar al
tipo de luz A, C, D65 y para observadores del 2º o
10º estándar.
320–1100 nm
± 1,5 nm (rango de longitud de onda 340–900 nm)
≤ 0,1 nm
1 nm
Automática
380 a 720 nm en fases de 10 nm
Medición de color
Especificaciones de
funcionamiento
Ancho de banda
espectral
Rango de medida
fotométrico
Exactitud fotométrica
Linealidad fotométrica
Luz difusa < 0,1 % T a 340 nm con NaNO
Registro de datos
Especificaciones físicas y ambientales
Anchura 350 mm (13,78 pulg.)
Altura 151 mm (5,94 pulg.)
Profundidad 255 mm (10,04 pulg.)
Peso 4200 g (9,26 libras)
Requisitos
medioambientales de
funcionamiento
Requisitos ambientales
de almacenamiento
LICO 690 LICO 620
5 nm
± 3 Abs (rango de longitud de onda de 340 a 900 nm)
5 mAbs a 0,0–0,5 Abs,
1 % a 0,50–2,0 Ext
< 0,5 % a 2 Abs
≤ 1 % a \> 2 Abs con vidrio neutro a 546nm
3000 mediciones de color,
100 valores de referencia
de color,
1000 mediciones
fotométricas,
20 escaneados de
longitud de onda, 20
escaneados de tiempo
10–40 °C (50–104 °F), humedad relativa máxima
80 % (sin formación de condensación)
–40–60 °C (–40–140 °F), humedad relativa máxima
80 % (sin formación de condensación)
400 mediciones de color
2
Español 63
Page 64

Especificaciones de
funcionamiento
Datos técnicos adicionales
Conector de
alimentación por medio
de fuente de
alimentación externa
Interfaces
Clasificación del
alojamiento
Clase de protección Clase I
LICO 690 LICO 620
Entrada: 100–240 V/47–63 Hz
Salida: 15 V/40 VA
Utilice únicamente un cable blindado con una
longitud máxima de 3 m:
2× USB de tipo A
1× USB de tipo B
Use únicamente cables con cubierta (por ejemplo,
STP, FTP, S/FTP) con una longitud máxima de 20 m:
1× Ethernet
IP40 (sin incluir interfaces y fuente de alimentación)
Información general
Información de seguridad
Lea todo el manual del usuario con detenimiento antes de desembalar
el dispositivo, configurarlo y ponerlo en funcionamiento. Preste especial
atención a todas las indicaciones de peligro y advertencia. De lo
contrario, podría provocar lesiones graves a los usuarios y averías al
equipo.
A fin de garantizar que no se deteriore la protección que ofrece este
instrumento, evite instalarlo de maneras distintas a las especificadas en
estas instrucciones de uso.
PELIGRO
Indica una situación de riesgo inminente o potencial que, de no evitarse,
ocasionará lesiones graves o la muerte.
ADVERTENCIA
Señala una situación de peligro inminente o potencial, que de no evitarse, podría
causar lesiones graves y la muerte.
ATENCIÓN
Señala una situación potencialmente peligrosa que podría causar lesiones leves
o menos graves.
AVISO
Indica una situación que, de no evitarse, puede ocasionar daños en el dispositivo.
Información que se debe recalcar de manera especial.
Nota: Información complementaria de algunos elementos del texto
principal.
Español 64
Page 65

Etiquetas de precaución
Lea todas las etiquetas y rótulos adosados al instrumento. De no
acatarse lo indicado en dichas etiquetas y rótulos, podrían ocurrir
lesiones personales y/o daños al instrumento. En el caso de los
símbolos adheridos al dispositivo, se pueden encontrar las notas de
advertencia correspondientes en el manual del usuario.
Seguridad alrededor de las fuentes de luz
La lámpara fuente funciona a altas temperaturas.
Para evitar una posible descarga eléctrica, desconecte el instrumento
de la fuente eléctrica antes de reemplazar la lámpara.
Es posible que este símbolo esté adherido al dispositivo y hace
referencia al funcionamiento o a las notas de seguridad en el manual
del usuario.
Este símbolo en el dispositivo es una indicación de superficies
calientes.
Los equipos eléctricos marcados con este símbolo no se podrán
desechar por medio de los sistemas europeos públicos o domésticos
de eliminación de desechos después del 12 de agosto de 2005. En
cumplimiento de las reglamentaciones legales nacionales y locales
(directiva europea 2002/96/CE), el fabricante se encarga de la
eliminación gratuita de viejos instrumentos.
Nota: Para la devolución a efectos del reciclaje, póngase en
contacto con el fabricante o distribuidor del equipo a fin de
obtener instrucciones sobre la correcta eliminación de
instrumentos viejos, accesorios eléctricos suministrados por
el fabricante y todos los elementos auxiliares.
ADVERTENCIA
El fabricante no es responsable por daños provocados por el uso o la aplicación
incorrectos de este producto, incluidos, entre otros, daños y perjuicios directos,
indirectos, circunstanciales y excluye totalmente dichos daños según lo permite
la ley vigente.
El usuario solo es responsable de identificar los riesgos críticos de aplicación y
de instalar adecuadamente los mecanismos para proteger los procesos en caso
de que el equipo no funcione correctamente.
ATENCIÓN
Peligro de quemadura. Permita que las lámpara se enfríen por lo menos
30 minutos antes de hacerles mantenimiento/reemplazarlas.
Seguridad química y biológica
PELIGRO
Daño potencial con el contacto con sustancias químicas/biológicas.
Trabajar con muestras químicas, estándares y reactivos puede resultar peligroso.
Asegúrese de conocer los procedimientos de seguridad necesarios y el manejo
correcto de los productos químicos antes de usarlos y de leer y seguir las hojas
de datos de seguridad relevantes.
Es posible que el funcionamiento normal de este dispositivo requiera el
uso de productos químicos o muestras biológicamente peligrosos.
• Lea con cuidado la información de prevención que figura en los
envases de las soluciones originales y en las hojas de datos de
seguridad antes de usarlas.
• Elimine las soluciones usadas según las regulaciones y leyes
nacionales y locales.
• Seleccione el tipo de equipo de protección más conveniente para la
concentración y cantidad del material peligroso que se utilice.
Información general del producto
Los instrumentos LICO 690 y LICO 620 son fotómetros espectrales VIS
con rangos de longitud de onda desde 320 hasta 1100 nm. Los
instrumentos pueden realizar un análisis colorimétrico preciso en
conformidad con las normas ISO/ASTM con una sola medición y
mostrar el resultado en la forma de sistemas de color clásicos, como los
colores yodo, Hazen o Gardner. El instrumento admite varios idiomas.
Español 65
Page 66

LICO 690 se proporciona con cálculos para 26 valores de color,
mientras que LICO 620 se proporciona con cálculos para cinco valores
de color (color yodo, color Hazen, color Gardner, color Saybolt y color
ASTM D 1500).
LICO 690 contiene los siguientes programas y modos de operación,
además de la medición de color: modo de longitud de onda única, modo
de longitud de onda múltiple, modo de escaneado de longitud de onda y
modo de escaneado de tiempo. Las mediciones digitales se muestran
en unidades de concentración de dimensión, absorbancia o % de
transmisión, permitiendo que LICO 690 sea universalmente adecuado
para los análisis de laboratorio.
Instalación
ADVERTENCIA
Peligro eléctrico y de incendio.
Utilice únicamente la fuente de alimentación de sobremesa LZV844 suministrada.
Las tareas que se describen en esta sección del manual sólo pueden ser
realizadas por expertos cualificados, que deben cumplir todas las normativas de
seguridad válidas en la región.
Desembalado del instrumento
Los siguientes componentes se incluyen con todos los LICO 690/620:
• Espectrofotómetro LICO 690/LICO 620
• Funda guardapolvo
• Funda guardapolvo USB, incluida de serie
• Alimentación eléctrica de sobremesa con cable eléctrico
• Adaptador Z para cubetas, instalado de serie
• Manual básico del usuario
• CD-ROM con instrucciones detalladas de funcionamiento
Nota: Si falta algún elemento, o alguno está dañado, póngase en
contacto inmediatamente con su fabricante o con un representante.
Entorno operativo
Cumpla con los siguientes puntos para permitir que el instrumento
funcione normalmente y tenga una larga vida útil.
• Ubique el instrumento firmemente en una superficie plana y tenga
la precaución de retirar cualquier objeto de debajo del dispositivo.
• La temperatura ambiental debe oscilar entre 10 y 40 °C (50–
104 °F).
AVISO
Proteja el instrumento de las temperaturas extremas de los radiadores, la luz
directa del sol u otras fuentes de calor.
• La humedad relativa debe ser inferior al 80 %; el vaho no debe
condensarse en el instrumento.
• Deje al menos 15 cm de espacio libre en la parte superior y en los
lados para permitir que la circulación evite el sobrecalentamiento
del dispositivo.
• No utilice ni almacene el dispositivo en lugares con mucho polvo o
humedad.
• Mantenga la superficie del instrumento, el compartimento de
cubetas y todos los accesorios limpios y secos en todo momento.
Limpie inmediatamente cualquier salpicadura o material derramado
en el instrumento.
Español 66
Page 67

Vista frontal y trasera
Figura 1 Vista frontal y trasera
1 Puerto USB de tipo A 5 Puerto Ethernet
2 Cubierta del compartimiento de la cubeta 6 Puerto USB de tipo B
3 Pantalla táctil 7 Puerto USB de tipo A
4 Interruptor de encendido/apagado 8 Conexión de fuente de alimentación de sobremesa
Español 67
Page 68

Conexiones eléctricas
ADVERTENCIA
Peligro eléctrico y de incendio.
Utilice únicamente la fuente de alimentación de sobremesa LZV844 suministrada.
1. Conecte el cable de alimentación eléctrica a la fuente de
alimentación de sobremesa.
2. Enchufe el cable de la fuente de alimentación de sobremesa a la
parte posterior del instrumento (Figura 1).
3. Introduzca el enchufe del cable de alimentación eléctrico en una
toma eléctrica (100-240 V~/47–63 Hz).
4. Encienda el interruptor de corriente que está junto a la pantalla
para activar la alimentación eléctrica (Figura 1).
Nota: Si no va a utilizar el instrumento por un periodo prolongado,
desconéctelo de la alimentación eléctrica.
Nota: Asegúrese de poder acceder fácilmente a la toma que utiliza.
Interfaces
El instrumento tiene tres puertos USB y un puerto Ethernet de serie. Se
encuentran en la parte delantera y trasera del instrumento (Figura 1).
Los puertos USB de tipo A se utilizan para las comunicaciones con la
impresora, la memoria USB o el teclado. La memoria USB se puede
utilizar para actualizar el software del instrumento.
El puerto USB de tipo B se utiliza para las comunicaciones con el PC. El
software opcional de datos en línea de Hach Lange se debe instalar en
el PC para este uso.
Se puede utilizar un concentrador USB para conectar varios accesorios
a la vez.
Nota: Los cables USB no deben exceder los 3m.
Estos puertos USB permiten exportar los datos a una impresora o PC y
además permiten actualizar el software del instrumento. El puerto
Ethernet permite la transferencia de datos en tiempo real en redes
locales, sistemas LIMS o controladores SC. Utilice únicamente un cable
blindado (por ejemplo, STP, FTP, S/FTP) con una longitud máxima de
Tabla 1 Interfaces
Interfaces Descripción
USB (Tipo A)
USB (Tipo B)
Ethernet
Este puerto USB se puede utilizar para conectar una impresora,
una memoria USB y un teclado.
Este puerto USB solo está destinado para la conexión entre el
instrumento y un PC (cuando está instalado el software
correspondiente).
El puerto Ethernet sirve para transferir datos a un PC sin el
software instalado o en una red local. Utilice únicamente un
cable blindado (por ejemplo, STP, FTP, S/FTP) con una longitud
máxima de 20 m para el puerto Ethernet.
Compartimientos de la cubeta y adaptadores de la
cubeta
Compartimientos de la cubeta y adaptador
Abra los compartimientos de la cubeta deslizando la cubierta del
compartimiento de la cubeta hacia la izquierda.
La cubierta baja hacia el costado junto a los compartimientos de la
cubeta.
Nota: Si hay periodos prolongados entre usos, cierre la cubierta del
compartimiento de la cubeta para proteger los lentes del instrumento del
polvo e impurezas.
El instrumento tiene dos compartimientos de la cubeta (Figura 2). Sólo
se puede utilizar un tipo de cubeta a la vez para una medición.
Compartimento de cubetas (1) para:
• Cubetas redondas de 11 mm
Nota: Inserte el adaptador Z de la cubeta en el compartimiento de
la cubeta (2).
Español 68
Page 69

Compartimento de cubetas (2) para:
En el compartimento de cubetas (2) se pueden utilizar los siguientes
tipos de cubetas.
• Sin el adaptador Z de la cubeta en el compartimiento de la cubeta
(2), puede insertar cubetas de 50 mm.
• Con el adaptador Z de la cubeta: cubetas cuadradas de 10 mm.
Nota: Estas cubetas se deben insertar con el adaptador Z de la
cubeta.
Nota: En caso de contaminación grave, puede reemplazar el
compartimiento de la cubeta (2).
Instalación del adaptador Z de la cubeta
1. Abra el compartimiento de cubeta.
2. Inserte el adaptador Z de la cubeta en el compartimiento de la
cubeta (2) de modo que la flecha del adaptador de la cubeta quede
apuntando hacia el compartimiento de la cubeta (1) (Figura 2).
Nota: La flecha del adaptador de la cubeta indica la dirección de la
trayectoria del haz de luz.
Figura 2 Compartimientos de la cubeta y adaptador de la cubeta Z
1 Compartimiento de la cubeta (1) para cubetas redondas
2 Compartimiento de la cubeta (2) para cubetas cuadradas, adaptador Z de
la cubeta instalado
Español 69
Page 70

Puesta en marcha
AVISO
Todas las imágenes de la pantalla de este manual de funcionamiento
corresponden a LICO 690. Las imágenes de la pantalla de LICO 620 pueden ser
distintas.
Encendido del instrumento, proceso de arranque
1. Conecte el cable de alimentación a la toma de alimentación
eléctrica.
2. Para encender el instrumento, presione el interruptor de encendido
que está junto a la pantalla.
3. El instrumento se inicia automáticamente con un proceso de
arranque que dura aproximadamente 45 segundos. La pantalla
muestra el logotipo del fabricante. Al final del proceso de arranque,
se oye una melodía de arranque.
Nota: Espere aproximadamente 20 segundos antes de volver a
encenderlo para no dañar el sistema electrónico y mecánico del
instrumento.
Selección del idioma
El software admite varios idiomas. La primera vez que se enciende el
instrumento aparece automáticamente la pantalla de selección del
idioma después del proceso de arranque.
1. Seleccione el idioma deseado.
2. Pulse OK para confirmar la selección. A continuación se inicia
automáticamente la autocomprobación.
Cambio del ajuste del idioma
El instrumento funcionará en el idioma seleccionado hasta que se
cambien las opciones.
1. Encienda el instrumento.
2. Durante el proceso de arranque, toque en cualquier punto de la
pantalla y mantenga el contacto hasta que aparezca la opción para
seleccionar un idioma (aproximadamente 45 segundos).
3. Seleccione el idioma deseado.
4. Pulse OK para confirmar la selección. A continuación se inicia
automáticamente la autocomprobación.
Autocomprobación
Español 70
Cada vez que se enciende el instrumento, se inicia un programa de
chequeo.
Durante el curso de este programa (aprox. 25 segundos), se pueden
realizar pruebas de sistemas, pruebas de lámparas, calibración del filtro,
Page 71

calibración de la longitud de onda y pruebas de voltaje. Cada test que
funciona correctamente se marca de la manera correspondiente.
Nota: Para ver los mensajes de error durante el programa de prueba,
consulte Diagnóstico de fallos.
1. Presione brevemente el interruptor de encendido que está junto a
la pantalla.
Aparecerá el mensaje "Modo de hibernación". A continuación, la
pantalla se apagará automáticamente.
2. Para encender, presione el interruptor de encendido que está junto
a la pantalla.
La autocomprobación se inicia automáticamente.
A continuación, el instrumento está listo para su uso.
Apagado del instrumento
1. Presione el interruptor de encendido que está junto a la pantalla
durante aprox. 5 segundos.
Programas estándar
Información general
Una vez completados los diagnósticos, aparece el Menú Principal.
Modo de hibernación
El instrumento se puede poner en el modo de hibernación.
Consejos de uso de la pantalla táctil
Toda la pantalla es táctil. Para elegir una opción, dé un golpecito con la
uña, la punta del dedo, una goma de borrar o un lápiz especial. No
toque la pantalla con objetos puntiagudos, como la punta de un
bolígrafo.
• No coloque nada encima de la pantalla, pues se podría rayar.
• Pulse sobre botones, palabras o iconos para seleccionarlos.
• Utilice la barra de desplazamiento para moverse rápidamente por la
lista. Pulse y mantenga pulsada la barra de desplazamiento y
después mueva la punta del dedo hacia arriba o hacia abajo para
moverse por la lista.
• Para seleccionar un elemento en una lista, pulse ese elemento una
vez. Cuando lo haya seleccionado correctamente, se visualizará
como texto inverso (texto claro sobre fondo oscuro).
Español 71
Page 72

Uso del teclado alfanumérico
Tabla 2 Teclado alfanumérico
Icono /
tecla
123 Numérico Para introducir números normales..
CE
Flecha
izquierda
Flecha
derecha
Descripció
n
Borrar
programa
introducido
Atrás Borra el carácter actual y retrocede una posición.
Siguiente Se desplaza al siguiente espacio en una entrada.
Función
Borra la introducción.
Este teclado alfanumérico se emplea para introducir letras, números y
símbolos al programar el instrumento. Las opciones no disponibles
están desactivadas. Los iconos de la derecha e izquierda de la pantalla
se describen en la Tabla 2.
El teclado central cambia para reflejar el modo de introducción elegido.
Pulse una tecla repetidamente hasta que aparezca en la pantalla el
carácter deseado. Para introducir un espacio utilice el subrayado de la
tecla YZ_.
Pulse Cancelar para cancelar una introducción o pulse OK para
confirmar la introducción.
Nota: También es posible utilizar un teclado USB (con la configuración
del teclado de EE. UU.) o un escáner de códigos de barras USB de
mano.
Tabla 2 Teclado alfanumérico
Icono /
tecla
ABC/abc Alfabético
# % Símbolo
Descripció
n
Función
Cambia el modo de introducción de caracteres entre
mayúsculas y minúsculas.
Se puede introducir puntuación, símbolos, subíndices
y superíndices..
Español 72
Menú Principal
En el Menú Principal pueden seleccionarse diversos modos operativos.
En la siguiente tabla se describe brevemente cada opción del menú.
Hay una barra de herramientas en la parte derecha de la pantalla.
Púlsela para activar las diversas funciones.
Tomar y preparar muestras
Tome una muestra representativa del producto que desea medir en
conformidad con DIN EN ISO 15528 (o ASTM D3925-02).
Page 73

Tabla 3 Opciones del Menú Principal
Opción Función
El MODO DE MEDICIÓN DE COLOR se
utiliza para determinar colores, como Hazen,
Medición de color
Medición de diferencia de color
(solo LICO 690)
Gardner y Saybolt. LICO 690 además ofrece
valores colorimétricos absolutos
tridimensionales, así como las escalas de
color de CIE L*a*b*, Hunter Lab o
farmacopea europea.
El modo para la MEDICIÓN DE
DIFERENCIA DE COLOR se utiliza para
determinar una diferencia de color
cuantitativa entre una referencia (R) y una
muestra (P) en el espacio de color
tridimensional (CIE L*a*b* o Hunter Lab). En
este modo, hay disponible una memoria de
referencia adicional para hasta 100
referencias.
Tabla 3 Opciones del Menú Principal
Opción Función
Las medidas de la longitud de onda única
son:
Medidas de absorbancia: La luz absorbida
por la muestra se mide en unidades de
absorbancia.
Medida de transmitancia (%): Mide el
porcentaje de luz original que atraviesa la
muestra y alcanza el detector.
Medidas de concentración: Introduciendo
un factor de concentración se pueden
convertir los valores medidos de
absorbancia en valores de concentración.
En este modo, la absorbancia (Abs) o el
porcentaje de transmitancia (%T) se miden
hasta con cuatro longitudes de onda;
además, se calculan las diferencias y
relaciones de absorbancia. Asimismo, se
realizan conversiones simples en
concentraciones.
Las cinéticas en el tiempo registran la
absorbancia o la transmitancia (%) a una
longitud de onda en un periodo de tiempo
definido.
El barrido de longitud de onda muestra cómo
se absorbe la luz de una muestra en un
espectro de longitud de onda definido. Esta
función se puede utilizar para determinar la
longitud de onda a la cual se puede medir el
valor de absorbancia máximo. El
comportamiento de la absorbancia se
muestra de manera gráfica durante el
barrido.
Fotometría
(solo
LICO 690)
Longitud de onda
única
Long. de onda
múltiple
Cinéticas en el
tiempo
Barrido de
longitud de onda
Español 73
Page 74

Tabla 3 Opciones del Menú Principal
Opción Función
El menú "Pruebas del sistema" contiene
varias opciones, como información del
Pruebas del sistema
Recuperación de datos de
mediciones
Configuración del instrumento
instrumento, verificaciones ópticas, copia de
seguridad del instrumento, tiempos de
servicio, actualización del instrumento,
configuración para asegurar la calidad
analítica e historial de la lámpara.
Los datos guardados se pueden recuperar,
filtrar, enviar a una impresora, memoria USB
o PC y eliminar.
Este menú se utiliza para configurar ajustes
específicos del usuario o específicos del
proceso: ID del usuario, fecha y hora,
configuración de seguridad, datos
guardados, sonido, PC e impresora, y
administración de energía.
Si el material muestra cualquier signo de turbiedad, elimine esta
turbiedad por medio de filtración, centrifugado, aplicación de calor,
tratamiento de ultrasonido u otro medio adecuado.
Caliente las muestras parcialmente sólidas antes de hacer la medición
para disolver el material sólido en el líquido. La preparación no debe
causar ningún cambio químico en la muestra.
Asegúrese de que durante la medición no haya burbujas en la muestra.
Para la medición de diferencia de color, hay disponible tres tipos de
cubetas que se diferencian en términos de material (vidrio, PS y PMMA)
y longitud del recorrido (10 mm, 11 mm y 50 mm). Agregue aprox. 2 cm
de la muestra a la cubeta. El haz de luz pasa a través de la cubeta a
aprox. 0,5 cm a 1,5 cm por sobre la parte inferior de la cubeta.
El programa calcula automáticamente los colores de yodo, Hazen,
Gardner, Saybolt, Klett y ASTM D 1500, y muestra los colores. Se toma
en cuenta el tipo de cubeta que se utiliza.
Hay disponible un termostato seco para las cubetas redondas
desechables de vidrio de 11 mm. El termostato seco calienta la cubeta a
cualquier temperatura entre la temperatura ambiental y 150 °C (302 °F).
AVISO
Las muestras deben ser claras y sin turbiedad. Si no se puede medir directamente
los productos en forma de pasta o sólidos, se debe derretir el producto antes de
transferirlos a las cubetas/cubetas para muestras. Asegúrese de que las cubetas/
cubetas para muestras no contengan ninguna burbuja de aire.
• Siempre sostenga la cubeta/cubeta para muestras cerca de la parte
superior para asegurarse de que no queden huellas digitales en la
zona de medición de la cubeta/cubeta para muestras. Utilice
pipetas de transferencia adecuadas para introducir las muestras en
las cubetas/cubetas para muestras.
• Agregue las muestras lentamente a las cubetas/cubetas para
muestras para asegurarse de que no se formen burbujas de aire en
la pared de la cubeta/cubeta para muestras ni en la muestra. Las
burbujas de aire causarán lecturas falsas.
• Si quedan burbujas de aire atrapadas, quítelas por medio de calor,
vacío, tratamiento de ultrasonido u otro medio adecuado.
• Limpie profundamente la parte exterior de las cubetas/cubetas para
muestras antes de insertarlas en el compartimiento de la cubeta.
AVISO
Antes de utilizar las cubetas/cubetas para muestras desechables hechas de PS
(poliestireno) o PMMA (polimetilmetacrilato), asegúrese de que las muestras no
destruirán las cubetas/cubetas para muestras, en caso contrario se puede dañar
el compartimiento de la cubeta.
Español 74
Page 75

Medición de color
La correcta preparación de la muestra es extremadamente importante
para obtener una medición exacta del color. Para asegurarse de que se
toma una medición exacta, consulte las siguientes pautas para la
preparación de muestras:
• Siempre limpie las cubetas/cubetas para muestras inmediatamente
después de su uso.
• Utilice solo las muestras preferidas ópticamente para realizar la
medición. Asegúrese de que las cubetas/cubetas para muestras
estén limpias y no muestren signos de opacidad.
• Agregue el líquido lentamente a la cubeta para evitar la formación
de burbujas de aire en la muestra.
El modo de medición de color se utiliza para determinar valores
absolutos en las escalas de color Hazen, Gardner, CIE L*a*b* o de
farmacopea europea.
Para cada tipo de cubeta (cubeta redonda de 11 mm y cubetas
cuadradas de 10 y 50 mm ), se utiliza un registro de datos de
calibración independiente.
Se puede calibrar el instrumento con uno, dos o tres tipos de cubetas/
cubetas para muestras y utilizar estos distintos tipos de cubetas/cubetas
para muestras en paralelo.
Para utilizar la cubeta cuadrada de 10 mm y las cubetas redondas de
11 mm , el adaptador Z debe estar insertado en el compartimiento de la
cubeta (2). Para realizar mediciones con las cubetas cuadradas de
50 mm , debe retirar el adaptador.
Cómo hacer una medición de color
1. Presione Medición de color.
2. Inserte una cubeta/cubeta para muestras con agua destilada para
hacer la calibración.
Español 75
Page 76

Nota: Siempre realice la calibración con mucho cuidado, ya que una
calibración defectuosa puede causar la obtención de resultados
inexactos.
3. La calibración comienza automáticamente una vez que el
instrumento detecta la cubeta.
El tipo de cubeta/cubeta para muestras que se utiliza y el avance
exacto de la calibración se muestra en una ventana aparte.
4. Después de la calibración, se muestra el tamaño de la cubeta
utilizada en la parte superior derecha.
Nota: Después de la calibración, puede volver a medir la cubeta
con agua destilada como muestra.
Los valores medidos que se muestran deben coincidir con los
índices de color sin color (es decir, Hazen = 0, Gardner = 0.0, CIE
L*a*b* = 100,0; 0,0; 0,0; etc.)
5. Inserte la cubeta de prueba.
La medición comienza automáticamente.
Se muestra el resultado del cálculo de color.
Nota: La barra que aparece a la derecha junto a los resultados
muestra el resultado respecto del rango de medición.
6. Para la próxima medición, retire la cubeta e inserte la cubeta con la
siguiente muestra o presione Medir para volver a medir la misma
muestra.
Español 76
Page 77

Áreas sensibles al tacto en el modo de medición
En el modo de medición, hay áreas sensibles al tacto que le
proporcionan acceso inmediato a diversas opciones del menú.
Figura 3 Áreas sensibles al tacto en el modo de medición
1 Abra Seleccionar escala de colores y seleccione la escala para la
pantalla.
2 Cambie la escala de colores que se muestra al siguiente sistema de
colores que está seleccionado para visualizar en la lista de escala de
colores de la ID del usuario.
3 Abra ID de la muestra para cambiar o agregar la ID de la muestra.
4 Cambie el Límite superior del rango de colores.
5 Cambie el Límite inferior del rango de colores.
6 Abra Comentarios para ingresar un comentario.
Opciones de configuración de parámetros
Presione Opciones para configurar el parámetro.
Español 77
Page 78

Tabla 4 Opciones de medición de color
Opciones Descripción
Más Para otras opciones
Símbolo: Memorizar datos, si está seleccionado Configuración del instrumento \> Configuración del registro de datos \> Auto
Icono Guardar
Icono Enviar datos Para enviar datos a una impresora, equipo o dispositivo de memoria USB (USB A) o red.
Escala de colores Seleccionar la escala de colores
Ver gráfico
Ver tabla
Ver valores
Escala y Unidades
F. eur.: Auto
Selección de la escala de
colores
memorizado: desactivado .
Símbolo: Recuperar datos, si está seleccionado Configuración del instrumento \> Configuración del registro de datos \> Auto
memorizado: activado .
VER GRÁFICO muestra el gráfico espectral de la transmisión o el gráfico de absorbancia.
Nota: Ver gráfico se activa después del primer valor medido.
VER TABLA muestra los valores de transmisión espectral T% desde 380 nm hasta 720 nm.
VER VALORES muestra el resultado del último cálculo de color.
UNIDADES: selecciona absorbancia o transmisión.
ESCALA: en el modo de escala automática, el eje y se ajusta automáticamente de modo que se visualice el barrido total.
El modo de escala manual permite mostrar secciones del escaneado.
Farmacopea europea
Seleccione AUTO o la ESCALA REQUERIDA
Defina 3 combinaciones distintas de escalas de colores con hasta 3 escalas de colores distintas para la visualización del resultado.
Selección 1: color Klett Nro. + Índice de amarillo
Selección 2: color Klett Nro. + Color ADMI Nro. + Índice de amarillo
Selección 3: índice de amarillo + transmisión individual
Español 78
Page 79

Tabla 4 Opciones de medición de color (continuación)
Opciones Descripción
Iluminante/Observador: C/2°
Escalas de color para la ID del
usuario
Iluminante: seleccione C, A o D65
Observador: 2° o 10°
Selección individual de las escalas de color para la ID del usuario.
Diagnóstico de fallos
Error mostrado Definición Resolución
Se produjo un error al cargar los datos del
instrumento.
Se produjo un error al leer la memoria USB.
Se produjo un error al escribir en la memoria USB.
Compruebe el último fichero de actualización. Error durante la actualización. Compruebe la memoria USB.
Comuníquese con el servicio de atención al cliente. Error durante la actualización.
Compruebe la configuración de red. Compruebe la configuración de la red.
Compruebe la conexión. Compruebe la configuración de la red.
Cierre la tapa. Cierre la cubierta del compartimento de la cubeta.
Reinicie el proceso o comuníquese con el fabricante o
con el distribuidor autorizado.
Reinicie el proceso o comuníquese con el fabricante o
con el distribuidor autorizado.
Reinicie el proceso o comuníquese con el fabricante o
con el distribuidor autorizado.
Comuníquese con el fabricante o con el distribuidor
autorizado.
Español 79
Page 80

Error mostrado Definición Resolución
Inserte la memoria USB.
Compruebe la conexión y contacte con su
administrador.
Actualización del instrumento. Archivo perdido. Error durante la actualización. Compruebe la memoria USB.
Actualización del instrumento. Archivo dañado. Error durante la actualización.
Se recomienda realizar una verificación del sistema
completa
Introducción no válida Contraseña incorrecta.
¡Absorbancia >3.5! La absorbancia medida es superior a 3,5. Diluya la muestra y vuelva a realizar la medición.
Color = *** Color fuera del rango de medición.
Error al llamar a la dirección IP local.
Error durante la configuración del gateway por
defecto.
¡Error durante la configuración de la unidad de red! Error durante la configuración de la red. Compruebe los ajustes.
Error durante la configuración de la máscara de
subred.
Error al copiar desde la memoria USB. Error durante la actualización
Error en la conexión FTP. Error de FTP.
Error de configuración de red o FTP.
La comprobación de los valores de aire ha fallado.
Configuración de red: el cliente DHCP no tiene
conexión con el servidor DHCP.
Configuración de red: el gateway por defecto no se
puede configurar para una dirección IP fija.
Configuración de red: la máscara de subred no se
puede configurar para una dirección IP fija.
Introduzca una memoria USB en un puerto USB A del
instrumento.
Compruebe la configuración de la red o comuníquese
con el fabricante o con el distribuidor autorizado.
Vuelva a guardar el archivo de actualización y repita el
procedimiento.
Apague el instrumento y vuélvalo a encender. Si la
prueba del sistema no se realiza correctamente,
comuníquese con el fabricante o con el distribuidor
autorizado.
¿Ha olvidado la contraseña?
Comuníquese con el fabricante o con el distribuidor
autorizado.
Diluya la muestra o seleccione la escala de color
correcta.
Vuelva a introducir la dirección IP.
Intente volver a crear la conexión.
Vuelva a introducir la máscara de subred.
Reinicie el proceso o comuníquese con el fabricante o
con el distribuidor autorizado.
Asegúrese de que el instrumento esté conectado a la
red.
Español 80
Page 81

Error mostrado Definición Resolución
Fallo
¡Programa de test interrumpido!
Compruebe la lámpara
Cierre la tapa.
Error [xx]
Fallo
Programa de test interrumpido.
Retire la cubeta
Cierre la tapa.
Error
Autocomprobac. interrumpida.
Error de hardware.
Error [x]
Error
¡Demasiada luz ambiental!
Ponga el equipo a la sombra
o cierre la tapa
¡Ningún backup de instrumento disponible! Compruebe la memoria USB.
¡Datos no válidos para este parámetro!
No se han encontrado datos válidos. Los datos no se pueden ver en el registro de datos Cambie la selección.
No disponibles datos de mediciones.
¡Rango de control no alcanzado! No se han alcanzado los límites del análisis de datos.
¡Se ha superado el rango de control! Se han superado los límites del análisis de datos.
¡Concentrac. demasiado alta! La concentración calculada es mayor que 999999. Diluya la muestra y vuelva a realizar la medición.
Posible interferencia por: Comprobación de interferencias.
El programa de test se interrumpe cuando se inicia el
instrumento.
El programa de test se interrumpe cuando se inicia el
instrumento.
Fallo electrónico.
Los sensores del instrumento detectan demasiada luz
en el ambiente.
No es posible realizar el análisis de datos, no hay
datos de mediciones.
Los ajustes del análisis de datos no se pueden
configurar sin datos de mediciones.
Compruebe la lámpara y, si fuera necesario, cámbiela.
Cierre la tapa.
Pulse Volver a empezar.
Retire la cubeta del compartimento de cubetas.
Pulse OK.
Comuníquese con el fabricante o con el distribuidor
autorizado y especifique el número de error.
Disminuya la luz ambiental. Evite la luz directa del sol.
Cierre la tapa.
Cambie la selección.
Cambie la selección.
Se trata de una advertencia. No se ha alcanzado el
límite de control fijado.
Se trata de una advertencia. Se ha superado el límite
de control.
Posiblemente el análisis es erróneo debido a
interferencias.
Español 81
Page 82

Error mostrado Definición Resolución
Posible interferencia de: Comprobación de interferencias.
¡Siguiente inspección está pendiente!
¡Resultado negativo! El resultado calculado es negativo. Compruebe la concentración de muestra.
Red apagada.
Servidor remoto inalcanzable. Error durante la configuración de la red.
¡Condiciones de iluminación inestables! Evite la luz directa del sol en la ubicación de medición.
Inserte el adaptador Z.
Memoria insuficiente para la actualización. Error durante la actualización. Seleccione una memoria con más espacio.
Verificación del sistema incorrecta. Ha fallado la medición de los valores del aire.
Temperatura demasiado alta.
¡No es posible realizar la medición!
El archivo de actualización es defectuoso. Error durante la actualización.
Memoria USB no conectada. No es posible realizar la actualización. Compruebe la memoria USB.
Servidor Web inalcanzable.
La configuración de red está desactivada cuando se
accede a la página de inicio a través de la barra lateral.
Para realizar mediciones con cubetas redondas de
11 mm, se requiere el adaptador Z.
La página principal de los instrumentos no está
disponible
Posiblemente el análisis es erróneo debido a
interferencias.
Comuníquese con el fabricante o con el distribuidor
autorizado para solicitar mantenimiento para el
instrumento.
Active la conexión en línea.
Asegúrese de que el instrumento esté conectado a la
red.
Inserte el adaptador Z en el compartimiento de la
cubeta (2). Confirme con OK.
Apague el instrumento y vuélvalo a encender. Si la
prueba del sistema no se realiza correctamente,
comuníquese con el fabricante o con el distribuidor
autorizado.
Apague el instrumento y deje que se enfríe unos
minutos. Si es necesario, llévelo a un lugar más frío.
Vuelva a guardar el archivo de actualización y repita el
procedimiento.
Vuelva a intentar realizar la conexión más tarde.
Español 82
Page 83

Piezas de repuesto
Accesorios
Descripción Nº No.
Filtro de prueba certificado para 4 filtros de vidrios de precisión (Kit de verificación) de autocomprobación con valores nominales LZM339
Conjunto de solución de prueba certificada "color Addista" compuesta por 6 soluciones de prueba certificadas LZM282
Cubetas redondas de 11 mm, vidrio, 560 unidades LYY621
Cubetas cuadradas de 10 mm, vidrio, 3 unidades LZP045
Cubetas plásticas cuadradas de 10 mm, PS, 1000 unidades EBK019
Cubeta cuadrada de 50 mm, vidrio, 1 unidad LZP167
Cubetas cuadradas de 50 mm, PMMA con tapa, 10 unidades LZP341
Cubetas cuadradas de 50 mm, PMMA, 50 unidades LZM130
Escáner de códigos de barras manual LZV566
Memoria USB LZV568
Teclado USB (diseño de teclado para EE.UU.) LZV582
Datos en línea Hach Lange para transferencia directa de datos a MS Excel LZV799
Tapa de protección de puerto USB LZV881
Cable de extensión USB LZV567
Cable Ethernet, blindado, 2 mm de longitud. LZV873
Cable de interfaz USB (PC) LZV632
Español 83
Page 84

Español 84
Page 85

Français
Caractéristiques techniques
Celles-ci sont susceptibles de modifications sans préavis!
Caractéristiques de
performance
Mode Affichage
Mesure colorimétrique 26 indices de coloration 5 indices de coloration
Evaluation
colorimétrique
Lampe source Lampe halogène
Gamme de longueurs
d'onde
Précision de la longueur
d’onde
Reproductibilité des
longueurs d'onde
Résolution de la
longueur d'onde
Etalonnage de la
longueur d'onde
Gamme de longueurs
d'onde pour la mesure
colorimétrique
Vitesse de balayage ≥ 8 nm/s (par pas de 1 nm)
LICO 690 LICO 620
Mesure colorimétrique,
mesure de la différence
colorimétrique, absorption
et concentration
Tous les indices de coloration visuels sont calculés
pour une lumière étalon C et un observateur standard
2° conformément à DIN 5033. Toutes les valeurs de
couleurs colorimétriques peuvent être remplacées par
une lumière type A, C, D65 et des observateurs
standard 2° ou 10°.
320–1 100 nm
± 1,5 nm (gamme de longueurs d'onde 340–900 nm)
≤ 0,1 nm
1nm
Automatique
380–720 nm par pas de 10 nm
Mesure colorimétrique
Caractéristiques de
performance
Largeur de bande
spectrale
Plage de mesure
photométrique
Exactitude
photométrique
Linéarité photométrique
Lumière parasite < 0,1 % T à 340 nm avec NaNO
Journal de données
Caractéristiques physiques et environnementales
Largeur 350 mm (13,78 pouces)
Hauteur 151 mm (5,94 pouces)
Profondeur 255 mm (10,04 pouces)
Poids 4 200 g (9,26 livres)
Conditions ambiantes de
fonctionnement
requises
Conditions ambiantes de
stockage requises
LICO 690 LICO 620
5nm
± 3 Abs (gamme de longueurs d'onde 340-900 nm)
5 mAbs à 0,0–0,5 Abs,
1 % à 0,50–2,0 Ext
< 0,5 % à 2 Abs
≤ 1 % à > 2 Abs avec verre neutre à 546 nm
3 000 mesures
colorimétriques,
100 valeurs de référence
de couleur,
1 000 mesures
photométriques,
20 balayages de
longueurs d'onde,
20 balayages de durée
10-40 °C (50-104 °F), maximum 80 % d'humidité
relative (sans condensation)
-40-60 °C (-40-140 °F), maximum 80 % d'humidité
relative (sans condensation)
Mesures de 400 couleurs
2
Français 85
Page 86

Caractéristiques de
performance
Autres caractéristiques techniques
Connecteur
d'alimentation via une
alimentation électrique
externe
Interfaces
Caractéristiques du
boîtier
Classe de protection Classe I
LICO 690 LICO 620
Entrée : 100-240 V/47-63 Hz
Sortie : 15 V/40 VA
Utilisez uniquement un câble blindé d'une longueur
de 3 m maximum :
2× USB type A
1× USB type B
Utilisez uniquement un câble blindé (par
exemple STP, FTP, S/FTP) d'une longueur de 20 m
maximum :
1× Ethernet
IP40 (sans les interfaces et l'alimentation électrique)
Informations d'ordre général
Consignes de sécurité
Lisez attentivement l'ensemble du présent manuel avant de déballer
l'appareil, de le configurer et de le mettre en service. Prêtez attention
aux prescriptions de danger, avertissements et mises en garde. Le nonrespect de cette procédure peut conduire à des blessures graves de
l'opérateur ou à des dégâts matériels.
Pour vous assurer que la protection fournie par cet appareil n'est pas
affectée, n'utilisez pas ou n'installez pas ce dernier d'une autre façon
que celle décrite dans ces instructions d'utilisation.
DANGER
Signale une situation potentiellement dangereuse ou un danger imminent qui, s'il
n'est pas évité, entraîne des blessures graves ou mortelles.
AVERTISSEMENT
Signale une situation potentiellement dangereuse ou un danger imminent qui peut
entraîner des blessures graves ou mortelles si elle n'est pas évitée.
ATTENTION
Signale une situation potentiellement dangereuse qui peut provoquer des
blessures légères à modérées.
AVIS
Indique une situation qui, si elle n'est pas évitée, peut endommager l'appareil.
Informations nécessitant une mise en avant particulière.
Remarque : informations supplémentaires pour l'utilisateur.
Français 86
Page 87

Etiquettes de mise en garde
Lire toutes les étiquettes et tous les repères apposés sur l’instrument.
Des personnes peuvent se blesser et le matériel peut être endommagé
si les instructions ne sont pas respectées. Vous trouverez des notes
d'avertissement correspondant aux symboles apposés sur l'appareil
dans le manuel d'utilisation.
Sécurité autour des lampes sources
La lampe source fonctionne à haute température.
Afin d'éviter tout choc électrique, débranchez l'appareil avant de
procéder à la maintenance de la lampe.
Ce symbole peut être apposé sur l'appareil. Il fait référence aux
consignes d'utilisation et/ou de sécurité fournies dans le manuel
d'utilisation.
Ce symbole apposé sur l'appareil indique les surfaces chaudes.
Il est interdit de mettre au rebut le matériel électrique portant ce
symbole dans les réseaux de collecte des déchets ménagers et les
décharges publiques européennes depuis le 12 août 2005.
Conformément aux réglementations locales, nationales et
européennes (directive UE 2002/96/CE), les utilisateurs de matériel
électrique de marque européenne doivent dorénavant retourner le
matériel usagé ou en fin de vie à son fabricant lorsqu'ils souhaitent
s'en débarrasser, sans que cela leur soit facturé.
Remarque : Pour le recyclage, veuillez contacter le fabricant
ou le revendeur du matériel afin de savoir comment retourner
le matériel, les accessoires électriques fournis par le
fabricant et tous les accessoires auxiliaires en fin de vie, afin
qu'ils soient traités correctement.
AVERTISSEMENT
Le fabricant ne peut être tenu responsable de dommages résultant d'une
utilisation incorrecte ou abusive du produit, notamment (sans limitation) les
dommages matériels directs et indirects. Le fabricant rejette toute responsabilité
quant à ces dommages dans la mesure permise par la loi en vigueur.
L'utilisateur est seul responsable de la vérification des risques d'application
critiques et de la mise en place de mécanismes de protection des processus en
cas de défaillance de l'équipement.
ATTENTION
Risque de brûlure. Laissez la ou les lampes refroidir pendant au moins
30 minutes avant de procéder à leur maintenance/remplacement.
Sécurité chimique et biologique
DANGER
Danger potentiel en cas de contact avec des substances chimiques/biologiques.
La manipulation d'échantillons chimiques, d'étalons et de réactifs peut s'avérer
dangereuse.
Familiarisez-vous avec les procédures de sécurité nécessaires et avec les
méthodes de manipulation appropriées pour les produits chimiques avant de
commencer à travailler. Veuillez également lire et respecter toutes les fiches
techniques de sécurité concernées.
Le fonctionnement normal de cet appareil peut nécessiter l'utilisation de
substances chimiques ou d'échantillons présentant un danger
biologique.
• Respectez toutes les informations de mise en garde imprimées sur
les flacons contenant les solutions initiales, ainsi que les
informations fournies dans les fiches techniques de sécurité.
• Détruisez toutes les solutions usagées conformément aux
réglementations et lois nationales.
• Utilisez un équipement de protection adapté à la concentration et à
la quantité du matériau dangereux utilisé.
Français 87
Page 88

Synthèse du produit
Les appareils LICO 690 et LICO 620 sont des photomètres spectraux de
type VIS avec intervalles de longueur d'onde allant de 320 à 1100 nm.
Ces appareils peuvent effectuer une analyse colorimétrique précise
conformément aux normes ISO/ASTM avec une seule mesure et
afficher le résultat sous forme de systèmes de couleurs classiques
comme les couleurs Iode, Hazen et Gardner. Ces appareils prennent en
charge plusieurs langues.
Le LICO 690 dispose de 26 calculs de valeurs de couleur tandis que le
LICO 620 en propose 5 (Iode, Hazen, Gardner, Saybolt et ASTM D
1500).
Outre la mesure colorimétrique, le LICO 690 dispose des programmes
et modes suivants : : le mode Longueur d'onde unique, le mode
Longueur d'onde multiple, le mode Balayage de longueurs d'onde et et
le mode Plage de temps. Les résultats de mesure numériques
s'affichent en unités de concentration, d'absorption ou en pourcentage
de transmission, ce qui fait que le LICO 690 s'adapte à toutes les
analyses en laboratoire.
Installation
AVERTISSEMENT
Danger d'incendie ou de choc électrique.
N'utilisez que l'alimentation de table LZV844 fournie.
Les tâches décrites dans cette section du manuel doivent être réalisées
exclusivement par des experts qualifiés dans le respect de toutes les
réglementations de sécurité locales en vigueur.
Déballage de l'appareil
Les éléments suivants sont fournis en standard avec l'appareil
LICO 690/620.
• Spectrophotomètre LICO 690/LICO 620
• Cache anti-poussière
• Pare-poussière USB standard
• Alimentation électrique avec cordon d'alimentation
• Adaptateur pour cuves Z, installé en standard
• Manuel d'utilisation de base
• CD-ROM avec instructions de fonctionnement détaillées
Remarque : Si un élément est absent ou endommagé, veuillez contacter
immédiatement le fabricant ou un représentant.
Conditions d'utilisation
Respectez les points suivants afin de garantir le bon fonctionnement de
l'appareil et de prolonger sa durée de vie.
• Placez l'instrument sur une surface plane et retirez tous les objets
susceptibles de se trouver dessous.
• La température ambiante doit être comprise entre 10 et 40 °C (50 et
104 °F).
AVIS
Protégez l'instrument des températures extrêmes provenant d'appareils de
chauffage, du rayonnement solaire direct et d'autres sources de chaleur.
• L'humidité relative doit être inférieure à 80 % et aucune
condensation ne doit se former sur l'instrument.
• Conservez un espace d'au moins 15 cm au-dessus et autour de
l'instrument pour la circulation de l'air, afin d'éviter une surchauffe
des composants électriques.
• N'utilisez pas ou ne stockez pas l'instrument dans un endroit
extrêmement poussiéreux ou humide.
• Faites en sorte que la surface de l'instrument, le compartiment pour
cuves et tous les accessoires soient toujours propres et secs.
Eliminez immédiatement les éclaboussures ou tout produit renversé
sur ou dans l'instrument.
Français 88
Page 89

Vues avant et arrière
Figure 1 Vues avant et arrière
1 Port USB type A 5 Port Ethernet
2 Couvercle du compartiment pour cuves 6 Port USB type B
3 Ecran tactile 7 Port USB type A
4 Interrupteur marche/arrêt 8 Raccord pour alimentation de table
Français 89
Page 90

Branchements électriques
AVERTISSEMENT
Danger d'incendie ou de choc électrique.
N'utilisez que l'alimentation de table LZV844 fournie.
1. Branchez le cordon d'alimentation à l'alimentation de table.
2. Insérez le câble de l'alimentation de table à l'arrière de l'instrument
(Figure 1).
3. Insérez la prise du câble d'alimentation dans une prise secteur
(100-240 V~/47-63 Hz).
4. Appuyez sur le bouton de démarrage situé à côté de l'écran pour
mettre l'appareil sous tension (Figure 1).
Remarque : Si l'instrument n'est pas utilisé sur une longue période,
mettez-le hors tension.
Remarque : Veillez à utiliser une prise facile d'accès.
Interfaces
L'instrument est doté de 3 ports USB et d'1 port Ethernet en standard.
Ces différents ports se trouvent à l'avant et à l'arrière de l'appareil
(Figure 1).
Les ports USB de type A servent à communiquer avec une imprimante,
un clavier ou une clé USB. Une clé USB peut être utilisée pour mettre à
jour le logiciel de l'instrument.
Le port USB de type B sert à communiquer avec un PC. Le logiciel
optionnel Hach Lange Online Data doit être installé sur le PC.
Il est possible d'utiliser un concentrateur USB pour connecter plusieurs
accessoires à la fois.
Remarque : La longueur des câbles USB ne doit pas dépasser 3m.
Grâce à ces ports USB, les données peuvent être exportées vers une
imprimante ou un PC, et le logiciel de l'appareil peut être mis à jour. Le
port Ethernet prend en charge le transfert de données en temps réel sur
les réseaux locaux, les systèmes LIMS ou les contrôleurs SC. Utilisez
uniquement un câble blindé (par ex. STP, FTP, S/FTP) d'une longueur
maximale de 20 m pour le port Ethernet.
Français 90
Tableau 1 Interfaces
Interfaces Description
USB (type A)
USB (type B)
Ethernet
Ce port USB peut être utilisé pour connecter une imprimante, une
clé USB ou un clavier.
Ce port USB ne permet que de relier l'appareil à un PC (si le
logiciel approprié est installé).
Le port Ethernet est conçu pour le transfert de données vers un
PC sans logiciel installé ou sur un réseau local . Utilisez
uniquement un câble blindé (par ex. STP, FTP, S/FTP) d'une
longueur maximale de 20 m pour le port Ethernet.
Compartiments pour cuves et adaptateurs pour cuves
Compartiments pour cuves et adaptateur
Ouvrez les compartiments pour cuves en faisant glisser leur couvercle
vers la gauche.
Ce dernier s'abaisse sur le côté des compartiments pour cuves.
Remarque : Si les utilisations sont espacées, fermez le couvercle du
compartiment pour cuves afin de protéger les parties optiques de
l'instrument de la poussière et des impuretés.
L'instrument possède deux compartiments pour cuves (Figure 2). Il n'est
possible d'utiliser qu'un seul type de cuve à la fois pour effectuer une
mesure.
Compartiment pour cuves (1) pour :
• Cuves rondes de 11 mm
Remarque : Insérez l'adaptateur pour cuves Z dans le
compartiment pour cuves (2).
Page 91

Compartiment pour cuves (2) pour :
Les types de cuves suivants peuvent être utilisés dans le compartiment
pour cuves (2).
• En l'absence d'adaptateur pour cuves Z dans le compartiment pour
cuves (2), vous pouvez insérer des cuves de 50 mm.
• Avec l'adaptateur pour cuves Z : cuves carrées de 10 mm.
Remarque : Ces cuves doivent être insérées à l'aide de
l'adaptateur pour cuves Z.
Remarque : En cas de grave contamination, vous pouvez remplacer le
compartiment pour cuves (2).
Installation de l'adaptateur pour cuves Z
1. Ouvrez le compartiment pour cuves.
2. Insérez l'adaptateur pour cuves Z dans le compartiment pour cuves
(2) de telle sorte que la flèche présente sur l'adaptateur pointe vers
le compartiment pour cuves (1) (Figure 2).
Remarque : La flèche située sur l'adaptateur indique la direction de la
trajectoire du faisceau.
Figure 2 Compartiment pour cuves et adaptateur pour cuves Z
1 Compartiment (1) pour cuves rondes
2 Compartiment (2) pour cuves carrées, adaptateur pour cuves Z installé
Français 91
Page 92

Mise en route
AVIS
Toutes les captures d'écran présentées dans ce manuel d'utilisation
correspondent au LICO 690. Les captures d'écran du LICO 620 peuvent être
différentes.
Mise en marche de l'instrument, processus de
démarrage
1. Branchez le câble d'alimentation sur la prise secteur.
2. Mettez l'instrument en marche en appuyant sur le bouton de
démarrage situé à côté de l'écran.
3. L'instrument démarre automatiquement avec un processus de
démarrage qui dure environ 45 secondes. L'écran affiche le logo du
fabricant. A la fin du processus de démarrage; une mélodie de
démarrage est émise.
Remarque : Attendez environ 20 secondes avant de remettre en
marche afin de ne pas endommager le système électronique et
mécanique de l'instrument.
Sélection de la langue
Le logiciel prend en charge plusieurs langues. Au premier démarrage de
l'instrument, l'écran de sélection de la langue s'affiche automatiquement
après le processus de démarrage.
1. Sélectionnez la langue souhaitée.
2. Appuyez sur OK pour confirmer la langue sélectionnée.
L'autodiagnostic démarre alors automatiquement.
Modification du paramètre de langue
L'appareil fonctionne dans la langue sélectionnée tant que cette option
n'est pas modifiée.
1. Mettez l'instrument sous tension.
2. Pendant le processus de démarrage, touchez l'écran à n'importe
quel endroit et maintenez le contact jusqu'à ce que l'option de
sélection de la langue s'affiche (environ 45 secondes).
3. Sélectionnez la langue souhaitée.
4. Appuyez sur OK pour confirmer la langue sélectionnée.
L'autodiagnostic démarre alors automatiquement.
Autodiagnostic
Français 92
Un programme de test est lancé à chaque démarrage de l'instrument.
Pendant toute la durée de ce programme (soit environ 25 secondes), le
système, les lampes, l'étalonnage du filtre, l'étalonnage de la longueur
Page 93

d'onde et la tension sont testés. Chaque test qui se déroule
correctement est signalé en conséquence.
Remarque : Pour connaître les messages d'erreur pouvant apparaître
pendant le programme de test, reportez-vous à la Dépannage.
1. Appuyez brièvement sur le bouton de démarrage situé à côté de
l'écran.
Le message « Mode veille » s'affiche. L'écran s'éteint alors
automatiquement.
2. Pour le rallumer, appuyez sur le bouton de démarrage situé à côté
de l'écran.
L'autodiagnostic démarre automatiquement.
L'instrument est alors prêt à fonctionner.
Arrêt de l'instrument
1. Appuyez sur le bouton de démarrage situé à côté de l'écran
pendant environ 5 secondes.
Programmes standard
Présentation
Une fois les diagnostics terminés, le menu principal s'affiche.
Mode veille
L'instrument peut être mis en veille.
Conseils d'utilisation de l'écran tactile
L'écran est entièrement tactile. Pour choisir une option, tapotez avec un
ongle, le bout du doigt, une gomme ou un stylet prévu à cet effet. Ne
touchez pas l'écran avec un objet pointu tel que le bout d'un stylo à
bille.
• Ne posez aucun objet sur l'écran, sous peine de l'endommager ou
de le rayer !
• Appuyer sur les boutons, mots ou icônes pour les sélectionner.
• Utilisez les barres de défilement pour vous déplacer rapidement
dans les longues listes. Touchez une barre de défilement et
maintenez le contact, puis effectuez un mouvement vers le haut ou
vers le bas pour vous déplacer dans la liste.
• Pour sélectionner un élément de la liste, touchez-le une fois.
Lorsque l'élément a été correctement sélectionné, son mode
d'affichage est inversé (texte clair sur fond sombre).
Français 93
Page 94

Utilisation du clavier alphanumérique
Le clavier alphanumérique sert à entrer des lettres, des chiffres et des
symboles pour la programmation de l'instrument. Les options non
disponibles sont désactivées (grisées). Les icônes situées à droite et à
gauche de l'écran sont décrites dans le Tableau 2.
Le clavier central change en fonction du mode de saisie choisi. Appuyez
plusieurs fois sur une touche jusqu'à ce que le caractère souhaité
apparaisse à l'écran. Pour entrer une espace, utilisez le trait de
soulignement de la touche YZ_.
Appuyez sur Annuler pour annuler une entrée ou sur OK pour la
valider.
Remarque : Il est également possible d'utiliser un clavier USB (format
américain) ou un scanner à codes à barres USB manuel.
Tableau 2 Clavier alphanumérique
Icône/
touche
123 Numérique Pour saisir des chiffres ordinaires..
CE
Flèche
gauche
Flèche
droite
Description Fonction
Suppression
de l'entrée
Précéd.
Suivant Accède à l'espace suivant d'une entrée.
Efface l'entrée.
Supprime le caractère actuel et recule d'une
position.
Menu principal
Tableau 2 Clavier alphanumérique
Icône/
touche
ABC/abc Alphabétique
# % Symboles
Description Fonction
Permet de basculer le mode de saisie entre
majuscules et minuscules.
Il est possible de saisir des signes de ponctuation,
des symboles et des indices et exposants
numériques..
Français 94
Plusieurs modes peuvent être sélectionnés à partir du Menu principal.
Le tableau suivant décrit brièvement chaque option du menu.
Une barre d'outils se trouve sur le côté droit de l'écran. Appuyez ici pour
activer les différentes fonctions.
Prise et préparation des échantillons
Prenez un échantillon représentatif du produit que vous souhaitez
mesurer, conformément à la norme DIN EN ISO 15528 (ou
ASTM D3925-02).
Page 95

Tableau 3 Options du Menu principal
Option Fonction
Le MODE MESURE COLORIMETRIQUE
sert à déterminer les valeurs de couleurs
visibles telles que Hazen, Gardner et
Mesure colorimétrique
Mesure de la différence
colorimétrique
(LICO 690 uniquement)
Saybolt. Le LICO 690 donne également les
valeurs colorimétriques absolues,
trichromatiques et les échelles de couleurs
de CIE L*a*b*, Hunter Lab ou de la
pharmacopée européenne.
Le mode MESURE DE DIFF DE COUL.
sert à déterminer la différence
colorimétrique quantitative entre une
référence (R) et un échantillon (P) à
l'intérieur du système trichromatique (CIE
L*a*b* ou Hunter Lab). Ce mode dispose
d'une mémoire de références
complémentaire pouvant contenir jusqu'à
100 références.
Tableau 3 Options du Menu principal
Option Fonction
Les mesures de longueur d'onde unique
incluent :
Mesures d'absorption : la lumière
absorbée par l'échantillon est mesurée en
termes d'unités d'absorption.
Mesures de transmission (%) : mesure le
pourcentage de lumière incidente qui
traverse l'échantillon et atteint le détecteur.
Mesures de concentration : un facteur de
concentration peut être entré pour pouvoir
convertir les valeurs d'absorption
mesurées en valeurs de concentration.
En mode Longueur d'onde multiple,
l'absorption (Abs) ou le pourcentage de
transmission (%T) est mesuré(e) à quatre
longueurs d'onde différentes maximum,
puis les différences et les relations
d'absorption sont calculées. De simples
conversions en concentrations sont
également possibles.
Le balayage de plage de temps enregistre
l'absorption ou le pourcentage de
transmission à une longueur d'onde sur
une période de temps définie.
Un balayage de longueurs d'onde montre
la manière dont la lumière émise par un
échantillon est absorbée sur un spectre de
longueurs d'onde défini. Cette fonction
peut être utilisée pour déterminer la
longueur d'onde à laquelle la valeur
d'absorption maximale peut être mesurée.
Le comportement d'absorption s'affiche
sous forme de graphique pendant le
balayage.
Photométrie
(LICO 690
uniquement)
Longueur d'onde
unique
Longueur d'onde
multiple
Plage de temps
Balayage de
longueurs d'onde
Français 95
Page 96

Tableau 3 Options du Menu principal
Option Fonction
Le menu « Vérification du système »
contient plusieurs options : informations
sur l'instrument, vérifications optiques,
Vérifications du système
Rappel de mesures
Configuration de l'instrument
sauvegarde de l'instrument, temps
d'utilisation, mise à jour de l'instrument
ainsi que des paramètres pour l'AQA
(Assurance Qualité Analytique) et
l'historique des lampes.
Les données enregistrées peuvent être
rappelées, filtrées, envoyées vers une
imprimante, une clé USB ou un PC, ou
bien être supprimées.
Ce menu sert à configurer les paramètres
spécifiques à un processus et/ou à un
utilisateur : ID opérateur, date et heure,
paramètres de sécurité, données
enregistrées, son, PC et imprimante,
gestion de l'énergie.
Si le matériau montre des signes de turbidité, filtrez, centrifugez,
chauffez, traitez par ultrasons ou par tout autre moyen cette turbidité.
Chauffez les échantillons en partie solides avant la mesure, afin de
dissoudre les éléments solides dans le liquide. La préparation ne doit
provoquer aucune modification chimique de l'échantillon.
Veillez à ce que l'échantillon soit exempt de bulles d'air pendant la
mesure.
Pour la mesure de la différence de couleur, il existe 3 types de cuve,
disponibles en différents matériaux (verre, PS et PMMA) et en plusieurs
trajets optiques (10 mm, 11 mm et 50 mm). Ajoutez environ 2 cm
d'échantillon dans la cuve. Le faisceau lumineux traverse la cuve entre
environ 0,5 cm à 1,5 cm au-dessus du fond de la cuve.
Le programme calcule automatiquement les couleurs iode, Hazen,
Gardner, Saybolt, Klett et ASTM D 1500 et affiche ces valeurs. Le type
de cuve utilisé est pris en considération.
Un thermostat sec est disponible pour les cuves rondes en verre
jetables de 11 mm. Cet appareil permet de chauffer la cuve à une
température située entre la température ambiante et 150 °C (302 °F).
AVIS
Les échantillons doivent être clairs et non troubles. Si certains produits sous forme
de pâte ou sous forme solide ne peuvent pas être mesurés directement, ils doivent
être fondus avant d'être versés dans les cuves/cellules d'échantillon. Vérifiez que
ces dernières ne contiennent aucune bulle d'air.
• Afin de ne pas apposer de traces de doigts sur la zone de mesure,
manipulez toujours les cuves/cellules d'échantillon par la partie
supérieure. Utilisez des pipettes de transfert adaptées pour insérer
les échantillons dans les cuves/cellules d'échantillon.
• Versez lentement les échantillons dans les cuves/cellules
d'échantillon, afin d'éviter la formation de bulles d'air contre les
parois et dans l'échantillon. Les bulles d'air faussent les mesures.
• Si des bulles d'air se forment, faites-les disparaître par chauffage,
aspiration, traitement par ultrasons ou tout autre moyen approprié.
• Nettoyez soigneusement l'extérieur des cuves/cellules d'échantillon
avant de les insérer dans le compartiment pour cuves.
AVIS
Avant d'utiliser des cuves/cellules d'échantillon jetables en PS (polystyrène) ou en
PMMA (polyméthacrylate de méthyle), assurez-vous qu'elles ne seront pas
détruites par les échantillons, sous peine d'endommager le compartiment pour
cuves.
Mesure colorimétrique
Pour réaliser une mesure colorimétrique précise, une bonne préparation
des échantillons est essentielle. Pour garantir la précision des mesures,
respectez les instructions de préparation des échantillons suivantes :
• Nettoyez toujours les cuves/cellules d'échantillon en verre
immédiatement après usage.
• Pour les mesures, n'utilisez que des échantillons optiquement sûrs.
Vérifiez que les cuves/cellules d'échantillon sont propres et ne
présentent aucune opacité.
Français 96
Page 97

• Versez lentement le liquide dans la cuve afin d'éviter la formation de
bulles d'air dans l'échantillon.
Le mode Mesure colorimétrique sert à déterminer les valeurs
colorimétriques absolues dans les systèmes Hazen, Gardner, CIE
L*a*b* et Pharmacopée européenne.
Pour chaque type de cuve (cuves rondes de 11 mm et cuves carrées de
10 et 50 mm ), un enregistrement de données d'étalonnage indépendant
est utilisé.
L'instrument peut être étalonné pour un, deux ou trois types de cuves/
cellules d'échantillon, avec possibilité d'utiliser ces derniers en parallèle.
Pour pouvoir utiliser les cuves carrées de 10 mm et les cuves rondes de
11 mm , l'adaptateur Z doit être inséré dans le compartiment pour cuves
(2). Pour procéder à des mesures dans des cuves carrées de 50 mm ,
retirez l'adaptateur.
Réalisation d'une mesure colorimétrique
1. Appuyez sur Couleur - Mesure.
2. Insérez une cuve/cellule d'échantillon contenant de l'eau distillée
pour l'étalonnage.
Remarque : Réalisez toujours l'étalonnage avec soin, car un mauvais
étalonnage peut entraîner des résultats imprécis.
Français 97
Page 98

3. L'étalonnage commence automatiquement dès que l'instrument
détecte une cuve.
Le type de cuve/cellule d'échantillon utilisé et la progression de
l'étalonnage s'affichent dans une fenêtre distincte.
4. Une fois l'étalonnage terminé, la taille de la cuve utilisée apparaît
en haut à droite.
Remarque : Une fois l'étalonnage terminé, vous pouvez mesurer
de nouveau la cuve avec de l'eau distillée comme un échantillon.
Les valeurs mesurées affichées doivent correspondre aux indices
de couleur incolores (par ex. Hazen = 0, Gardner = 0.0, CIE
L*a*b* = 100.0, 0.0, 0.0, etc.)
Français 98
5. Insérez la cuve de test.
La mesure démarre automatiquement.
Le résultat de la détermination de la couleur s'affiche.
Remarque : La barre située à droite près du résultat affiche ce
dernier par rapport à la gamme de mesure.
6. Pour la mesure suivante, retirez la cuve et insérez la suivante, ou
appuyez sur Mesurer pour mesurer de nouveau le même
échantillon.
Page 99

Zones tactiles en mode Mesure
En mode Mesure, certaines zones sont tactiles pour vous permettre
d'accéder directement à diverses options de menu.
Figure 3 Zones tactiles en mode Mesure
1 Ouvrez choisir échelle de couleurs, puis sélectionnez l'échelle de l'écran.
2 Pour modifier l'échelle de couleurs affichée en faveur du système de
couleurs suivant sélectionné dans la liste des échelles de couleurs de
l'affichage de l'ID opérateur.
3 Ouvrez ID échantillon pour modifier ou ajouter l'ID d'échantillon.
4 Modifiez la limite supérieure de la gamme de couleur.
5 Modifiez la limite inférieure de la gamme de couleur.
6 Ouvrez Commentaires pour saisir un commentaire.
Options de configuration des paramètres
Appuyez sur Options pour configurer le paramètre.
Français 99
Page 100

Tableau 4 Options de mesure colorimétrique
Options Description
Autres... Autres options.
Icône Enregistrer
Icône Envoyer les données Pour envoyer des données vers une imprimante, un ordinateur, une clé USB (USB A) ou un réseau.
Couleur - Echelle Sélectionnez l'échelle de couleurs.
Afficher graphique
Afficher tableau
Voir valeurs
Echelle et unités
Pharm. eur. : Auto
Sélection de l'échelle de
couleurs
Symbole : Enregistrer données, si vous sélectionnez Configuration de l'instrument > Config. données > Mémo auto. : Désact.
Symbole : Rappeler données, si vous sélectionnez Configuration de l'instrument > Config. données > Mémo auto : Activer .
AFFICHER GRAPHIQUE affiche le graphique spectral de la courbe de transmission ou d'absorption.
Remarque : Afficher graphique est activé après la première valeur mesurée.
AFFICHER TABLEAU affiche les valeurs de transmission spectrale T% de 380 nm à 720 nm.
VOIR VALEURS affiche le résultat du dernier calcul colorimétrique.
UNITES : sélectionnez absorption ou transmission.
ECHELLE : en mode Mise à l'échelle automatique, l'axe y est automatiquement ajusté de manière à afficher le balayage dans son
intégralité.
Le mode Mise à l'échelle manuelle permet d'afficher des sections du balayage.
Pharmacopée européenne
Sélectionnez AUTO ou l'ECHELLE REQUISE
Définissez 3 combinaisons d'échelle de couleurs différentes composées d'un maximum de 3 échelles de couleurs différentes pour
l'affichage du résultat.
Sélection 1 : couleur Klett + indice de jaune
Sélection 2 : couleur Klett + couleur ADMI + indice de jaune
Sélection 3 : indice de jaune + transmission individuelle
Français 100
 Loading...